Windows PC에서 macOS 실행 단계
Microsoft 장치에서 Apple의 운영 체제를 실행하는 방법을 단계별로 안내하는 가이드를 통해 Windows PC에 macOS를 설치하는 방법을 알아보세요.

알림은 어떤 경우에는 필수적이지만 때로는 주의를 산만하게 하는 요소가 됩니다. 휴대폰과 마찬가지로 PC에서도 알림으로 주의를 산만하게 할 수 있습니다. 이것이 Windows 11에 집중 지원 기능이 포함되어 있어 주의를 산만하게 하는 알림을 피할 수 있는 이유입니다. 이 기능을 사용하면 무작위 메시지 및 알림에 주의가 분산되지 않고 완전한 집중으로 작업을 수행할 수 있습니다. 알림은 또한 생산성에 해를 끼칠 수 있으므로 적시에 알림을 표시하지 않아야 합니다.
몇 번의 클릭만으로 PC의 모든 알림, 경고 및 메시지를 숨길 수 있습니다. 최근에 시스템을 Windows 11로 업그레이드했고 새 UI를 파악할 수 없는 경우 이 문서는 Windows 11에서 Focus Assist를 사용하여 알림을 제거하는 방법에 대한 포괄적인 가이드를 제공합니다.
내용물
Windows 11에서 초점 지원이란 무엇입니까?
Focus Assist는 휴대폰에 있는 것과 같은 PC용 방해 금지 모드입니다. 불필요한 알림, 메시지 및 경고를 제거할 수 있는 Windows 11의 편리한 기능입니다. 집중 지원 기능을 사용하면 모든 알림에서 PC를 차단하는 대신 우선 순위 목록을 사용자 지정할 수 있습니다.
주의가 산만하면 생산성이 저하될 수 있습니다. 따라서 Focus Assist 기능을 사용하면 중요한 작업을 하는 동안 모든 알림, 경고 및 메시지를 숨길 수 있습니다. 그들은 당신에게 경고하는 대신 액션 센터로 바로 갈 것입니다. 숨겨진 알림은 알림센터에서 원하는 시간에 확인하실 수 있습니다.
Focus 지원은 Windows 11에서 어떻게 작동합니까?
Focus Assist는 메시지, 알림 및 경고와 같은 방해 요소를 차단할 시기를 선택할 수 있는 유연성을 제공합니다. 언제든지 초점 지원을 켜거나 설정에서 초점 지원을 자동으로 켜는 시간 범위를 예약할 수도 있습니다.
집중 지원 기능을 사용하면 연락처에서 가장 중요한 사람들의 알림을 놓치지 않도록 우선 순위 목록을 만들 수 있습니다. 귀하의 우선 순위 목록에 있는 사람들은 귀하가 중요한 일을 하고 있는 경우에도 항상 귀하에게 연락할 수 있습니다. 작업하는 동안 완전한 집중이 필요한 경우 모든 알림을 차단하도록 선택할 수도 있습니다. 작업 중에 수신한 차단된 알림을 모두 보려면 시스템의 관리 센터를 여십시오.
초점 지원을 활성화하는 방법
초점 지원은 기본적으로 꺼져 있습니다. 그러나 알림 수신을 중지하도록 설정하려면 아래 단계를 따르세요.
방법 #1: 설정 사용
작업 표시줄에 돋보기 모양 의 검색 아이콘을 클릭합니다 .

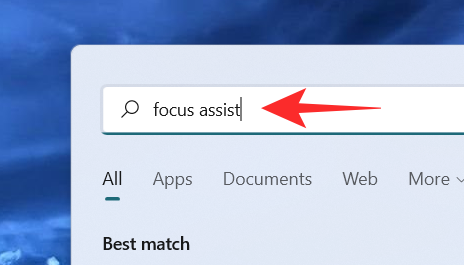
검색 창에 초점 지원 을 입력 합니다.
초점 지원 시스템 설정을 클릭합니다 .
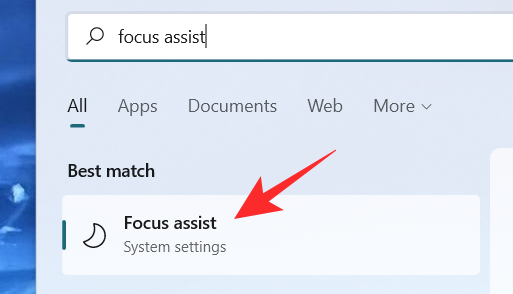
Focus Assist 시스템 설정 창이 화면에 나타납니다. 아래에 초점 지원 , 이러한 옵션 중 하나를 선택합니다 :
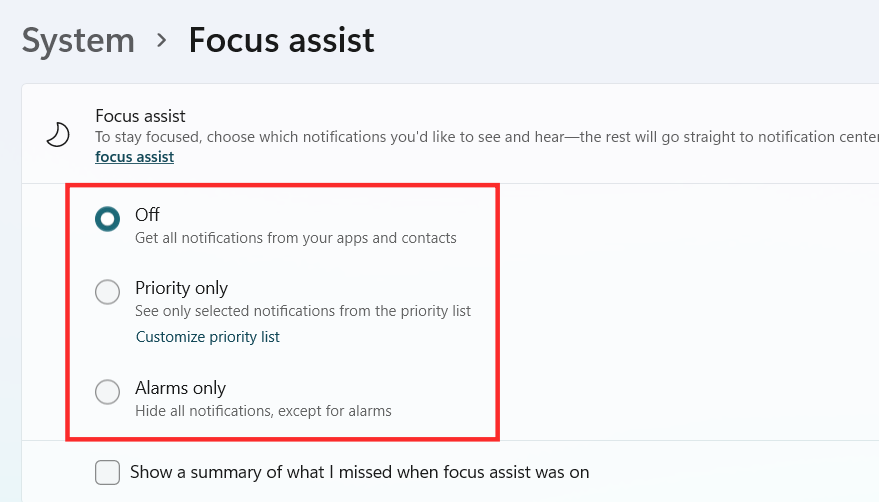
이제 선택한 항목에 따라 Windows 11 내에서 초점 지원이 활성화되어야 합니다.
방법 #2: 관리 센터 사용
Wi-Fi, 볼륨 및 배터리 아이콘이 함께 표시되는 Action Center를 클릭합니다.

블루투스 아이콘 바로 아래 에 초승달 모양 의 포커스 어시스트 아이콘이 있습니다.
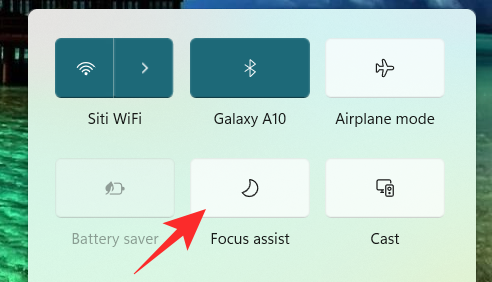
기본적으로 초점 지원 기능은 비활성화됩니다. 그것을 클릭하면 기능이 우선 순위 전용으로 직접 설정 됩니다 .
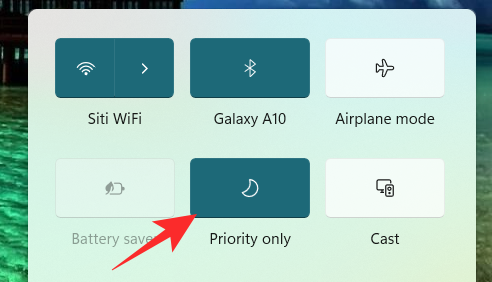
다시 클릭하여 Focus Assist 기능을 알람 전용 으로 설정합니다 .
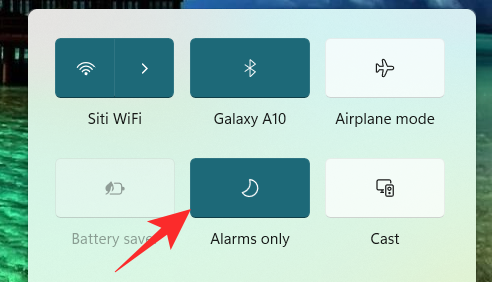
초점 지원 기능을 비활성화하려면 다시 클릭하십시오.
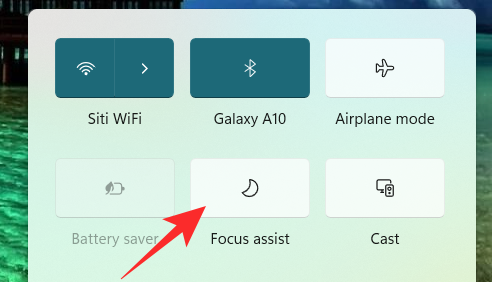
Action Center에서 Focus Assist 아이콘을 클릭하기만 하면 기능을 끄기, 우선 순위만, 알람만으로 변경할 수 있습니다. 그러나 Action Center에서 Focus Assist 설정에서 필요한 다른 변경을 수행하려면 Action Center에서 Focus Assist 아이콘을 마우스 오른쪽 버튼으로 클릭하고 Go to Settings 를 클릭하십시오 .
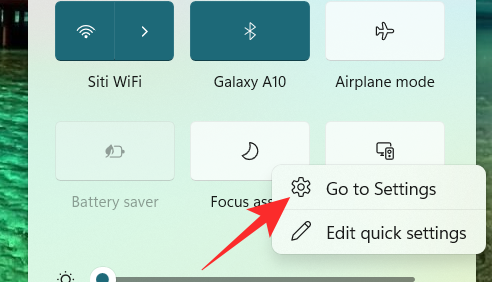
그러면 원하는 모든 변경을 쉽게 수행할 수 있는 설정 앱으로 이동합니다. 그리고 그게 다야! 집중 지원은 이제 관리 센터에서 직접 Windows 11 내에서 활성화되어야 합니다.
방법 #3: 그룹 정책 편집기 사용
관리자인 경우 그룹 정책 편집기를 사용하여 집중 지원 모드를 활성화할 수도 있습니다. 아래 가이드를 사용하여 프로세스를 진행하세요.
Windows + R키보드에서 를 누르고 실행 대화 상자에 다음을 입력합니다. 키보드에서 Enter 키를 눌러 그룹 정책 편집기를 엽니다.
gpedit.msc
아래에 언급된 다음 노드로 이동합니다.
User configuration > Administrative Templates > Start Menu and Taskbar > Notifications
오른쪽에 있는 '정숙 시간 끄기' 값을 찾아 두 번 클릭합니다.
이제 속성 창의 왼쪽 상단 모서리에서 현재 요구 사항에 따라 다음 옵션 중 하나를 선택합니다.
그리고 그게 다야! 이제 기본 설정에 따라 그룹 정책 편집기에서 포커스 지원을 활성화하거나 비활성화할 수 있습니다. 안타깝게도 관리자는 Focus 지원 동작을 사용자 지정할 수 없습니다. 그 능력은 여전히 사용자에게 있습니다. 그룹 정책 편집기를 사용하여 시스템에 초점 지원을 사용하는 기능만 활성화하거나 비활성화할 수 있습니다.
포커스 어시스트 사용 방법
초점 지원에는 현재 요구 사항에 따라 동작을 변경하는 데 도움이 될 수 있는 다양한 설정 및 사용자 지정 옵션이 있습니다. 현재 요구 사항에 가장 적합한 아래 가이드 중 하나를 사용하십시오.
방법 #1: 알람 전용 모드 활성화
Focus Assist 창의 알람 전용 모드를 사용하면 알람을 제외한 모든 알림을 숨길 수 있습니다. 알람 전용 모드를 활성화하려면 아래에 언급된 단계를 따르십시오.
작업 표시줄 에서 검색 아이콘을 클릭합니다 .

유형 초점 지원

초점 지원 을 클릭합니다 .

Focus Assist에서 Alarms Only 를 클릭하여 알람 을 제외한 알림 수신을 중지합니다.
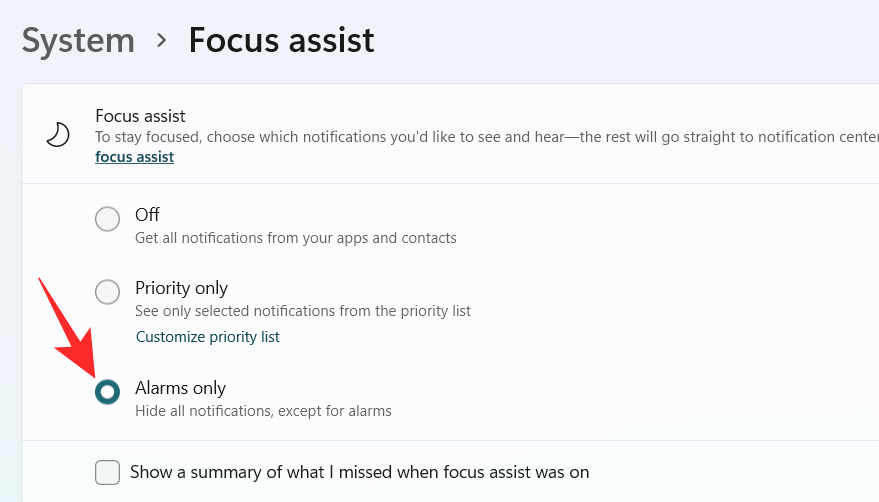
그리고 그게 다야! 이제 시스템의 알람에 대한 정보만 받게 됩니다. 우선 순위에 관계없이 다른 모든 알림은 Windows 11 내에서 무음 처리됩니다.
방법 #2: 사용자 지정 목록으로만 우선 순위 활성화
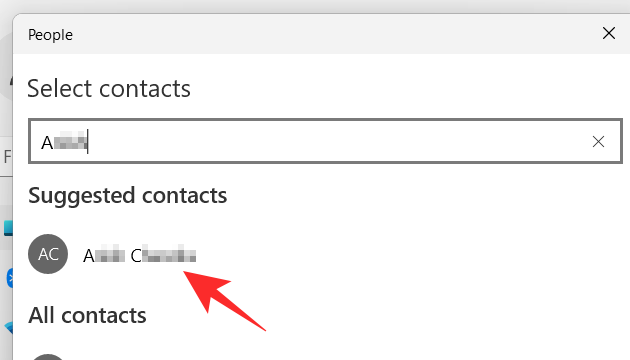
사람들의 창이 화면에 나타납니다. 검색 창에 이름을 입력하여 원하는 사람을 선택하십시오.
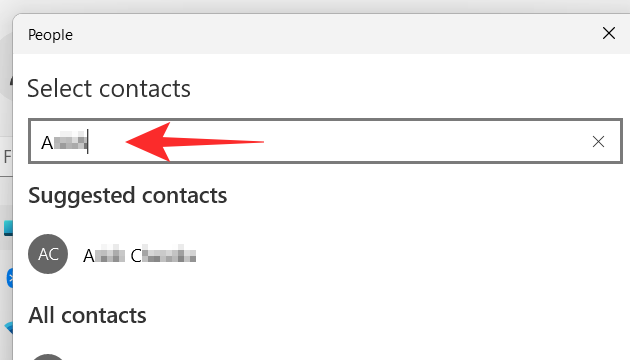
사람의 이름을 클릭합니다.
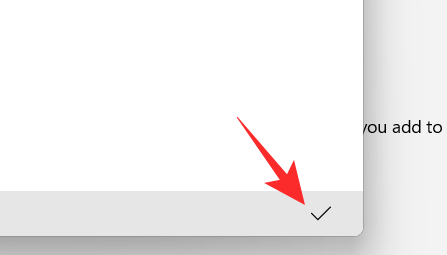
사람 창의 오른쪽 하단 모서리 에 있는 체크 버튼을 클릭합니다 .
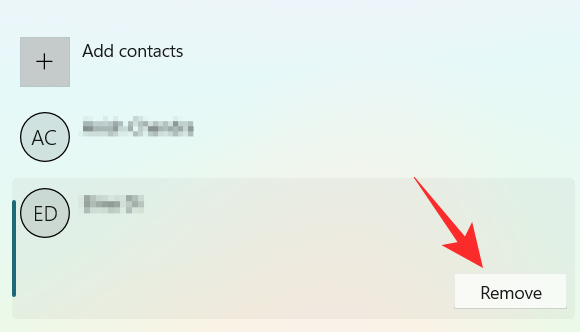
우선순위 목록이 생성되었습니다. 이제 우선 순위 목록에서 연락처를 제거하려면 사람 아래에서 연락처를 클릭합니다 .

제거 를 클릭합니다 .
이제 앱 섹션에서 조용한 시간을 보낼 수 있는 앱을 선택할 수 있습니다. 앱에서 알림을 표시하도록 허용하려면 앱 추가 버튼을 클릭합니다.
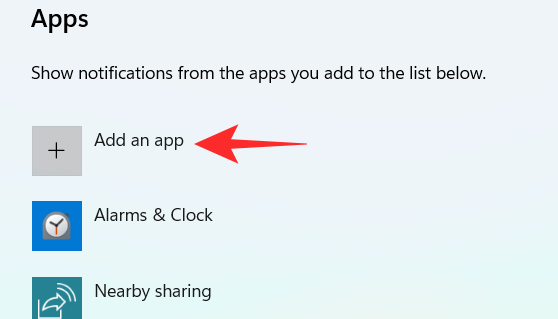
화면에 앱 목록이 나타납니다. 우선 순위 목록에 추가하려는 앱을 클릭합니다.
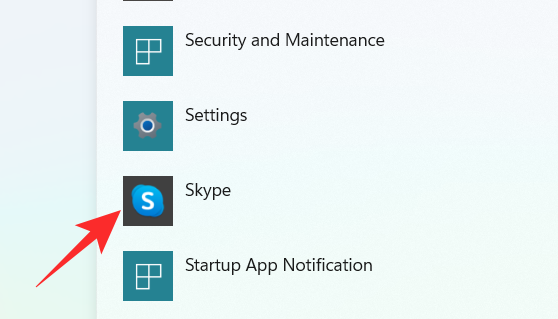
앱 선택이 완료될 때까지 이 프로세스를 계속하십시오. 당신이 당신의 우선 순위 목록에서 응용 프로그램을 제거 할 경우, 당신은 단순히 아래에있는 응용 프로그램을 클릭하면 응용 프로그램의 섹션을 참조하십시오.
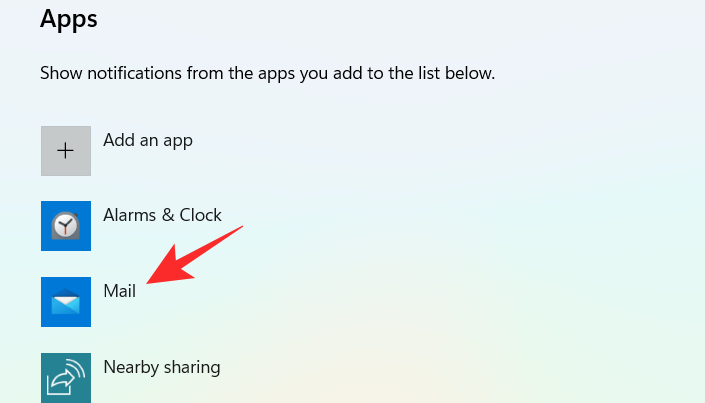
제거 를 클릭합니다 .
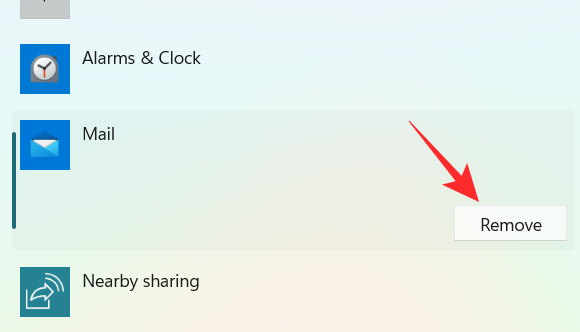
그리고 이것이 Focus 지원의 우선 순위 목록을 사용자 정의하고 중요한 연락처로부터만 알림을 수신하도록 유리하게 사용하는 방법입니다.
방법 #3: 초점 지원이 비활성화된 경우 알림 요약 활성화
작업 표시줄 에서 검색 아이콘을 클릭합니다 .

유형 초점 지원

초점 지원 을 클릭합니다 .

원하는 옵션 우선순위만 또는 경보만 클릭 합니다 .
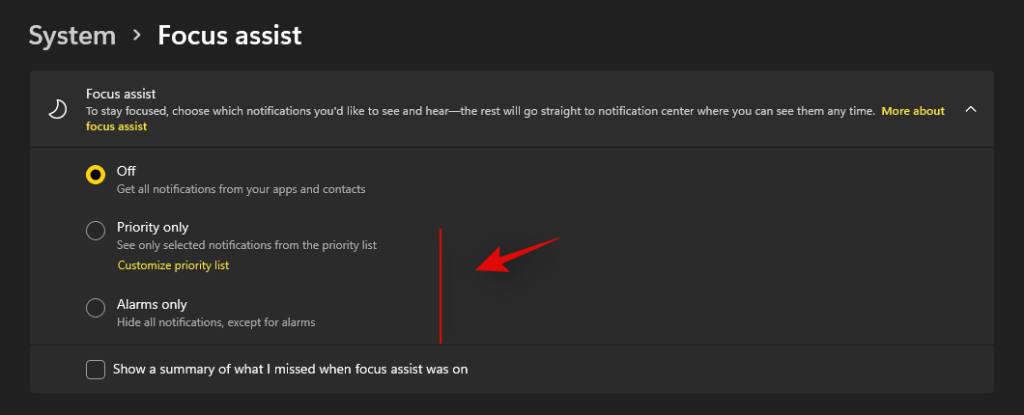
초점 지원이 켜져 있을 때 놓친 부분에 대한 요약 표시 확인란 을 선택 합니다.
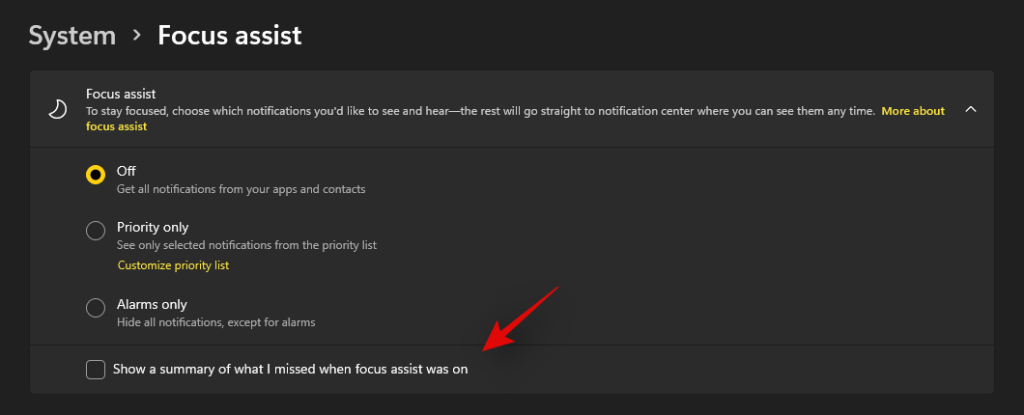
방법 #4: 자동 초점 지원 규칙 활성화 또는 비활성화
초점 지원의 자동 규칙을 사용하면 초점 지원을 자동으로 활성화할 수 있는 조건을 결정할 수 있습니다. Focus Assist 설정 창에는 사용자 지정할 수 있는 네 가지 자동 규칙이 있습니다. Focus 지원에서 자동 규칙을 사용자 정의하려면 아래에 언급된 단계를 확인하십시오.
작업 표시줄 에서 검색 아이콘을 클릭합니다 .

유형 초점 지원

초점 지원 을 클릭합니다 .

언더 자동 규칙 섹션, 네 개의 섹션이 있습니다. 선택하려는 옵션의 토글 스위치를 켭니다.
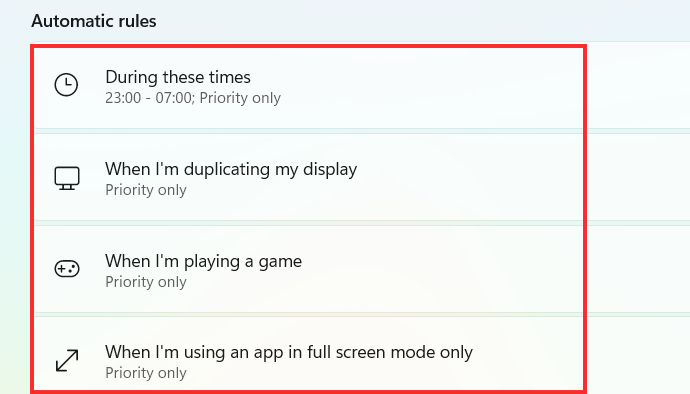
이제 자동 규칙에서 위에서 언급한 옵션을 사용자 지정하는 방법을 살펴보겠습니다.
1. 이 시기에
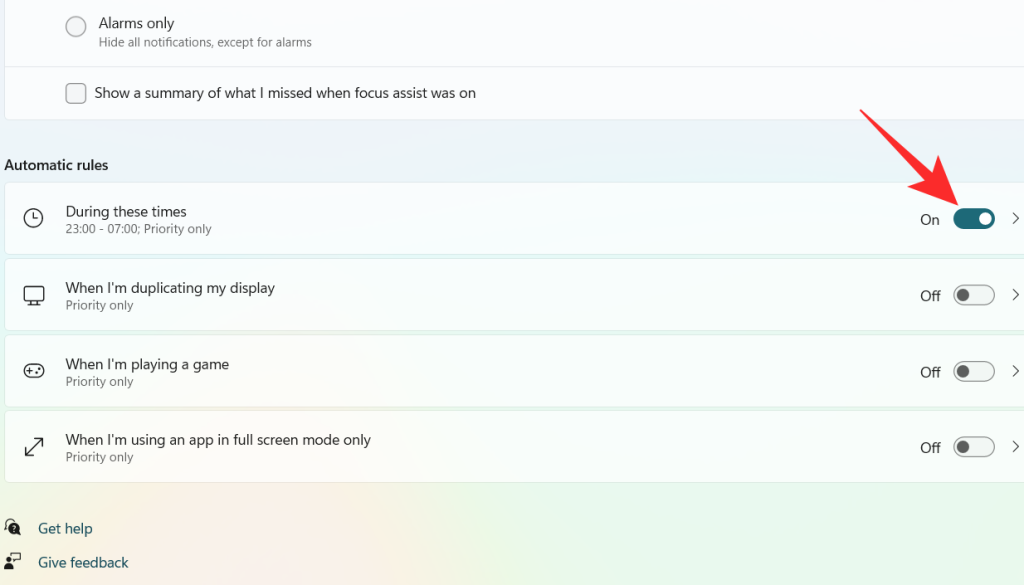
이 시간 동안 탭 의 맨 오른쪽에 있는 토글 스위치를 켭니다 .
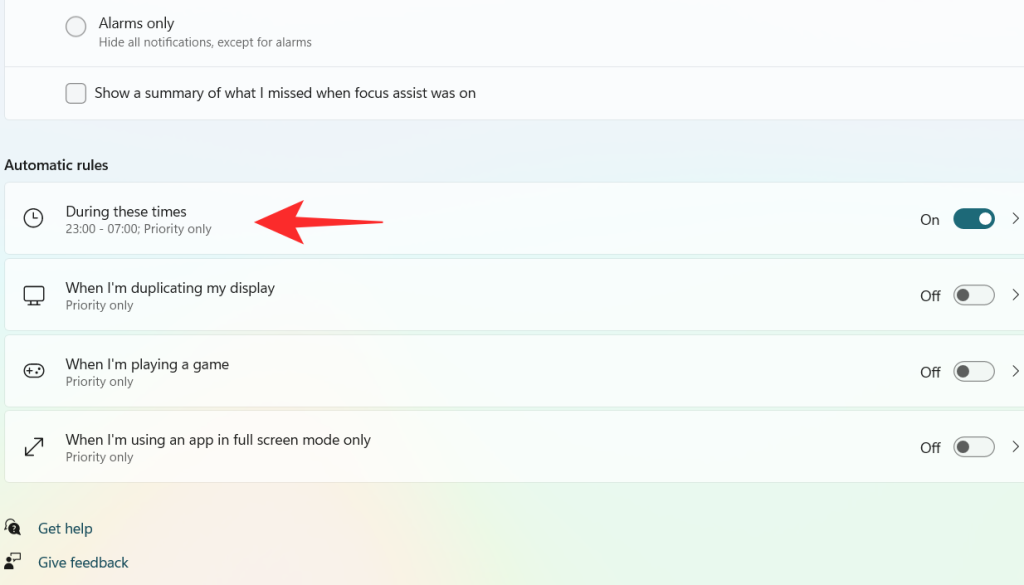
이 시간 동안 탭을 클릭합니다 .
시작 시간 아래의 상자를 클릭합니다 .
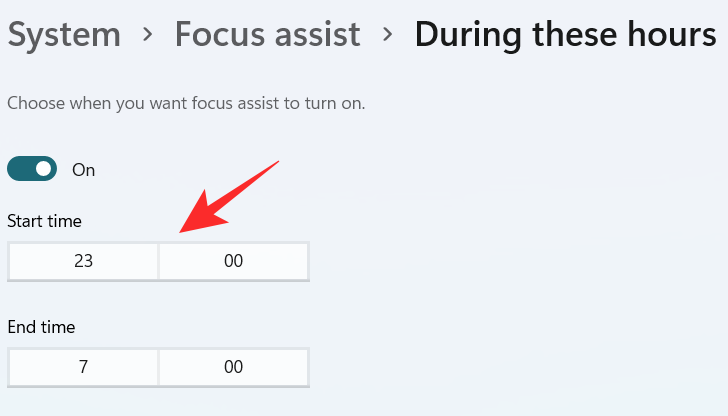
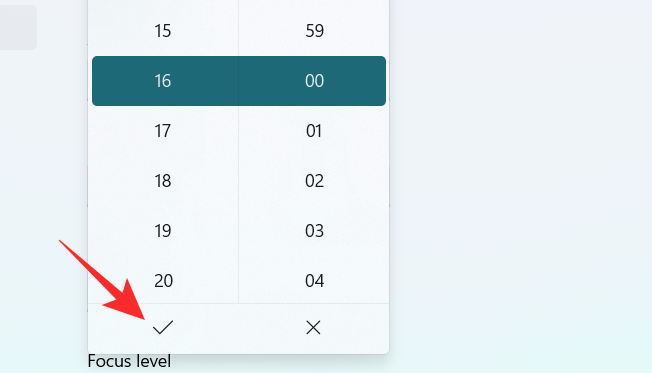
초점 지원을 켜고 싶은 시간을 선택하고 드롭다운 메뉴 하단의 체크 표시 를 클릭 합니다.
종료 시간 아래의 상자를 클릭합니다 .
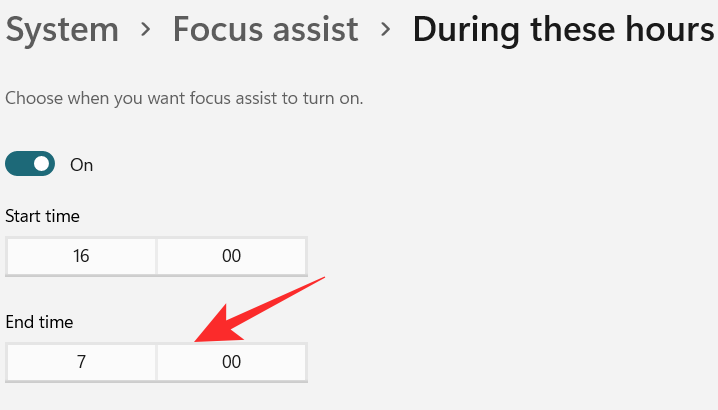
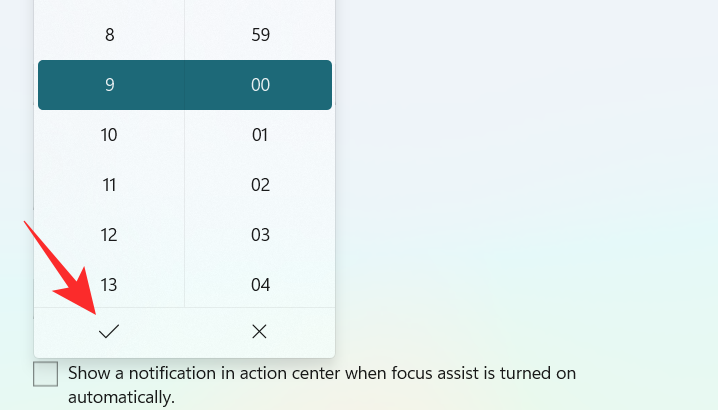
초점 지원을 끄고 싶은 시간을 선택하고 드롭다운 메뉴 하단의 체크 표시 를 클릭 합니다.
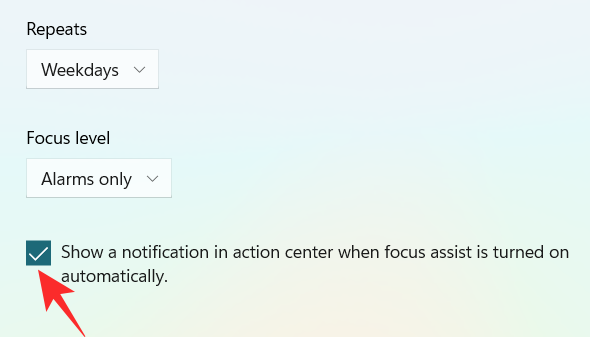
반복 아래의 상자를 클릭합니다 .
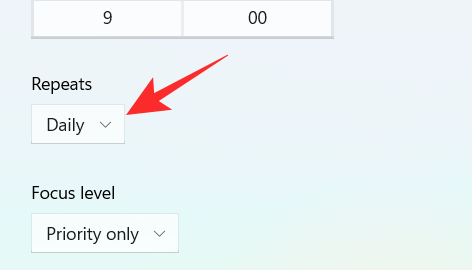
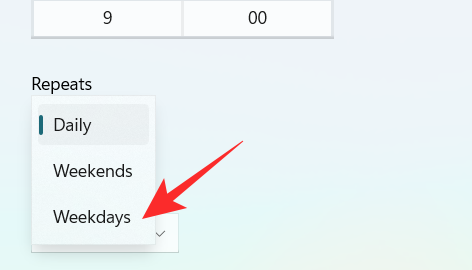
A small dropdown menu appears. Set the schedule to Daily, Weekends, or Weekdays.
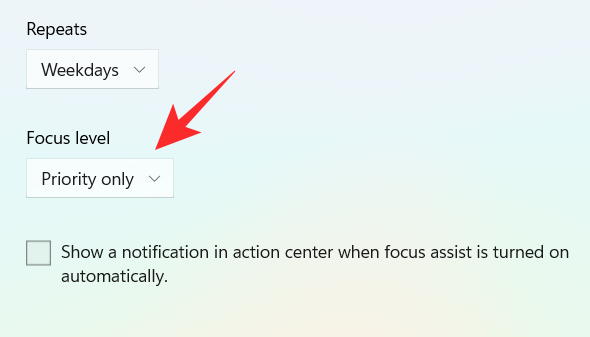
Click on the box under Focus level.
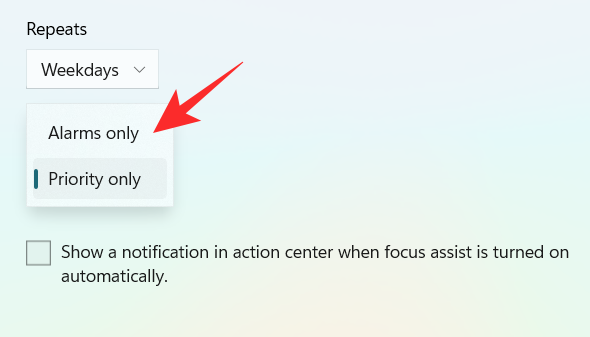
A small dropdown menu appears. Choose between Alarm only or Priority only.
Finally, to get a notification when the Focus assist is turned on, check the box “Show a notification in action center when Focus assist is turned on automatically“.
2. When I’m duplicating my display
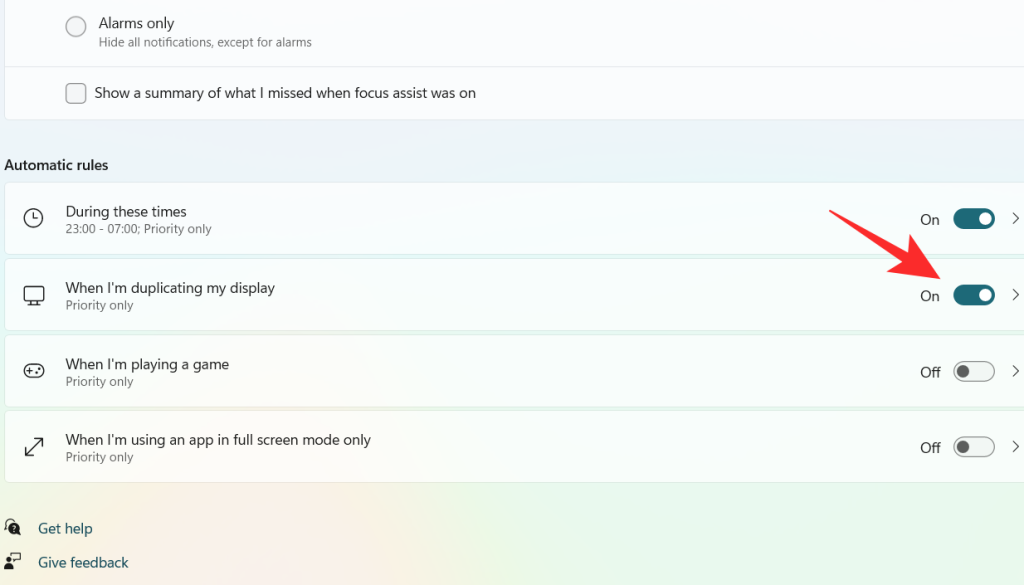
Turn on the toggle switch, which is extreme right to the When I’m duplicating my display tab.
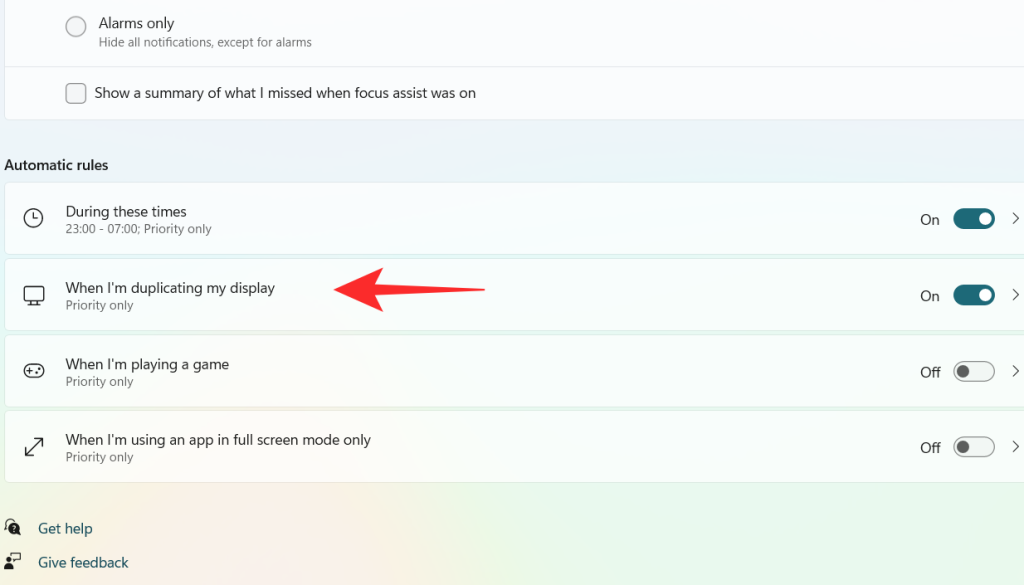
Click on the When I’m duplicating my display tab.
Click on the box under Focus level.
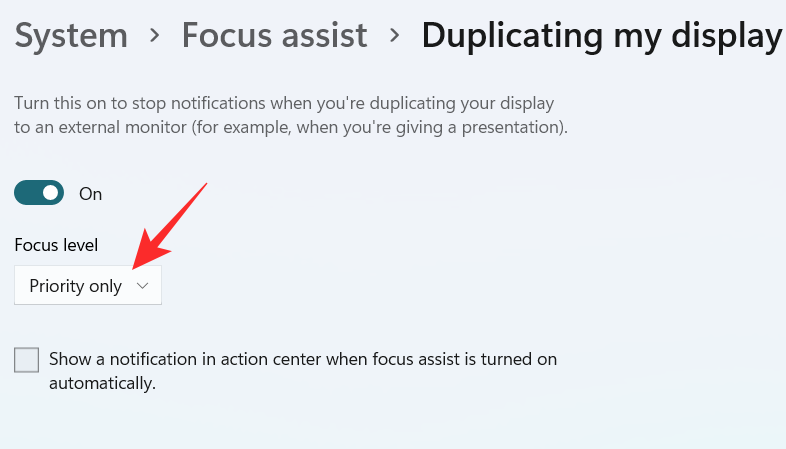
A dropdown menu appears, click on your desired option between Priority only and Alarms only.
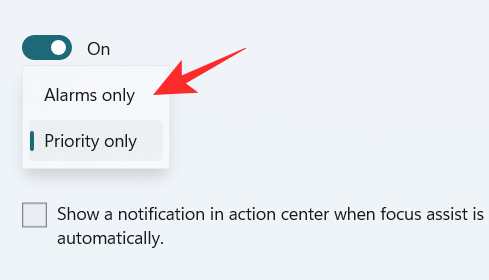
To get a notification when the Focus assist is turned on, check the box “Show a notification in action center when Focus assist is turned on automatically“
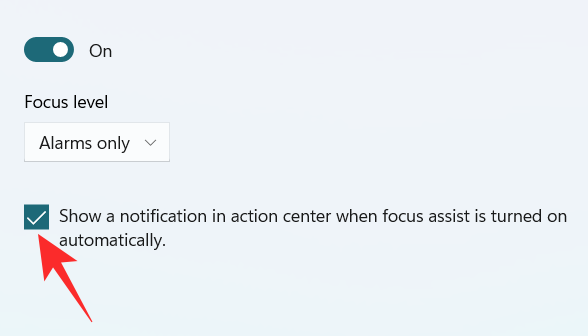
3. When I’m playing a game
Turn on the toggle switch, which is extreme right to the When I’m playing a game tab.
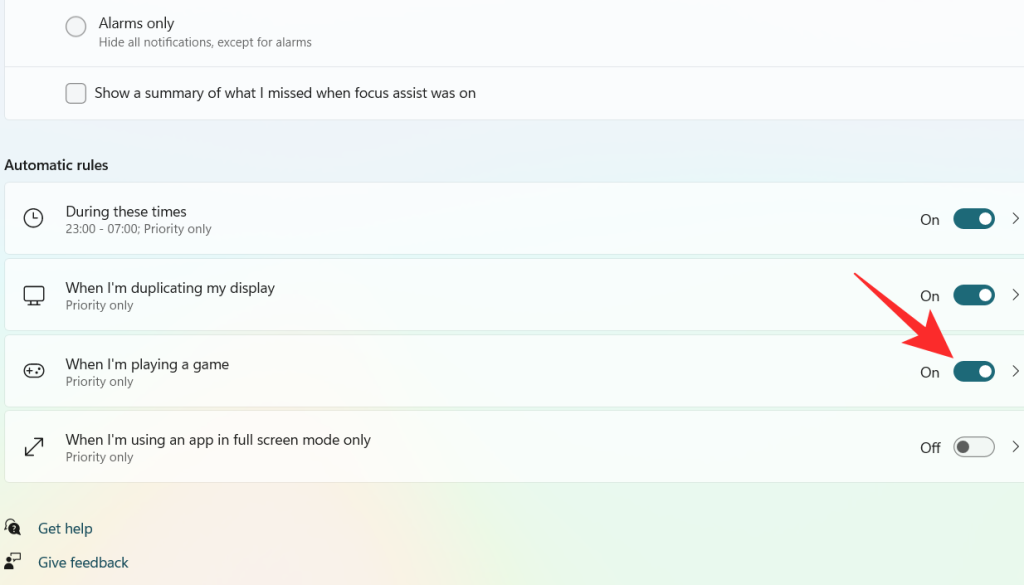
Click on the When I’m playing a game tab
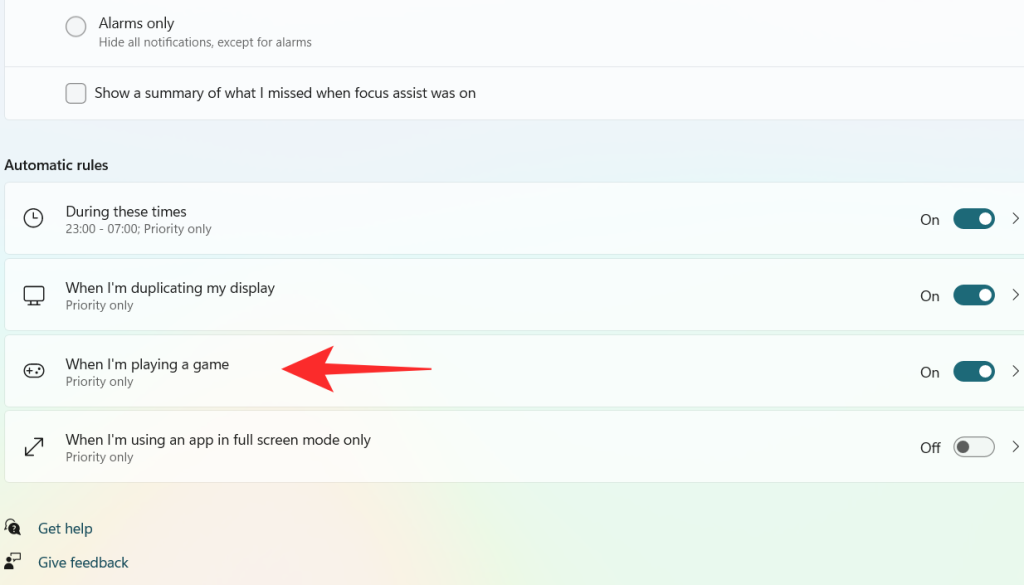
Click on the box under Focus Level.
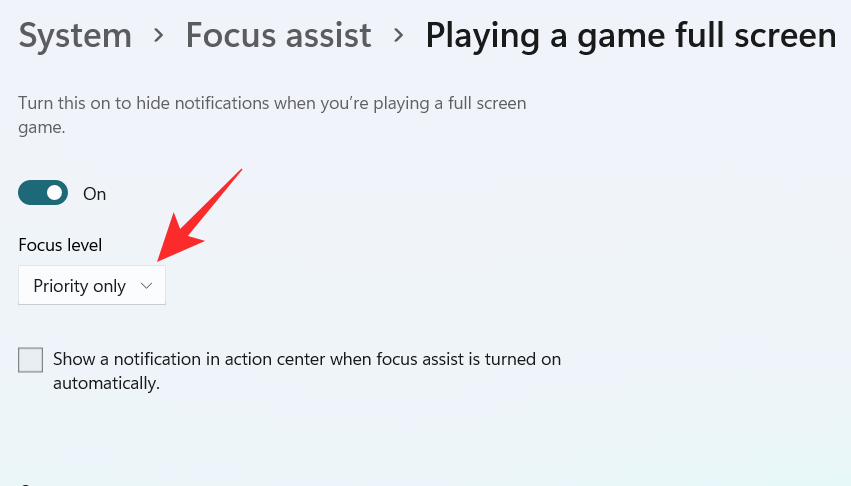
A dropdown menu appears, click on your desired option between Priority only and Alarms only.

To get a notification when the Focus assist is turned on, check the box “Show a notification in action center when Focus assist is turned on automatically“

4. When I’m using an app in full-screen mode only
Turn on the toggle switch, which is extreme right to the When I’m using an app in full-screen mode only tab.
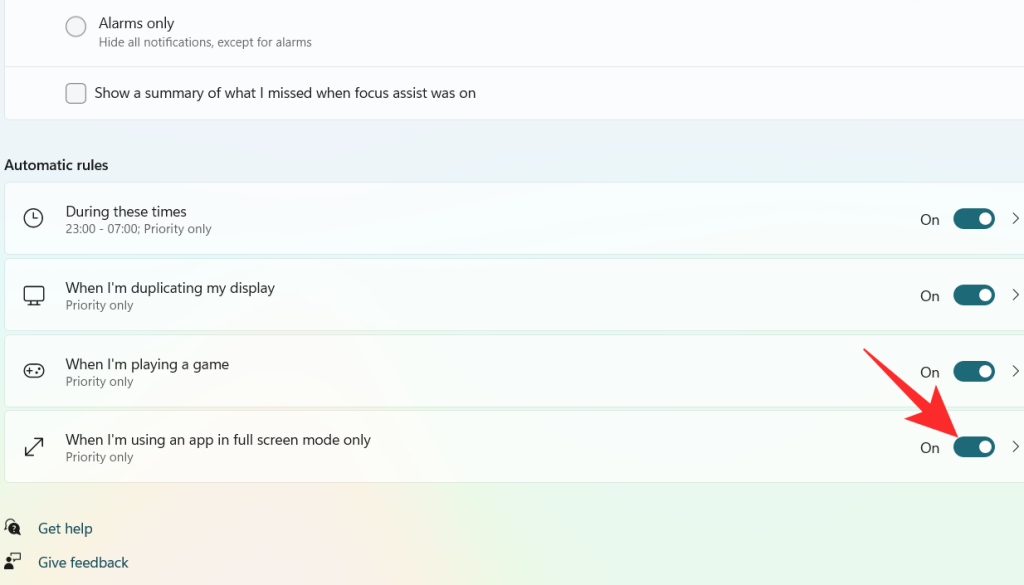
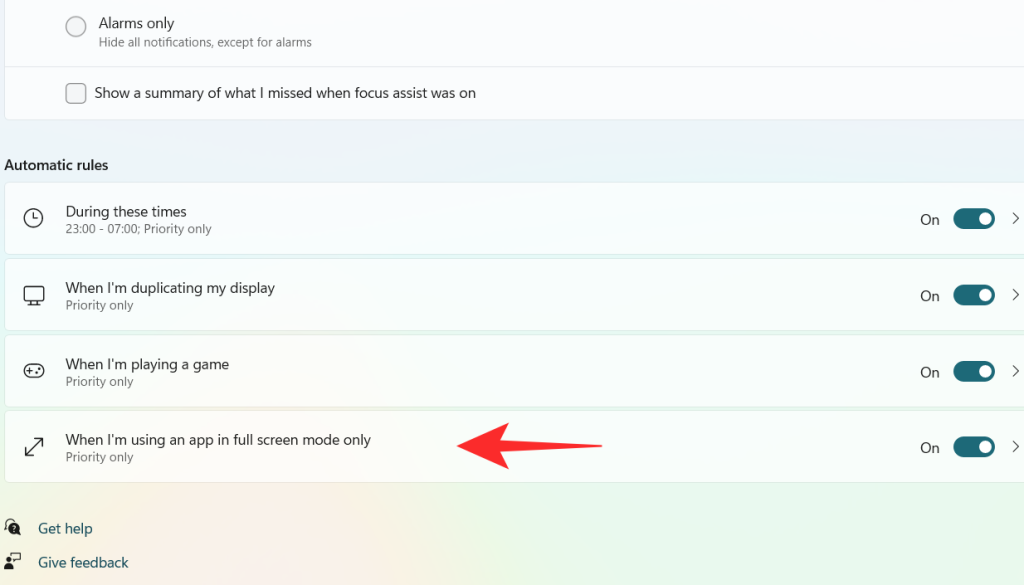
Click on the When I’m using an app in full-screen mode only tab
Click on the box under Focus Level.
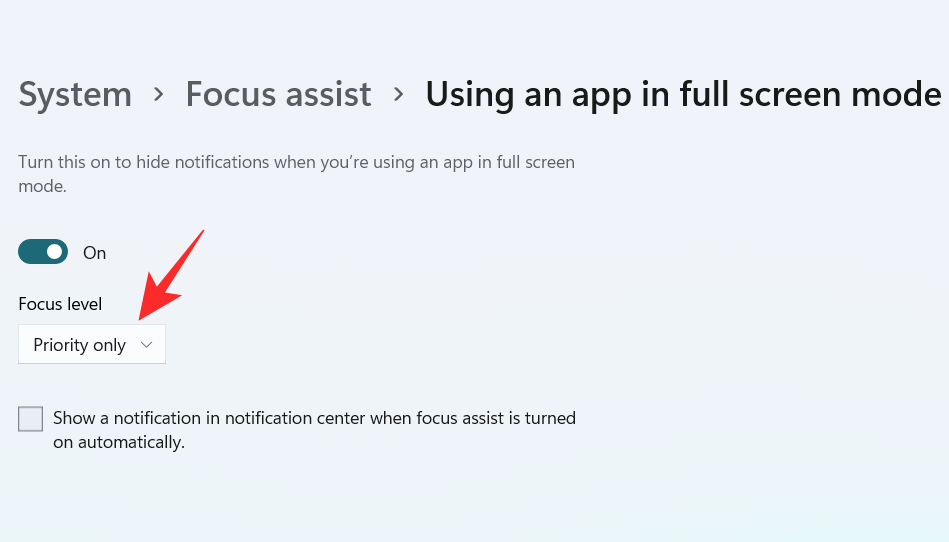
A dropdown menu appears, click on your desired option between Priority only and Alarms only.

To get a notification when the Focus assist is turned on, check the box “Show a notification in action center when Focus assist is turned on automatically“.

Using the above customizations, you can schedule and control Focus assist’s behavior according to your workflow for maximum efficiency no matter the task at hand.
Can you remove the Focus Assist icon from the Action Center?
Yes, you can easily remove the Focus Assist icon from the Action Center. Windows 11 brings a host of new cosmetic and UI changes and one of them has been the ability to customize your action center. You can now add or remove icons from the action center depending on your needs and opt for a more minimal or productive look depending on your workflow.
For now, you can only add and remove certain system modules but in the future, some users expect Microsoft to add the support for third-party apps as well. This would be a much welcome change that would allow you to manage dedicated system settings managed by third-party apps directly from your action center.
Customize your Focus assist icon in the action center
Depending on your current needs you can either remove or add the Focus assist module to the action center. Use one of the guides below depending on your current requirements.
1. Remove it
Click on the Action Center which shows the icon of Wifi, volume, and battery together.

Right-click on an empty place or on any icon and click on Edit quick settings.
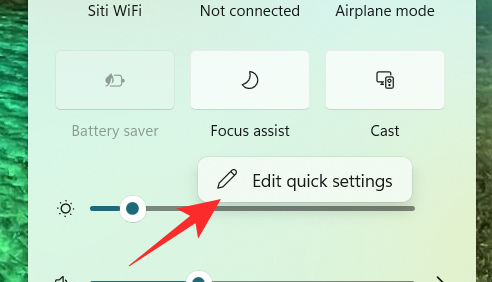
Click on the unpin symbol at the top right corner of the Focus Assist icon to remove the Focus Assist icon from the Action Center.
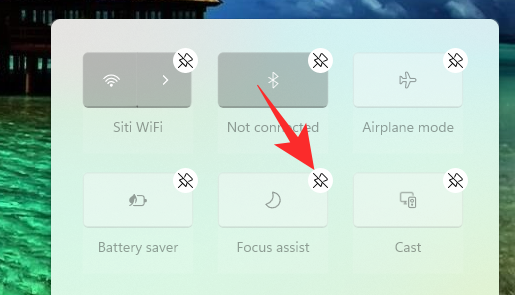
The Focus assist module should now have been removed from your action center. If not, we recommend you restart explorer.exe or your PC for the changes to take effect.
2. Restore it
Click on the Action Center which shows the icon of Wifi, volume, and battery together.

Right-click on an empty place or on any icon and click on Edit quick settings.
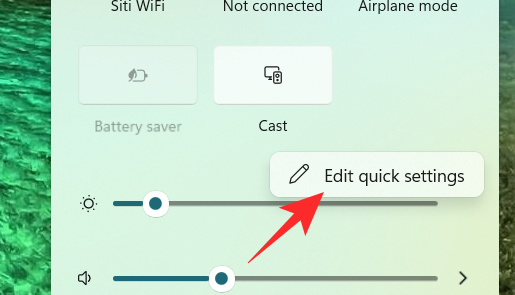
Now, click on the Add button at the bottom of the action center.
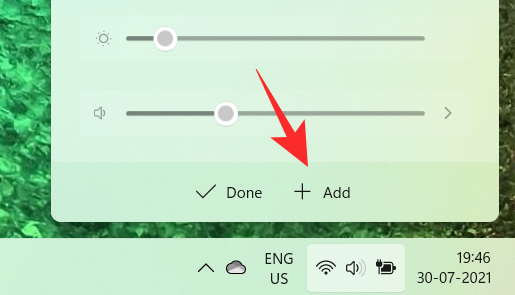
A list of different settings appears. Click on Focus Assist from the list and you will get to see the Focus Assist icon on the Action Center again.
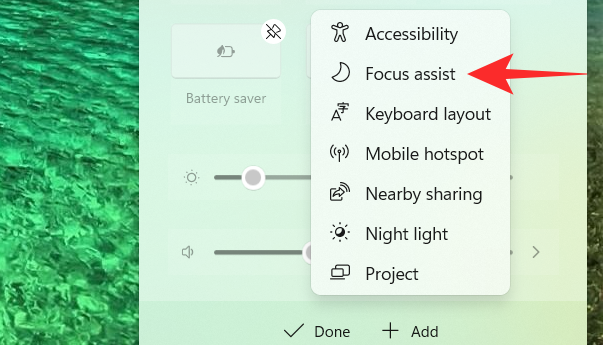
And that’s how you can add the Focus assist module back in the action center.
Focus assist keeps turning on automatically Issue: How to fix
If Focus assist keeps turning on automatically then there could be a couple of reasons for this behavior. Depending on its cause we can either fix it or use a workaround to manage the issue. Let’s find out why Focus assist keeps turning on automatically on your system.
Fix #1: Check Automatic Rules
Are you having this issue when projecting to a secondary display? Or when sharing your screen with a public computer? Then it is likely that focus assist is getting turned on automatically due to the default automatic rules in Windows 11.
By default, focus assist will silence all notifications in such scenarios to help maintain your privacy. But this can be counterproductive in case you are just trying to use a bigger display from a portable system like a laptop or an NUC.
It could also be that scheduled Focus assist was turned on your system by mistake which will enable and disable Focus assist automatically during certain hours. If any of these situations sounds like what you are facing then you can use the guide below to disable all automatic rules that enable Focus assist during certain scenarios and workflows on Windows 11. Let’s get started.
Press Windows + i on your keyboard to open the Settings app. Ensure ‘System’ is selected on your left and then click on ‘Focus Assist’ on your right.
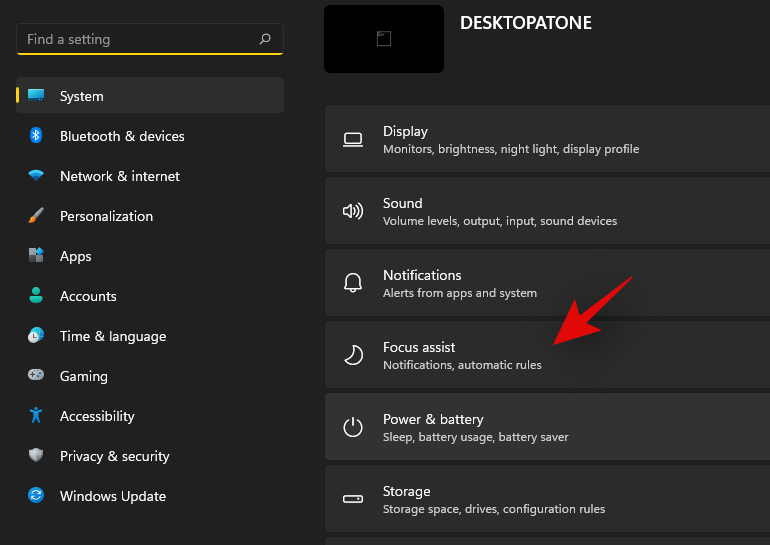
Go down to automatic rules and turn off the following toggles.
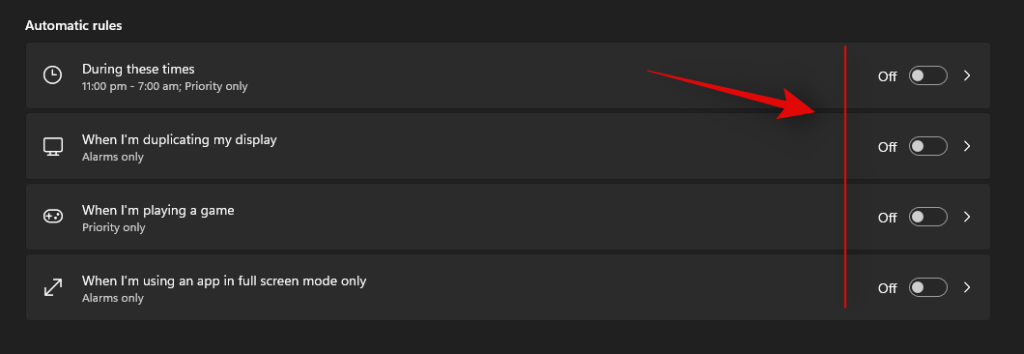
Once these rules are disabled, Windows 11 will not turn on Focus assist automatically on your system.
Fix #2: Turn of GeForce Overlay
This is another way to solve Focus assist misbehaving on your system. If you have a dGPU from Nvidia and are using the GeForce experience app then we recommend disabling its overlay option and restarting your system. With the automatic rule for ‘When I’m using an app in full-screen mode only’ turned on, Windows will mistake the Nvidia overlay detection on your desktop for a full-screen app which will trigger the Focus assist settings in return. You can also disable this automatic rule in case you wish to keep the Geforce Experience overlay enabled on your system.
Focus assist greyed out, option missing or not working; How to fix
Is the focus assist option missing from Windows 11 settings app? Is the module greyed out in the action center? This is a known bug that shows up occasionally with every feature update of Windows. Even certain versions of Windows 10 faced huge issues with this bug until a fix was released.
Fix #1: Enable in Group Policy Editor
If Focus assist seems to be missing from your system then it is likely disabled using the group policy editor. If your PC is managed by your organization or your workplace then it is likely disabled by your administrator. If you have access to the group policy editor then you can use the guide below to enable focus assist on your system. However, in case you have limited access, then you might need to get in touch with your administrator to enable Focus assist on your system.
Press Windows + R on your keyboard to bring up the Run dialog box and type in the following command to launch the Group Policy Editor. Click on ‘Ok’ once you are done.
gpedit.msc
Navigate to the following node.
User configuration > Administrative Templates > Start Menu and Taskbar > Notifications
Double click on ‘Turn off Quiet Hours’ on your right.
Click and select ‘Disabled’ in the top left corner.
Click on ‘Ok’ to save your changes.
And that’s it! Focus assist should now be enabled on your system in case it was disabled using the group policy editor.
Fix #2: Reinstall and repair default Windows UWP apps and system apps
If Focus assist is still missing from your system then let’s check if all the necessary apps and utilities are installed properly on your system. Use the guide below to check and repair Windows 11’s basic apps and functionality on your system.
Press Windows + S and search for PowerShell. Click on ‘Run as administrator’ once it shows up in your search results.
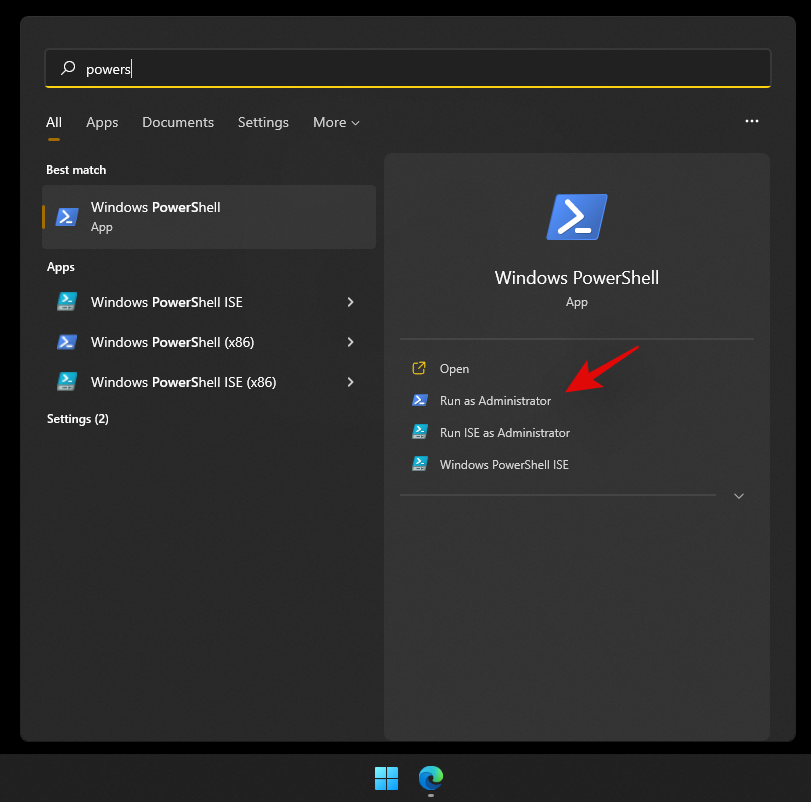
Once PowerShell is launched, execute the following command to reinstall all UWP apps and check and repair other default utilities required by Windows 11 in the background.
Get-AppXPackage -AllUsers | Foreach {Add-AppxPackage -DisableDevelopmentMode -Register "$ ($ _. InstallLocation) \ AppXManifest.xml"}

Wait for the process to finish and restart your PC for good measure. If Focus assist was corrupted or missing from your system, then this fix should help solve all your issues.
Fix #3: Check for a Windows Update
Haven’t updated in a while? We recommend checking for recent Windows Updates. While updates rarely disable major features like Focus assist, a new feature update installation can help refresh your registry, fix mismatched values and more importantly iron out bugs that could be preventing you from accessing Focus assist on your system. Use the guide below to check for recent Windows updates on your system.
Press Windows + i on your keyboard to open the Settings app and click on ‘Windows Update’ on your left.

Click on ‘Check for updates’.

In case any new updates show up, let them install on your system and restart if prompted. In case you are using a metered connection then you will need to click on ‘Download now’ manually to avoid any unexpected data charges.
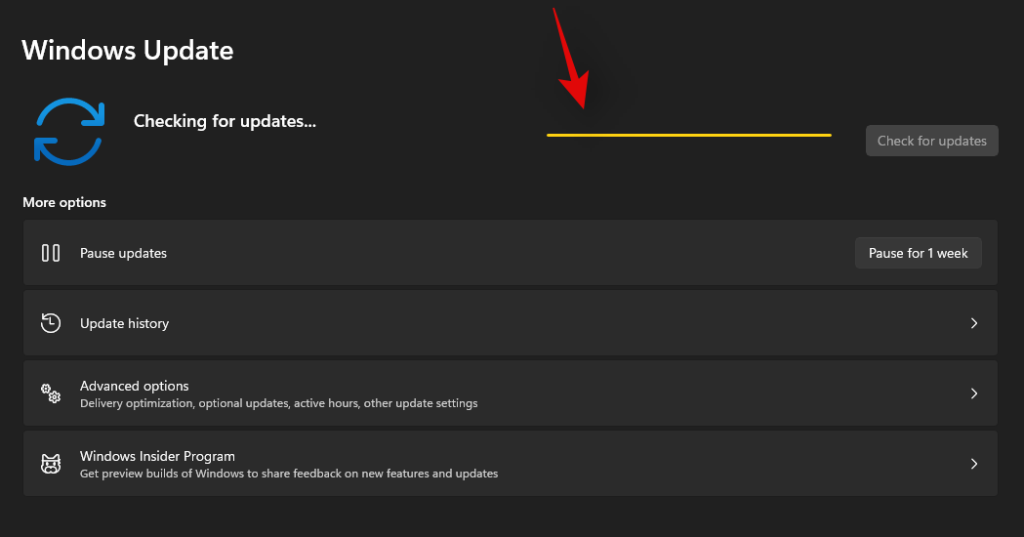
Once the necessary Windows updates are installed on your system, Focus assist should be restored in your action center and the Settings app.
Last Resort: Reset your PC
If Focus assist is still missing from your PC then this indicates a corrupted Windows installation on your system. The best way to fix this without wasting much time on troubleshooting would be to simply reset your PC while keeping all your files intact. This will refresh the entire Windows 11 installation and reinstall all the apps which should help restore functionality for all Windows features including Focus assist. Follow the guide below to reset your PC while keeping your files.
Note: The reset process will remove all installed applications and only retain files stored manually on your local storage. A list of all the removed apps will be available in .txt format on your desktop once your PC has been reset.
Press Windows + i on your keyboard and click on ‘Windows Update’ on your left.
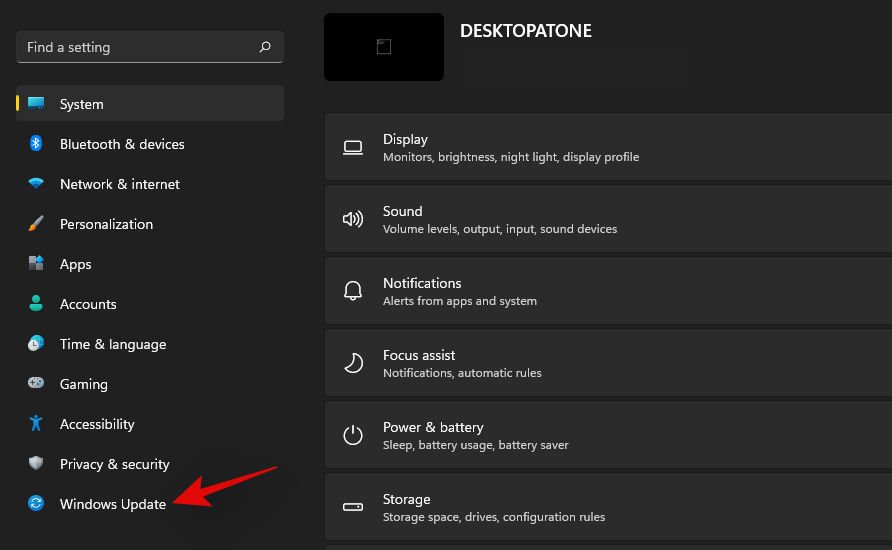
Click on ‘Advanced options’.
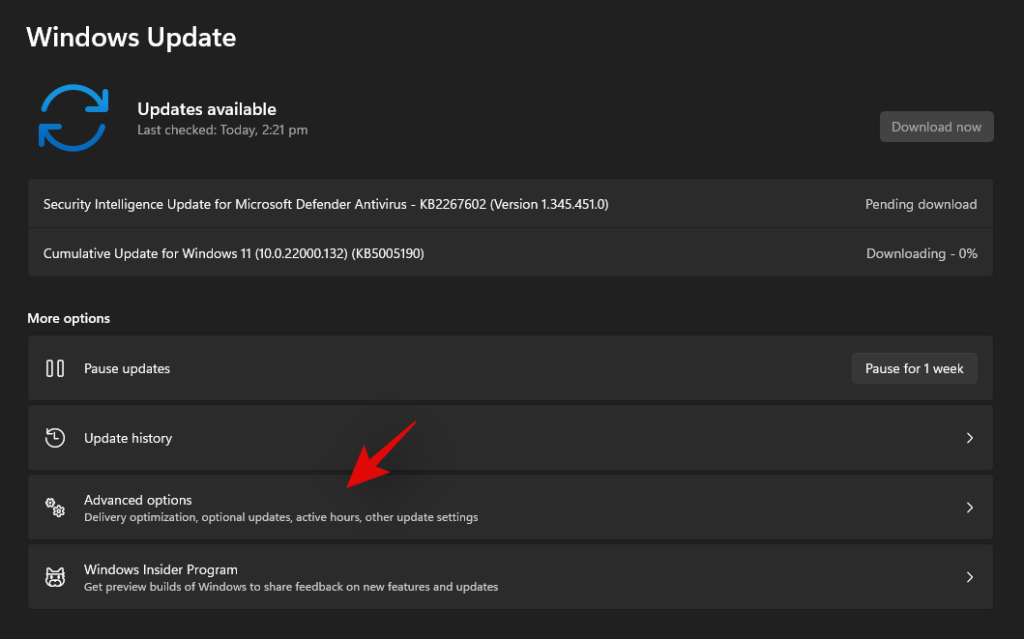
Click and select ‘Recovery’.
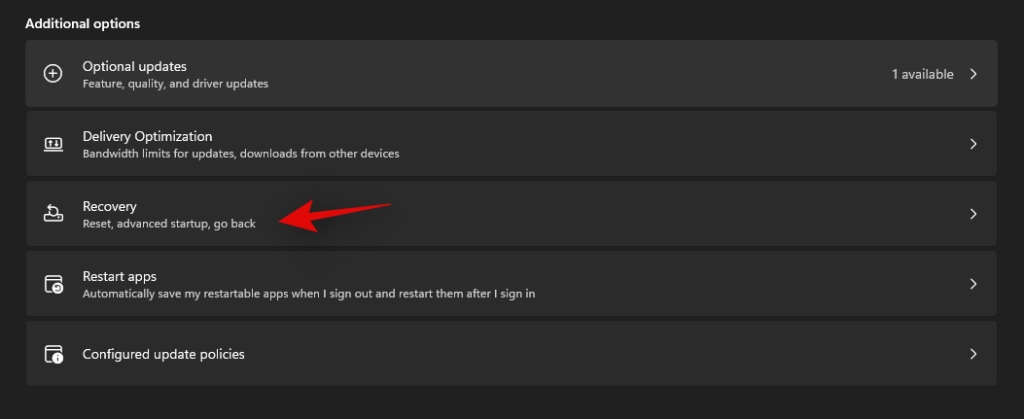
Click on ‘Reset PC’ beside Reset this PC.

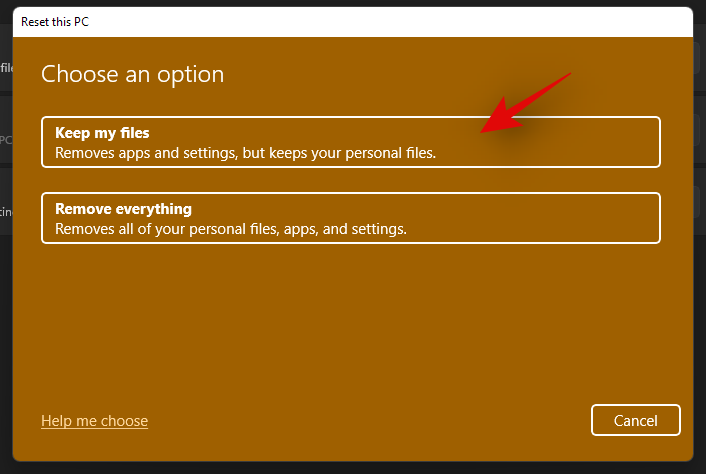
Click on ‘Keep my files’.
Windows will now process all the files on your local storage. Click on ‘Reset’.
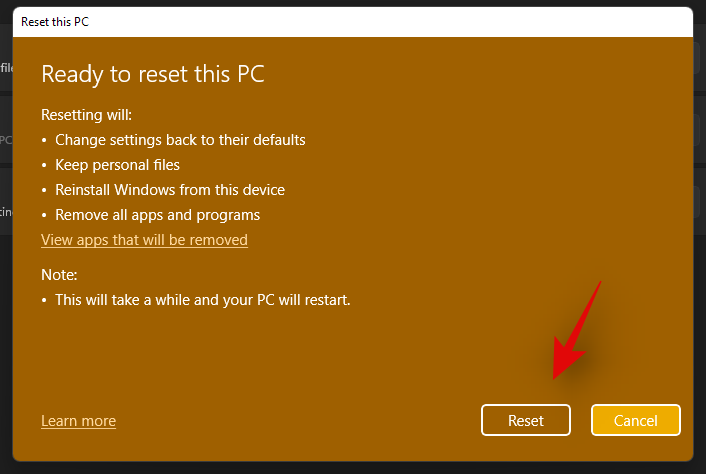
Note: If you are using Windows 11 Pro or higher then you will get the option to use a local installation/recovery media to reinstall Windows 11 as well. However, this option will be missing for Windows 11 Home users.
Windows will now reset your PC while retaining all your files. Your PC will restart several times during this process. This is completely normal and you should let Windows do its thing. If you are using a laptop or a portable NUC, then ensure that your unit is plugged into the power at all times during this process.
How to turn off Focus assist permanently
Do you wish to turn off Focus assist permanently in all scenarios? Then you can use the guide below to do so. The best way to disable Focus assist is by using the group policy editor. But in case you are using Windows 11 Home Edition, then you can use the first method in this guide to disable Focus assist permanently.
Method #1: Disable all settings and rules
Once you disable all the settings and rules for Focus assist, the feature should be turned off automatically on your system. Use the guide below to get you started.
Press Windows + i on your keyboard to open the Settings app and click on ‘Focus assist’ on your right.

Click and select ‘Off’ at the top.
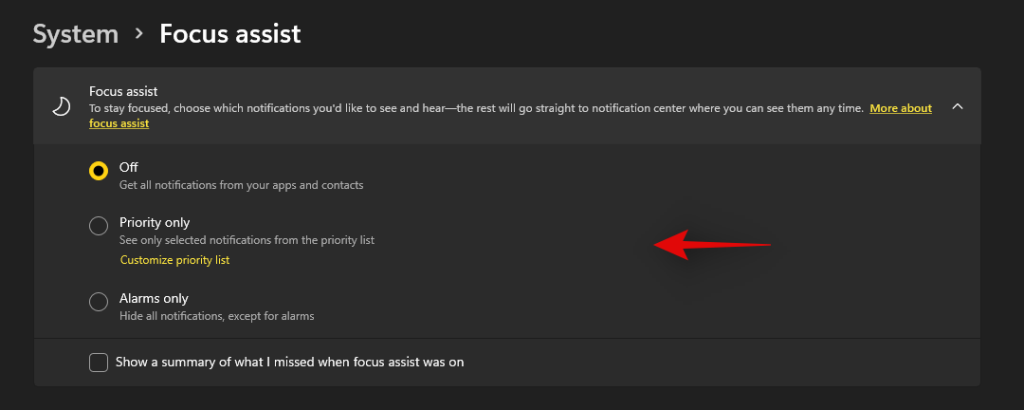
Uncheck the box for ‘Show a summary of what I missed when focus assist was on’.

Subsequently, disable all the toggles under ‘Automatic rules’ as shown below.

We also recommend turning off notifications for unnecessary apps using the guide after this section to avoid unnecessary notifications from interrupting you when focus assist is disabled.
Method #2: Using Group Policy Editor
The group policy editor will permanently disable focus assist on your system and even prevent you from accessing it in your settings. However, this method will only work on Windows 11 Pro or higher versions. In case you have the Windows 11 home edition, you can use the guide above to disable Focus assist instead.
Press Windows + R and type in the following to open Froup Policy EDitor. Click on ‘Ok’ once done.
gpedit.msc
Navigate to the following node.
User configuration > Administrative Templates > Start Menu and Taskbar > Notifications
Find and double-click on ‘Turn on Quiet Hours’ on your right.
Select ‘Enabled’ in the top left and click on ‘Ok’.
Focus assist will now be permanently disabled on the selected system. We recommend you restart your system or explorer.exe in case the changes do not take place immediately.
Is there any other way to disable notifications?
Yes, you can disable notifications individually on a per-app basis in Windows 11 to customize the notifications you receive. This is another way to ensure that you are only notified about the apps and notifications that you intended. Customizing your notifications this way will also allow you to retain the full functionality of the focus assist mode without having to disable certain rules to avoid mismatched scenarios in your workflow.
However, the only downside to managing your notifications this way is that you have to keep enabling and disabling notifications for apps every few months depending on your new installs and uninstalls. You can use the guide below to disable notifications on a per-app basis in Windows 11.
Disable notifications permanently on a per-app basis
Here’s how you can disable notifications on a per-app basis in Windows 11.
Press Windows + i on your keyboard to open the Settings app and then click on ‘Notifications’ on your right.
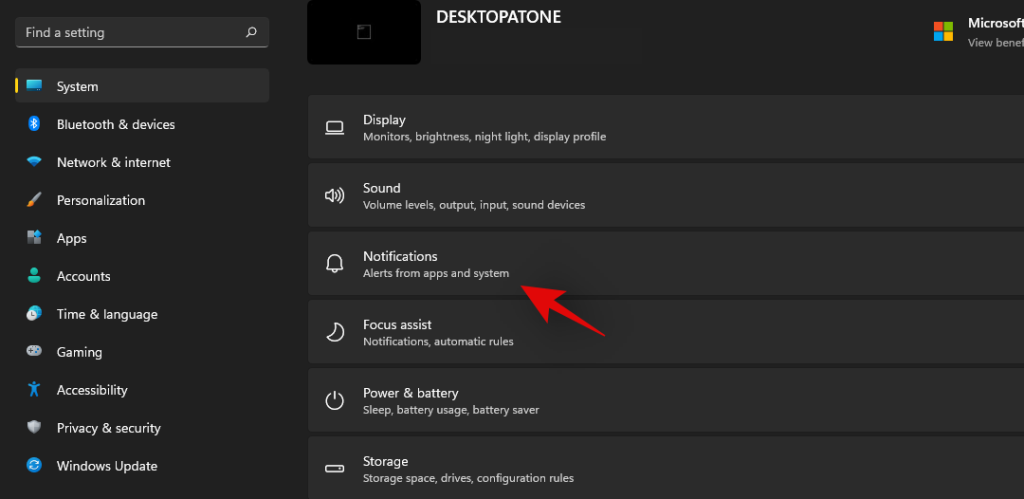
You will now get a list of all the apps that have the permission to deliver notifications on your system. Scroll the list to find the necessary apps and turn off the toggle beside them to disable notifications.

Repeat the steps above for all the intended apps to disable notifications.
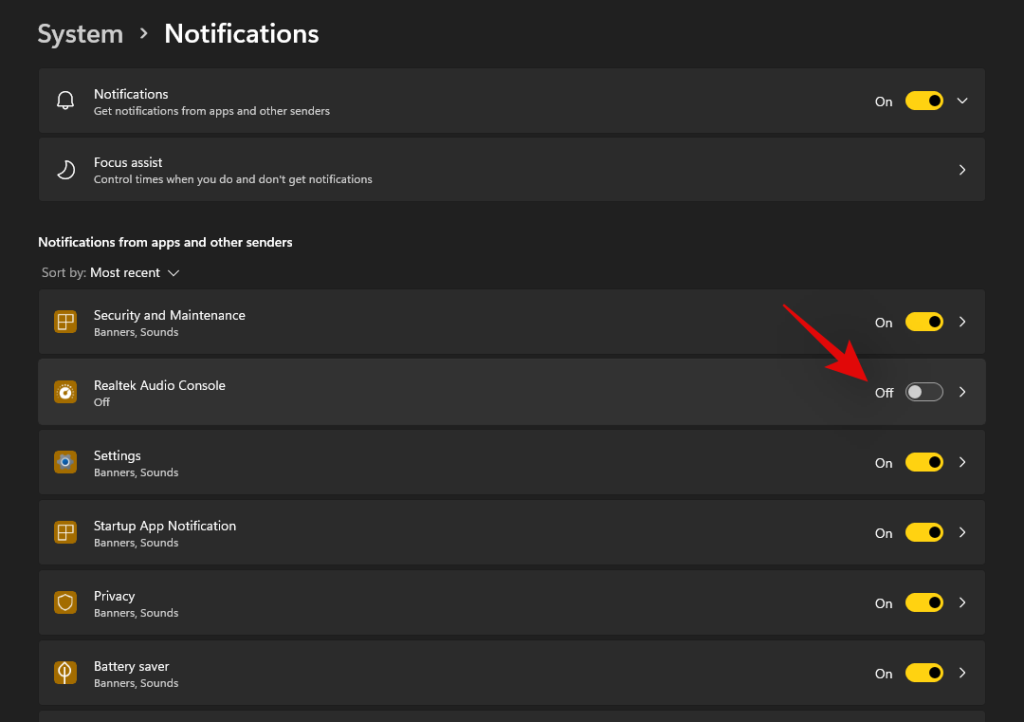
Close the Settings app and notifications for the selected apps should now be permanently disabled on your system.
Can you customize notifications in Windows 11?
Well, not exactly. Windows 11 currently has very limited options when it comes to customizing your notifications. You can not change the look, behavior, or color palette of your notifications without changing the accent color of your overall UI. However, you can customize the way your notifications sound. You can set a nice quiet notification sound that does not interrupt your workflow or opt for a quirky take that makes for a few good laughs each time you get a notification. The choice is completely up to you. Use the guide below to customize your Windows 11 notification sounds.
Required
Guide
Let’s start by first placing the .wav file in a compatible media folder so that you can set it as your default notification sound in Windows 11. Navigate to the concerned .wav file and copy it to your clipboard.
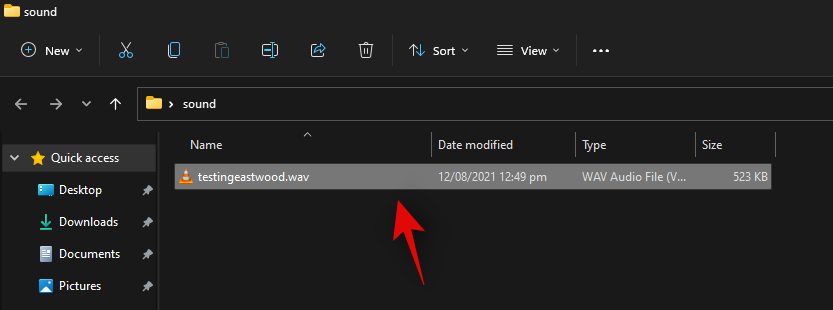
Now navigate to the following path given below. Paste your .wav file in this location. Click on ‘Continue’ when you will be prompted for administrator permission.
C:\Windows\media
We can now use the .wav file as our default notification sound. Press Windows + i on your keyboard to open the Settings app and then click on ‘Sound’ on your right.
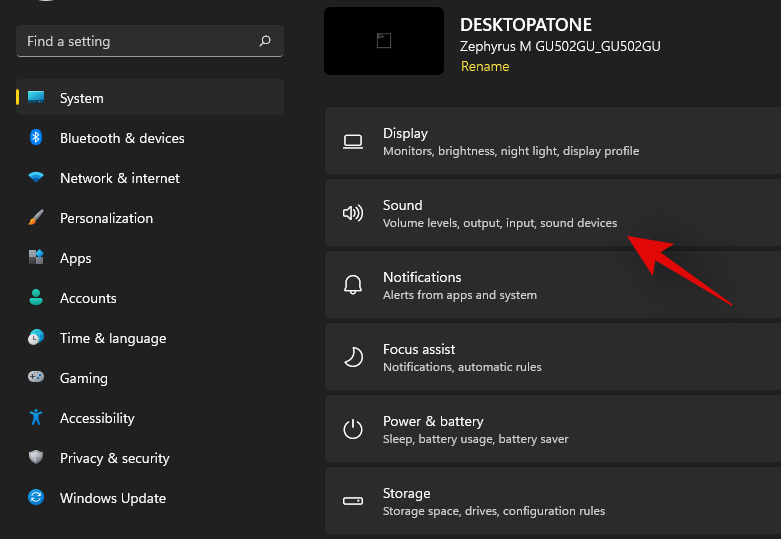
Scroll to the bottom and click on ‘More sound settings’.

Click and switch to the ‘Sounds’ tab at the top.
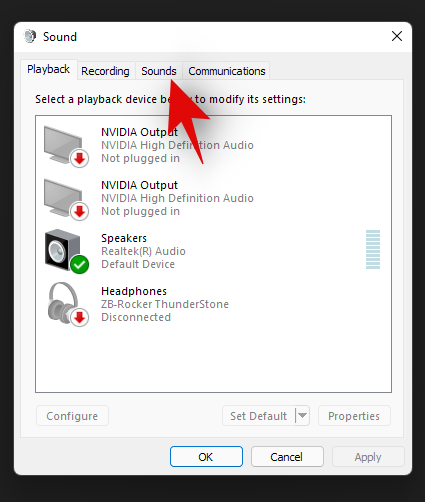
Under ‘Program Events’ scroll the list and find ‘Notifications’. Click on ‘Notifications’ to select it.
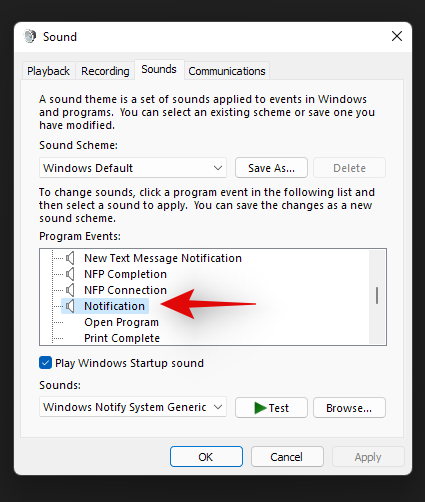
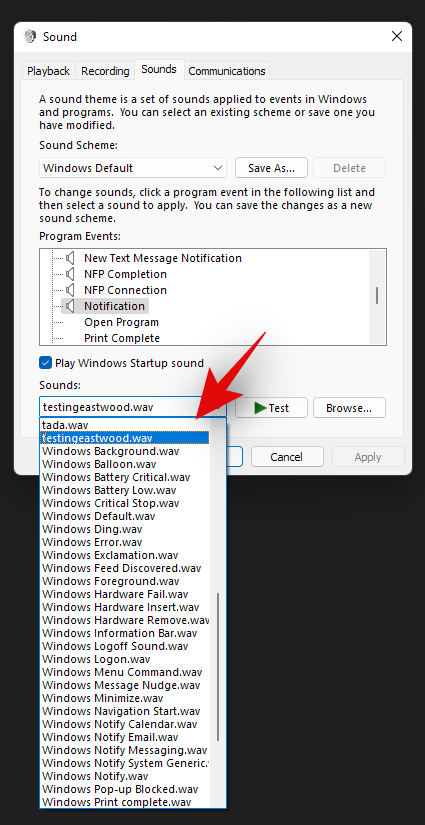
Now click on the drop-down arrow under Sounds and select the .wav file we pasted in the Media folder.
You can click on ‘Test’ to test your custom notification sound.
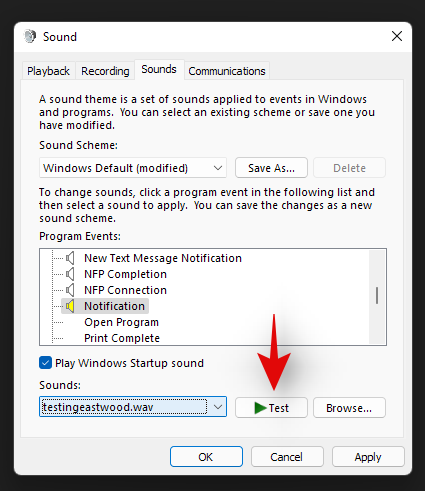
Click on ‘Ok’ to save your changes.
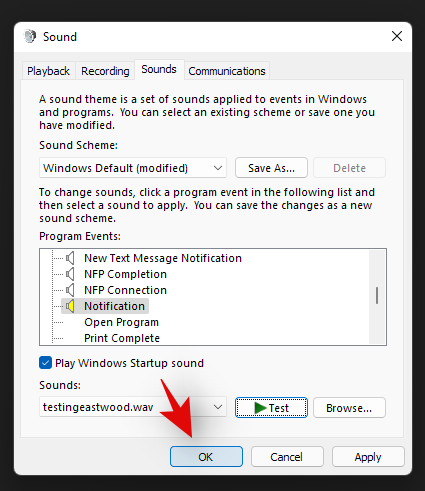
And that’s it! You will now have set a custom sound as your default notification sound in Windows 11.
Distractions from notifications are a huge problem especially when you are into some important work. Using the steps mentioned above, now, you can easily get rid of unnecessary notifications and work peacefully with full concentration.
Related:
Microsoft 장치에서 Apple의 운영 체제를 실행하는 방법을 단계별로 안내하는 가이드를 통해 Windows PC에 macOS를 설치하는 방법을 알아보세요.
스마트폰의 가장 일반적인 기능 중 하나는 스크린샷을 캡처하는 기능입니다. 시간이 지남에 따라 이러한 스크린샷을 찍는 방법이 진화해왔습니다.
Microsoft는 항상 업데이트와 최신 OS 반복을 통해 Windows에 새로운 변경 사항을 가져오려고 노력하는 아주 바쁜 회사입니다. 그러나 주님께서 주시는 것 같이 주님도 거두어 가십니다.
Zoom 회의는 전 세계 수백만 명의 학생과 일하는 전문가의 필수 요소가 되었습니다. Zoom 회의 종료 방법을 배우고 필요한 상황에 맞게 대처하세요.
Microsoft Edge는 문제를 해결하거나 새 릴리스의 버그를 건너뛰기 위해 이전 버전으로 롤백하는 두 가지 방법을 지원합니다. 방법은 다음과 같습니다.
Zoom은 전 세계 기업에서 사용하는 가장 인기 있는 협업 도구 중 하나입니다. 비용 효율적인 회의와 협업을 위해 꼭 필요한 정보를 제공합니다.
Google Meet의 볼륨을 조절하는 방법과 유용한 팁을 제공합니다.
Windows 11에서 창 게임 최적화를 활성화하려면 설정 > 시스템 > 디스플레이 > 그래픽, 기본 그래픽을 열고 기능을 켭니다.
Microsoft Teams는 팀원들과 원활하게 소통하기 위해 카메라를 테스트하는 최고의 방법을 제공합니다. 카메라 문제를 해결하는 방법을 알아보세요.
Windows 10에서 동기화 설정을 활성화 또는 비활성화하거나 개별 동기화 설정을 선택하려면 다음 단계를 사용할 수 있습니다.
Windows 11에서 개발자 모드를 쉽게 활성화할 수 있으며, 개발자용 설정 페이지에서 스위치를 켜는 단계를 안내합니다.
Windows 11에서 오래된 게임을 실행하는 방법에 대한 유용한 팁과 정보를 제공합니다.
Windows 11에서 Android 게임을 플레이하려면 Google Play 게임 또는 Android 플랫폼용 Windows 하위 시스템을 사용할 수 있습니다. 방법은 다음과 같습니다.
Windows 11에서 마우스 오버 시 검색 열기를 활성화하려면 명령 프롬프트(관리자)를 열고 vivetool /enable /id:43572857,43572692 명령을 실행합니다.
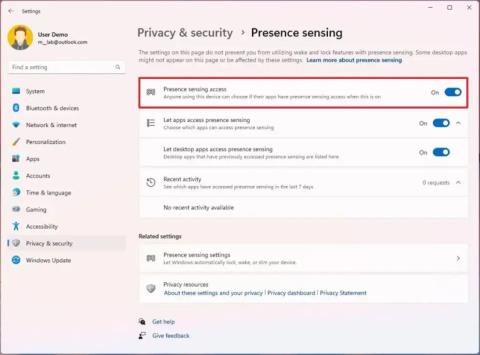
Windows 11에서 존재 감지 설정을 활성화하려면 설정 > 개인 정보 보호 및 보안 > 존재 감지를 열고 기능을 켜십시오.
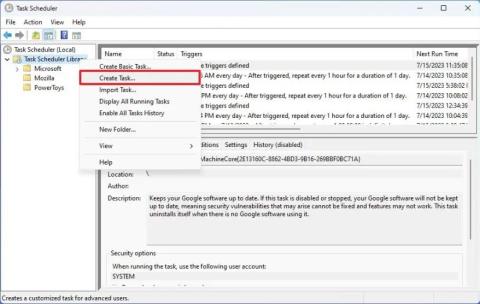
작업 스케줄러에서 숨겨진 상태로 실행되도록 예약된 작업을 구성하려면 작업 일반 설정에서 사용자 로그온 여부에 관계없이 실행을 선택합니다.
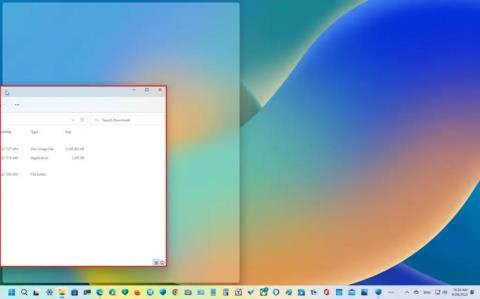
Windows 11에서는 스냅 지원, 레이아웃(최대화 및 상단 화면), 스냅 그룹을 사용하여 키보드 및 마우스를 사용하여 창을 나란히 스냅하는 단계를 제공합니다.
Windows 11에서 작업 관리자 검색 표시줄을 활성화하려면 Vivetool /enable /id:39420424 명령을 사용하고 컴퓨터를 다시 시작하십시오.
Windows 11에서 새로운 제품 키 변경 UI를 활성화하려면 다음 vivetool /enable /id:36390579 및 vivetool /enable /id:42733866 명령을 실행하세요.
Windows 11에서 게임 성능을 향상하려면 메모리 무결성 및 가상 머신 플랫폼을 비활성화하세요. 단계는 다음과 같습니다.
Windows 11 보안 센터 서비스가 사라져서 어려움을 겪고 계신가요? 안전하고 간편하게 PC를 보호하고 서비스를 복원할 수 있는 검증된 단계별 해결 방법을 알아보세요. 최적의 보호를 위해 최신 방법으로 업데이트되었습니다.
Windows 11에서 Stream Deck 앱이 열리지 않아 어려움을 겪고 계신가요? Elgato Stream Deck을 다시 원활하게 실행할 수 있는 검증된 단계별 해결 방법을 알아보세요. 기술적인 전문 지식은 필요하지 않습니다!
Windows 11에서 내장 마이크 소리가 먹먹하게 들리시나요? 검증된 단계별 해결 방법을 통해 깨끗한 음질을 손쉽게 복원해 보세요. 지금 바로 마이크를 완벽하게 작동하도록 만들어 보세요!
Windows 11에서 코어 격리 기능이 켜지지 않아 어려움을 겪고 계신가요? 이 중요한 보안 기능을 활성화하고, 일반적인 문제를 해결하고, PC 성능을 향상시키는 단계별 해결 방법을 알아보세요.
Windows 11에서 느린 성능 때문에 어려움을 겪고 계신가요? PC 성능 향상을 위한 최적의 성능 플랜에 대한 단계별 해결 방법을 알아보세요.
Windows 11에서 wget 및 curl 명령 오류로 어려움을 겪고 계신가요? 이 단계별 가이드에서는 일반적인 문제, 빠른 해결 방법, 그리고 효율적인 문제 해결을 위한 전문가 팁을 다룹니다. 지금 바로 다운로드 및 API 호출을 다시 원활하게 실행하세요.
Windows 11에서 클래식 셸 또는 Start11 오류가 발생하여 어려움을 겪고 계신가요? 충돌, 호환성 문제 등을 해결하고 사용자 지정 시작 메뉴를 다시 사용할 수 있도록 단계별 해결 방법을 알아보세요. 최신 문제 해결 팁이 포함되어 있습니다.
Windows 11 DirectAccess 연결 오류로 어려움을 겪고 계신가요? 원활한 VPN 접속을 복원하고 생산성을 향상시키는 검증된 단계별 해결 방법을 확인해 보세요. 번거로움 없는 네트워크를 위한 최신 솔루션이 업데이트되었습니다.
윈도우 11 속도가 느려서 불편하신가요? 레지스트리 용량 증가 문제를 해결하고 속도를 최적화하여 PC 성능을 되찾는 검증된 방법을 알아보세요.
Windows 11 시작 로고 화면에서 멈춰서 답답하신가요? 2026년 버전을 위한 이 종합적인 문제 해결 가이드는 안전 모드부터 고급 복구까지 검증된 해결 방법을 제공하여 문제를 빠르고 간편하게 해결할 수 있도록 도와줍니다.
