Windows 11에서 시스템 복원을 수행하는 단계
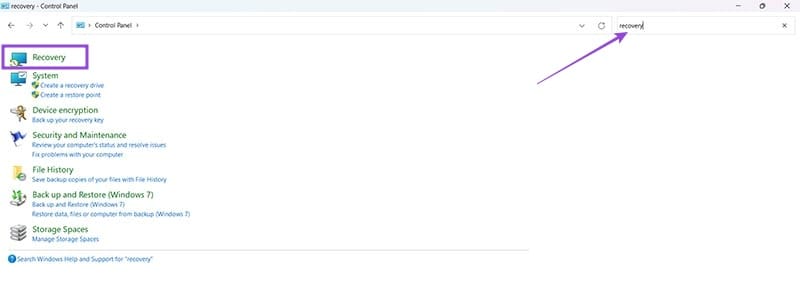
오류나 충돌이 발생하는 경우, Windows 11에서 시스템 복원을 수행하여 장치를 이전 버전으로 롤백하는 단계를 따르세요.

ShareX는 화면을 캡처하고 PC에서 스크린샷을 편집 및 공유하는 과정을 편리하게 만들어주는 무료 오픈 소스 생산성 도구입니다. 다양한 기능을 갖추고 화면의 모든 것을 캡처할 수 있는 가벼운 소프트웨어인 ShareX는 Windows PC에서 스크린샷을 캡처하거나 편집해야 하는 모든 사람을 위한 훌륭한 도구입니다.
효율성을 극대화하기 위해 PC에서 ShareX를 설정하고 사용하는 방법은 다음과 같습니다.
PC에 ShareX를 다운로드하고 설치하는 방법은 다음과 같습니다.
ShareX는 공식 ShareX 웹사이트에서 다운로드할 수 있습니다.
ShareX를 다운로드하려면 PC의 웹 브라우저에서 위에 언급된 링크를 방문하고 다음 단계를 따르십시오.
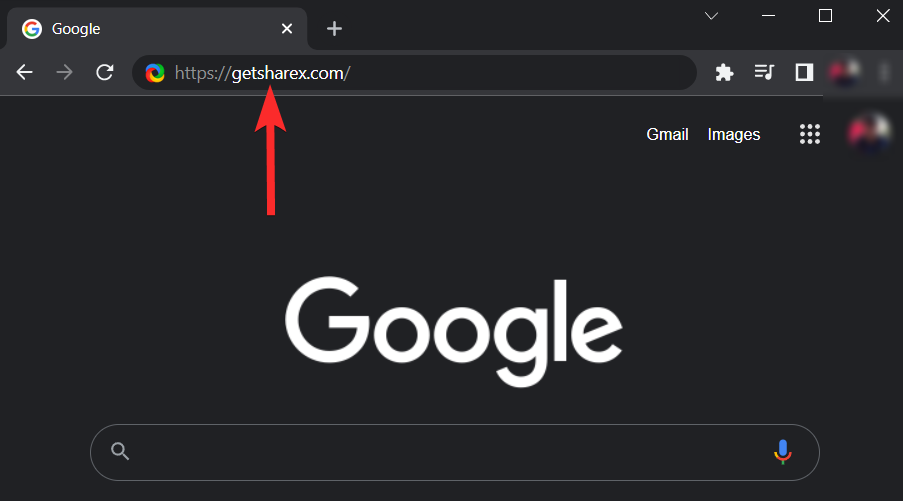
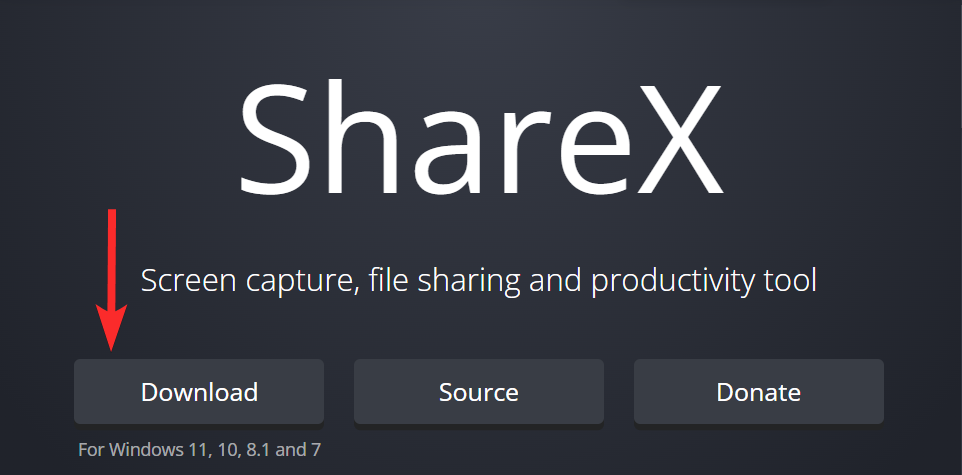
ShareX 웹사이트에서 다운로드 옵션을 클릭하세요.
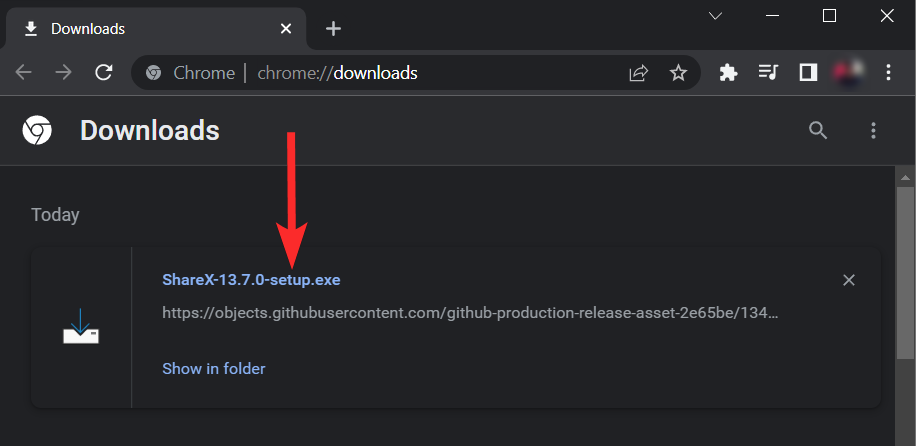
이제 ShareX 설정 파일이 PC에 다운로드되었습니다. 다운로드 위치에서 새로 다운로드한 ShareX 설정 파일을 열고 이 설정 파일을 관리자로 실행하라는 UAC 프롬프트를 확인합니다.
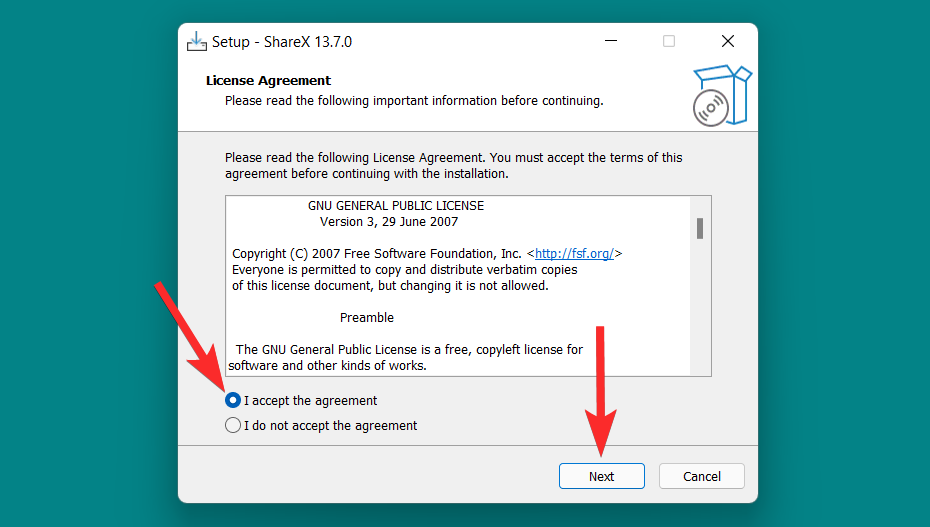
ShareX 설정에서 동의함 확인란이 선택되어 있는지 확인하고 다음 을 클릭하세요 .
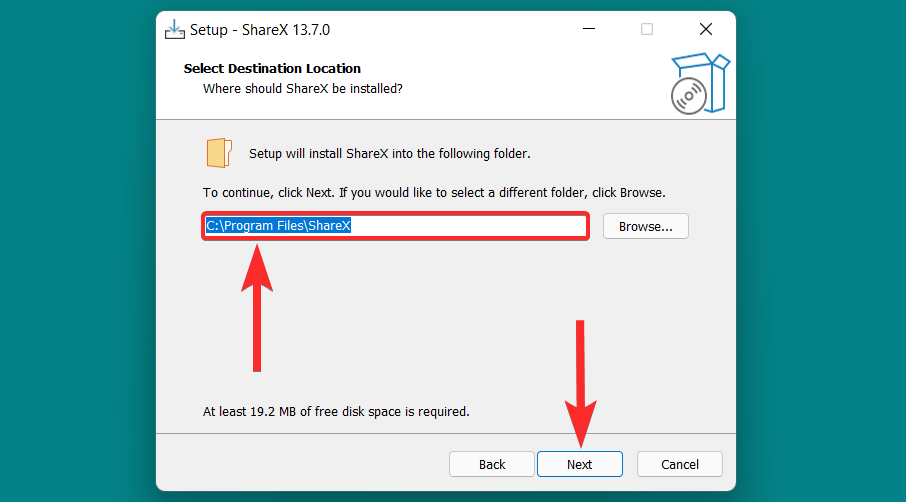
ShareX를 설치할 대상 폴더를 선택하고 다음을 클릭하세요 .
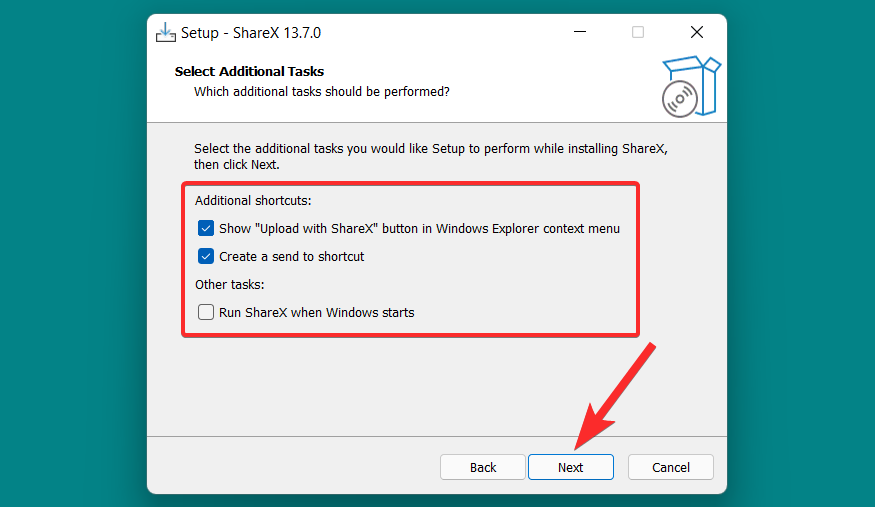
원하는 대로 추가 옵션을 선택하고 다음을 클릭하세요 .
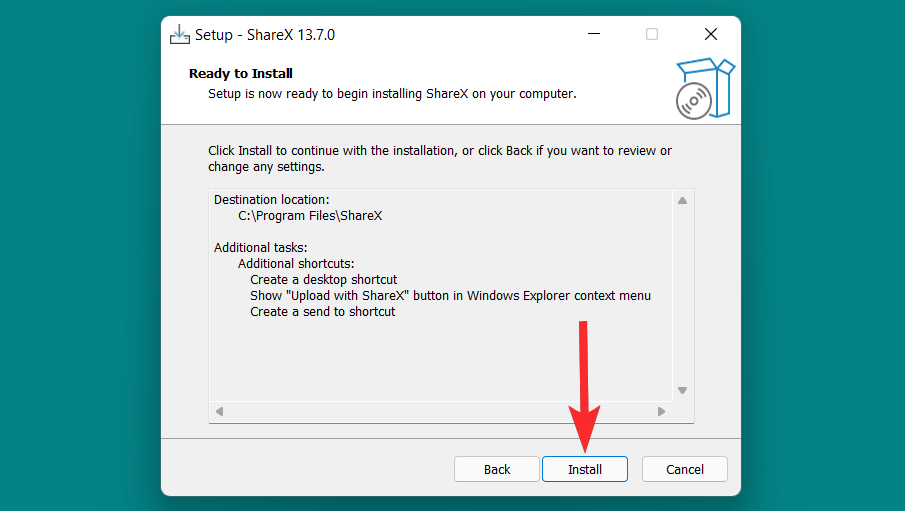
컴퓨터에 ShareX 설치를 시작하려면 설치를 클릭하세요 .
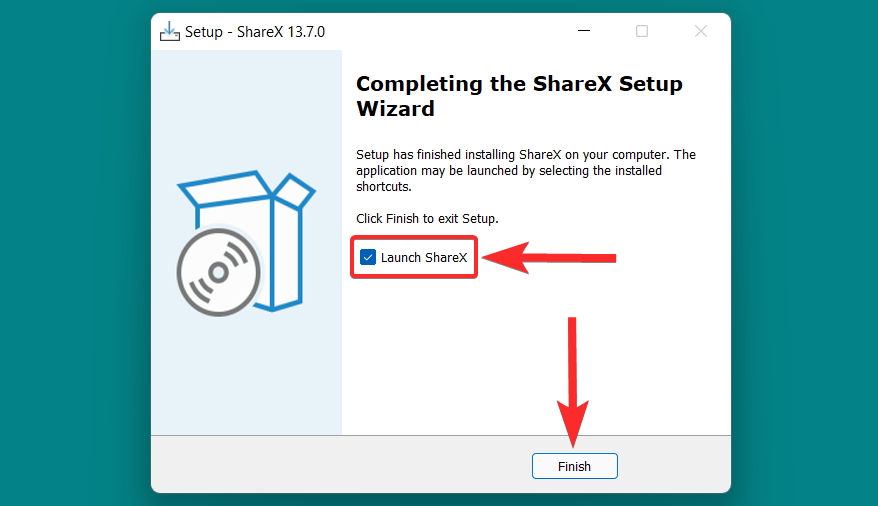
설치가 완료되면 마침을 클릭하세요 .
시작하기 전에
ShareX가 다른 유사한 화면 캡처 소프트웨어와 다른 점은 접근성과 스크린샷 생성의 지루한 프로세스 속도를 높이는 데 어떻게 도움이 되는지입니다. 그러나 ShareX는 기능이 무궁무진하므로 ShareX 사용 초기에는 모든 옵션을 제대로 파악하기 어려울 수 있습니다.
필요에 따라 해당 기능을 찾아서 사용할 수 있도록 스크린샷을 찍기 전에 다음 기능을 구성하는 것이 좋습니다. 각각을 간단히 살펴보겠습니다.
팁 1: 커서 숨기기
PC에서 ShareX를 엽니다.

ShareX에서 작업 설정을 클릭합니다 .
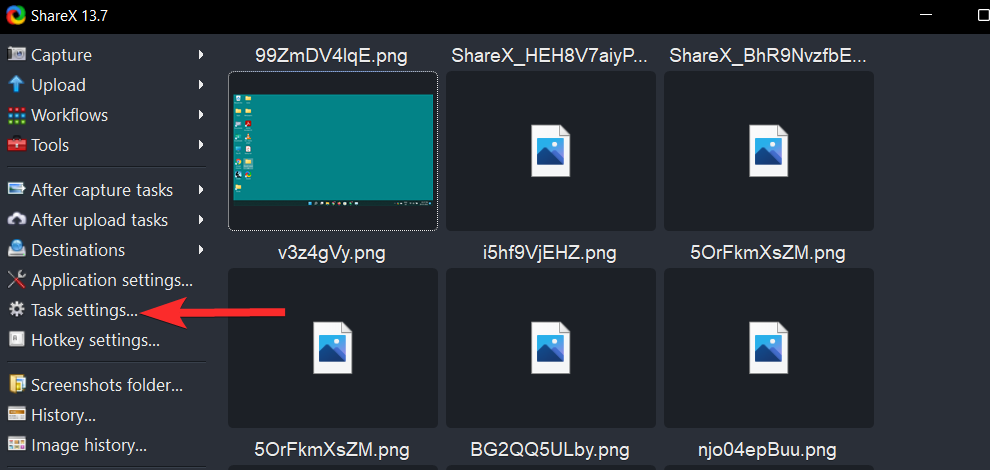
작업 설정에서 캡처 옵션을 클릭하세요.
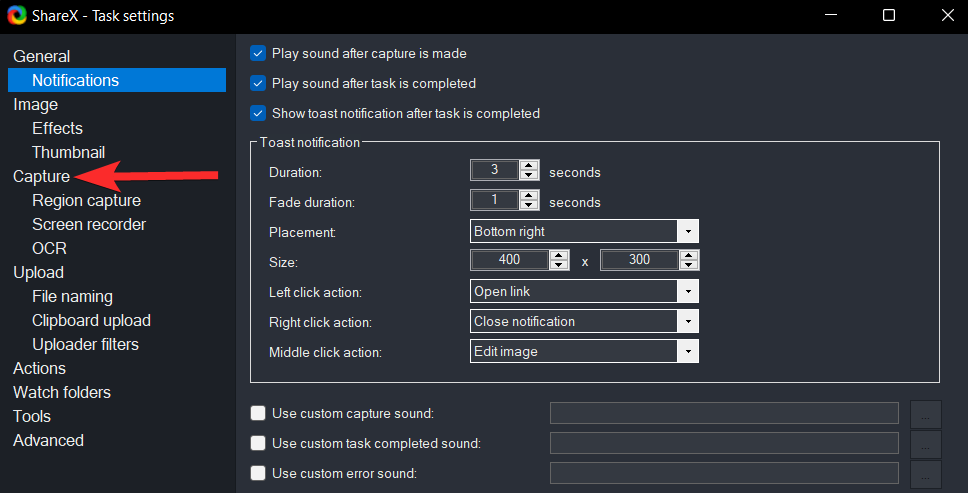
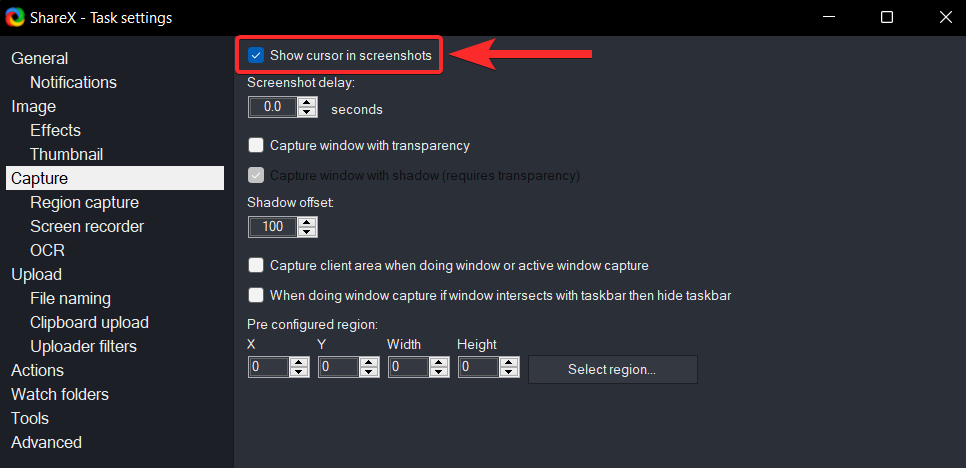
스크린샷에 커서 표시 확인란을 클릭하여 선택을 취소합니다.
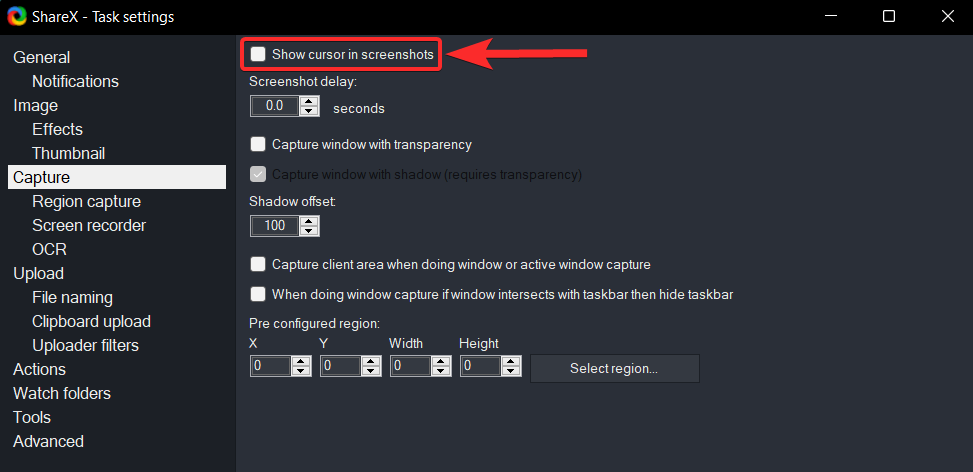
스크린샷에 커서 표시 확인란이 선택 해제되어 있는지 확인하세요 .
ShareX는 Windows 탐색기 상황에 맞는 메뉴(오른쪽 클릭 메뉴)에 전용 ShareX 편집 버튼을 추가할 수 있는 옵션을 제공합니다 . 그런 다음 이 버튼을 사용하면 ShareX 도구를 별도로 열지 않고도 ShareX 이미지 편집기에서 직접 이미지를 열 수 있습니다.
PC의 ShareX 도구에서 이 옵션이 활성화되어 있는지 확인해 보겠습니다.
PC에서 ShareX를 엽니다.

ShareX에서 응용 프로그램 설정을 클릭하세요 .
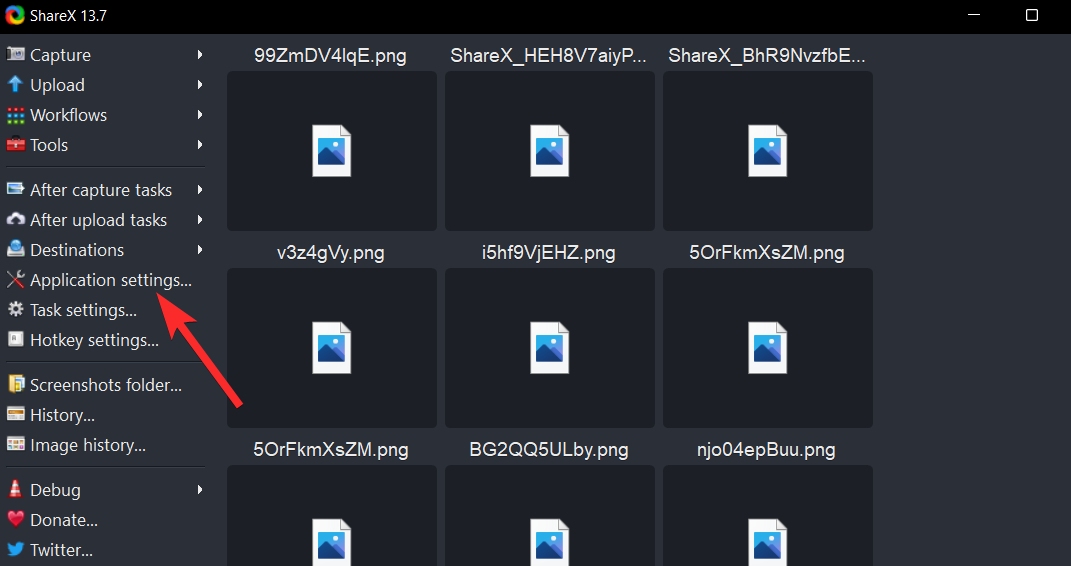
애플리케이션 설정에서 통합 옵션을 클릭하세요.
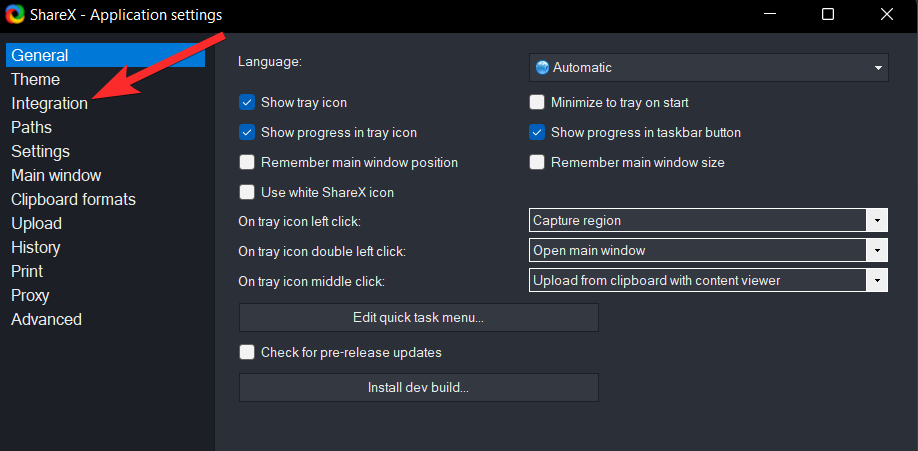
통합 설정에서 Windows 탐색기 컨텍스트 메뉴에 "ShareX로 편집" 버튼 표시 확인란을 클릭하여 선택합니다.
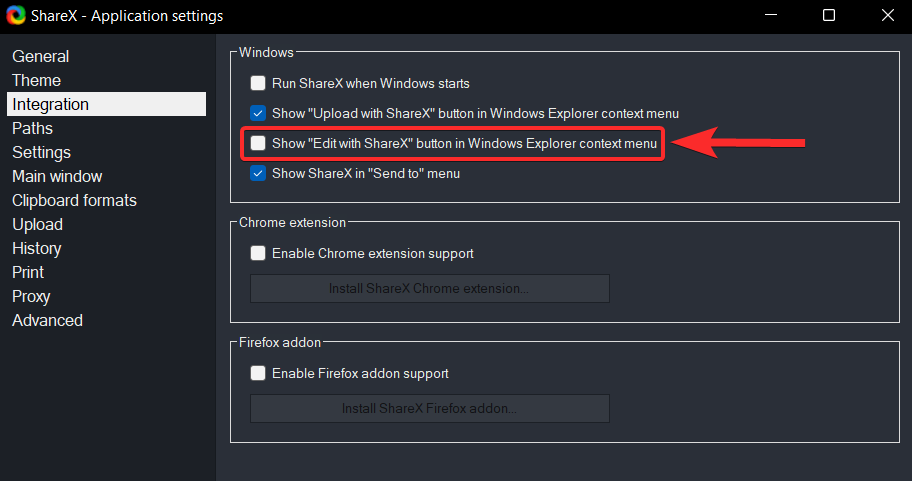
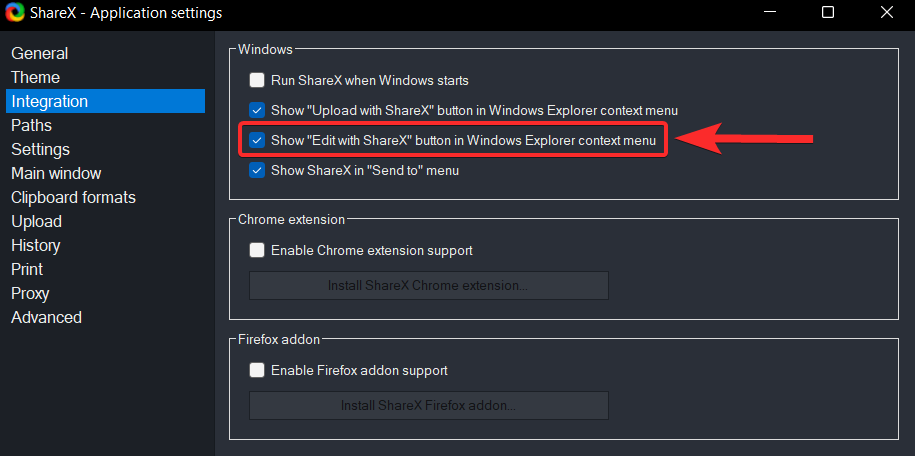
Windows 탐색기 상황에 맞는 메뉴 확인란에서 ShareX로 편집 표시 버튼이 선택되어 있는지 확인하세요 .
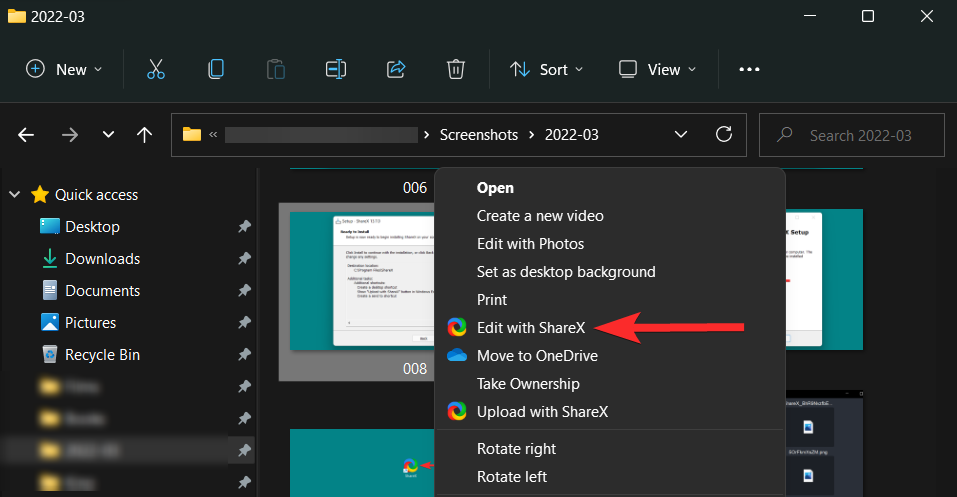
이 옵션을 보려면 이미지를 마우스 오른쪽 버튼으로 클릭하고 더보기 옵션을 클릭하세요 . 그러면 상황에 맞는 메뉴에서 이 옵션을 볼 수 있습니다.
팁 3: 대상 폴더 설정
로컬 대상 폴더를 설정하려면 왼쪽 패널에서 애플리케이션 설정 아이콘을 클릭하세요.
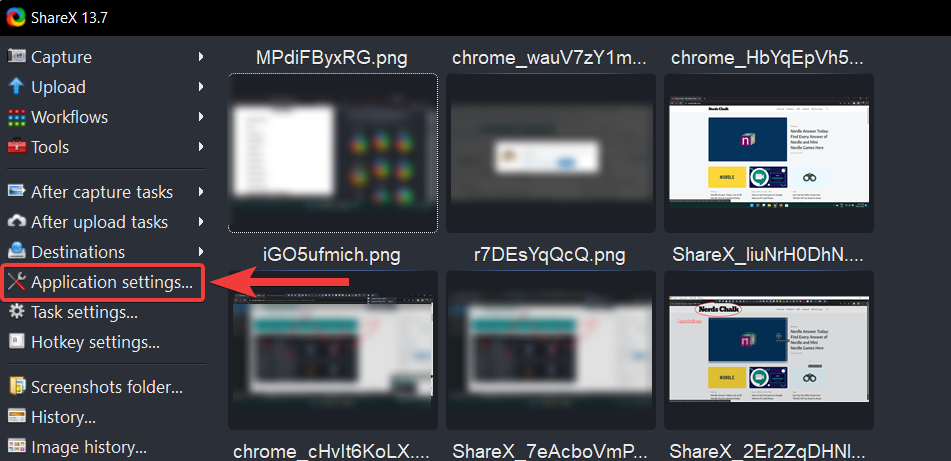
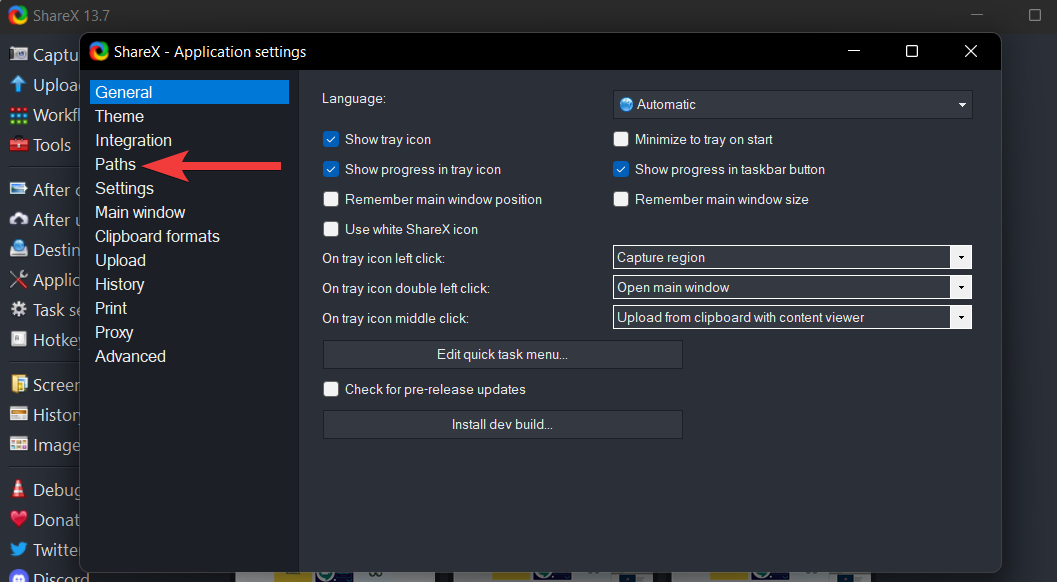
응용 프로그램 설정에서 경로 옵션을 클릭합니다.
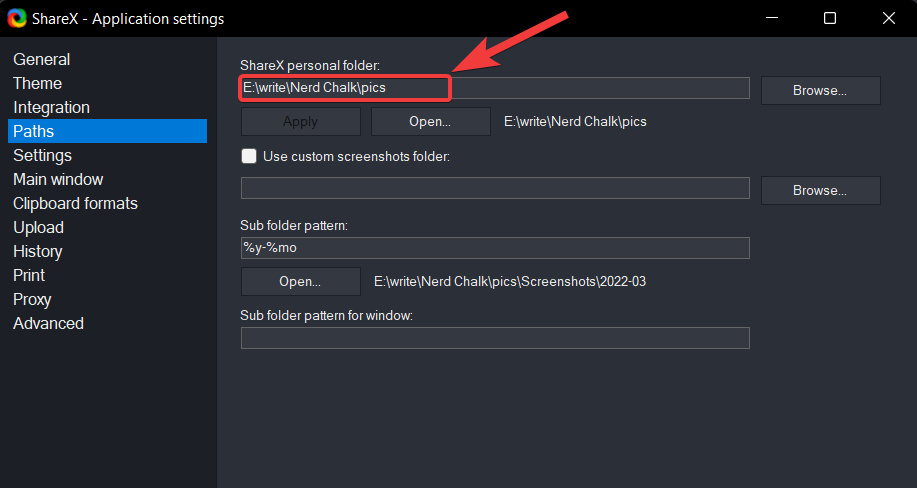
경로 섹션 에서는 ShareX를 사용하여 캡처한 모든 스크린샷이 저장되는 주소를 볼 수 있습니다.
이 주소를 변경하려면 찾아보기 를 클릭하세요 .
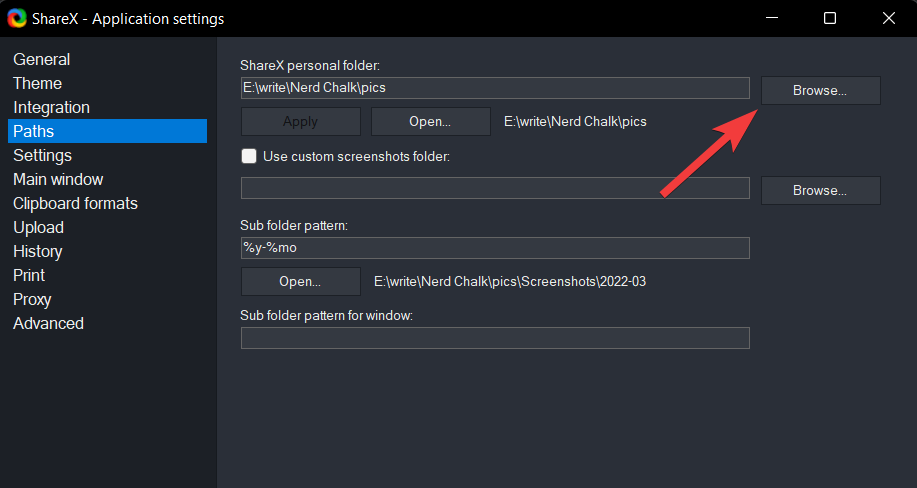
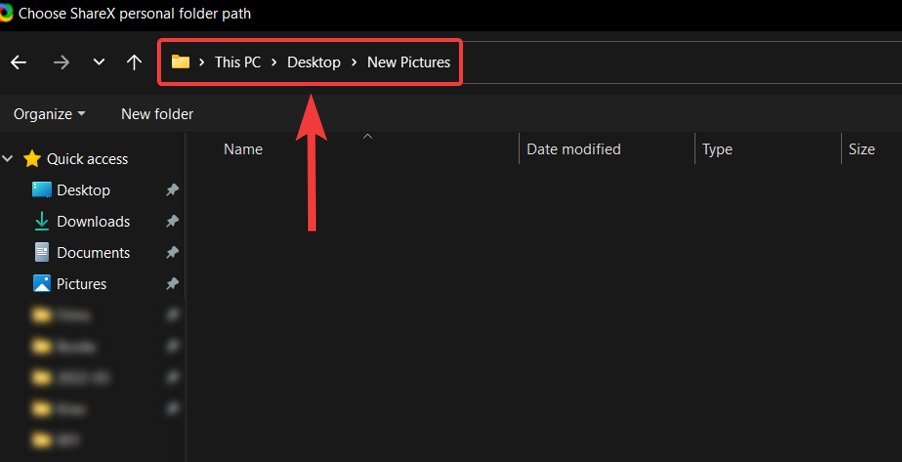
ShareX 개인 폴더 경로 선택 창 에서 새 대상 폴더로 이동한 후 화면 오른쪽 하단에 있는 폴더 선택 옵션을 클릭하세요.
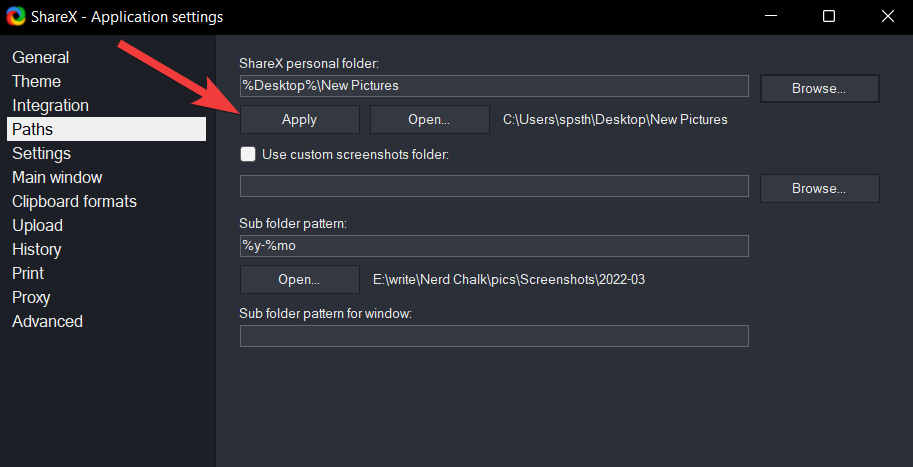
이제 적용을 클릭하여 변경 사항을 저장하세요.
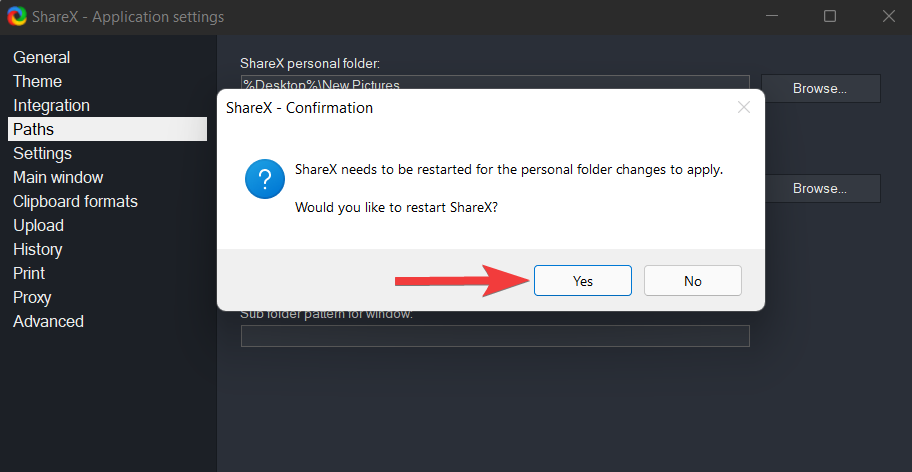
다음 프롬프트에서 예를 클릭하여 ShareX를 다시 시작하고 새 대상 폴더를 마무리합니다.
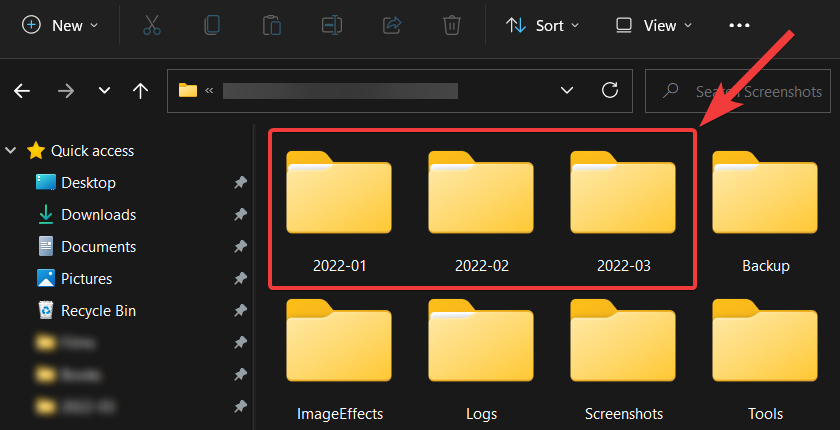
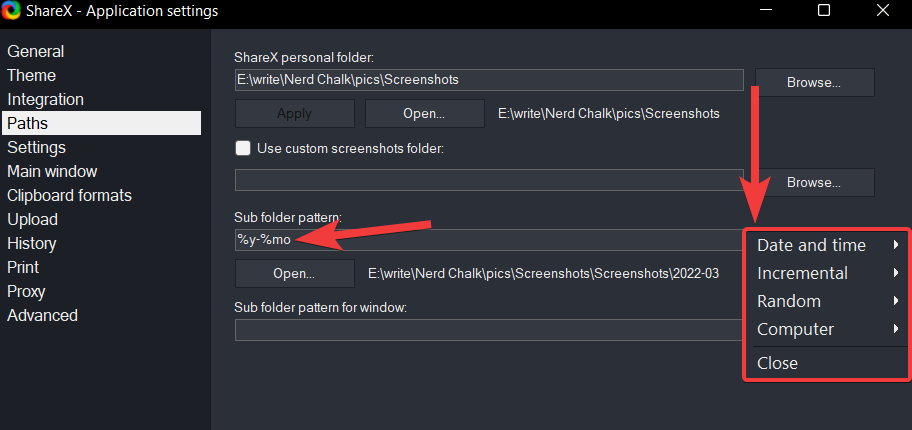
ShareX는 대상 폴더에 하위 폴더를 추가로 생성한다는 점에 유의해야 합니다. 이러한 하위 폴더의 기본 형식은 연-월입니다. 예를 들어 2022-03 등입니다.
원하는 경우 하위 폴더 형식을 변경할 수도 있습니다. 이렇게 하려면 원래 하위 폴더 패턴을 클릭하고 패턴에 포함할 매개변수를 선택하기만 하면 됩니다.
이제 ShareX 이미지 편집기를 사용하여 스크린샷을 편집할 수 있습니다.
ShareX의 모든 기능을 사용하려면 이에 따라 PC에 단축키를 설정해야 합니다. 이제 Windows 11에는 PrtSc 키에 대한 전용 커널 맵이 있으므로 ShareX용 단축키와 동일한 것을 사용할 수 없습니다. 먼저 단축키를 설정한 다음 이를 사용하여 화면을 캡처하는 방법을 살펴보겠습니다.
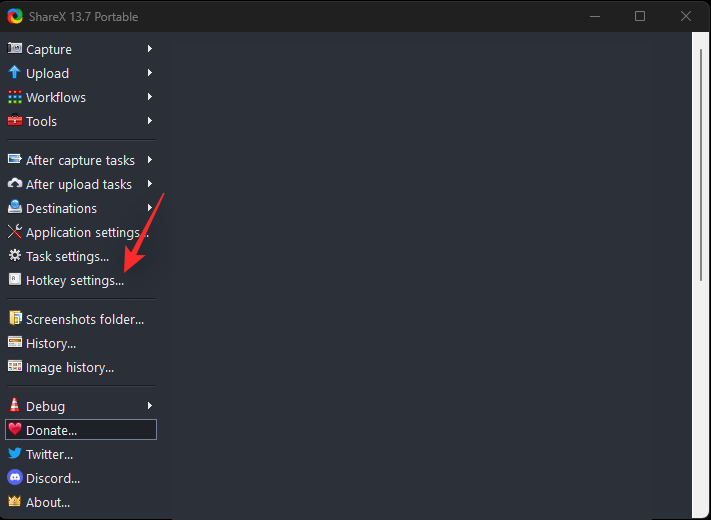
ShareX를 열고 왼쪽의 단축키 설정을 클릭하세요.
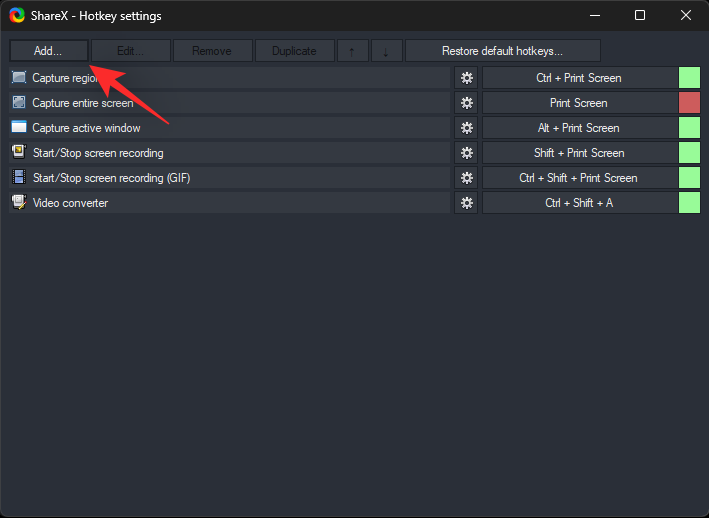
이제 단축키를 구성할 수 있는 새 창이 표시됩니다. 먼저 ShareX 내에서 설정할 모든 작업에 단축키를 추가하는 것부터 시작해 보겠습니다. 기본적으로 다음 단축키 옵션이 이미 존재합니다.
추가 항목을 추가하려면 상단의 추가를 클릭하세요 .
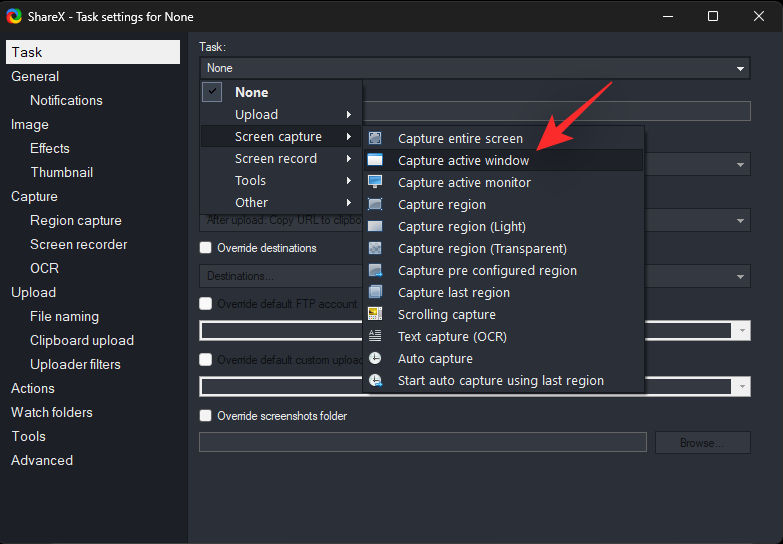
작업: 드롭다운 메뉴를 클릭 하고 화면 캡처 > 활성 창 캡처를 선택합니다 .
X를 눌러 대화 상자를 닫습니다.
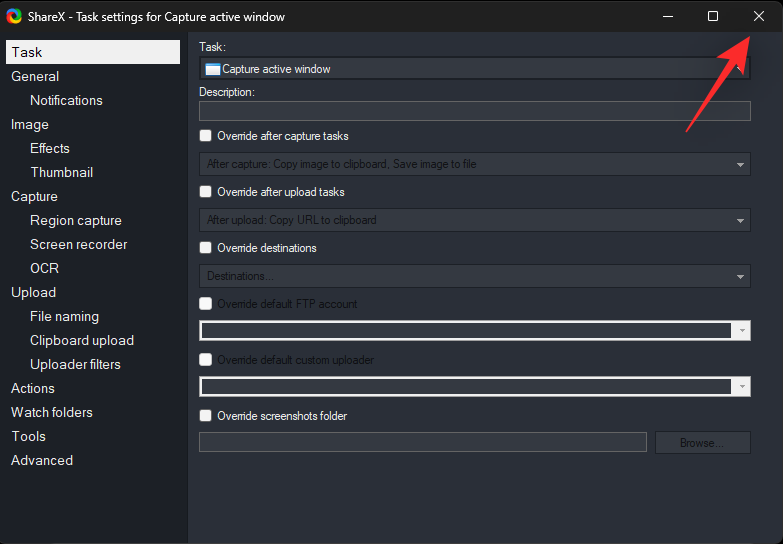
마찬가지로 화면 캡처 아래에 다음 작업 모두에 대한 목록을 추가합니다 .
마찬가지로 화면 레코드 아래에 다음 작업을 추가합니다 .
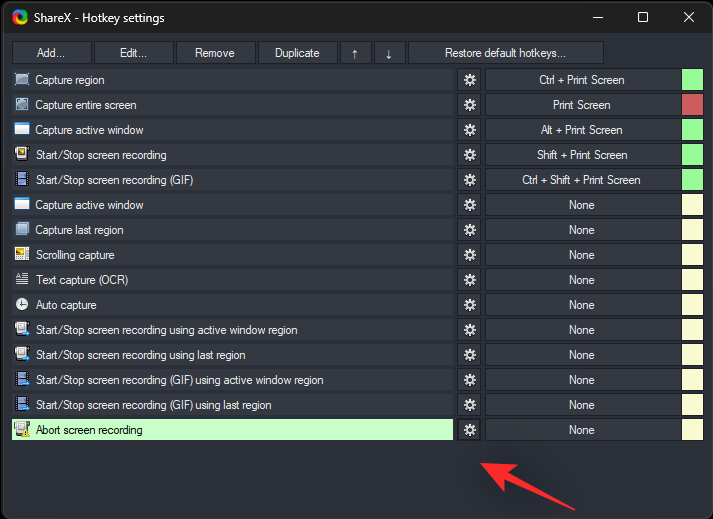
이제 Tools 아래에 있는 다음 작업을 추가하세요 .
마지막으로 기타 아래에 있는 다음 작업을 추가하세요 .
이러한 작업을 모두 추가한 후에는 단축키를 모두 한 번에 구성할 수 있습니다. 추가한 첫 번째 작업인 활성 창 캡처 외에 없음을 클릭하여 시작합니다 .
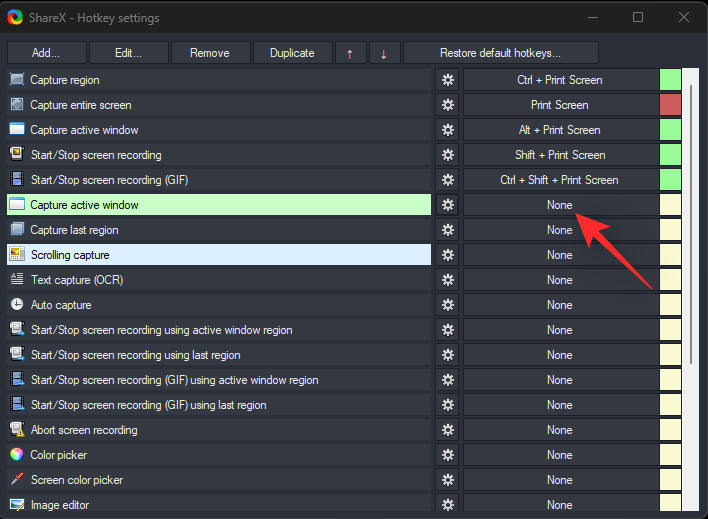
이제 단축키 선택이라는 텍스트와 함께 옵션이 녹색으로 바뀌는 것을 볼 수 있습니다 . 이 작업에 대한 단축키를 설정하려면 키보드에서 원하는 키 조합을 누르세요.
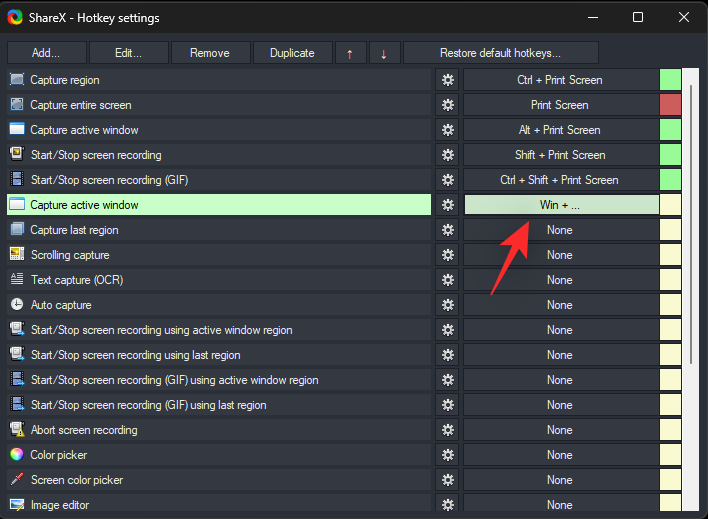
마찬가지로 이전에 추가한 모든 작업에 대한 단축키를 설정합니다. ShareX를 처음 시작할 때 소프트웨어가 레지스트리 설정에서 단축키를 구성할 수 없다는 오류 메시지를 받은 경우 기본 목록에 대한 기본 단축키도 변경하는 것이 좋습니다.
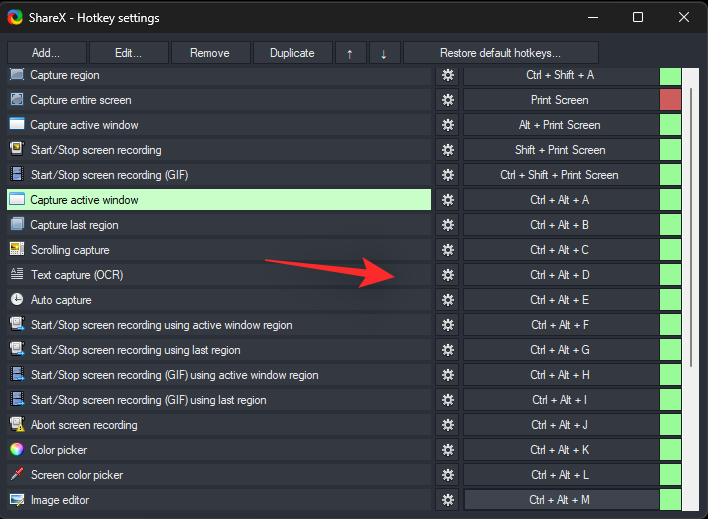
작업이 완료되면 아래 단축키와 가이드를 사용하여 PC에서 스크린샷을 효율적으로 캡처할 수 있습니다.
ShareX를 사용하여 현재 요구 사항에 따라 다양한 방법으로 스크린샷을 캡처할 수 있습니다. 현재 요구사항에 따라 아래 관련 섹션 중 하나를 따르세요. 시작하자.
방법 1: 전체 화면 스크린샷
전체 화면 스크린샷을 캡처하려면 이전에 동일한 전용 단축키를 사용하십시오. 스크린샷이 캡처되었음을 나타내기 위해 화면이 한 번 깜박이며 이제 스크린샷 폴더에서 동일한 내용을 찾을 수 있습니다. 이 가이드의 시작 부분에서 이 폴더의 위치를 사용자 정의했어야 합니다.
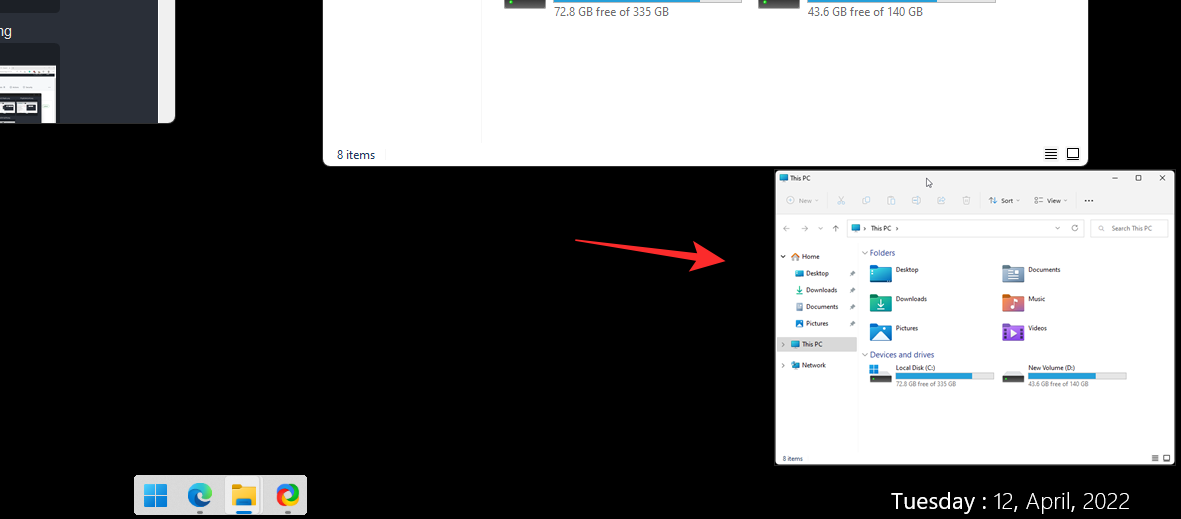
이 외에도 ShareX 앱 자체를 사용하여 전체 화면 스크린샷을 캡처할 수도 있습니다.
또는 전체 컴퓨터 화면을 캡처하려면 ShareX 도구에서 캡처 > 전체 화면을 클릭하세요.
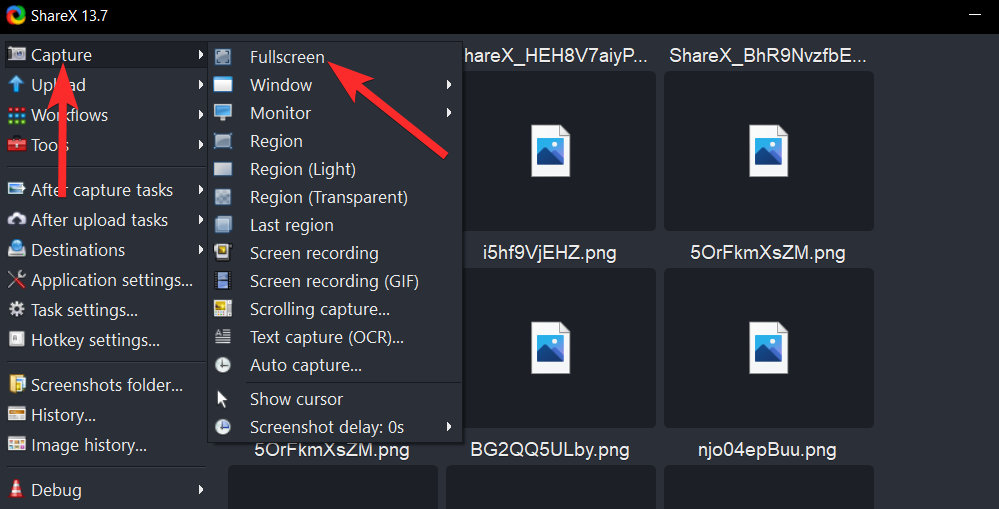
이렇게 하면 전체 화면이 캡처되어 대상 폴더에 저장됩니다.
방법 2: 활성 창 캡처
앞서 설정한 단축키를 이용하여 활성 창 캡처를 실행합니다. 캡처하려는 창이 화면에만 표시되지 않고 현재 모니터에서 활성화되어 있는지 확인하세요.
이제 스크린샷이 전용 폴더에 저장됩니다. ShareX를 사용하여 활성 창 스크린샷을 캡처할 수도 있습니다.
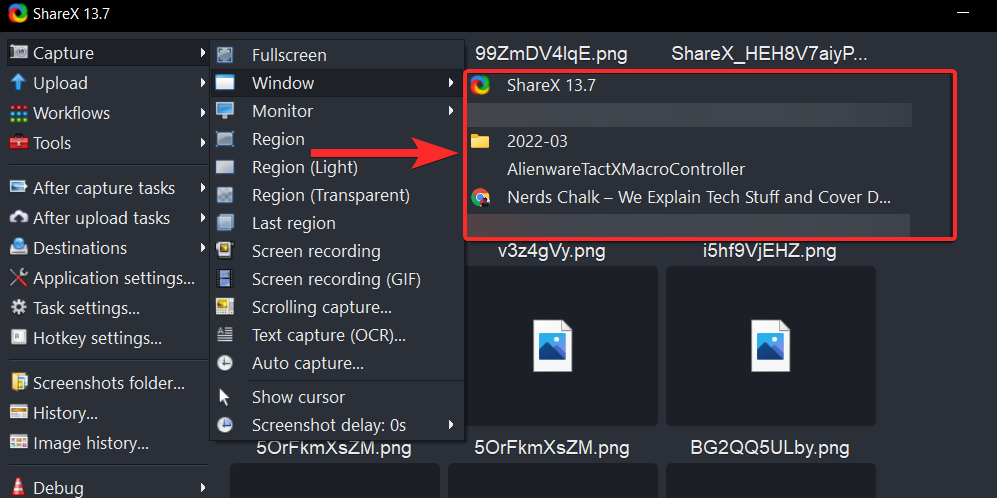
또는 PC에서 실행 중인 활성 창 중 하나를 캡처하려면 ShareX 도구에서 캡처 > 창을 선택하세요.
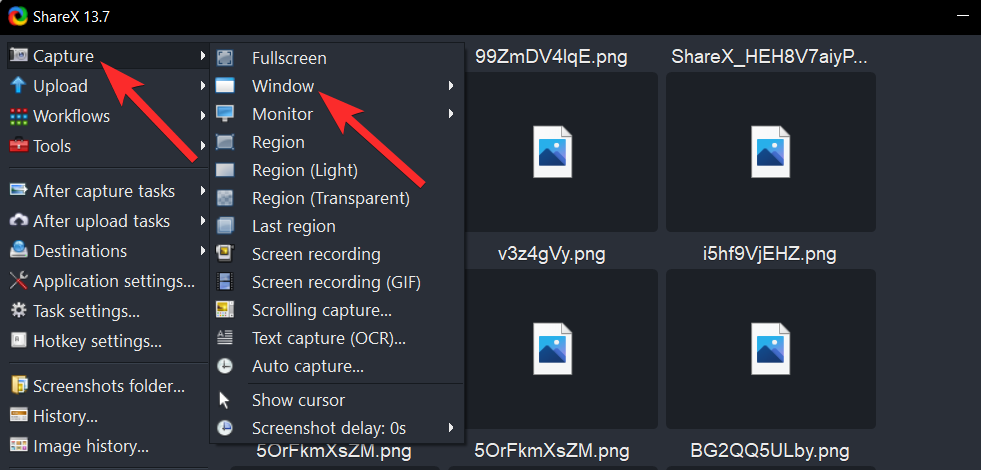
스크린샷을 찍고 싶은 창을 선택하고 클릭하세요.
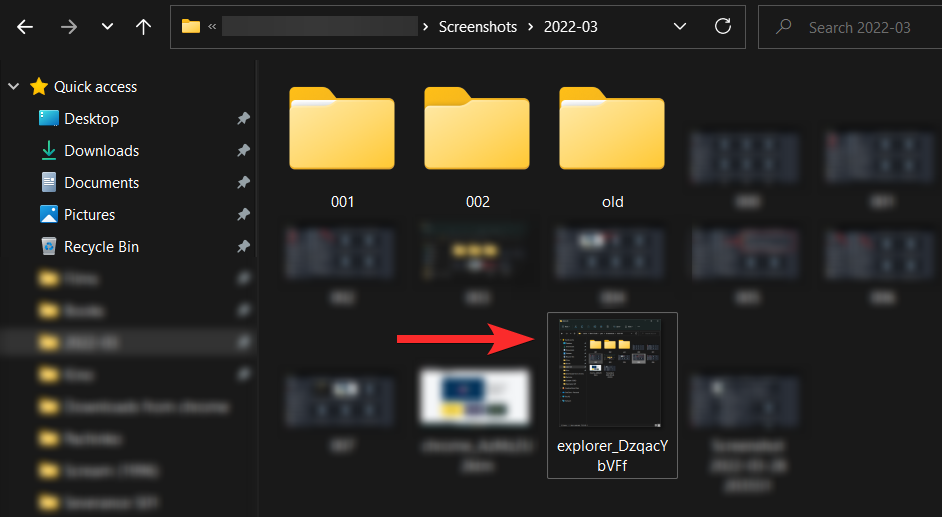
대상 폴더에서도 동일한 내용을 찾을 수 있습니다.
ShareX 도구 자체에서도 이 스크린샷을 찾을 수 있습니다.
방법 3: 모니터 캡처
모니터 캡처는 다중 모니터 설정이 있는 경우 큰 이점이 되는 ShareX의 훌륭한 기능입니다.
키보드의 전용 단축키를 사용하여 시작 하고 동일한 영역을 클릭하여 캡처하려는 모니터를 선택하십시오.
이제 스크린샷이 캡처되어 앞서 구성한 전용 스크린샷 폴더에 저장됩니다. ShareX 앱을 사용하여 설정에서 개별 모니터를 캡처할 수도 있습니다.
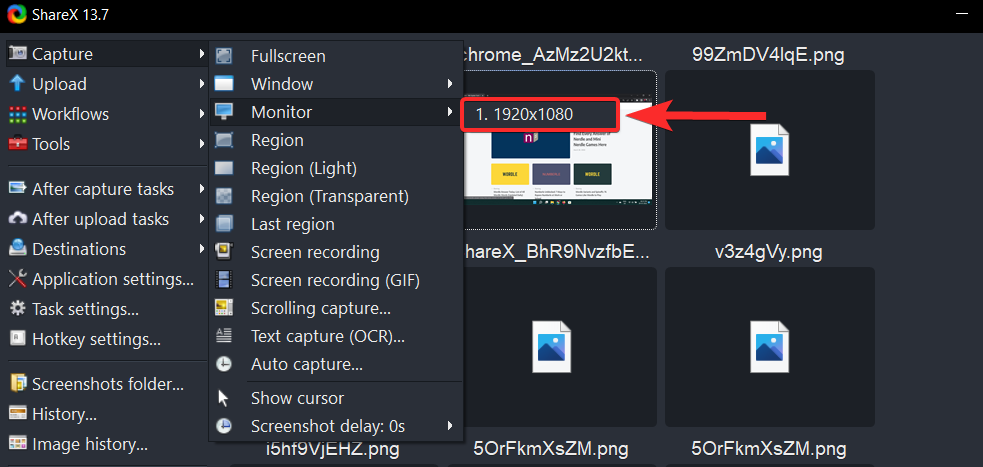
또는 스크린샷을 찍을 모니터를 선택하려면 ShareX 도구에서 캡처 > 모니터를 선택하세요.
스크린샷을 찍고 싶은 모니터를 선택하고 클릭하세요.
그러면 선택한 모니터의 스크린샷이 캡처되어 대상 폴더에 저장됩니다.
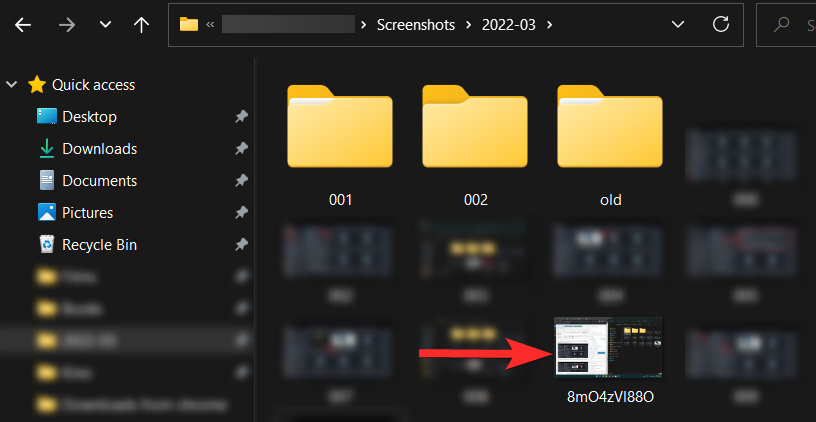
방법 4: 지역 캡처
ShareX에서 영역 캡처 도구를 활성화하려면 앞서 설정한 단축키를 사용하세요. 이 도구는 자동 캡처 기능을 사용하여 경계를 기준으로 캡처하려는 영역을 지능적으로 선택합니다. 이를 활용하여 클릭하여 캡처하거나 화면의 다른 부분을 클릭하고 드래그하여 영역을 수동으로 캡처할 수 있습니다.
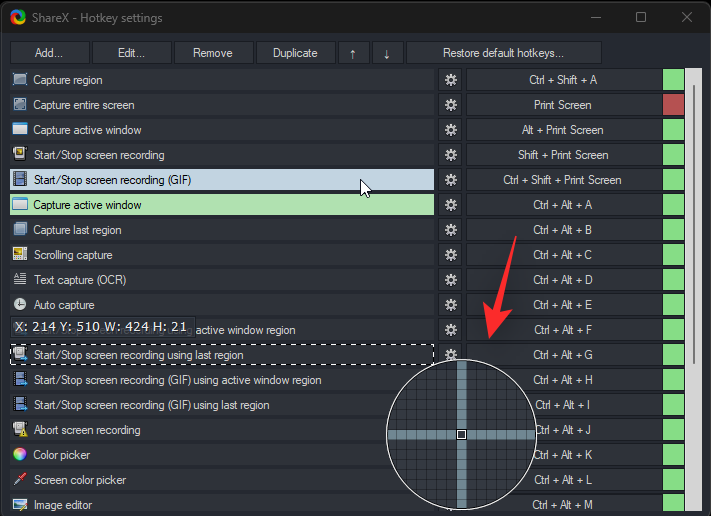
화면에서 클릭하고 선택하여 원하는 영역을 캡처하세요. LMB를 놓으면 선택한 영역이 자동으로 캡처되어 스크린샷 폴더에 저장됩니다.
ShareX 앱을 사용하여 화면의 영역을 캡처하는 방법은 다음과 같습니다.
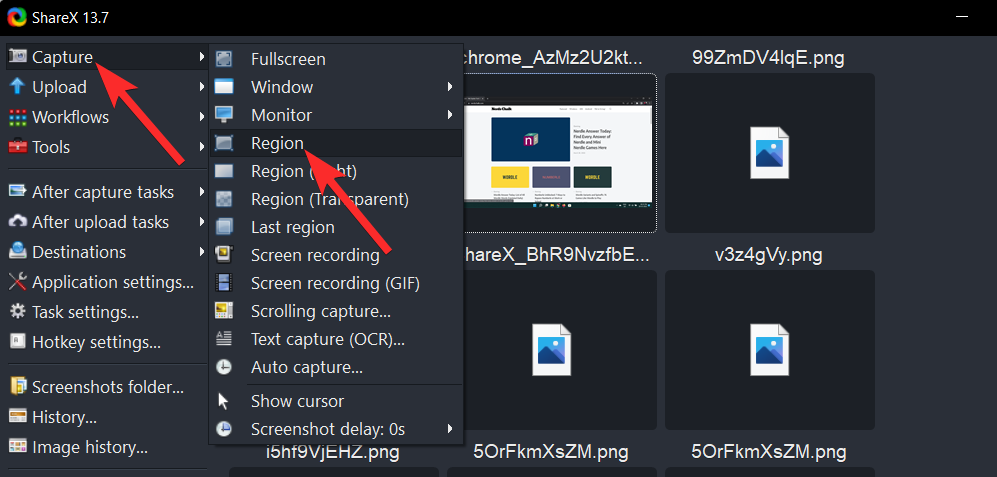
또는 사용자 정의 선택 영역을 캡처하려면 ShareX 도구에서 캡처 > 영역을 선택합니다.
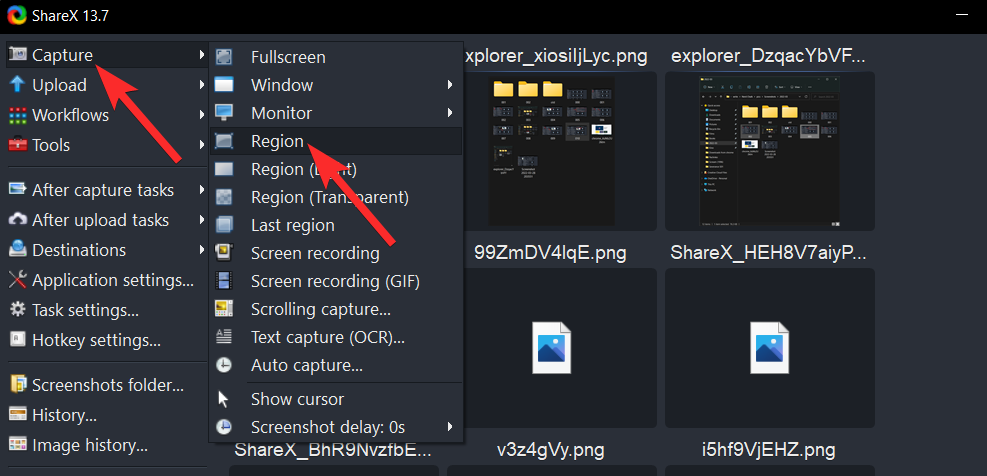
위의 단축키와 유사하게 도구는 자동으로 활성 영역을 선택하려고 시도합니다. 캡처하려는 영역을 수동 또는 자동으로 선택하면 선택한 영역이 스크린샷 폴더에 저장됩니다.
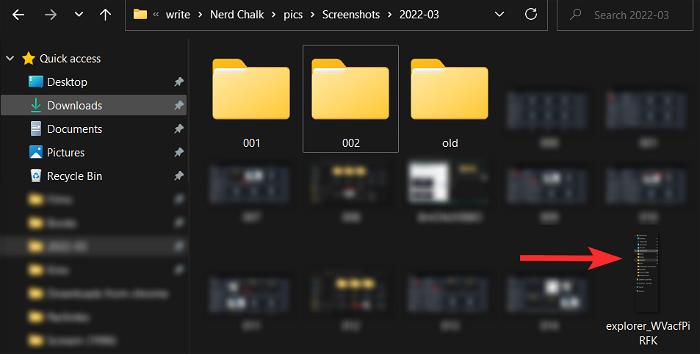
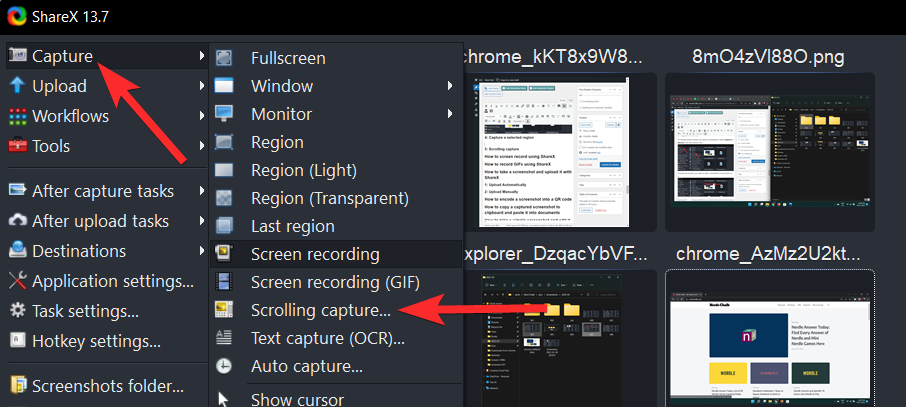
방법 5: 스크롤 화면 캡처
스크롤 캡처를 시작하려면 앞서 설정한 전용 단축키를 사용하세요. 그러면 캡처 도구가 실행되고 해당 영역을 클릭하거나 수동으로 선택하여 캡처하려는 문서나 웹페이지를 선택합니다.
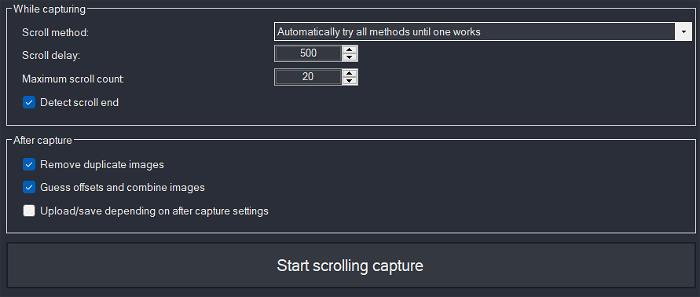
이제 스크롤링 캡처 옵션이 표시됩니다. 우리는 대부분을 그대로 두고 최대 스크롤 수 에 초점을 맞추고 싶습니다 . 먼저 문서 길이를 추정하고 그에 따라 숫자를 입력하세요.
이제 현재 요구 사항에 따라 캡처 후 옵션을 구성하십시오. 무엇을 해야 할지 확실하지 않은 경우에는 모두 선택을 취소하는 것이 좋습니다.
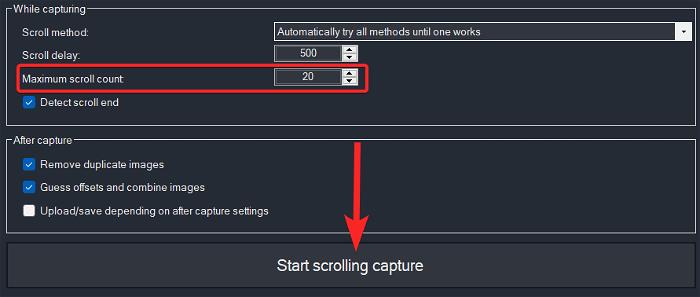
완료되면 스크롤 캡처 시작을 클릭합니다 .
영역이 캡처되면 대화 상자가 표시됩니다. 캡처 후 설정에 따라 업로드/저장을 클릭하여 캡처된 영역을 그에 따라 저장합니다. 대상 폴더에서 찾을 수 있습니다.
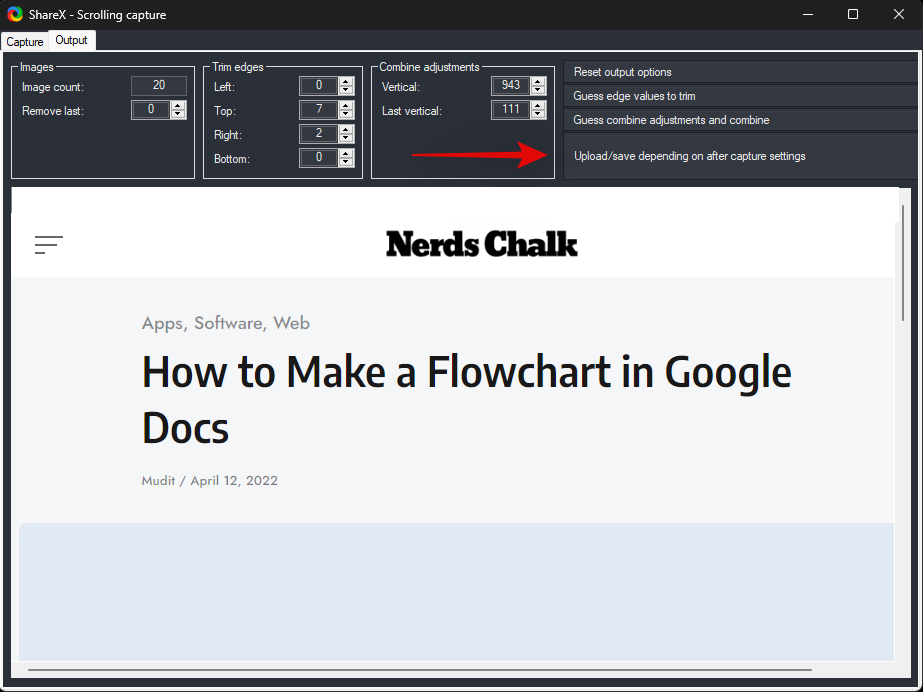
또는 ShareX 도구에서 캡처 > 스크롤 캡처 로 이동하여 이 옵션에 액세스할 수도 있습니다 .
방법 6: 화면 텍스트 캡처
이 기능을 사용하면 PDF, 이미지, 비디오, 스크린샷 등과 같은 비대화형 요소를 포함하여 화면 요소에서 텍스트를 복사하고 캡처할 수 있습니다.
앞서 설정한 단축키를 사용하여 화면 텍스트 캡처 도구 또는 OCR(광학 문자 인식)을 활성화하세요. 활성화되면 화면에서 텍스트를 캡처하려는 영역을 클릭하여 선택하십시오.

ShareX가 온라인 API를 사용하여 화면 문자를 인식하도록 허용하려면 예를 클릭하세요 . 이제 ShareX가 서버에 액세스하여 그에 따라 인식된 텍스트의 결과를 표시합니다.
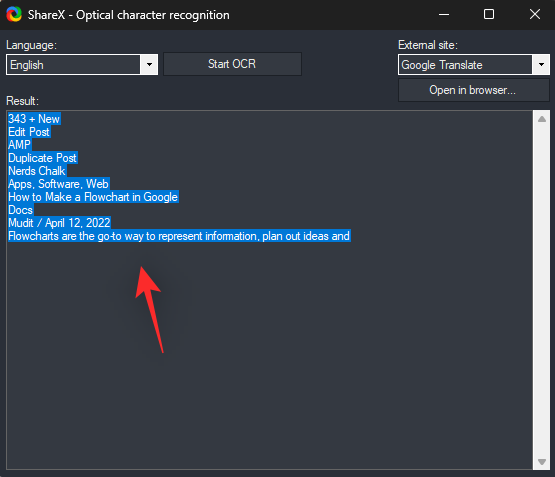
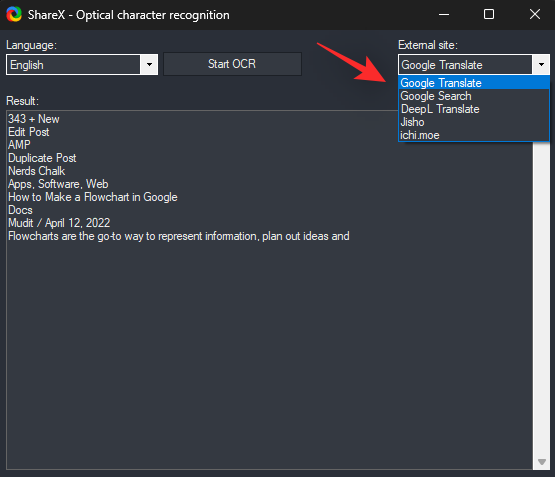
이제 아래 텍스트 상자의 모든 텍스트를 복사하여 PC에서 원하는 대로 사용할 수 있습니다. 모르는 언어를 캡처하려는 경우 오른쪽 상단에 있는 드롭다운 메뉴를 클릭하여 번역 서비스를 변경할 수도 있습니다 .
방법 7: 스크린샷 자동 캡처
자동 캡처를 사용하면 한 번에 한 지역에 대한 여러 스크린샷을 캡처할 수 있습니다. 전체 화면 스크린샷에도 사용할 수 있으며 화면상의 작업을 캡처하는 데에도 사용할 수 있습니다. 미리 정해진 시간이 지나면 스크린샷이 촬영되므로 단계를 쉽게 캡처하는 데에도 사용할 수 있습니다.
자동 화면 캡처 도구를 활성화하려면 앞서 설정한 단축키를 사용하세요. 이제 클릭하여 전체 화면을 캡처할지 아니면 사용자가 선택한 영역을 캡처할지 선택하세요. 사용자 정의 지역을 선택하려면 지역 선택을 클릭 하고 화면에서 원하는 지역을 선택하세요.
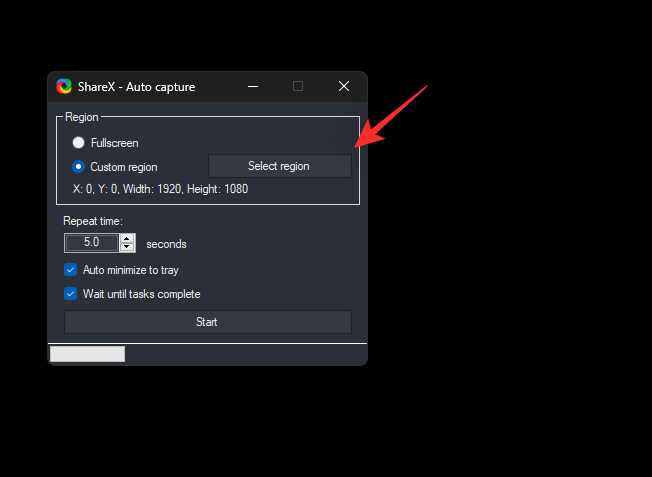
다음으로 반복 시간을 선택하세요 . 설정된 기간이 끝날 때마다 스크린샷이 촬영됩니다.
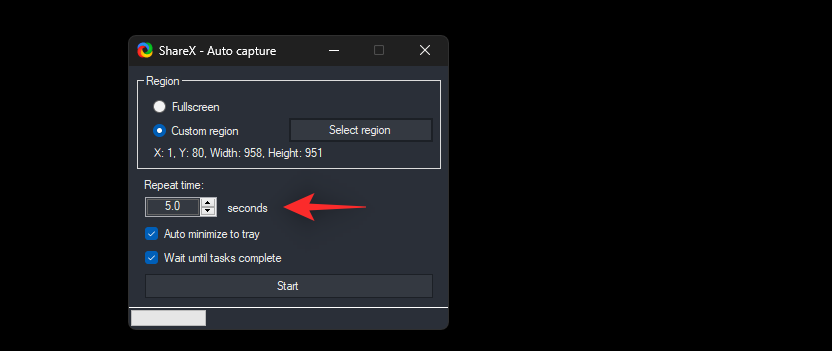
완료되면 시작을 클릭하세요 .
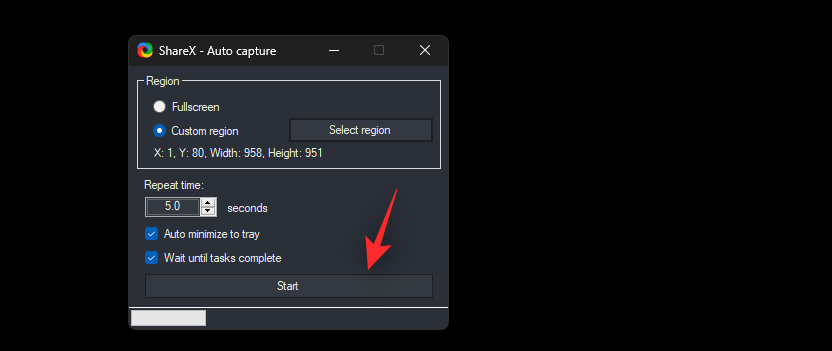
이제 캡처하려는 화면 작업 수행을 시작할 수 있습니다. ShareX는 설정된 기간이 끝날 때마다 자동으로 스크린샷을 캡처합니다.
완료하고 자동 캡처 작업을 종료하려면 동일한 단축키를 다시 누르고 중지를 클릭하십시오.
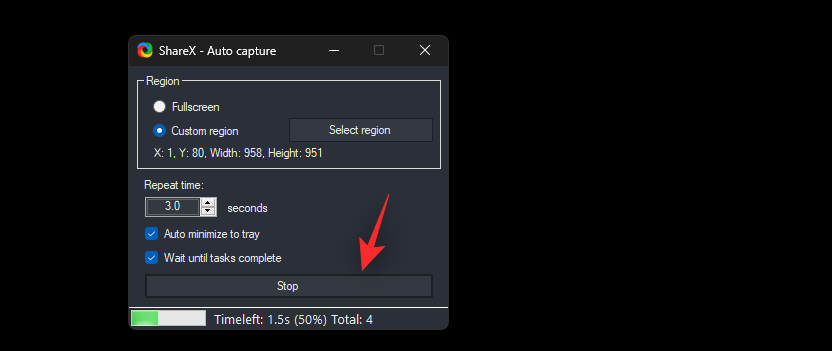
이것이 바로 ShareX 내에서 자동 캡처를 활용하는 방법입니다.
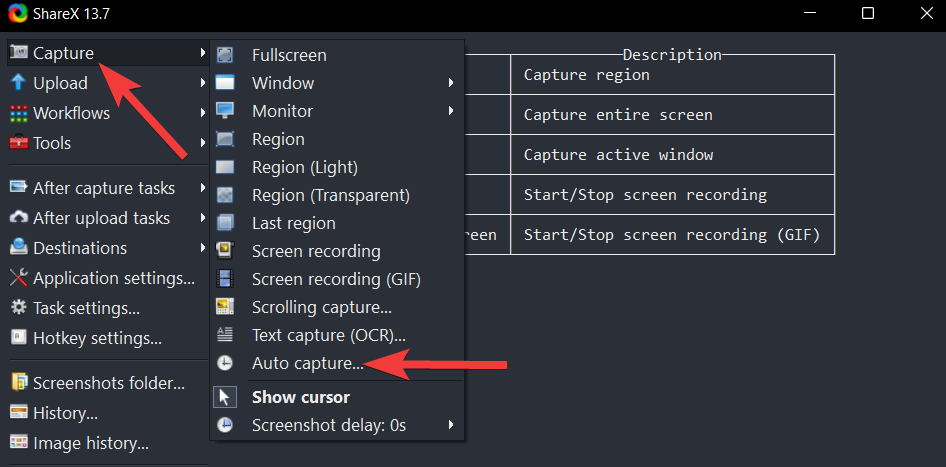
또는 ShareX 앱에서 캡처 > 자동 캡처를 클릭하여 자동 캡처를 활성화할 수도 있습니다.
방법 8: 지연된 스크린샷 캡처
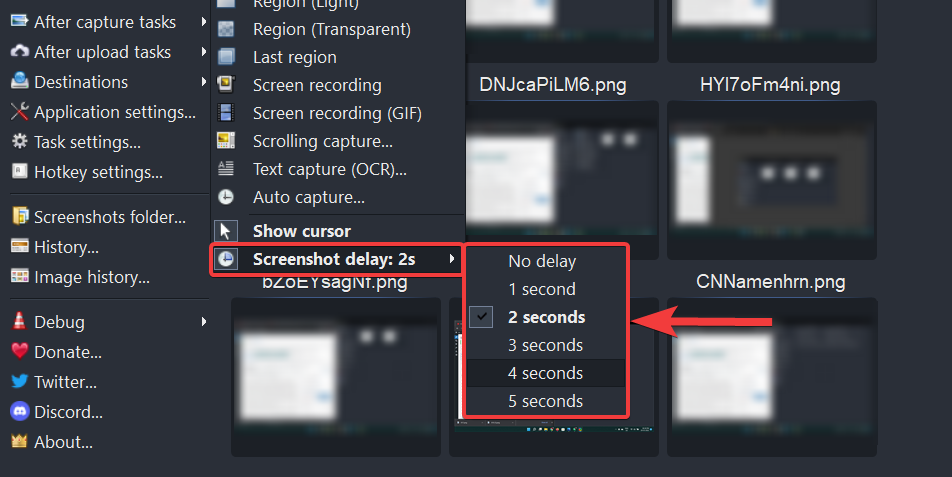
지연된 스크린샷을 사용하면 스크린샷을 찍는 작업에 지연을 추가할 수 있습니다. 여기에는 ShareX에서 제공하는 모든 화면 캡처 옵션이 포함됩니다. 일반적으로 기존 수단을 통해 캡처할 수 없는 OS 요소를 캡처하는 데 도움이 될 수 있는 최대 5초의 지연을 설정할 수 있습니다. 여기에는 로딩 화면, 잠금 화면, 복구 화면 등이 포함됩니다. 도구는 지연 후에 활성화되므로 도구를 사용할 수 있을 때 스크린샷을 트리거한 다음 잠금 화면으로 전환하여 스크린샷을 찍을 수 있습니다. ShareX에서 지연된 스크린샷을 활용하는 방법은 다음과 같습니다.
참고: 불행하게도 ShareX 내에서는 스크린샷 지연 단축키를 설정할 수 없습니다. 앱을 사용하여 지연을 설정한 다음 PC에서 적절한 단축키를 사용하여 캡처 작업을 활성화해야 합니다.
또는 설정된 간격으로 자동으로 스크린샷을 캡처하려면 ShareX 도구에서 캡처 > 스크린샷 지연을 클릭하세요 .
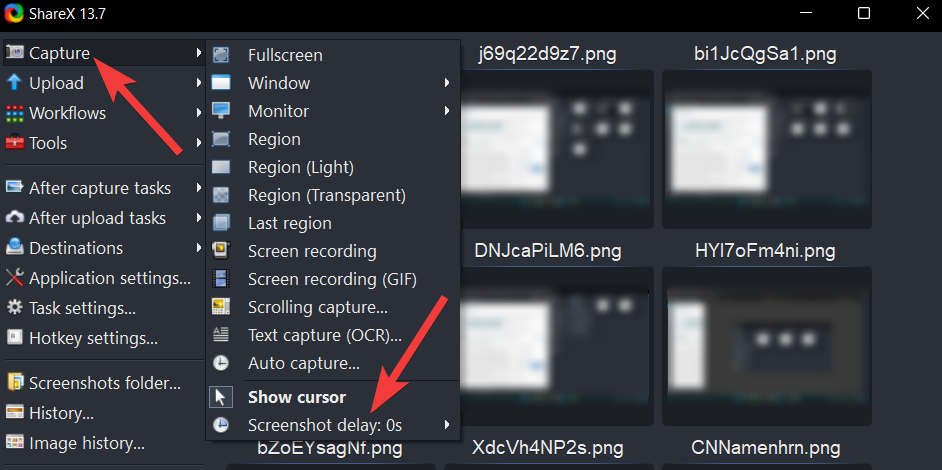
원하는 대로 스크린샷 지연 값을 선택하고 클릭하세요.
이제 앞서 설정한 단축키 중 하나를 사용하여 원하는 대로 화면을 캡처하세요.
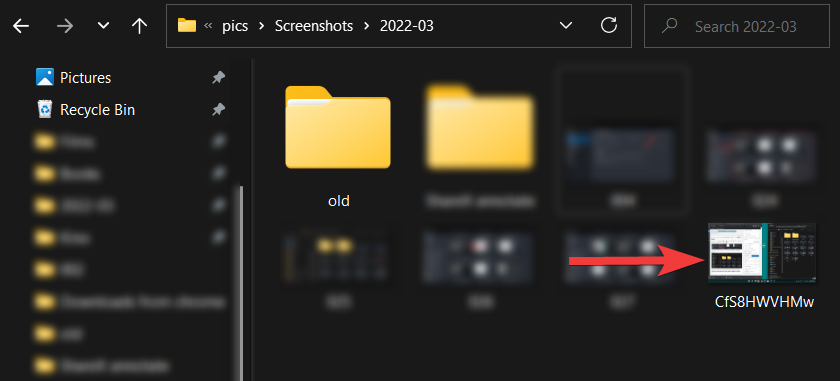
완료되면 대상 폴더에서 스크린샷을 찾을 수 있습니다.
ShareX에는 생산성을 높이는 데 도움이 되는 여러 가지 도구가 내장되어 있습니다. 각각의 기능을 간략히 살펴보고 이를 어떻게 활용할 수 있는지 살펴보겠습니다.
눈금자를 사용하면 화면 요소를 측정한 다음 그에 따라 캔버스를 준비하고 편집할 수 있습니다. 이 도구는 일반적으로 이미지를 합성하거나 화면 요소를 비교할 때 유용합니다. 또한 화면 캡처 전체에서 주석을 일관되게 유지하는 데 도움이 될 수 있습니다. ShareX 내에서 눈금자에 액세스하는 방법은 다음과 같습니다.
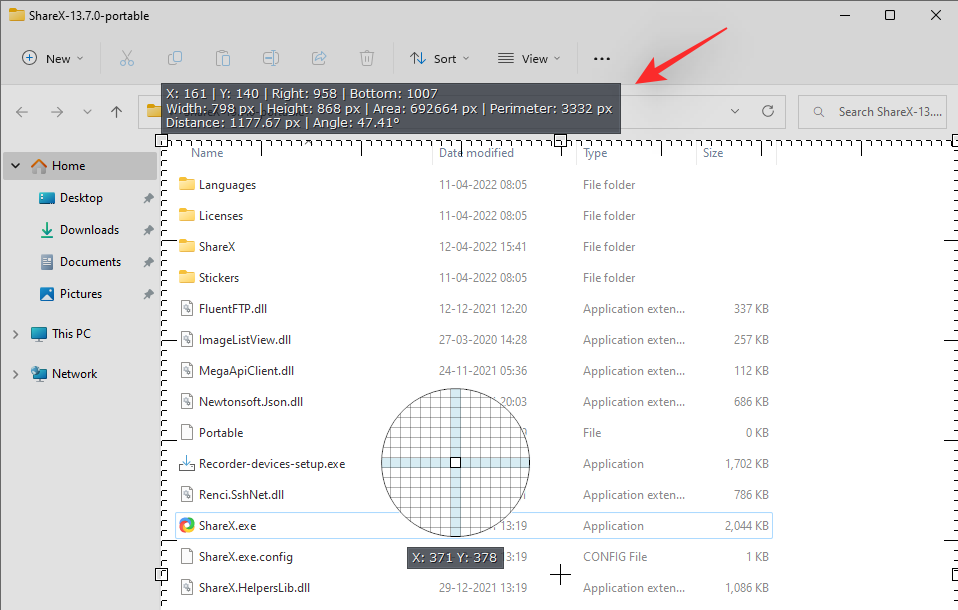
이전에 PC에 설정한 단축키를 사용하여 눈금자를 활성화하는 것부터 시작하세요. 이제 화면에서 측정하려는 영역을 선택할 수 있는 선택기가 표시됩니다.
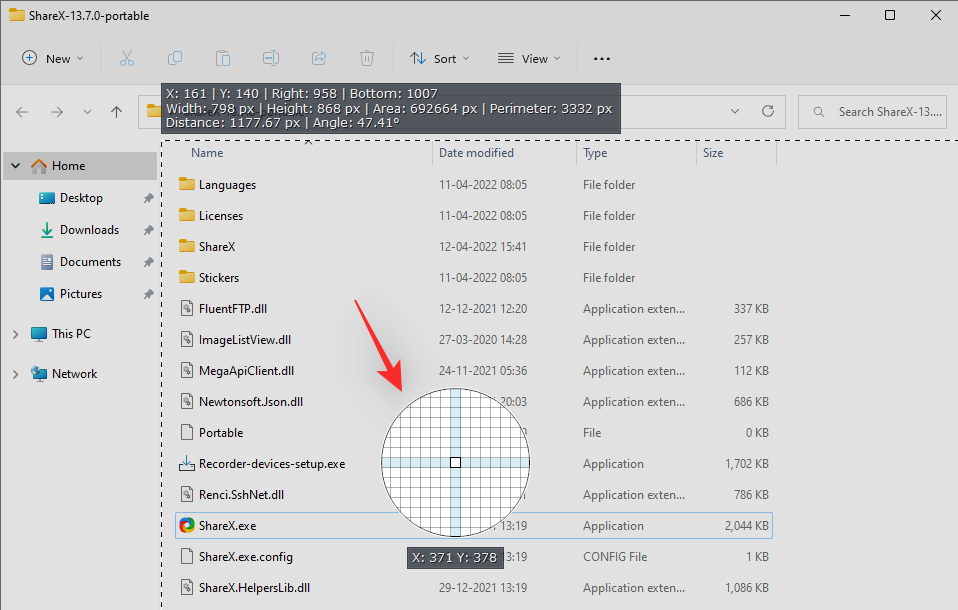
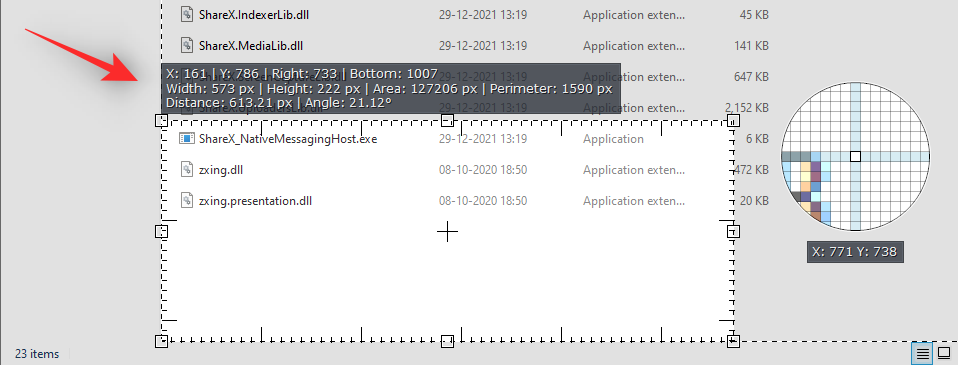
선택하면 선택한 영역의 상단에서 동일한 치수를 모두 찾을 수 있습니다.
선택한 지역의 모서리 중 하나를 클릭하고 끌어서 화면에서 지역을 수동으로 선택할 수도 있습니다.
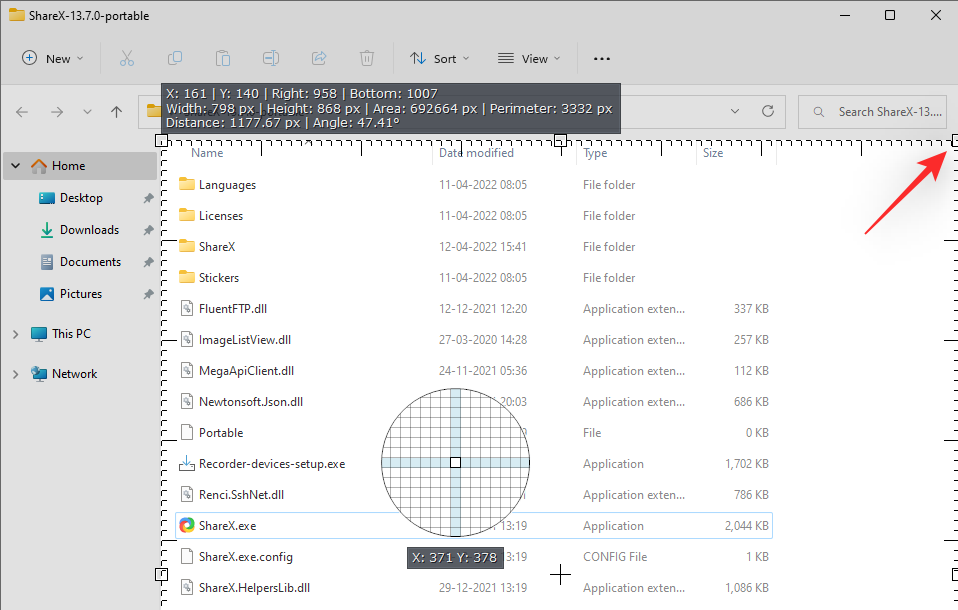
이것이 ShareX의 눈금자를 사용하여 화면 요소를 측정하는 방법입니다.
도구 > 눈금자 로 이동하여 ShareX 앱 내에서 눈금자를 활성화할 수도 있습니다 .
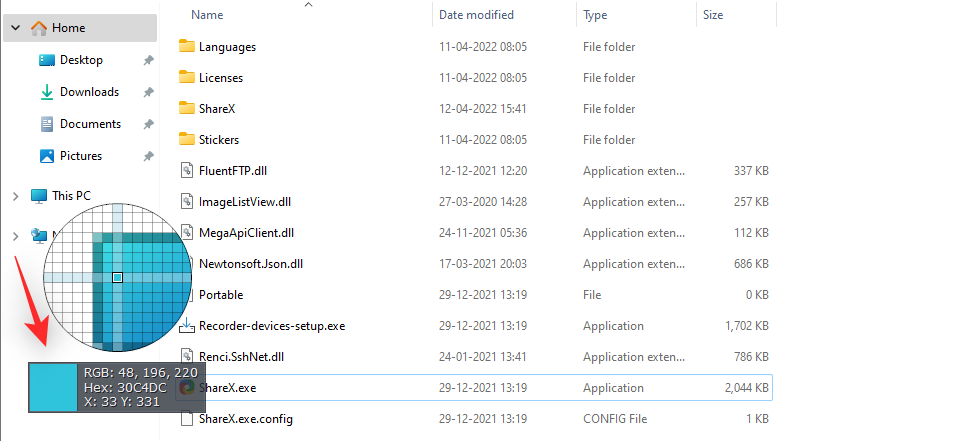
색상 선택기는 이미지 편집자에게 특히 유용한 도구입니다. 간단히 클릭하면 화면의 모든 화면 색상에 대한 RGB, CMYK 및 HEX 값을 얻을 수 있습니다. 이를 통해 사용자 정의 색상을 찾고, 일관된 색상 팔레트를 유지하고, 시선을 사로잡는 새로운 색상을 추출할 수도 있습니다. 프로세스를 진행하는 데 도움이 되도록 아래 가이드를 따르세요.
PC에 ShareX를 설정한 상태에서 PC의 Color Picker 단축키를 누르세요. 그러면 PC에서 색상 선택기가 활성화됩니다. 이제 RGB, HEX 또는 CMYK 값을 입력하여 색상을 선택하세요. 화면에서 색상을 선택하려면 선택기 아이콘을 클릭하세요.
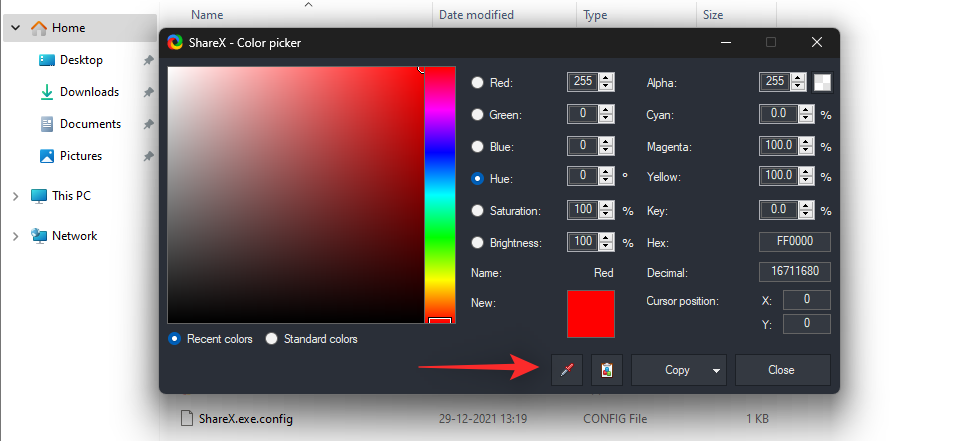
선택기로 원하는 색상을 가리키고 마우스의 LMB를 클릭하세요. 색상이 자동으로 캡처되어 색상 선택 도구에 추가됩니다.
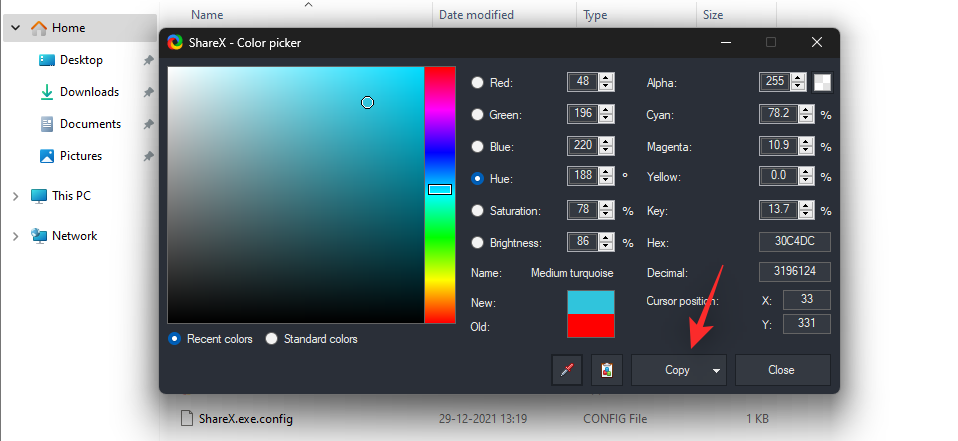
이제 복사를 클릭하여 선택한 색상을 클립보드에 복사하세요. 이제 원하는 이미지나 비디오 편집기에 동일한 내용을 붙여넣을 수 있습니다.
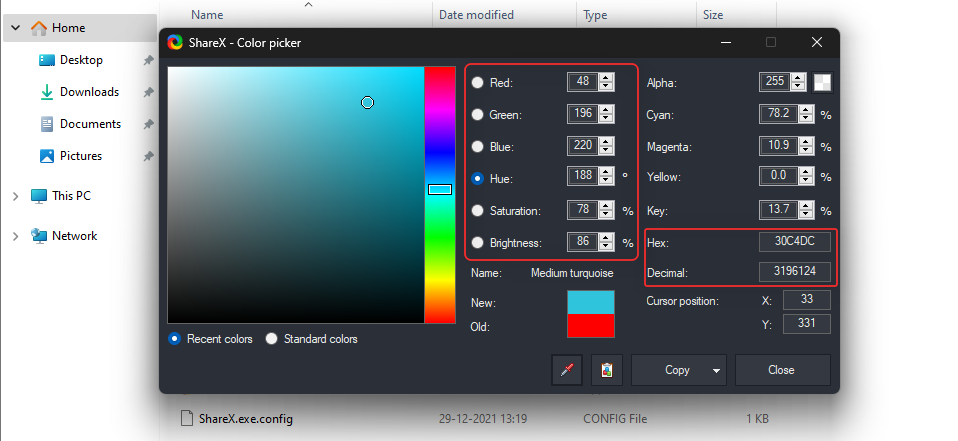
화면에 표시되는 옵션에서 값을 수동으로 입력하도록 선택할 수도 있습니다.
도구 > 색상 선택기로 이동하여 ShareX 내에서 색상 선택기에 액세스할 수도 있습니다 .
ShareX에는 또한 즉시 이미지 자르기, 크기 조정 및 수정에 도움이 되는 내장 편집기가 있습니다. PC에서 이 기능을 최대한 활용하는 방법은 다음과 같습니다.
이미지 편집기를 사용하면 필요에 따라 이미지를 자르고, 크기를 조정하고, 주석을 달고, 편집할 수 있습니다. 앞서 키보드에서 설정한 이미지 편집기 단축키를 눌러 시작하세요 .
이제 화면에 다음 옵션이 표시됩니다. 이미지 편집기 에서 이미지를 열려면 현재 요구 사항과 요구 사항에 가장 적합한 것을 선택하세요 .
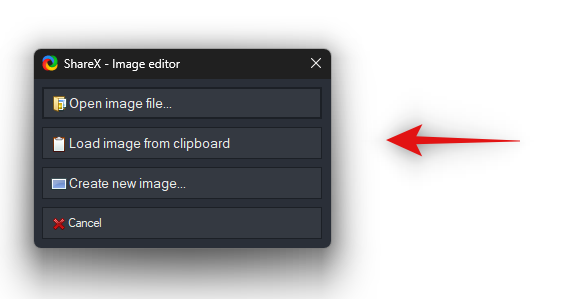
편집하려는 이미지를 선택하면 해당 이미지가 이미지 편집기에서 자동으로 열립니다. 이제 상단의 도구 모음을 사용하여 필요에 따라 이미지를 편집할 수 있습니다.
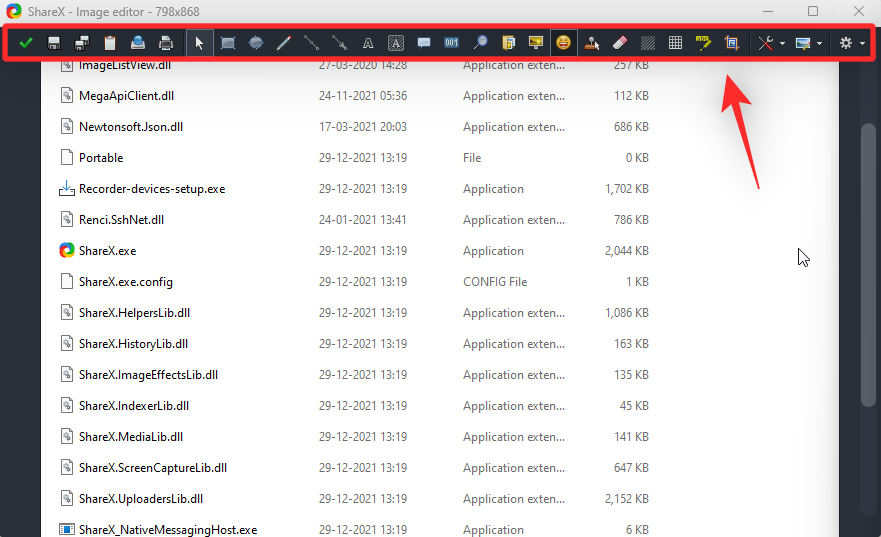
현재 사용할 수 있는 모든 옵션을 간단히 살펴보겠습니다.
EnterCtrl + SCtrl + Shift + SCtrl + Shift + CCtrl + UCtrl + PMREFLAOTSIBPHC필요에 따라 이미지를 편집한 후 저장 또는 다른 이름으로 저장 옵션을 사용하여 이미지를 로컬 저장소에 저장합니다. 저장을 선택하면 변경 사항이 원본 이미지에 저장됩니다. 반면에 다른 이름으로 저장을 사용 하면 이미지에 적용된 변경 사항과 함께 현재 이미지의 복사본을 저장할 수 있습니다.
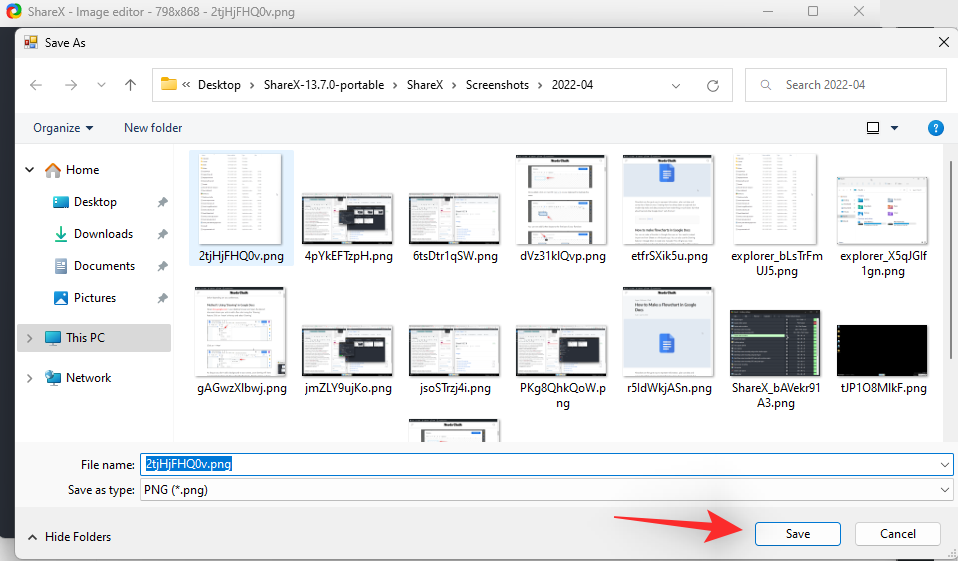
또한 도구 > 이미지 편집기 로 이동하여 ShareX 앱 내에서 이미지 편집기에 액세스할 수도 있습니다 .
ShareX에는 이미지에 효과를 추가하는 전용 도구도 있습니다. ShareX 내에서 이미지 효과를 활성화하려면 앞서 설정한 단축키를 사용하세요. 로컬 저장소에서 편집하려는 이미지를 선택하세요.
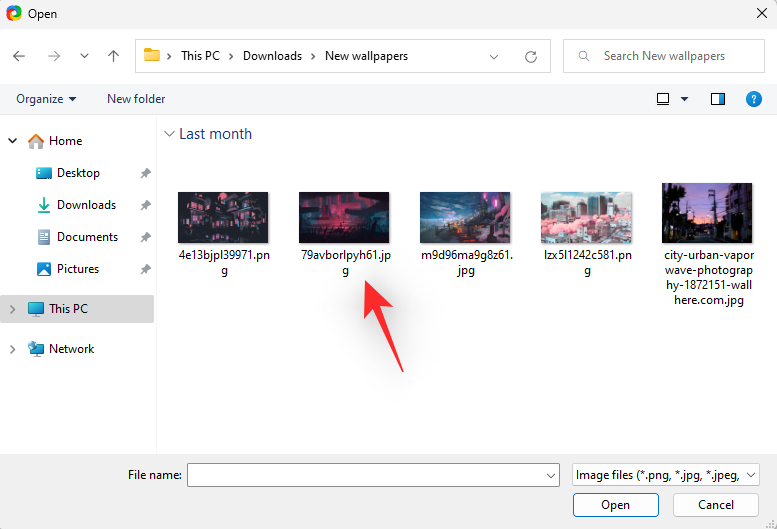
이제 이미지가 이미지 효과 편집기에서 열립니다. 이제 효과 아래의 + 아이콘을 클릭하여 효과를 추가할 수 있습니다.
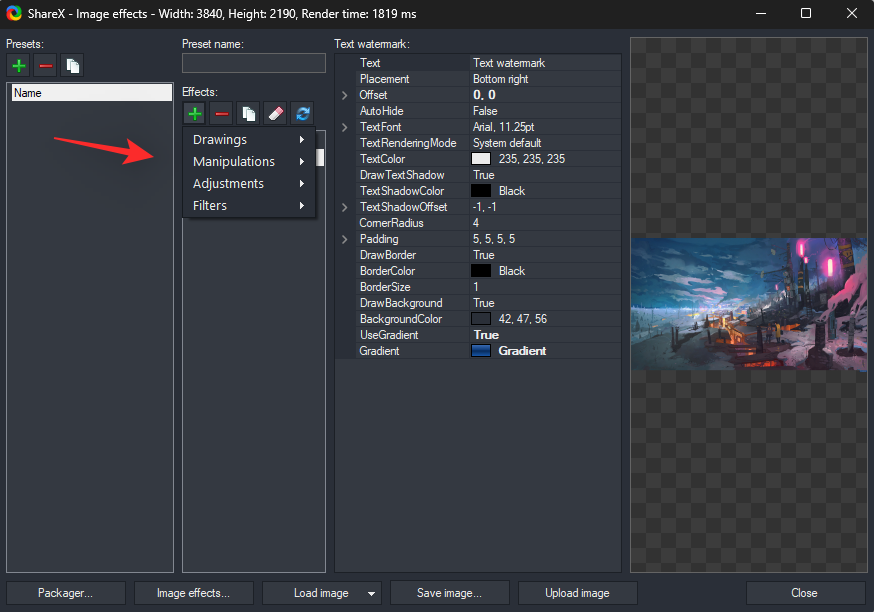
이미지에 원하는 효과를 선택하고 추가하세요. 주로 다음 4가지 옵션을 사용할 수 있습니다.
Once you have edited your image, click on Save Image to save your changes. You can also click Upload Image to upload it to a chosen service.

You can also access Image Effects by going to Tools > Image Effects within ShareX.
Image combiner in ShareX can help you create composite images easily. Use the hotkey we set earlier to launch the Image Combiner on your PC.
Once launched, click Add… and select the images you wish to combine from your local storage.
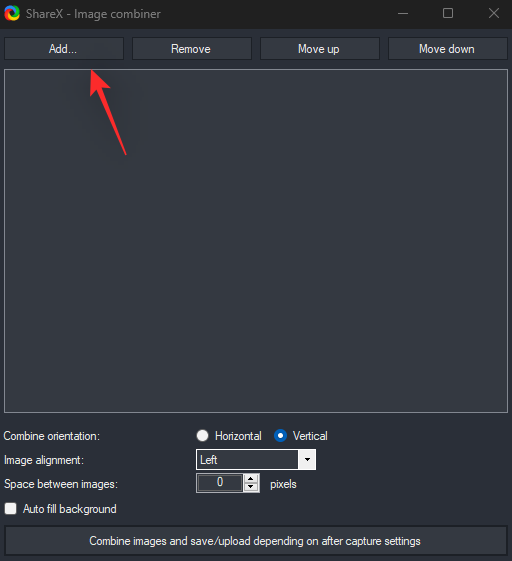
You can now change the order of the images by clicking on Move up or Move down.
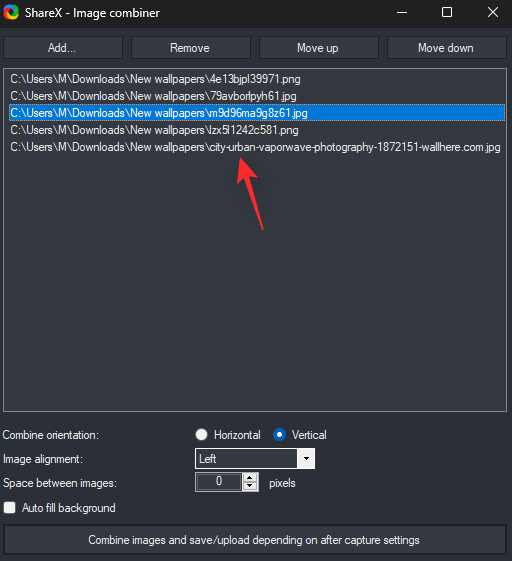
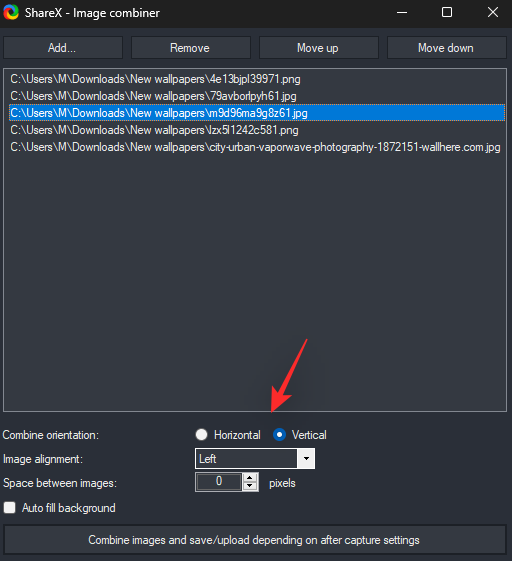
Select the way you wish to combine your images by selecting the orientation beside Combine orientation.
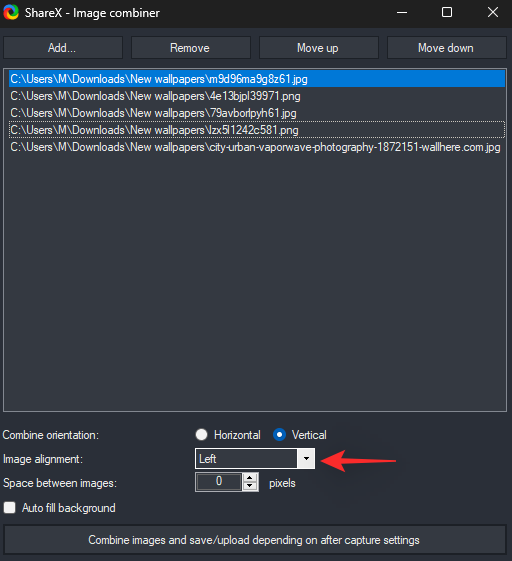
Additionally, choose your alignment by clicking on the next drop-down menu.
If you wish to add space between the images, you can dictate the same in terms of pixels using the Space between images option.
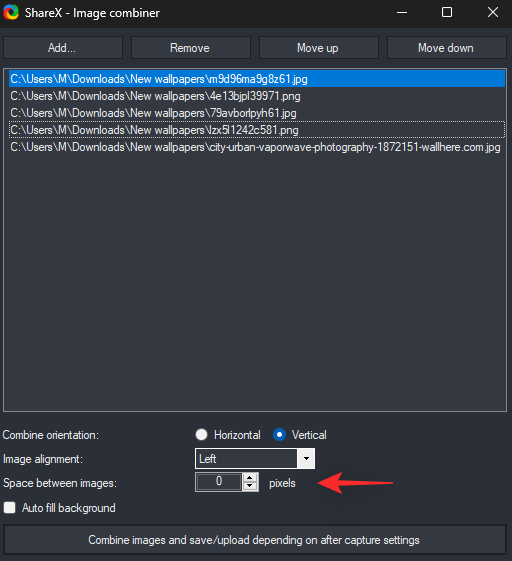
Check the box for Autofill background if you wish for your background to be non-transparent.
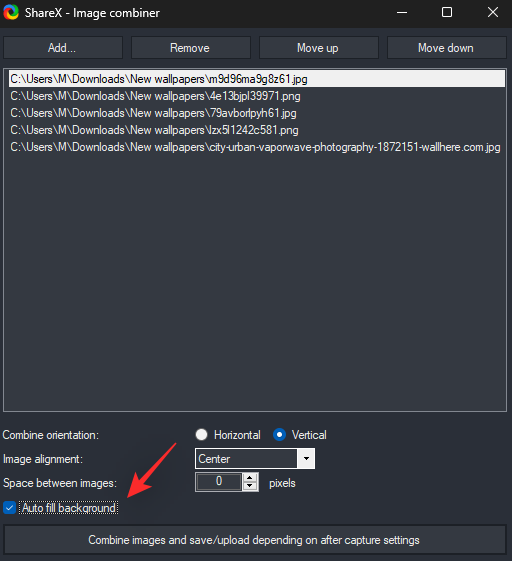
Once you are done, click Combine images and save/upload depending on after capture settings.
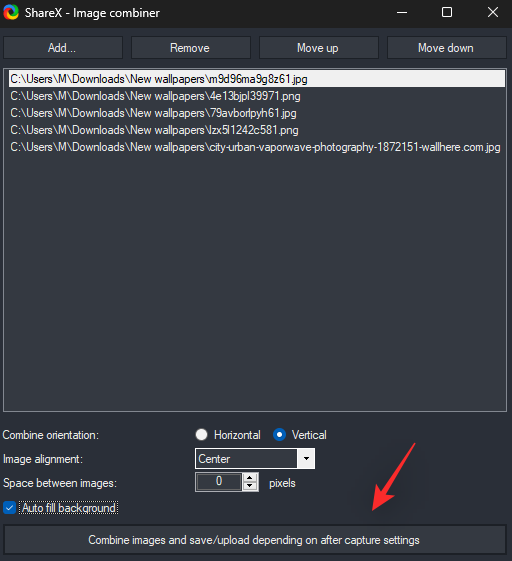
And that’s it! The combined image will now be saved to your destination folder as well as uploaded to the cloud depending on your current configuration.
You can also access the Image Combiner from the ShareX app by going to Tools > Image Combiner.
Image Splitter can help you split images from your local storage into columns and rows. This can come in handy if you wish to separately show different sections of an image. Start by using the hotkey we set earlier to activate the Image Splitter.
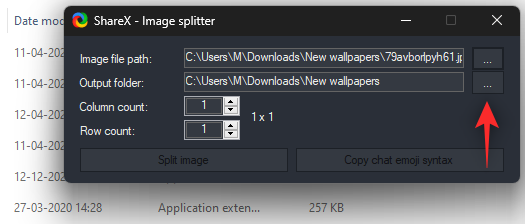
Now click … beside Image file path: to select the image from your local storage that you wish to split.
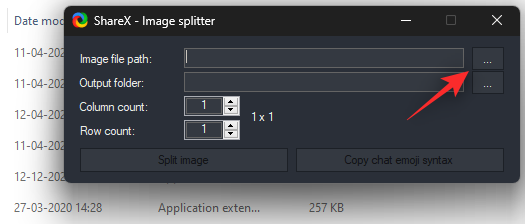
Click … beside the Output folder and select your destination folder for the split images.
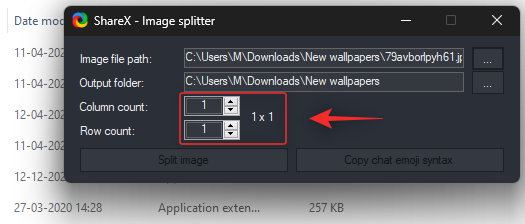
Now choose the number of columns and rows from the next menus.
Click Split image once you are done.
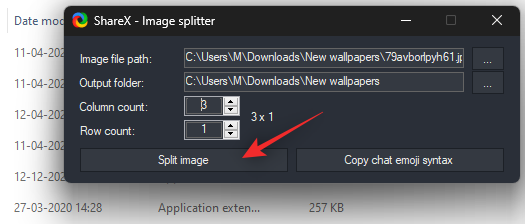
And that’s it! The selected image will now be split and stored in the destination folder you configured earlier.
You can also access the splitter within the ShareX app by going to Tools > Image Splitter.
If you’re a content creator then creating the right thumbnails is the key to success. While finding the right thumbnail can be easy, producing multiple of them in a single click can be a tough task. Use the Image thumbnailer in ShareX to help you with the same.
Use the hotkey on your keyboard to activate the thumbnailer. Now click Add and select all the images you wish to use to create thumbnails.
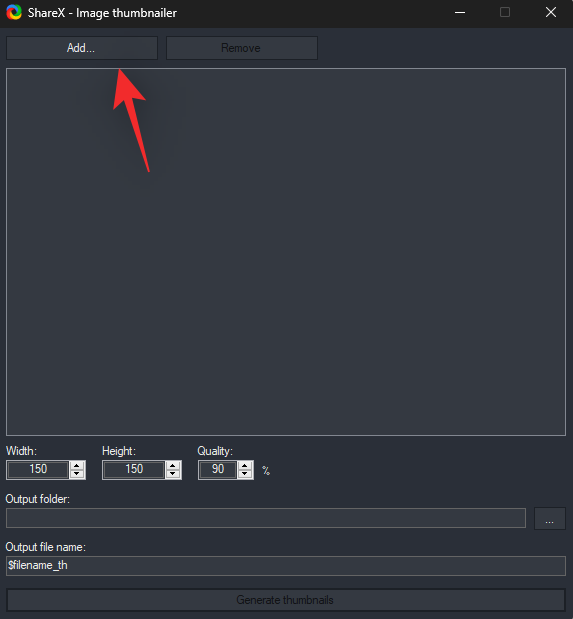
Once selected, use the dimensions at the bottom to determine your thumbnail dimensions. Select the quality of your thumbnails as well.
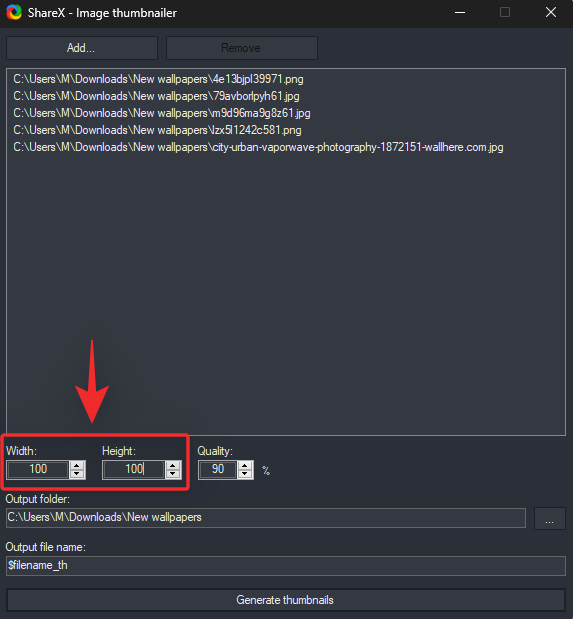
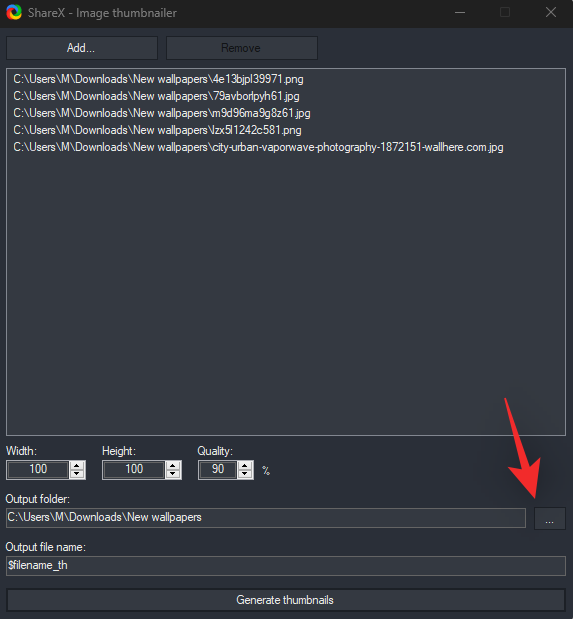
Now select your Output folder by clicking on … besides the same.
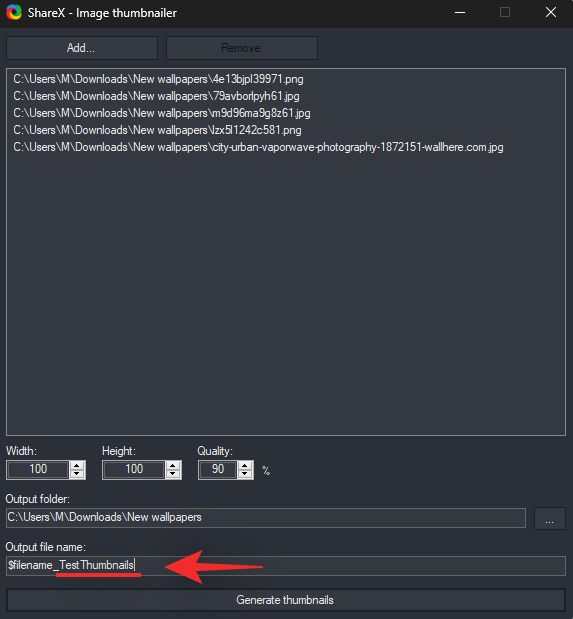
Select a filename format for your thumbnails. Use the following format where $filename_ denotes the original filename of the thumbnail.
$filenmae_YOURNAME
Click Generate thumbnails once you are done.
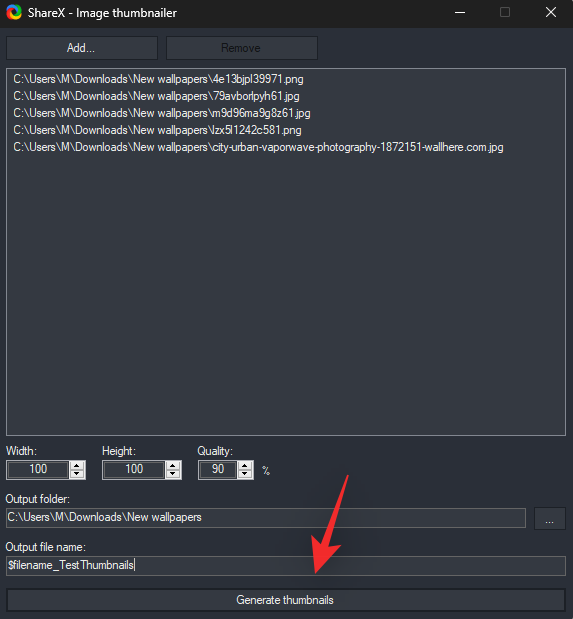
And that’s it! The selected thumbnails will now be generated and stored in the Output folder set by you earlier.
You can also access the Image Thumbnailer by going to Tools > Image Thumbnailer.
Want to convert videos? Use the video converter in ShareX to help you do the same on your PC.
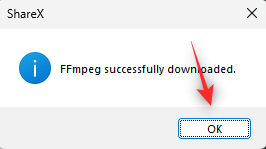
Start by activating the converter using the hotkey we had set up earlier. You will now be prompted to download ffmpeg on your PC. Click Yes to automatically download and set up the same. Once downloaded, click OK.
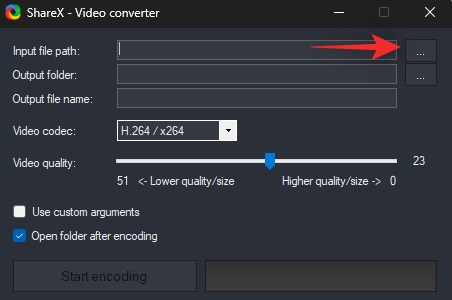
The converter will now automatically launch on your PC. Click … beside Input file path to select the file you wish to convert.
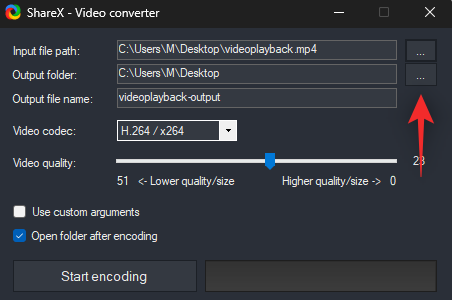
Select your Output folder by clicking on … besides the same.
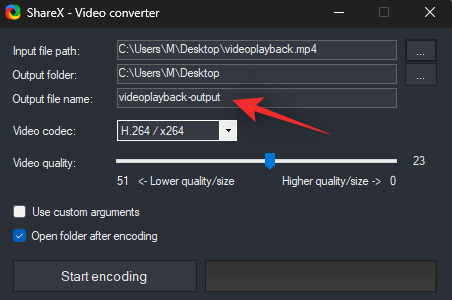
Enter a name for your output file once you are done.
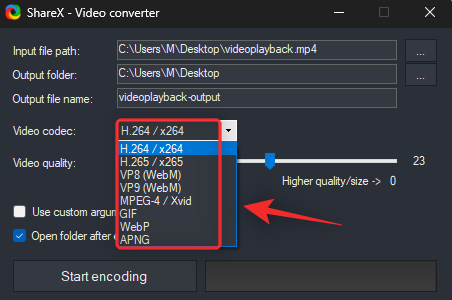
Click the next drop-down menu and select the desired video codec. We recommend leaving this at default if you are unsure of what to select at this point.
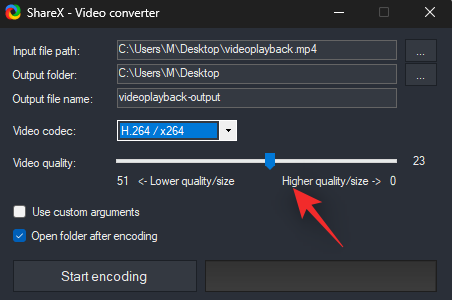
Use the next slider to determine your output video quality.
Click Start encoding to convert your video once you are done.
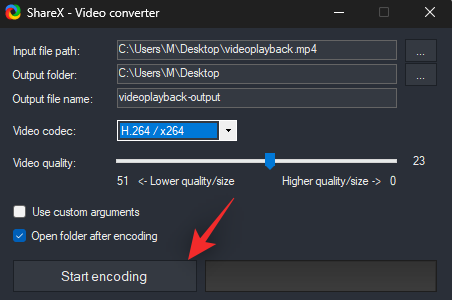
And that’s it! Once the video has been converted, the folder containing the video will be automatically opened on your PC.
You can also access the converter by going to Tools > Video converter within the ShareX app.
Video thumbnailer can help you create thumbnails for videos based on a set of pre-defined parameters. Thumbnails created by ShareX are the more traditional ones that combine different frames from your video to create a thumbnail. Use the guide below to help you create thumbnails for all your videos.
Start by activating the Video thumbnailer by using the hotkey we set earlier. Click … and select the video you wish to use from your local storage.
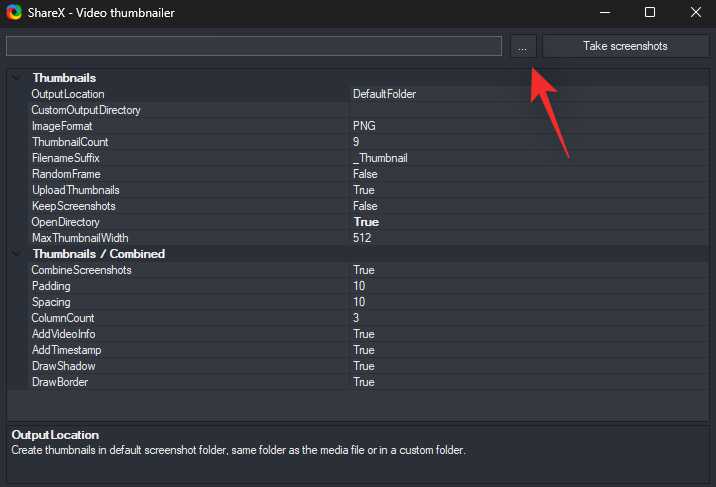
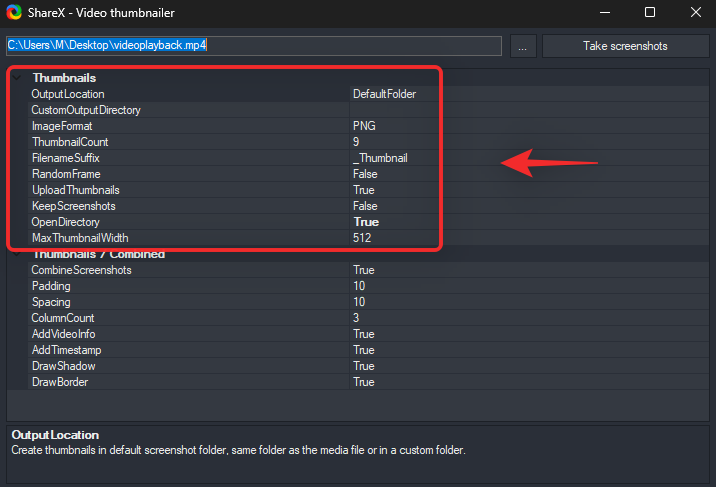
Now configure the following options based on your current preferences.
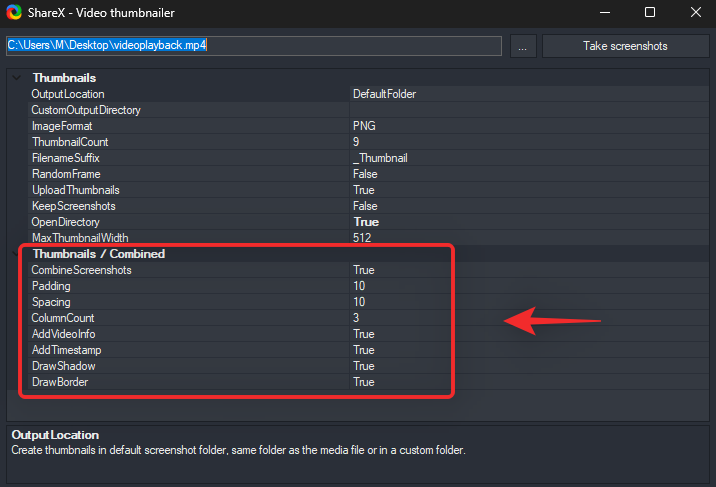
Similarly, configure the following options under Thumbnails/Combined.
Once you are happy with your settings, click Take screenshots.
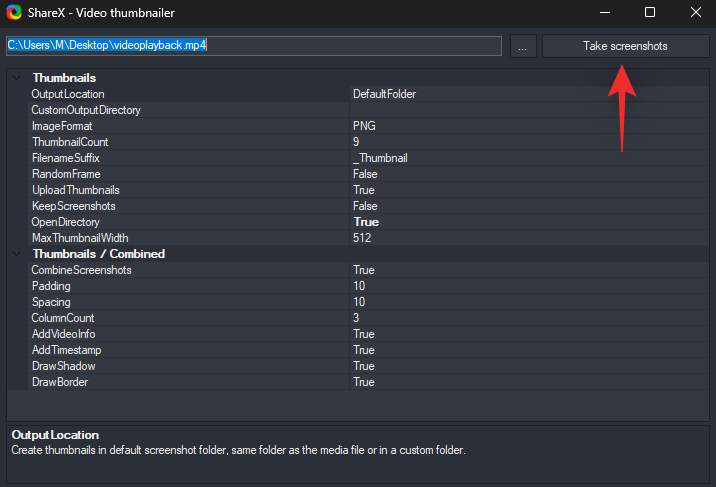
ShareX will now process the selected video and output a thumbnail file based on your settings. You can find this file in the default destination folder in case you did not modify your settings.
You can also access the video thumbnailer by going to Tools > Video Thumbnailer.
After capture tasks can help you perform automated tasks in ShareX as soon as you capture your screen. This can help you with efficiency. You can choose to directly edit your image, add effects to it, upload it to a website, and more. Use the guide below to help you along with the process.
In the ShareX tool, click on the After capture tasks option in the left panel.
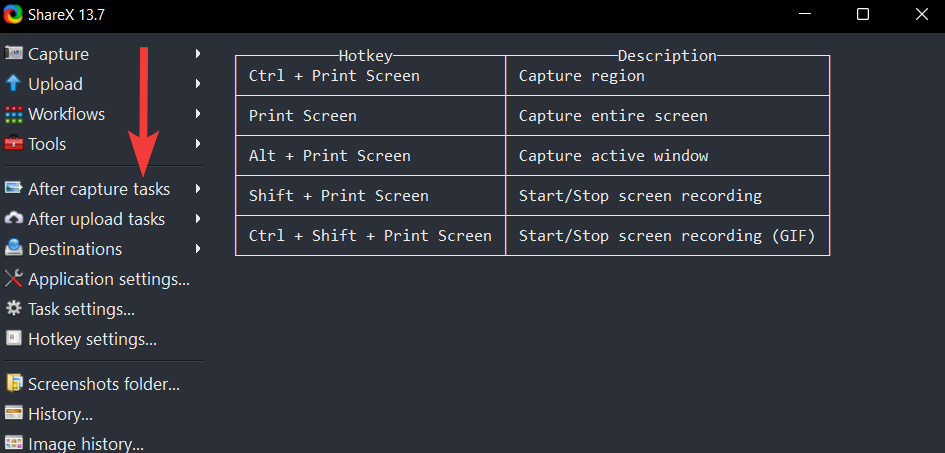
In the list of after-capture tasks, click on the tasks that you want ShareX to execute immediately after capturing a screenshot.
For example, in the picture below the tasks Copy image to clipboard, Save image to file, and Upload image to host are selected.
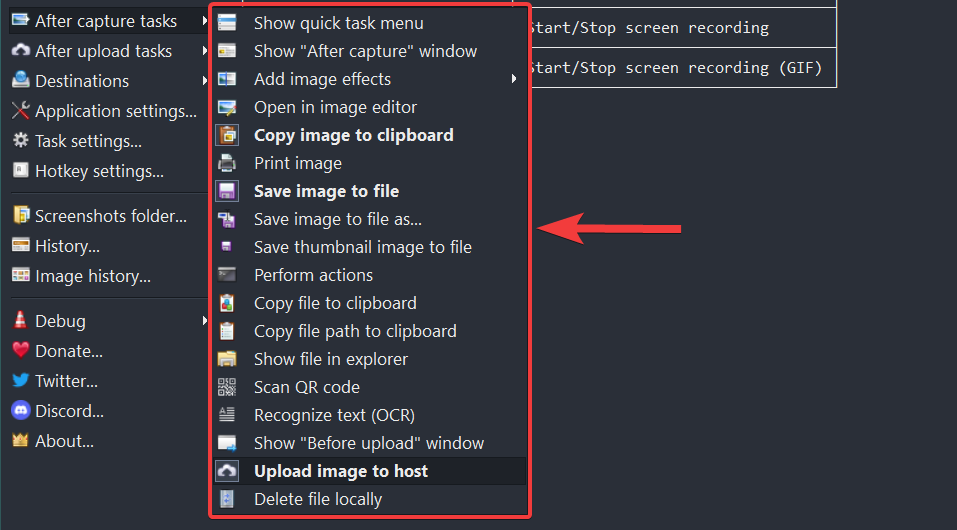
To execute the selected after-capture tasks, simply use one of the capture options available in ShareX to take a screenshot.
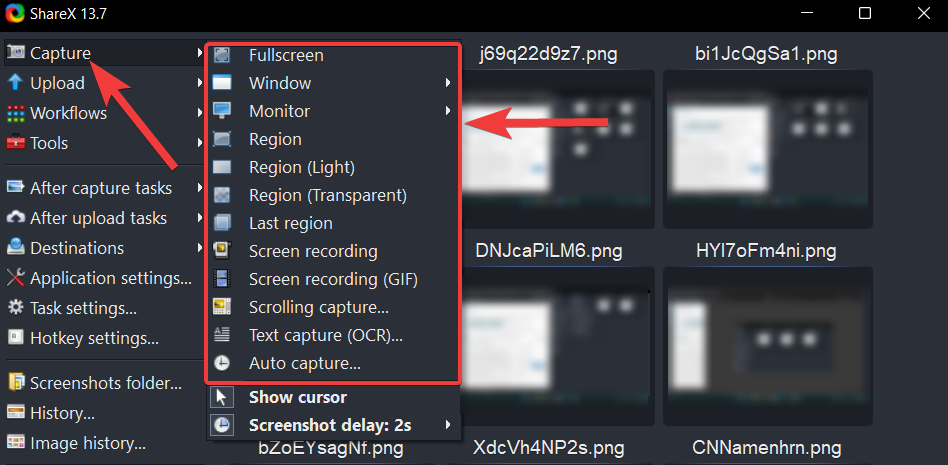
After capturing, ShareX will automatically execute the selected after-capture tasks one by one.
For example, in our case, the captured screenshot will be saved to the local destination folder, copied to the clipboard, and uploaded to an image hosting service.
After-upload tasks as the name suggests, perform automated tasks as soon as your images are uploaded to a particular website. This is mainly used by users to edit their images after backing them up to the cloud but you can use it for other scenarios as well. Follow the steps below to help you along with the process.
Open ShareX and click the After-upload tasks option in the left panel.
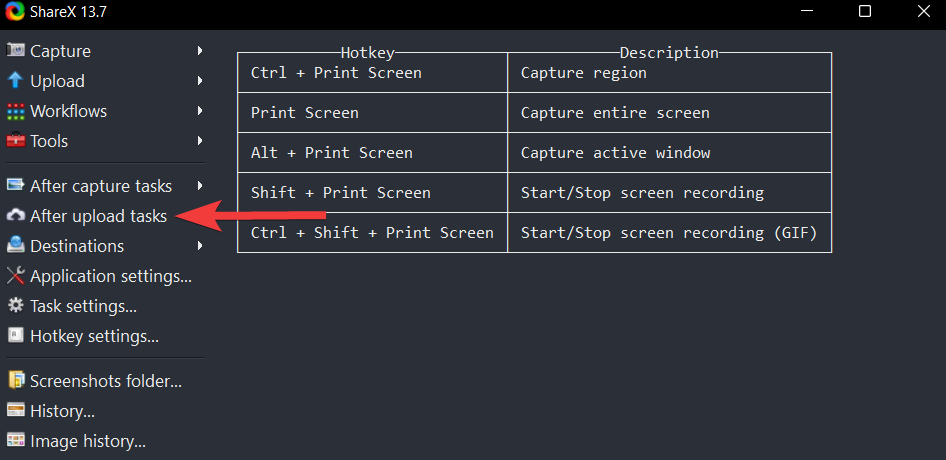
In the list of After-upload tasks, click on the tasks that you want ShareX to execute immediately after uploading a screenshot.
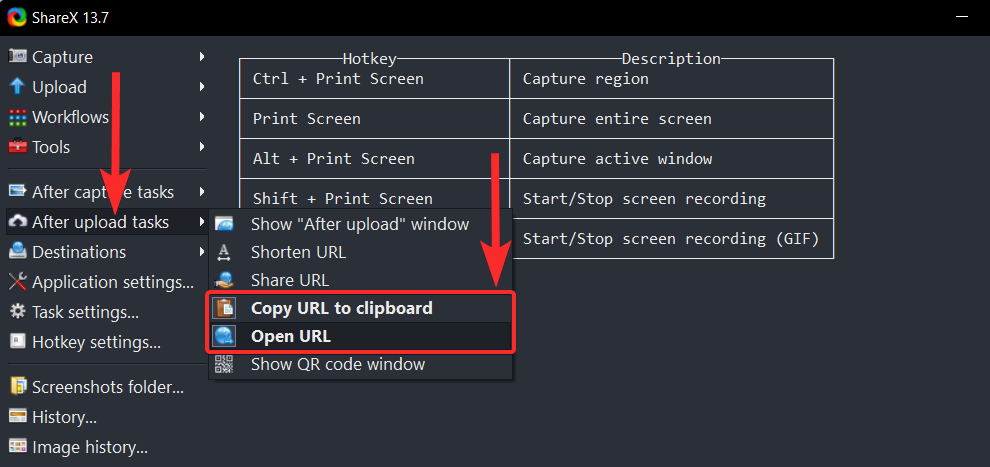
For example, in the picture below the tasks Copy URL to clipboard and Open URL are selected.
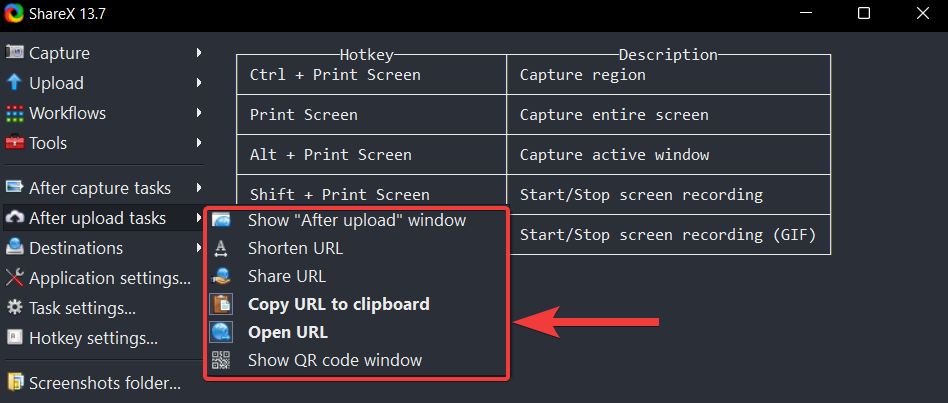
To execute the selected After-upload tasks, select one of the capture options available in ShareX.

After capturing, ShareX will automatically execute the selected After-upload tasks, one by one.
For example, in our case, ShareX will copy the URL of the uploaded screenshot to your clipboard and open the same URL in your default web browser.
ShareX uses ffmpeg.exe to record your screen which is free and open source. Use the guide below to help you record your screen using ShareX.
Start by activating the ShareX screen record tool using the hotkey we had set earlier. Once activated, you will be prompted to download ffmpeg.exe. Click on Yes to continue with the same.
Click on OK once you are done.

The tool will be automatically launched once ffmpeg.exe is set up on your device. Click and select a region that you wish to capture.
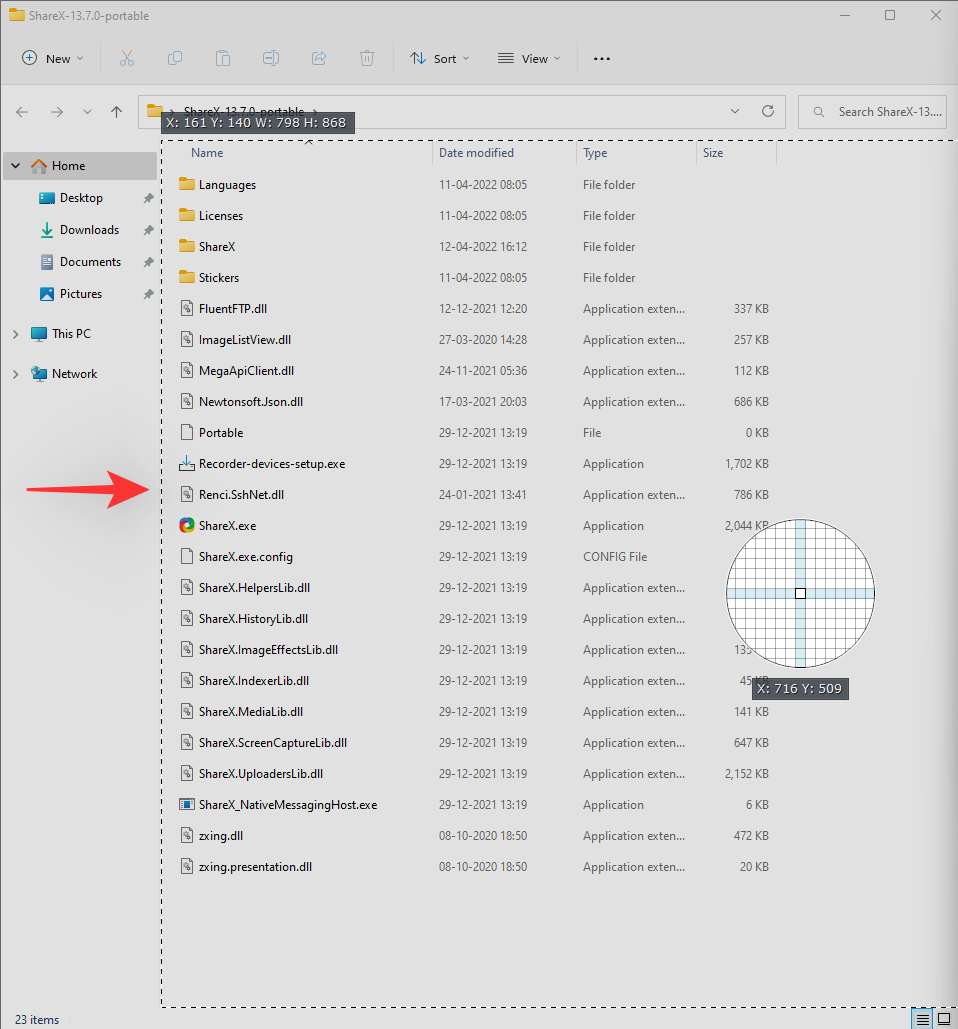
ShareX will now automatically record the selected region. Click Stop once you are done recording your screen.
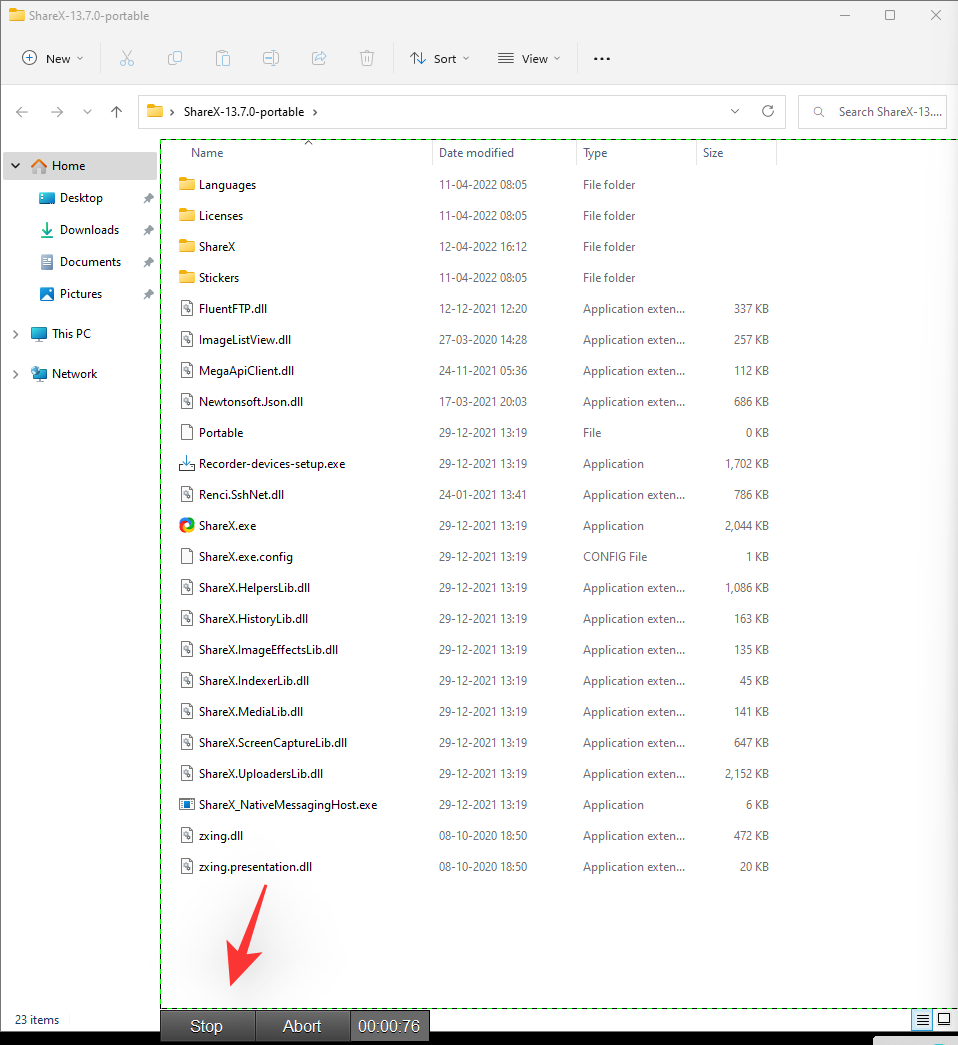
Tip: You can use Abort in case you wish to start over and discard the current recording.
The recording will now be saved to your destination folder.
You can also access the screen recording option by going to Capture > Screen recording.
The normal screen recording tool will record videos but in case you wish to record GIFs then you can use this tool instead. Activate the same by using the hotkey for Recording GIFs that we had set earlier.
You will now be shown a region selection tool. Select the region you wish to capture by clicking on the same.

ShareX will now automatically start recording the selected region. Once you are done click Stop.

Tip: You can also click Abort if you wish to start over and abandon the current recording.
The selected recording will now be saved to your destination folder.
You can also activate this tool by going to Capture > Screen recording (GIF).
ShareX is a comprehensive tool and thus comes with in-built upload tools that can help you upload your screenshots directly to the cloud or image hosting websites. Use either of the guides below depending on your preferences to help you along with the process.
Method 1: Automatically
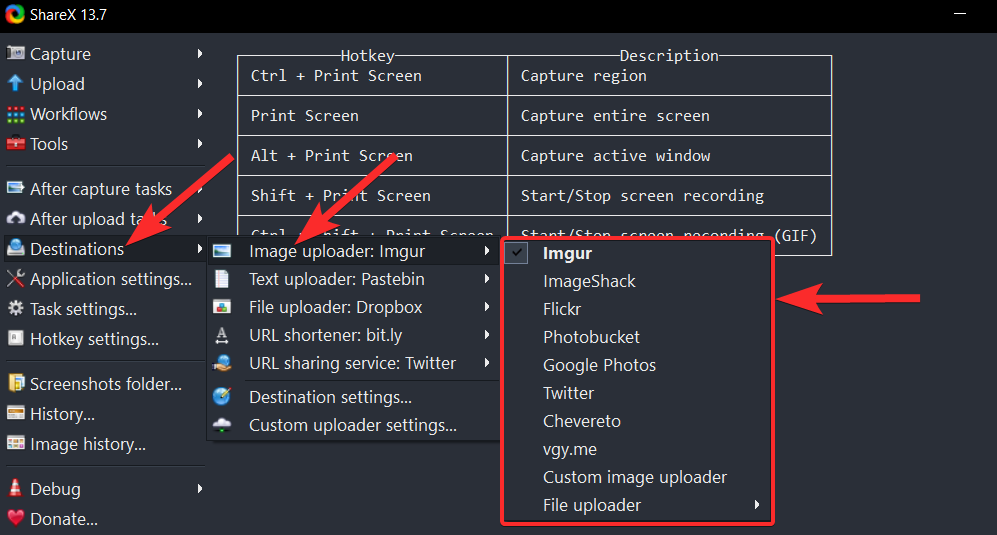
To set up ShareX so that it uploads the screenshots automatically after capturing, select Destinations > Image uploader from the ShareX tool.
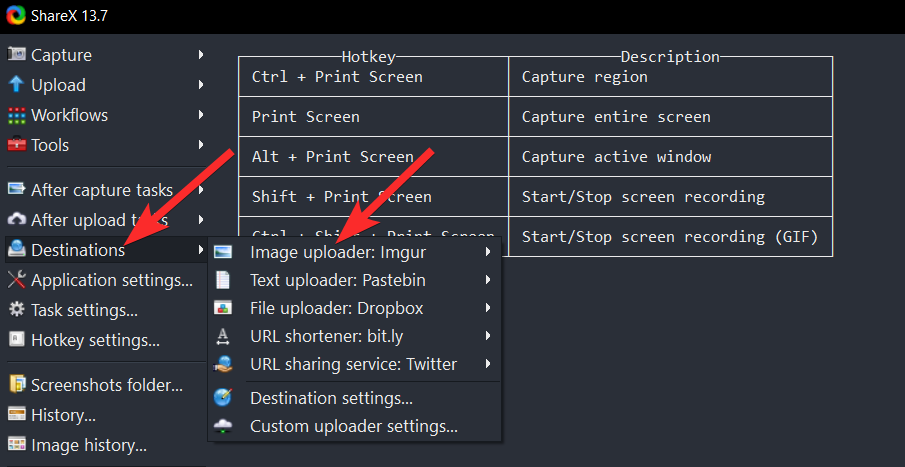
In the Image uploader options, select the host website where you want to upload your screenshots. For this guide, we will choose Imgur.
Now, in the ShareX tool, click on the Upload image to host option located in After capture tasks.
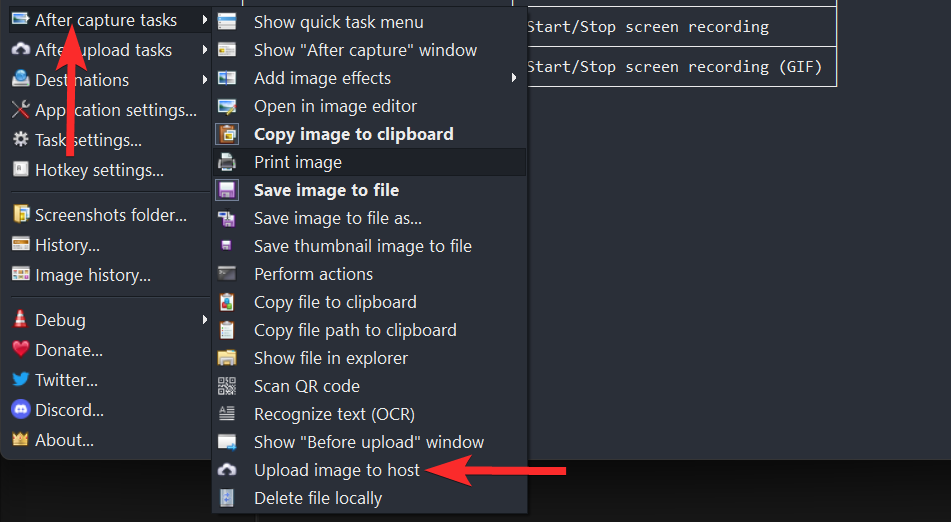
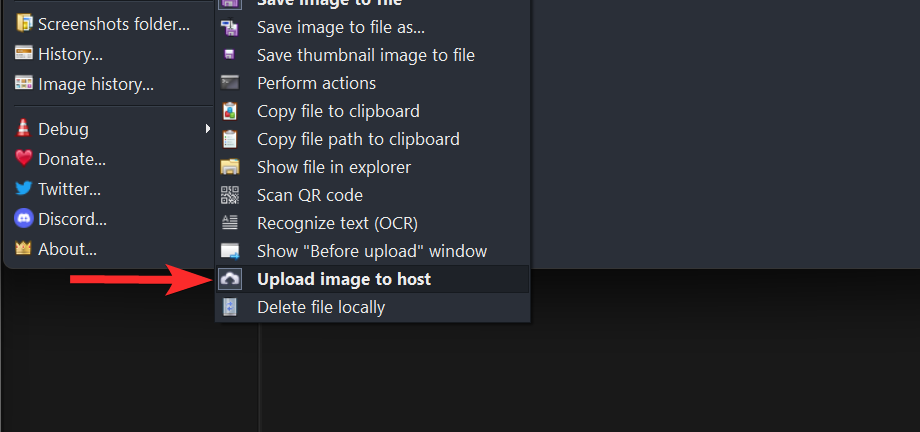
Once selected, the Upload image to host option will look similar to the picture below.
Then, click on After-upload tasks and make sure the Copy URL to clipboard and Open URL options are selected.
That’s it. Now, every time a screenshot is taken, ShareX will open the Imgur upload link for that particular screenshot in a new tab in your default browser.
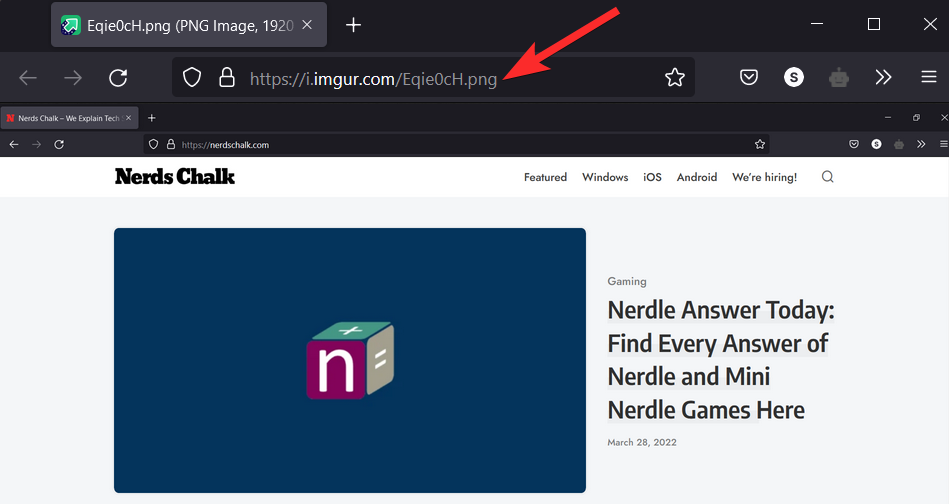
Additionally, the link to this uploaded picture has also been copied to your clipboard. You can then share this Imgur link by pasting it in a messaging app of your choice by using CTRL + V shortcut from your keyboard.
Method 2: Manually
You can also configure After-upload tasks so that you can upload screenshots manually with a single click. Follow the steps below to help you along with the process.
To do that, select Destinations > Image uploader from the ShareX tool.

In the Image uploader options, select the host website where you want to upload your screenshots. For this guide, we will choose Imgur.

Now, take the screenshot using ShareX or locate the screenshot you want to upload.
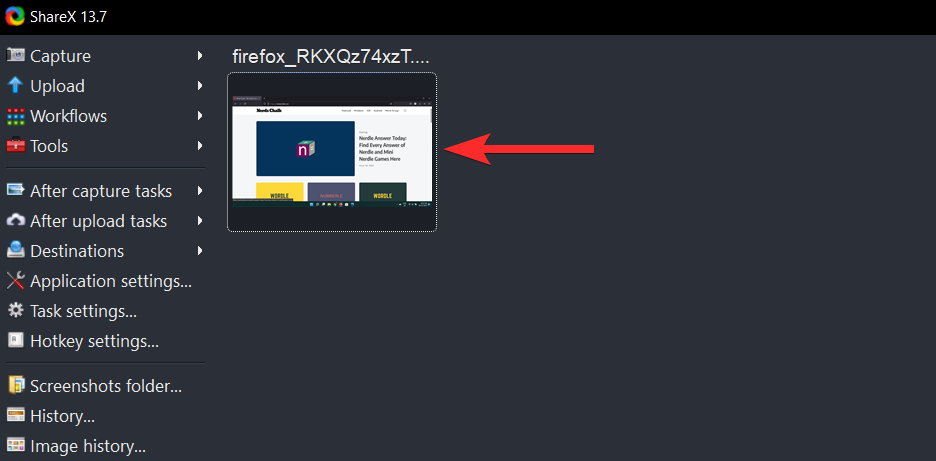
Right-click on this screenshot and select Upload. This will upload the screenshot to your chosen host and create a new thumbnail in ShareX.
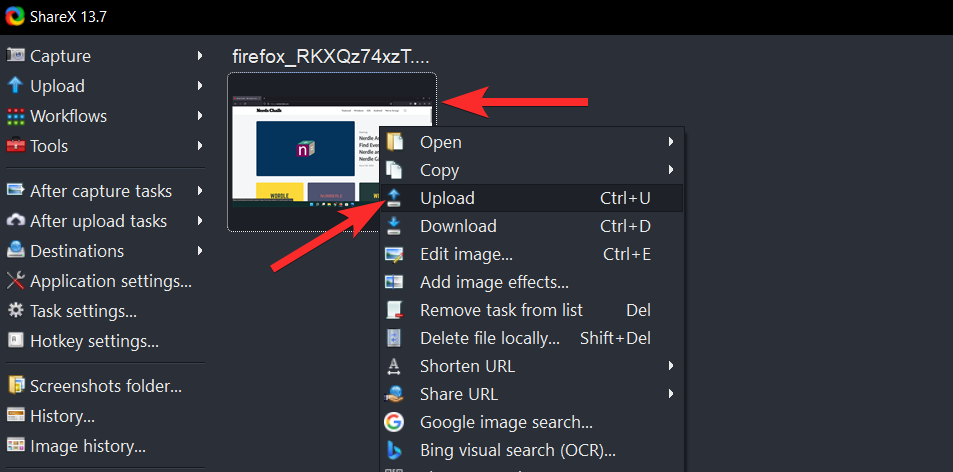
Now, to visit the upload link, right-click on the new thumbnail and select Open > URL.
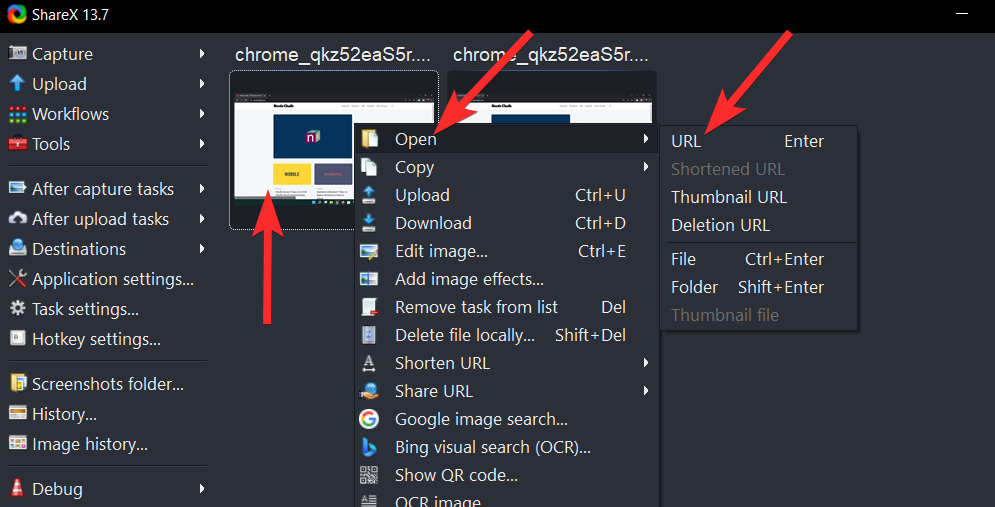
This will open the Imgur upload link for that particular screenshot in a new tab in your default browser.
Sharing screenshots can be a bit difficult if you’re low on data or want a permanent solution. ShareX offers you the ability to create QR codes for cloud-hosted screenshots which can then be scanned and opened from any device. Follow the guide below to help you along with the process.
Choose a screenshot that you wish to use for a QR code. Capture your screen, go to your destination folder, and right-click on the screenshot to select Upload.

Now, right-click on the new thumbnail and select Show QR code.
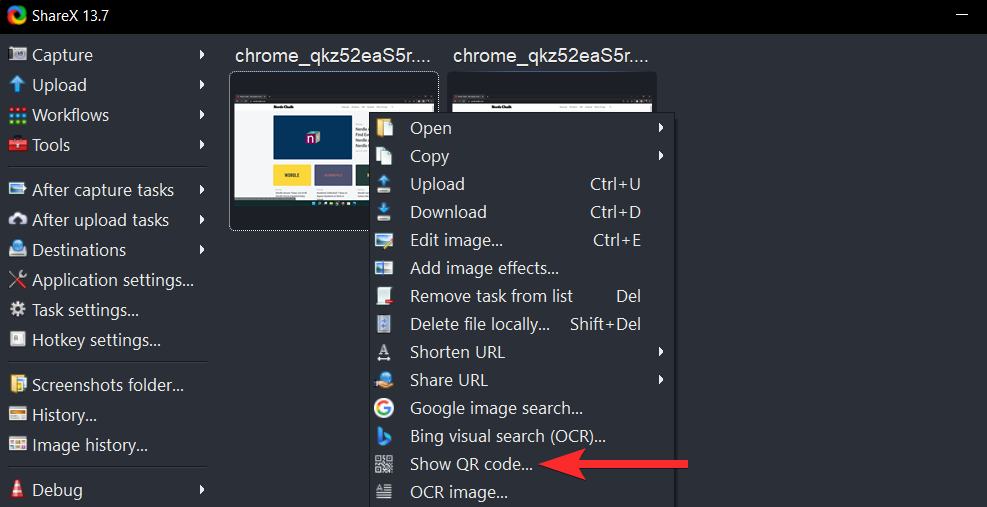
You will be presented with the QR code for the Imgur upload link of your screenshot.
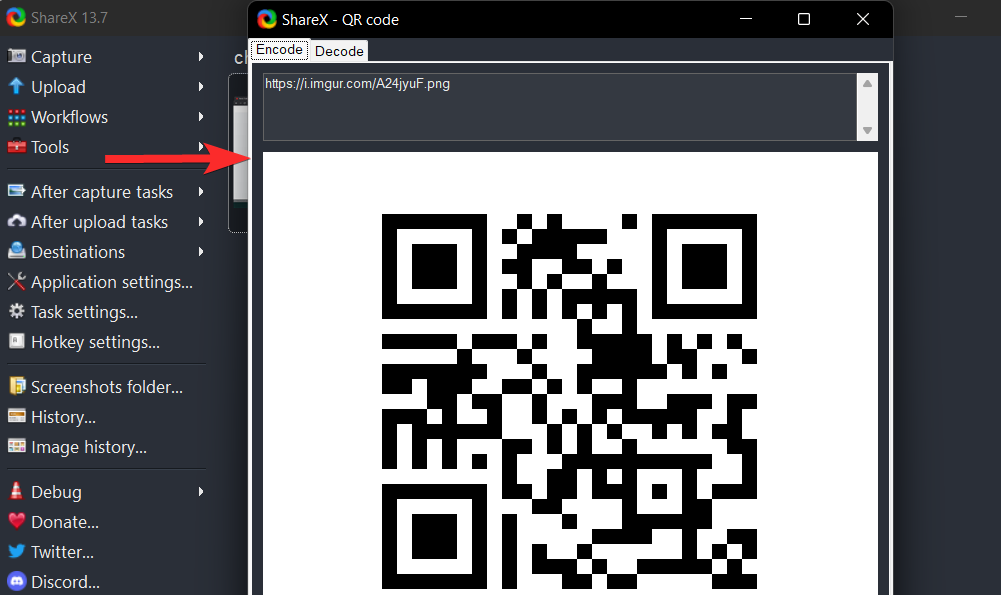
Right-click on the QR code and select one of the options depending on your preference. 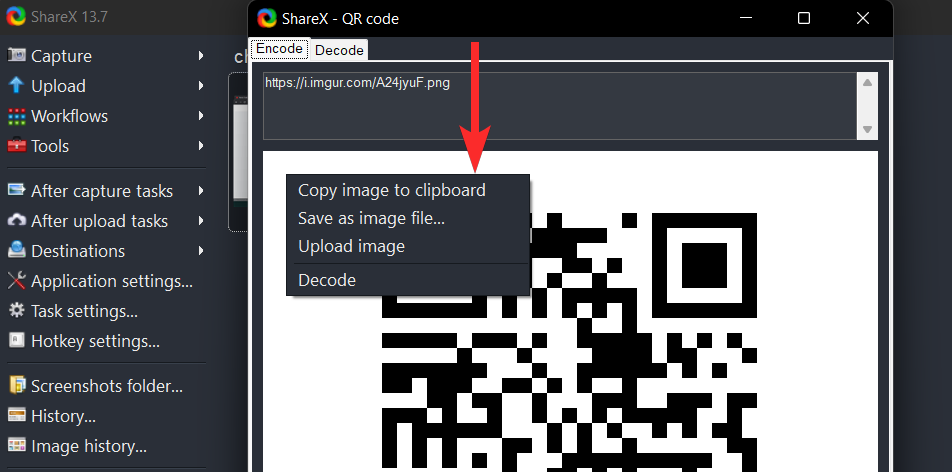
First, manually upload the screenshot from ShareX to an online host. To do that, select Destinations > Image uploader from the ShareX tool.

In the Image uploader options, select the host website where you want to upload your screenshots. For this guide, we will choose Imgur.

Now, take the screenshot using ShareX or locate the screenshot you want to upload.

Right-click on this screenshot and select Upload. This will upload the screenshot to your chosen host and create a new thumbnail in ShareX.

Now, right-click on the new thumbnail and select Show QR code.

You will be presented with the QR code for the Imgur upload link of your screenshot.

To see the following 3 options for dealing with the QR code, simply right-click on the QR code.

You can now choose one of the above 3 options to handle the QR code the way you desire.
As discussed above, ShareX has a dedicated image editor that you can use to your advantage to annotate and edit your screenshots as needed. Use the steps below to help you along with the process.
Open ShareX and navigate to your destination folder. Now click on the desired image and hit Ctrl + E on your keyboard.
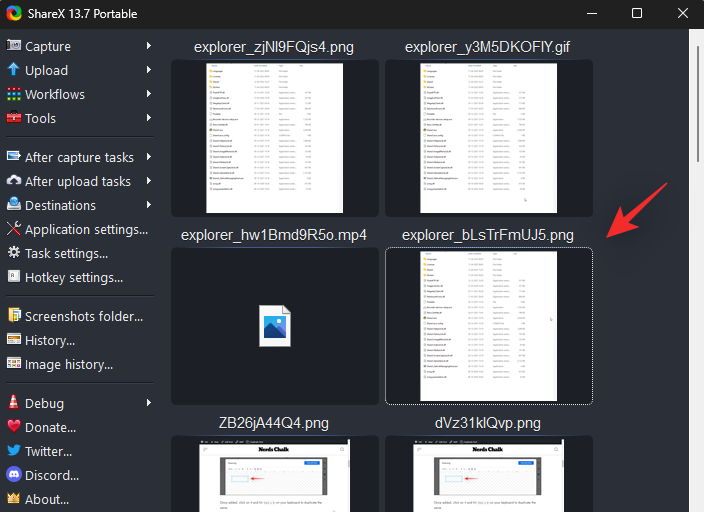
The image will now be opened in the ShareX editor and you can edit and save the same to your local storage as needed.
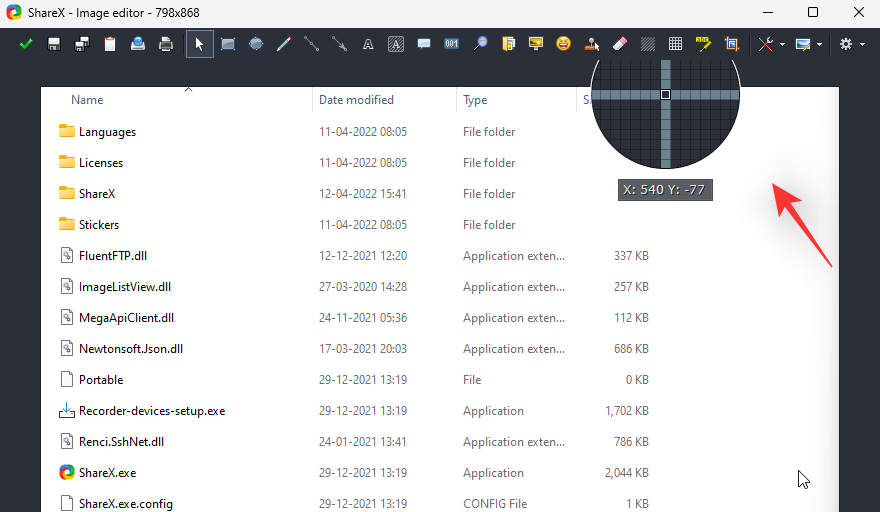
As we had configured ShareX to use the context menu option, we can also directly edit images from the File Browser itself.
Navigate to the desired image in the File Browser and right-click on the same. Select Edit with ShareX.
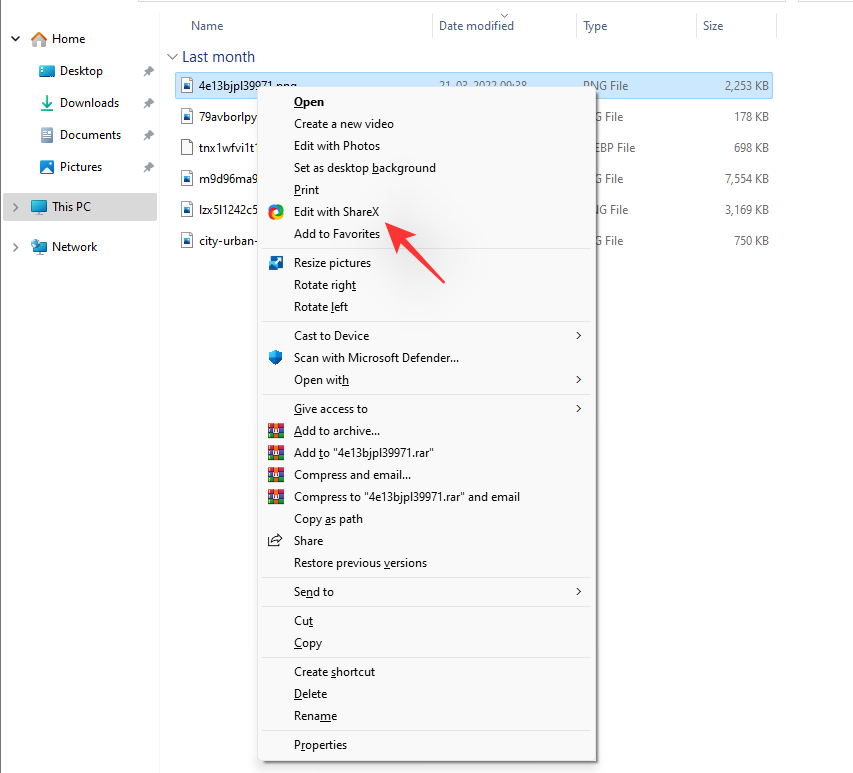
The selected image will now be automatically opened in the ShareX editor. You can now edit and save the image to your local storage as intended.
We hope this post helped you get familiar with ShareX. If you face any issues or have any more questions for us, feel free to reach out to us using the comments section below.
RELATED:
오류나 충돌이 발생하는 경우, Windows 11에서 시스템 복원을 수행하여 장치를 이전 버전으로 롤백하는 단계를 따르세요.
마이크로소프트 오피스의 최고의 대안을 찾고 있다면, 여기 6가지 훌륭한 솔루션이 있습니다.
이 튜토리얼은 명령 프롬프트를 특정 폴더 위치에서 열 수 있는 윈도우 데스크탑 바로가기 아이콘을 만드는 방법을 보여줍니다.
자리를 비운 동안 다른 사람이 컴퓨터에 접근하지 못하게 하려면? 윈도우 11에서 화면을 잠그는 효율적인 방법들을 시도해 보세요.
최근 업데이트 설치 후 컴퓨터에 문제가 있는 경우 손상된 Windows 업데이트를 수정하는 여러 가지 방법을 찾아보세요.
Windows 11의 내레이터 기능에 짜증이 나십니까? 여러 가지 쉬운 방법으로 내레이터 음성을 비활성화하는 방법을 알아보세요.
Windows 11 PC에서 삭제 확인 대화 상자를 비활성화하고 싶으신가요? 이 기사를 통해 다양한 방법을 확인해보세요.
여러 개의 이메일 수신함을 유지하는 것은 특히 중요한 이메일이 양쪽에 도착하는 경우 골칫거리가 될 수 있습니다. 이 기사에서는 PC 및 Apple Mac 장치에서 Microsoft Outlook과 Gmail을 동기화하는 방법을 보여줍니다.
키보드가 중복 공백을 입력하는 경우 컴퓨터를 재시작하고 키보드를 청소하세요. 그런 다음 키보드 설정을 확인하세요.
원격 데스크톱을 통해 컴퓨터에 연결할 때 "Windows는 프로파일을 로드할 수 없기 때문에 로그온할 수 없습니다." 오류를 해결하는 방법을 보여줍니다.

