Windows 11 został wydany publicznie, a ta nowa aktualizacja długo działającego systemu operacyjnego wydaje się otrzymywać świetne recenzje. Microsoft zwiększył prywatność, bezpieczeństwo dodało nowy interfejs użytkownika i możliwość instalowania aplikacji na Androida w systemie Windows 11. Ale jak zwykle system Windows zawiera wiele wstępnie zainstalowanych elementów, które są nieistotne dla prawie każdego użytkownika.
A jeśli kupiłeś gotowy system lub laptop, istnieje duże prawdopodobieństwo, że w twoim systemie jest zainstalowane dodatkowe oprogramowanie reklamowe, które możesz chcieć usunąć. Możesz łatwo usunąć i odinstalować większość aplikacji w systemie Windows za pomocą jednego kliknięcia, jednak sprawy stają się nieco skomplikowane, gdy przejdziesz do programów, aplikacji Windows Store, aktualizacji systemu Windows i aplikacji systemowych. Nie obawiaj się, możesz postępować zgodnie z naszymi przewodnikami poniżej, aby usunąć wszelkiego rodzaju aplikacje z systemu Windows bez względu na bieżące ustawienia. Zacznijmy.
Zawartość
Jak odinstalować aplikacje w systemie Windows 11 [8 sposobów]
Oto wszystkie sposoby odinstalowywania aplikacji z komputera z systemem Windows 11. Aby odinstalować aplikacje systemowe , zapoznaj się z dedykowanymi sekcjami i specjalnymi metodami poniżej, po tej sekcji.
Metoda nr 01: Korzystanie z ustawień
Postępuj zgodnie z poniższym przewodnikiem, aby odinstalować aplikację za pomocą ustawień z systemu. Jeśli próbujesz odinstalować domyślną aplikację, zalecamy wcześniejszą jej zmianę, aby opcja odinstalowania nie była dla Ciebie wyszarzona. Jeśli nie wiesz, jak zmienić domyślną aplikację w systemie Windows 11, możesz skorzystać z poniższego przewodnika.
Krok 1: Najpierw zmienić domyślną aplikację? [Opcjonalny]
Uwaga: upewnij się, że masz zainstalowaną w systemie aplikację zastępczą, aby zastąpić aplikację domyślną. Na przykład, jeśli zmieniasz przeglądarkę z Microsoft Edge, musisz mieć inną przeglądarkę, której chcesz używać, już zainstalowaną w systemie, abyś mógł wybrać ją jako domyślną przeglądarkę.
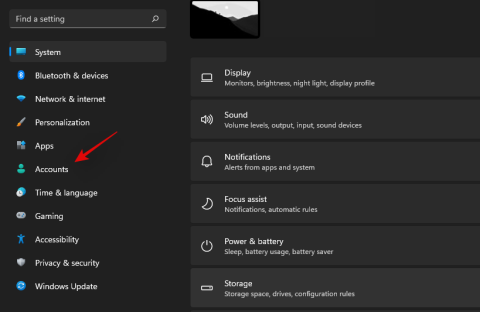
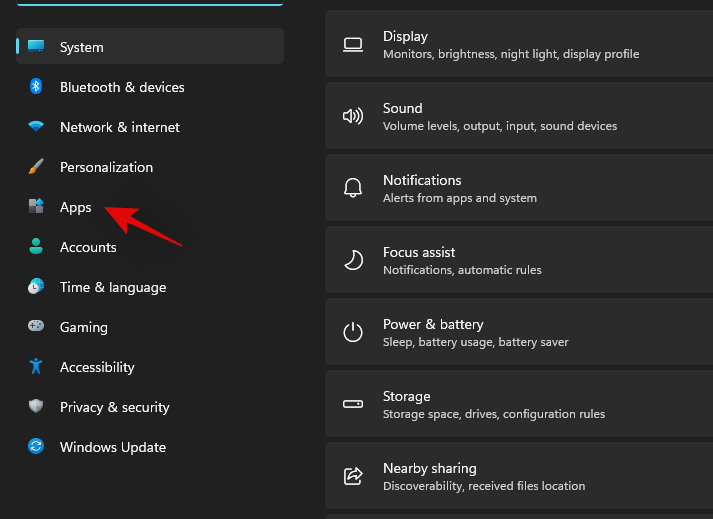
Naciśnij Windows + ina klawiaturze, aby otworzyć aplikację Ustawienia. Teraz kliknij „Aplikacje” na lewym pasku bocznym.
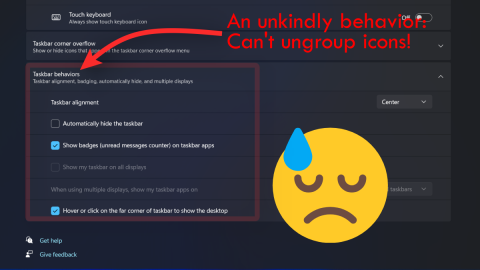
Kliknij i wybierz „Aplikacje domyślne” po prawej stronie.
Teraz wybierz aplikację, którą chcesz usunąć jako aplikację domyślną i kliknij ją. Jeśli chcesz zmienić domyślną aplikację według typu pliku, kliknij „Wybierz domyślne według typu pliku” na dole, jak pokazano poniżej.
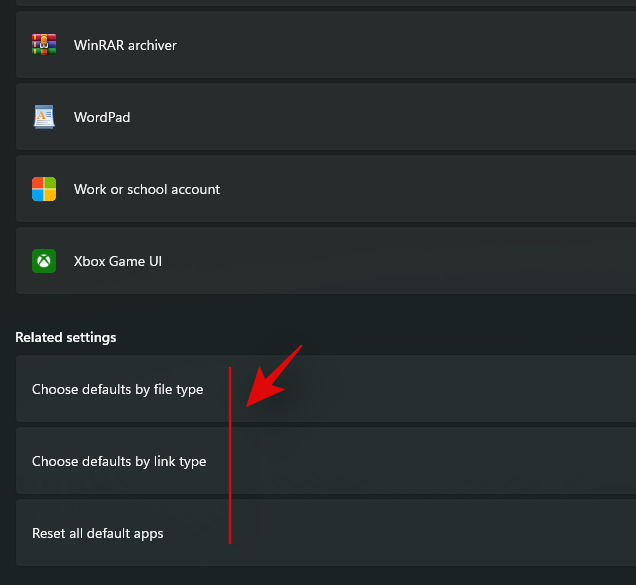
Teraz kliknij żądany typ pliku/rozszerzenie i wybierz wybraną aplikację.
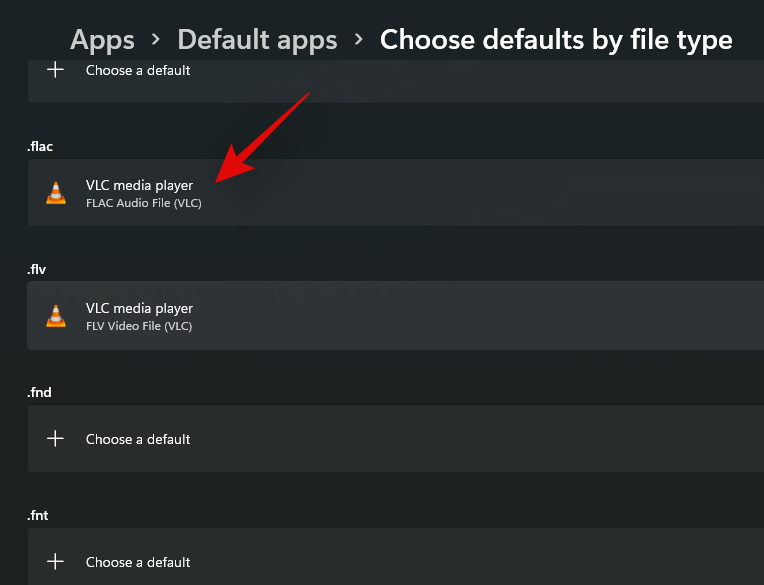
Powtórz powyższy krok dla wszystkich niezbędnych typów plików/rozszerzeń.
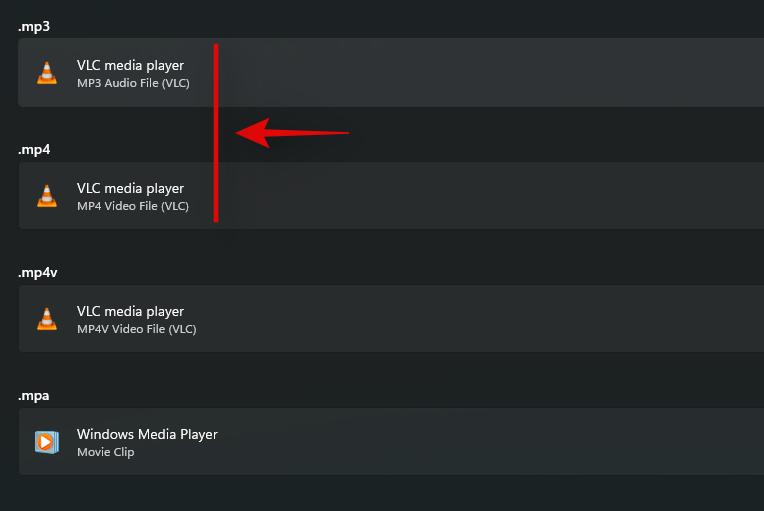
Zamknij aplikację Ustawienia i uruchom ponownie system, aby uzyskać dokładny pomiar.
I to wszystko! Po ponownym uruchomieniu systemu domyślna aplikacja powinna zostać zmieniona. Możesz teraz skorzystać z poniższego przewodnika, aby odinstalować niezbędną aplikację za pomocą „Ustawienia” w swoim systemie.
Krok 2: Odinstaluj aplikację z Ustawień
Naciśnij Windows + ina klawiaturze i wybierz „Aplikacje” po lewej stronie.

Teraz kliknij „Aplikacje i funkcje” po prawej stronie.
Przewiń listę i znajdź aplikację, którą chcesz odinstalować. Po znalezieniu kliknij ikonę menu z trzema kropkami po prawej stronie.
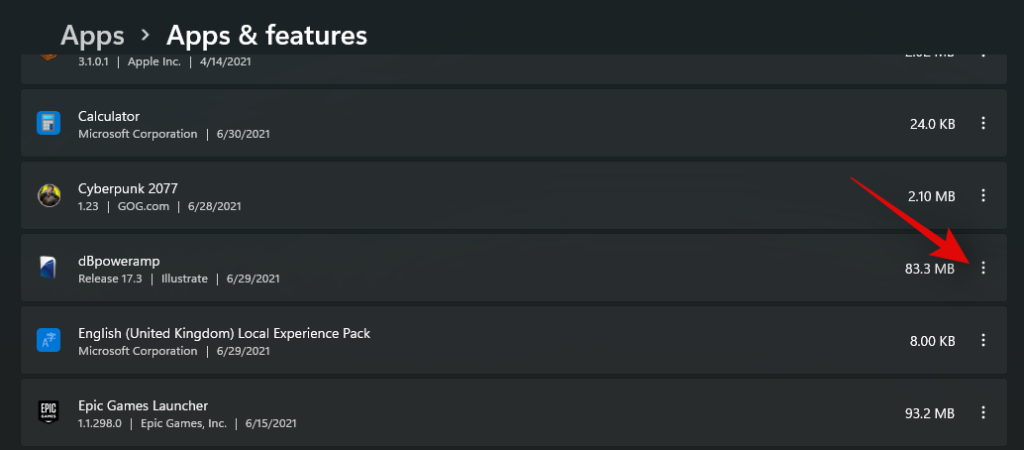
Kliknij i wybierz „Odinstaluj”.
Teraz postępuj zgodnie z instrukcjami wyświetlanymi na ekranie, aby odinstalować aplikację. Jeśli odinstalowujesz aplikację preinstalowaną lub aplikację ze Sklepu Windows, zostanie ona automatycznie odinstalowana w tle. Jeśli jednak jest to program wykryty przez system Windows, to w zależności od programu system Windows spróbuje odinstalować go w tle lub uruchomi plik „uninstall.exe” lub „setup.msi”, aby można go było odinstalować samodzielnie z żądanymi ustawieniami. Możesz być w stanie zachować/zapisać niektóre dane, gdy napotkasz takie konfiguracje, w tym takie rzeczy, jak pliki dziennika, dane użytkownika, dane zapisu, zdjęcia i inne.
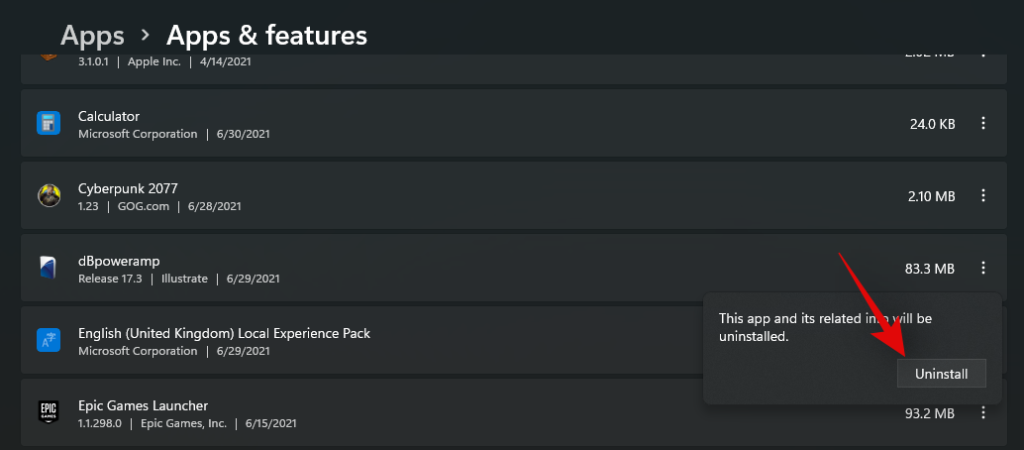
Alternatywnie będziesz mieć również możliwość całkowitego usunięcia z systemu wszystkiego, co jest związane z programem.
I to wszystko! Wybrana aplikacja powinna zostać teraz odinstalowana z systemu. Jeśli odinstalowałeś ciężki program, zalecamy wyczyszczenie pamięci podręcznej za pomocą tego przewodnika, zwłaszcza jeśli program przekroczył rozmiar 30+ GB.
Naciśnij przycisk „Windows” na klawiaturze, aby wyświetlić menu „Start”. Możesz również kliknąć ikonę na pasku zadań.
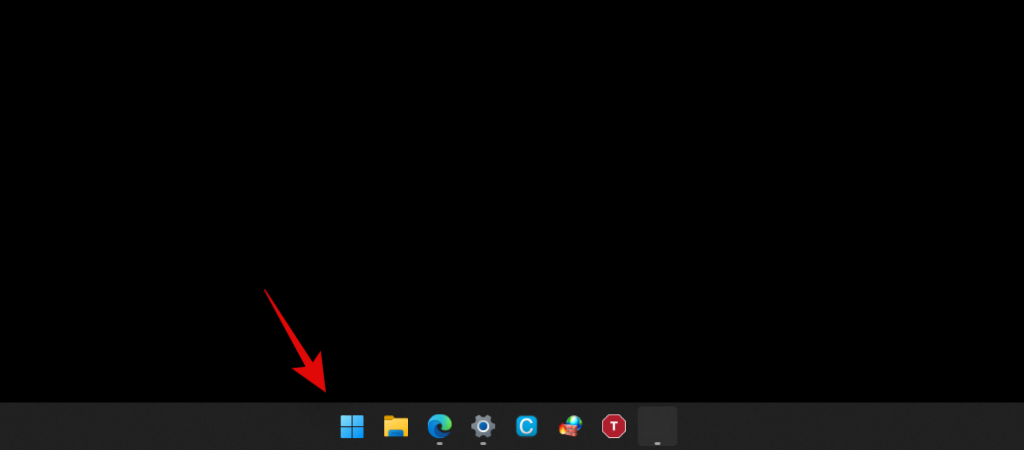
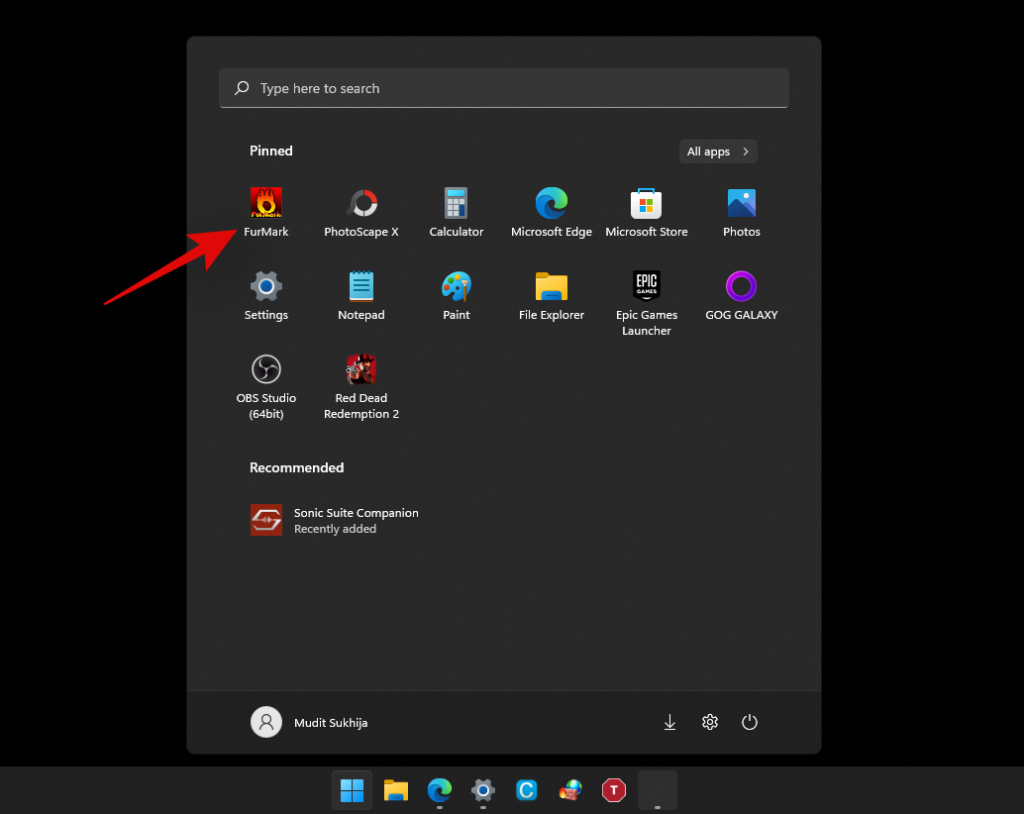
Znajdź aplikację, którą chcesz odinstalować, i kliknij ją prawym przyciskiem myszy.
Teraz kliknij „Odinstaluj”. W razie potrzeby postępuj zgodnie z instrukcjami wyświetlanymi na ekranie, aby zakończyć proces dezinstalacji.
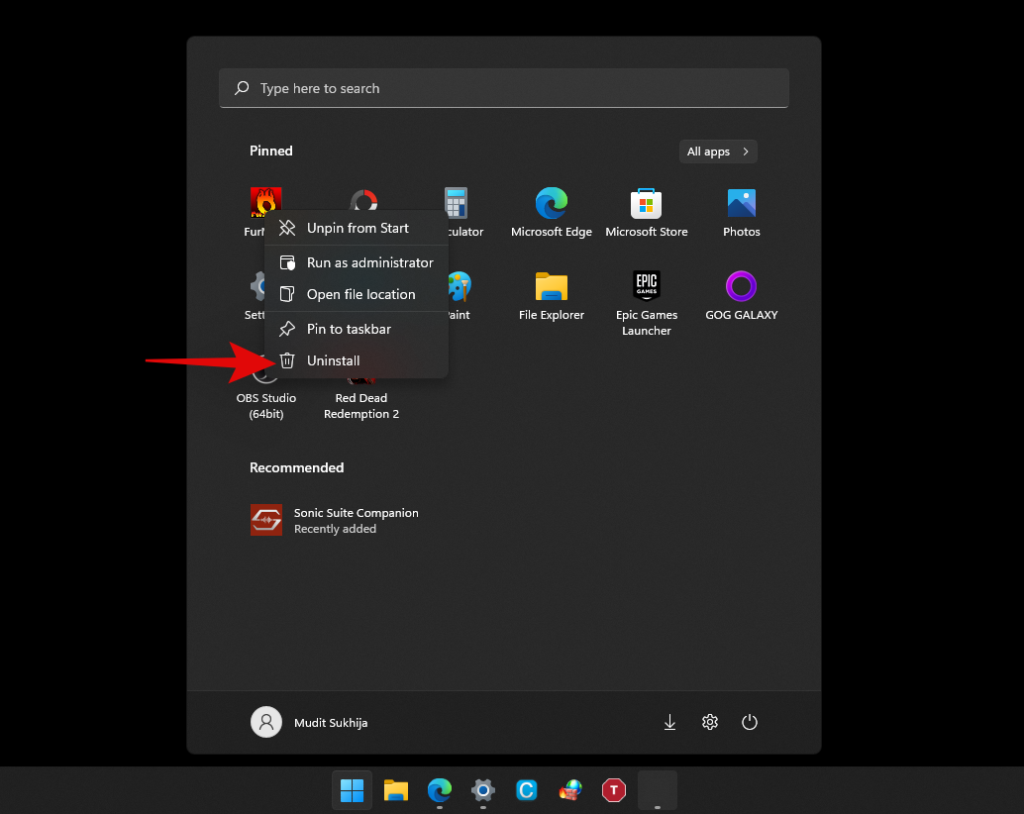
I to wszystko! Teraz odinstalowałeś aplikację z systemu za pomocą menu Start.
Metoda nr 03: Korzystanie z dezinstalacyjnego pliku „.exe”
Idealnie byłoby, gdyby nie trzeba było ręcznie uruchamiać pliku wykonywalnego dezinstalacji programu, ale w niektórych przypadkach, na przykład w przypadku starszych programów, w systemie może być zainstalowany program, którego opcja dezinstalacji nigdzie nie jest wyświetlana w ustawieniach. W takich przypadkach możesz samodzielnie uruchomić plik dezinstalacyjny, korzystając z poniższego przewodnika.
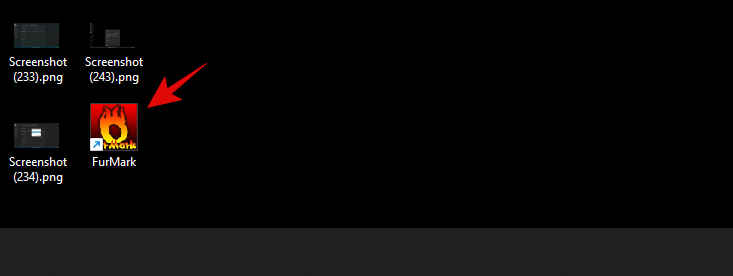
Znajdź plik .exe programu lub skrót, którego zwykle używasz do uruchamiania programu, i kliknij go prawym przyciskiem myszy.
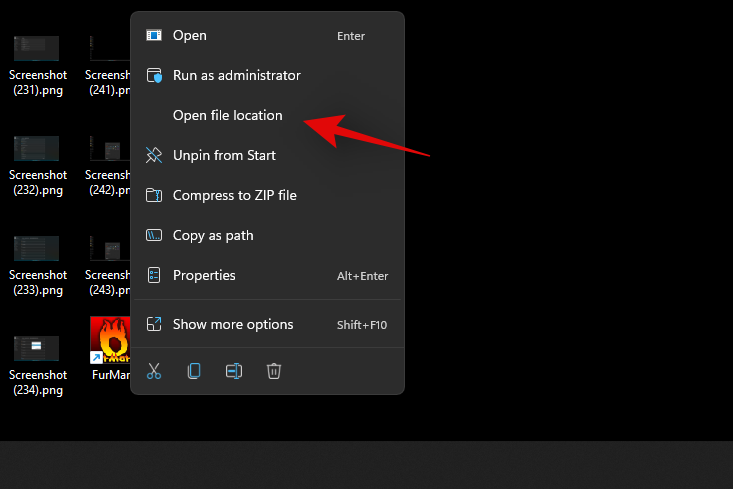
Wybierz „Otwórz lokalizację pliku”. Jeśli nie widzisz tej opcji, wybierz właściwości. Teraz znajdziesz opcję „Otwórz lokalizację pliku” w zakładce „Ogólne”, jak pokazano poniżej.
Zostaniesz teraz przeniesiony do katalogu instalacyjnego programu. Poszukaj pliku .exe o jednej z poniższych nazw lub podobnej nazwie.
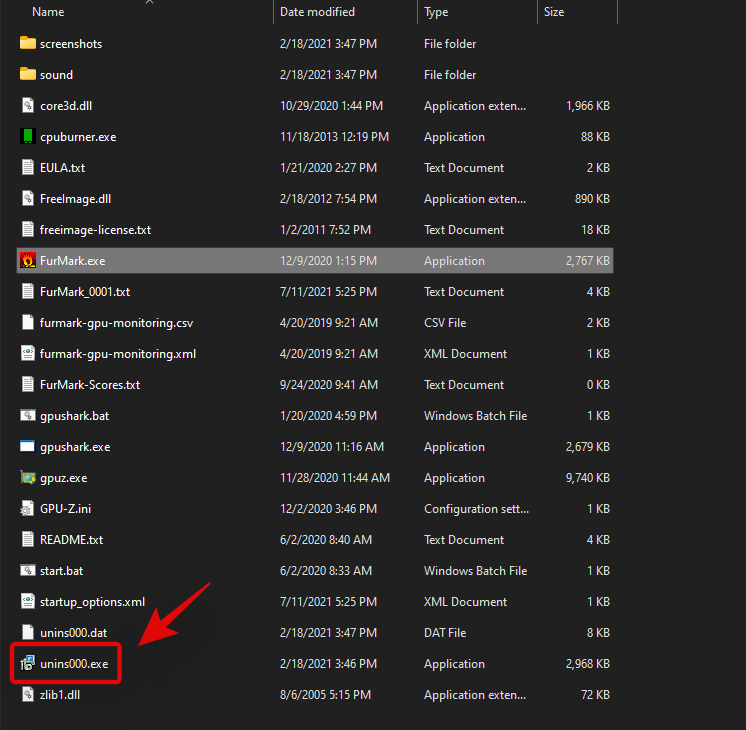
- uninst.exe
- odinstalować.exe
- setup.exe
- setup.msi
- (nazwa programu)setup.exe/.msi
- (nazwa programu) uninstall.exe/uninst.exe
i więcej. Program/instalator dezinstalacyjny będzie miał podobną nazwę. Po uruchomieniu możesz postępować zgodnie z instrukcjami wyświetlanymi na ekranie, aby odinstalować go z systemu.
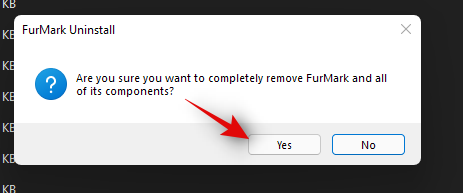
W niektórych przypadkach możesz również otrzymać opcję naprawy, ponownej instalacji lub modyfikacji programu wraz z dezinstalacją. Możesz wybrać żądaną opcję i kontynuować konfigurację zgodnie z zamierzeniami.
Metoda #04: Korzystanie z Panelu sterowania
Możesz także łatwo usuwać programy i aplikacje z Panelu sterowania. W idealnym przypadku zaleca się odinstalowanie tylko starszych i nowoczesnych programów za pomocą Panelu sterowania, ponieważ nie wszystkie zainstalowane aplikacje pojawią się tutaj. Postępuj zgodnie z poniższym przewodnikiem, aby odinstalować programy za pomocą panelu sterowania.
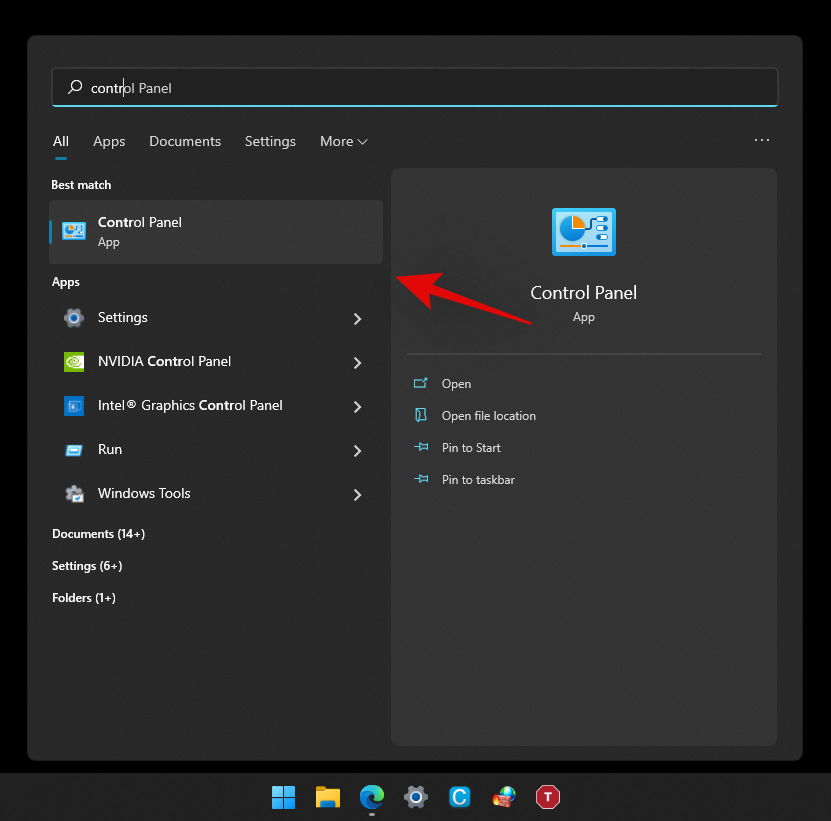
Naciśnij Windows + sna klawiaturze i wpisz „Panel sterowania”. Kliknij i uruchom aplikację, gdy pojawi się w wynikach wyszukiwania.
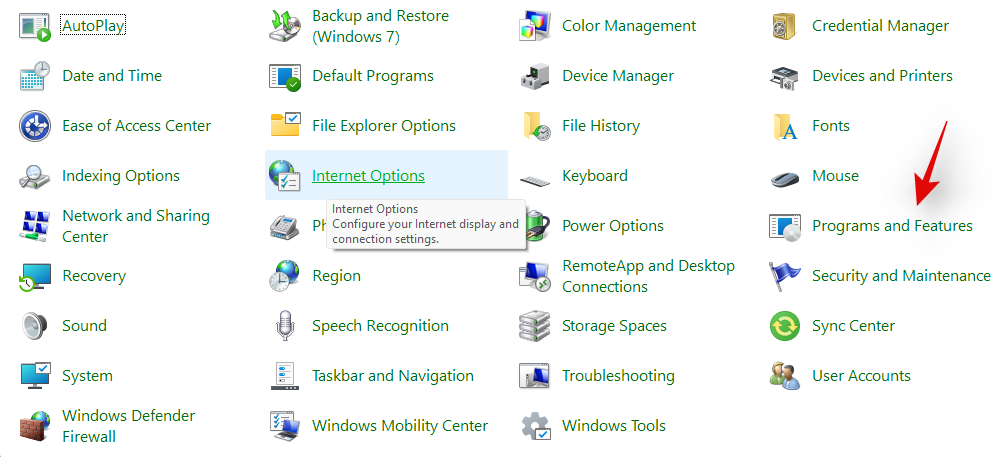
Teraz kliknij „Programy i funkcje”.
Otrzymasz teraz listę wszystkich programów zainstalowanych obecnie w twoim systemie. Znajdź program, który chcesz odinstalować i kliknij go.
Teraz wybierz „Odinstaluj” u góry.

Postępuj zgodnie z instrukcjami wyświetlanymi na ekranie, aby zakończyć proces instalacji. W niektórych przypadkach będzie to proces zautomatyzowany, podczas gdy w innych możesz otrzymać opcję naprawy istniejącej instalacji lub wybrać, które dane chcesz zachować, a które chcesz usunąć.
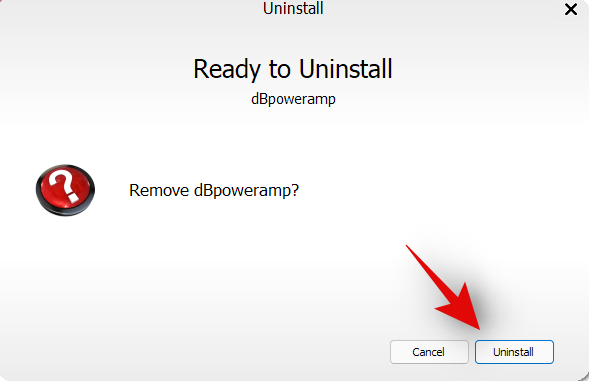
Po dokonaniu wyboru nastąpi proces dezinstalacji, a program powinien zostać usunięty z systemu po zakończeniu procesu.
Metoda #05: Używanie PowerShell
Możesz także odinstalować aplikacje za pomocą podwyższonego programu PowerShell w systemie Windows 11. Chociaż polecenie odinstalowania jest dość proste, uzyskanie nazwy pakietu dla danej aplikacji lub programu nie jest. Dlatego w poniższym przewodniku dowiesz się, jak odinstalować aplikacje za pomocą PowerShell, jeśli masz nazwę pakietu.
Jeśli jednak nie wiesz, jak pozyskać pełną nazwę pakietu, zalecamy skorzystanie z poniższego przewodnika po aplikacjach systemowych, który omawia tę samą metodę bardziej szczegółowo. Zacznijmy.
Naciśnij Windows + sna klawiaturze i wpisz „PowerShell”. Teraz kliknij „Uruchom jako administrator”, gdy pojawi się w wynikach wyszukiwania.
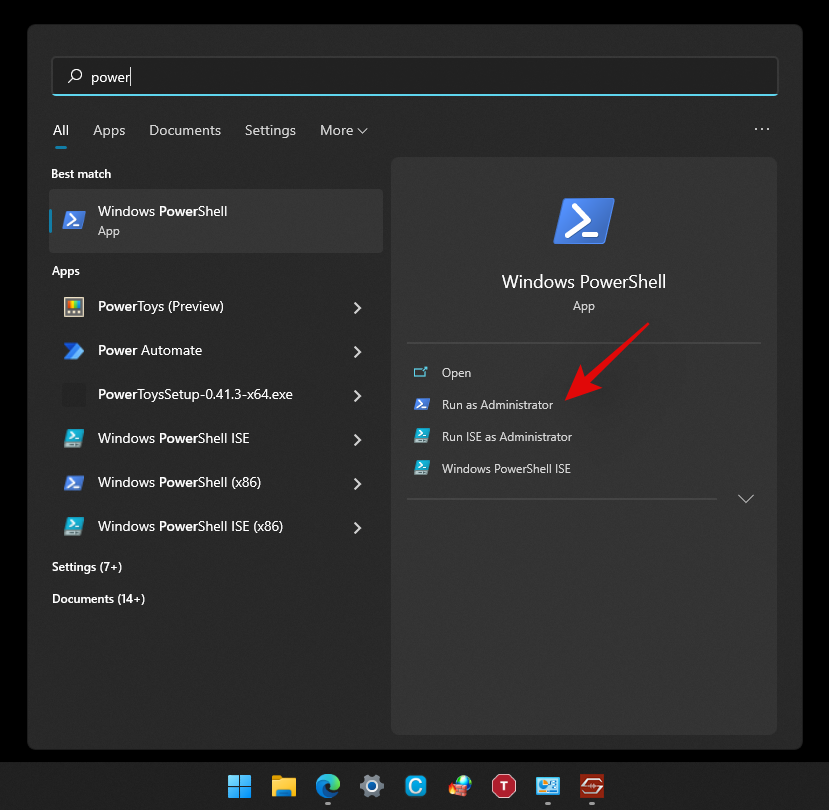
Gdy pojawi się okno PowerShell na pulpicie, wpisz następujące polecenie i naciśnij „Enter” na klawiaturze. Upewnij się, że zastąpiłeś „[Nazwa]” pełną nazwą pakietu odpowiedniej aplikacji.
Remove-AppxPackage [Name]

I to wszystko! Powershell zrobi teraz swoją magię i odinstaluje daną aplikację z twojego systemu.
Metoda #06: Korzystanie z CMD
Możesz także użyć wiersza poleceń w systemie Windows 11, aby odinstalować aplikacje z systemu. Postępuj zgodnie z poniższym przewodnikiem, aby rozpocząć.
Naciśnij Windows + sna klawiaturze i wyszukaj „CMD”. Kliknij „Uruchom jako administrator”, gdy pojawi się w wynikach wyszukiwania.
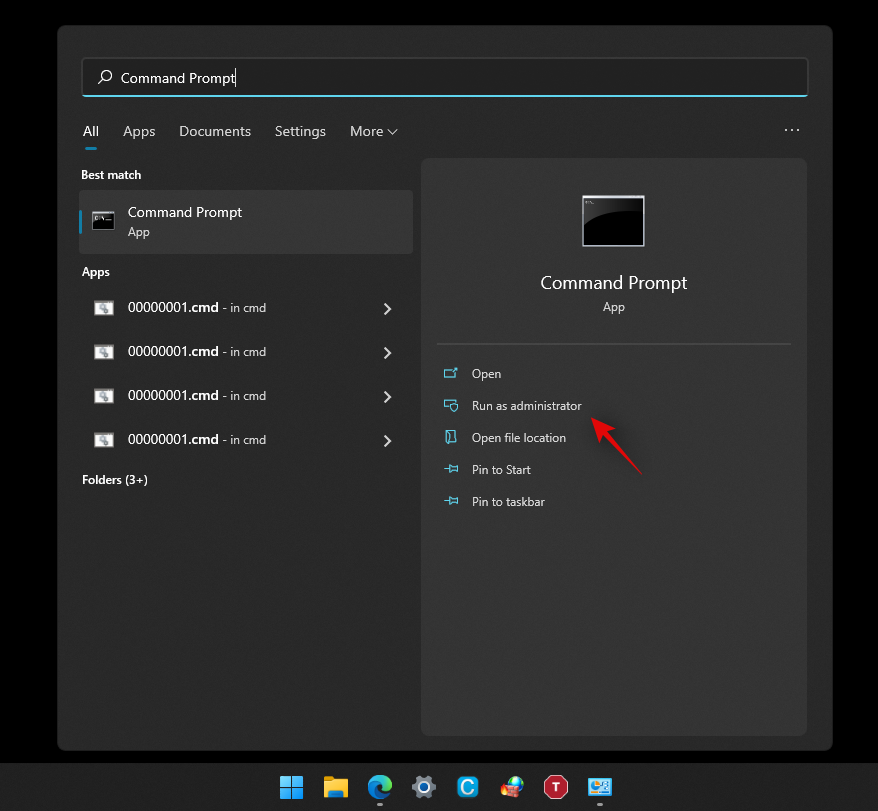
Po uruchomieniu CMD wpisz następujące polecenie i naciśnij „Enter” na klawiaturze.
wmic

Teraz wpisz następujące polecenie, aby uzyskać listę wszystkich aplikacji i programów zainstalowanych w twoim systemie.
product get name

Po uzyskaniu listy wszystkich programów znajdź na tej liście ten, który chcesz odinstalować. Po znalezieniu zanotuj całą jego nazwę w dogodnym miejscu.
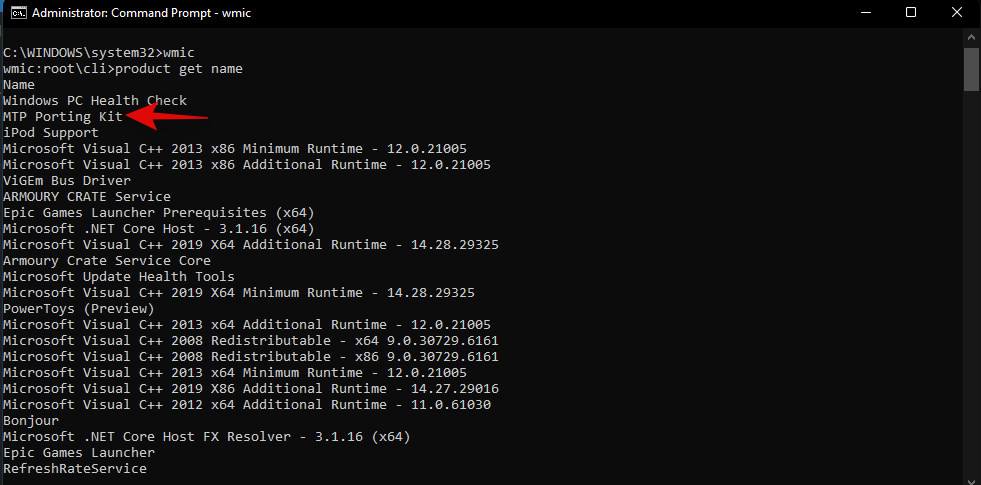
Teraz wpisz następujące polecenie i zastąp AppName nazwą aplikacji, którą zanotowałeś wcześniej.
product where name="AppName" call uninstall/nointeractive
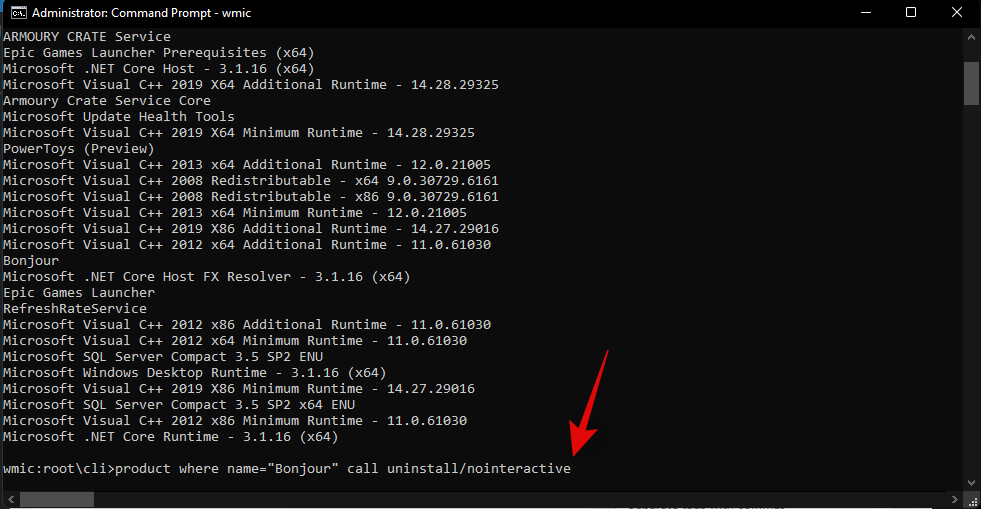
Uwaga: nie usuwaj cudzysłowów z polecenia, ponieważ są one niezbędne dla tej składni.
Naciśnij „Enter” na klawiaturze, aby wykonać polecenie.
Wiersz polecenia wykona teraz niezbędne procesy w tle i po zakończeniu procesu powinieneś otrzymać potwierdzenie, jak pokazano poniżej.
I to wszystko! Teraz odinstalowałeś aplikację z systemu za pomocą wiersza polecenia.
Metoda #07: Korzystanie z pliku setup.msi
Jeśli twój program został dostarczony z plikiem instalacyjnym, który miał rozszerzenie .msi zamiast .exe, możesz użyć tego samego pliku do odinstalowania programu. Dowiedzmy się nieco więcej o plikach .msi, aby łatwiej było zrozumieć ich funkcję.
Co to jest plik .msi?
Tradycyjnie instalatory są dostarczane z rozszerzeniem .exe. Są to programy przeznaczone do instalowania programów w systemie wraz z dołączonymi do nich plikami instalacyjnymi. Pliki MSI idą o krok dalej, umożliwiając łączenie wielu instalatorów w tym samym pliku.
Pozwala to plikowi MSI na wykonywanie różnych funkcji dzięki dołączonym instalatorom. Obejmuje to takie rzeczy, jak instalatory aktualizacji, instalatory oprogramowania, narzędzie do naprawy programu, modyfikator programu i dezinstalator. Dlatego jeśli twój program został dostarczony z plikiem instalacyjnym .msi, możesz skorzystać z poniższego przewodnika, aby użyć tego samego pliku do odinstalowania programu z systemu.
Uwaga: Starsze pliki .msi rzadko działają z nowszymi instalacjami tego samego oprogramowania. Pamiętaj o tym na wypadek, gdybyś próbował obniżyć swój program do poprzedniej wersji.
Odinstaluj za pomocą pliku .msi
Znajdź plik instalacyjny .msi w lokalnej pamięci masowej, kliknij dwukrotnie i uruchom aplikację.
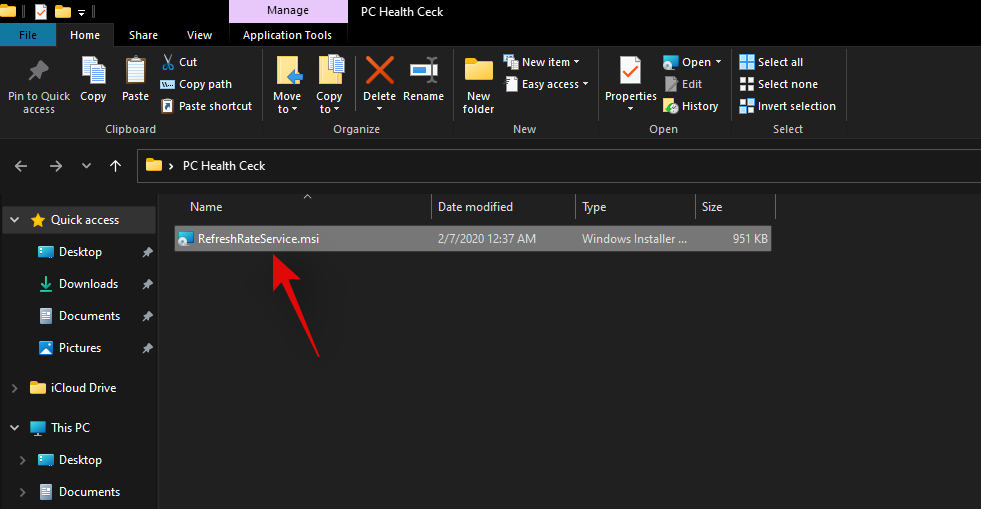
Postępuj zgodnie z instrukcjami wyświetlanymi na ekranie, aż zostaniesz poproszony o wybranie jednego z kierunków działania.
- Naprawa
- Modyfikować
- Odinstaluj
- Zainstaluj aktualizacje
- Usuń aktualizacje
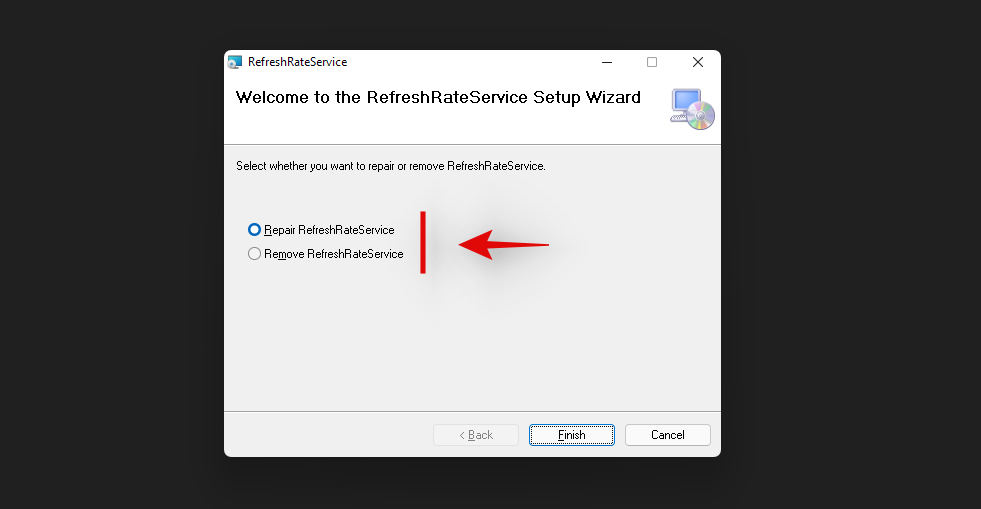
Wybierz żądaną opcję i postępuj zgodnie z instrukcjami wyświetlanymi na ekranie, aby zakończyć proces dezinstalacji.
I to wszystko! Wybrany program powinien teraz zostać usunięty z systemu za pomocą pliku instalacyjnego .msi.
Metoda #08: Użyj dezinstalatora innej firmy
Na rynku dostępne są również różne dezinstalatory innych firm. Te aplikacje pomagają zidentyfikować wszystkie aplikacje systemowe i aplikacje innych firm w systemie, które można następnie odinstalować z komputera jednym kliknięciem. Większość z tych programów umożliwia usuwanie aplikacji systemowych po wybraniu wersji premium oprogramowania.
Jeśli zdecydujesz się skorzystać z darmowej wersji, w większości przypadków będziesz ograniczony do określonej liczby odinstalowań. Choć może to wydawać się zbędne, te narzędzia są niezwykle przydatne dla profesjonalistów i techników, którzy muszą odinstalować wiele programów jednym kliknięciem. Większość z tych dezinstalatorów obsługuje dezinstalacje zbiorcze, co jest przydatne podczas konfigurowania wielu systemów w środowisku biurowym. Poniżej połączyliśmy dwa najpopularniejsze dezinstalatory innych firm. Mamy nadzieję, że okażą się przydatne w dążeniu do odinstalowania programów z systemu Windows 11.
Jak odinstalować aplikacje systemowe w systemie Windows 11 [2 sposoby]
Możesz odinstalować aplikacje systemowe w systemie Windows 11 za pomocą podwyższonego programu PowerShell lub za pomocą skryptu PowerShell innej firmy. Sugerowałbym użycie metody PowerShell, chociaż może się to wydawać bardziej skomplikowane, nie będziesz musiał uruchamiać w swoim systemie skryptów innych firm z podwyższonymi uprawnieniami.
Jeśli jednak nadal zdecydujesz się na użycie zautomatyzowanego skryptu, upewnij się, że zmieniłeś zasady wykonywania z powrotem na normalne po wykonaniu skryptu. Będzie to miało ogromne znaczenie dla bezpieczeństwa systemu, ponieważ pozostawienie niezmienionych zasad wykonywania może pozwolić złośliwym użytkownikom na łatwe uruchamianie skryptów PowerShell w systemie. Aby rozpocząć, użyj jednej z poniższych metod, która najlepiej odpowiada Twoim obecnym potrzebom i wymaganiom.
Metoda nr 01: Korzystanie z Powershell
Proces dezinstalacji programu PowerShell dla dowolnego programu ma dwa procesy. Najpierw pozyskaj pełną nazwę pakietu odpowiedniej aplikacji, a następnie za pomocą programu PowerShell odinstaluj daną aplikację. Jeśli Twoja aplikacja nie pojawia się na liście PowerShell, może być konieczne użycie poniższego skryptu innej firmy, aby usunąć daną aplikację z systemu. Zacznijmy.
Krok 1: Źródło pełnej nazwy pakietu
Naciśnij Windows + sna klawiaturze i wyszukaj „PowerShell”. Kliknij „Uruchom jako administrator”, gdy pojawi się w wynikach wyszukiwania.

Po uruchomieniu PowerShell wpisz poniższe polecenie i naciśnij „Enter” na ekranie.
get-appxpackage
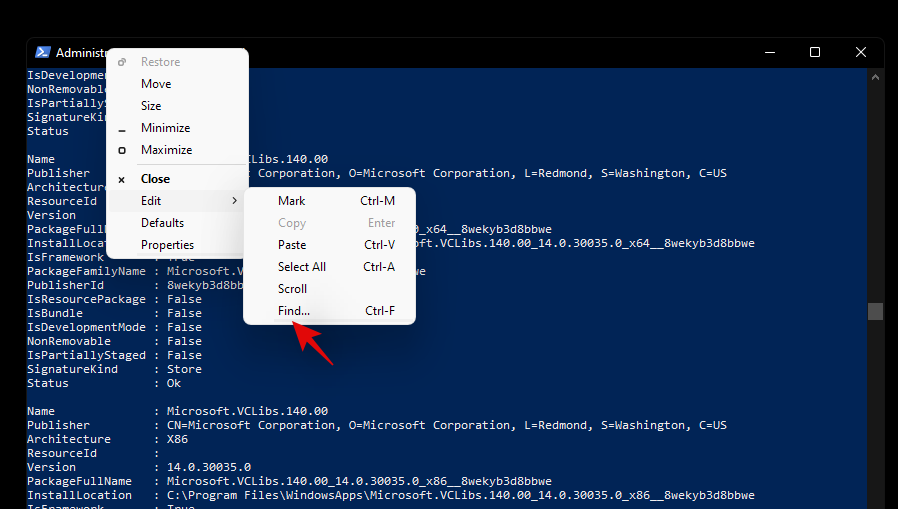
PowerShell will now generate and show a list of all the apps installed on your system including built-in OEM apps and Windows app. Scroll the list to find your app, however, if this seems too tedious, start by right-clicking on the title bar at the top.
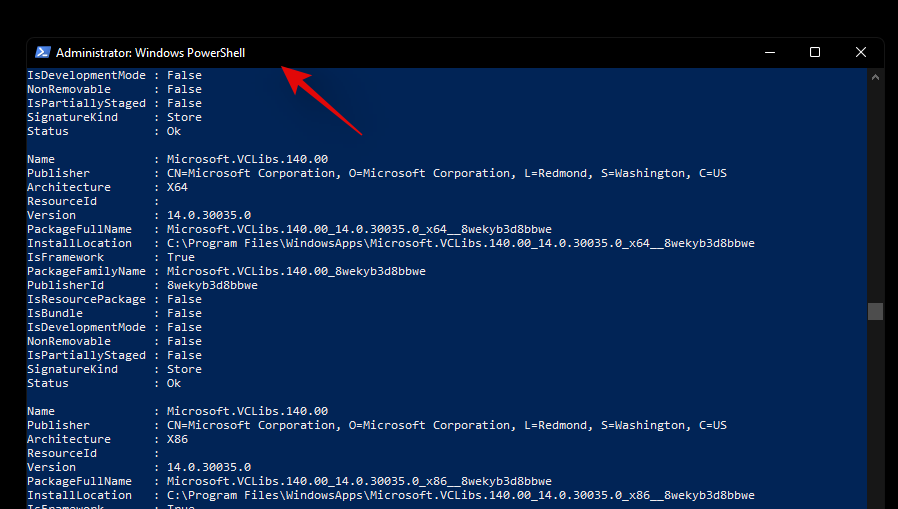
Now select ‘Edit’.
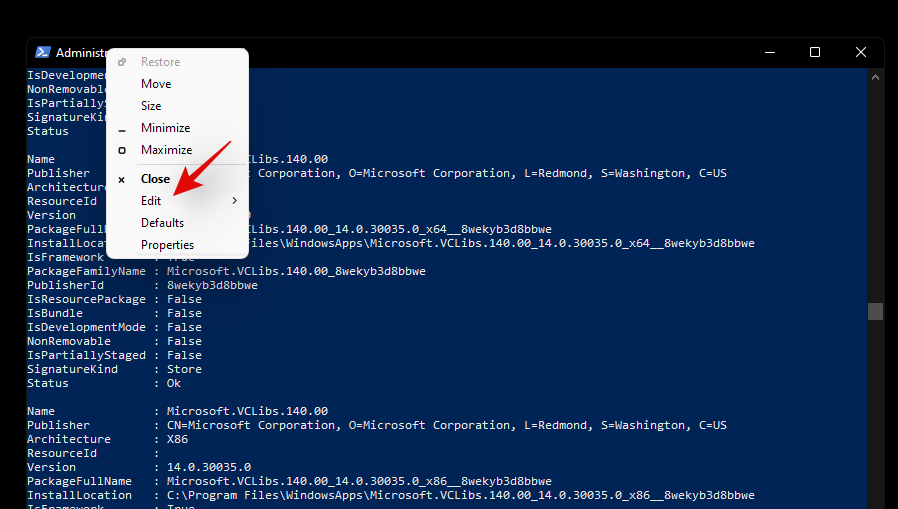
Click on ‘Find’.
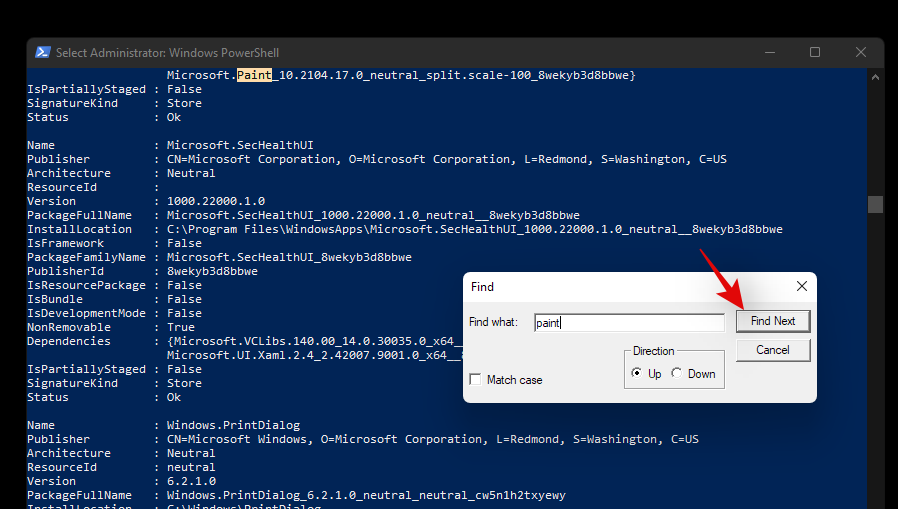
Now search for the general name of the app and the ‘Find’ feature should automatically take you to the app in the list.
Note down the ‘FullPackageName’ of the concerned app as shown below.
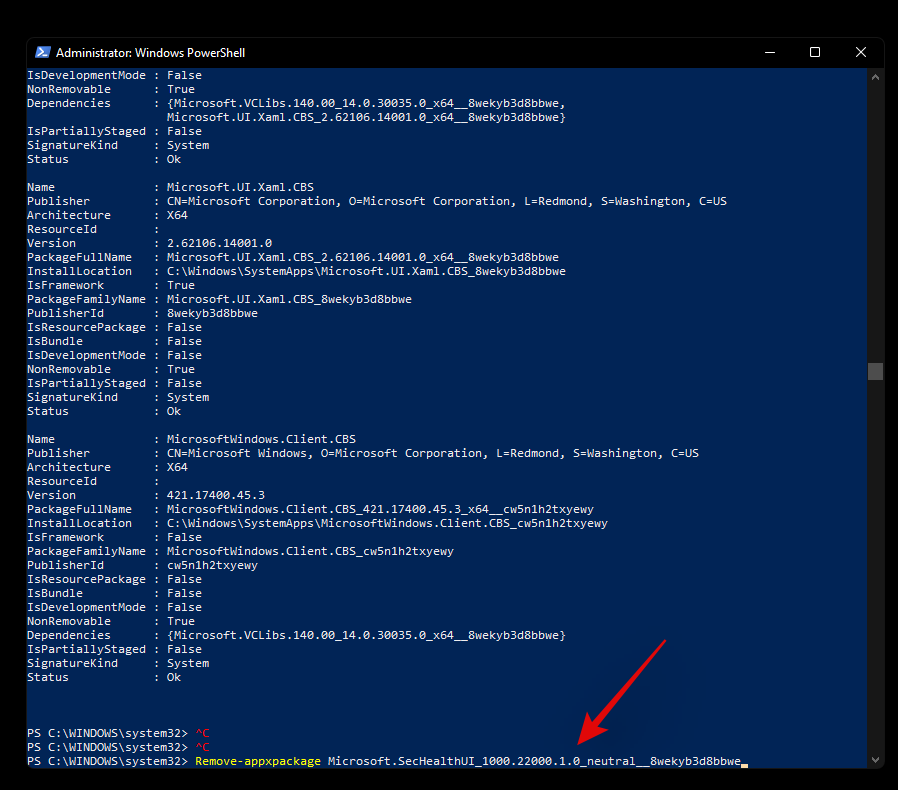
And that’s it! You will now have sourced the full package name for the concerned app on your system. You can now use the guide below to uninstall it from your system.
Step 2: Uninstall app via PowerShell
Open an elevated PowerShell using the guide above. If you already have one open on your screen, then start by typing in the following command. Ensure that you replace ‘[PackageName]’ with the full package name of the app we sourced above.
Remove-Appxpackage [PackageName]

Hit ‘Enter’ on your keyboard once you are done. PowerShell will now do its thing and the app should be installed from your system in no time.
Can’t remove an app using PowerShell? How to fix
If you are unable to remove the app via PowerShell then we recommend you do the following checks to solve the issue.
- Ensure that you are using an elevated PowerShell window.
- Ensure that the Full Package Name has been sourced correctly.
- Verify your ‘uninstall’ codes and try to keep everything lowercase.
- Repeat the same guide in Safe mode.
- Verify if the app hasn’t been already removed from your system and only leftover registry files are showing up in PowerShell.
You should be able to solve your issue by crosschecking the above-stated checks. However, if you are still unable to uninstall the concerned app, then you can use the third-party script below.
Method #02: Using a third party script
You can also use a third-party script to remove system apps from your Windows 11 system. These scripts have been quite popular lately and have been the go-to choice for many users when setting up fresh installations of Windows. Use the guide below to get started.
- Windows10debloater by Sycnex | Download Link
Note: While this is a Windows 10 script, it has been verified to remove system apps on Windows 11 as well. However, we recommend you keep checking the download page for updates that should be better compatible with Windows 11. We recommend using the script to only remove system apps and nothing else offered by the script. Other features could potentially break Windows 11 until a compatible script for the same is released in the future.
Visit the link above and you will be taken to the GitHub page for the script. Click on ‘Code’ in the top right corner.
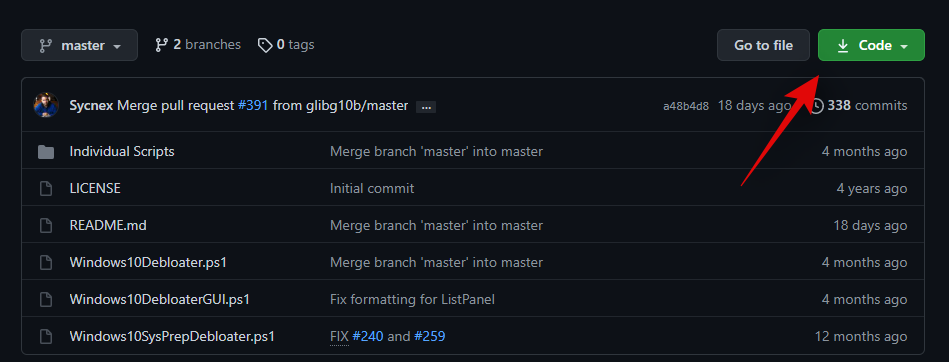
Now click and select ‘Download ZIP’.
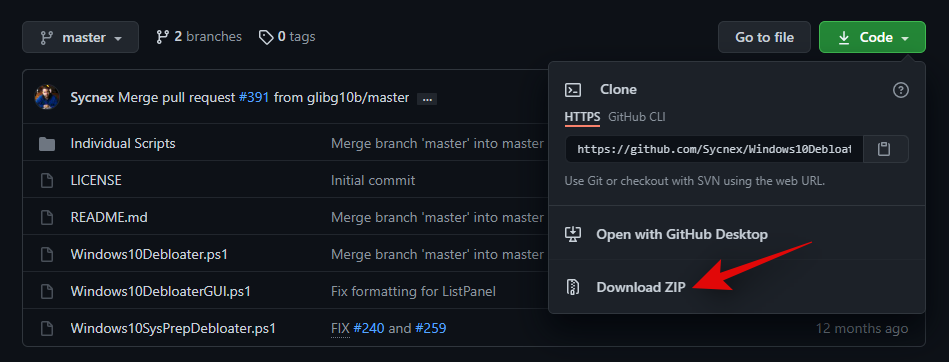
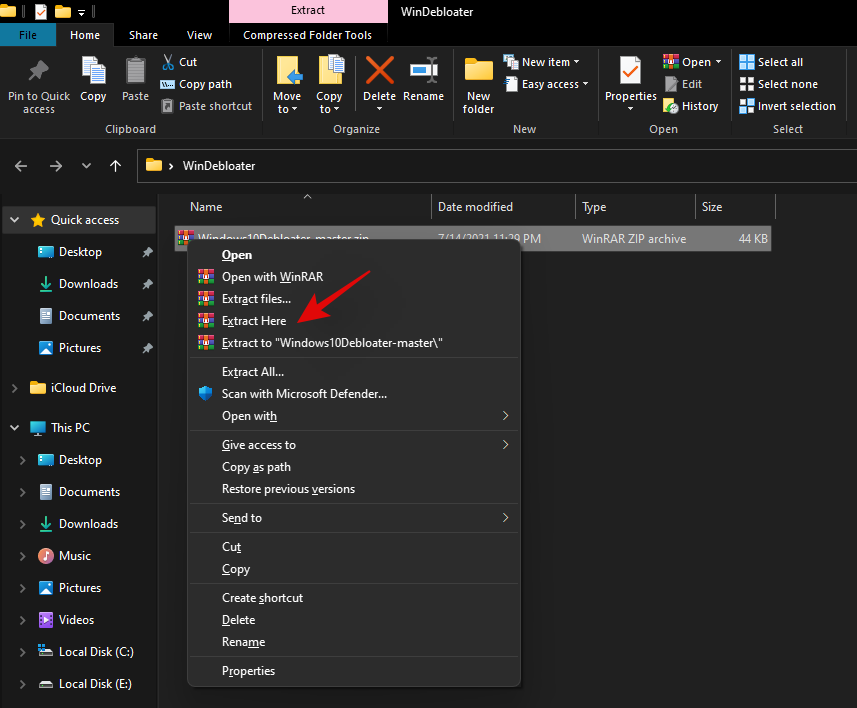
A Zip file will now be downloaded to your local storage. Extract the files to a convenient location.
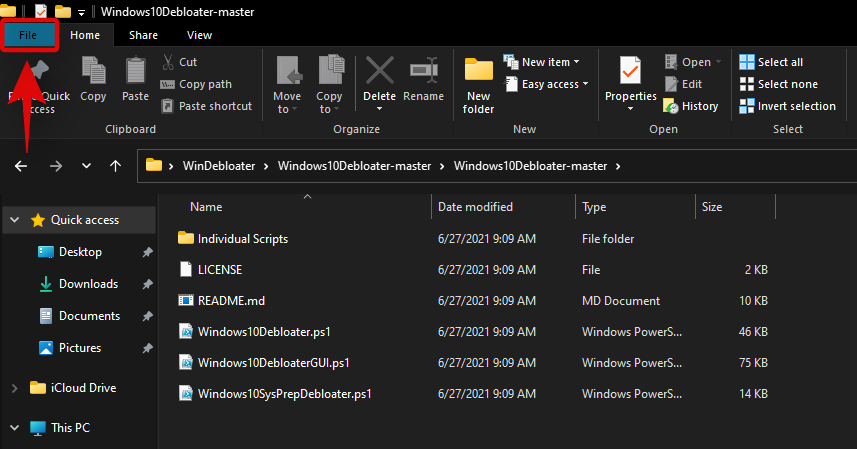
Once extracted, open the folder and click on ”File’ in the top left corner.
Hover over ‘Open Windows PowerShell’ and select ‘Open Windows PowerShell as administrator’.
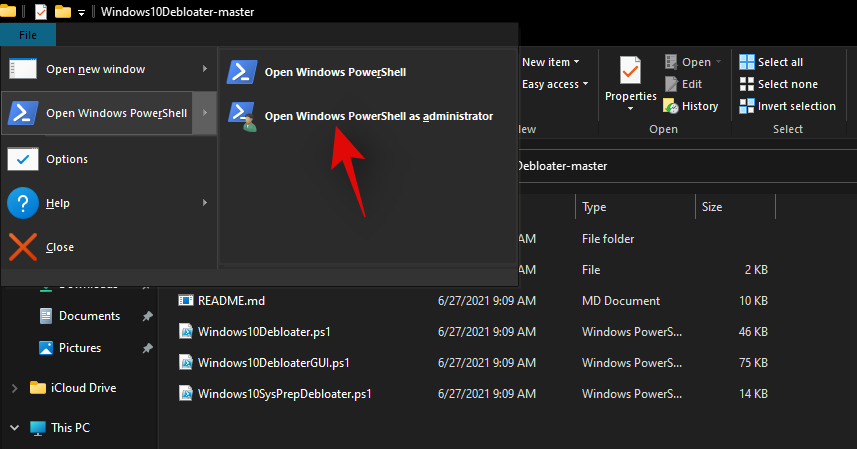
An elevated PowerShell window will now launch on your system. Start by executing the following command given below.
Set-ExecutionPolicy Unrestricted -Force

This will set your script execution policy as unrestricted which will allow us to use the script on your system. Once executed, enter the following command in the window and press ‘Enter’ on your keyboard once you are done.
.\Windows10DebloaterGUI.ps1

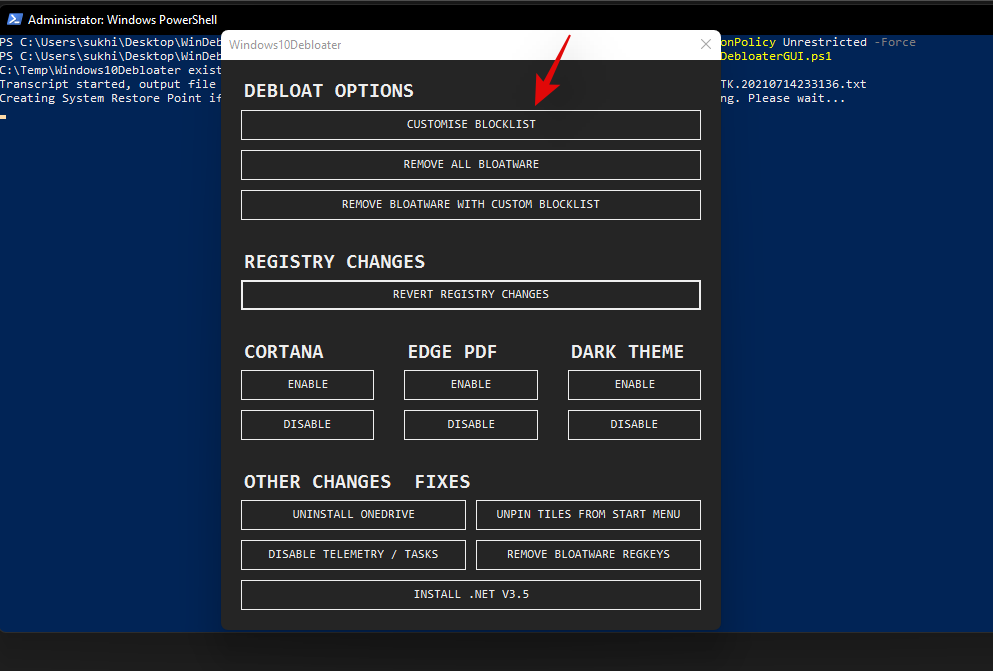
This will execute the debloat script and you should now get a graphical interface for it on your screen. Click on ‘Customize Blacklist’ at the top.
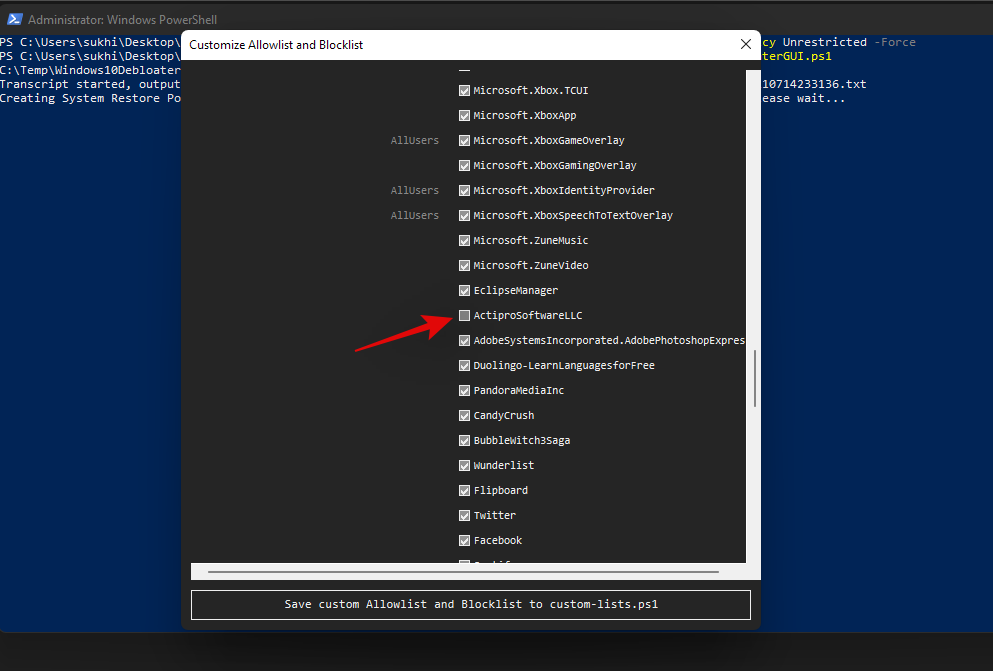
You will now get a list of all the apps installed on your system. Check the box for the apps you wish to uninstall and uncheck the box for the apps you wish to keep on your device. Ensure that you go through the entire list to remove any default selections made by the script for the programs that you wish to keep on your device.
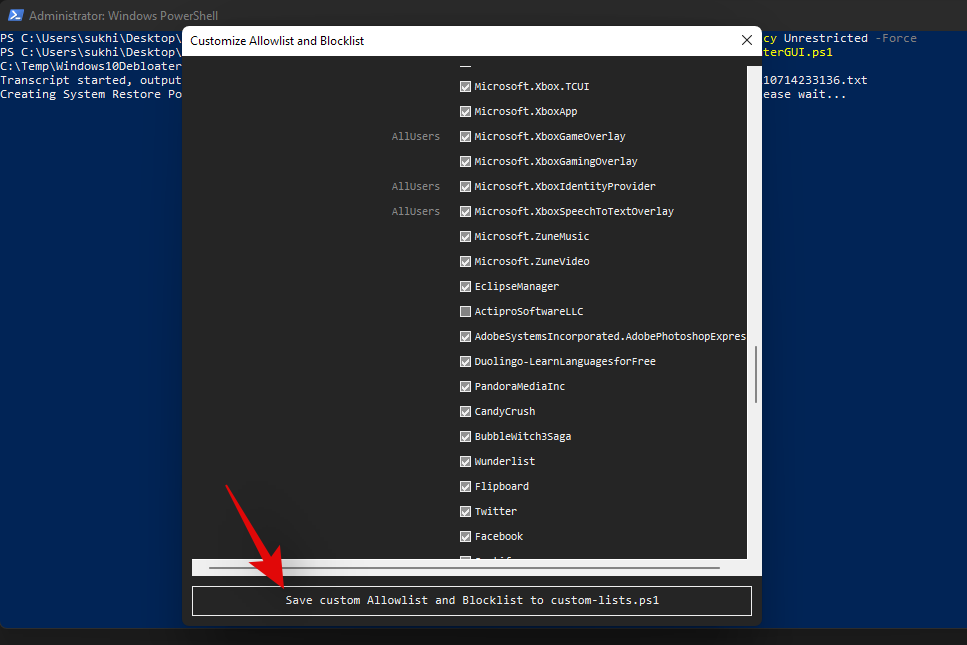
Once you have edited your list, simply click on ‘Save custom Whitelist and Blacklist to custom-lists.ps1’ at the top. You can now close this app selection window.
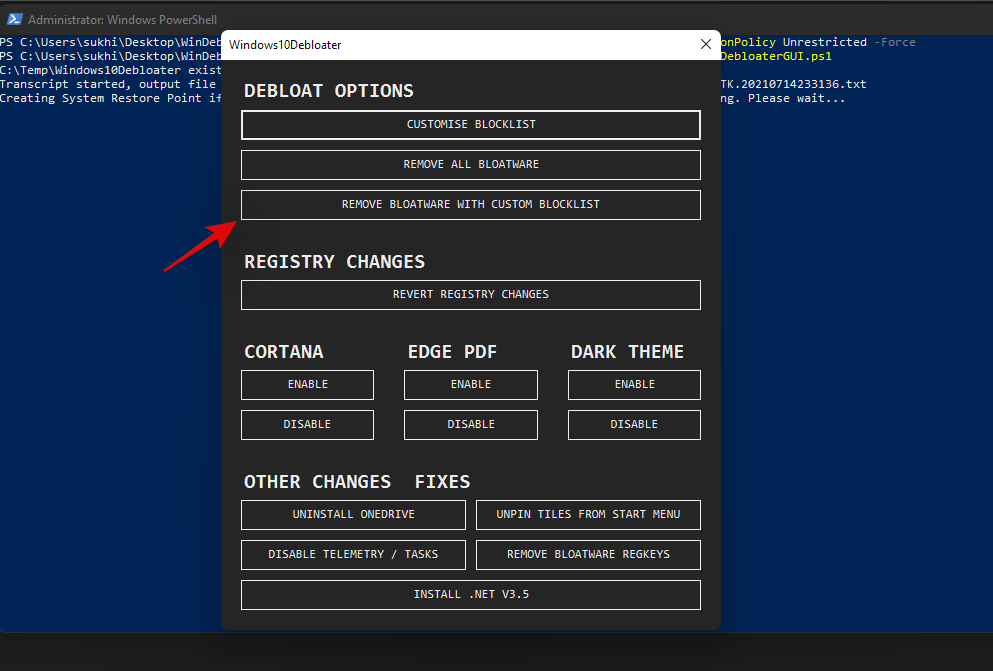
Now click on ‘Remove Bloatware with Customized Blacklist’. Keep an eye on the PowerShell window on the background once the command executes.
Once all programs have been removed, you will get a confirmation for the same in the PowerShell window in the background. Close the graphical interface by clicking on the ‘X’ in the top right corner.
Now go back to your PowerShell window and execute the following command.
Set-ExecutionPolicy Restricted -Force

This will revert changes to your execution policy and revert the changes we made earlier. Doing this is quite important to maintain proper security on your Windows system.
And that’s it! You will now have uninstalled system apps from your system via a third-party PowerShell script.
Can’t uninstall apps on Windows 11? How to fix
There could be a few reasons why you are unable to uninstall apps on your system. Here are a few workarounds that should help you uninstall persistent apps from your system easily.
Method #01: Close instance in task manager and try again
Chances are that the app has an instance or a process open in the background which is preventing it from being uninstalled. In such cases, you can try finding processes related to the app and kill them on your own. Once the processes have been killed, you can then try to uninstall the app again. Follow the guide below to find and kill the process.
Press Ctrl + Shift + Esc on your keyboard to open the ‘Task Manager’. Switch to the ‘Details’ tab by clicking on it.
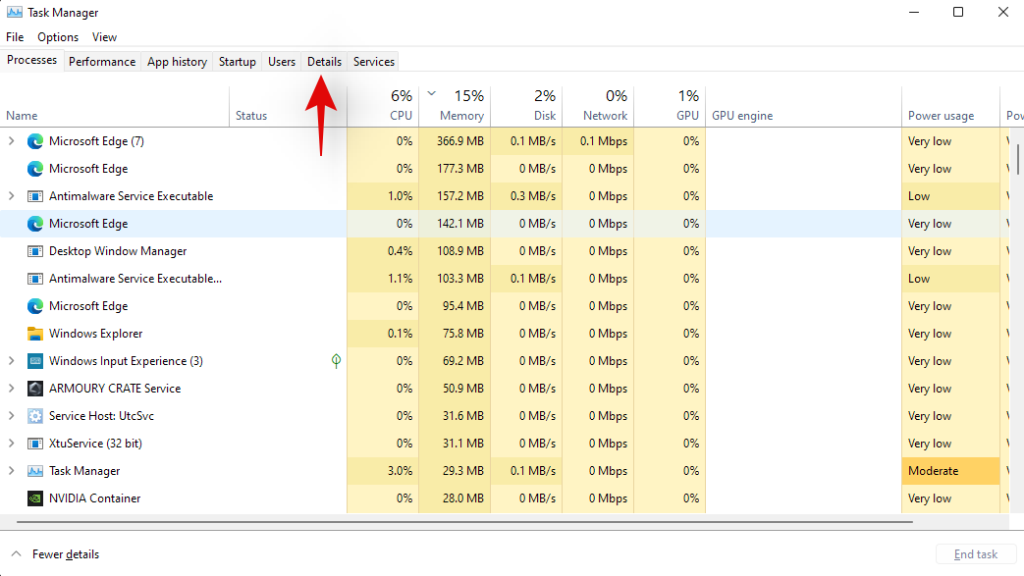
Now look for a process in the list for the concerned app. In our case, we are looking to uninstall ‘AsusOptimization’, hence we will look for a PowerToys process. Once found, click and select the process.
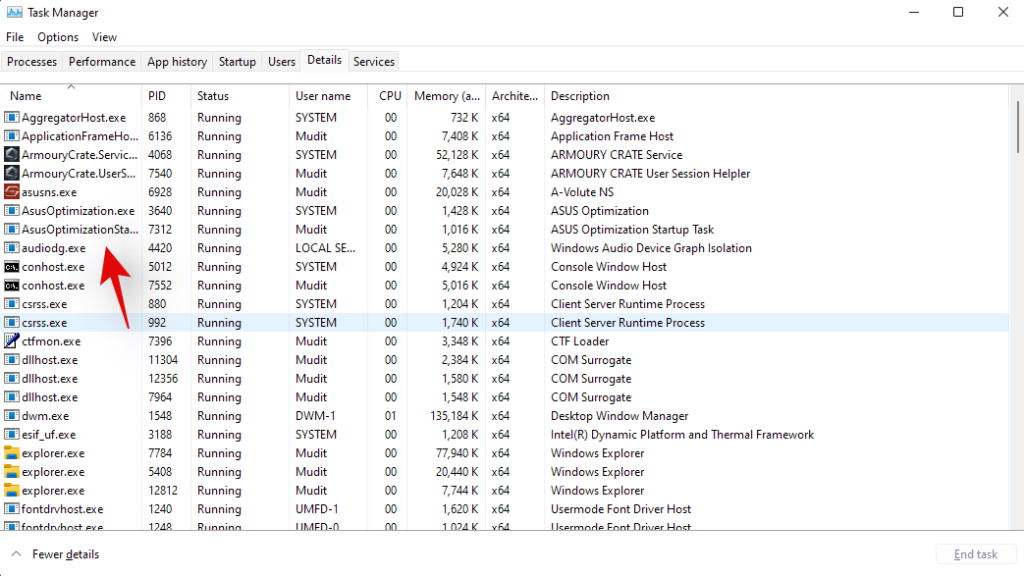
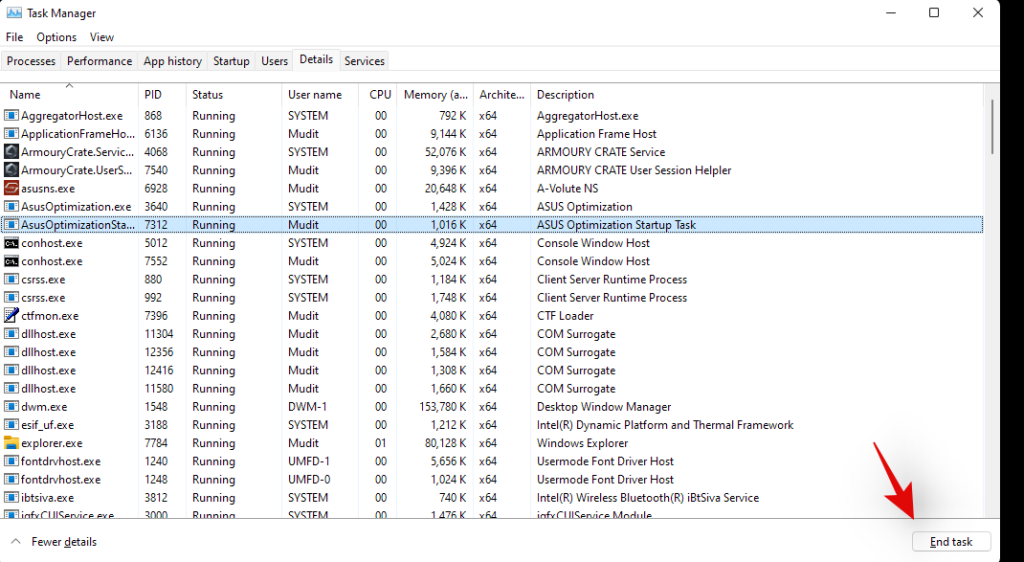
Hit delete on your keyboard or click on ‘End Task’.
Confirm your choice by selecting ‘End Process’.
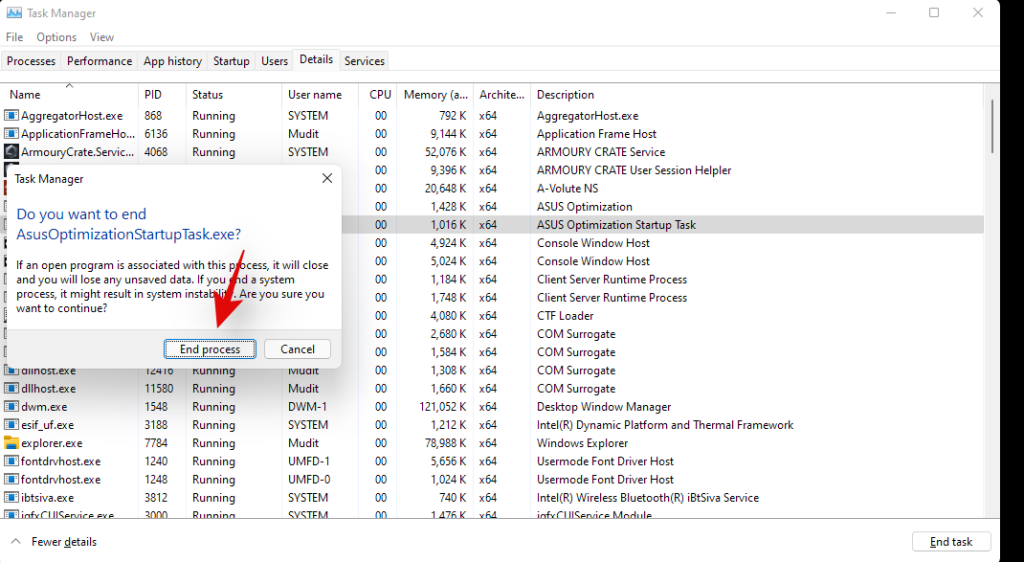
And that’s it! the process should now be killed and you can now try uninstalling the concerned app again.
Method #02: Uninstall in Safe mode
Another way to ensure that no third-party apps are launched or used in the background is to launch your system in safe mode and then try to uninstall your concerned app. You can use this comprehensive guide by us to enter safe mode on Windows 11.
Once in safe mode, follow the guide below to get the installer service back up and running on your system. Once the service is running in the background, you can use either of the methods above to uninstall the concerned app from your system.
Press Windows key + S key to open Windows Search and type in ‘cmd’. Click on ‘Run as administrator’ when the command prompt shows in your search results.
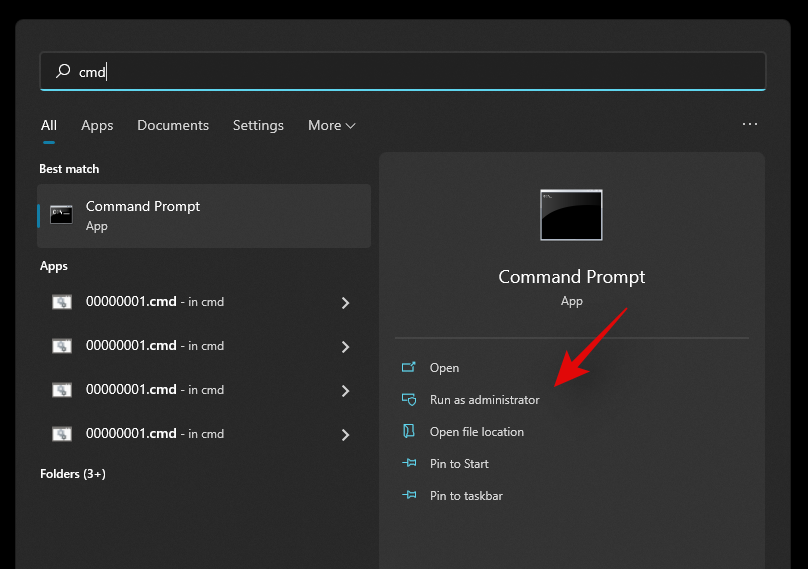
Enter the following commands in the command prompt one by one and hit Enter on your keyboard to execute each one of them.
REG ADD "HKLM\SYSTEM\CurrentControlSet\Control\SafeBoot\Minimal\MSIServer" /VE /T REG_SZ /F /D "Service"
REG ADD "HKLM\SYSTEM\CurrentControlSet\Control\SafeBoot\Network\MSIServer" /VE /T REG_SZ /F /D "Service"
net start msiserver

And that’s it! The installer service should now be running on your system and you should now be able to uninstall the concerned app using either one of the methods above.
Method #03: Run the Microsoft Uninstaller troubleshooter
You can also run a Microsoft Troubleshooter to try and fix uninstaller issues. Microsoft troubleshooters have come a long way since they were first introduced and can now fix most software and driver incompatibility issues without any user intervention.
Microsoft has also made it much easier for you to now launch any troubleshooter to try and solve your current issue. Use the guide below to launch an uninstaller troubleshooter on your Windows 11 system.
Required
Guide
Download the troubleshooter using the link above to your PC. Once downloaded, extract the .zip file to a convenient location. If you have trouble extracting the .zip file or it seems to be blocked, use the guide below to unblock it, else you can skip the guide and jump to the next guide.
Unblock the .zip file
Right-click on the .zip file and select ‘Properties’.
Check the box for ‘Unblock’ at the bottom of the Window.
Click on ‘Ok’.
Provide administrator permission to make the necessary change.
The file should now be unblocked on your system and you should now be able to extract it like any other .zip file on your system.
Run the troubleshooter
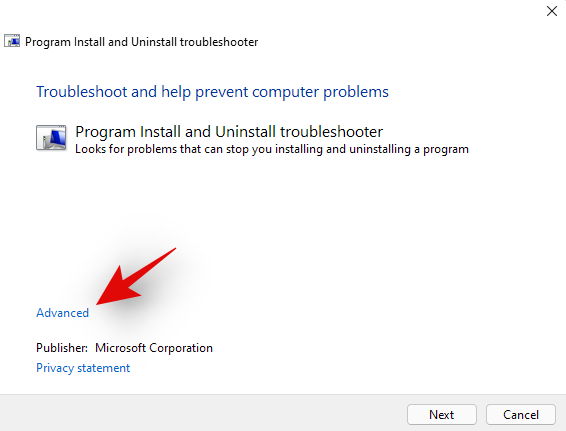
Navigate to the extracted files on your local storage. Cut the file named ‘MicrosoftProgram_Install_and_Uninstall.meta.diagcab’ and paste it on your desktop. Double click and run the file from your desktop. Click on ‘Advanced’ at the bottom once the troubleshooter is launched.
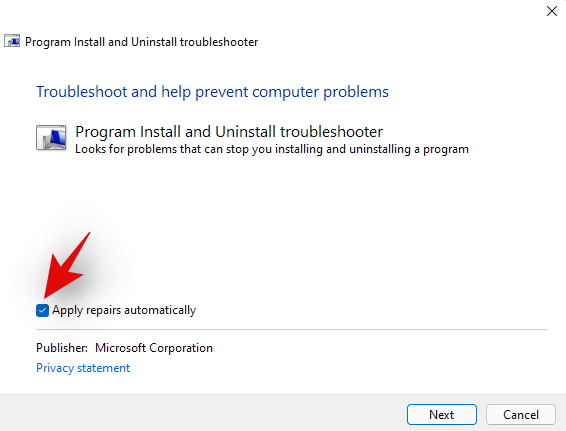
Check the box for ‘Apply repairs automatically’. Click on ‘Next’ once you are done.
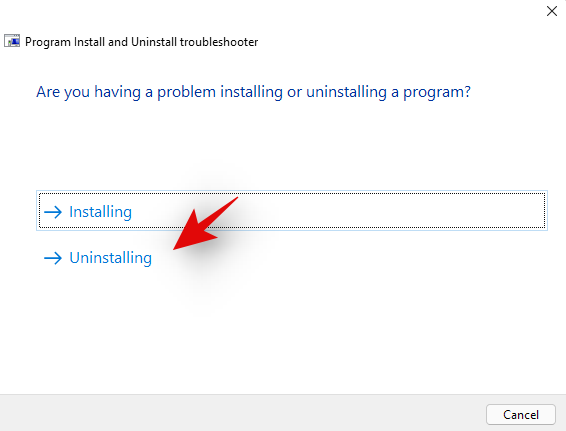
Select ‘Uninstallting’ on the next step.
Select the concerned program from the list provided on your screen. If your program does not appear in the list, click on ‘Not Listed’.
Now follow the on-screen instructions depending on your choice to complete the troubleshooting process.
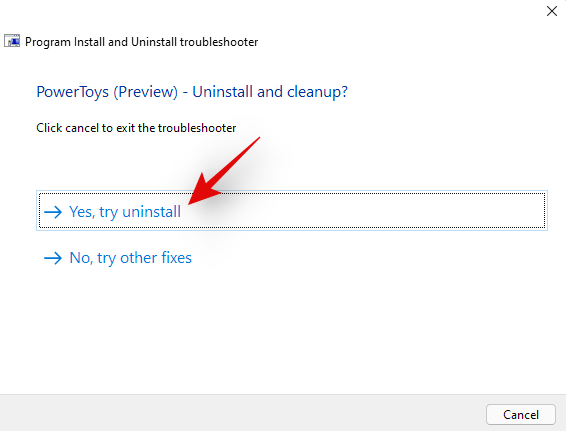
And that’s it! In most cases, the troubleshooter will detect your issue and solve it automatically. A report for the same will be presented to you at the end of the process with all the details.
Method #04: Use a restore point
If you are still having issues uninstalling the software from your system then it is time for some drastic steps as this could be malicious in nature. Let’s restore your PC to a restore point before the concerned app or program was installed on your system.
However, if you do not have a restore point then you can jump to one of the other methods listed below. Here’s how you can use a restore point to restore your PC to its previous state.
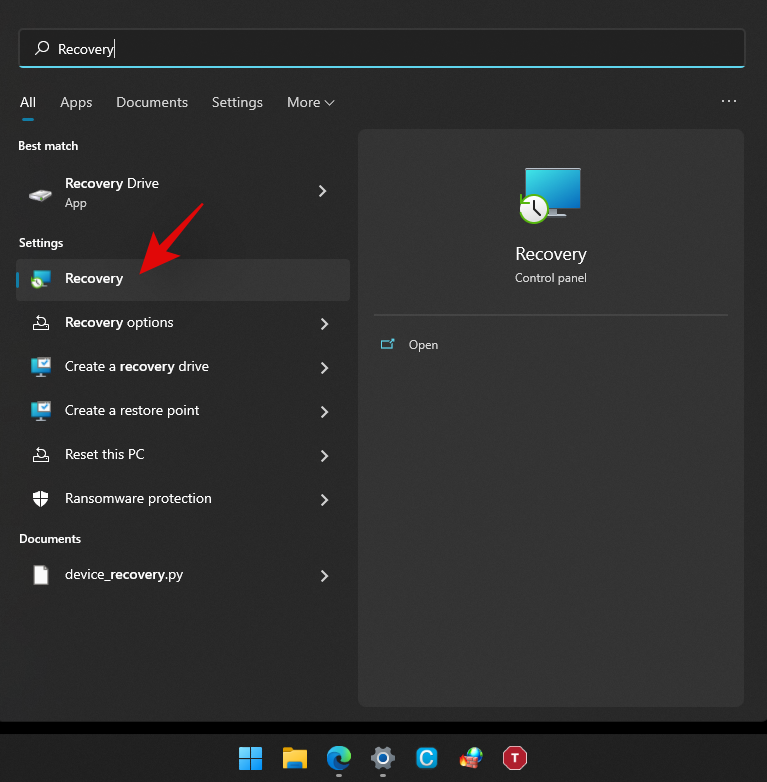
Press Windows + S on your keyboard and search for ‘Recovery’. Click and launch the app link once it shows up in your search results.
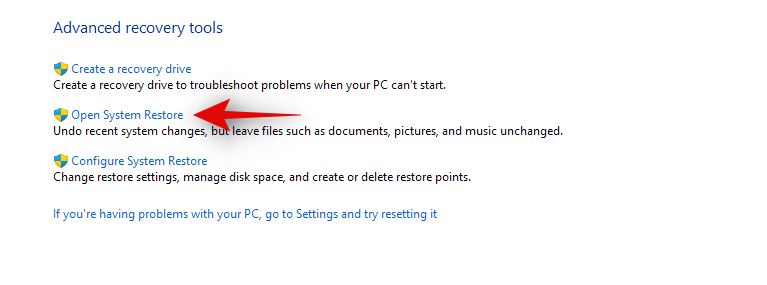
Click on ‘Open System Restore’.
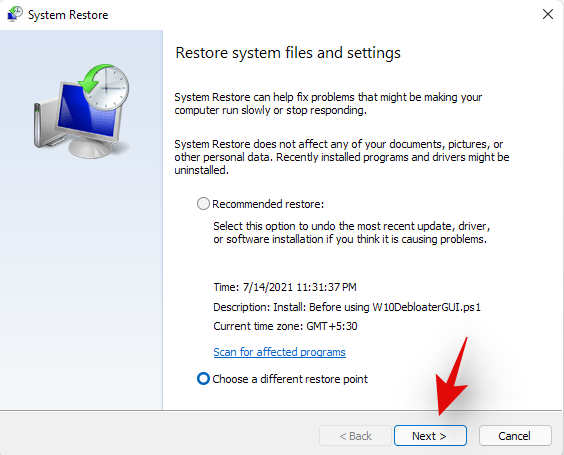
You will now be suggested a recent system restore point if you have one. Select that if needed, or click on ‘Choose a different restore point’ if you wish to choose an older one.
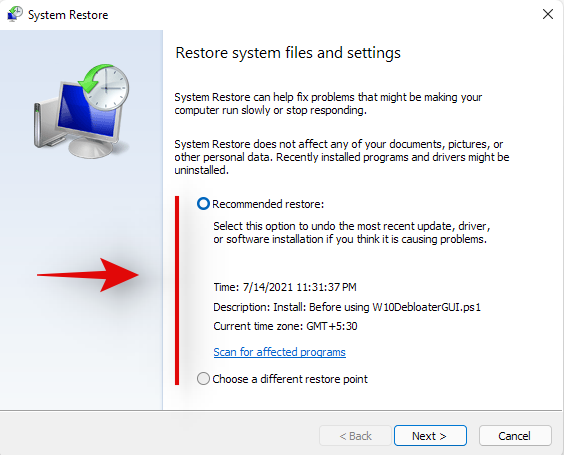
Select ‘Next’ or hit ‘Enter’ on your keyboard.
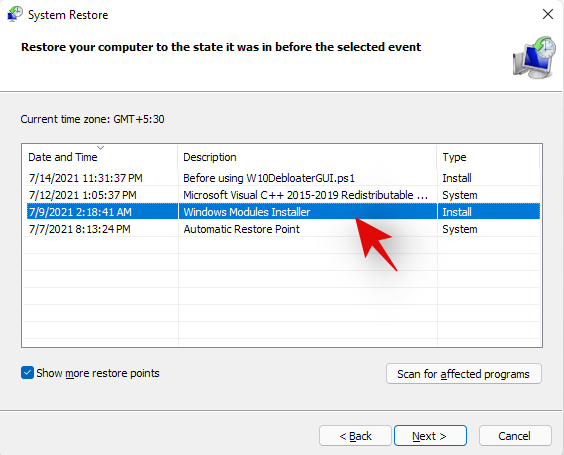
You can now select the desired Restore Point from the list at the top. You can check the box for ‘Show more restore points’ if you wish to look at more restore points.
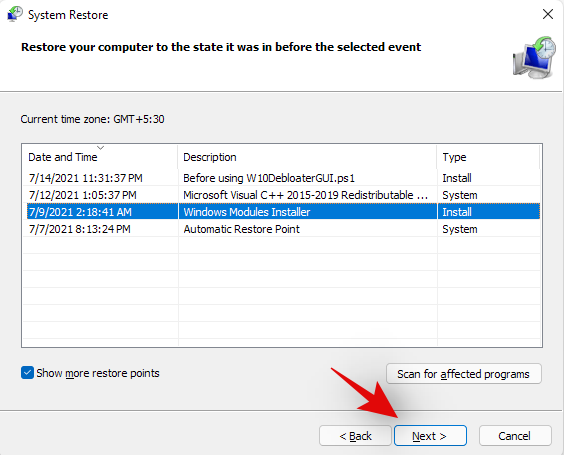
Once selected, click on ‘Next’.
Finally, click on ‘Finish’.
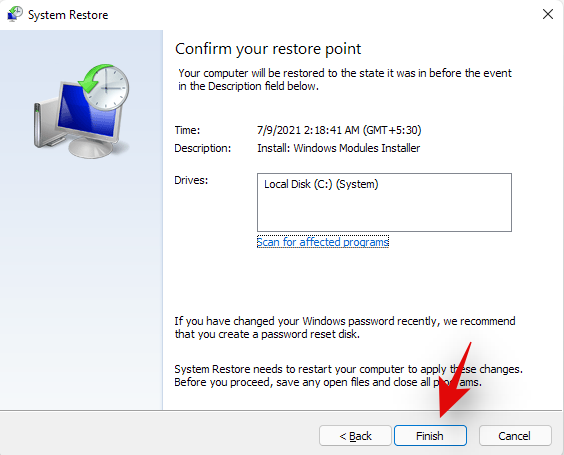
Windows 11 will now restore your system to the selected restore point and the concerned app should no longer be on your system once the process is completed.
Method #05: Contact Windows Support
If you are still unable to get the app uninstalled from your system then it might be time to contact Microsoft Support. Microsoft Support executives are trained to solve such issues with more expertise and can even remotely takeover your system if needed. It might be time to get in touch with the support team to solve your issue. Additionally, if you purchased a pre-built system, you can use your OEM support for some help as well. Use the link below to get in touch with Microsoft Support.
► Microsoft Support
Uninstall programs on Windows 11: FAQs
Can you uninstall pre-installed apps?
Well, officially, you can not and it is not recommended by Microsoft. But still, if you wish to remove preinstalled apps, you can easily do so depending on the type of the app. If you wish to remove a system app then the process is a bit complicated. Else, if you wish to remove third-party pre-installed apps then you can simply do so by uninstalling them like any other app from your Windows 11 Pc using the guide below.
Can you uninstall system apps?
Yes, you can uninstall system apps but not officially. Officially Windows 11 or any Windows for that matter, doesn’t allow you to remove system apps from the OS. However, there are many workarounds to circumvent this restriction and uninstall preinstalled system apps from your system.
This includes using command prompt/PowerShell or a third-party software. Using these methods you should be able to easily uninstall system apps from your system. Follow our guides below for each of the methods depending on your current needs and requirements.
Can you uninstall apps downloaded from the Microsoft Store?
Yes, apps downloaded from the Microsoft Store can be uninstalled easily using either of the methods listed below. This includes Android apps that you may have downloaded on your system but did not find appealing enough. We recommend uninstalling Windows Store apps either via Settings or Start.
Chances are that the Store app will now show up in the Control Panel and if uninstalled via CMD or PowerShell, you could end up with leftover files including empty Start menu folders. Hence, use Powershell or CMD for Windows Store apps only if you are facing an issue uninstalling them via the Settings or the Start menu.
What happens when you uninstall a program?
Uninstallation is the process of removing a program or an app from your system. While apps are installed singularly with all dependencies available to them in a sandbox, programs operate differently. Programs usually have scheduled tasks, customized registry values to execute them, and dependencies for various Windows features and extensions that they need for their own installation process to create and place every file and task correctly.
Hence the removal process for all these things created by a program when it is first installed on your system is called uninstallation. All scheduled tasks, registered services, registry keys, executables, temporary files, log files, and more are removed once you uninstall a program from your system. In some cases, you will be leftover with settings and save files so that you don’t have to set up the program entirely when installing it in the future.
These files can be cleared by clearing your Windows Cache and temporary files in most cases. However, if you still suspect leftover files from a program on your system, then we recommend checking the following places for any leftover files. If found, you can simply delete them like any other file on your system.
- /Documents
- C:\Program Files (x86)\Common Files
- C:\Program Files\Common Files
- C:\ProgramData
- C:\Users\USER\AppData\Local
- C:\Users\USER\AppData\LocalLow
- C:\Users\USER\AppData\Roaming
- C:\Users\USER
How to remove data of uninstalled programs
If you still see the remaining files and folders or context menu options for a removed program or app, then you can try the fixes below to solve your issue.
Method #01: Clear cache and temporary files from Windows
You should first try clearing cache and temporary files from your Windows 11 system. In most cases, this will help the overall File Explorer UI to refresh itself which should automatically remove leftover files and context menu items for removed programs from your system.
You can use this comprehensive guide by us to easily clear your Windows 11 cache and storage. You can also use the same guide to free up storage space on your system as well by deleting other large files and installations that show up in the list.
Method #02: Check for leftover files manually
You can also check and delete all leftover files manually for the removed program or app. You should start by using Windows Search to look for any files or folders associated with the uninstalled program. You can then delete these manually from your local storage.
Once you have deleted all the files and folders that show up in the search, you can proceed to manually check the locations listed below. If they contain any leftover files or folders from the removed program, then you can simply select them and delete them from your system.
- /Documents
- C:\Program Files (x86)\Common Files
- C:\Program Files\Common Files
- C:\ProgramData
- C:\Users\USER\AppData\Local
- C:\Users\USER\AppData\LocalLow
- C:\Users\USER\AppData\Roaming
- C:\Users\USER
Method #03: Run a third-party uninstaller/cleaner
If you are still left with the remaining files and context menus for the program then it is time to use a third-party uninstaller or cleaner. These programs are specifically designed to identify and remove leftover files from previously uninstalled programs on your system. We recommend you give Revo uninstaller a try as even the free model for the app will help you identify the location of leftover files which can then be deleted by you manually. You can also use something like CCleaner that is designed to remove leftover files and free up storage and processing space on your system.
Method #04: Try to remove the app via PowerShell
If nothing works, then chances are that the concerned app was installed on your system using elevated privileges which prevents some files and folders from being removed from your system.
In such cases, we recommend you try to remove the app via PowerShell. You can use our guide above to remove system apps from Windows 11 via PowerShell. You will first need to source the full package name for your app or program, which can then be used to force uninstall it from your system.
Can you uninstall Windows Updates?
Yes you can easily uninstall Windows Update from your system. New updates can often introduce compatibility issues on older hardware and having the option to uninstall updates can always help. You can use the guide below to uninstall recently installed updates from your system.
How to uninstall Windows Updates
Follow the guide below to uninstall recently installed Windows Updates from your Windows 11 system.
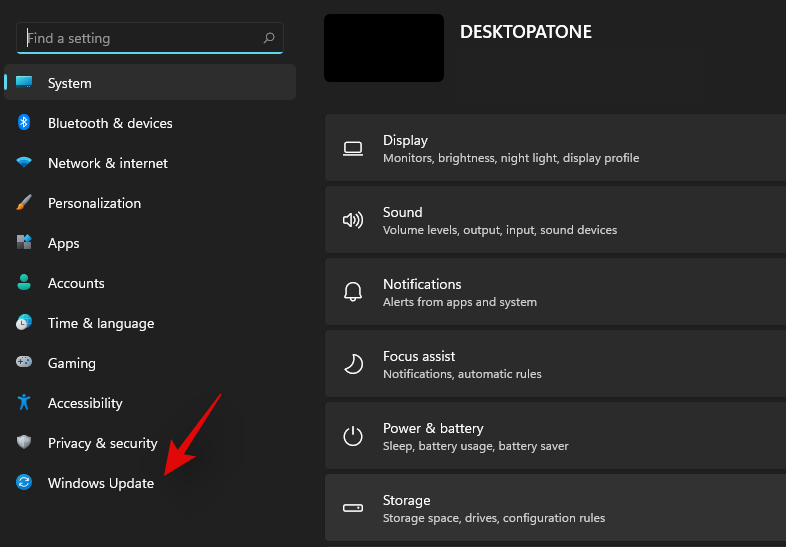
Press Windows + i on your keyboard to open the Settings app. Click on ‘Windows Update’ on your left.
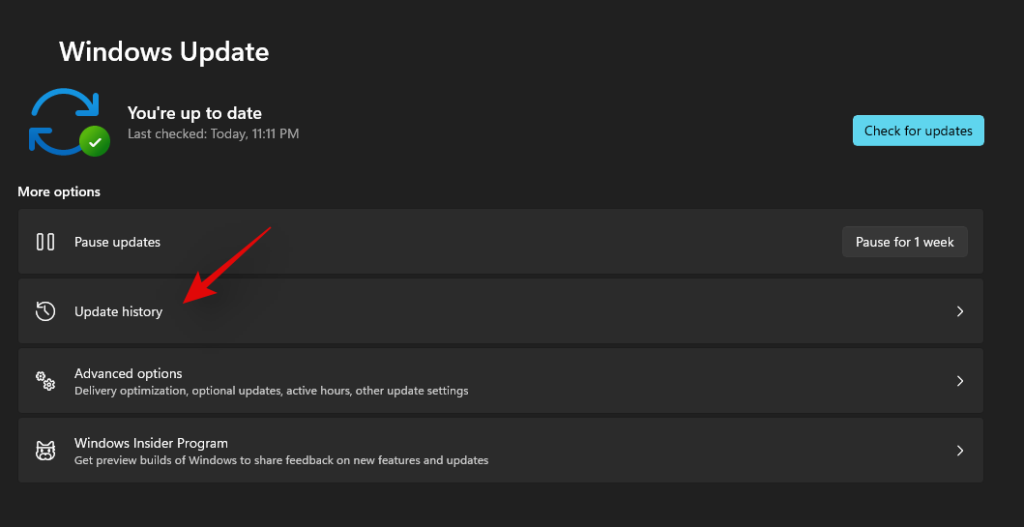
Now click on ‘Update history’.
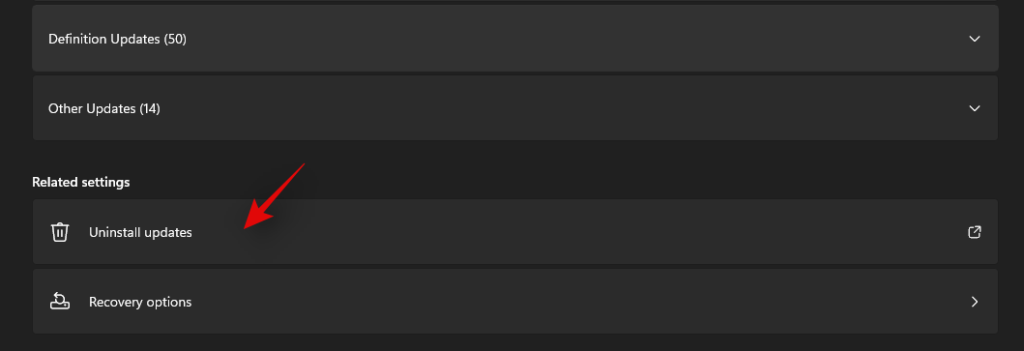
Scroll to the bottom on your right and click on ‘Uninstall Updates’.
You will now get a list of all the recent updates installed on your system. Click and select the update you wish to uninstall.
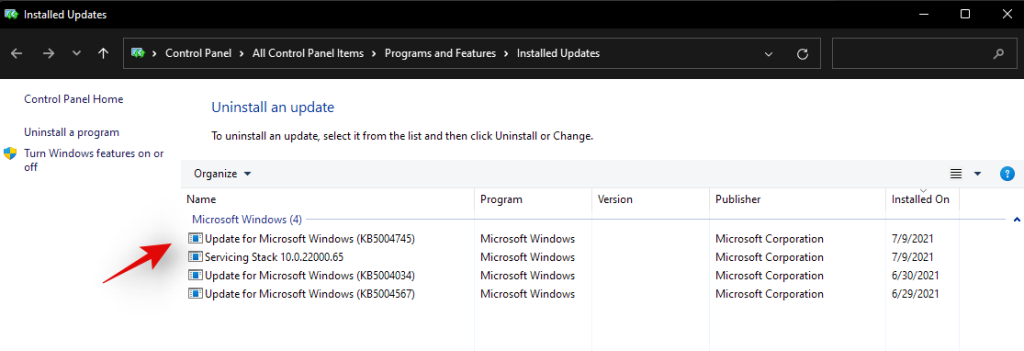
Click on ‘Uninstall’ at the top now.
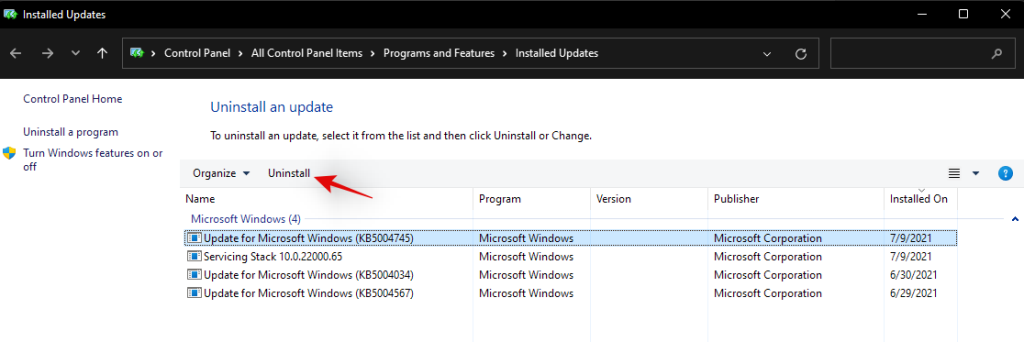
Follow the on-screen instructions to complete the process.
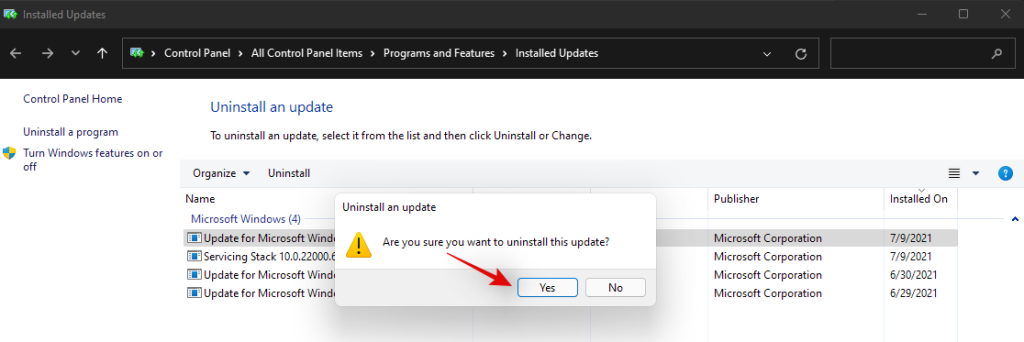
And that’s it! Your selected Windows update should now be uninstalled from your system.
We hope this guide helped you uninstall the concerned apps or programs from your system. If you still face issues, feel free to reach out to us using the comments section below.


