Как очистить реестр в Windows 11 [4 способа]
![Как очистить реестр в Windows 11 [4 способа] Как очистить реестр в Windows 11 [4 способа]](https://cloudo3.com/resources8/images31/image-9744-0105182733836.png)
Реестр Windows - это банк памяти вашего ПК. Узнайте, как правильно очистить его в Windows 11 и ускорить работу вашего компьютера.

Хотя в некоторых случаях уведомления необходимы, иногда они отвлекают внимание. Как и ваш телефон, компьютер может отвлекать вас уведомлениями. Вот почему Windows 11 включает функцию Focus Assist, которая позволяет вам не отвлекать внимание от уведомлений. Используя эту функцию, вы можете полностью сосредоточиться на своей работе, а не отвлекаться на случайные сообщения и уведомления. Уведомления также могут нанести вред вашей производительности, поэтому их необходимо подавлять в нужное время.
Всего несколькими щелчками мыши можно скрыть все уведомления, предупреждения и сообщения на вашем компьютере. Если вы недавно обновили свою систему до Windows 11 и не можете понять новый пользовательский интерфейс, эта статья поможет вам с подробным руководством о том, как использовать Focus Assist в Windows 11, чтобы избавиться от уведомлений.
По теме: Как делать скриншоты в Windows 11
СОДЕРЖАНИЕ
Что такое Focus Assist в Windows 11?
Focus Assist - это просто режим «Не беспокоить» для вашего ПК, точно такой же, как и на ваших телефонах. Это удобная функция в Windows 11, которая позволяет избавиться от ненужных уведомлений, сообщений и предупреждений. Функция помощи при фокусировке позволяет настроить список приоритетов, а не блокировать компьютер от всех уведомлений.
Отвлечение внимания может нанести вред вашей производительности. Следовательно, с помощью функции Focus Assist вы можете скрыть все уведомления, предупреждения и сообщения, пока вы работаете над чем-то важным. Вместо того, чтобы предупреждать вас, они пойдут прямо в центр действий. Вы можете просматривать скрытые уведомления в центре действий в удобное для вас время.
Как работает Focus Assist в Windows 11?
Focus Assist позволяет гибко выбирать, когда блокировать отвлекающие факторы, такие как сообщения, уведомления и предупреждения. Вы можете включить Focus Assist в любое время или также можете запланировать временной диапазон в Настройках, который включит Focus Assist автоматически.
Функция помощи в фокусе позволяет вам создать список приоритетов, чтобы не пропустить никаких уведомлений от самых важных людей в вашем контакте. Люди из вашего списка приоритетов всегда могут связаться с вами, даже если вы заняты важной работой. Если вам нужна полная концентрация во время работы, вы также можете заблокировать все уведомления. Чтобы просмотреть все заблокированные уведомления, полученные вами во время работы, откройте центр действий вашей системы.
Связанный: Как остановить всплывающие окна в Windows 11
Как включить помощь при фокусировке
Помощь при фокусировке по умолчанию отключена. Но если вы хотите, чтобы он перестал получать уведомления, выполните следующие действия.
Метод №1: Использование настроек
Щелкните значок поиска , который выглядит как увеличительное стекло на панели задач.

Введите помощь при фокусировке в строке поиска.
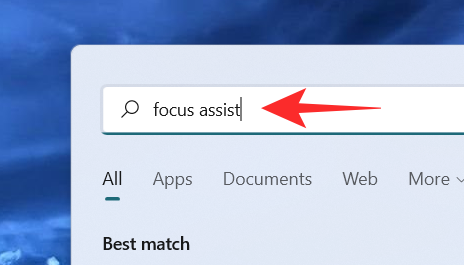
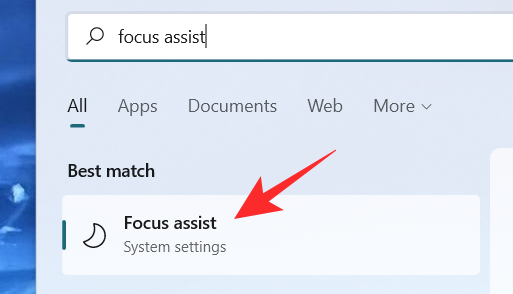
Щелкните настройки системы Focus Assist .
На экране появится окно настроек системы Focus Assist. В разделе « Помощь при фокусировке» выберите один из следующих вариантов:
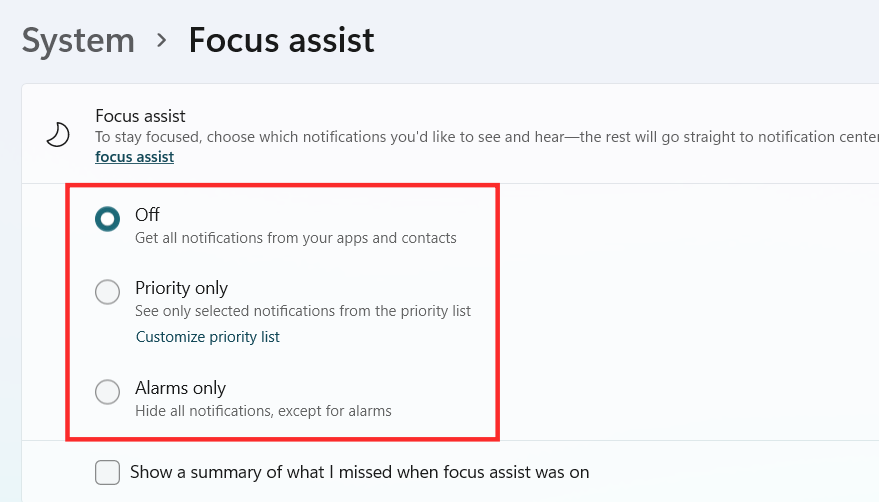
Поддержка фокусировки теперь должна быть включена в Windows 11 в зависимости от сделанного вами выбора.
Метод № 2: Использование Центра поддержки
Щелкните Центр действий, в котором отображаются значки Wi-Fi, громкости и батареи.

Прямо под значком Bluetooth вы можете увидеть значок Focus Assist, который выглядит как полумесяц.
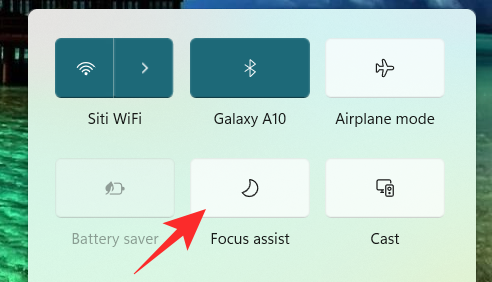
По умолчанию функция Focus Assist отключена. Нажмите на нее, и функция сразу перейдет в режим « Только приоритет» .
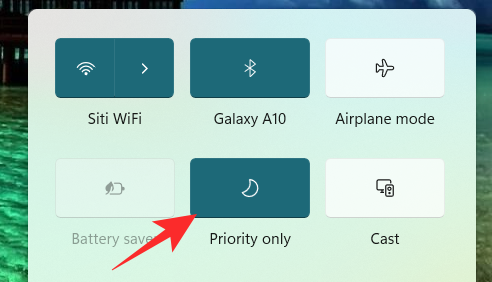
Щелкните по нему еще раз, чтобы установить функцию Focus Assist только для сигналов тревоги .
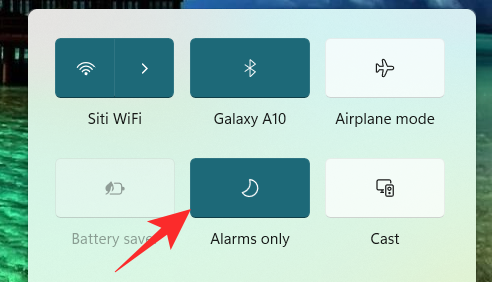
Чтобы отключить функцию помощи при фокусировке, щелкните ее еще раз.
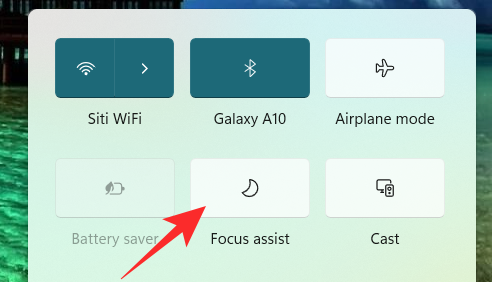
Просто щелкнув значок Focus Assist в Центре действий, вы можете изменить его функцию на «Выкл.», «Только приоритет» и «Только будильник». Однако, чтобы внести другие необходимые изменения в настройки Focus Assist из Центра действий, щелкните правой кнопкой мыши значок Focus Assist в Центре уведомлений и выберите « Перейти к настройкам» .
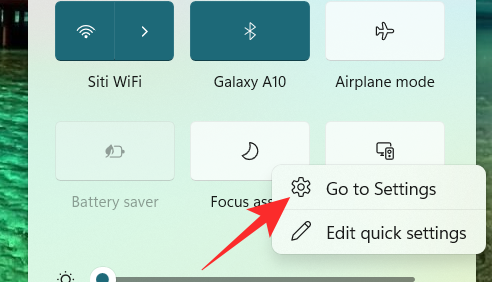
Вы попадете в приложение «Настройки», где сможете легко внести все необходимые изменения. И это все! Теперь помощь при фокусировке должна быть включена в Windows 11 прямо из центра действий.
Метод № 3: Использование редактора групповой политики
Вы также можете включить режим помощи при фокусировке с помощью редактора групповой политики, если вы являетесь администратором. Используйте приведенное ниже руководство, чтобы помочь вам в этом процессе.
Нажмите Windows + Rна клавиатуре и введите следующее в диалоговом окне «Выполнить». Нажмите клавишу ВВОД на клавиатуре, чтобы открыть редактор групповой политики.
gpedit.msc
Перейдите к следующему узлу, упомянутому ниже.
User configuration > Administrative Templates > Start Menu and Taskbar > Notifications
Найдите справа значение «Отключить тихие часы» и дважды щелкните его.
Теперь выберите один из следующих вариантов в зависимости от ваших текущих потребностей в верхнем левом углу окна свойств.
И это все! Поддержка фокусировки теперь будет включена или отключена в редакторе групповой политики в зависимости от ваших предпочтений. К сожалению, вы не можете настроить поведение помощи при фокусировке как администратор. Эта способность по-прежнему принадлежит пользователю. Вы можете только включить или отключить возможность использования Focus Assist для системы с помощью редактора групповой политики.
Как использовать помощь при фокусировке
У помощи при фокусировке есть различные настройки и параметры настройки, которые могут помочь вам изменить его поведение в соответствии с вашими текущими потребностями. Воспользуйтесь одним из приведенных ниже руководств, который лучше всего соответствует вашим текущим требованиям.
Метод №1: включить режим только сигналов тревоги
Режим «Только будильник» в окне Focus Assist позволяет скрыть все уведомления, кроме будильника. Выполните шаги, указанные ниже, чтобы включить режим «Только сигналы тревоги».
Щелкните значок поиска на панели задач.

Type Focus assist

Click on Focus Assist.

Under Focus Assist, click on Alarms Only to stop receiving notifications, except for alarms.
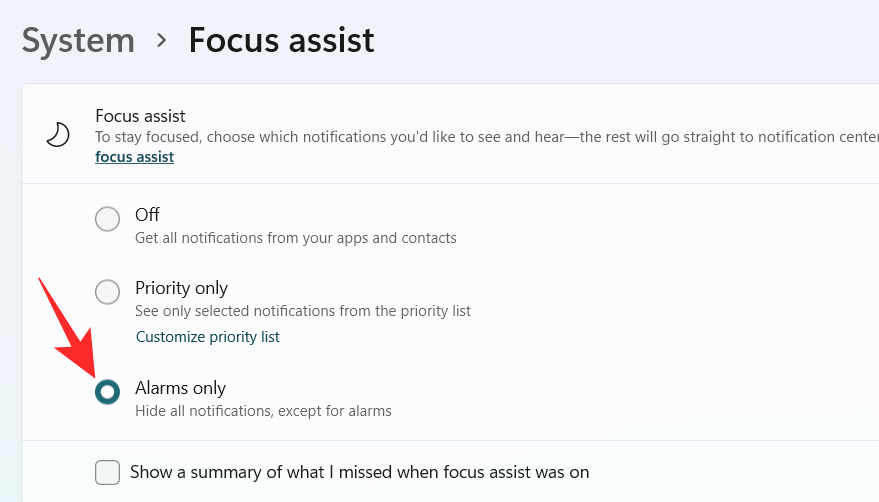
And that’s it! You will now be only informed about alarms on your system. All other notifications no matter their priority, will be silenced within Windows 11.
Method #2: Enable Priority only with a customized list
The People window will appear on the screen. Choose your preferred people by typing their names on the search bar.
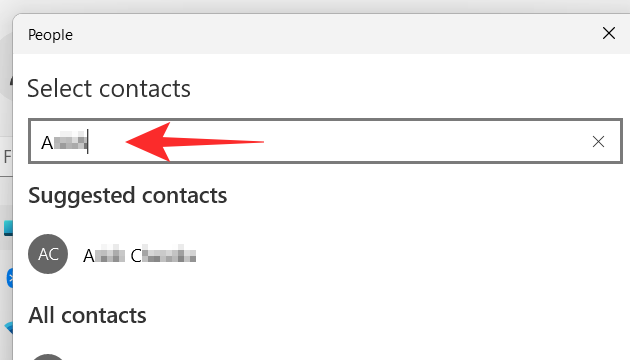
Click on the name of the person.
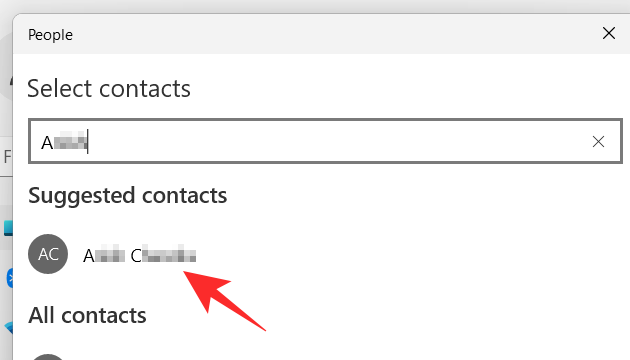
Click on the tick button at the bottom right corner of the People window.
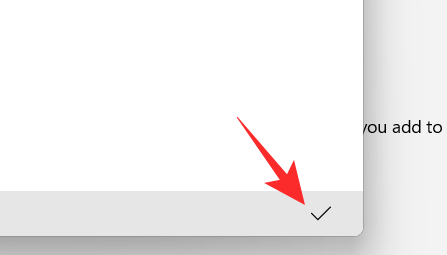
Your priority list has been created. Now, if you want to remove a contact from your priority list, click on the contact under People.

Click on Remove.
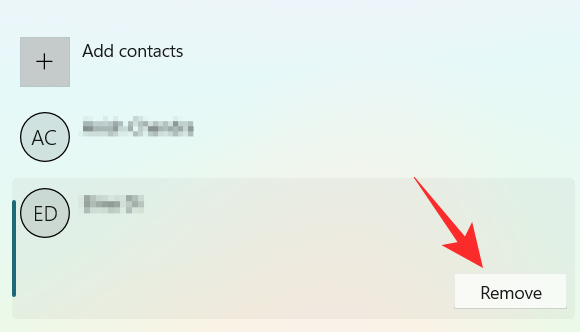
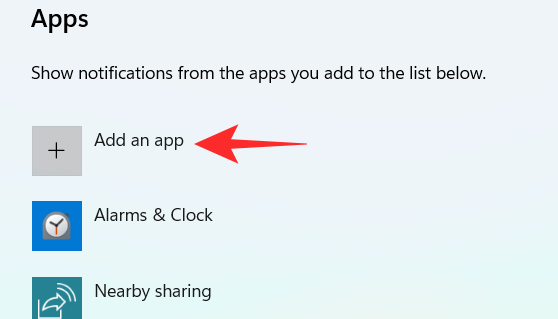
Now, in the Apps section, you can select the apps that can break through your quiet hours. To allow the apps to show notifications, click on the Add an app button.
A list of apps appears on your screen. Click on the app you want to add to your priority list.
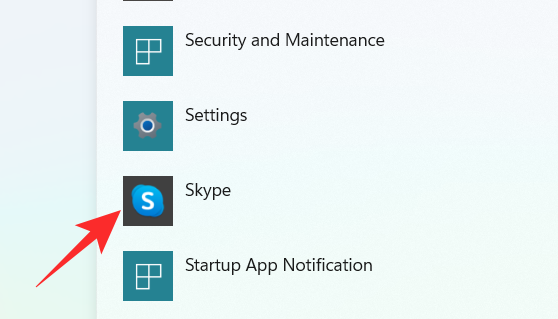
Continue this process until you are done selecting the apps. In case you want to remove an app from your priority list, you can simply click on the app under the App section.
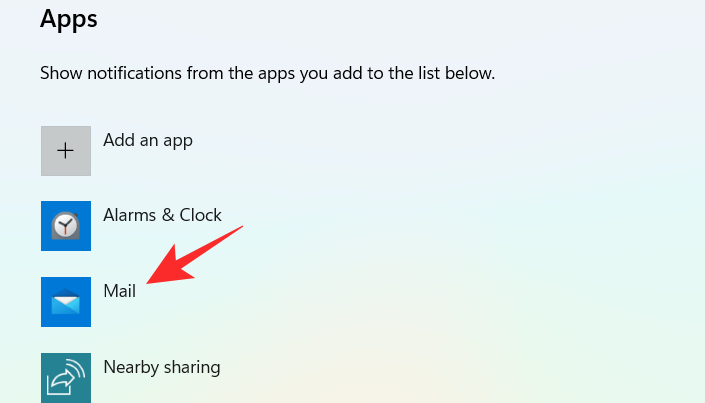
Click on Remove.
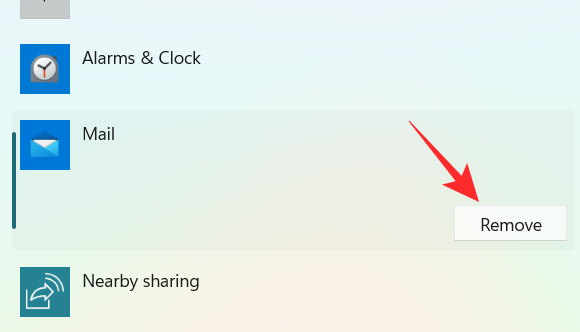
And that’s how you can customize the priority list in Focus assist and use it to your advantage to receive notifications only from important contacts.
Method #3: Enable notification summary when Focus assist is disabled
Click on the Search icon on the taskbar.

Type Focus assist

Click on Focus Assist.

Click on your desired option Priority only or Alarms only.
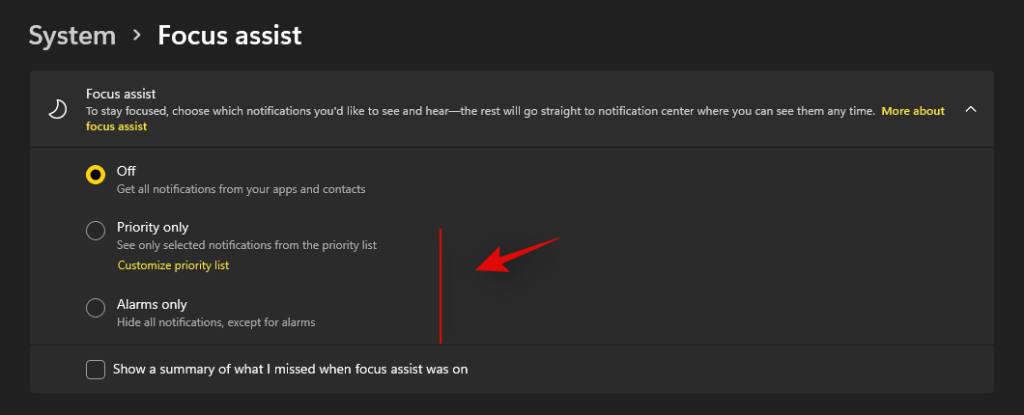
Check the box Show a summary of what I missed when Focus assist was on.
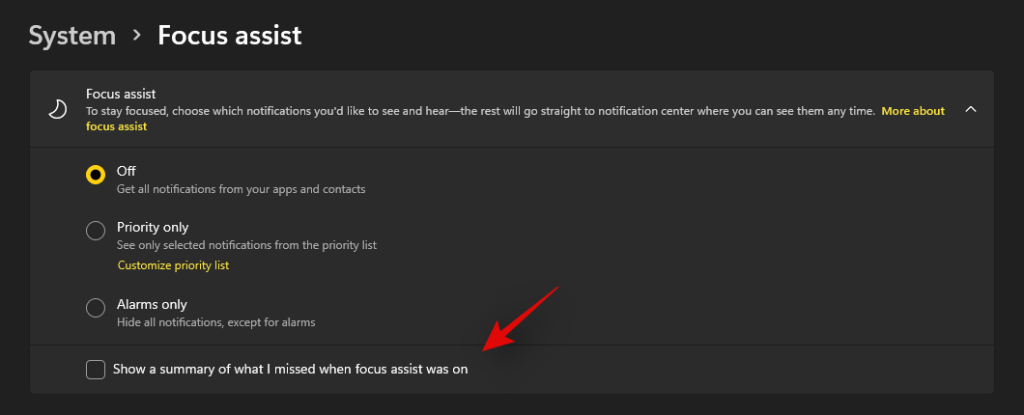
Method #4: Enable or disable automatic Focus assist rules
The Automatic rules in Focus assist allow you to determine the conditions that can activate the Focus assist automatically. There are four different automatic rules in the Focus Assist settings window that can be customized. Check out the steps mentioned below to customize automatic rules in Focus assist.
Click on the Search icon on the taskbar.

Type Focus assist

Click on Focus Assist.

Under the Automatic rules section, there are four sections. Turn on the toggle switch for the option you want to choose.
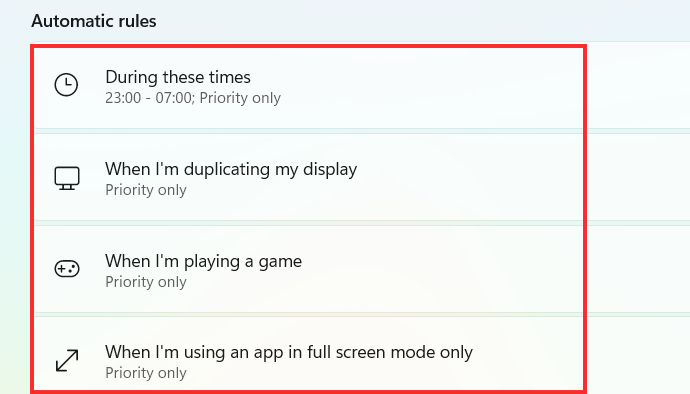
Now, let’s have a look at how to customize the above-mentioned options under Automatic rules.
1. During these times
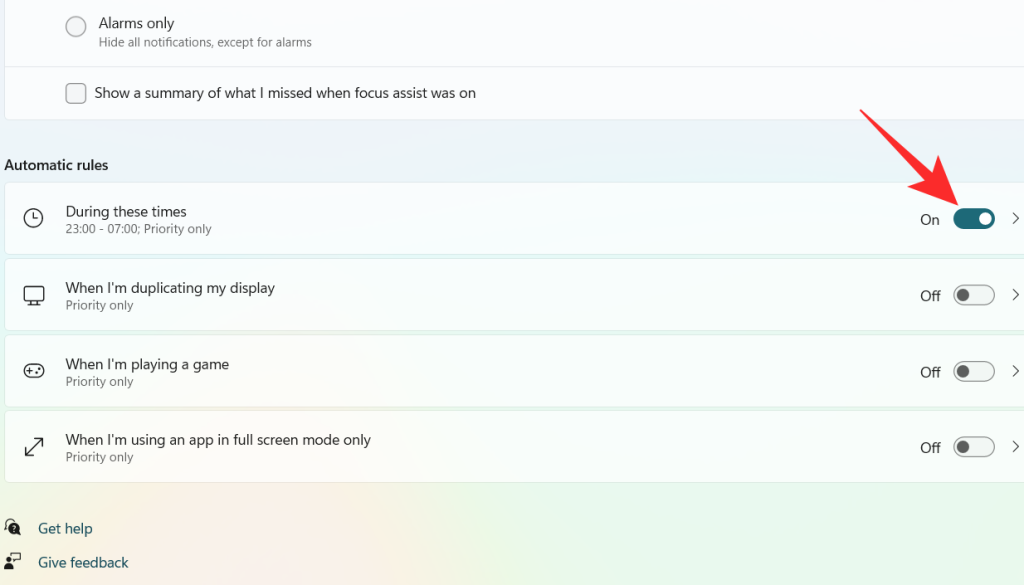
Turn on the toggle switch, which is extreme right to the During these times tab.
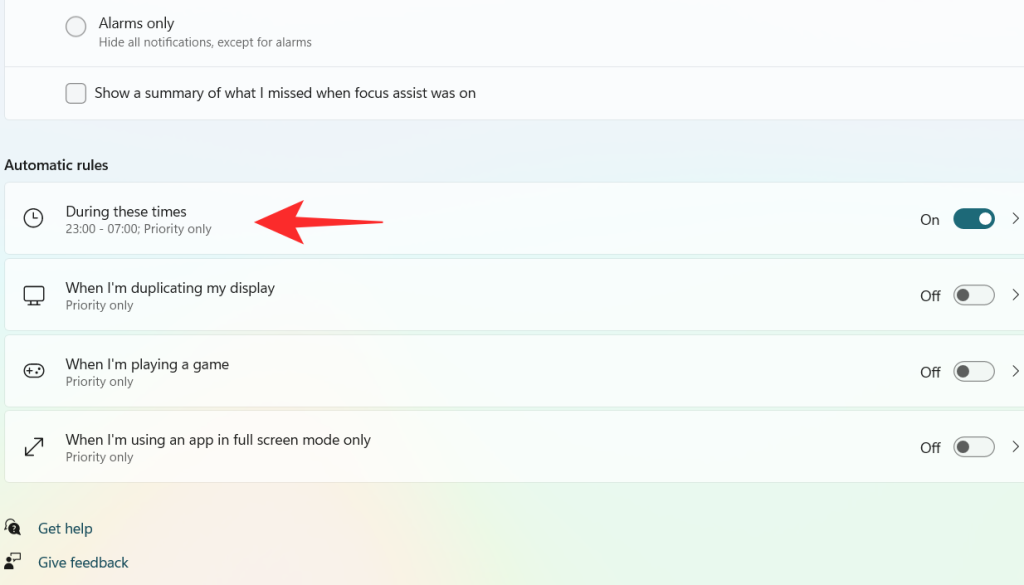
Click on the During these times tab.
Click on the box under Start time.
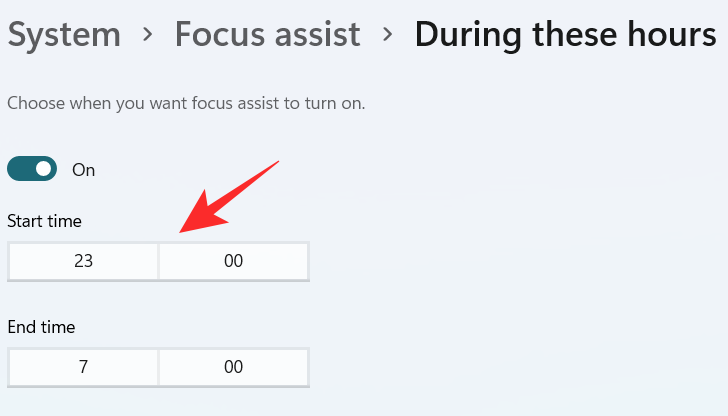
Select the time when you want the Focus Assist to turn on and click on the tick on the bottom of the dropdown menu.
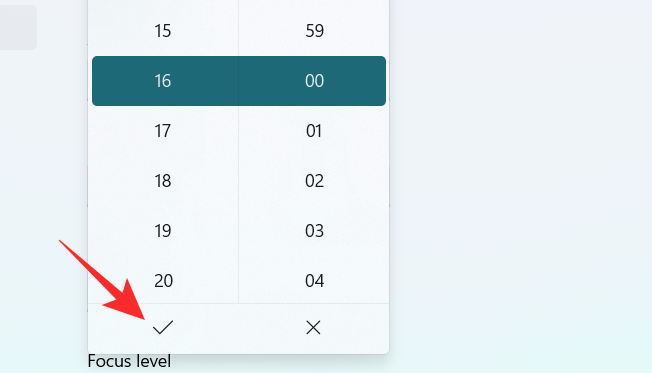
Click on the box under End time.
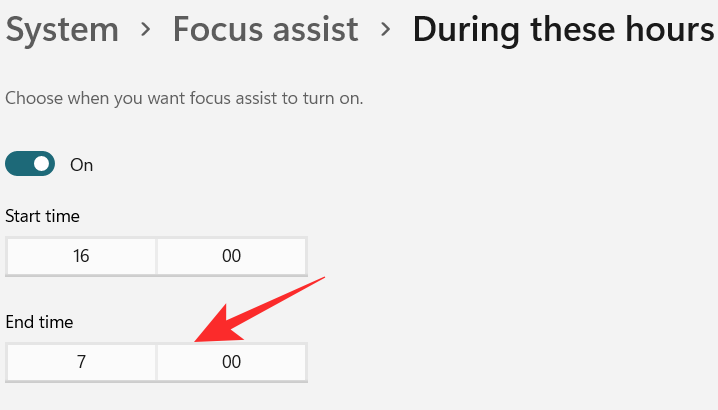
Select the time when you want the Focus Assist to turn off and click on the tick on the bottom of the dropdown menu.
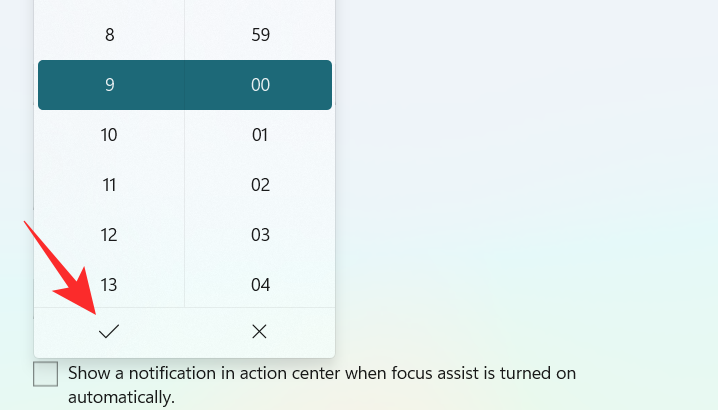
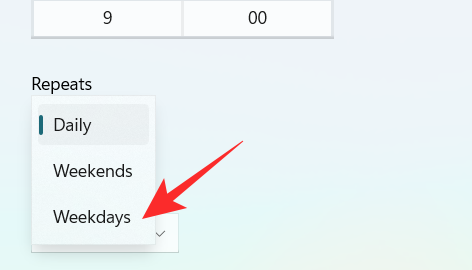
Click on the box under Repeats.
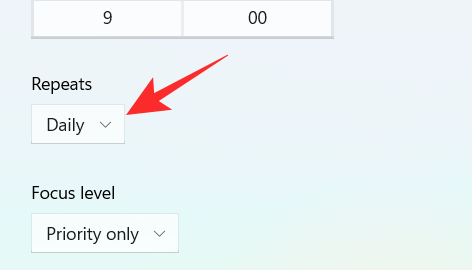
A small dropdown menu appears. Set the schedule to Daily, Weekends, or Weekdays.
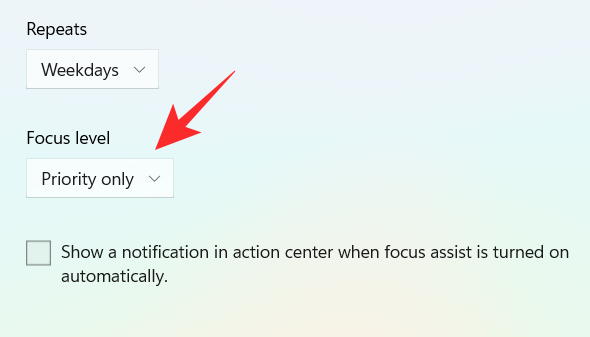
Click on the box under Focus level.
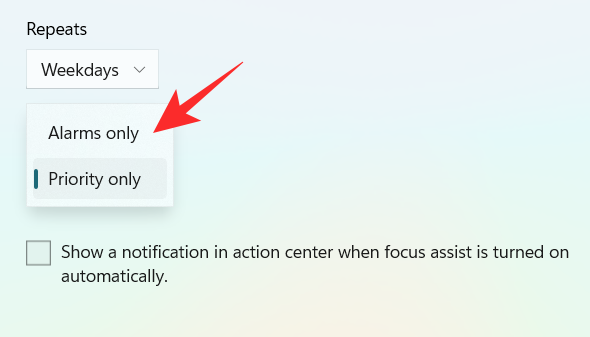
A small dropdown menu appears. Choose between Alarm only or Priority only.
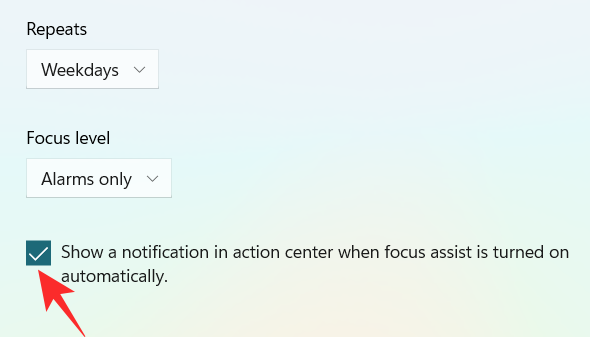
Finally, to get a notification when the Focus assist is turned on, check the box “Show a notification in action center when Focus assist is turned on automatically“.
2. When I’m duplicating my display
Turn on the toggle switch, which is extreme right to the When I’m duplicating my display tab.
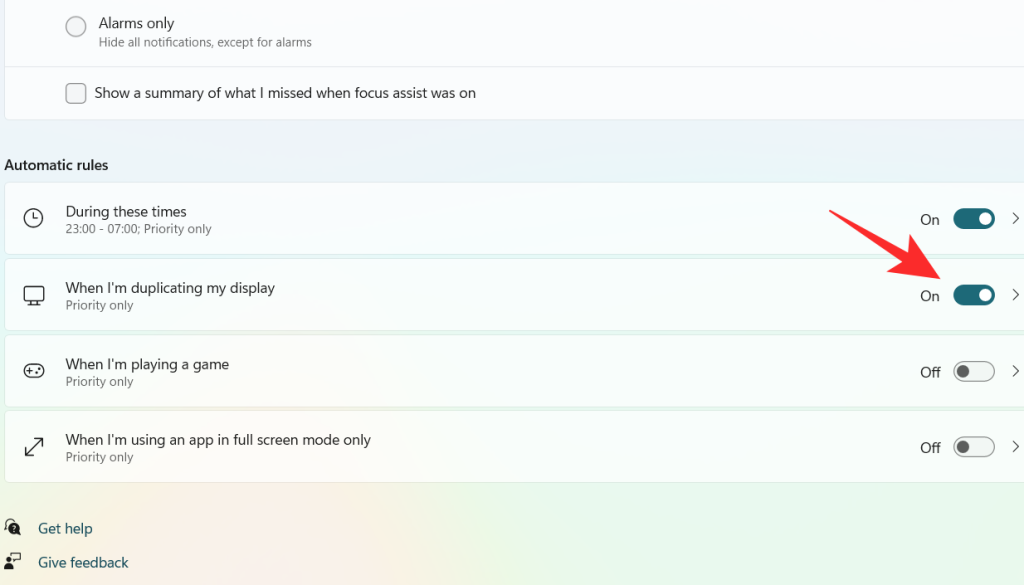
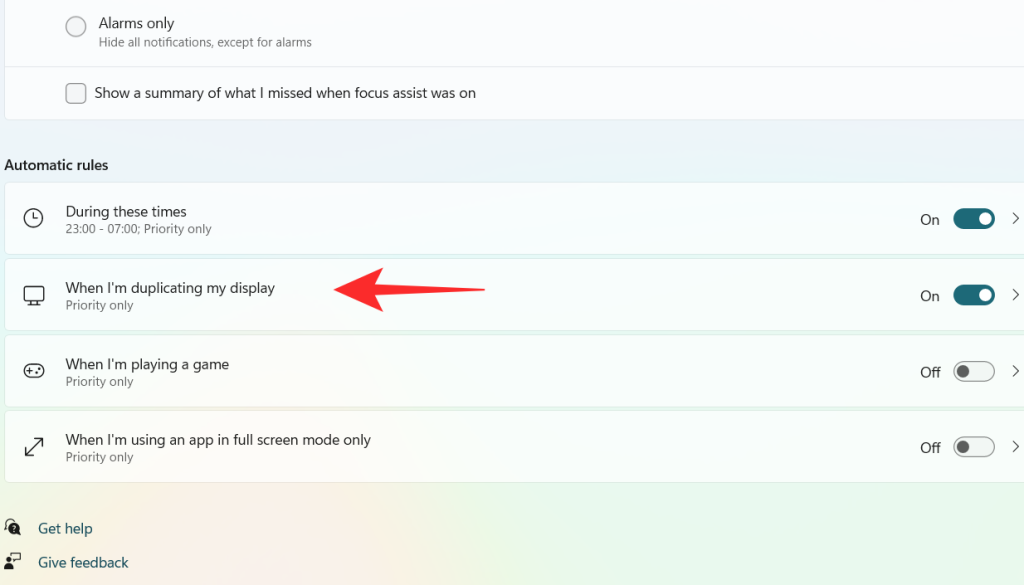
Click on the When I’m duplicating my display tab.
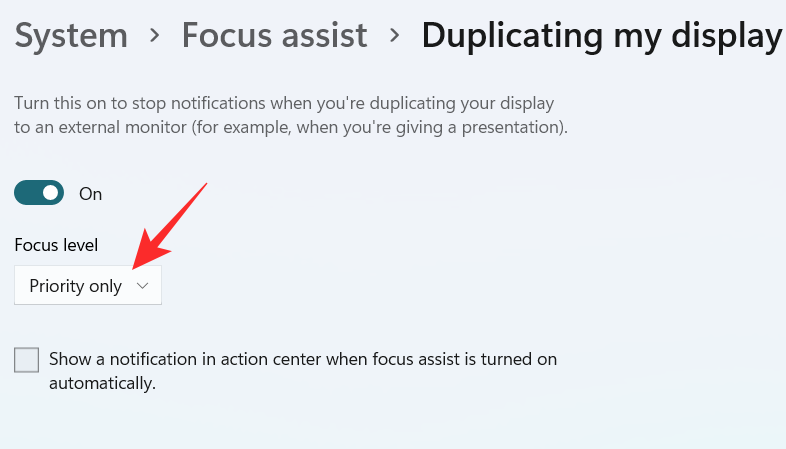
Click on the box under Focus level.
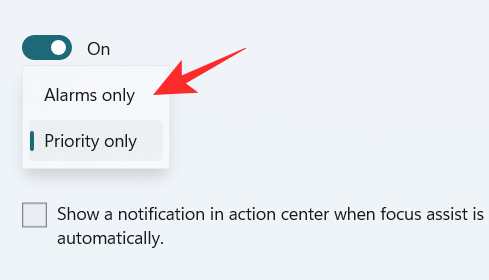
A dropdown menu appears, click on your desired option between Priority only and Alarms only.
To get a notification when the Focus assist is turned on, check the box “Show a notification in action center when Focus assist is turned on automatically“
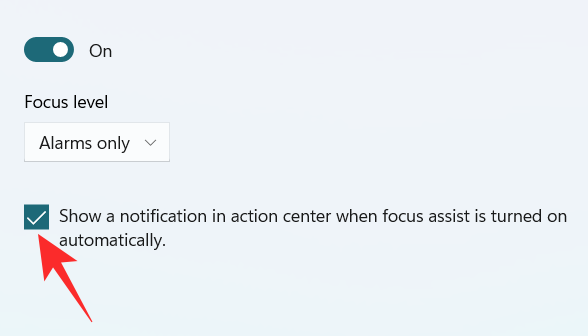
3. When I’m playing a game
Turn on the toggle switch, which is extreme right to the When I’m playing a game tab.
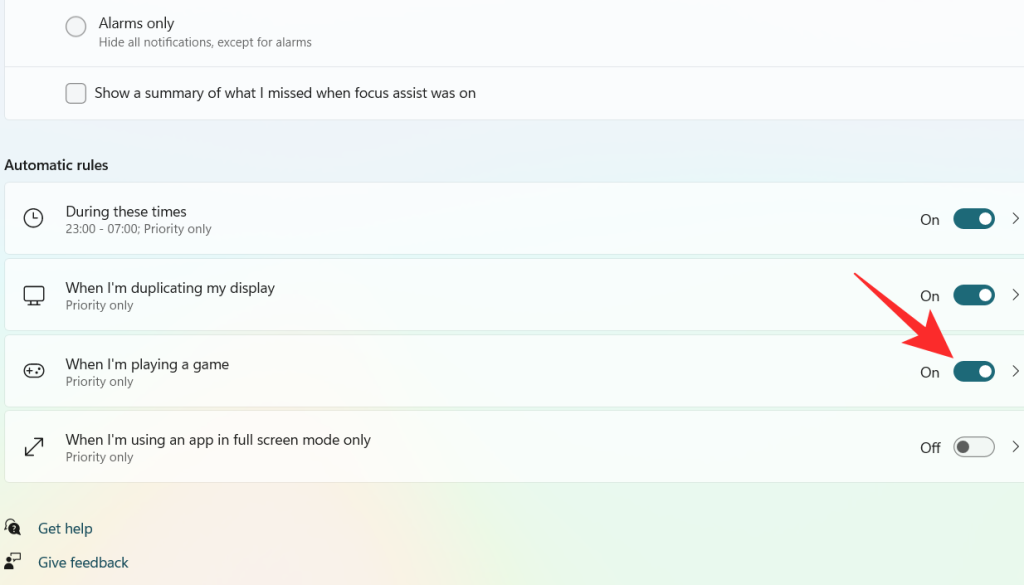
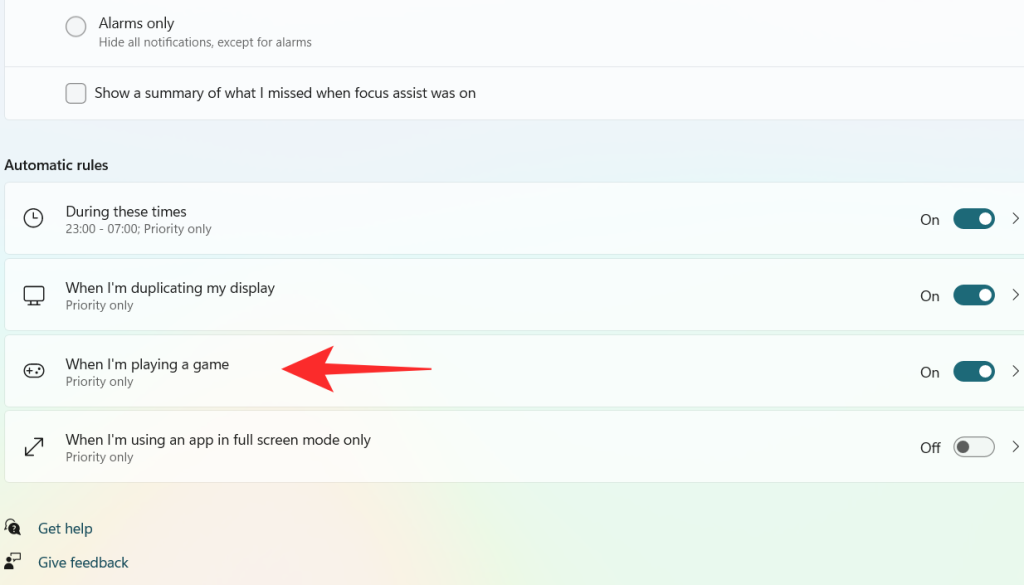
Click on the When I’m playing a game tab
Click on the box under Focus Level.
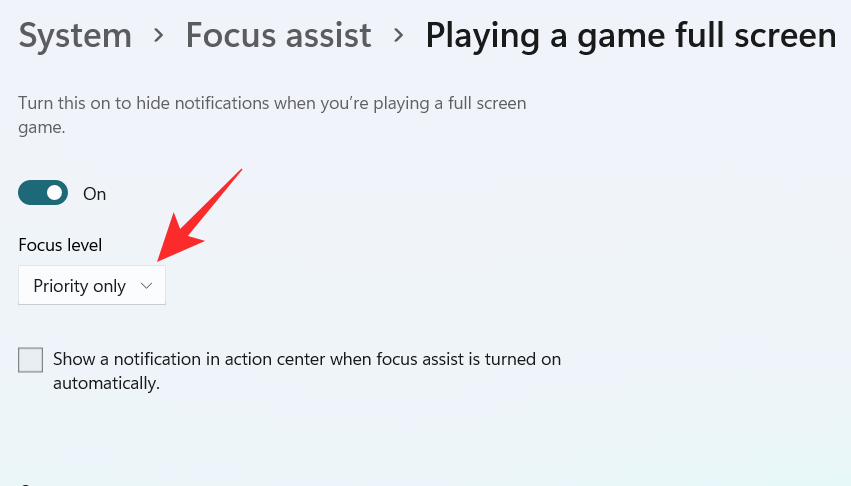
A dropdown menu appears, click on your desired option between Priority only and Alarms only.

To get a notification when the Focus assist is turned on, check the box “Show a notification in action center when Focus assist is turned on automatically“

4. When I’m using an app in full-screen mode only
Turn on the toggle switch, which is extreme right to the When I’m using an app in full-screen mode only tab.
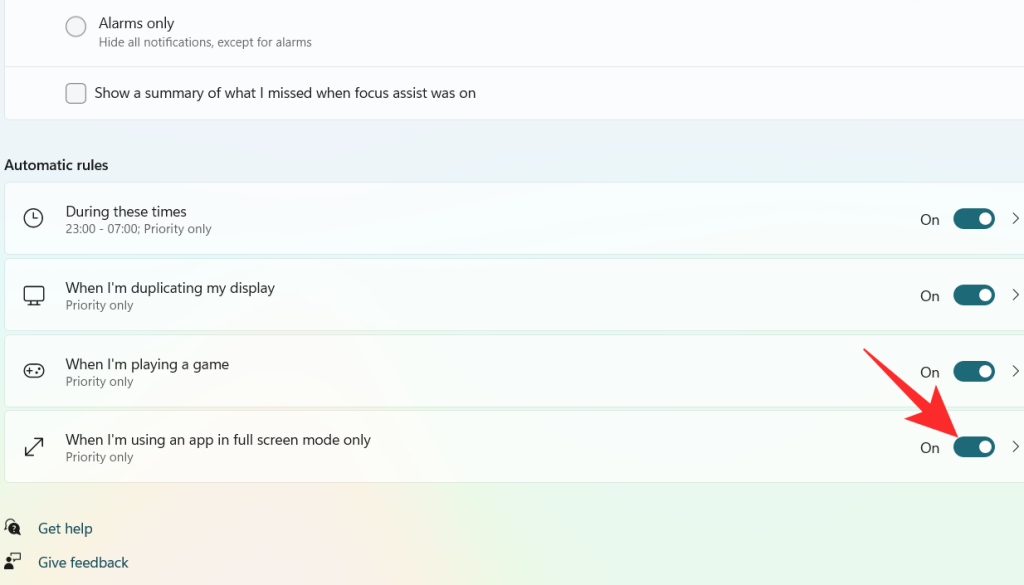
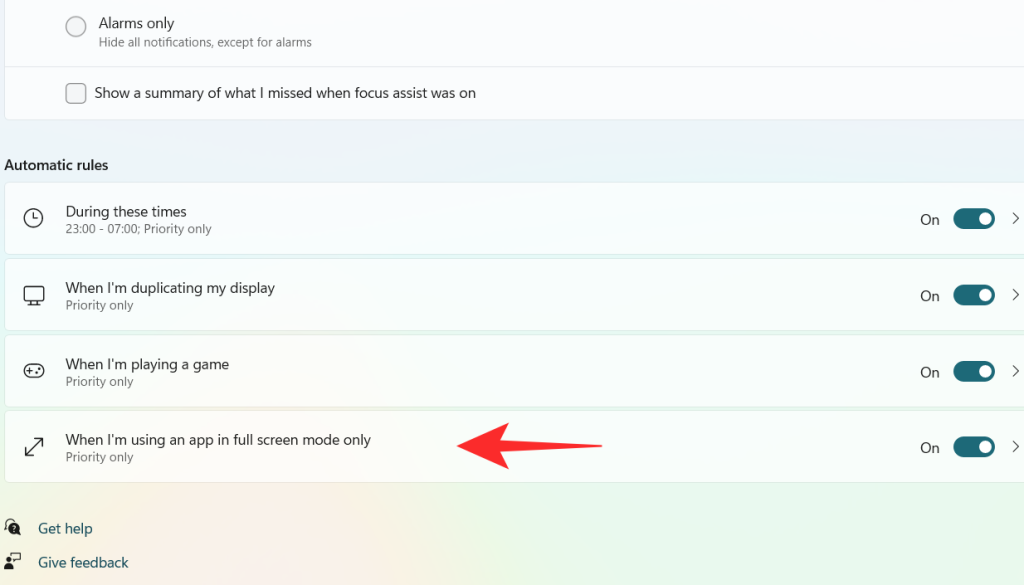
Click on the When I’m using an app in full-screen mode only tab
Click on the box under Focus Level.
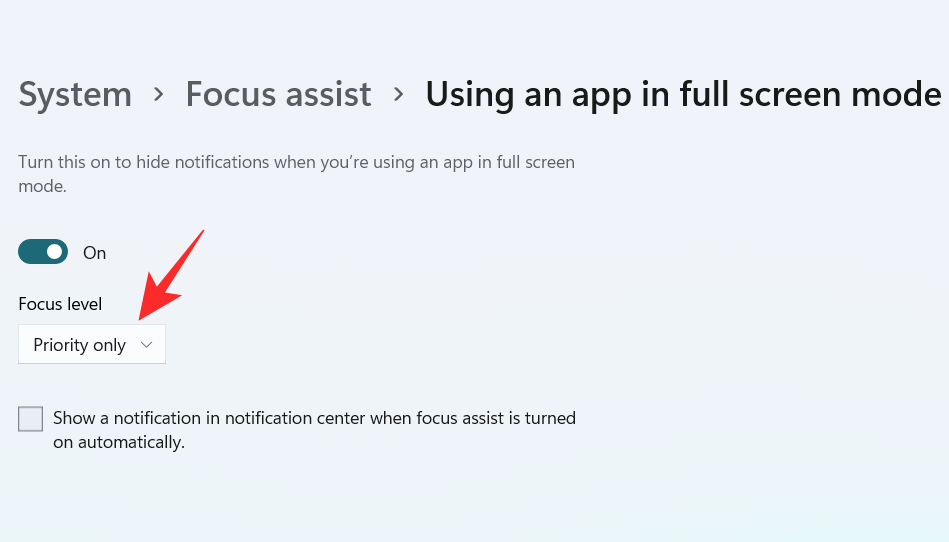
A dropdown menu appears, click on your desired option between Priority only and Alarms only.

To get a notification when the Focus assist is turned on, check the box “Show a notification in action center when Focus assist is turned on automatically“.

Using the above customizations, you can schedule and control Focus assist’s behavior according to your workflow for maximum efficiency no matter the task at hand.
Can you remove the Focus Assist icon from the Action Center?
Yes, you can easily remove the Focus Assist icon from the Action Center. Windows 11 brings a host of new cosmetic and UI changes and one of them has been the ability to customize your action center. You can now add or remove icons from the action center depending on your needs and opt for a more minimal or productive look depending on your workflow.
For now, you can only add and remove certain system modules but in the future, some users expect Microsoft to add the support for third-party apps as well. This would be a much welcome change that would allow you to manage dedicated system settings managed by third-party apps directly from your action center.
Customize your Focus assist icon in the action center
Depending on your current needs you can either remove or add the Focus assist module to the action center. Use one of the guides below depending on your current requirements.
1. Remove it
Click on the Action Center which shows the icon of Wifi, volume, and battery together.

Right-click on an empty place or on any icon and click on Edit quick settings.
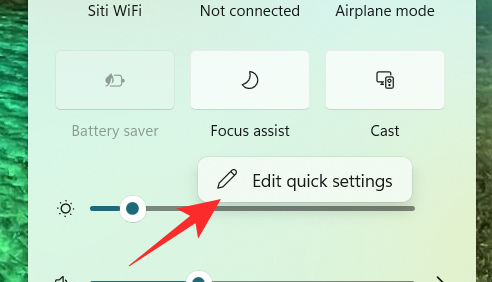
Click on the unpin symbol at the top right corner of the Focus Assist icon to remove the Focus Assist icon from the Action Center.
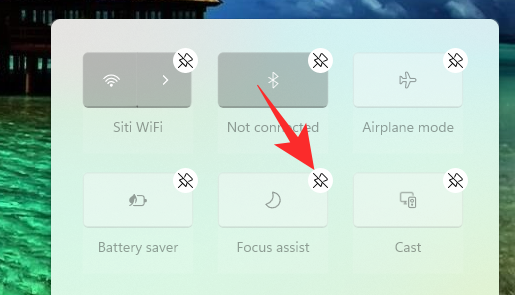
The Focus assist module should now have been removed from your action center. If not, we recommend you restart explorer.exe or your PC for the changes to take effect.
2. Restore it
Click on the Action Center which shows the icon of Wifi, volume, and battery together.

Right-click on an empty place or on any icon and click on Edit quick settings.
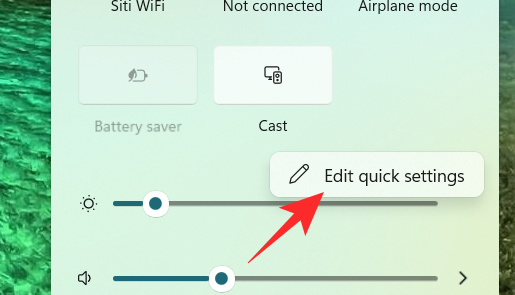
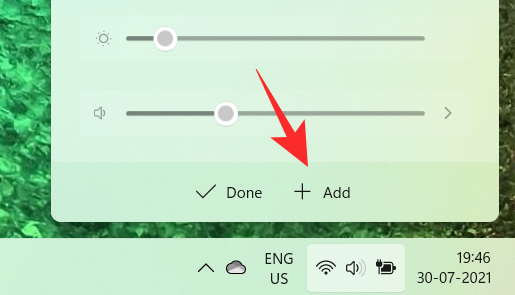
Now, click on the Add button at the bottom of the action center.
A list of different settings appears. Click on Focus Assist from the list and you will get to see the Focus Assist icon on the Action Center again.
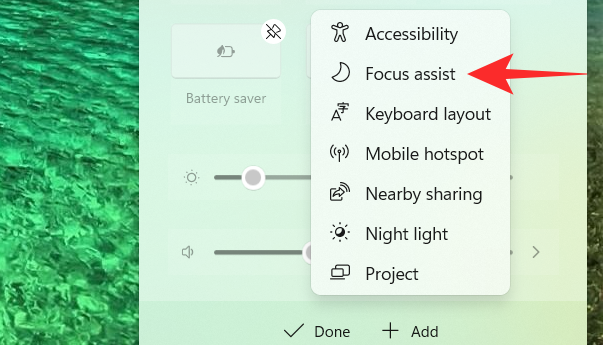
And that’s how you can add the Focus assist module back in the action center.
Focus assist keeps turning on automatically Issue: How to fix
If Focus assist keeps turning on automatically then there could be a couple of reasons for this behavior. Depending on its cause we can either fix it or use a workaround to manage the issue. Let’s find out why Focus assist keeps turning on automatically on your system.
Fix #1: Check Automatic Rules
Are you having this issue when projecting to a secondary display? Or when sharing your screen with a public computer? Then it is likely that focus assist is getting turned on automatically due to the default automatic rules in Windows 11.
By default, focus assist will silence all notifications in such scenarios to help maintain your privacy. But this can be counterproductive in case you are just trying to use a bigger display from a portable system like a laptop or an NUC.
It could also be that scheduled Focus assist was turned on your system by mistake which will enable and disable Focus assist automatically during certain hours. If any of these situations sounds like what you are facing then you can use the guide below to disable all automatic rules that enable Focus assist during certain scenarios and workflows on Windows 11. Let’s get started.
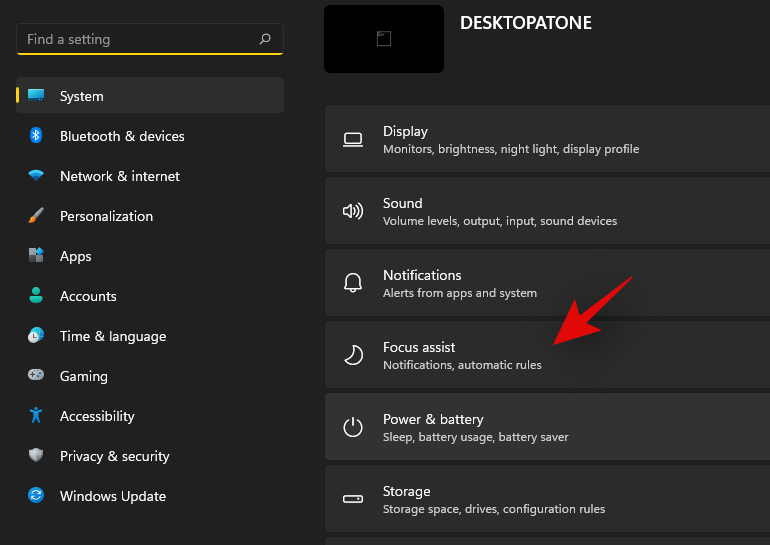
Press Windows + i on your keyboard to open the Settings app. Ensure ‘System’ is selected on your left and then click on ‘Focus Assist’ on your right.
Go down to automatic rules and turn off the following toggles.
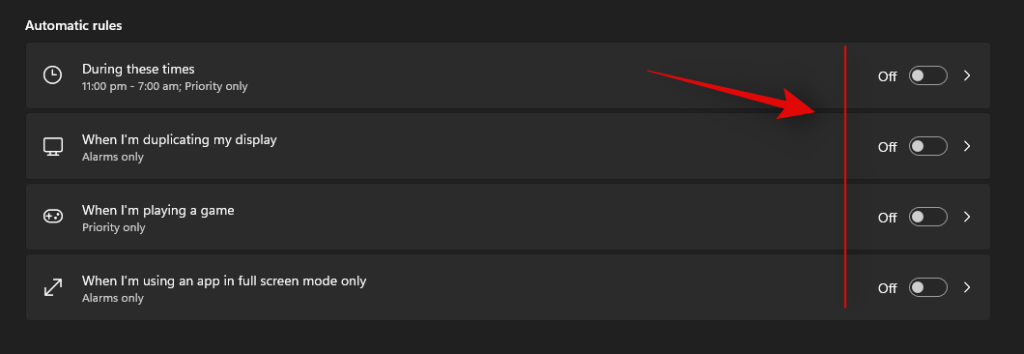
Once these rules are disabled, Windows 11 will not turn on Focus assist automatically on your system.
Fix #2: Turn of GeForce Overlay
This is another way to solve Focus assist misbehaving on your system. If you have a dGPU from Nvidia and are using the GeForce experience app then we recommend disabling its overlay option and restarting your system. With the automatic rule for ‘When I’m using an app in full-screen mode only’ turned on, Windows will mistake the Nvidia overlay detection on your desktop for a full-screen app which will trigger the Focus assist settings in return. You can also disable this automatic rule in case you wish to keep the Geforce Experience overlay enabled on your system.
Focus assist greyed out, option missing or not working; How to fix
Is the focus assist option missing from Windows 11 settings app? Is the module greyed out in the action center? This is a known bug that shows up occasionally with every feature update of Windows. Even certain versions of Windows 10 faced huge issues with this bug until a fix was released.
Fix #1: Enable in Group Policy Editor
If Focus assist seems to be missing from your system then it is likely disabled using the group policy editor. If your PC is managed by your organization or your workplace then it is likely disabled by your administrator. If you have access to the group policy editor then you can use the guide below to enable focus assist on your system. However, in case you have limited access, then you might need to get in touch with your administrator to enable Focus assist on your system.
Press Windows + R on your keyboard to bring up the Run dialog box and type in the following command to launch the Group Policy Editor. Click on ‘Ok’ once you are done.
gpedit.msc
Navigate to the following node.
User configuration > Administrative Templates > Start Menu and Taskbar > Notifications
Double click on ‘Turn off Quiet Hours’ on your right.
Click and select ‘Disabled’ in the top left corner.
Click on ‘Ok’ to save your changes.
And that’s it! Focus assist should now be enabled on your system in case it was disabled using the group policy editor.
Fix #2: Reinstall and repair default Windows UWP apps and system apps
If Focus assist is still missing from your system then let’s check if all the necessary apps and utilities are installed properly on your system. Use the guide below to check and repair Windows 11’s basic apps and functionality on your system.
Press Windows + S and search for PowerShell. Click on ‘Run as administrator’ once it shows up in your search results.
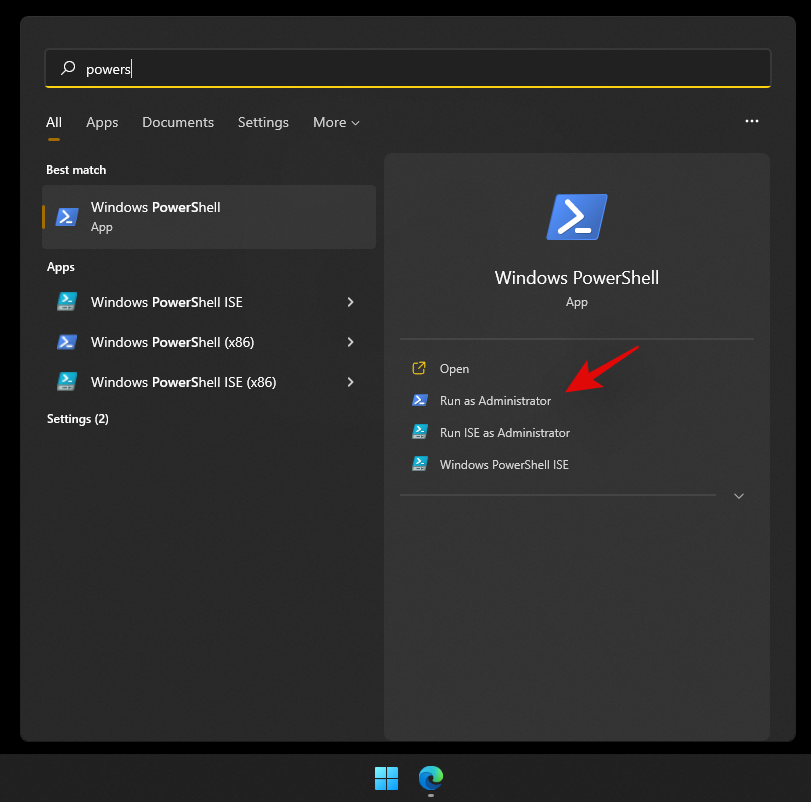
Once PowerShell is launched, execute the following command to reinstall all UWP apps and check and repair other default utilities required by Windows 11 in the background.
Get-AppXPackage -AllUsers | Foreach {Add-AppxPackage -DisableDevelopmentMode -Register "$ ($ _. InstallLocation) \ AppXManifest.xml"}

Wait for the process to finish and restart your PC for good measure. If Focus assist was corrupted or missing from your system, then this fix should help solve all your issues.
Fix #3: Check for a Windows Update
Haven’t updated in a while? We recommend checking for recent Windows Updates. While updates rarely disable major features like Focus assist, a new feature update installation can help refresh your registry, fix mismatched values and more importantly iron out bugs that could be preventing you from accessing Focus assist on your system. Use the guide below to check for recent Windows updates on your system.
Press Windows + i on your keyboard to open the Settings app and click on ‘Windows Update’ on your left.

Click on ‘Check for updates’.

In case any new updates show up, let them install on your system and restart if prompted. In case you are using a metered connection then you will need to click on ‘Download now’ manually to avoid any unexpected data charges.
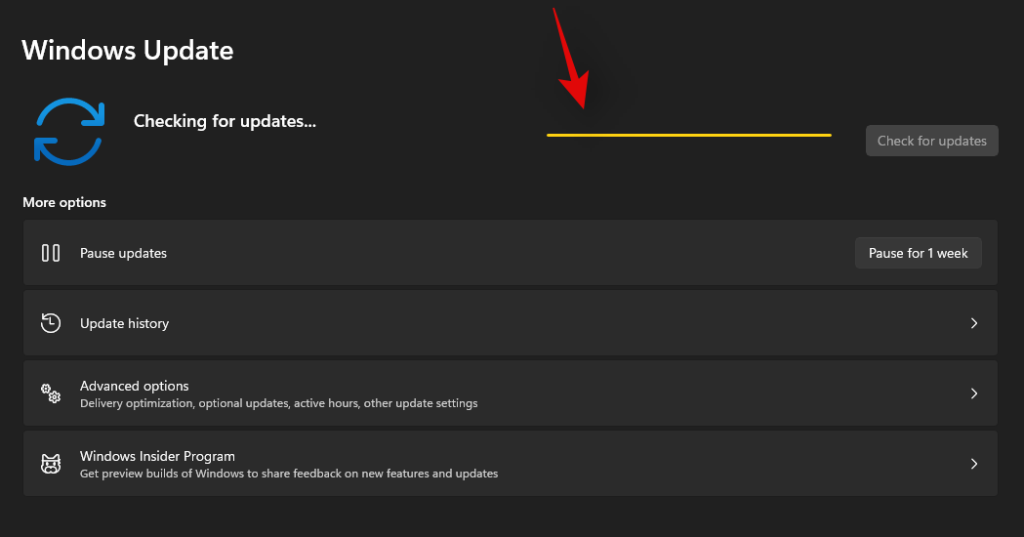
Once the necessary Windows updates are installed on your system, Focus assist should be restored in your action center and the Settings app.
Last Resort: Reset your PC
If Focus assist is still missing from your PC then this indicates a corrupted Windows installation on your system. The best way to fix this without wasting much time on troubleshooting would be to simply reset your PC while keeping all your files intact. This will refresh the entire Windows 11 installation and reinstall all the apps which should help restore functionality for all Windows features including Focus assist. Follow the guide below to reset your PC while keeping your files.
Note: The reset process will remove all installed applications and only retain files stored manually on your local storage. A list of all the removed apps will be available in .txt format on your desktop once your PC has been reset.
Press Windows + i on your keyboard and click on ‘Windows Update’ on your left.
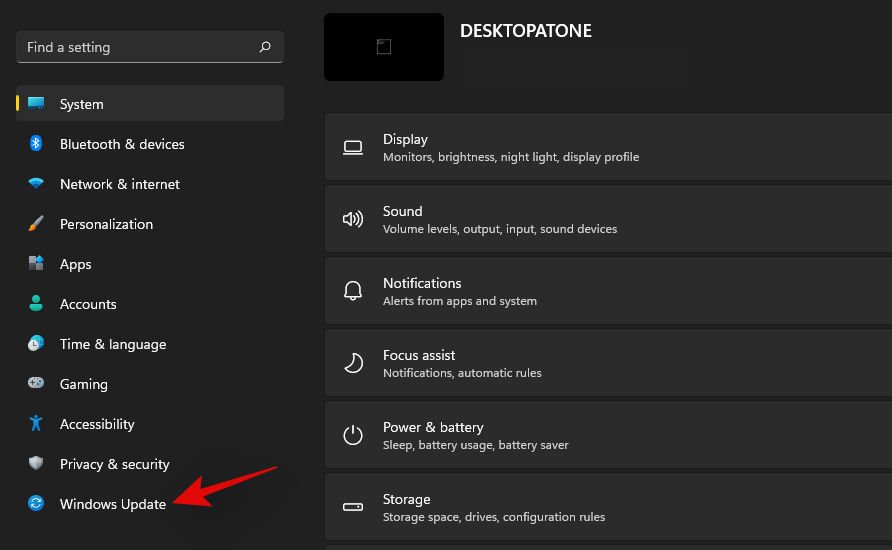
Click on ‘Advanced options’.
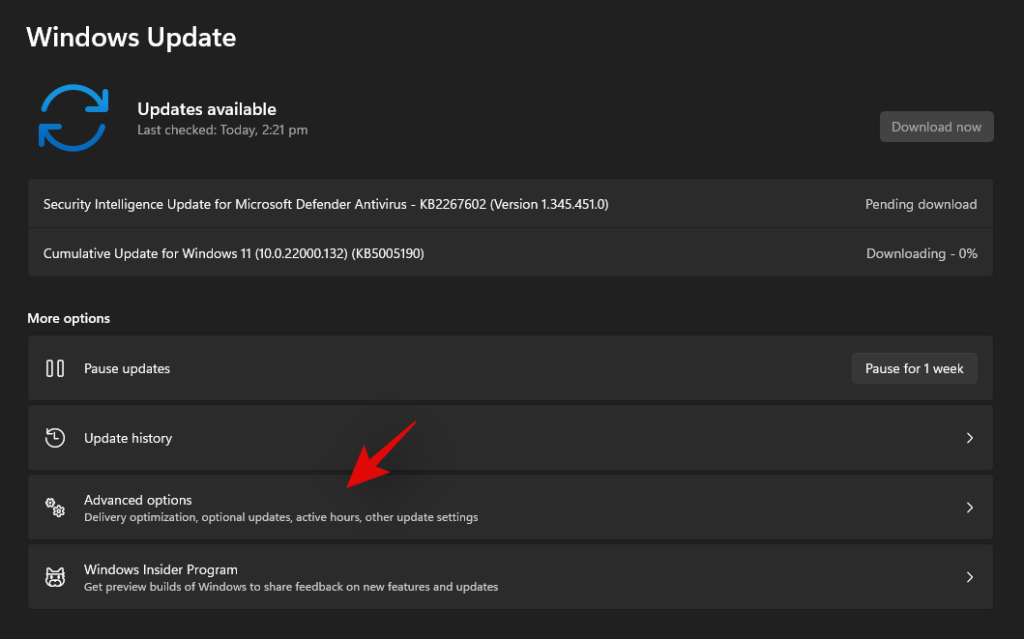
Click and select ‘Recovery’.
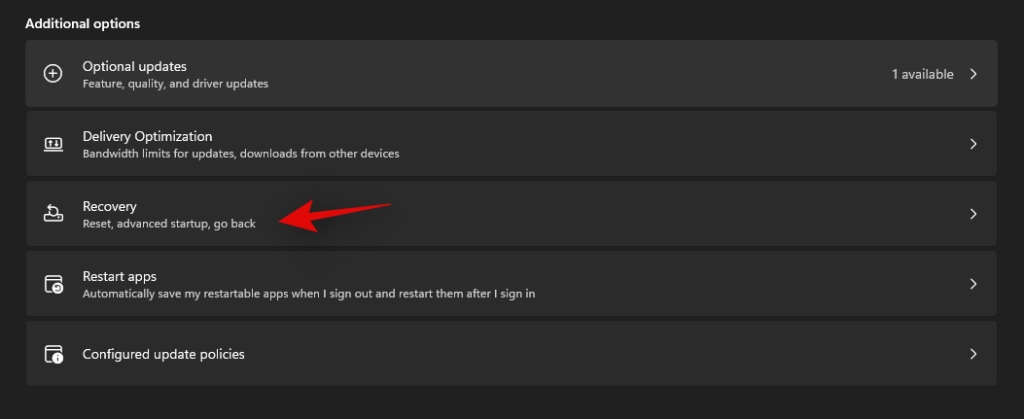
Click on ‘Reset PC’ beside Reset this PC.

Click on ‘Keep my files’.
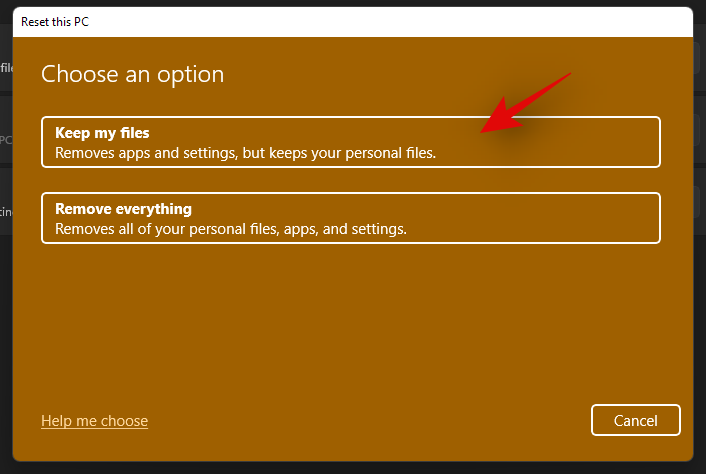
Windows will now process all the files on your local storage. Click on ‘Reset’.
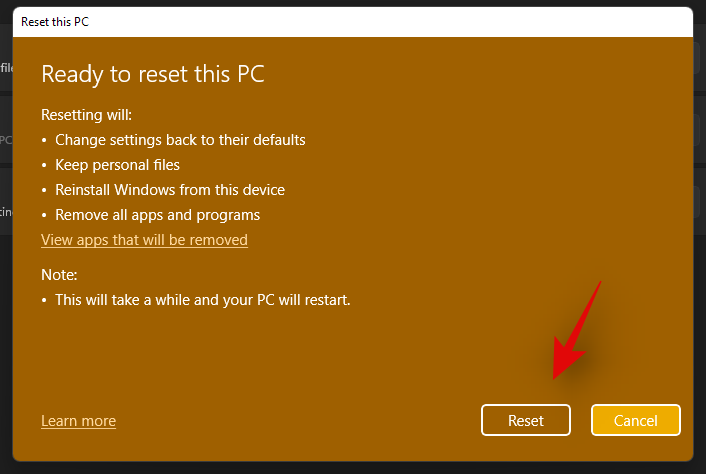
Note: If you are using Windows 11 Pro or higher then you will get the option to use a local installation/recovery media to reinstall Windows 11 as well. However, this option will be missing for Windows 11 Home users.
Windows will now reset your PC while retaining all your files. Your PC will restart several times during this process. This is completely normal and you should let Windows do its thing. If you are using a laptop or a portable NUC, then ensure that your unit is plugged into the power at all times during this process.
How to turn off Focus assist permanently
Do you wish to turn off Focus assist permanently in all scenarios? Then you can use the guide below to do so. The best way to disable Focus assist is by using the group policy editor. But in case you are using Windows 11 Home Edition, then you can use the first method in this guide to disable Focus assist permanently.
Method #1: Disable all settings and rules
Once you disable all the settings and rules for Focus assist, the feature should be turned off automatically on your system. Use the guide below to get you started.
Press Windows + i on your keyboard to open the Settings app and click on ‘Focus assist’ on your right.

Click and select ‘Off’ at the top.
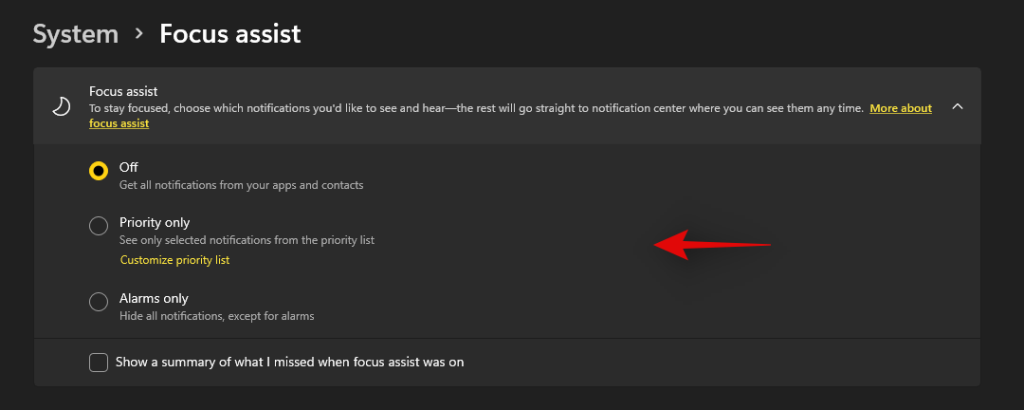
Uncheck the box for ‘Show a summary of what I missed when focus assist was on’.

Subsequently, disable all the toggles under ‘Automatic rules’ as shown below.

We also recommend turning off notifications for unnecessary apps using the guide after this section to avoid unnecessary notifications from interrupting you when focus assist is disabled.
Method #2: Using Group Policy Editor
The group policy editor will permanently disable focus assist on your system and even prevent you from accessing it in your settings. However, this method will only work on Windows 11 Pro or higher versions. In case you have the Windows 11 home edition, you can use the guide above to disable Focus assist instead.
Press Windows + R and type in the following to open Froup Policy EDitor. Click on ‘Ok’ once done.
gpedit.msc
Navigate to the following node.
User configuration > Administrative Templates > Start Menu and Taskbar > Notifications
Find and double-click on ‘Turn on Quiet Hours’ on your right.
Select ‘Enabled’ in the top left and click on ‘Ok’.
Focus assist will now be permanently disabled on the selected system. We recommend you restart your system or explorer.exe in case the changes do not take place immediately.
Is there any other way to disable notifications?
Yes, you can disable notifications individually on a per-app basis in Windows 11 to customize the notifications you receive. This is another way to ensure that you are only notified about the apps and notifications that you intended. Customizing your notifications this way will also allow you to retain the full functionality of the focus assist mode without having to disable certain rules to avoid mismatched scenarios in your workflow.
However, the only downside to managing your notifications this way is that you have to keep enabling and disabling notifications for apps every few months depending on your new installs and uninstalls. You can use the guide below to disable notifications on a per-app basis in Windows 11.
Disable notifications permanently on a per-app basis
Here’s how you can disable notifications on a per-app basis in Windows 11.
Press Windows + i on your keyboard to open the Settings app and then click on ‘Notifications’ on your right.
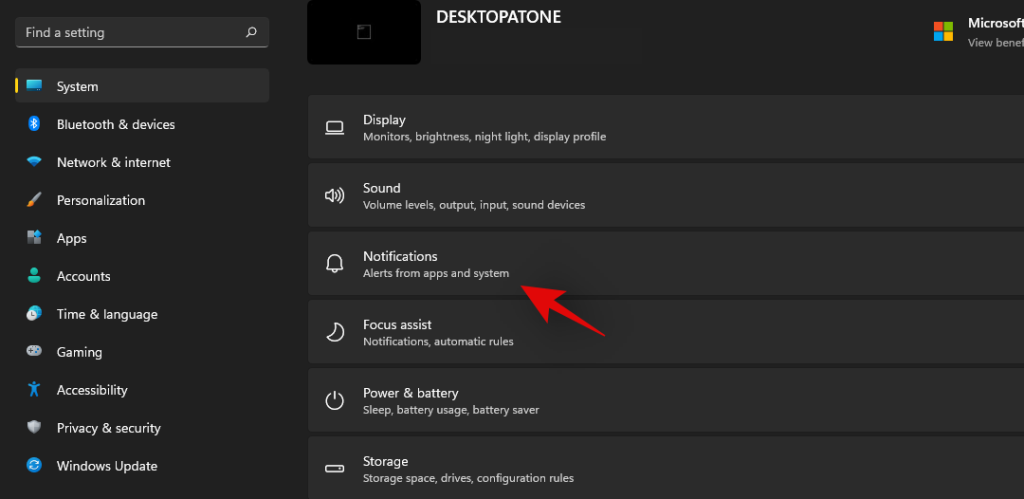
You will now get a list of all the apps that have the permission to deliver notifications on your system. Scroll the list to find the necessary apps and turn off the toggle beside them to disable notifications.

Repeat the steps above for all the intended apps to disable notifications.
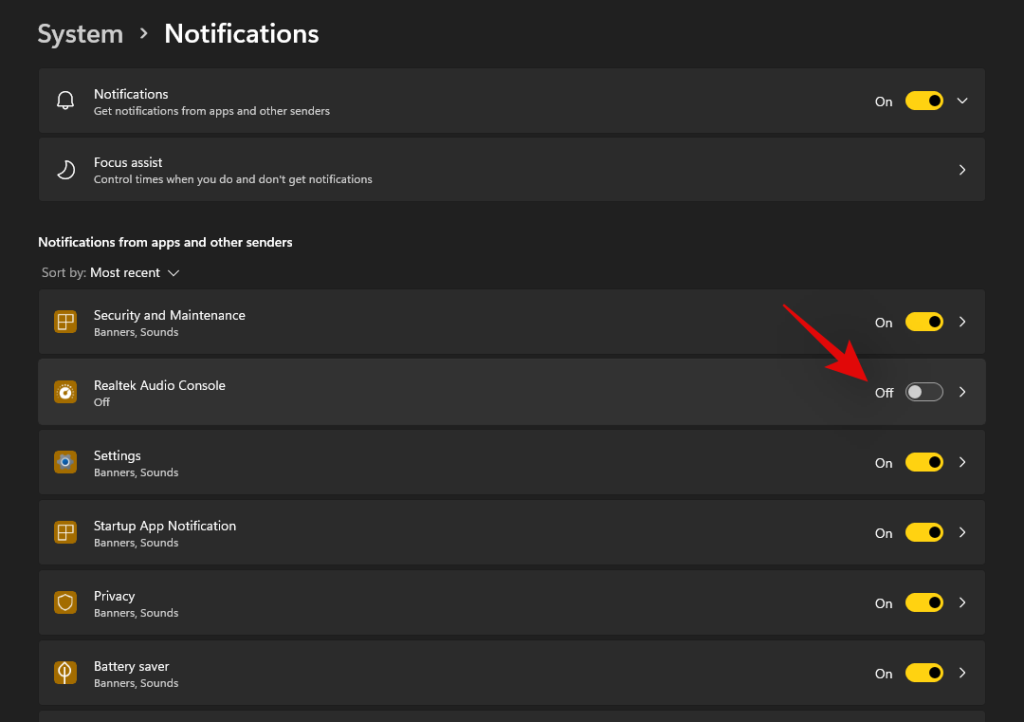
Close the Settings app and notifications for the selected apps should now be permanently disabled on your system.
Can you customize notifications in Windows 11?
Well, not exactly. Windows 11 currently has very limited options when it comes to customizing your notifications. You can not change the look, behavior, or color palette of your notifications without changing the accent color of your overall UI. However, you can customize the way your notifications sound. You can set a nice quiet notification sound that does not interrupt your workflow or opt for a quirky take that makes for a few good laughs each time you get a notification. The choice is completely up to you. Use the guide below to customize your Windows 11 notification sounds.
Required
Guide
Let’s start by first placing the .wav file in a compatible media folder so that you can set it as your default notification sound in Windows 11. Navigate to the concerned .wav file and copy it to your clipboard.
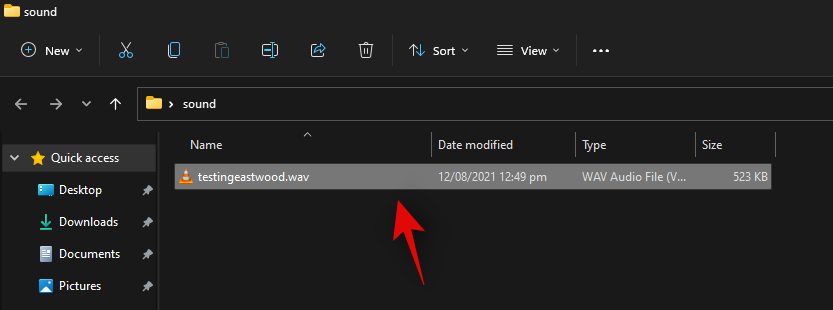
Now navigate to the following path given below. Paste your .wav file in this location. Click on ‘Continue’ when you will be prompted for administrator permission.
C:\Windows\media
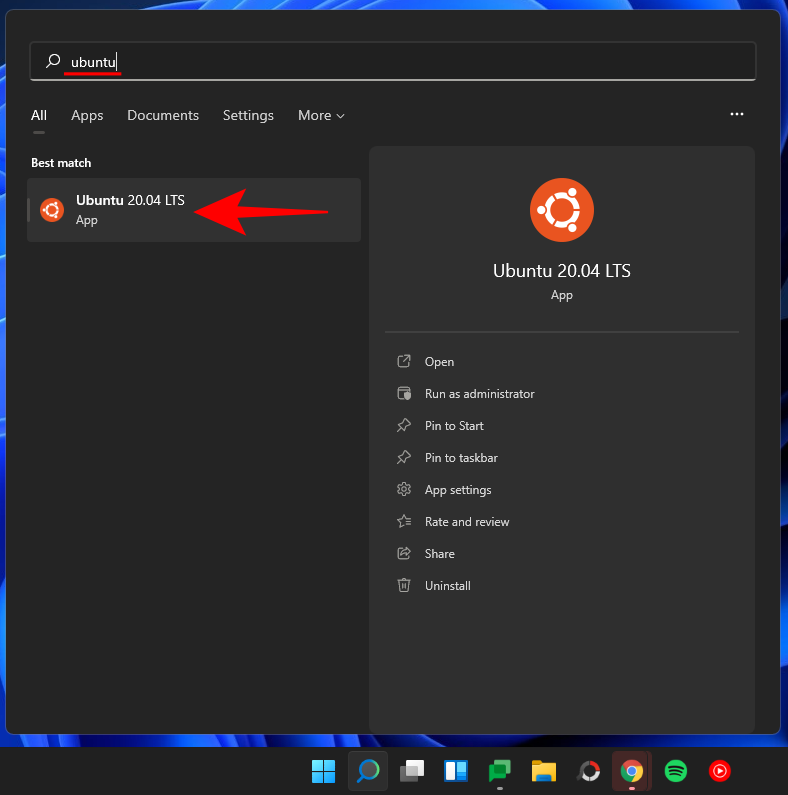
We can now use the .wav file as our default notification sound. Press Windows + i on your keyboard to open the Settings app and then click on ‘Sound’ on your right.
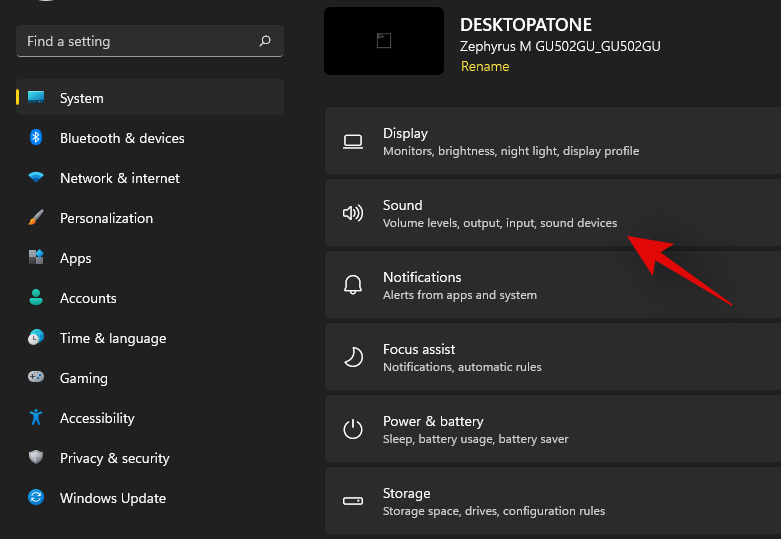
Scroll to the bottom and click on ‘More sound settings’.

Click and switch to the ‘Sounds’ tab at the top.
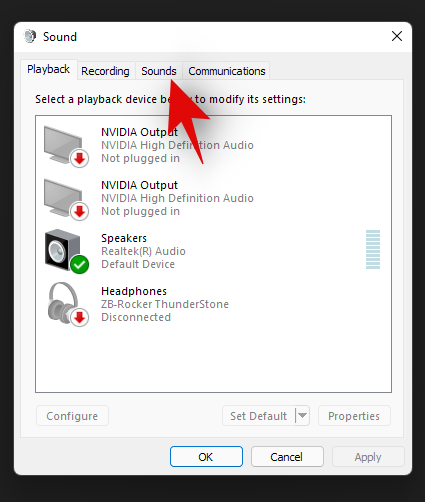
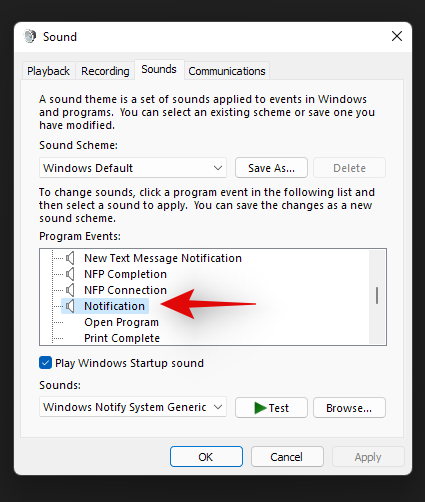
Under ‘Program Events’ scroll the list and find ‘Notifications’. Click on ‘Notifications’ to select it.
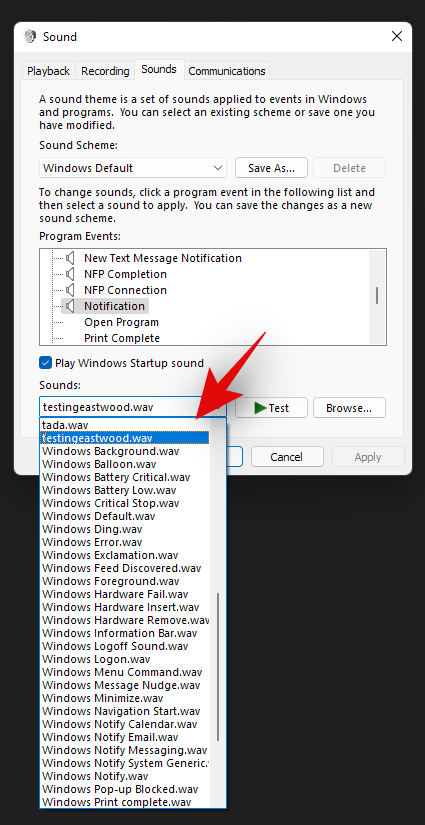
Now click on the drop-down arrow under Sounds and select the .wav file we pasted in the Media folder.
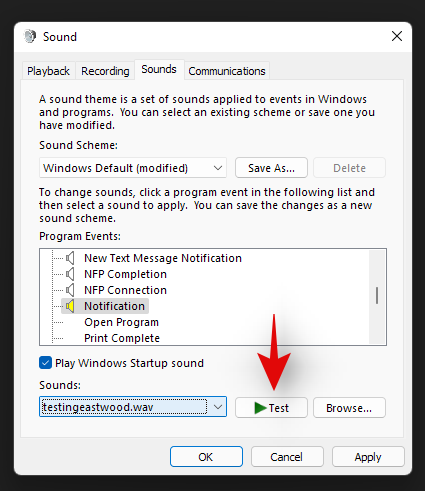
You can click on ‘Test’ to test your custom notification sound.
Click on ‘Ok’ to save your changes.
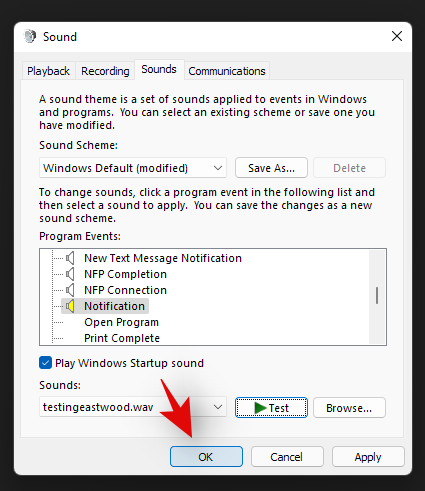
And that’s it! You will now have set a custom sound as your default notification sound in Windows 11.
Distractions from notifications are a huge problem especially when you are into some important work. Using the steps mentioned above, now, you can easily get rid of unnecessary notifications and work peacefully with full concentration.
Related:
Реестр Windows - это банк памяти вашего ПК. Узнайте, как правильно очистить его в Windows 11 и ускорить работу вашего компьютера.
Изучите эффективные методы решения неприятной проблемы с бесконечным экраном загрузки Skyrim, гарантируя более плавный и бесперебойный игровой процесс.
Я внезапно не могу работать со своим сенсорным экраном, на который жалуется HID. Я понятия не имею, что поразило мой компьютер. Если это вы, вот несколько исправлений.
Хотите знать, как транслировать «Аквамен», даже если он недоступен для потоковой передачи в вашей стране? Читайте дальше, и к концу статьи вы сможете насладиться Акваменом.
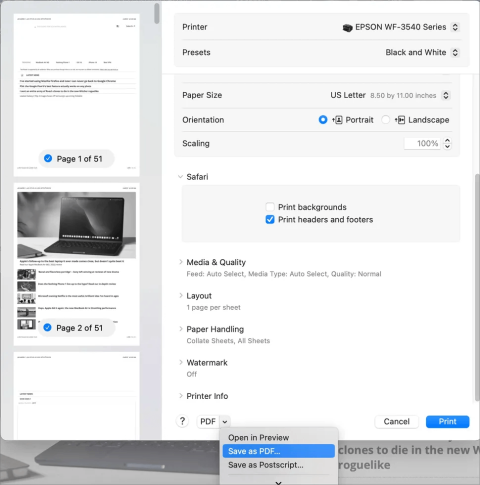
Узнайте, как легко сохранить веб-страницу в формате PDF, а также откройте для себя различные методы и инструменты для преобразования веб-контента в переносимые файлы PDF для автономного доступа и совместного использования.
Этот блог поможет пользователям загрузить, установить и обновить драйвер Logitech G510, чтобы они могли в полной мере использовать функции этой клавиатуры Logitech.
Изучите шаги по устранению неполадок и проверенные методы решения проблем с задержкой в Rainbow Six Siege, чтобы обеспечить более плавный и приятный игровой процесс.
Что конвертировать PDF-файл в текстовый файл? Не волнуйтесь, в этом руководстве вы найдете два простейших метода преобразования PDF-файла в текстовый файл.
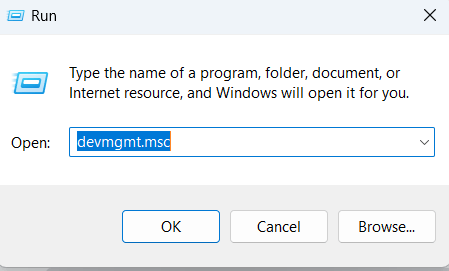
Редактор групповой политики может не работать на вашем компьютере из-за ошибки gpedit.msc не найден. Вот как это исправить!
Google Найти мое устройство не работает? Не волнуйтесь, блог предоставит вам подробное руководство по устранению неполадок и решению проблем с Google Find My Device.
Изучите пошаговые решения, адаптированные для систем Mac, обеспечивающие бесперебойную работу Discord без сбоев.
Изучите шаги по устранению неполадок, чтобы решить распространенные проблемы и беспрепятственно вернуть потоковую передачу Netflix на Roku.
Узнайте, как эффективно увеличить объем памяти вашего iPhone, с помощью нашего подробного руководства. Узнайте практические шаги и варианты, которые помогут вам никогда больше не исчерпать место для своих дорогих воспоминаний и важных данных.
Знаете ли вы, как увидеть все приложения, отслеживающие вас на Facebook? И есть ли у вас идеи, как их заблокировать? Читайте дальше, чтобы узнать, как защитить ваши данные от приложений, отслеживаемых Facebook.
Этот блог поможет читателям загрузить и обновить драйвер Canon MF237W для Windows 11/10, выполнив действия, рекомендованные экспертами.
Этот блог поможет читателям отключить функцию Copilot в Windows, если они не хотят использовать модель искусственного интеллекта.
Покупаете новый внешний диск? Сэкономьте немного денег и преобразуйте свой старый жесткий диск во внешний жесткий диск. Прочтите, чтобы узнать больше о переоборудовании и типах корпусов для вашего нового жесткого диска.
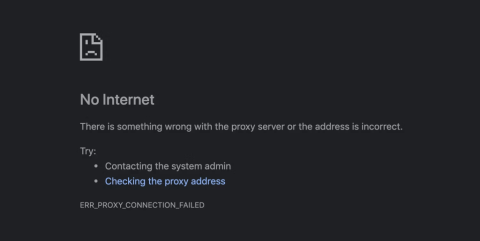
Этот блог поможет читателям, которые столкнулись с ошибкой «Что-то не так с прокси-сервером» в Chrome в Windows.
Kaspersky Password Manager не работает должным образом на вашем компьютере с Windows 11/10. Независимо от причины, вот несколько лучших способов решить проблему.
Этот блог поможет читателям решить проблему с сенсорной панелью ASUS, не работающей в Windows, с помощью рекомендованных экспертами шагов, которые можно быстро и легко выполнить.
Возникли проблемы с ошибкой «Отсутствует драйвер Precision в Windows 11»? Узнайте о проверенных способах восстановления точности сенсорной панели и мыши. Пошаговое руководство для простого устранения неполадок.
Застряли в надоедливом цикле восстановления с помощью ключа BitLocker в Windows 11? Узнайте пошаговые инструкции, как обойти бесконечные запросы, восстановить диск и вернуться к нормальной работе. Никаких технических знаний не требуется — простые и эффективные решения внутри.
Возникли проблемы с ошибкой обновления Windows 11 0x80073712? Узнайте о проверенных пошаговых решениях для обновления до 2026 года, включая советы по устранению неполадок, которые помогут вам обновить систему без проблем и безопасно. Больше никаких головных болей с обновлениями!
Возникли проблемы с ошибкой каталога обновлений Windows 11? Узнайте о проверенных пошаговых решениях для беспроблемного восстановления обновлений. Быстро верните свою систему в рабочее состояние — никаких технических знаний не требуется!
Проблемы с медленной работой Windows 11? Узнайте пошаговые решения для плана Ultimate Performance Plan, чтобы повысить производительность вашего ПК.
Проблемы с приглушенным звуком встроенного микрофона в Windows 11? Откройте для себя проверенные пошаговые решения для восстановления кристально чистого качества звука без лишних хлопот. Верните своему микрофону безупречную работу уже сегодня!
Возникли проблемы с Classic Shell или ошибками Start11 в Windows 11? Узнайте о пошаговых решениях проблем со сбоями, совместимостью и многом другом, чтобы восстановить работоспособность вашего персонализированного меню «Пуск». Обновлено с учетом последних советов по устранению неполадок.
Проблемы с задержками в играх на Windows 11 из-за VBS и HVCI? Узнайте о проверенных шагах по устранению неполадок, которые помогут оптимизировать производительность, уменьшить зависания и повысить FPS без ущерба для безопасности. Простые решения для геймеров.
Возникли проблемы со сбросом PIN-кода Windows Hello в Windows 11? Ознакомьтесь с проверенными шагами по устранению неполадок, чтобы быстро решить эту проблему и восстановить безопасный доступ к вашему устройству. Обновлено с учетом последних исправлений.
Возникли проблемы с отображением эффектов «Акрил» и «Слюда» в Windows 11? Узнайте о проверенных способах восстановления этих потрясающих визуальных эффектов и легкого улучшения работы с рабочим столом.
