Дисковое пространство всегда было роскошью, будь то старые времена DOS, когда все хранилось на гибких дисках, или наше современное время, когда нам трудно хранить наши музыкальные библиотеки на одном диске. В зависимости от вашей текущей конфигурации системы вам может легко не хватить места, поскольку вы продолжаете использовать свою систему.
Это пространство можно использовать для временных файлов , файлов подкачки, старой Windows , больших архивов, файлов для загрузки и многого другого. Лучшим способом освободить место является удаление самых больших файлов в вашей системе, но найти эти файлы может оказаться проблемой. В таких случаях вы можете использовать приведенное ниже руководство, чтобы определить и удалить самые большие файлы в вашей системе. Давайте начнем.
Связанный: Как исправить высокую загрузку процессора или диска Windows Search в Windows 11
СОДЕРЖАНИЕ
Освободите место в Windows 11
Вы можете легко проверить наличие огромных файлов в вашей системе в Windows 11 (или 10), используя различные методы. Windows 11 также поставляется со встроенной утилитой, которая помогает идентифицировать файлы, занимающие большой объем дискового пространства на вашем компьютере. Следуйте одному из приведенных ниже методов, который лучше всего соответствует вашим текущим потребностям и требованиям.
Метод № 01: удаление приложений, занимающих много места
Нажмите Windows + i на клавиатуре, чтобы запустить приложение «Настройки», и нажмите «Хранилище» справа.
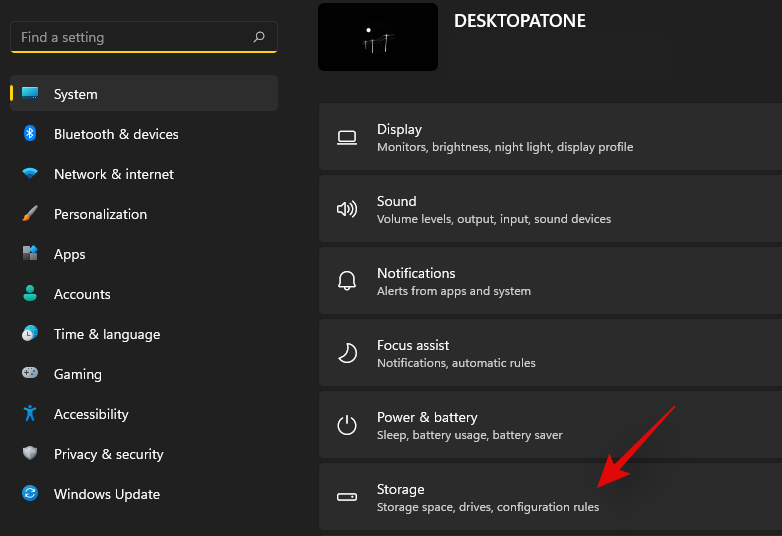
Теперь вы получите список всех категорий, занимающих большие участки дискового пространства на вашем ПК. Нажмите на категорию по вашему выбору, чтобы начать. Следуйте приведенным ниже инструкциям в зависимости от вашего выбора.
Нажмите "Сортировать по" вверху.
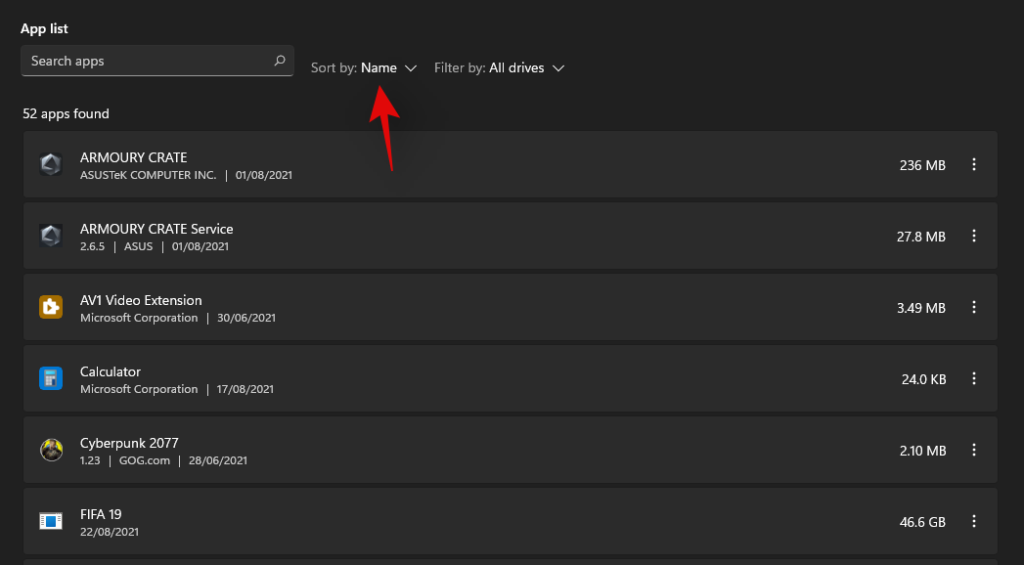
Выберите размер'.
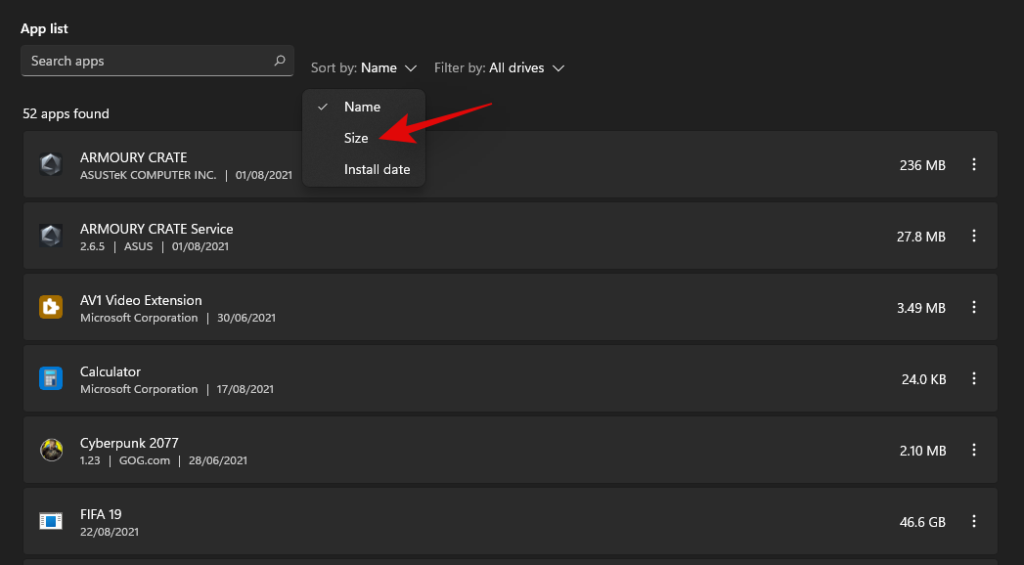
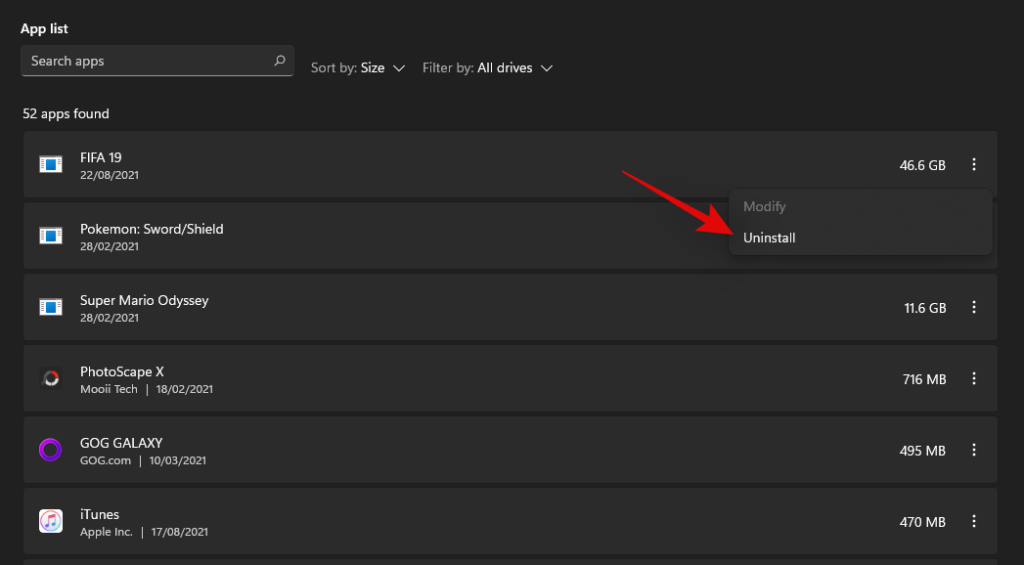
Самые крупные приложения и программы в вашей системе теперь будут перечислены в порядке убывания. Щелкните значок меню с тремя точками рядом с приложением, которое хотите удалить с компьютера.

Выберите «Удалить».
Снова нажмите «Удалить», чтобы подтвердить свой выбор.
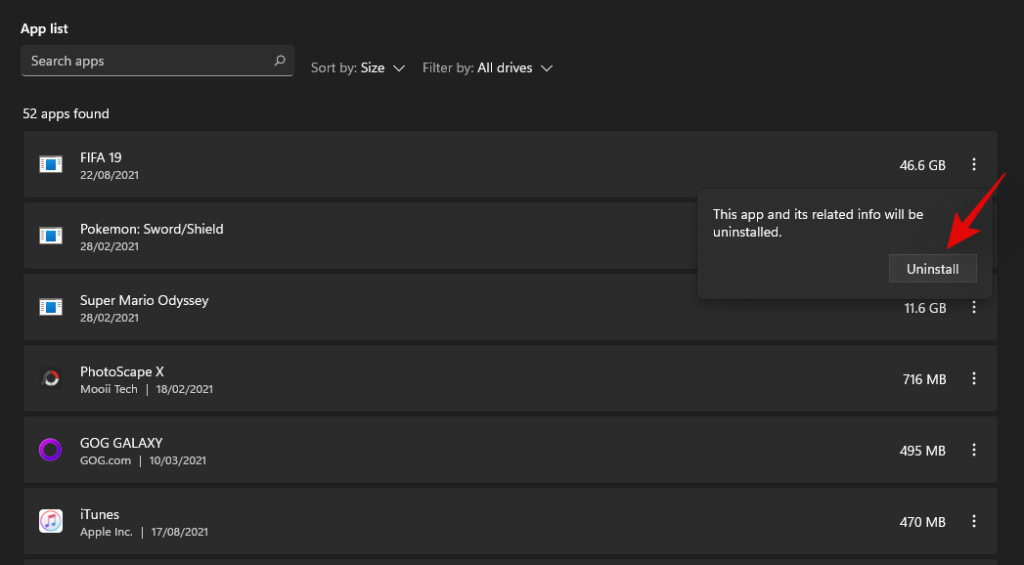
Теперь приложение должно быть удалено из вашей системы.
Если вы были перенаправлены в Панель управления
Щелкните и выберите приложение, которое хотите удалить / удалить.
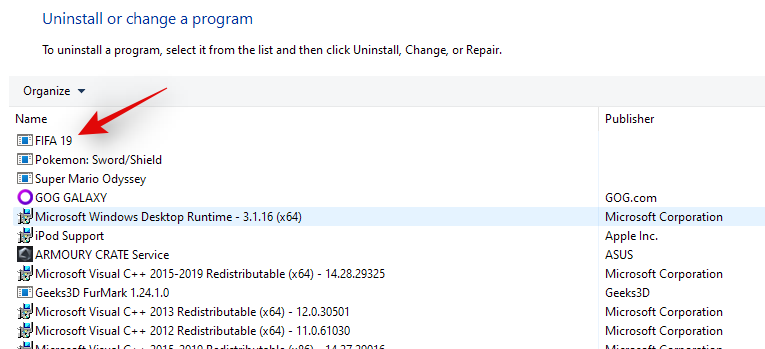
Нажмите "Удалить" вверху.
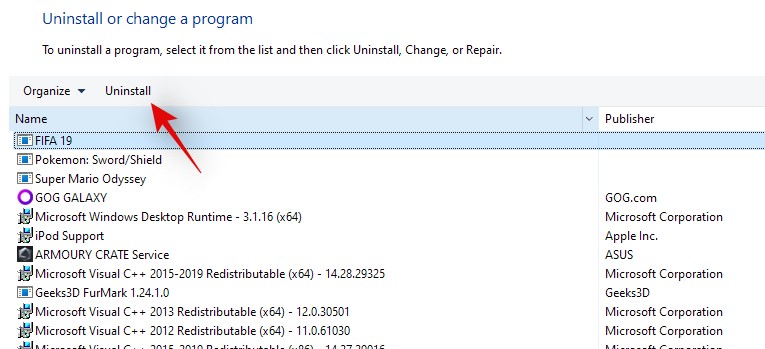
Программа удаления должна запуститься на вашем ПК. Следуйте инструкциям на экране, чтобы удалить выбранную программу из вашей системы.
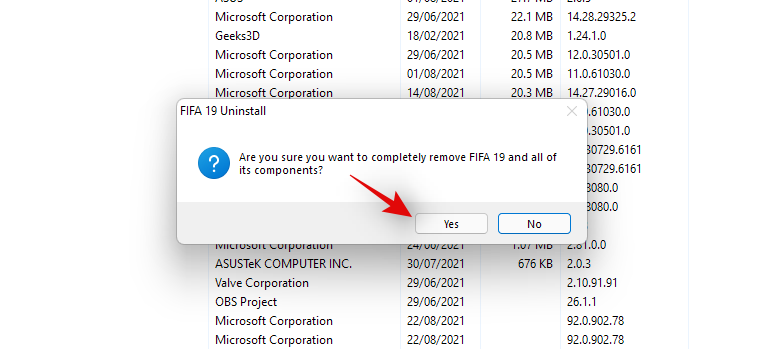
Выбранная программа должна быть удалена из вашей системы.
Связанный: Как восстановить Windows 11 [15 способов]
Метод № 02: Освободите место, используя параметр «временные файлы» в настройках хранилища.
Ваши временные файлы уже будут перечислены в порядке убывания их размера. Установите флажки для всех временных файлов, которые вы хотите удалить с вашего ПК.
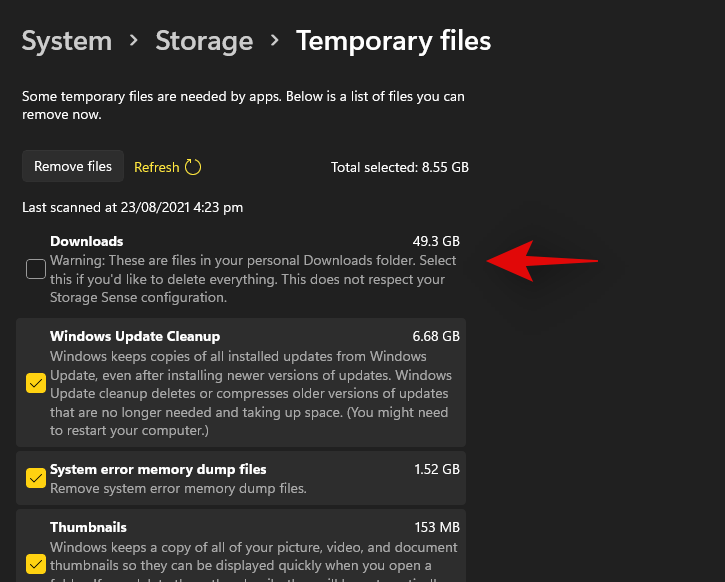
Примечание. При выборе «Загрузки» ваши личные файлы, хранящиеся в папке «Загрузки», будут удалены.
Нажмите «Удалить файлы» вверху, чтобы удалить выбранные временные файлы с вашего ПК.
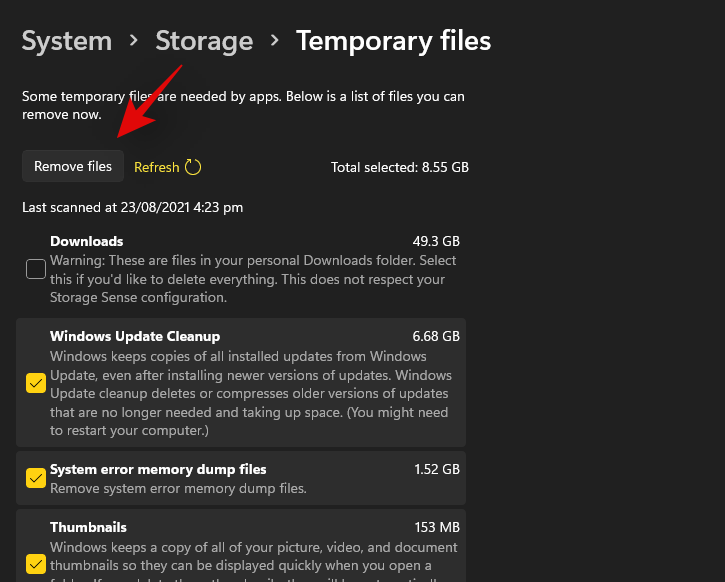
Теперь временные файлы должны быть удалены из вашей системы.
Связанный: Как удалить временные файлы в Windows 11
Метод № 03: Освободите место, используя другие параметры в настройках хранилища.
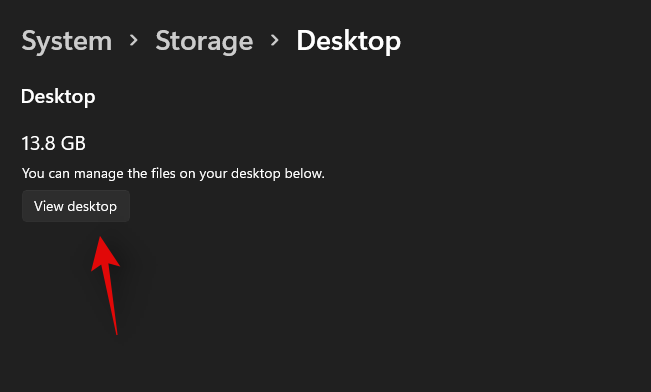
Нажмите «Просмотр рабочего стола / Музыка / Документы / Видео», и вы будете перенаправлены на свой рабочий стол.
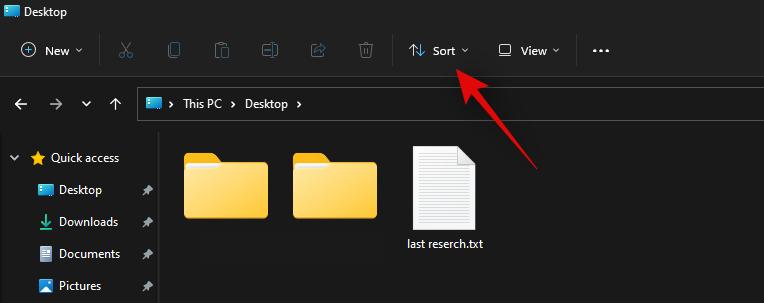
Нажмите "Сортировать" вверху.
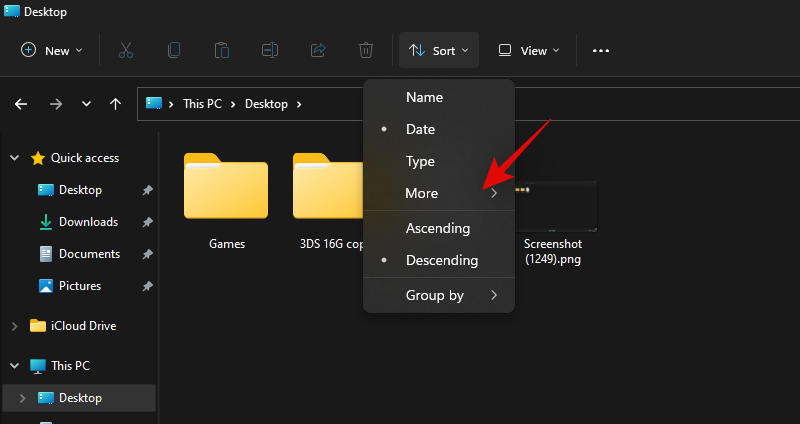
Щелкните "Еще".
Теперь выберите «Размер».
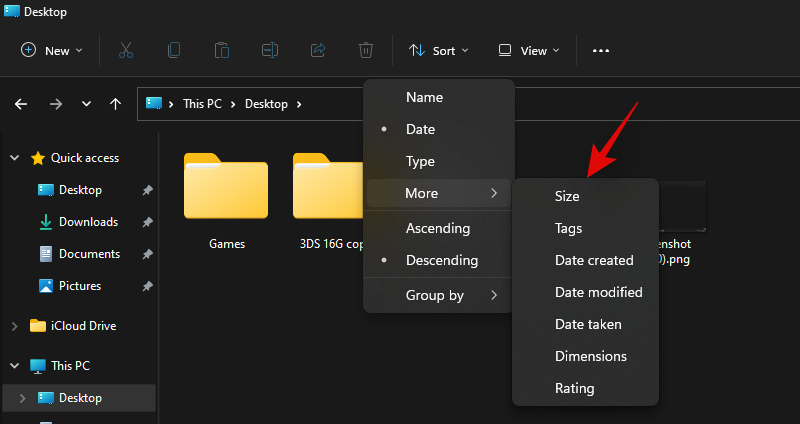
Теперь ваши файлы будут перечислены в порядке убывания их размера. Выберите файлы, которые хотите удалить, и нажмите Del на клавиатуре.
Теперь нажмите «Да», чтобы подтвердить свой выбор.
Выбранные файлы теперь должны быть удалены из выбранной папки.
Метод # 04: Использование WizDirStat
WizDirStat - популярная утилита с открытым исходным кодом, часто используемая для создания графического представления вашего локального хранилища в удобной для пользователя форме. Это упрощает определение больших фрагментов дискового пространства, занимаемых одним файлом, папкой или архивом, что, в свою очередь, упростит вам освобождение места на вашем компьютере. Используйте приведенное ниже руководство, чтобы определить, что занимает место на вашем ПК с Windows 11.
Загрузите и установите WinDirStat на свой компьютер по ссылке выше. После установки запустите приложение.

Теперь выберите один из вариантов, который лучше всего соответствует вашим потребностям. Если в вашей системе установлен только один диск с одним разделом, вы можете пропустить этот шаг. По завершении нажмите «ОК».
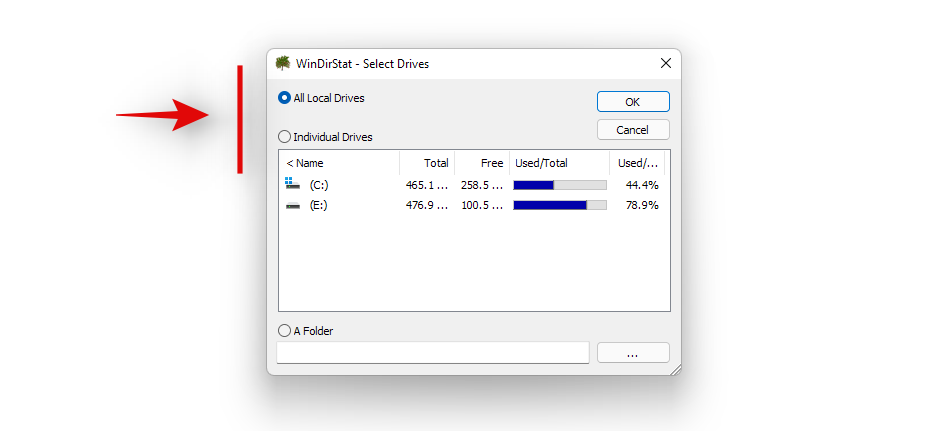
- Все локальные диски: это заставит WinDirStat проанализировать все ваши диски и отобразить их данные в графическом виде.
- Отдельные диски: выберите один из установленных дисков, который будет проанализирован на предмет использования дискового пространства. Вы можете выбрать эту опцию, а затем выбрать диск, который хотите использовать.
Теперь ваши диски будут проанализированы, и вы можете отслеживать их прогресс в нижней части окна.
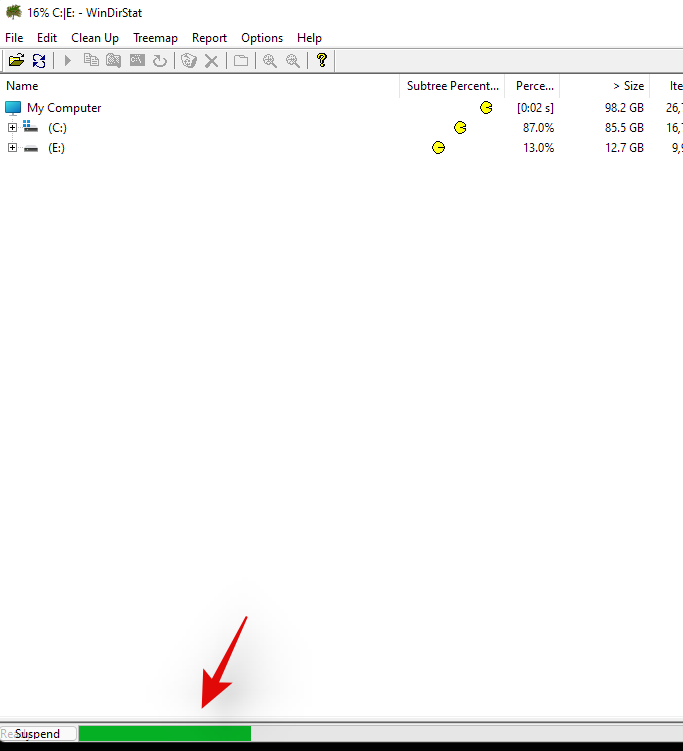
После анализа на вашем экране будет отображаться цветное графическое представление использования дискового пространства на выбранных дисках. Просто нажмите на самые большие фрагменты, чтобы определить самые большие файлы.
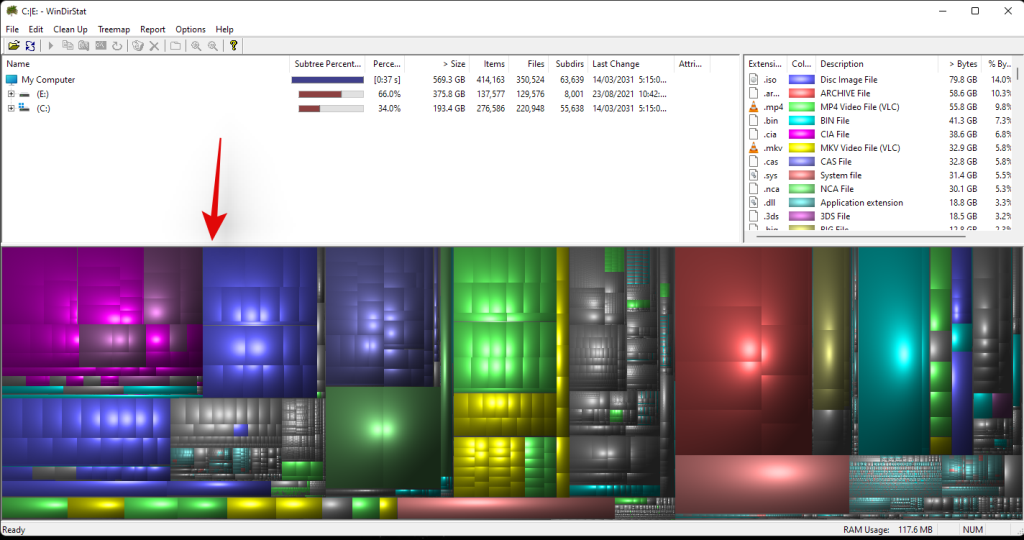
Нажмите Del на клавиатуре, чтобы удалить файл. Это отправит его в вашу корзину, и вы сможете решить его судьбу при просмотре элементов корзины. Кроме того, вы можете использовать Shift + Del, чтобы навсегда удалить элемент из вашей системы.
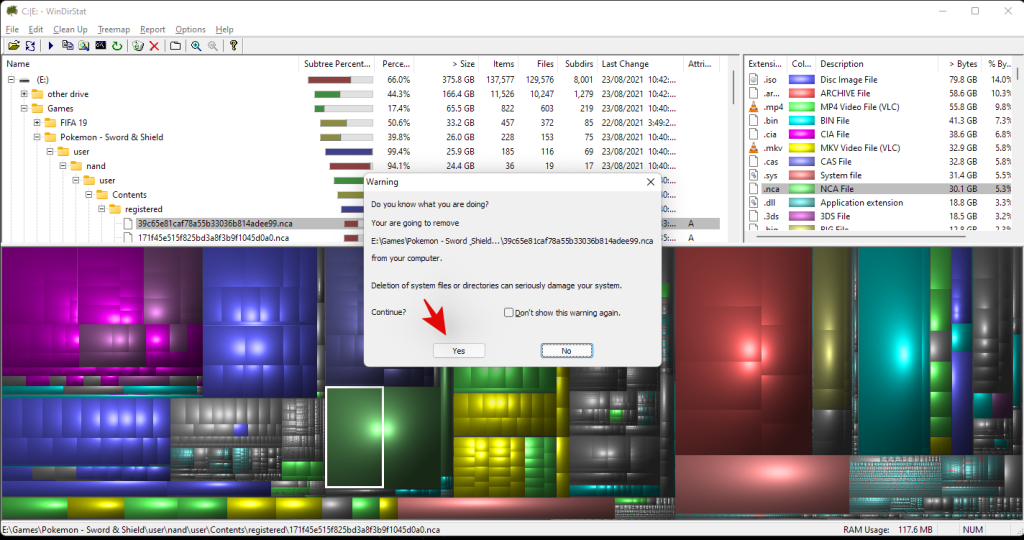
И это все! Вы можете повторить последние шаги, чтобы удалить больше самых больших файлов из вашей системы.
Метод № 05: использование Windows Search для удаления больших файлов
Windows Search также может помочь вам определить самые большие файлы в вашей системе в Windows 11. Однако на данный момент это хит и промах с новым проводником файлов, и в случае, если метод не сработает для вас, вам нужно будет временно вернитесь в проводник Windows 10. Не волнуйтесь, как только вы определили и нашли самые большие файлы, вы можете отменить изменения и вернуться к новому проводнику файлов Windows 11. Используйте приведенные ниже руководства, чтобы начать.
5.1 Поиск больших файлов
Теперь мы будем искать большие файлы на основе ваших критериев.
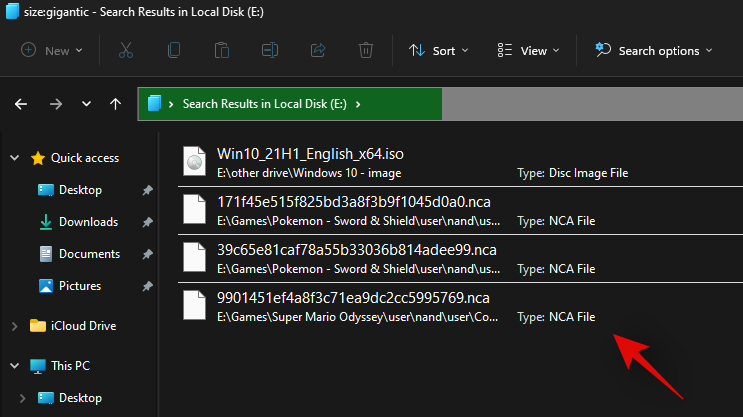
Нажмите Windows + Eна клавиатуре, чтобы открыть проводник, и щелкните поле поиска в правом верхнем углу. Найдите следующий термин.
size:gigantic
Теперь результаты будут отфильтрованы, и файлы размером более 4 ГБ будут отображаться на вашем экране. Выберите ненужные файлы, которые вам не нужны на вашем компьютере, и просто удалите их, чтобы освободить место. Если вы хотите использовать меньший минимальный размер файла, замените слово «гигантский» одним из приведенных ниже терминов в зависимости от того, какой размер вы предпочитаете.
- Большой: файлы размером от 128 МБ до 1 ГБ.
- Огромный: файлы от 1 до 4 ГБ
- Средний: файлы от 1 МБ до 128 МБ
И это все! Вы можете использовать Windows Search таким образом, чтобы фильтровать файлы по размеру и находить самые большие из них на вашем компьютере.
Примечание. Если ваш компьютер также индексирует и показывает системные файлы, мы рекомендуем вам дважды проверить файлы перед их удалением, чтобы избежать удаления каких-либо важных системных файлов из вашей системы.
Теперь вы найдете на своем компьютере большие файлы с помощью Windows Search.
5.2 If the search term does not work for you
If typing in ‘size:gigantic’ does not work for you, then you will need to switch to the old file explorer from Windows 10. Use the guide below to get you started. Once you switch back to the old file explorer, use the guide above to search for large files. Once found, use the subsequent guide below to get the new Windows 11 file explorer back on your system.
Switch to the old file explorer
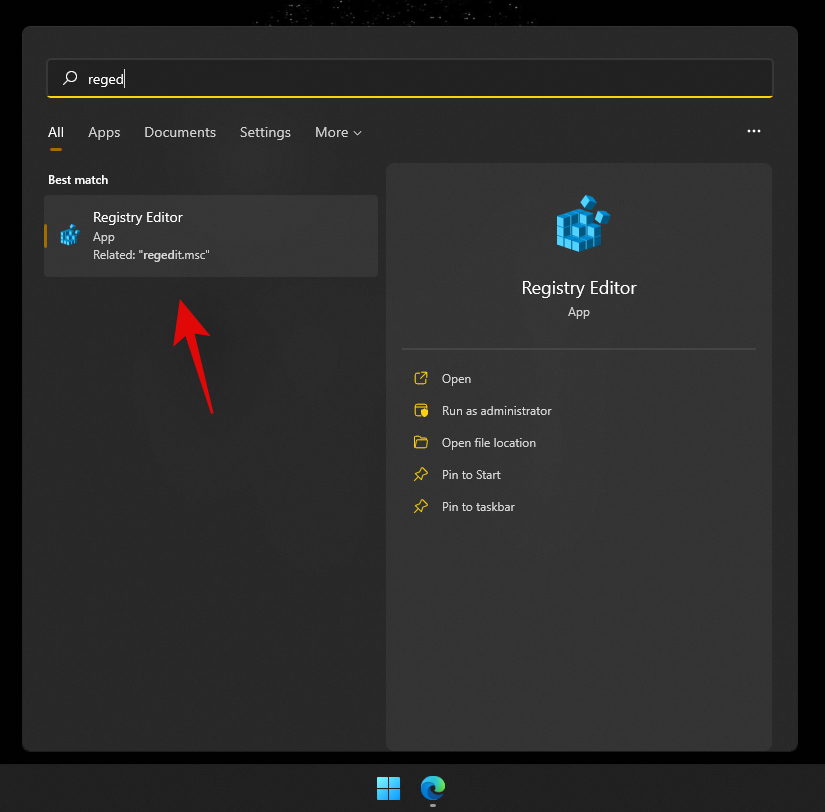
Press Windows + S on your keyboard and search for ‘Regedit’. Click and launch the app from your search results.
Navigate to the following directory or copy-paste the address below in your address bar.
HKEY_LOCAL_MACHINE\SOFTWARE\Microsoft\Windows\CurrentVersion\Shell Extensions
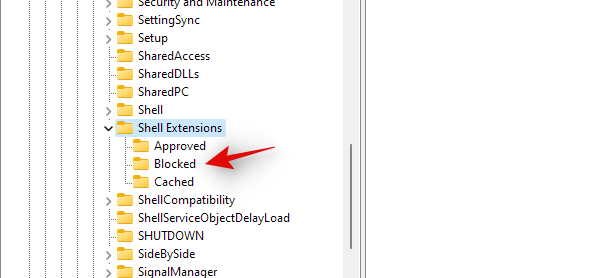
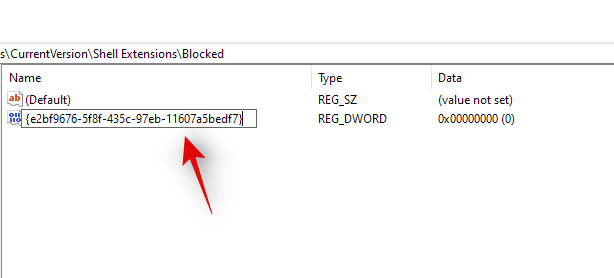
Click on the folder named ‘Blocked’.
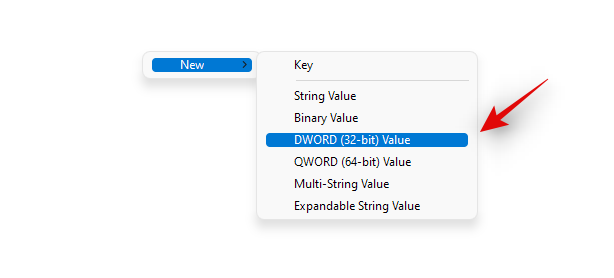
Right-click on an empty area on your right, select ‘New’ and then click on ‘DWORD (32-bit) value’.
Enter the following name and press Enter on your keyboard. We recommend you copy-paste the same to avoid any naming errors.
{e2bf9676-5f8f-435c-97eb-11607a5bedf7}
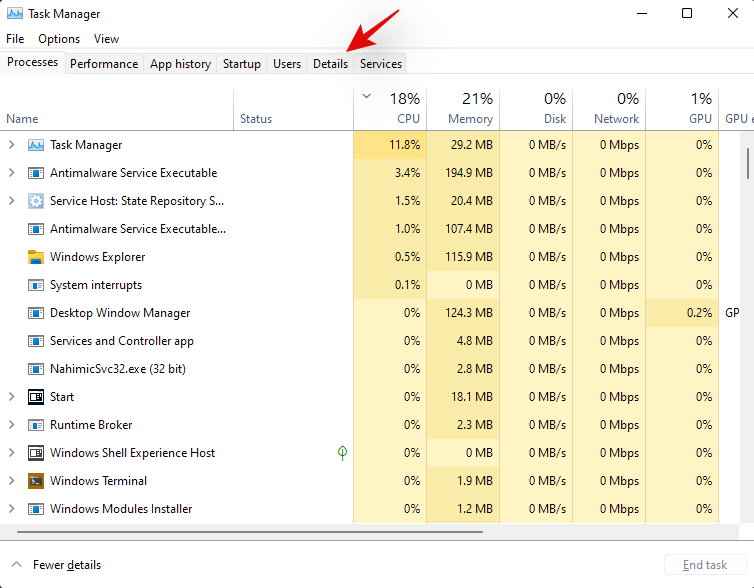
Close the registry editor and press Ctrl + Shift + Esc to open the Task Manager. Switch to the ‘Details’ tab.
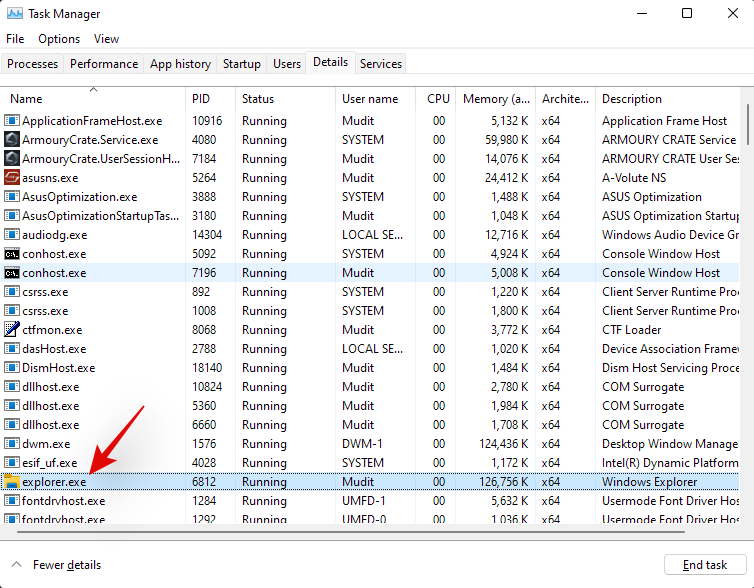
Click on ‘Explorer.exe’ and hit Del on your keyboard.
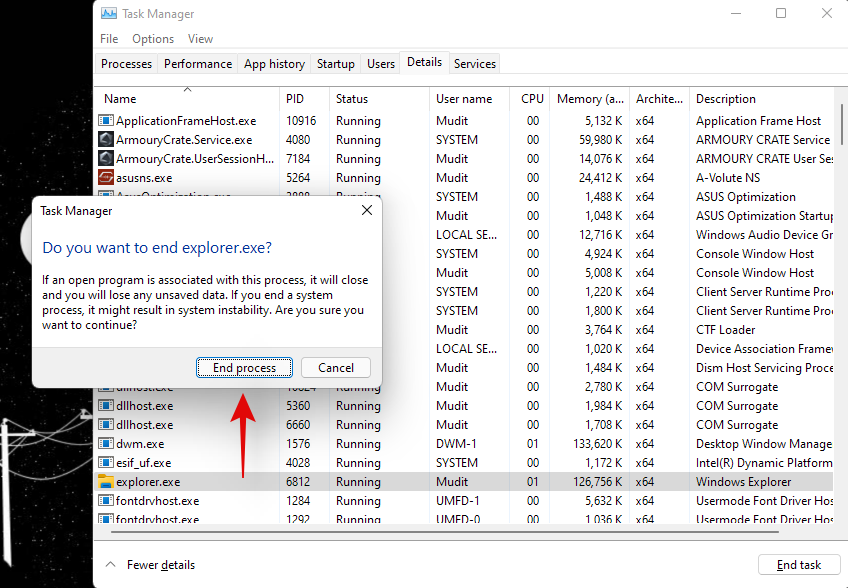
Click on ‘End process’ to confirm your choice.
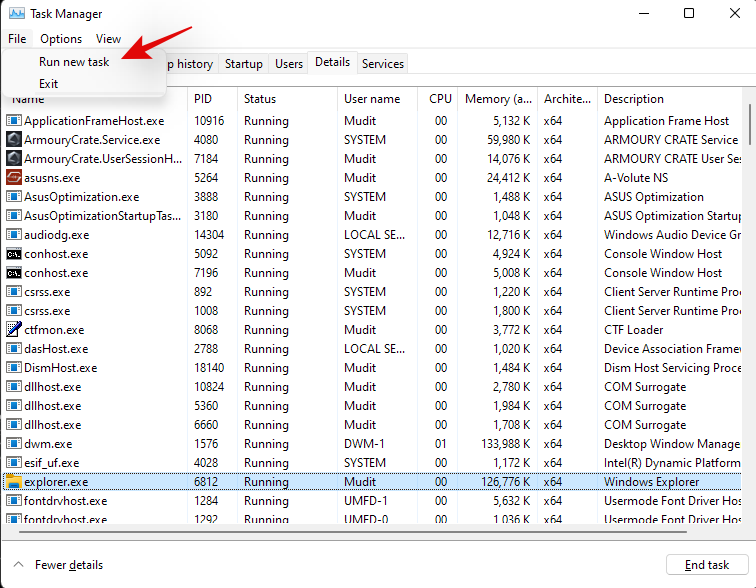
Click on ‘File’ and select ‘Run new task’.
Enter the following in the text box and click on ‘Ok’.
explorer.exe
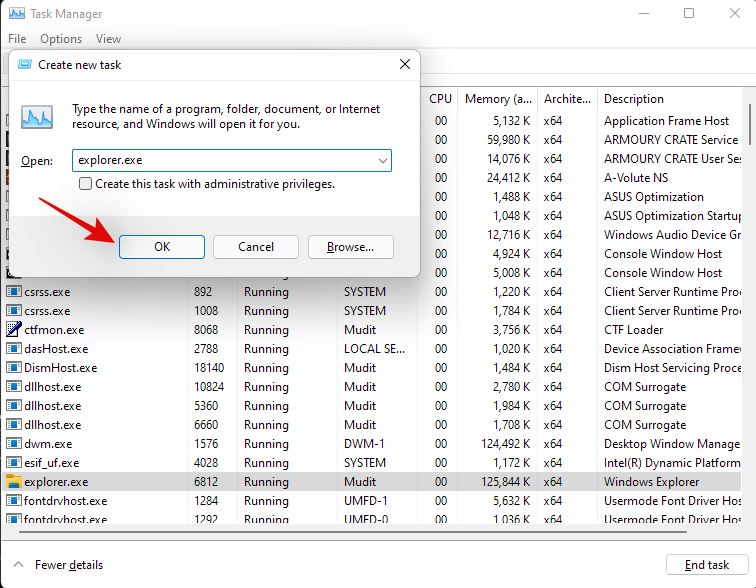
Windows File Explorer will now restart on your system and it should be reverted to the Windows 10 File Explorer. You can open a random folder to check the same. Confirm that you have gone back to the old file explorer and use the guide below to find large files on your system.
Switch to the new file explorer
We can now revert to the old file explorer. Follow the guide below to get you started.
Press Windows + S on your keyboard and search for Regedit. Click and launch the app once it shows up in your search results.

Navigate to the following path below or copy-paste it in your address bar.
HKEY_LOCAL_MACHINE\SOFTWARE\Microsoft\Windows\CurrentVersion\Shell Extensions

Simply click on the DWORD (32-bit) value we had created earlier and hit Del on your keyboard. Click on ‘Yes’ to confirm your choice.

Press Ctrl + Shift + Esc on your keyboard and switch to the ‘Details’ tab.

Click on ‘explorer.exe’ and hit Del on your keyboard.

Click on ‘End process’.

Click on ‘File’ and select ‘Run new task’.

Type in ‘explorer.exe’ and hit Enter on your keyboard.

You can close the task manager and registry editor on your PC now.
And that’s it! You will now have gone back to the new File Explorer on Windows 11.
Method #06: Using CMD (command prompt)
CMD can also help you find large files on your system. Use the guide below to get you started.
Press Windows + E on your keyboard and navigate to a location where you wish to search for large files and click on the address bar at the top.

Type in CMD and press Enter on your keyboard.
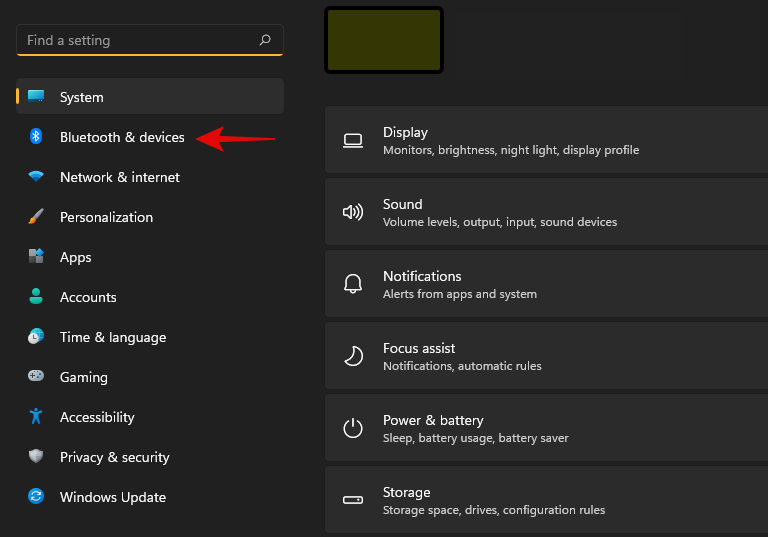
CMD will now be launched in the particular folder. Type in the following command and replace ‘PATH’ with the path we copied to your clipboard.
forfiles /S /M * /C “cmd /c if @fsize GEQ 1073741824 echo @path > largefiles.txt
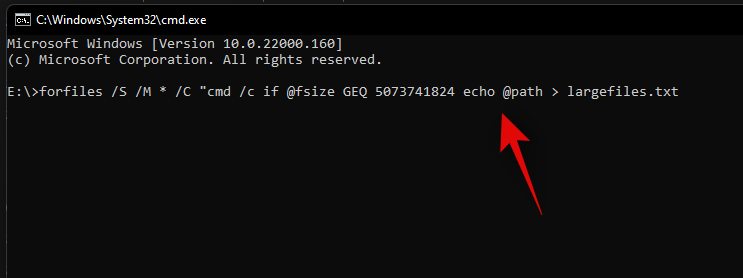
The above command will look for files larger than 1GB on your PC. If you wish to define a larger minimum size, then replace ‘1073741824’ with one of the following options below.
- 2GB: 2147483648
- 5GB: 5368709120
- 10GB: 10737418240
Execute the command with your desired variables and a text file will be created in the same location with a list of all the large files found on your system based on your criteria. You will also find the path for each file on your local storage in the text file.
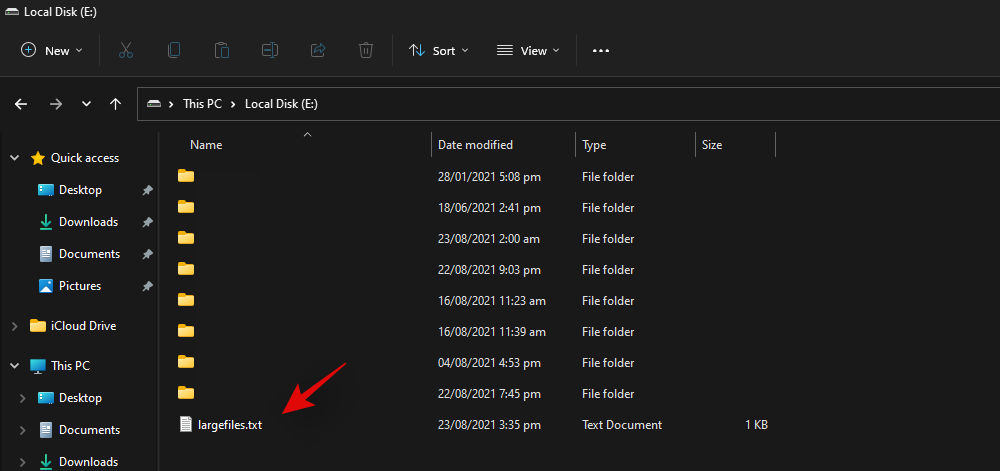
You can use this list to identify the largest files in the current location and then delete them at your discretion to free up some disk space on your system.
Method #07: Using PowerShell
You can also find large files on your system using PowerShell. Just like the command for CMD, PowerShell will scour your local files based on a minimum size and display all the files larger than it. Use the guide below to get you started.
Press Windows + E on your keyboard and navigate to the location where you wish to look for large files. Click on the address bar at the top and type in ‘PowerShell’. Press Enter on your keyboard once you are done.
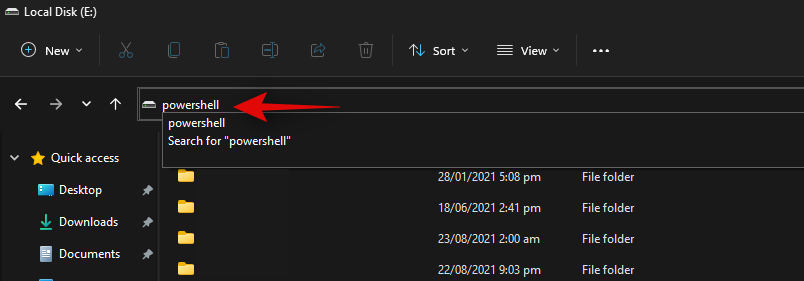
Copy-paste the command below in the PowerShell window and press Enter on your keyboard.
gci -r| sort -descending -property length | select -first 10 name, length
You will now get a list of the top 10 largest files currently taking the most disk space on your system. If you wish to view the top 20 files, then replace ‘select-first 10’ with ‘select-first 20’.
PowerShell will now find and display the 20 largest files on your system along with their size. The file size will be in bytes which can make it a bit difficult to judge the size of files in terms of gigabytes.
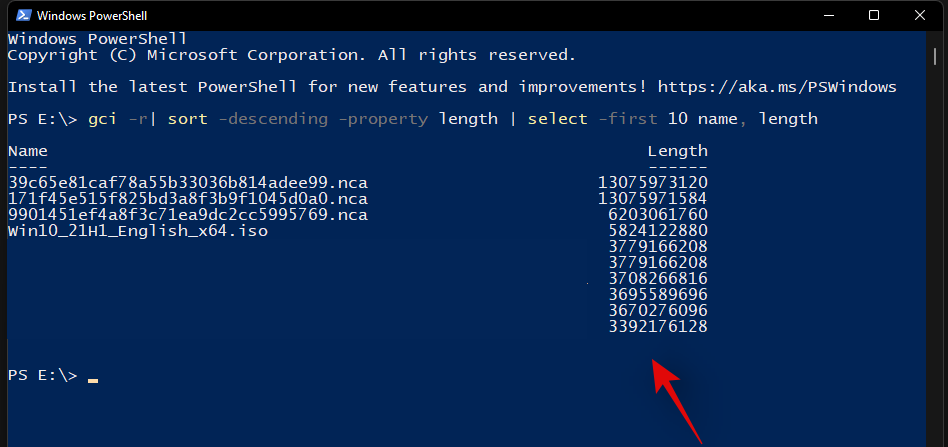
And that’s it! You will now have found the largest files on your PC using PowerShell in Windows 11.
Method #08: Using SpaceSniffer
Space Sniffer is another popular third-party utility used to analyze disk space usage on Windows 11. Space sniffer can help you identify large files using huge amounts of space on your system. You can also find hidden files taking huge disk space on your PC using the SpaceSniffer. Use the guide below to get you started.
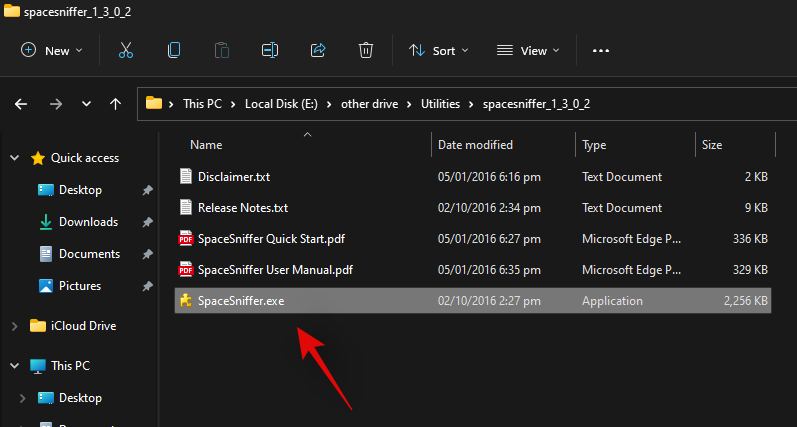
Download SpaceSniffer to your PC using the link above. A portable .exe will be downloaded to your system. Extract the archive and right-click on the .exe file.
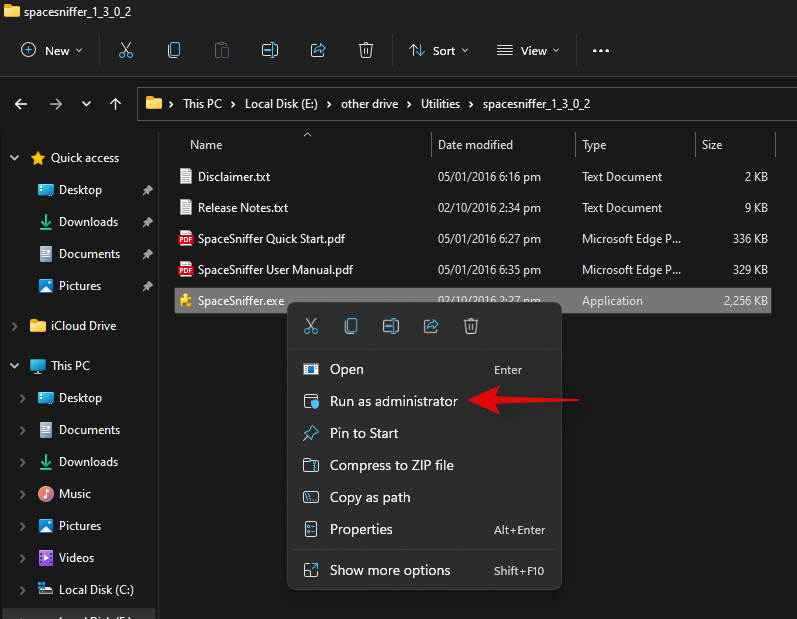
Select ‘Run as administrator’.
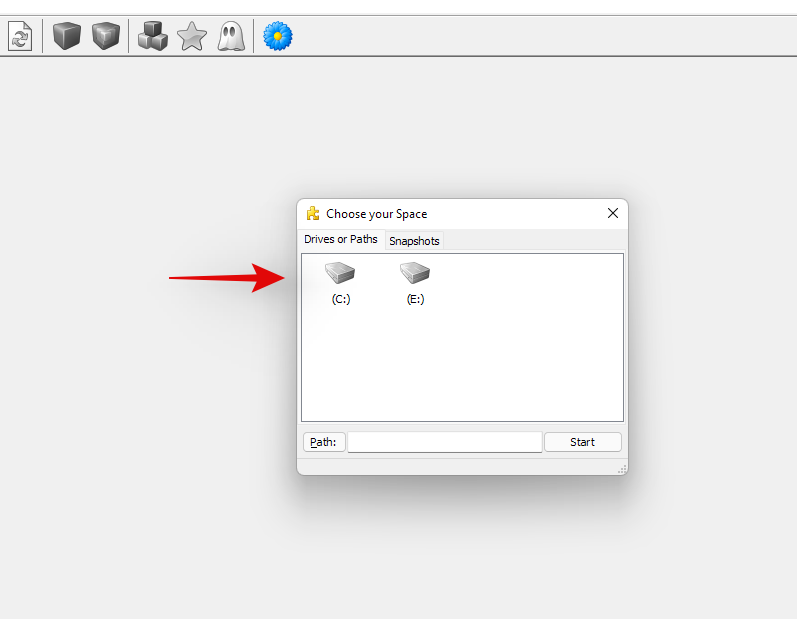
Now select the drive you wish to scan. If you wish to analyze and find large files in a particular directory, then you can enter its path in the text box below.
You will now be shown a graphical representation of your disk space usage on your screen. Simply hover over the largest chunk and you will be shown the name of the folder or file occupying that space.
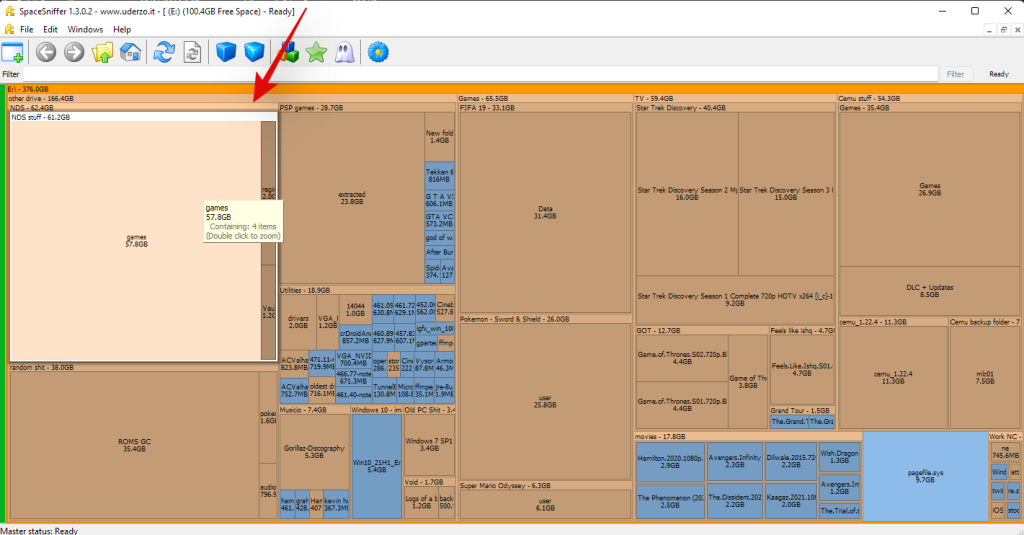
And that’s it! You can use SpaceSniffer this way to identify the largest files on your system by simply looking at the largest chunks on your screen.
Method #09: Other third-party tools you can use to analyze disk usage on Windows 11
The world of third-party tools is a rabbit hole. The more you look, the more programs you will find that claim to help you find and reclaim your disk space on Windows 11. This huge selection of programs can be quite daunting and challenging at first, making it difficult for you to find the perfect tools that fit your current needs and requirements. If you are not a fan of one of the programs used above, then you can opt for one of the alternatives listed below. You can find a few details about each program below their listing.
Tips to free storage space on Windows 11
If you are running low on disk space or have a smaller-sized drive that you are unable to currently upgrade, then you can use the following tips to save as much disk space on your PC as currently possible. Let’s get started.
- Use Disk Cleanup
- Run SFC & DISM commands to fix errors with your drives
- Uninstall unnecessary apps
- Delete or Archive unnecessary or currently unused files
- Use OneDrive or other cloud storage services to save space
- Use an external storage device to store your libraries
- Regularly free up your recycle bin
- Use Storage Sense on Windows 11
- Disable Hibernation to delete the hibernation file
- Rebuild your search index
- Delete additional users created on your system
And more. You can free up space on your PC using tons of ways but each usually comes with a compromise. If you are looking to avoid compromises, then upgrading your storage is the best option. SSDs are cheaper than ever and if you are looking to upgrade your storage, then an M.2 SSD could go a long way for your system.
Note: M.2 SSDs will work at their advertised capacity only if you have a compatible M.2 slot on your system. Not all M.2 slots are the same and not all of them are routed through the PCI lanes on your motherboard.
Free up disk space on Windows 11!
Using the numerous methods above, you can easily find what’s taking up space on your PC and fix it pretty easily. If the Windows-based solutions do not work for you, try using a free-ish software like TreeSize (or others mentioned above).
Если вам все еще нужна помощь с очисткой места в Windows 11, сообщите нам об этом в поле для комментариев ниже. Правильно объясните свою проблему.
СВЯЗАННЫЙ




![Как удалить McAfee в Windows 11 [5 способов] Как удалить McAfee в Windows 11 [5 способов]](https://cloudo3.com/resources8/images31/image-4917-0105182719945.png)


