Während Benachrichtigungen in einigen Fällen unerlässlich sind, werden sie manchmal zu einem Ablenkungselement. Genau wie Ihr Telefon kann auch ein PC Sie mit Benachrichtigungen ablenken. Aus diesem Grund enthält Windows 11 die Focus Assist-Funktion, mit der Sie ablenkende Benachrichtigungen vermeiden können. Mit dieser Funktion können Sie Ihre Arbeit mit voller Konzentration erledigen, anstatt von zufälligen Nachrichten und Benachrichtigungen abgelenkt zu werden. Benachrichtigungen können auch Ihre Produktivität beeinträchtigen und müssen daher zum richtigen Zeitpunkt unterdrückt werden.
Mit nur wenigen Klicks können Sie alle Benachrichtigungen, Warnungen und Nachrichten auf Ihrem PC ausblenden. Wenn Sie Ihr System kürzlich auf Windows 11 aktualisiert haben und die neue Benutzeroberfläche nicht verstehen können, hilft Ihnen dieser Artikel mit einer umfassenden Anleitung zur Verwendung von Focus Assist unter Windows 11, um Benachrichtigungen loszuwerden.
Verwandte: So erstellen Sie Screenshots unter Windows 11
Inhalt
Was ist Focus Assist unter Windows 11?
Focus Assist ist einfach ein „Nicht stören“-Modus für Ihren PC – genau wie auf Ihren Telefonen. Es ist eine praktische Funktion unter Windows 11, mit der Sie unnötige Benachrichtigungen, Nachrichten und Warnungen loswerden können. Mit der Focus-Assist-Funktion können Sie Ihre Prioritätenliste anpassen, anstatt Ihren PC von allen Benachrichtigungen abzuschotten.
Ablenkung kann Ihre Produktivität beeinträchtigen. Daher können Sie mit der Focus Assist-Funktion alle Benachrichtigungen, Warnungen und Nachrichten ausblenden, während Sie an etwas Wichtigem arbeiten. Anstatt Sie zu warnen, werden sie direkt zum Aktionszentrum weitergeleitet. Sie können die ausgeblendeten Benachrichtigungen im Aktionscenter nach Belieben anzeigen.
Wie funktioniert Focus assist unter Windows 11?
Focus Assist bietet Ihnen die Flexibilität, auszuwählen, wann Ablenkungen wie Nachrichten, Benachrichtigungen und Warnungen blockiert werden sollen. Sie können den Focus Assist jederzeit einschalten oder in den Einstellungen einen Zeitraum festlegen, in dem der Focus Assist automatisch eingeschaltet wird.
Mit der Focus-Assist-Funktion können Sie eine Prioritätenliste erstellen, um sicherzustellen, dass Sie keine Benachrichtigungen von den wichtigsten Personen in Ihrem Kontakt verpassen. Die Personen auf Ihrer Prioritätenliste können Sie immer erreichen, auch wenn Sie wichtige Aufgaben haben. Wenn Sie während der Arbeit volle Konzentration benötigen, können Sie auch alle Benachrichtigungen blockieren. Um alle blockierten Benachrichtigungen anzuzeigen, die Sie während Ihrer Arbeit erhalten haben, öffnen Sie das Action Center Ihres Systems.
Verwandte: So stoppen Sie Pop-ups unter Windows 11
So aktivieren Sie den Fokusassistenten
Focus Assist ist standardmäßig deaktiviert. Wenn Sie jedoch aktivieren möchten, dass keine Benachrichtigungen mehr erhalten werden, führen Sie die folgenden Schritte aus.
Methode #1: Verwenden von Einstellungen
Klicken Sie auf das Suchsymbol, das wie eine Lupe auf der Taskleiste sieht.

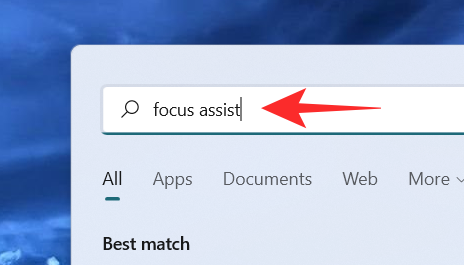
Geben Sie Fokushilfe in die Suchleiste ein.
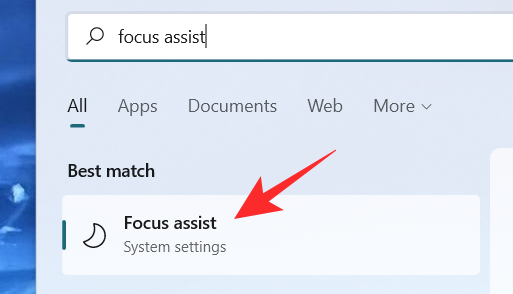
Klicken Sie auf die Focus Assist -Systemeinstellungen.
Das Fenster mit den Einstellungen des Focus Assist-Systems wird auf dem Bildschirm angezeigt. Wählen Sie unter Focus Assist eine dieser Optionen aus:
- Aus – Deaktiviert die Focus Assist-Funktion und ermöglicht den Empfang von Benachrichtigungen von Apps und Kontakten.
- Nur Alarme – Diese Funktion unterdrückt alle Benachrichtigungen außer dem Alarm.
- Nur Priorität – Diese Funktion lässt nur Benachrichtigungen aus Ihrer Prioritätenliste zu, die Sie anpassen müssen.
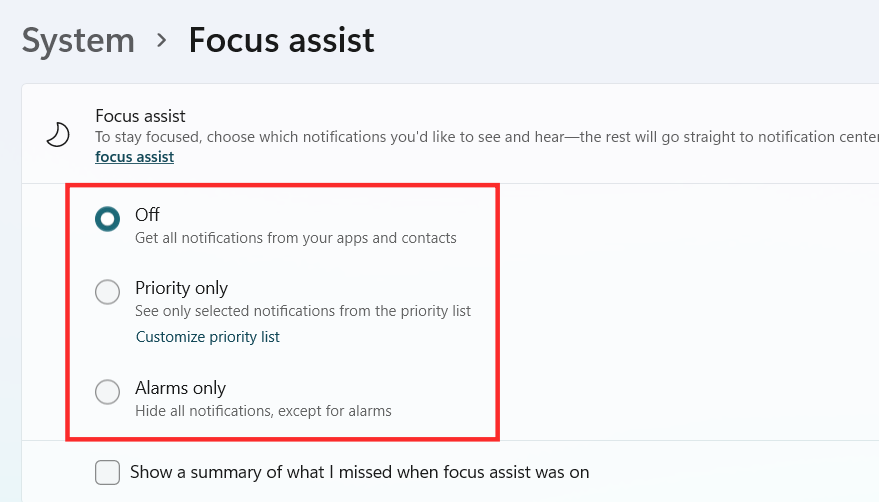
Focus Assist sollte jetzt in Windows 11 aktiviert sein, je nach Ihrer Auswahl.
Methode #2: Verwenden des Aktionszentrums
Klicken Sie auf das Action Center, das das Symbol von Wifi, Lautstärke und Akku zusammen anzeigt.

Direkt unter dem Bluetooth-Symbol sehen Sie das Focus Assist- Symbol, das wie eine Mondsichel aussieht.
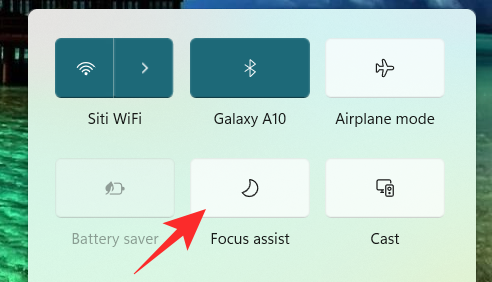
Standardmäßig ist die Focus Assist-Funktion deaktiviert. Klicken Sie darauf und die Funktion wird direkt auf Nur Priorität gesetzt .
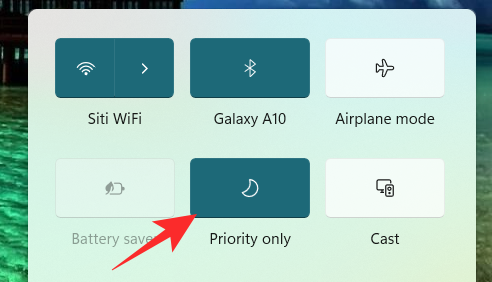
Klicken Sie erneut darauf, um die Focus Assist-Funktion auf Nur Alarme einzustellen .
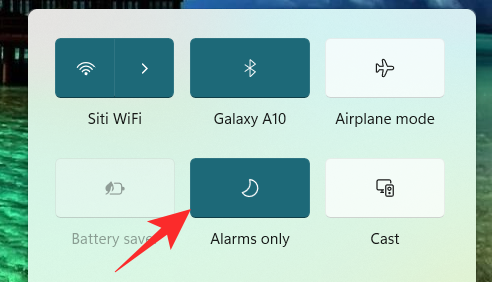
Um die Focus Assist-Funktion zu deaktivieren, klicken Sie erneut darauf.
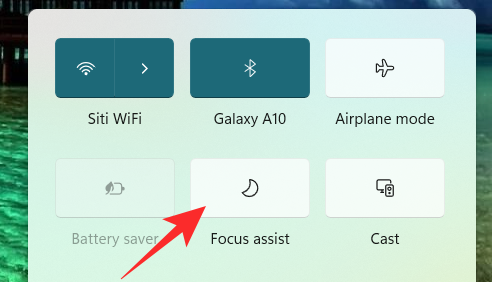
Durch einfaches Klicken auf das Focus Assist-Symbol im Action Center können Sie seine Funktion auf Aus, Nur Priorität und Nur Alarme ändern. Um jedoch andere notwendige Änderungen an den Focus Assist-Einstellungen im Action Center vorzunehmen, klicken Sie mit der rechten Maustaste auf das Focus Assist- Symbol im Action Center und klicken Sie auf Go to Settings .
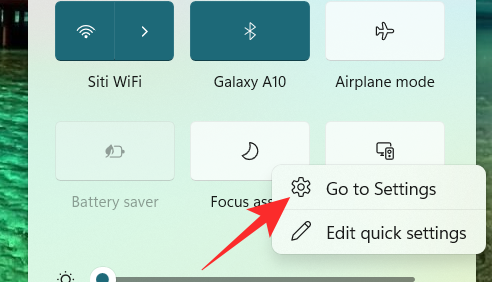
Dadurch gelangen Sie zur App Einstellungen, in der Sie alle beabsichtigten Änderungen einfach vornehmen können. Und das ist es! Der Fokusassistent sollte jetzt in Windows 11 direkt aus dem Action Center aktiviert werden.
Methode 3: Verwenden des Gruppenrichtlinien-Editors
Sie können den Fokus-Unterstützungsmodus auch mit dem Gruppenrichtlinien-Editor aktivieren, falls Sie ein Administrator sind. Verwenden Sie die folgende Anleitung, um Sie bei dem Prozess zu unterstützen.
Drücken Sie Windows + Rauf Ihrer Tastatur und geben Sie im Dialogfeld Ausführen Folgendes ein. Drücken Sie die Eingabetaste auf Ihrer Tastatur, um den Gruppenrichtlinien-Editor zu öffnen.
gpedit.msc
Navigieren Sie zu dem folgenden Knoten, der unten erwähnt wird.
User configuration > Administrative Templates > Start Menu and Taskbar > Notifications
Suchen und doppelklicken Sie auf den Wert "Ruhezeiten deaktivieren" auf der rechten Seite.
Wählen Sie nun je nach Ihren aktuellen Anforderungen in der oberen linken Ecke des Eigenschaftenfensters eine der folgenden Optionen aus.
- Aktivieren: Dies aktiviert den Fokusassistenten auf dem ausgewählten System.
- Deaktivieren : Dadurch wird die Fokusunterstützung für das ausgewählte System deaktiviert.
Und das ist es! Die Fokusunterstützung wird nun je nach Ihren Einstellungen im Gruppenrichtlinien-Editor aktiviert oder deaktiviert. Leider können Sie als Administrator das Verhalten des Focus Assist nicht anpassen. Diese Fähigkeit liegt immer noch beim Benutzer. Sie können die Möglichkeit, Focus Assist für ein System zu verwenden, nur mit dem Gruppenrichtlinien-Editor aktivieren oder deaktivieren.
So verwenden Sie den Fokusassistenten
Focus Assist verfügt über verschiedene Einstellungen und Anpassungsoptionen, mit denen Sie sein Verhalten an Ihre aktuellen Anforderungen anpassen können. Verwenden Sie eine der folgenden Anleitungen, die Ihren aktuellen Anforderungen am besten entspricht.
Methode 1: Aktivieren Sie den Modus "Nur Alarme"
Der Modus „Nur Alarme“ im Fenster „Focus Assist“ ermöglicht es Ihnen, alle Benachrichtigungen außer dem Alarm auszublenden. Befolgen Sie die unten aufgeführten Schritte, um den Modus Nur Alarme zu aktivieren.
Klicken Sie in der Taskleiste auf das Symbol Suchen .

Typ Fokusassistent

Klicken Sie auf Fokusassistent .

Klicken Sie unter Focus Assist auf Nur Alarme , um keine Benachrichtigungen zu erhalten, außer für Alarme.
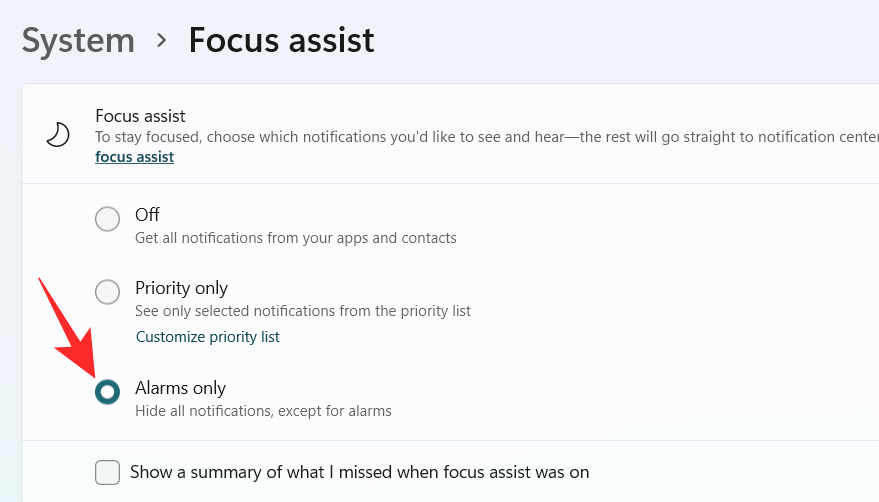
Und das ist es! Sie werden nun nur noch über Alarme auf Ihrem System informiert. Alle anderen Benachrichtigungen werden unabhängig von ihrer Priorität in Windows 11 stummgeschaltet.
Methode 2: Aktivieren Sie die Priorität nur mit einer benutzerdefinierten Liste
Die Menschen Fenster werden auf dem Bildschirm angezeigt. Wählen Sie Ihre bevorzugten Personen aus, indem Sie deren Namen in die Suchleiste eingeben.
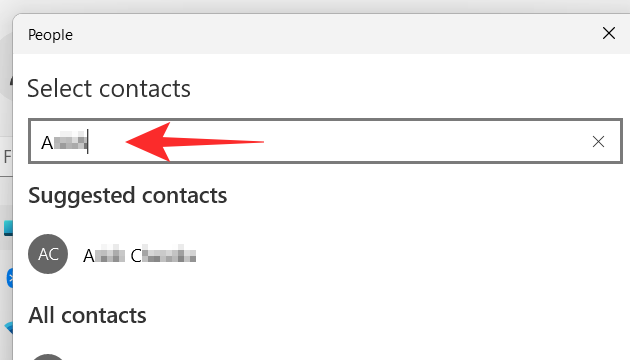
Klicken Sie auf den Namen der Person.
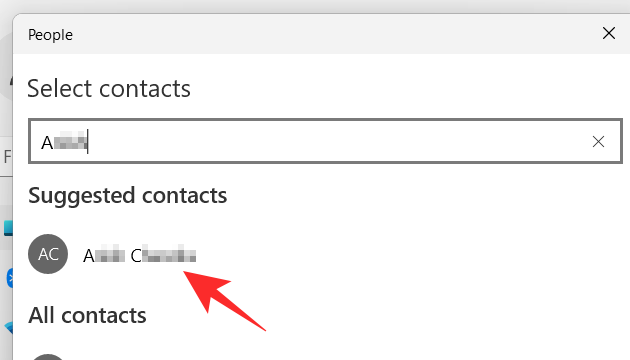
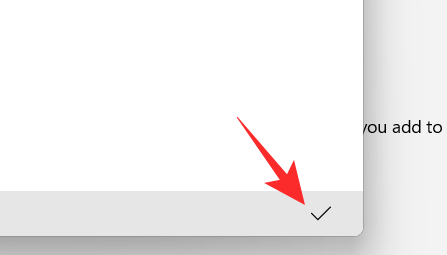
Klicken Sie auf das Häkchen in der unteren rechten Ecke des Personenfensters.
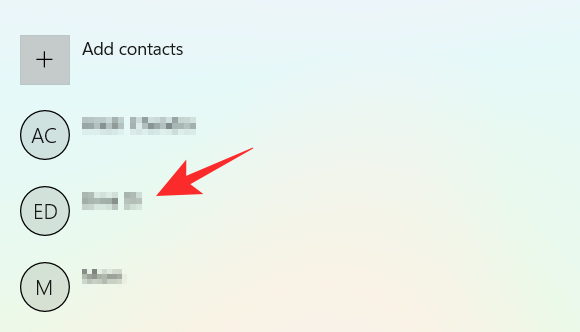
Your priority list has been created. Now, if you want to remove a contact from your priority list, click on the contact under People.
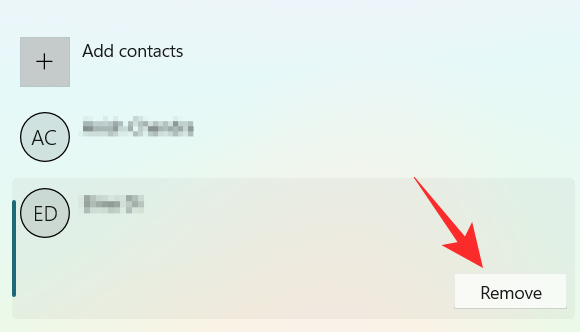
Click on Remove.
Now, in the Apps section, you can select the apps that can break through your quiet hours. To allow the apps to show notifications, click on the Add an app button.
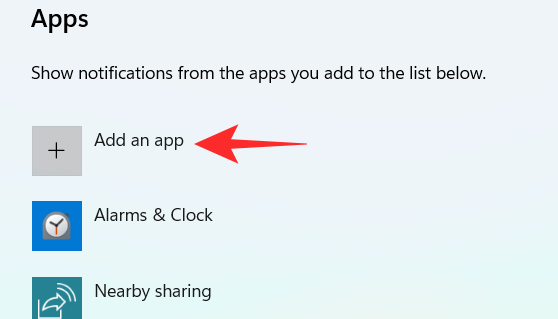
A list of apps appears on your screen. Click on the app you want to add to your priority list.
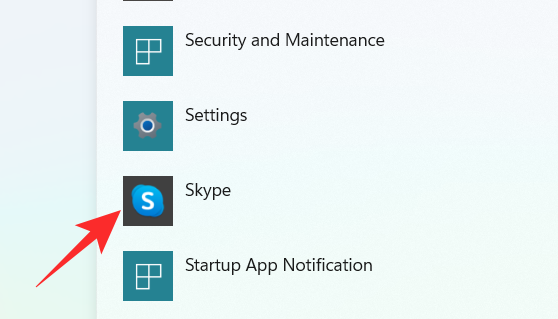
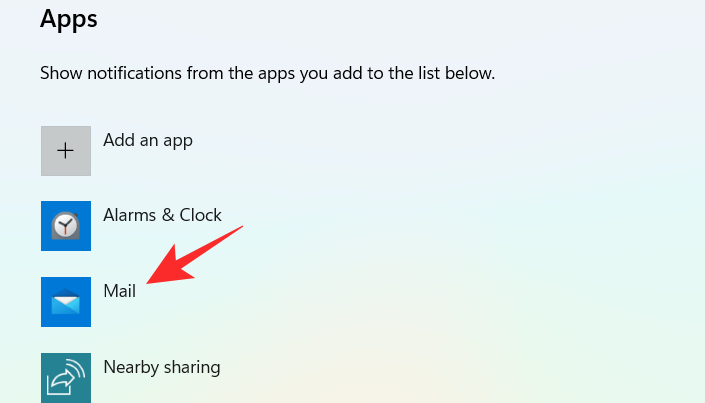
Continue this process until you are done selecting the apps. In case you want to remove an app from your priority list, you can simply click on the app under the App section.
Click on Remove.
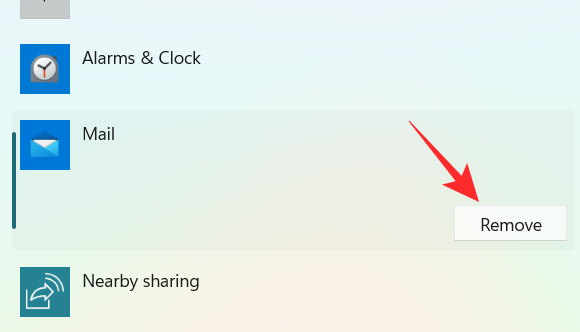
And that’s how you can customize the priority list in Focus assist and use it to your advantage to receive notifications only from important contacts.
Method #3: Enable notification summary when Focus assist is disabled
Click on the Search icon on the taskbar.

Type Focus assist

Click on Focus Assist.

Click on your desired option Priority only or Alarms only.
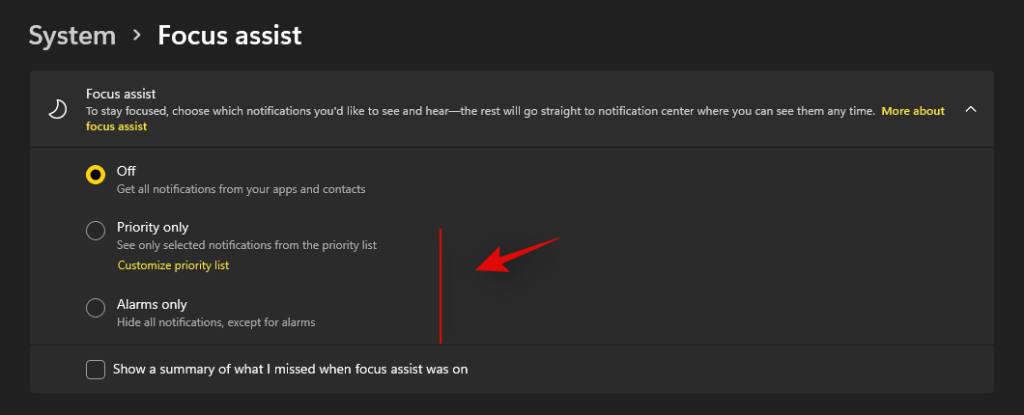
Check the box Show a summary of what I missed when Focus assist was on.
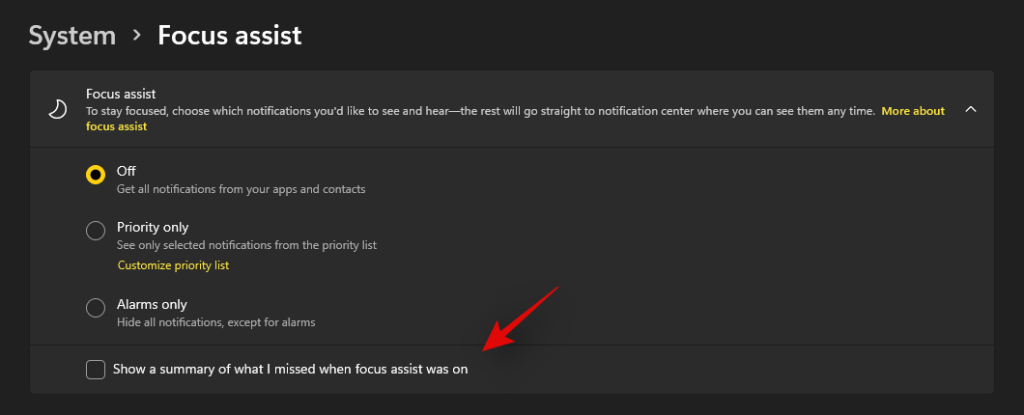
Method #4: Enable or disable automatic Focus assist rules
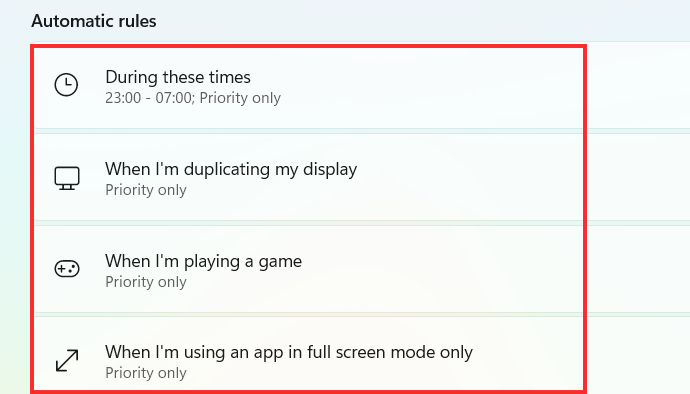
The Automatic rules in Focus assist allow you to determine the conditions that can activate the Focus assist automatically. There are four different automatic rules in the Focus Assist settings window that can be customized. Check out the steps mentioned below to customize automatic rules in Focus assist.
Click on the Search icon on the taskbar.

Type Focus assist

Click on Focus Assist.

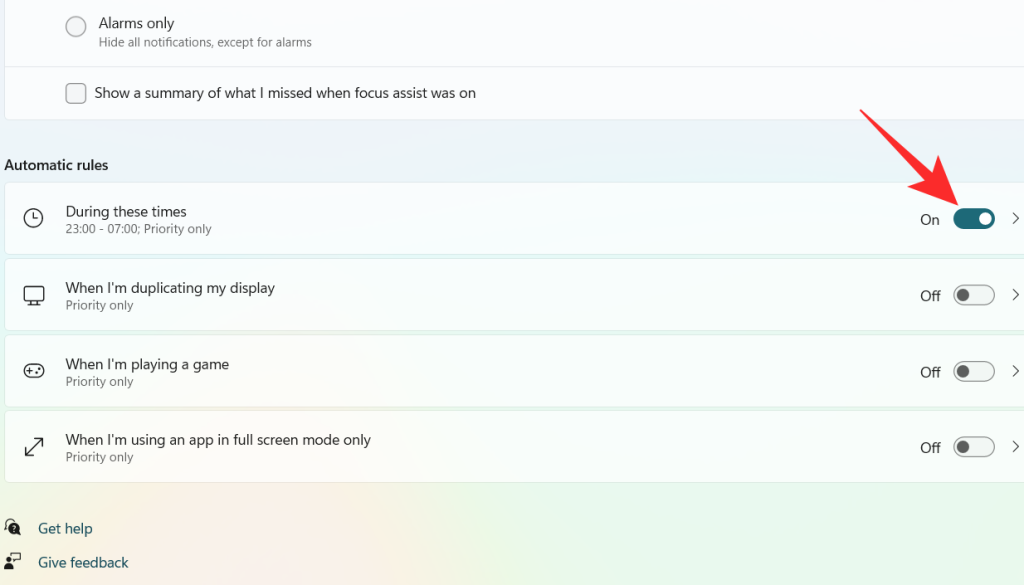
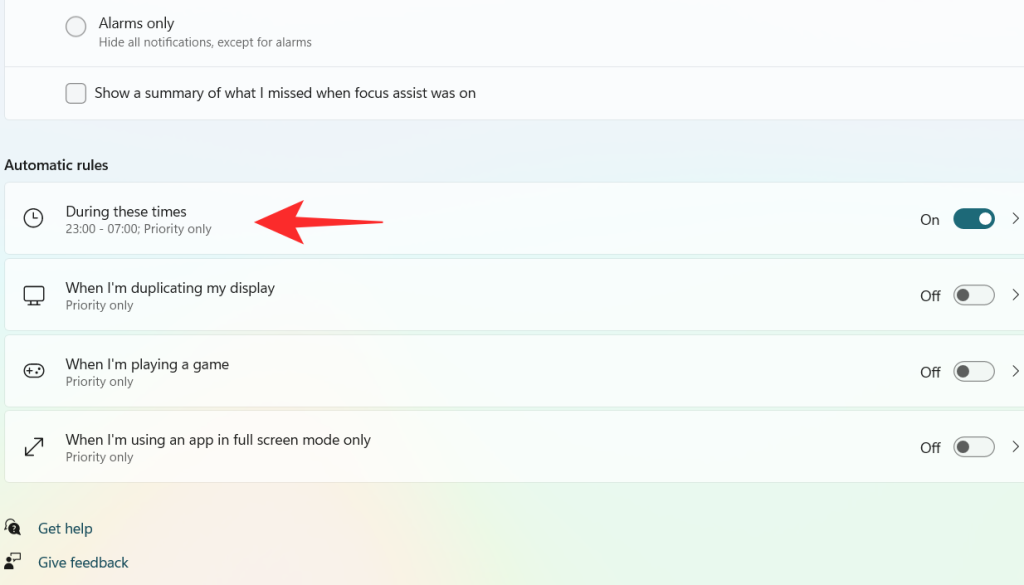
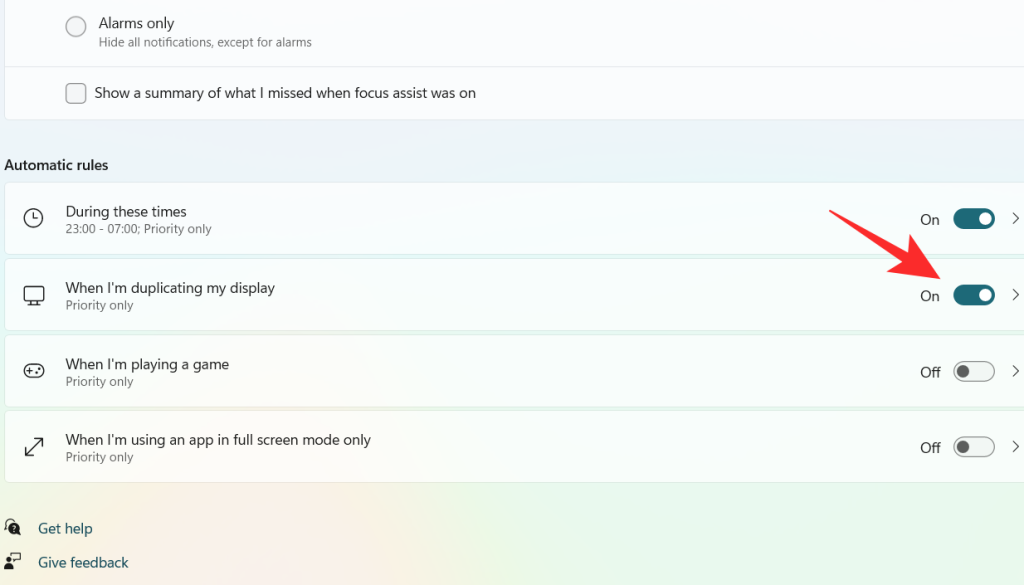
Under the Automatic rules section, there are four sections. Turn on the toggle switch for the option you want to choose.
- During these times – This function allows you to set a specific time range depending on which the Focus Assist feature automatically turns itself on or off.
- When I’m duplicating my display – This function automatically turns on the Focus Assist when it detects that your display is being shared. This function can be used especially to prevent notifications from popping up when you are in the middle of a presentation.
- When I’m playing a game – While you are playing games on a full-screen mode, this function allows the Focus Assist to suppress the notifications from popping up on the screen.
- When I’m using an app in full-screen mode only – This function enables the Focus Assist to turn on automatically when it detects that you’re using an app in full-screen mode. You will not receive any notifications until you have an app opened on a full-screen mode.
Now, let’s have a look at how to customize the above-mentioned options under Automatic rules.
1. During these times
Turn on the toggle switch, which is extreme right to the During these times tab.
Click on the During these times tab.
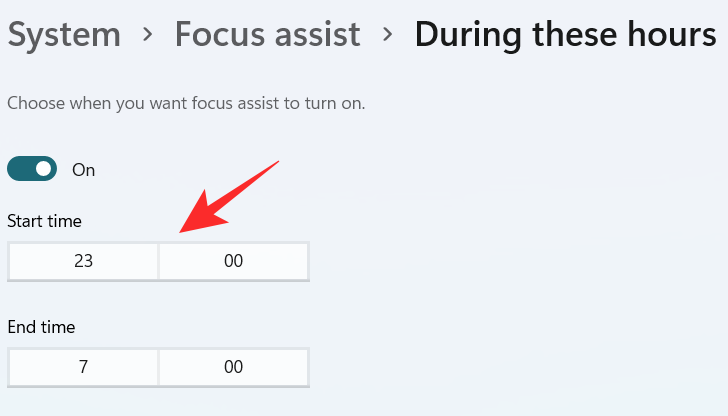
Click on the box under Start time.
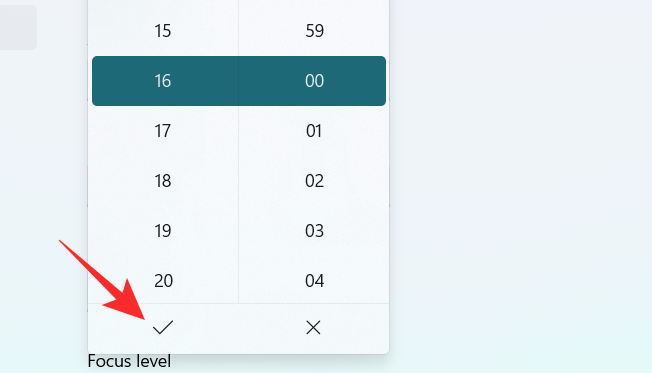
Select the time when you want the Focus Assist to turn on and click on the tick on the bottom of the dropdown menu.
Click on the box under End time.
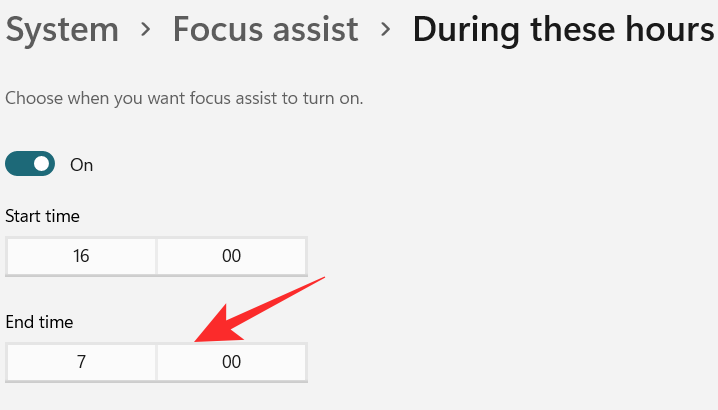
Select the time when you want the Focus Assist to turn off and click on the tick on the bottom of the dropdown menu.
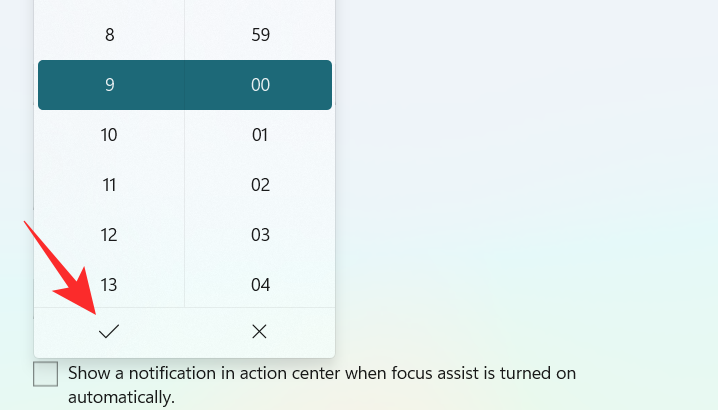
Click on the box under Repeats.
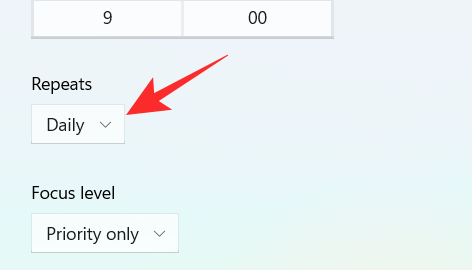
A small dropdown menu appears. Set the schedule to Daily, Weekends, or Weekdays.
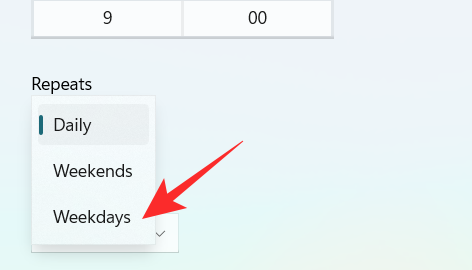
Click on the box under Focus level.
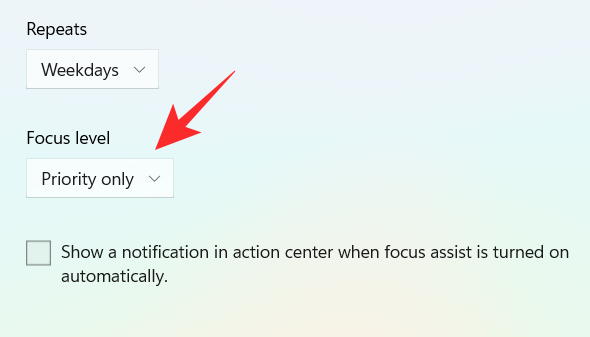
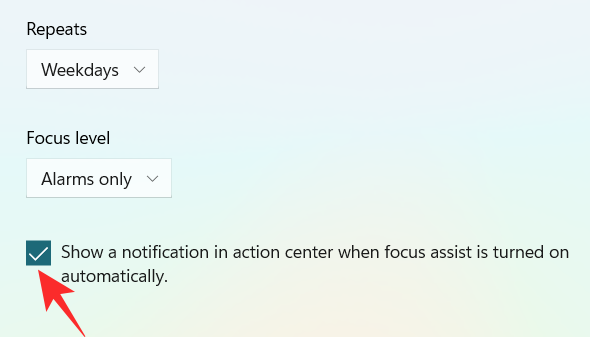
A small dropdown menu appears. Choose between Alarm only or Priority only.
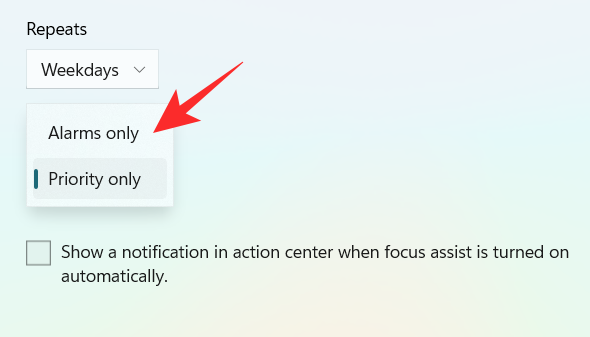
Finally, to get a notification when the Focus assist is turned on, check the box “Show a notification in action center when Focus assist is turned on automatically“.
2. When I’m duplicating my display
Turn on the toggle switch, which is extreme right to the When I’m duplicating my display tab.
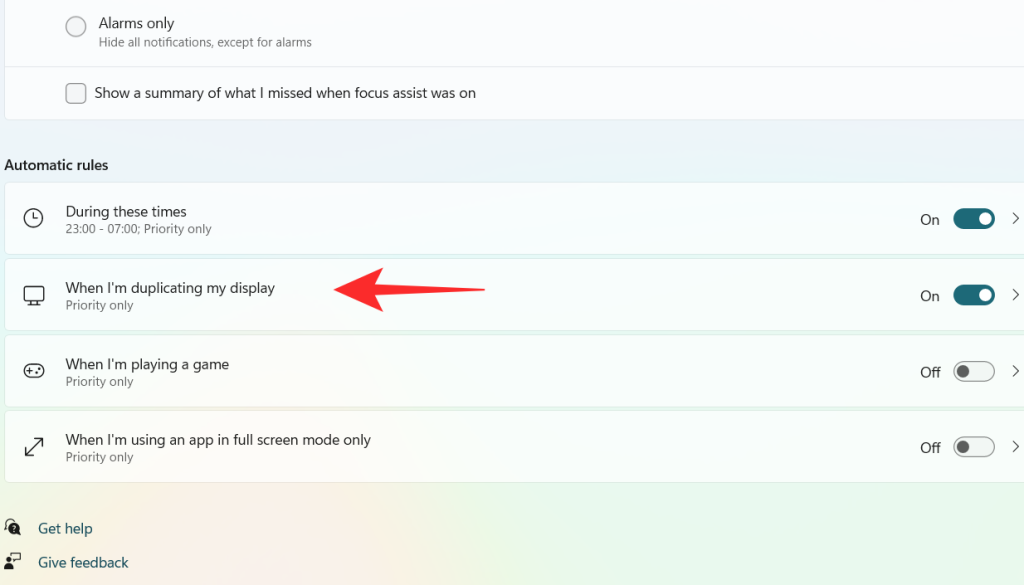
Click on the When I’m duplicating my display tab.
Click on the box under Focus level.
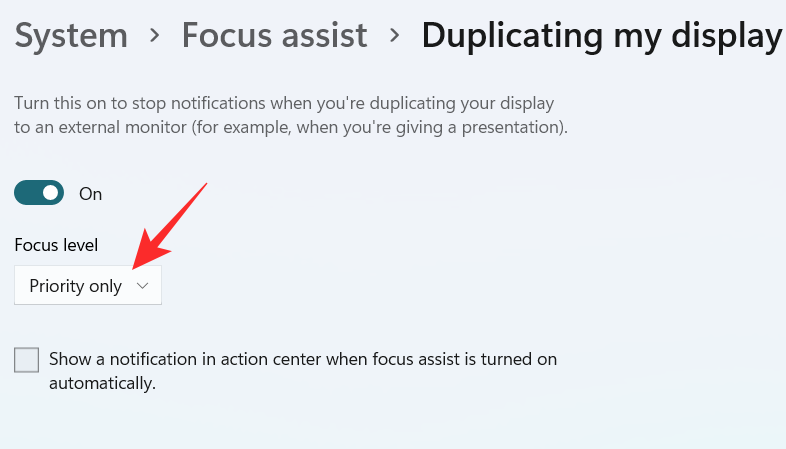
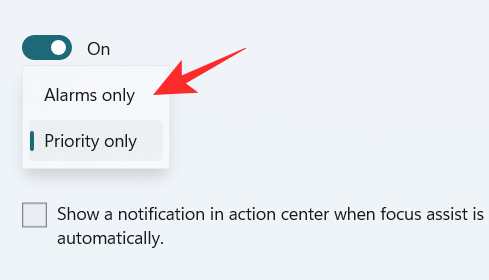
A dropdown menu appears, click on your desired option between Priority only and Alarms only.
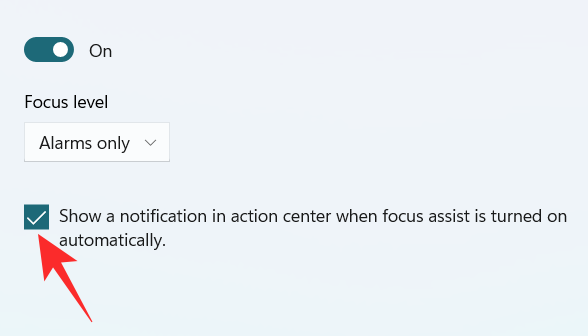
To get a notification when the Focus assist is turned on, check the box “Show a notification in action center when Focus assist is turned on automatically“
3. When I’m playing a game
Turn on the toggle switch, which is extreme right to the When I’m playing a game tab.
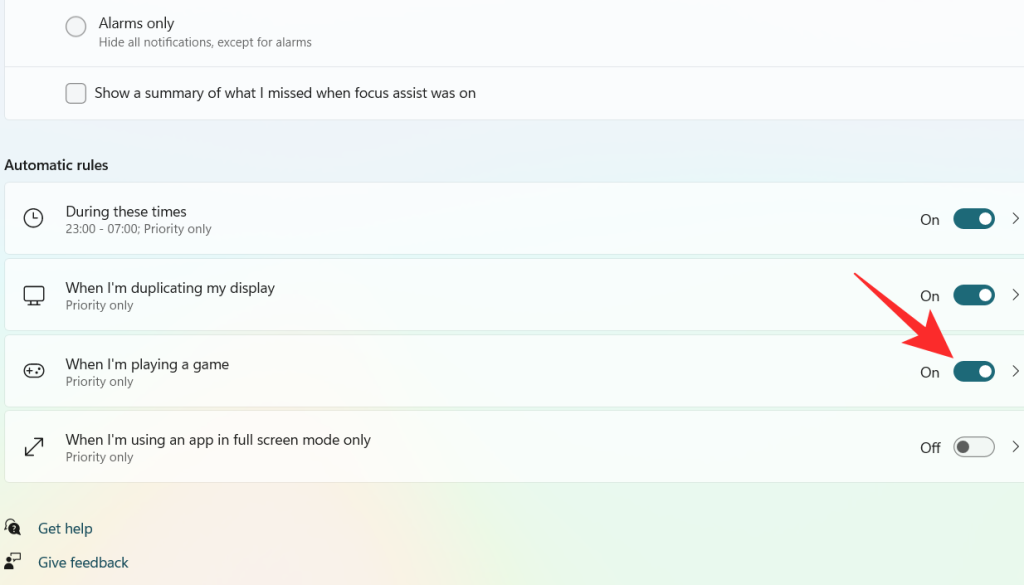
Click on the When I’m playing a game tab
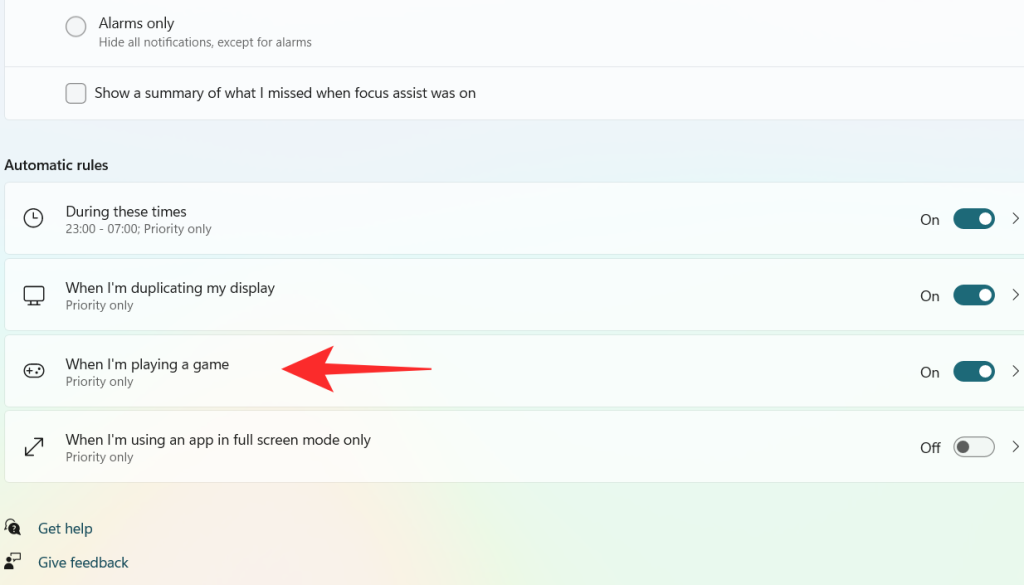
Click on the box under Focus Level.
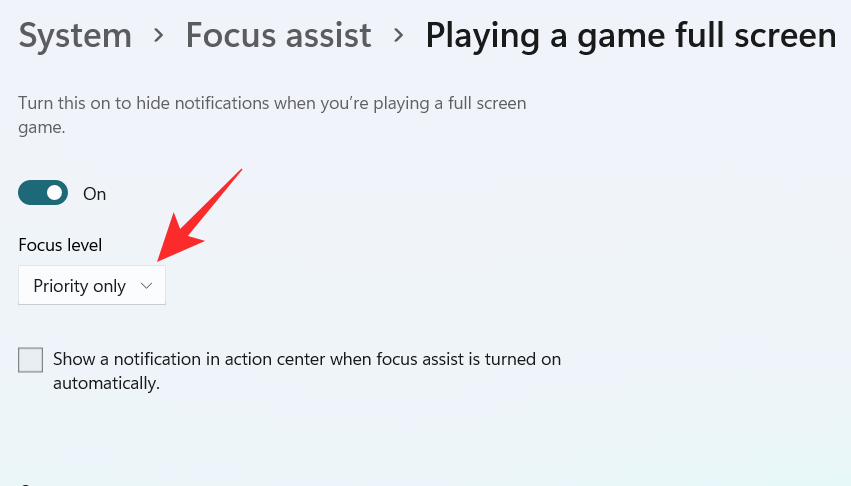
A dropdown menu appears, click on your desired option between Priority only and Alarms only.

To get a notification when the Focus assist is turned on, check the box “Show a notification in action center when Focus assist is turned on automatically“

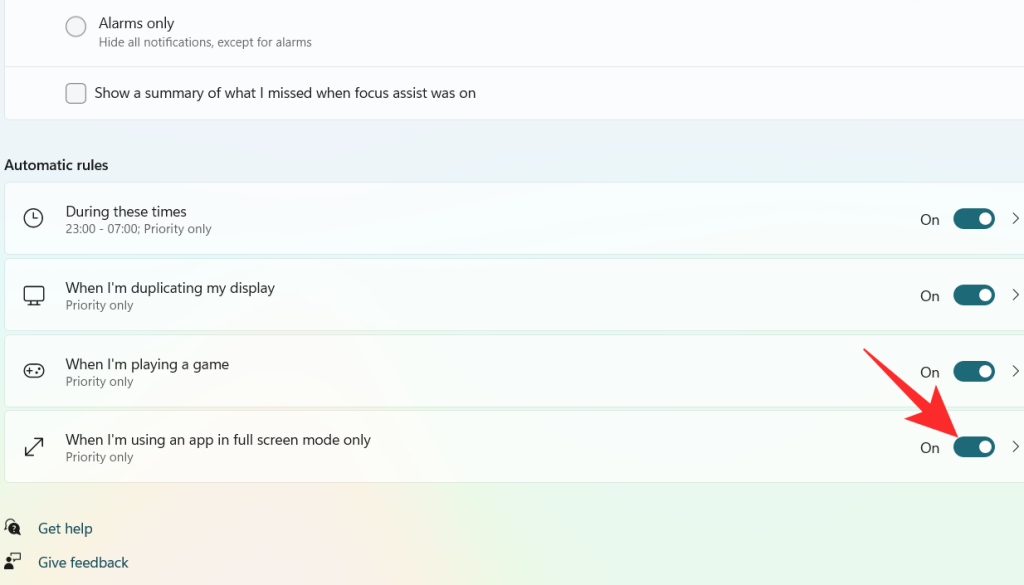
4. When I’m using an app in full-screen mode only
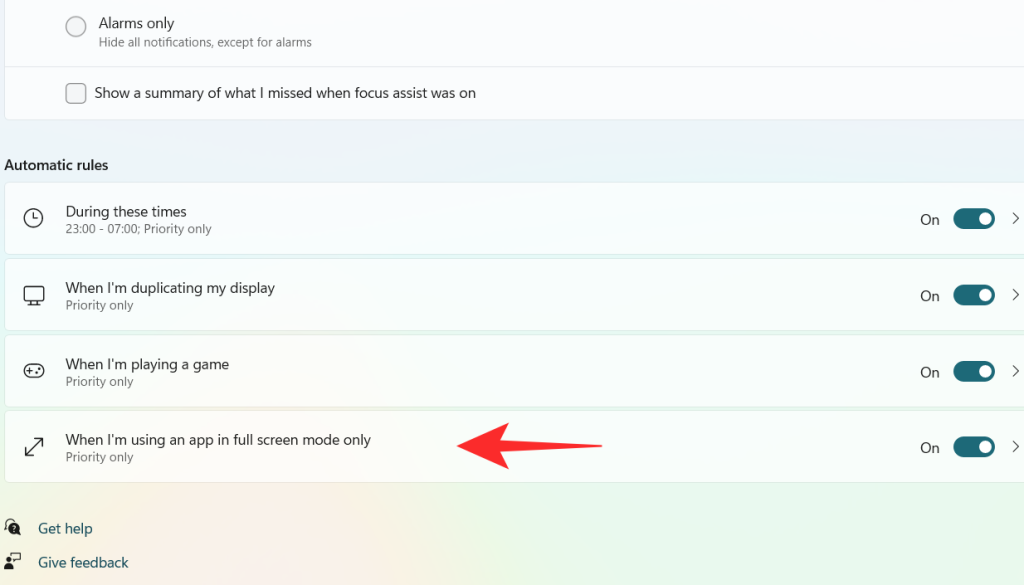
Turn on the toggle switch, which is extreme right to the When I’m using an app in full-screen mode only tab.
Click on the When I’m using an app in full-screen mode only tab
Click on the box under Focus Level.
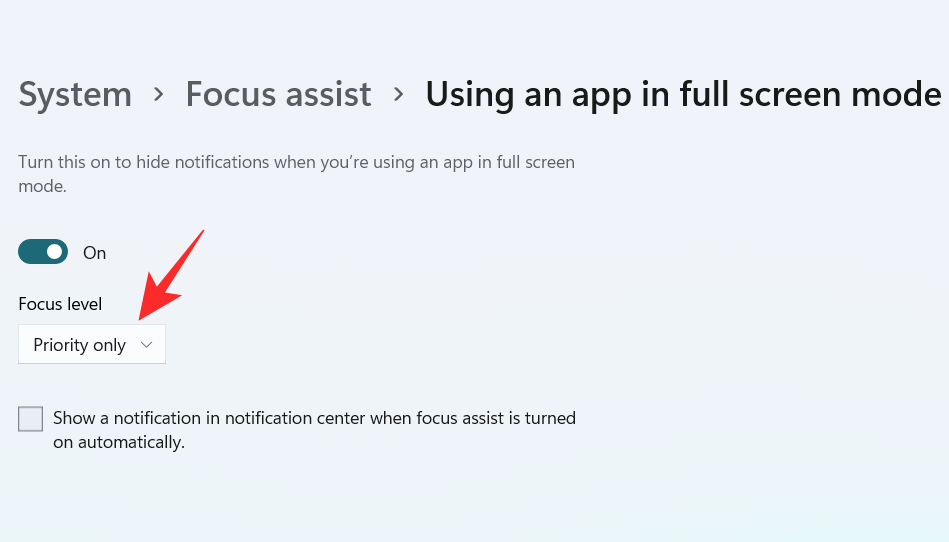
A dropdown menu appears, click on your desired option between Priority only and Alarms only.

To get a notification when the Focus assist is turned on, check the box “Show a notification in action center when Focus assist is turned on automatically“.

Using the above customizations, you can schedule and control Focus assist’s behavior according to your workflow for maximum efficiency no matter the task at hand.
Can you remove the Focus Assist icon from the Action Center?
Yes, you can easily remove the Focus Assist icon from the Action Center. Windows 11 brings a host of new cosmetic and UI changes and one of them has been the ability to customize your action center. You can now add or remove icons from the action center depending on your needs and opt for a more minimal or productive look depending on your workflow.
For now, you can only add and remove certain system modules but in the future, some users expect Microsoft to add the support for third-party apps as well. This would be a much welcome change that would allow you to manage dedicated system settings managed by third-party apps directly from your action center.
Customize your Focus assist icon in the action center
Depending on your current needs you can either remove or add the Focus assist module to the action center. Use one of the guides below depending on your current requirements.
1. Remove it
Click on the Action Center which shows the icon of Wifi, volume, and battery together.

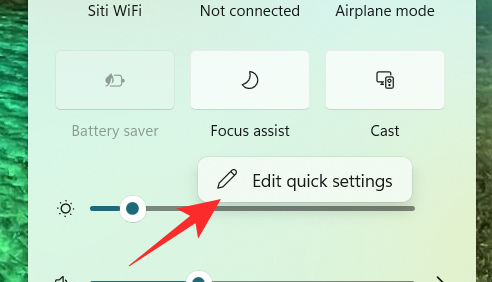
Right-click on an empty place or on any icon and click on Edit quick settings.
Click on the unpin symbol at the top right corner of the Focus Assist icon to remove the Focus Assist icon from the Action Center.
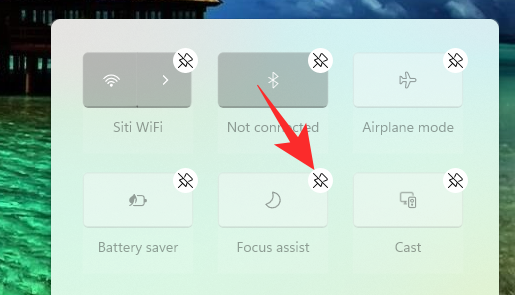
The Focus assist module should now have been removed from your action center. If not, we recommend you restart explorer.exe or your PC for the changes to take effect.
2. Restore it
Click on the Action Center which shows the icon of Wifi, volume, and battery together.

Right-click on an empty place or on any icon and click on Edit quick settings.
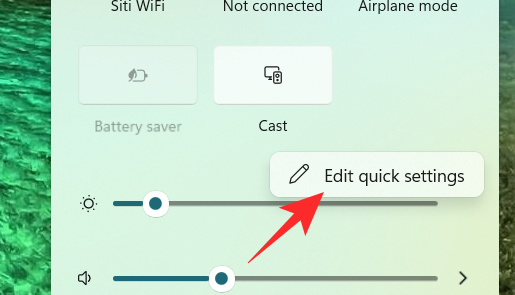
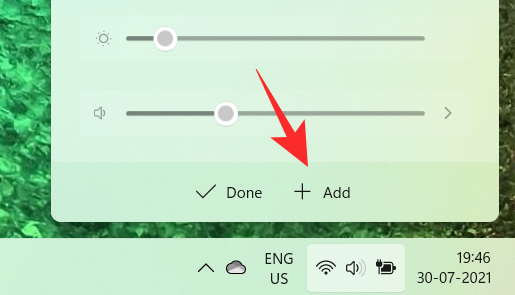
Now, click on the Add button at the bottom of the action center.
A list of different settings appears. Click on Focus Assist from the list and you will get to see the Focus Assist icon on the Action Center again.
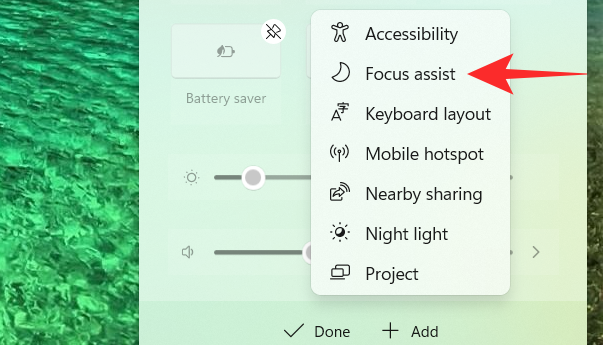
And that’s how you can add the Focus assist module back in the action center.
Focus assist keeps turning on automatically Issue: How to fix
If Focus assist keeps turning on automatically then there could be a couple of reasons for this behavior. Depending on its cause we can either fix it or use a workaround to manage the issue. Let’s find out why Focus assist keeps turning on automatically on your system.
Fix #1: Check Automatic Rules
Are you having this issue when projecting to a secondary display? Or when sharing your screen with a public computer? Then it is likely that focus assist is getting turned on automatically due to the default automatic rules in Windows 11.
By default, focus assist will silence all notifications in such scenarios to help maintain your privacy. But this can be counterproductive in case you are just trying to use a bigger display from a portable system like a laptop or an NUC.
It could also be that scheduled Focus assist was turned on your system by mistake which will enable and disable Focus assist automatically during certain hours. If any of these situations sounds like what you are facing then you can use the guide below to disable all automatic rules that enable Focus assist during certain scenarios and workflows on Windows 11. Let’s get started.
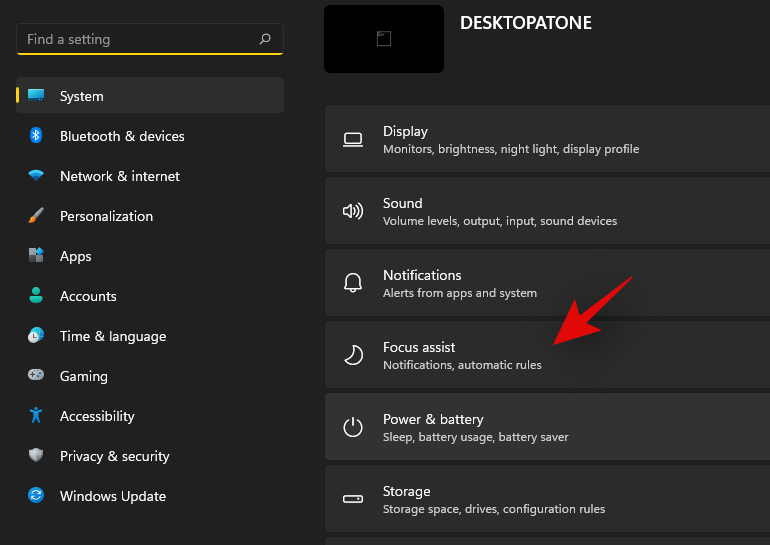
Press Windows + i on your keyboard to open the Settings app. Ensure ‘System’ is selected on your left and then click on ‘Focus Assist’ on your right.
Go down to automatic rules and turn off the following toggles.
- During these times
- When I’m duplicating my display
- When I’m playing a game
- When I’m using an app in full-screen mode only
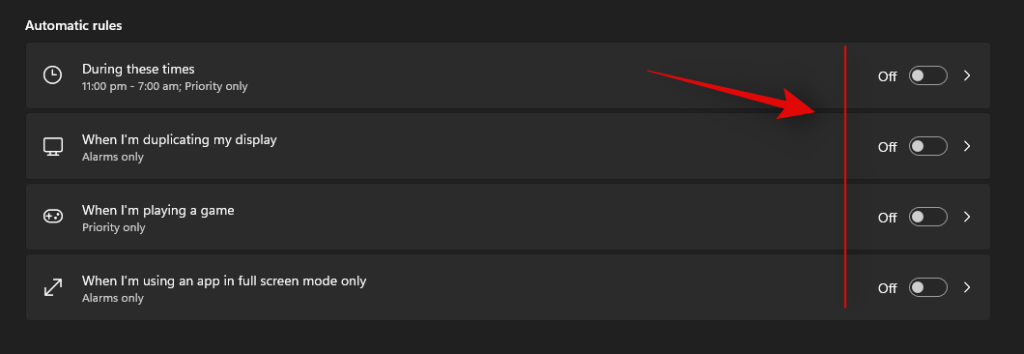
Once these rules are disabled, Windows 11 will not turn on Focus assist automatically on your system.
Fix #2: Turn of GeForce Overlay
This is another way to solve Focus assist misbehaving on your system. If you have a dGPU from Nvidia and are using the GeForce experience app then we recommend disabling its overlay option and restarting your system. With the automatic rule for ‘When I’m using an app in full-screen mode only’ turned on, Windows will mistake the Nvidia overlay detection on your desktop for a full-screen app which will trigger the Focus assist settings in return. You can also disable this automatic rule in case you wish to keep the Geforce Experience overlay enabled on your system.
Focus assist greyed out, option missing or not working; How to fix
Is the focus assist option missing from Windows 11 settings app? Is the module greyed out in the action center? This is a known bug that shows up occasionally with every feature update of Windows. Even certain versions of Windows 10 faced huge issues with this bug until a fix was released.
Fix #1: Enable in Group Policy Editor
If Focus assist seems to be missing from your system then it is likely disabled using the group policy editor. If your PC is managed by your organization or your workplace then it is likely disabled by your administrator. If you have access to the group policy editor then you can use the guide below to enable focus assist on your system. However, in case you have limited access, then you might need to get in touch with your administrator to enable Focus assist on your system.
Press Windows + R on your keyboard to bring up the Run dialog box and type in the following command to launch the Group Policy Editor. Click on ‘Ok’ once you are done.
gpedit.msc
Navigate to the following node.
User configuration > Administrative Templates > Start Menu and Taskbar > Notifications
Double click on ‘Turn off Quiet Hours’ on your right.
Click and select ‘Disabled’ in the top left corner.
Click on ‘Ok’ to save your changes.
And that’s it! Focus assist should now be enabled on your system in case it was disabled using the group policy editor.
Fix #2: Reinstall and repair default Windows UWP apps and system apps
If Focus assist is still missing from your system then let’s check if all the necessary apps and utilities are installed properly on your system. Use the guide below to check and repair Windows 11’s basic apps and functionality on your system.
Press Windows + S and search for PowerShell. Click on ‘Run as administrator’ once it shows up in your search results.
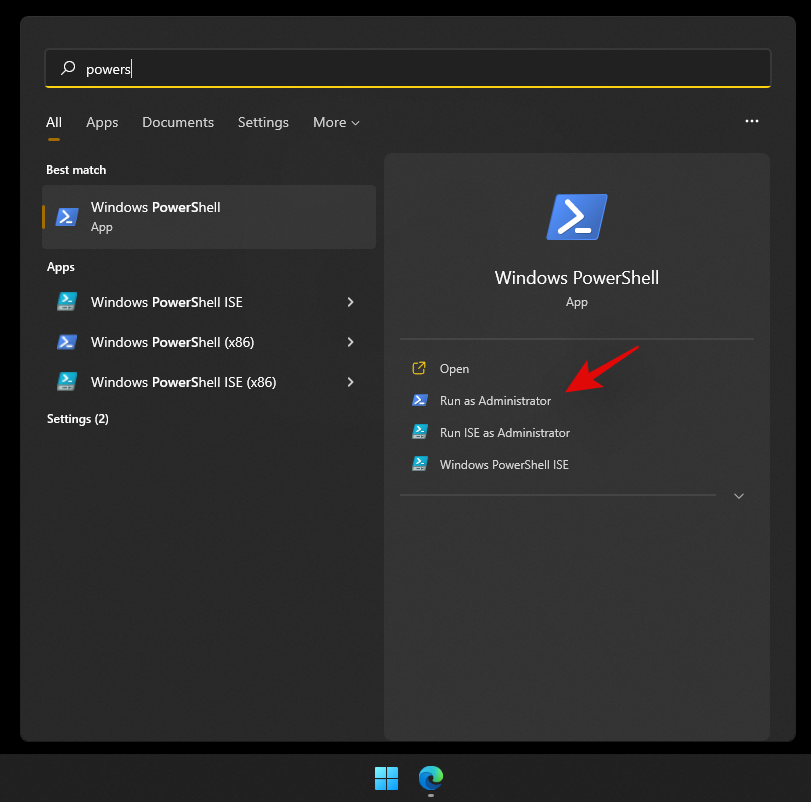
Once PowerShell is launched, execute the following command to reinstall all UWP apps and check and repair other default utilities required by Windows 11 in the background.
Get-AppXPackage -AllUsers | Foreach {Add-AppxPackage -DisableDevelopmentMode -Register "$ ($ _. InstallLocation) \ AppXManifest.xml"}

Wait for the process to finish and restart your PC for good measure. If Focus assist was corrupted or missing from your system, then this fix should help solve all your issues.
Fix #3: Check for a Windows Update
Haven’t updated in a while? We recommend checking for recent Windows Updates. While updates rarely disable major features like Focus assist, a new feature update installation can help refresh your registry, fix mismatched values and more importantly iron out bugs that could be preventing you from accessing Focus assist on your system. Use the guide below to check for recent Windows updates on your system.
Press Windows + i on your keyboard to open the Settings app and click on ‘Windows Update’ on your left.

Click on ‘Check for updates’.

In case any new updates show up, let them install on your system and restart if prompted. In case you are using a metered connection then you will need to click on ‘Download now’ manually to avoid any unexpected data charges.
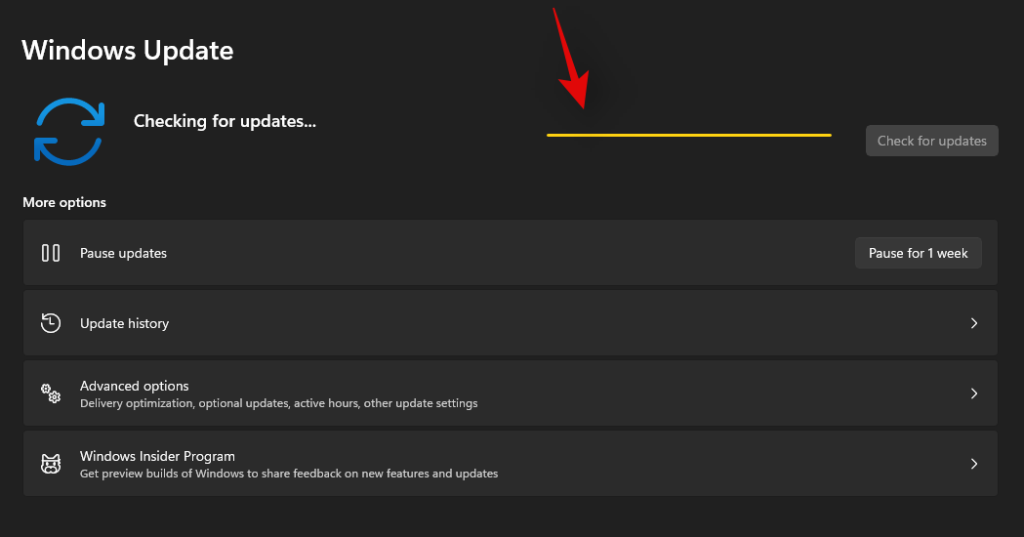
Once the necessary Windows updates are installed on your system, Focus assist should be restored in your action center and the Settings app.
Last Resort: Reset your PC
If Focus assist is still missing from your PC then this indicates a corrupted Windows installation on your system. The best way to fix this without wasting much time on troubleshooting would be to simply reset your PC while keeping all your files intact. This will refresh the entire Windows 11 installation and reinstall all the apps which should help restore functionality for all Windows features including Focus assist. Follow the guide below to reset your PC while keeping your files.
Note: The reset process will remove all installed applications and only retain files stored manually on your local storage. A list of all the removed apps will be available in .txt format on your desktop once your PC has been reset.
Press Windows + i on your keyboard and click on ‘Windows Update’ on your left.
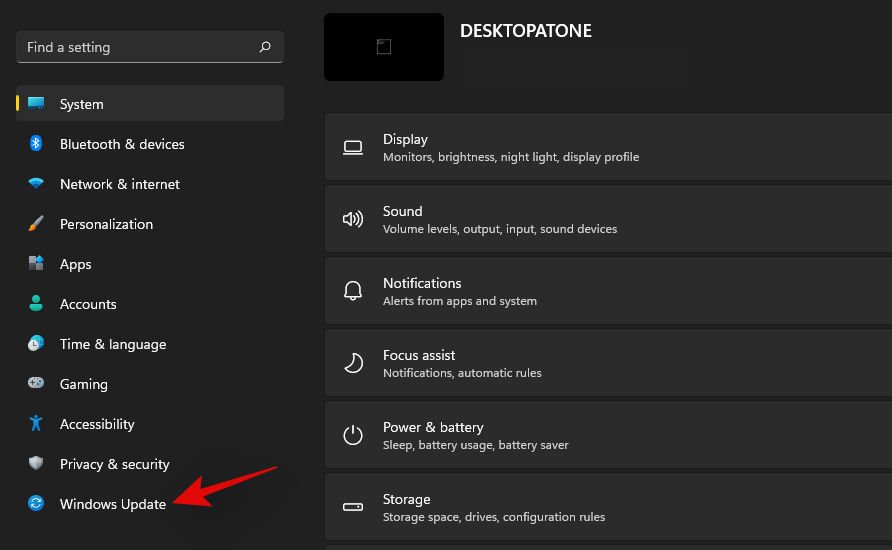
Click on ‘Advanced options’.
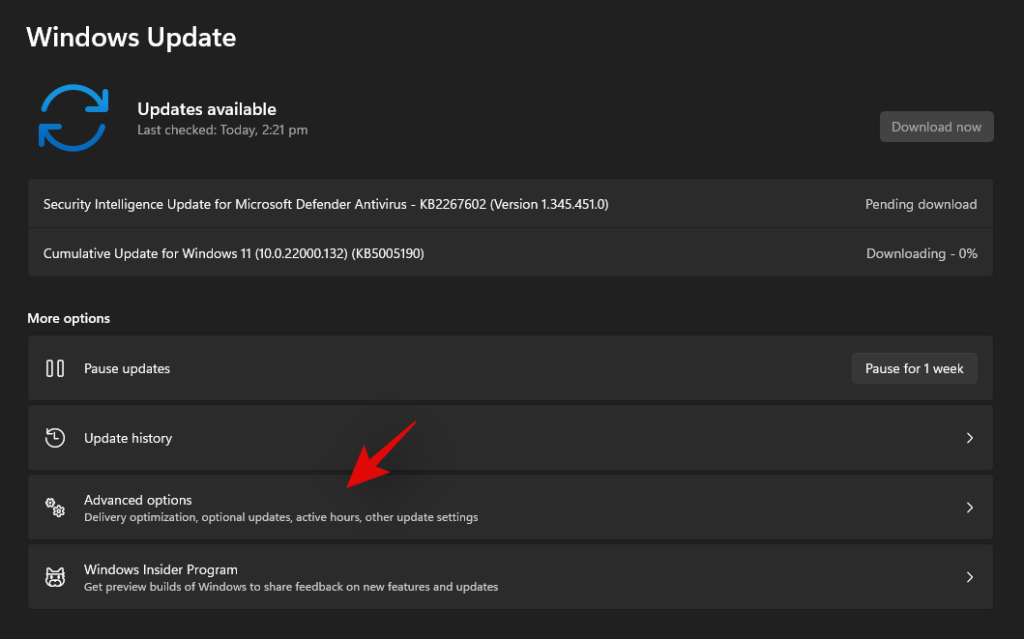
Click and select ‘Recovery’.
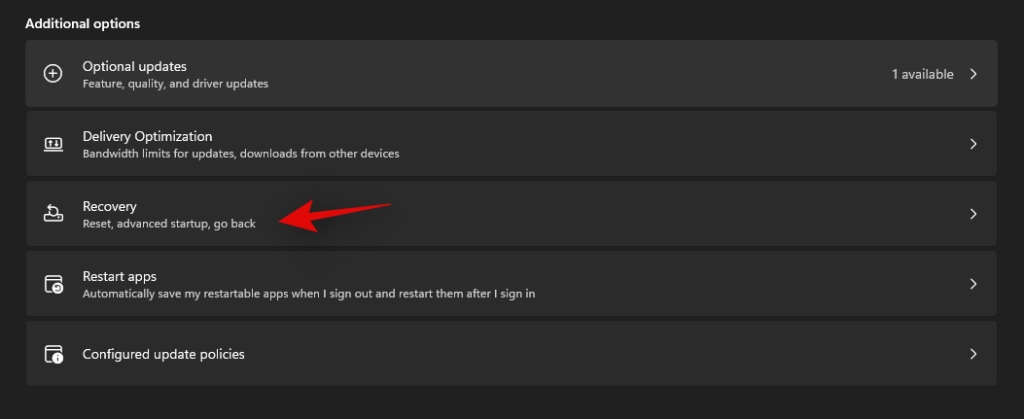
Click on ‘Reset PC’ beside Reset this PC.

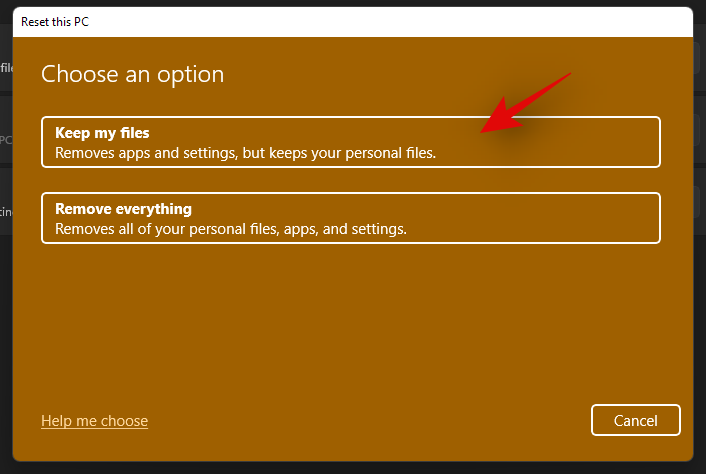
Click on ‘Keep my files’.
Windows will now process all the files on your local storage. Click on ‘Reset’.
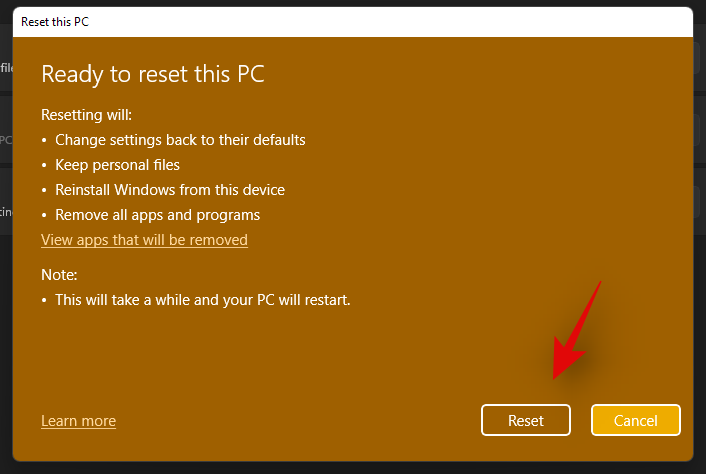
Note: If you are using Windows 11 Pro or higher then you will get the option to use a local installation/recovery media to reinstall Windows 11 as well. However, this option will be missing for Windows 11 Home users.
Windows will now reset your PC while retaining all your files. Your PC will restart several times during this process. This is completely normal and you should let Windows do its thing. If you are using a laptop or a portable NUC, then ensure that your unit is plugged into the power at all times during this process.
How to turn off Focus assist permanently
Do you wish to turn off Focus assist permanently in all scenarios? Then you can use the guide below to do so. The best way to disable Focus assist is by using the group policy editor. But in case you are using Windows 11 Home Edition, then you can use the first method in this guide to disable Focus assist permanently.
Method #1: Disable all settings and rules
Once you disable all the settings and rules for Focus assist, the feature should be turned off automatically on your system. Use the guide below to get you started.
Press Windows + i on your keyboard to open the Settings app and click on ‘Focus assist’ on your right.

Click and select ‘Off’ at the top.
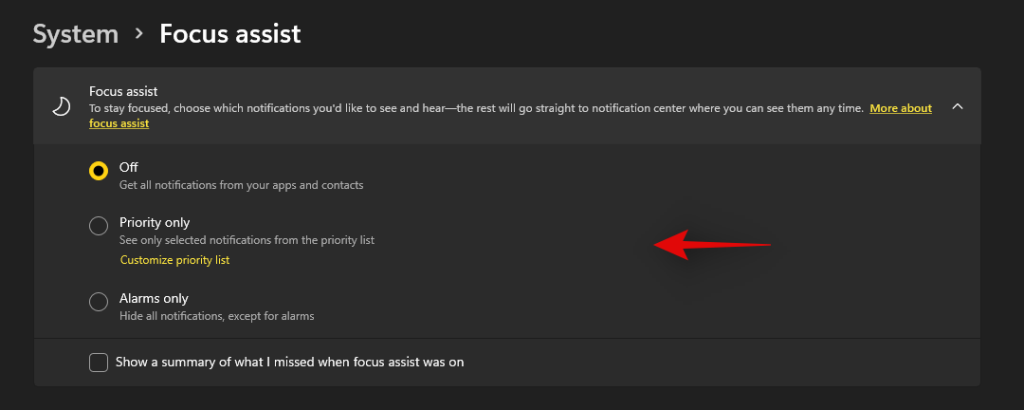
Uncheck the box for ‘Show a summary of what I missed when focus assist was on’.

Subsequently, disable all the toggles under ‘Automatic rules’ as shown below.

We also recommend turning off notifications for unnecessary apps using the guide after this section to avoid unnecessary notifications from interrupting you when focus assist is disabled.
Method #2: Using Group Policy Editor
The group policy editor will permanently disable focus assist on your system and even prevent you from accessing it in your settings. However, this method will only work on Windows 11 Pro or higher versions. In case you have the Windows 11 home edition, you can use the guide above to disable Focus assist instead.
Press Windows + R and type in the following to open Froup Policy EDitor. Click on ‘Ok’ once done.
gpedit.msc
Navigate to the following node.
User configuration > Administrative Templates > Start Menu and Taskbar > Notifications
Find and double-click on ‘Turn on Quiet Hours’ on your right.
Select ‘Enabled’ in the top left and click on ‘Ok’.
Focus assist will now be permanently disabled on the selected system. We recommend you restart your system or explorer.exe in case the changes do not take place immediately.
Is there any other way to disable notifications?
Yes, you can disable notifications individually on a per-app basis in Windows 11 to customize the notifications you receive. This is another way to ensure that you are only notified about the apps and notifications that you intended. Customizing your notifications this way will also allow you to retain the full functionality of the focus assist mode without having to disable certain rules to avoid mismatched scenarios in your workflow.
However, the only downside to managing your notifications this way is that you have to keep enabling and disabling notifications for apps every few months depending on your new installs and uninstalls. You can use the guide below to disable notifications on a per-app basis in Windows 11.
Disable notifications permanently on a per-app basis
Here’s how you can disable notifications on a per-app basis in Windows 11.
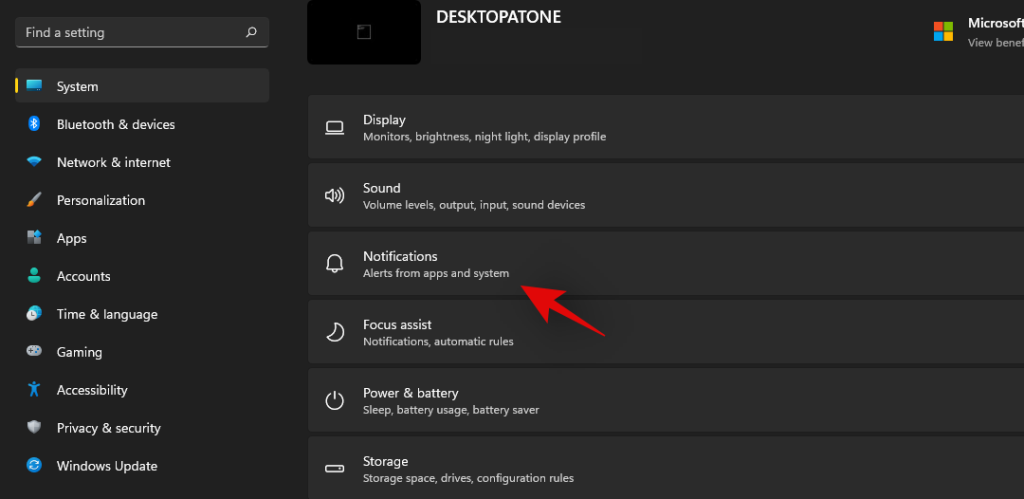
Press Windows + i on your keyboard to open the Settings app and then click on ‘Notifications’ on your right.
You will now get a list of all the apps that have the permission to deliver notifications on your system. Scroll the list to find the necessary apps and turn off the toggle beside them to disable notifications.

Repeat the steps above for all the intended apps to disable notifications.
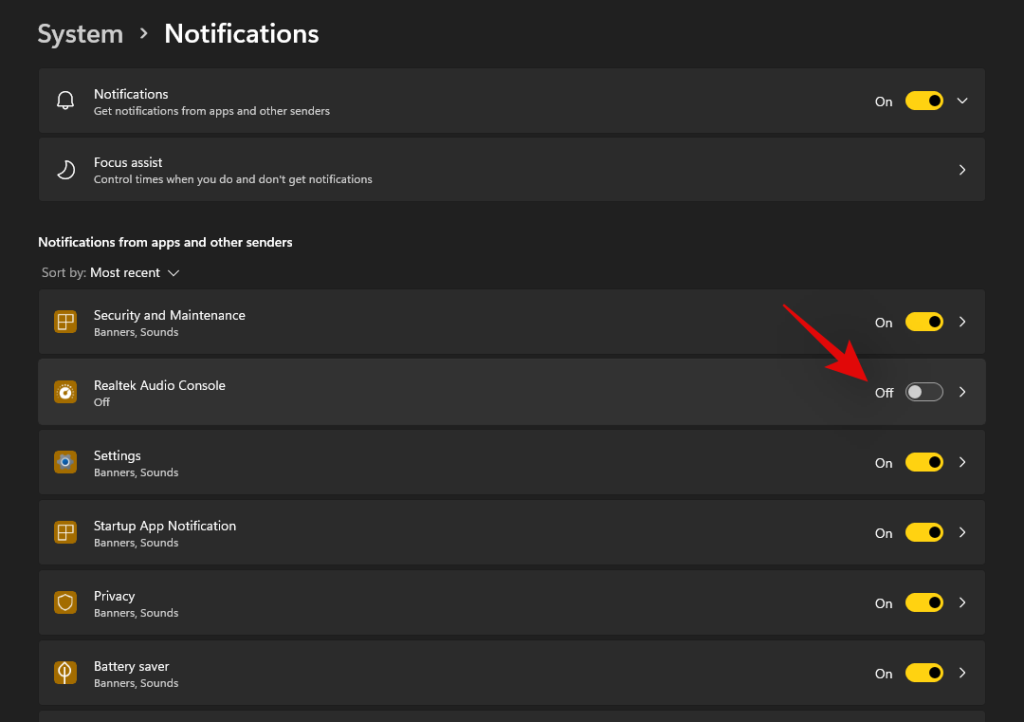
Close the Settings app and notifications for the selected apps should now be permanently disabled on your system.
Can you customize notifications in Windows 11?
Well, not exactly. Windows 11 currently has very limited options when it comes to customizing your notifications. You can not change the look, behavior, or color palette of your notifications without changing the accent color of your overall UI. However, you can customize the way your notifications sound. You can set a nice quiet notification sound that does not interrupt your workflow or opt for a quirky take that makes for a few good laughs each time you get a notification. The choice is completely up to you. Use the guide below to customize your Windows 11 notification sounds.
Required
- A .wav file for the sound you wish to set as your custom notification on Windows 11
Guide
Let’s start by first placing the .wav file in a compatible media folder so that you can set it as your default notification sound in Windows 11. Navigate to the concerned .wav file and copy it to your clipboard.
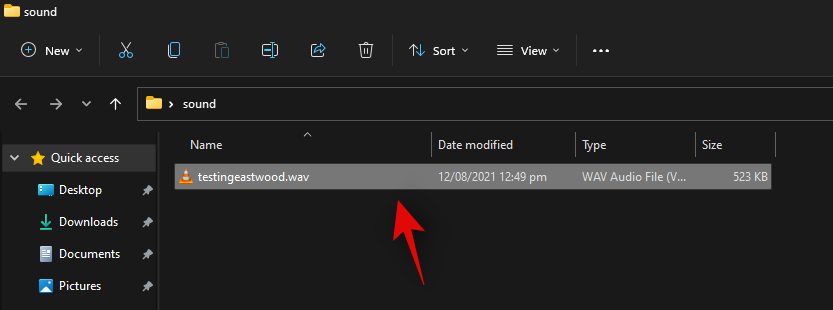
Now navigate to the following path given below. Paste your .wav file in this location. Click on ‘Continue’ when you will be prompted for administrator permission.
C:\Windows\media
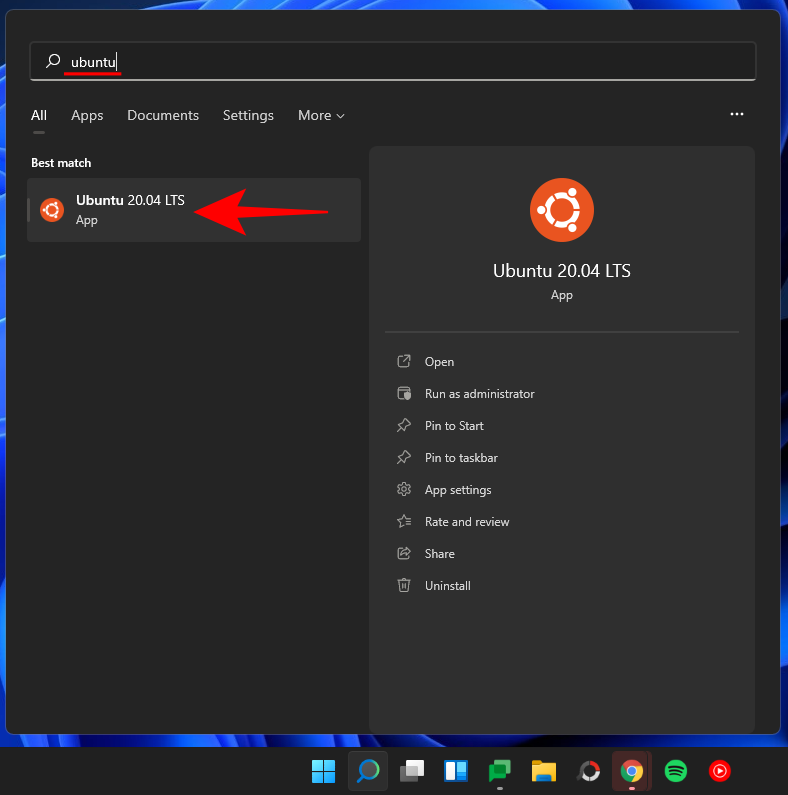
We can now use the .wav file as our default notification sound. Press Windows + i on your keyboard to open the Settings app and then click on ‘Sound’ on your right.
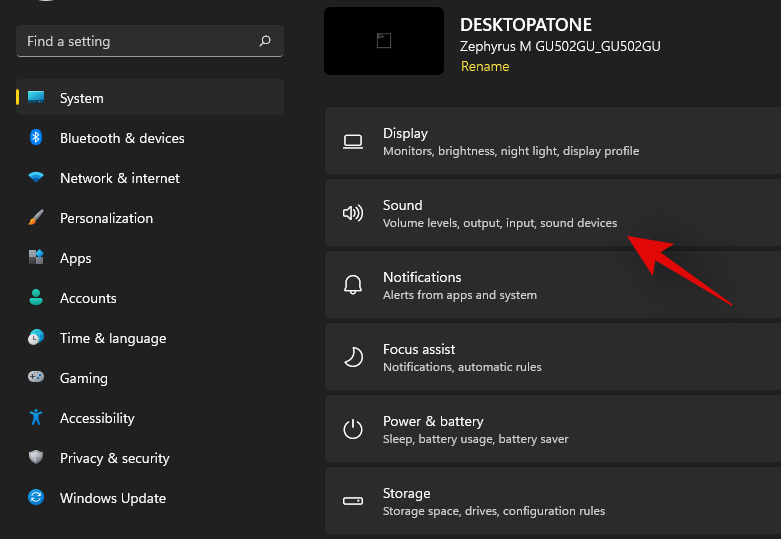
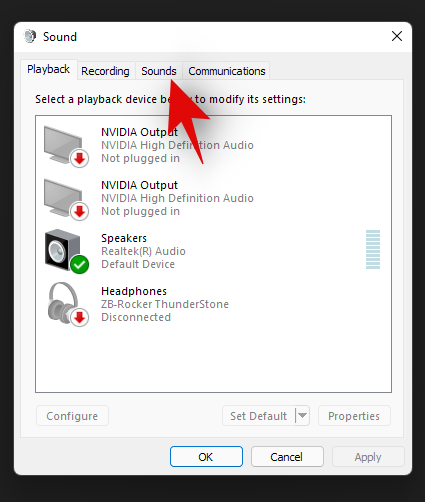
Scroll to the bottom and click on ‘More sound settings’.

Click and switch to the ‘Sounds’ tab at the top.
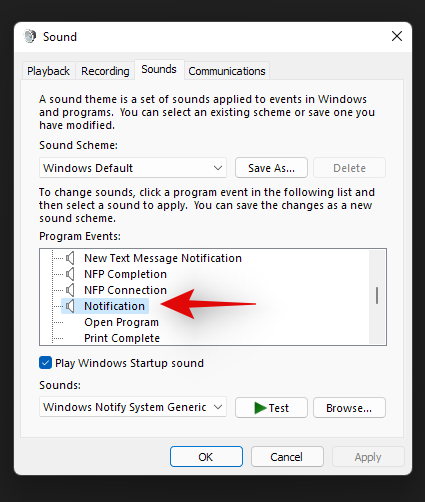
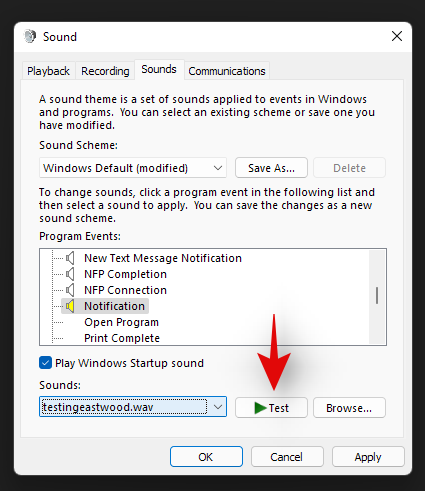
Under ‘Program Events’ scroll the list and find ‘Notifications’. Click on ‘Notifications’ to select it.
Now click on the drop-down arrow under Sounds and select the .wav file we pasted in the Media folder.
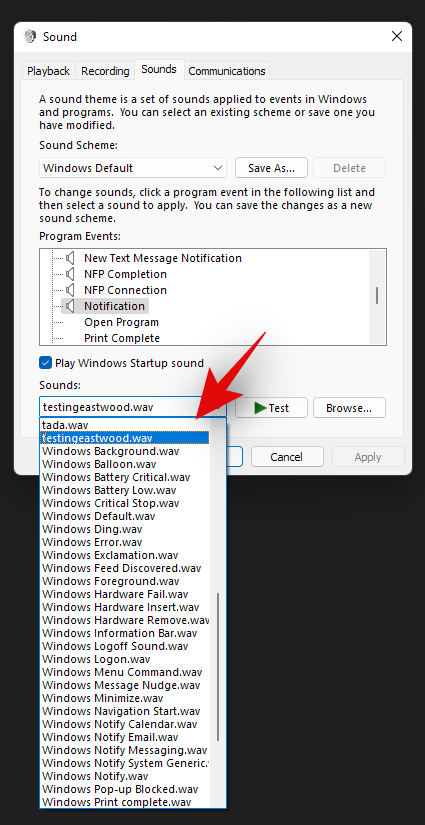
You can click on ‘Test’ to test your custom notification sound.
Click on ‘Ok’ to save your changes.
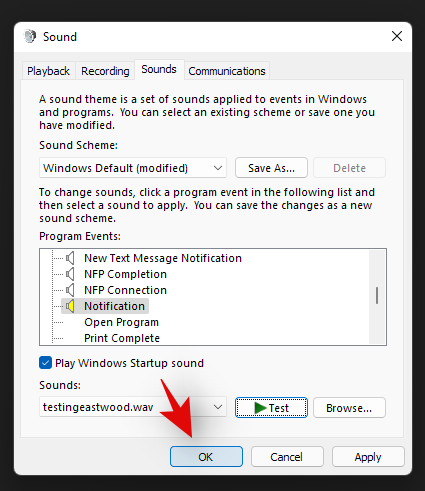
And that’s it! You will now have set a custom sound as your default notification sound in Windows 11.
Distractions from notifications are a huge problem especially when you are into some important work. Using the steps mentioned above, now, you can easily get rid of unnecessary notifications and work peacefully with full concentration.
Related:


