Windows 11 hat einen neuen minimalistischen Milchglas-Look eingeführt, der bei jedem sehr gut zu sitzen scheint. Abgerundete Ecken zusammen mit beabstandeten UI-Elementen verleihen Windows 11 ein futuristisches Aussehen, das durch Einstellen eines benutzerdefinierten Hintergrunds und einer Akzentfarbe weiter angepasst werden kann . Aber wäre es nicht schön, wenn Sie die Farbe Ihrer Taskleiste ändern könnten ?
Vielleicht passt es zu Ihrer Tapete oder zu Ihrer Akzentfarbe? Nun, es gibt einige Möglichkeiten, dies unter Windows 11 zu tun. Hier finden Sie alles, was Sie über das Anpassen der Farbe Ihrer Taskleiste in Windows 11 wissen müssen.
Inhalt
Können Sie die Farbe der Taskleiste in Windows 11 nativ ändern?
Ja, Sie können Ihre Taskleiste mit einem einfachen Umschalter so einstellen, dass sie Ihre aktuelle Akzentfarbe verwendet. Auf diese Weise hat Ihre Taskleiste dieselbe Farbe wie Ihre Akzentfarbe, die im Bereich der Schnelleinstellungen, des Lautstärkereglers und mehr verwendet wird. Falls Ihre Akzentfarbe automatisch von Ihrem Hintergrundbild ausgewählt wird, wird auch die Farbe Ihrer Taskleiste automatisch von Ihrem Hintergrundbild ausgewählt. Wenn Sie die Farbe Ihrer Taskleiste ändern möchten, können Sie die folgenden Anleitungen verwenden, um loszulegen.
So ändern Sie die Farbe der Taskleiste
Sie können die Farbe Ihrer Taskleiste ändern, indem Sie entweder die App "Einstellungen", eine Registrierungsänderung oder Tools von Drittanbietern verwenden. Jede dieser Methoden hat ihre eigenen Vor- und Nachteile. Finden Sie diejenige, die Ihren Anforderungen am besten entspricht, um loszulegen und die Farbe Ihrer Taskleiste in Windows 11 zu ändern.
Methode #01: Verwenden von Einstellungen
Mit der Einstellungs-App können Sie Ihre Taskleiste in Windows 11 nativ einfärben. Dabei wird Ihre Akzentfarbe verwendet, unabhängig davon, ob Sie eine benutzerdefinierte Farbe oder eine aus Ihrem Hintergrund verwenden, die als Ihre Taskleistenfarbe festgelegt wird. Folgen Sie der Anleitung unten, um loszulegen.
Drücken Sie Windows + iauf Ihrer Tastatur, um die App Einstellungen zu öffnen. Klicken Sie links auf „Personalisierung“.

Klicken Sie auf „Farben“.

Klicken Sie auf das Dropdown-Menü neben 'Akzentfarbe' und wählen Sie eine Option entsprechend Ihren Vorlieben.

- Automatisch: Windows wählt automatisch eine Akzentfarbe aus Ihrem aktuellen Hintergrundbild aus.
- Manuell: Sie können manuell eine Akzentfarbe für die Windows-Benutzeroberfläche aus einer der Ihnen zur Verfügung gestellten Optionen auswählen.
Wenn Sie eine benutzerdefinierte Akzentfarbe verwenden möchten, klicken Sie neben "Benutzerdefinierte Farben" auf "Farben anzeigen".

Wählen Sie eine Farbe, die Ihnen gefällt, von der GUI auf Ihrem Bildschirm.

Klicken Sie auf „Mehr“, wenn Sie RGB- oder HEX-Werte verwenden möchten, um Ihre benutzerdefinierte Farbe zu definieren. Klicken Sie auf „Fertig“, wenn Sie die gewünschte Farbe ausgewählt haben.

Scrollen Sie nach unten und aktivieren Sie den Schalter für "Akzentfarbe auf Start- und Taskleiste anzeigen".

Der Explorer sollte sich jetzt selbst aktualisieren und die neue Akzentfarbe sollte sich jetzt in Ihrer Taskleiste widerspiegeln.

Wenn nicht, können Sie den Explorer anhand der folgenden Anleitung auf Ihrem System neu starten, damit die Änderungen sofort wirksam werden.
So starten Sie den Windows-Datei-Explorer neu:
Drücken Sie Ctrl + Shift + Escauf Ihrer Tastatur und wechseln Sie zum Reiter „Details“.

Klicken Sie auf 'explorer.exe' und klicken Sie auf Ihrer Tastatur auf Löschen.

Klicken Sie auf „Prozess beenden“, um Ihre Auswahl zu bestätigen.

Klicken Sie nun in der oberen linken Ecke Ihres Bildschirms auf „Datei“ und wählen Sie „Neue Aufgabe ausführen“.

Geben Sie den folgenden Namen ein und drücken Sie die Eingabetaste auf Ihrer Tastatur.
explorer.exe

Der Explorer sollte jetzt auf Ihrem System neu gestartet werden und die neue Akzentfarbe sollte sich jetzt in Ihrer Taskleiste widerspiegeln.
So ändern Sie die Farbe der Windows 11-Taskleiste mit Tools von Drittanbietern:
Sie können auch Tools von Drittanbietern verwenden, um Ihre Taskleiste anzupassen. Diese Tools verfügen über zusätzliche Funktionen, mit denen Sie Ihre Taskleiste ändern können, aber die meisten verwenden alten Code, der für Windows 10 entwickelt wurde. Dies kann zu Problemen mit vorhandenen Windows 11-Elementen führen. Daher empfehlen wir Ihnen, die folgenden Tools nur zum Ändern der Akzentfarbe zu verwenden Ihrer Taskleiste.
Methode #02: OpenShell verwenden
OpenShell ist das neu überarbeitete Projekt, das ClassicShell für moderne Benutzer am Leben erhalten soll. ClassicShell ist ein seit langem bestehendes Dienstprogramm, das von Benutzern auf der ganzen Welt verwendet wird, um ihr Startmenü und ihre Taskleiste anzupassen. Wir können OpenShell zu unserem Vorteil nutzen und unsere Taskleiste einfach einfärben. Folgen Sie der Anleitung unten, um loszulegen.
Klicken Sie auf den obigen Link, um die Download-Seite zu öffnen. Klicken und erweitern Sie "Assets".

Klicken Sie nun auf die .exe-Datei, um sie auf Ihren PC herunterzuladen. Doppelklicken Sie nach dem Herunterladen darauf und installieren Sie die Anwendung.

Starten Sie nach der Installation die OpenShell-Menüeinstellungen. Seien Sie nicht beunruhigt, wenn Sie feststellen, dass Ihr Startmenü anders ist. Wir werden die Änderungen in Kürze rückgängig machen.

Klicken Sie auf und wechseln Sie zum Reiter 'Grundeinstellungen'.

Ändern Sie nun die folgenden Werte, um Ihr Startmenü wiederherzustellen und verwenden Sie weiterhin das neue 'Windows 11-Startmenü.

- Linksklick öffnet: Windows Startmenü
- Umschalt + Klick öffnet: Windows Startmenü
- Windows-Taste öffnet: Windows-Startmenü
- Umschalt + Win öffnet: Windows Startmenü
Deaktivieren Sie außerdem das Kontrollkästchen „Für diesen Benutzer automatisch starten“, wenn Sie den automatischen Start für OpenShell deaktivieren möchten.

Wechseln Sie nun zum Reiter 'Taskbar', indem Sie darauf klicken.

Wählen Sie je nach Ihren ästhetischen Vorlieben eine der folgenden Optionen aus.

- Undurchsichtig: Kein Farbverlauf oder Transparenz in Ihrer Taskleiste. Sie erhalten stattdessen eine einfarbige undurchsichtige Taskleiste.
- Transparent: Völlig transparente und durchsichtige Taskleiste, gekennzeichnet durch die gewählte Akzentfarbe. Das Hintergrundbild ist über Ihre Taskleiste vollständig sichtbar, wenn Sie diese Option verwenden.
- Glas: Glas ähnelt der Option 'Transparent'. Es macht Ihre Taskleiste durchsichtig, während die gewählte Akzentfarbe beibehalten wird. Auf die Taskleiste wird jedoch ein Unschärfewert angewendet, um ihr einen leicht mattierten Look zu verleihen. Ihr Hintergrundbild wird in der Taskleiste nicht vollständig sichtbar sein.
Wenn Sie transparent oder Glas ausgewählt haben, verwenden Sie 'Taskleisten-Deckkraft', um die Transparenz Ihrer Taskleiste zu definieren. Sie können diese Werte ändern, um die Transparenz der Taskleiste basierend auf Ihren Einstellungen und Ihrem Thema zu optimieren.

Klicken Sie nun auf „Taskleistenfarbe“ und wählen Sie das „3-Punkt“-Menüsymbol daneben aus.

Wählen Sie im Farbwähler eine Farbe aus, die Ihnen gefällt. Sie können auch eine benutzerdefinierte Farbe verwenden, indem Sie rechts auf den gewünschten Bereich klicken.

Nachdem Sie die gewünschte Farbe ausgewählt haben, klicken Sie auf 'OK'.

Der Farbwechsel sollte sich nun automatisch in Ihrer Taskleiste widerspiegeln.

Klicken Sie noch einmal auf 'OK'.

Und das ist es! Sie haben jetzt die Farbe Ihrer Taskleiste mit OpenShell geändert. Denken Sie daran, dass Ihre Taskleiste nicht mehr von Ihren Akzentfarbenänderungen betroffen ist, sobald Sie Ihre Farbe und Ihren Typ über die OpenShell-Einstellungen festgelegt haben. Das bedeutet, dass Sie zwar die Akzentfarbe zum Anpassen der Windows 11-Benutzeroberfläche verwenden können, die Taskleistenfarbe jedoch individuell an Ihr Design anpassen müssen.
Methode #03: Verwenden von TaskbarX
TaskbarX ist ein weiteres langjähriges Dienstprogramm, das hauptsächlich von Benutzern verwendet wurde, um ihre Taskleiste zu zentrieren, dh bis Windows 11 mit derselben nativen Funktion veröffentlicht wurde. Dennoch gibt es viele coole Dinge, bei denen TaskbarX Ihnen helfen kann, und eine davon ist das Ändern der Farbe Ihrer Taskleiste. Genau wie OpenShell ändert TaskbarX Ihre Taskleistenfarbe individuell und wird nicht von der von Ihnen gewählten Gesamtakzentfarbe in Windows 11 beeinflusst. Sie können dies zu Ihrem Vorteil nutzen und Farbkombinationen erstellen, die sonst in Windows 11 nicht möglich wären So können Sie TaskbarX zu Ihrem Vorteil nutzen und die Farbe Ihrer Taskleiste ändern.
Klicken Sie auf den obigen Link und laden Sie TaskbarX auf Ihren PC herunter. Entpacken Sie das Archiv an einen geeigneten Ort, doppelklicken Sie darauf und starten Sie 'TaskbarX Configurator'.

Note: Make sure you download the correct version based on your system. If you aren’t aware of your system’s compatibility, then you shoudl download ‘TaskbarX_1.7.2.0_x64.zip‘ for most modern PCs. Keep in mind that the version number could be different if you are downloading TaskbarX in the future.
Ensure that ‘Style’ is selected on your left and select one of the taskbar materials below.

These materials will define the texture, transparency, and behavior of your taskbar. You can use different materials and find the one that best fits your current needs and requirements.

- Default: The default Windows 11 taskbar texture and transparency are used.
- Transparent: The taskbar becomes completely see-through.
- Transparent Gradient: The taskbar is completely transparent with a slight gradient on it to help differentiate the taskbar from other elements on your desktop. This gradient can be changed by redefining the ‘Alpha’ value at the bottom.
- Opaque: The taskbar is completely opaque with no transparency effects applied to it.
- Blur: The taskbar gets a see-through blur texture applied to it. This makes the taskbar transparent enough to make out your wallpaper but blurred enough so that the details of your wallpaper do not interfere with taskbar elements.
- Acrylic: This is a new texture that emulates acrylic surfaces. Slightly transparent, slightly blurred, and a slight gradient help produce this texture. This is an experimental feature and can cause your taskbar to flicker especially if used in conjunction with other taskbar customization third-party apps.
Once you have selected the desired option, change the RGB sliders at the bottom to reflect the desired custom color you wish to use.

You can also click on the dropper icon to pick a color from your screen.

Additionally, if you have HEX values then you can enter them in the following text box as shown below.

Click on ‘Apply’ once you are done.

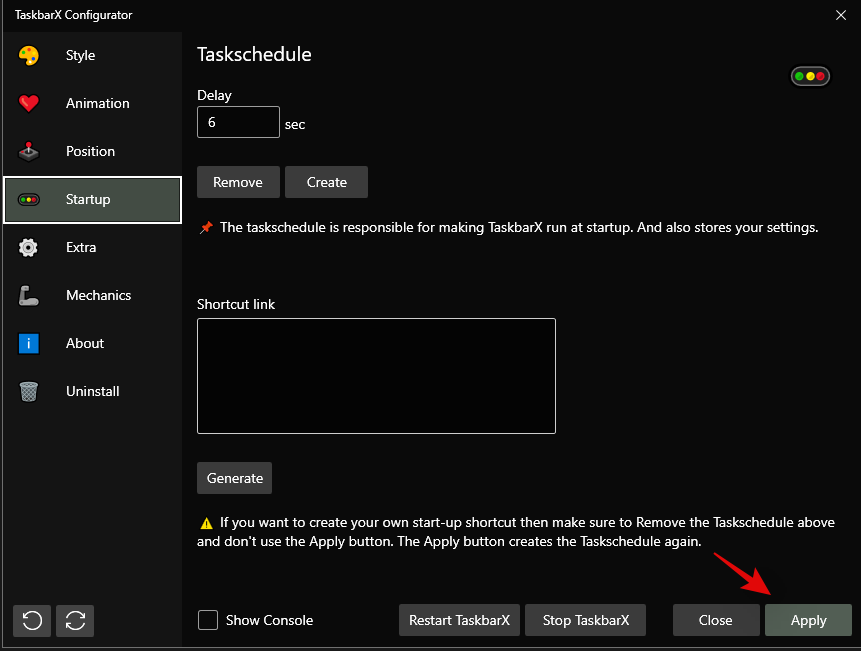
TaskbarX needs to be configured to auto-start on your PC for a seamless experience. Click on ‘Startup’ to get started.

If you have a 4 core or less CPU, then set the ‘Delay’ to 10s or higher. If you have a 6 core CPU or higher, then let the time be 6s. You can reduce the startup interval further if you wish TaskbarX to be launched immediately upon logging in to your user account.

Click on ‘Apply’.

Now click on ‘Restart TaskbarX’ if changes are not reflected in your taskbar.

And that’s it! You will now have changed your taskbar color using TaskbarX in Windows 11.
Method #04: Using Windows 10 Color Control
Color Control is another popular utility that was developed to only change your DWM and accent color in Windows 10. However, the utility seems to work great on Windows 11 as well so you can use it to easily change the accent color of your taskbar in Windows 11. Use the guide below to get you started.
Download the archive using the link above to your local storage. Extract the archive and launch the .exe file by double-clicking on it.

Click on ‘Pick new color’ beside ‘Accent color’.

Choose a new color for your taskbar now. The same color will be used for your Start menu as well.

Check the box for ‘Disable new auto-color accent algorithm’.

Click on ‘Apply’.

The newly selected color should now be reflected in your taskbar.

You can use the steps above to set a custom color for desktop windows manager as well. And that’s it! You will now have chosen a custom color for your taskbar using Windows 10 Color Control.
Can you set an accent color only for your taskbar?
Yes, you can set a custom accent color only for your taskbar provided that you are using one of the third-party utilities mentioned above. Either one of them can help you easily set a custom color for your taskbar. However, if you are looking to do the same natively in Windows 11, then sadly it is not possible. You will need to use one of the third-party utilities listed above. We would suggest you use TaskbarX as you won’t have to manage other tweaks in the third-party utility that can’t be disabled.
Unable to change Windows 11 taskbar color? How to fix
Have you been unable to change your Windows 11 taskbar color? Then there could be a couple of reasons for this issue. Use the troubleshooting guide below to fix this issue on your system.
- Ensure that you aren’t using a deactivated version or trial version of Windows 11. These versions do not allow you to customize and personalize Windows 11 which could be the reason why you are unable to change the taskbar color on your PC.
- Restart explorer.exe to refresh DWM which should help reflect the changes in the overall Windows 11 UI. Explorer.exe can sometimes fail to reflect changes recently made in Windows 11. You can manually restart the application from your task manager to have explorer reflect the changes immediately.
- Uninstall any third-party apps that customize your taskbar and try changing your accent color natively in Windows 11.
- Use Windows 10 Color Control to change your taskbar. This GUI uses the same Windows Settings options to change your accent and DWM colors in Windows 11. If the app can change the taskbar color on your PC then it is likely that the Settings app is facing issues on your system. In such cases, you can try restart explroer.exe to fix your issue.
- Install latest Windows Updates: Windows 11 is fairly new and it could be that your system is facing a known bug or conflict in the background. Installing the latest updates will help fix this issue on your system and fix any background service conflicts as well.
- Ensure that Windows is not automatically picking a custom accent color from your wallpaper. If this option is enabled then a custom accent color will be automatically selected by Windows 11 regardless of your choice and changes in the custom color section in the Settings app.
- Lastly, if nothing works for you then we recommend you check Windows for corrupted and missing files. This can be done by using SFC and DISM commands on your machine. You can use this detailed guide by us to run these commands on your PC and fix your Windows 11 installation.
Can you make the taskbar on Windows 11 transparent?
Yes, you can easily make Windows 11 taskbar transparent on your PC using a third-party utility. You can use the following apps to get a transparent taskbar on your PC.
Use the detailed guides above at the top of this post to help you choose a transparent taskbar on your PC. You can even add gradients and blur to your transparent taskbar to further customize it to match the look of your PC.
Can you further customize your taskbar?
Yes, you can use TaskbarX to further customize your taskbar on your PC. You can use the following options to further customize your taskbar in Windows 11.

- Animation: Change your animation, type, and duration using this option. These changes are applied to taskbar animations and taskbar window animations.
- Position: Windows 11 no longer allows you to reposition your taskbar but you can use this option to move your taskbar around on your desktop. You can also use the options in this section to offset taskbar elements and create a completely new look on your PC.
- Extra: You can use options in this section to customize your taskbar behavior depending on your current setup and what you are currently doing on your PC.
- Mechanics: This section will allow you to change the refresh rate of your taskbar elements when using TaskbarX.
You can also use OpenShell to further customize your taskbar in Windows 11. OpenShell was recently updated for Windows 11 and hence comes with a few dedicated tweaks for the new OS. It offers similar options to TaskbarX to customize your taskbar. Simply switch to the ‘Tasksbar’ tab at the top and make the desired changes to customize your taskbar.
Apart from the above-discussed apps, you can also use Winaero Tweaker on your PC to customize your taskbar in Windows 11. Use the guide below to get familiar with Winaero Tweaker in Windows 11.
How to use Winaero Tweaker to customize the taskbar
Winaero Tweaker is a long-standing utility that has been used to customize Windows UI for a long time. The app was recently updated with some dedicated options to customize Windows 11 and here’s how you can use them to your advantage.
Download and install Winaero Tweaker to your PC using the link above. You can also extract a portable to your local storage if needed. Once installed/extracted, launch the .exe file on your system.

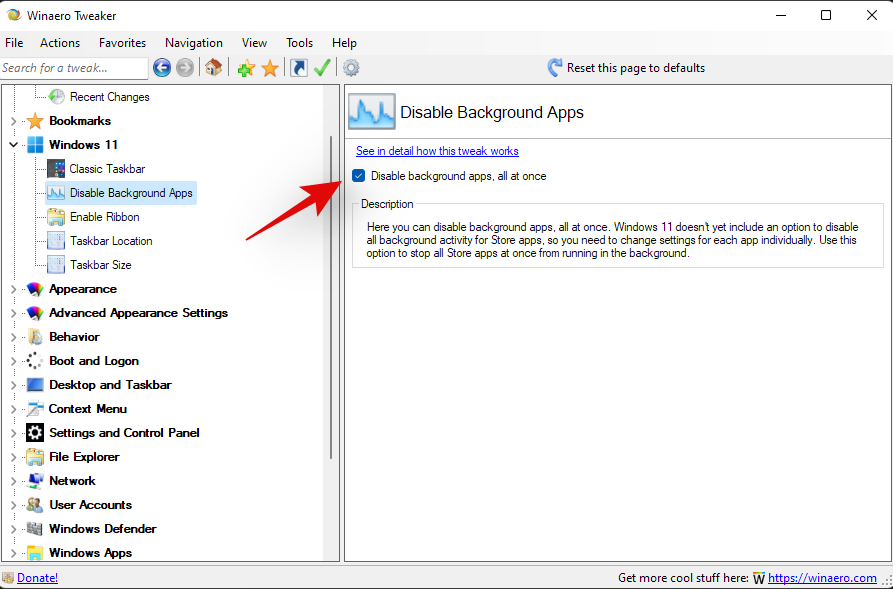
Click and expand Windows 11 on your left.

Now enable the following tweaks depending on your preferences.

- Classic Taskbar: Use this option to get the old classic taskbar back on your PC. Check the box for ‘Enable Classic Taskbar’ and then follow the subsequent guides to set up the old taskbar on your system.

- Disable Background apps: Windows 11 has reduced the capability to disable background applications. You can use this option to disable most background apps in Windows 11.

- Enable Ribbon: This will enable the old File Explorer ribbon in the new Windows 11 file explorer. Enabling this option will break the functionality of the ‘Share’ menu in the file explorer.

- Taskbar Location: This option can be used to reposition the taskbar on your desktop. Repositioning your taskbar to the left or right is known to cause compatibility issues. A fix is expected for the same in future updates to Winaero Tweaker.

- Taskbar Size: You can change your taskbar’s size using this option. Changing the size of your taskbar will also change the size of your taskbar icons. Additionally, on some systems, you might find that the taskbar overflow is not properly displayed on your screen. This is a known issue and a fix is expected in subsequent updates to the Winaero tweaker.

Click on ‘Restart explorer’ at the bottom of your screen, if prompted, after enabling any one of the options above.

Note: You could also be prompted to sign out and sign back in to your account depending on the changes you decide to make on your PC.
And that’s it! You will now have customized your Windows 11 taskbar using Winaero tweaker.
Should you use third-party utilities to customize the taskbar?
As long as the third-party utility is trusted and compatible with Windows 11, you should have no problems using a third-party utility to customize your taskbar. However, if a utility is developed for Windows 10 then we recommend you avoid using it until it has been verified to work on Windows 11. The new OS comes with additional background services and changes to the registry that could get messed up if using incompatible applications. This could break the functionality of DWM in Windows and introduce glitches that might force you to reset your PC. Hence we recommend you verify the functionality of the concerned utility before using it on your system.
We hope this guide helped you easily change the color of your taskbar in Windows 11. If you face any issues or have any questions for us, feel free to reach out using the comments section below.


