Seit Jahren wirbt Windows für seine Vielzahl neuer Funktionen und Verbesserungen und behauptet, dass sie nur einen Klick auf das Startmenü entfernt sind. Aber was ist, wenn sich das Startmenü nicht mehr für Sie öffnet? Nun, es kann vorkommen, dass das Startmenü unter Windows 11 plötzlich nicht mehr funktioniert, was die Ausführung regelmäßiger Aufgaben etwas anstrengend macht.
Wenn sich das Startmenü unter Windows 11 nicht für Sie öffnet, gibt es so viele Fixes, wie wir uns vorstellen können, um Ihnen bei der Lösung des Problems zu helfen .
Verwandte: So deinstallieren Sie Apps unter Windows 11
HINWEIS: Wenn die 17 (!) unten aufgeführten regulären Fixes für Sie fehlschlagen, versuchen Sie es mit Fix #18 unten im Abschnitt 'Last Resorts', in dem es um das Erstellen eines neuen Benutzers über die Befehlszeile geht . Dies hilft Ihnen, einen neuen Benutzer mit CMD zu erstellen, ohne auf die Einstellungen-App oder das Startmenü zugreifen zu müssen, die für Sie möglicherweise nicht funktionieren. Das heißt, Fix Nr. 1 zu dem durch 'Windows Update KB5004300' verursachten Problem ist eine neue Ergänzung, also überprüfen Sie dies vielleicht zuerst.
Inhalt
Wir haben insgesamt 20 (!) Fixes hinzugefügt, um das Problem mit dem Startmenü unter Windows 11 unten zu lösen. 3 davon sind allgemeine Fixes, die erst ausprobiert werden sollten, wenn Sie sicher sind, dass die 17 primären Fixes nicht hilfreich sind.
17 Primäre Fixes
Probieren Sie diese Fixes zuerst aus, bevor Sie die 3 allgemeinen Fixes (auch unten angegeben) ausprobieren.
Fix Nr. 1: Deinstallieren Sie das Windows Update KB5004300 und installieren Sie es erneut
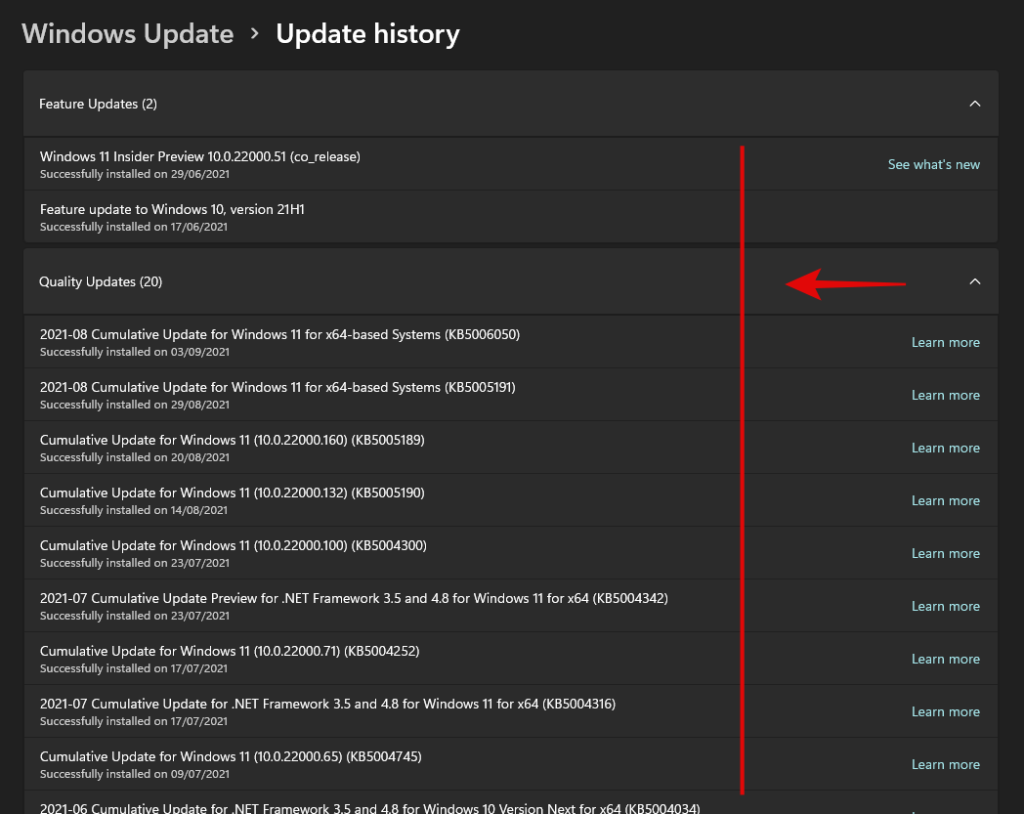
Ein kürzlich von Benutzern mit Adleraugen entdeckter Fix scheint das Startmenü bei neuen Windows 11-Upgrades leicht zu reparieren. Das unter dem Namen KB5004300 veröffentlichte Windows Update scheint dieses Problem zu verursachen. Das Deinstallieren und Neuinstallieren desselben auf Ihrem PC wird das Startmenü und die Taskleiste für Sie reparieren. Folgen Sie der Anleitung unten, um loszulegen.
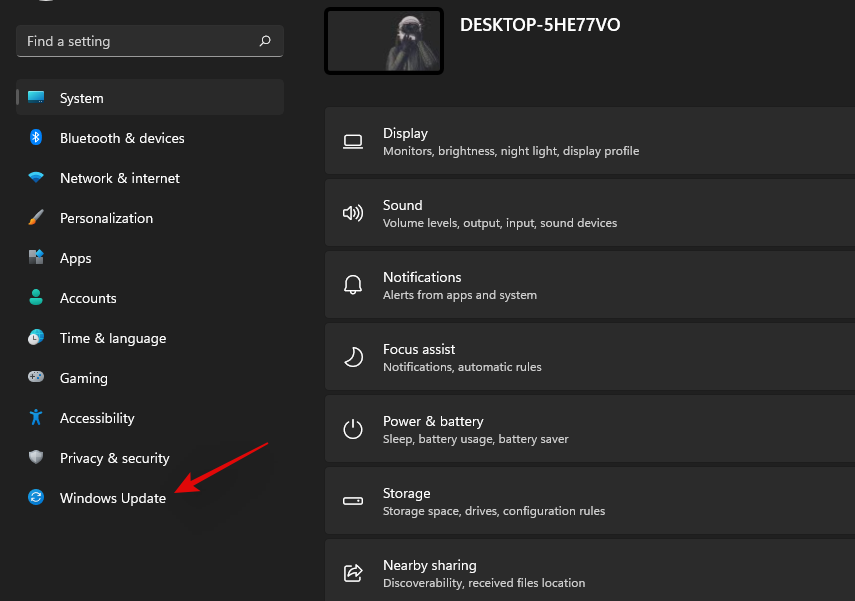
Drücken Sie Windows + iauf Ihrer Tastatur, um die App Einstellungen zu öffnen. Klicken Sie links auf „Windows Update“.
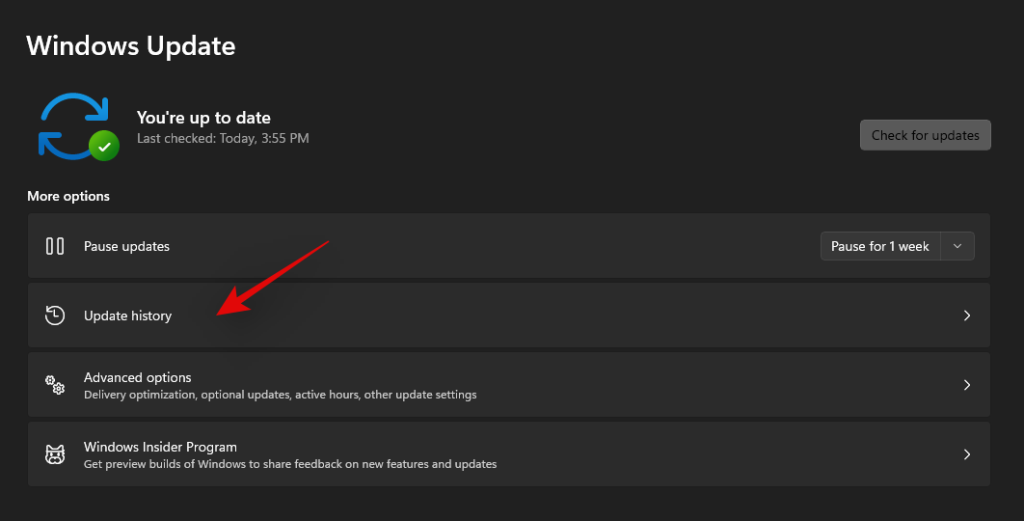
Klicken Sie nun auf „Verlauf aktualisieren“.
Klicken Sie auf „Updates deinstallieren“.
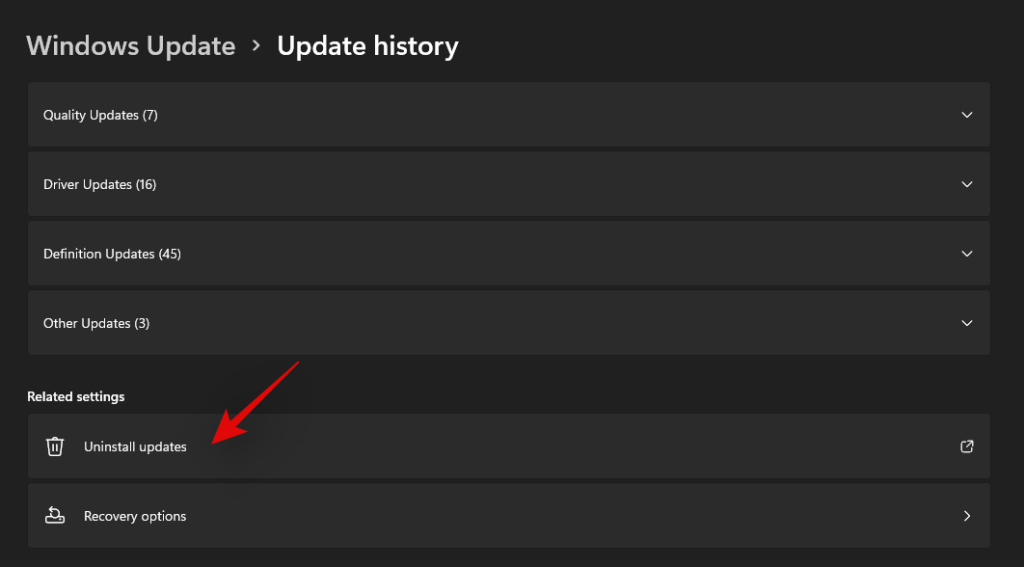
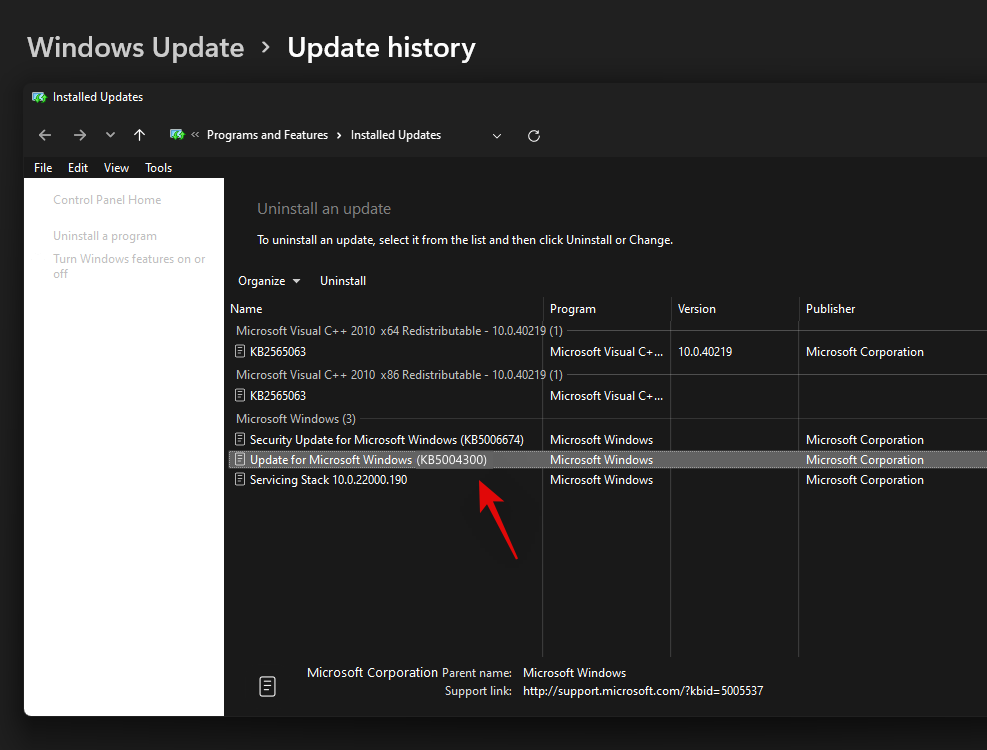
Sie werden nun zum Kontrollzentrum weitergeleitet. Suchen Sie das betreffende KB5004300-Update in der Liste, klicken Sie darauf und wählen Sie es aus.
Klicken Sie nun oben auf 'Deinstallieren'.
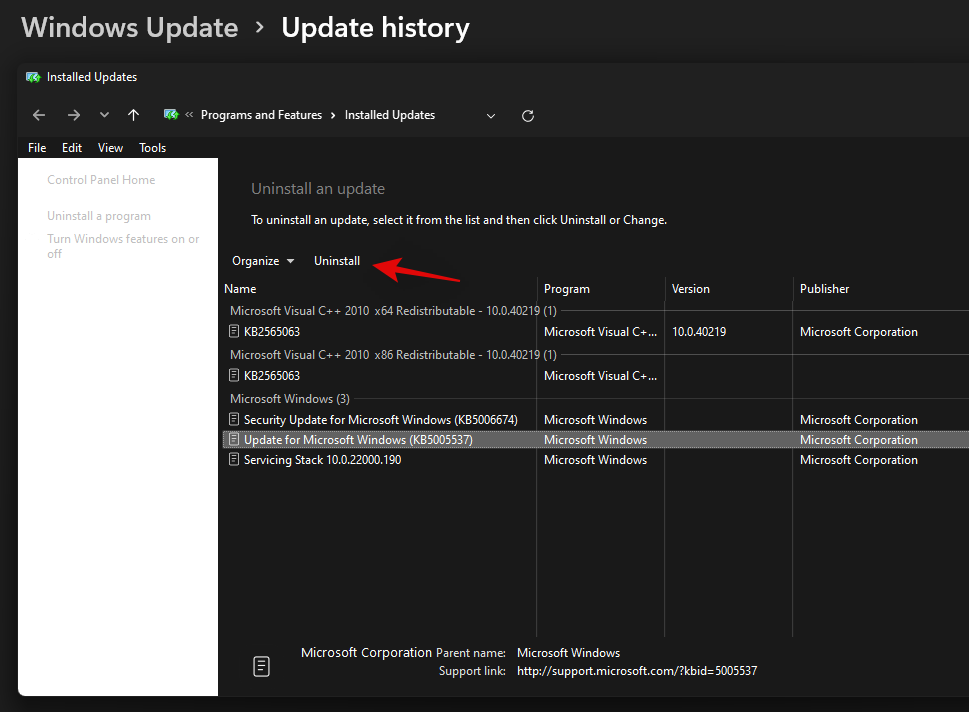
Befolgen Sie die Anweisungen auf dem Bildschirm, um das Update von Ihrem PC zu entfernen. Starten Sie Ihren PC nach der Aktualisierung zur Sicherheit neu.
Drücken Sie nun Windows + ierneut, sobald Ihr PC neu gestartet wurde, und wählen Sie erneut Windows Update.

Suchen Sie nach Updates und Sie sollten nun die Möglichkeit haben, Windows Update KB 5004300 erneut auf Ihrem PC zu installieren.
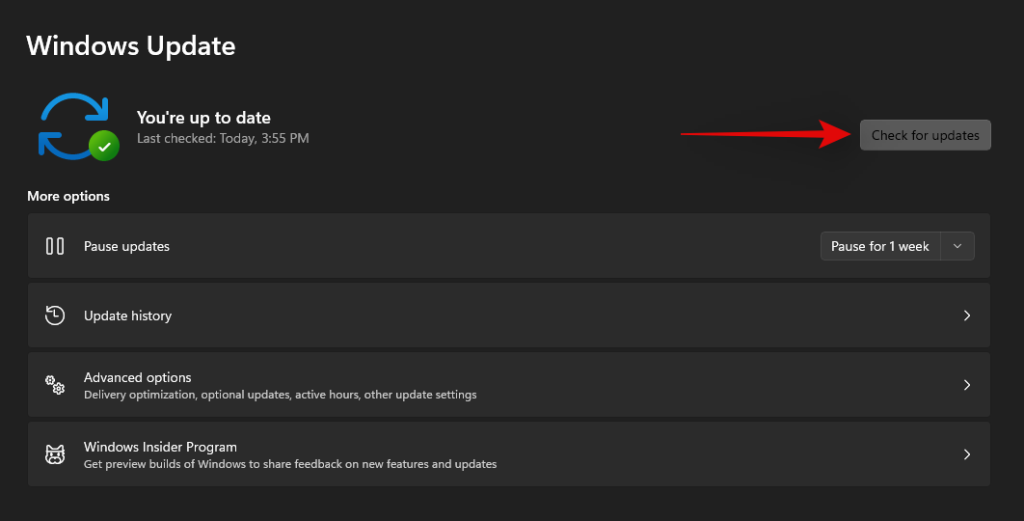
Laden Sie das Update herunter und installieren Sie es und die Funktionen von Taskleiste und Startmenü sollten jetzt in Windows 11 wiederhergestellt werden.
Fix Nr. 2: Neustart des Iris-Dienstes erzwingen
Ein aktuelles Update der Insider-Builds von Microsoft hat bei vielen Benutzern zu großen Problemen mit der Taskleiste und dem Startmenü geführt. Wenn auch Sie den Insider-Kanal abonniert haben und beim Update auf die Build-Nummer 22449 oder höher Probleme aufgetreten sind, können Sie den unten genannten Fix verwenden.
Diese Methode löscht den Registrierungswert für den Iris-Dienst, der bei einem Neustart eine Neuinstallation erzwingen sollte. Eine Neuinstallation scheint dieses Problem für die meisten Benutzer zu beheben. Auch wenn Sie nicht die gleichen Builds verwenden, ist dieser Fix einen Versuch wert. Folgen Sie der Anleitung unten, um loszulegen.
Hinweis: Dieser Befehl startet Ihren PC sofort neu. Wenn Sie im Hintergrund laufende Arbeiten ausführen, stellen Sie sicher, dass Sie diese speichern, bevor Sie mit diesem Handbuch fortfahren.
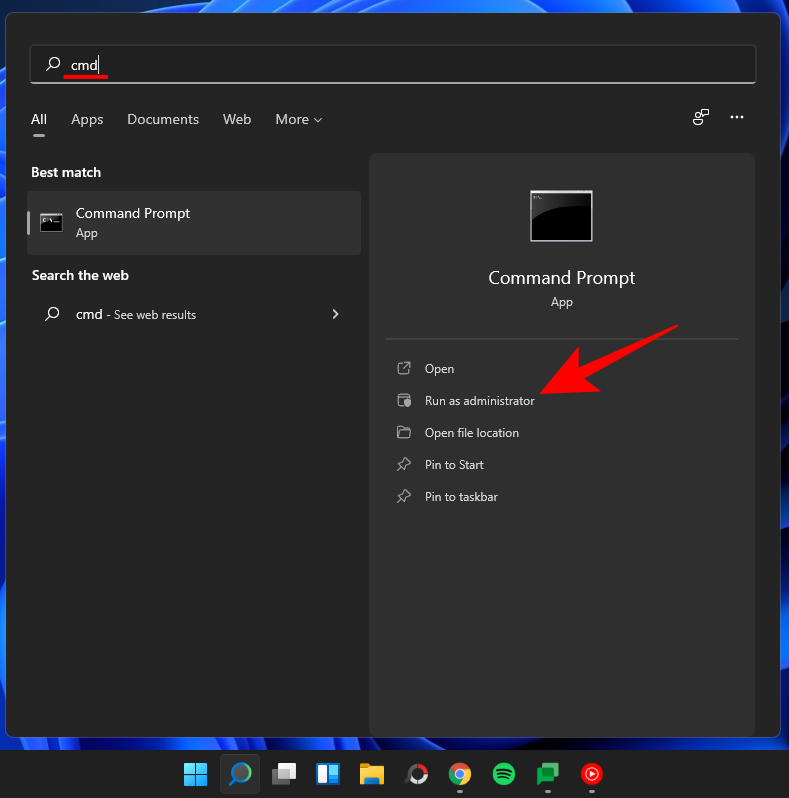
Drücken Sie Windows + S auf Ihrer Tastatur und suchen Sie nach CMD. Klicken Sie auf „Als Administrator ausführen“ oder drücken Sie Ctrl + Shift + Enter auf Ihrer Tastatur.
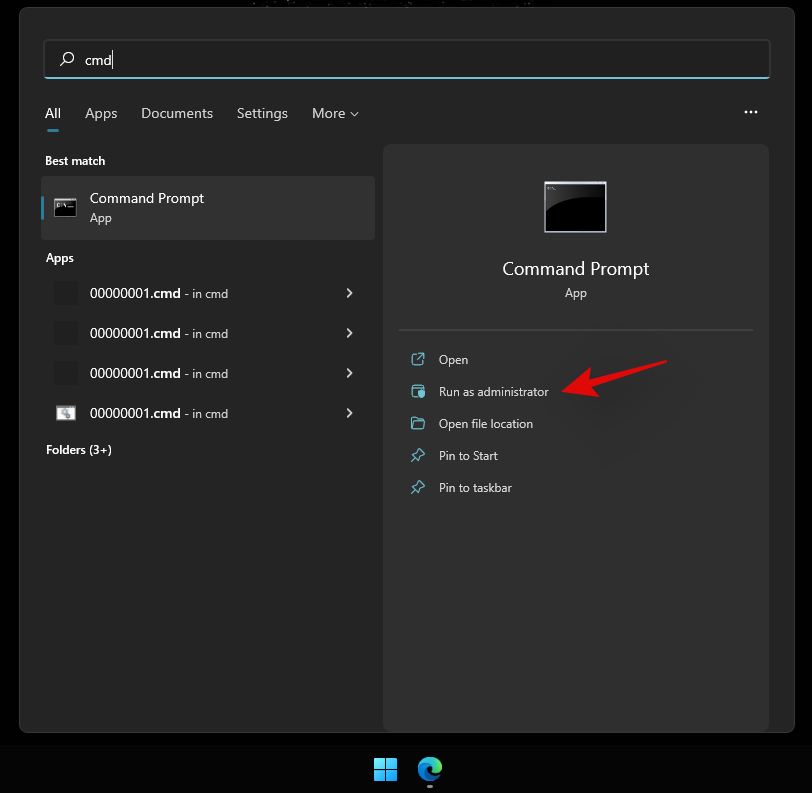
Geben Sie den folgenden Befehl ein und drücken Sie die Eingabetaste auf Ihrer Tastatur.
reg delete HKCU\SOFTWARE\Microsoft\Windows\CurrentVersion\IrisService /f && shutdown -r -t 0

Ihr PC wird jetzt neu gestartet. Melden Sie sich wie gewohnt an Ihrem PC an und die Startmenüfunktionalität sollte jetzt auf Ihrem System wiederhergestellt sein.
Fix #3: Starten Sie Ihren PC neu
Dies ist bei weitem die einfachste Methode, die Ihnen einfällt, wenn Sie versuchen, die meisten Probleme auf einem Windows 11-PC zu beheben. Normalerweise erzwingen Sie bei einem Systemneustart im Wesentlichen alle Prozesse, einschließlich Windows, alle ihre Dienste und Prozesse neu zu starten. Dadurch wird auch der Prozess des Startmenüs neu gestartet, der dazu beitragen soll, das Problem damit zu beheben.
Wenn es nicht offensichtlich ist, gehen Sie wie folgt vor, um Ihren PC neu zu starten.
Stellen Sie sicher, dass alle Ihre Apps und Dateien geschlossen sind. Oder gehen Sie einfach zum Desktop-Bildschirm, indem Sie Windows key + D zusammen drücken . Drücken Sie nun die Alt + F4 Tasten auf Ihrer Tastatur zusammen, um den Bildschirm „Windows herunterfahren“ zu erhalten.
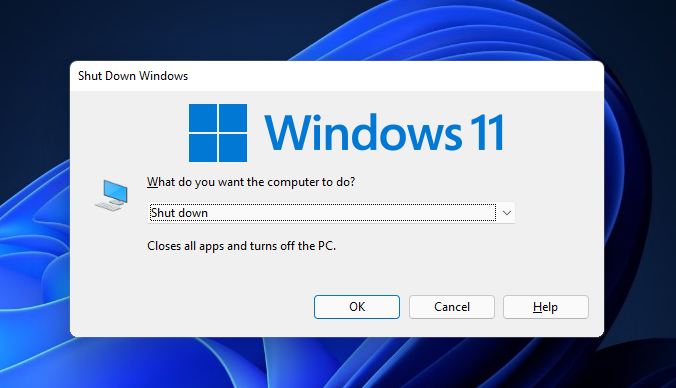
Klicken Sie auf das Dropdown-Menü, wählen Sie „Neustart“ und klicken Sie auf die Schaltfläche „OK“.
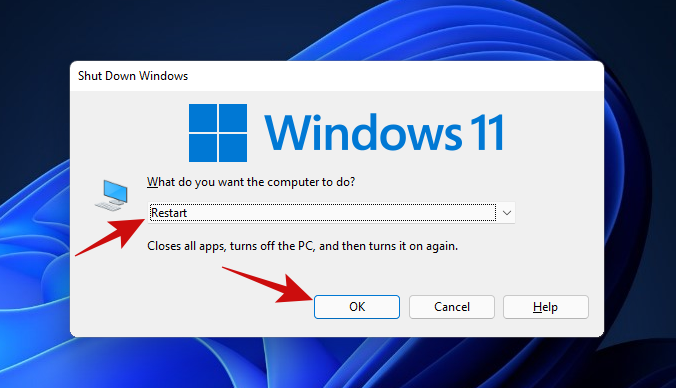
Sobald Ihr PC neu gestartet wurde, sollten Sie das Startmenü wieder verwenden können. Wenn dies immer noch nicht möglich ist, versuchen Sie die nächste Methode.
Fix Nr. 4: Starten Sie den Windows Explorer mit dem Task-Manager neu
Die nächste einfache Lösung für ein eingefrorenes Startmenü verwendet den Task-Manager. Der Task-Manager kann das perfekte Werkzeug sein, um jeden laufenden Prozess auf einem Windows-PC zu verwalten.
Wenn Ihr Startmenü nicht auf Ihre Klicks reagieren möchte, führen Sie die unten aufgeführten Schritte aus, um zu sehen, ob Ihr Problem dadurch behoben wird.
Drücken Sie die Ctrl + Shift + Esc Tasten, um den Task-Manager auszulösen. Wenn Ihr Task-Manager so aussieht, klicken Sie auf die Schaltfläche "Weitere Details", um auf die Detailansicht zuzugreifen.
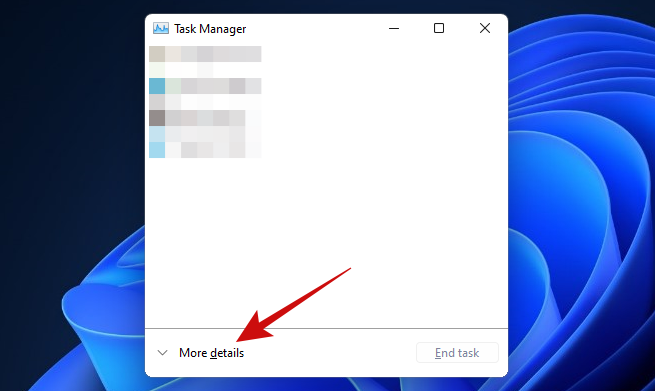
Scrollen Sie im Task-Manager durch die Liste der Prozesse, um den Prozess "Windows Explorer" zu finden. Klicken Sie mit der rechten Maustaste auf den Prozess und klicken Sie auf die Option 'Neustart'.
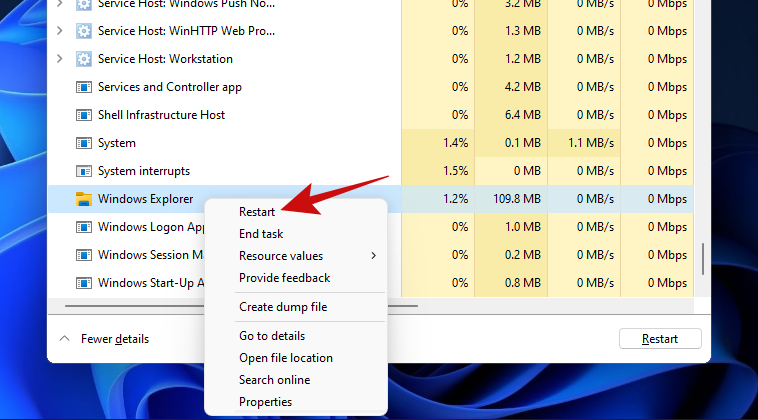
Sobald Sie darauf geklickt haben, sollte Windows den Windows Explorer-Prozess sofort neu starten, und das sollte Ihr Startmenü reparieren.
Der Neustart des Windows Explorer-Prozesses ist dem Neustart Ihres PCs ziemlich ähnlich. Der einzige Unterschied besteht darin, dass Sie hier nur einen einzelnen Prozess neu starten, während Sie bei einem Neustart alle Prozesse neu starten. Außerdem haben viele Leute in der Vergangenheit ihr Startmenü mit dieser Methode erfolgreich repariert, was einen Versuch wert ist.
Fix Nr. 5: Nach Updates für Windows suchen
Wenn Sie das Startmenü immer noch nicht öffnen können, sollten Sie Windows Update ausprobieren. Das Problem ist möglicherweise weiter verbreitet, als Sie denken, und Microsoft hat möglicherweise einen Hotfix veröffentlicht, um das nicht reagierende Startmenü zu patchen.
So können Sie das tun.
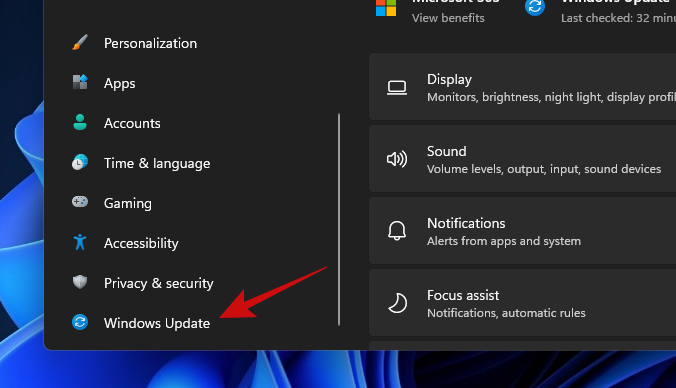
Öffnen Sie die Einstellungen-App mit Win key + i Tasten zusammen. Klicken Sie nach dem Öffnen auf die Option „Windows Update“.
Klicken Sie auf die große Schaltfläche "Nach Updates suchen", um mit der Suche nach verfügbaren Updates für Windows für Ihren PC zu beginnen. Falls verfügbar, lassen Sie Windows alle Updates installieren.
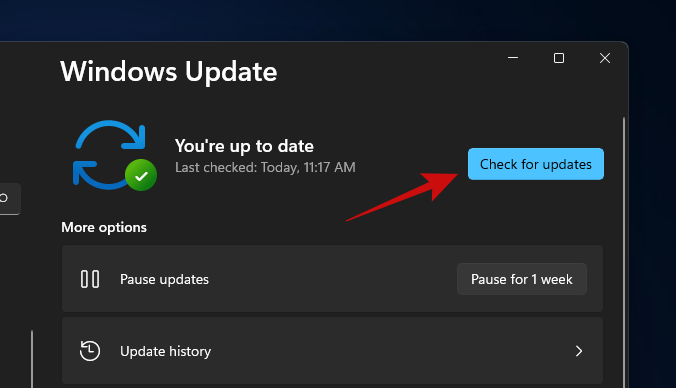
Wenn Windows mit der Aktualisierung Ihres PCs fertig ist, starten Sie es einfach neu und versuchen Sie, das Startmenü zu öffnen. Wenn Sie das Startmenü immer noch nicht öffnen können, ist es unserer Meinung nach an der Zeit, sich für die fortgeschritteneren Fehlerbehebungen zu entscheiden.
Fix #6: Führen Sie DISM und SFC aus
DISM (Deployment Image Servicing and Management) und SFC (System File Checker) sind zwei der wirksamsten Tools zum Identifizieren und Reparieren beschädigter Windows-Installationen. Diese Tools können entweder mit der Eingabeaufforderung oder mit Windows PowerShell verwendet werden. In diesem Handbuch verwenden wir sie mit der Eingabeaufforderung.
Beginnen wir mit DISM. DISM kann verwendet werden, um neue Kopien von beschädigten Windows-Dateien zu erhalten.
Drücken Sie Win key + r zum Öffnen des Feld Ausführen in cmd und drücken Sie dann Ctrl + Shift + Enter zusammen (statt enter) Prompt einer erhöhten Eingabe zu öffnen.
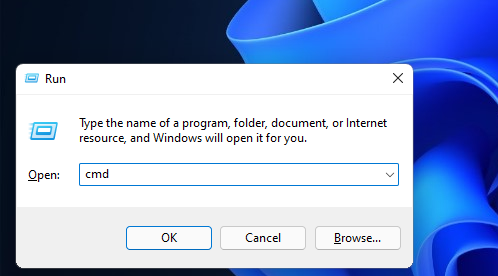
Sobald Sie sich in der Eingabeaufforderung befinden, fügen Sie den folgenden Code ein und drücken Sie die Eingabetaste.
DISM /Online /Cleanup-Image /RestoreHealth
DISM versucht nun, die beschädigten Dateien (sofern vorhanden) aus Ihrer aktuellen Installation wiederherzustellen, indem eine neue Kopie dieser Datei von Windows Update angefordert wird. Der gesamte Vorgang dauert etwa 15-20 Minuten. So sieht der Befehl in Aktion aus.
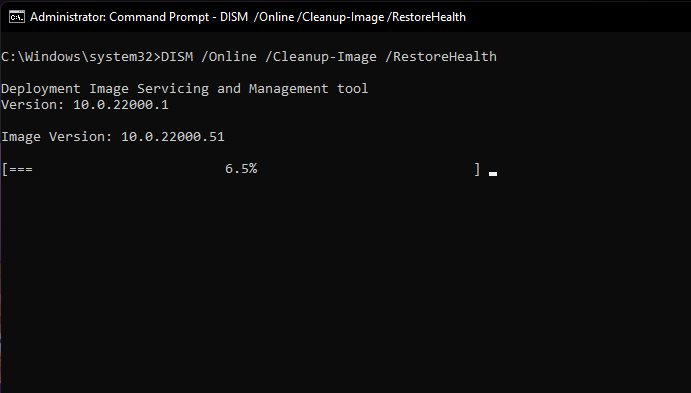
Sobald der Befehl alle beschädigten Dateien wiederhergestellt hat, sollten Sie so etwas sehen.
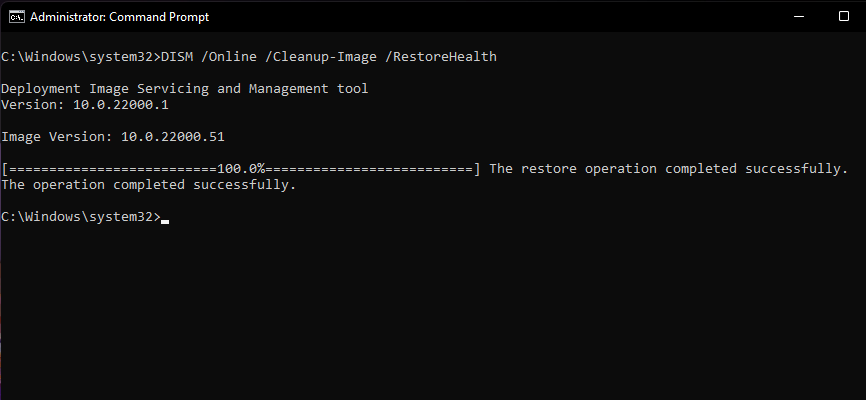
Wenn Sie mit diesem Schritt fertig sind, lassen Sie das Eingabeaufforderungsfenster geöffnet, um den nächsten Befehl auszuführen.
Der nächste Schritt besteht darin, die Integrität aller Ihrer Windows 11-Dateien zu überprüfen, um sicherzustellen, dass sie in gutem Zustand sind. Dazu verwenden wir das SFC-Tool.
Hier ist wie.
Fügen Sie den folgenden Code in das Eingabeaufforderungsfenster ein und drücken Sie die Eingabetaste.
sfc /scannow
So sieht der Befehl aus.
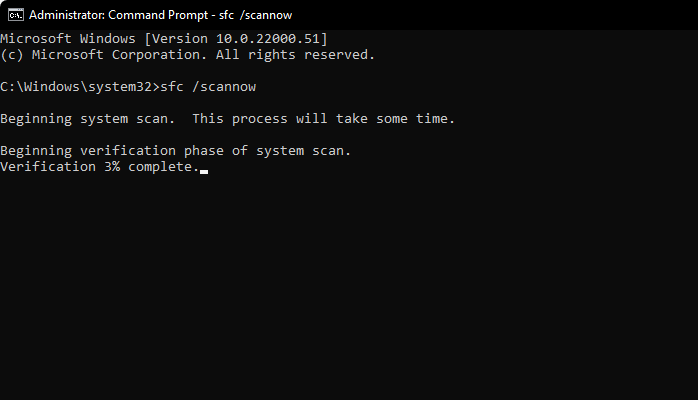
Der obige Befehl dauert nur ein paar Minuten, um die Überprüfung der Integrität Ihrer Windows-Dateien abzuschließen. Sobald dies erledigt ist, sollte das Ergebnis so aussehen.
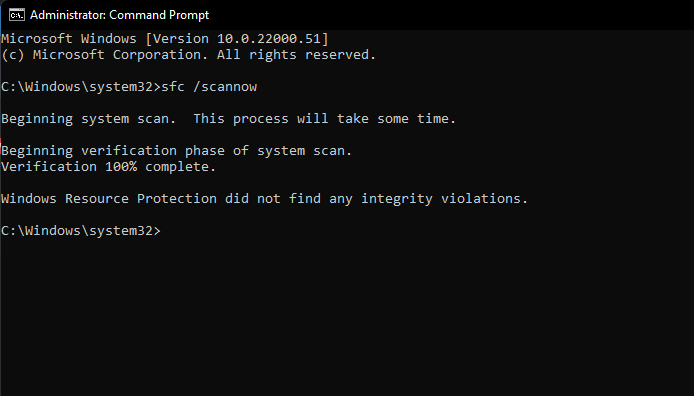
Tipp: Stellen Sie sicher, dass Ihr PC über eine stabile Internetverbindung verfügt, damit diese Methode funktioniert.
Es ist jetzt Zeit für einen Neustart.
Immer noch mit einem kaputten Startmenü stecken, ist es an der Zeit, die nächste Methode auszuprobieren.
Verwandte: 6 Möglichkeiten zum Aktualisieren von Treibern unter Windows 11
Fix #7: Suchindex neu erstellen
Das Startmenü und die Windows-Suche sind eng integriert. Möglicherweise haben sich Probleme mit der Suche und Indexierung in das Startmenü eingeschlichen und es beeinflusst. Schließen wir also auch diese Möglichkeit aus.
Werfen wir einen Blick auf die Schritte dazu.
Öffnen Sie das Feld Ausführen, indem Sie drücken Win key + r. Fügen Sie dann den folgenden Text in das Feld Ausführen ein und drücken Sie die Eingabetaste.
control /name Microsoft.IndexingOptions
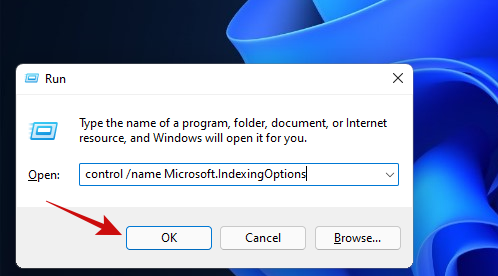
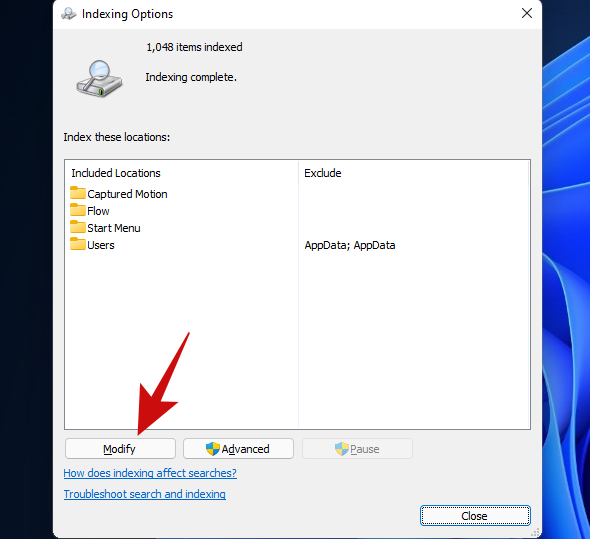
Sie sollten ein Popup mit dem Titel "Indizierungsoptionen" sehen. Klicken Sie auf die Schaltfläche 'Ändern'.
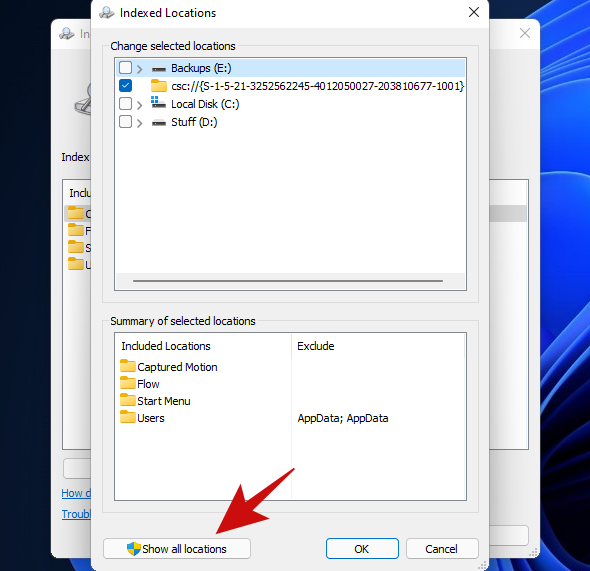
Klicken Sie auf die Schaltfläche 'Alle Standorte anzeigen'.
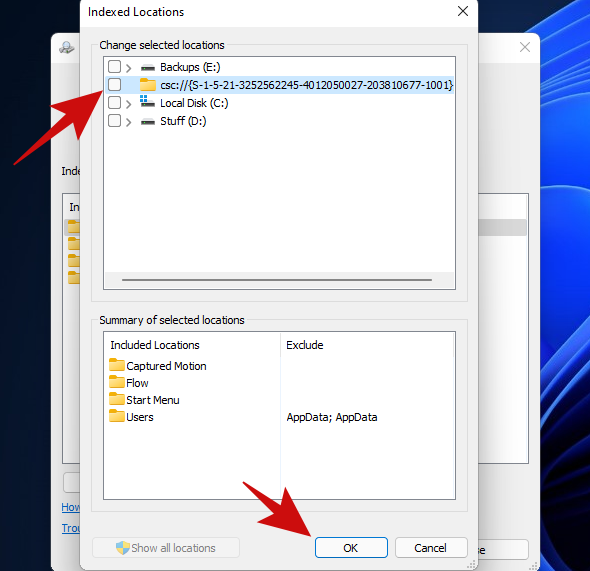
Deaktivieren Sie auf diesem Bildschirm alle Standorte und klicken Sie auf die Schaltfläche „OK“. Bei uns war nur ein Ort angekreuzt, daher haben wir nur einen Ort auf dieser Liste deaktiviert.
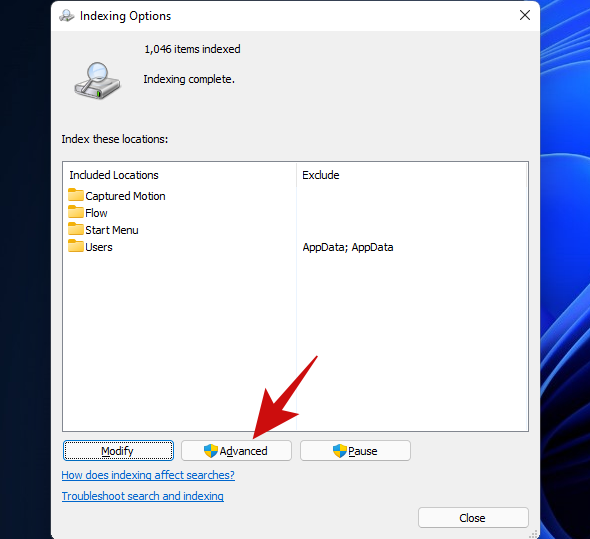
Klicken Sie auf die Schaltfläche 'Erweitert'.
Klicken Sie auf die Schaltfläche 'Neu erstellen'.
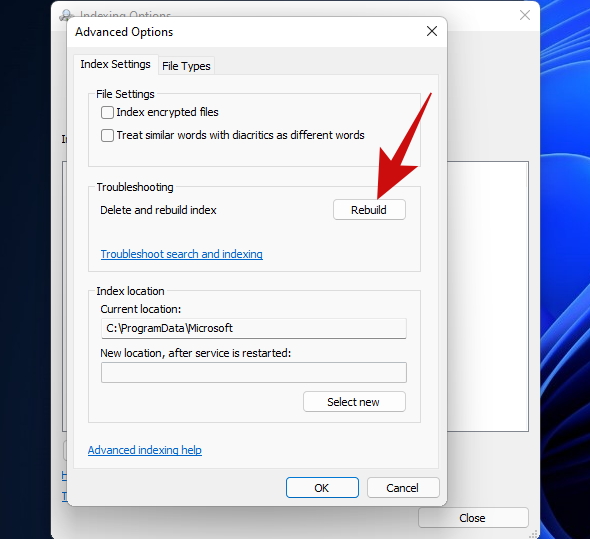
Windows beginnt nun mit der Neuerstellung des Suchindex. Seien Sie versichert, der gesamte Vorgang wird jetzt von Windows abgewickelt und erfordert keine Benutzereingaben, obwohl er einige Zeit in Anspruch nimmt.
Wenn Windows Ihren Suchindex neu erstellt hat, starten Sie Ihren PC neu. Wenn Sie sich wieder in Windows befinden, versuchen Sie, das Startmenü zu öffnen. Wenn es immer noch nicht funktioniert, ist es unserer Meinung nach an der Zeit, sich für eine widerstandsfähigere Methode zu entscheiden.
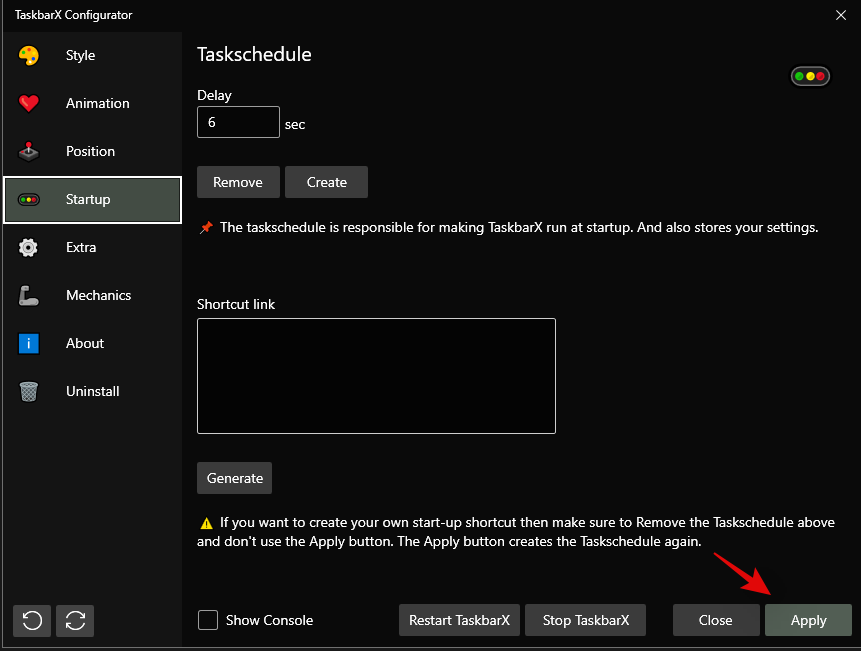
If you have installed any third-party programs to modify the look or functions of your start menu then we recommend removing all such programs. Likely, one of these programs is not compatible with the new Windows 11 start menu which is why you are facing issues with your system. If you have one of the following apps mentioned below, then we recommend you revert their settings and uninstall them as soon as possible. Most of these apps were designed for Windows 10 and are incompatible with the Windows 11 Start menu code to a certain extent. A recent Windows 11 update likely broke their compatibility causing the start menu to glitch out on your system.
- Open Shell
- Classic Start
- WinAero Tasbar
- TaskbarX
And more. If removing a third-party app that modifies your start menu helps restore its functionality then you can wait for a compatible update to use the app again.
Did you use a registry hack to get the older Windows 10 start menu on Windows 11? If so then it is likely that this registry hack’s functionality broke with a recent Windows 11 update. In such cases, you can use the guide below to revert the changes on your system.
Press Windows + R on your keyboard and type in the following in the Run dialog box.
regedit

Press Enter on your keyboard once you are done to launch the registry editor. You can also click on ‘Ok’ instead.
Now copy and paste the address given below in the address bar at the top of the registry editor and press ‘Enter’ on your keyboard.
Computer\HKEY_CURRENT_USER\Software\Microsoft\Windows\CurrentVersion\Explorer\Advanced
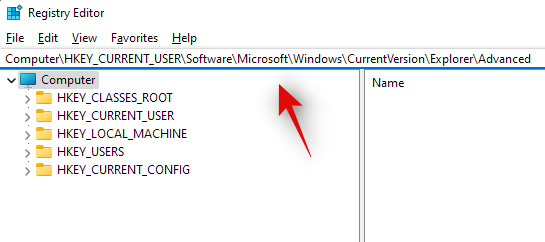
Look for ‘Show_StartClassicMode’ on your right and right-click on it.

Select ‘Modify’.

Change its value data to ‘0’ and click on ‘Ok’. Do not close the registry editor just yet.

Press Ctrl + Shift + Esc on your keyboard to launch the Task Manager. Now click and switch to the ‘Details’ tab at the top.
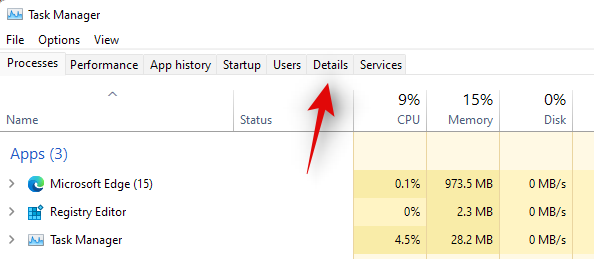
Click and select Explorrer.exe from the list and press Delete on your keyboard.

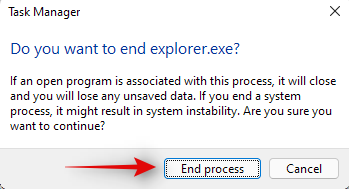
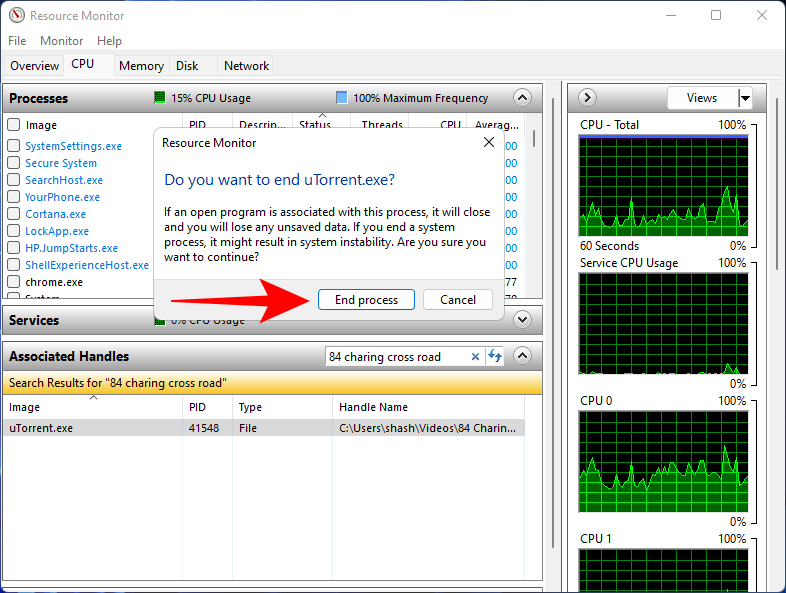
Confirm your choice by clicking on ‘End Process’.
Now click on ‘File’ in the top left corner and select ‘Run new task’.
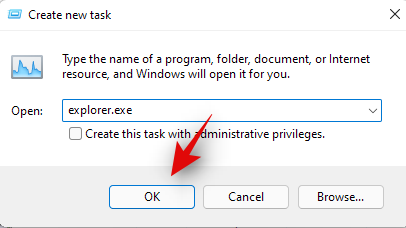
Type in ‘Explorer.exe’ and press Enter on your keyboard. You can also click on ‘Ok’ instead.
Explorer will now be restarted on your system. Switch back to the registry editor and click and select ‘Start_ShowClassicMode’.
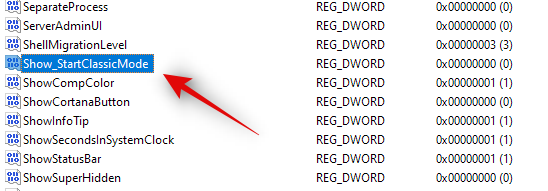
Press Delete on your keyboard and confirm your choice to delete the registry value.

Restart your system for good measure now.
If your Start menu wasn’t working due to a registry hack to get the older start menu then it should be fixed by now. You can check for the same by clicking on the Start menu icon in your taskbar.
Windows 11 has come a long way when compared to its predecessors. Background processes, tasks, and apps are more streamlined now and various features and elements seem to have their own dedicated packages. These dedicated packages make it easier for you to troubleshoot problems with certain features of Windows and even reinstall them in worst-case scenarios. If the start menu is still not working for you then you can reinstall basic elements of Windows 11 which will also reinstall the Start menu module on your system. This should help fix any background conflicts and get the Start menu back up and running on your system. Follow the guide below to get you started.
Press Windows + S on your keyboard and search for PowerShell. Click on ‘Run as administrator’ once the app shows up in your search results.
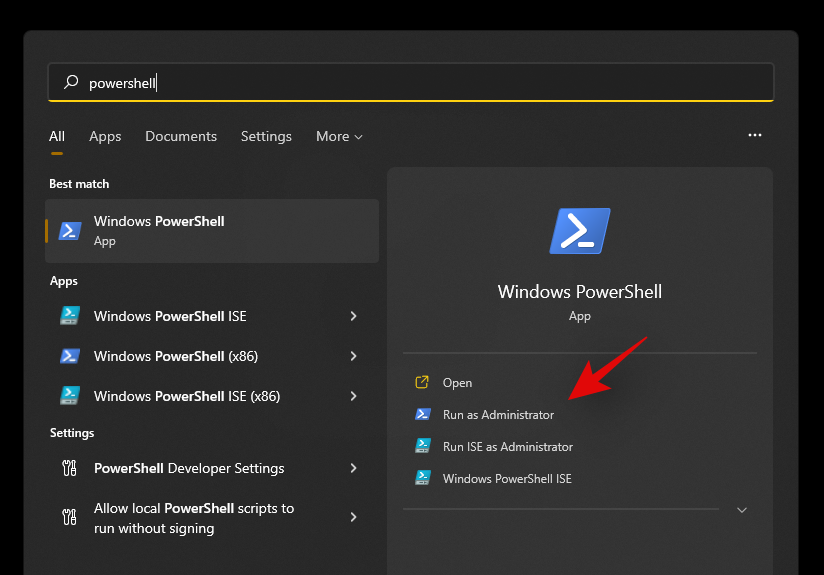
Now type in the following command and press ‘Enter’ on your keyboard.
Get-appxpackage -all *shellexperience* -packagetype bundle |% {add-appxpackage -register -disabledevelopmentmode ($_.installlocation + “\appxmetadata\appxbundlemanifest.xml”)}

Ignore any warnings that you get and continue with the process. Once complete, restart your system for good measure.
Now that the Start menu and other basic features have been reinstalled on your system, let’s rebuild your system’s index to get everything back up and running again. Press Windows + R on your keyboard to open the Run dialog box.
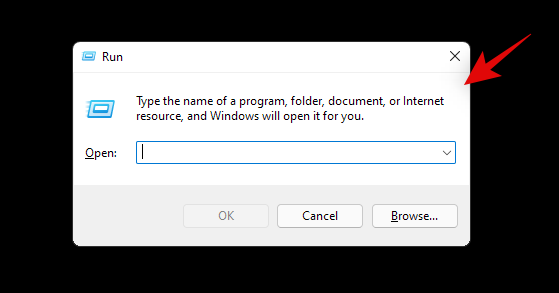
Type in the following command and press Enter on your keyboard.
control /name Microsoft.IndexingOptions
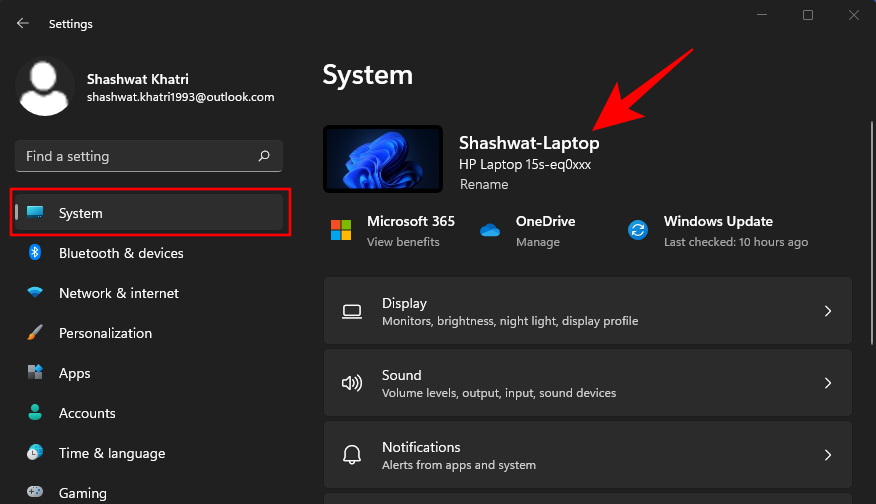
Click on ‘Modify’ and select ‘Show all locations’.
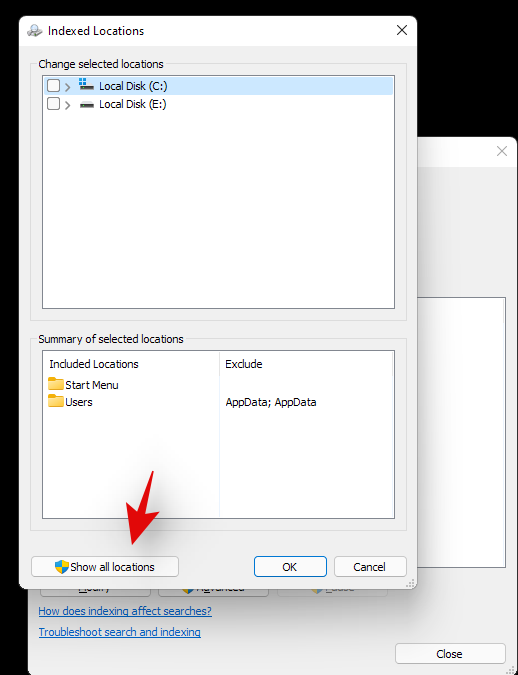
Uncheck all the boxes in the current list.
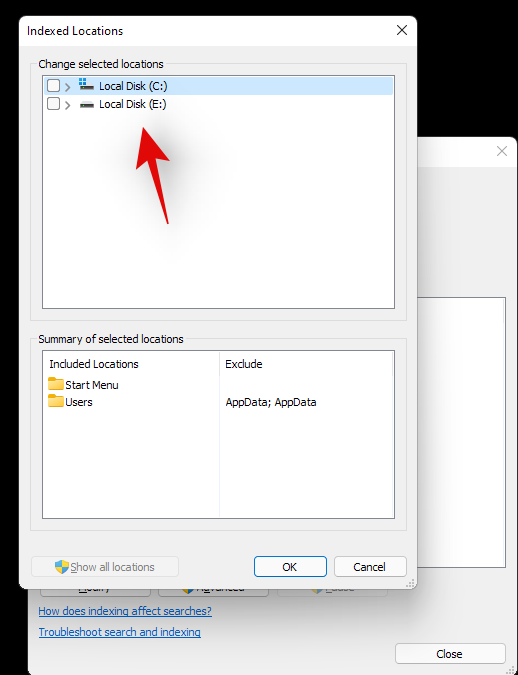
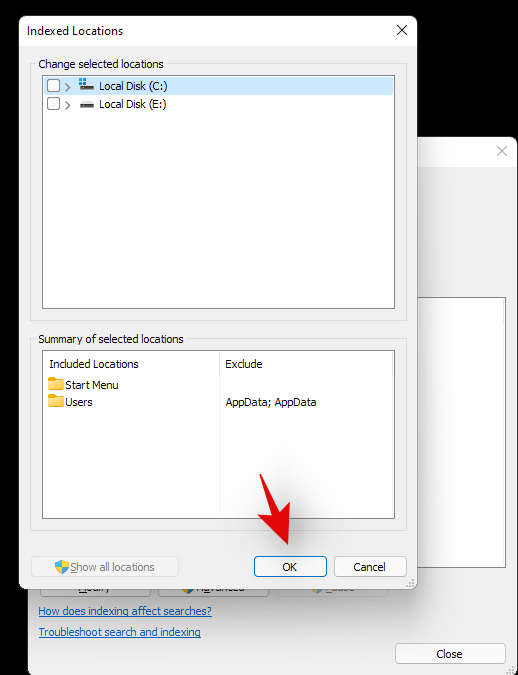
Click on ‘Ok’.
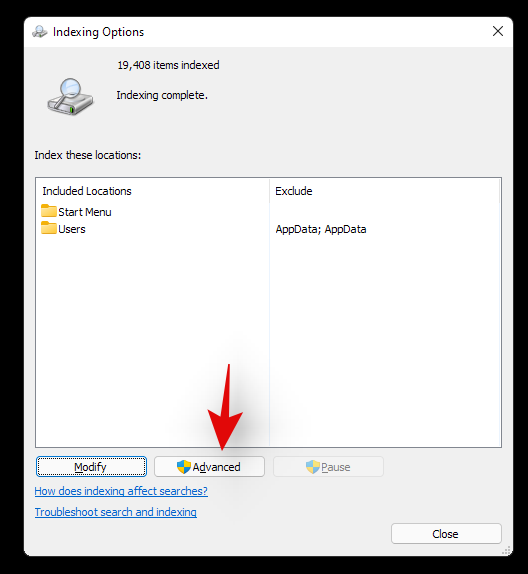
Click on ‘Advanced’ now.
Select ‘Rebuild’ under troubleshooting.
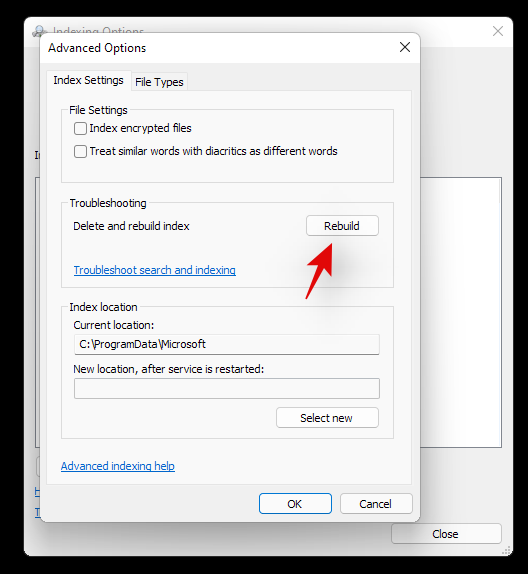
Click on ‘Ok’ once the warning pops up on your screen.
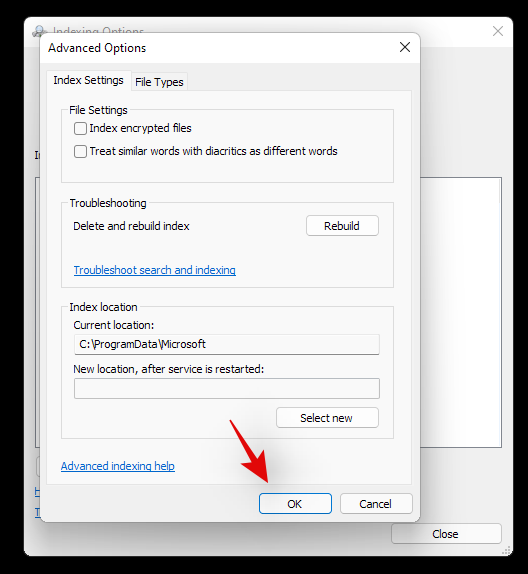
Once the process finishes, we highly recommend you restart your system.
You can now try clicking on the Start icon once your system restarts. Reinstalling the Start menu should help fix any issues with the Start menu on most systems.
Fix #11: Install any pending driver and Windows updates
This might be a bit obvious but you should definitely install any pending driver updates or Windows update on your system. This will help get you up and running on the latest drivers and help your system be compatible with all the hardware installed on your system. While drivers rarely cause issues with Windows features, you can never be too sure. Hence we recommend you install the latest available drivers on your system. You can use the link below to go to our detailed guide for updating drivers on Windows 11. If you are using a pre-built system or a laptop, then we recommend checking your OEM support page for dedicated driver updates as well.
There is a registry value that if modified, can disable your Start menu altogether. If you have been using registry modifiers, cleaners, and more, then it is likely that this registry value was modified which ended up disabling the Start menu on your system. Additionally, the Start menu’s functionality was moved to a Xaml process once Windows 10 was released. This process is known to glitch out
Use the guide below to check if the start menu is disabled on your system and re-enable it if needed.
Press Windows + R on your keyboard and type in the following command given below.
regedit
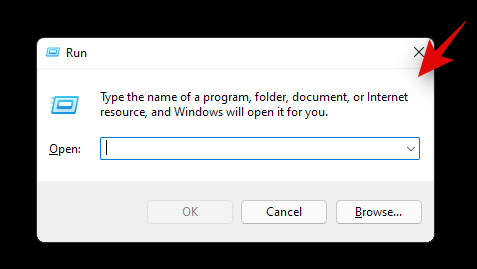
Now press Enter on your keyboard or click on ‘Ok’.
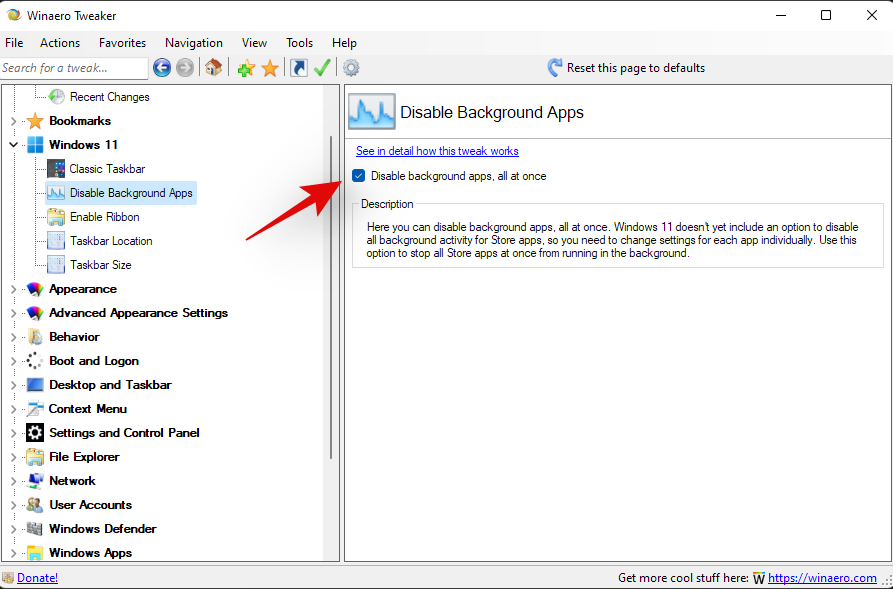
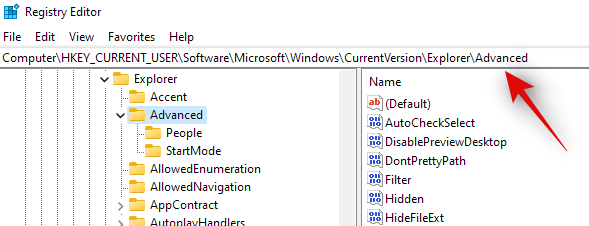
Copy and paste the following address in the address bar at the top of your registry editor.
HKEY_CURRENT_USER\Software\Microsoft\Windows\CurrentVersion\Explorer\Advanced
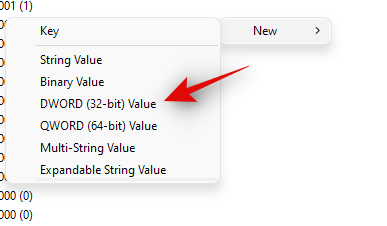
Now right-click on your right tab and select ‘New’.
Select ‘DWORD (32-bit value)’.
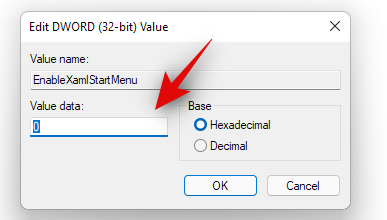
Enter the name as ‘EnableXamlStartMenu’.
Enter the value as ‘0’.
Restart your PC now.
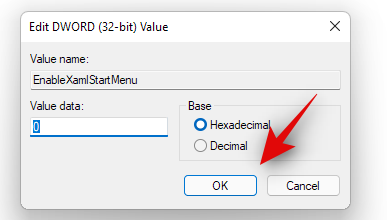
Once restarted try activating the Start menu now. If the Xaml process was facing conflicts, then they should be fixed now and the Start menu should be back up and running on your system again.
Fix #13: Restart Windows background services
If the Start menu still fails to launch then it’s time to restart all background Windows services. Usually restarting the ‘ShellExperienceHost.exe’ is enough but if that does not work for you, you can try restarting all the services listed below. This usually gets the Start menu back up and running on most systems.
Press Ctrl + Shift + Esc on your keyboard to open the ‘Task Manager’. Now click on ‘Details’ at the top to switch to the Details tab.
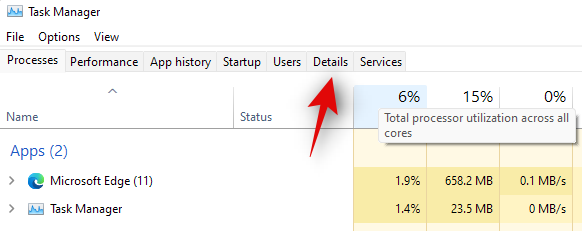
Find ‘StartMenuExperienceHost.exe’ in the list and click and select it.

Press Delete on your keyboard or click on ‘End Task’ in the bottom right corner. Click on ‘End Process’ again to confirm your choice.
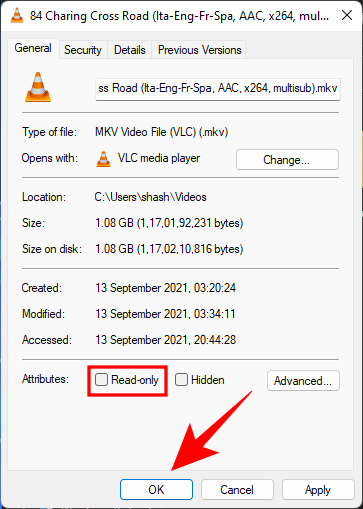
ShellExperienceHost.exe will now be killed. The process should automatically restart within a few seconds. Once restarted, try activating the Start menu on your system. If the menu starts working then you are good to go. However, if it is still not working then use the guide above to restart the following services on your system as well.
- SearchIndexer.exe
- SearchHost.exe
- RuntimeBroker.exe
And that’s it! If a background process was stopping you from accessing the Start menu then the issue should be fixed for you by now.
Fix #14: Run a Windows Troubleshooter
During a Windows 1909 feature update back in 2019, the Start menu was essentially broken due to a background conflict. To fix this issue for the masses, a troubleshooter was released by Microsoft to help fix this issue. If the Start menu is still not working for you then you can try running this troubleshooter on your system. Use the guide below to download and run the troubleshooter on your system.
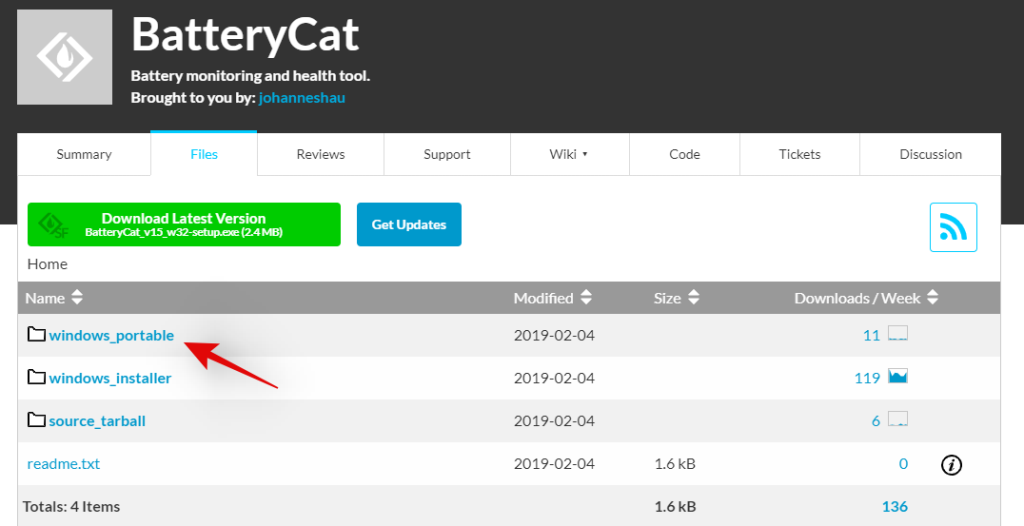
Download the archive linked above to a convenient location on your local storage and extract its contents.
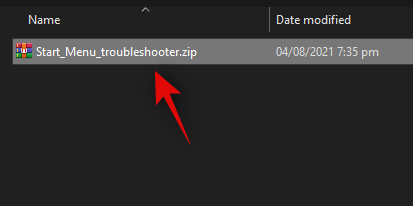
Now copy and paste the ‘startmenu.diagcab’ file on your desktop.

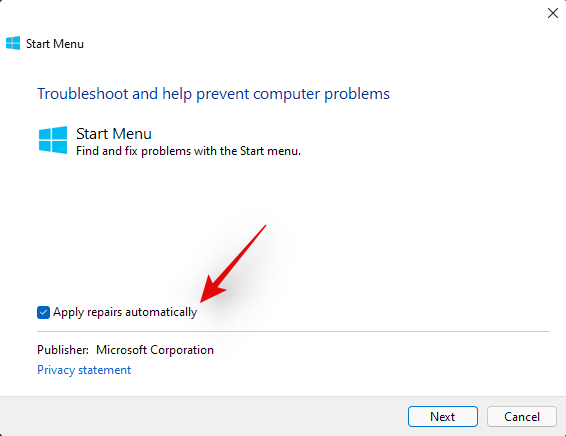
Double click and run the file from your desktop. Click on ‘Advanced’.
Check the box for ‘Apply repairs automatically’. Click on ‘Next’ once you are done.
The troubleshooter will now do its thing and try to fix the Start menu on your system. Any errors or issues found will be automatically fixed and the Start menu’s functionality should now be restored on your system.
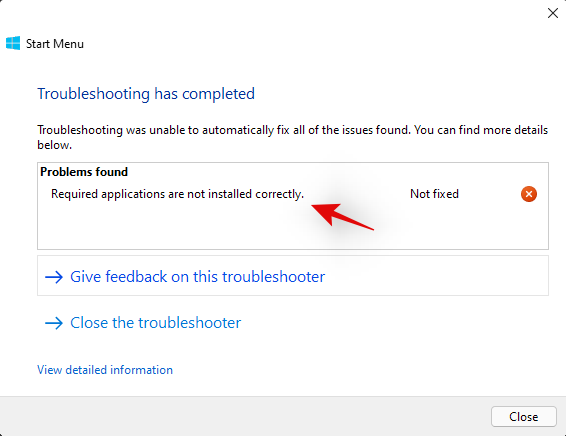
However, if the troubleshooter fails to fix the Start menu then this might indicate a more serious issue on your system. In such cases, let’s verify if Windows is actually able to access and initiate the process for the Start menu on your system. Use the checks below to help you along with the process.
We now need to check if the Start menu is actually available within your install of Windows 11. Let’s create a new local account that will help you verify its functionality. If the Start menu is working in the new account then it is likely an issue with your current user account.
Press Windows + i on your keyboard and click on ‘Accounts’ on your left.
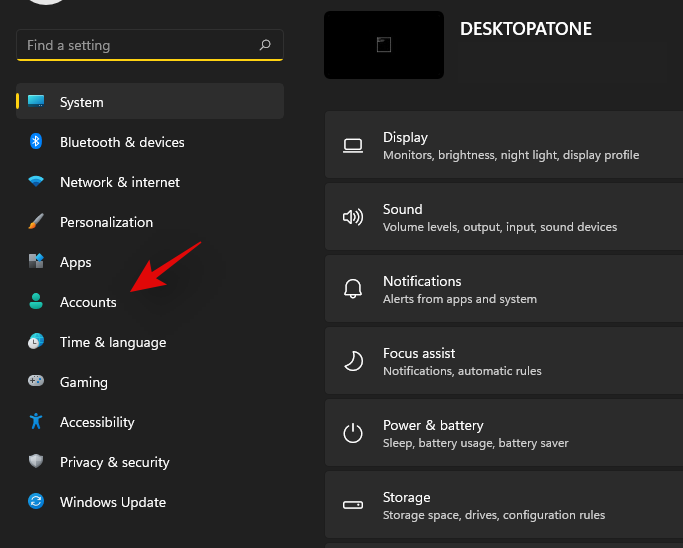
Click on ‘Family & other users’.
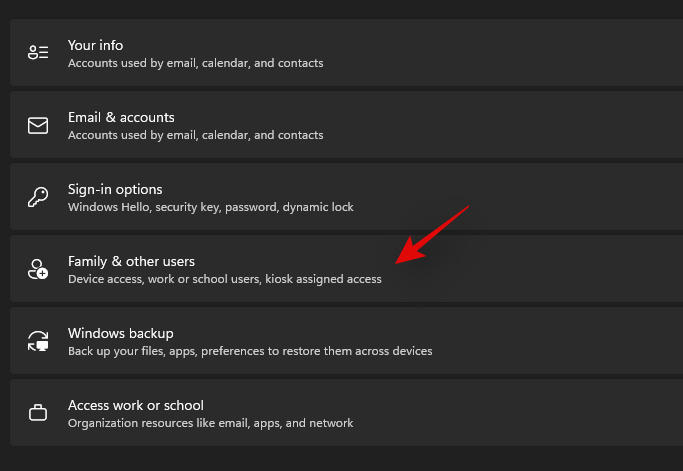
Now click on ‘Add account’ under other users.

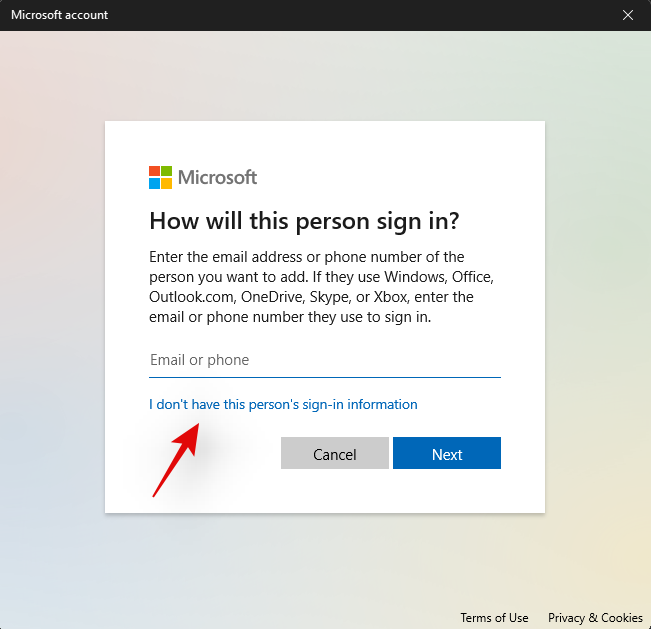
Click on ‘I don’t have this person’s sign-in information’.
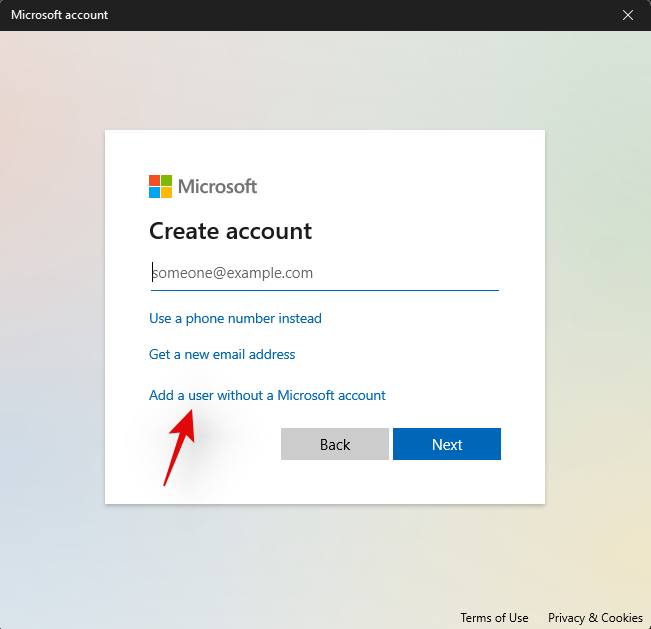
Click on ‘Add a user without a Microsoft Account’.
Now enter a username for the new account, and a password if needed.
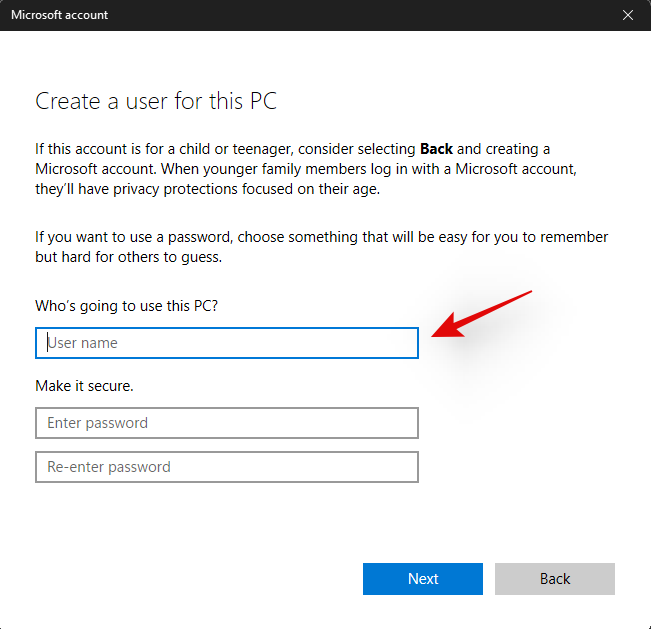
Click on ‘Next’ once you are done.
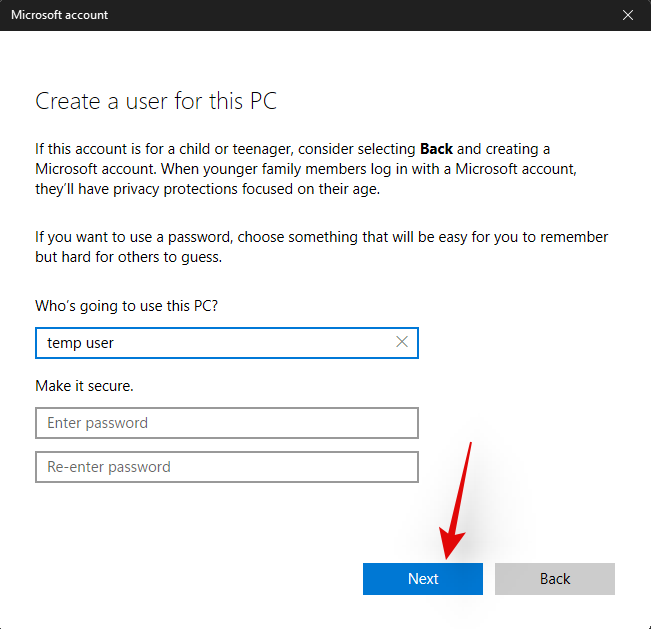
The new user account will now be created. Sign out of your current account and sign in to the new account.
Try to activate the Start menu now in the new temporary local account. If it is working then this is an issue specific to your user account. However, in case the Start menu fails to open, then this might indicate a more serious issue with your Windows 11 installation.
It’s now time to check if the Start menu is working in Safe mode. In case it is, then a third-party app is likely interfering with the Start menu’s functionality. You can remove any third-party apps used to modify the Start menu to try and fix this issue. Follow the guide below to activate Safe mode on Windows 11.
Press Windows + i on your keyboard and select ‘Windows Update’.
Now click on ‘Advanced options’.
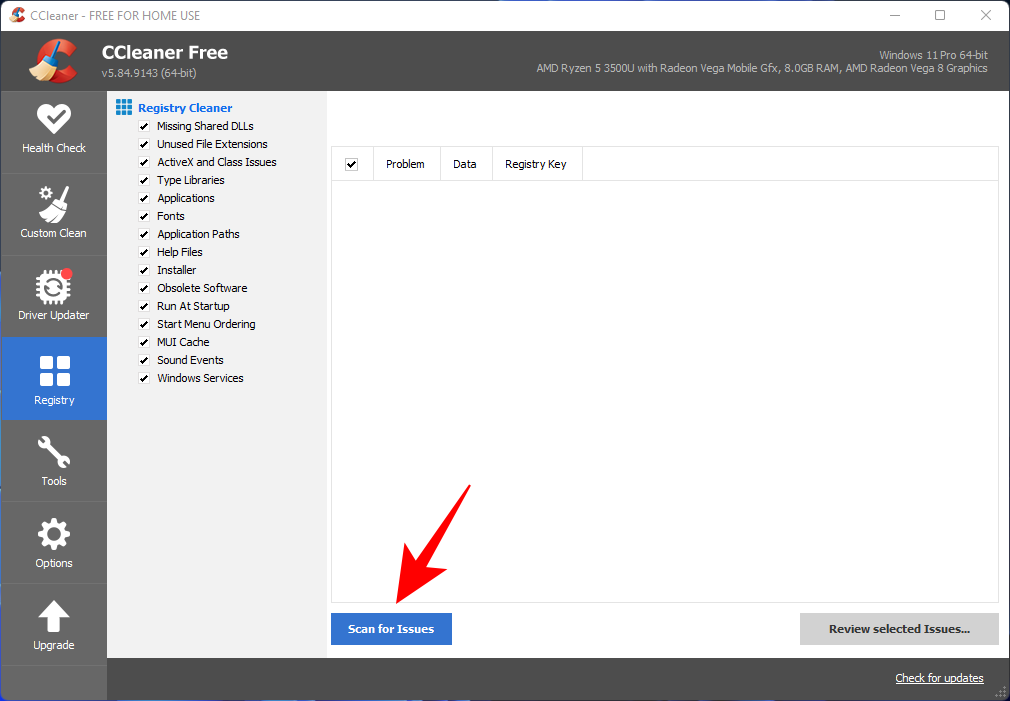
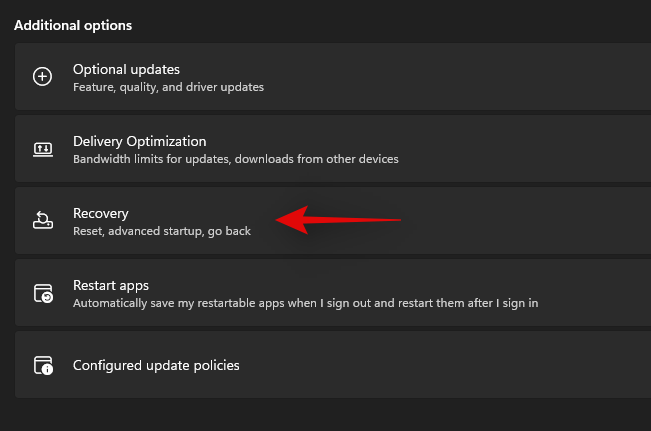
Click and select ‘Recovery’.
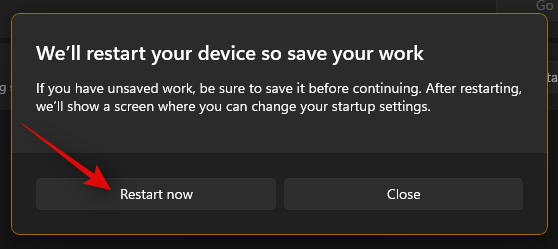
Now click on ‘Restart now’ beside ‘Advanced startup’.

Click on ‘Restart now’ again.
Your PC will now restart to the recovery screen. Click and select ‘Troubleshoot’.
Now click on ‘Advanced options’.
Click on ‘Startup Settings’.
Press ‘F4’ to start your PC in safe mode now.
Once your PC restarts, the safe mode should be active on your system. Now try to activate the start menu. If the menu activates, then it is likely that a third-party app is causing issues on your Windows 11 system. You can try removing apps used to customize the Start menu one by one to find the culprit on your system.
Fix #17: Run a malware and antivirus scan
We recommend you try and run a malware scan before opting for the last resort. If any malware or malicious service is causing issues with the Start menu, then a scan will help solve these issues. Use the guide below to run a malware scan through Windows Defender.
Press Windows + S on your keyboard and search for ‘Windows Security’. Click and launch the app once it shows up in your search results.

Click on ‘Virus & threat protection’.
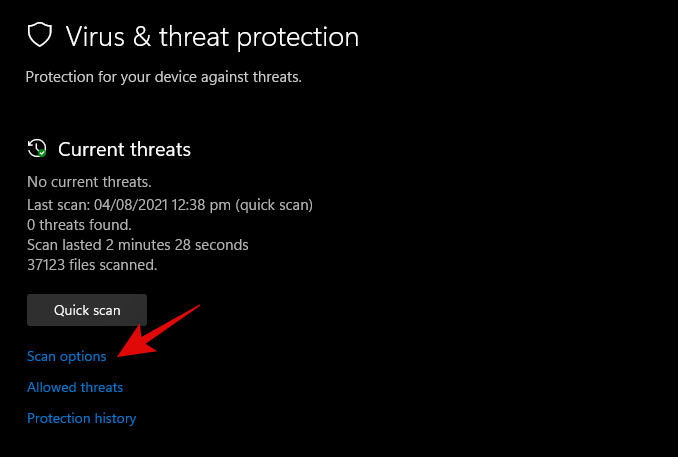
Click on ‘Scan options’.
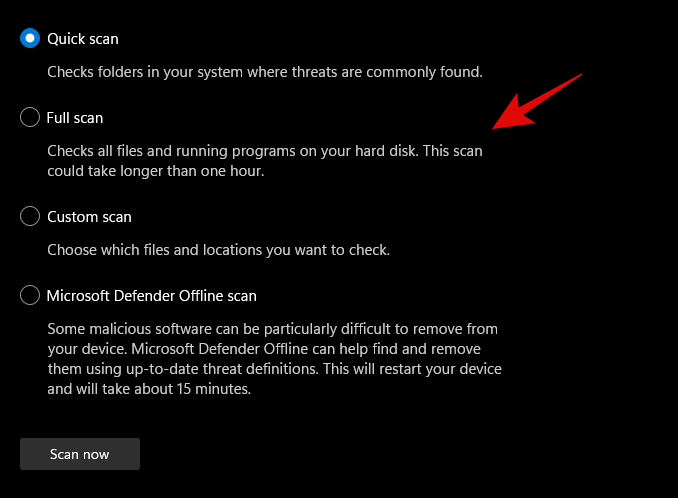
Select ‘Full Scan’.
Finally, click on ‘Scan now’.
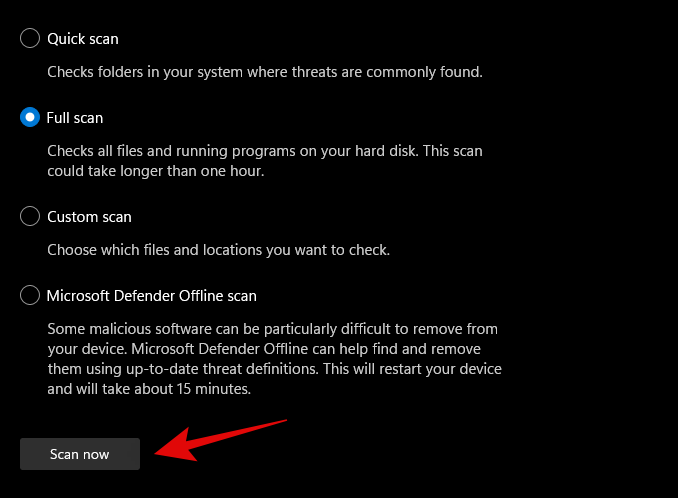
Windows Defender will now scan your entire PC for malware and malicious software. In case any are found, they will be automatically quarantined, and you will be prompted to take the necessary action as soon as possible.
3 General Fixes: Last Resort options
Fix #18: Create a new user via command prompt
If you’re facing an issue where you’re unable to add a local account via Settings to your PC then you can use the command prompt (CMD) for the same. Once added you can try and check if the Start menu is working for you. If it is, you can try the fixes below to restore it in your original account. However, if none of the fixes work for you then you can use the newly created account instead. The new account will be created with administrator privileges so you shouldn’t have problems moving your files and Settings. More on this below.
Press Windows + R to bring up the Run dialog box and type in the following. Press Ctrl + Shift + Enter on your keyboard once you are done.
cmd
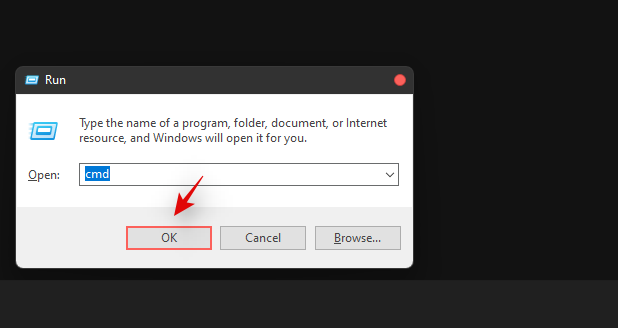
Type in the following command and press Enter on your keyboard. Replace ‘USER’ with your desired username for the new account. Similarly, replace ‘PASSWORD’ with your desired password.
net user /add USER PASSWORD
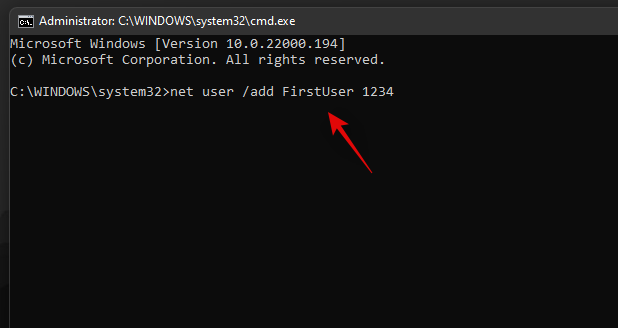
Now execute the following command as well and use the same username as above.
net localgroup administrators USER /add
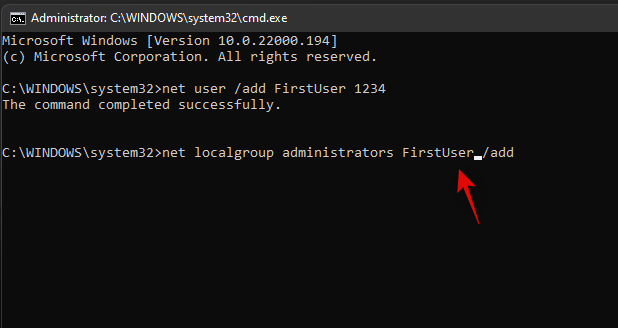
The user will now be added to your PC. Simply restart and log into the new account when the PC restarts.
The start menu should work alright now in the new user account. You can copy your files from the old user account to the new account.
To find your data in the old user account, open Windows Explorer and go to the User folder under the C Drive (or whichever drive you have installed Windows in).
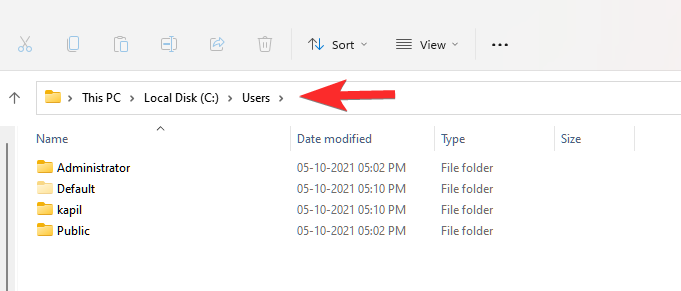
Click on the old user account. Now, copy all the files from here to your new user account that you can also find in the Users folder.
An easy method to transfer files from one user account (old one) to another user account (new one) is to copy the profile. Read more about it here.
Fix #19: Perform a Windows Reset
If you had zero luck with all of the previous methods, we think you should try a Windows Reset. It has been known to solve a host of problems in Windows 11 while keeping your personal files intact. Moreover, resetting Windows to its factory settings can give your PC a fresh start.
Here are the steps.
For this method, you’ll need an elevated PowerShell instance.
Press Win key + r to open the Run box, then type in ‘PowerShell and press Ctrl + Shift + Enter to open PowerShell as administrator.
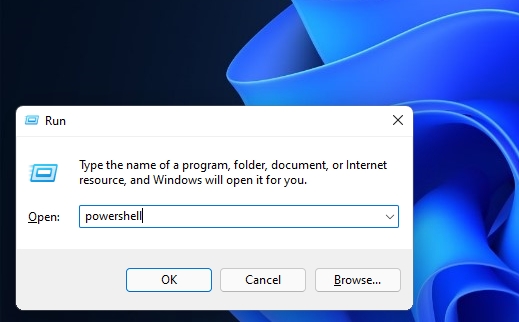
When opened correctly, you should already be inside the C:\Windows\system32 folder.
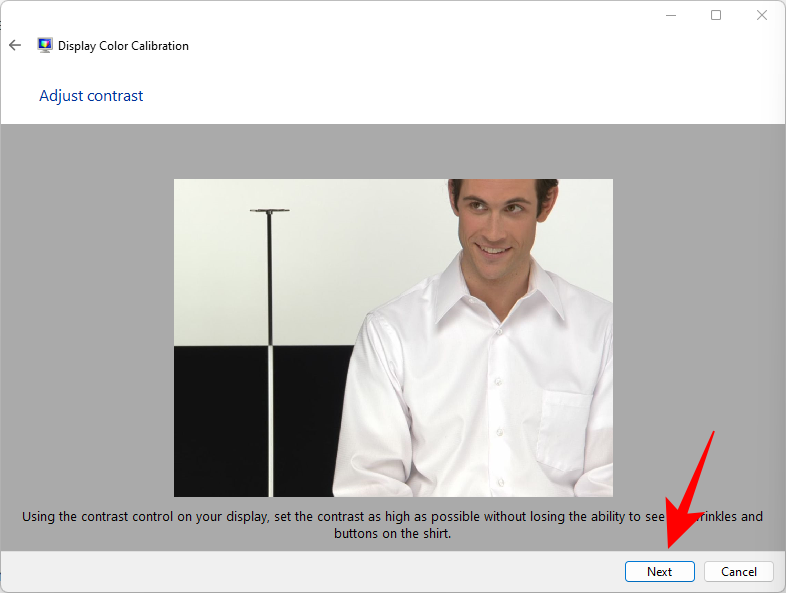
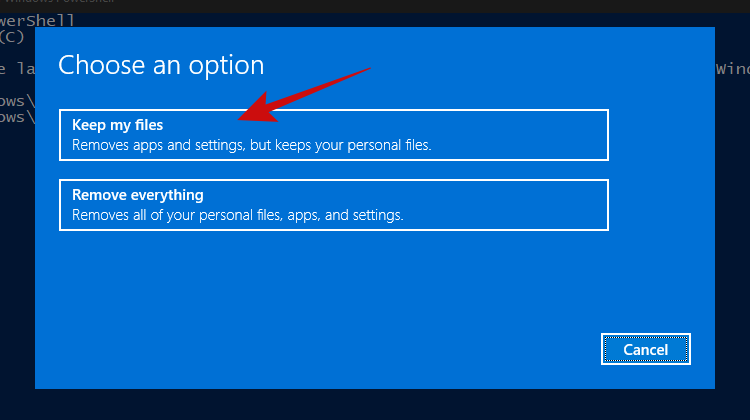
Now type in ‘system reset and press enter. You should be presented with two options, to either keep all your files or to remove everything. Click on ‘Keep my files’.
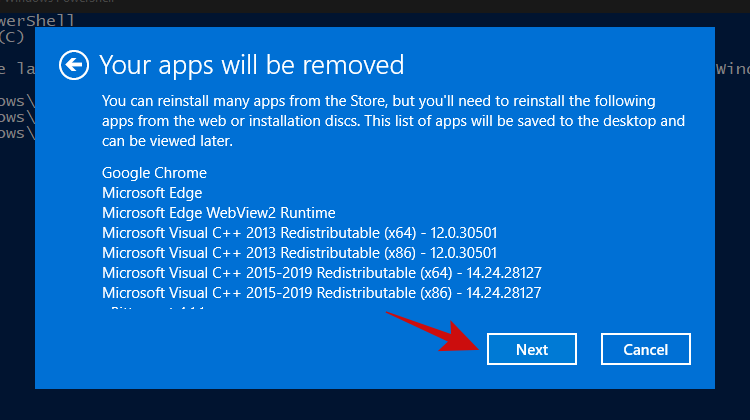
Within a few minutes, Windows should give you a list of apps that’ll be removed from your PC after the reset. Here’s how our list looks.
Once you’ve scrolled through the list of apps, simply click on the ‘Next’ button.
Windows should now start the reset process. Simply follow the instructions and your PC should be reset within a couple of minutes. The Start menu should be working now.
Fix #20: Re-install Windows from scratch
Well, if you’re really considering this method, it’s safe to assume that none of the other methods worked for you. At this point, we think it’s now time to go for a clean installation of Windows 11, which will probably wipe your current Windows partition (if you choose to).
Note: Before proceeding with this method, we recommend making a complete backup of all your files stored inside folders on the Windows drive, such as in Downloads, Documents, and the likes.
Once you have backed up all your files from the Windows drive, let’s take a look at the things you’ll need.
- A USB stick of 8GB or more (no external hard drives, unless you want to lose all your precious data)
- Rufus
Next, follow our guide on downloading and installing the Windows 11 ISO.
Read: How to Download and Install Official Windows 11 ISO
We hope that after following this guide, you were able to fix the annoying and unresponsive Start menu in Windows 11 and bring it back to life.
If you find yourself stuck at any point in this guide, let us know in the comments below.
Related:


![So beheben Sie den Greenscreen-Fehler von Windows 11 [8 Möglichkeiten] So beheben Sie den Greenscreen-Fehler von Windows 11 [8 Möglichkeiten]](https://cloudo3.com/resources8/images31/image-5564-0105182715287.png)


