Cómo instalar Vtiger CRM Open Source Edition en CentOS 7
Aprende cómo instalar Vtiger CRM, una aplicación de gestión de relaciones con el cliente, en CentOS 7 para aumentar tus ventas y mejorar el servicio al cliente.
Throughout this tutorial you will learn how to configure a basic level of security on a brand new Vultr VC2 virtual machine running Ubuntu 18.04.
The first thing we are going to do is create our new user that we will be using to log into the VM:
adduser porthorian
Note: It is recommended to use a unique username that will be difficult to guess. Most bots will default to try root, admin, moderator, and similar.
You will be prompted for a password here. It is strongly recommended that you use a strong alpha numeric password. After that, follow the prompts on your screen and when it asks you if the information is correct just press Y.
Once that new user is added we will need to give that user sudo permissions so we can execute commands from the user on behalf of the root user:
usermod -aG sudo porthorian
Once you have given your user sudo permissions switch to your new user:
su - porthorian
To generate the SSH key, please follow this doc.
Once you have generated your new SSH key, copy your public key. It should look like the following:
ssh-rsa AAAAB3NzaC1yc2EAAAABJQAAAQEAmB3uRWxAAELNJ8oGBCBmZx7S11vnAp0RG8rdKf6CLdvT7NMbKF55F8Wf0hFPewEryplaH54ibdmaTuheJVKy1lUhHnVi0AcBpkhJiiOQdEtvbYKT/eIkQl/Qm92Gz6aL3lJ0UknO4gO0LzgqI2vYX0b9LHMF+ZvApEDahLCna6RKo3/lffnANUKfExE+dVwOcJwATL3Ld5IkSatm7zBqbJAim0wj/JQ5ejzkL+aYd3YawpW3qf+WsY3HGbK2TIJt3LsiZJ3M7giZo/fVIZCJqsIOyO9NUOEx5/+KE8IniGb7gdRYgquAEJr89poDCNz/8CBODi9z3ukiE1+UnVlhfQ== rsa-key-20190408
Navigate to your users home directory if you are not already in it:
cd $HOME
$HOME is the environment variable for your users home directory. This is automatically set when the new user is created.
While in our home directory we are going to place another directory inside it. This directory will be hidden from other users on the machine, except root and the user who owns the directory. Create the new directory and restrict its permissions with the following commands:
mkdir ~/.ssh
chmod 700 ~/.ssh
Now we are going to open a file in .ssh called authorized_keys. This is the universal file that OpenSSH looks for. You can change the name of this inside the OpenSSH config, /etc/ssh/sshd_config, if the need arises.
Use your favorite editor to create the file. This tutorial will use nano:
nano ~/.ssh/authorized_keys
Copy and paste your ssh key into the authorized_keys file that we have opened. Once the public key is inside you can save the file by pressing CTRL + O.
Make sure the appropriate file path shows up:
/home/porthorian/.ssh/authorized_keys
If it is the right file path just press ENTER, otherwise, make necessary changes to match the example above. Then exit the file with CTRL + X.
Now we are going to restrict access to the file:
chmod 600 ~/.ssh/authorized_keys
Exit our created user and go back to the root user:
exit
We can now disable password authentication to the server, that way login will require an ssh key. It is important to note that if you disable password authentication and the public key was not installed correctly you will lock yourself out of your server. It is recommended that you test the key first before even logging out of your root user.
We are currently logged into our root user, so we are going to edit the sshd_config:
nano /etc/ssh/sshd_config
We are going to search for 3 values to make sure that OpenSSH is configured properly.
PasswordAuthenticationPubkeyAuthenticationChallengeResponseAuthenticationWe can find these values by pressing CTRL + W.
The values should be set to the following:
PasswordAuthentication  no
ChallengeResponseAuthentication  no
PubkeyAuthentication  yes
If the values are commented out, remove the # at the beginning of the line and make sure that the values of those variables are as shown above. Once you have changed those variables, save and exit your editor, with CTRL + O, ENTER and finally CTRL + X.
Now we are going to reload sshd with the following command:
systemctl reload sshd
Now we can test the login. Make sure you have not logged out of your root session yet, and open up a new ssh window and connect with your ssh key linked to the connection.
In PuTTY this is under Connection -> SSH -> Auth.
Browse to find your private key for authentication, as you should have saved it when creating the ssh key.
Connect to your server with the private key as your authentication. You will now be logged in to your Vultr VC2 virtual machine.
Note: If you added a passphrase while generating the ssh key you will be prompted for one. This is completely different from your actual user's password on the virtual machine.
First we are going to start by installing UFW if it is not already on the virtual machine. A good way to check is with the following command:
sudo ufw status
If UFW is installed, it will output Status:inactive. If it is not installed, you will be instructed to do so.
We can install it with this command:
sudo apt-get install ufw -y
Now we are going to allow SSH port 22 in our firewall:
sudo ufw allow 22
Alternatively, you can allow OpenSSH:
sudo ufw allow OpenSSH
Either one of the commands above will work.
Now that we have allowed the port through our firewall we can enable UFW:
sudo ufw enable
You will be asked if you are sure you want to perform this operation. Typing y followed by ENTER will enable the firewall:
porthorian@MEANStack:~$ sudo ufw enable
Command may disrupt existing ssh connections. Proceed with operation? y
Note: If you did not allow OpenSSH or Port 22, you will lock yourself out of your virtual machine. Make certain that one of these is allowed before enabling UFW.
Once the firewall is enabled, you will still be connected to your instance. We are going to double check our firewall now with the same command as before:
sudo ufw status
You will see something similar to the following output:
porthorian@MEANStack:~$ sudo ufw status
Status: active

To                         Action      From
--                         ------      ----
22                         ALLOW       Anywhere
22 (v6)                    ALLOW       Anywhere (v6)
To further secure our server we are going to use our Vultr Firewall. Log in to your account. Once logged in you will navigate to the firewall tab located towards the top of your screen:

Now we are going to add a new firewall group. This will allow us to specify which ports can even reach our UFW firewall, providing us with a double layer of security:

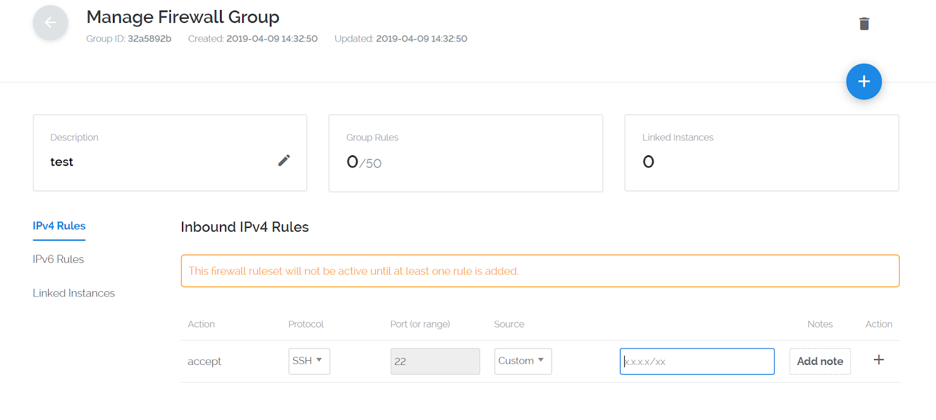
Vultr will now ask you what you are going to name your firewall using the "Description" field. Make sure you describe what the servers under this firewall group will be doing, for easier future administration. For the sake of this tutorial we are going to name it test. You can always change the description later if you would like.
First we are going to need to get our IP address. The reason we are doing this directly is that if your IP address is not static and is constantly changing, you can simply log in to your Vultr account and change the IP address.
That is also why we did not require the IP address on the UFW firewall. Plus it limits the use of your virtual machine's firewall from filtering out all the other ports and just lets the Vultr firewall handle it. This limits the strain of overall traffic filtering on your instance.
Use Vultr's network looking glass to find your IP address.
So now that we have our IP address we are going to add an IPV4 Rule to our newly created firewall:

Once you have the IP address entered, click the + symbol to add your IP address to the firewall.
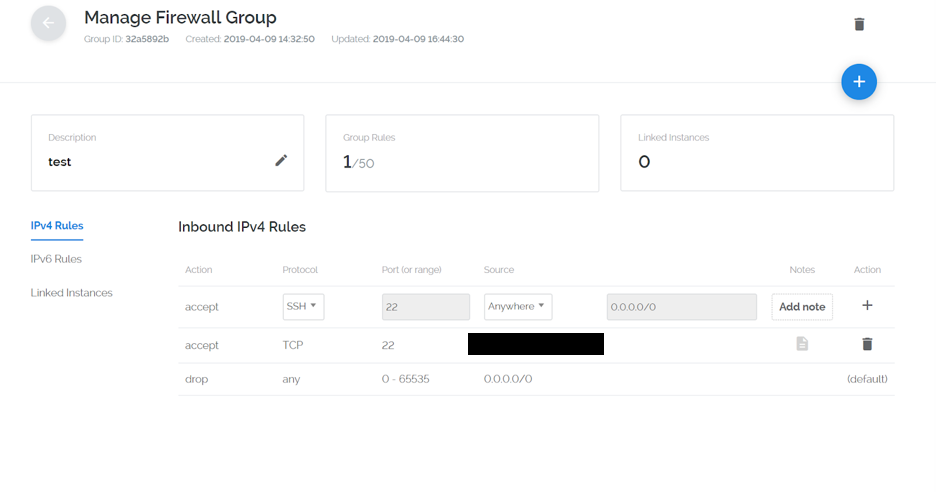
Your firewall group will look like the following:

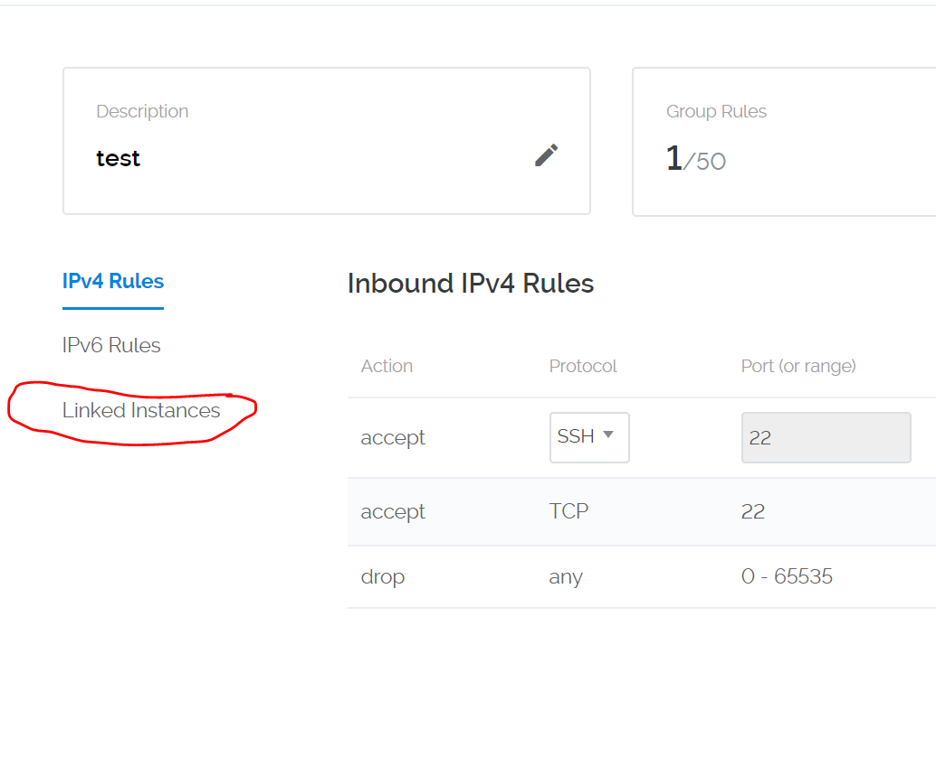
Now that we have our IP properly binded in the Firewall group, we need to link our Vultr Instance. On the left hand side you will see a tab that says "Linked Instances":

Once on the page you will see a drop down with a list of your server instances:

Click the drop down and select your instance. Then, when your ready to add the instance to the firewall group click the + symbol.
Congratulations, you have successfully secured your Vultr VC2 Virtual Machine. This gives you a good basis for a very basic security layer without the worry of someone trying to brute-force your instance.
Aprende cómo instalar Vtiger CRM, una aplicación de gestión de relaciones con el cliente, en CentOS 7 para aumentar tus ventas y mejorar el servicio al cliente.
Esta guía completa le mostrará cómo configurar un servidor Counter-Strike 1.6 en Linux, optimizando el rendimiento y la seguridad para el mejor juego. Aprende los pasos más recientes aquí.
LiteCart es una plataforma de carrito de compras gratuita y de código abierto escrita en PHP, jQuery y HTML 5. Es un software de comercio electrónico simple, liviano y fácil de usar.
¿Usando un sistema diferente? MODX Revolution es un sistema de gestión de contenido (CMS) de nivel empresarial rápido, flexible, escalable, gratuito y de código abierto escrito i
McMyAdmin es un panel de control del servidor de Minecraft utilizado para administrar su servidor. Aunque McMyAdmin es gratuito, hay varias ediciones, algunas de las cuales son pai
TeamTalk es un sistema de conferencia que permite a los usuarios tener conversaciones de audio / video de alta calidad, chat de texto, transferir archivos y compartir pantallas. Es yo
Using a Different System? Introduction CyberPanel is one of the first control panels on the market that is both open source and uses OpenLiteSpeed. What thi
¿Usando un sistema diferente? Introducción Grafana es un software de código abierto que transforma múltiples feeds de sistemas como Graphite, Telegraf, an
PhpBB es un programa de tablón de anuncios de código abierto. Este artículo le mostrará cómo instalar phpBB en la parte superior de un servidor web Apache en Ubuntu 16.04. Fue escrito
¿Usando un sistema diferente? Foreman es una herramienta gratuita y de código abierto que lo ayuda con la configuración y administración de servidores físicos y virtuales. Forema
Tener un solo usuario, que es root, puede ser peligroso. Así que arreglemos eso. Vultr nos brinda la libertad de hacer lo que queramos con nuestros usuarios y nuestros servidores.
Using a Different System? ESpeak can generate text-to-speech (TTS) audio files. These can be useful for many reasons, such as creating your own Turin
¿Usando un sistema diferente? Thelia es una herramienta de código abierto para crear sitios web de comercio electrónico y administrar contenido en línea, escrito en PHP. Código fuente de Thelia i
¿Usando un sistema diferente? Fuel CMS es un sistema de gestión de contenido basado en CodeIgniter. Su código fuente está alojado en GitHub. Esta guía le mostrará cómo t
¿Usando un sistema diferente? Couch CMS es un sistema de gestión de contenido (CMS) simple y flexible, gratuito y de código abierto que permite a los diseñadores web diseñar
¿Usando un sistema diferente? LibreNMS es un completo sistema de monitoreo de red de código abierto. Utiliza SNMP para obtener los datos de diferentes dispositivos. Una variedad
Introducción ¿Tiene problemas con la conectividad cuando los visitantes de otros países acceden a su sitio web? Preguntándose por qué la velocidad de descarga de su extranjero
¿Usando un sistema diferente? Ghost es una plataforma de blogs de código abierto que ha estado ganando popularidad entre los desarrolladores y usuarios comunes desde su 201
Pip es una herramienta para administrar paquetes de Python. El uso de un administrador de paquetes permite una gestión eficiente de su servidor. En este tutorial, explicaré cómo t
Cacti es una herramienta de gráficos y monitoreo de red de código abierto y libre escrita en PHP. Con la ayuda de RRDtool (herramienta de base de datos Round-Robin), Cacti se puede usar t
ZPanel, un panel de control de alojamiento web popular, se bifurcó en 2014 a un nuevo proyecto llamado Sentora. Aprende a instalar Sentora en tu servidor con este tutorial.
Aprende cómo instalar Vtiger CRM, una aplicación de gestión de relaciones con el cliente, en CentOS 7 para aumentar tus ventas y mejorar el servicio al cliente.
Esta guía completa le mostrará cómo configurar un servidor Counter-Strike 1.6 en Linux, optimizando el rendimiento y la seguridad para el mejor juego. Aprende los pasos más recientes aquí.
Los ataques de ransomware van en aumento, pero ¿puede la IA ayudar a lidiar con el último virus informático? ¿Es la IA la respuesta? Lea aquí, sepa que la IA es una bendición o una perdición
ReactOS, un sistema operativo de código abierto y gratuito, está aquí con la última versión. ¿Puede satisfacer las necesidades de los usuarios de Windows de hoy en día y acabar con Microsoft? Averigüemos más sobre este estilo antiguo, pero una experiencia de sistema operativo más nueva.
Whatsapp finalmente lanzó la aplicación de escritorio para usuarios de Mac y Windows. Ahora puede acceder a Whatsapp desde Windows o Mac fácilmente. Disponible para Windows 8+ y Mac OS 10.9+
Lea esto para saber cómo la Inteligencia Artificial se está volviendo popular entre las empresas de pequeña escala y cómo está aumentando las probabilidades de hacerlas crecer y dar ventaja a sus competidores.
Recientemente, Apple lanzó macOS Catalina 10.15.4, una actualización complementaria para solucionar problemas, pero parece que la actualización está causando más problemas que conducen al bloqueo de las máquinas Mac. Lee este artículo para obtener más información
13 Herramientas comerciales de extracción de datos de Big Data
Nuestra computadora almacena todos los datos de una manera organizada conocida como sistema de archivos de diario. Es un método eficiente que permite a la computadora buscar y mostrar archivos tan pronto como presiona buscar.


