วิธีกำจัด Yahoo Search ใน Chrome
คำแนะนำในการกำจัด Yahoo Search เป็นเครื่องมือค้นหาเริ่มต้นใน Chrome โดยใช้วิธีที่ง่ายและมีประสิทธิภาพ

Windows 11 ได้รับการเผยแพร่สู่สาธารณะแล้ว และการอัปเดตใหม่สำหรับระบบปฏิบัติการที่ใช้งานได้ยาวนานนี้ดูเหมือนว่าจะได้รับคำวิจารณ์ดีๆ อยู่บ้าง Microsoft ได้เพิ่มความเป็นส่วนตัว ความปลอดภัยเพิ่ม UI ใหม่ และความสามารถในการติดตั้งแอพ Android ลงใน Windows 11 แต่ตามปกติ Windows จะมาพร้อมกับสิ่งที่ติดตั้งไว้ล่วงหน้ามากมายซึ่งไม่เกี่ยวข้องกับผู้ใช้เกือบทุกคน
และถ้าคุณซื้อระบบที่สร้างไว้ล่วงหน้าหรือแล็ปท็อป ก็มีโอกาสที่จะมีซอฟต์แวร์โฆษณาเพิ่มเติมติดตั้งอยู่ในระบบของคุณซึ่งคุณอาจต้องการลบออก คุณสามารถลบและถอนการติดตั้งแอพส่วนใหญ่บน Windows ได้อย่างง่ายดายด้วยการคลิกเพียงครั้งเดียว อย่างไรก็ตาม สิ่งต่าง ๆ จะซับซ้อนเล็กน้อยเมื่อคุณไปที่โปรแกรม, แอพ Windows Store, Windows Updates และแอพระบบ อย่ากลัวไปเลย คุณสามารถทำตามคำแนะนำของเราด้านล่างเพื่อลบแอพทุกประเภทออกจากระบบ Windows ของคุณ ไม่ว่าคุณจะตั้งค่าปัจจุบันอย่างไร มาเริ่มกันเลย.
สารบัญ
วิธีถอนการติดตั้งแอพใน Windows 11 [8 วิธี]
นี่คือวิธีการทั้งหมดที่คุณสามารถถอนการติดตั้งแอพจากพีซี Windows 11 ของคุณ สำหรับการถอนการติดตั้งแอประบบโปรดดูหัวข้อเฉพาะและวิธีการพิเศษด้านล่างหลังจากส่วนนี้
วิธี #01: การใช้การตั้งค่า
ทำตามคำแนะนำด้านล่างเพื่อถอนการติดตั้งแอพผ่านการตั้งค่าจากระบบของคุณ ในกรณีที่คุณพยายามถอนการติดตั้งแอปเริ่มต้น เราขอแนะนำให้เปลี่ยนแอปล่วงหน้าเพื่อไม่ให้ตัวเลือกถอนการติดตั้งเป็นสีเทา ในกรณีที่คุณไม่ทราบถึงการเปลี่ยนแอปเริ่มต้นใน Windows 11 คุณสามารถทำตามคำแนะนำด้านล่าง
ขั้นตอนที่ 1: เปลี่ยนแอปเริ่มต้นก่อนหรือไม่ [ไม่จำเป็น]
หมายเหตุ:ตรวจสอบให้แน่ใจว่าคุณได้ติดตั้งแอพทดแทนบนระบบของคุณไว้ล่วงหน้าเพื่อแทนที่แอพเริ่มต้นของคุณ ตัวอย่างเช่น หากคุณกำลังเปลี่ยนเบราว์เซอร์จาก Microsoft Edge คุณต้องมีเบราว์เซอร์อื่นที่คุณต้องการใช้ ติดตั้งไว้แล้วในระบบของคุณ เพื่อให้คุณสามารถเลือกให้เป็นเบราว์เซอร์เริ่มต้นแทนได้
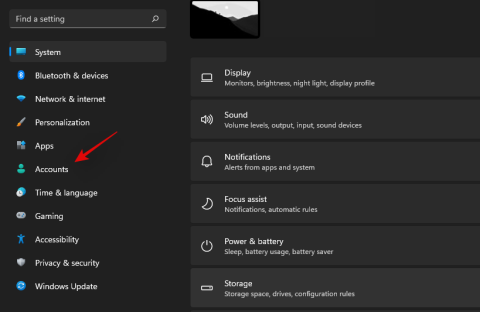
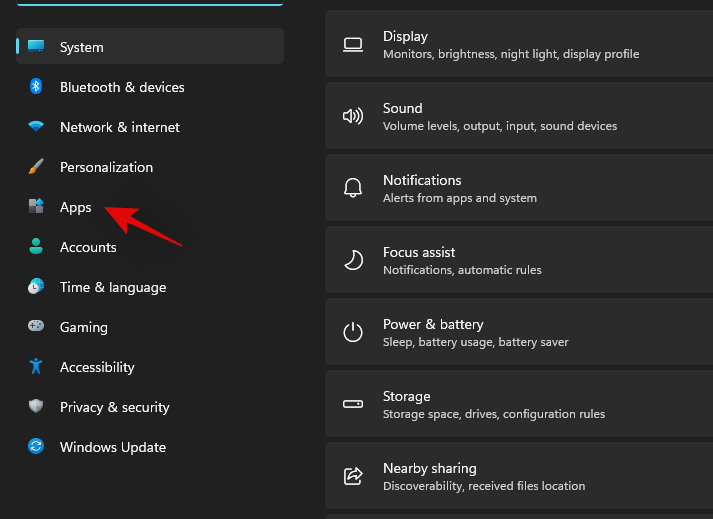
กดWindows + iบนแป้นพิมพ์เพื่อเปิดแอปการตั้งค่า ตอนนี้คลิกที่ 'แอพ' ในแถบด้านข้างทางซ้ายของคุณ
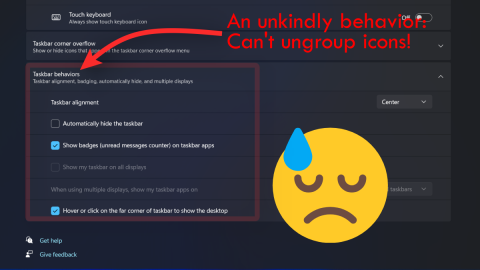
คลิกและเลือก 'แอปเริ่มต้น' ทางด้านขวาของคุณ
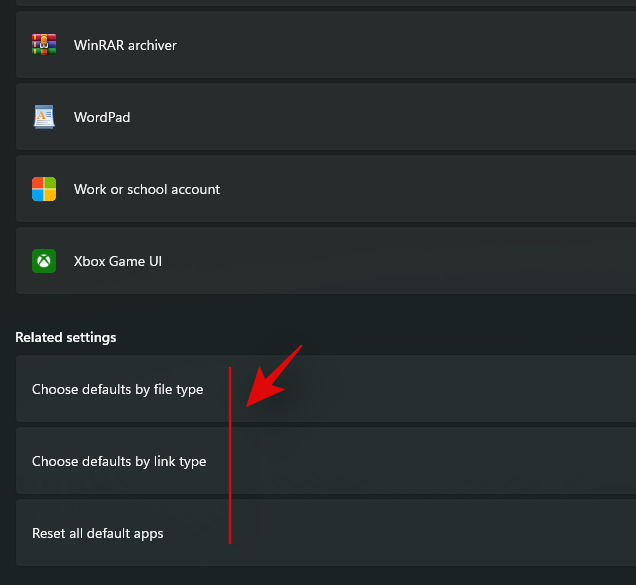
ตอนนี้เลือกแอปที่คุณต้องการลบเป็นแอปเริ่มต้นแล้วคลิก ในกรณีที่คุณต้องการเปลี่ยนแอปเริ่มต้นตามประเภทไฟล์ ให้คลิกที่ 'เลือกค่าเริ่มต้นตามประเภทไฟล์' ที่ด้านล่างดังที่แสดงด้านล่าง
ตอนนี้ คลิกที่ประเภทไฟล์/นามสกุลที่ต้องการ แล้วเลือกแอปที่คุณต้องการ
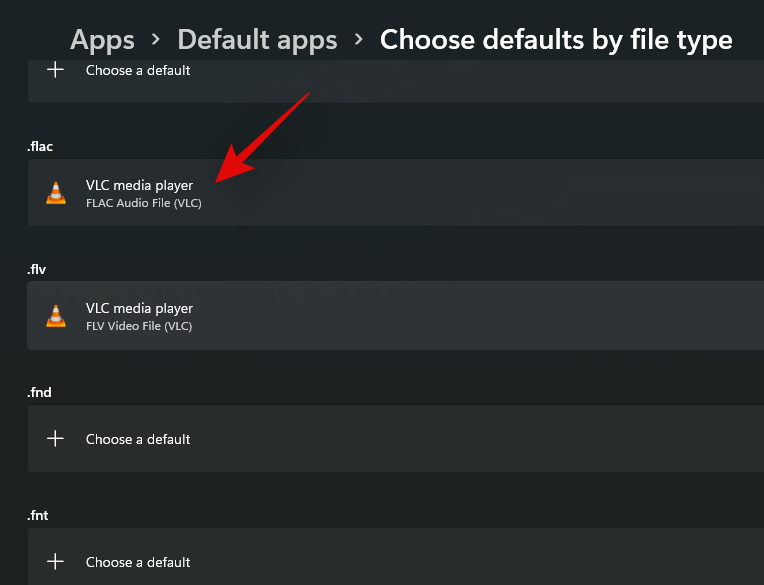
ทำซ้ำขั้นตอนข้างต้นสำหรับประเภทไฟล์/นามสกุลที่จำเป็นทั้งหมด
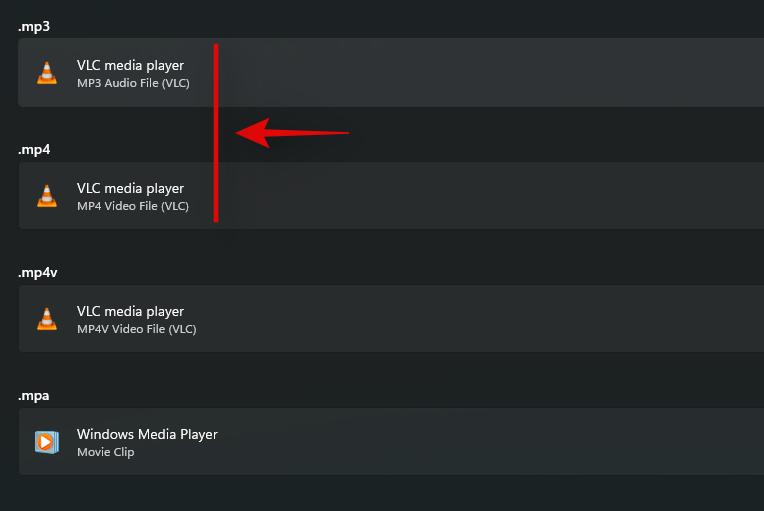
ปิดแอปการตั้งค่าและรีสตาร์ทระบบของคุณเพื่อการวัดผลที่ดี
และนั่นแหล่ะ! เมื่อระบบของคุณรีสตาร์ทแล้ว ควรเปลี่ยนแอปเริ่มต้นของคุณ ตอนนี้คุณสามารถใช้คำแนะนำด้านล่างเพื่อถอนการติดตั้งแอพที่จำเป็นผ่าน 'การตั้งค่า' ในระบบของคุณ
ขั้นตอนที่ 2: ถอนการติดตั้งแอพจากการตั้งค่า
กดWindows + iบนแป้นพิมพ์และเลือก 'Apps' จากด้านซ้ายของคุณ

ตอนนี้คลิกที่ 'แอพและคุณสมบัติ' ทางด้านขวาของคุณ
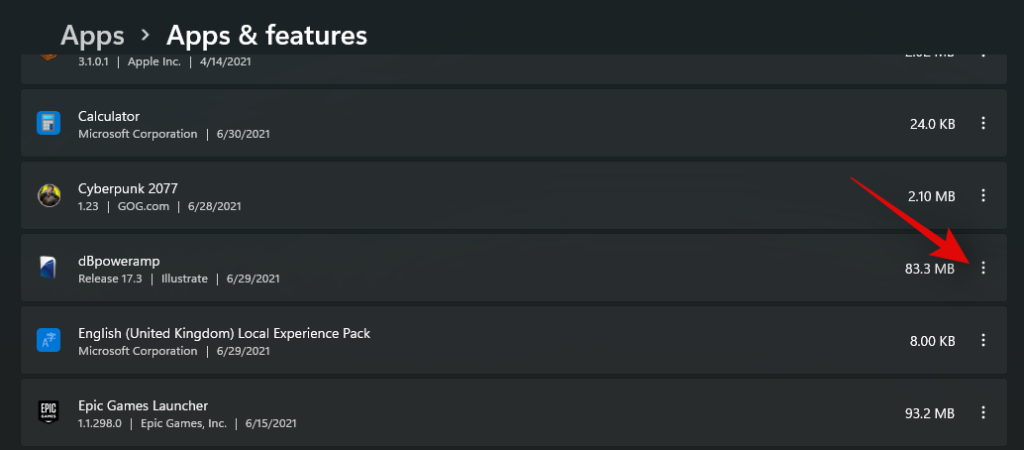
เลื่อนรายการและค้นหาแอปที่คุณต้องการถอนการติดตั้ง เมื่อพบแล้ว ให้คลิกที่ไอคอนเมนู '3 จุด' ทางด้านขวาของคุณ
คลิกและเลือก 'ถอนการติดตั้ง'
ทำตามคำแนะนำบนหน้าจอเพื่อถอนการติดตั้งแอพ หากคุณกำลังถอนการติดตั้งแอปที่ติดตั้งไว้ล่วงหน้าหรือ Windows Store แอปนั้นจะถูกถอนการติดตั้งโดยอัตโนมัติในเบื้องหลัง อย่างไรก็ตาม หากเป็นโปรแกรมที่ตรวจพบโดย Windows Windows จะพยายามถอนการติดตั้งในพื้นหลังหรือเปิด 'uninstall.exe' หรือ 'setup.msi' ทั้งนี้ขึ้นอยู่กับโปรแกรม เพื่อให้คุณสามารถถอนการติดตั้งได้เอง ด้วยการตั้งค่าที่ต้องการ คุณอาจสามารถเก็บรักษา/บันทึกข้อมูลบางอย่างได้เมื่อพบกับการตั้งค่าดังกล่าว รวมถึงสิ่งต่างๆ เช่น ไฟล์บันทึก ข้อมูลผู้ใช้ บันทึกข้อมูล รูปภาพ และอื่นๆ
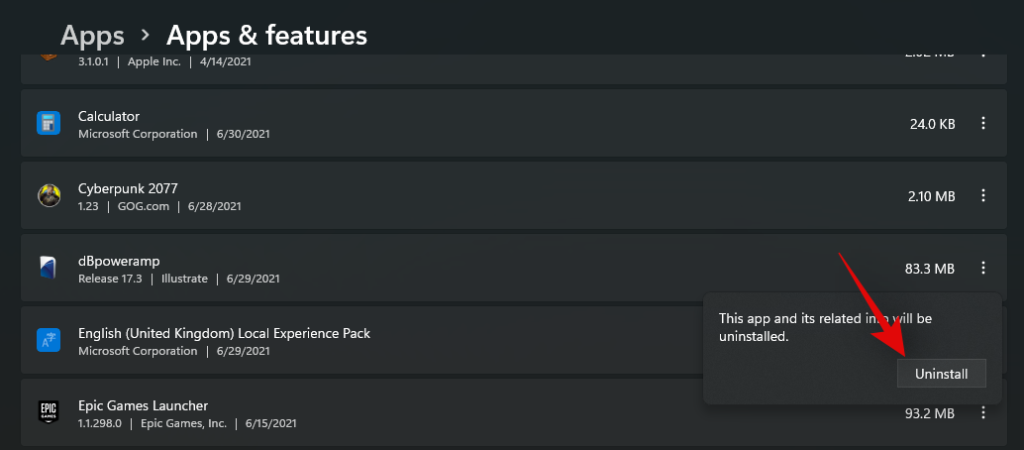
หรือคุณจะมีตัวเลือกที่จะลบทุกอย่างที่เกี่ยวข้องกับโปรแกรมออกจากระบบของคุณโดยสมบูรณ์
และนั่นแหล่ะ! ตอนนี้ควรถอนการติดตั้งแอพที่เลือกจากระบบของคุณ หากคุณถอนการติดตั้งโปรแกรมจำนวนมาก เราขอแนะนำให้คุณล้างแคชโดยใช้คู่มือนี้ โดยเฉพาะอย่างยิ่งหากโปรแกรมมีขนาดเกิน 30+ GB
กดปุ่ม 'Windows' บนแป้นพิมพ์เพื่อเปิดเมนู 'เริ่ม' อีกวิธีหนึ่ง คุณยังสามารถคลิกที่ไอคอนใน 'แถบงาน' ของคุณ
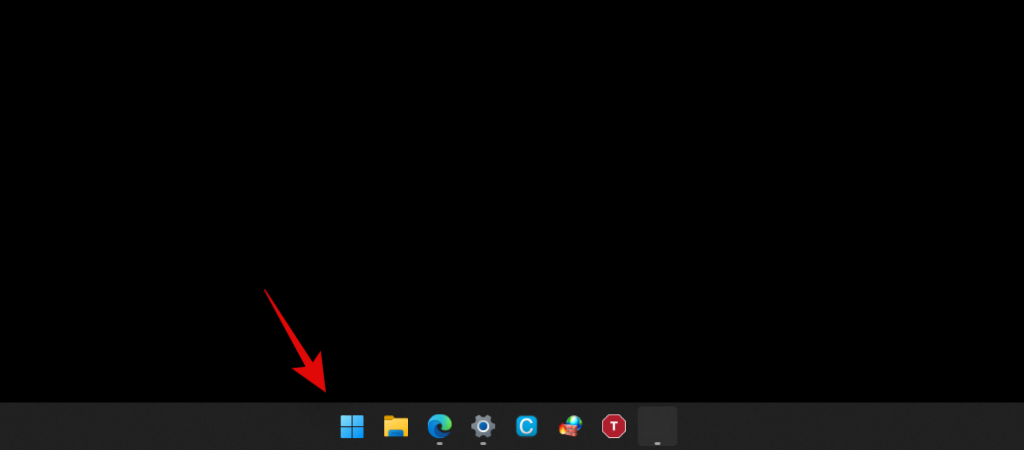
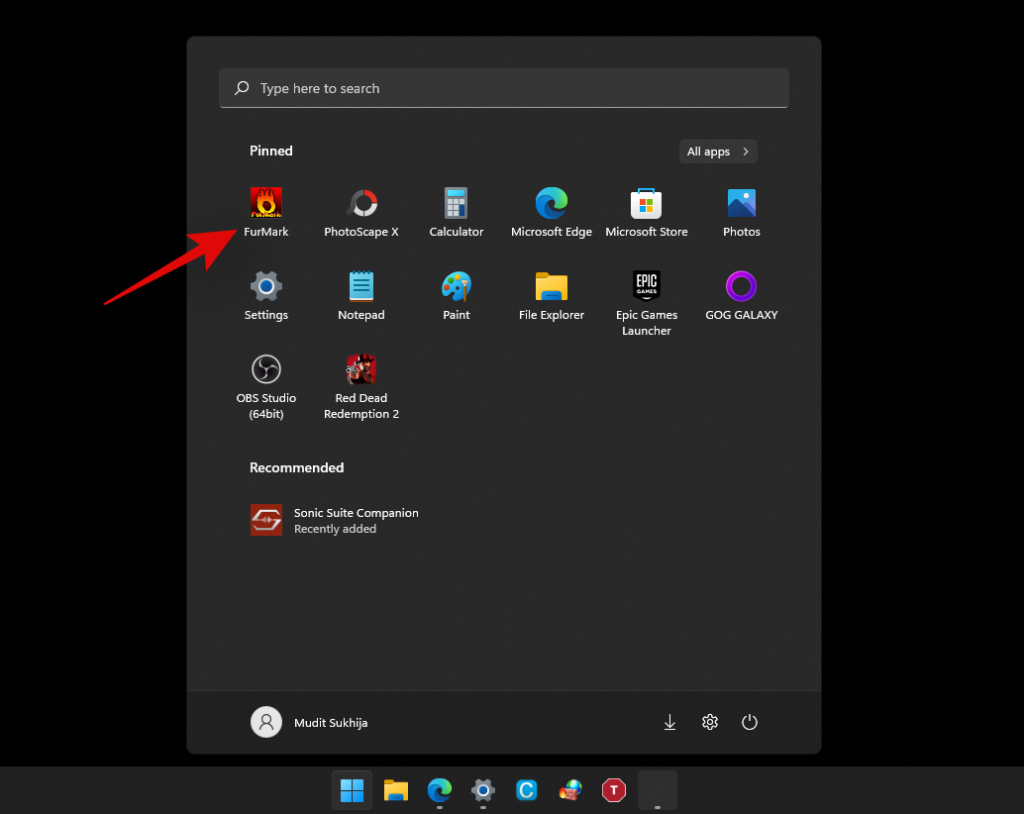
ค้นหาแอพที่คุณต้องการถอนการติดตั้งและคลิกขวาที่มัน
ตอนนี้คลิกที่ 'ถอนการติดตั้ง' ทำตามคำแนะนำบนหน้าจอ หากจำเป็น เพื่อสิ้นสุดกระบวนการถอนการติดตั้ง
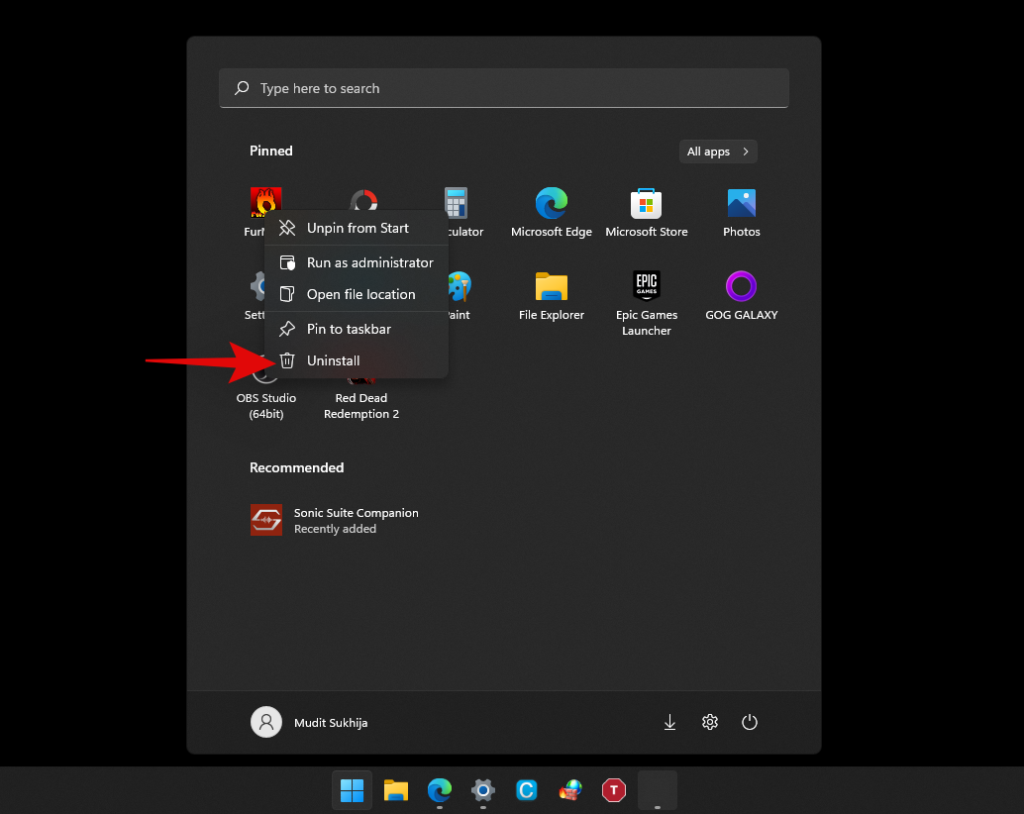
และนั่นแหล่ะ! ตอนนี้คุณจะถอนการติดตั้งแอพจากระบบของคุณผ่านเมนูเริ่ม
วิธี #03: การใช้ไฟล์ถอนการติดตั้ง '.exe'
ตามหลักการแล้ว คุณไม่จำเป็นต้องเปิดไฟล์ปฏิบัติการถอนการติดตั้งด้วยตนเองสำหรับโปรแกรม แต่ในบางกรณี เช่น โปรแกรมรุ่นเก่า คุณอาจมีโปรแกรมติดตั้งอยู่ในระบบของคุณ ซึ่งตัวเลือกการถอนการติดตั้งไม่แสดงที่ใดในการตั้งค่าของคุณ ในกรณีดังกล่าว คุณสามารถเปิดไฟล์การถอนการติดตั้งได้ด้วยตนเองโดยใช้คำแนะนำด้านล่าง
ค้นหาไฟล์ .exe ของโปรแกรมหรือทางลัดที่คุณใช้เพื่อเปิดโปรแกรมและคลิกขวาที่ไฟล์นั้น
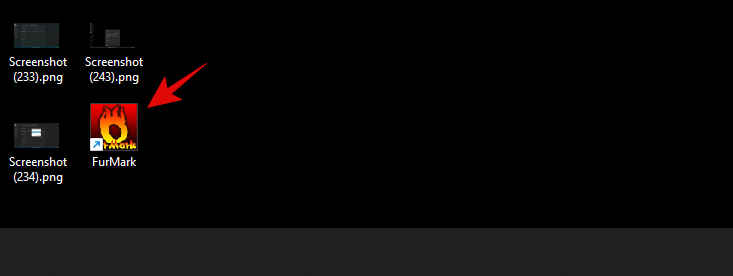
เลือก 'เปิดตำแหน่งไฟล์' หากคุณไม่เห็นตัวเลือกนี้ ให้เลือกคุณสมบัติ ตอนนี้คุณจะพบตัวเลือก 'เปิดตำแหน่งไฟล์' ในแท็บ 'ทั่วไป' ดังที่แสดงด้านล่าง
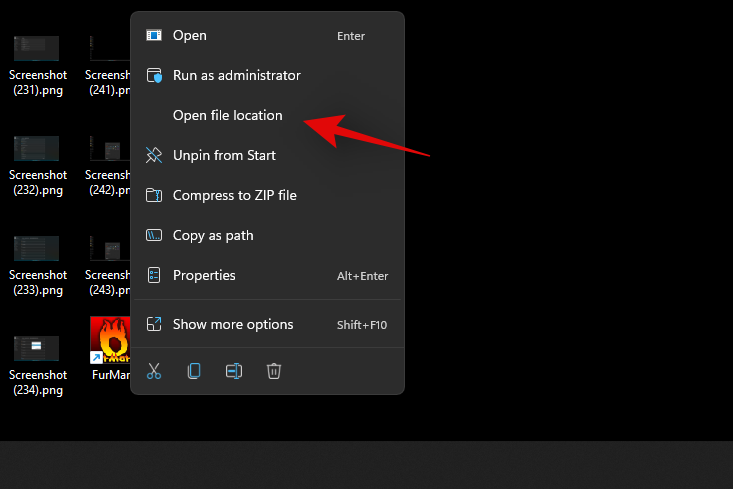
คุณจะถูกนำไปที่ไดเร็กทอรีการติดตั้งของโปรแกรม ค้นหาไฟล์ .exe ที่มีชื่อต่อไปนี้หรือชื่อที่คล้ายกัน
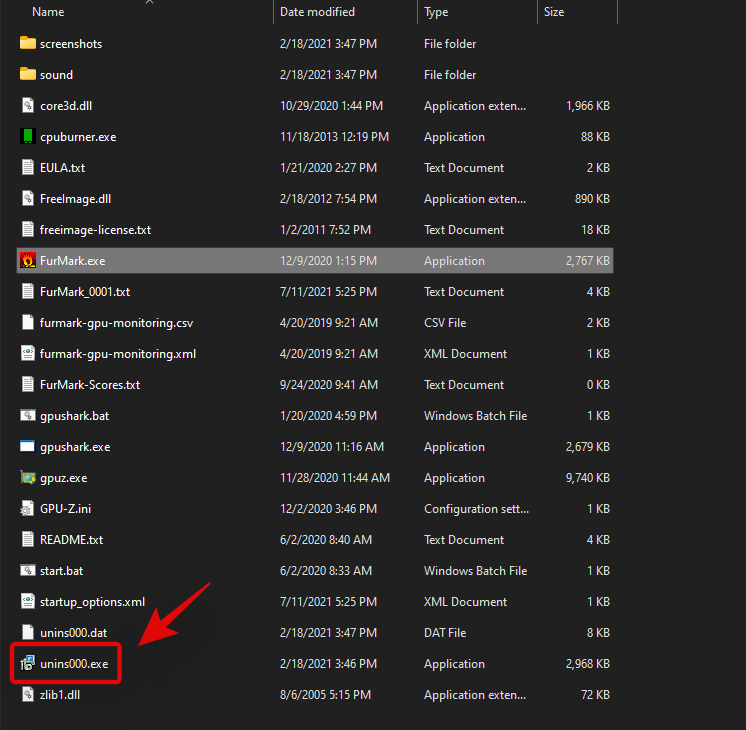
และอื่น ๆ. โปรแกรมถอนการติดตั้ง/การตั้งค่าจะมีชื่อเหมือนกัน เมื่อคุณเปิดใช้งาน คุณสามารถทำตามคำแนะนำบนหน้าจอเพื่อถอนการติดตั้งจากระบบของคุณ
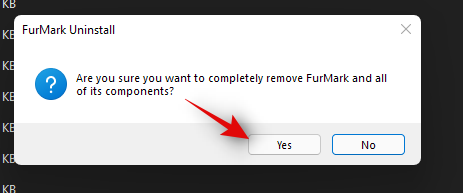
ในบางกรณี คุณอาจได้รับตัวเลือกในการซ่อมแซม ติดตั้งใหม่ หรือแก้ไขโปรแกรมพร้อมกับการถอนการติดตั้ง คุณสามารถเลือกตัวเลือกที่ต้องการและดำเนินการตั้งค่าตามที่คุณต้องการ
วิธี #04: การใช้แผงควบคุม
คุณยังสามารถลบโปรแกรมและแอพออกจากแผงควบคุมได้อย่างง่ายดาย ตามหลักการแล้ว ขอแนะนำให้คุณถอนการติดตั้งเฉพาะโปรแกรมรุ่นเก่าและรุ่นใหม่โดยใช้แผงควบคุม เนื่องจากแอปที่ติดตั้งไว้ทั้งหมดจะไม่แสดงขึ้นที่นี่ ทำตามคำแนะนำด้านล่างเพื่อถอนการติดตั้งโปรแกรมผ่านแผงควบคุม
กดWindows + sบนแป้นพิมพ์ของคุณและพิมพ์ใน 'แผงควบคุม' คลิกและเปิดแอปเมื่อปรากฏในผลการค้นหาของคุณ
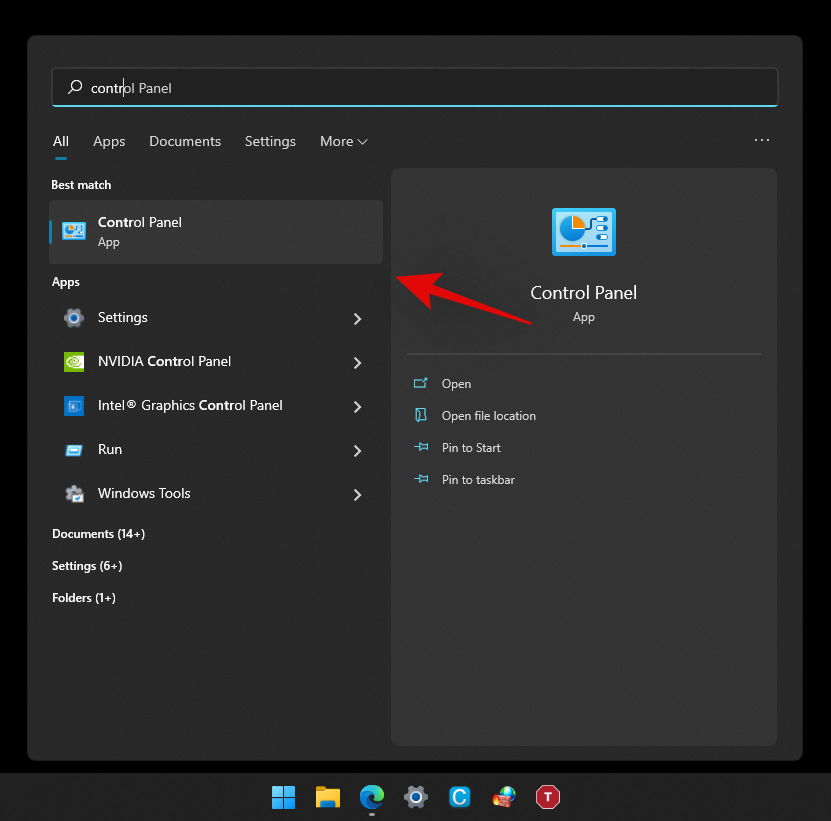
ตอนนี้คลิกที่ 'โปรแกรมและคุณสมบัติ'
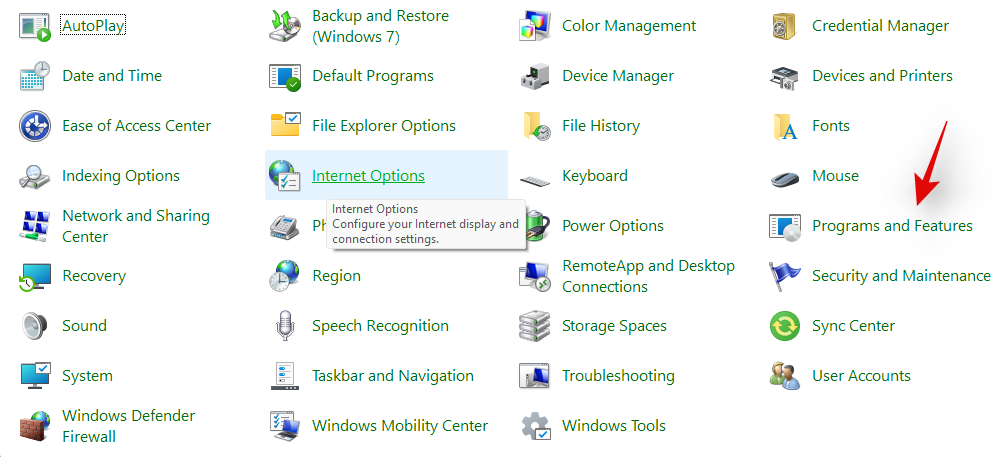
คุณจะได้รับรายชื่อโปรแกรมทั้งหมดที่ติดตั้งในระบบของคุณในปัจจุบัน ค้นหาโปรแกรมที่คุณต้องการถอนการติดตั้งแล้วคลิก
ตอนนี้เลือก 'ถอนการติดตั้ง' ที่ด้านบน

ทำตามคำแนะนำบนหน้าจอเพื่อสิ้นสุดขั้นตอนการติดตั้ง ในบางกรณี นี่อาจเป็นกระบวนการอัตโนมัติ ในขณะที่ในบางกรณี คุณอาจได้รับตัวเลือกในการซ่อมแซมการติดตั้งที่มีอยู่ หรือเลือกว่าข้อมูลใดที่คุณต้องการเก็บรักษาและข้อมูลใดที่คุณต้องการลบ
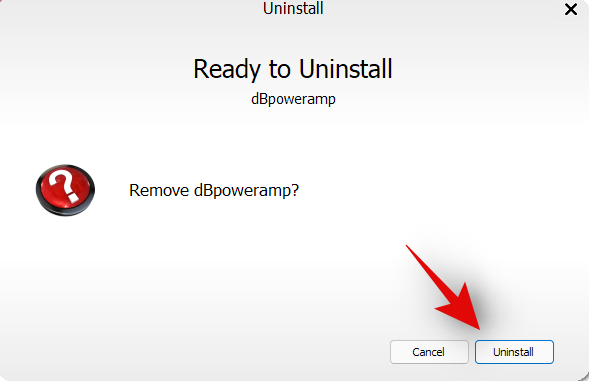
เมื่อคุณได้เลือกแล้ว กระบวนการถอนการติดตั้งจะเกิดขึ้นและโปรแกรมควรถูกลบออกจากระบบของคุณเมื่อกระบวนการเสร็จสมบูรณ์
วิธี #05: การใช้ PowerShell
คุณยังสามารถถอนการติดตั้งแอพผ่าน PowerShell ที่ยกระดับใน Windows 11 แม้ว่าคำสั่งถอนการติดตั้งจะค่อนข้างง่าย แต่การรับชื่อแพ็คเกจสำหรับแอพหรือโปรแกรมที่เกี่ยวข้องนั้นไม่ใช่ ดังนั้น ในคำแนะนำด้านล่าง คุณจะพบวิธีถอนการติดตั้งแอพผ่าน PowerShell หากคุณมีชื่อแพ็คเกจ
อย่างไรก็ตาม หากคุณไม่ทราบวิธีระบุแหล่งที่มาของชื่อแพ็กเกจแบบเต็ม เราขอแนะนำให้คุณปฏิบัติตามคู่มือแอประบบด้านล่าง ซึ่งครอบคลุมวิธีการเดียวกันในรายละเอียดมากขึ้น มาเริ่มกันเลย.
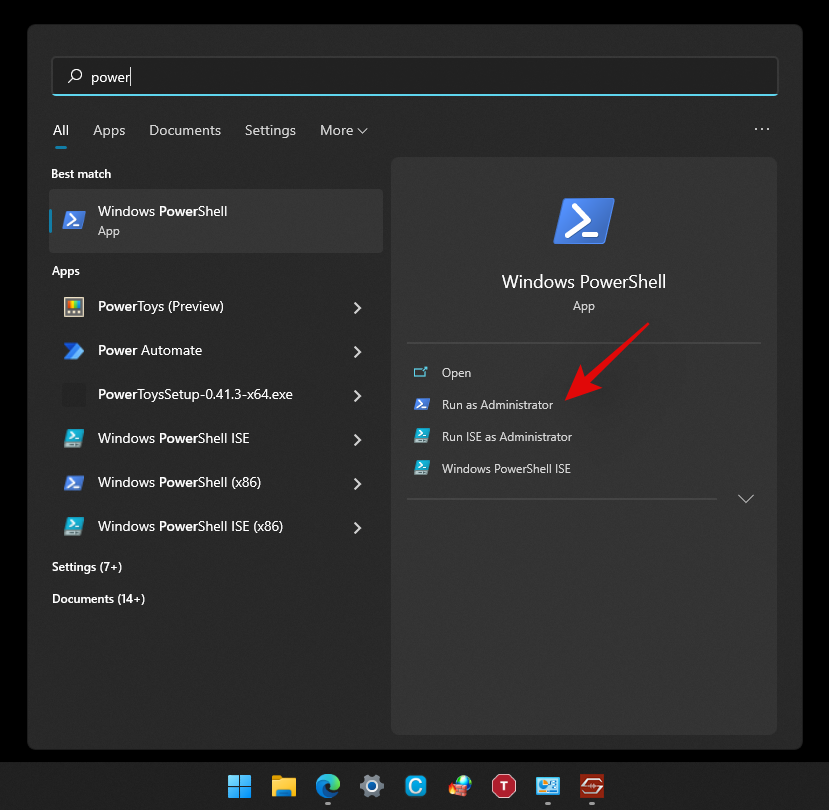
กดWindows + sบนแป้นพิมพ์แล้วพิมพ์ 'PowerShell' ตอนนี้คลิกที่ 'เรียกใช้ในฐานะผู้ดูแลระบบ' เมื่อปรากฏในผลการค้นหาของคุณ
เมื่อคุณได้รับหน้าต่าง PowerShell บนเดสก์ท็อปแล้ว ให้พิมพ์คำสั่งต่อไปนี้แล้วกด 'Enter' บนแป้นพิมพ์ของคุณ ตรวจสอบให้แน่ใจว่าคุณแทนที่ '[ชื่อ]' ด้วยชื่อแพ็คเกจเต็มของแอพที่เกี่ยวข้อง
Remove-AppxPackage [Name]

และนั่นแหล่ะ! ตอนนี้ Powershell จะใช้เวทมนตร์และถอนการติดตั้งแอปที่เกี่ยวข้องออกจากระบบของคุณ
วิธี #06: การใช้ CMD
คุณยังสามารถใช้พรอมต์คำสั่งใน Windows 11 เพื่อถอนการติดตั้งแอพจากระบบของคุณ ทำตามคำแนะนำด้านล่างเพื่อเริ่มต้นใช้งาน
กดWindows + sบนแป้นพิมพ์ของคุณและค้นหา 'CMD' คลิก 'เรียกใช้ในฐานะผู้ดูแลระบบ' เมื่อปรากฏในผลการค้นหาของคุณ
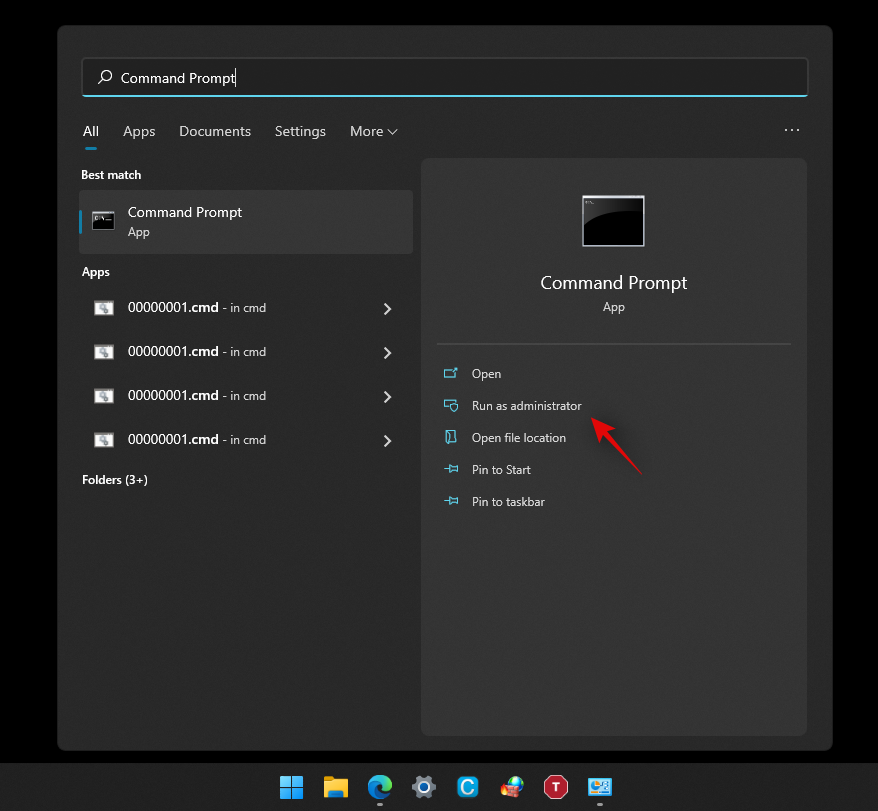
เมื่อเปิด CMD แล้ว ให้พิมพ์คำสั่งต่อไปนี้แล้วกด 'Enter' บนแป้นพิมพ์ของคุณ
wmic

ตอนนี้พิมพ์คำสั่งต่อไปนี้เพื่อรับรายการแอพและโปรแกรมทั้งหมดที่ติดตั้งในระบบของคุณ
product get name

เมื่อคุณได้รับรายชื่อโปรแกรมทั้งหมดแล้ว ให้ค้นหาโปรแกรมที่คุณต้องการถอนการติดตั้งในรายการนี้ เมื่อพบแล้ว ให้จดชื่อทั้งหมดไว้ในที่ที่สะดวก
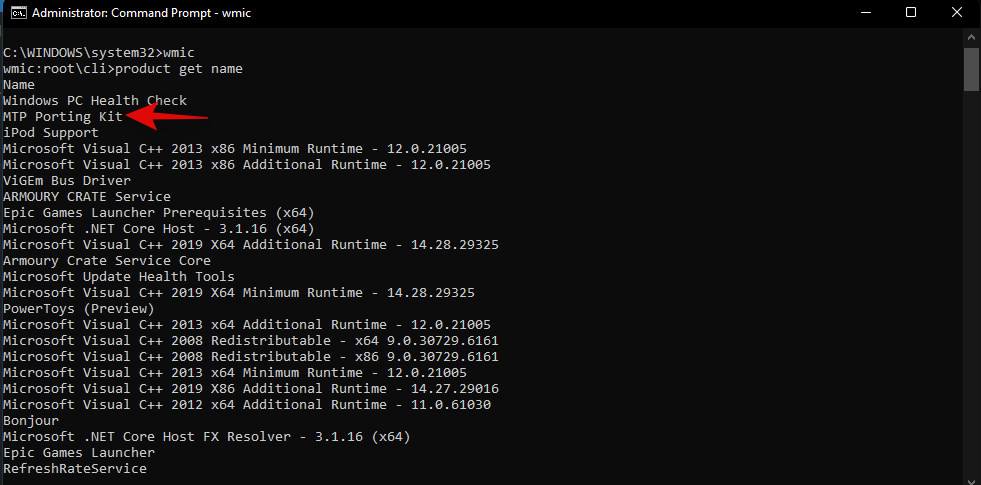
ตอนนี้พิมพ์คำสั่งต่อไปนี้และแทนที่AppNameด้วยชื่อแอพที่คุณจดบันทึกไว้ก่อนหน้านี้
product where name="AppName" call uninstall/nointeractive
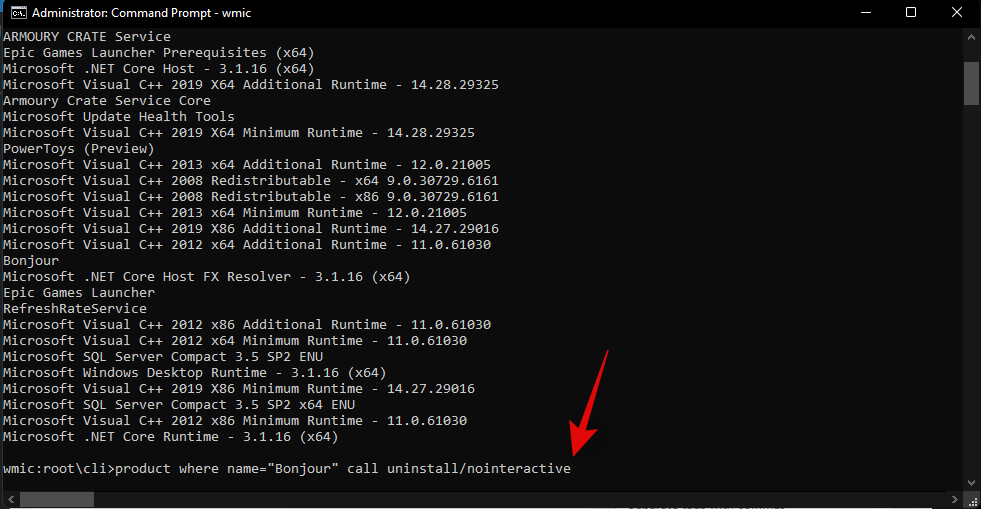
หมายเหตุ:อย่าลบเครื่องหมายคำพูดออกจากคำสั่ง เนื่องจากจำเป็นสำหรับไวยากรณ์นี้
กด 'Enter' บนแป้นพิมพ์เพื่อดำเนินการคำสั่ง
Command Prompt จะดำเนินการตามกระบวนการที่จำเป็นในเบื้องหลัง และคุณควรได้รับการยืนยันดังที่แสดงด้านล่างเมื่อกระบวนการเสร็จสมบูรณ์
และนั่นแหล่ะ! ตอนนี้คุณจะถอนการติดตั้งแอพจากระบบของคุณผ่านทางพรอมต์คำสั่ง
วิธี #07: การใช้ setup.msi
ในกรณีที่โปรแกรมของคุณมาพร้อมกับไฟล์ติดตั้งที่มีนามสกุล .msi แทนที่จะเป็น .exe คุณสามารถใช้ไฟล์เดียวกันเพื่อถอนการติดตั้งโปรแกรมของคุณได้เช่นกัน มาดูรายละเอียดเพิ่มเติมเกี่ยวกับไฟล์ .msi เพื่อให้เข้าใจฟังก์ชันได้ง่ายขึ้น
ไฟล์ .msi คืออะไร
ตามเนื้อผ้าโปรแกรมติดตั้งของคุณมาพร้อมกับนามสกุล .exe โปรแกรมเหล่านี้เป็นโปรแกรมที่ออกแบบมาเพื่อติดตั้งโปรแกรมในระบบของคุณด้วยไฟล์การติดตั้งที่รวมมาด้วย ไฟล์ MSI ก้าวไปอีกขั้นโดยอนุญาตให้คุณรวมตัวติดตั้งหลายตัวเข้าด้วยกันในไฟล์เดียวกัน
ซึ่งช่วยให้ไฟล์ MSI สามารถทำงานต่างๆ ได้ด้วยโปรแกรมติดตั้งที่รวมมา ซึ่งรวมถึงสิ่งต่างๆ เช่น ตัวติดตั้งอัปเดต โปรแกรมติดตั้งซอฟต์แวร์ ตัวซ่อมแซมโปรแกรม ตัวแก้ไขโปรแกรม และตัวถอนการติดตั้ง ดังนั้น หากโปรแกรมของคุณมาพร้อมกับไฟล์ติดตั้ง .msi คุณสามารถใช้คำแนะนำด้านล่างเพื่อใช้ไฟล์เดียวกันในการถอนการติดตั้งโปรแกรมจากระบบของคุณ
หมายเหตุ:ไฟล์ .msi ที่เก่ากว่านั้นไม่ค่อยทำงานกับการติดตั้งซอฟต์แวร์เดียวกันที่ใหม่กว่า จำสิ่งนี้ไว้ในกรณีที่คุณพยายามดาวน์เกรดโปรแกรมของคุณเป็นเวอร์ชันก่อนหน้า
ถอนการติดตั้งผ่านไฟล์ .msi
ค้นหาไฟล์ติดตั้ง .msi ในที่จัดเก็บในตัวเครื่องของคุณ แล้วดับเบิลคลิกและเปิดแอป
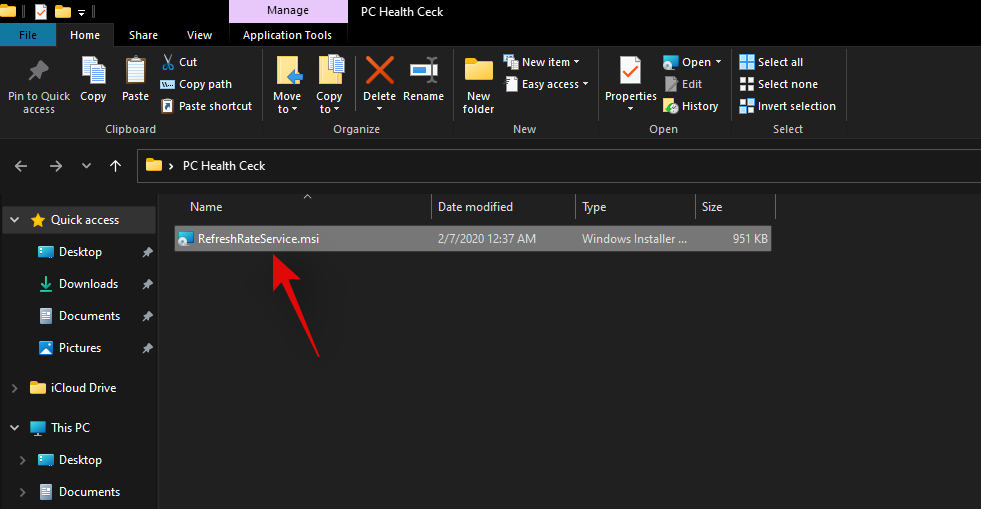
ทำตามคำแนะนำบนหน้าจอจนกว่าคุณจะได้รับแจ้งให้เลือกหนึ่งในแนวทางการดำเนินการ
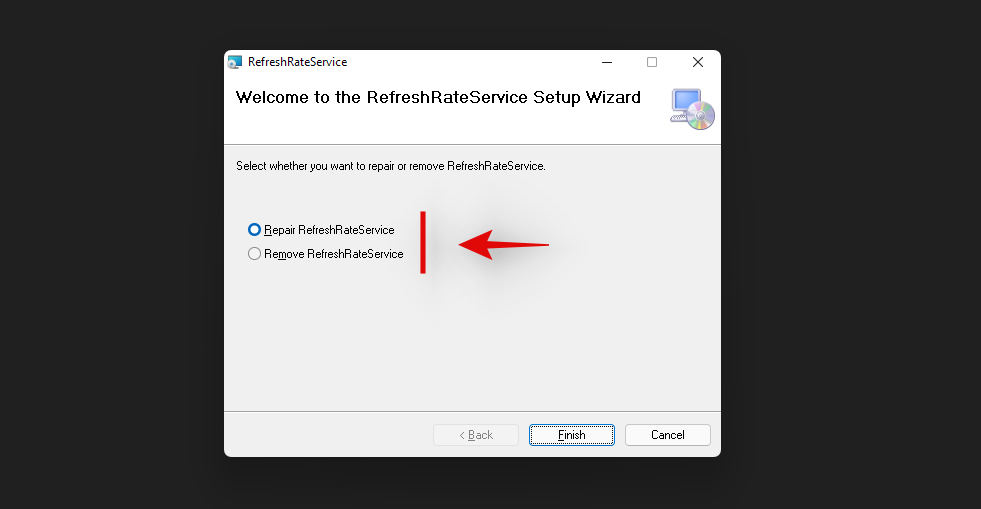
เลือกตัวเลือกที่ต้องการและดำเนินการตามคำแนะนำบนหน้าจอเพื่อดำเนินการถอนการติดตั้งให้เสร็จสิ้น
และนั่นแหล่ะ! ตอนนี้ควรลบโปรแกรมที่เลือกออกจากระบบของคุณผ่านไฟล์ติดตั้ง .msi
วิธี #08: ใช้โปรแกรมถอนการติดตั้งของบริษัทอื่น
มีโปรแกรมถอนการติดตั้งของบริษัทอื่นในตลาดเช่นกัน แอพเหล่านี้ช่วยระบุระบบและแอพของบริษัทอื่นทั้งหมดในระบบของคุณ ซึ่งสามารถถอนการติดตั้งจากพีซีของคุณได้ด้วยการคลิกง่ายๆ โปรแกรมเหล่านี้ส่วนใหญ่อนุญาตให้คุณลบแอประบบหลังจากเลือกใช้ซอฟต์แวร์รุ่นพรีเมียม
ในกรณีที่คุณตัดสินใจใช้เวอร์ชันฟรี คุณจะถูกจำกัดจำนวนการถอนการติดตั้งในกรณีส่วนใหญ่ แม้ว่าสิ่งนี้อาจฟังดูซ้ำซาก แต่ยูทิลิตี้เหล่านี้มีประโยชน์มากสำหรับมืออาชีพและช่างเทคนิคที่ต้องการถอนการติดตั้งหลายโปรแกรมด้วยการคลิกเพียงครั้งเดียว โปรแกรมถอนการติดตั้งเหล่านี้ส่วนใหญ่รองรับการถอนการติดตั้งจำนวนมากซึ่งค่อนข้างมีประโยชน์เมื่อตั้งค่าหลายระบบสำหรับสภาพแวดล้อมในสำนักงาน เราได้เชื่อมโยงโปรแกรมถอนการติดตั้งบุคคลที่สามที่ได้รับความนิยมสูงสุดสองรายการด้านล่าง เราหวังว่าคุณจะพบว่ามีประโยชน์ในการถอนการติดตั้งโปรแกรมจาก Windows 11
วิธีถอนการติดตั้งแอประบบใน Windows 11 [2 วิธี]
คุณสามารถถอนการติดตั้งแอประบบใน Windows 11 ผ่าน PowerShell ที่ยกระดับหรือโดยใช้สคริปต์ PowerShell ของบริษัทอื่น ฉันอยากจะแนะนำให้คุณใช้วิธีการของ PowerShell แม้ว่ามันอาจจะดูซับซ้อนกว่านั้น แต่คุณไม่จำเป็นต้องเรียกใช้สคริปต์ของบริษัทอื่นที่มีสิทธิ์ระดับสูงในระบบของคุณ
อย่างไรก็ตาม หากคุณยังคงตัดสินใจใช้สคริปต์อัตโนมัติ ตรวจสอบให้แน่ใจว่าคุณได้เปลี่ยนนโยบายการดำเนินการของคุณกลับเป็นปกติเมื่อเรียกใช้สคริปต์แล้ว นี่จะมีความสำคัญยิ่งต่อความปลอดภัยของระบบของคุณเนื่องจากการไม่เปลี่ยนแปลงนโยบายการดำเนินการอาจทำให้ผู้ใช้ที่ประสงค์ร้ายสามารถเรียกใช้สคริปต์ PowerShell ในระบบของคุณได้อย่างง่ายดาย ใช้วิธีการใดวิธีหนึ่งด้านล่างนี้ที่ตรงกับความต้องการและข้อกำหนดในปัจจุบันของคุณเพื่อเริ่มต้น
วิธี #01: การใช้ Powershell
กระบวนการถอนการติดตั้ง PowerShell สำหรับโปรแกรมใดๆ มีสองกระบวนการ ขั้นแรก หาชื่อแพ็กเกจแบบเต็มของแอปที่เกี่ยวข้อง จากนั้นใช้ PowerShell เพื่อถอนการติดตั้งแอปที่เกี่ยวข้อง หากแอปของคุณไม่แสดงในรายการ PowerShell คุณอาจต้องใช้สคริปต์ของบริษัทอื่นด้านล่างเพื่อลบแอปที่เกี่ยวข้องออกจากระบบของคุณ มาเริ่มกันเลย.
ขั้นตอนที่ 1: แหล่งที่มาชื่อแพ็คเกจเต็ม
กดWindows + sบนแป้นพิมพ์ของคุณและค้นหา 'PowerShell' คลิก 'เรียกใช้ในฐานะผู้ดูแลระบบ' เมื่อปรากฏในผลการค้นหาของคุณ

เมื่อ PowerShell เปิดตัว ให้พิมพ์คำสั่งด้านล่างแล้วกด 'Enter' บนหน้าจอของคุณ
get-appxpackage
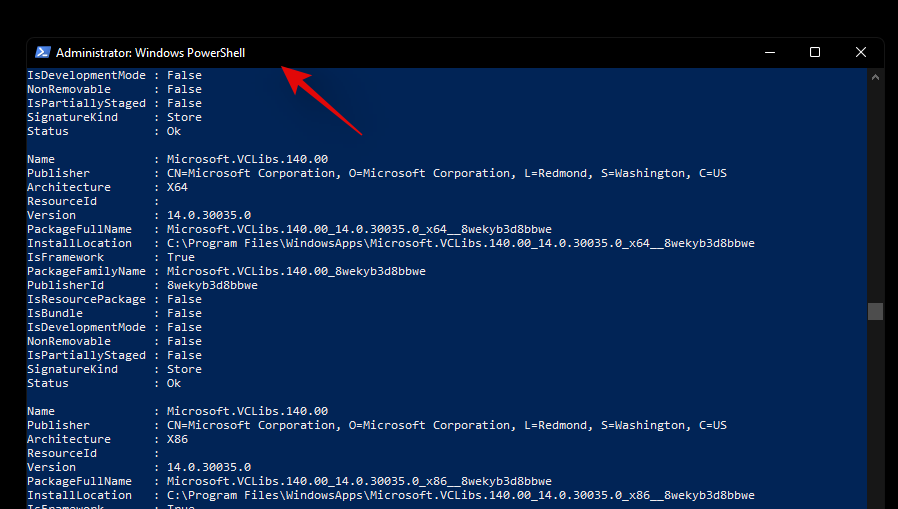
PowerShell จะสร้างและแสดงรายการแอปทั้งหมดที่ติดตั้งในระบบของคุณ รวมถึงแอป OEM ในตัวและแอป Windows เลื่อนรายการเพื่อค้นหาแอปของคุณ อย่างไรก็ตาม หากสิ่งนี้ดูน่าเบื่อเกินไป ให้เริ่มด้วยการคลิกขวาที่แถบชื่อที่ด้านบน
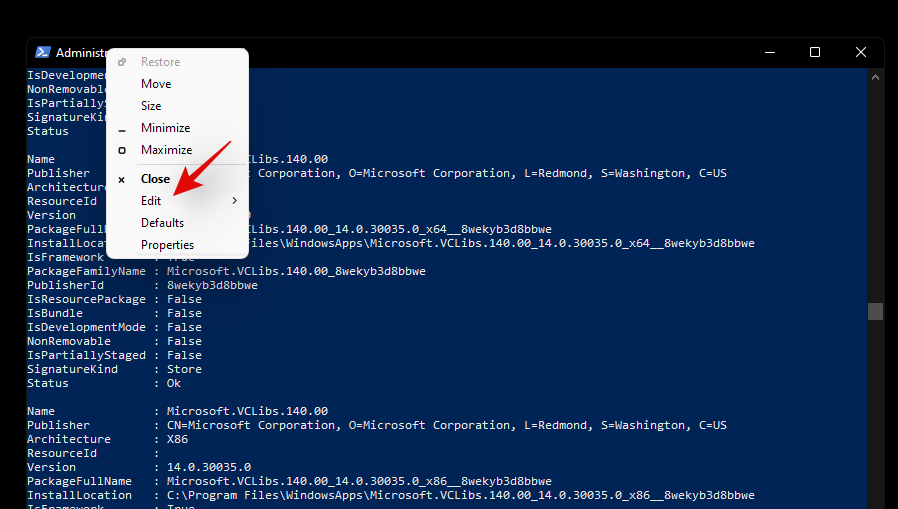
ตอนนี้เลือก 'แก้ไข'
คลิกที่ 'ค้นหา'
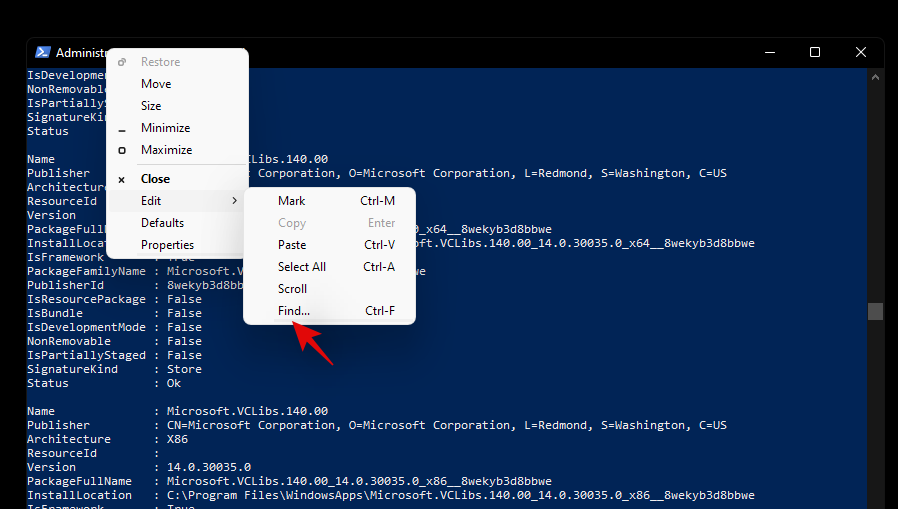
ตอนนี้ให้ค้นหาชื่อทั่วไปของแอปและคุณลักษณะ "ค้นหา" จะนำคุณไปยังแอปในรายการโดยอัตโนมัติ
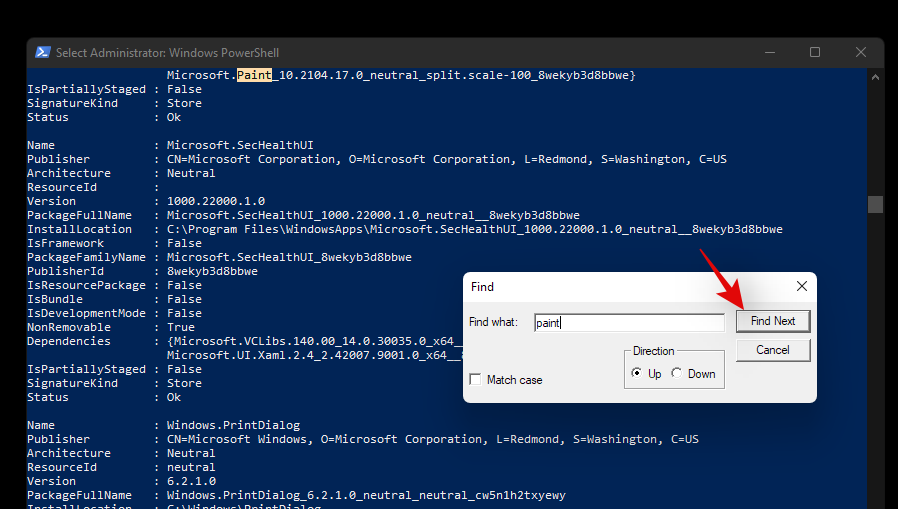
จด 'FullPackageName' ของแอพที่เกี่ยวข้องตามที่แสดงด้านล่าง
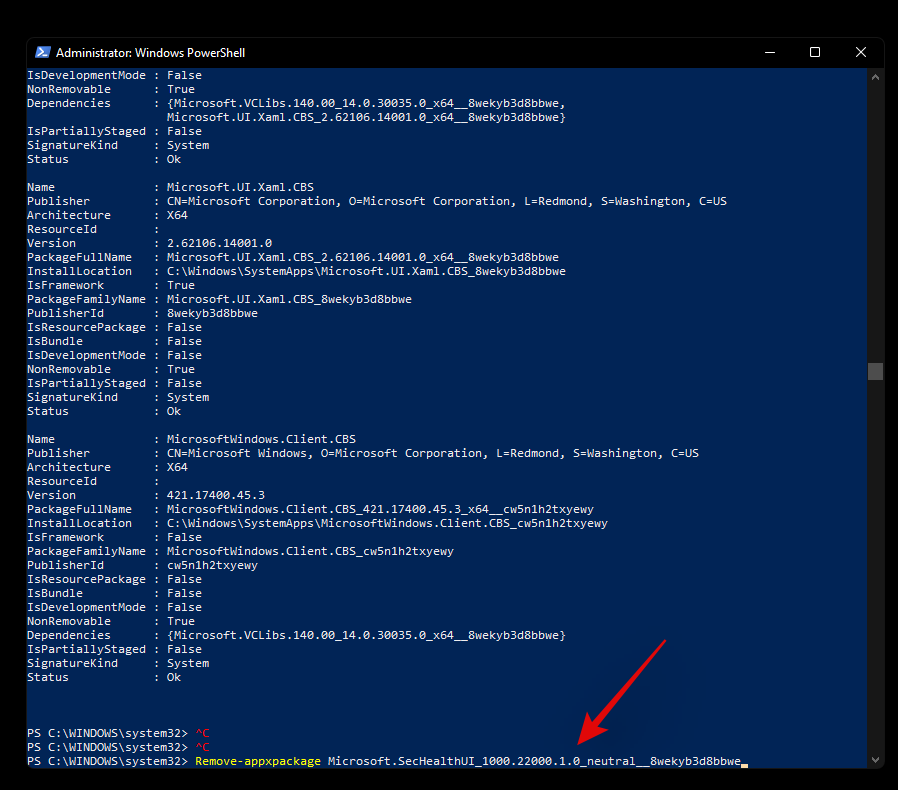
และนั่นแหล่ะ! ตอนนี้คุณจะได้ชื่อแพ็กเกจแบบเต็มสำหรับแอปที่เกี่ยวข้องในระบบของคุณแล้ว ตอนนี้คุณสามารถใช้คำแนะนำด้านล่างเพื่อถอนการติดตั้งจากระบบของคุณ
ขั้นตอนที่ 2: ถอนการติดตั้งแอพผ่าน PowerShell
Open an elevated PowerShell using the guide above. If you already have one open on your screen, then start by typing in the following command. Ensure that you replace ‘[PackageName]’ with the full package name of the app we sourced above.
Remove-Appxpackage [PackageName]

Hit ‘Enter’ on your keyboard once you are done. PowerShell will now do its thing and the app should be installed from your system in no time.
Can’t remove an app using PowerShell? How to fix
If you are unable to remove the app via PowerShell then we recommend you do the following checks to solve the issue.
You should be able to solve your issue by crosschecking the above-stated checks. However, if you are still unable to uninstall the concerned app, then you can use the third-party script below.
Method #02: Using a third party script
You can also use a third-party script to remove system apps from your Windows 11 system. These scripts have been quite popular lately and have been the go-to choice for many users when setting up fresh installations of Windows. Use the guide below to get started.
Note: While this is a Windows 10 script, it has been verified to remove system apps on Windows 11 as well. However, we recommend you keep checking the download page for updates that should be better compatible with Windows 11. We recommend using the script to only remove system apps and nothing else offered by the script. Other features could potentially break Windows 11 until a compatible script for the same is released in the future.
Visit the link above and you will be taken to the GitHub page for the script. Click on ‘Code’ in the top right corner.
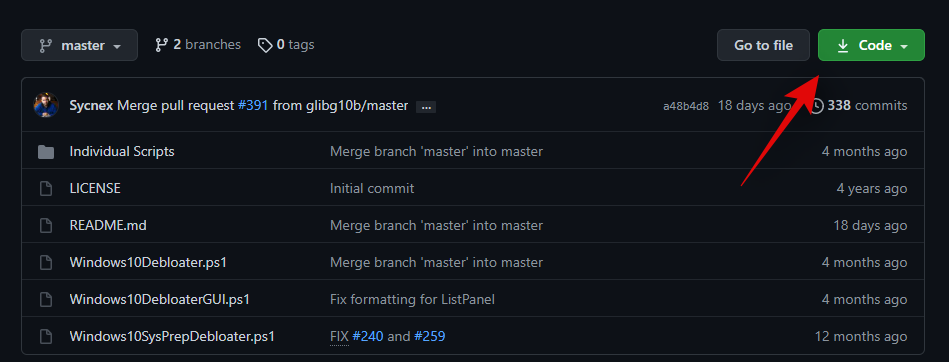
Now click and select ‘Download ZIP’.
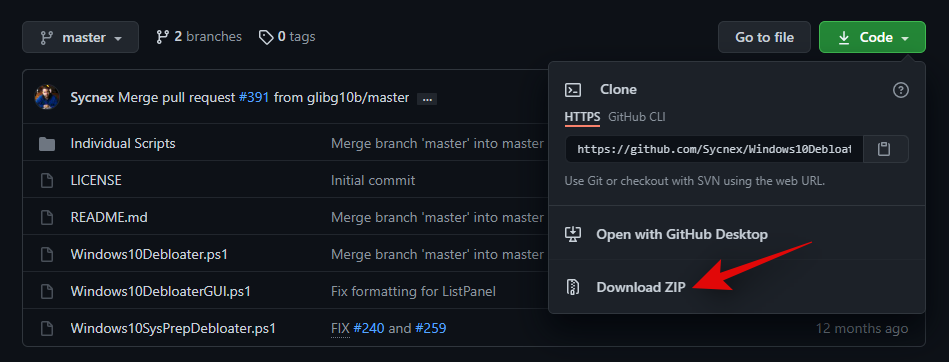
A Zip file will now be downloaded to your local storage. Extract the files to a convenient location.
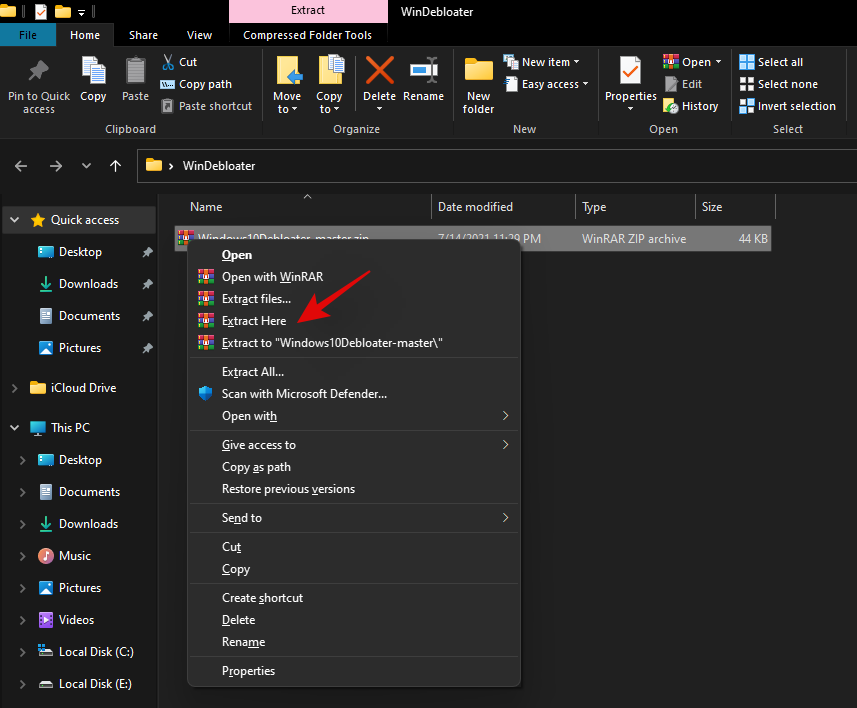
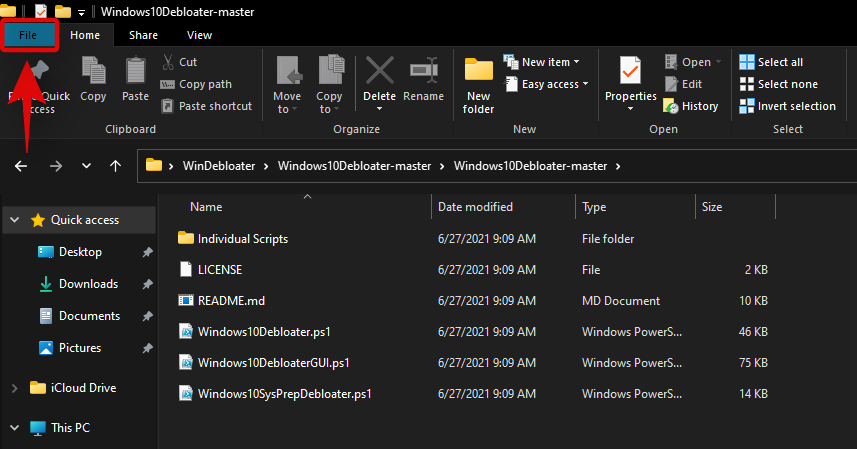
Once extracted, open the folder and click on ”File’ in the top left corner.
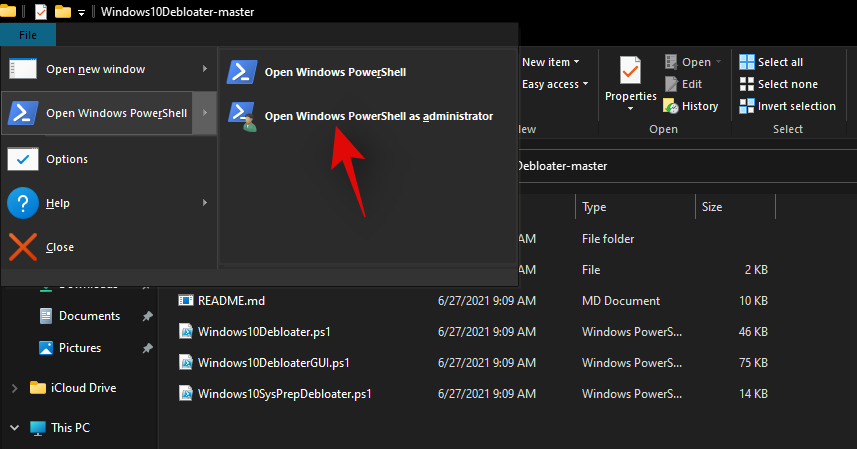
Hover over ‘Open Windows PowerShell’ and select ‘Open Windows PowerShell as administrator’.
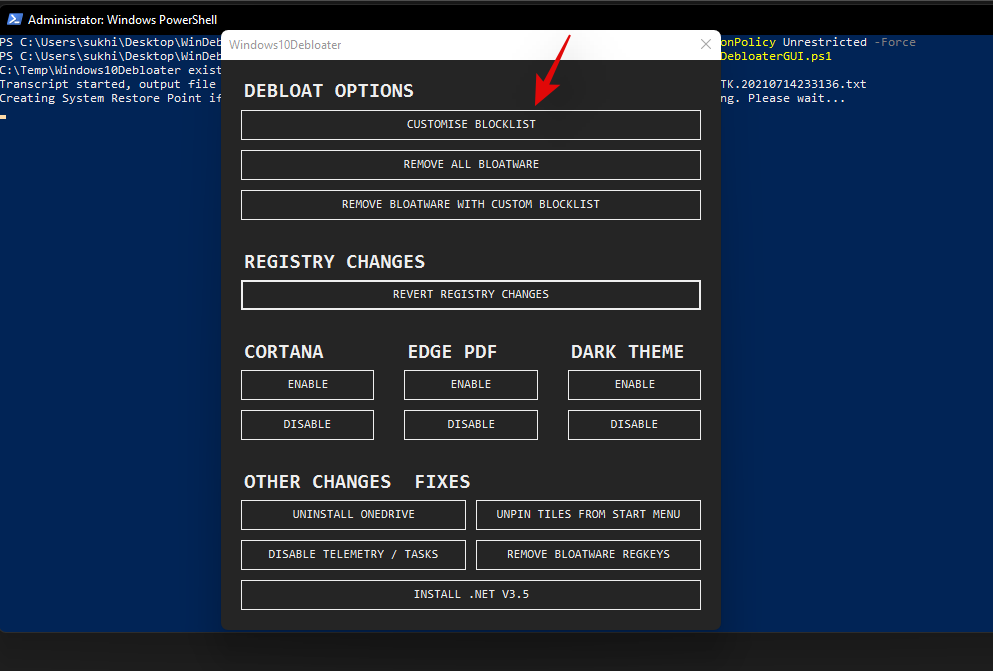
An elevated PowerShell window will now launch on your system. Start by executing the following command given below.
Set-ExecutionPolicy Unrestricted -Force

This will set your script execution policy as unrestricted which will allow us to use the script on your system. Once executed, enter the following command in the window and press ‘Enter’ on your keyboard once you are done.
.\Windows10DebloaterGUI.ps1

This will execute the debloat script and you should now get a graphical interface for it on your screen. Click on ‘Customize Blacklist’ at the top.
You will now get a list of all the apps installed on your system. Check the box for the apps you wish to uninstall and uncheck the box for the apps you wish to keep on your device. Ensure that you go through the entire list to remove any default selections made by the script for the programs that you wish to keep on your device.
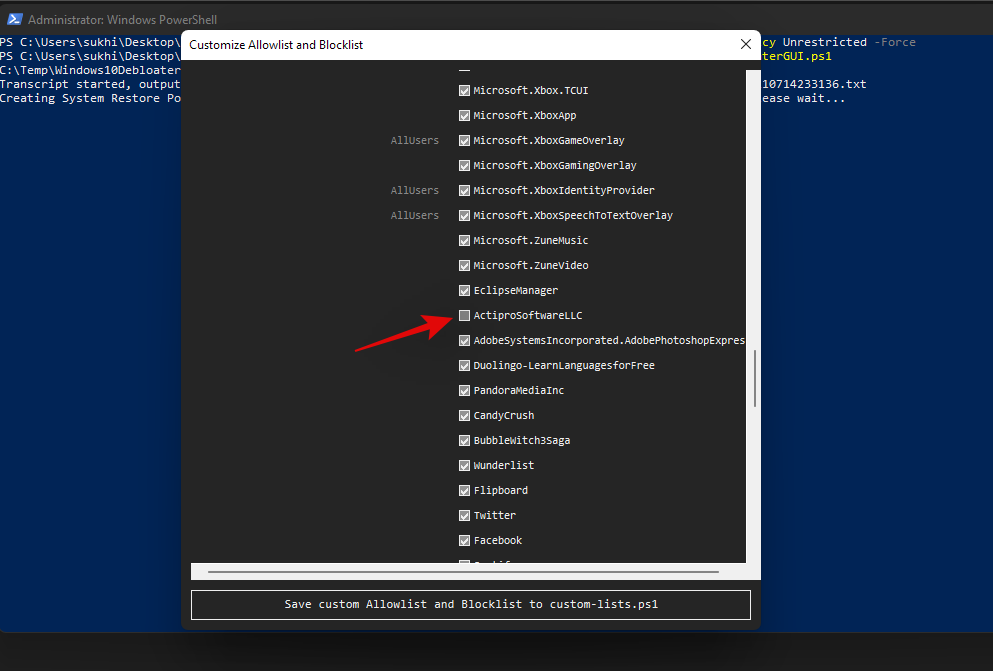
Once you have edited your list, simply click on ‘Save custom Whitelist and Blacklist to custom-lists.ps1’ at the top. You can now close this app selection window.
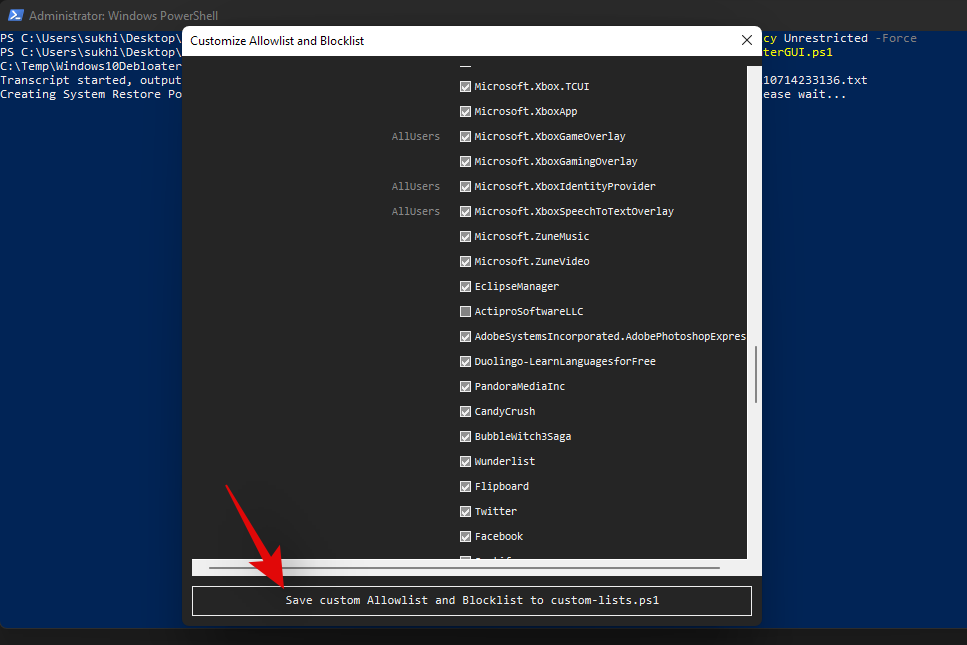
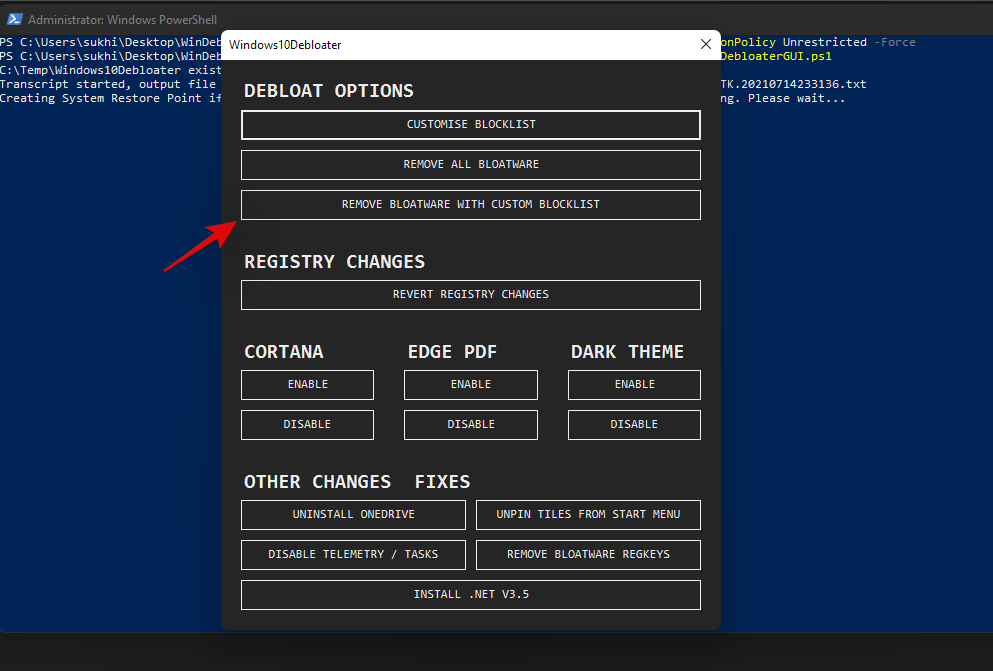
Now click on ‘Remove Bloatware with Customized Blacklist’. Keep an eye on the PowerShell window on the background once the command executes.
Once all programs have been removed, you will get a confirmation for the same in the PowerShell window in the background. Close the graphical interface by clicking on the ‘X’ in the top right corner.
Now go back to your PowerShell window and execute the following command.
Set-ExecutionPolicy Restricted -Force

This will revert changes to your execution policy and revert the changes we made earlier. Doing this is quite important to maintain proper security on your Windows system.
And that’s it! You will now have uninstalled system apps from your system via a third-party PowerShell script.
Can’t uninstall apps on Windows 11? How to fix
There could be a few reasons why you are unable to uninstall apps on your system. Here are a few workarounds that should help you uninstall persistent apps from your system easily.
Method #01: Close instance in task manager and try again
Chances are that the app has an instance or a process open in the background which is preventing it from being uninstalled. In such cases, you can try finding processes related to the app and kill them on your own. Once the processes have been killed, you can then try to uninstall the app again. Follow the guide below to find and kill the process.
Press Ctrl + Shift + Esc on your keyboard to open the ‘Task Manager’. Switch to the ‘Details’ tab by clicking on it.
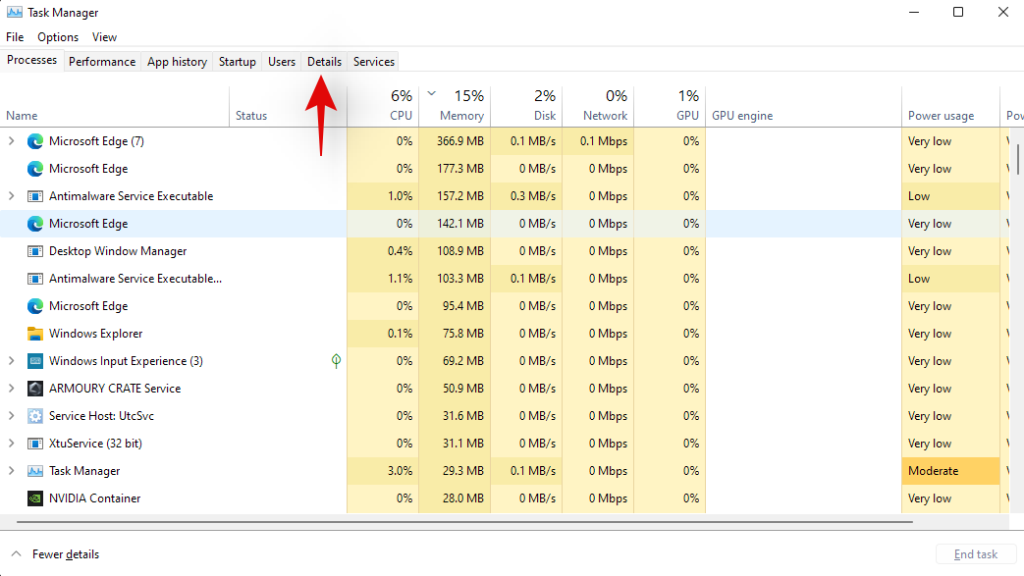
Now look for a process in the list for the concerned app. In our case, we are looking to uninstall ‘AsusOptimization’, hence we will look for a PowerToys process. Once found, click and select the process.
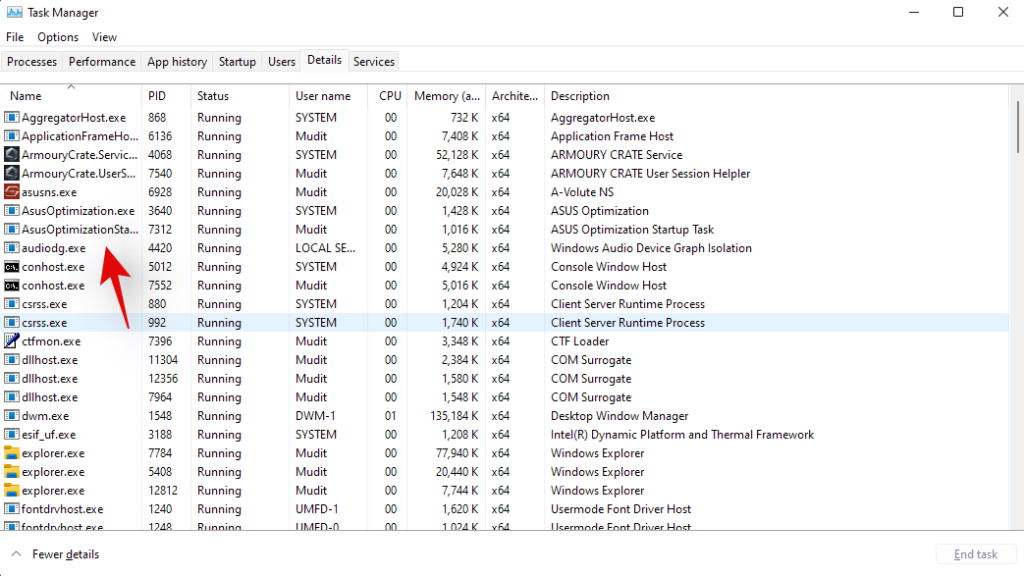
Hit delete on your keyboard or click on ‘End Task’.
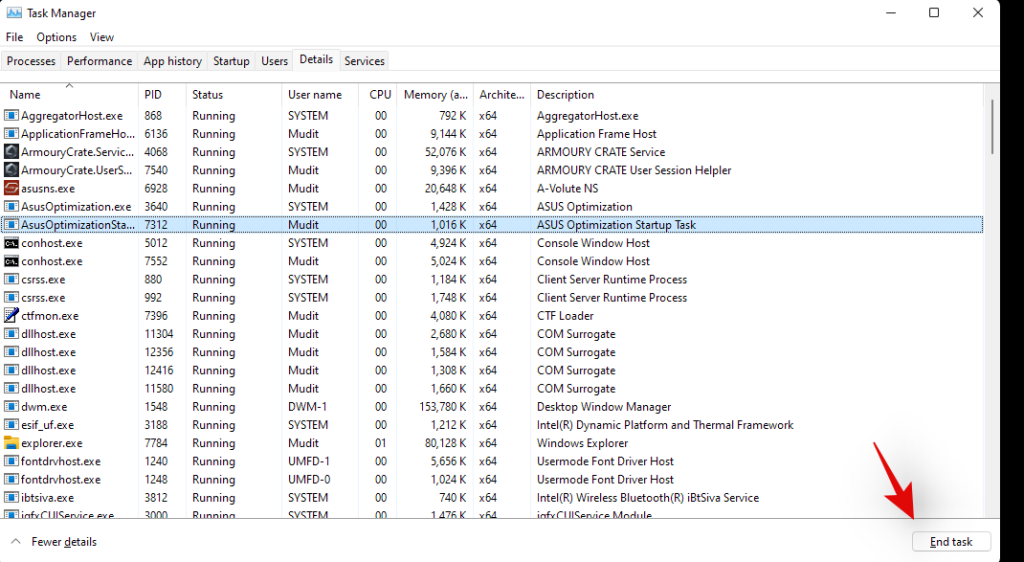
Confirm your choice by selecting ‘End Process’.
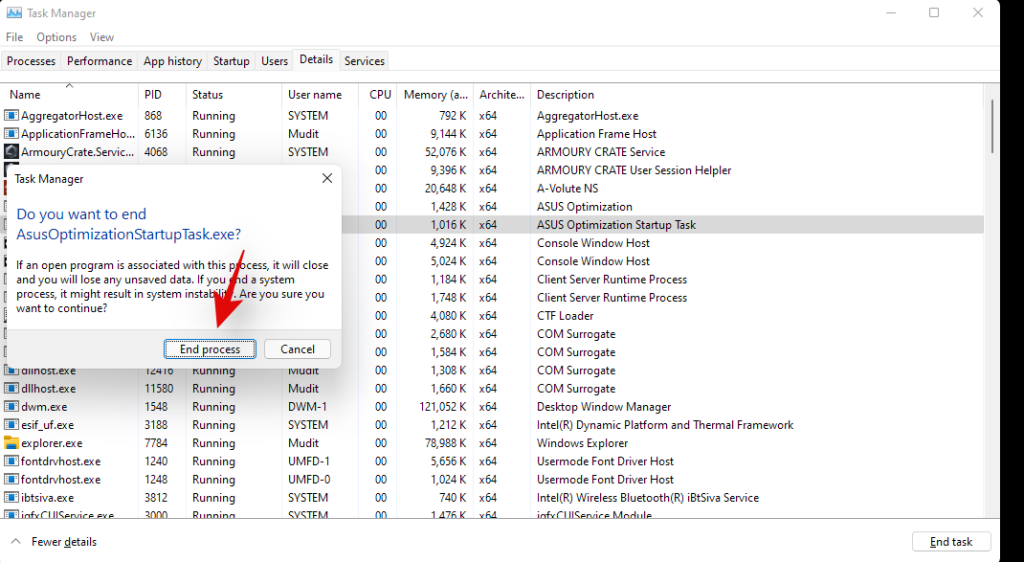
And that’s it! the process should now be killed and you can now try uninstalling the concerned app again.
Method #02: Uninstall in Safe mode
Another way to ensure that no third-party apps are launched or used in the background is to launch your system in safe mode and then try to uninstall your concerned app. You can use this comprehensive guide by us to enter safe mode on Windows 11.
Once in safe mode, follow the guide below to get the installer service back up and running on your system. Once the service is running in the background, you can use either of the methods above to uninstall the concerned app from your system.
Press Windows key + S key to open Windows Search and type in ‘cmd’. Click on ‘Run as administrator’ when the command prompt shows in your search results.
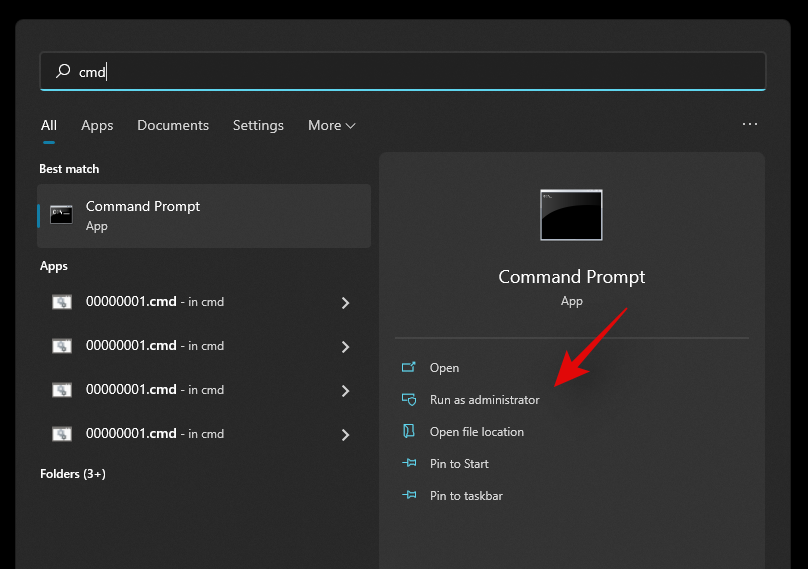
Enter the following commands in the command prompt one by one and hit Enter on your keyboard to execute each one of them.
REG ADD "HKLM\SYSTEM\CurrentControlSet\Control\SafeBoot\Minimal\MSIServer" /VE /T REG_SZ /F /D "Service"
REG ADD "HKLM\SYSTEM\CurrentControlSet\Control\SafeBoot\Network\MSIServer" /VE /T REG_SZ /F /D "Service"
net start msiserver

And that’s it! The installer service should now be running on your system and you should now be able to uninstall the concerned app using either one of the methods above.
Method #03: Run the Microsoft Uninstaller troubleshooter
You can also run a Microsoft Troubleshooter to try and fix uninstaller issues. Microsoft troubleshooters have come a long way since they were first introduced and can now fix most software and driver incompatibility issues without any user intervention.
Microsoft has also made it much easier for you to now launch any troubleshooter to try and solve your current issue. Use the guide below to launch an uninstaller troubleshooter on your Windows 11 system.
Required
Guide
Download the troubleshooter using the link above to your PC. Once downloaded, extract the .zip file to a convenient location. If you have trouble extracting the .zip file or it seems to be blocked, use the guide below to unblock it, else you can skip the guide and jump to the next guide.
Unblock the .zip file
Right-click on the .zip file and select ‘Properties’.
Check the box for ‘Unblock’ at the bottom of the Window.
Click on ‘Ok’.
Provide administrator permission to make the necessary change.
The file should now be unblocked on your system and you should now be able to extract it like any other .zip file on your system.
Run the troubleshooter
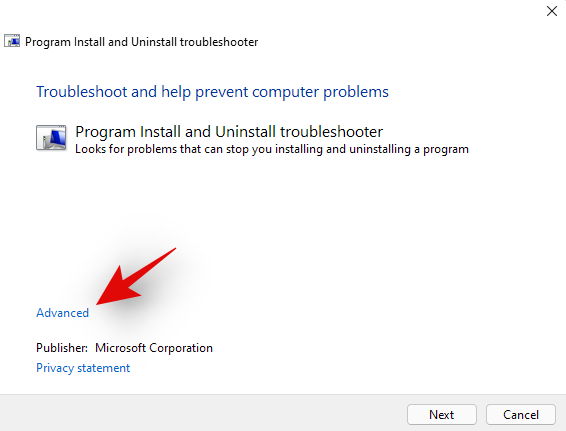
Navigate to the extracted files on your local storage. Cut the file named ‘MicrosoftProgram_Install_and_Uninstall.meta.diagcab’ and paste it on your desktop. Double click and run the file from your desktop. Click on ‘Advanced’ at the bottom once the troubleshooter is launched.
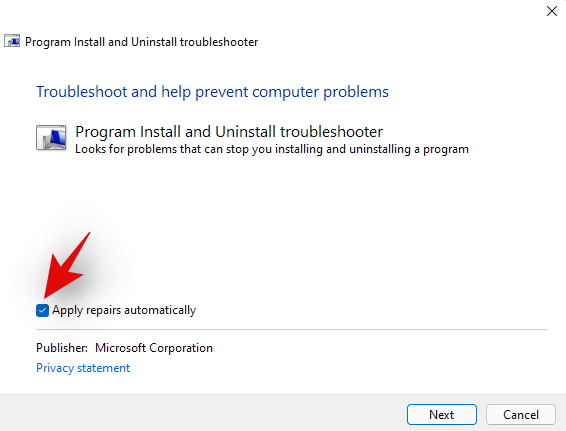
Check the box for ‘Apply repairs automatically’. Click on ‘Next’ once you are done.
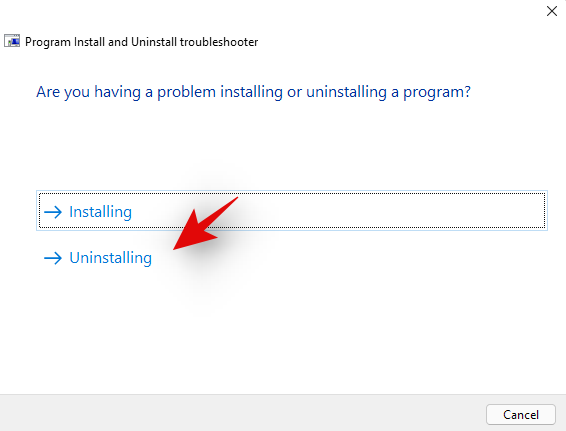
Select ‘Uninstallting’ on the next step.
Select the concerned program from the list provided on your screen. If your program does not appear in the list, click on ‘Not Listed’.
Now follow the on-screen instructions depending on your choice to complete the troubleshooting process.
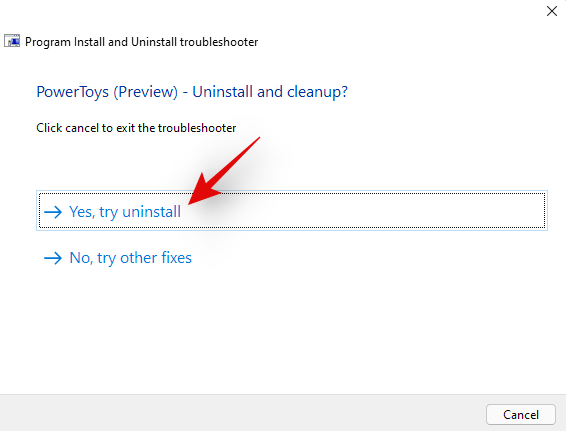
And that’s it! In most cases, the troubleshooter will detect your issue and solve it automatically. A report for the same will be presented to you at the end of the process with all the details.
Method #04: Use a restore point
If you are still having issues uninstalling the software from your system then it is time for some drastic steps as this could be malicious in nature. Let’s restore your PC to a restore point before the concerned app or program was installed on your system.
However, if you do not have a restore point then you can jump to one of the other methods listed below. Here’s how you can use a restore point to restore your PC to its previous state.
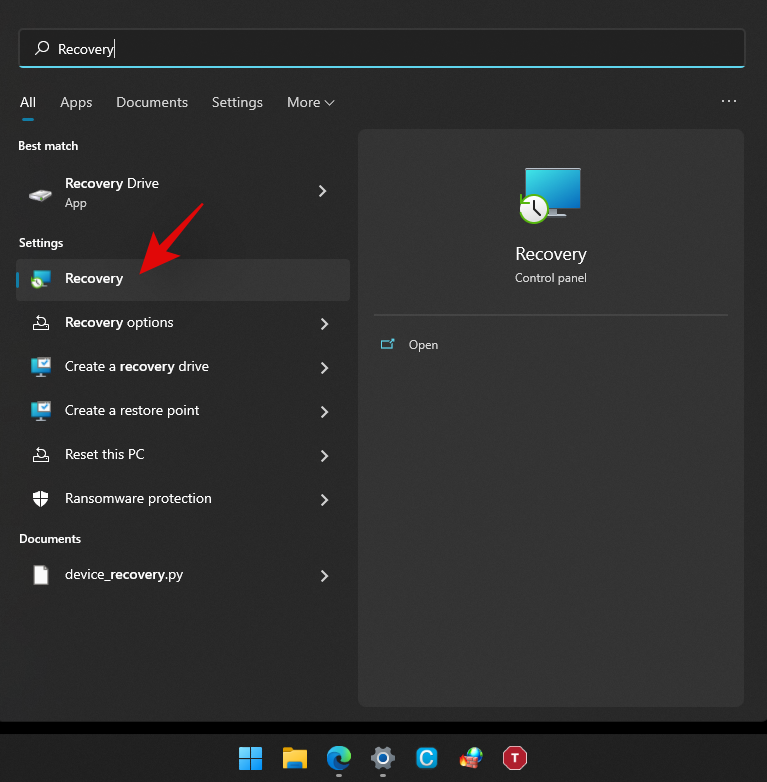
Press Windows + S on your keyboard and search for ‘Recovery’. Click and launch the app link once it shows up in your search results.
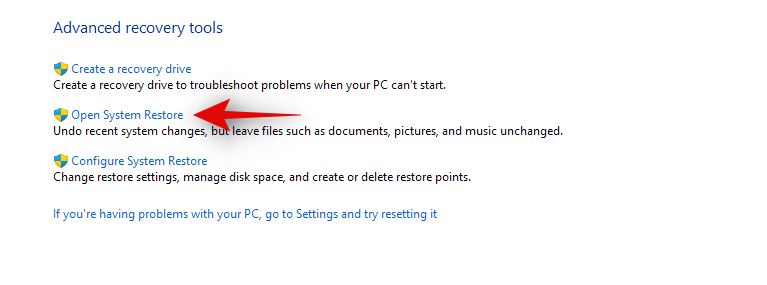
Click on ‘Open System Restore’.
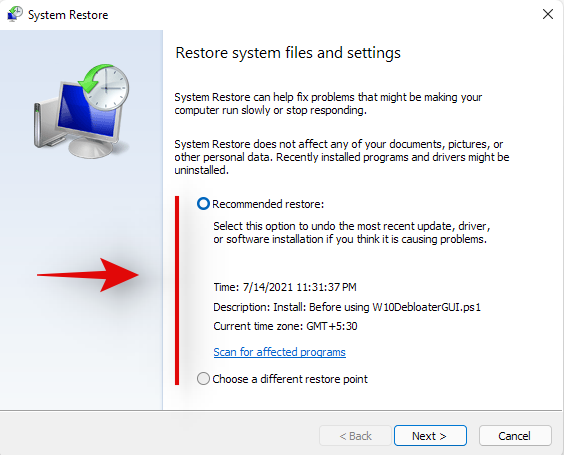
You will now be suggested a recent system restore point if you have one. Select that if needed, or click on ‘Choose a different restore point’ if you wish to choose an older one.
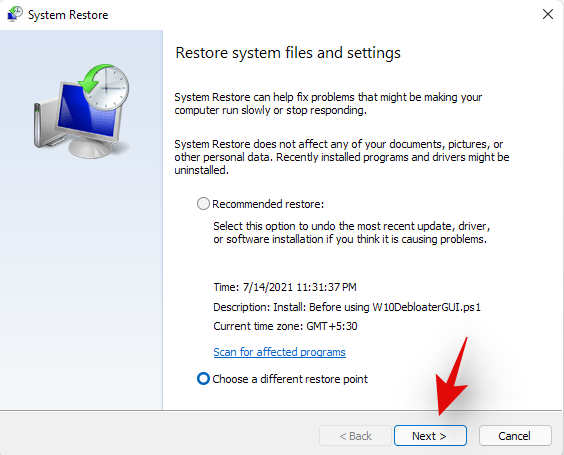
Select ‘Next’ or hit ‘Enter’ on your keyboard.
You can now select the desired Restore Point from the list at the top. You can check the box for ‘Show more restore points’ if you wish to look at more restore points.
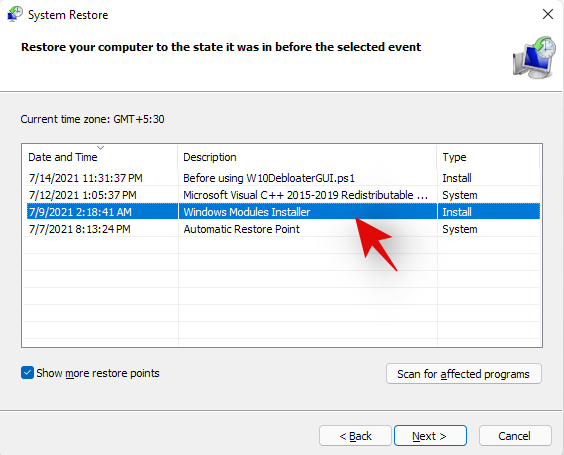
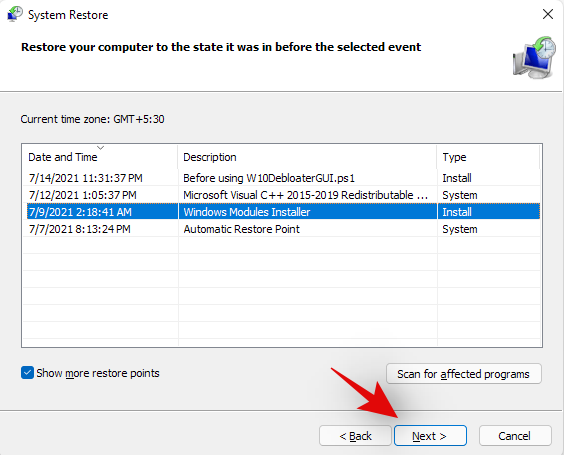
Once selected, click on ‘Next’.
Finally, click on ‘Finish’.
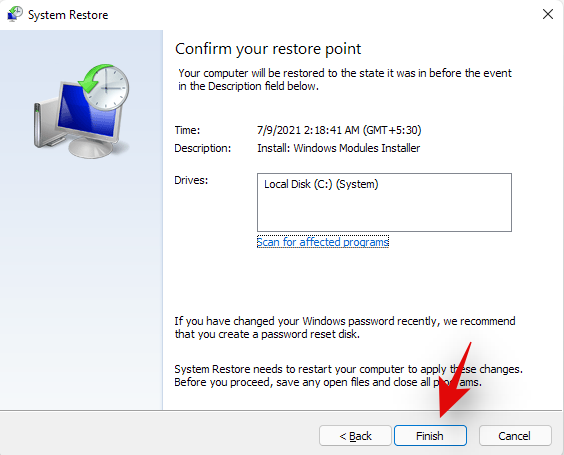
Windows 11 will now restore your system to the selected restore point and the concerned app should no longer be on your system once the process is completed.
Method #05: Contact Windows Support
If you are still unable to get the app uninstalled from your system then it might be time to contact Microsoft Support. Microsoft Support executives are trained to solve such issues with more expertise and can even remotely takeover your system if needed. It might be time to get in touch with the support team to solve your issue. Additionally, if you purchased a pre-built system, you can use your OEM support for some help as well. Use the link below to get in touch with Microsoft Support.
Uninstall programs on Windows 11: FAQs
Can you uninstall pre-installed apps?
Well, officially, you can not and it is not recommended by Microsoft. But still, if you wish to remove preinstalled apps, you can easily do so depending on the type of the app. If you wish to remove a system app then the process is a bit complicated. Else, if you wish to remove third-party pre-installed apps then you can simply do so by uninstalling them like any other app from your Windows 11 Pc using the guide below.
Can you uninstall system apps?
Yes, you can uninstall system apps but not officially. Officially Windows 11 or any Windows for that matter, doesn’t allow you to remove system apps from the OS. However, there are many workarounds to circumvent this restriction and uninstall preinstalled system apps from your system.
This includes using command prompt/PowerShell or a third-party software. Using these methods you should be able to easily uninstall system apps from your system. Follow our guides below for each of the methods depending on your current needs and requirements.
Can you uninstall apps downloaded from the Microsoft Store?
Yes, apps downloaded from the Microsoft Store can be uninstalled easily using either of the methods listed below. This includes Android apps that you may have downloaded on your system but did not find appealing enough. We recommend uninstalling Windows Store apps either via Settings or Start.
Chances are that the Store app will now show up in the Control Panel and if uninstalled via CMD or PowerShell, you could end up with leftover files including empty Start menu folders. Hence, use Powershell or CMD for Windows Store apps only if you are facing an issue uninstalling them via the Settings or the Start menu.
What happens when you uninstall a program?
Uninstallation is the process of removing a program or an app from your system. While apps are installed singularly with all dependencies available to them in a sandbox, programs operate differently. Programs usually have scheduled tasks, customized registry values to execute them, and dependencies for various Windows features and extensions that they need for their own installation process to create and place every file and task correctly.
Hence the removal process for all these things created by a program when it is first installed on your system is called uninstallation. All scheduled tasks, registered services, registry keys, executables, temporary files, log files, and more are removed once you uninstall a program from your system. In some cases, you will be leftover with settings and save files so that you don’t have to set up the program entirely when installing it in the future.
These files can be cleared by clearing your Windows Cache and temporary files in most cases. However, if you still suspect leftover files from a program on your system, then we recommend checking the following places for any leftover files. If found, you can simply delete them like any other file on your system.
How to remove data of uninstalled programs
If you still see the remaining files and folders or context menu options for a removed program or app, then you can try the fixes below to solve your issue.
Method #01: Clear cache and temporary files from Windows
You should first try clearing cache and temporary files from your Windows 11 system. In most cases, this will help the overall File Explorer UI to refresh itself which should automatically remove leftover files and context menu items for removed programs from your system.
You can use this comprehensive guide by us to easily clear your Windows 11 cache and storage. You can also use the same guide to free up storage space on your system as well by deleting other large files and installations that show up in the list.
Method #02: Check for leftover files manually
You can also check and delete all leftover files manually for the removed program or app. You should start by using Windows Search to look for any files or folders associated with the uninstalled program. You can then delete these manually from your local storage.
Once you have deleted all the files and folders that show up in the search, you can proceed to manually check the locations listed below. If they contain any leftover files or folders from the removed program, then you can simply select them and delete them from your system.
Method #03: Run a third-party uninstaller/cleaner
If you are still left with the remaining files and context menus for the program then it is time to use a third-party uninstaller or cleaner. These programs are specifically designed to identify and remove leftover files from previously uninstalled programs on your system. We recommend you give Revo uninstaller a try as even the free model for the app will help you identify the location of leftover files which can then be deleted by you manually. You can also use something like CCleaner that is designed to remove leftover files and free up storage and processing space on your system.
Method #04: Try to remove the app via PowerShell
If nothing works, then chances are that the concerned app was installed on your system using elevated privileges which prevents some files and folders from being removed from your system.
In such cases, we recommend you try to remove the app via PowerShell. You can use our guide above to remove system apps from Windows 11 via PowerShell. You will first need to source the full package name for your app or program, which can then be used to force uninstall it from your system.
Can you uninstall Windows Updates?
Yes you can easily uninstall Windows Update from your system. New updates can often introduce compatibility issues on older hardware and having the option to uninstall updates can always help. You can use the guide below to uninstall recently installed updates from your system.
How to uninstall Windows Updates
Follow the guide below to uninstall recently installed Windows Updates from your Windows 11 system.
Press Windows + i on your keyboard to open the Settings app. Click on ‘Windows Update’ on your left.
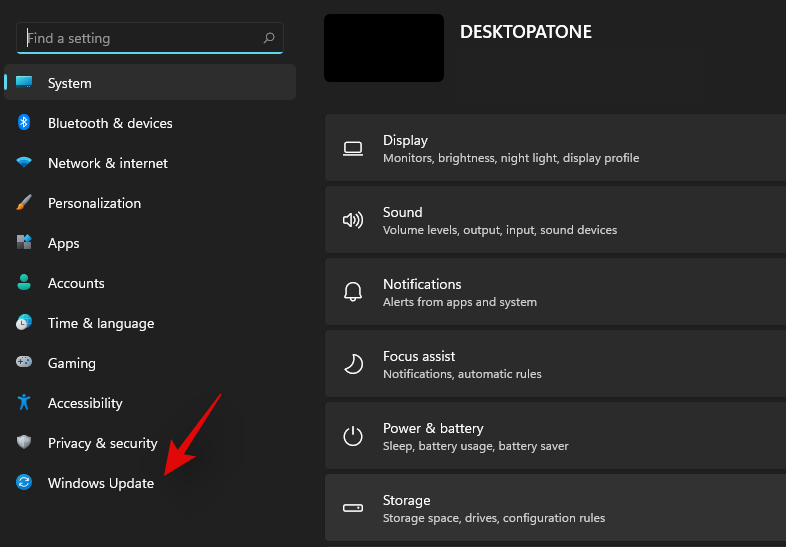
Now click on ‘Update history’.
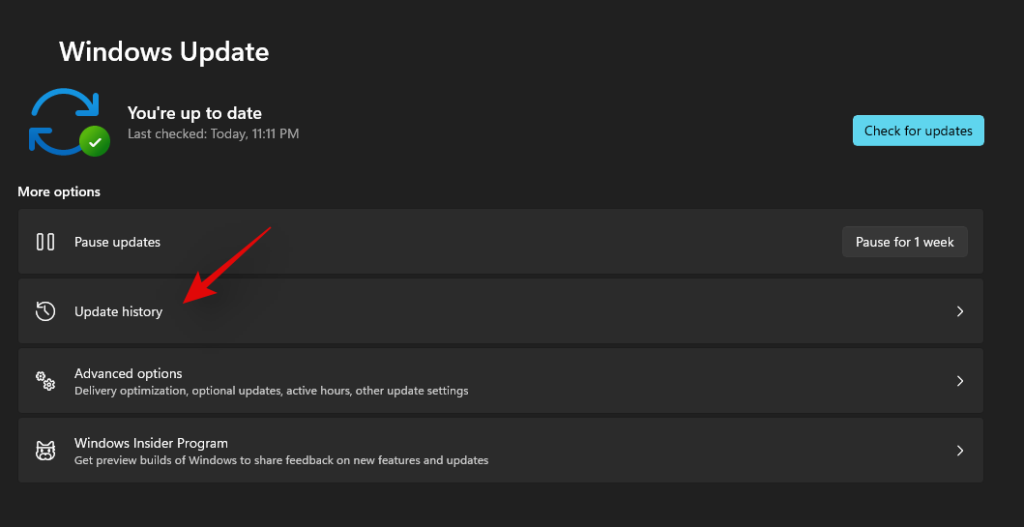
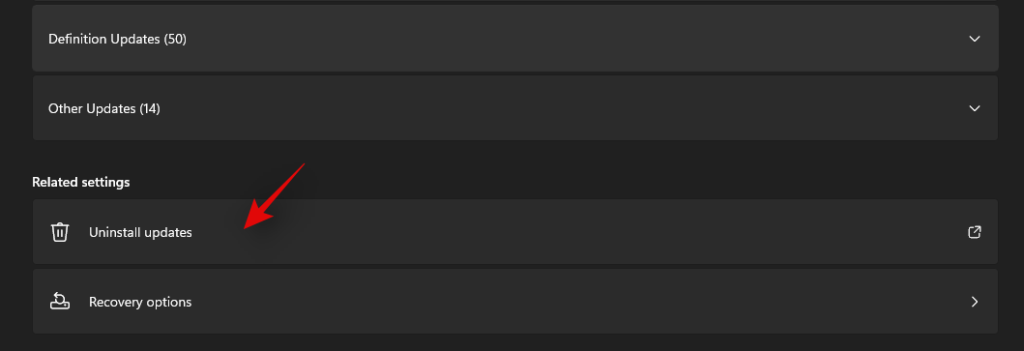
Scroll to the bottom on your right and click on ‘Uninstall Updates’.
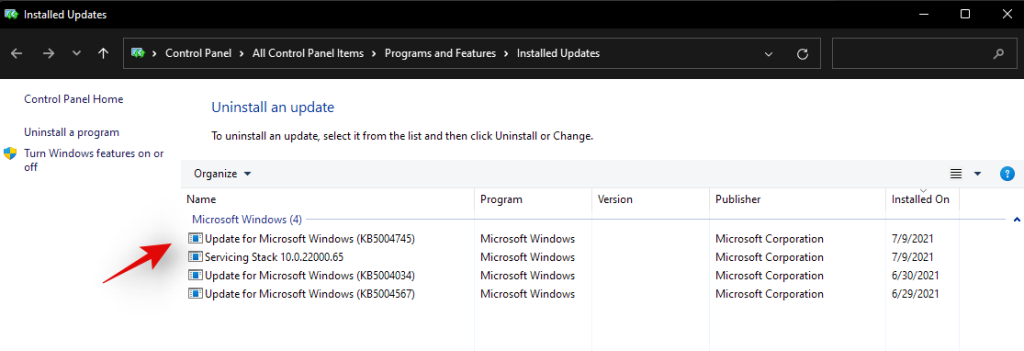
You will now get a list of all the recent updates installed on your system. Click and select the update you wish to uninstall.
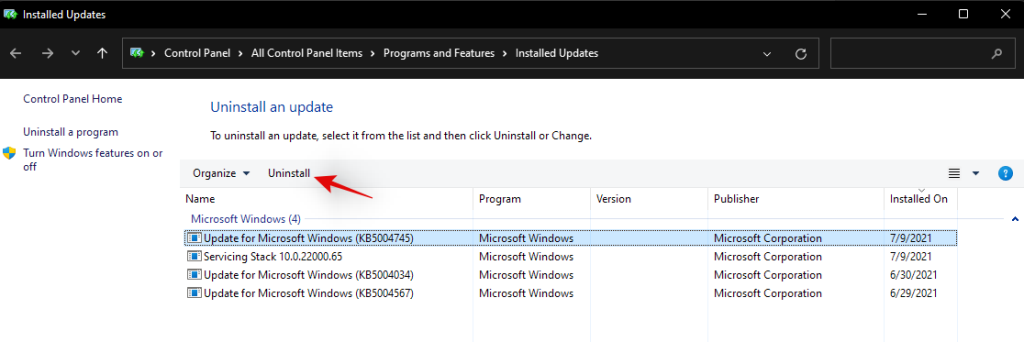
Click on ‘Uninstall’ at the top now.
Follow the on-screen instructions to complete the process.
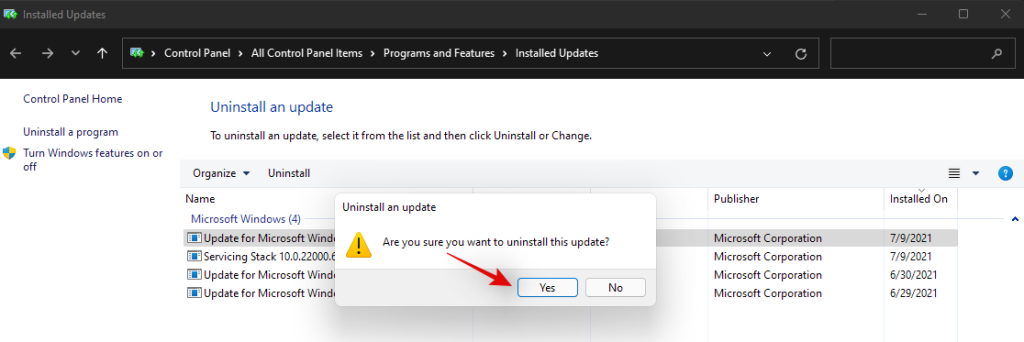
And that’s it! Your selected Windows update should now be uninstalled from your system.
We hope this guide helped you uninstall the concerned apps or programs from your system. If you still face issues, feel free to reach out to us using the comments section below.
คำแนะนำในการกำจัด Yahoo Search เป็นเครื่องมือค้นหาเริ่มต้นใน Chrome โดยใช้วิธีที่ง่ายและมีประสิทธิภาพ
เมื่อคุณค้นหารายการในการค้นหา Windows จะแสดงผลลัพธ์ในเครื่องสำหรับแอป ไฟล์ หรือการตั้งค่า หากไม่มีอะไรเกิดขึ้น Windows ยังมีการค้นหา Bing ในตัวที่จะแสดงรายการออนไลน์ ...
การแจ้งเตือนได้กลายเป็นส่วนสำคัญในชีวิตของเรา พวกเขาทำให้เราอัปเดต ช่วยเรารักษาตารางเวลาของเรา และที่สำคัญที่สุดคือช่วยให้เราได้รับข่าวสารล่าสุดและยิ่งใหญ่ที่สุด อย่างไรก็ตาม บริษัทต่างๆ ดูเหมือนจะ ...
Windows Insider builds และ beta builds เป็นวิธีที่ยอดเยี่ยมในการทดลองใช้การอัปเดตที่จะเกิดขึ้น เนื่องจาก Windows 11 ที่กำลังจะเปิดตัว ผู้ใช้จำนวนมากทั่วโลกได้เข้าร่วมโปรแกรมวงในเพื่อ ...
การทำซ้ำล่าสุดของ Windows คือทุกสิ่งที่ผู้ที่ชื่นชอบเทคโนโลยีต้องการให้เป็น ตั้งแต่ความเข้ากันได้ของแอปที่ดีขึ้นไปจนถึงอินเทอร์เฟซผู้ใช้ที่สวยงาม มีอะไรอีกมากมายให้น้ำลายสอ แต่มี…
Windows 11 เพิ่งเปิดตัว และหากคุณได้ลองติดตั้งระบบปฏิบัติการล่าสุด คุณอาจได้ตระหนักถึงความจำเป็นของ Secure Boot และ TPM คุณสามารถค้นหาและเปิดใช้งานการตั้งค่าเหล่านี้ได้อย่างง่ายดายในตัวคุณ...
คอมพิวเตอร์เข้ามาในชีวิตของเรามากขึ้นกว่าเดิม ซึ่งเป็นสาเหตุที่ผู้ผลิตกำลังมองหาวิธีใหม่ในการประหยัดพลังงานบนอุปกรณ์มือถือของคุณ อย่างไรก็ตาม สลีปแบบแมนนวลที่ทดลองและทดสอบแล้ว w...
แม้ว่า Microsoft จะพยายามอย่างดีที่สุดเพื่อหลอกล่อคุณในการใช้ Teams หากคุณยังไม่ชอบ คุณอาจต้องการลบออกจากทาสก์บาร์ คุณสามารถทำได้ง่ายๆ และเพิ่มพื้นที่...
เรียนรู้วิธีซิงค์ Sticky Notes ระหว่างอุปกรณ์ต่างๆ ใน Windows 11 ได้อย่างง่ายดาย คู่มือนี้ครอบคลุมการตั้งค่า การแก้ไขปัญหา และเคล็ดลับเพื่อเพิ่มประสิทธิภาพการทำงานสูงสุดด้วยคุณสมบัติล่าสุด
กำลังประสบปัญหาเครื่อง Windows 11 ทำงานช้าใช่ไหม? มาดูวิธีแก้ไขทีละขั้นตอนสำหรับแผนเพิ่มประสิทธิภาพขั้นสูงสุดเพื่อเพิ่มประสิทธิภาพพีซีของคุณกัน
กำลังประสบปัญหาเกี่ยวกับการจัดวางสกิน Rainmeter บน Windows 11 อยู่ใช่ไหม? พบกับวิธีแก้ไขทีละขั้นตอนที่ได้รับการพิสูจน์แล้ว เพื่อคืนความสมบูรณ์แบบให้กับเดสก์ท็อปของคุณ อัปเดตด้วยการปรับแต่งล่าสุดเพื่อการปรับแต่งที่ราบรื่น
กำลังประสบปัญหาข้อผิดพลาดในการรีเซ็ต PIN ของ Windows Hello ใน Windows 11 อยู่ใช่ไหม? ค้นพบขั้นตอนการแก้ไขปัญหาที่ได้รับการพิสูจน์แล้วเพื่อแก้ไขปัญหานี้อย่างรวดเร็วและกลับมาเข้าถึงอุปกรณ์ของคุณได้อย่างปลอดภัย อัปเดตด้วยการแก้ไขล่าสุดแล้ว
กำลังประสบปัญหาข้อผิดพลาดของ Cortana และ Copilot AI ใน Windows 11 อยู่ใช่ไหม? ค้นพบวิธีแก้ไขที่ได้รับการพิสูจน์แล้วเพื่อแก้ปัญหาการหยุดทำงาน การไม่ตอบสนอง และปัญหาการทำงานร่วมกัน เพื่อประสิทธิภาพ AI ที่ราบรื่น ทำให้ระบบของคุณกลับมาใช้งานได้ตามปกติในวันนี้!
กำลังประสบปัญหาเกี่ยวกับระยะห่างและขนาดของแถบงานใน Windows 11 อยู่ใช่ไหม? พบกับวิธีแก้ไขที่ได้ผลจริงเพื่อกำจัดไอคอนขนาดใหญ่เกินไป ระยะห่างที่ผิดปกติ และคืนแถบงานให้ราบรื่นและไม่มีปัญหา คู่มือทีละขั้นตอนสำหรับผู้ใช้ทุกคน
กำลังประสบปัญหาเสียงเบาจากไมโครโฟนภายในเครื่องบน Windows 11 อยู่ใช่ไหม? พบกับวิธีแก้ไขแบบทีละขั้นตอนที่พิสูจน์แล้ว เพื่อคืนคุณภาพเสียงที่คมชัดโดยไม่ต้องยุ่งยาก ทำให้ไมโครโฟนของคุณใช้งานได้อย่างสมบูรณ์แบบในวันนี้!
กำลังประสบปัญหาการใช้งาน Pagefile.sys สูงใน Windows 11 อยู่ใช่ไหม? มาดูขั้นตอนการแก้ไขปัญหาที่ได้รับการพิสูจน์แล้ว เพื่อแก้ไขปัญหานี้ ปรับแต่งหน่วยความจำเสมือน และคืนประสิทธิภาพการทำงานที่ราบรื่นให้กับพีซีของคุณ วิธีแก้ไขง่ายๆ สำหรับทั้งมือใหม่และมืออาชีพ
กำลังประสบปัญหาหน้าจอดำใน OBS Studio บน Windows 11 อยู่ใช่ไหม? พบกับวิธีแก้ไขปัญหาที่ได้ผลจริงสำหรับปัญหาการบันทึกภาพ ปัญหาความขัดแย้งของ GPU และอื่นๆ อีกมากมาย คู่มือทีละขั้นตอนที่จะช่วยให้การสตรีมและการบันทึกของคุณกลับมาใช้งานได้ตามปกติโดยไม่มีปัญหา
กำลังประสบปัญหาเกี่ยวกับเสียง aptX และ LDAC ใน Windows 11 อยู่ใช่ไหม? พบกับวิธีแก้ไขที่ได้รับการพิสูจน์แล้วเพื่อคืนคุณภาพเสียง Bluetooth คุณภาพสูงบนพีซีของคุณ คู่มือทีละขั้นตอนเพื่อการเล่นที่ราบรื่นโดยไม่มีปัญหาใดๆ


