
Windows 11i yüklemek için TPM gereksinimi nasıl atlanır

Bu bilgisayar Windows 11 hatası çalıştıramıyor olmadan yüklemeye devam etmek için Windows 11 TPM 2.0 gereksinimini atlamak için bu kolay adımları kullanın.
Windows 11'de (sürüm 21H2), temiz kurulum, sabit sürücüyü silme ve özel ayarlar, sürücüler, uygulamalar veya dosyalar olmadan işletim sisteminin yeni bir kopyasını uygulama sürecini ifade eder. Genellikle bu, yükleme sorunlarını önlemek ve mevcut sorunları gidermek için uyumlu donanımda Windows 11'in en son sürümüne yükseltme yapmak için önerilen yaklaşımdır .
Örneğin, bilgisayar uzun süredir aynı kuruluma sahipse, temiz bir Windows 11 yüklemesi performans sorunlarını, kapatma, önyükleme, bellek ve uygulamaları çözmeye yardımcı olabilir. Ayrıca, bu yükleme türü, Windows 7 veya Windows 8.1 gibi daha eski bir sürümden yükseltme yapmak için en iyi yöntemdir . Ayrıca, varsayılan kurulumla önceden yüklenmiş olarak gelen can sıkıcı bloatware'i silmek için bu seçeneği kullanabilirsiniz.
Microsoft , işletim sistemini bir SSD'ye (Katı Hal Sürücüsü) kurmak için bir USB flash sürücü kullanmak da dahil olmak üzere Windows 11'i temizlemenin birden çok yolunu destekler . Sabit sürücüyü hızlı bir şekilde silmek ve işletim sistemini ek araçlar olmadan yeniden yüklemek için “Bu Bilgisayarı Sıfırla” özelliğini kullanmak da mümkündür. Veya aygıt başlamazsa, temiz bir yükleme başlatmak için Gelişmiş başlatma seçeneklerini kullanabilir veya ISO dosyasını Dosya Gezgini'ne bağlayabilirsiniz.
Bu kılavuzda , bilgisayarınıza temiz bir Windows 11 yüklemesi gerçekleştirmenin altı farklı yolunu öğreneceksiniz. Ancak, bu talimatlara geçmeden önce, bunları yüklemeden önce yapın .
Önemli: Bu işlem, cihazınızdaki her şeyi silecektir. Devam etmeden önce bilgisayarınızın tam yedeğini almanız önerilir. Uyarılmıştın. Ayrıca bu yönergeler, Windows 11'i daha önce değil, resmi olarak kullanıma sunulduğunda yüklemenize yardımcı olmayı amaçlamaktadır.
USB'den Windows 11 nasıl temizlenir
Bu yöntemi seçerseniz, aygıtın USB'den başlayabildiğinden de emin olmanız gerekir; bu, BIOS veya UEFI ayarlarını değiştirmeniz gerekeceği anlamına gelir. Tek uyarı, bu ayarlar çoğu bilgisayarda farklı olduğundan, daha spesifik ayrıntılar için üretici destek web sitenizi kontrol etmeniz gerekecek.
USB'den temiz bir Windows 11 yüklemesi gerçekleştirmek için şu adımları kullanın:
PC'yi Windows 11 USB flash sürücü ile başlatın .
Devam etmek için herhangi bir tuşa basın.
İleri düğmesine tıklayın .

Windows 11 Kurulumu
Şimdi yükle düğmesini tıklayın .

Windows 11 yükleme seçeneği
Yeniden yükleme yapıyorsanız Ürün anahtarım yok seçeneğini tıklayın . Kurulumdan sonra Windows 11 daha önce etkinleştirildiyse, yeniden etkinleştirme otomatik olarak gerçekleşir.

Lisans anahtarı seçeneğini atla
Lisans anahtarınızın etkinleştirdiği (varsa) “Windows 11” sürümünü seçin.
Lisans koşullarını kabul ediyorum seçeneğini işaretleyin.
İleri düğmesine tıklayın .
Özel: Yalnızca Windows'u yükle (gelişmiş) seçeneğini belirleyin.

Windows 11 özel yükleme seçeneği
Windows 11 21H2'yi yüklemek istediğiniz sabit sürücüdeki her bölümü seçin ve Sil düğmesini tıklayın. (Genellikle, "Sürücü 0", tüm yükleme dosyalarını içeren sürücüdür.)

Bölümleri sil Windows 11 kurulumu
Uyarı: Bir bölümü sildiğinizde, sürücüdeki tüm veriler de silinir. Ayrıca, bölümleri ikincil bir sabit sürücüden silmek gerekli değildir.
Windows 11'i yüklemek için sabit sürücüyü (Sürücü 0 Ayrılmamış Alan) seçin.

Ayrılmamış alana temiz kurulum Windows 11
İleri düğmesine tıklayın .
Kullanıma hazır deneyimin (OOBE) ilk sayfasında kurulumdan sonra bölge ayarınızı seçin .

Windows 11 OOBE bölgesi
Evet düğmesini tıklayın .
Klavye düzeni ayarınızı seçin.

Klavye düzeni
Evet düğmesini tıklayın .
İkinci bir düzeni yapılandırmanız gerekmiyorsa Atla düğmesini tıklayın .
Bilgisayar bir Ethernet bağlantısı kullanıyorsa, ağa otomatik olarak bağlanacaktır. Kablosuz bağlantınız varsa, bağlantıyı manuel olarak kurmanız gerekecektir (bir güvenlik anahtarı gerekebilir).
(İsteğe bağlı) Bilgisayar için bir ad onaylayın.

İleri düğmesine tıklayın . (Cihaz otomatik olarak yeniden başlayacaktır.)
Windows 11 Pro'yu yapılandırıyorsanız , Kişisel kullanım için kur seçeneğini seçin . "Ev" sürümünde bu seçenek yoktur.

Windows 11 kurulum türleri
İleri düğmesine tıklayın .
Bir hesap oluşturmak için Microsoft hesabı e-postanızı, telefon numaranızı veya Skype kimliğinizi onaylayın.

Windows 11 hesabı oluştur
İleri düğmesine tıklayın .
Microsoft hesabı parolanızı onaylayın.
İleri düğmesine tıklayın .
PIN Oluştur düğmesini tıklayın .

Windows 11 OOBE PIN oluştur
Dört basamaklı yeni bir PIN oluşturun.

Hesap PIN'i oluştur
Tamam düğmesini tıklayın .
“Yeni cihaz olarak kur” seçeneğini seçin . Veya önceki bir kurulumdan ayarlarınızı geri yüklemeyi seçin.

Windows 11 OOBE geri yükleme ayarları
İleri düğmesine tıklayın .
Durumunuza en uygun gizlilik ayarlarınızı, her bir ayar için açma/kapama düğmesini açıp kapatarak onaylayın.

Windows 11 OOBE gizlilik ayarları
İleri düğmesine tıklayın .
İleri düğmesine tekrar tıklayın .
Kabul Et düğmesini tıklayın .

Gizlilik ayarları devam ediyor
(İsteğe bağlı) "Deneyiminizi özelleştirelim" sayfasında, kurulumun bu deneyim sırasında araçlar ve hizmetler özelleştirmesi önermesine izin vermek için cihazı kullanmayı planladığınız bir veya daha fazla yolu seçin.

Windows 11 OOBE, deneyim seçeneklerini özelleştiriyor
Devam etmek için Kabul Et düğmesini tıklayın . Veya kurulumun bu bölümünü atlamak için Atla düğmesini tıklayın.
Masaüstü, Resimler ve Belgeler klasörlerinizi otomatik olarak buluta yüklemek için “Dosyalarımı OneDrive ile yedekle” seçeneğini seçin . Veya “Dosyayı yalnızca bu bilgisayara kaydet” seçeneğini seçin.

Windows 11 OOBE yedekleme dosyaları OneDrive'a
İleri düğmesine tıklayın .
Microsoft 365 kurulumunu atlamak için Hayır, teşekkürler düğmesine tıklayın .

Office yüklemesini atla
Adımları tamamladığınızda Windows 11 kuruluma bilgisayarda devam edecektir.
Windows 11'i ISO dosyasından nasıl temizleyebilirim?
Alternatif olarak, işletim sistemi zaten kurulu olan bir cihazda temiz bir kurulum veya yerinde yükseltme başlatmak için ISO'yu Dosya Gezgini'ne bağlayabilirsiniz.
Windows 11'i bir ISO dosyasıyla temizlemek için şu adımları kullanın:
“Windows 11 Disk Görüntüsünü İndir (ISO)” bölümünün altında, Windows 11 seçeneğini seçin.
İndir düğmesini tıklayın .
Kurulum dilini seçin.
Onayla düğmesini tıklayın .
Windows 11 ISO dosyasını cihaza kaydetmek için İndir düğmesine tıklayın .
ISO dosyasına sağ tıklayın ve Bağla seçeneğini seçin.

Dosya Gezgini montaj ISO seçeneği
Sol gezinme bölmesinden sanal sürücüyü seçin.
Windows 11 21H2 kurulumunu başlatmak için Kurulum dosyasına çift tıklayın .

Windows 11 kurulum.exe
(İsteğe bağlı) Windows Kurulumunun güncellemeleri indirme şeklini değiştir seçeneğini tıklayın.

Windows 11 kurulum güncelleme seçenekleri
Şu anda değil seçeneğini seçin .

Yükleme sırasında güncellemeleri devre dışı bırakın
İleri düğmesine tıklayın .
Koşulları kabul etmek için Kabul Et düğmesini tıklayın .
Saklanacakları değiştir seçeneğini tıklayın .

Medya Oluşturma Aracı ayarları
Hiçbir şey seçeneğini seçin .

Hiçbir şey seçeneği
İleri düğmesine tıklayın .
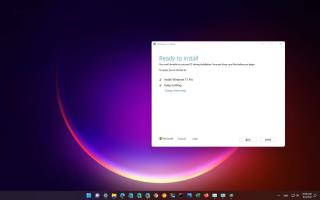
Yükle düğmesini tıklayın .

Windows 11 ISO temiz kurulum kurulumu
Select your region setting after the installation on the first page of the out-of-the-box experience (OOBE).
Windows 11 OOBE region
Click the Yes button.
Select your keyboard layout setting.
Keyboard layout
Click the Yes button.
Click the Skip button if you do not need to configure a second layout.
If the computer uses an Ethernet connection, it will automatically connect to the network. If you have a wireless connection, you will need to set up the connection manually (a security key may be required).
(Optional) Confirm a name for the computer.
Click the Next button. (The device will restart automatically.)
Select the Set up for personal use option if you are configuring Windows 11 Pro. The “Home” edition does not have this option.
Windows 11 setup types
Click the Next button.
Confirm your Microsoft account email, phone number, or Skype identification to create an account.
Create Windows 11 account
Click the Next button.
Confirm your Microsoft account password.
Click the Next button.
Click the Create PIN button.
Windows 11 OOBE create PIN
Create a new four-digit PIN.
Create account PIN
Click the OK button.
Select the “Set up as new device” option. Or select to restore your settings from a previous installation.
Windows 11 OOBE restore settings
Click the Next button.
Confirm your privacy settings that best suit your situation by turning on or off the toggle switch for each setting.
Windows 11 OOBE privacy settings
Click the Next button.
Click the Next button again.
Click the Accept button.
Privacy settings continued
(Optional) On the “Let’s customize your experience” page, select one or more ways you plan to use the device to allow the setup to suggest tools and services customization during this experience.
Windows 11 OOBE customize experience
Click the Accept button to continue. Or click the Skip button to skip this part of the setup.
Select the “Back up my files with OneDrive” option to automatically upload your Desktop, Pictures, and Documents folders to the cloud. Or Select the “Only save file to this PC” option.
Windows 11 OOBE backup files to OneDrive
Click the Next button.
Click the No, thanks button to skip the Microsoft 365 setup.
Skip Office installation
Once you complete the steps, the clean installation process will begin, similar to using the Media Creation Tools or USB flash drive to upgrade the system.
How to clean install Windows 11 using Reset this PC local image
The recovery settings offer another method to start fresh with a clean copy of Windows 11. Unlike the Media Creation Tool, bootable flash drive, and ISO file options, you can only use this method to reinstall Windows 11 on a computer already running the same OS.
If you plan to upgrade a computer running Windows 10, Windows 8.1, or Windows 7, you will have to use one of the previous alternative methods.
To clean install Windows 11 with the local recovery image, use these steps:
Open Settings on Windows 11.
Click on System.
Click on Recovery on the right side.

Windows 11 recovery
Under the “Recovery options” section, in the “Reset this PC” setting, click the Reset PC button.

Reset This PC
Click the Remove everything option to perform a fresh install of Windows 11.

Hard drive wipe out option
Click the Local reinstall option.

Local reinstall option
(Optional) Click the Change settings option.

Change reset settings
Configure the reinstallation options:
Click the Confirm button.

Choose reset settings
Click the Next button.
Click the Reset button.

Windows 11 clean install with Local reinstall option
Select your region setting after the installation on the first page of the out-of-the-box experience (OOBE).
Windows 11 OOBE region
Click the Yes button.
Select your keyboard layout setting.
Keyboard layout
Click the Yes button.
Click the Skip button if you do not need to configure a second layout.
If the computer uses an Ethernet connection, it will automatically connect to the network. If you have a wireless connection, you will need to set up the connection manually (a security key may be required).
(Optional) Confirm a name for the computer.
Click the Next button. (The device will restart automatically.)
Select the Set up for personal use option if you are configuring Windows 11 Pro. The “Home” edition does not have this option.
Windows 11 setup types
Click the Next button.
Confirm your Microsoft account email, phone number, or Skype identification to create an account.
Create Windows 11 account
Click the Next button.
Confirm your Microsoft account password.
Click the Next button.
Click the Create PIN button.
Windows 11 OOBE create PIN
Create a new four-digit PIN.
Create account PIN
Click the OK button.
Select the “Set up as new device” option. Or select to restore your settings from a previous installation.
Windows 11 OOBE restore settings
Click the Next button.
Confirm your privacy settings that best suit your situation by turning on or off the toggle switch for each setting.
Windows 11 OOBE privacy settings
Click the Next button.
Click the Next button again.
Click the Accept button.
Privacy settings continued
(Optional) On the “Let’s customize your experience” page, select one or more ways you plan to use the device to allow the setup to suggest tools and services customization during this experience.
Windows 11 OOBE customize experience
Click the Accept button to continue. Or click the Skip button to skip this part of the setup.
Select the “Back up my files with OneDrive” option to automatically upload your Desktop, Pictures, and Documents folders to the cloud. Or Select the “Only save file to this PC” option.
Windows 11 OOBE backup files to OneDrive
Click the Next button.
Click the No, thanks button to skip the Microsoft 365 setup.
Skip Office installation
Once you complete the steps, the recovery feature will continue with the reinstallation using the locally available image of Windows 11. If you have a computer from HP, Dell, Acer, or another brand, this process will restore the original settings. This means the factory settings, drivers, applications, and tools the manufacturer included in the custom image.
If you don’t want to reinstall the custom manufacturer image, use the “Cloud Download” option (see steps below).
How to clean install Windows 11 using Reset this PC Cloud download
The Reset this PC feature also includes the “Cloud Download” option, which allows you to reset a computer with a clean installation, removing apps, files, and settings similar to the local image option. The only difference is that the feature will download the installation files from the Microsoft server.
The option is available to reinstall Windows 11 when the local image is not working or you do not want to use the same installation settings provided by the manufacturer. If you select the “Cloud download” option, the feature will download the same version already installed on the computer, which means you cannot use this method to upgrade to a newer version. Also, if the device was using a custom image from the manufacturer, the new installation won’t include the custom settings, drivers, or tools.
To reinstall Windows 11 with the “Cloud Download” option, use these steps:
Open Settings on Windows 11.
Click on System.
Click on Recovery on the right side.
Windows 11 recovery
Under the “Recovery options” section, in the “Reset this PC” setting, click the Reset PC button.
Reset This PC
Click the Remove everything option to perform a fresh install of Windows 11.
Hard drive wipe out option
Click the Cloud reinstall option.

Cloud download reinstall option
(Optional) Click the Change settings option.
Change reset settings
Configure the reinstallation options:
Click the Confirm button.

Windows 11 download option
Click the Next button.
Click the Reset button.
Windows 11 clean install with Local reinstall option
Select your region setting after the installation on the first page of the out-of-the-box experience (OOBE).
Windows 11 OOBE region
Click the Yes button.
Select your keyboard layout setting.
Keyboard layout
Click the Yes button.
Click the Skip button if you do not need to configure a second layout.
If the computer uses an Ethernet connection, it will automatically connect to the network. If you have a wireless connection, you will need to set up the connection manually (a security key may be required).
(Optional) Confirm a name for the computer.
Click the Next button. (The device will restart automatically.)
Select the Set up for personal use option if you are configuring Windows 11 Pro. The “Home” edition does not have this option.
Windows 11 setup types
Click the Next button.
Confirm your Microsoft account email, phone number, or Skype identification to create an account.
Create Windows 11 account
Click the Next button.
Confirm your Microsoft account password.
Click the Next button.
Click the Create PIN button.
Windows 11 OOBE create PIN
Create a new four-digit PIN.
Create account PIN
Click the OK button.
Select the “Set up as new device” option. Or select to restore your settings from a previous installation.
Windows 11 OOBE restore settings
Click the Next button.
Confirm your privacy settings that best suit your situation by turning on or off the toggle switch for each setting.
Windows 11 OOBE privacy settings
Click the Next button.
Click the Next button again.
Click the Accept button.
Privacy settings continued
(Optional) On the “Let’s customize your experience” page, select one or more ways you plan to use the device to allow the setup to suggest tools and services customization during this experience.
Windows 11 OOBE customize experience
Click the Accept button to continue. Or click the Skip button to skip this part of the setup.
Select the “Back up my files with OneDrive” option to automatically upload your Desktop, Pictures, and Documents folders to the cloud. Or Select the “Only save file to this PC” option.
Windows 11 OOBE backup files to OneDrive
Click the Next button.
Click the No, thanks button to skip the Microsoft 365 setup.
Skip Office installation
After you complete the steps, the feature will reset the computer by erasing and reinstalling a fresh copy of Windows 11 downloaded from the cloud.
How to clean install Windows 11 from Advanced startup options
If the computer does not boot, the Advanced startup options environment includes the same options included with the “Reset this PC” feature.
You can only use this option to reinstall the same version of the OS already installed on the computer. If you want to upgrade to the latest version, you need to use the USB flash drive, Media Creation Tool, or ISO file options.
To clean install Windows 11 from the Advanced startup options, use these steps:
Start device.
Immediately after the Power-On Self-Test (POST), press the Power button again to shut down.
Repeat steps No. 1 and 2 twice, and in the third restart, the operating system should enter the Windows Recovery Environment (Windows RE).
Quick note: Windows 11 has multiple ways to open the Advanced startup settings. If you cannot access the recovery environment, you can use these other options.
Click the Advanced options button.

Advanced startup
Click on Troubleshoot.

Troubleshoot option
Click on Reset this PC option.

Reset this PC option
Select the Remove everything option.

Remove everything option
Click the Cloud download or Local reinstall option. Cloud download: Downloads a fresh image from the Microsoft servers and performs a fresh installation. Local reinstall: Uses the locally available image to install a clean copy of Windows 11.

Advanced startup cloud download option
Select the “Only the drive where Windows is installed” option. (The All drives option will delete the data on all drives. This option is usually recommended only when you have to decommission the device.)

Delete drive data option
Select the “Just remove my files” or “Full clean the drive” option.

Just remove files option
Click the Reset button.

Windows 11 clean install with the advanced startup option
Select your region setting after the installation on the first page of the out-of-the-box experience (OOBE).
Windows 11 OOBE region
Click the Yes button.
Select your keyboard layout setting.
Keyboard layout
Click the Yes button.
Click the Skip button if you do not need to configure a second layout.
If the computer uses an Ethernet connection, it will automatically connect to the network. If you have a wireless connection, you will need to set up the connection manually (a security key may be required).
(Optional) Confirm a name for the computer.
Click the Next button. (The device will restart automatically.)
Select the Set up for personal use option if you are configuring Windows 11 Pro. The “Home” edition does not have this option.
Windows 11 setup types
Click the Next button.
Confirm your Microsoft account email, phone number, or Skype identification to create an account.
Create Windows 11 account
Click the Next button.
Confirm your Microsoft account password.
Click the Next button.
Click the Create PIN button.
Windows 11 OOBE create PIN
Create a new four-digit PIN.
Create account PIN
Click the OK button.
Select the “Set up as new device” option. Or select to restore your settings from a previous installation.
Windows 11 OOBE restore settings
Click the Next button.
Confirm your privacy settings that best suit your situation by turning on or off the toggle switch for each setting.
Windows 11 OOBE privacy settings
Click the Next button.
Click the Next button again.
Click the Accept button.
Privacy settings continued
(Optional) On the “Let’s customize your experience” page, select one or more ways you plan to use the device to allow the setup to suggest tools and services customization during this experience.
Windows 11 OOBE customize experience
Click the Accept button to continue. Or click the Skip button to skip this part of the setup.
Select the “Back up my files with OneDrive” option to automatically upload your Desktop, Pictures, and Documents folders to the cloud. Or Select the “Only save file to this PC” option.
Windows 11 OOBE backup files to OneDrive
Click the Next button.
Click the No, thanks button to skip the Microsoft 365 setup.
Skip Office installation
Once you complete the steps, Windows 11 will reinstall, resolving the existing problems. The completion time will depend on your computer hardware configuration and the selected reset configuration.
How to clean install Windows 11 using Media Creation Tool
Starting with Windows 11, the Media Creation Tool no longer includes an option to perform a clean installation or in-place upgrade. You can only use the tool to create a bootable media to perform an installation using a USB flash drive or ISO file.
If you want to proceed with the Media Creation Tool, you can use it to create an installation media, and then you can launch the setup from the USB flash drive.
To use the Media Creation Tool to create a bootable USB install media and proceed with the setup, use these steps:
Under the “Create Windows 11 installation media” section, click the Download Now button.
Double-click the MediaCrationToolW11.exe file to launch the tool.
Click the Accept button.
Click the Next button.

Quick note: If you are creating a Windows 11 USB for another device, you can also clear the “Use the recommended options for this PC” option to select the correct language, architecture, and edition.
Select the USB flash drive option.

Click the Next button.
Select the USB flash drive from the list, but make sure that it does not have any important files, as this process will erase everything on it.

Click the Next button.
Click the Finish button.
Open the installation media with File Explorer.
Double-click the Setup file to begin the Windows 11 installation.
Windows 11 setup.exe
(İsteğe bağlı) Windows Kurulumunun güncellemeleri indirme şeklini değiştir seçeneğini tıklayın.
Windows 11 kurulum güncelleme seçenekleri
Şu anda değil seçeneğini seçin .
Yükleme sırasında güncellemeleri devre dışı bırakın
İleri düğmesine tıklayın .
Koşulları kabul etmek için Kabul Et düğmesini tıklayın .
Saklanacakları değiştir seçeneğini tıklayın .
Medya Oluşturma Aracı ayarları
Hiçbir şey seçeneğini seçin .
Hiçbir şey seçeneği
İleri düğmesine tıklayın .
Yükle düğmesini tıklayın .
Windows 11 ISO temiz kurulum kurulumu
Kullanıma hazır deneyimin (OOBE) ilk sayfasında kurulumdan sonra bölge ayarınızı seçin .
Windows 11 OOBE bölgesi
Evet düğmesini tıklayın .
Klavye düzeni ayarınızı seçin.
Klavye düzeni
Evet düğmesini tıklayın .
İkinci bir düzeni yapılandırmanız gerekmiyorsa Atla düğmesini tıklayın .
Bilgisayar bir Ethernet bağlantısı kullanıyorsa, ağa otomatik olarak bağlanacaktır. Kablosuz bağlantınız varsa, bağlantıyı manuel olarak kurmanız gerekecektir (bir güvenlik anahtarı gerekebilir).
(İsteğe bağlı) Bilgisayar için bir ad onaylayın.
İleri düğmesine tıklayın . (Cihaz otomatik olarak yeniden başlayacaktır.)
Windows 11 Pro'yu yapılandırıyorsanız , Kişisel kullanım için kur seçeneğini seçin . "Ev" sürümünde bu seçenek yoktur.
Windows 11 kurulum türleri
İleri düğmesine tıklayın .
Bir hesap oluşturmak için Microsoft hesabı e-postanızı, telefon numaranızı veya Skype kimliğinizi onaylayın.
Windows 11 hesabı oluştur
İleri düğmesine tıklayın .
Microsoft hesabı parolanızı onaylayın.
İleri düğmesine tıklayın .
PIN Oluştur düğmesini tıklayın .
Windows 11 OOBE PIN oluştur
Dört basamaklı yeni bir PIN oluşturun.
Hesap PIN'i oluştur
Tamam düğmesini tıklayın .
“Yeni cihaz olarak kur” seçeneğini seçin . Veya önceki bir kurulumdan ayarlarınızı geri yüklemeyi seçin.
Windows 11 OOBE geri yükleme ayarları
İleri düğmesine tıklayın .
Durumunuza en uygun gizlilik ayarlarınızı, her bir ayar için açma/kapama düğmesini açıp kapatarak onaylayın.
Windows 11 OOBE gizlilik ayarları
İleri düğmesine tıklayın .
İleri düğmesine tekrar tıklayın .
Kabul Et düğmesini tıklayın .
Gizlilik ayarları devam ediyor
(İsteğe bağlı) "Deneyiminizi özelleştirelim" sayfasında, kurulumun bu deneyim sırasında araçlar ve hizmetler özelleştirmesi önermesine izin vermek için cihazı kullanmayı planladığınız bir veya daha fazla yolu seçin.
Windows 11 OOBE deneyimi özelleştirme
Devam etmek için Kabul Et düğmesini tıklayın . Veya kurulumun bu bölümünü atlamak için Atla düğmesini tıklayın.
Masaüstü, Resimler ve Belgeler klasörlerinizi otomatik olarak buluta yüklemek için “Dosyalarımı OneDrive ile yedekle” seçeneğini seçin . Veya “Dosyayı yalnızca bu bilgisayara kaydet” seçeneğini seçin.
Windows 11 OOBE yedekleme dosyaları OneDrive'a
İleri düğmesine tıklayın .
Microsoft 365 kurulumunu atlamak için Hayır, teşekkürler düğmesine tıklayın .
Office yüklemesini atla
Adımları tamamladıktan sonra kurulum, Windows 11'in yeni kurulumuyla devam edecektir.
27 Mayıs 2022 güncellemesi: Kılavuz ilk olarak Ağustos 2021'de yayınlandı ve tüm adımların hala doğru olduğundan emin olmak için Mayıs 2022'de güncellendi.
Bu bilgisayar Windows 11 hatası çalıştıramıyor olmadan yüklemeye devam etmek için Windows 11 TPM 2.0 gereksinimini atlamak için bu kolay adımları kullanın.
Çalışmıyorsa, açılmıyorsa, çökmeye devam ediyorsa veya başka bir sorun varsa, Windows 10 Ayarları uygulamasını iki şekilde sıfırlayabilirsiniz. İşte nasıl.
Windows 11'de Kayıt Defterini yedeklemek için, bir geri yükleme noktası oluşturmak için Sistem Geri Yükleme'yi kullanın veya veritabanını Kayıt Defteri Düzenleyicisi ile dışa aktarın. İşte nasıl.
Android uygulamalarını Windows 11'e hızlı bir şekilde yandan yüklemek için WSATools uygulamasını yükleyin, apk dosyasını seçin ve Yükle düğmesini tıklayın. Basit.
Macrium Reflect, bir HDD'yi SSD ile değiştiriyor veya tam bir yedekleme oluşturuyor olsanız da, sürücü klonlama için harika bir araçtır. İşte nasıl kullanılacağı.
Windows 10 için Gece ışığı gri görünüyorsa, ayarlarını manuel olarak sıfırlayarak bu sorunu hızlı bir şekilde çözebilirsiniz - İşte nasıl yapılacağı.
Windows 10'da 0xC1900200 – 0x20008 ve 0xC1900202 – 0x20008 hatası, bilgisayarınızın minimum gereksinimleri karşılamadığı anlamına gelir. Sorun gidermeyi kontrol edin
Windows 10 için XAMPP'nin kurulumu kolaydır, ancak her şeyin doğru çalışması için Apache ve phpMyAdmin'i nasıl yapılandıracağınızı bilmeniz gerekir.
Windows 10'u temiz yüklemeniz mi gerekiyor? Bunu USB, Medya Oluşturma Aracı, Bu Bilgisayarı Sıfırla, ISO'yu SSD veya HDD'ye monte ederek nasıl yapacağınız aşağıda açıklanmıştır.
PowerShell komutunu kullanarak Windows 10'da Uzak Masaüstü'nü (RDP) etkinleştirebilir veya devre dışı bırakabilirsiniz ve bu kılavuzda bunu nasıl yapacağınızı göreceksiniz.
Windows 10'da bir sanal makine çalıştırmanız gerekiyorsa, Hyper-V'yi ücretsiz olarak kullanabilirsiniz ve özelliğin nasıl etkinleştirileceğini veya kaldırılacağını burada bulabilirsiniz.
Windows 10'da binlerce dosya ve alt klasör içeren büyük bir klasörü silmenin en hızlı yolu budur. İşte nasıl.
Windows Terminal koyu temasını etkinleştirmek için Görünüm ayarlarını veya Settings.json dosyasını ve burada her ikisinin nasıl kullanılacağını kullanabilirsiniz.
Windows Terminal, Ayarlar Kullanıcı Arayüzü ve Settings.json dosyasını kullanarak renk düzenini (tema) değiştirmenize olanak tanır. İşte şemaların nasıl ve nasıl oluşturulacağı.
Windows 11 22H2'ye yükseltme sorunları yaşamamak için yalnızca Windows Update'i kullanın, bir yedek oluşturun, güvenlik uygulamalarını kaldırın, cihazların bağlantısını kesin ve...
Windows 11'de tam bir yedekleme oluşturmak için Sistem Görüntüsü Yedekleme'yi kullanın. Araç ayrıca wbAdmin komutuyla Komut İstemi ile çalışır. İşte nasıl.
Windows Terminal, Settings.json dosyasını temizleyerek veya silerek tüm ayarları sıfırlamanıza olanak tanır ve işte bunun nasıl yapılacağına ilişkin üç yol.
Kanat ayarlarını düzenlemek için Komut İstemi'ni (yönetici) açın, kanat ayarları komutunu çalıştırın, ayarları özelleştirin ve kaydedin.
Windows 10, 0kb kayıt defteri kovanlarıyla RegBack klasörünü gösteriyor mu? Seçeneği devre dışı bırakıldığından, otomatik Kayıt Defteri yedeklemesini etkinleştirmek için bu adımları kullanın.
Windows 11'de Windows Güvenlik uygulaması, Denetim Masası, Komut İstemi veya PowerShell'i kullanarak güvenlik duvarını devre dışı bırakabilirsiniz. İşte nasıl.
Hiç Microsoft Windows'ta önceden yüklenmiş sürücüler listesine kendi sürücülerinizi eklemek istiyorsunuz. Bu adımlarla kolaylıkla yapabilirsiniz.
Stable Diffusion sahneye çıktı ve sanatçıları, programcıları ve yaratıcılık kıvılcımına sahip herkesi büyüledi. Bu açık kaynaklı metinden resme yapay zeka
Windows 11'in en kullanışlı özelliklerinden biri, klasörleri ve dosyaları aynı ağdaki diğer kullanıcılarla paylaşma yeteneğidir. Klasör paylaşımını ayarlayarak
Bu blog, genel sistem kararlılığını iyileştirmek için okuyucuların Windows 11/10'daki "Dosyaları Geçici Konuma Çıkarma" Hatası 1152'yi düzeltmelerine yardımcı olacaktır.
PDF belgelerinizi ilgi çekici PPT'lere dönüştürmek istiyorsunuz ancak bunun nasıl yapılabileceği konusunda hiçbir fikriniz yok mu? Doğru bilgiye rastladınız. İşte bunu yapmanın yolları.
Dinamik kilit, Windows 10'da bulunan gizli özelliktir. Bu kilit, Bluetooth hizmeti aracılığıyla çalışır. Birçoğumuz Windows 10'un bu yeni özelliğinden haberimiz yok. Biz de bu yazımızda sizlere bu özelliği bilgisayarınızda nasıl etkinleştirebileceğinizi ve nasıl kullanabileceğinizi gösterdik.
Bu blog, kullanıcıların Windows 11 bilgisayarlarındaki Geri Dönüşüm Kutusu Grileşme sorununu uzmanların önerdiği yöntemlerle çözmelerine yardımcı olacaktır.
Bu blog, okuyuculara Windows 10/11'deki Xvdd SCSI Miniport Sorunlarını düzeltmeye yönelik tüm önemli yöntemler konusunda yardımcı olacaktır.
Bu blog, Windows PC'deki Windows Yazıcıya Bağlanılamıyor hata mesajını düzeltmek için sorun giderme yöntemlerine odaklanmaktadır.
Bu makale, Windows PC'de "vcruntime140 DLL eksik olduğu için kod yürütme işlemine devam edilemiyor" hatasının nasıl düzeltileceğine ilişkin tüm çözümlere odaklanmaktadır.