在 Windows 11 中执行系统还原的步骤
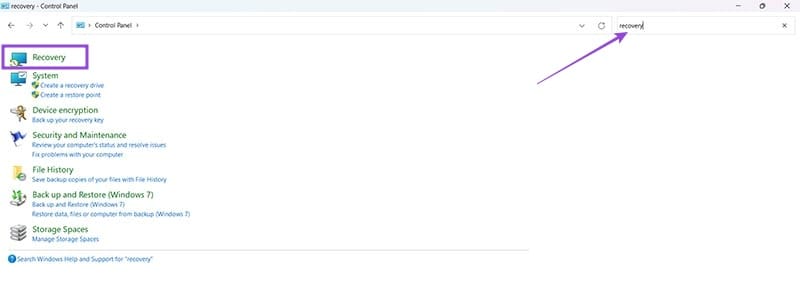
如果您的设备出现错误或崩溃,请按照 Windows 11 中系统还原的步骤,将您的设备恢复到先前版本。

BSOD 或藍屏死機是可怕的 Windows 錯誤,可能會導致您的電腦出現嚴重問題並完全阻止您啟動到 Windows 11。發生 BSOD 的原因有多種,並且通常會顯示一個停止代碼來幫助您識別問題。
根據最近的用戶報告,“無法訪問的啟動設備”就是這樣一種停止代碼,它是 Windows 11 上出現大量 BSOD 的原因。Windows 更新、驅動程序更新甚至第三方程序都可能是導致此問題的原因。如果您也有同樣的情況,那麼這就是您需要了解的全部內容。
為什麼我在 Windows 11 上收到“無法訪問啟動設備”停止代碼,它是什麼?
“無法訪問的啟動設備”是 Windows 無法識別啟動驅動器並從啟動驅動器啟動時發出的停止代碼。發生這種情況的原因有多種,下面列出了最常見的原因。
和更多!所有這些原因都可能導致啟動驅動器無法讀取,從而導致您的電腦出現 BSOD。
Windows 11 無法訪問啟動設備:17 個修復和 5 個檢查解釋!
以下是 修復系統上無法訪問啟動設備 BSOD 的方法。我們首先建議您對系統執行一些檢查,以縮小問題的原因。然後,您可以使用下面提到的適當修復程序來修復 Windows 11 系統上的此 BSOD。讓我們開始吧。
Windows 11 無法訪問啟動設備:需要進行 5 項檢查
讓我們首先檢查您的啟動驅動器是否出現在 BIOS 菜單中。如果是這樣,那麼您可能會遇到 Windows 安裝問題。但是,如果您的啟動驅動器未出現在 BIOS 菜單中,則可能表明驅動器出現故障。讓我們開始吧。
#1:在 BIOS 中檢查啟動驅動器
重新啟動您的 PC 並使用 BIOS 鍵之一(具體取決於您的 OEM)來訪問 BIOS 菜單。如果您不知道 PC 的 BIOS 密鑰,那麼您可以使用我們的這篇綜合文章。進入 BIOS 菜單後,切換到高級設置並查找 啟動順序或類似名稱的選項。這將允許您選擇要從中啟動到所需操作系統的啟動設備。
我們不需要更改此選項,而是檢查可用的驅動器。如果您的啟動驅動器顯示為啟動順序的選項,則您的 Windows 11 安裝遇到問題。但是,如果您的驅動器丟失,那麼您可能會遇到驅動器故障。我們建議您選擇以下修復並檢查以驗證是否相同。
根據您的診斷結果,按照以下相關部分的操作繼續修復Windows 11 電腦上的無法訪問啟動設備 BSOD。
相關: 如何在沒有 CD 的情況下修復 Windows 11:12 種方法解釋!
#2:檢查您的驅動器是否有物理損壞
如果您願意,我們建議您打開您的電腦並檢查您的驅動器是否有物理損壞。如果您最近遇到電源故障、攜帶電腦旅行或在壓力下運輸電腦,這可能會相關。打開您的電腦或筆記本電腦,然後從連接的端口上拔下相關驅動器。我們現在建議您檢查驅動器的連接器引腳是否有任何損壞。這可能表現為凹痕、划痕,甚至可能是電火花證據的黑色污跡。如果您使用帶有散熱器的 SSD,我們建議您檢查導熱墊,然後檢查散熱器是否有任何損壞跡象。如果您使用的是硬盤驅動器,那麼您可以搖動它來診斷任何損壞或未對準的部件。
完成後,如果您的驅動器出現任何損壞跡象,那麼您應該儘早將其交給經過認證的技術人員。這將最大限度地提高您在驅動器上的部件和扇區變得無法讀取之前恢復數據的機會。
#3:檢查是否可以進入恢復模式
Windows 恢復模式提供了一組內置的高級功能,旨在診斷和修復啟動操作系統時的問題。您可以通過在啟動過程中途重新啟動電腦 3 次來自動觸發恢復模式。您也可以在啟動過程中按鍵盤上的F11 鍵輸入相同的內容。如果您可以訪問恢復模式,那麼您的 Windows 11 安裝可能會遇到一個小問題。但是,如果您無法訪問恢復模式,則可能表明您的電腦存在更嚴重的問題。我們建議您根據您的診斷進行以下相關修復。
某些電腦可能還捆綁了自定義恢復模式,這些模式存儲在啟動驅動器上的隱藏分區上。對於預裝 PC 和筆記本電腦,通常會出現這種情況,其中 OEM 提供自定義恢復模式,可提供額外的恢復選項。如果您能夠訪問此模式,那麼您可以嘗試使用這些選項恢復您的電腦並修復無法訪問的啟動設備BSOD。
相關: Windows 11 Spotlight 不工作?9 項修復和 3 項檢查
#4:檢查電纜是否鬆動
如果您最近對電腦進行了維修或升級,那麼我們建議您檢查所有電纜並驗證所有必要的連接。您可能錯過了一根電線,或者連接器可能沒有正確安裝。重新安裝所有相關的連接和端口可以幫助解決問題,尤其是當您的 BIOS 無法訪問啟動驅動器時。如果您的主板上有 M.2 SSD 和多個端口,那麼您甚至可以嘗試切換端口。您可能會遇到 M.2 端口故障或故障的問題。更改端口可以幫助同時診斷和修復相同的問題,直到您可以將電腦交給經過認證的技術人員。
Windows 11 無法訪問啟動設備:解釋了 17 個修復
現在您已經驗證並檢查了您的電腦以進一步診斷您的問題,您可以使用以下相關部分開始修復您的電腦。讓我們開始吧。
第 1 部分:如果您可以訪問啟動驅動器:13 個修復
如果您能夠在 BIOS 中訪問並查看啟動驅動器,那麼您可以開始執行下面提到的修復。我們建議您從第一個修復開始,逐步完成列表,直到能夠啟動進入 Windows 11。
修復1:卸載最近安裝的程序
最近安裝的程序或應用程序可能會阻止您啟動 Windows。您可以使用 CMD 卸載最近的程序和應用程序,可以使用恢復模式或使用 Windows 安裝介質訪問 CMD。要啟動進入恢復模式,請在啟動過程中重新啟動電腦 3 次。如果您使用的是 Windows 啟動介質,請插入該介質並單擊“下一步”。

現在單擊 修復您的計算機。

啟動進入 Windows 恢復環境後,單擊“疑難解答”。

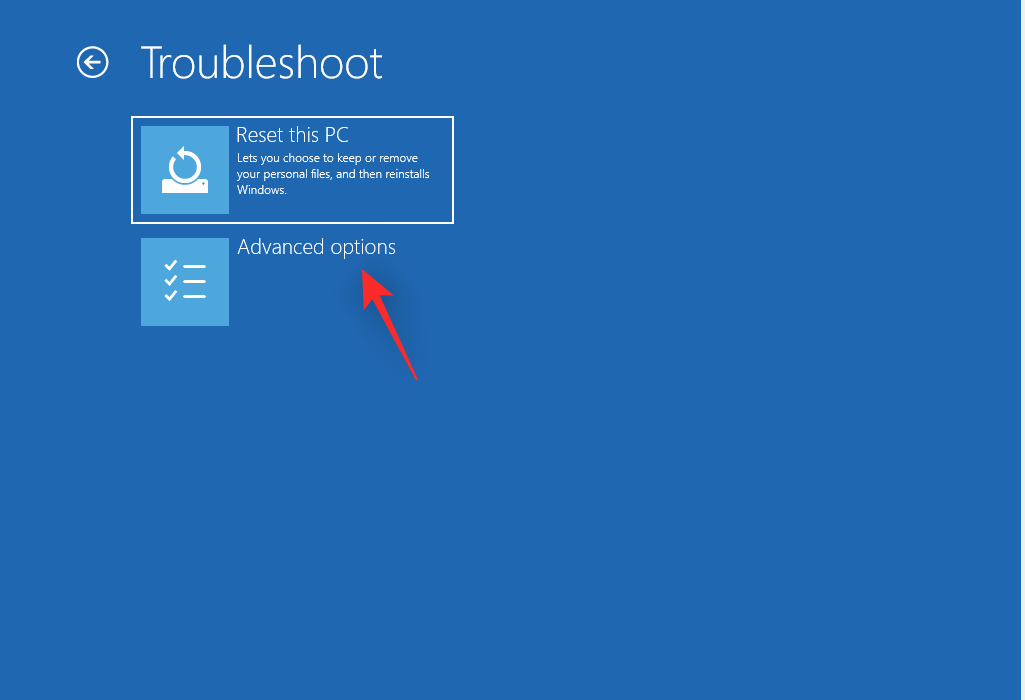
單擊 高級選項。
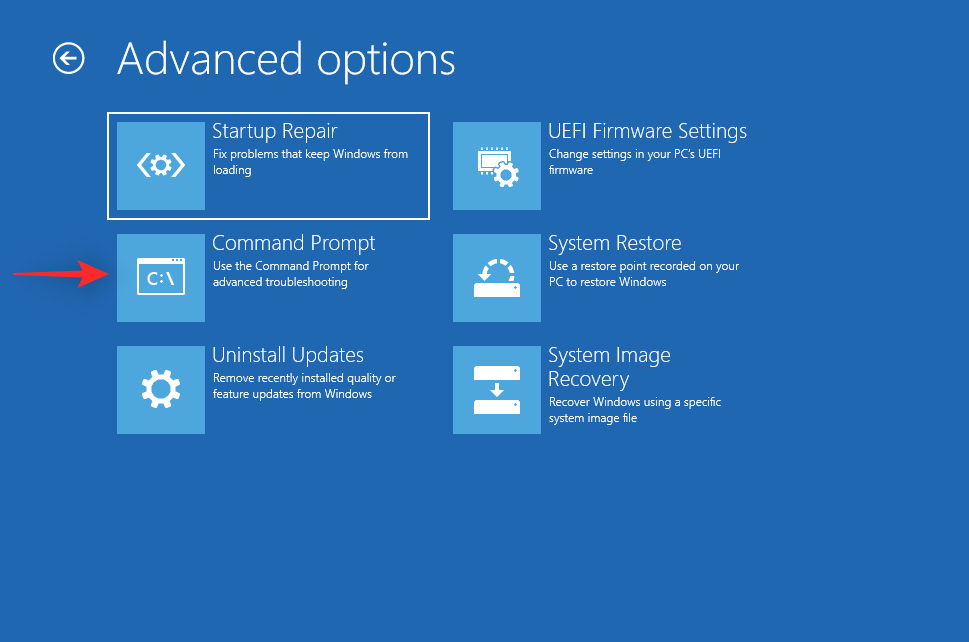
現在單擊 命令提示符。
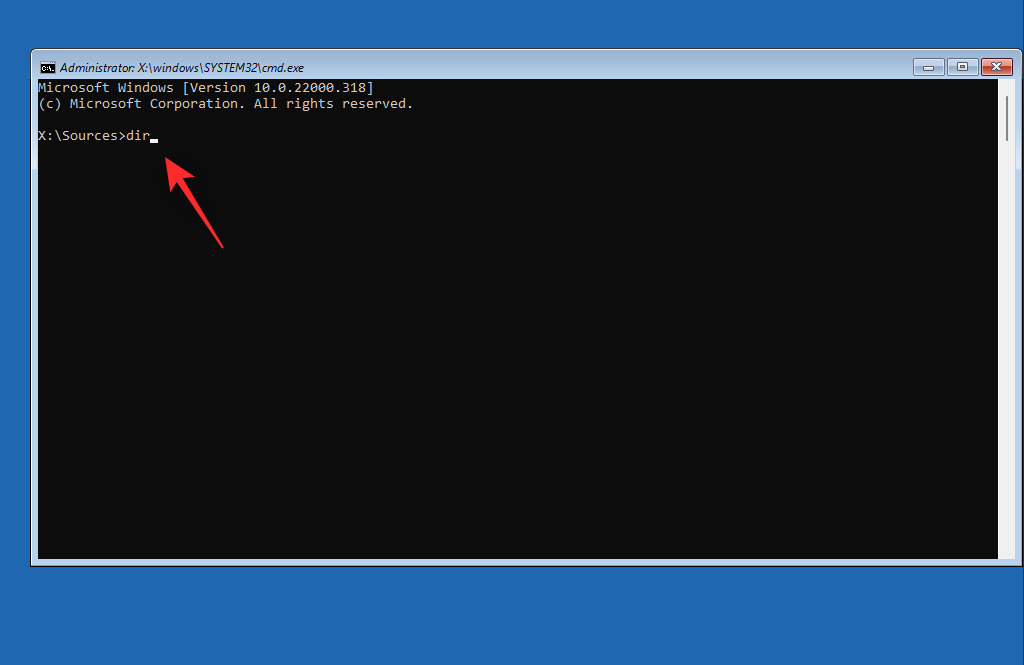
現在,您可以使用以下命令來卸載您懷疑會導致 PC 上無法訪問的啟動設備 BSOD 的最近安裝的程序和應用程序。輸入以下內容並按 Enter 鍵即可開始。
dir
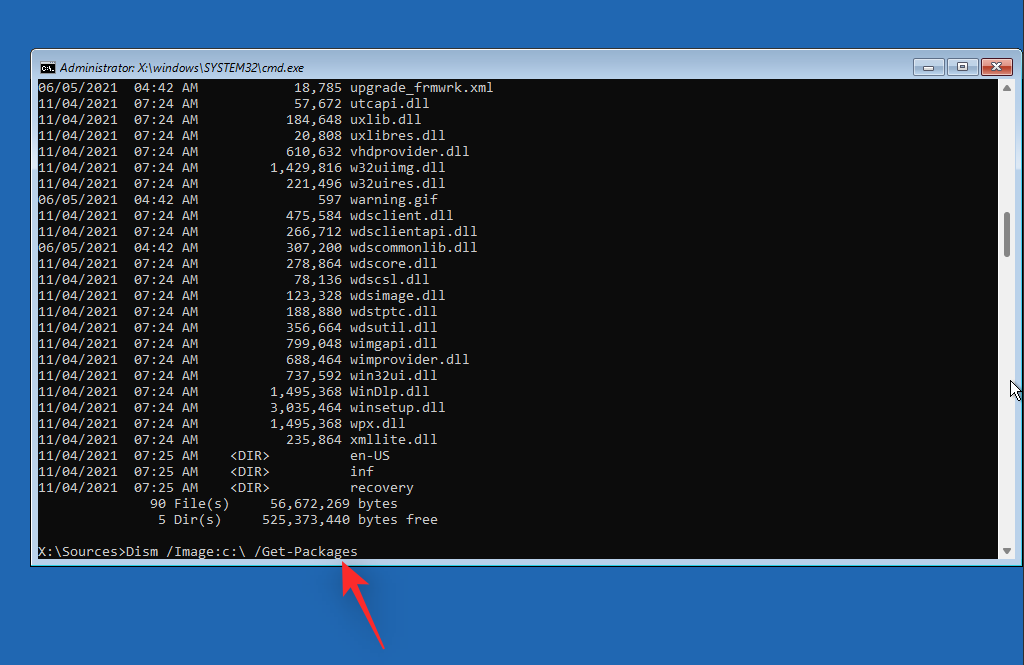
現在將向您顯示安裝 Windows 的驅動器和卷。記下其驅動器號並執行以下命令。將LTR替換為您之前記下的驅動器盤符。
Dism /Image:LTR:\ /Get-Packages
現在確定您想要從電腦中刪除的程序並記下其名稱。使用以下命令將其從您的 PC 上卸載。將NAME 替換 為您之前記下的程序的名稱。同樣,將LTR 替換為安裝 Windows 的驅動器號。
exe /image:LTR:\/remove-package/packagename:NAME

現在將從您的電腦中卸載所選的程序。卸載後,使用以下命令關閉 CMD。
exit

現在重新啟動您的電腦,看看在遇到 BSOD 時是否仍然遇到 無法訪問的啟動設備停止代碼���如果最近安裝的程序引起了問題,那麼現在應該修復它。
修復 2:嘗試在 BIOS 中切換 SATA 模式
我們現在建議您在 BIOS 中切換 SATA 模式,特別是如果您擁有 Intel 系統。重新啟動 PC 並使用 F2啟動至 BIOS 菜單。您可以通過我們的此鏈接找到與您的 OEM 相關的 BIOS 密鑰。進入 BIOS 後,將 SATA 模式切換為 AHCI,反之亦然。根據您的電腦,您可能可以使用以下選項。
和更多。我們的想法是切換到另一種模式,看看哪種模式最適合您。切換模式有時可以幫助解決啟動驅動器的問題,特別是當您的 BIOS 遇到錯誤時。
修復 3:取消待處理的 Windows 更新
我們現在建議您取消任何可能在啟動過程中嘗試安裝的掛起的 Windows 更新,從而阻止 Windows 訪問啟動驅動器。使用以下步驟來幫助您完成該過程。
使用您喜歡的方法啟動進入恢復模式並啟動 CMD。

輸入以下內容並按 Enter。
reg load HKLM\temp c:\windows

現在執行以下命令。
system32\config
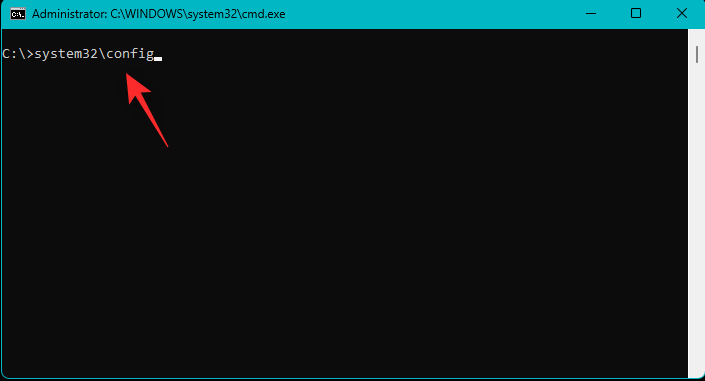
隨後,執行以下命令。
software
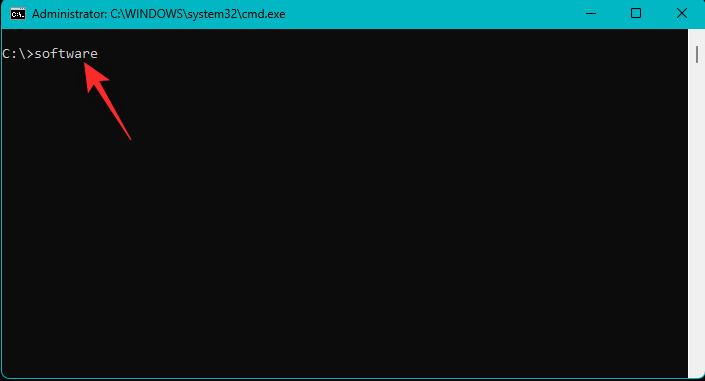
現在使用以下命令刪除掛起的更新註冊表項。
reg delete "HKLM\temp\Microsoft\Windows\CurrentVersion\Component Based Servicing\SessionsPending"/v exclusive

使用以下命令卸載註冊表。
reg unload HKLM\temp
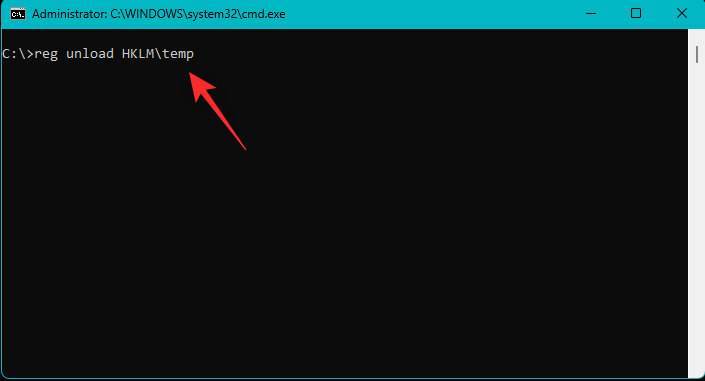
現在輸入以下命令以查看 PC 上的可用更新。如果適用,請將c 替換為引導驅動器的驅動器號。
dism /image:c:\ /get-packages
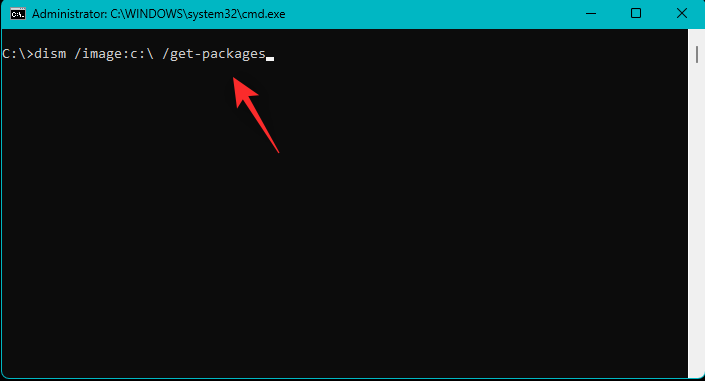
查找帶有“安裝 待處理” 標籤的更新。一旦找到,記下他們的名字。完成後,輸入以下內容並按 Enter 鍵。
MKDIR C:\temp\packages

現在輸入以下內容並按 Enter 執行命令。將NAME替換 為您之前記下的更新包的名稱。另外, 如果適用,請將c:替換為引導驅動器的驅動器號。
dism /image:c:\ /remove-package /packagename:NAME /scratchdir:c:\temp\packages
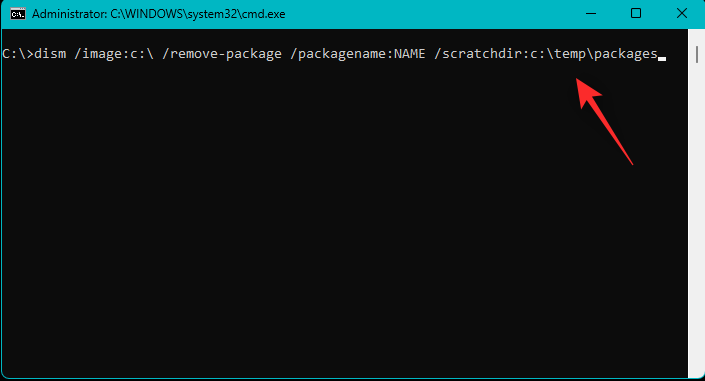
對電腦上其他待處理的更新重複上述步驟。完成後,使用以下命令關閉 CMD。
exit

重新啟動你的電腦,如果掛起的更新是導致 BSOD 的原因,你現在應該能夠啟動到 Windows 11。
修復 4:運行 Chkdsk
使用所需的方法在您的電腦上 啟動 恢復模式 並啟動命令提示符。

現在使用以下命令運行 Chkdsk。如果適用,請將 c:替換為引導驅動器的驅動器號。
chkdsk /f /r c:

完成後,使用以下命令關閉 CMD。
exit

重新啟動您的電腦,如果啟動驅動器上的壞扇區導致 您的電腦上無法訪問啟動設備 問題,那麼現在應該已修復。
修復 5:以安全模式啟動 Windows
我們現在建議您嘗試以安全模式啟動 Windows。如果您可以在安全模式下啟動 Windows,則第三方程序或服務可能會導致您的系統出現問題並導致無法訪問啟動設備 BSOD。請按照以下步驟操作以幫助您完成該過程。
使用您喜歡的方法將您的電腦重新啟動到 恢復模式 。單擊 疑難解答。

現在單擊 高級選項。

單擊 啟動設置。
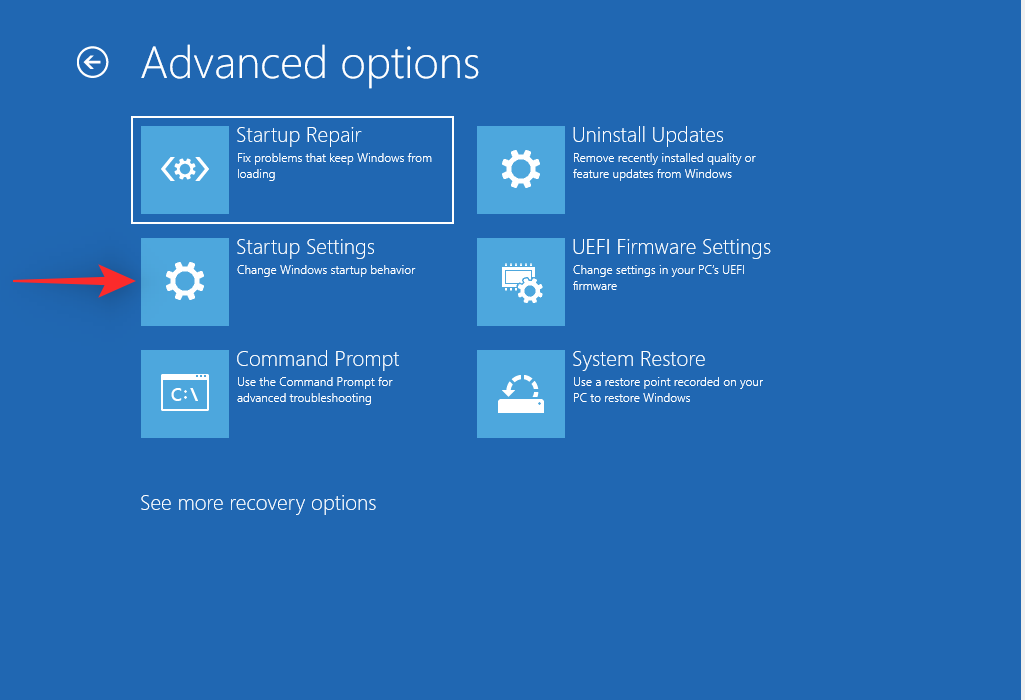
單擊 重新啟動。
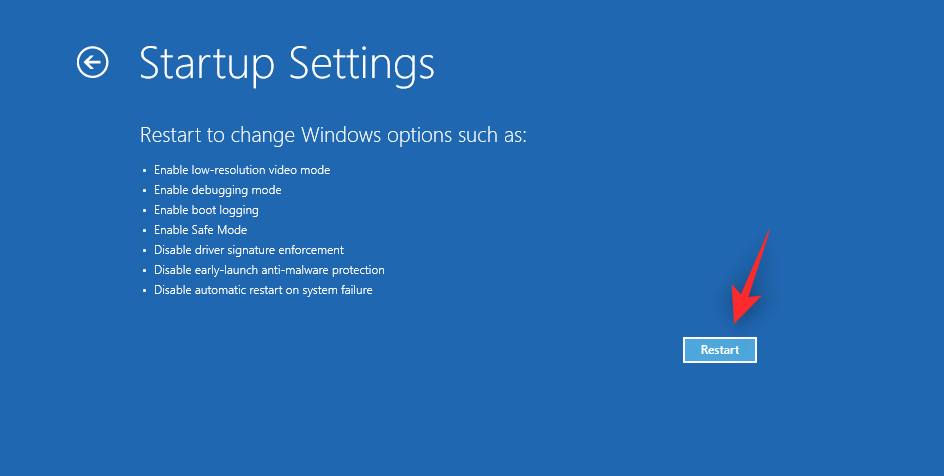
您的電腦現在將重新啟動並顯示相關的啟動選項。按 鍵盤上的F4或 4 將 Windows 引導至安全模式。
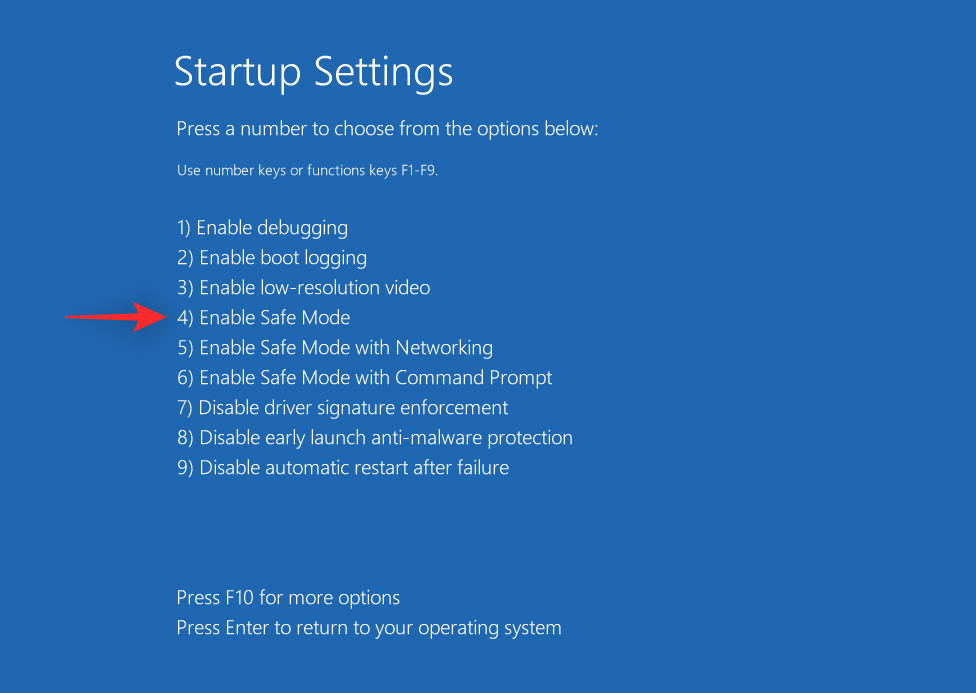
如果您的電腦能夠以安全模式啟動 Windows,那麼您可以診斷並刪除最近安裝的第三方程序來解決您的問題。但是,如果您無法啟動 Windows,則可以繼續執行下面提到的其他修復。
修復 6:更新存儲控制器的驅動程序
過時或有缺陷的存儲控制器驅動程序也會阻止您的電腦訪問啟動驅動器。最近的 BIOS 更新可能會導致不兼容,或者最近的驅動程序更新可能會面臨未診斷的錯誤。使用以下步驟可幫助您刪除有故障的驅動程序並為存儲控制器安裝已知的工作驅動程序。
注意:在繼續執行本指南之前,您需要下載或獲取適合您的存儲控制器的驅動程序,並將它們傳輸到 PC 的 USB 連接上。
使用您喜歡的方法 在恢復模式 下重新啟動您的電腦並啟動命令提示符。

現在使用以下命令獲取 PC 上安裝的所有驅動程序的列表。
pnputil -e > C:\drivers.txt
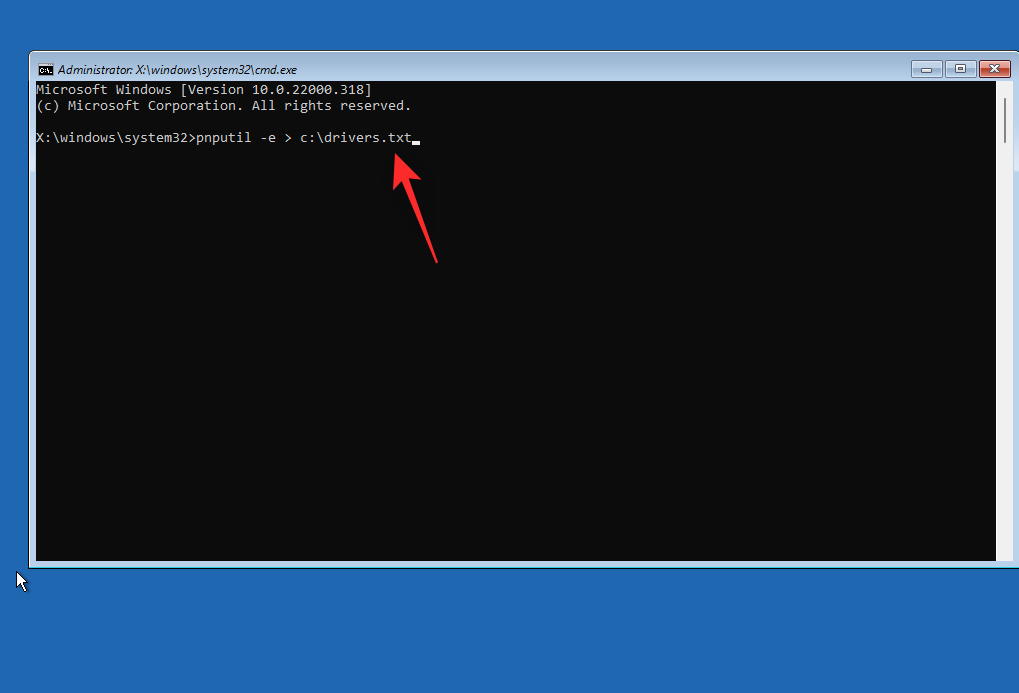
使用以下命令查看 PC 上安裝的所有驅動程序的列表。
type C:\drivers.txt
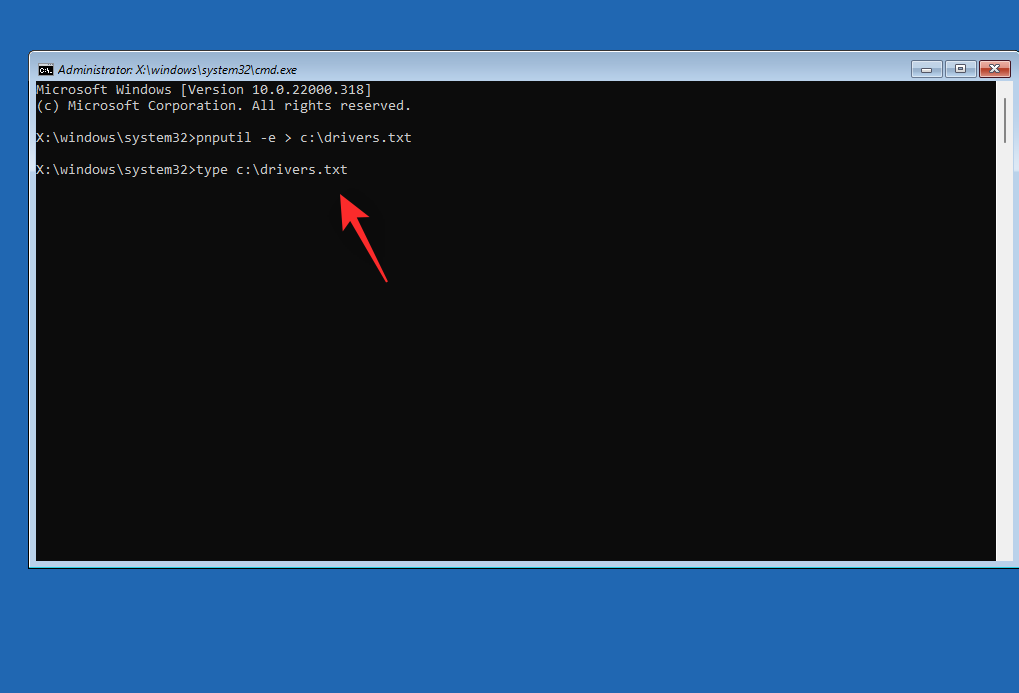
現在,從屏幕上的列表中識別您的存儲控制器驅動程序,並記下其 發布的名稱。使用以下命令刪除驅動程序。將NAME替換 為您之前記下的名稱。
pnputil.exe -d NAME.inf

刪除後,使用以下命令從 USB 安裝適當的驅動程序。將 LTR 替換為 USB 的驅動器號, 將NAME 替換為 USB 中的驅動程序名稱。
pnputil.exe -a LTR:\NAME.INF

現在使用以下命令關閉 CMD。
exit

重新啟動您的電腦並嘗試正常啟動進入 Windows。如果存儲控制器驅動程序故障是導致您問題的原因,那麼現在應該已在您的 PC 上修復該問題。
您可以使用 bootrec.exe 命令嘗試修復 Windows 啟動菜單問題。使用以下步驟來幫助您完成該過程。
在恢復模式 下重新啟動電腦並啟動 命令提示符。

輸入以下命令並按 Enter 鍵。
bootrec.exe /rebuildbcd

接下來,執行以下命令。
bootrec.exe /fixmbr

最後,執行以下命令來修復啟動順序。
bootrec.exe /fixboot

使用以下命令關閉 CMD。
exit

重新啟動電腦並嘗試照常啟動 Windows 11。如果啟動菜單的問題導致您無法啟動,那麼現在應該在您的系統上修復它。
修復 8:運行啟動修復
啟動修復是恢復模式下的內置實用程序,可以幫助您解決 Windows 11 上的啟動問題。請按照以下步驟操作以幫助您完成該過程。
將電腦重新啟動至 恢復模式 ,然後單擊 “故障排除”。
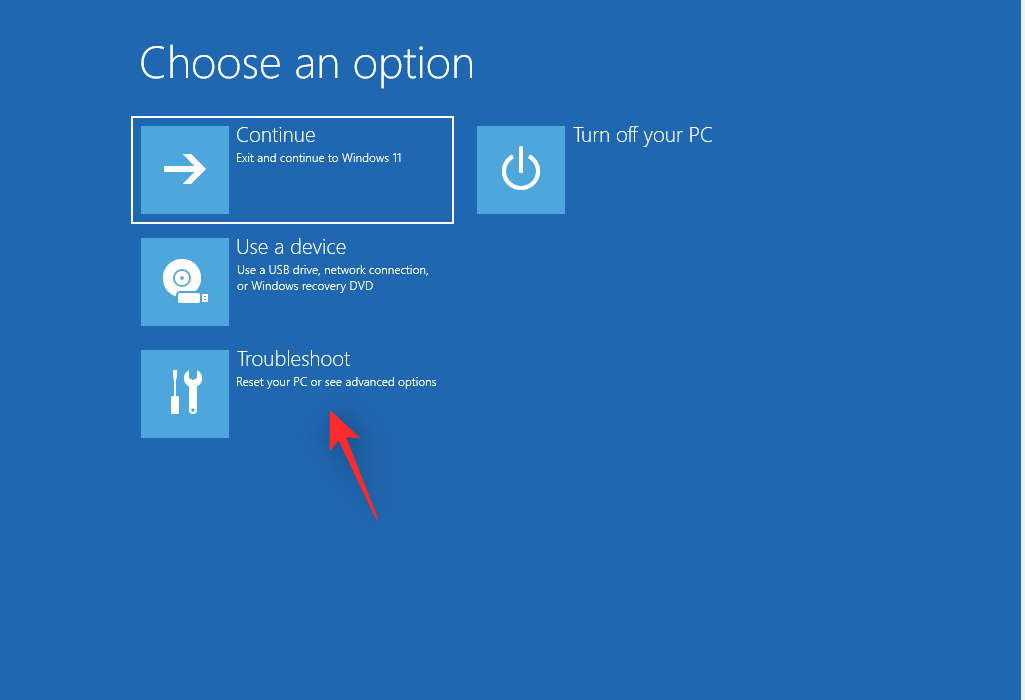
現在單擊 高級選項。

單擊 啟動修復。

登錄您的用戶帳戶以確認您的身份。Windows 現在將嘗試自動修復系統啟動問題。完成後,重新啟動您的電腦,如果啟動修復成功解決了您的問題,您現在應該能夠啟動進入 Windows。
修復 9:使用系統還原
當一切正常時,系統還原可以幫助您將電腦恢復到之前的還原點。在此過程中,恢復點後所有最近安裝的程序、服務和驅動程序都將被刪除。請按照以下步驟操作以幫助您完成該過程。
使用您喜歡的方法 將您的電腦重新啟動到 恢復模式 ,然後單擊“故障排除”。

單擊 高級選項。

現在單擊 “系統還原”。

單擊 並選擇所需的用戶帳戶並通過輸入密碼驗證您的身份。系統還原現在將在您的電腦上啟動。單擊 “下一步”。
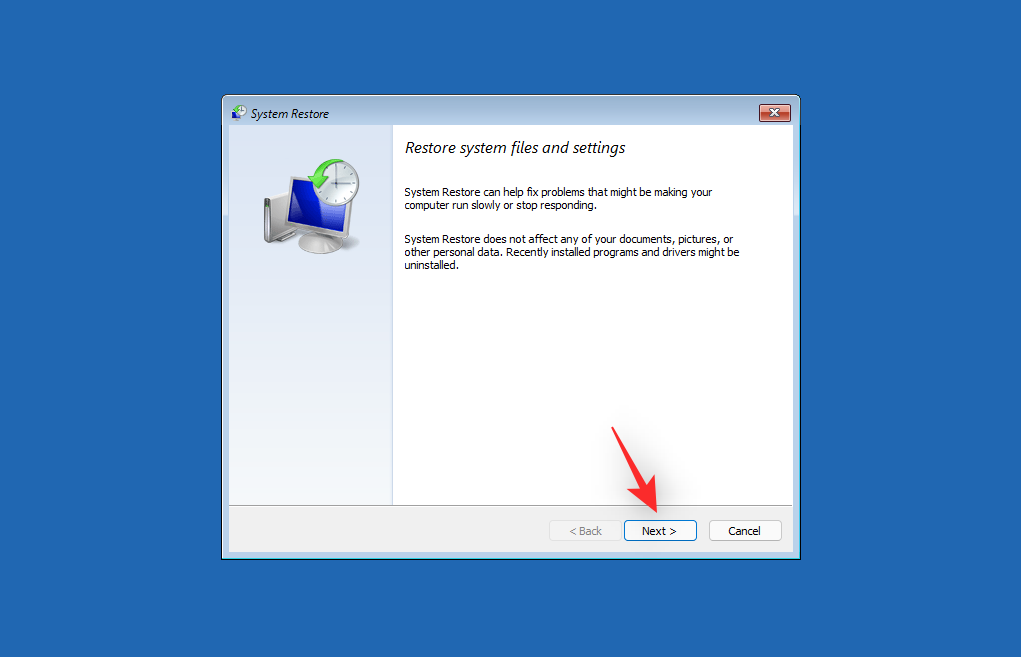
現在, 如果出現提示,請單擊選擇不同的還原點 。當您的電腦上一切正常時,單擊 並選擇所需的還原點。
提示:您可以單擊 掃描受影響的程序 來查看在此過程中將從您的電腦中刪除的程序列表。

單擊“下一步”。

現在單擊 “完成”。

您的電腦現在將恢復到所選的恢復點。您的系統上不應再遇到 無法訪問的啟動設備 BSOD。
修復 10:運行 SFC 和 DISM 掃描
將電腦重新啟動至恢復模式並啟動 命令提示符。

現在使用以下命令運行 SFC 掃描。
sfc /scannow

完成後,使用以下命令恢復 Windows 11 安裝映像。
DISM /Cleanup-Image /RestoreHealth

完成後,使用以下命令關閉 CMD。
exit

重新啟動電腦並嘗試像往常一樣啟動進入 Windows 11。如果損壞的系統文件導致您的系統出現 BSOD,那麼該問題現在應該已得到解決。
修復 11:刷新系統 BIOS
我們現在建議您嘗試刷新 BIOS。您可能會遇到過時或損壞的 BIOS 問題,而當前的硬件組件可能會遇到錯誤。刷新 BIOS 可以幫助解決相同的問題。對於每台 PC,刷新 BIOS 的過程可能有所不同,具體取決於其 OEM。我們建議您根據您的 OEM 遵循下面鏈接的指南來刷新 BIOS。
如果 BIOS 問題導致 系統出現 無法訪問啟動設備BSOD,那麼該問題現在應該已得到解決。
修復 12:檢查並重新分配引導驅動器號(如果更改)
有時,啟動驅動器的驅動器號可能會根據您對電腦所做的更改而更改。同樣可以阻止您啟動 Windows 並導致 BSOD 並顯示停止代碼 Inaccessible Boot Device。使用以下步驟在您的 PC 上檢查並更正該問題。讓我們開始吧。
使用您喜歡的方法將您的電腦重新啟動到 恢復模式並啟動 命令提示符。

現在使用以下命令啟動 diskpart。
diskpart
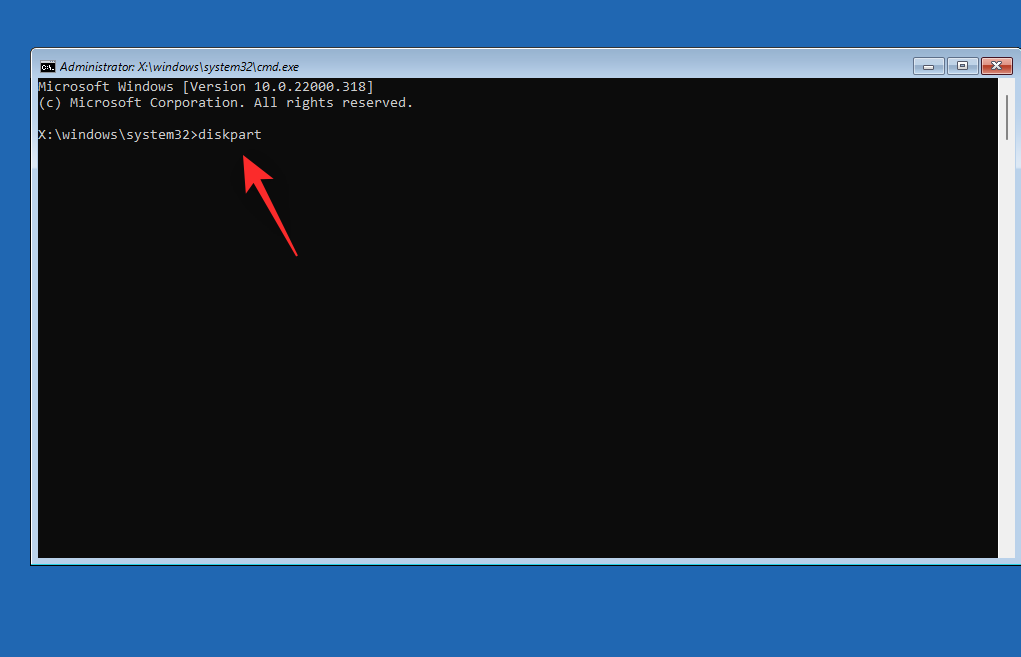
輸入以下內容並按 Enter。
list vol

使用信息列從屏幕上的列表中查找並識別您的啟動驅動器。檢查旁邊的字母。如果它與您的初始引導驅動器號 (C:) 不同,請使用以下命令進行更正。

首先使用以下命令選擇啟動卷。將 VOLUMENUMBER替換為啟動卷的相關卷號。
sel vol VOLUMENUMBER
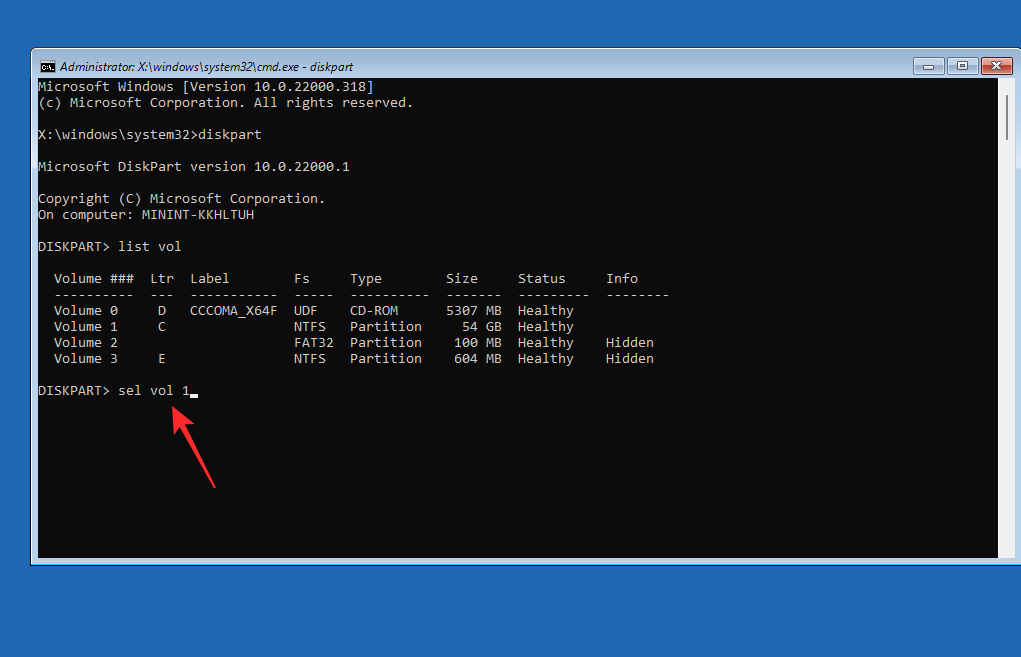
現在輸入以下命令將 C: 指定為啟動卷的默認驅動器號。
assign letter=C

使用以下命令關閉diskpart。
exit

現在使用以下命令關閉 CMD。
exit

重新啟動你的電腦,你現在應該能夠像平常一樣啟動到 Windows 11。
修復 13:手動安裝 Intel RST 驅動程序(僅適用於 Intel 用戶)
如果您有快速存儲兼容的驅動器和 CPU,那麼您可能會遇到 RST 驅動程序的問題。RST 驅動程序因在某些情況下嘗試啟動 Windows 時引發問題而臭名昭著,重新安裝該驅動程序可以幫助解決許多問題。使用以下步驟幫助您根據您的 PC 重新安裝或安裝 Intel RST 驅動程序。
注意:我們強烈建議您下載並使用 OEM 發布的與您的 PC 相關的驅動程序。如果您的 OEM 不提供任何英特爾 RST 驅動程序,那麼我們建議您驗證兼容性並從此鏈接下載相關驅動程序。
首先下載適用於您 PC 的相關 RST 驅動程序,然後使用第二個設備將它們傳輸到 USB。將 USB 連接到您的 PC。現在將您的電腦重新啟動到 恢復模式 並啟動 命令提示符。

使用以下命令導出所有已安裝驅動程序的列表。
pnputil -e > C:\drivers.txt

使用以下命令查看 PC 上安裝的驅動程序列表。
type C:\drivers.txt

查找並識別您的 PC 上安裝的所有 RST 驅動程序。如果發現任何內容,請記下 發布的名稱。現在使用以下命令刪除驅動程序。將NAME替換 為您之前記下的名稱。
pnputil.exe -d NAME.inf

重複上述步驟以刪除 PC 上的任何其他 RST 驅動程序。在某些情況下,您的電腦可能有多個版本的驅動程序。完成後,使用以下命令安裝從 USB 下載的驅動程序。將LTR替換 為分配給 USB 驅動器的字母,將NAME替換為驅動程序 .INF 文件的名稱。
pnputil.exe -a LTR:\NAME.INF

現在將為您的 Windows 11 安裝安裝所選的驅動程序。使用以下命令關閉 CMD。
exit

Reboot your PC and try booting Windows 11 as usual again. If faulty or incompatible RST drivers were causing issues with your system, then the same should now be fixed.
Last Resorts
If by this time you’re still facing Inaccessible Boot Device BSOD on your system then it’s time for some drastic measures. We now recommend you format your boot drive and reinstall Windows 11 from scratch. This can help fix major issues with your Windows 11 installation.
We will first backup all your important data using an Ubuntu ISO. We can then format and reinstall Windows 11 without the risk of losing your data.
If however, starting from scratch does not fix your issue, then you might be looking at a hardware failure. We recommend you get in touch with a certified technician at the earliest in such cases.
Things you need
Format and reinstall Windows 11
Here’s how you can format and reinstall Windows 11 on your PC. Use the steps below to help you along with the process.
Step 1: Backup your data using Ubuntu
Start by downloading the Ubuntu ISO linked above. Similarly, download a portable copy of Rufus using the link above. Now launch Rufus on your PC. Click the drop-down menu at the top and select your USB if not already selected.
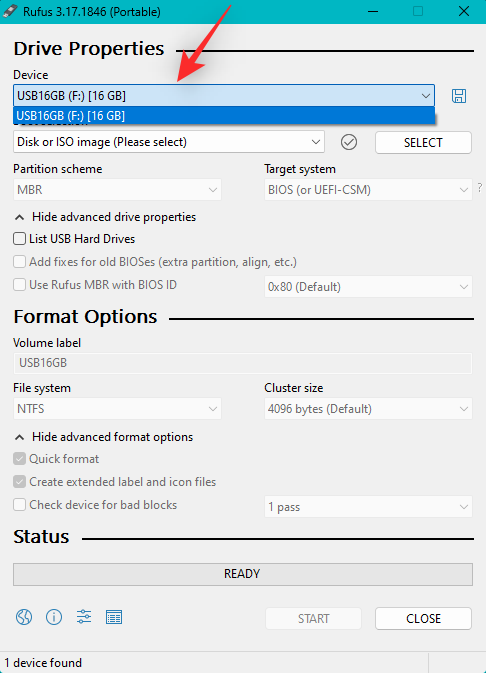
Click SELECT.

Navigate to the Ubuntu ISO you downloaded and double-click the same to select it.
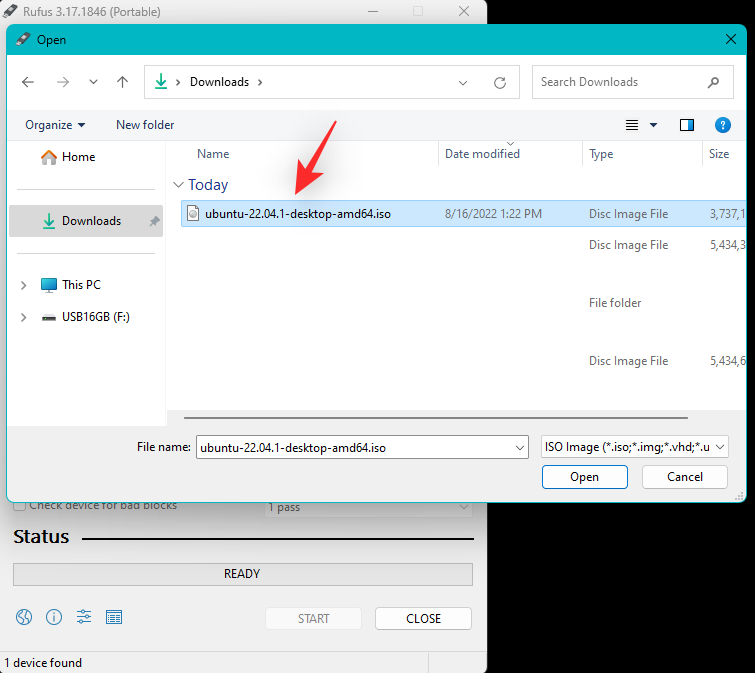
The values will be automatically filled in for your Ubuntu ISO. Click START once done.
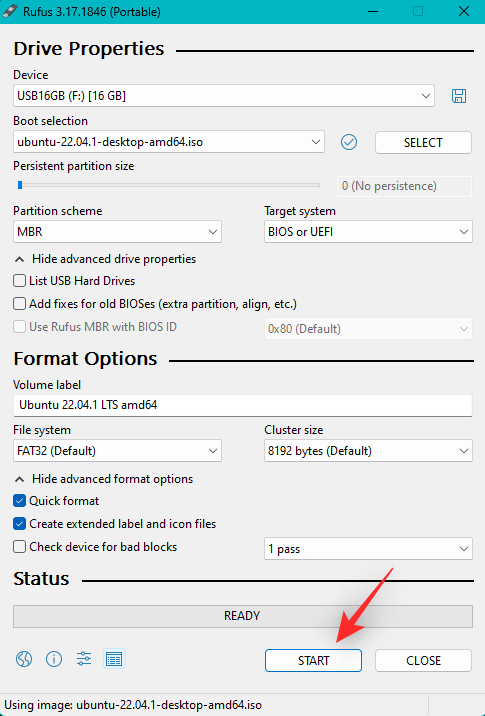
If you’re asked about image mode, let it be at its default option, Write in ISO Image mode (Recommended).

Click OK.

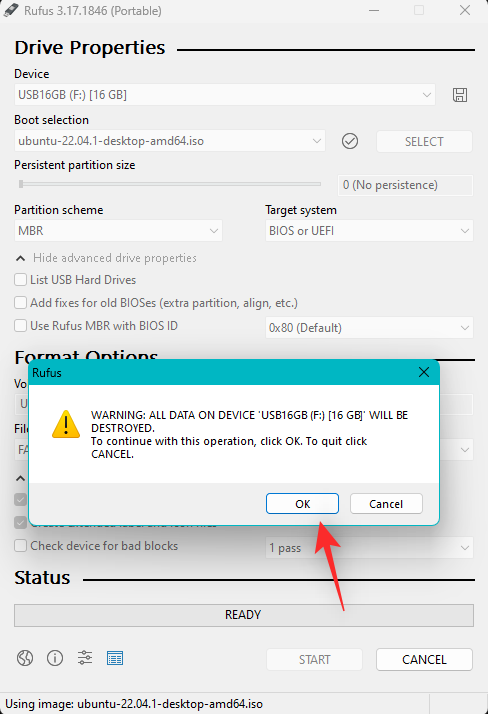
You will now be shown an alert that all data on your USB will be deleted. Click OK to confirm your choice.
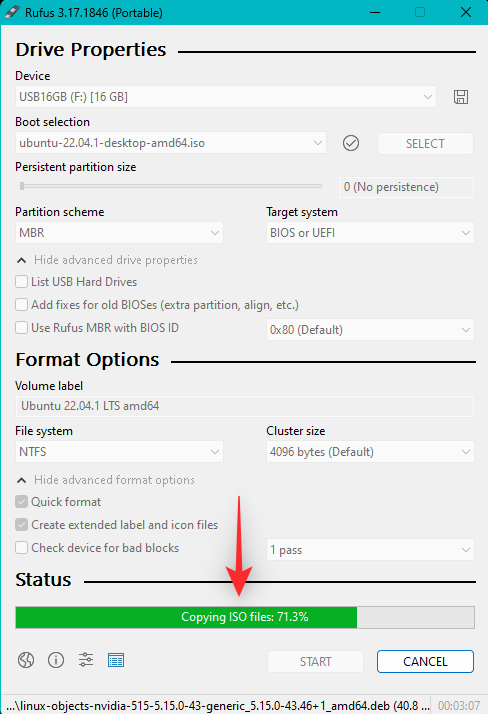
Rufus will now format and create a bootable Ubuntu USB. This can take some time depending on your PC and USB. You can track its progress at the bottom of Rufus.
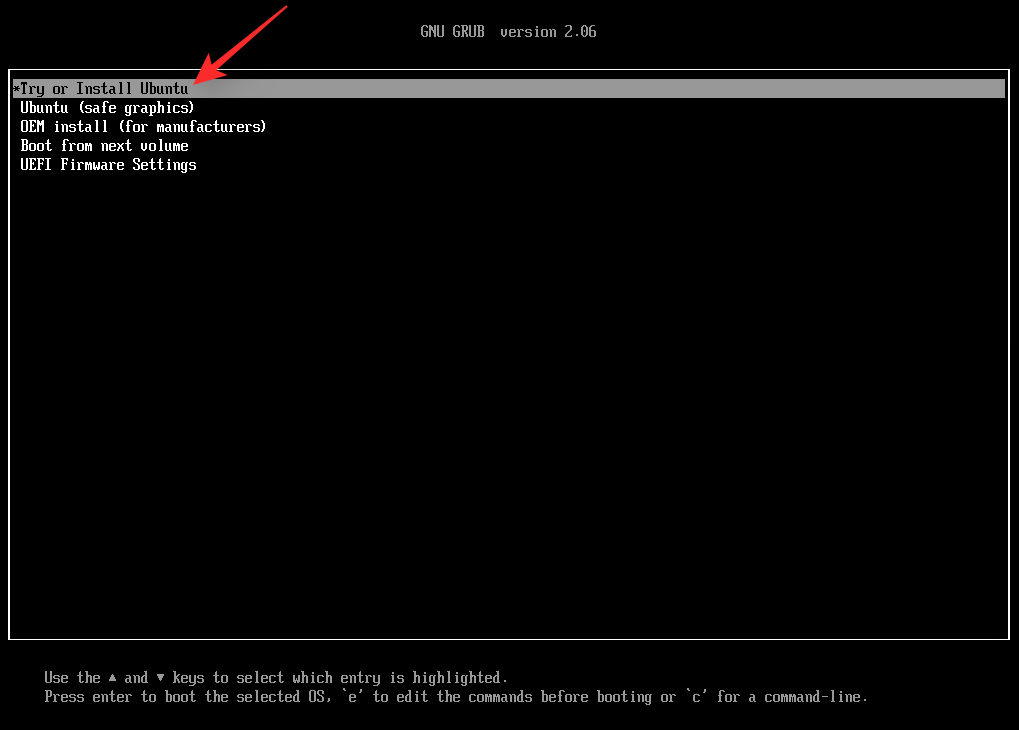
Once done, leave your USB plugged in and reboot your PC. Press Esc on your keyboard as soon as your PC reboots. You will now be given the choice to select your boot device. Use the arrow keys to select your USB drive and press Enter to select the same. You can also use the BIOS to set the USB as your preferred boot device. Now select Try or Install Ubuntu from the Grub menu.
Your PC will now boot from your USB drive and launch Ubuntu. Click and select your preferred language from the left sidebar.

Now click Try Ubuntu.
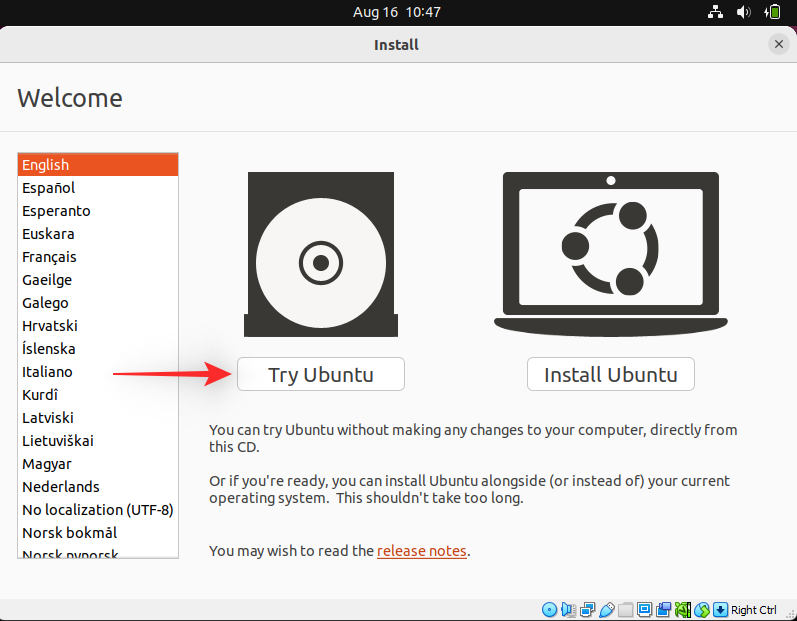
The live desktop environment will now boot and launch on your PC. Once done, double-click the Home folder on your desktop.

Click Other Locations on your left. You will now be shown all the available disks on your PC. This includes your failing Windows drive as well. Double click the same and backup all your important files to your external drive.
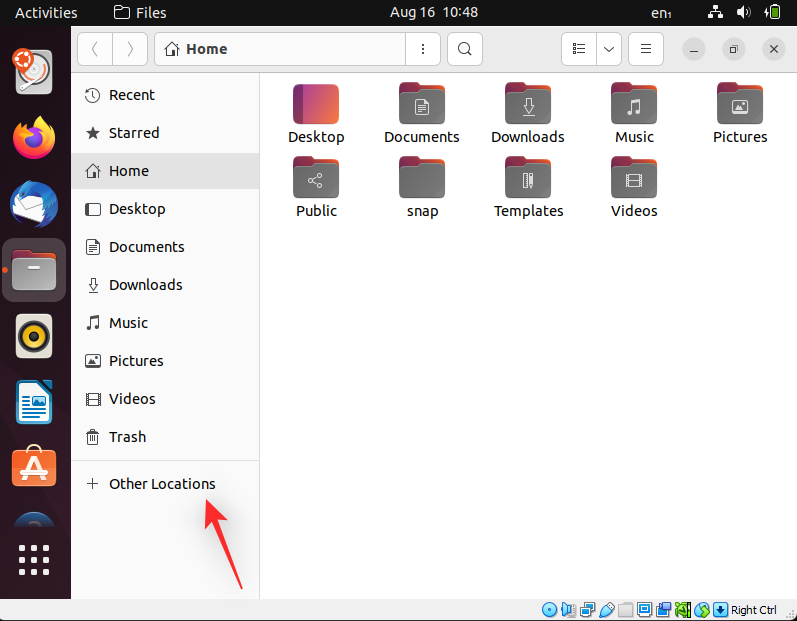
Once you’re done simply reboot your PC and follow the next step to format and reinstall Windows 11 on your drive.

Step 2: Format and reinstall Windows 11
Similar to booting Ubuntu, you will need to create a Windows 11 installation media using the downloaded ISO. Once you’re done, you can boot from the USB, format the concerned drive, and re-install Windows 11. Keep in mind that formatting your boot drive will remove all data from the same including hidden partitions. If you have a custom recovery partition, then we recommend you backup the same before proceeding further.
Once you’re ready, use this comprehensive guide from us to format and reinstall Windows 11 on your PC.
Part 2: If you can not access your drive at all (4 Fixes)
If you can not access your drive at all in your BIOS menu then it might indicate a failing drive or in the worst case, a hardware failure. We recommend you try out the following fixes to try and diagnose your issue further. Let’s get started.
Fix 1: Try changing SATA/NVMe ports
If you have multiple ports available on your motherboard then you can try switching the same to see if that fixes the issue for you. You could be facing a failing SATA or NVMe port on your PC which is preventing your boot drive from showing up on your PC.
Ports can get damaged due to various reasons including stress, transit damage, power surges, failing chargers, and more. All these issues can prevent your drive from being read which can cause the Inaccessible Boot Device BSOD on your system.
If you’re comfortable, we recommend you open up your PC or laptop and try switching drive slots to see if that helps your drive show up on your PC. Most NVMe drives are held down by a single screw and will pop up once the screw is removed. The drives are inserted removed at an angle and then pressed down to create tension.
SATA drives and HDDs on the other hand use slot-in or cable connectors that can be pulled out and inserted. These drives are also held down using screws and detaching the connector can help your remove the same.
If however, you’re using a laptop then your options can be limited. You might not have an additional port on your system which might force you to try your drive on a different PC or a test bench. Use the next section to help you along with the same.
Fix 2: Try using your drive on a different PC
We now recommend you try using the concerned drive on a different PC. While you will face your issues when trying to boot your Windows 11 installation, the idea is to check the BIOS and verify if the drive can be read or not. This can help you diagnose issues with your PC that might be specific to your hardware components and will be preventing you from using the concerned drive on your PC. If your drive shows up on a different PC then we recommend you get in touch with a certified technician to further diagnose and fix this issue specific to your PC.
Fix 3: Replace your faulty drive
If your drive is unreadable and dead then there is not much you can do at this point. You can pay for professional data recovery services to recover important data from your drive if needed and then replace the drive to start afresh.
You can use this guide from us to fresh install Windows 11 on your new drive once replaced.
Fix 4: Reinstall Windows 11 on a new drive
You can try installing Windows 11 on a different drive to further diagnose and fix the issue with your previous installation. You can however only do this if you have another drive installed on your system. As your boot drive is currently unreadable, you won’t be able to create a new partition to install Windows 11 on the same. Use the steps below to help you along with the process.
Step 1: Backup your data using Ubuntu
As we’ll be installing Windows 11 on your alternate drive, you can backup data from the same using the Ubuntu live environment. Follow the steps below to help you along with the process.
Start by downloading the Ubuntu ISO linked above. Similarly, download a portable copy of Rufus using the link above. Now launch Rufus on your PC. Click the drop-down menu at the top and select your USB if not already selected.

Click SELECT.

Navigate to the Ubuntu ISO you downloaded and double-click the same to select it.

The values will be automatically filled in for your Ubuntu ISO. Click START once done.

Let the image mode be its default selection and click OK if you’re prompted.

You will now be shown an alert that all data on your USB will be deleted. Click Yes to confirm your choice.

Rufus will now format and create a bootable Ubuntu USB. This can take some time depending on your PC and USB. You can track its progress at the bottom of Rufus.

Once done, leave your USB plugged in and reboot your PC. Press Esc on your keyboard as soon as your PC reboots. You will now be given the choice to select your boot device. Use the arrow keys to select your USB drive and press Enter to select the same. Your PC will now boot from your USB drive and launch Ubuntu. Select Try or Install Ubuntu from the Grub menu.

Click and select your preferred language from the left sidebar.

Now click Try Ubuntu.

The live desktop environment will now boot and launch on your PC. Once done, double-click the Home folder on your desktop.

Click Other Locations on your left.

You will now be shown all the available disks on your PC. This includes your failing Windows drive as well. Double click the same and backup all your important files to your external drive.
Once you’re done simply reboot your PC and follow the next step to format and reinstall Windows 11 on your drive.

Step 2: Install Windows 11
We now recommend you format your drive and install Windows 11 on the same. Use this comprehensive guide from us to help you along with the process. Once you’ve installed Windows 11 you can set up your PC as needed and try reading your initial drive using data recovery tools. You might be looking at a bricked drive that might need additional fixes to get it working again. If the drive does not show up at all, we recommend you get in touch with a certified technician to further help diagnose and fix your PC.
We hope this post helped you fix the Inaccessible Boot Device stop code BSOD on your PC. If you have any more questions, feel free to reach out using the comments below.
RELATED
如果您的设备出现错误或崩溃,请按照 Windows 11 中系统还原的步骤,将您的设备恢复到先前版本。
如果你在寻找最佳的Microsoft Office替代品,这里有六个优秀的解决方案供你参考。
本教程向您展示如何创建一个 Windows 桌面快捷方式图标,该图标打开一个命令提示符到特定文件夹位置。
在Microsoft Windows中右键单击应用程序图标时,“以不同用户身份运行”选项缺失?您可以使用这些方法来启用它。
不想让其他人在您离开时访问您的计算机?尝试这些有效的锁定Windows 11屏幕的方法。
如果您的计算机在安装最近的Windows更新后出现问题,请了解几种修复损坏的Windows更新的方法。
你是否在尝试找出如何在Windows 11中将视频设置为屏幕保护程序。我们揭示了如何使用一种适用于多种视频文件格式的免费软件来实现。
您在 Windows 11 中的旁白功能烦吗?了解如何通过多种简单方法禁用旁白声音。
想要在 Windows 11 PC 上禁用删除确认对话框吗?请阅读本文,了解各种方法。
维护多个电子邮件收件箱可能很痛苦,特别是当您有重要邮件同时到达时。本文将介绍如何在PC和Apple Mac设备上将Microsoft Outlook与Gmail同步的简单步骤。

