Wie man RAR-Dateien in ZIP unter Windows konvertiert
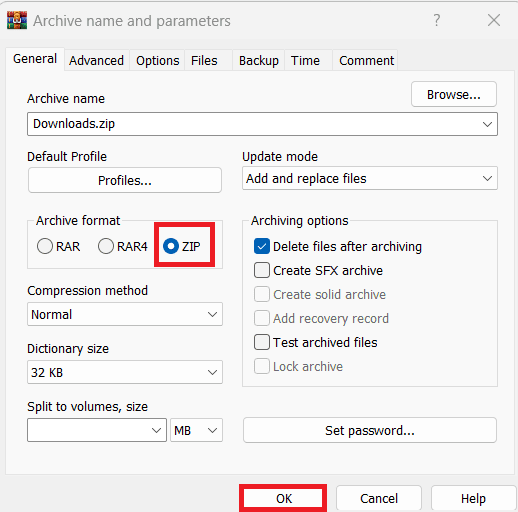
Haben Sie RAR-Dateien, die Sie in ZIP-Dateien konvertieren möchten? Erfahren Sie, wie Sie RAR-Dateien in das ZIP-Format konvertieren.

Dieses Dokument beschreibt, wie man Teams Direct Routing Hosting-Modell konfiguriert und bezieht sich nur auf die AudioCodes SBC-Konfiguration.
3 Konfigurieren von AudioCodes SBC 3.1 Voraussetzungen
3.1.1 SBC-Domänenname im Mandanten eines Netzbetreibers
3.1.2 SBC-Domänenname im Mandanten eines Kunden
3.3 LAN- und WAN-IP-Schnittstellen konfigurieren
3.3.1 Netzwerkschnittstellen in der Topologie mit SIP-Trunk im LAN
3.3.2 Validieren der Konfiguration von physischen Ports und Ethernet-Gruppen
3.3.3 LAN- und WAN-VLANs konfigurieren
3.3.4 Netzwerkschnittstellen konfigurieren
3.4.1 Konfigurieren Sie die NTP-Serveradresse
3.4.2 Erstellen Sie einen TLS-Kontext für Teams Direct Routing
3.4.4 Stellen Sie den SBC und die Stamm-/Zwischenzertifikate auf dem SBC bereit
3.5 Verfahren zum Generieren und Installieren des Wildcard-Zertifikats
3.6 Stellen Sie das Baltimore Trusted Root-Zertifikat bereit
3.7 Medienbereiche konfigurieren
3.8 SIP-Signalisierungsschnittstellen konfigurieren
3.10 Konfigurieren Sie eine Proxy-Adresse
3.11 Konfigurieren Sie den Wählplan
3.12 Verbindungsaufbauregeln konfigurieren
3.13 Nachrichtenbearbeitungsregeln konfigurieren
3.14 Konfigurieren Sie eine Coder-Gruppe
3.15 Konfigurieren Sie ein IP-Profil
3.18 Nachrichtenbedingungsregeln konfigurieren
3.19 Klassifizierungsregeln konfigurieren
3.20 IP-zu-IP-Anrufroutingregeln konfigurieren
4 Firewall-Einstellungen konfigurieren
5 Überprüfen Sie die Kopplung zwischen dem SBC und dem direkten Routing
7 Mandantenbereitstellungsskript
8 SIP-Proxy-Direct-Routing-Anforderungen
Direktes Routing für Teams
Teams Direct Routing ermöglicht die Verbindung eines vom Kunden bereitgestellten SBC mit dem Microsoft-Telefonsystem. Der vom Kunden bereitgestellte SBC kann an fast jede Telefonleitung oder an PSTN-Geräte von Drittanbietern angeschlossen werden.
Die Verbindung ermöglicht:
AudioCodes SBC-Produktserie
Die SBC-Gerätefamilie von AudioCodes ermöglicht eine zuverlässige Konnektivität und Sicherheit zwischen dem VoIP-Netzwerk des Unternehmens und dem VoIP-Netzwerk des Dienstanbieters. Der SBC bietet Perimeter-Verteidigung als Möglichkeit, Unternehmen vor böswilligen VoIP-Angriffen zu schützen; Vermittlung zur Ermöglichung der Verbindung einer beliebigen PBX und/oder IP-PBX mit einem beliebigen Dienstanbieter; und Service Assurance für Servicequalität und Verwaltbarkeit.
Der als kostengünstige Appliance konzipierte SBC basiert auf praxiserprobten VoIP- und Netzwerkdiensten mit einem nativen Hostprozessor, der die Erstellung speziell entwickelter Multiservice-Appliances ermöglicht und eine reibungslose Konnektivität zu Cloud-Diensten mit integrierter Servicequalität (SLA) bietet Überwachung, Sicherheit und Verwaltbarkeit. Die native Implementierung von SBC bietet eine Vielzahl zusätzlicher Funktionen, die mit eigenständigen SBC-Appliances nicht möglich sind, wie z. B. VoIP-Vermittlung, Überlebensfähigkeit des PSTN-Zugriffs und Mehrwertdienstanwendungen von Drittanbietern. Dadurch können Unternehmen die Vorteile konvergenter Netzwerke nutzen und eigenständige Appliances überflüssig machen.
Der SBC von AudioCodes ist als integrierte Lösung erhältlich, die auf seinen praxiserprobten Media Gateway- und Multi-Service Business Router-Plattformen läuft, oder als reine Softwarelösung für den Einsatz mit Hardware von Drittanbietern. Der SBC kann als virtualisierter SBC angeboten werden und unterstützt die folgenden Plattformen: Hyper-V, AWS, AZURE, AWP, KVM und VMWare.
Konfigurieren von AudioCodes SBC
In diesem Abschnitt wird gezeigt, wie der SBC von AudioCodes für das Internetworking mit Teams Direct Routing konfiguriert wird. Die folgende Abbildung zeigt ein Beispiel der Verbindungstopologie für das Hosting-Modell. In der Abbildung sind mehrere Verbindungsentitäten dargestellt:

Mandantendomänenstruktur:

Voraussetzungen
Bevor Sie mit der Konfiguration beginnen, stellen Sie sicher, dass Sie diese für jeden Hosting-SBC haben, den Sie koppeln möchten:
SBC-Domänenname im Mandanten eines Netzbetreibers
Der SBC-Domänenname muss von einem der in „Domänen“ des Mandanten registrierten Namen stammen. Sie können den Mandanten *.onmicrosoft.com nicht für den Domänennamen verwenden.
Von einem Administrator für den Mandanten eines Netzbetreibers registrierte DNS-Namen:

Beispiel für registrierte DNS-Namen:

Zur Aktivierung der Domain muss der Hosting-Provider mindestens einen Benutzer aus der für den Mandanten registrierten SIP-Domain hinzufügen. Beispielsweise können Sie den Benutzern [email protected] den Domänen-FQDN Customers.aceducation.info zur Verfügung stellen, wenn dieser Name für diesen Tenant registriert ist. Sie sollten mindestens einen lizenzierten Benutzer erstellen, der zu der SBC-Domäne gehört, die Sie wie oben beschrieben hinzugefügt haben.
Beispiel eines Benutzers, der zur Domain von SBC Carrier gehört:

SBC-Domänenname im Mandanten eines Kunden
Für jeden Kundenmandanten sollten Sie eine Domäne hinzufügen, die zu einem Netzbetreiber gehört, der auf einen Kundenmandanten verweist.

Beispiel eines Benutzers für Carrier SBC in der Kundendomäne:

Die folgende IP-Adresse und der FQDN werden in diesem Handbuch als Beispiele verwendet:

Jeder Kunde muss mindestens einen Benutzer aus der für den Mandanten registrierten SIP-Domäne des Netzbetreibers hinzufügen. Beispielsweise können Sie den Benutzern [email protected] den Domänen-FQDN sbc2.Customers.aceducation.info bereitstellen, solange dieser Name für diesen Mandanten registriert ist. Sie sollten mindestens einen lizenzierten Benutzer erstellen, der zu Ihrer SBC-Domäne gehört, die Sie im obigen Schritt hinzugefügt haben.
SBC-Konfigurationskonzept
Die folgende Abbildung veranschaulicht das Konzept hinter der Konfiguration des SBC-Geräts von AudioCodes.

Das Routing vom SIP-Trunk zum direkten Routing ist abhängig von der Switch-Routing-Methode der Klasse 4. Die Routing-Entscheidung kann basieren auf:
Die in diesem Dokument gezeigte Konfiguration basiert auf dem DID-Bereich des Kunden unter Verwendung des Wählplans.
Konfigurieren Sie LAN- und WAN-IP-Schnittstellen
Dieser Abschnitt beschreibt, wie die IP-Netzwerkschnittstellen des SBC konfiguriert werden. Es gibt mehrere Möglichkeiten, den SBC bereitzustellen. SBC-Schnittstellen mit den folgenden IP-Einheiten:
Netzwerkschnittstellen in der Topologie mit SIP-Trunk im LAN

Validieren Sie die Konfiguration von physischen Ports und Ethernet-Gruppen
Die physischen Ports werden vom SBC automatisch erkannt. Die Ethernet-Gruppen werden den Ports ebenfalls automatisch zugewiesen. In diesem Schritt ist nur eine Parametervalidierung erforderlich.
So validieren Sie physische Ports:

So validieren Sie Ethernet-Gruppen:

Konfigurieren Sie LAN- und WAN-VLANs
In diesem Abschnitt wird beschrieben, wie Sie VLANs für jede der folgenden Schnittstellen definieren:
So konfigurieren Sie VLANs:

Netzwerkschnittstellen konfigurieren
In diesem Abschnitt wird beschrieben, wie Sie die IP-Netzwerkschnittstellen für jede der folgenden Schnittstellen konfigurieren:
So konfigurieren Sie Netzwerkparameter für LAN- und WAN-Schnittstellen:

Die konfigurierten IP-Netzwerkschnittstellen werden unten angezeigt.

TLS-Kontext konfigurieren
Die Konfigurationsanweisungen in diesem Abschnitt basieren auf der folgenden Domänenstruktur, die als Teil des Zertifikats implementiert werden muss, das in den Host-SBC geladen werden muss:
CN:
Kunden.ACeducation.info SAN: *.Kunden.ACeducation.info
Dieses Zertifikatsmodul basiert auf dem eigenen TLS-Zertifikat des Dienstanbieters.

Die direkte Routing-Schnittstelle von Teams lässt nur TLS-Verbindungen von SBC-Geräten für SIP-Datenverkehr mit einem Zertifikat zu, das von einer der vertrauenswürdigen Zertifizierungsstellen signiert wurde. Die derzeit unterstützten Zertifizierungsstellen finden Sie auf der Microsoft-Website .
Konfigurieren Sie die NTP-Serveradresse
Dieser Abschnitt beschreibt, wie Sie die IP-Adresse des NTP-Servers konfigurieren. Es wird empfohlen, einen NTP-Server (Microsoft NTP-Server oder ein anderer globaler Server) zu implementieren, um sicherzustellen, dass der SBC das aktuelle Datum und die aktuelle Uhrzeit erhält. Dies ist erforderlich, um Zertifikate von Remote-Teilnehmern zu validieren. Wichtig ist, dass sich der NTP Server auf dem OAMP IP Interface (in unserem Fall LAN_IF) befindet oder darüber erreichbar ist.
So konfigurieren Sie die NTP-Serveradresse:

Erstellen Sie einen TLS-Kontext für Teams Direct Routing
Der folgende Abschnitt beschreibt, wie Sie ein Zertifikat für die SBC-WAN-Schnittstelle anfordern und konfigurieren, basierend auf dem Beispiel von DigiCert Global Root CA. Das Zertifikat wird vom SBC verwendet, um die Verbindung mit Teams Direct Routing zu authentifizieren. Das Verfahren umfasst die folgenden Hauptschritte:
So erstellen Sie einen TLS-Kontext für Teams Direct Routing:

Note: The table above exemplifies configuration focusing on interconnecting SIP and media. You might want to configure additional parameters according to your company’s policies. For example, you might want to configure Online Certificate Status Protocol (OCSP) to check if SBC certificates presented in the online server are still valid or revoked.

Generate a CSR and Obtain the Certificate from a Supported CA
This section shows on how to generate a Certificate Signing Request (CSR) and obtain the certificate from a supported Certification Authority.
To generate a Certificate Signing Request (CSR) and obtain the certificate from a supported Certification Authority:
Under the Certificate Signing Request group, do the following:

Deploy the SBC and Root / Intermediate Certificates on the SBC
After obtaining the SBC signed and Trusted Root/Intermediate Certificate from the CA, install the following:
To install the SBC certificate:


The above method creates a signed certificate for an explicit device, on which a Certificate Sign Request was generated (and signed with private key). To be able to use the same wildcard certificate on multiple devices, use following methods.
Method of Generating and Installing the Wildcard Certificate
To use the same certificate on multiple devices, you may prefer using 3rd party application (e.g., DigiCert Certificate Utility for Windows) to process the certificate request from your Certificate Authority on another machine, with this utility installed.
After you’ve processed the certificate request and response using the DigiCert utility, test the certificate private key and chain and then export the certificate with private key and assign a password.
To install the certificate:
Deploy Baltimore Trusted Root Certificate
Loading Baltimore Trusted Root Certificates to AudioCodes’ SBC is mandatory for implementing an MTLS connection with the Microsoft Teams network.
The DNS name of the Teams Direct Routing interface is sip.pstnhub.microsoft.com. In this interface, a certificate is presented which is signed by Baltimore Cyber Baltimore CyberTrust Root with Serial Number: 02 00 00 b9 and SHA fingerprint: d4:de:20:d0:5e:66:fc: 53:fe:1a:50:88:2c:78:db:28:52:ca:e4:74. To trust this certificate, your SBC must have the certificate in Trusted Certificates storage. Download the certificate from and follow the steps above to import the certificate to the Trusted Root storage.
Before importing the Baltimore root certificate into AudioCodes’ SBC, make sure it’s in .PEM or .PFX format. If it isn’t, you need to convert it to .PEM or .PFX format, otherwise the ‘Failed to load new certificate’ error message is displayed. To convert to PEM format, use Windows local store on any Windows OS and then export it as ‘Base-64 encoded X.509 (.CER) certificate’.
Configure Media Realms
Media Realms allow dividing the UDP port ranges for use on different interfaces. In the example below, two Media Realms are configured:
To configure Media Realms:

The configured Media Realms are shown in the figure below.
Configure SIP Signaling Interfaces
This section shows on how to configure a SIP Signaling Interfaces. A SIP Interface defines a listening port and type (UDP, TCP, or TLS) for SIP signaling traffic on a specific logical IP network interface (configured in the Interface Table above) and Media Realm.
Note that the configuration of a SIP interface for the SIP Trunk shows as an example and your configuration might be different. For specific configuration of interfaces pointing to SIP trunks and/or a third-party PSTN environment connected to the SBC, see the trunk / environment vendor documentation.
AudioCodes also offers a comprehensive suite of documents covering the interconnection between different trunks and equipment.
To configure a SIP interfaces:

The configured SIP Interfaces are shown in the figure below.

Configure Proxy Sets
The Proxy Set and Proxy Address defines TLS parameters, IP interfaces, FQDN and the remote entity’s port. Proxy Sets can also be used to configure load balancing between multiple servers. The example below covers configuration of a Proxy Sets for Teams Direct Routing and SIP Trunk. Note that the configuration of a Proxy Set for the SIP Trunk shows as an example and your configuration might be different.
For specific configuration of interfaces pointing to SIP trunks and/or the third-party PSTN environment connected to the SBC. AudioCodes also offers a comprehensive suite of documents covering the interconnection between different trunks and the equipment.
The Proxy Sets will later be applied to the VoIP network by assigning them to IP Groups.
To configure a Proxy Sets:


Configure a Proxy Address
This section shows on how to configure a Proxy Address.
To configure a Proxy Address for SIP Trunk:


To configure a Proxy Address for Teams:


Configure the Dial Plan
For deployments requiring hundreds of routing rules (which may exceed the maximum number of rules that can be configured in the IP-to-IP Routing table), you can employ tags to represent the many different calling (source URI user name) and called (destination URI user name) prefix numbers in your routing rules.
Tags are typically implemented when you have users of many different called and/or calling numbers that need to be routed to the same destination (e.g., IP Group or IP address). In such a scenario, instead of configuring many routing rules to match all the required prefix numbers, you need only to configure a single routing rule using the tag to represent all the possible prefix numbers.
The Dial Plan (e.g., TeamsTenants) will be configured with a customer tenant FQDN tag per prefix.
To configure Dial Plans:


Configure Call Setup Rules
This section describes on how to configure Call Setup Rules based on customer DID range (Dial Plan). Call Setup rules define various sequences that are run upon receipt of an incoming call (dialog) at call setup, before the device routes the call to its destination.
Configured Call Setup Rules need be assigned to specific IP Group.
To configure a Call Setup Rules based on customer DID range (Dial Plan):


Configure Message Manipulation Rules
This section describes on how to configure SIP message manipulation rules. SIP message manipulation rules can include insertion, removal, and/or modification of SIP headers. Manipulation rules are grouped into Manipulation Sets, enabling you to apply multiple rules to the same SIP message (IP entity).
Once you have configured the SIP message manipulation rules, you need to assign them to the relevant IP Group (in the IP Group table) and determine whether they must be applied to inbound or outbound messages.
To configure SIP message manipulation rule for Teams:


Configure a Coder Group
This section describes on how to configure coders (termed Coder Groups). As Teams Direct Routing supports the SILK and OPUS coders while the network connection to the SIP Trunk may restrict operation with a dedicated coders list, you need to add a Coder Group with the supported coders for each leg, the Teams Direct Routing and the SIP Trunk.
Note that the Coder Group ID for this entity will be assigned to its corresponding IP Profile in the next section.
To configure a Coder Group:

Configure an IP Profile
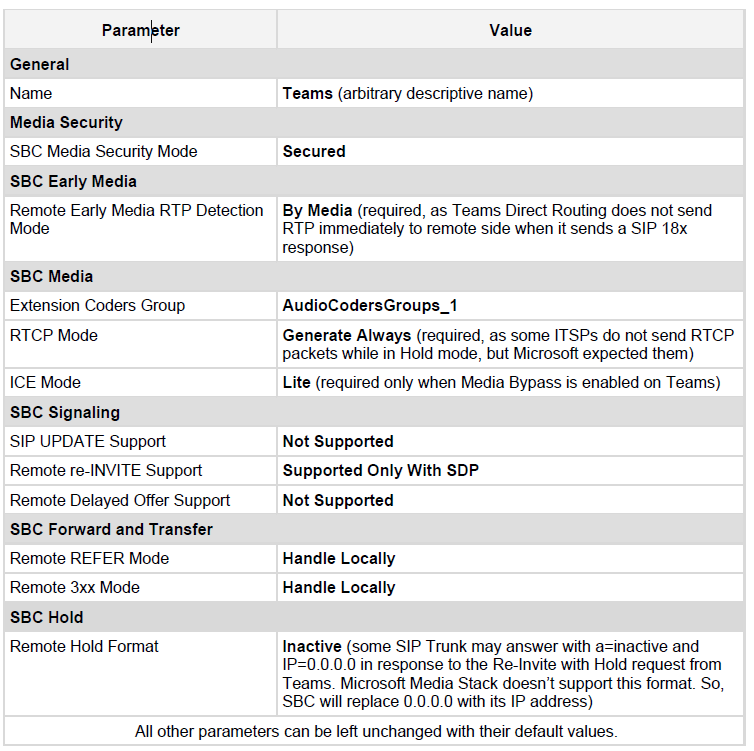
This section describes on how to configure IP Profiles. An IP Profile is a set of parameters with user-defined settings related to signaling (e.g., SIP message terminations such as REFER) and media (e.g., coder type). An IP Profile need be assigned to specific IP Group.
To configure an IP Profile:

Configure IP Groups
This section describes on how to configure IP Groups. The IP Group represents an IP entity on the network with which the SBC communicates. This can be a server (e.g., IP-PBX or SIP Trunk) or it can be a group of users (e.g., LAN IP phones). For servers, the IP Group is typically used to define the server’s IP address by associating it with a Proxy Set. Once IP Groups are configured, they are used to configure IP-to-IP routing rules for denoting source and destination of the call.
To configure an IP Groups:


Configure SRTP
This section describes on how to configure media security. The Direct Routing Interface needs to use of SRTP only, so you need to configure the SBC to operate in the same manner. By default, SRTP is disabled.
To enable SRTP:

Configure Message Condition Rules
This section describes on how to configure the Message Condition Rules. A Message Condition defines special conditions (pre-requisites) for incoming SIP messages. These rules can be used as additional matching criteria for the IP-to-IP routing rules in the IP-to-IP Routing table.
To configure a Message Condition rule:


Configure Classification Rules
This section describes on how to configure Classification rules. A Classification rule classifies incoming SIP dialog-initiating requests (e.g., INVITE messages) to a “source” IP Group. The source IP Group is the SIP entity that sent the SIP dialog request. Once classified, the device uses the IP Group to process the call (manipulation and routing).
You can also use the Classification table for employing SIP-level access control for successfully classified calls, by configuring Classification rules with whitelist and blacklist settings. If a Classification rule is configured as a whitelist (“Allow”), the device accepts the SIP dialog and processes the call. If the Classification rule is configured as a blacklist (“Deny”), the device rejects the SIP dialog.
To configure a Classification rule:


Konfigurieren Sie IP-zu-IP-Anrufroutingregeln
In diesem Abschnitt wird beschrieben, wie IP-zu-IP-Anrufweiterleitungsregeln konfiguriert werden. Diese Regeln definieren die Routen zum Weiterleiten von SIP-Nachrichten (z. B. INVITE), die von einer IP-Entität zu einer anderen empfangen werden. Der SBC wählt die Regel aus, deren konfigurierte Eingabemerkmale (z. B. IP-Gruppe) mit denen der eingehenden SIP-Nachricht übereinstimmen. Wenn die Eingabemerkmale nicht mit der ersten Regel in der Tabelle übereinstimmen, werden sie mit der zweiten Regel verglichen usw., bis eine übereinstimmende Regel gefunden wird. Wenn keine Regel zutrifft, wird die Nachricht zurückgewiesen. Das unten gezeigte Beispiel deckt nur das IP-zu-IP-Routing ab, obwohl Sie die Anrufe vom SIP-Trunk an Teams und umgekehrt weiterleiten können.
Die folgenden IP-zu-IP-Routing-Regeln werden definiert:
To configure IP-to-IP routing rules:


Note: The routing configuration may change according to your specific deployment topology.
Configure Firewall Settings
As extra security, there is an option to configure traffic filtering rules (access list) for incoming traffic on AudioCodes SBC. For each packet received on the configured network interface, the SBC searches the table from top to bottom until the first matching rule is found. The matched rule can permit (allow) or deny (block) the packet. Once a rule in the table is located, subsequent rules further down the table are ignored. If the end of the table is reached without a match, the packet is accepted. Please note that the firewall is stateless. The blocking rules will apply to all incoming packets, including UDP or TCP responses.
To configure a firewall rule:

Note: Be aware, that if in your configuration, connectivity to SIP Trunk (or other entities) is performed through the same IP Interface as Teams (WAN_IF in our example), you must add rules to allow traffic from these entities.
Verify the Pairing between the SBC and Direct Routing
After you’ve paired the SBC with Direct Routing using the New-CsOnlinePSTNGateway PowerShell command, validate that the SBC can successfully exchange OPTIONs with Direct Routing.
To validate the pairing using SIP options:

Make a Test Call
After installation is complete, you can run a test call from the SBC to a registered user, and in the other direction as well. Running a test call will help to perform diagnostics and to check the connectivity for future support calls or setup automation.
Test calls can be performed using the Test Agent, integral to AudioCodes’ SBC. The Test Agent gives you the ability to remotely verify connectivity, voice quality and SIP message flow between SIP UAs.
Auf dem SBC kann ein simulierter Endpunkt konfiguriert werden, um die SIP-Signalisierung von Anrufen zwischen dem SBC und einem entfernten Ziel zu testen. Diese Funktion ist nützlich, da sie den SIP-Nachrichtenfluss remote überprüfen kann, ohne das Remote-Ende in den Debug-Prozess einzubeziehen. Der SIP-Testanruf simuliert den Ablauf der SIP-Signalisierung: Rufaufbau, SIP 1xx-Antworten bis hin zum Abschluss der SIP-Transaktion mit einem 200 OK.
Der Testanruf sendet Syslog-Nachrichten an einen Syslog-Server, die den SIP-Nachrichtenfluss, Tonsignale (z. B. DTMF), Beendigungsgründe sowie Sprachqualitätsstatistiken und Schwellenwerte (z. B. MOS) anzeigen.
So konfigurieren Sie den Test-Agent:
So starten, stoppen und starten Sie einen Testanruf neu:
Mandantenbereitstellungsskript
Das Powershell-Skript unten implementiert einen Direct Routing-Mandanten basierend auf dieser Konfiguration.
The script is based on the assumption that a permanent configuration, not unique to a specific Direct Routing Tenant, is already configured (for example, Proxy Sets Table, Condition Table, IP-to-IP Routing, etc.).
Red = variables that must be set/changed for each tenant.
Green = constants unique to this Configuration
Access the powershell using a Telnet admin credentials.
The following script should be executed if the customer uses a Direct Inward Dialing (DID) service.

SIP Proxy Direct Routing Requirements
Teams Direct Routing has three FQDNs:
sip.pstnhub.microsoft.com [Global FQDN. The SBC attempts to use it as the first priority region. When the SBC sends a request to resolve this name, the Microsoft Azure DNS server returns an IP address pointing to the primary Azure datacenter assigned to the SBC. The assignment is based on performance metrics of the datacenters and geographical proximity to the SBC. The IP address returned corresponds to the primary FQDN.]
sip2.pstnhub.microsoft.com [Secondary FQDN. Geographically maps to the second priority region.]
sip3.pstnhub.microsoft.com [Tertiary FQDN. Geographically maps to the third priority region.]
These three FQDNs must be placed in the order shown above to provide optimal quality of experience (less loaded and closest to the SBC datacenter assigned by querying the first FQDN). The three FQDNs provide a failover if a connection is established from an SBC to a datacenter that is experiencing a temporary issue.
Failover Mechanism
Now It’s Your Turn:
So that’s how configure teams direct routing works.
Which finding from today’s report did you find most interesting? Or maybe you have a question about something that I covered.
Either way, I’d like to hear from you. So go ahead and leave a comment below.
Haben Sie RAR-Dateien, die Sie in ZIP-Dateien konvertieren möchten? Erfahren Sie, wie Sie RAR-Dateien in das ZIP-Format konvertieren.
Müssen Sie wiederkehrende Meetings in MS Teams mit denselben Teammitgliedern planen? Erfahren Sie, wie Sie ein wiederkehrendes Meeting in Teams einrichten.
Wir zeigen Ihnen, wie Sie die Farbe der Hervorhebung für Texte und Textfelder in Adobe Reader mit diesem schrittweisen Tutorial ändern können.
In diesem Tutorial zeigen wir Ihnen, wie Sie die Standard-Zoom-Einstellung in Adobe Reader ändern.
Spotify kann lästig sein, wenn es automatisch jedes Mal geöffnet wird, wenn Sie Ihren Computer starten. Deaktivieren Sie den automatischen Start mit diesen Schritten.
Wenn LastPass keine Verbindung zu seinen Servern herstellen kann, löschen Sie den lokalen Cache, aktualisieren Sie den Passwortmanager und deaktivieren Sie Ihre Browsererweiterungen.
Microsoft Teams unterstützt momentan nicht die native Übertragung von Meetings und Anrufen auf Ihren Fernseher. Aber Sie können eine Bildschirmspiegelungs-App verwenden.
Erfahren Sie, wie Sie den OneDrive-Fehlercode 0x8004de88 beheben können, damit Sie Ihren Cloud-Speicher wieder nutzen können.
Sind Sie neugierig, wie Sie ChatGPT in Microsoft Word integrieren können? Diese Anleitung zeigt Ihnen genau, wie Sie es in 3 einfachen Schritten mit dem ChatGPT für Word-Add-in tun können.
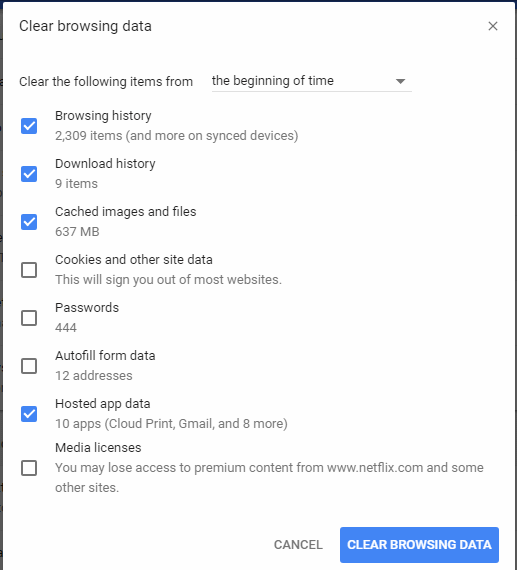
Halten Sie den Cache in Ihrem Google Chrome-Webbrowser mit diesen Schritten sauber.

