Die Windows-Taskleiste steht im Mittelpunkt aller Aufmerksamkeit, seit sie mit der Veröffentlichung von Windows 11 ihr neues Aussehen erhielt. Sie können jetzt Ihre Taskleiste zentrieren, das neue Action Center genießen, ihre Ausrichtung ändern und sie auf beiden Seiten Ihres Bildschirms platzieren. Leider war die Bereitstellung dieser Funktion weniger erfolgreich, da immer mehr Benutzer Schwierigkeiten hatten, ihre Taskleiste für einige Monate unter Windows 11 zum Laufen zu bringen.
Obwohl Microsoft das Problem bestätigt, eine Problemumgehung herausgegeben hat und derzeit an einem Fix arbeitet, scheinen Benutzer immer noch nicht in der Lage zu sein, die Taskleiste wieder zum Laufen zu bringen. Wenn Sie im selben Boot sind, haben wir eine Liste aller verfügbaren Fixes zusammengestellt, um Ihre Taskleiste unter Windows 11 wieder zum Laufen zu bringen. Folgen Sie der Anleitung unten, um loszulegen.
Inhalt
Warum wird meine Taskleiste nicht angezeigt?
Die Windows 11-Taskleiste hat ein neues Aussehen, das aus einer überarbeiteten Version ihrer Funktionsweise stammt. Die Taskleiste ist jetzt auf mehrere Dienste und das Startmenü selbst angewiesen, um ordnungsgemäß zu funktionieren. Es scheint, dass der Upgrade-Prozess von Windows 10 auf Windows 11 die Taskleiste durcheinander bringt, je nachdem, welche Version von Windows 10 Sie auf Ihrem System installiert haben und auf welche Windows 11-Version Sie aktualisieren.
Darüber hinaus scheint ein kürzlich veröffentlichtes Windows-Update, das letzten Monat veröffentlicht wurde, dieses Problem bei einigen Benutzern zu verursachen, während andere aufgrund einer nicht übereinstimmenden Systemzeit mit dem gleichen Problem konfrontiert sind, obwohl alles richtig eingerichtet ist. Es gibt viele Möglichkeiten, Ihre Taskleiste zu reparieren, und wir empfehlen Ihnen, mit den folgenden Korrekturen nacheinander zu beginnen.
12 Möglichkeiten zum Beheben von Taskleistenproblemen unter Windows 11
Verwenden Sie die folgenden Methoden, um Ihre Taskleiste unter Windows 11 zu reparieren. Wenn Sie bereits versucht haben, Ihr System neu zu starten, können Sie die erste Methode überspringen.
Fix Nr. 1: PC neu starten
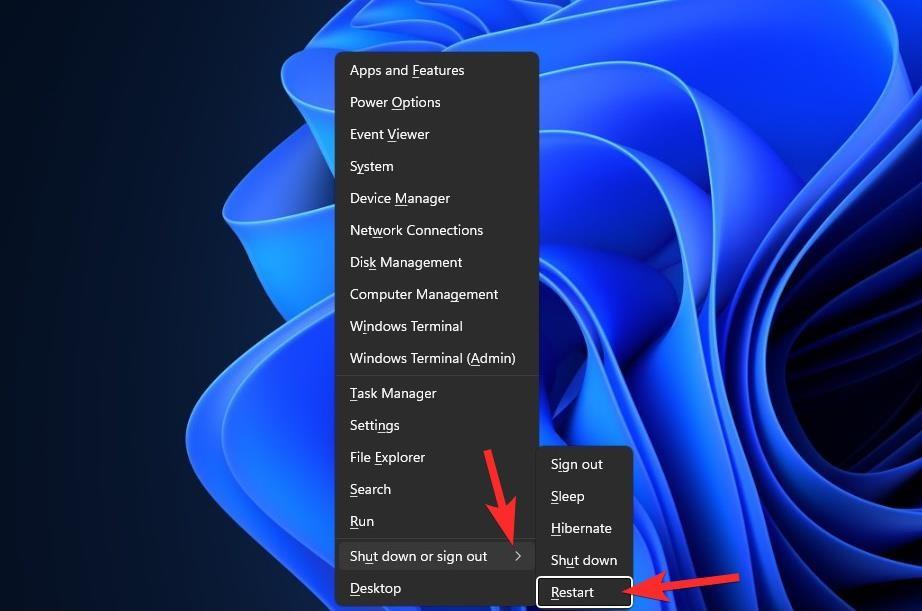
Bevor Sie etwas Ausgefallenes ausprobieren, sollten Sie einfachere Maßnahmen ausprobieren, wie z. B. den Neustart des PCs oder des Windows Explorers (siehe unten). Dies gibt Ihrem System einen Soft-Reset, sodass die Daten neu geladen werden können und möglicherweise Probleme mit der Taskleiste und dem Startmenü behoben werden.
Fix #2: Stellen Sie sicher, dass „Taskleiste automatisch ausblenden“ deaktiviert ist
Drücken Sie Windows + iauf Ihrer Tastatur und klicken Sie links auf „Personalisierung“.
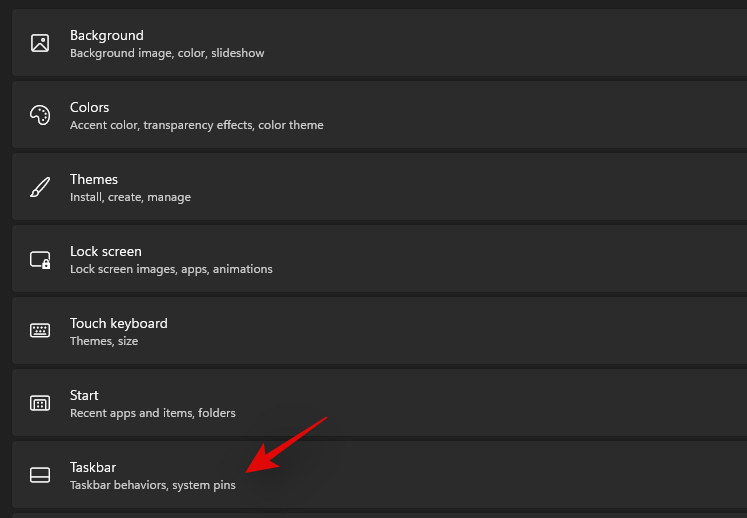
Klicken Sie auf 'Taskleiste'.
Klicken Sie nun auf 'Taskbar-Verhalten'.
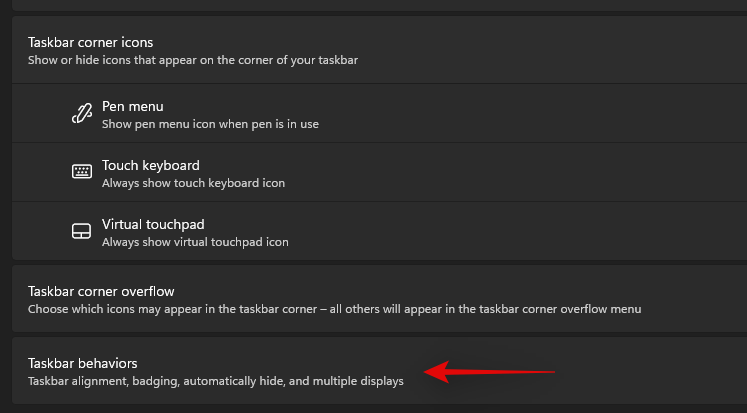
Deaktivieren Sie das Kontrollkästchen für "Taskleiste automatisch ausblenden".

Schließen Sie nun die Einstellungen-App und wenn Ihre Taskleiste automatisch ausgeblendet wurde, sollte sie jetzt auf Ihrem System deaktiviert sein.
Fix #3: Notwendige Dienste neu starten
Wie bereits erwähnt, hat Windows 11 die Taskleiste überarbeitet, was bedeutet, dass es jetzt auf mehrere Dienste angewiesen ist, um auf jedem System ordnungsgemäß zu funktionieren. Lassen Sie uns alle diese Dienste neu starten, um sicherzustellen, dass ein Hintergrundkonflikt Ihre Taskleiste nicht daran hindert, ordnungsgemäß auf Ihrem System zu funktionieren.
Drücken Sie Ctrl + Shift + Escauf Ihrem System, um den Task-Manager zu starten. Wechseln Sie oben auf den Reiter „Details“.
Suchen Sie nun die folgenden laufenden Dienste und wählen Sie sie aus, indem Sie darauf klicken. Drücken Sie auf Ihrer Tastatur auf „Löschen“ und bestätigen Sie Ihre Auswahl, indem Sie „Prozess beenden“ auswählen.
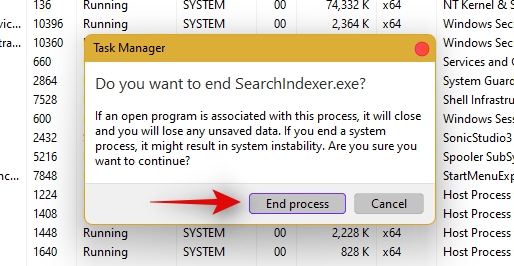
- Explorer.exe
- ShellExperienceHost.exe
- SearchIndexer.exe
- SearchHost.exe
- RuntimeBroker.exe
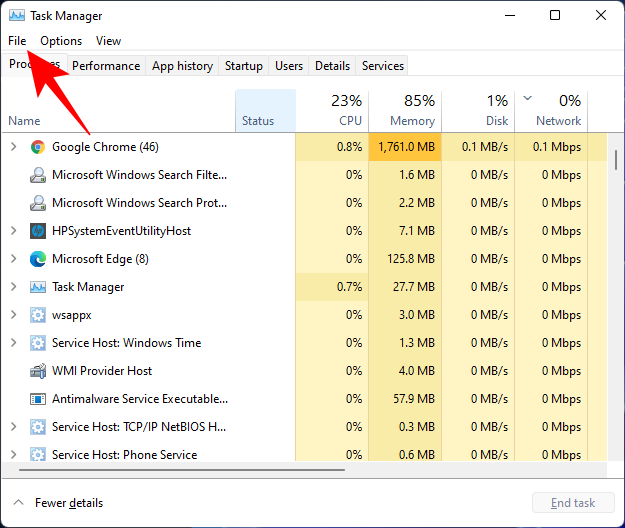
Starten wir jetzt den Windows Explorer neu. Klicken Sie oben links auf „Datei“ und wählen Sie „Neue Aufgabe ausführen“.
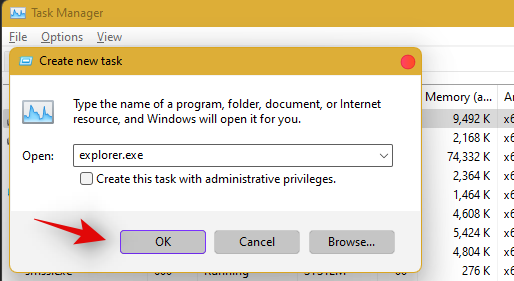
Geben Sie 'explorer.exe' ein und drücken Sie die Eingabetaste auf Ihrer Tastatur. Sie können bei Bedarf auch auf 'Ok' klicken.
Sobald der Explorer neu gestartet wurde, starten Sie einfach Ihren PC neu, um andere Dienste auf Ihrem System neu zu starten.
Die Taskleiste sollte jetzt wiederhergestellt werden, wenn ein Hintergrunddienstkonflikt die Ursache für Ihr Problem war.
Fix Nr. 4: Löschen Sie IrisService in der Registrierung und starten Sie neu
Drücken Sie Ctrl + Shift + Esc, um den Task-Manager zu öffnen. Klicken Sie dann oben links auf Datei .
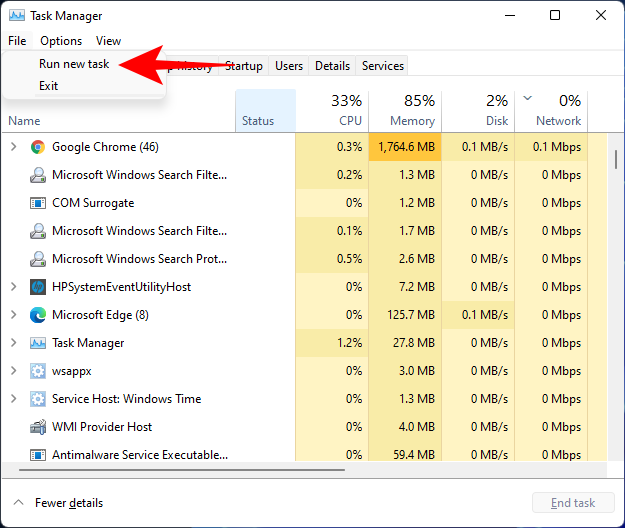
Wählen Sie Neue Aufgabe ausführen aus .
Geben Sie cmd ein und drücken Sie die Eingabetaste.
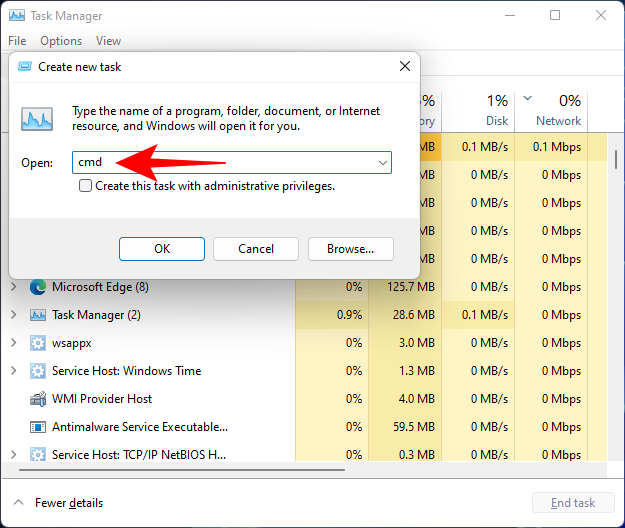
Dadurch wird eine erhöhte Instanz der Eingabeaufforderung geöffnet. Kopieren Sie nun den folgenden Befehl und fügen Sie ihn in die Eingabeaufforderung ein:
reg delete HKCU\SOFTWARE\Microsoft\Windows\CurrentVersion\IrisService /f && shutdown -r -t 0

Drücken Sie dann die Eingabetaste. Sobald Sie dies tun, wird Ihr PC neu gestartet. Sobald es wieder gestartet wurde, sollten die Dinge wieder normal sein, einschließlich der Taskleiste.
Fix Nr. 5: Hinzufügen von UndockingDisabled in der Registrierung
Drücken Sie Ctrl + Shift + Esc, um den Task-Manager zu öffnen. Klicken Sie dann auf Datei (obere linke Ecke) und führen Sie eine neue Aufgabe aus .
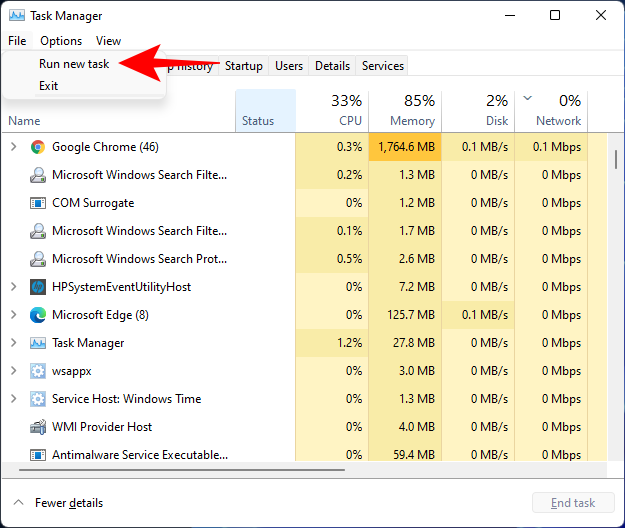
Geben Sie regedit ein und drücken Sie die Eingabetaste.
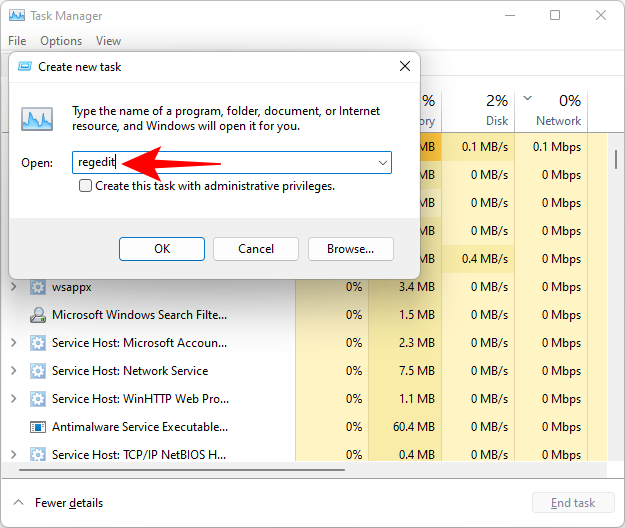
Dadurch wird der Registrierungseditor geöffnet. Navigieren Sie nun zu folgender Adresse:
Computer\HKEY_LOCAL_MACHINE\SOFTWARE\Microsoft\Windows\CurrentVersion\Shell\Update\Packages
Alternativ kopieren Sie einfach das Obige und fügen Sie es in die Adressleiste des Registrierungseditors ein, wie folgt:

Sobald Sie die Eingabetaste drücken, werden Sie zur angegebenen Taste weitergeleitet. Rechtsklicken Sie auf das Leerzeichen und wählen Sie Neu > DWORD (32-Bit) Wert .
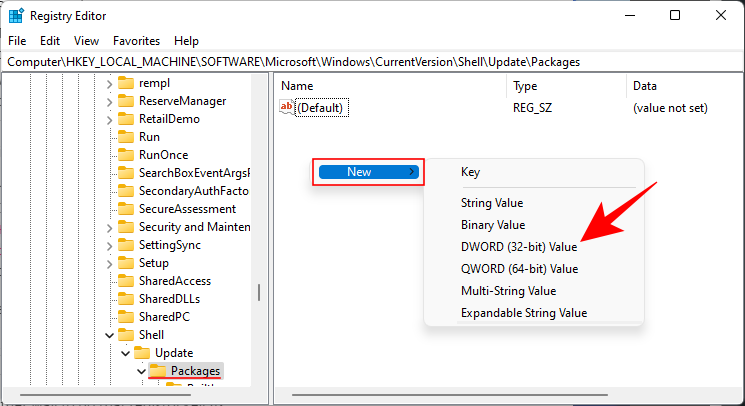
Nennen Sie dieses neu erstellte DWORD UndockingDisabled .
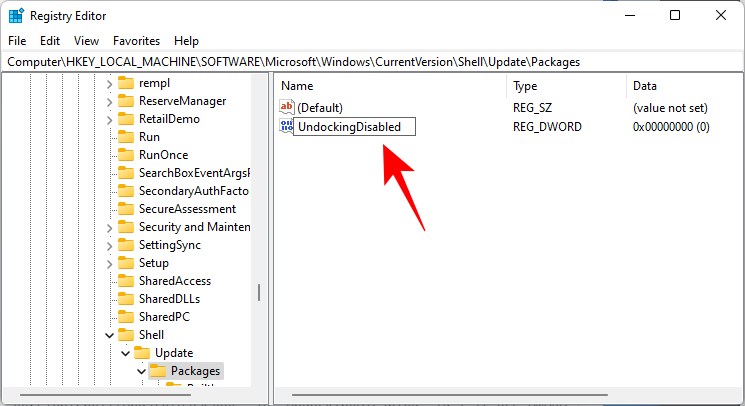
Dann doppelklicken Sie darauf und ändern Sie die „Wertdaten“ auf 1 . Klicken Sie dann auf OK .
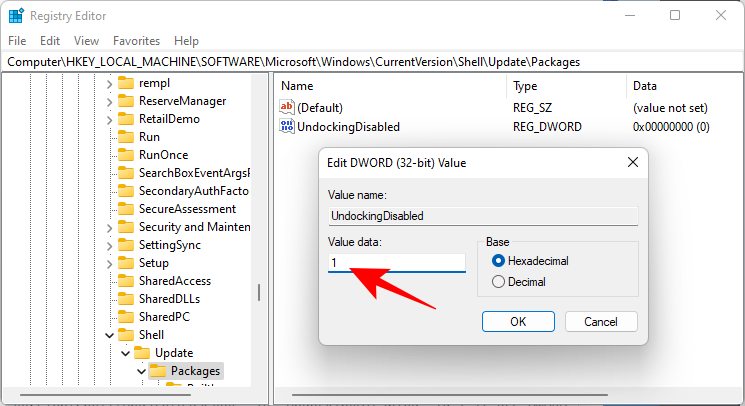
Starten Sie Ihren PC neu, damit die Änderungen wirksam werden.
Fix #6: Führen Sie SFC- und DISM-Befehle aus
Drücken Sie Start, geben Sie cmd ein und klicken Sie auf Als Administrator ausführen .
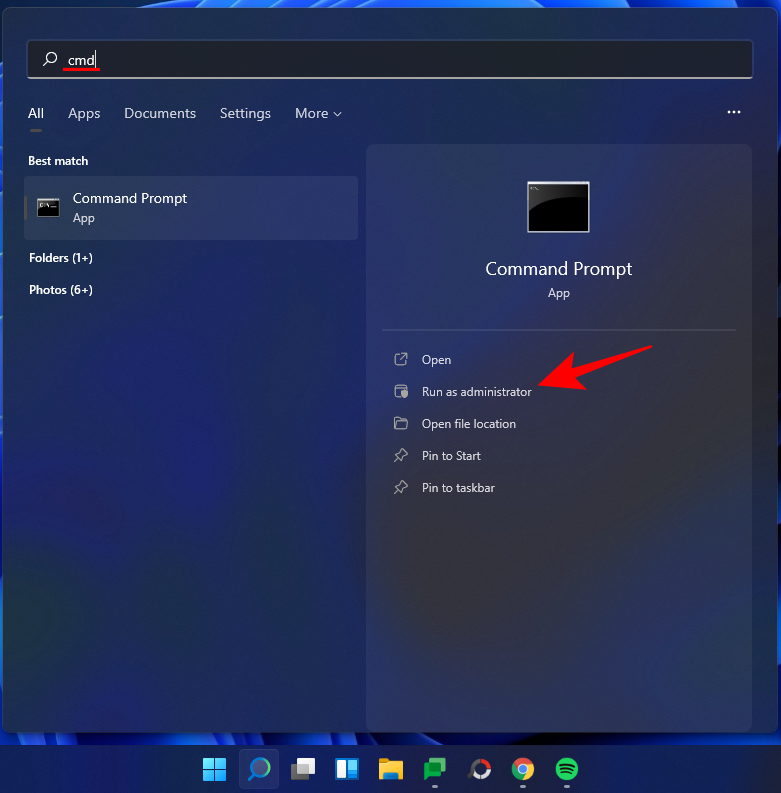
Geben Sie nun folgenden Befehl ein:
sfc /scannow
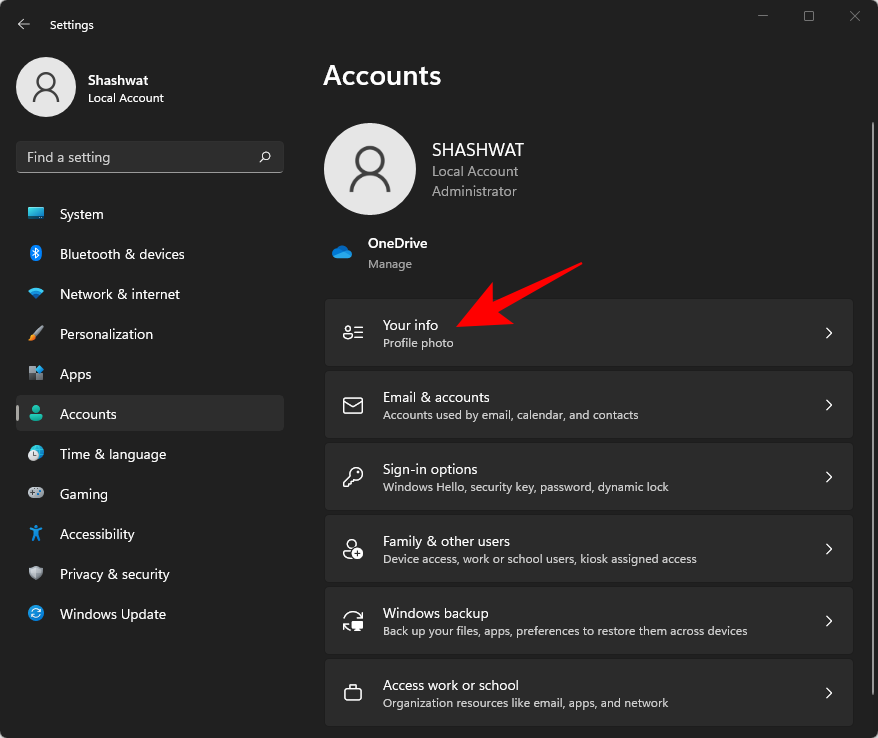
Drücken Sie Enter. Warten Sie, bis SFC den Scanvorgang abgeschlossen hat und alle gefundenen Probleme behoben sind.

Führen Sie als Nächstes den folgenden DISM-Befehl für das Deployment Image Servicing and Management-Tool aus:
dism /online /cleanup-image /scanhealth
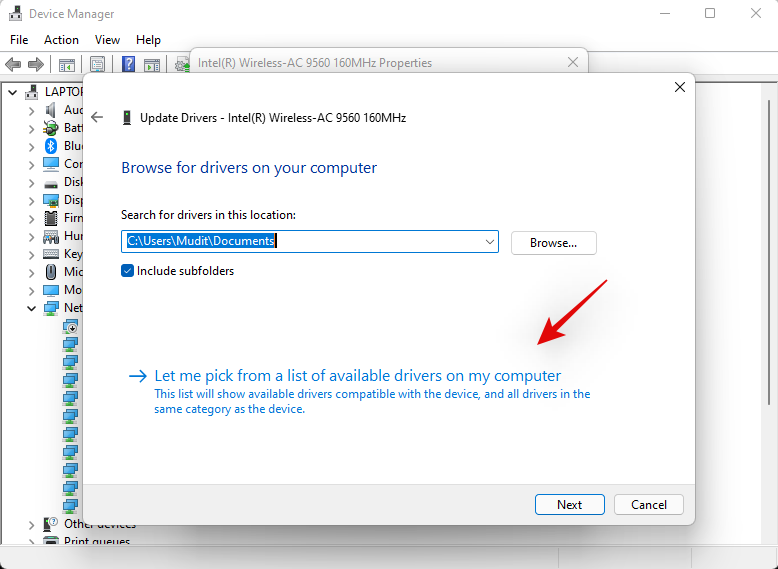
Drücken Sie dann die Eingabetaste. Warten Sie erneut, bis der Scan abgeschlossen ist.

Führen Sie nun den folgenden DISM-Befehl aus:
dism /online /cleanup-image /restorehealth

Drücken Sie Enter. Warten Sie, bis DISM die Gesundheit wiederherstellt.

Führen Sie abschließend den Befehl chkdsk aus, um das Dienstprogramm Datenträger überprüfen auszuführen:
chkdsk c: /r
Drücken Sie Enter. Die Eingabeaufforderung wird eine Meldung ausgeben, die Ihnen mitteilt, dass „das aktuelle Laufwerk nicht gesperrt werden kann … weil das Volume von einem anderen Prozess verwendet wird“ und Sie um Erlaubnis bitten, einen Scan vor dem nächsten Start zu planen. Geben Sie ein Y, um zu entsprechen.

And press Enter. Now restart your computer, let the Check Disk tool do its job, and check if the taskbar has resumed normal functioning.
Fix #7: Reinstall UWP
Press Ctrl + Shift + Esc on your keyboard to launch the Task Manager. Click on ‘File’ and select ‘Run new task’.
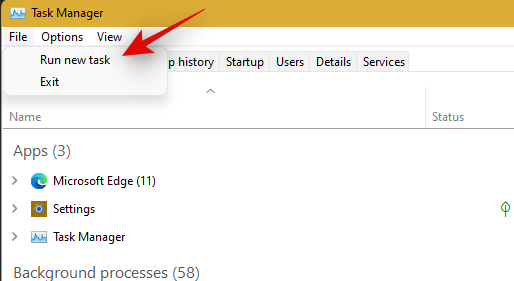
Type in ‘PowerShell’ and press Ctrl + Shift + Enter on your keyboard.

PowerShell will now be launched as an administrator on your system. Type the following command:
Get-AppxPackage -AllUsers | Foreach {Add-AppxPackage -DisableDevelopmentMode -Register “$ ($ _. InstallLocation) \ AppXManifest.xml”}
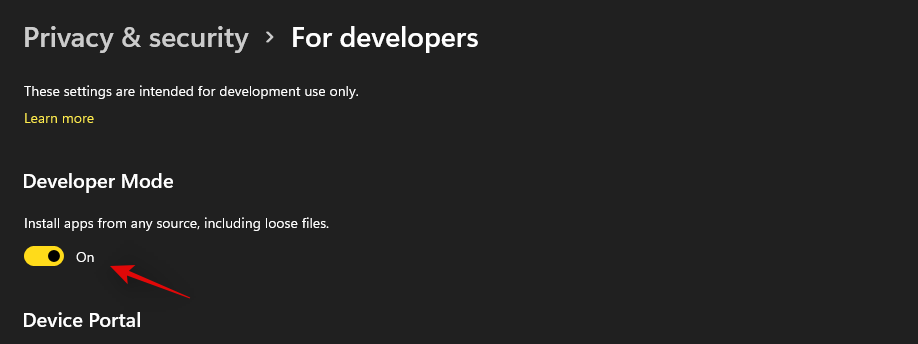
Press Enter. PowerShell will throw up a running list of messages in red. But don’t worry about it. Just wait for the command to finish executing.

Fix #8: Check UAC and add edit Registry if needed
UAC is a must-have for all modern apps and features including the Start Menu and the taskbar. You should first enable UAC if it is disabled and restart your system. If the Taskbar still fails to work for you, then we recommend you try adding a Xaml Start menu value to your Registry Editor.
Adding this value seems to restart and re-register Taskbar services which seem to get Taskbar working again on most systems. Follow the guide below to get you started.
Check and enable UAC if disabled
Press Ctrl + Shift + Esc on your keyboard to launch the task manager. Now click on ‘File’ in the top left corner of your screen and select ‘Run new task’.

Type in ‘cmd’ and press Ctrl + Shift + Enter on your keyboard.
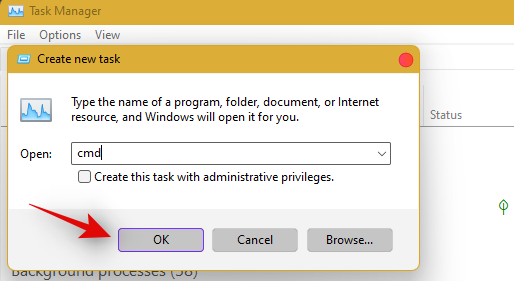
Now type in the following command and press Enter to execute the command.
C:\Windows\System32\cmd.exe /k %windir%\System32\reg.exe ADD HKLM\SOFTWARE\Microsoft\Windows\CurrentVersion\Policies\System /v EnableLUA /t REG_DWORD /d 0 /f
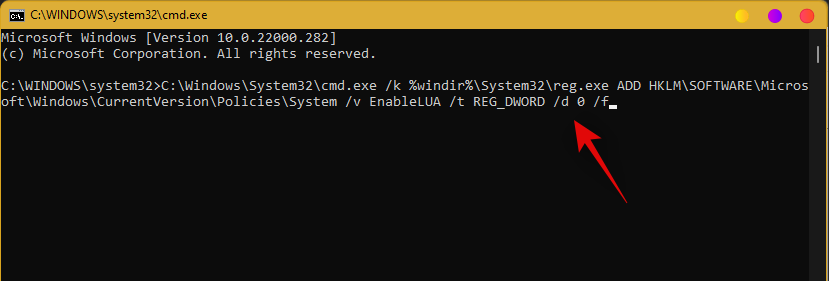
UAC will now be enabled for your system. Restart your PC for the changes to take effect on your system. Once restarted, Taskbar should be up and running on your system if UAC was the issue for you. If not, use the guide below to trigger the taskbar’s functionality on your system.
Add Registry Value
Press Ctrl + Shift + Esc to launch the task manager. Now click on ‘File’ in the top left corner and select ‘Run new task’.

Type in ‘cmd’ and press Ctrl + Shift + Enter on your keyboard.

Now type in the following command and press Enter on your keyboard.
REG ADD "HKCU\Software\Microsoft\Windows\CurrentVersion\Explorer\Advanced" /V EnableXamlStartMenu /T REG_DWORD /D 1 /F
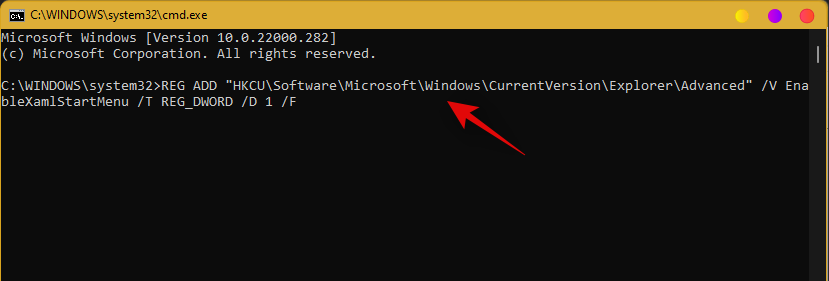
Go back to the task manager now, find Windows Explorer in the list, and right-click on it. Select Restart to restart explorer.exe.
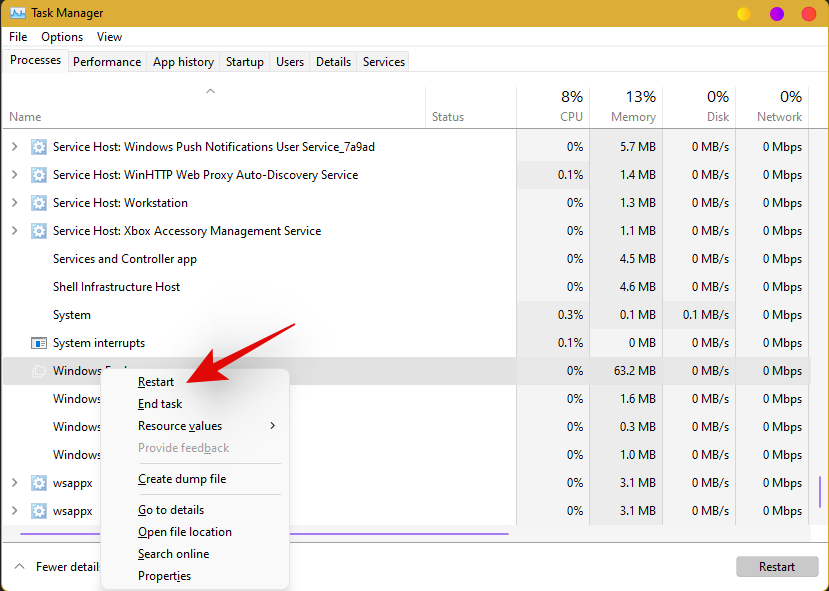
Once restarted, try to access your taskbar. The taskbar should now be available on your system.
Fix #9: Edit date and time to fix Taskbar
Date and Time settings seem to be the major cause of issues with the taskbar in Windows 11. Use the guide below to try out the following time fixes to see which one works the best for you.
Ensure that your time is correctly synchronized with the time server
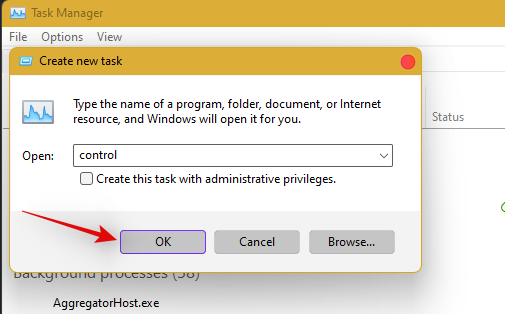
Press Ctrl + Shift + Esc on your keyboard and click on ‘File’. Select ‘Run new task’.

Type in ‘Control’ and hit Enter on your keyboard.
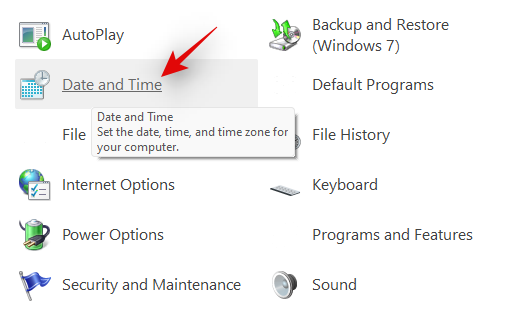
Click on ‘Date and Time’.
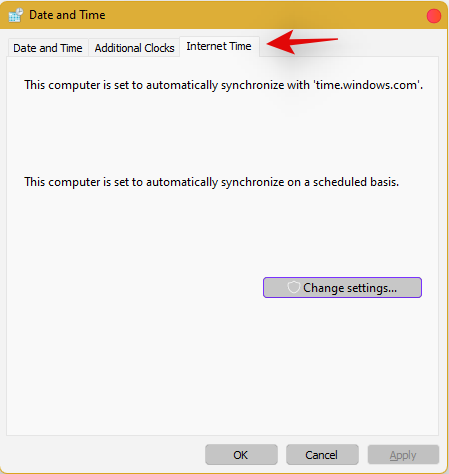
Select ‘Internet Time’ from the top.
Click on ‘Change Settings’.
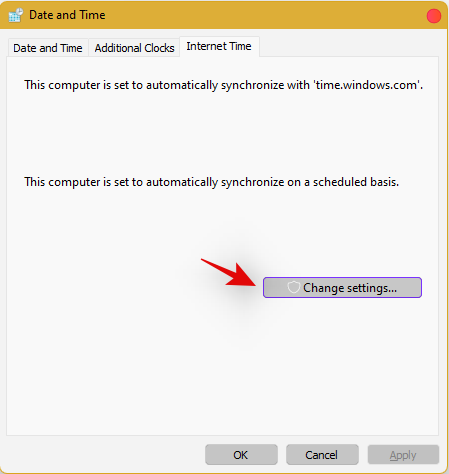
Uncheck the box for ‘Synchronize with an Internet time server’.

Click on ‘Ok’ once you are done.
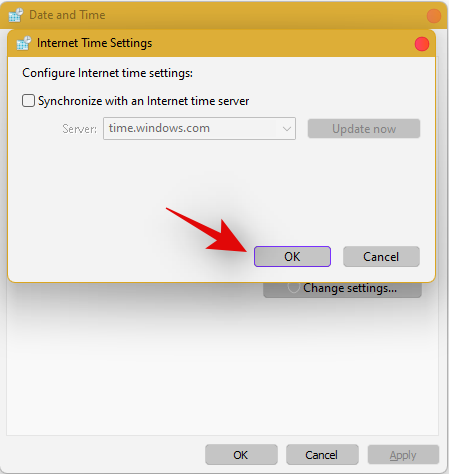
Restart your PC at this point and check your taskbar. If it is still disabled, do not fret, follow the steps above and enable Synchronization with an Internet Time Server again.
Once enabled, press Ctrl + Shift + Esc on your keyboard, and find Windows Explorer in the list on your screen. Right-click the listing and select ‘Restart’.

Once explorer restarts, try using the Taskbar. If synchronization was your issue, then it should now be fixed on your system. If not, continue with the other time fixes mentioned below.
Change date to 1 day ahead
Open the Task Manager by pressing Ctrl + Shift + Esc simultaneously. Then click on File.
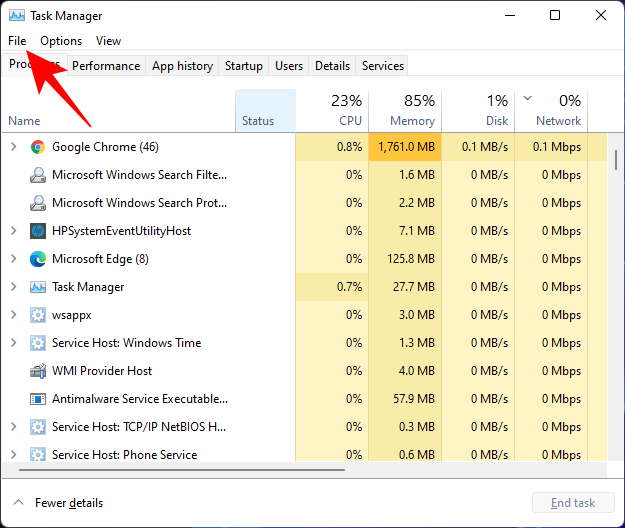
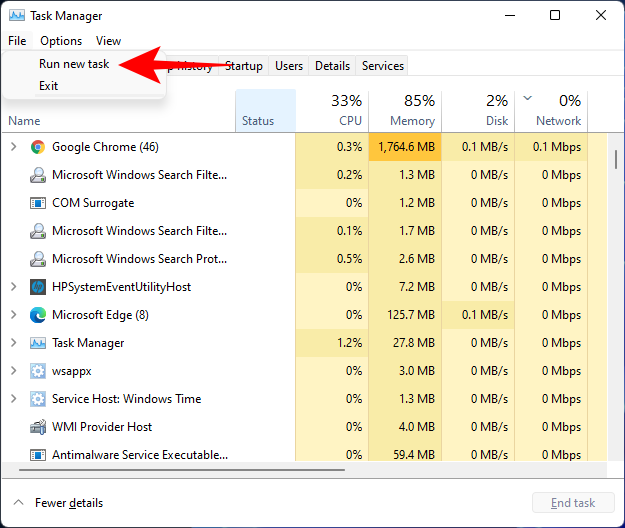
Click on Run new task.
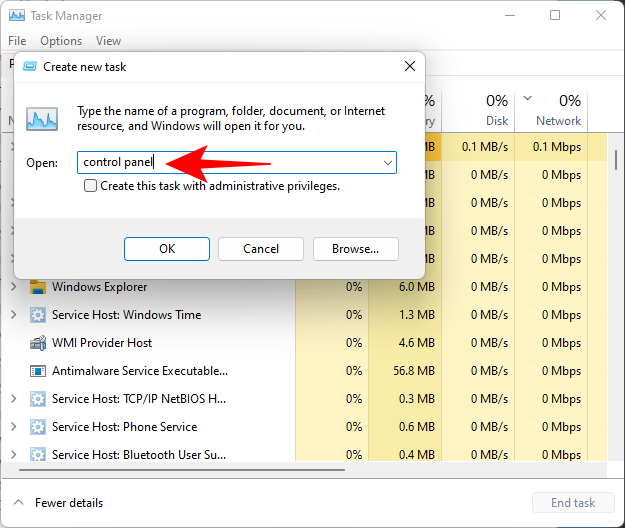
Type control panel and hit Enter.
Now click on Clock and Region.
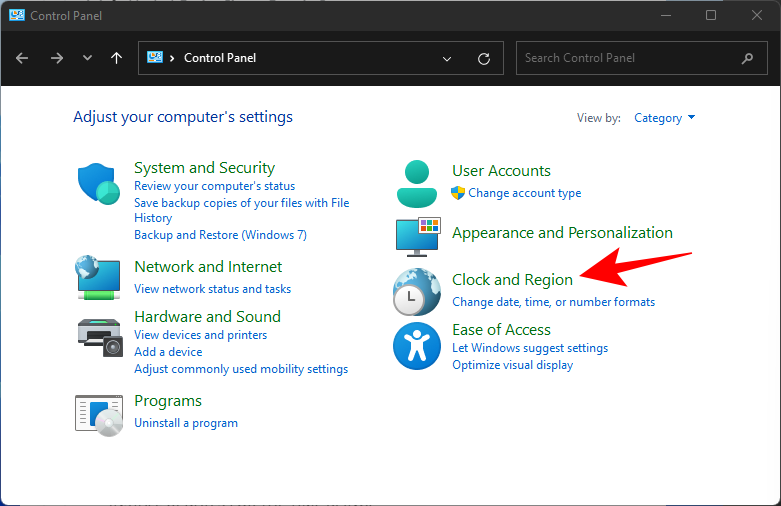
Under “Date and Time”, click on Set the time and date.
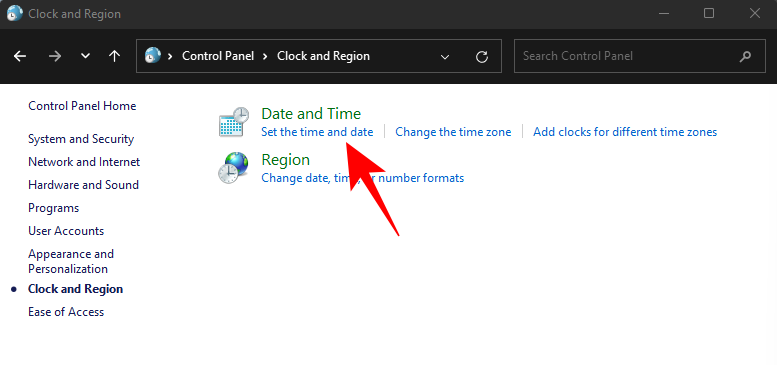
Click on the Internet Time tab to switch to it.
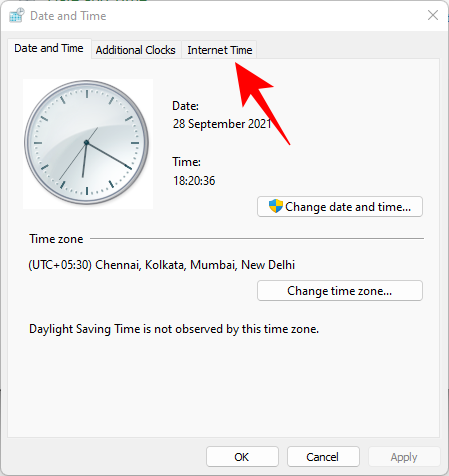
Click on Change settings…
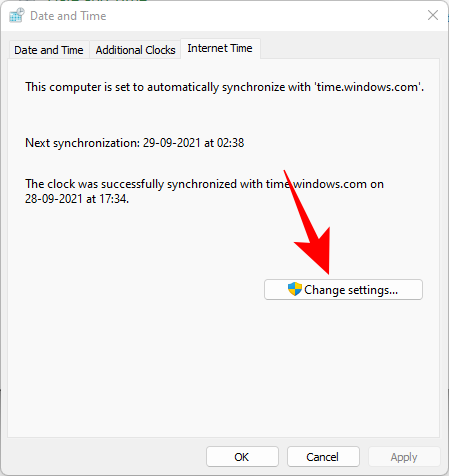
Uncheck Synchronize with an Internet time server, then click OK.
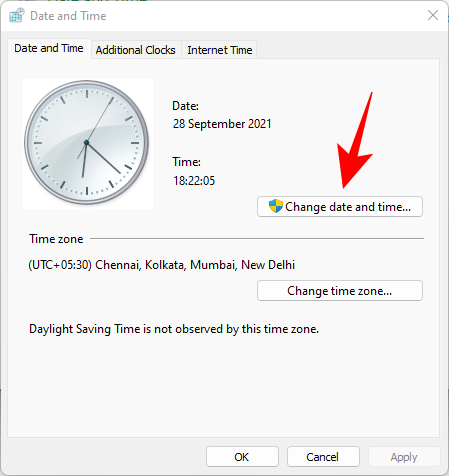
Now click on the Date and Time tab to switch back to it.
Here, click on Change date and time…
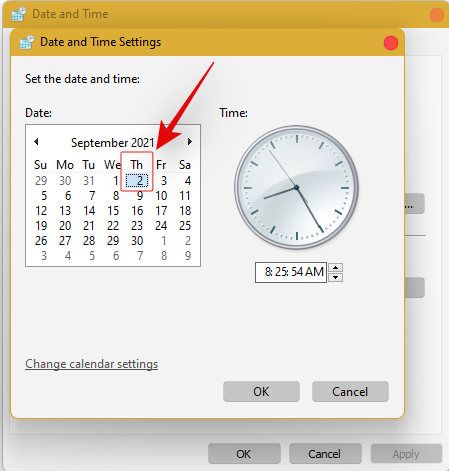
Now change the date and time to reflect tomorrow. As of writing this post, it is the 1st November so we will be changing the date to 2nd November.
Change Dates to last cumulative updates
If you are still unable to get the Taskbar working then you will have to jump through a few hoops to change your date and time multiple times and get the taskbar working on your system. Follow the guide below to get you started.
Press Ctrl + Shift + Esc on your keyboard, click on ‘File’ and select ‘Run new task’.

Type in ‘Control’ and press Enter on your keyboard.

Select ‘Date and Time’.

Switch to ‘Internet time’.

Click on ‘Change Settings’.

Uncheck the box for ‘Synchronize with an Internet Time Server’.

Click on ‘Ok’.

Switch back to ‘Date and Time’. Click on ‘Change Date and Time’ and select your date as 2nd September.
Close all windows and restart your system. Once restarted, open the ‘Date and Time’ dialog box again and change your date to 7th October this time.
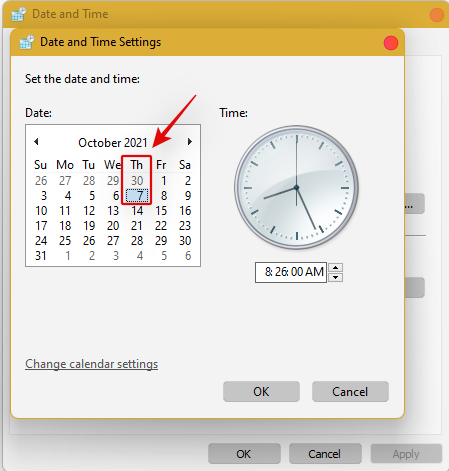
Restart your system again and Taskbar should now be back up and running on your system again. You can now enable synchronization for time again using the steps above on your system.
If synchronizing time does not work, move a month ahead to restore Taskbar
If you are still unable to get Taskbar up and running on your system again you can try the last date change fix. We recommend you use the steps above to change your date and time to a month ahead of your current date. Once changed, restart your system, and the taskbar should be up and running on your system now.
The downside of this fix is that if you revert to your normal date, Taskbar will stop working on your system. Having a mismatched date can cause issues with background syncs for various applications and cause some websites to malfunction. You will also have issues installing and getting the latest Windows Updates, so you will need to check all of these manually when updating in the future.
Fix #10: Uninstall the latest cumulative Windows Update ie: KB5006050
The cumulative update released in September for Windows 11 seems to also cause issues with the taskbar on some desktops and laptops. Use the guide below to uninstall the necessary update from your system.
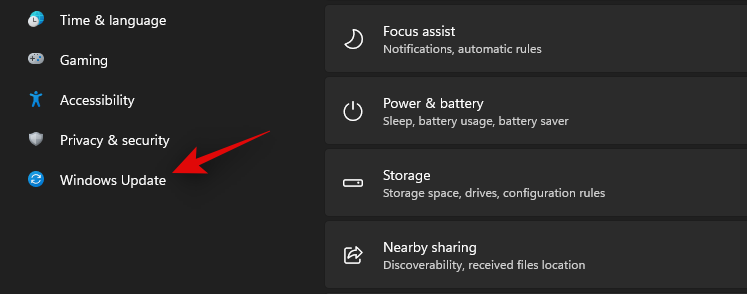
Press Windows + i and select Windows Update from the left.
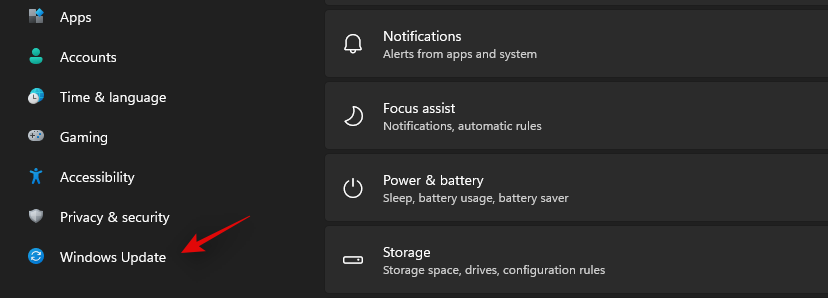
Click on ‘Update history’.
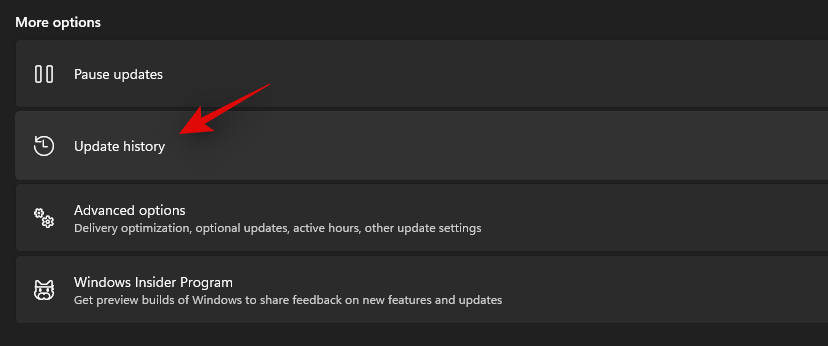
Now select ‘Uninstall updates’.
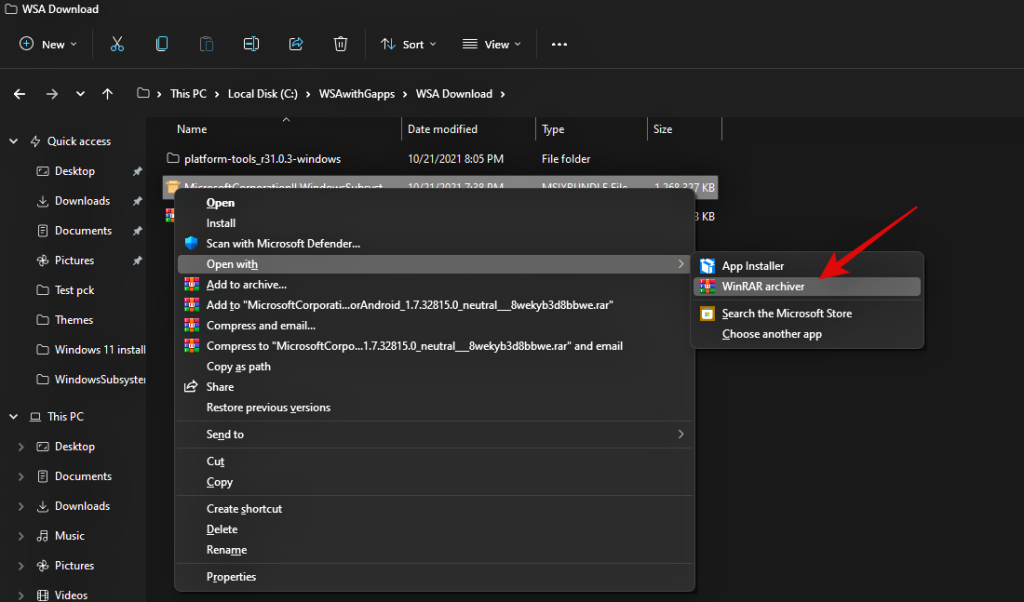
Click and select Windows Cumulative update KB5006050 from the list.

Now click on ‘Uninstall’ at the top and confirm your choice to uninstall the selected update.
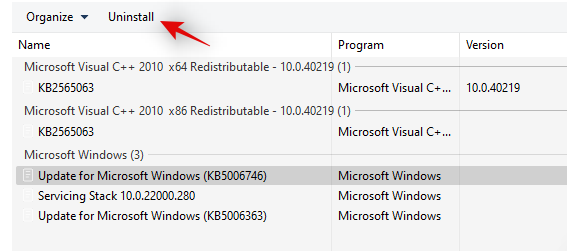
Restart your system and taskbar functionality should now be restored on your system.
Fix #11: Restore PC to a previous restore point
If you had the taskbar working at a previous point in time then we recommend you restore your PC to a previously available restore point on your system. Follow the guide below to get you started.
Press Ctrl + Shift + Esc on your keyboard and click on ‘File’. Select ‘Run new task’ once you are done.

Type in CMD and press Ctrl + Shift + Enter on your keyboard.

Now type in ‘rstrui.exe’ and press Enter on your keyboard.
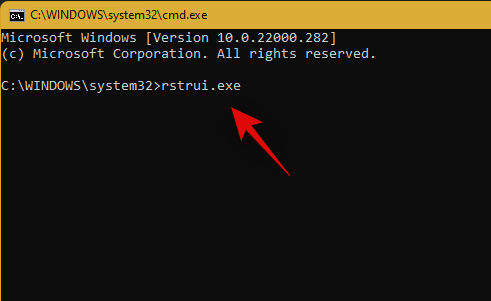
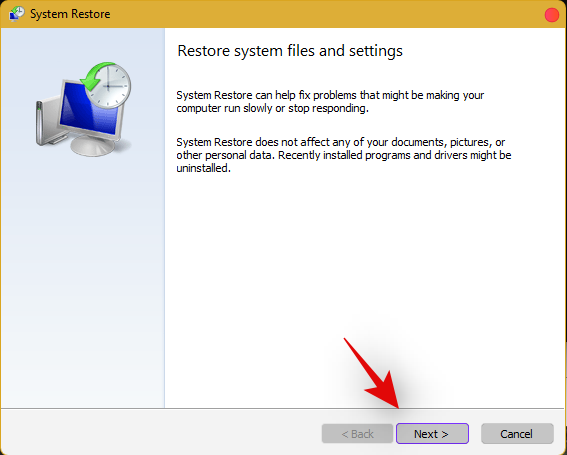
The system restore utility will now launch on your system. Click on ‘Next’.
Select the desired restore point from the list on your screen. Click on ‘Next’ once you are done.
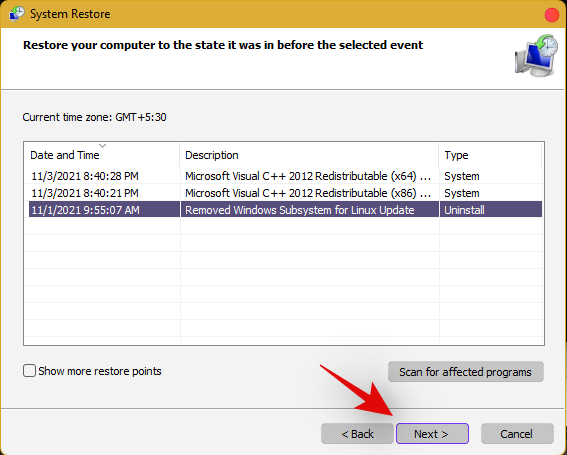
Tip: Click on ‘Scan for affected programs’ to view a list of installed programs that will be removed from your system during the restore process.
Click on ‘Finish’ once the restore finishes and restart your system.
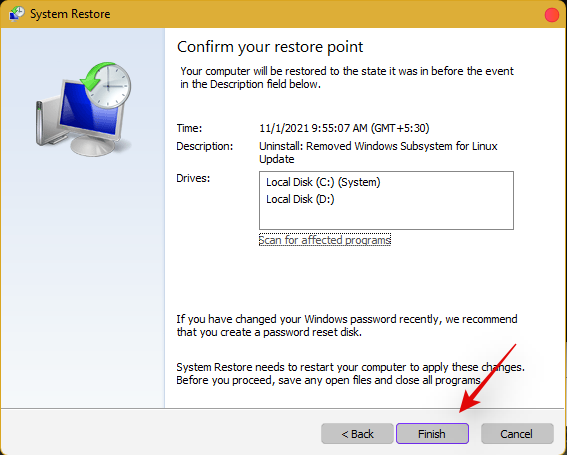
The taskbar should now be back up and running on your system again.
Fix #12: Last Resort: Create a new local admin account and transfer all your data
If by this point Taskbar still fails to work for you then it’s time for some drastic measures. You can create a new local admin account, check if Taskbar is working there, and then transfer all your data to the new account. This will be a tedious process but it is the next best way to get the taskbar working on your system without resetting your PC. Follow the guide below to get you started.
Create a new local admin account
Herre’s how you can create a new local admin account on your system.
Note: Most users facing the taskbar issue are unable to access the Settings app as well. Hence we will be using CMD to add a new local admin account to your PC. However, if the Settings app is available to you then you can use the same to add a new account as well.
Press Ctrl + Shift + Esc on your keyboard, click on ‘File’ and select ‘Run new task’.

Type in ‘cmd’ and press Ctrl + Shift + Enter on your keyboard.

CMD will now be launched as an administrator. Use the command below to add a new local admin account. Replace NAME with the Username of your choice for the new account. You can add a password later once you have confirmed that the taskbar is available in the new account.
net user /add NAME 
Once you have added the new user, use the command below to convert it to an administrator account on your PC. As usual, replace NAME with the Username for the new account you created earlier.
net localgroup Administrators NAME /add

Now type in the following to log out of your current account.
logoff

Once logged out, click on the newly added account to log in to the same. Once logged in, check if the taskbar is available in the new account. If it is, you can use the next section to transfer all your data. However, if the taskbar is still missing then you have no choice but to perform a fresh install of Windows 11 on your PC from a removable USB media drive.
Transfer all your data
Press Windows + i on your keyboard and click on ‘About’ on your right.
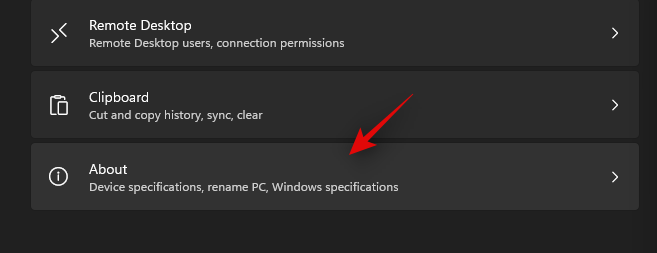
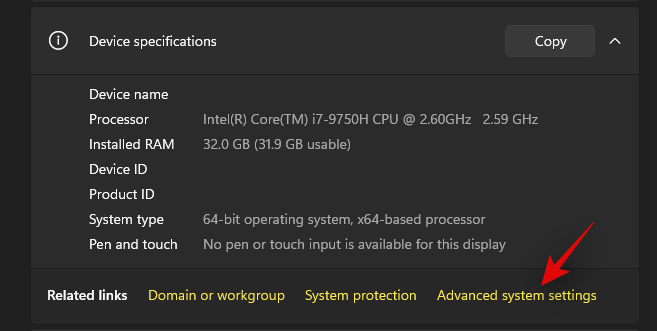
Click on ‘Advanced system settings’.
Click on ‘Settings’ under ‘User Profiles’.
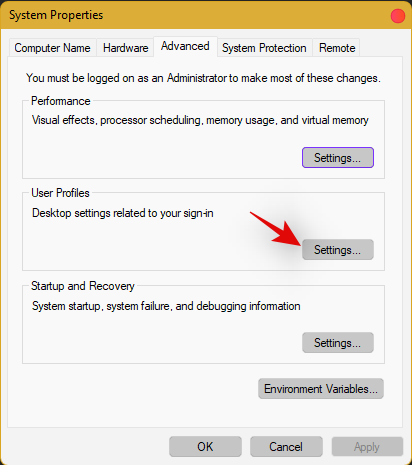
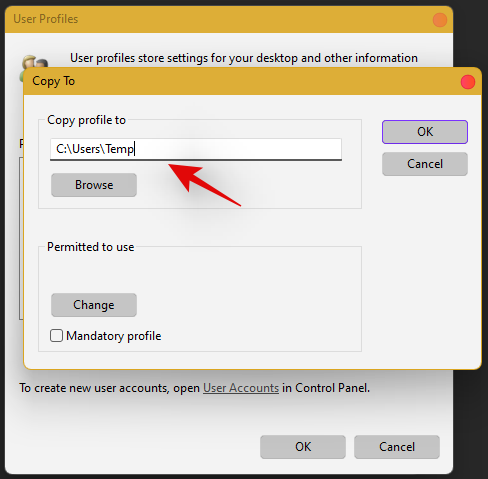
Select your original profile by clicking on it and selecting ‘Copy To’.
Now enter the following path under ‘Copy profile to’. Rename NAME to the username of your previous profile from where you wish to copy all your data.
C:\Users\NAME
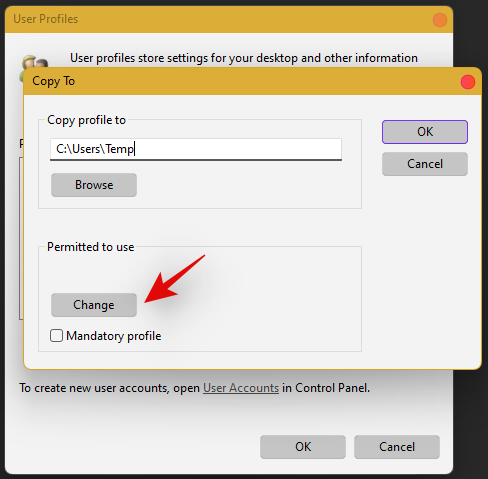
Click on ‘Change’.
Enter the name for your new user profile and press Enter on your keyboard.
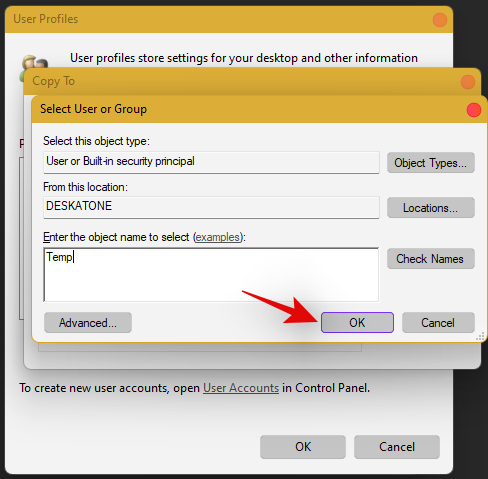
Click on ‘Ok’ once you are done.
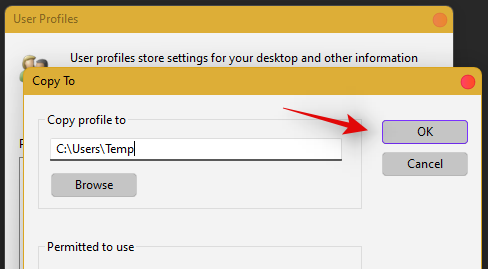
All your data will now be copied over to the new profile where the taskbar is functional on your PC. You can now delete your previous user account and set a password for your new account as well.
Frequently Asked Questions (FAQs):
With so many fixes, you are bound to have a few questions on your mind. Here are some commonly asked ones that should help you get up to speed.
How do I access Windows apps and Settings without a taskbar?
You can use the Task Manager to launch almost any program or Settings page on your system. To launch the desired program, launch the Taskbar > File > Run new task and enter the path to the program you wish to launch. Press Enter if you wish to launch the program normally or press Ctrl + Shift + Enter if you wish to launch the program with administrator privileges.
Is it safe to edit the Registry?
Registry edits are never safe as they have the potential to break your system. Fixes from trusted sources can help you avoid such issues but a good rule of thumb is to always back up your registry before making any edits. This way you can easily restore your Registry values in case some get messed up when editing the Registry.
When will Microsoft fix this issue?
Sadly, Microsoft is yet to release a proper fix for this issue. The company has tried to release a fix in the past cumulative updates to Windows 11 but they have been a hit and miss. We expect Microsoft to completely fix this issue in the upcoming feature update to Windows 11 when the OS gets the ability to run Android apps officially.
Can I update my Windows 11 after fixing the taskbar?
This will depend on the fix that you’re currently using. If you are using a date fix then you won’t be able to install updates until you restore to the current time. This will, however, cause the taskbar to be disabled again and the changes will be carried over after you update your PC. However, if you are using any other fix then you can easily update Windows.
For users with the date fix, you should try updating with the modified time first. If the update gets stuck on ‘Installing 0%’ or ‘Downloading 100%’ then change your date and time to the current date and time and update your PC. Ensure that you do not restart explorer or your PC during this process to keep the current instance of the taskbar alive on your system during the update process. This should help fix the issue for you once Microsoft officially releases an update to fix the issue.
We hope you were able to easily get the taskbar back up and running on your system using the guide above. If you face any more issues, feel free to reach out to us using the comments section below.
Related:


![So beheben Sie den Greenscreen-Fehler von Windows 11 [8 Möglichkeiten] So beheben Sie den Greenscreen-Fehler von Windows 11 [8 Möglichkeiten]](https://cloudo3.com/resources8/images31/image-5564-0105182715287.png)


