Comment supprimer les informations enregistrées de l'autocomplétion de Firefox
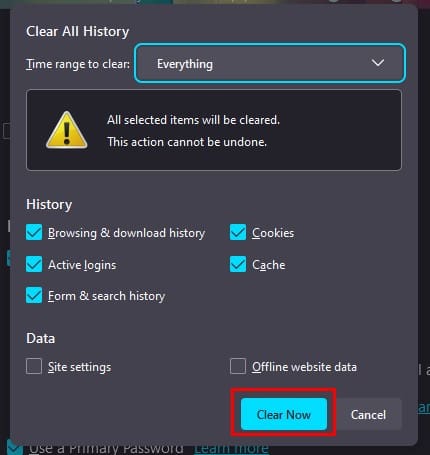
Supprimez les informations enregistrées de l

Les mises à jour de Windows ont toujours été une nuisance notoire pour de nombreux utilisateurs depuis l'époque de Windows XP. Heureusement, la livraison des mises à jour Windows s'est considérablement améliorée au cours des dernières années et très peu de mises à jour de fonctionnalités ont tendance à poser des problèmes majeurs de nos jours.
Vous pouvez configurer Windows pour télécharger et mettre à jour automatiquement en arrière-plan et même le faire redémarrer pendant vos heures d'inactivité. Tout cela est génial mais que se passe-t-il si une mise à jour est installée dont vous n'avez pas besoin ? Ou si vous obtenez une mise à jour qui dégrade les performances de votre machine ? Eh bien, dans ce cas, vous pouvez désinstaller les mises à jour Windows dans Windows 11. Mais voici quelques points que vous devez garder à l'esprit avant de désinstaller les mises à jour de votre PC Windows 11.
Connexe : Comment désactiver les mises à jour sur Windows 11
Contenu
Pourquoi désinstaller les mises à jour Windows ?
Il peut y avoir plusieurs raisons pour lesquelles vous souhaitez désinstaller les mises à jour Windows, voici quelques-unes des plus courantes. Si vous résolvez des erreurs après une mise à jour récente de Windows, vous pouvez également consulter cette liste.
Si vous rencontrez de tels problèmes sur votre système, vous pouvez essayer de désinstaller la dernière mise à jour de Windows pour essayer de résoudre votre problème.
et plus. Il peut y avoir des tonnes de problèmes auxquels vous pouvez être confronté lors de l'installation d'une nouvelle mise à jour pour Windows 11, surtout si vous êtes abonné à la version bêta ou à la chaîne d'initiés. Dans de tels cas, vous pouvez essayer de désinstaller la mise à jour concernée à l'aide du guide de cet article.
Connexe : Comment annuler une mise à jour Windows Insider en attente
Est-il sûr de désinstaller les mises à jour Windows ?
Oui, tant que vous ne supprimez pas de force les mises à jour Windows manuellement ou à l'aide d'un utilitaire obsolète, vous devriez pouvoir désinstaller les mises à jour Windows de votre système en toute sécurité. Cependant, vous devez garder à l'esprit que Microsoft utilise les mises à jour Windows pour fournir des correctifs de sécurité, des correctifs logiciels et plus encore afin de protéger votre système contre les dernières menaces et vulnérabilités de sécurité.
La suppression des mises à jour Windows désinstallera également ces correctifs, ce qui à son tour rendra votre système vulnérable aux menaces en ligne. C'est particulièrement le cas si vous cherchez à désinstaller les mises à jour de sécurité récentes.
Par conséquent, même si vous pouvez désinstaller toute mise à jour en toute sécurité, il est recommandé d'annuler vos modifications dès que l'erreur est corrigée. Si votre bogue ou erreur persiste après la réinstallation de la mise à jour, vous pouvez attendre jusqu'à ce qu'une mise à jour et un correctif ultérieurs soient publiés par Microsoft.
Connexe : Comment supprimer Bing de Windows 11
Comment trouver les mises à jour que vous souhaitez supprimer
Nous pouvons supprimer les mises à jour en utilisant diverses méthodes, mais pour trouver la mise à jour que vous souhaitez supprimer, vous devez l'identifier sur votre PC. Chaque mise à jour Microsoft se voit attribuer un numéro KB qui permet de déterminer et d'identifier la mise à jour sur les PC grand public ainsi que sur les serveurs de Microsoft. Nous pouvons utiliser ce numéro à notre avantage et supprimer la mise à jour concernée de votre système à l'aide de l'un des guides ci-dessous. Voici comment identifier les mises à jour récentes de Windows installées sur votre PC.
Méthode n°01 : Utilisation des paramètres
Appuyez Windows + isur votre clavier et sélectionnez "Mise à jour Windows" sur votre gauche.
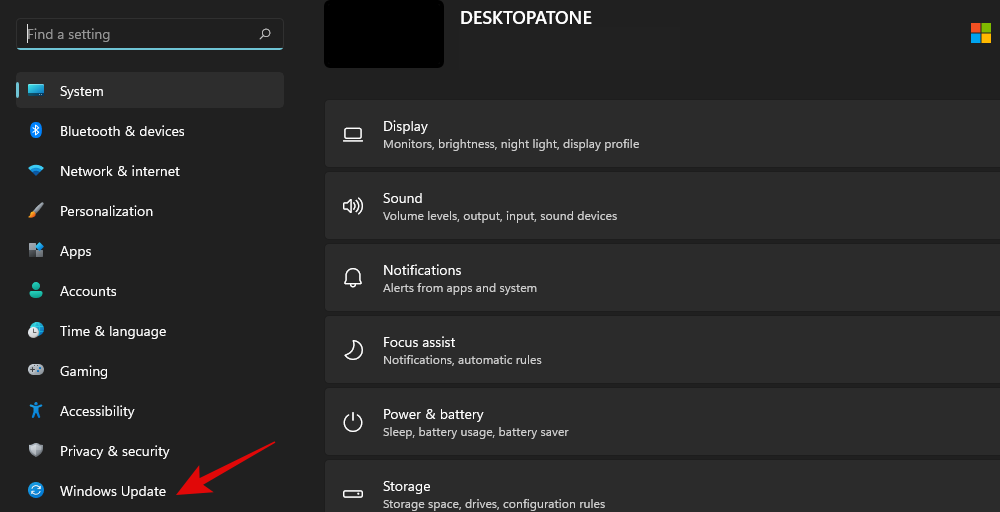
Cliquez sur « Mettre à jour l'historique » maintenant.
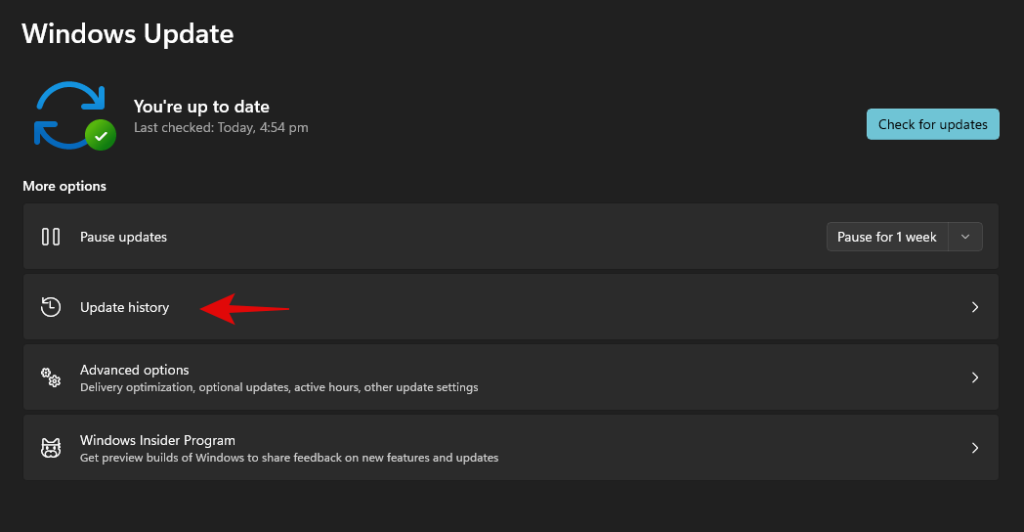
Vous obtiendrez maintenant une liste des mises à jour Windows récemment installées sur votre système.
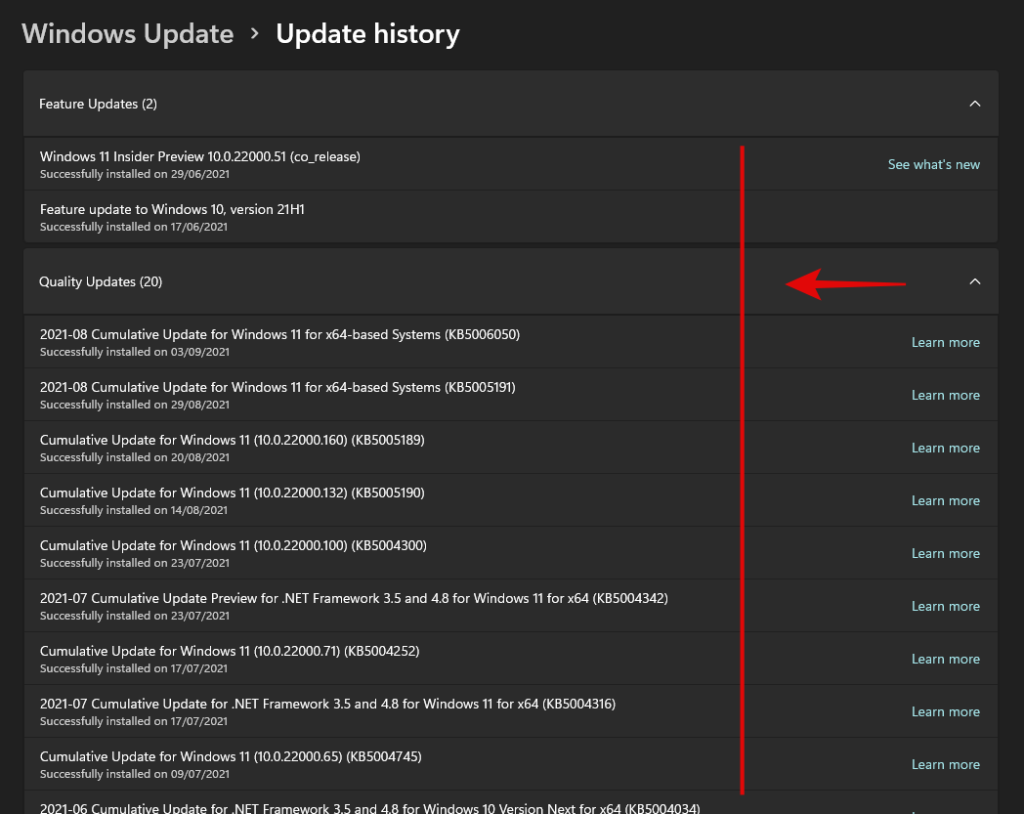
Notez simplement le numéro de Ko de la mise à jour que vous souhaitez supprimer de votre PC.
Méthode n°02 : Utiliser CMD
Appuyez Windows + Ssur votre clavier et recherchez CMD. Cliquez sur « Exécuter en tant qu'administrateur » une fois que l'application apparaît dans vos résultats de recherche.
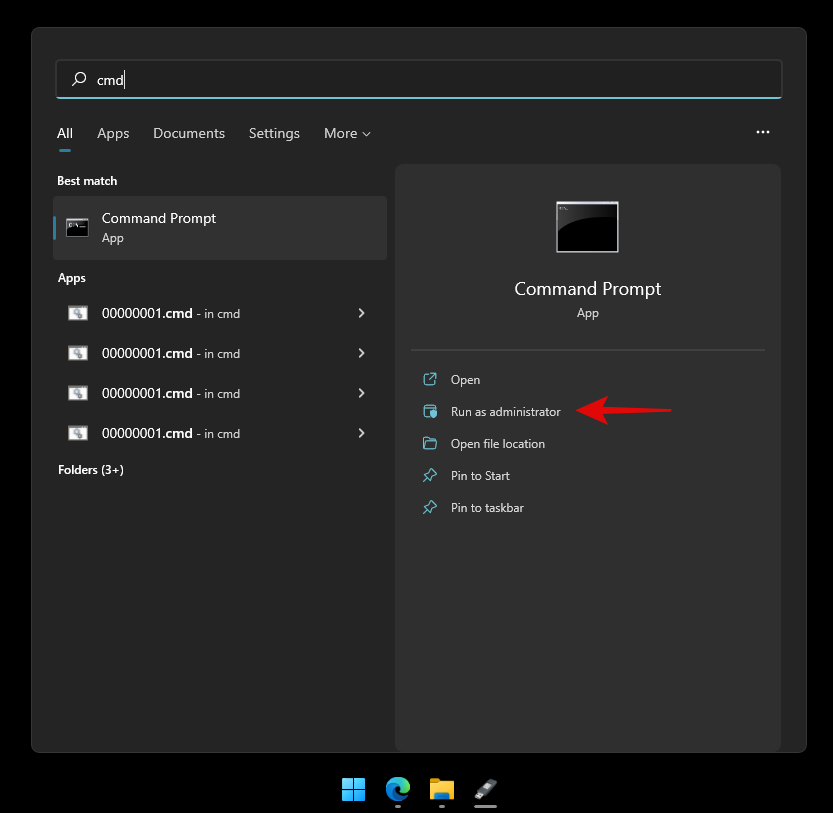
Tapez la commande suivante et appuyez sur Entrée sur votre clavier.
wmic qfe list brief /format:table
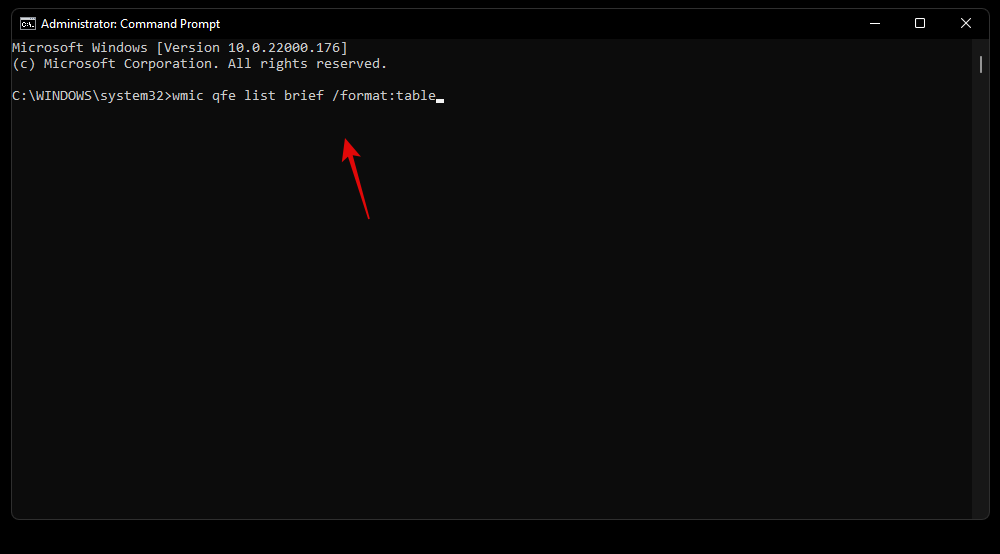
Vous obtiendrez maintenant une liste de toutes les mises à jour récentes de Windows installées sur votre PC. Cliquez et développez la catégorie concernée dans la liste ci-dessous.
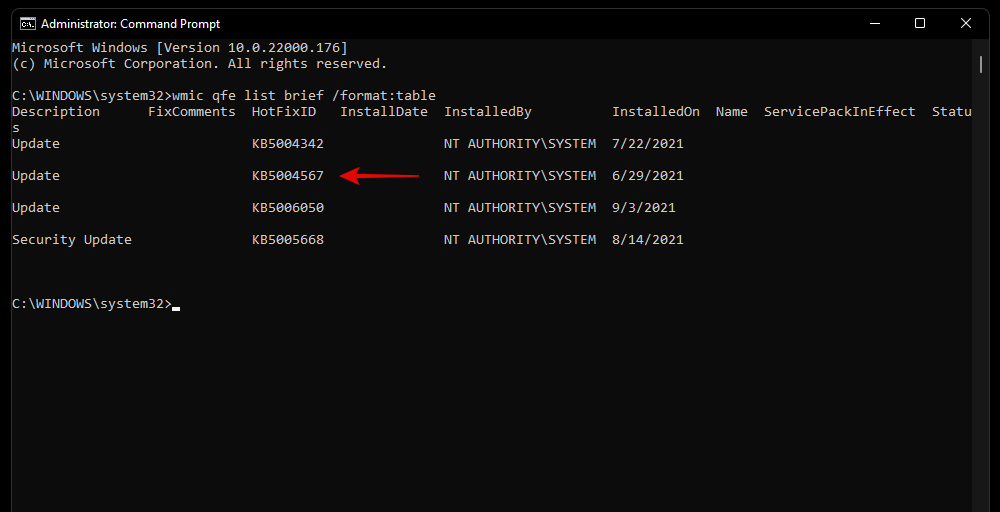
Identifiez la mise à jour que vous souhaitez supprimer et notez son 'HotFixID'. Nous utiliserons cet identifiant pour supprimer la mise à jour concernée à l'aide du guide ci-dessous.
Comment supprimer les mises à jour Windows de votre PC
Vous pouvez supprimer les mises à jour Windows de votre PC en utilisant l'une des méthodes ci-dessous. Si vous êtes bloqué sur Windows ou incapable de démarrer sur votre bureau, nous vous recommandons d'utiliser la méthode Windows RE ou la méthode CMD. Si vous pouvez accéder à votre bureau, vous pouvez utiliser l'application Paramètres pour supprimer facilement les mises à jour de votre système. Utilisez les guides ci-dessous pour vous aider à démarrer en fonction de vos préférences.
Méthode n°01 : Utilisation des paramètres
Appuyez Windows + isur votre clavier et cliquez sur "Mise à jour Windows" dans la barre latérale gauche.

Cliquez sur 'Mettre à jour l'historique'.

Faites défiler vers le bas et cliquez sur "Désinstaller les mises à jour".
Vous allez maintenant être redirigé vers le Panneau de configuration où vous trouverez une liste des mises à jour récentes qui peuvent être supprimées de votre système.

Sélectionnez la mise à jour que vous souhaitez supprimer et cliquez sur « Désinstaller » en haut.

Suivez les instructions à l'écran pour désinstaller la mise à jour concernée de votre PC.
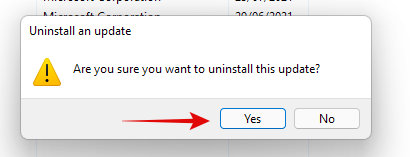
Vous pouvez maintenant redémarrer votre PC et tous les problèmes auxquels vous étiez confronté en raison de la mise à jour devraient maintenant être résolus.
Méthode n°02 : Utilisation de l'utilitaire de résolution des problèmes de mise à jour Windows
Appuyez Windows + isur votre clavier et cliquez sur « Dépanner ».
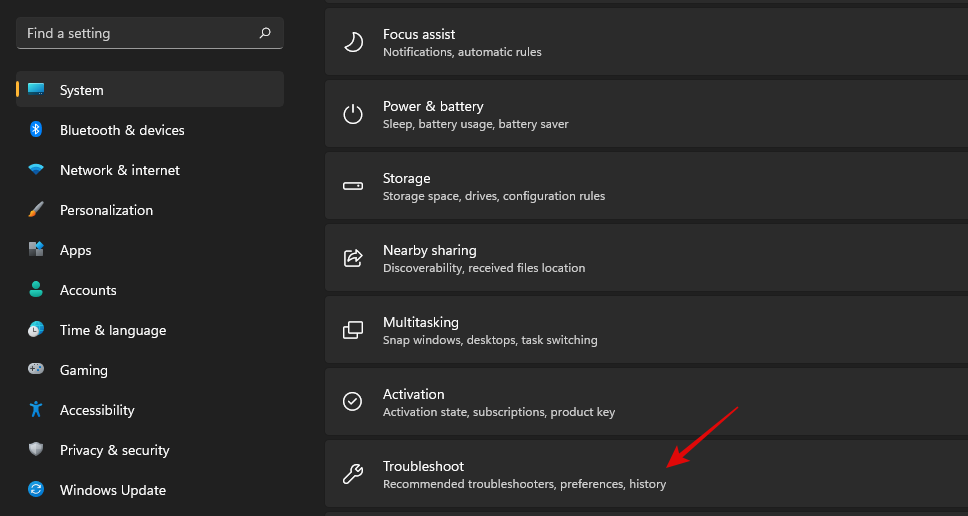
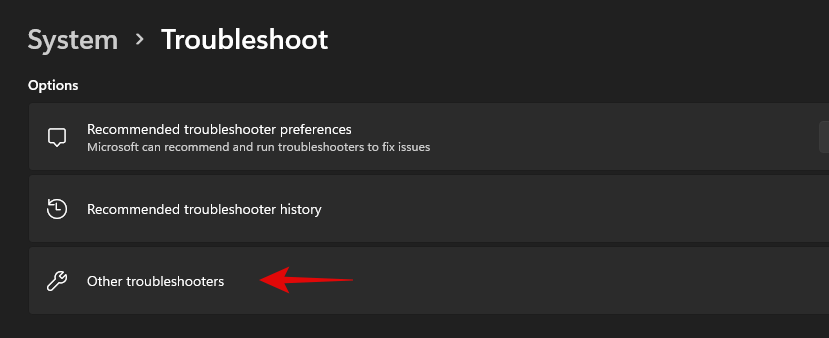
Cliquez sur « Autres dépanneurs ».
Cliquez sur « Exécuter » à côté de Windows Update.
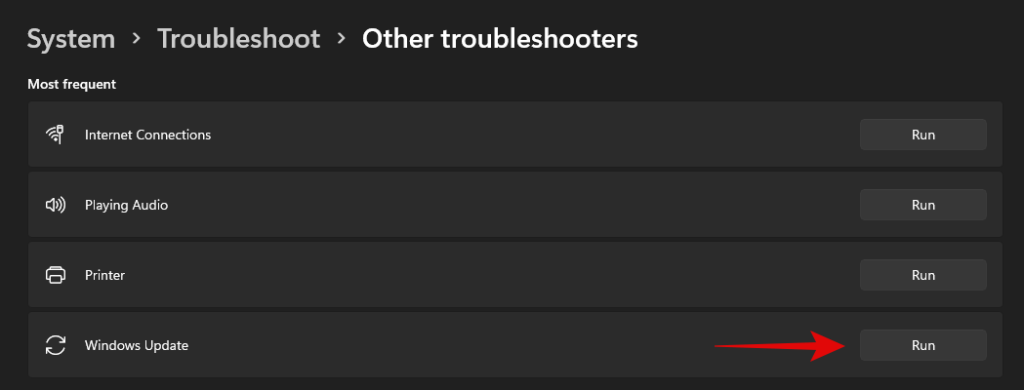
L'utilitaire de résolution des problèmes Windows recherchera désormais les problèmes liés aux mises à jour Windows sur votre PC et causés par celles-ci. S'il en trouve, l'utilitaire de résolution des problèmes résoudra automatiquement le problème. Si une mise à jour récente s'avère être le coupable, l'utilitaire de résolution des problèmes vous donnera la possibilité de sélectionner et de désinstaller la mise à jour Windows nécessaire. Suivez les instructions à l'écran suivantes pour supprimer complètement la mise à jour.
Une fois terminé, cliquez sur 'Fermer'.
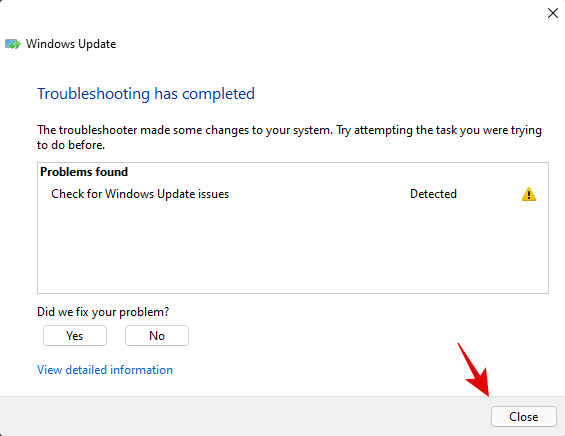
Redémarrez votre PC pour faire bonne mesure et le problème devrait maintenant être résolu à ce stade. Sinon, vous pouvez utiliser la méthode PowerShell ci-dessous pour désinstaller manuellement la mise à jour Windows souhaitée de votre système.
Méthode #03 : Utiliser PowerShell ou CMD
Appuyez Windows + Ssur votre clavier et recherchez PowerShell. Cliquez sur « Exécuter en tant qu'administrateur » une fois que l'application apparaît dans vos résultats de recherche.
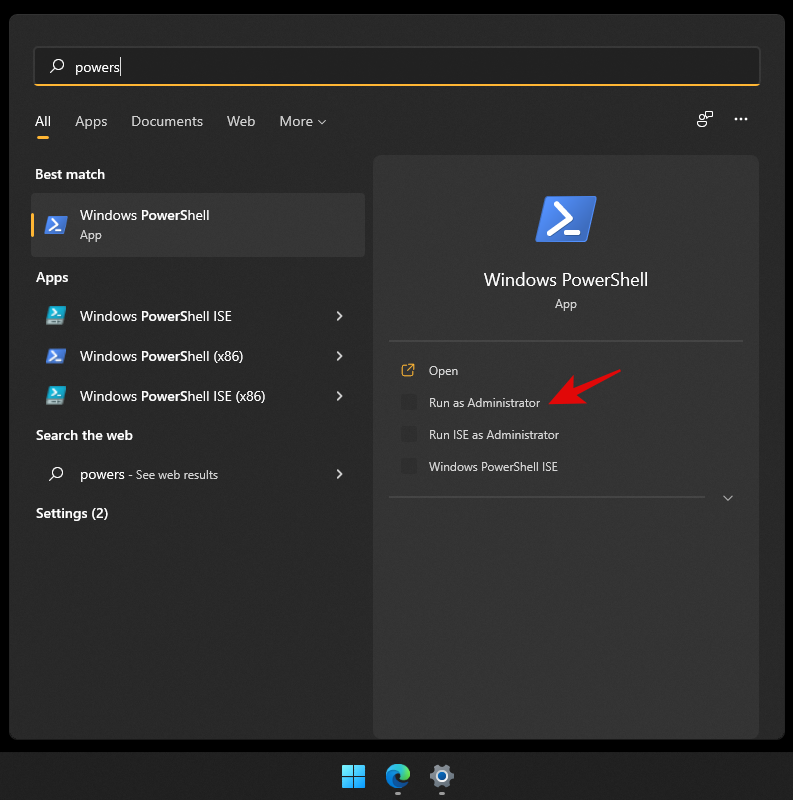
Type in the following command and press Enter on your keyboard to execute it.
wmic qfe list brief /format:table

You will now get a list of all the recently installed Windows Updates on your system in a table format. Note down the KB number for the selected Windows Update.
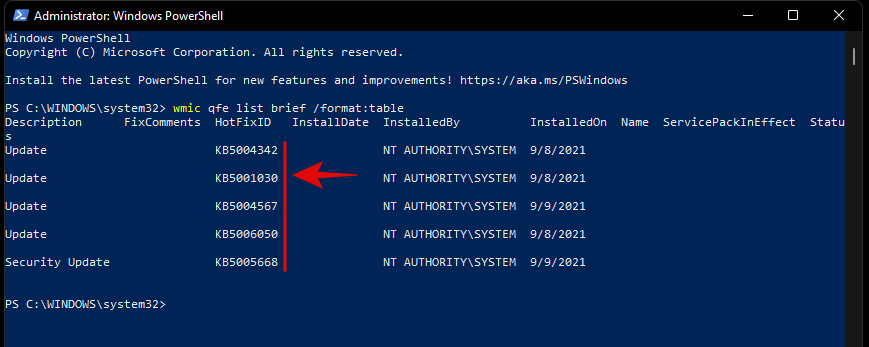
Note: You only need the number and not the letters before it.
Once done, type in the command below and execute it. Replace ‘NUMBER’ with the KB number you noted down earlier.
wusa /uninstall /kb:NUMBER
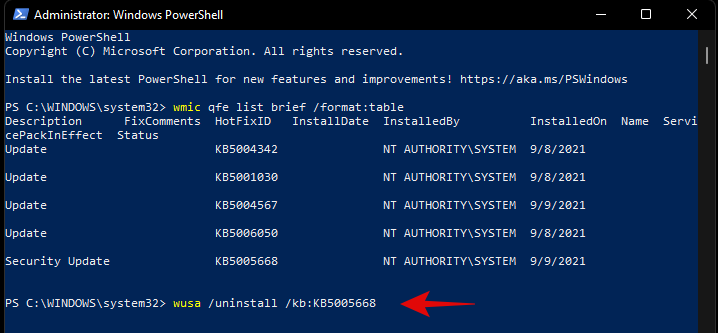
Once prompted, confirm your choice.
If prompted for a restart, we recommend you restart your system at the earliest while saving your work in the background.
If however, you do not wish to receive confirmations before uninstallation and a restart, then you can use the command below.
wusa /uninstall /kb:NUMBER /quiet
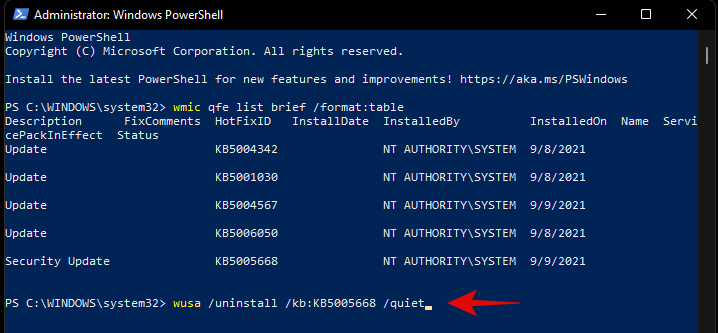
While the command above won’t prompt for confirmations, it will wait for your apps to shut down normally in the background. If you are looking to force close your apps and restart your system immediately, then you can use the command given below.
wusa /uninstall /kb:NUMBER /quiet /forcerestart
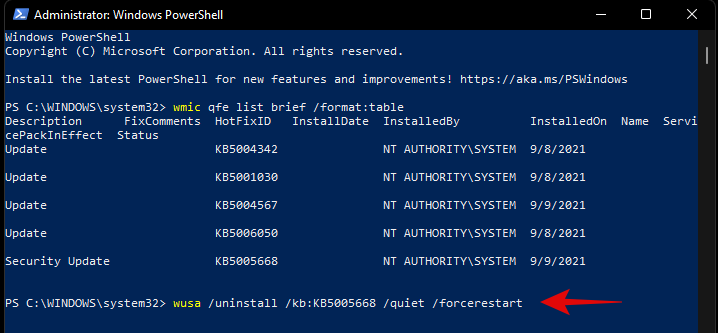
Subsequently, if you only wish to confirm a restart, then you can use the command below.
wusa /uninstall /kb:NUMBER /quiet /promptrestart
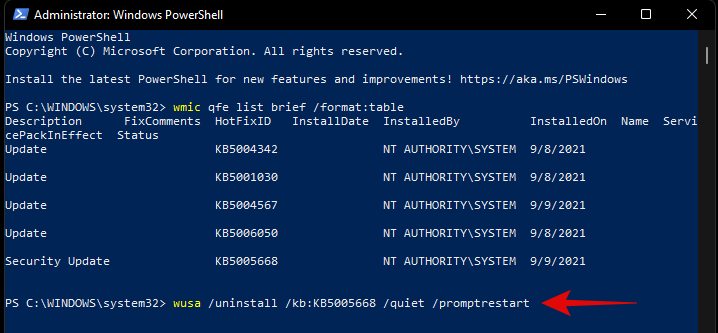
And that’s it! The problematic Windows Update should now be uninstalled from your PC.
Method #04: From Windows RE
Windows Recovery Environment also allows you to uninstall conflicting updates. Use the guide below to get you started. If you are facing a BSOD and are already in the Recovery Environment, then you can skip the first few steps of this guide.
Press Windows + i on your keyboard and select Windows Update from your left.
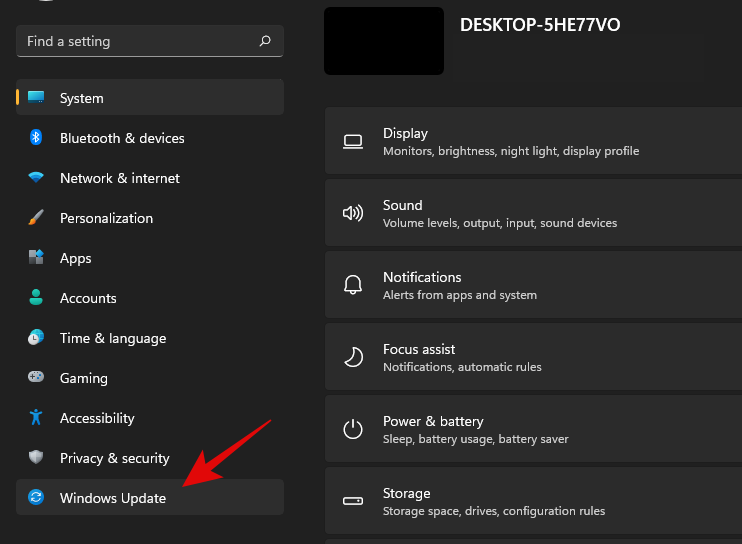
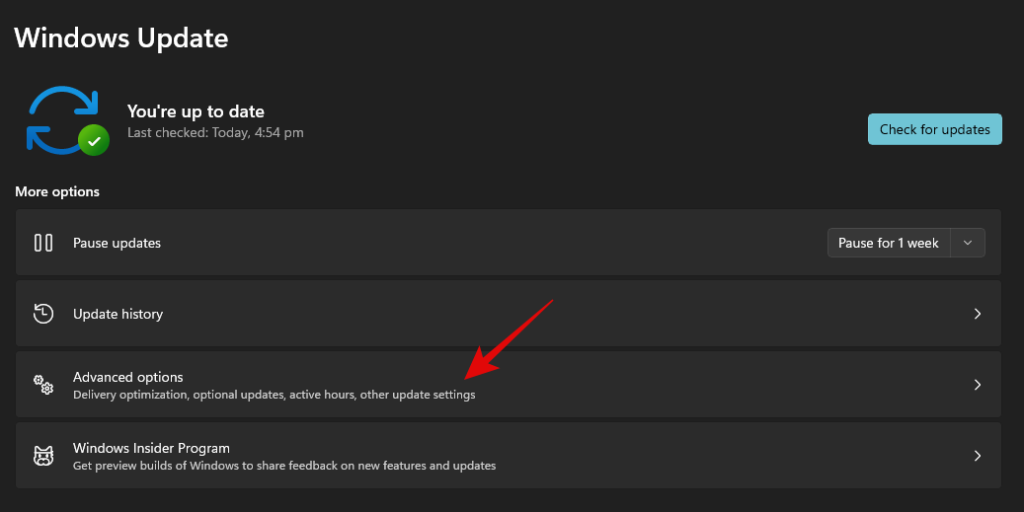
Click on ‘Advanced options’ now.
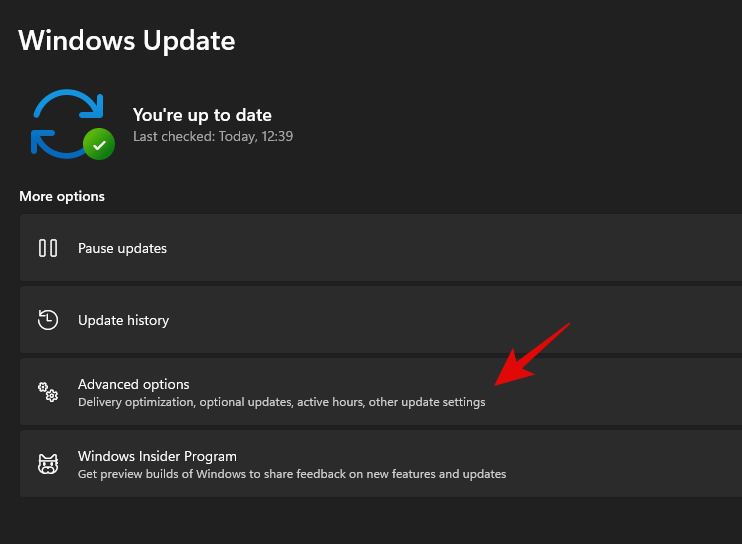
Select ‘Recovery’.
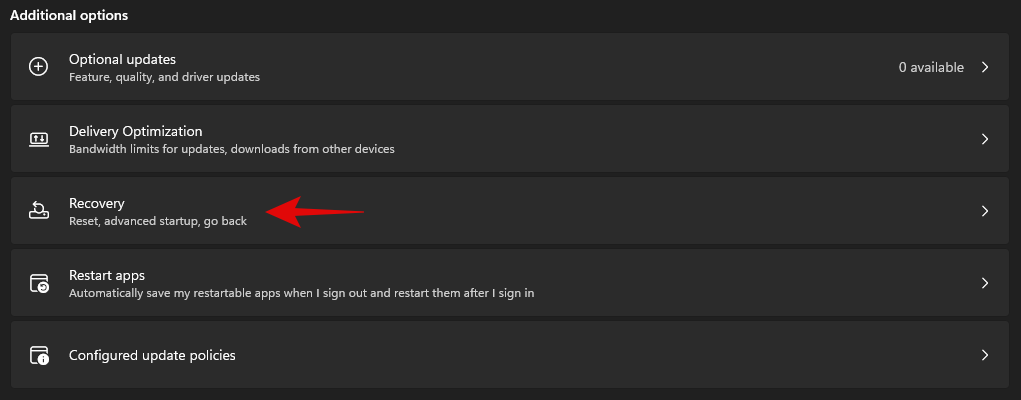
Click on ‘Restart now’ beside Advanced Startup.

You will now boot into the recovery environment. Click on ‘Troubleshoot’.
Now click on ‘Advanced Options’.
Select ‘Uninstall updates’.
Click and select the type of update you wish to install from the options on your screen.
Note: In case you are confused, feature updates refer to major updates to your Windows system that include new features, updated integrations, and sometimes new UI. Quality updates on the other hand encompass everything else including Security updates, Driver updates, Intelligence updates, Telemetry updates, and more.
Click on your administrator account and log in with your password.
Click on ‘Uninstall quality/feature’ update to confirm your choice.
Click on ‘Done’ once the process finishes.
Restart your PC and boot into Windows normally. You shouldn’t face any more issues caused by a problematic Windows update.
Method #05: Using DISM
DISM or Deployment Image Servicing and Management tool is an administrative tool within Windows that helps repair your Windows image and even mount images if needed. DISM supports image formats like .wim, .vhd, and more.
The tool can help you fix issues with your Windows installation and even remove problematic Windows updates. If you are looking to remove windows updates using DISM, then you can follow the steps below to get you started.
Note: DISM can be accessed via CMD and thus, you can use this guide from a recovery environment or an installation media as well. Follow the guide above to get CMD working on your lock screen or within Windows Recovery Environment.
Launch CMD and type in the following command. Press Enter on your keyboard once you are done.
dism /online /get-packages /format:table
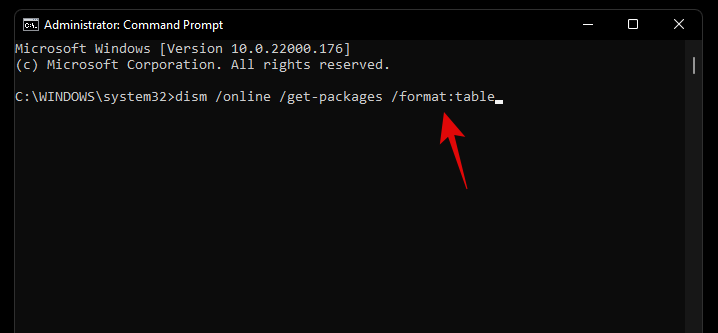
Unlike the WUSA commands we used earlier with PowerShell and CMD, you will need to note down the entire name of the Windows Update package we need to remove. Unfortunately, this includes special characters, spaces, and everything else included in the name. Thankfully you can easily copy the entire name to your clipboard by selecting it with your mouse and then using the keyboard shortcut. Once done, type in the command below and replace NAME with the package name you noted down earlier.
Note: This includes the term ‘Package_for_’ prefixed before some updates.
dism /online /Remove-Package /PackageName:NAME

The selected Windows Update will now be uninstalled from your system. In some cases, you will be prompted to restart your system, type in ‘Y’, and hit Enter on your keyboard to restart your system immediately.
How to stop receiving an update
While removing an update can help you, this does not mean that the broken Windows Update will stop showing up in your Updates section. This can be annoying and if you have automatic updates then you run the risk of automatically installing the problematic update in the background. In all such cases, you can try blocking Windows Updates on your system using the guides below depending on your preferences.
Method #01: Stop OEM driver updates through Windows update
OEM driver updates are delivered through Windows updates as well depending on their importance. Security vulnerabilities and bugs that have been recently found in components like CPU, GPU, or your wireless card, are instantly patched through such updates.
However, if you do not wish to install an OEM driver update provided by Windows update, then you can follow the guide below to block your OEM driver updates.
Press Windows + S on your keyboard and search for ‘Change device installation settings’. Click and launch the app from your search results.
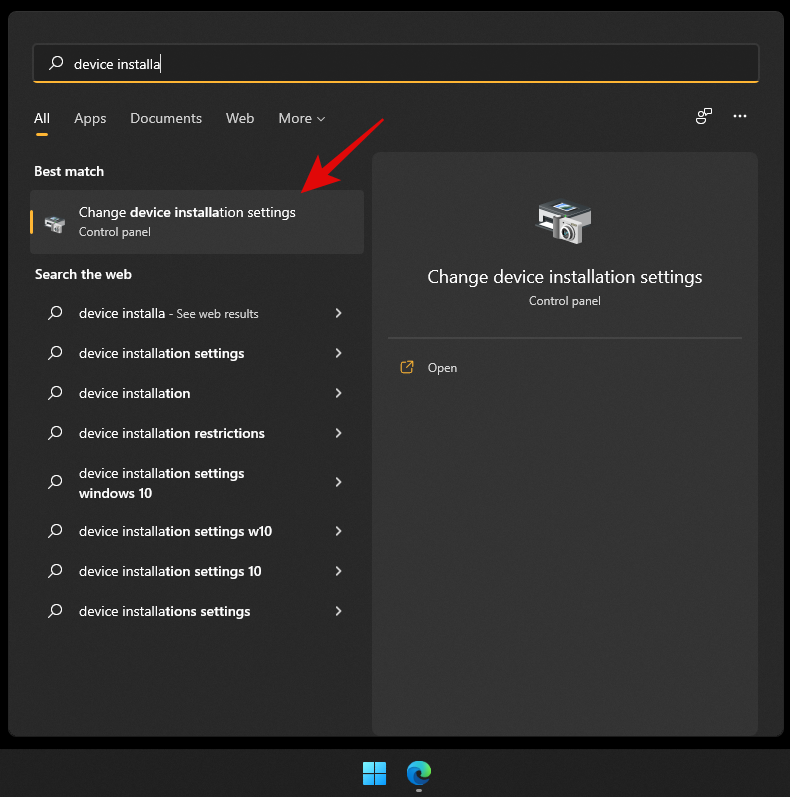
Select ‘No’.
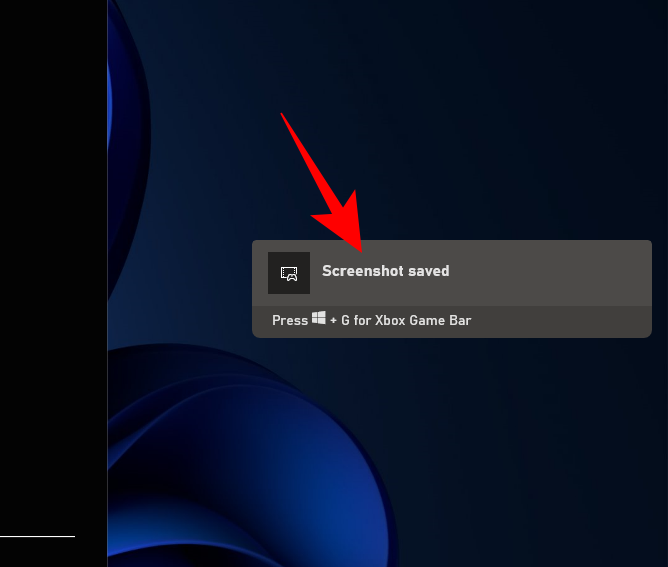
Click on ‘Save changes’.
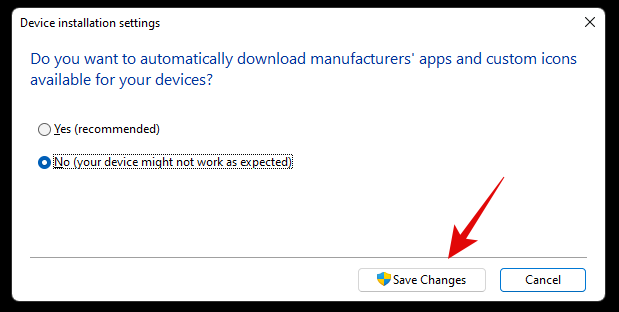
The changes will now be saved and you will no longer receive OEM driver updates through Windows Update.
Related: 6 Ways to Update Drivers on Windows 11
Method #02: Stop updates for Microsoft products
If you have been receiving constant updates for new Microsoft features and old products that keep messing up your system, then you can use the guide below to disable updates for Microsoft products via Windows Update.
Press Windows + i on your keyboard to open the Settings app and select ‘Windows Update’ from the left sidebar.

Click on ‘Advanced options’.

Now turn off the toggle for ‘Receive updates for other Microsoft products’ at the top.
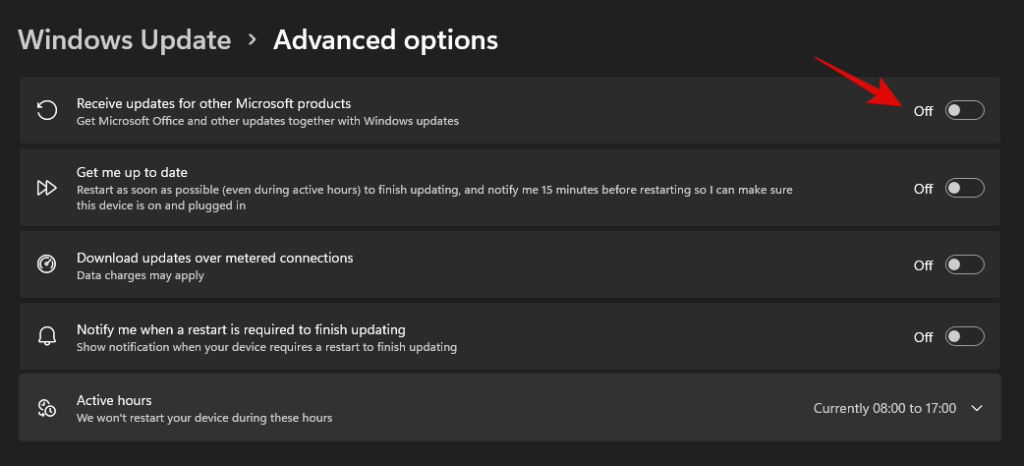
You will no longer receive updates for Microsoft products installed on your system via Windows update.
Method #03: Change active hours for background download and installation for updates
If you’re just looking to dismiss updates so that they don’t interfere with your work hours, then this is the perfect option for you. You can decide when Windows can download and update your PC in the background which will prevent Windows from interfering with your work hours. Follow the guide below to get you started.
Press Windows + i on your keyboard and click on ‘Windows Update’ on your left.

Click on ‘Advanced options’.

Now turn off the toggle for ‘Get me up to date’.
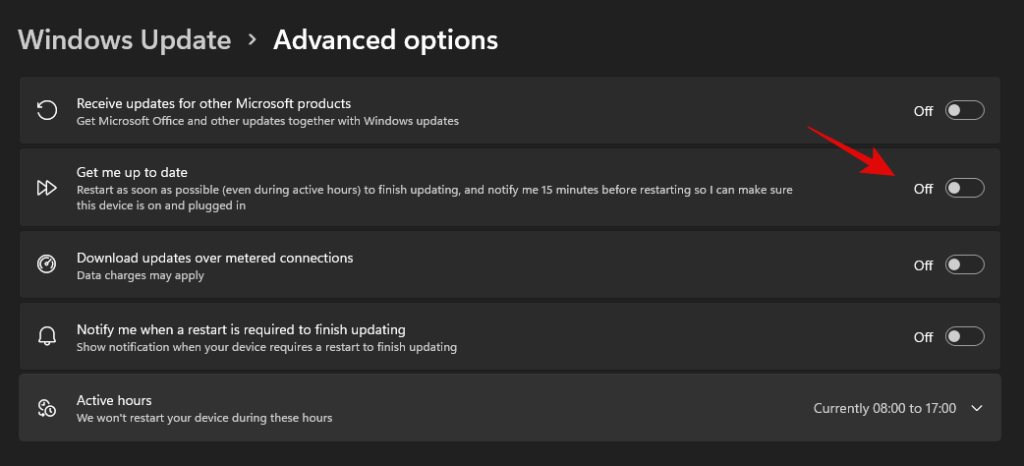
Click on ‘Active hours’.
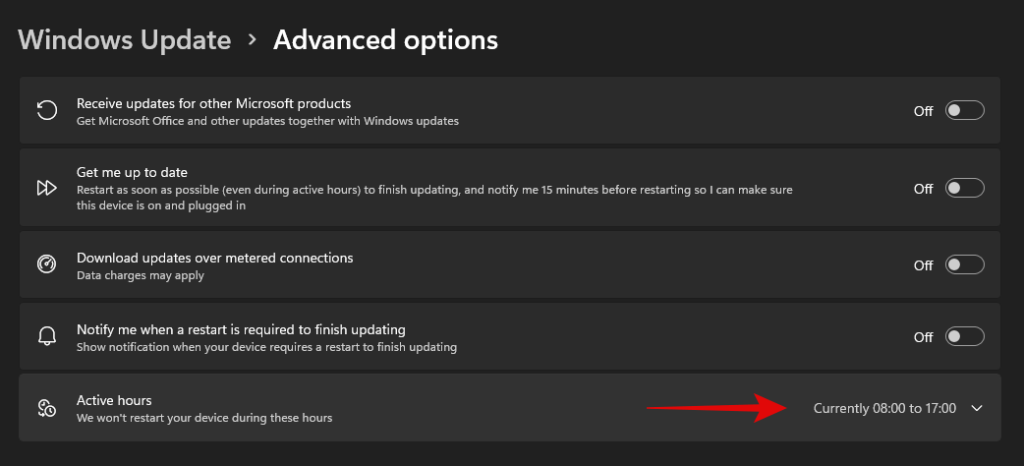
Click on the drop-down menu and select ‘Manually’.
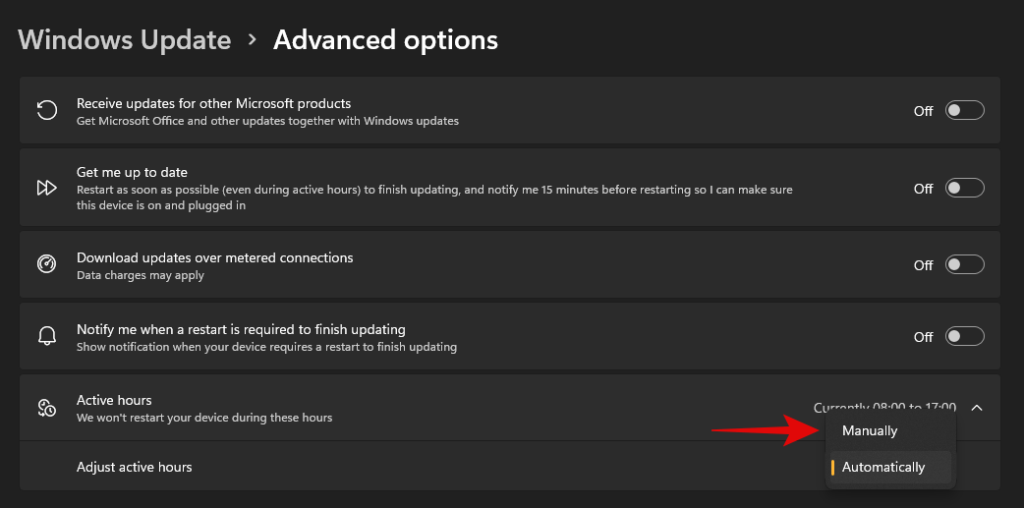
Define your desired start and end time. Windows won’t download updates and restart your PC during these hours.

And that’s it! Active hours should now be enabled for your system.
Method #04: Block Windows updates that you never wish to install
If you are receiving forced Windows updates that you don’t ever wish to install on your system then you can use a dedicated Windows troubleshooter to solve your issue.
This can be helpful in case you are trying to stop an update that disables a certain feature on your system that you don’t want disabled. This could be access to voltage controls, clock speed controls, turbo controls, fan controls, RGB control, and more. Follow the guide below to get you started.
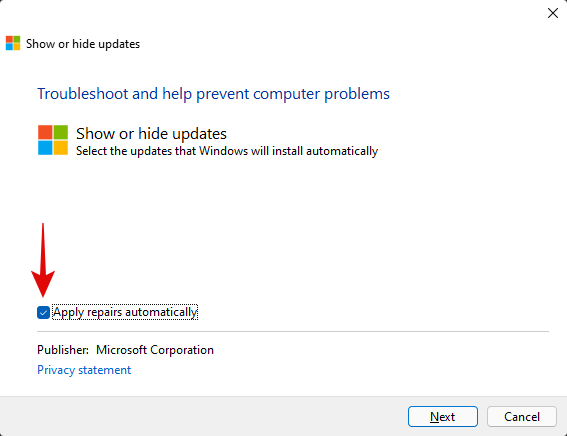
Download the Windows Update Show Hide troubleshooter using the link above and launch it on your PC. Click on ‘Advanced’.

Uncheck the option for ‘Apply repairs automatically’.
Click on ‘Next’.
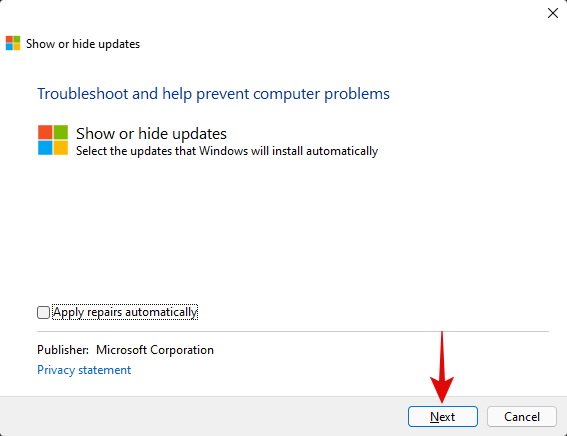
The troubleshooter will now look for pending updates and display them on your screen. Click on ‘Hide updates’.
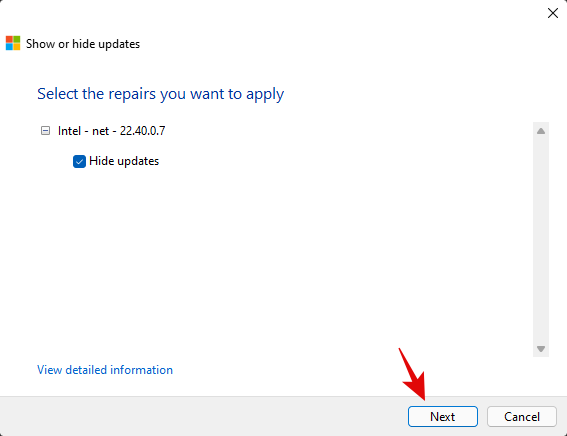
Check the boxes for all the updates you don’t wish to receive on your PC.

Click on ‘Next’.
Ensure that ‘Hide updates’ is selected and click on ‘Next’.
The troubleshooter will now hide the necessary Windows updates from your PC which in turn will prevent them from ever being downloaded on your PC. Click on ‘Close’.
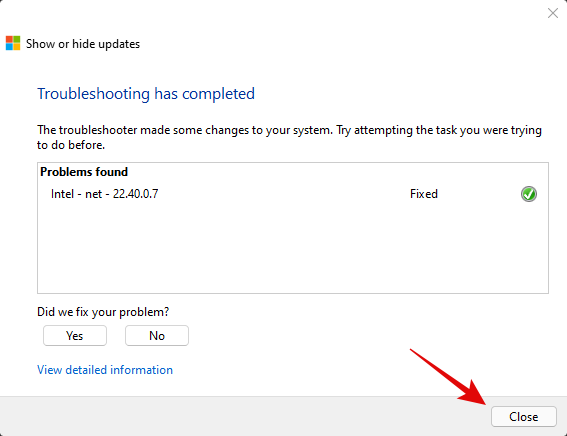
And that’s it! You will now have blocked the necessary updates on Windows 11.
Can you turn off Windows updates?
Yes, you can use certain workarounds and tricks to disable Windows updates on your PC. However, this isn’t recommended as you will lose out on important security patches which would leave you vulnerable to online threats including hackers, malware, adware, and more.
Hence we recommend you keep your PC updated or at least opt to install the latest security updates on your PC. Even if you are losing out on features it’s usually because of a hardware security vulnerability that would compromise your system.
However, if you still wish to disable Windows Updates on your PC, you can use this dedicated guide from us. If you face any issues, feel free to drop a comment.
Can’t uninstall Windows updates? Try these fixes!
If you are unable to install updates on your PC, then you can try the following fixes. However, if you are still unable to uninstall updates then this might indicate an issue with your Windows installation in which case resetting your PC might be the best option.
Follow the guides below to get you started.
Method #01: Reset Windows components and try again
If you have been unable to uninstall updates then you can try resetting your windows components. This will help fix corrupted system files in the background that might be preventing you from uninstalling updates on your system. We will be using a modified script from Mircosoft to help reset all components of Windows 11. The script was originally developed for Windows 10 or higher and hence will need some edits to work properly on Windows 11. This script will perform the following tasks on your system when executed;
Follow the steps below to run the script on your system and reset Windows update components on your PC.
Download the script using the link above to your local storage and extract it to a convenient location. Once extracted right click on the script.
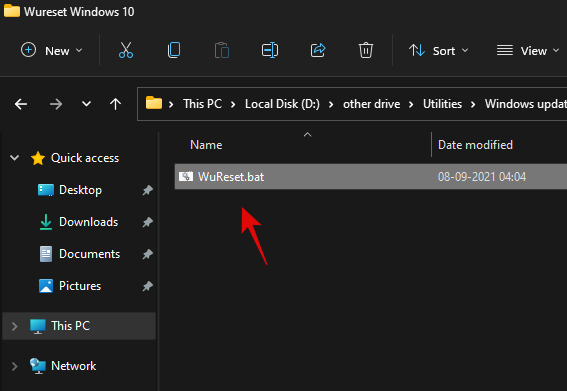
Click on ‘Show more options’.
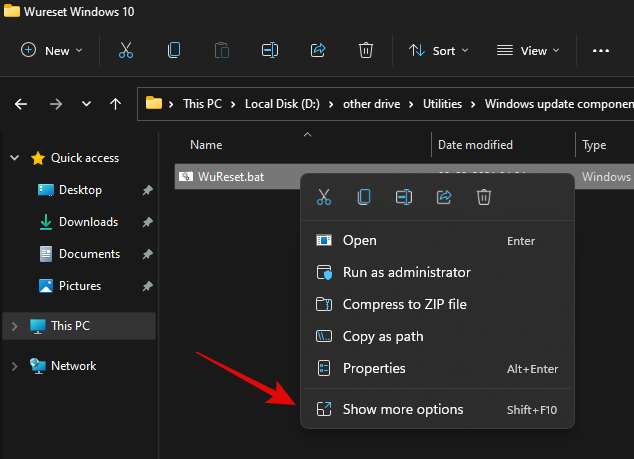
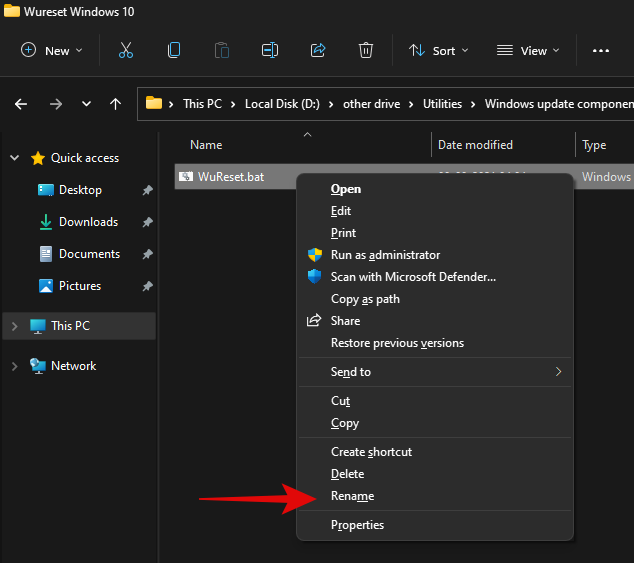
Select ‘Rename’.
Replace ‘.bat’ with ‘.txt’.
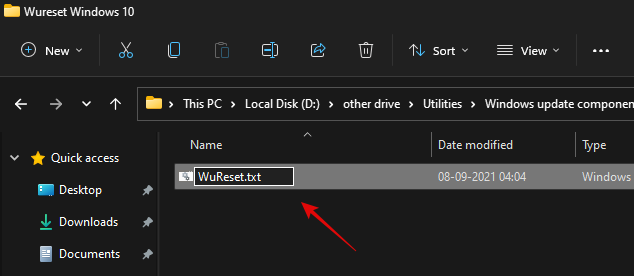
Click on ‘Yes’ to confirm your choice.
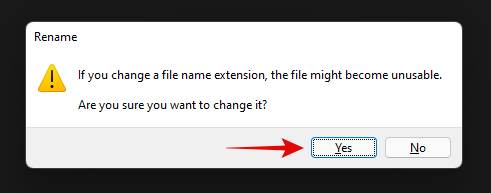
Now double click and open the file and it should open in your notepad. Once opened, scroll to the ‘:Reset’ section for resetting network commands and add the following line after the first delete command as shown below.
del /s /q /f "%SYSTEMROOT%\Logs\WindowsUpdate\*"
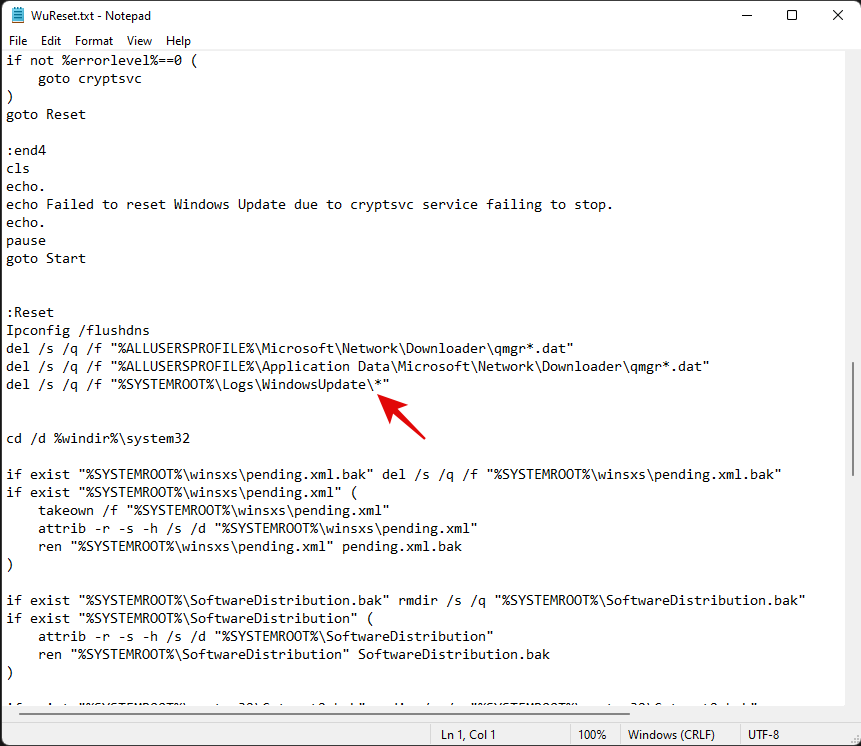
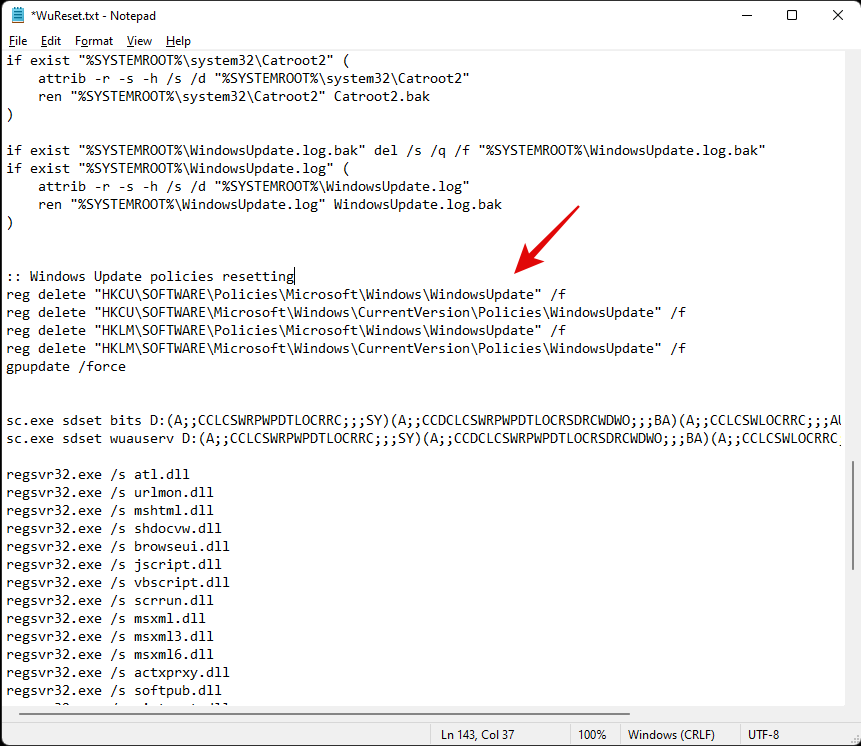
Once added, hit Ctrl + S on your keyboard. Ensure that there are no formatting changes or spaces before or after the line. The file will now be saved on your system along with its recent changes. We will now add some code to Reset Windows’s update policies on your system. Copy the lines below and paste them after your system commands. Ensure that two empty lines are available at either end of the code as shown below.
:: Windows Update policies resetting
reg delete "HKCU\SOFTWARE\Policies\Microsoft\Windows\WindowsUpdate" /f
reg delete "HKCU\SOFTWARE\Microsoft\Windows\CurrentVersion\Policies\WindowsUpdate" /f
reg delete "HKLM\SOFTWARE\Policies\Microsoft\Windows\WindowsUpdate" /f
reg delete "HKLM\SOFTWARE\Microsoft\Windows\CurrentVersion\Policies\WindowsUpdate" /f
gpupdate /force
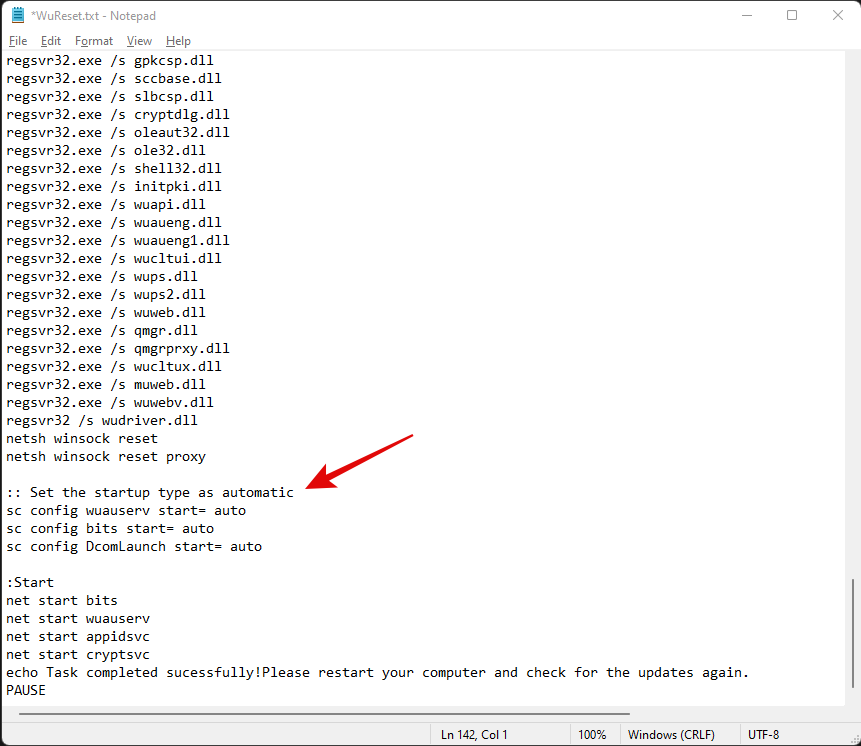
Lastly, let’s add some lines to ensure that the startup type for this service is set to ‘Automatic’. Copy the code below and add the lines after your winsock reset commands but before your service starting commands as shown below. Copy and paste the code in its respective location.
:: Set the startup type as automatic
sc config wuauserv start= auto
sc config bits start= auto
sc config DcomLaunch start= auto
Once you are done, hit Ctrl + S on your keyboard to save your changes. Close the file and right-click on it again and select ‘Show more options’.
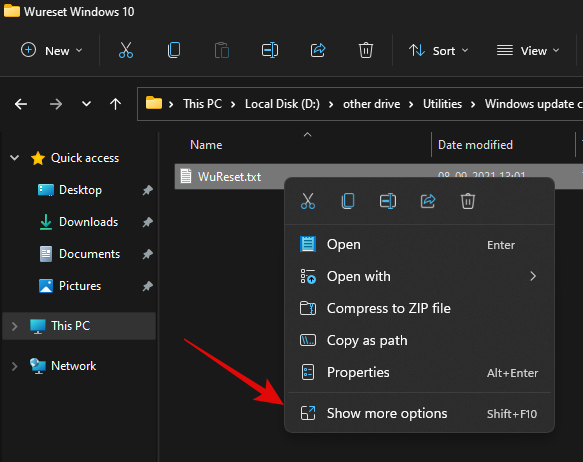
Click on ‘Rename’.
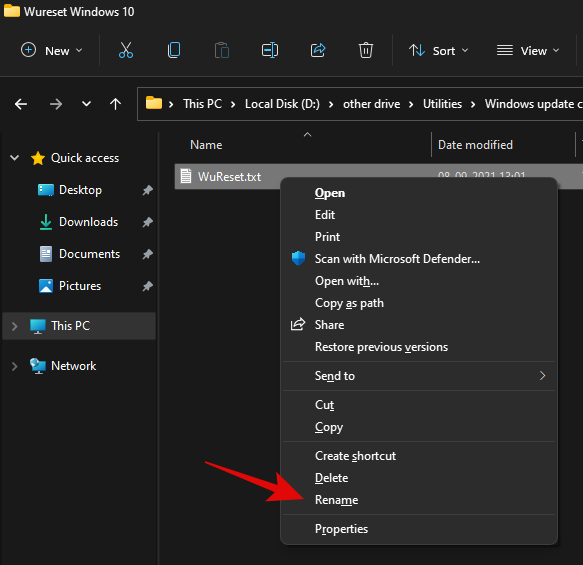
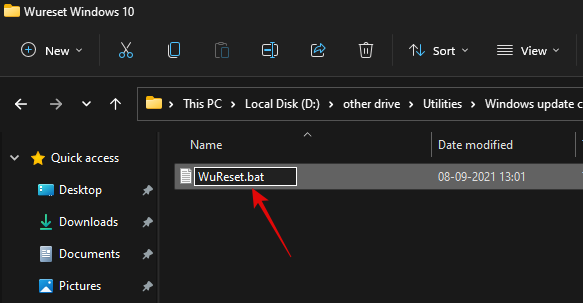
Replace ‘.txt’ with ‘.bat’.
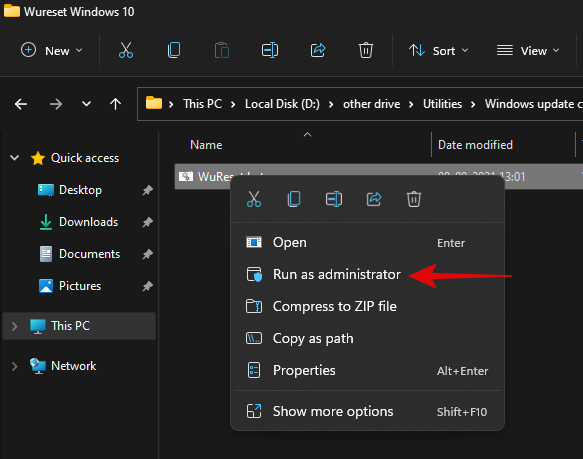
Once done, right-click on the file and select ‘Run as administrator’.
The batch script will now run on your PC and do its thing. Once the process completes, you will be asked to restart your PC. We highly recommend that you restart your PC at the earliest after running this script. Upon a restart, your Windows update should be reset and a fresh start should help you easily install pending Windows updates on your PC.
Method #02: Use DISM to uninstall the concerned packages
If you are still unable to uninstall specific Windows Update packages then simply use the DISM method to remove the concerned updates from your PC. This method force removes any available Windows updates from your PC without any issue. You will get a list of all the available updates in a table format which should make it much easier for you to find the culprit on your PC. Simply follow the guide at the top to get you started.
Method #03: Run SFC & DISM commands
At this point, if Windows still fails to update your system then you are facing a more serious issue than we anticipated earlier. This could indicate system-level corruption of files or missing system files from your system. In such cases, you can run SFC and DISM checks to fix corrupted files as well as restore missing system files. Follow the guide below to get you started.
Press Windows + S on your keyboard and search for CMD. Click on ‘Run as administrator’ once it shows up in your search results.
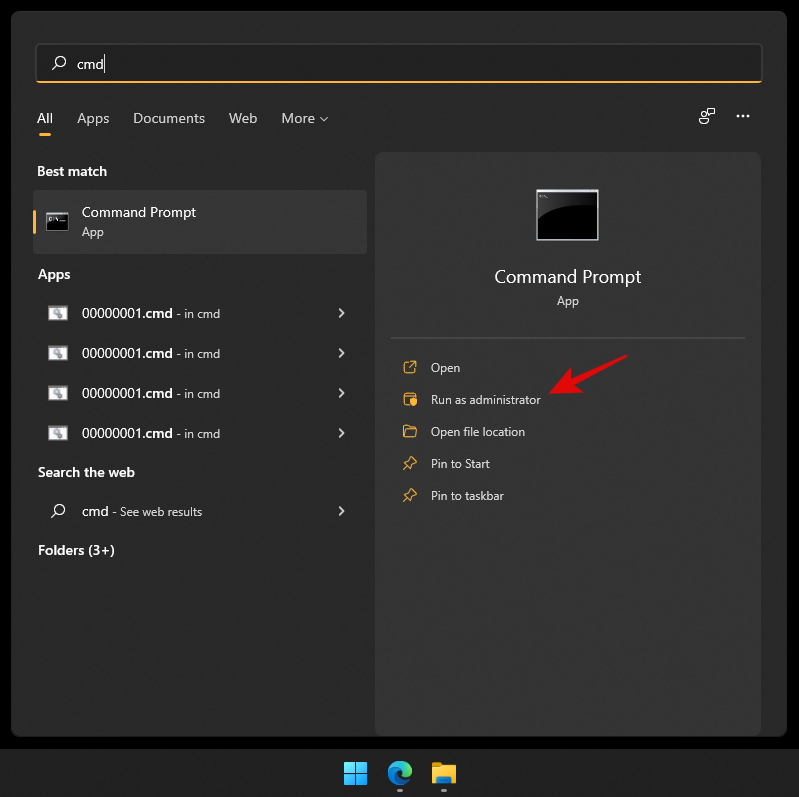
Type in the following command and press Enter on your PC.
sfc /scannow
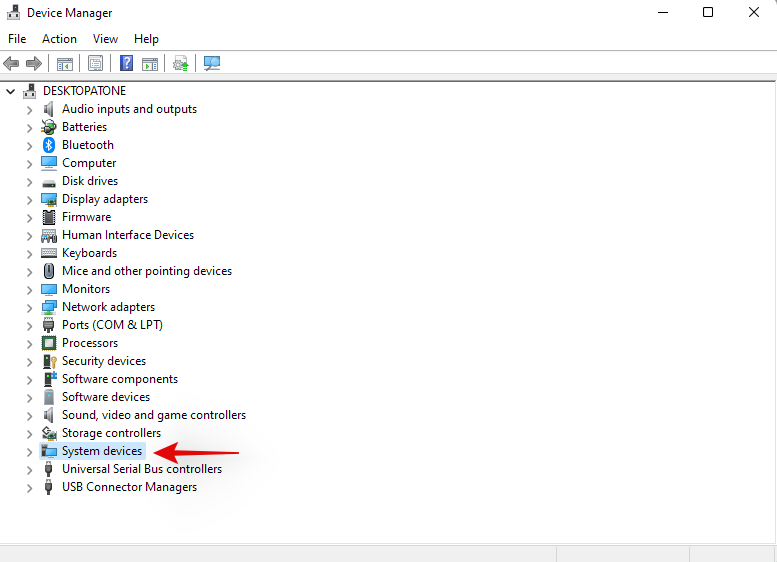
Once the SFC scan completes, type in the following command and execute it.
DISM /Online /Cleanup-Image /RestoreHealth
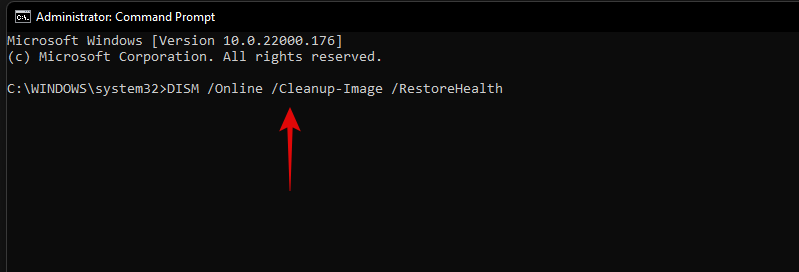
We recommend you restart your PC once the process completes.
Method #04: Last resort: Reset your PC
If nothing seems to be working for you then it might be time for a fresh installation of Windows 11 on your system. You can try getting in touch with your support team as well but if nothing works then a reset of your PC is the best option. In most cases, a reset while keeping your local files should help get Windows update working on your system.
Windows 11 connects to the update servers and updates your security definitions and drivers during OOBE. Windows will fix all update issues and reinstall necessary services on your system to get Windows update back up and running on your system during this process.
► You can use this dedicated guide from us to reset your Windows 11 PC.
We hope you were able to easily uninstall updates from your Windows 11 PC using the guide above. If you face any issues, feel free to drop a comment below.
Related:
Supprimez les informations enregistrées de l
Découvrez comment modifier ou supprimer un message sur Microsoft Teams et les raisons qui peuvent l
La photo d'affichage ou la photo de profil de n'importe quel compte (réseaux sociaux ou autres) est un identifiant crucial. Il permet à nos collègues et amis de mettre un visage sur nos noms, de construire un sentiment de confiance…
Presque tous les autres fabricants de PC semblent aimer le logiciel de protection du système McAfee et refusent catégoriquement d'expédier leur PC sans lui. Mais beaucoup de gens n'aiment pas particulièrement McAfee…
Avoir votre PC encombré de fichiers en double peut être un problème ennuyeux. Même si vous n'êtes pas du genre organisé, vous allez les sentir empiéter sur votre espace plus tôt ou…
L'espace disque a toujours été un luxe, que ce soit à l'époque du DOS où tout était stocké sur une disquette ou à notre époque moderne où nous avons du mal à stocker nos bibliothèques musicales sur un seul lecteur…
Lorsque vous recherchez un élément dans la recherche, Windows affiche les résultats locaux pour les applications, les fichiers ou les paramètres. Si rien ne se présente, Windows dispose également d'une recherche Bing intégrée qui affichera les éléments en ligne…
Malgré les meilleures tentatives de Microsoft pour vous séduire en utilisant Teams, si vous ne l'aimez toujours pas, vous voudrez peut-être le supprimer de la barre des tâches. Eh bien, vous pouvez facilement le faire et obtenir plus d'espace…
Les builds Windows Insider et les builds bêta sont un excellent moyen d'avoir un avant-goût de la mise à jour à venir. En raison de la prochaine version de Windows 11, de nombreux utilisateurs du monde entier ont rejoint le programme d'initiés pour…
Microsoft Teams est l'un des outils les plus populaires qui aident les équipes à collaborer à domicile. Vous pouvez communiquer via des messages directs et de groupe, une vidéoconférence avec les membres de votre équipe et partager des fichiers e…
La dernière version de Windows est tout ce que les passionnés de technologie voulaient qu'elle soit. D'une meilleure compatibilité des applications à une interface utilisateur magnifique, il y a de quoi baver. Mais il y a un…
L'automatisation a pris tellement d'aspects de nos vies qu'il nous est parfois nécessaire de reprendre une partie de ce contrôle. Comme pour les applications d'appel vidéo comme Zoom, il existe des cas…
Contrairement à Zoom et Google Meet, Microsoft Teams suit un certain décorum lorsqu'il s'agit de configurer votre lieu de travail. Il vous permet de gérer plusieurs organisations à partir de l'application et…
Les notifications font désormais partie intégrante de notre vie. Ils nous tiennent au courant, nous aident à maintenir notre emploi du temps et surtout nous aident à obtenir les dernières et meilleures nouvelles. Cependant, les entreprises semblent…
Windows 11 a été rendu public et cette nouvelle mise à jour du système d'exploitation de longue date semble recevoir de bonnes critiques. Microsoft a augmenté la confidentialité, la sécurité a ajouté une nouvelle interface utilisateur et la capacité…
Vous rencontrez des difficultés avec le pare-feu Windows 11 qui bloque les jeux en local ? Découvrez des solutions éprouvées pour débloquer le multijoueur et retrouver une expérience de jeu fluide. Guide pas à pas pour jouer sans souci.
Vous rencontrez l'erreur 0x80073712 lors de la mise à jour de Windows 11 ? Découvrez des solutions éprouvées et détaillées pour 2026, ainsi que des conseils de dépannage pour une mise à jour système fluide et sécurisée. Fini les soucis de mise à jour !
Vous rencontrez des difficultés avec l'erreur « Pilote de précision manquant » sous Windows 11 ? Découvrez des solutions éprouvées pour restaurer la précision de votre pavé tactile et de votre souris. Guide pas à pas pour un dépannage simplifié.
Vous rencontrez des problèmes de lenteur avec Windows 11 ? Découvrez des solutions étape par étape pour optimiser votre PC grâce au Plan de performances ultimes.
Vous rencontrez des problèmes de positionnement avec le thème Rainmeter sous Windows 11 ? Découvrez des solutions éprouvées et détaillées pour retrouver un bureau impeccable. Mise à jour avec les dernières améliorations pour une personnalisation optimale.
Vous rencontrez des problèmes de latence en jeu sous Windows 11 à cause de VBS et HVCI ? Découvrez des solutions éprouvées pour optimiser les performances, réduire les saccades et augmenter le nombre d'images par seconde sans compromettre la sécurité. Des solutions simples pour les joueurs.
Vous êtes bloqué dans une boucle de récupération BitLocker sous Windows 11 ? Découvrez des solutions pas à pas pour contourner les invites interminables, récupérer votre disque et retrouver un fonctionnement normal. Aucune compétence technique n'est requise : des solutions simples et efficaces vous attendent.
Votre Windows 11 est lent ? Découvrez des solutions éprouvées pour réduire la taille du registre, optimiser la vitesse et reprendre le contrôle de votre PC.
Vous rencontrez une erreur du catalogue Windows Update sous Windows 11 ? Découvrez des solutions éprouvées et détaillées pour rétablir les mises à jour sans interruption. Remettez votre système en état de marche rapidement : aucune compétence technique n’est requise !
Vous rencontrez des problèmes de son étouffé avec votre micro interne sous Windows 11 ? Découvrez des solutions éprouvées et faciles à mettre en œuvre pour retrouver une qualité audio optimale. Réparez votre micro dès aujourd’hui !

![Comment désinstaller McAfee sur Windows 11 [5 manières] Comment désinstaller McAfee sur Windows 11 [5 manières]](https://cloudo3.com/resources8/images31/image-4917-0105182719945.png)


