Windows 11 è stato rilasciato di recente e, nonostante le controversie sui requisiti di sistema, sembra che Microsoft abbia reso le cose più facili per tutti. Ora puoi facilmente ignorare i requisiti di Windows 11 con alcune semplici modifiche a seconda della configurazione e dei componenti attuali. Utilizza i metodi seguenti per ignorare i requisiti di Windows 11 sul tuo sistema.
Contenuti
Riesci a ignorare i requisiti di Windows 11?
Sì, puoi ignorare i requisiti di Windows 11 a seconda delle funzionalità disponibili nella configurazione corrente. La cosa più sorprendente di questo è che Microsoft stessa ha suggerito un modo semplice per farlo. Sì, non scherzo! Vedere È quindi possibile utilizzare un hack del registro, modificare l'ISO o creare un USB avviabile per installare Windows 11 sul sistema. Segui una delle guide pertinenti di seguito a seconda delle tue preferenze.
Puoi installare Windows 11 su hardware o CPU non supportati?
Sì e sì. Utilizzando i trucchi indicati di seguito, è possibile ignorare i controlli per TPM, Secure Boot, RAM, ecc. per installare Windows 11 su qualsiasi PC altrimenti non idoneo per Windows 11.
Una nota di avvertimento, però. L'installazione di Windows 11 su sistemi non supportati può influire negativamente sulle prestazioni del sistema. Consulta le domande frequenti di seguito per informazioni su questo e sulla sicurezza degli hack di 4se.
Correlati: Aggiungi WinRAR al menu contestuale di Windows 11
3 modi per ignorare i requisiti di Windows 11:
Se hai TPM 1.2 o Secure Boot disponibile sul tuo sistema, sarai in grado di farla franca con un hack del registro e un ISO modificato. Tuttavia, se mancano i requisiti rigidi per almeno TPM 1.2 e Secure Boot, dovrai invece creare un USB avviabile o utilizzare l'hack del registro nel tuo ambiente di ripristino. In questi casi, puoi anche cavartela modificando l'attuale installazione di Windows. Segui una delle guide di seguito a seconda delle tue esigenze attuali.
Metodo n. 01: utilizzo del bypass del registro (di Microsoft)
Ci sono due opzioni disponibili per te con questo metodo che utilizza il più semplice degli hack del registro, condiviso anche dalla stessa Microsoft. Utilizzare l'opzione 1 se si desidera modificare manualmente il registro. Se desideri utilizzare apportare le modifiche automaticamente utilizzando uno script di registro, puoi invece utilizzare l'opzione 2.
Opzione 1: apportare le modifiche al registro manualmente
Premi Windows + R sulla tastiera, digita regedit e poi premi Invio sulla tastiera per aprire l'editor del registro.

Vai al seguente percorso. Puoi anche copiare e incollare l'indirizzo in basso nella barra degli indirizzi in alto.
HKEY_LOCAL_MACHINE\SYSTEM\Setup\MoSetup

Ora fai clic con il pulsante destro del mouse sull'area vuota alla tua destra e seleziona "Nuovo".

Seleziona "Valore DWORD (32 bit)".

Inserisci il seguente nome per il tuo nuovo valore e premi Invio sulla tastiera per confermare le modifiche.
AllowUpgradesWithUnsupportedTPMOrCPU

Fai doppio clic sul valore appena creato e inserisci "1" come Dati valore.

Fare clic su "Ok" per salvare le modifiche.

Ora puoi installare Windows 11 sul tuo sistema e non dovresti più essere limitato durante l'installazione.
Opzione 2: utilizzare uno script per apportare automaticamente modifiche al registro
Se desideri modificare automaticamente i valori del registro, puoi semplicemente utilizzare il file collegato di seguito.
Scarica il file sul tuo PC ed esegui il file "DisableTPMcheck".

Fare clic su "Sì" per confermare le modifiche.

Ora puoi installare Windows 11 sul tuo PC e non dovresti più essere limitato a causa dei requisiti TPM. Se desideri annullare le modifiche, esegui semplicemente il file "EnableTPMcheck" nell'archivio .zip collegato sopra.
Passaggio successivo: aggiornamento a Windows 11
Ora puoi facilmente aggiornare a Windows 11 senza preoccuparti del controllo TPM. Puoi installare Windows 11 utilizzando uno dei due metodi indicati di seguito:
Metodo #02: rimuovere appraiserres.dll dall'ISO
Passaggio 1: creare un file ISO modificato senza il file appraiserres.dll
Scarica e installa Anyburn sul tuo PC utilizzando il link sottostante.
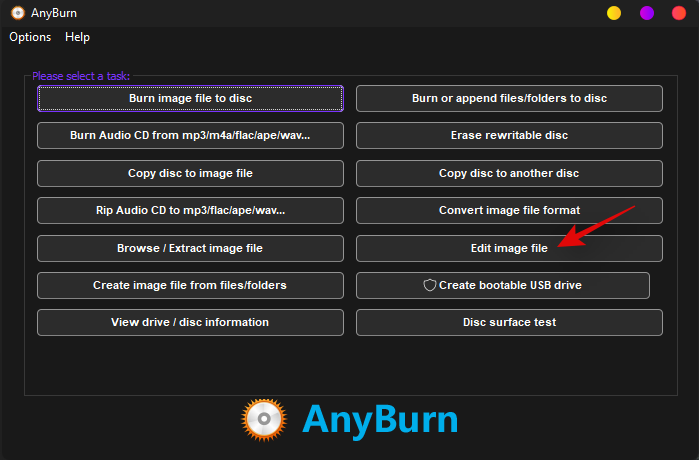
Una volta installata, avvia l'app e seleziona "Modifica file immagine".

Ora fai clic sull'icona "Cartella" e seleziona l'ISO di Windows 11 dalla memoria locale.

Fare clic su "Avanti".

L'immagine si aprirà ora in una finestra del browser di file. Fai clic su "Sorgenti" alla tua sinistra.

Individua "appraiserrs.dll" alla tua destra. Fare clic e selezionare il file.

Ora fai clic su "Rimuovi" in alto.

Clicca su "Sì" per confermare la tua scelta ora.

Ora fai clic su "Avanti".

Inserisci un nuovo nome per la tua nuova ISO. Ciò ti consentirà di salvare le modifiche nella stessa posizione nella memoria locale.

Non apportare modifiche alla configurazione ISO e fare clic su "Crea ora".

Il processo inizierà ora e puoi monitorare i progressi per lo stesso nella parte inferiore dello schermo.

Fare clic su "Esci" una volta terminato.

Anyburn uscirà e si chiuderà automaticamente. Ora puoi utilizzare l'ISO modificato e aggiornare a Windows 11 utilizzando uno dei metodi seguenti.
Passaggio 2: aggiornamento a Windows 11
Puoi eseguire l'aggiornamento a Windows 11 utilizzando l'ISO per eseguire l'aggiornamento direttamente dalla tua attuale installazione di Windows o utilizzare l'ISO per creare un USB avviabile se desideri formattare le tue unità. Puoi utilizzare questa guida completa da noi per eseguire l'aggiornamento utilizzando uno dei metodi a seconda delle tue preferenze.
Metodo n. 03: utilizzare Rufus per creare un'unità USB avviabile che ignori TPM e Secure Boot
Scarica il file ISO di Windows 11 da Microsoft da qui .

Collega una chiavetta USB al tuo PC.
È necessaria la versione beta di Rufus fornita sopra per questo poiché la versione stabile non dispone di questa funzionalità (a partire dal 12 ottobre 2021).
Scarica l'ultima versione di Rufus dal link sopra.

Con il file — Rufus-3.16_BETA2 — salvato sul disco, fai doppio clic su di esso per eseguire Rufus. (Concedi l'accesso come amministratore quando lo richiede in un pop-up.)

Vedrai la versione Rufus Rufus_3.16.1833_(Beta) nella barra del titolo.

Rufus rileverà automaticamente il tuo dispositivo USB. Se hai più di un dispositivo di archiviazione esterno collegato, puoi selezionare il tuo dispositivo USB dal primo menu a discesa.
Ora, fai clic con SELEZIONA in Selezione avvio per selezionare il file ISO di Windows 11.

Cerca l'ISO di Windows 11 scaricato e fai clic su Apri .

Una volta caricato il file ISO, Rufus configurerà automaticamente il resto delle opzioni.
Now, the most important and unique part of this guide. Click the dropdown under the Image option to select the “Extended Windows 11 Installation (no TPM/no Secure 800t/8G8- RAM)” option. Yes, change from Standard installation to Extended installation.

Now, make sure that the Partition scheme is set to GPT and the Target system is set to UEFI (non-CSM).

[Optional] Change the label of your Pen Drive under “Volume label” if you wish to.
Now, we are ready to create a bootable USB drive that will have the checks for TPM, Secure Boot, and RAM disabled. When ready, click Start.

When prompted, click Yes.

The process will take some time. Once it’s done, you will see the “Ready” status message turn green.

You have now created a Windows 11 bootable USB device.
FAQs
Now that you’re trying to bypass Windows 11 requirements, you’re bound to have some questions. Here are some of the most asked ones that should help you get up and running on Windows 11.
Which is the best method for me?
If you have TPM 1.2 and Secure Boot then you can simply use the Registry hack on your system. If you’re missing either then you can try deleting the .dll file or using Rufus to create a USB. For now, it seems that there is a hard requirement for TPM 1.2 but it seems you can bypass it in some cases when using a USB. Each system is unique and your best bet is to try a relevant method and see what works for you.
Is it safe to edit Registry or edit the ISO?
Yes, it’s safe to edit your Registry or ISO as long as you follow the exact instructions above. Editing an ISO at most can break its functionality, so having a backup can save you from almost any change to the file. Registry change on the other hand can adversely affect your system hence you shouldn’t play around with them. If you have all the information about the registry key, registry value, and value data then you can attempt an edit to your registry on your own. Additionally, it’s recommended that you download and use registry files only from trusted sources as unknown ones could compromise your privacy.
Disadvantages of bypassing Windows 11 requirements
You will lose out on the following when bypassing Windows 11 requirements.
- Security Patches
- Security Updates
- Feature Updates
- Online threat protection
It is thus recommended that you have a third-party anti-virus and privacy protection software handy before bypassing the requirements.
How to revert changes to the Registry
If you wish to revert the changes made to the registry then navigate to the path below and delete the key for ‘AllowUpgradesWithUnsupportedTPMOrCPU’.
HKEY_LOCAL_MACHINE\SYSTEM\Setup\MoSetup
You can also use the ‘EnableTPMcheck’ file in the .zip archive linked in the guide above. It will automatically delete all the necessary files and registry values from your system.
How will I get updates in the future?
This is quite unclear for now as very few updates have been released from Microsoft since the Windows 11 stable release. According to official reports, you will need to manually reinstall or upgrade to a newer version of Windows 11 by downloading the ISO in the future. Other updates make it seem that meeting the basic requirements for Secure Boot and TPM 1.2 will allow you to receive feature updates via Windows update but not security patches or updates to Windows Defender. This all is yet to be confirmed, but it seems that it will be a bit difficult to get updates in the future, however, we expect third-party utilities that help with the same to crop up soon.
How to ensure proper security and privacy?
You can ensure proper security and privacy on your system by opting for third-party protection software. We recommend you have at least the following utilities installed on your system after upgrading to Windows 11 by bypassing its requirements.
- Use a third party anti-virus
- Use third party ransomware, malware, and adware protection
- Use a third-party firewall manager/utility.
- Disable Remote access on your PC
- Maintain discretion when visiting questionable websites and web pages.
We hope this post helped you bypass Windows 11 requirements on your PC easily. If you have any more questions or face any issues, feel free to reach out to us using the comments section below.
Related:


