La tastiera è una delle periferiche principali di un PC e deve funzionare correttamente per un'interazione significativa con il computer. Se alcuni tasti non funzionano, potrebbe essere necessario disabilitare la tastiera.
Disabilitare la tastiera è una misura di sicurezza utile quando sei lontano dal computer e può prevenire incidenti, soprattutto se hai bambini o animali domestici in casa.
Qui di seguito, esploreremo diversi metodi pratici per disabilitare la tastiera, sia essa integrata nel laptop che esterna.
Correlati: Come cambiare la tastiera su Android
Contenuti
Disabilita temporaneamente la tastiera con Gestione dispositivi
Puoi disabilitare la tastiera per la sessione corrente seguendo questi passaggi:
Disabilita la tastiera integrata del tuo laptop
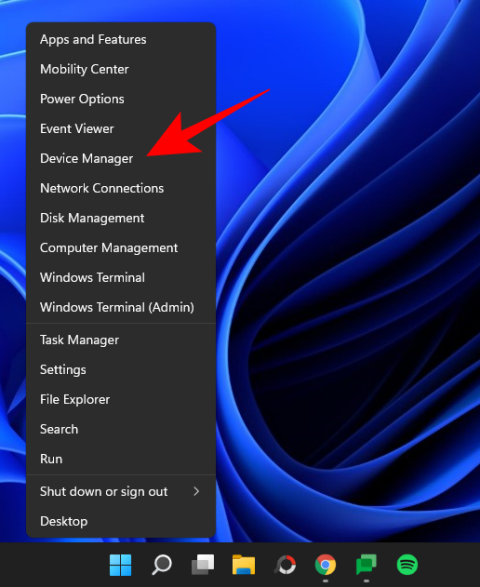
- Fare clic con il pulsante destro del mouse sul menu Start e selezionare Gestione dispositivi.
- Espandere il ramo Tastiere.
- Fare clic con il pulsante destro del mouse sulla tastiera integrata e selezionare Disinstalla dispositivo.
Disinstalla per confermare.

Disabilita tastiera esterna
- Accedi di nuovo a Gestione dispositivi e vai al ramo Tastiere.
- Seleziona la tastiera esterna e fai clic con il tasto destro per scegliere Disinstalla dispositivo.

Come disabilitare permanentemente la tastiera
Esploriamo diversi metodi per mantenere disabilitata la tastiera anche dopo il riavvio del sistema.
Impedisci a Windows di installare i driver della tastiera utilizzando l'Editor criteri di gruppo
- Apre Gestione dispositivi.
- Espandi Tastiere e clicca destro sulla tua tastiera, seleziona Proprietà.
- Prendi nota dell'ID hardware.
- Aprire l'Editor criteri di gruppo con il comando gpedit.msc.
- Naviga a Configurazione computer > Modelli amministrativi > Sistema > Installazione dispositivo > Restrizioni installazione dispositivo.

Interrompi l'aggiornamento automatico della tastiera con Proprietà del sistema
- Accedi alla finestra RUN e digita sysdm.cpl.
- Naviga alla scheda Hardware e seleziona Impostazioni di installazione del dispositivo.
- Scegli No.

Usa il driver sbagliato per la tua tastiera (quindi non funziona)
Questo metodo non è consigliabile, ma puoi utilizzare driver incompatibili per disabilitare la tastiera.
Disabilitare il servizio porta PS/2 dal prompt dei comandi
- Apri il prompt dei comandi come amministratore e inserisci il comando:
sc config i8042prt start= disabled

Usa applicazioni di terze parti per disabilitare la tastiera
Se desideri una soluzione più semplice, ci sono diverse applicazioni di terze parti disponibili. Ecco alcune delle più popolari:
Keyboard Locker
Anche se è un'applicazione obsoleta, è ancora efficace per bloccare la tastiera.
Download:
Keyboard Locker
BlueLife KeyFreeze
Questa applicazione è utile quando sei lontano dalla tastiera.
Download:
BlueLife KeyFreeze
KeyboardLock
Consente di disabilitare la tastiera, proteggendo la funzione con una password.
Download:
KeyboardLock
Domande frequenti (FAQ)
Ecco alcune domande comuni:
Come disabilitare le scorciatoie da tastiera o i tasti di scelta rapida?
Per disabilitare le scorciatoie, apri il RUN con Win + R, inserisci gpedit.msc e segui il percorso per configurare le scorciatoie.

Come abilitare la tastiera del laptop dopo la disabilitazione?
Le modalità di abilitazione dipendono dal metodo precedentemente utilizzato per disabilitare la tastiera.
Ciò conclude la guida su come disabilitare la tastiera su Windows 11 sia temporaneamente che permanentemente. Speriamo che questa guida ti sia stata utile per affrontare i problemi legati alla tastiera.
RELATED


Valentina C. -
Ho usato il metodo delle impostazioni, ma non è andato come previsto. Ci sono opzioni migliori?
Stefano -
Oh, fantastico! Sono riuscito a disabilitare la tastiera e ora posso giocare senza interferenze. Grazie del consiglio
Francesca -
Questo articolo è stato un grande aiuto! Non sapevo da dove cominciare e ora ho tutto sotto controllo
Lisa -
Sono rimasta sorpresa dalla varietà di metodi disponibili per disabilitare la tastiera! Ne proverò sicuramente alcuni!
Roberto -
Non posso credere che ci sia un modo per disabilitare permanentemente la tastiera! Ho sempre pensato fosse impossibile. Grazie
Cecilia -
Alcuni di voi hanno provato a usare il metodo del registro di sistema? Non sono sicura se sia sicuro
Claudio -
Ho condiviso questo articolo con i miei amici! Sono sicuro che anche a loro servirà. Ottimo lavoro!
Mary IT -
Incredibile quanto siano utili queste informazioni! Ho finalmente risolto il mio problema. Grazie mille
Rocco -
Perché mai qualcuno vuoi disabilitare la tastiera? Cioè, io sono un fan delle scorciatoie da tastiera e non potrei mai farne a meno!
Martina -
Se mi permettete di chiedere, dove posso trovare ulteriori informazioni sulle app di terze parti? Grazie
Stella -
Una cosa che ho notato, ci sono parti del sistema che potrebbero non funzionare senza la tastiera. Qualcuno ha avuto problemi?
Francesco -
Non mi sarei mai aspettato che fosse così facile disabilitare la tastiera. Ho usato un'app di terze parti ed è stata una passeggiata
Sara -
È possibile riattivare la tastiera in modo semplice dopo averla disabilitata? Ho paura di bloccarmi completamente
Elena -
Ho trovato il post molto ben strutturato e ricco di informazioni utili. Sono sicura che aiuterà molti come me!
Giorgio89 -
Ma chi diavolo ha bisogno di disabilitare la tastiera? Non capisco l'utilità di questa guida
Andrea -
Stavo pensando se disabilitare solo la tastiera del mio laptop fosse un’idea migliore. Qualcuno ha esperienza in merito
Matteo IT -
Quando ho letto di disabilitare la tastiera in modo permanente, ho pensato che fosse un'idea pazzesca! Chissà se ci sono conseguenze
Chiara -
Avete qualche suggerimento su quali app di terze parti utilizzare? Non sono molto a mio agio con le installazioni esterne
Lisa Miao -
Ho provato a disabilitare la tastiera utilizzando le impostazioni, ma non funziona. Qualcuno ha qualche consiglio
Sofia -
Alcuni di voi hanno provato a riabilitare la tastiera dopo averla disabilitata? Volevo sapere se ci sono problemi!
Luca -
Grazie per i dettagli su come usare le app di terze parti! Ho sempre avuto paura di installarle, ma ora mi sento più sicuro
Alessia -
Ottimo articolo! Ho seguito i passaggi e adesso la tastiera non mi dà più problemi. Siete fantastici!
Giovanni -
Ho trovato molto utile l’approccio temporaneo per disabilitare la tastiera! Grazie per aver condiviso questo consiglio
Simone -
Chissà se ci sono anche metodi alternativi per disattivare la tastiera. Qualcuno ha informazioni al riguardo?
Adriano -
Ho testato alcuni dei suggerimenti e sono stati fantastici! Questo articolo merita un applauso
Ginevra -
Bell'articolo, ma vorrei approfondire come si possono usare altre app di terze parti. Se qualcuno può consigliarmi, sarebbe fantastico
Filippo -
Wow! Ho risolto il mio problema seguendo questo articolo e ora sono senza parole! Grazie per la condivisione!
Marco -
Finalmente ho trovato la soluzione per disabilitare la tastiera! Grazie per questo post, mi ha salvato
Giulia -
Mi sono divertita a leggere questo post! Ho finalmente trovato una soluzione semplice ai miei problemi con la tastiera