Windows 11 sta lentamente guadagnando una cattiva reputazione tra le persone per le prestazioni insufficienti rispetto al suo predecessore. In primo luogo, c'erano i nuovi requisiti per Secure Boot e TPM 2.0, poi le prestazioni ridotte durante i giochi e ora diversi utenti stanno affrontando problemi con le loro schede di rete, in particolare la linea Killer Wireless di Intel.
Se anche tu hai riscontrato problemi con il driver o non riesci a far funzionare la tua scheda Killer Wireless, ecco tutto ciò che devi sapere al riguardo.
Contenuti
Cos'è Killer Wireless 1535?
Sviluppata da Rivet Technologies e successivamente acquistata da Intel, Killer Wireless 1535 è una WLAN o una scheda di rete sviluppata per i sistemi orientati al gioco. L'elenco di schede Killer Wireless vanta un lungo elenco di funzionalità tra cui Bluetooth 4.1 e supporto dual-band sia per 2,4 GHz che per 5 GHz.
Basato su un chip Qualcomm, il Killer Wireless mette in mostra la tecnologia ExtremeRange per ottenere un'ampia gamma di connessioni, perdita di pacchetti minima e latenza ridotta al minimo durante i giochi multiplayer.
Perché Killer Wireless sta causando problemi di driver sul mio PC?
I problemi con Killer Wireless non sono nuovi. Negli ultimi anni ha causato problemi a più utenti su Windows 10 e il passaggio a Windows 11 sembra aver peggiorato le cose. Secondo il sito Web Killer Wireless, i loro driver non supportavano Windows 11 quando è stato lanciato, il che ha causato problemi di driver per molti utenti che sono passati a Windows 11.
La serie ha anche affrontato un supporto limitato una volta che è stata acquistata da Intel e le pagine di supporto iniziali che dettagliavano le correzioni sono state rimosse del tutto dal sito.
Microsoft ha anche affermato che potrebbe essere causato da un bug di rete su Windows 11 che ha interessato UDP. Driver obsoleti e l'assenza di patch di compatibilità tra il software Killer Wireless e Windows 11 potrebbero aver causato gravi problemi di driver.
Come risolvere i problemi con il driver Killer Wireless 1535
Ecco un elenco di correzioni note per risolvere i problemi del driver Killer Wireless 1535 sulla maggior parte dei sistemi. Ti consigliamo di iniziare con le prime correzioni note e di spostarti nell'elenco finché non riesci a far funzionare nuovamente il Wi-Fi sul tuo dispositivo. Iniziamo.
Metodo n. 01: disabilitare la priorità
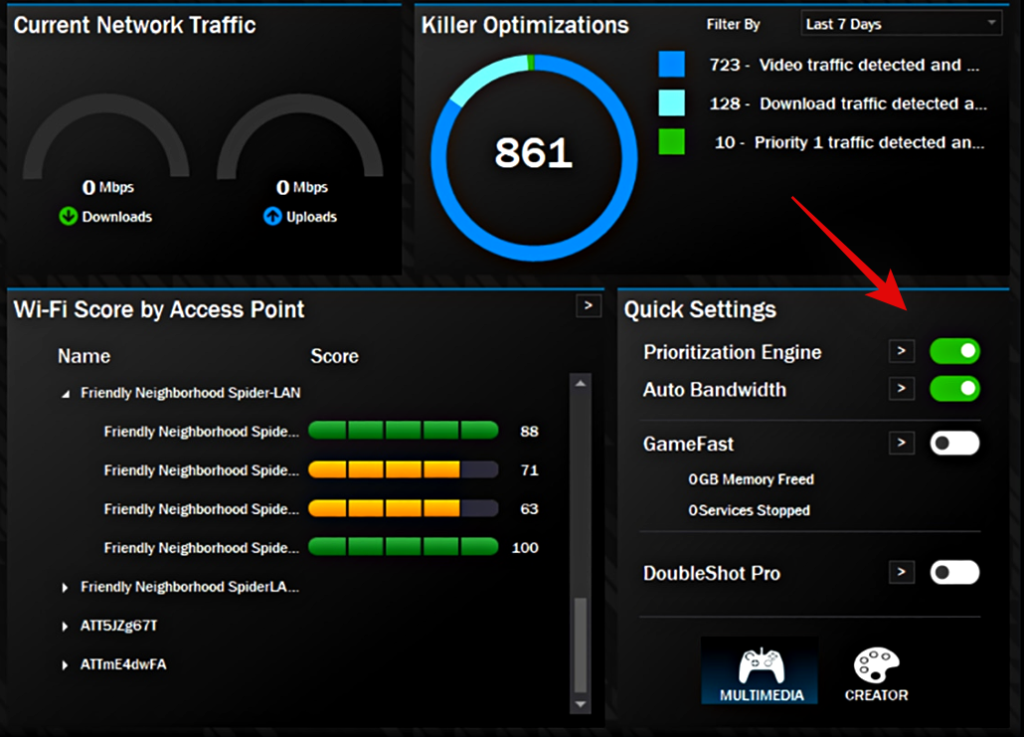
Se riesci ad accedere al Killer Wireless Control Center, questa è la soluzione consigliata per te. La prioritizzazione Wi-Fi è una funzionalità del Killer Wireless Control Center che utilizza il motore di prioritizzazione di Intel per identificare le richieste di rete in corso e assegnarle la priorità in base alle esigenze e ai requisiti attuali. Questo aiuta la tua scheda di rete a soddisfare automaticamente le tue esigenze di connessione di gioco multiplayer prima e ad affrontare le attività di rete in background in seguito.
Tuttavia, questo motore di prioritizzazione fa più male che bene. Con driver obsoleti e supporto limitato, la maggior parte delle schede di rete Killer sembra avere problemi con questa funzione su Windows 11. Pertanto, ti consigliamo di disabilitare lo stesso e riavviare il sistema al più presto. Se hai un laptop da gioco acquistato alcuni anni fa, questa è probabilmente la causa dei problemi con il driver wireless.
Avvia il Killer Wireless Control Center e disattiva semplicemente l'interruttore per "Motore di priorità" nel widget Impostazioni rapide. Puoi anche disattivare lo stesso facendo clic su Motore di priorità in alto. Una volta spento, riavvia il sistema e il Wi-Fi dovrebbe essere di nuovo attivo e funzionante sul tuo sistema.
Metodo #02: seleziona manualmente un driver diverso per la tua scheda di rete
Questa è la prossima soluzione consigliata, specialmente se stai riscontrando problemi con il driver con il tuo Killer Wireless Network Adapter con il driver in errore in Gestione dispositivi. Microsoft di solito cerca i suoi utenti e ha funzionalità integrate che possono aiutarti a ripristinare le modifiche che potrebbero interrompere le funzionalità del tuo sistema.
Questo è uno dei motivi per cui non solo puoi eseguire il rollback degli aggiornamenti dei driver, ma anche selezionare un driver diverso quando si tratta di componenti come l'adattatore di rete e l'adattatore Bluetooth. Usa la guida qui sotto per selezionare manualmente un driver diverso per il tuo adattatore Killer Wireless Network. Iniziamo.
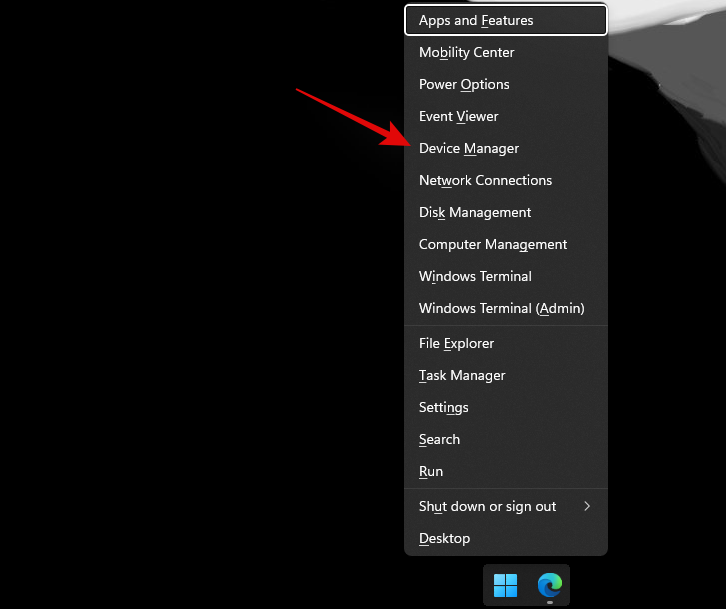
Premi Windows + X
sulla tastiera e seleziona "Gestione dispositivi".
Trova il tuo adattatore di rete wireless Killer in "Schede di rete" e fai clic e selezionalo. Premi Alt + Enter
sulla tastiera per aprire la finestra Proprietà.
Passa alla scheda "Driver" facendo clic sulla stessa in alto.
Ora fai clic su "Aggiorna driver".
Fare clic su "Cerca i driver nel mio computer".
Ora fai clic su "Fammi scegliere da un elenco di driver disponibili sul mio computer".
Fare clic e selezionare un nuovo driver dall'elenco. Ti consigliamo vivamente di provare i driver Qualcomm in quanto sembrano risolvere i problemi Wi-Fi sulla maggior parte dei sistemi. Tuttavia, puoi provarli tutti finché non trovi quello che funziona meglio per te.
Fare clic su "Avanti" una volta terminato.
Fare clic su "Chiudi" una volta terminato.
Ora ti verrà chiesto di riavviare il sistema, fai clic su "Sì" per riavviare il PC.
Una volta riavviato il PC, prova a connetterti nuovamente a una rete. Nella maggior parte dei casi, il tuo adattatore di rete wireless Killer dovrebbe ora essere di nuovo attivo e funzionante come previsto sul tuo sistema.
Metodo #03: Aggiorna Windows
A questo punto, ti consigliamo di provare ad aggiornare Windows 11 agli ultimi aggiornamenti di Cumilitavie che apportano correzioni ufficiali da Microsoft per risolvere i problemi del driver Killer Wireless sulla maggior parte dei sistemi. Utilizzare la guida di seguito a seconda della configurazione corrente.
Nella versione stabile di Windows 11
Quando Microsoft ha riscontrato segnalazioni di più utenti che hanno riscontrato problemi con Killer Wireless su Windows 11, ha iniziato a distribuire una correzione tramite aggiornamenti cumulativi. Microsoft ha affermato che potrebbe essere causato da un bug che colpisce i pacchetti UDP e provoca la limitazione di Internet.
Ti consigliamo di controllare e scaricare eventuali aggiornamenti disponibili per il tuo PC e assicurarti di eseguire l'aggiornamento cumulativo di Windows 11 vKB5006674 o successivo.
Sul canale Insider per sviluppatori di Windows 11
Se sei un Windows Insider, ti consigliamo di aggiornare Windows 11 alla versione Developer vKB5008918 + USP-721.1116.211.0 o successiva. Questa è l'ultima correzione rilasciata da Microsoft che sembra correggere il noto bug di rete che interessa le connessioni UDP.
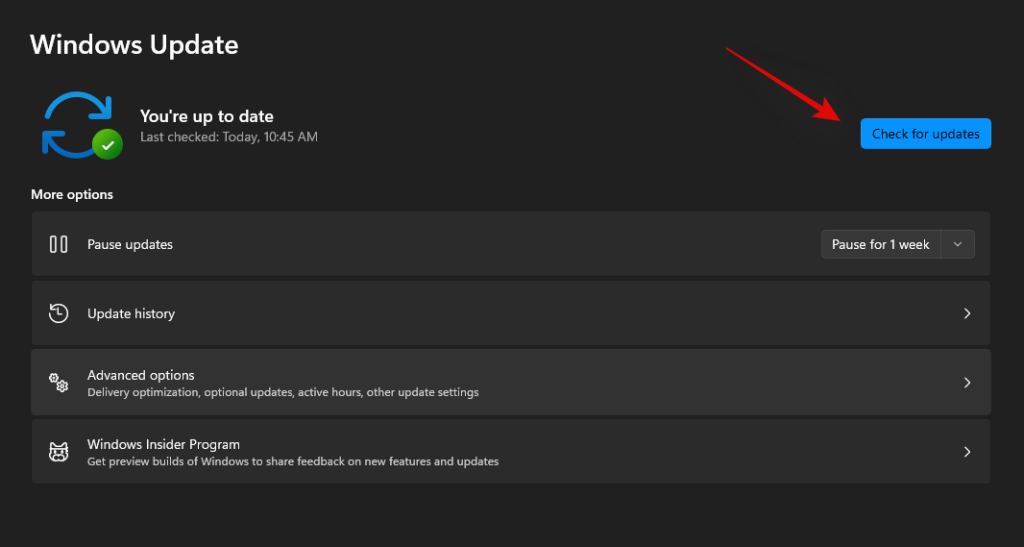
Basta andare su Impostazioni> Windows Update> Verifica aggiornamenti per aggiornare Windows 11 all'ultima versione disponibile.
Nota: se non aggiorni il tuo sistema da un po' di tempo, potresti dover installare alcuni aggiornamenti incrementali prima e poi aggiornare di nuovo per ottenere l'ultima versione di Windows 11 in esecuzione sul tuo sistema.
Metodo n. 04: aggiorna manualmente i driver wireless
La soluzione più ovvia per risolvere un problema di driver è semplicemente aggiornare i driver, quindi segui i passaggi seguenti e verifica se risolve il problema per te.
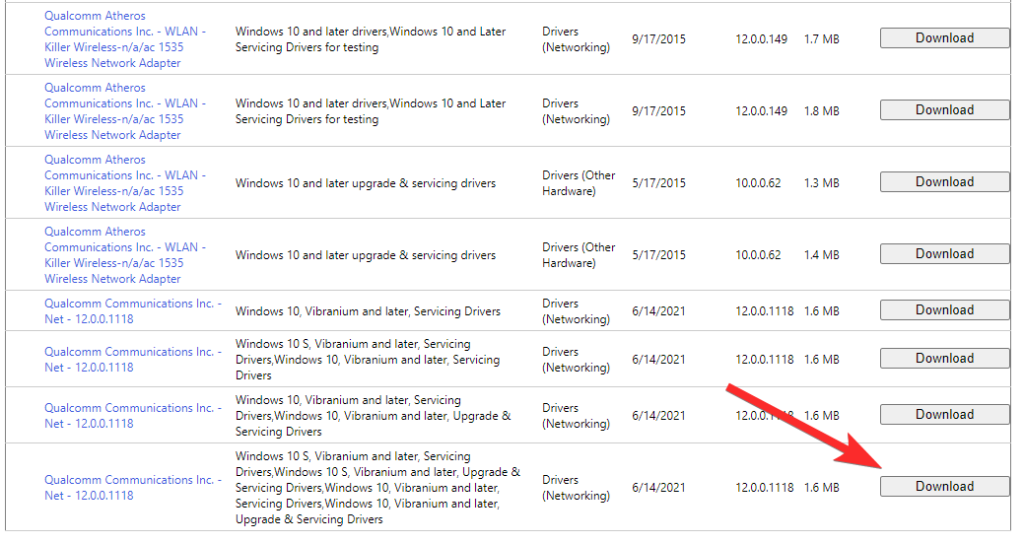
Scarica gli ultimi driver Qualcomm da questo link .
Premere Windows + R
per aprire la finestra di dialogo Esegui.
Digita il comando seguente nella casella Esegui, quindi premi il tasto Invio o premi OK.
devmgmt.msc
Fai clic sull'adattatore wireless Killer e premi Alt + Enter
sulla tastiera.
Fare clic su e passare alla scheda "Driver" in alto, quindi fare clic su "Aggiorna driver".
Scegli l'opzione per cercare manualmente i driver.
Seleziona i driver Qualcomm dall'elenco e completa l'installazione.
Metodo #05: aggiorna automaticamente i driver wireless
Puoi anche aggiornare automaticamente i driver della tua scheda di rete wireless utilizzando la guida di seguito. Questo non è il modo consigliato per gli utenti con sistemi e laptop precostruiti in quanto tali unità richiedono ulteriori modifiche ai loro driver per essere compatibili con l'unità. Tuttavia, se l'aggiornamento manuale dei driver utilizzando la guida sopra non ha risolto il problema, ti consigliamo di utilizzare uno degli strumenti di seguito.
Avvertimento: Ti consigliamo vivamente di utilizzare software di terze parti per ottenere gli aggiornamenti dei driver come ultima risorsa. I software di terze parti di solito hanno politiche sulla privacy discutibili e, sebbene lo strumento collegato di seguito sia open source, puoi comunque finire per installare driver incompatibili a causa di componenti erroneamente identificati che possono danneggiare seriamente il tuo sistema e, nei casi peggiori, bloccare del tutto la tua scheda di rete.
5.2 Utilizzo di Intel Driver & Support Assistant
Visita il link sopra e fai clic su "Scarica ora". Salva il file scaricato in una posizione comoda.
Avvia il file .exe che abbiamo scaricato nel passaggio precedente e fai clic su "Esegui" quando richiesto.
Accetta i termini e le condizioni della licenza e fai clic su "Installa".
Ti verrà ora chiesto di accedere al programma di miglioramento del prodotto di Intel. Ciò consente a Intel di raccogliere ulteriori informazioni anonime dal sistema per migliorare i propri prodotti. Questo è un passaggio completamente facoltativo e quindi ti consigliamo di fare clic su "Rifiuta". Tuttavia, puoi scegliere di accedere a questo programma facendo clic su "Accetta".
Il programma di installazione ora scaricherà e installerà tutti i file necessari sul tuo sistema. Al termine, fai clic su "Riavvia" per riavviare il sistema. Assicurati di salvare tutti i documenti aperti e altri dati che potrebbero essere importanti per te.
Una volta riavviato il sistema, avvia "Intel Driver & Support Assistant" dal menu Start.
Verrai ora reindirizzato automaticamente a una pagina Web in cui puoi vedere gli aggiornamenti dei driver compatibili attualmente disponibili per il tuo sistema. Cerca gli aggiornamenti delle schede wireless e di rete disponibili per il tuo PC e fai clic su "Download" accanto.
L'aggiornamento inizierà ora a essere scaricato e dovrebbe essere installato automaticamente sul tuo sistema. Una volta installato, ti verrà chiesto di riavviare il sistema. Conferma le modifiche e riavvia il sistema al più presto.
The latest update for Windows 11 Killer Wireless Network adapter should now have fixed your Wi-Fi issues after a restart.
5.2 Using a third-party software
Windows update provides automatic updates for your drivers, but it won’t always provide you with the updates that you need. Users often make use of third-party software to get automatic updates for the drivers on their PC/Laptop. Follow the guide below to get you started.
Visit the link above and click on ‘Download Latest Version’.
A .zip file will now be downloaded to your local storage. Download it to a convenient location and extract the archive using your preferred utility. Once extracted, double click and launch the x64 .exe file.
Note: If you have a 32-bit system then you can use the other .exe file instead.
Accept the license agreement by clicking on the same.
Note: Allow the program to access your network in case you are prompted. This will be used to download the latest drivers currently available for your system.
Now click on ‘Updates are available: SDI NNNNN and NN driverpacks’ at the top.
You will now be shown a list of all the currently known driver updates available for your system. Click on ‘Check only needed for this PC’.
The tool will now automatically detect your components and select the appropriate driver updates for your system. Once selected, look for any Network Adapter-related updates checked in the list. In case any are found, uncheck all the rest of the selections and click on ‘Ok’ at the bottom.
SDI will now automatically download and install the selected drivers on your PC. Once done, close the program, and restart your PC.
If incompatible drivers or missing drivers were the cause of your issue then this should help fix your Killer Wireless Network card. You can now connect to a network and continue using the internet as usual on your system.
Method #06: Disable Killer Wireless Control Center from Task Manager
Make a right-click on the taskbar to open a context menu.
Launch Task Manager by clicking Task Manager from the list.
Click on Startup from the top bar.
Look for Killer Wireless and make a right-click on it.
Disable it by clicking Disable.
Follow the same process to disable any other Killer Wireless driver or software.
Last Resorts
If by this point you are still facing Network card issues then it could be a hardware-related issue on your system. We recommend you use the following two options in case you are desperate to connect to a network on your system. Let’s get started.
Method #07: Use Ethernet Cable to connect to the Internet
We are sorry if none of the above-mentioned steps worked for you, but rest assured we still have a last resort to help you get back on the internet. Though it may not seem very convenient, you can get the same speed out of your router if you are ready to go old school.
Yes, we are talking about Ethernet cables. You can easily connect your computer with your router via an Ethernet cable and get good internet speed without any hassle. Being a simple wired connection, it won’t have any dependency on the Killer Wireless Drivers and will provide you with the best possible speed without any throttling.
Method #08: Force Remove and Reinstall your drivers
Windows tends to hold and keep basic .inf files for components hidden in the background even if you uninstall them from the device manager. These driver files are used to provide basic functionality when you have no driver files installed or available for your system.
However, if you haven’t cleared your Driver Store in a while then you could have multiple Killer Wireless network adapter drivers on your system which could be conflicting in the background. As a last resort, we will now force remove them from your system, reset the CMOS battery and then install the latest Killer Wireless Network Adapter drivers currently available for your system. Follow the guide below to get you started.
What you need
You will need to make sure that your PC meets the following criteria before proceeding with the guide below as you will use the ability to connect to a wireless network once we force remove all drivers from your system.
- An Ethernet connection: This is the recommended option in case you have a LAN cable lying around. This way you can use the internet to get the latest available network drivers for your system.
- Latest Driver files for your Killer Wireless Network Adapter: You will need offline driver files and installation packages for your system if you do not have an Ethernet cable. We recommend you download the same from your OEM beforehand before proceeding with this guide.
- DriverStoreExplorer: This is a community-built tool that allows you to force remove .inf files from your system. We will be using this to remove all your network adapter drivers.
Force Remove Drivers
Visit the link above and download the latest archive for DriverStoreExplorer linked on the page.
Once downloaded, extract the archive and launch ‘Rapr.exe’ as an administrator.
The tool will take a few moments to scan your driver store and then show all the drivers installed on your current Windows setup. Click on ‘Driver Class’ column at the top to sort your drivers by their class.
Now look for ‘Network adapters’ in this list and check the box for each driver that you find.
Warning: Ensure that you are only selecting drivers that you wish to remove. DriverStoreExplorer is quite a thorough tool that manages to bypass most failsafes when removing drivers, hence if you end up removing the wrong drivers then you can face serious hardware failure issues with your system.
Check the box for ‘Force Deletion’ on your right.
Subsequently click on ‘Delete Driver(s)’.
Click on ‘Ok’ to confirm your choice. The selected drivers will now be deleted from your PC. Once done, close the app and turn off your system at the earliest.
Reset CMOS Battery
We now recommend you reset your CMOS battery. This is a recommended step that requires you to open up your PC or laptop to reset the CMOS battery. As this is an advanced step and you are hesitant to open up your PC then you can skip it and continue with reinstalling your drivers using the guide below.
A CMOS reset helps reset your system components as well as drain capacitors that could be malfunctioning on your board. A CMOS reset will help your network adapter get a fresh start which when combined with a fresh driver update should help get everything working again. Use this comprehensive guide by us to reset your CMOS battery.
Reinstall latest drivers
Now it’s a matter of simply installing your latest Killer Wi-Fi drivers. If you have an installer package then simply double click the file and follow the on-screen instructions from your OEM to install the latest drivers on your system. However, if you have .inf files then you can use the guide below to manually install your drivers.
Press Windows + X
on your system and click on ‘Device Manager’.
Click on ‘Add drivers’ at the top.
Click on ‘Browse’ and select the folder on your local storage containing your .inf files.
Once selected, click on ‘Next’.
The .inf files will now be installed on your system. Once done, click on ‘Close’.
We now recommend you restart your system for the changes to take effect. Once restarted, try connecting to a wireless network. If everything is working as intended then we recommend you skip the optional section below. However, certain network adapters need you to select a different driver depending on your manufacturer. Use the guide below to help you with this process.
Manually select your driver (optional)
If you wish to manually select a different driver then we recommend you use the guide at the top of this post. Multiple drivers for the same network adapter can exist depending on its components, specifications, and skew. Selecting a different one will help you fix driver conflicts and help you get everything back up and running on your system.
FAQs
With so much to do and fix, you are bound to have a few questions. Here are some commonly asked ones, to help get you up to speed with the latest developments.
Killer Wireless won’t work on Windows 11. Can I fix it by switching back to Windows 10?
Yes, you should be able to fix it by switching back to Windows 10. But you should try the solutions mentioned above and see if it fixes the problem. If your problems are fixed, then you won’t need to go through the pain of downgrading back to Windows 10 and would be able to enjoy the fresh feel and latest features of Windows 11.
Is it safe to change network cards to fix Killer Wireless issues?
Yes, it is safe to change the network card to fix Killer Wireless issues. But make note that opening your PC or Laptop on your own can void its warranty and wrong handling of the components can give you a minor to major level shock and could also damage your PC/Laptop. It is always advised to get any such components replaced by trained professionals.
Would uninstalling all Killer drivers fix the slow internet speed?
Yes, uninstalling the Killer Drivers might reset your internet speed. But this will be a temporary fix, cause Windows will anyway install the drivers to make the services function correctly. Rather than uninstalling, you can disable the drivers from launching by following the steps mentioned in the guide above.
Speriamo che questo post ti abbia aiutato a risolvere i problemi del driver wireless Killer sul tuo sistema. Se hai suggerimenti, sentiti libero di scriverli nella sezione commenti qui sotto.
IMPARENTATO: