Instagram의 귀하의 계정에서 자동 동작이 감지되었습니다 경고에 대한 상위 6가지 수정 사항

Instagram을 사용하는 동안 귀하의 계정에서 자동화된 동작이 감지되었습니다.라는 경고가 표시되면, 다음은 유용한 수정 사항과 팁입니다.

Windows 작업 표시줄은 Windows 11 출시와 함께 새롭게 개편된 이후 모든 관심의 중심이었습니다. 이제 작업 표시줄을 중앙에 배치하고, 새로운 알림 센터를 사용하고, 정렬을 변경하고, 화면 양쪽에 배치할 수 있습니다. 슬프게도 이 기능의 배포는 몇 달 동안 Windows 11에서 작업 표시줄을 작동시키는 데 어려움을 겪고 있는 점점 더 많은 사용자와 함께 성공하지 못했습니다.
Microsoft는 문제를 인정하고 해결 방법을 발표했으며 현재 수정 작업을 진행하고 있지만 사용자는 여전히 작업 표시줄을 다시 작동시킬 수 없는 것 같습니다. 같은 보트에 있다면 Windows 11에서 작업 표시줄을 백업하고 다시 실행하기 위해 사용 가능한 모든 수정 사항 목록을 작성했습니다. 시작하려면 아래 가이드를 따르세요.
내용물
내 작업 표시줄이 표시되지 않는 이유는 무엇입니까?
Windows 11 작업 표시줄의 기능이 새롭게 바뀌었습니다. 이제 작업 표시줄이 여러 서비스와 시작 메뉴 자체에 의존하여 제대로 작동합니다. Windows 10에서 Windows 11로의 업그레이드 프로세스는 시스템에 설치한 Windows 10 버전과 업데이트하려는 Windows 11 버전에 따라 작업 표시줄을 엉망으로 만드는 것 같습니다.
또한 지난 달에 출시된 최근 Windows Update에서도 일부 사용자에게는 이 문제가 발생하는 것으로 보이며 다른 사용자는 모든 것이 올바르게 설정되었음에도 불구하고 시스템 시간이 일치하지 않아 동일한 문제에 직면하고 있습니다. 작업 표시줄을 수정하는 방법에는 여러 가지가 있으며 아래 수정 사항부터 하나씩 시작하는 것이 좋습니다.
Windows 11에서 작업 표시줄 문제를 해결하는 12가지 방법
아래 방법을 사용하여 Windows 11에서 작업 표시줄 수정을 시작하십시오. 이미 시스템을 다시 시작하려고 시도했다면 첫 번째 방법을 건너뛸 수 있습니다.
수정 #1: PC 다시 시작
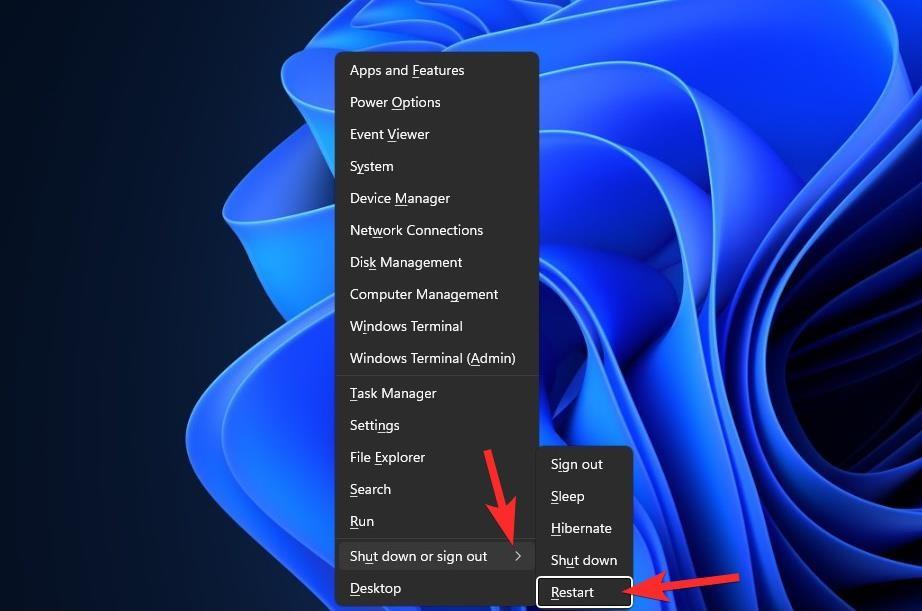
멋진 것을 시도하기 전에 PC 또는 Windows 탐색기를 다시 시작하는 것과 같은 간단한 조치를 시도하는 것이 좋습니다(아래 참조). 그렇게 하면 시스템이 소프트 리셋되어 데이터가 다시 로드되고 작업 표시줄과 시작 메뉴의 문제가 수정될 수 있습니다.
수정 #2: '작업 표시줄 자동 숨기기'가 비활성화되어 있는지 확인
를 눌러 Windows + i키보드와 왼쪽에 '개인 설정'을 클릭합니다.
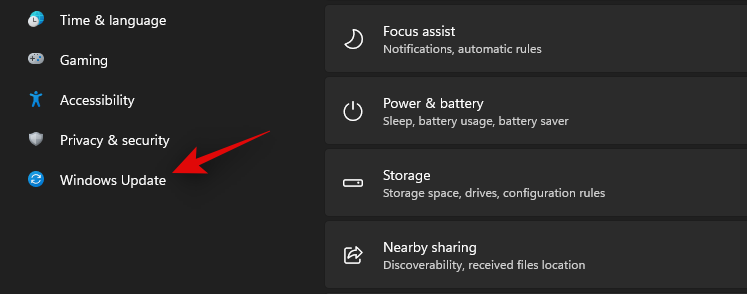
'작업 표시줄'을 클릭합니다.
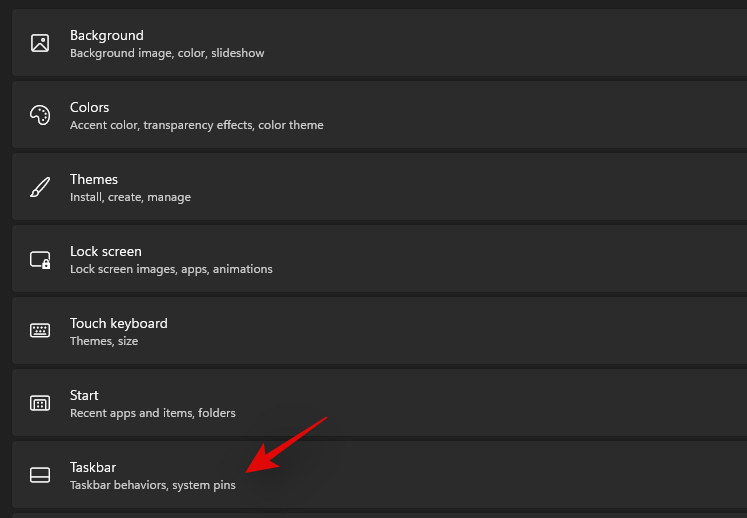
이제 '작업 표시줄 동작'을 클릭합니다.
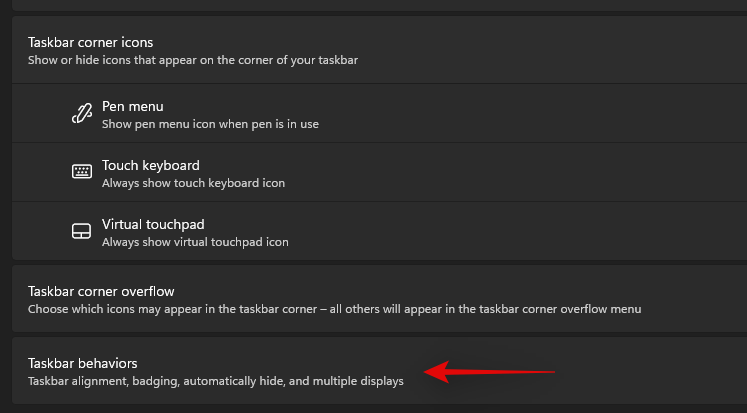
'작업 표시줄 자동 숨기기' 확인란의 선택을 취소합니다.

이제 설정 앱을 닫고 작업 표시줄이 자동으로 숨겨져 있었다면 이제 시스템에서 비활성화되어야 합니다.
수정 #3: 필요한 서비스 다시 시작
앞서 언급했듯이 Windows 11은 작업 표시줄을 개선하여 이제 모든 시스템에서 제대로 작동하기 위해 여러 서비스에 의존하게 되었습니다. 백그라운드 충돌로 인해 시스템에서 작업 표시줄이 제대로 작동하지 않는지 확인하기 위해 이러한 모든 서비스를 다시 시작하겠습니다.
Ctrl + Shift + Esc시스템에서 을 눌러 작업 관리자를 시작합니다. 상단의 '세부정보' 탭으로 전환합니다.
이제 다음 실행 중인 서비스를 찾아 클릭하여 선택합니다. 키보드에서 '삭제'를 누르고 '프로세스 종료'를 선택하여 선택을 확인합니다.
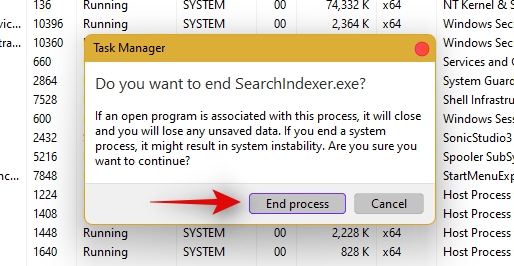
이제 Windows 탐색기를 다시 시작하겠습니다. 왼쪽 상단의 '파일'을 클릭하고 '새 작업 실행'을 선택합니다.
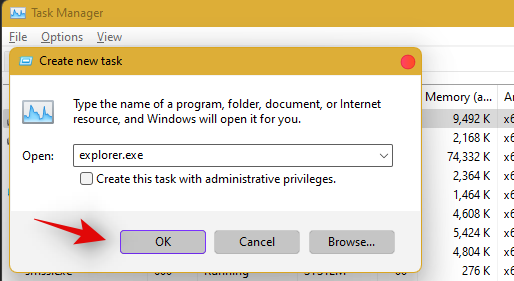
'explorer.exe'를 입력하고 키보드에서 Enter 키를 누릅니다. 필요한 경우 '확인'을 클릭할 수도 있습니다.
탐색기가 다시 시작되면 PC를 다시 시작하여 시스템의 다른 서비스를 다시 시작하십시오.
백그라운드 서비스 충돌이 문제의 원인인 경우 이제 작업 표시줄을 복원해야 합니다.
수정 #4: 레지스트리에서 IrisService를 삭제하고 다시 시작
Ctrl + Shift + Esc작업 관리자를 열려면 누릅니다 . 그런 다음 왼쪽 상단 모서리 에 있는 파일 을 클릭합니다 .
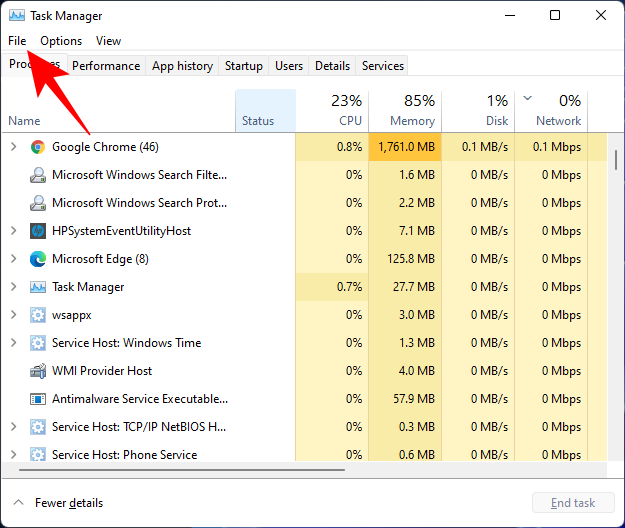
새 작업 실행을 선택합니다 .
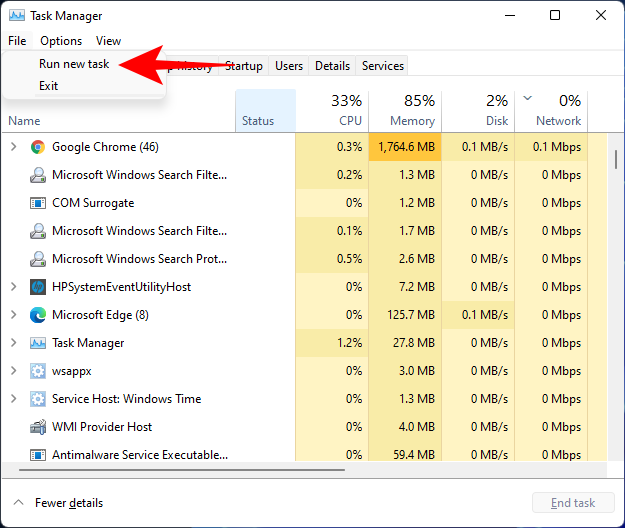
입력 cmd를 입력하고 Enter 키를 누르십시오.
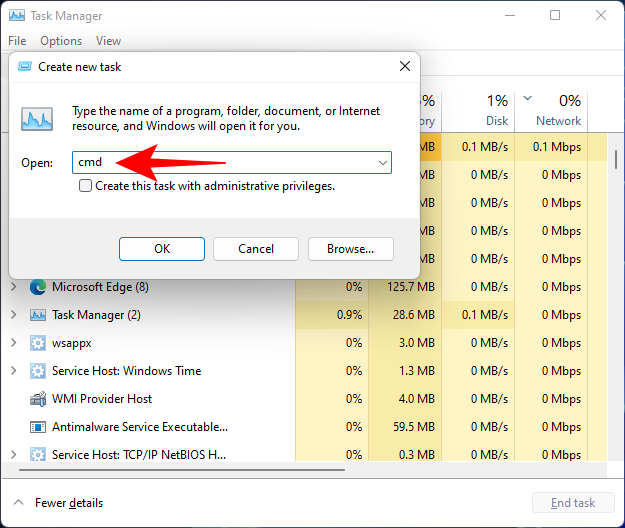
그러면 명령 프롬프트의 상승된 인스턴스가 열립니다. 이제 다음 명령을 복사하여 명령 프롬프트에 붙여넣습니다.
reg delete HKCU\SOFTWARE\Microsoft\Windows\CurrentVersion\IrisService /f && shutdown -r -t 0

그런 다음 Enter 키를 누릅니다. 그렇게 하는 즉시 PC가 재부팅됩니다. 백업이 시작되면 작업 표시줄을 포함하여 모든 것이 정상으로 돌아옵니다.
수정 #5: 레지스트리에 UndockingDisabled 추가
Ctrl + Shift + Esc작업 관리자를 열려면 누릅니다 . 그런 다음 파일 (왼쪽 상단)을 클릭 하고 새 작업 실행 을 클릭합니다 .
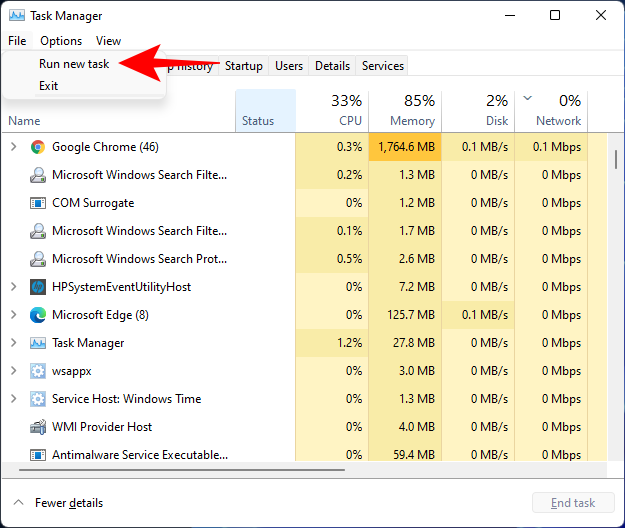
유형 regedit를 하고 인기를 누릅니다.
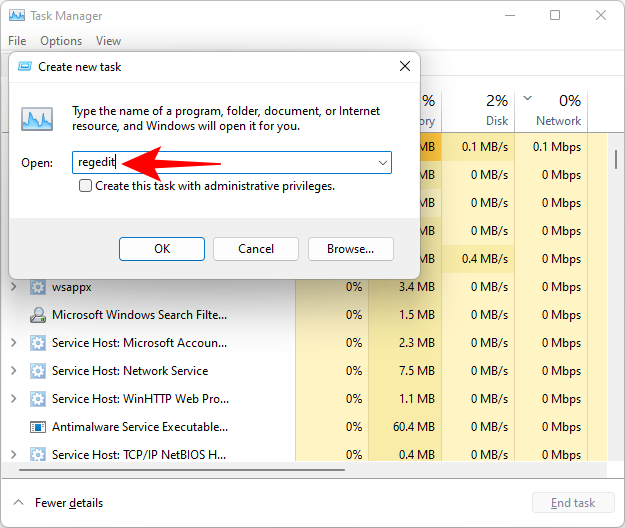
레지스트리 편집기가 열립니다. 이제 다음 주소로 이동합니다.
Computer\HKEY_LOCAL_MACHINE\SOFTWARE\Microsoft\Windows\CurrentVersion\Shell\Update\Packages
또는 위의 내용을 복사하여 다음과 같이 레지스트리 편집기의 주소 표시줄에 붙여넣습니다.

Enter 키를 누르면 지정된 키로 이동합니다. 오른쪽에서 공간을 마우스 오른쪽 버튼으로 클릭하고 새로 만들기 > DWORD(32비트) 값을 선택 합니다.
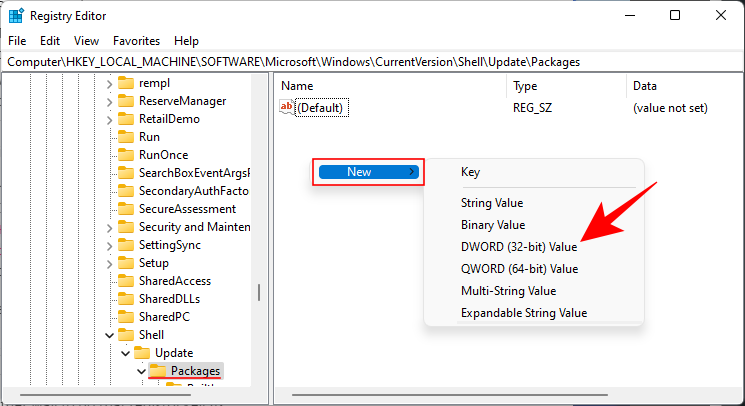
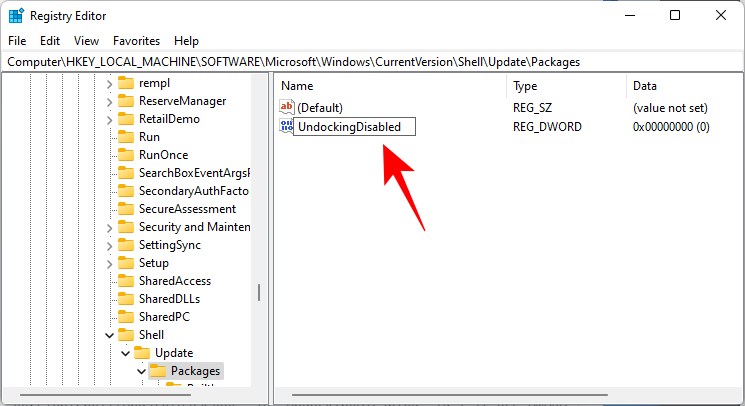
이 새로 생성된 DWORD UndockingDisabled의 이름을 지정합니다 .
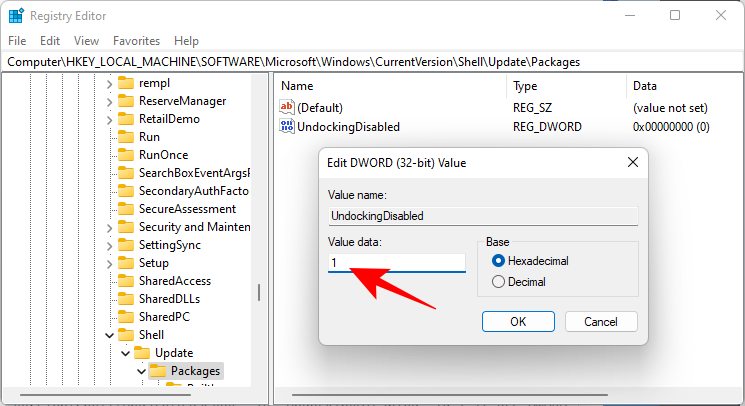
그런 다음 두 번 클릭하고 "값 데이터"를 1 로 변경합니다 . 그런 다음 확인 을 클릭 합니다.
변경 사항을 적용하려면 PC를 다시 시작하십시오.
수정 #6: SFC 및 DISM 명령 실행
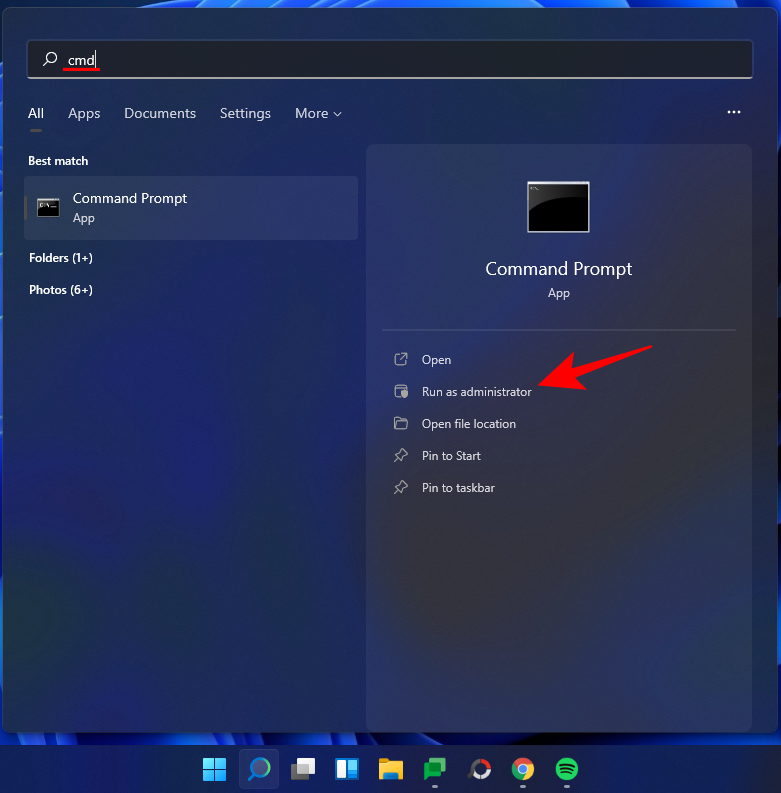
시작을 누르고 cmd 를 입력 한 다음 관리자 권한으로 실행을 클릭합니다 .
이제 다음 명령을 입력합니다.
sfc /scannow
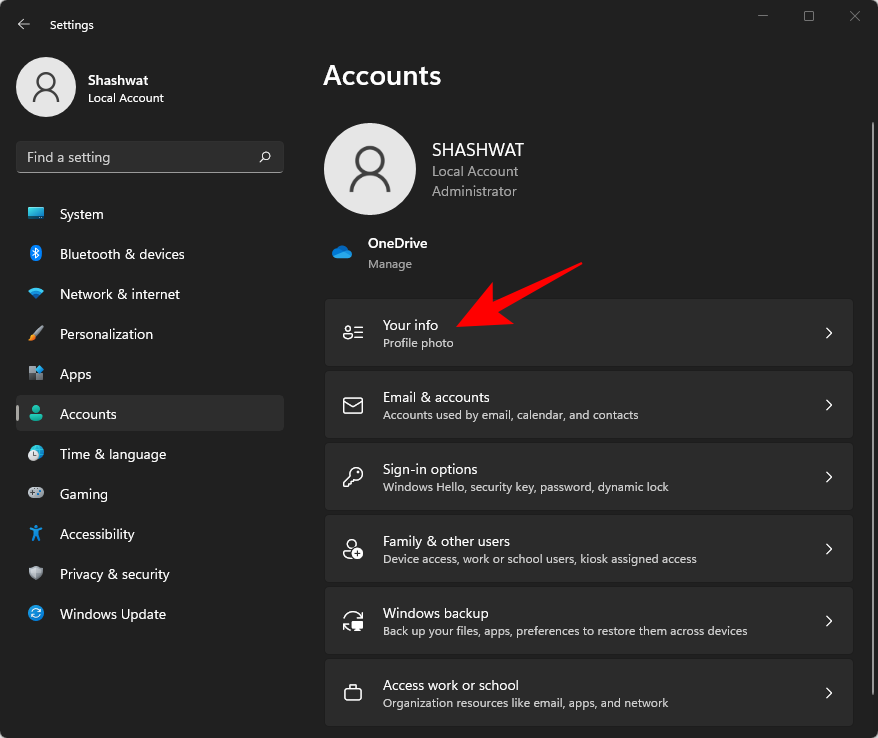
엔터 키를 치시오. SFC가 스캔을 완료하고 발견된 문제를 수정할 때까지 기다리십시오.

다음으로 배포 이미지 서비스 및 관리 도구에 대해 다음 DISM 명령을 실행합니다.
dism /online /cleanup-image /scanhealth
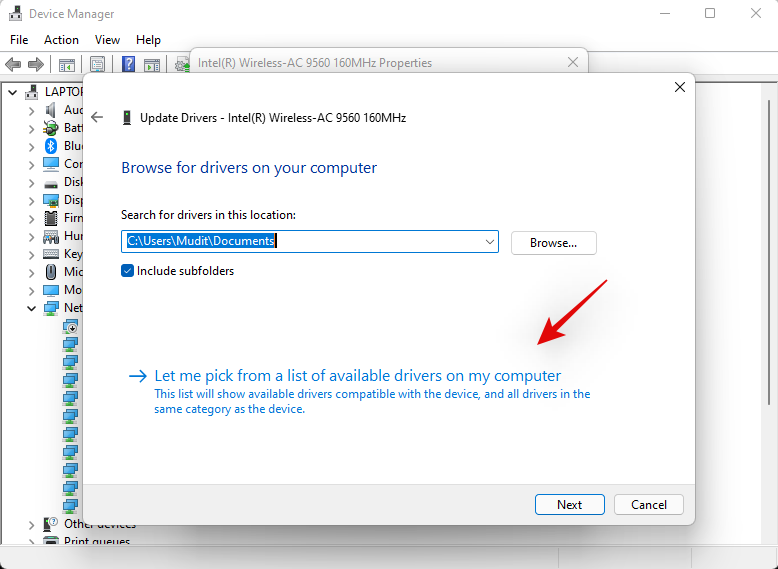
그런 다음 Enter 키를 누릅니다. 다시, 스캔이 완료될 때까지 기다립니다.

이제 다음 DISM 명령을 실행합니다.
dism /online /cleanup-image /restorehealth

엔터 키를 치시오. DISM이 상태를 복원할 때까지 기다립니다.

마지막으로 chkdsk 명령을 실행하여 디스크 검사 유틸리티를 실행합니다.
chkdsk c: /r
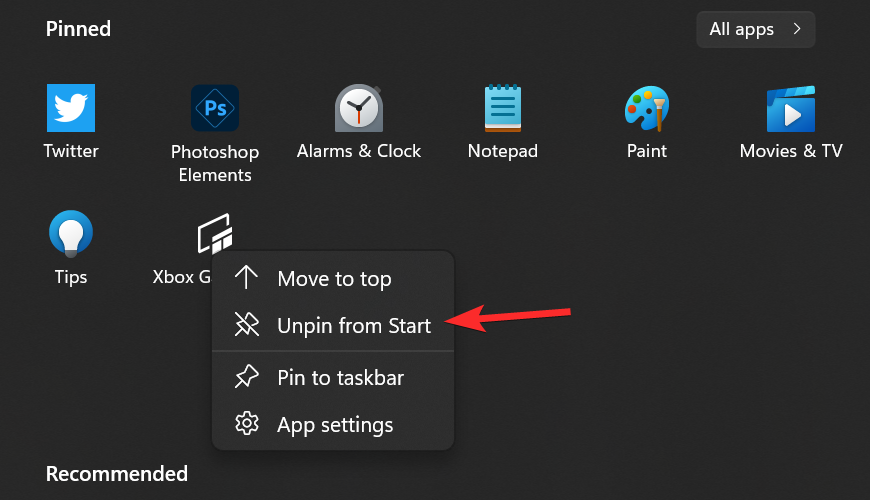
엔터 키를 치시오. 명령 프롬프트는 "현재 드라이브를 잠글 수 없습니다... 다른 프로세스에서 볼륨을 사용 중이기 때문에"라는 메시지를 표시하고 다음 부팅 전에 검사를 예약할 수 있도록 권한을 요청합니다. Y준수할 유형 입니다.

그리고 엔터를 누릅니다. 이제 컴퓨터를 다시 시작하고 디스크 검사 도구가 작업을 수행하도록 하고 작업 표시줄이 정상 작동을 재개했는지 확인합니다.
수정 #7: UWP 재설치
Ctrl + Shift + Esc키보드에서 을 눌러 작업 관리자를 시작합니다. '파일'을 클릭하고 '새 작업 실행'을 선택합니다.
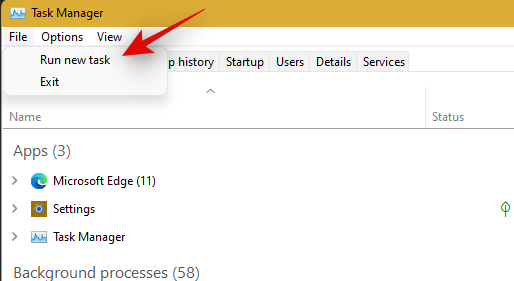
'PowerShell'을 입력하고 Ctrl + Shift + Enter키보드에서 키를 누릅니다 .

이제 PowerShell이 시스템의 관리자로 시작됩니다. 다음 명령을 입력합니다.
Get-AppxPackage -AllUsers | Foreach {Add-AppxPackage -DisableDevelopmentMode -Register “$ ($ _. InstallLocation) \ AppXManifest.xml”}
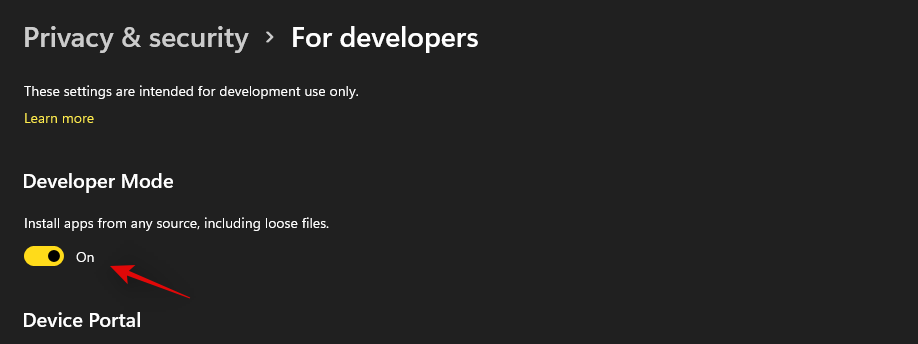
엔터 키를 치시오. PowerShell은 실행 중인 메시지 목록을 빨간색으로 표시합니다. 하지만 걱정하지 마세요. 명령 실행이 완료될 때까지 기다리십시오.

수정 #8: UAC를 확인하고 필요한 경우 레지스트리 편집 추가
UAC는 시작 메뉴 및 작업 표시줄을 포함한 모든 최신 앱 및 기능에 필수입니다. UAC가 비활성화된 경우 먼저 활성화하고 시스템을 다시 시작해야 합니다. 작업 표시줄이 여전히 작동하지 않으면 Xaml 시작 메뉴 값을 레지스트리 편집기에 추가하는 것이 좋습니다.
이 값을 추가하면 대부분의 시스템에서 작업 표시줄이 다시 작동하는 것처럼 보이는 작업 표시줄 서비스를 다시 시작하고 다시 등록하는 것 같습니다. 시작하려면 아래 가이드를 따르세요.
비활성화된 경우 UAC 확인 및 활성화
Ctrl + Shift + Esc키보드에서 을 눌러 작업 관리자를 실행합니다. 이제 화면 왼쪽 상단의 '파일'을 클릭하고 '새 작업 실행'을 선택합니다.

'cmd'를 입력하고 Ctrl + Shift + Enter키보드에서 키를 누릅니다 .
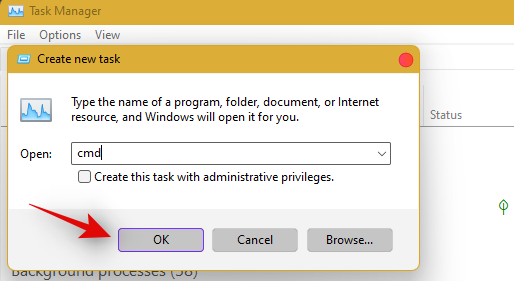
이제 다음 명령을 입력하고 Enter 키를 눌러 명령을 실행합니다.
C:\Windows\System32\cmd.exe /k %windir%\System32\reg.exe ADD HKLM\SOFTWARE\Microsoft\Windows\CurrentVersion\Policies\System /v EnableLUA /t REG_DWORD /d 0 /f
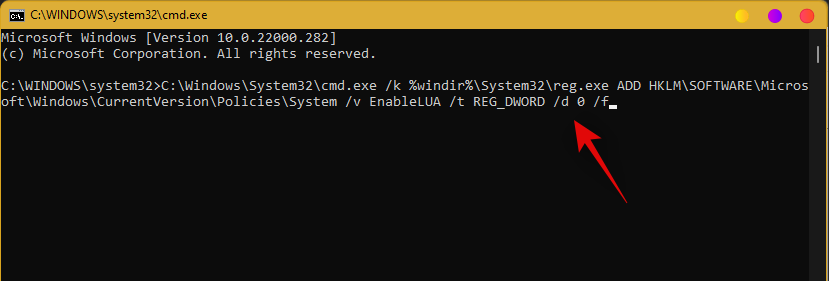
이제 시스템에 대해 UAC가 활성화됩니다. 시스템에 변경 사항을 적용하려면 PC를 다시 시작하십시오. 다시 시작하면 UAC가 문제인 경우 작업 표시줄이 시스템에서 실행 중이어야 합니다. 그렇지 않은 경우 아래 가이드를 사용하여 시스템에서 작업 표시줄의 기능을 트리거하십시오.
레지스트리 값 추가
Ctrl + Shift + Esc작업 관리자를 실행하려면 누릅니다 . 이제 왼쪽 상단의 '파일'을 클릭하고 '새 작업 실행'을 선택합니다.

'cmd'를 입력하고 Ctrl + Shift + Enter키보드에서 키를 누릅니다 .

이제 다음 명령을 입력하고 키보드에서 Enter 키를 누릅니다.
REG ADD "HKCU\Software\Microsoft\Windows\CurrentVersion\Explorer\Advanced" /V EnableXamlStartMenu /T REG_DWORD /D 1 /F
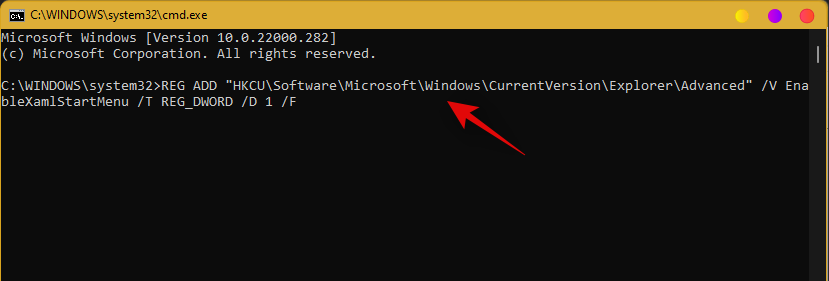
지금 작업 관리자로 돌아가서 목록에서 Windows 탐색기를 찾아 마우스 오른쪽 버튼으로 클릭합니다. 다시 시작을 선택하여 explorer.exe를 다시 시작하십시오.
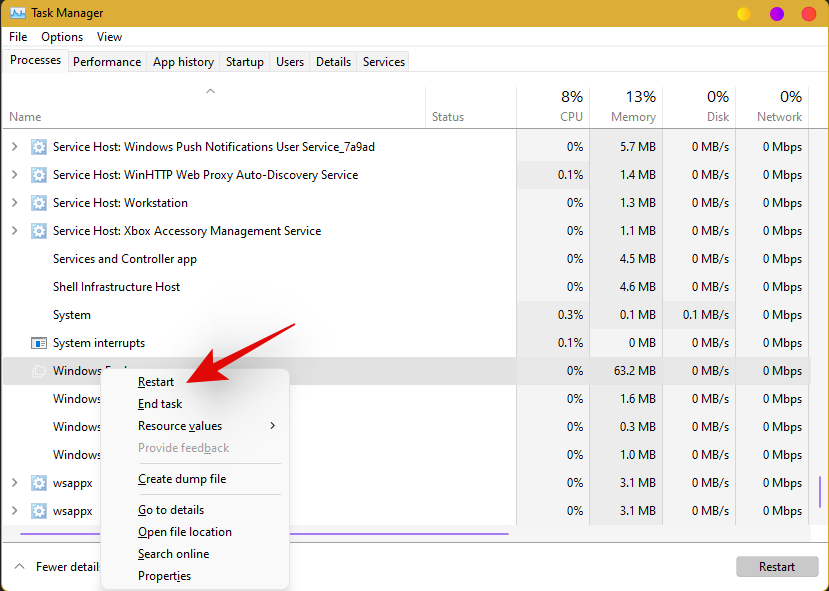
다시 시작되면 작업 표시줄에 액세스해 봅니다. 이제 시스템에서 작업 표시줄을 사용할 수 있습니다.
수정 #9: 작업 표시줄을 수정하기 위해 날짜 및 시간 편집
날짜 및 시간 설정은 Windows 11의 작업 표시줄 문제의 주요 원인인 것 같습니다. 아래 가이드를 사용하여 다음 시간 수정을 시도하여 어떤 수정이 가장 적합한지 확인하십시오.
시간이 시간 서버와 올바르게 동기화되었는지 확인하십시오.
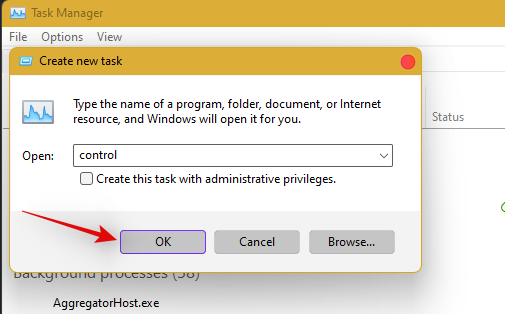
를 눌러 Ctrl + Shift + Esc키보드 및 '파일'을 클릭합니다. '새 작업 실행'을 선택합니다.

'컨트롤'을 입력하고 키보드에서 Enter 키를 누르십시오.
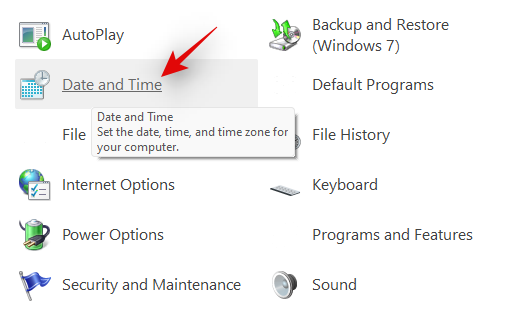
'날짜 및 시간'을 클릭합니다.
상단에서 '인터넷 시간'을 선택합니다.
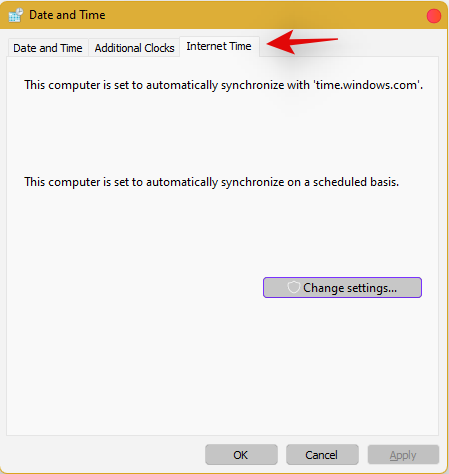
'설정 변경'을 클릭합니다.
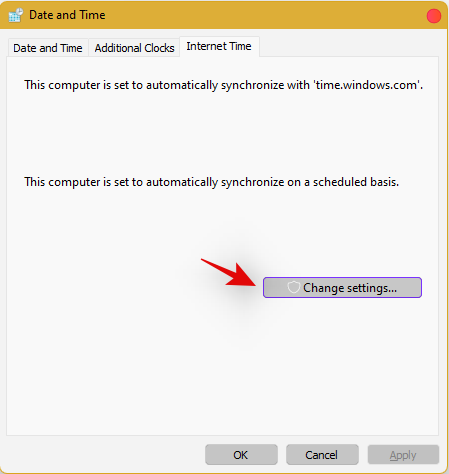
'인터넷 시간 서버와 동기화' 확인란의 선택을 취소합니다.

완료되면 '확인'을 클릭합니다.
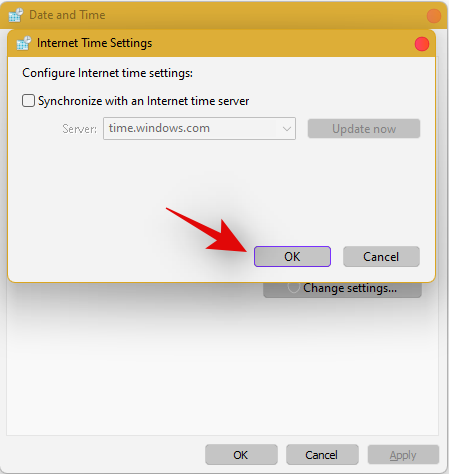
이 시점에서 PC를 다시 시작하고 작업 표시줄을 확인합니다. 여전히 비활성화되어 있으면 초조해하지 말고 위의 단계에 따라 인터넷 시간 서버와 동기화를 다시 활성화하십시오.
활성화되면 Ctrl + Shift + Esc키보드 에서 을 누르고 화면의 목록에서 Windows 탐색기를 찾습니다. 목록을 마우스 오른쪽 버튼으로 클릭하고 '다시 시작'을 선택합니다.

탐색기가 다시 시작되면 작업 표시줄을 사용해 보십시오. 동기화가 문제였다면 이제 시스템에서 수정되어야 합니다. 그렇지 않은 경우 아래에 언급된 다른 시간 수정을 계속하십시오.
날짜를 1일 앞으로 변경
Ctrl + Shift + Esc동시에 눌러 작업 관리자를 엽니다 . 그런 다음 파일 을 클릭합니다 .
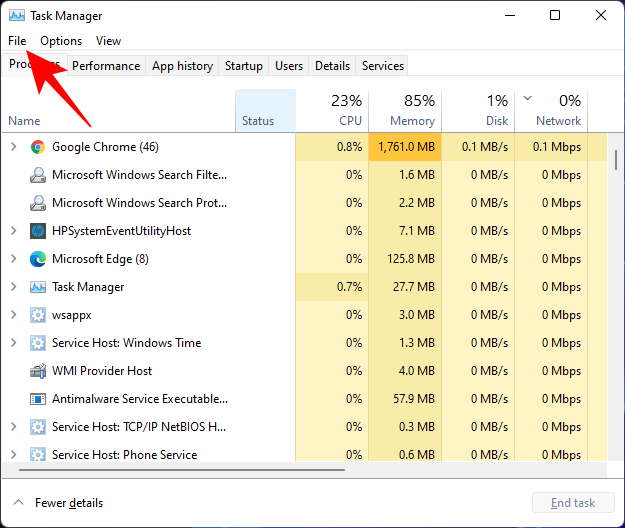
새 작업 실행 을 클릭합니다 .
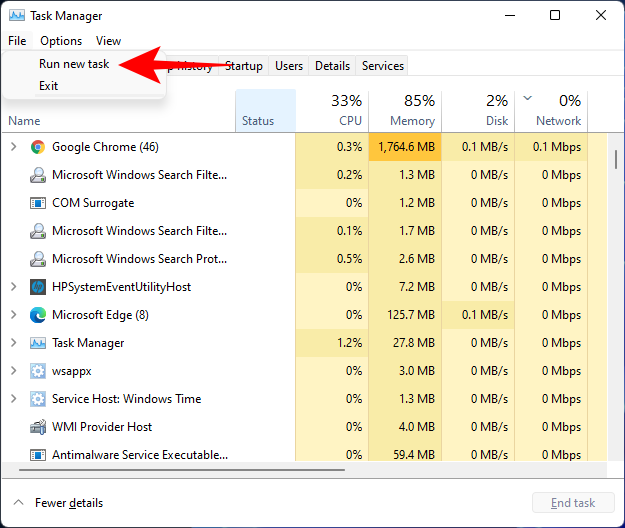
입력 컨트롤 패널 과 히트 입력합니다.
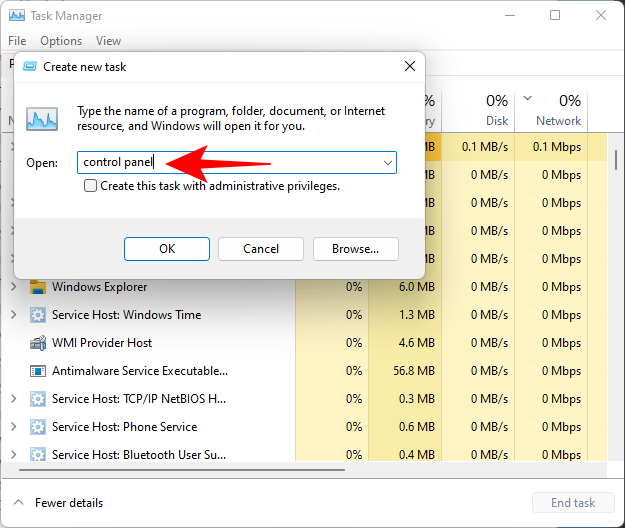
이제 시계 및 지역 을 클릭합니다 .
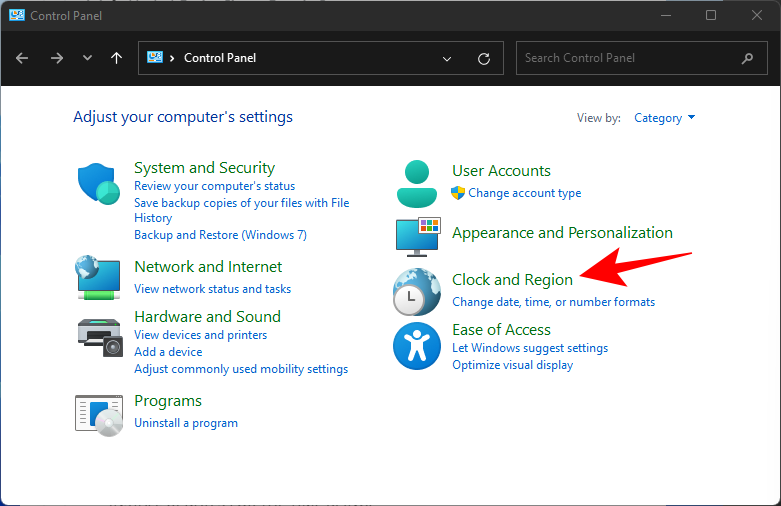
"날짜 및 시간" 에서 시간 및 날짜 설정 을 클릭 합니다 .
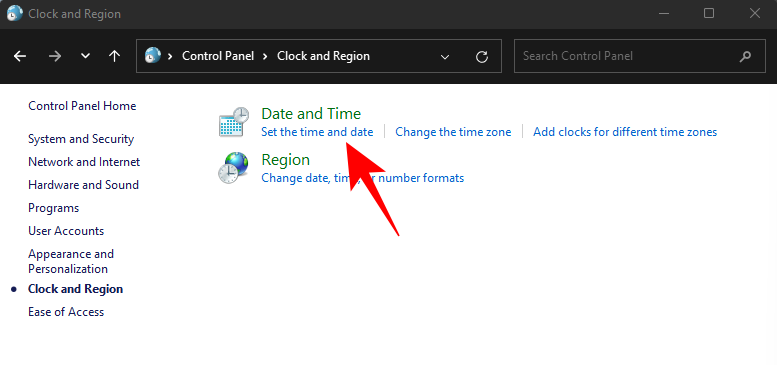
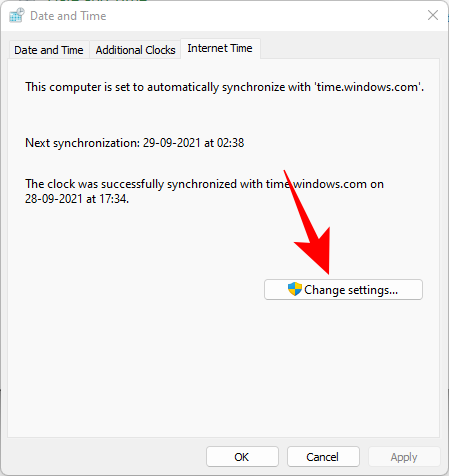
인터넷 시간 탭을 클릭 하여 전환합니다.
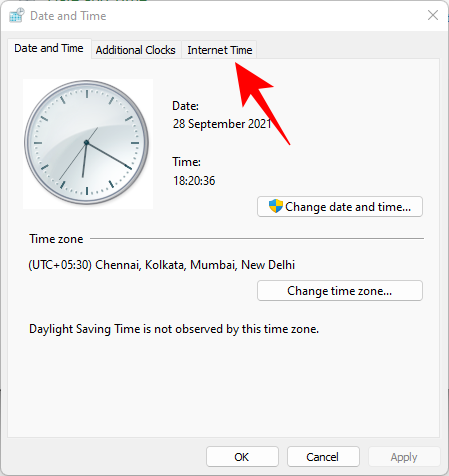
Click on Change settings…
Uncheck Synchronize with an Internet time server, then click OK.
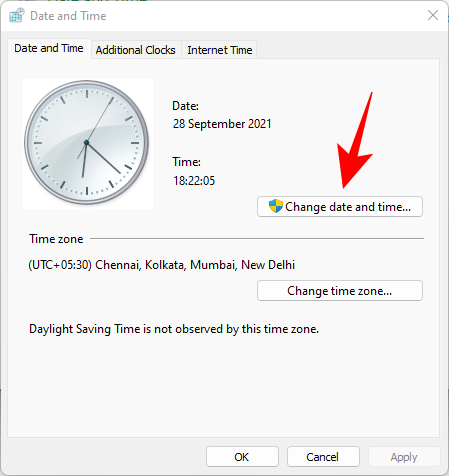
Now click on the Date and Time tab to switch back to it.
Here, click on Change date and time…
Now change the date and time to reflect tomorrow. As of writing this post, it is the 1st November so we will be changing the date to 2nd November.
Change Dates to last cumulative updates
If you are still unable to get the Taskbar working then you will have to jump through a few hoops to change your date and time multiple times and get the taskbar working on your system. Follow the guide below to get you started.
Press Ctrl + Shift + Esc on your keyboard, click on ‘File’ and select ‘Run new task’.

Type in ‘Control’ and press Enter on your keyboard.

Select ‘Date and Time’.

Switch to ‘Internet time’.

Click on ‘Change Settings’.

Uncheck the box for ‘Synchronize with an Internet Time Server’.

Click on ‘Ok’.

Switch back to ‘Date and Time’. Click on ‘Change Date and Time’ and select your date as 2nd September.
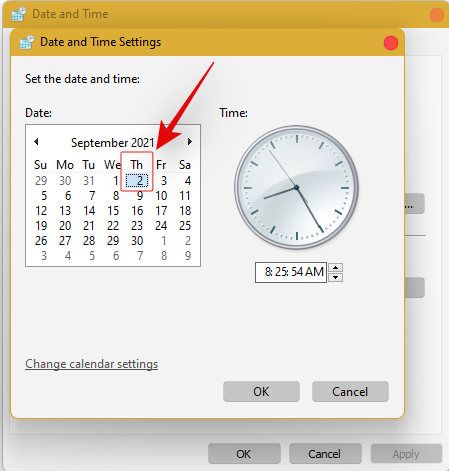
Close all windows and restart your system. Once restarted, open the ‘Date and Time’ dialog box again and change your date to 7th October this time.
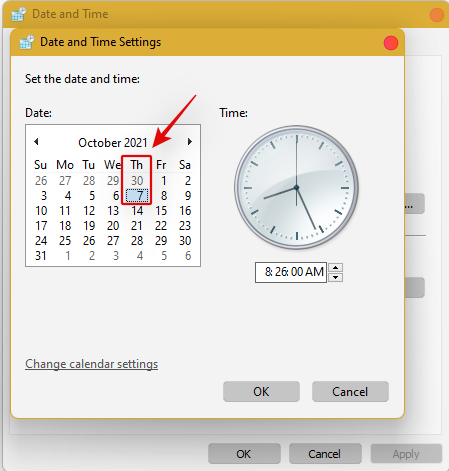
Restart your system again and Taskbar should now be back up and running on your system again. You can now enable synchronization for time again using the steps above on your system.
If synchronizing time does not work, move a month ahead to restore Taskbar
If you are still unable to get Taskbar up and running on your system again you can try the last date change fix. We recommend you use the steps above to change your date and time to a month ahead of your current date. Once changed, restart your system, and the taskbar should be up and running on your system now.
The downside of this fix is that if you revert to your normal date, Taskbar will stop working on your system. Having a mismatched date can cause issues with background syncs for various applications and cause some websites to malfunction. You will also have issues installing and getting the latest Windows Updates, so you will need to check all of these manually when updating in the future.
Fix #10: Uninstall the latest cumulative Windows Update ie: KB5006050
The cumulative update released in September for Windows 11 seems to also cause issues with the taskbar on some desktops and laptops. Use the guide below to uninstall the necessary update from your system.
Press Windows + i and select Windows Update from the left.
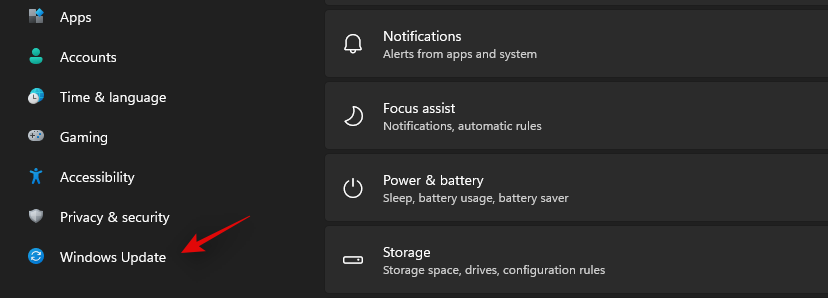
Click on ‘Update history’.
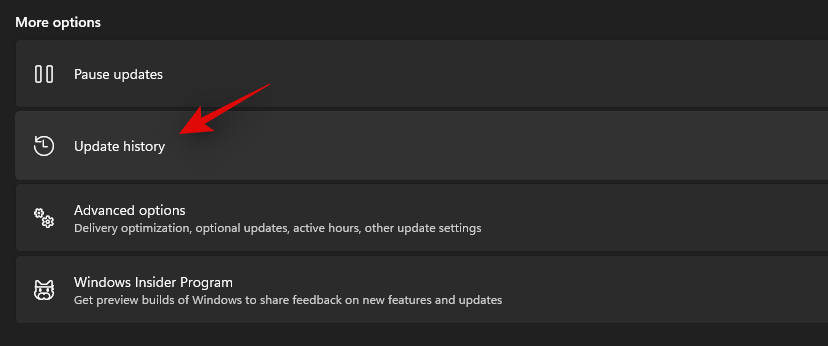
Now select ‘Uninstall updates’.
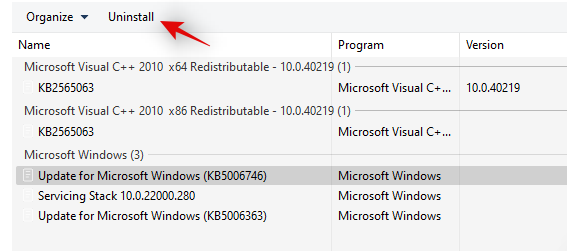
Click and select Windows Cumulative update KB5006050 from the list.

Now click on ‘Uninstall’ at the top and confirm your choice to uninstall the selected update.
Restart your system and taskbar functionality should now be restored on your system.
Fix #11: Restore PC to a previous restore point
If you had the taskbar working at a previous point in time then we recommend you restore your PC to a previously available restore point on your system. Follow the guide below to get you started.
Press Ctrl + Shift + Esc on your keyboard and click on ‘File’. Select ‘Run new task’ once you are done.

Type in CMD and press Ctrl + Shift + Enter on your keyboard.

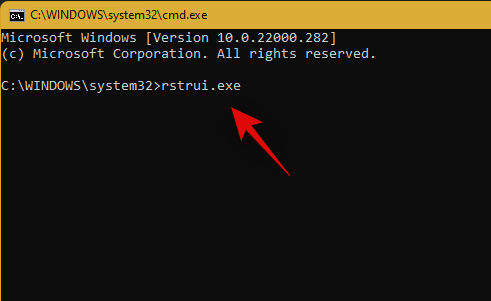
Now type in ‘rstrui.exe’ and press Enter on your keyboard.
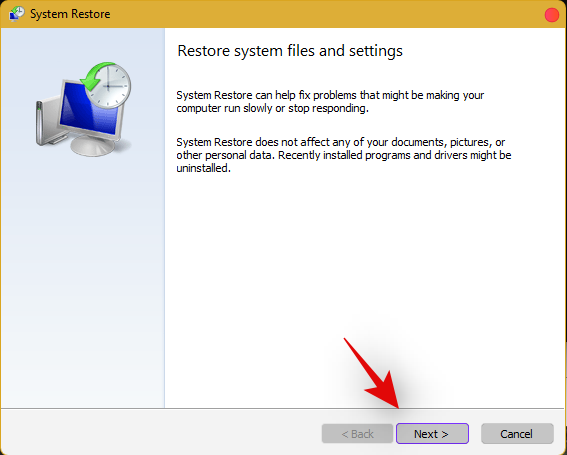
The system restore utility will now launch on your system. Click on ‘Next’.
Select the desired restore point from the list on your screen. Click on ‘Next’ once you are done.
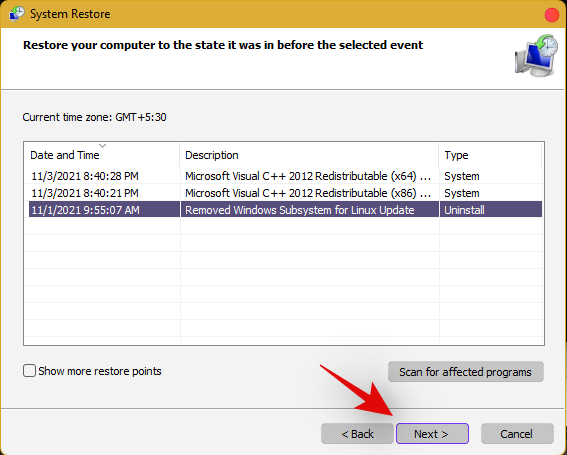
Tip: Click on ‘Scan for affected programs’ to view a list of installed programs that will be removed from your system during the restore process.
Click on ‘Finish’ once the restore finishes and restart your system.
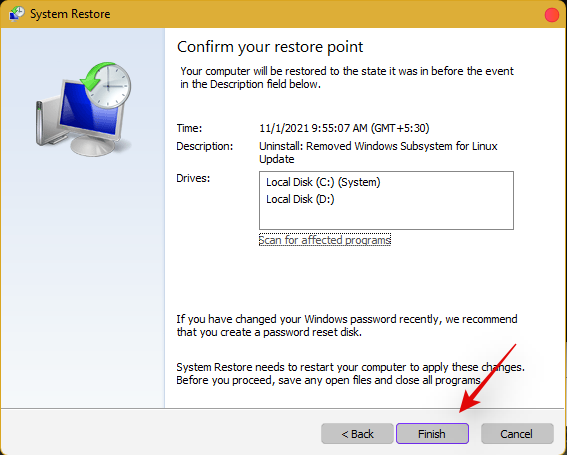
The taskbar should now be back up and running on your system again.
Fix #12: Last Resort: Create a new local admin account and transfer all your data
If by this point Taskbar still fails to work for you then it’s time for some drastic measures. You can create a new local admin account, check if Taskbar is working there, and then transfer all your data to the new account. This will be a tedious process but it is the next best way to get the taskbar working on your system without resetting your PC. Follow the guide below to get you started.
Create a new local admin account
Herre’s how you can create a new local admin account on your system.
Note: Most users facing the taskbar issue are unable to access the Settings app as well. Hence we will be using CMD to add a new local admin account to your PC. However, if the Settings app is available to you then you can use the same to add a new account as well.
Press Ctrl + Shift + Esc on your keyboard, click on ‘File’ and select ‘Run new task’.

Type in ‘cmd’ and press Ctrl + Shift + Enter on your keyboard.

CMD will now be launched as an administrator. Use the command below to add a new local admin account. Replace NAME with the Username of your choice for the new account. You can add a password later once you have confirmed that the taskbar is available in the new account.
net user /add NAME 
Once you have added the new user, use the command below to convert it to an administrator account on your PC. As usual, replace NAME with the Username for the new account you created earlier.
net localgroup Administrators NAME /add

Now type in the following to log out of your current account.
logoff

Once logged out, click on the newly added account to log in to the same. Once logged in, check if the taskbar is available in the new account. If it is, you can use the next section to transfer all your data. However, if the taskbar is still missing then you have no choice but to perform a fresh install of Windows 11 on your PC from a removable USB media drive.
Transfer all your data
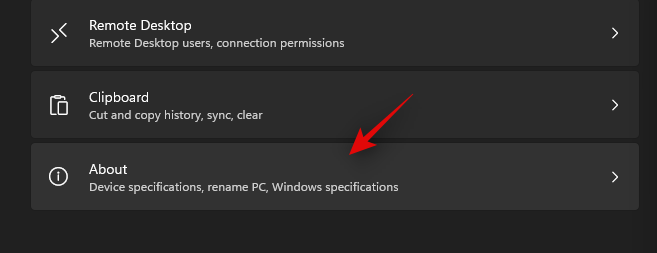
Press Windows + i on your keyboard and click on ‘About’ on your right.
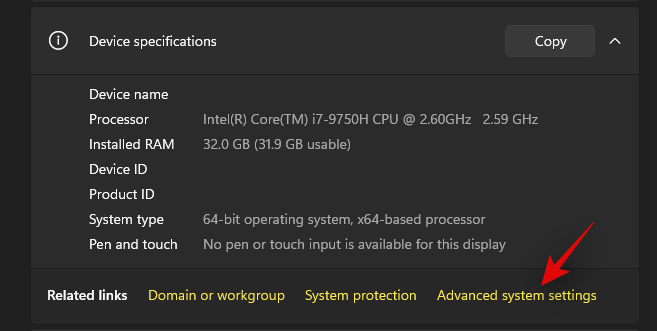
Click on ‘Advanced system settings’.
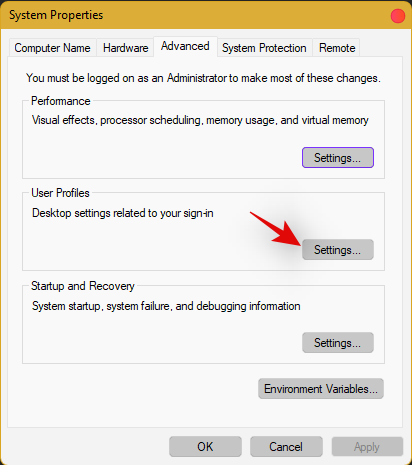
Click on ‘Settings’ under ‘User Profiles’.
Select your original profile by clicking on it and selecting ‘Copy To’.
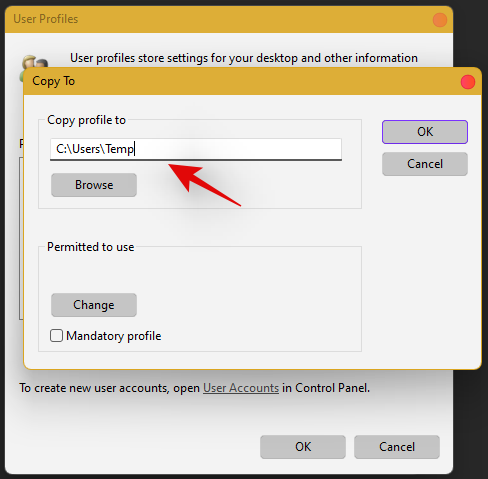
Now enter the following path under ‘Copy profile to’. Rename NAME to the username of your previous profile from where you wish to copy all your data.
C:\Users\NAME
Click on ‘Change’.
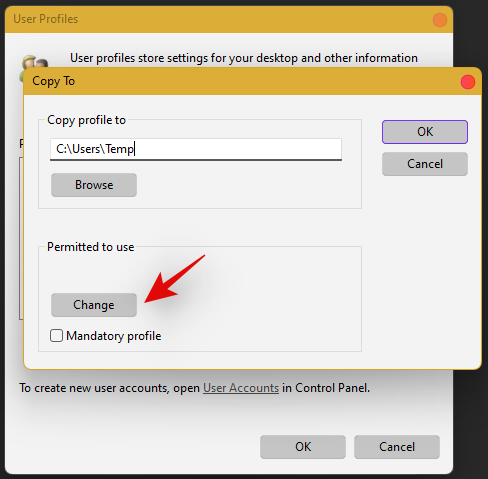
Enter the name for your new user profile and press Enter on your keyboard.
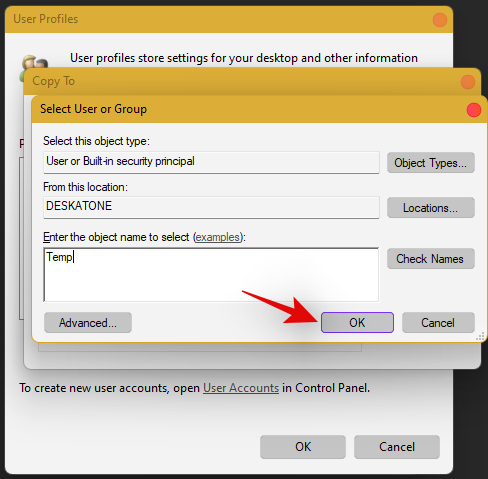
Click on ‘Ok’ once you are done.
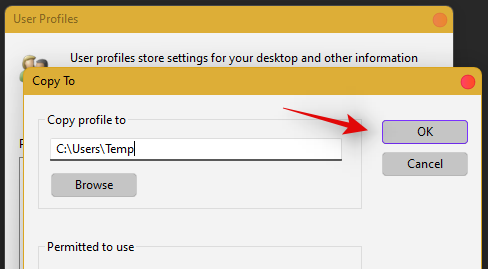
All your data will now be copied over to the new profile where the taskbar is functional on your PC. You can now delete your previous user account and set a password for your new account as well.
Frequently Asked Questions (FAQs):
With so many fixes, you are bound to have a few questions on your mind. Here are some commonly asked ones that should help you get up to speed.
How do I access Windows apps and Settings without a taskbar?
You can use the Task Manager to launch almost any program or Settings page on your system. To launch the desired program, launch the Taskbar > File > Run new task and enter the path to the program you wish to launch. Press Enter if you wish to launch the program normally or press Ctrl + Shift + Enter if you wish to launch the program with administrator privileges.
Is it safe to edit the Registry?
Registry edits are never safe as they have the potential to break your system. Fixes from trusted sources can help you avoid such issues but a good rule of thumb is to always back up your registry before making any edits. This way you can easily restore your Registry values in case some get messed up when editing the Registry.
When will Microsoft fix this issue?
Sadly, Microsoft is yet to release a proper fix for this issue. The company has tried to release a fix in the past cumulative updates to Windows 11 but they have been a hit and miss. We expect Microsoft to completely fix this issue in the upcoming feature update to Windows 11 when the OS gets the ability to run Android apps officially.
Can I update my Windows 11 after fixing the taskbar?
This will depend on the fix that you’re currently using. If you are using a date fix then you won’t be able to install updates until you restore to the current time. This will, however, cause the taskbar to be disabled again and the changes will be carried over after you update your PC. However, if you are using any other fix then you can easily update Windows.
For users with the date fix, you should try updating with the modified time first. If the update gets stuck on ‘Installing 0%’ or ‘Downloading 100%’ then change your date and time to the current date and time and update your PC. Ensure that you do not restart explorer or your PC during this process to keep the current instance of the taskbar alive on your system during the update process. This should help fix the issue for you once Microsoft officially releases an update to fix the issue.
We hope you were able to easily get the taskbar back up and running on your system using the guide above. If you face any more issues, feel free to reach out to us using the comments section below.
Related:
Instagram을 사용하는 동안 귀하의 계정에서 자동화된 동작이 감지되었습니다.라는 경고가 표시되면, 다음은 유용한 수정 사항과 팁입니다.
2021년 10월 첫 주에 Microsoft는 Windows 11의 안정적인 빌드를 공식적으로 발표했습니다. 공개 이후에 출시된 모든 신제품은 Windows 11을 즉시 실행할 수 있으며 Window…
Windows 사용자가 집단적으로 두려워하는 한 화면은 죽음의 블루 스크린입니다. BSOD는 수십 년 동안 사용되어 왔으며 수년에 걸쳐 거의 변경되지 않았지만 여전히 ...
따라서 Windows Insider Preview의 개발자 채널에 등록되었으며 마침내 Windows 11 미리 보기 빌드를 받았으며 업데이트가 진행 중입니다. 근데 언제까지 기다려야 하는건지...
Microsoft Teams는 팀 협업 기능으로 인해 최근에 상당히 인기를 얻은 포괄적인 도구입니다. 이 서비스를 사용하면 조직의 특정 팀을 만들고 초대할 수 있습니다.
Windows 11 사용자는 최근 새 OS의 Edge 및 웹 결과와 관련하여 Microsoft의 의심스러운 관행으로 인해 약간의 난관에 봉착했습니다. 이제 회사는 와이탄이있는 것 같습니다 ...
Microsoft는 Windows 11에 생명을 불어넣기 위해 기존 및 신규 디자인 요소를 모두 사용하여 Windows 11에서 많은 작업을 수행했습니다. 기본 Windows 파일 탐색기도 새로운 모습으로 축복받았습니다...
Windows 11이 세상에 공개되었을 때 Snap Layouts는 모든 사람의 관심을 가장 먼저 사로잡은 것이었습니다. 그들은 혁신적이고 새롭고 실제로 Windows 시스템에서 작업할 때 도움이 되었습니다...
Windows 11용 개발자 빌드가 릴리스되었으며 전 세계의 매니아들이 베타 전 빌드를 사용하고 있습니다. 그러나 예상대로 여기에는 작은 버그가 많이 있습니다.
유명한 Windows 운영 체제 라인업에 가장 최근에 추가된 Windows 11은 개발자 프리뷰에서도 많은 시선을 사로잡았습니다. 많은 매니아들이 몰리고 있습니다...
2021년 10월 12일: 대규모 업데이트! Windows 11을 설치할 때 TPM 검사를 우회하고 설치 오류를 수정하기 위해 더 이상 appraiserres.dll 파일을 교체할 필요가 없습니다. …
Windows 11은 지난 7월 OS가 유출된 이후 특정 CPU 지원을 둘러싸고 많은 논란이 있었습니다. OS의 공식 버전은 이제 수많은 변경 사항과 함께 대중에게 공개되었습니다…
Microsoft는 모바일 앱에서 광범위하게 작업했지만 때때로 가끔 결함이 발생할 수 있습니다. Microsoft 팀의 앱을 처음 탐색하거나 여는 동안 다음과 같은 작업을 할 수 있습니다.
Windows 검색이 예외적으로 높은 CPU 또는 디스크 리소스를 사용하는 경우 Windows 11에서 다음 문제 해결 방법을 사용할 수 있습니다. 문제를 해결하는 방법에는 더 간단한 방법이 포함됩니다…
Windows 11은 올해 6월에 논란의 여지가 있는 유출 이후 일반에 공개되었습니다. 그 이후로 OS는 많은 변화를 겪었습니다.
수년 동안 Windows는 시작 메뉴를 한 번만 클릭하면 된다고 주장하는 수많은 새로운 기능과 개선 사항을 선전해 왔습니다. 그러나 시작 메뉴가 더 이상 열리지 않는다면 어떻게 될까요? 잘…
이제 Windows 참가자 프로그램의 개발자 채널에 있는 업데이트로 Windows 11 미리 보기를 사용할 수 있습니다. 점점 더 많은 사람들이 Windows 11을 사용하기 시작하면서 다음과 같은 사실을 알게 되었습니다.
Microsoft Teams는 모든 플랫폼의 사용자를 위한 훌륭한 커뮤니케이션 유틸리티이지만 일단 사용을 마치면 앱이 짜증을 내기 시작합니다. Te를 사용하지 않는 경우…
Microsoft의 고유한 협업 도구인 Teams는 COVID-19 전염병 속에서 많은 사용자를 확보했으며 이러한 광범위한 사용으로 인해 일상적인 작업 루틴을 방해할 수 있는 몇 가지 문제가 발생합니다.
Insider Program을 통해 Windows 11 Dev 빌드를 손에 넣고 싶어하는 사람들은 대부분의 사용자가 안정적인 릴리스가 나올 때까지 기다리는 경향이 있는 이유를 천천히 이해하기 시작했습니다. 최초가 되는 …
Windows 11 보안 센터 서비스가 사라져서 어려움을 겪고 계신가요? 안전하고 간편하게 PC를 보호하고 서비스를 복원할 수 있는 검증된 단계별 해결 방법을 알아보세요. 최적의 보호를 위해 최신 방법으로 업데이트되었습니다.
Windows 11에서 Stream Deck 앱이 열리지 않아 어려움을 겪고 계신가요? Elgato Stream Deck을 다시 원활하게 실행할 수 있는 검증된 단계별 해결 방법을 알아보세요. 기술적인 전문 지식은 필요하지 않습니다!
Windows 11에서 내장 마이크 소리가 먹먹하게 들리시나요? 검증된 단계별 해결 방법을 통해 깨끗한 음질을 손쉽게 복원해 보세요. 지금 바로 마이크를 완벽하게 작동하도록 만들어 보세요!
Windows 11에서 코어 격리 기능이 켜지지 않아 어려움을 겪고 계신가요? 이 중요한 보안 기능을 활성화하고, 일반적인 문제를 해결하고, PC 성능을 향상시키는 단계별 해결 방법을 알아보세요.
Windows 11에서 느린 성능 때문에 어려움을 겪고 계신가요? PC 성능 향상을 위한 최적의 성능 플랜에 대한 단계별 해결 방법을 알아보세요.
Windows 11에서 wget 및 curl 명령 오류로 어려움을 겪고 계신가요? 이 단계별 가이드에서는 일반적인 문제, 빠른 해결 방법, 그리고 효율적인 문제 해결을 위한 전문가 팁을 다룹니다. 지금 바로 다운로드 및 API 호출을 다시 원활하게 실행하세요.
Windows 11에서 클래식 셸 또는 Start11 오류가 발생하여 어려움을 겪고 계신가요? 충돌, 호환성 문제 등을 해결하고 사용자 지정 시작 메뉴를 다시 사용할 수 있도록 단계별 해결 방법을 알아보세요. 최신 문제 해결 팁이 포함되어 있습니다.
Windows 11 DirectAccess 연결 오류로 어려움을 겪고 계신가요? 원활한 VPN 접속을 복원하고 생산성을 향상시키는 검증된 단계별 해결 방법을 확인해 보세요. 번거로움 없는 네트워크를 위한 최신 솔루션이 업데이트되었습니다.
윈도우 11 속도가 느려서 불편하신가요? 레지스트리 용량 증가 문제를 해결하고 속도를 최적화하여 PC 성능을 되찾는 검증된 방법을 알아보세요.
Windows 11 시작 로고 화면에서 멈춰서 답답하신가요? 2026년 버전을 위한 이 종합적인 문제 해결 가이드는 안전 모드부터 고급 복구까지 검증된 해결 방법을 제공하여 문제를 빠르고 간편하게 해결할 수 있도록 도와줍니다.


![Windows 11 그린 스크린 오류를 수정하는 방법 [8가지 방법] Windows 11 그린 스크린 오류를 수정하는 방법 [8가지 방법]](https://cloudo3.com/resources8/images31/image-5564-0105182715287.png)


