Selama bertahun-tahun, Windows telah menggembar-gemburkan hos ciri dan penambahbaikan baharunya dengan mendakwa ia hanya dengan satu klik pada menu Mula sahaja. Tetapi bagaimana jika menu Mula berhenti dibuka untuk anda? Mungkin, menu Mula pada Windows 11 tiba-tiba berhenti berfungsi untuk anda, dengan itu menjadikan melakukan tugas biasa agak membebankan.
Jika Menu Mula tidak dibuka untuk anda pada Windows 11, maka terdapat seberapa banyak pembetulan yang kami boleh fikirkan untuk membantu anda menyelesaikan masalah itu .
Berkaitan: Cara Menyahpasang Apl pada Windows 11
NOTA: Jika pembetulan biasa 17(!) yang diberikan di bawah gagal untuk anda, maka cuba Pembaikan #18 yang diberikan di bawah di bawah bahagian 'Last Resorts' yang membincangkan tentang mencipta pengguna baharu melalui baris arahan . Ini membantu anda mencipta pengguna baharu menggunakan CMD, oleh itu tanpa perlu mengakses apl Tetapan atau menu Mula, yang mungkin tidak berfungsi untuk anda. Yang berkata, Betulkan #1 tentang isu yang disebabkan oleh 'Windows Update KB5004300' ialah penambahan baharu, jadi mungkin semak ini dahulu.
kandungan
Kami telah menyertakan sejumlah 20 (!) pembetulan untuk menyelesaikan masalah dengan Start Menu pada Windows 11 di bawah. 3 daripadanya ialah pembetulan umum yang perlu dicuba hanya selepas anda yakin bahawa 17 pembaikan utama tidak membantu.
17 Pembetulan Utama
Cuba pembaikan ini dahulu sebelum mencuba 3 pembaikan umum (juga diberikan di bawah).
Betulkan #1: Nyahpasang dan pasang semula Kemas Kini Windows KB5004300
Pembaikan baru-baru ini yang ditemui oleh pengguna bermata helang nampaknya dengan mudah membetulkan menu mula pada peningkatan Windows 11 baharu. Kemas Kini Windows yang dikeluarkan di bawah nama KB5004300 nampaknya menyebabkan isu ini. Menyahpasang dan memasang semula yang sama pada PC anda akan membetulkan menu Mula dan Bar Tugas untuk anda. Ikuti panduan di bawah untuk memulakan anda.
Tekan Windows + ipada papan kekunci anda untuk membuka apl Tetapan. Klik pada 'Windows Update' di sebelah kiri anda.
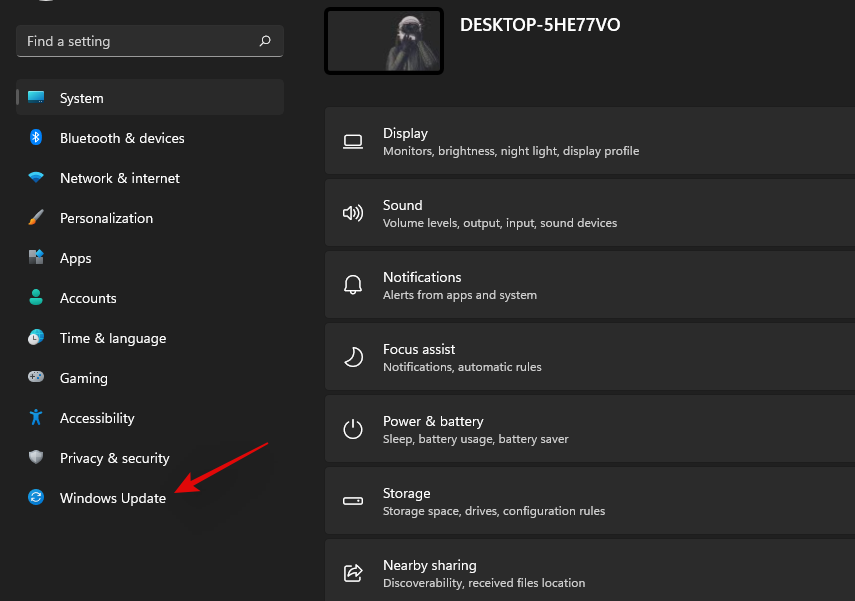
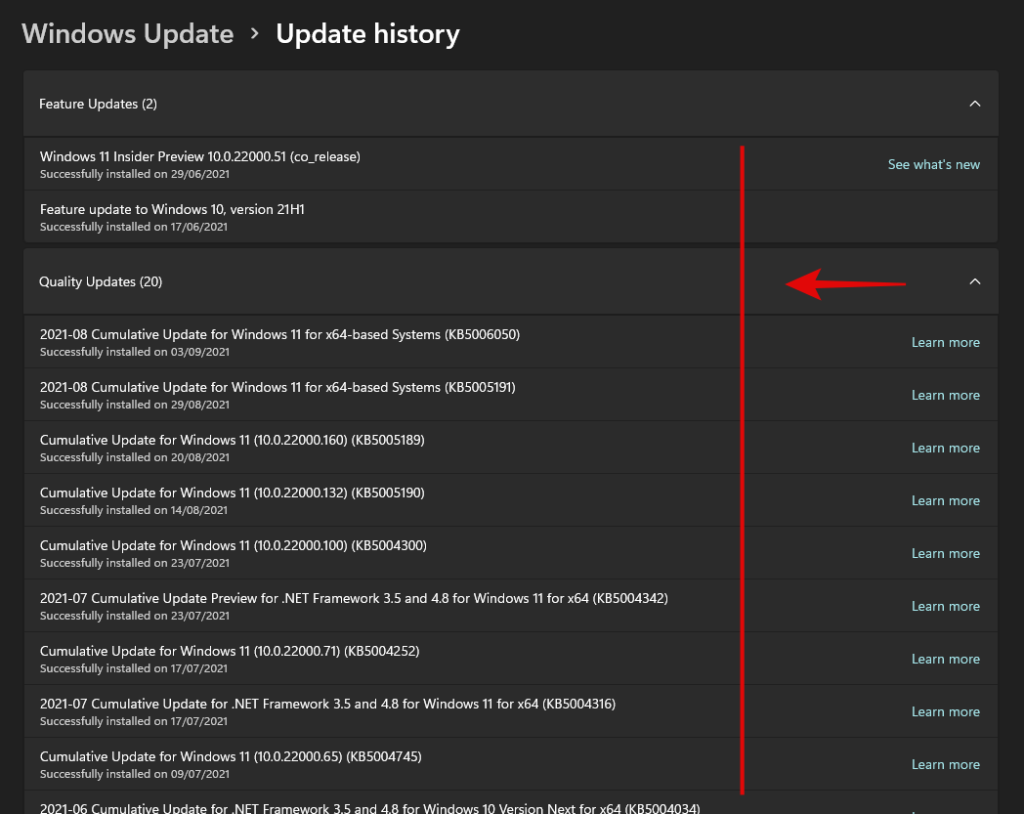
Sekarang klik pada 'Kemas Kini Sejarah'.
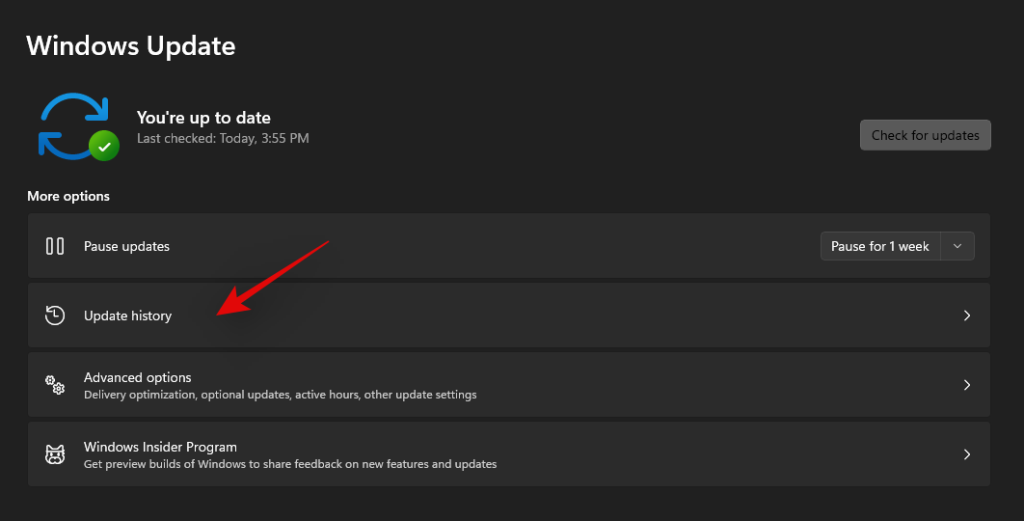
Klik pada 'Nyahpasang Kemas Kini'.
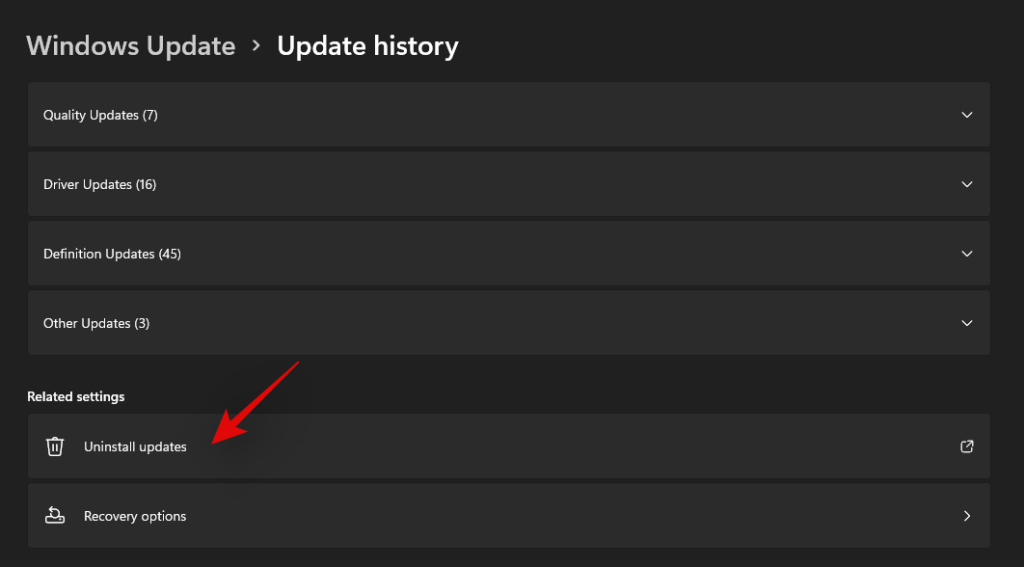
Anda kini akan diubah hala ke Pusat Kawalan. Cari kemas kini KB5004300 yang berkenaan dalam senarai dan klik dan pilihnya.
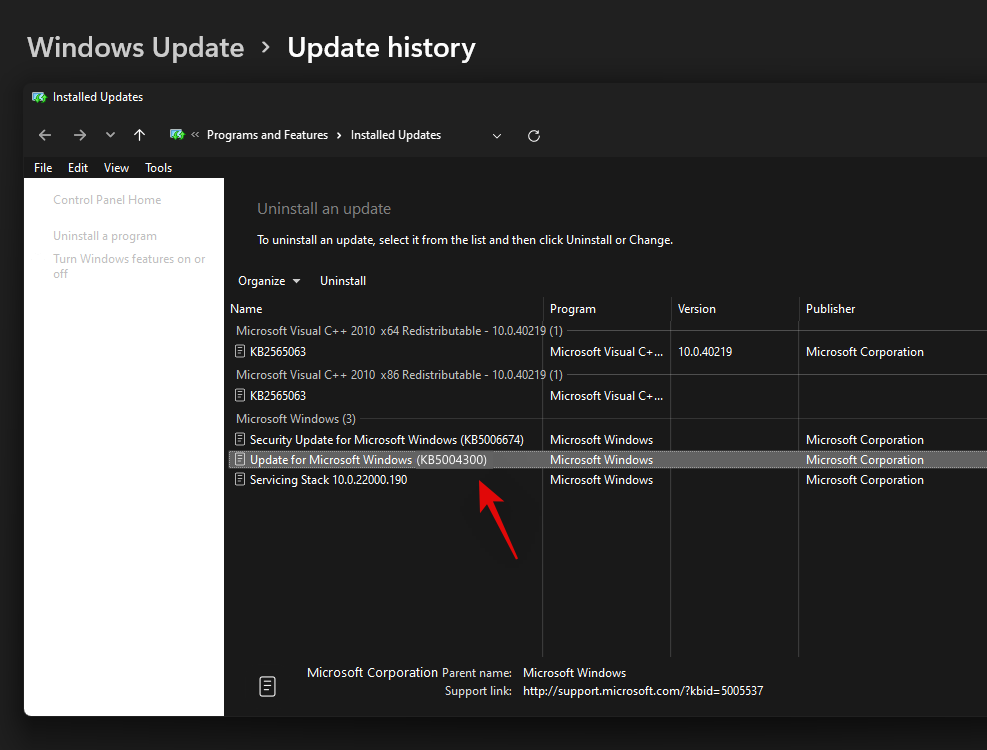
Sekarang klik pada 'Nyahpasang' di bahagian atas.
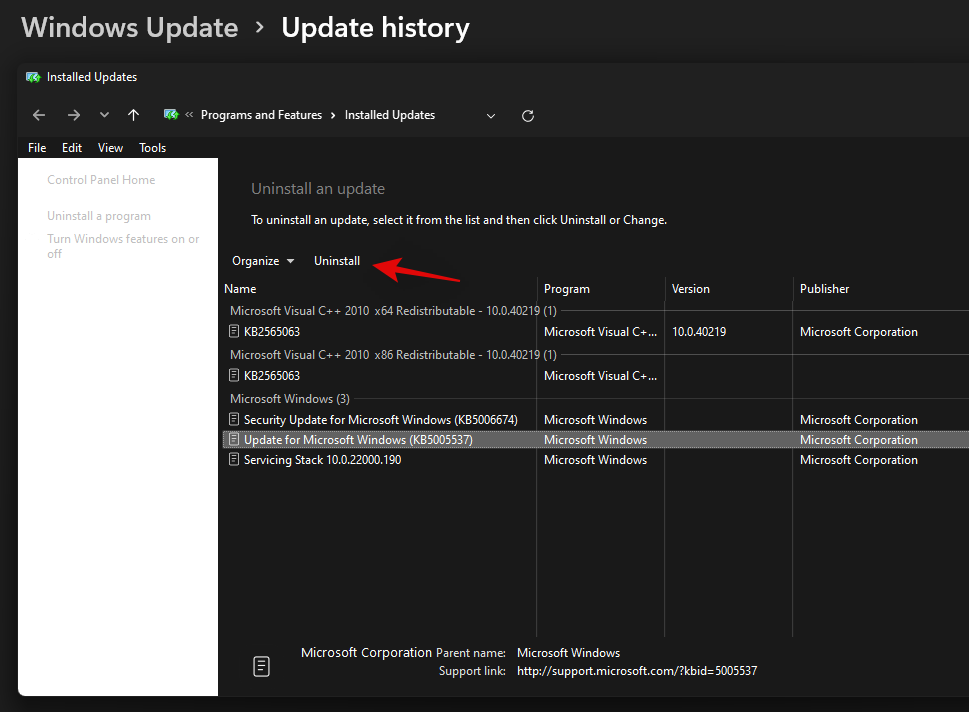
Ikut arahan pada skrin untuk mengalih keluar kemas kini daripada PC anda. Setelah dikemas kini, mulakan semula PC anda untuk langkah yang baik.
Sekarang tekan Windows + isekali lagi setelah PC anda dimulakan semula dan pilih Kemas Kini Windows sekali lagi.

Semak kemas kini dan anda kini sepatutnya mempunyai pilihan untuk memasang Windows Update KB 5004300 pada PC anda sekali lagi.
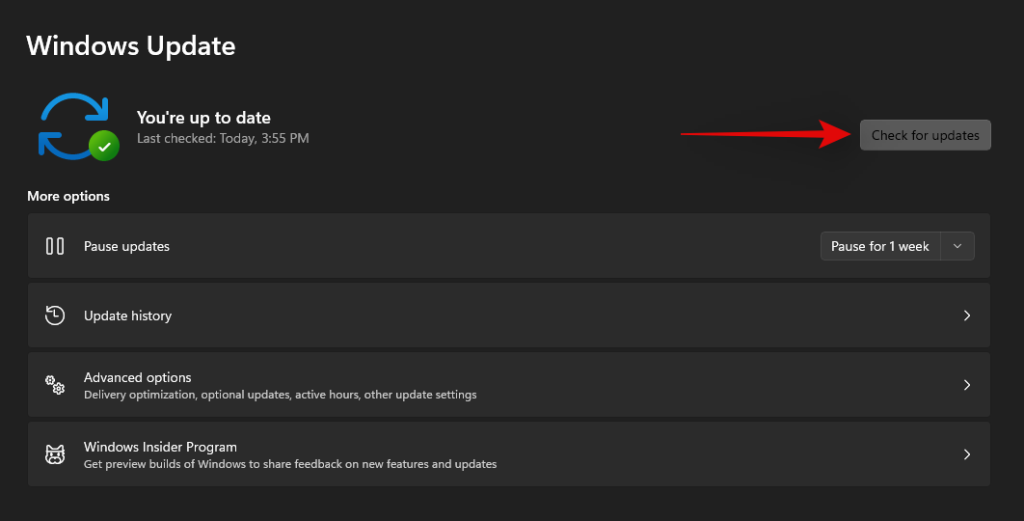
Muat turun dan pasang kemas kini dan fungsi menu Bar Tugas & Mula kini harus dipulihkan dalam Windows 11.
Betulkan #2: Paksa mulakan semula Perkhidmatan Iris
Kemas kini baru-baru ini kepada binaan orang dalam daripada Microsoft telah menyebabkan masalah besar dengan bar tugas dan menu Mula untuk ramai pengguna. Jika anda juga melanggan saluran Insider dan telah menghadapi masalah semasa mengemas kini untuk membina nombor 22449 atau lebih tinggi maka anda boleh menggunakan pembetulan yang dinyatakan di bawah.
Kaedah ini akan memadamkan nilai pendaftaran untuk Perkhidmatan Iris yang sepatutnya memasang semula secara paksa apabila dimulakan semula. Pemasangan semula nampaknya membantu menyelesaikan isu ini untuk kebanyakan pengguna. Walaupun anda tidak menggunakan binaan yang sama, pembaikan ini patut dicuba. Ikuti panduan di bawah untuk memulakan anda.
Nota: Perintah ini akan segera memulakan semula PC anda. Jika anda mempunyai sebarang kerja yang sedang berjalan di latar belakang, pastikan anda menyimpannya sebelum meneruskan dengan panduan ini.
Tekan Windows + S pada papan kekunci anda dan cari CMD. Klik pada 'Jalankan sebagai pentadbir' atau tekan Ctrl + Shift + Enter pada papan kekunci anda.
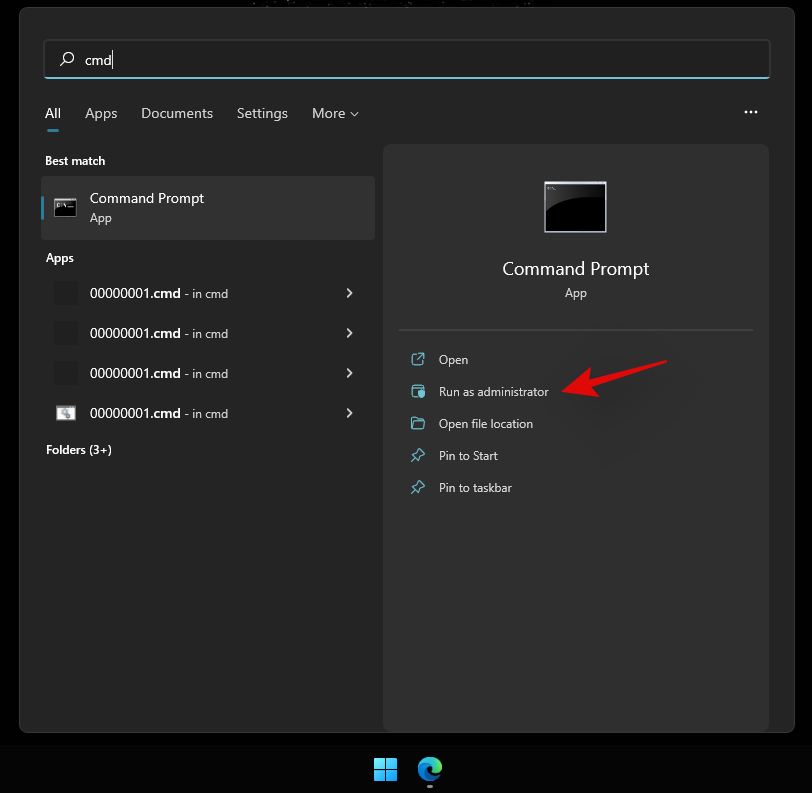
Masukkan arahan berikut dan tekan Enter pada papan kekunci anda.
reg delete HKCU\SOFTWARE\Microsoft\Windows\CurrentVersion\IrisService /f && shutdown -r -t 0

PC anda kini akan but semula. Log masuk ke PC anda seperti biasa dan fungsi menu Mula kini harus dipulihkan pada sistem anda.
Betulkan #3: Mulakan semula PC anda
Ini adalah kaedah paling mudah yang terlintas di fikiran semasa cuba menyelesaikan kebanyakan masalah pada PC Windows 11. Biasanya, apabila anda memulakan semula sistem, anda pada dasarnya memaksa semua proses, termasuk Windows, untuk memulakan semula semua perkhidmatan dan proses mereka. Ini juga memulakan semula proses menu Mula yang akan membantu menyelesaikan isu dengannya.
Jika ia tidak jelas, berikut ialah langkah-langkah untuk memulakan semula PC anda.
Pastikan semua apl dan fail anda ditutup. Atau, hanya pergi ke skrin Desktop dengan menekan Windows key + D bersama-sama. Sekarang, tekan Alt + F4 kekunci bersama-sama pada papan kekunci anda untuk mendapatkan skrin "Shut Down Windows".
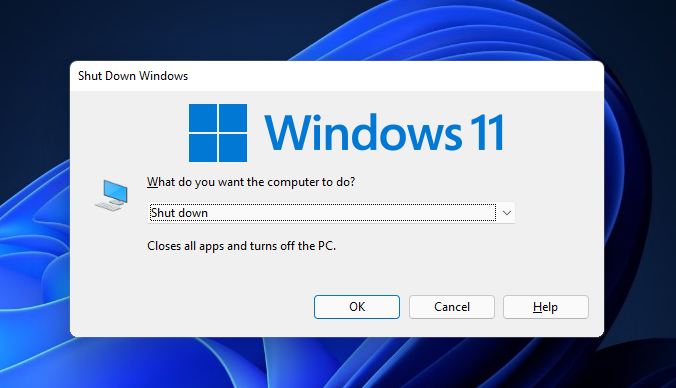
Klik pada menu lungsur, pilih 'Mulakan Semula', dan tekan butang 'OK'.
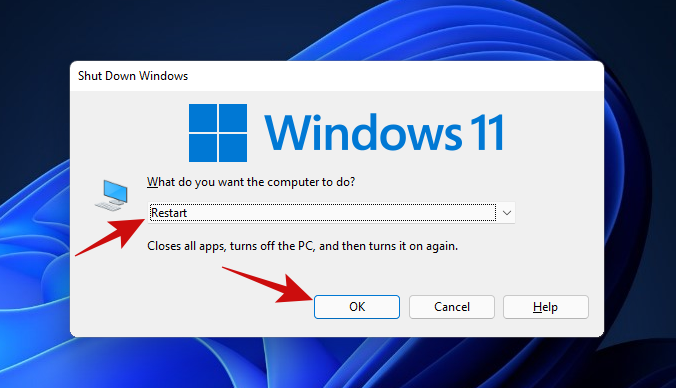
Setelah PC anda dimulakan semula, anda sepatutnya boleh menggunakan menu Mula semula. Jika anda masih tidak boleh, cuba kaedah seterusnya.
Betulkan #4: Mulakan semula Windows Explorer menggunakan Pengurus Tugas
Pembaikan mudah seterusnya untuk menu Mula beku menggunakan Pengurus Tugas. Pengurus Tugas boleh menjadi alat yang sempurna untuk mengurus sebarang proses berjalan pada PC Windows.
Jika anda mempunyai menu Mula yang tidak mahu membalas klik anda, ikut langkah yang dinyatakan di bawah untuk melihat sama ada ia menyelesaikan masalah anda.
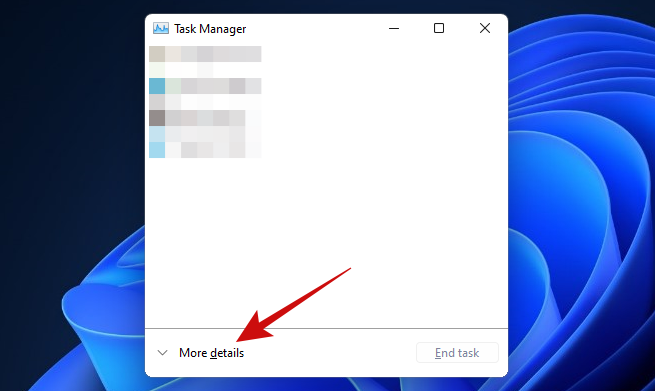
Tekan Ctrl + Shift + Esc kekunci untuk mencetuskan Pengurus Tugas. Jika Pengurus Tugas anda kelihatan seperti ini, klik pada butang 'Maklumat lanjut' untuk mendapatkan akses kepada paparan terperinci.
Setelah berada di dalam Pengurus Tugas, tatal melalui senarai Proses untuk mencari proses 'Windows Explorer'. Klik kanan pada proses dan klik pada pilihan 'Mulakan Semula'.
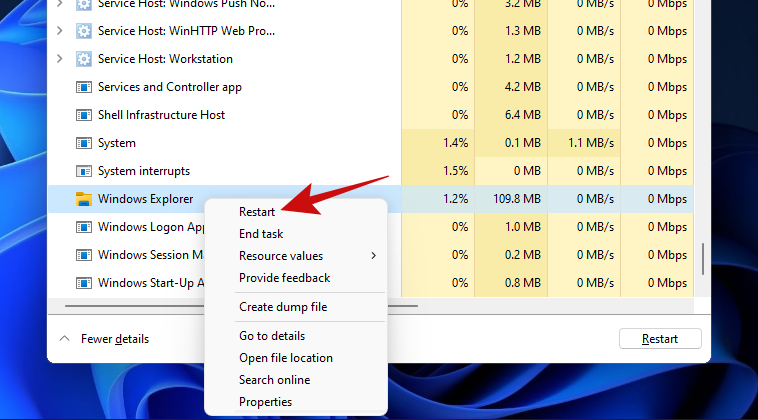
Setelah diklik, Windows harus memulakan semula proses Windows Explorer dalam sekelip mata, dan itu sepatutnya membetulkan menu mula anda.
Memulakan semula proses Windows Explorer hampir sama dengan memulakan semula PC anda. Satu-satunya perbezaan ialah di sini, anda hanya memulakan semula satu proses, manakala, dengan memulakan semula, anda memulakan semula semua proses. Selain itu, ramai orang pada masa lalu telah berjaya membetulkan menu Mula mereka dengan kaedah ini, yang menjadikan ini patut dicuba.
Betulkan #5: Semak kemas kini pada Windows
Jika anda masih tidak dapat membuka menu Mula, anda harus mencuba Kemas Kini Windows. Masalahnya mungkin lebih meluas daripada yang anda fikirkan dan Microsoft mungkin telah mengeluarkan hotfix untuk menampal menu Mula yang tidak responsif.
Begini cara anda boleh melakukannya.
Buka apl Tetapan dengan Win key + i kekunci bersama-sama. Setelah dibuka, klik pada pilihan 'Windows Update'.
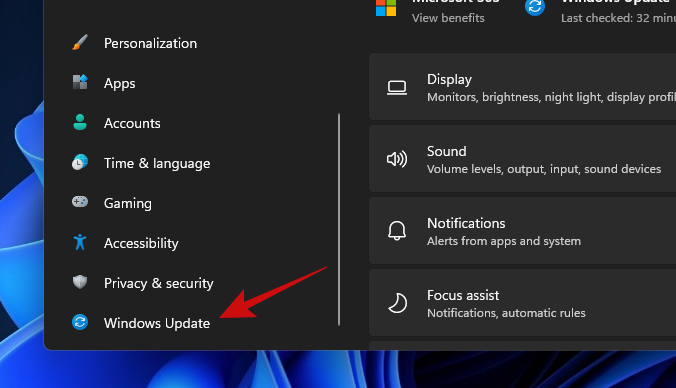
Klik pada butang besar 'Semak kemas kini' untuk mula menyemak sebarang kemas kini yang tersedia pada Windows untuk PC anda. Jika tersedia, biarkan Windows memasang semua kemas kini.
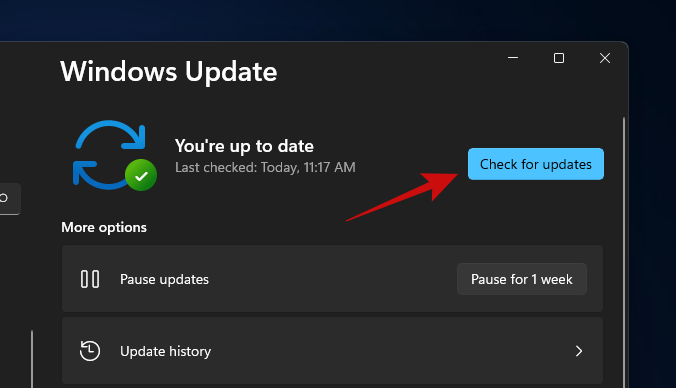
Apabila Windows selesai mengemas kini PC anda, hanya mulakan semula dan cuba buka menu Mula. Jika anda masih tidak boleh membuka menu Mula, kami rasa sudah tiba masanya untuk melakukan pembaikan yang lebih lanjut.
Betulkan #6: Jalankan DISM dan SFC
DISM (Deployment Image Servicing and Management) dan SFC (System File Checker) ialah dua alat yang paling mujarab untuk mengenal pasti dan membaiki pemasangan Windows yang rosak. Alat ini boleh digunakan dengan sama ada Command Prompt atau Windows PowerShell. Untuk panduan ini, kami akan menggunakannya dengan Command Prompt.
Mari mulakan dengan DISM. DISM boleh digunakan untuk mengambil salinan baharu fail Windows yang rosak.
Tekan Win key + r untuk membuka kotak Run, taip cmd dan kemudian tekan Ctrl + Shift + Enter bersama-sama (bukannya menekan enter) untuk membuka Prompt Perintah yang dinaikkan.
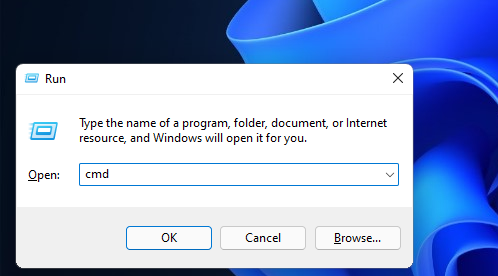
Sebaik sahaja anda berada di dalam Command Prompt, tampal kod di bawah dan tekan enter.
DISM /Online /Cleanup-Image /RestoreHealth
DISM kini akan cuba memulihkan fail yang rosak (jika ada) daripada pemasangan semasa anda dengan meminta salinan baharu fail tersebut daripada kemas kini Windows. Keseluruhan proses akan mengambil masa kira-kira ~15-20 minit. Begini cara arahan itu kelihatan dalam tindakan.
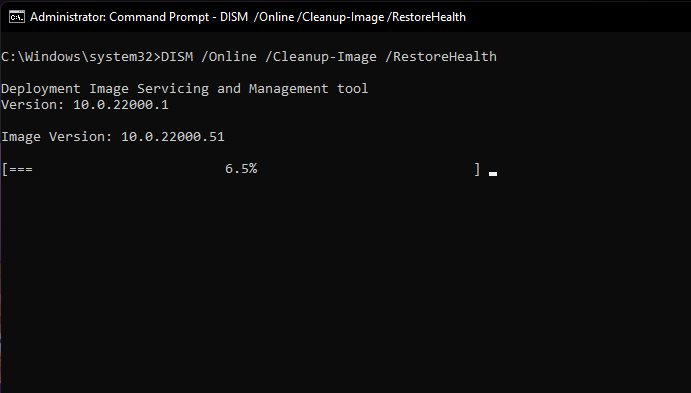
Sebaik sahaja arahan telah memulihkan semua fail yang rosak, anda sepatutnya melihat sesuatu seperti ini.
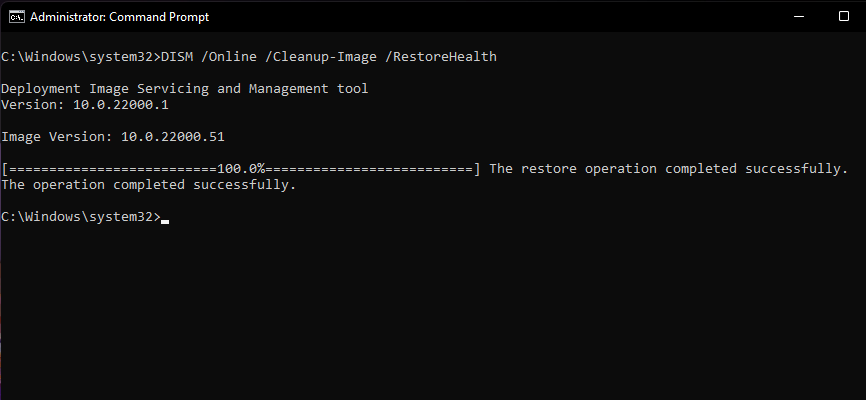
Sebaik sahaja anda selesai dengan langkah ini, pastikan tetingkap Prompt Perintah terbuka untuk menjalankan arahan seterusnya.
Langkah seterusnya ialah mengesahkan integriti semua fail Windows 11 anda untuk memastikan ia berada dalam keadaan yang baik. Untuk ini, kami akan menggunakan alat SFC.
Ini caranya.
Tampalkan kod di bawah dalam tetingkap Prompt Perintah, dan tekan enter.
sfc /scannow
Begini rupa arahan itu.
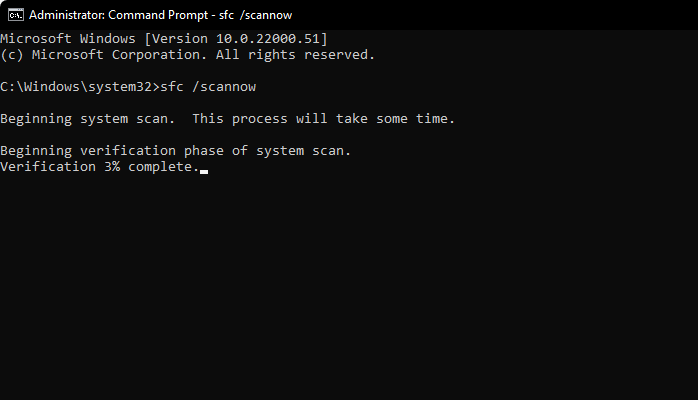
Perintah di atas hanya akan mengambil masa beberapa minit untuk menyelesaikan pengimbasan integriti fail Windows anda. Setelah selesai, hasilnya akan kelihatan seperti ini.
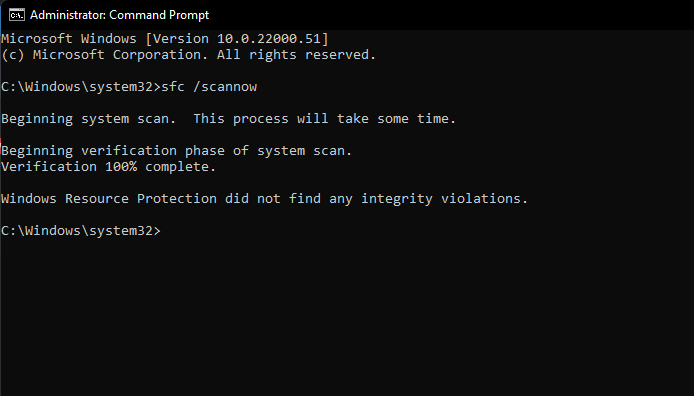
Petua: Pastikan PC anda mempunyai sambungan internet yang stabil untuk kaedah ini berfungsi.
Kini tiba masanya untuk but semula.
Masih terperangkap dengan menu Mula yang rosak, sudah tiba masanya untuk mencuba kaedah seterusnya.
Berkaitan: 6 Cara untuk Kemas Kini Pemacu pada Windows 11
Betulkan #7: Bina Semula Indeks Carian
Menu Mula dan Carian Windows disepadukan rapat. Isu dengan carian dan pengindeksan mungkin telah masuk ke dalam menu Mula dan menjejaskannya. Jadi, mari kita tolak kemungkinan ini juga.
Mari kita lihat langkah-langkah untuk melakukannya.
Buka kotak Run dengan menekan Win key + r. Kemudian tampal teks di bawah dalam kotak Run dan tekan enter.
control /name Microsoft.IndexingOptions
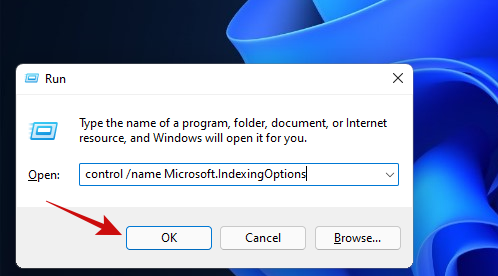
Anda sepatutnya melihat pop timbul bertajuk 'Pilihan Pengindeksan' terbuka. Klik pada butang 'Ubah suai'.
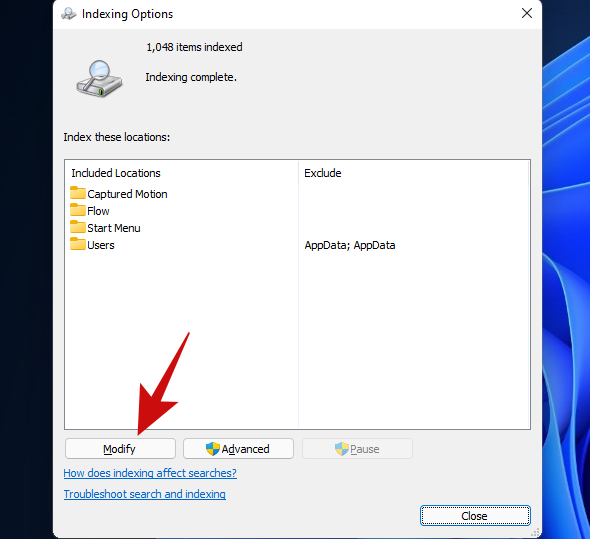
Klik pada butang 'Tunjukkan semua lokasi'.
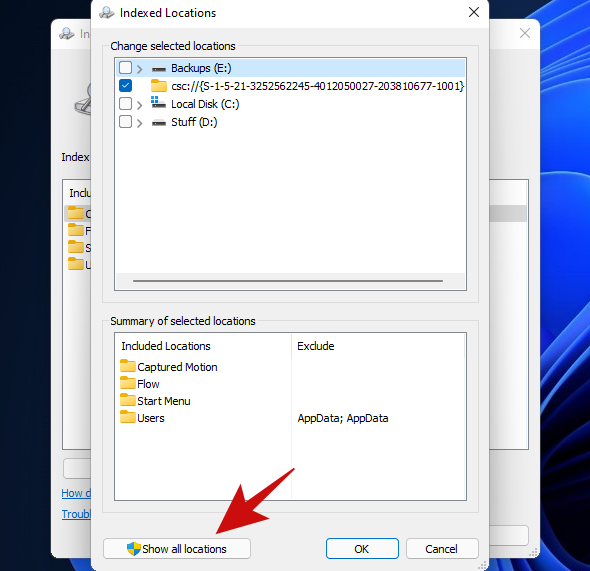
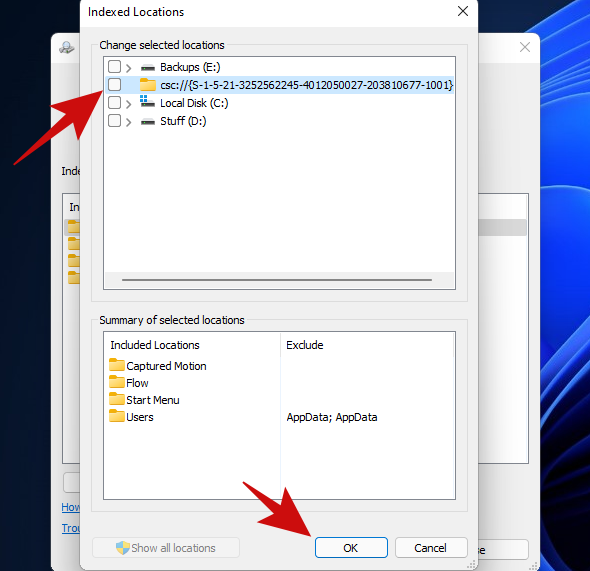
Pada skrin ini, nyahtanda semua lokasi dan klik pada butang 'OK'. Lokasi kami hanya mempunyai satu lokasi yang ditandakan, jadi kami hanya menyahtanda satu lokasi dalam senarai ini.
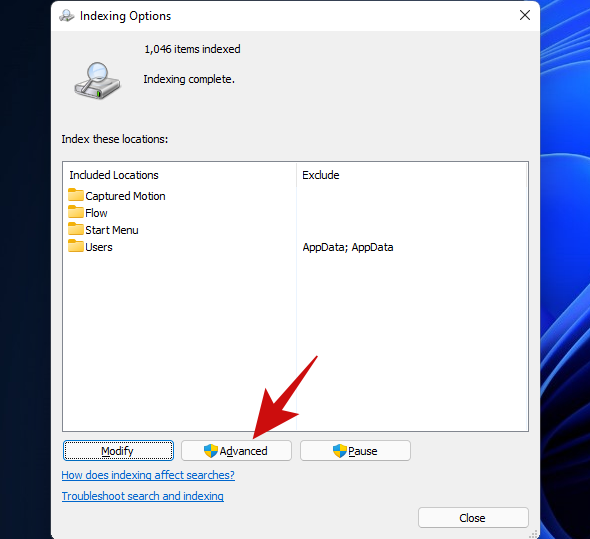
Klik pada butang 'Lanjutan'.
Klik pada butang 'Bina Semula'.
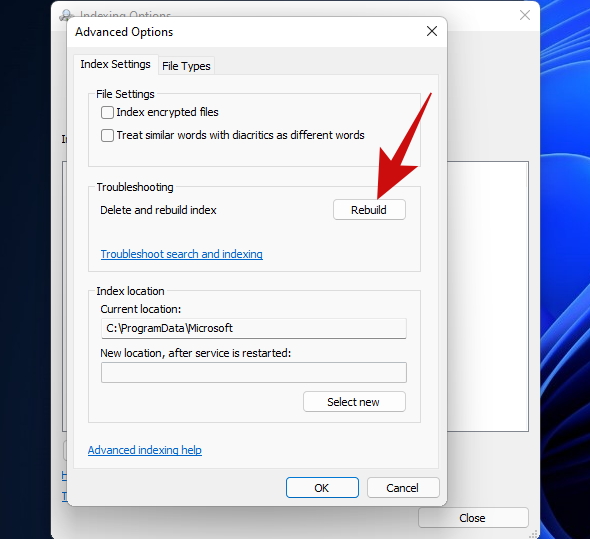
Windows kini akan mula membina semula Indeks Carian. Yakinlah, keseluruhan proses kini akan dikendalikan oleh Windows dan tidak memerlukan sebarang input pengguna, walaupun ia mengambil sedikit masa untuk diselesaikan.
Apabila Windows telah membina semula Indeks Carian anda, mulakan semula PC anda. Sebaik sahaja anda berada di dalam Windows semula, cuba buka menu Mula. Jika ia masih tidak berkesan, kami fikir sudah tiba masanya untuk memilih kaedah yang lebih berdaya tahan.
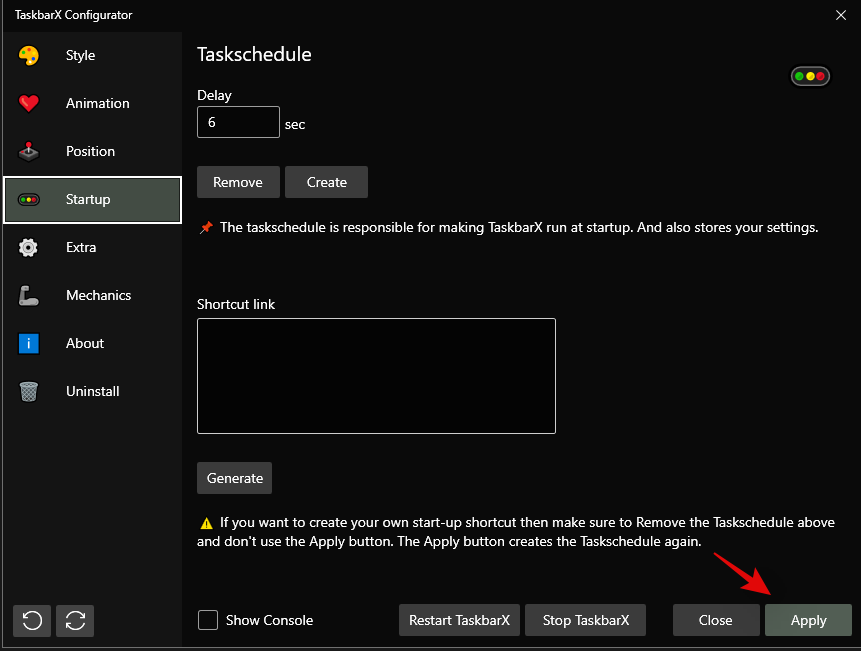
If you have installed any third-party programs to modify the look or functions of your start menu then we recommend removing all such programs. Likely, one of these programs is not compatible with the new Windows 11 start menu which is why you are facing issues with your system. If you have one of the following apps mentioned below, then we recommend you revert their settings and uninstall them as soon as possible. Most of these apps were designed for Windows 10 and are incompatible with the Windows 11 Start menu code to a certain extent. A recent Windows 11 update likely broke their compatibility causing the start menu to glitch out on your system.
- Open Shell
- Classic Start
- WinAero Tasbar
- TaskbarX
And more. If removing a third-party app that modifies your start menu helps restore its functionality then you can wait for a compatible update to use the app again.
Did you use a registry hack to get the older Windows 10 start menu on Windows 11? If so then it is likely that this registry hack’s functionality broke with a recent Windows 11 update. In such cases, you can use the guide below to revert the changes on your system.
Press Windows + R on your keyboard and type in the following in the Run dialog box.
regedit

Press Enter on your keyboard once you are done to launch the registry editor. You can also click on ‘Ok’ instead.
Now copy and paste the address given below in the address bar at the top of the registry editor and press ‘Enter’ on your keyboard.
Computer\HKEY_CURRENT_USER\Software\Microsoft\Windows\CurrentVersion\Explorer\Advanced
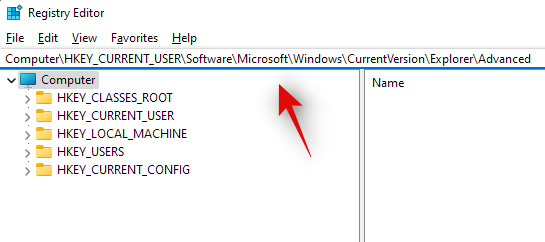
Look for ‘Show_StartClassicMode’ on your right and right-click on it.

Select ‘Modify’.

Change its value data to ‘0’ and click on ‘Ok’. Do not close the registry editor just yet.

Press Ctrl + Shift + Esc on your keyboard to launch the Task Manager. Now click and switch to the ‘Details’ tab at the top.
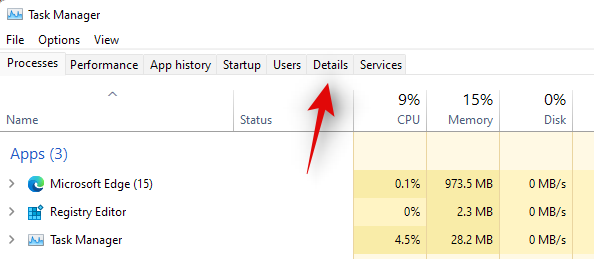
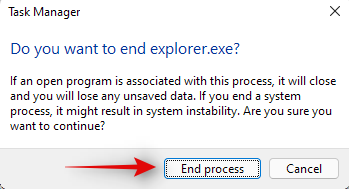
Click and select Explorrer.exe from the list and press Delete on your keyboard.

Confirm your choice by clicking on ‘End Process’.
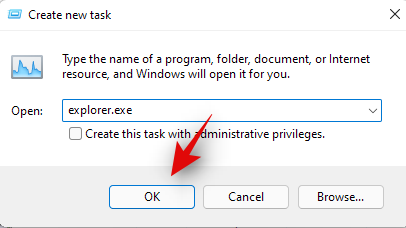
Now click on ‘File’ in the top left corner and select ‘Run new task’.
Type in ‘Explorer.exe’ and press Enter on your keyboard. You can also click on ‘Ok’ instead.
Explorer will now be restarted on your system. Switch back to the registry editor and click and select ‘Start_ShowClassicMode’.
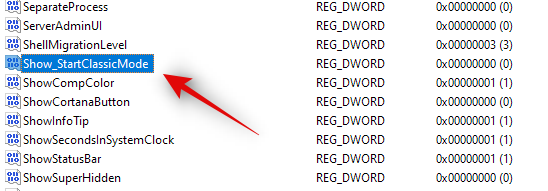
Press Delete on your keyboard and confirm your choice to delete the registry value.

Restart your system for good measure now.
If your Start menu wasn’t working due to a registry hack to get the older start menu then it should be fixed by now. You can check for the same by clicking on the Start menu icon in your taskbar.
Windows 11 has come a long way when compared to its predecessors. Background processes, tasks, and apps are more streamlined now and various features and elements seem to have their own dedicated packages. These dedicated packages make it easier for you to troubleshoot problems with certain features of Windows and even reinstall them in worst-case scenarios. If the start menu is still not working for you then you can reinstall basic elements of Windows 11 which will also reinstall the Start menu module on your system. This should help fix any background conflicts and get the Start menu back up and running on your system. Follow the guide below to get you started.
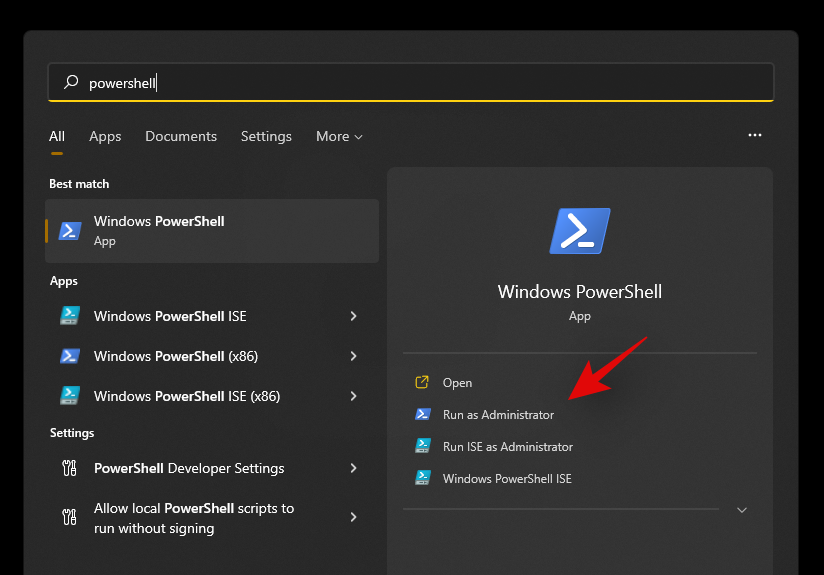
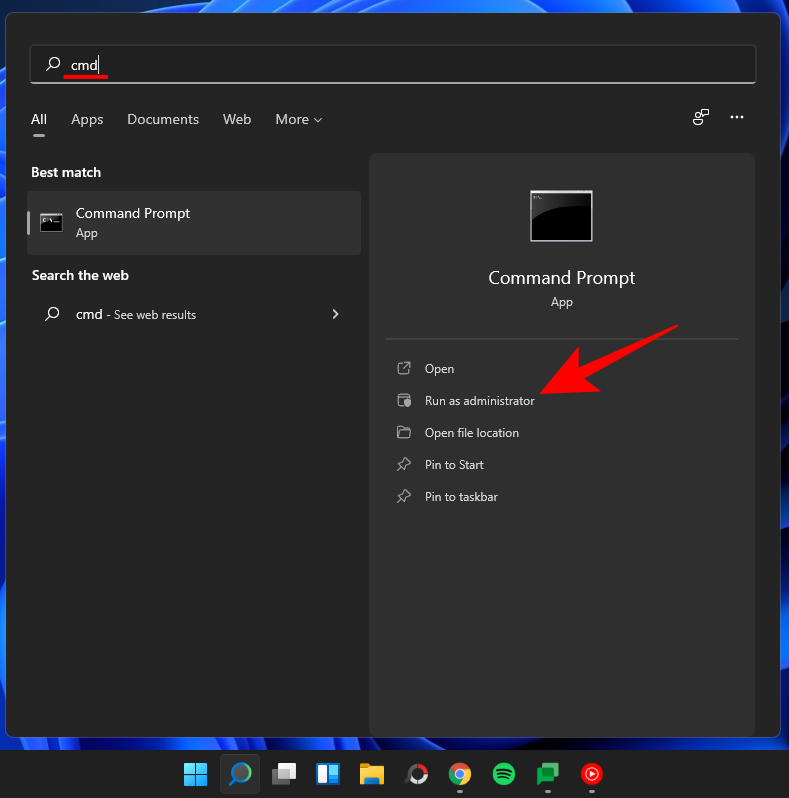
Press Windows + S on your keyboard and search for PowerShell. Click on ‘Run as administrator’ once the app shows up in your search results.
Now type in the following command and press ‘Enter’ on your keyboard.
Get-appxpackage -all *shellexperience* -packagetype bundle |% {add-appxpackage -register -disabledevelopmentmode ($_.installlocation + “\appxmetadata\appxbundlemanifest.xml”)}

Ignore any warnings that you get and continue with the process. Once complete, restart your system for good measure.
Now that the Start menu and other basic features have been reinstalled on your system, let’s rebuild your system’s index to get everything back up and running again. Press Windows + R on your keyboard to open the Run dialog box.
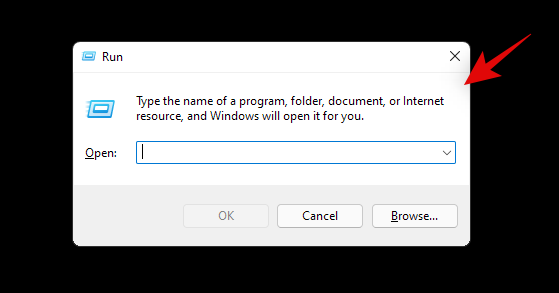
Type in the following command and press Enter on your keyboard.
control /name Microsoft.IndexingOptions
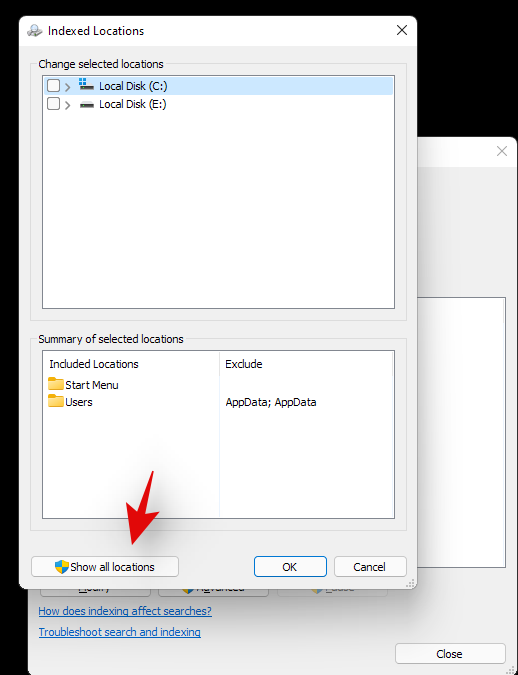
Click on ‘Modify’ and select ‘Show all locations’.
Uncheck all the boxes in the current list.
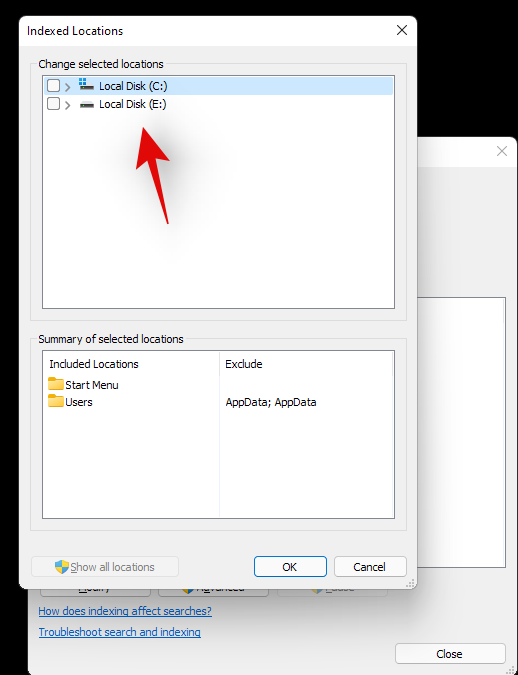
Click on ‘Ok’.
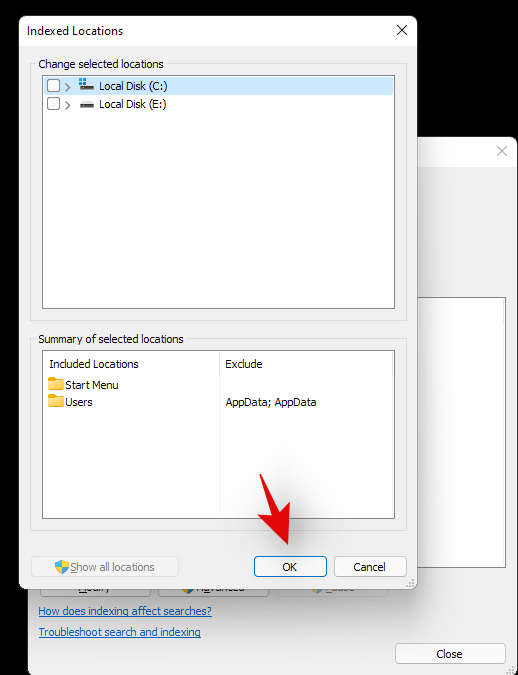
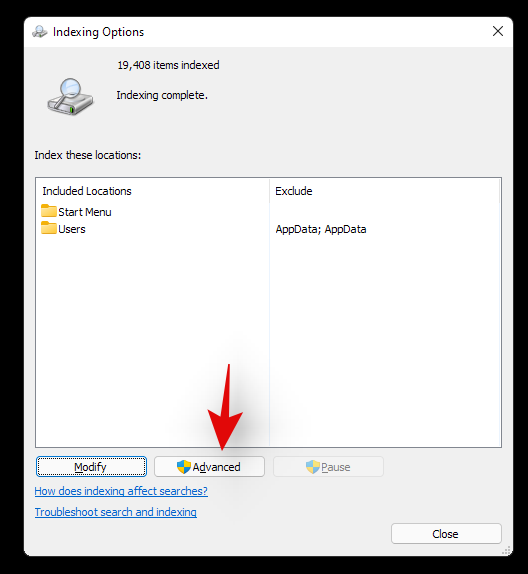
Click on ‘Advanced’ now.
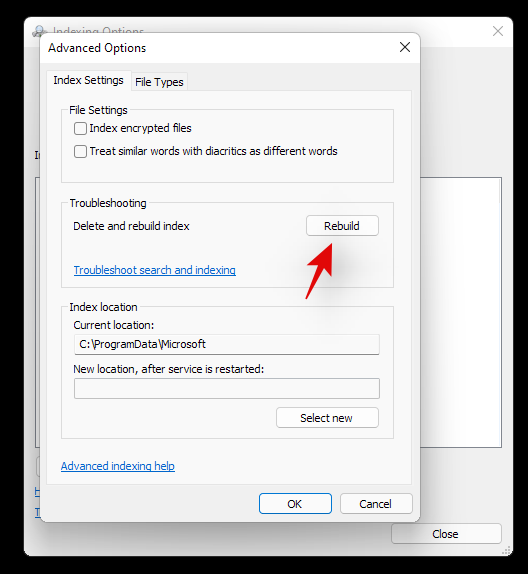
Select ‘Rebuild’ under troubleshooting.
Click on ‘Ok’ once the warning pops up on your screen.
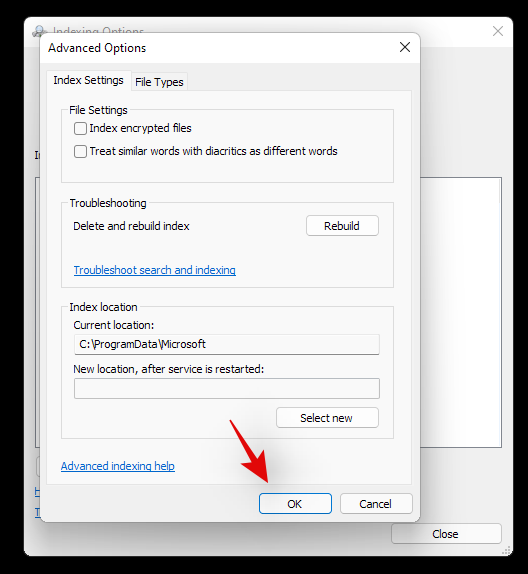
Once the process finishes, we highly recommend you restart your system.
You can now try clicking on the Start icon once your system restarts. Reinstalling the Start menu should help fix any issues with the Start menu on most systems.
Fix #11: Install any pending driver and Windows updates
This might be a bit obvious but you should definitely install any pending driver updates or Windows update on your system. This will help get you up and running on the latest drivers and help your system be compatible with all the hardware installed on your system. While drivers rarely cause issues with Windows features, you can never be too sure. Hence we recommend you install the latest available drivers on your system. You can use the link below to go to our detailed guide for updating drivers on Windows 11. If you are using a pre-built system or a laptop, then we recommend checking your OEM support page for dedicated driver updates as well.
There is a registry value that if modified, can disable your Start menu altogether. If you have been using registry modifiers, cleaners, and more, then it is likely that this registry value was modified which ended up disabling the Start menu on your system. Additionally, the Start menu’s functionality was moved to a Xaml process once Windows 10 was released. This process is known to glitch out
Use the guide below to check if the start menu is disabled on your system and re-enable it if needed.
Press Windows + R on your keyboard and type in the following command given below.
regedit
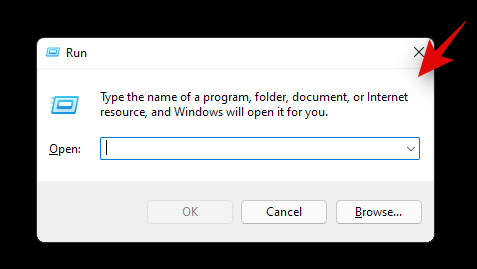
Now press Enter on your keyboard or click on ‘Ok’.
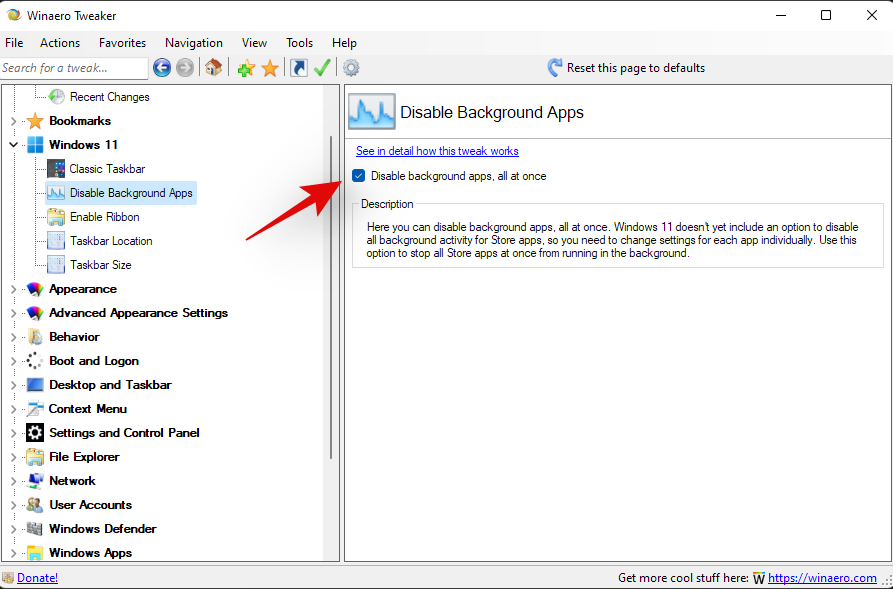
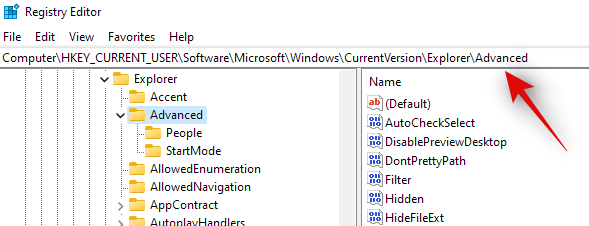
Copy and paste the following address in the address bar at the top of your registry editor.
HKEY_CURRENT_USER\Software\Microsoft\Windows\CurrentVersion\Explorer\Advanced
Now right-click on your right tab and select ‘New’.
Select ‘DWORD (32-bit value)’.
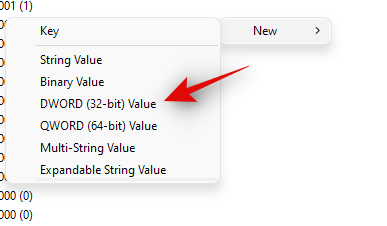
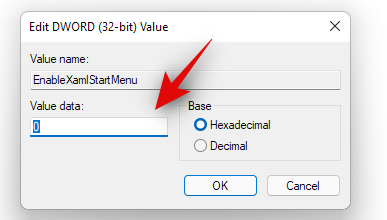
Enter the name as ‘EnableXamlStartMenu’.
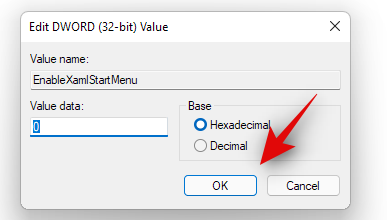
Enter the value as ‘0’.
Restart your PC now.
Once restarted try activating the Start menu now. If the Xaml process was facing conflicts, then they should be fixed now and the Start menu should be back up and running on your system again.
Fix #13: Restart Windows background services
If the Start menu still fails to launch then it’s time to restart all background Windows services. Usually restarting the ‘ShellExperienceHost.exe’ is enough but if that does not work for you, you can try restarting all the services listed below. This usually gets the Start menu back up and running on most systems.
Press Ctrl + Shift + Esc on your keyboard to open the ‘Task Manager’. Now click on ‘Details’ at the top to switch to the Details tab.
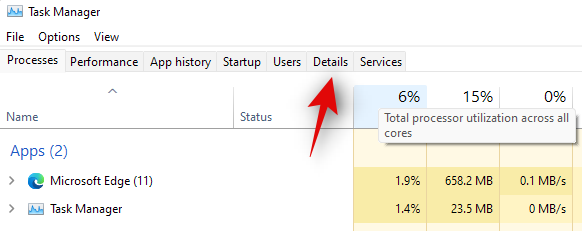
Find ‘StartMenuExperienceHost.exe’ in the list and click and select it.

Press Delete on your keyboard or click on ‘End Task’ in the bottom right corner. Click on ‘End Process’ again to confirm your choice.
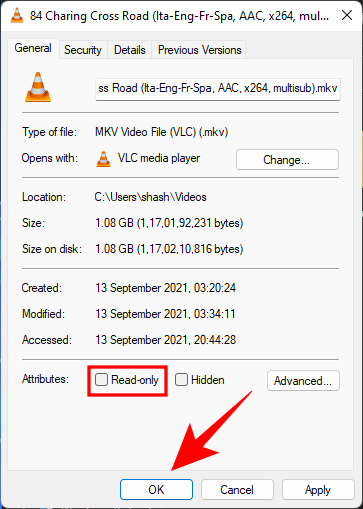
ShellExperienceHost.exe will now be killed. The process should automatically restart within a few seconds. Once restarted, try activating the Start menu on your system. If the menu starts working then you are good to go. However, if it is still not working then use the guide above to restart the following services on your system as well.
- SearchIndexer.exe
- SearchHost.exe
- RuntimeBroker.exe
And that’s it! If a background process was stopping you from accessing the Start menu then the issue should be fixed for you by now.
Fix #14: Run a Windows Troubleshooter
During a Windows 1909 feature update back in 2019, the Start menu was essentially broken due to a background conflict. To fix this issue for the masses, a troubleshooter was released by Microsoft to help fix this issue. If the Start menu is still not working for you then you can try running this troubleshooter on your system. Use the guide below to download and run the troubleshooter on your system.
Download the archive linked above to a convenient location on your local storage and extract its contents.
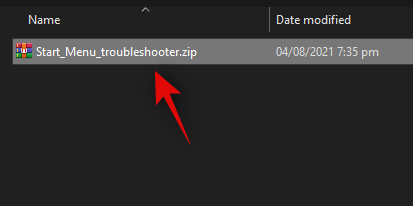
Now copy and paste the ‘startmenu.diagcab’ file on your desktop.

Double click and run the file from your desktop. Click on ‘Advanced’.
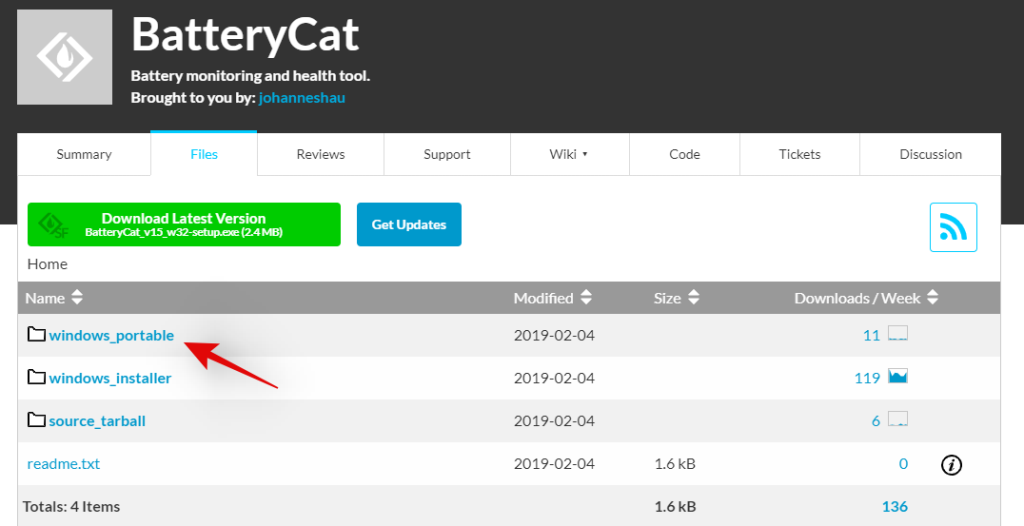
Check the box for ‘Apply repairs automatically’. Click on ‘Next’ once you are done.
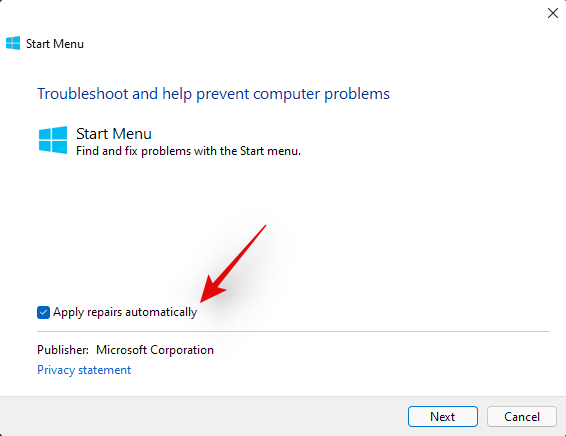
The troubleshooter will now do its thing and try to fix the Start menu on your system. Any errors or issues found will be automatically fixed and the Start menu’s functionality should now be restored on your system.
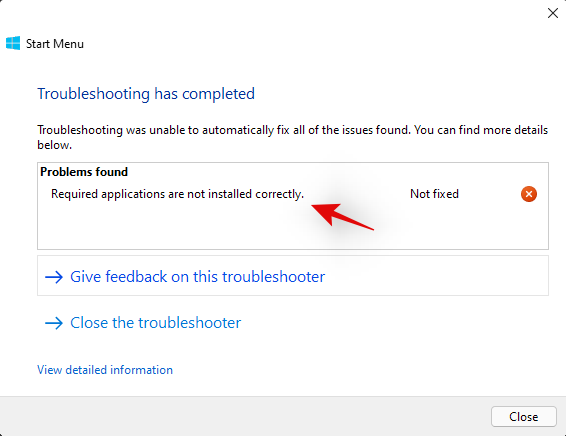
However, if the troubleshooter fails to fix the Start menu then this might indicate a more serious issue on your system. In such cases, let’s verify if Windows is actually able to access and initiate the process for the Start menu on your system. Use the checks below to help you along with the process.
We now need to check if the Start menu is actually available within your install of Windows 11. Let’s create a new local account that will help you verify its functionality. If the Start menu is working in the new account then it is likely an issue with your current user account.
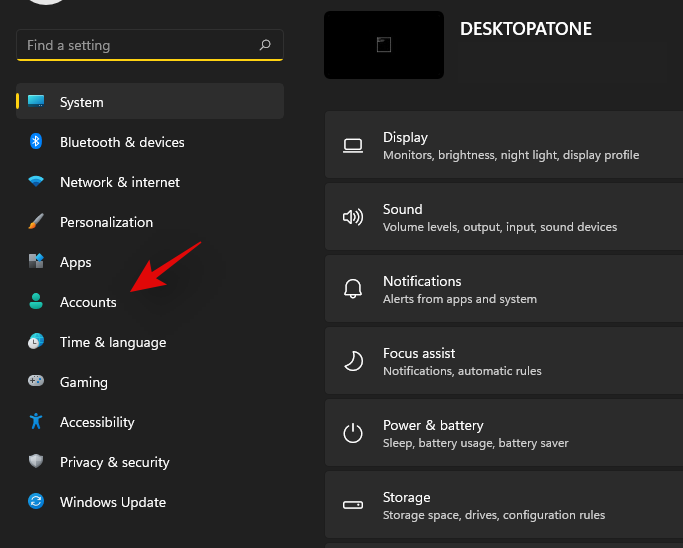
Press Windows + i on your keyboard and click on ‘Accounts’ on your left.
Click on ‘Family & other users’.
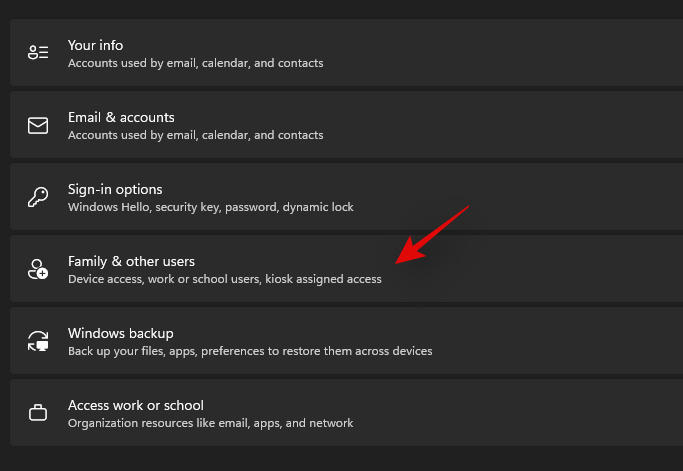
Now click on ‘Add account’ under other users.

Click on ‘I don’t have this person’s sign-in information’.
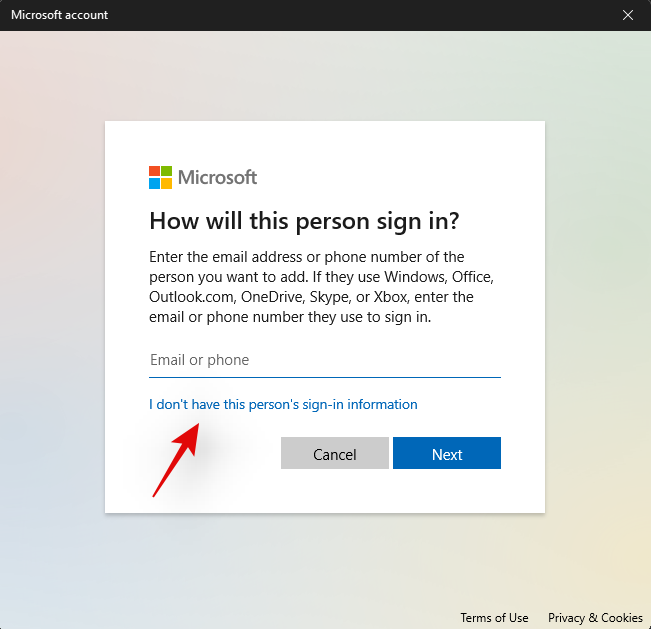
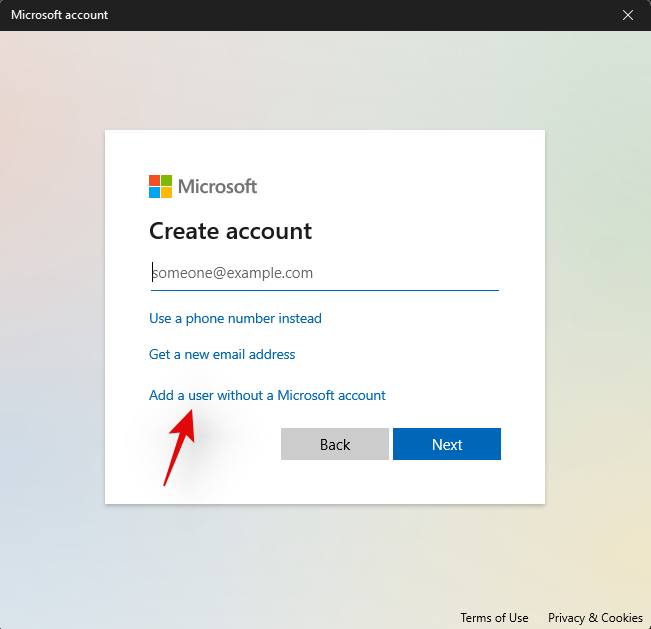
Click on ‘Add a user without a Microsoft Account’.
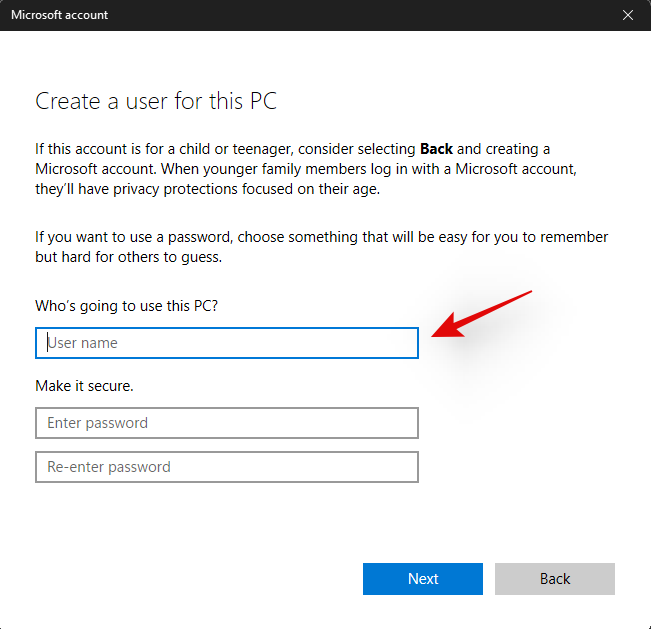
Now enter a username for the new account, and a password if needed.
Click on ‘Next’ once you are done.
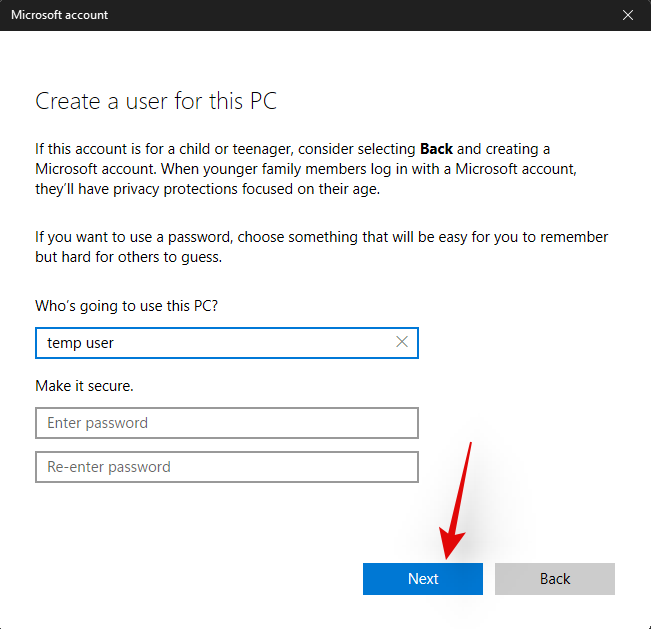
The new user account will now be created. Sign out of your current account and sign in to the new account.
Try to activate the Start menu now in the new temporary local account. If it is working then this is an issue specific to your user account. However, in case the Start menu fails to open, then this might indicate a more serious issue with your Windows 11 installation.
It’s now time to check if the Start menu is working in Safe mode. In case it is, then a third-party app is likely interfering with the Start menu’s functionality. You can remove any third-party apps used to modify the Start menu to try and fix this issue. Follow the guide below to activate Safe mode on Windows 11.
Press Windows + i on your keyboard and select ‘Windows Update’.
Now click on ‘Advanced options’.
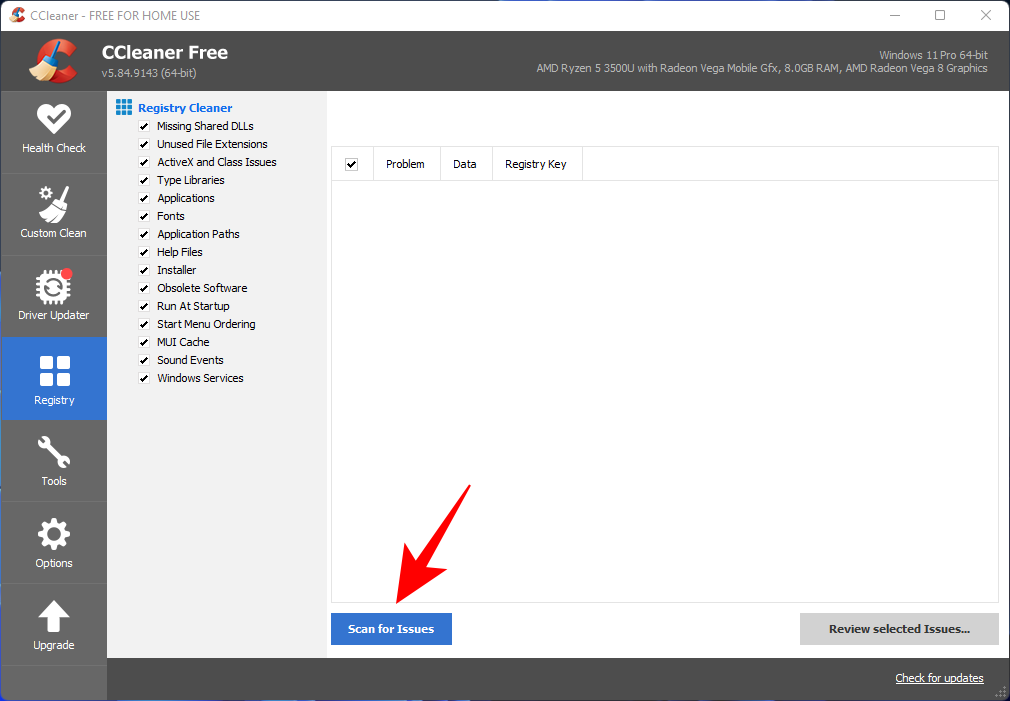
Click and select ‘Recovery’.
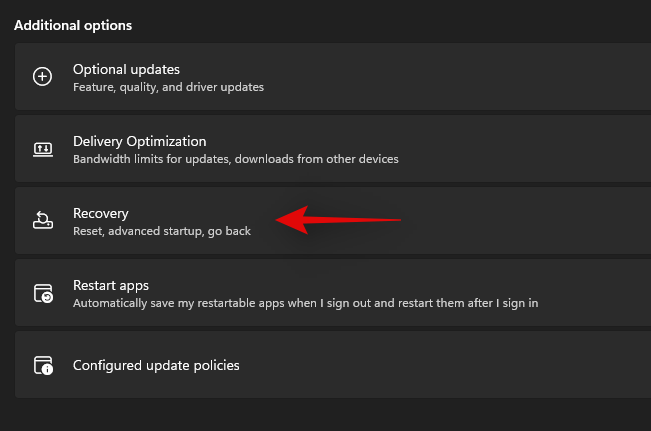
Now click on ‘Restart now’ beside ‘Advanced startup’.

Click on ‘Restart now’ again.
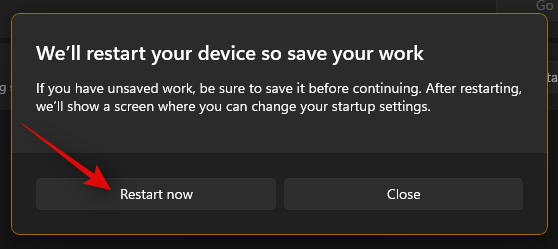
Your PC will now restart to the recovery screen. Click and select ‘Troubleshoot’.
Now click on ‘Advanced options’.
Click on ‘Startup Settings’.
Press ‘F4’ to start your PC in safe mode now.
Once your PC restarts, the safe mode should be active on your system. Now try to activate the start menu. If the menu activates, then it is likely that a third-party app is causing issues on your Windows 11 system. You can try removing apps used to customize the Start menu one by one to find the culprit on your system.
Fix #17: Run a malware and antivirus scan
We recommend you try and run a malware scan before opting for the last resort. If any malware or malicious service is causing issues with the Start menu, then a scan will help solve these issues. Use the guide below to run a malware scan through Windows Defender.
Press Windows + S on your keyboard and search for ‘Windows Security’. Click and launch the app once it shows up in your search results.

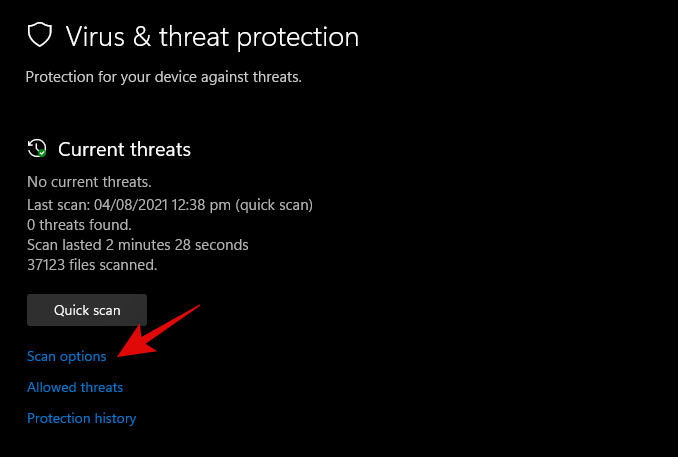
Click on ‘Virus & threat protection’.
Click on ‘Scan options’.
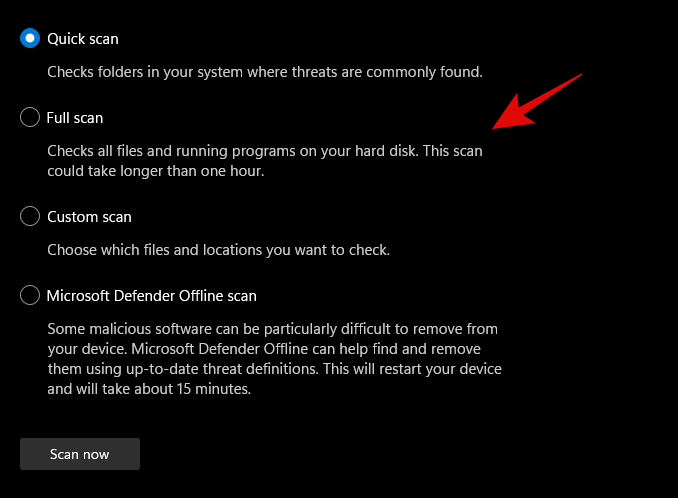
Select ‘Full Scan’.
Finally, click on ‘Scan now’.
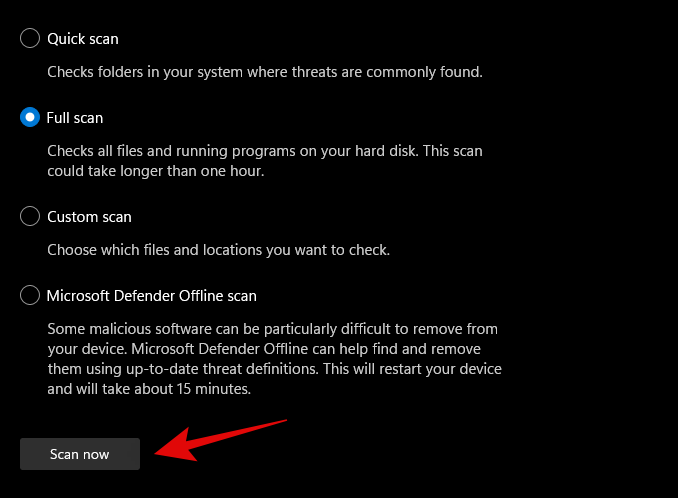
Windows Defender will now scan your entire PC for malware and malicious software. In case any are found, they will be automatically quarantined, and you will be prompted to take the necessary action as soon as possible.
3 General Fixes: Last Resort options
Fix #18: Create a new user via command prompt
If you’re facing an issue where you’re unable to add a local account via Settings to your PC then you can use the command prompt (CMD) for the same. Once added you can try and check if the Start menu is working for you. If it is, you can try the fixes below to restore it in your original account. However, if none of the fixes work for you then you can use the newly created account instead. The new account will be created with administrator privileges so you shouldn’t have problems moving your files and Settings. More on this below.
Press Windows + R to bring up the Run dialog box and type in the following. Press Ctrl + Shift + Enter on your keyboard once you are done.
cmd
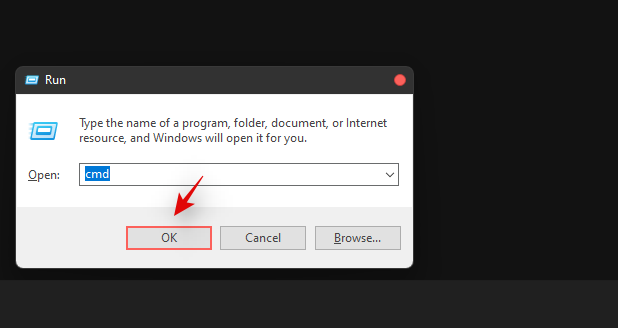
Type in the following command and press Enter on your keyboard. Replace ‘USER’ with your desired username for the new account. Similarly, replace ‘PASSWORD’ with your desired password.
net user /add USER PASSWORD
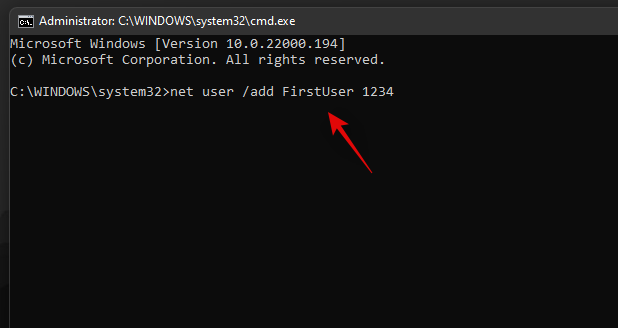
Now execute the following command as well and use the same username as above.
net localgroup administrators USER /add
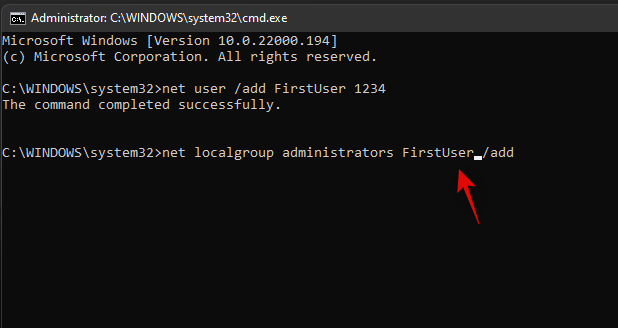
The user will now be added to your PC. Simply restart and log into the new account when the PC restarts.
The start menu should work alright now in the new user account. You can copy your files from the old user account to the new account.
To find your data in the old user account, open Windows Explorer and go to the User folder under the C Drive (or whichever drive you have installed Windows in).
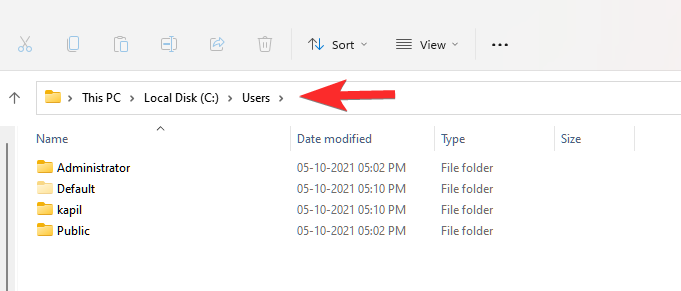
Click on the old user account. Now, copy all the files from here to your new user account that you can also find in the Users folder.
An easy method to transfer files from one user account (old one) to another user account (new one) is to copy the profile. Read more about it here.
Fix #19: Perform a Windows Reset
If you had zero luck with all of the previous methods, we think you should try a Windows Reset. It has been known to solve a host of problems in Windows 11 while keeping your personal files intact. Moreover, resetting Windows to its factory settings can give your PC a fresh start.
Here are the steps.
For this method, you’ll need an elevated PowerShell instance.
Press Win key + r to open the Run box, then type in ‘PowerShell and press Ctrl + Shift + Enter to open PowerShell as administrator.
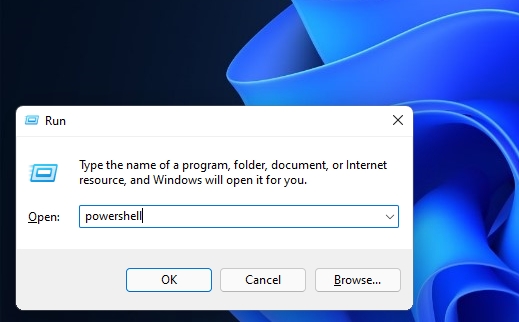
When opened correctly, you should already be inside the C:\Windows\system32 folder.
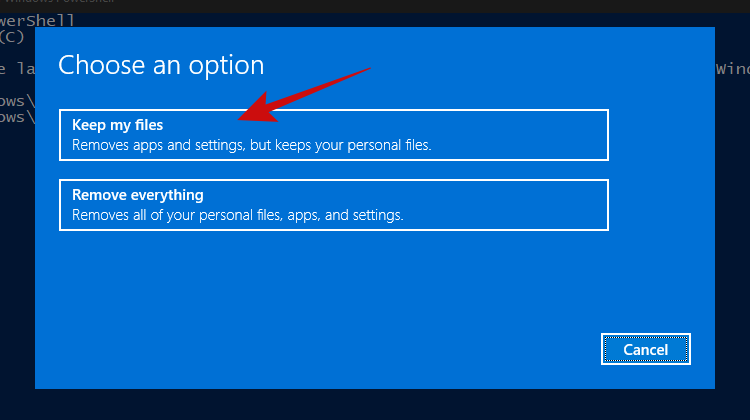
Now type in ‘system reset and press enter. You should be presented with two options, to either keep all your files or to remove everything. Click on ‘Keep my files’.
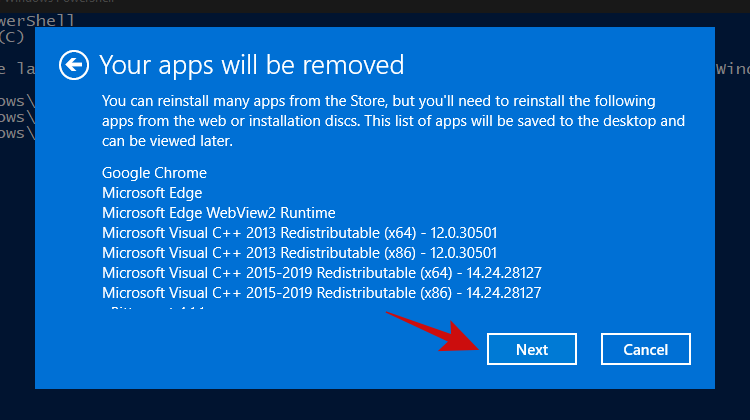
Within a few minutes, Windows should give you a list of apps that’ll be removed from your PC after the reset. Here’s how our list looks.
Once you’ve scrolled through the list of apps, simply click on the ‘Next’ button.
Windows should now start the reset process. Simply follow the instructions and your PC should be reset within a couple of minutes. The Start menu should be working now.
Fix #20: Re-install Windows from scratch
Well, if you’re really considering this method, it’s safe to assume that none of the other methods worked for you. At this point, we think it’s now time to go for a clean installation of Windows 11, which will probably wipe your current Windows partition (if you choose to).
Note: Before proceeding with this method, we recommend making a complete backup of all your files stored inside folders on the Windows drive, such as in Downloads, Documents, and the likes.
Once you have backed up all your files from the Windows drive, let’s take a look at the things you’ll need.
- A USB stick of 8GB or more (no external hard drives, unless you want to lose all your precious data)
- Rufus
Next, follow our guide on downloading and installing the Windows 11 ISO.
Read: How to Download and Install Official Windows 11 ISO
We hope that after following this guide, you were able to fix the annoying and unresponsive Start menu in Windows 11 and bring it back to life.
If you find yourself stuck at any point in this guide, let us know in the comments below.
Related:




![Cara Membetulkan Ralat Skrin Hijau Windows 11 [8 Cara] Cara Membetulkan Ralat Skrin Hijau Windows 11 [8 Cara]](https://cloudo3.com/resources8/images31/image-5564-0105182715287.png)


