Bar tugas Windows telah menjadi pusat perhatian semua sejak ia mendapat rupa baharunya yang diubah suai dengan keluaran Windows 11. Anda kini boleh memusatkan bar tugas anda, menikmati pusat tindakan baharu, menukar penjajarannya dan meletakkannya pada kedua-dua sisi skrin anda. Malangnya, penggunaan ciri ini kurang berjaya dengan semakin ramai pengguna yang bergelut untuk memastikan bar tugas mereka berfungsi pada Windows 11 selama beberapa bulan.
Walaupun Microsoft telah mengakui isu itu, mengeluarkan penyelesaian dan sedang berusaha untuk membetulkan, pengguna nampaknya masih tidak dapat memastikan Bar Tugas berfungsi semula. Jika anda berada dalam bot yang sama maka kami telah menyusun senarai semua pembetulan yang tersedia untuk mendapatkan bar tugas anda kembali dan berjalan semula pada Windows 11. Ikuti panduan di bawah untuk memulakan anda.
kandungan
Mengapa bar tugas saya tidak dipaparkan?
Bar tugas Windows 11 mempunyai rupa baharu yang datang daripada pandangan yang diubah suai pada fungsinya. Bar tugas kini bergantung pada beberapa perkhidmatan dan menu Mula itu sendiri untuk berfungsi dengan betul. Nampaknya proses naik taraf daripada Windows 10 kepada Windows 11 nampaknya merosakkan bar tugas bergantung pada versi Windows 10 yang telah anda pasang pada sistem anda dan versi Windows 11 yang anda sedang kemas kini.
Selain itu, Kemas Kini Windows baru-baru ini yang dikeluarkan bulan lepas juga nampaknya menyebabkan isu ini kepada sesetengah pengguna manakala yang lain menghadapi perkara yang sama kerana masa sistem yang tidak sepadan walaupun semuanya telah disediakan dengan betul. Terdapat banyak cara untuk membetulkan bar tugas anda dan kami mengesyorkan anda mulakan dengan pembetulan di bawah satu demi satu.
12 Cara untuk membetulkan isu bar tugas pada Windows 11
Gunakan kaedah di bawah untuk mula membetulkan bar tugas anda pada Windows 11. Jika anda telah mencuba memulakan semula sistem anda, maka anda boleh melangkau kaedah pertama.
Betulkan #1: Mulakan semula PC
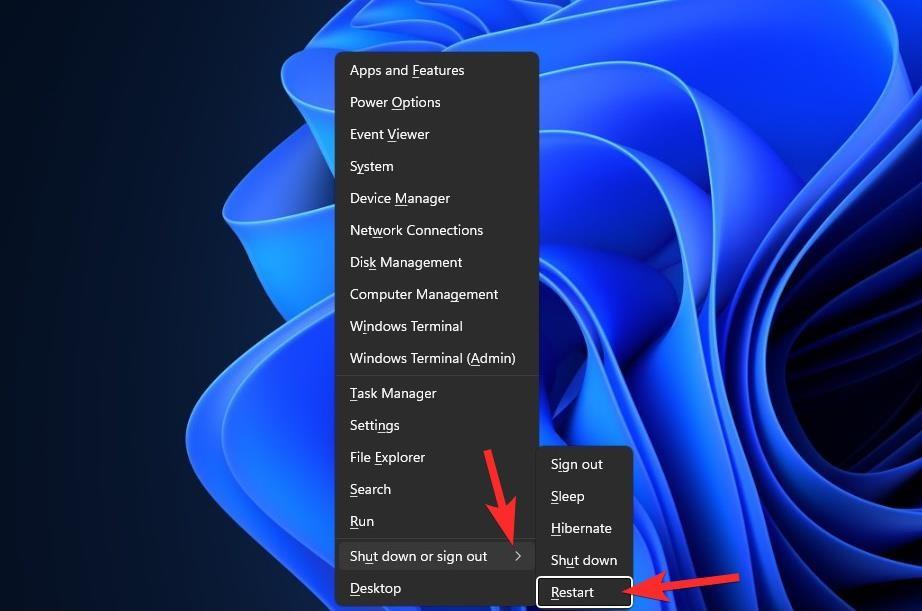
Sebelum anda mencuba sesuatu yang menarik, adalah baik untuk mencuba langkah yang lebih mudah, seperti memulakan semula PC atau Windows Explorer (lihat di bawah). Melakukannya akan memberikan sistem anda tetapan semula lembut, membenarkan data dimuatkan semula dan, mungkin, menyelesaikan masalah dengan bar tugas dan menu Mula.
Betulkan #2: Pastikan 'Sembunyikan bar tugas secara automatik' dilumpuhkan
Tekan Windows + ipada papan kekunci anda dan klik pada 'Pemperibadian' di sebelah kiri anda.
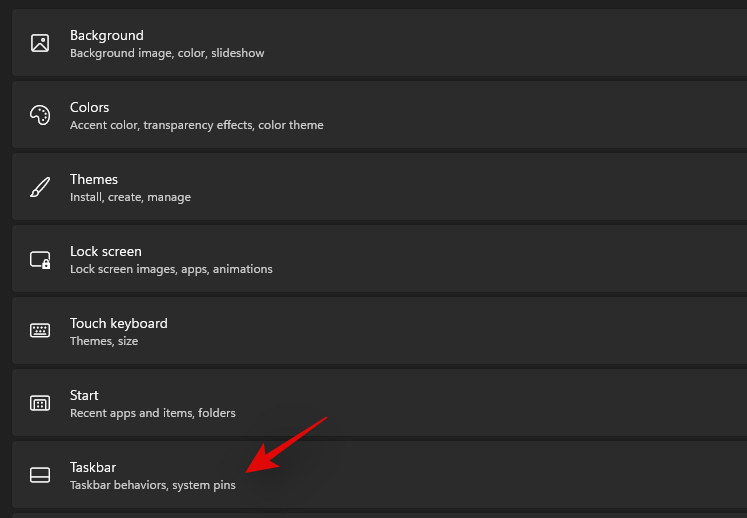
Klik pada 'Taskbar'.
Sekarang klik pada 'Kelakuan Bar tugas'.
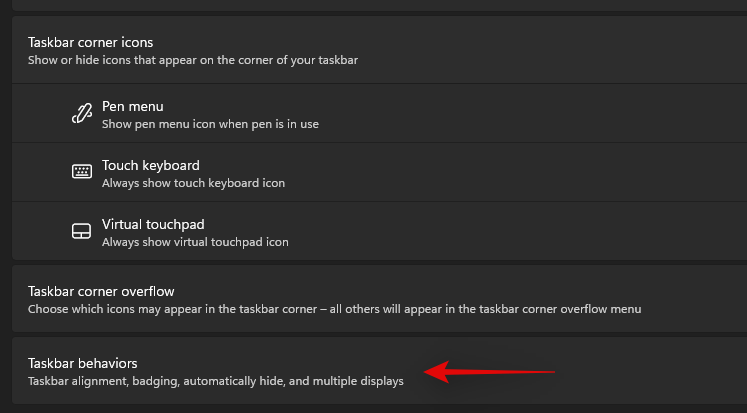
Nyahtanda kotak untuk 'Sembunyikan bar tugas secara automatik'.

Sekarang tutup apl Tetapan dan jika bar tugas anda disembunyikan secara automatik, maka bar tugas itu kini seharusnya dilumpuhkan pada sistem anda.
Betulkan #3: Mulakan semula perkhidmatan yang diperlukan
Seperti yang dinyatakan sebelum ini, Windows 11 telah merombak bar tugas yang kini bermakna ia bergantung pada pelbagai perkhidmatan untuk berfungsi dengan baik pada mana-mana sistem. Mari mulakan semula semua perkhidmatan ini untuk memastikan bahawa konflik latar belakang tidak menghalang Bar Tugas anda daripada berfungsi dengan betul pada sistem anda.
Tekan Ctrl + Shift + Escpada sistem anda untuk melancarkan Pengurus Tugas. Beralih ke tab 'Butiran' di bahagian atas.
Sekarang cari perkhidmatan berjalan berikut dan pilihnya dengan mengklik padanya. Tekan 'Padam' pada papan kekunci anda dan sahkan pilihan anda dengan memilih 'Tamat Proses'.
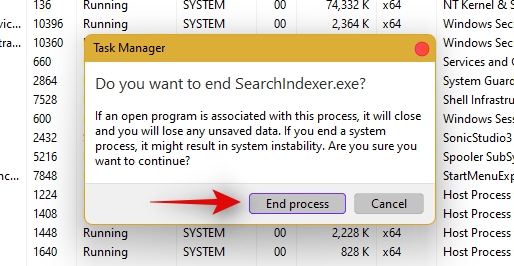
- Explorer.exe
- ShellExperienceHost.exe
- SearchIndexer.exe
- SearchHost.exe
- RuntimeBroker.exe
Mari mulakan semula Windows Explorer sekarang. Klik pada 'Fail' di sudut kiri atas dan pilih 'Jalankan tugas baharu'.
Taipkan 'explorer.exe' dan tekan Enter pada papan kekunci anda. Anda juga boleh klik pada 'Ok' jika perlu.
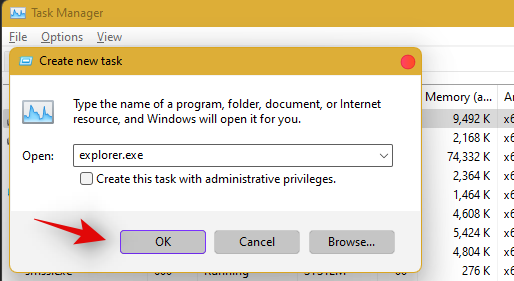
Setelah explorer dimulakan semula, hanya mulakan semula PC anda untuk memulakan semula perkhidmatan lain pada sistem anda.
Bar tugas kini harus dipulihkan jika konflik perkhidmatan latar belakang menjadi punca isu anda.
Betulkan #4: Padamkan IrisService dalam Registry dan mulakan semula
Tekan Ctrl + Shift + Escuntuk membuka Pengurus Tugas. Kemudian klik pada Fail di sudut kiri atas.
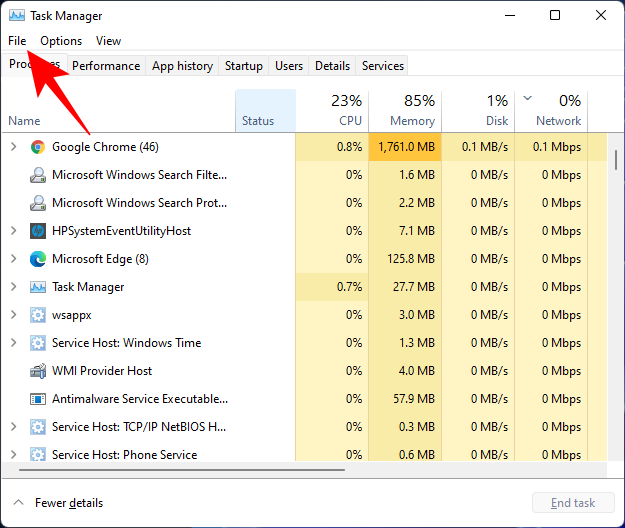
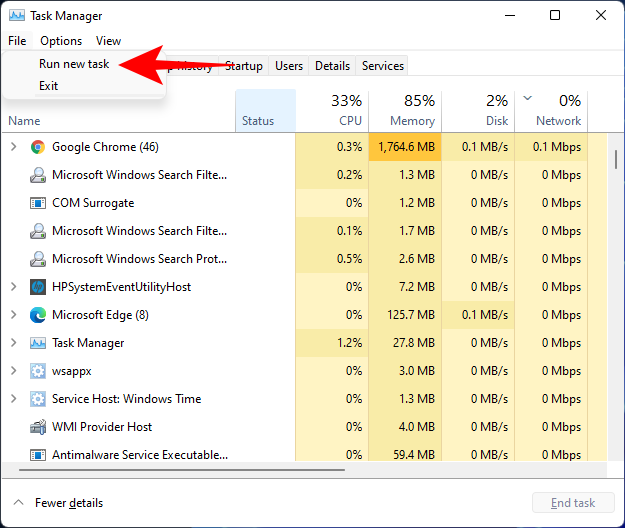
Pilih Jalankan tugas baharu .
Taip cmd dan tekan Enter.
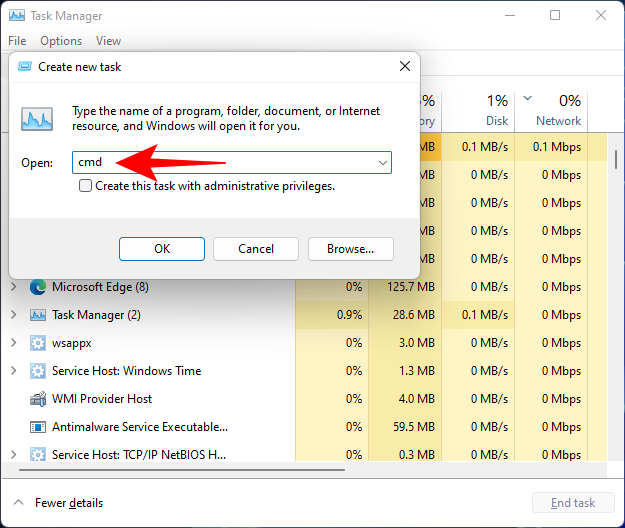
Ini akan membuka contoh Prompt Perintah yang tinggi. Sekarang salin arahan berikut dan tampalkannya dalam Prompt Perintah:
reg delete HKCU\SOFTWARE\Microsoft\Windows\CurrentVersion\IrisService /f && shutdown -r -t 0

Kemudian tekan Enter. Sebaik sahaja anda berbuat demikian, PC anda akan but semula. Sebaik sahaja ia dimulakan semula, keadaan harus kembali normal, termasuk Bar Tugas.
Betulkan #5: Tambah UndockingDisabled dalam Registry
Tekan Ctrl + Shift + Escuntuk membuka Pengurus Tugas. Kemudian klik pada Fail (sudut kiri atas) dan Jalankan tugas baharu .
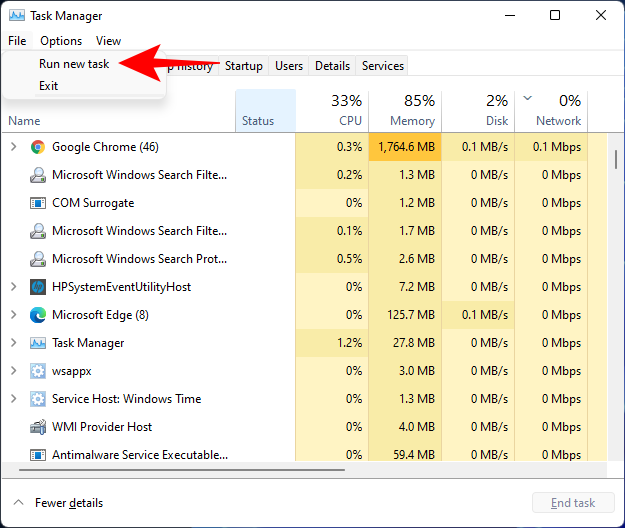
Taip regedit dan tekan Enter.
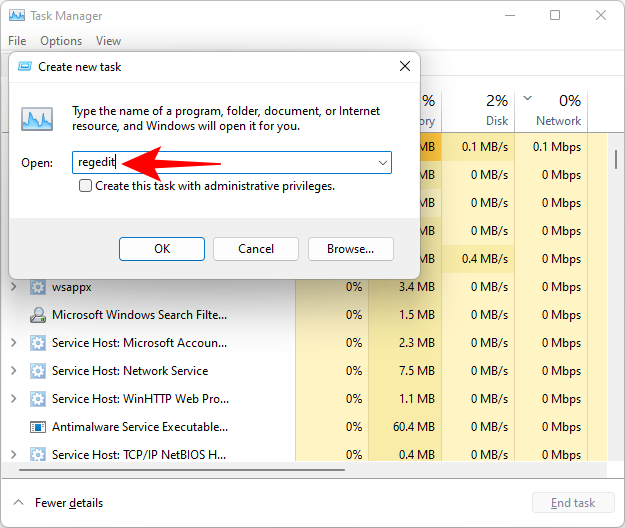
Ini akan membuka Editor Pendaftaran. Sekarang navigasi ke alamat berikut:
Computer\HKEY_LOCAL_MACHINE\SOFTWARE\Microsoft\Windows\CurrentVersion\Shell\Update\Packages
Sebagai alternatif, hanya salin di atas dan tampalkannya ke dalam bar alamat Editor Pendaftaran, seperti:

Sebaik sahaja anda menekan Enter, anda akan diarahkan ke kekunci yang ditentukan. Di sebelah kanan, klik kanan pada ruang dan pilih Baharu > Nilai DWORD (32-bit) .
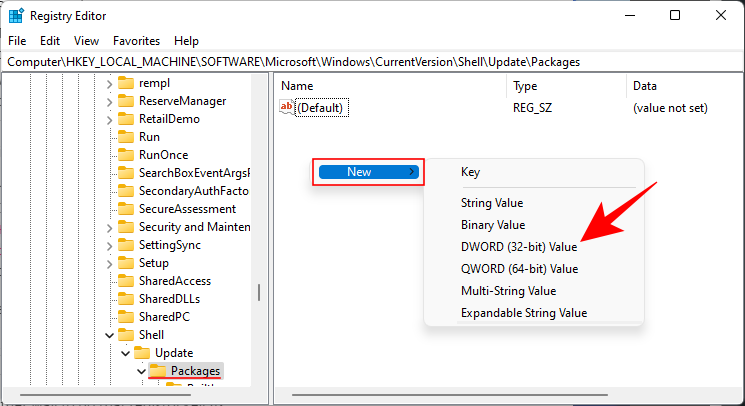
Namakan DWORD UndockingDisabled yang baru dibuat ini .
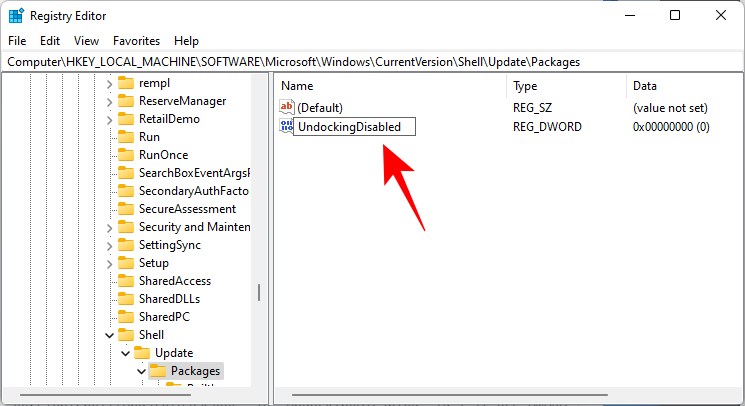
Kemudian klik dua kali padanya dan tukar “Data nilai” kepada 1 . Kemudian klik OK .
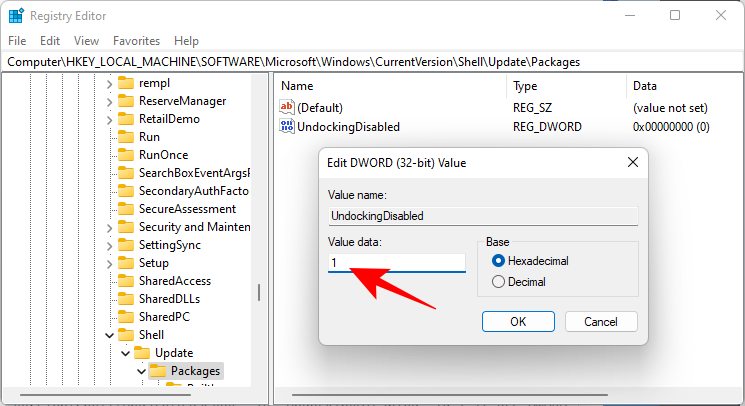
Mulakan semula PC anda untuk perubahan berkuat kuasa.
Betulkan #6: Jalankan arahan SFC & DISM
Tekan Mula, taip cmd , dan klik pada Jalankan sebagai pentadbir .
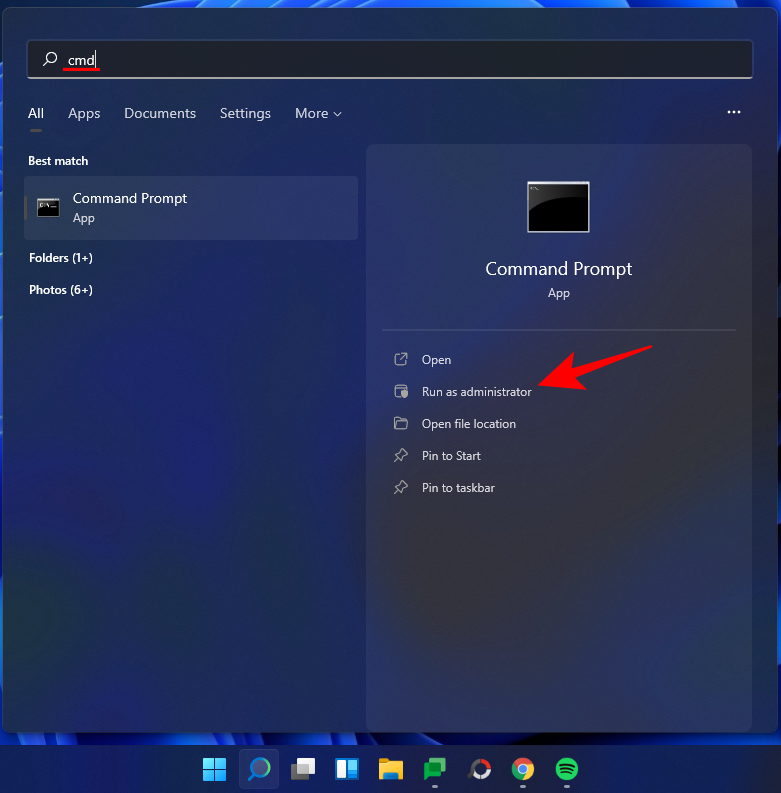
Sekarang taip arahan berikut:
sfc /scannow
Tekan enter. Tunggu SFC selesai mengimbas dan selesaikan sebarang isu yang ditemui.

Seterusnya, jalankan perintah DISM berikut untuk alat Servis dan Pengurusan Imej Deployment:
dism /online /cleanup-image /scanhealth
Kemudian tekan Enter. Sekali lagi, tunggu sehingga imbasan selesai.

Sekarang, jalankan arahan DISM berikut:
dism /online /cleanup-image /restorehealth

Tekan enter. Tunggu DISM memulihkan kesihatan.

Akhir sekali, jalankan arahan chkdsk untuk menjalankan utiliti Semak Cakera:
chkdsk c: /r
Tekan enter. Prompt Perintah akan melontarkan mesej yang memberitahu anda bahawa ia "tidak boleh mengunci pemacu semasa... kerana volum sedang digunakan oleh proses lain", dan meminta kebenaran anda untuk menjadualkan imbasan sebelum boot seterusnya. Taip Yuntuk mematuhi.

Dan tekan Enter. Sekarang mulakan semula komputer anda, biarkan alat Semak Cakera melakukan tugasnya dan semak jika bar tugas telah menyambung semula fungsi normal.
Betulkan #7: Pasang semula UWP
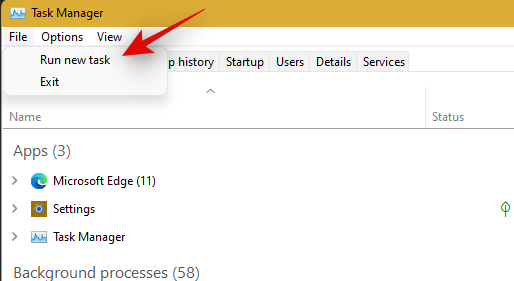
Tekan Ctrl + Shift + Escpada papan kekunci anda untuk melancarkan Pengurus Tugas. Klik pada 'Fail' dan pilih 'Jalankan tugas baharu'.
Taipkan 'PowerShell' dan tekan Ctrl + Shift + Enterpada papan kekunci anda.

PowerShell kini akan dilancarkan sebagai pentadbir pada sistem anda. Taip arahan berikut:
Get-AppxPackage -AllUsers | Foreach {Add-AppxPackage -DisableDevelopmentMode -Register “$ ($ _. InstallLocation) \ AppXManifest.xml”}
Tekan enter. PowerShell akan mengeluarkan senarai mesej yang sedang berjalan dengan warna merah. Tetapi jangan risau. Hanya tunggu arahan selesai melaksanakan.

Betulkan #8: Semak UAC dan tambah edit Registry jika perlu
UAC is a must-have for all modern apps and features including the Start Menu and the taskbar. You should first enable UAC if it is disabled and restart your system. If the Taskbar still fails to work for you, then we recommend you try adding a Xaml Start menu value to your Registry Editor.
Adding this value seems to restart and re-register Taskbar services which seem to get Taskbar working again on most systems. Follow the guide below to get you started.
Check and enable UAC if disabled
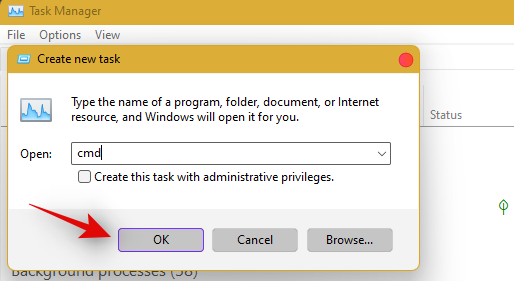
Press Ctrl + Shift + Esc on your keyboard to launch the task manager. Now click on ‘File’ in the top left corner of your screen and select ‘Run new task’.

Type in ‘cmd’ and press Ctrl + Shift + Enter on your keyboard.
Now type in the following command and press Enter to execute the command.
C:\Windows\System32\cmd.exe /k %windir%\System32\reg.exe ADD HKLM\SOFTWARE\Microsoft\Windows\CurrentVersion\Policies\System /v EnableLUA /t REG_DWORD /d 0 /f
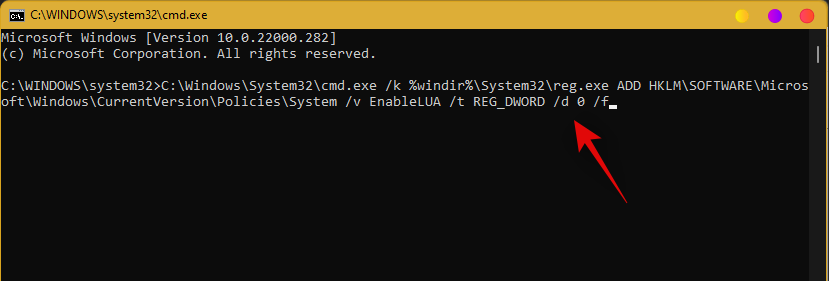
UAC will now be enabled for your system. Restart your PC for the changes to take effect on your system. Once restarted, Taskbar should be up and running on your system if UAC was the issue for you. If not, use the guide below to trigger the taskbar’s functionality on your system.
Add Registry Value
Press Ctrl + Shift + Esc to launch the task manager. Now click on ‘File’ in the top left corner and select ‘Run new task’.

Type in ‘cmd’ and press Ctrl + Shift + Enter on your keyboard.

Now type in the following command and press Enter on your keyboard.
REG ADD "HKCU\Software\Microsoft\Windows\CurrentVersion\Explorer\Advanced" /V EnableXamlStartMenu /T REG_DWORD /D 1 /F
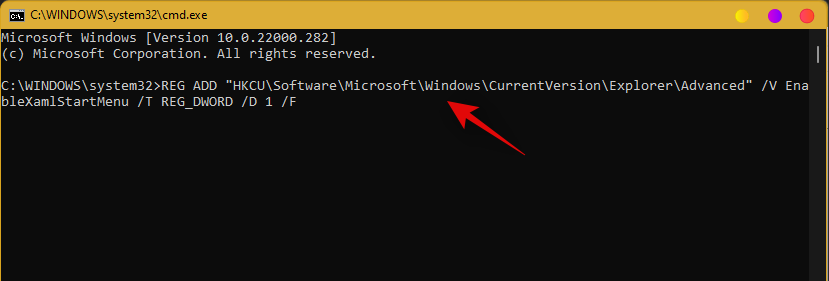
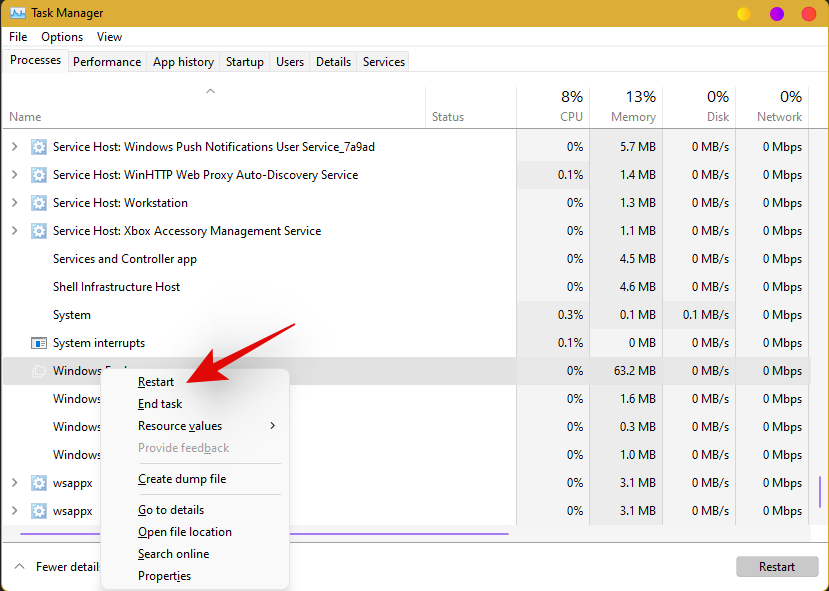
Go back to the task manager now, find Windows Explorer in the list, and right-click on it. Select Restart to restart explorer.exe.
Once restarted, try to access your taskbar. The taskbar should now be available on your system.
Fix #9: Edit date and time to fix Taskbar
Date and Time settings seem to be the major cause of issues with the taskbar in Windows 11. Use the guide below to try out the following time fixes to see which one works the best for you.
Ensure that your time is correctly synchronized with the time server
Press Ctrl + Shift + Esc on your keyboard and click on ‘File’. Select ‘Run new task’.

Type in ‘Control’ and hit Enter on your keyboard.
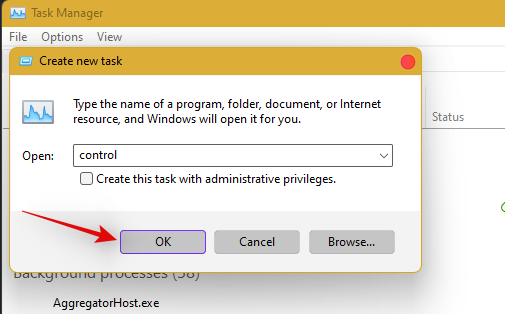
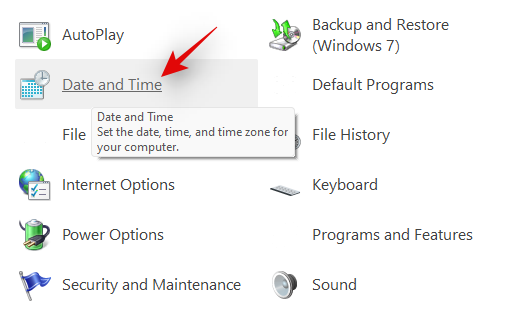
Click on ‘Date and Time’.
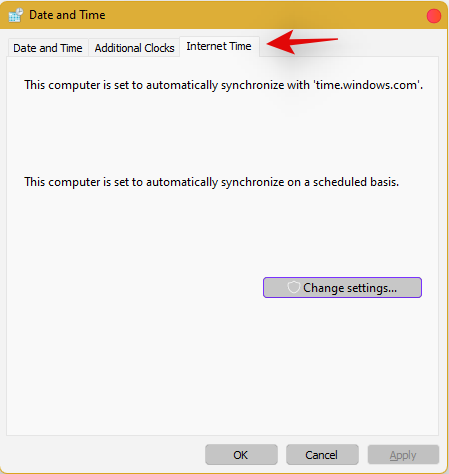
Select ‘Internet Time’ from the top.
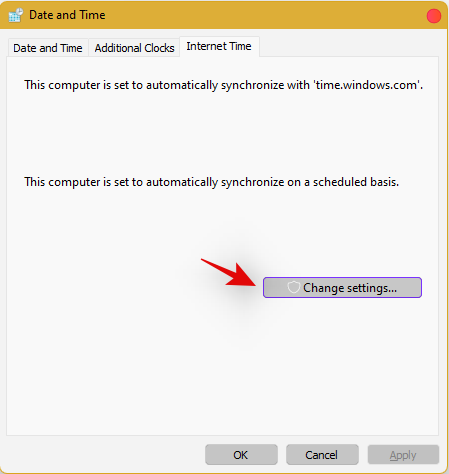
Click on ‘Change Settings’.
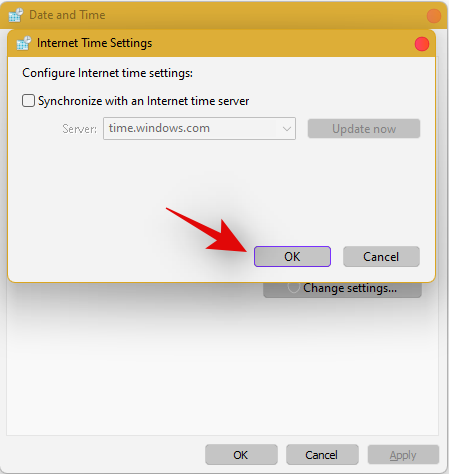
Uncheck the box for ‘Synchronize with an Internet time server’.

Click on ‘Ok’ once you are done.
Restart your PC at this point and check your taskbar. If it is still disabled, do not fret, follow the steps above and enable Synchronization with an Internet Time Server again.
Once enabled, press Ctrl + Shift + Esc on your keyboard, and find Windows Explorer in the list on your screen. Right-click the listing and select ‘Restart’.

Once explorer restarts, try using the Taskbar. If synchronization was your issue, then it should now be fixed on your system. If not, continue with the other time fixes mentioned below.
Change date to 1 day ahead
Open the Task Manager by pressing Ctrl + Shift + Esc simultaneously. Then click on File.
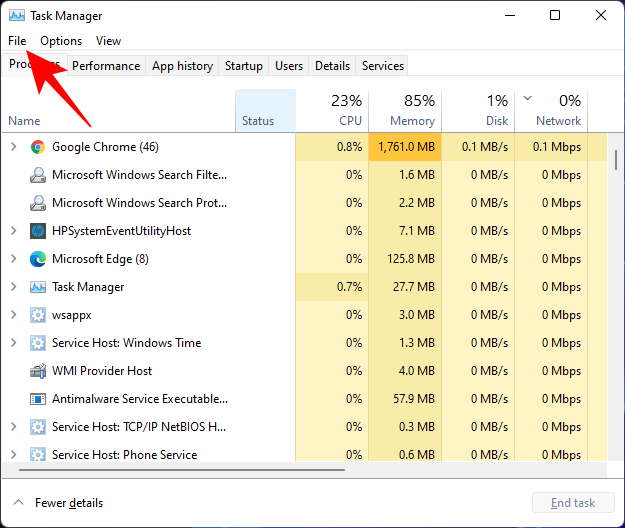
Click on Run new task.
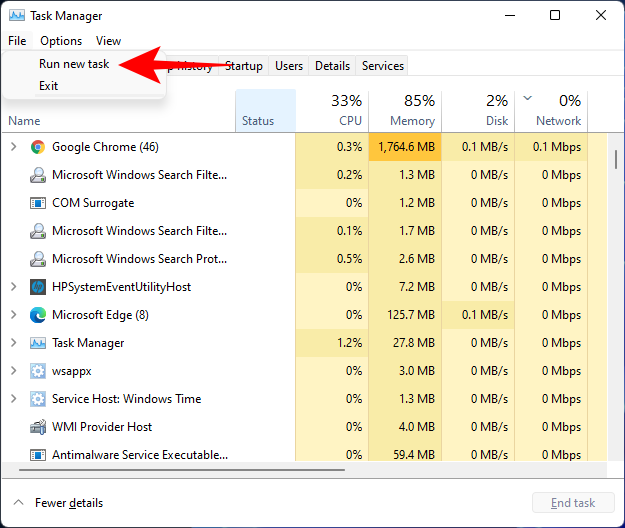
Type control panel and hit Enter.
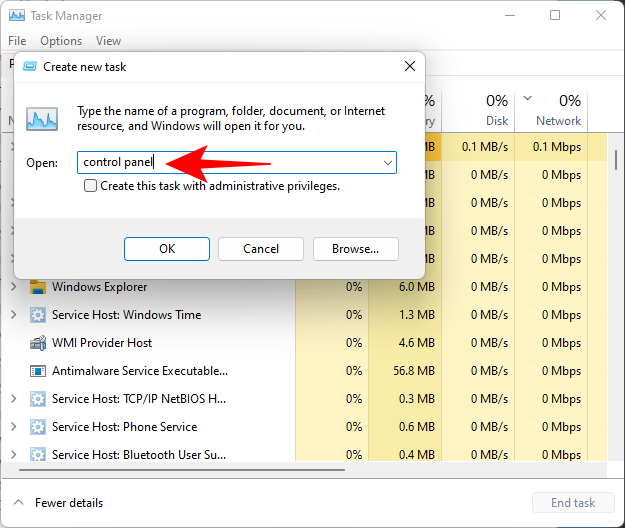
Now click on Clock and Region.
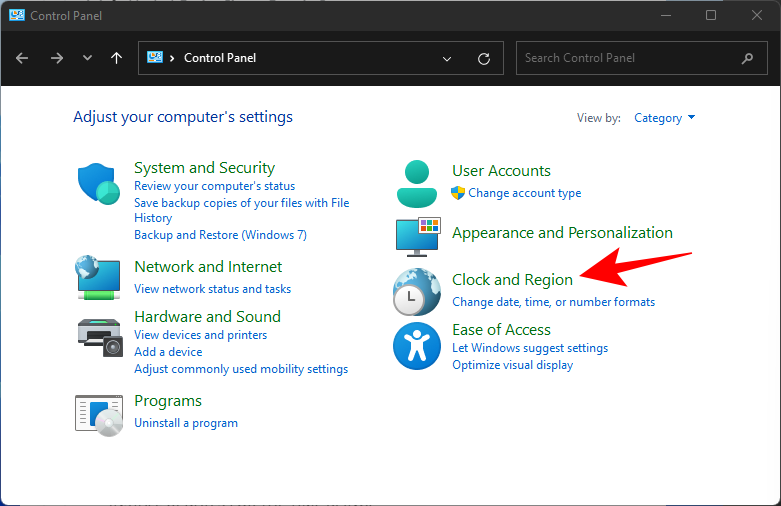
Under “Date and Time”, click on Set the time and date.
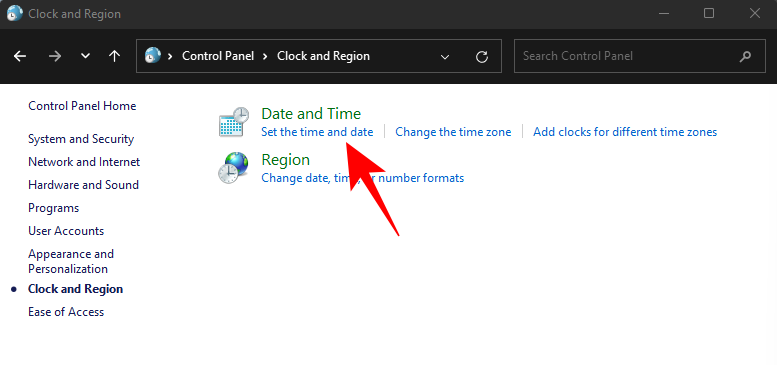
Click on the Internet Time tab to switch to it.
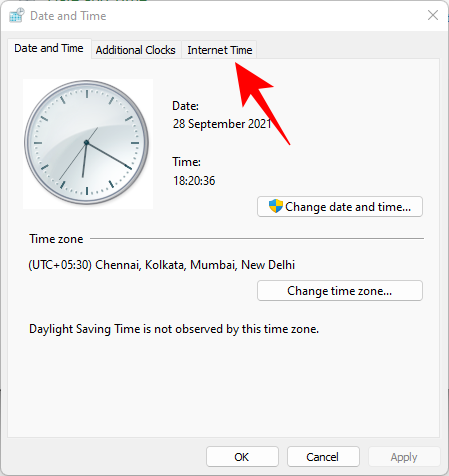
Click on Change settings…
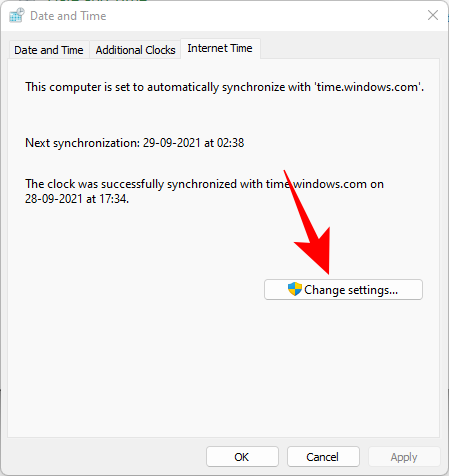
Uncheck Synchronize with an Internet time server, then click OK.
Now click on the Date and Time tab to switch back to it.
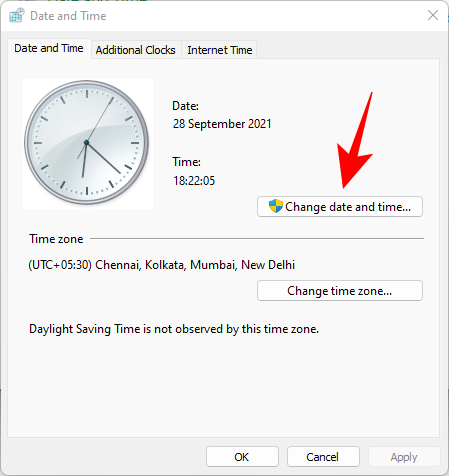
Here, click on Change date and time…
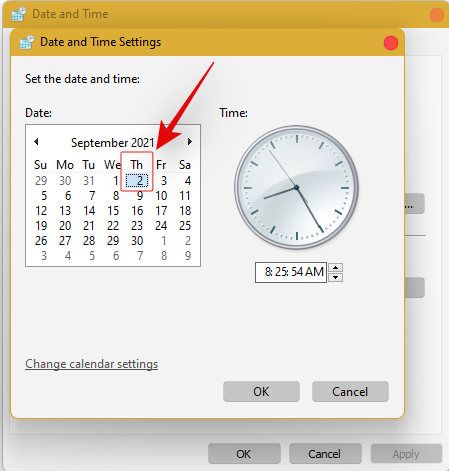
Now change the date and time to reflect tomorrow. As of writing this post, it is the 1st November so we will be changing the date to 2nd November.
Change Dates to last cumulative updates
If you are still unable to get the Taskbar working then you will have to jump through a few hoops to change your date and time multiple times and get the taskbar working on your system. Follow the guide below to get you started.
Press Ctrl + Shift + Esc on your keyboard, click on ‘File’ and select ‘Run new task’.

Type in ‘Control’ and press Enter on your keyboard.

Select ‘Date and Time’.

Switch to ‘Internet time’.

Click on ‘Change Settings’.

Uncheck the box for ‘Synchronize with an Internet Time Server’.

Click on ‘Ok’.

Switch back to ‘Date and Time’. Click on ‘Change Date and Time’ and select your date as 2nd September.
Close all windows and restart your system. Once restarted, open the ‘Date and Time’ dialog box again and change your date to 7th October this time.
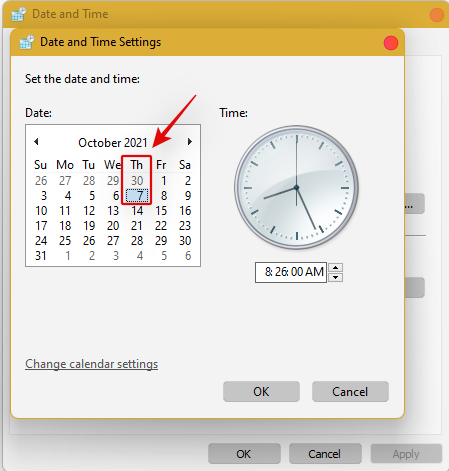
Restart your system again and Taskbar should now be back up and running on your system again. You can now enable synchronization for time again using the steps above on your system.
If synchronizing time does not work, move a month ahead to restore Taskbar
If you are still unable to get Taskbar up and running on your system again you can try the last date change fix. We recommend you use the steps above to change your date and time to a month ahead of your current date. Once changed, restart your system, and the taskbar should be up and running on your system now.
The downside of this fix is that if you revert to your normal date, Taskbar will stop working on your system. Having a mismatched date can cause issues with background syncs for various applications and cause some websites to malfunction. You will also have issues installing and getting the latest Windows Updates, so you will need to check all of these manually when updating in the future.
Fix #10: Uninstall the latest cumulative Windows Update ie: KB5006050
The cumulative update released in September for Windows 11 seems to also cause issues with the taskbar on some desktops and laptops. Use the guide below to uninstall the necessary update from your system.
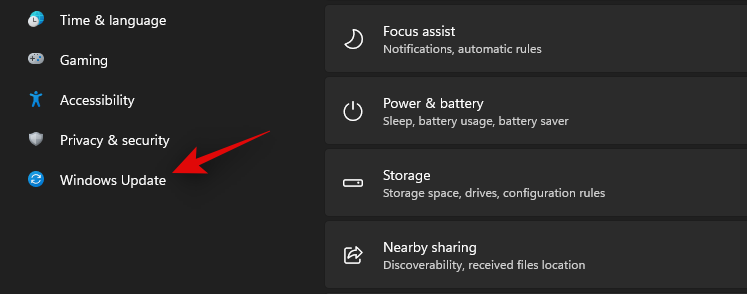
Press Windows + i and select Windows Update from the left.
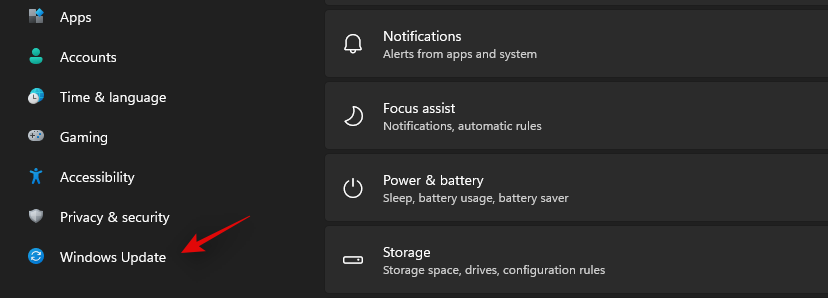
Click on ‘Update history’.
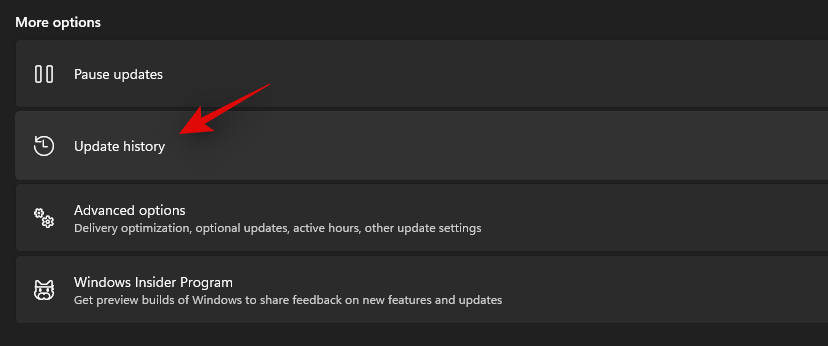
Now select ‘Uninstall updates’.
Click and select Windows Cumulative update KB5006050 from the list.

Now click on ‘Uninstall’ at the top and confirm your choice to uninstall the selected update.
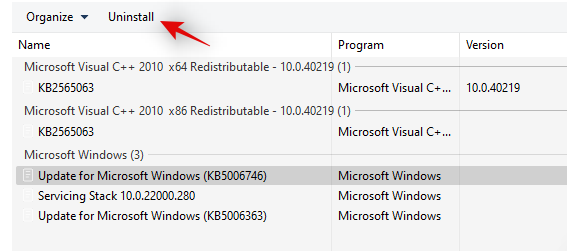
Restart your system and taskbar functionality should now be restored on your system.
Fix #11: Restore PC to a previous restore point
If you had the taskbar working at a previous point in time then we recommend you restore your PC to a previously available restore point on your system. Follow the guide below to get you started.
Press Ctrl + Shift + Esc on your keyboard and click on ‘File’. Select ‘Run new task’ once you are done.

Type in CMD and press Ctrl + Shift + Enter on your keyboard.

Now type in ‘rstrui.exe’ and press Enter on your keyboard.
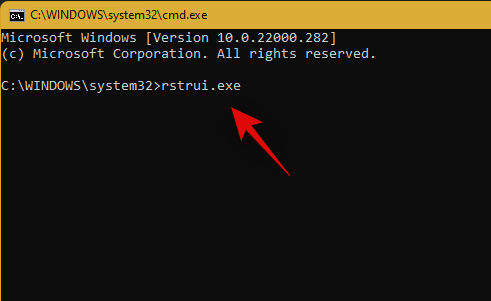
The system restore utility will now launch on your system. Click on ‘Next’.
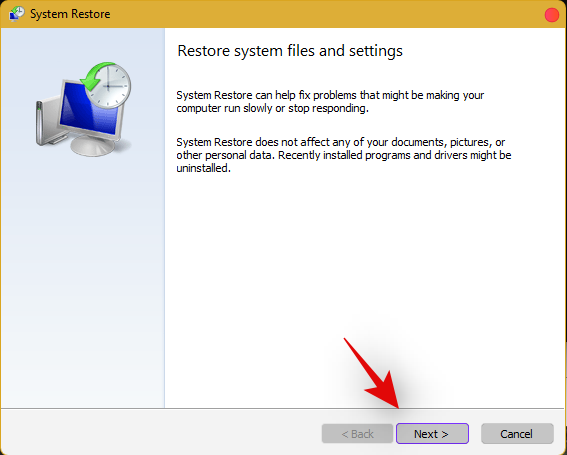
Select the desired restore point from the list on your screen. Click on ‘Next’ once you are done.
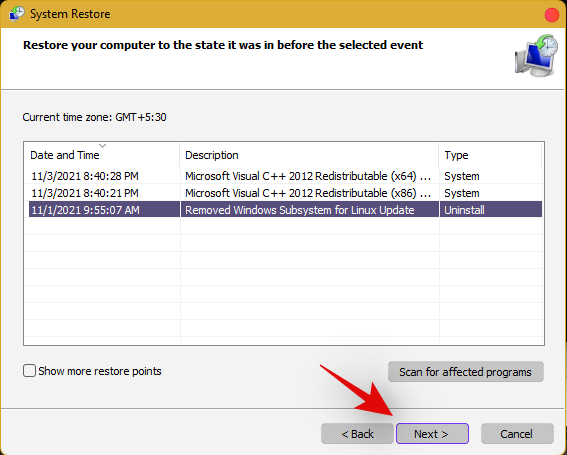
Tip: Click on ‘Scan for affected programs’ to view a list of installed programs that will be removed from your system during the restore process.
Click on ‘Finish’ once the restore finishes and restart your system.
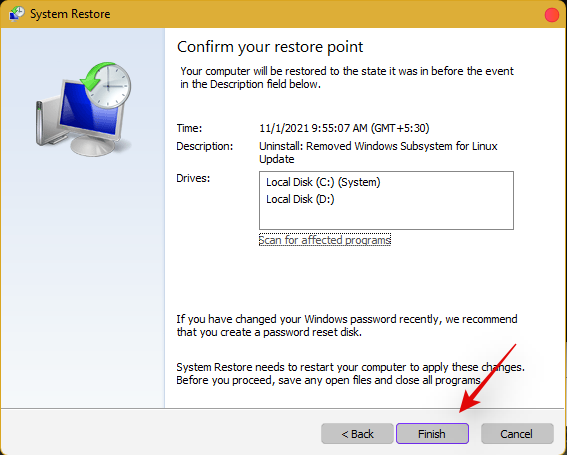
The taskbar should now be back up and running on your system again.
Fix #12: Last Resort: Create a new local admin account and transfer all your data
If by this point Taskbar still fails to work for you then it’s time for some drastic measures. You can create a new local admin account, check if Taskbar is working there, and then transfer all your data to the new account. This will be a tedious process but it is the next best way to get the taskbar working on your system without resetting your PC. Follow the guide below to get you started.
Create a new local admin account
Herre’s how you can create a new local admin account on your system.
Note: Most users facing the taskbar issue are unable to access the Settings app as well. Hence we will be using CMD to add a new local admin account to your PC. However, if the Settings app is available to you then you can use the same to add a new account as well.
Press Ctrl + Shift + Esc on your keyboard, click on ‘File’ and select ‘Run new task’.

Type in ‘cmd’ and press Ctrl + Shift + Enter on your keyboard.

CMD will now be launched as an administrator. Use the command below to add a new local admin account. Replace NAME with the Username of your choice for the new account. You can add a password later once you have confirmed that the taskbar is available in the new account.
net user /add NAME 
Once you have added the new user, use the command below to convert it to an administrator account on your PC. As usual, replace NAME with the Username for the new account you created earlier.
net localgroup Administrators NAME /add

Now type in the following to log out of your current account.
logoff

Once logged out, click on the newly added account to log in to the same. Once logged in, check if the taskbar is available in the new account. If it is, you can use the next section to transfer all your data. However, if the taskbar is still missing then you have no choice but to perform a fresh install of Windows 11 on your PC from a removable USB media drive.
Transfer all your data
Press Windows + i on your keyboard and click on ‘About’ on your right.
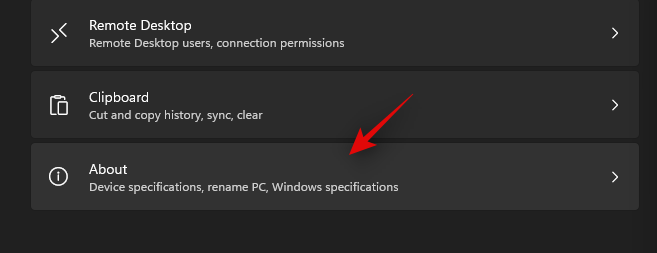
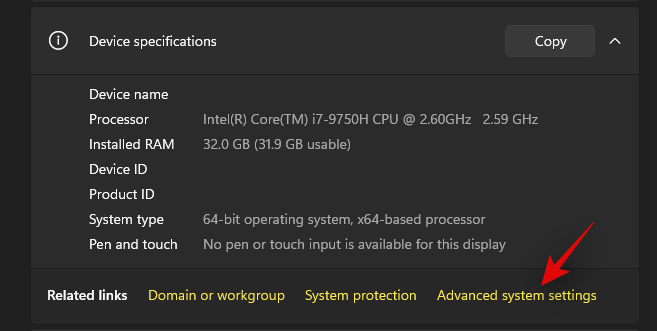
Click on ‘Advanced system settings’.
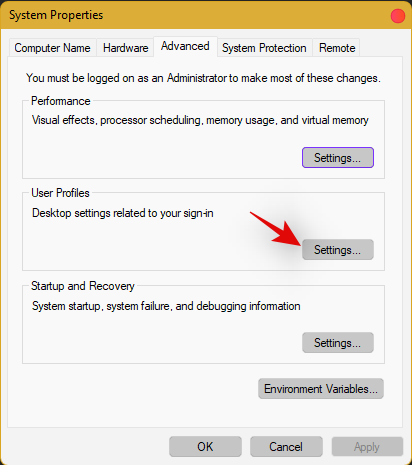
Click on ‘Settings’ under ‘User Profiles’.
Select your original profile by clicking on it and selecting ‘Copy To’.
Now enter the following path under ‘Copy profile to’. Rename NAME to the username of your previous profile from where you wish to copy all your data.
C:\Users\NAME
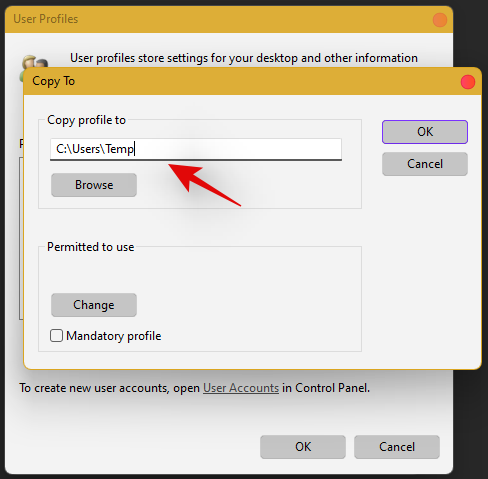
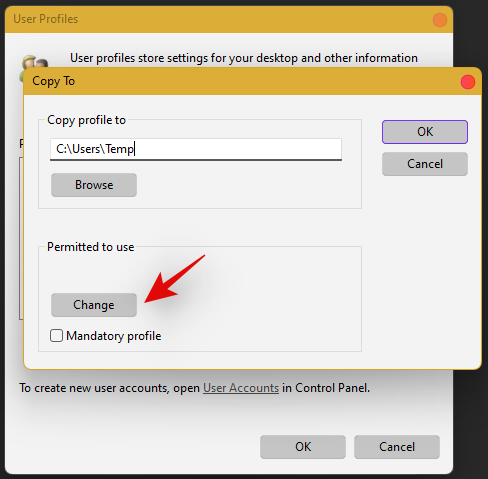
Click on ‘Change’.
Enter the name for your new user profile and press Enter on your keyboard.
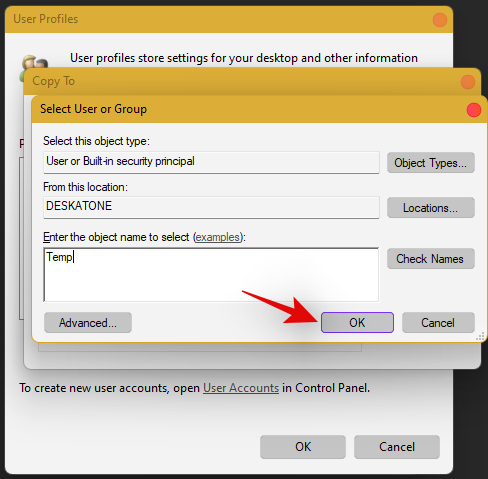
Click on ‘Ok’ once you are done.
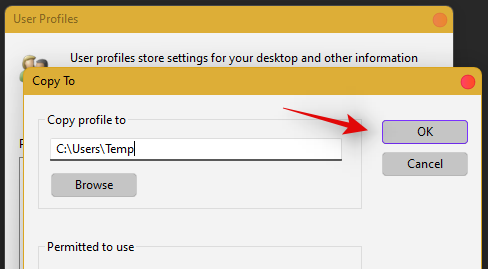
All your data will now be copied over to the new profile where the taskbar is functional on your PC. You can now delete your previous user account and set a password for your new account as well.
Frequently Asked Questions (FAQs):
With so many fixes, you are bound to have a few questions on your mind. Here are some commonly asked ones that should help you get up to speed.
How do I access Windows apps and Settings without a taskbar?
You can use the Task Manager to launch almost any program or Settings page on your system. To launch the desired program, launch the Taskbar > File > Run new task and enter the path to the program you wish to launch. Press Enter if you wish to launch the program normally or press Ctrl + Shift + Enter if you wish to launch the program with administrator privileges.
Is it safe to edit the Registry?
Registry edits are never safe as they have the potential to break your system. Fixes from trusted sources can help you avoid such issues but a good rule of thumb is to always back up your registry before making any edits. This way you can easily restore your Registry values in case some get messed up when editing the Registry.
When will Microsoft fix this issue?
Sadly, Microsoft is yet to release a proper fix for this issue. The company has tried to release a fix in the past cumulative updates to Windows 11 but they have been a hit and miss. We expect Microsoft to completely fix this issue in the upcoming feature update to Windows 11 when the OS gets the ability to run Android apps officially.
Can I update my Windows 11 after fixing the taskbar?
This will depend on the fix that you’re currently using. If you are using a date fix then you won’t be able to install updates until you restore to the current time. This will, however, cause the taskbar to be disabled again and the changes will be carried over after you update your PC. However, if you are using any other fix then you can easily update Windows.
For users with the date fix, you should try updating with the modified time first. If the update gets stuck on ‘Installing 0%’ or ‘Downloading 100%’ then change your date and time to the current date and time and update your PC. Ensure that you do not restart explorer or your PC during this process to keep the current instance of the taskbar alive on your system during the update process. This should help fix the issue for you once Microsoft officially releases an update to fix the issue.
We hope you were able to easily get the taskbar back up and running on your system using the guide above. If you face any more issues, feel free to reach out to us using the comments section below.
Related:




![Cara Membetulkan Ralat Skrin Hijau Windows 11 [8 Cara] Cara Membetulkan Ralat Skrin Hijau Windows 11 [8 Cara]](https://cloudo3.com/resources8/images31/image-5564-0105182715287.png)


