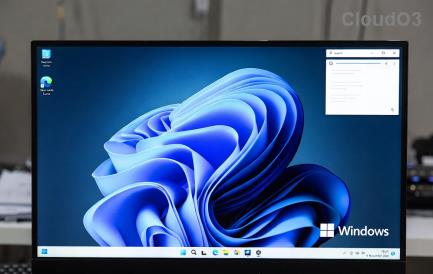
Hoewel meldingen in sommige gevallen essentieel zijn, wordt het soms een afleidingselement. Net als je telefoon kan ook een pc je afleiden met notificaties. Dit is de reden waarom Windows 11 de Focus Assist-functie bevat, waarmee u afleidende meldingen kunt voorkomen. Met deze functie kunt u uw werk met volledige concentratie doen in plaats van afgeleid te worden door willekeurige berichten en meldingen. Meldingen kunnen ook uw productiviteit schaden en daarom moeten ze op het juiste moment worden onderdrukt.
Met slechts een paar klikken kunt u alle meldingen, waarschuwingen en berichten op uw pc verbergen. Als je onlangs je systeem hebt geüpgraded naar Windows 11 en je bent niet in staat om de nieuwe gebruikersinterface te achterhalen, zal dit artikel je helpen met een uitgebreide handleiding over hoe je Focus Assist op Windows 11 kunt gebruiken om van meldingen af te komen.
Gerelateerd: Schermafbeeldingen maken op Windows 11
Inhoud
Wat is Focus assist op Windows 11?
Focus Assist is gewoon een modus Niet storen voor uw pc, net zoals die op uw telefoons. Het is een handige functie op Windows 11 waarmee u onnodige meldingen, berichten en waarschuwingen kunt verwijderen. Met de functie Focus assist kunt u uw prioriteitenlijst aanpassen in plaats van uw pc te barricaderen van alle meldingen.
Afleiding kan schade toebrengen aan uw productiviteit. Daarom kunt u met de functie Focus Assist alle meldingen, waarschuwingen en berichten verbergen terwijl u aan iets belangrijks werkt. In plaats van u te waarschuwen, gaan ze rechtstreeks naar het actiecentrum. U kunt de verborgen meldingen in het actiecentrum op uw eigen tijd bekijken.
Hoe werkt Focus assist op Windows 11?
Focus Assist biedt u de flexibiliteit om te selecteren wanneer u afleidingen zoals berichten, meldingen en waarschuwingen wilt blokkeren. Je kunt Focus Assist op elk moment inschakelen of je kunt ook een tijdsbereik plannen in de Instellingen waardoor de Focus Assist automatisch wordt ingeschakeld.
Met de functie Focus assist kunt u een prioriteitenlijst maken om ervoor te zorgen dat u geen meldingen van de belangrijkste personen in uw contactpersoon mist. De mensen op uw prioriteitenlijst kunnen u altijd bereiken, zelfs als u bezig bent met belangrijk werk. Als je tijdens het werken volledige concentratie nodig hebt, kun je er ook voor kiezen om alle meldingen te blokkeren. Om alle geblokkeerde meldingen te bekijken die u hebt ontvangen terwijl u aan het werk was, opent u het actiecentrum van uw systeem.
Gerelateerd: Hoe pop-ups op Windows 11 te stoppen
Focushulp inschakelen
Focus Assist is standaard uitgeschakeld. Maar als u wilt dat het geen meldingen meer ontvangt, volgt u de onderstaande stappen.
Methode #1: Instellingen gebruiken
Klik op het pictogram Zoeken , dat eruitziet als een vergrootglas op de taakbalk.

Typ focushulp in de zoekbalk.
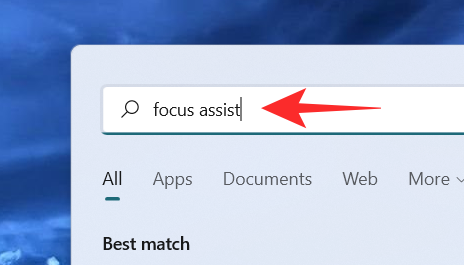
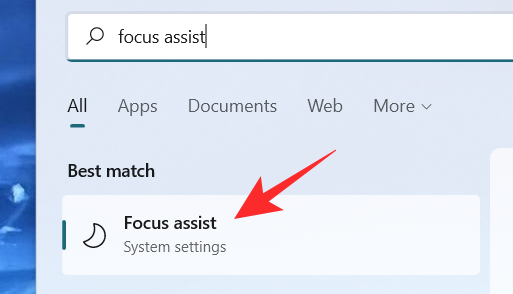
Klik op de Focus Assist- systeeminstellingen.
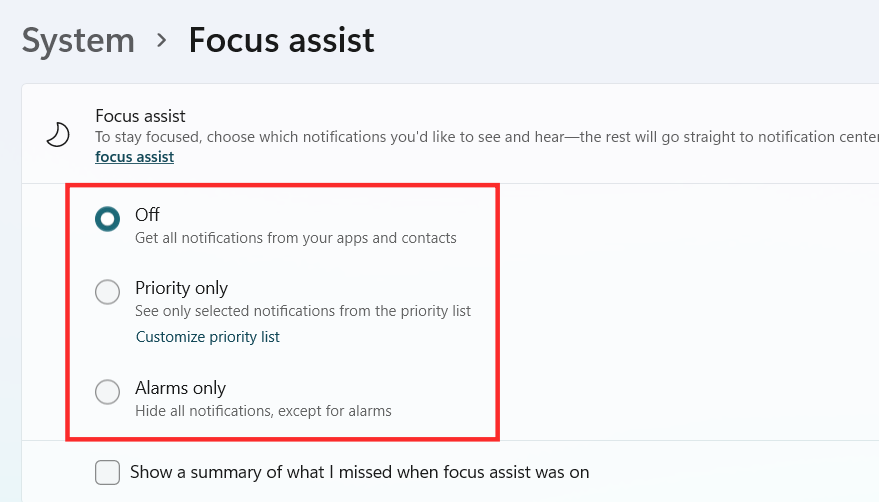
Het venster Focus Assist-systeeminstellingen verschijnt op het scherm. Selecteer onder Focus Assist een van deze opties:
- Uit - Schakelt de Focus Assist-functie uit en laat u meldingen ontvangen van apps en contacten.
- Alleen alarmen – Deze functie onderdrukt alle meldingen, behalve het alarm.
- Alleen prioriteit - Met deze functie zijn alleen meldingen van uw prioriteitenlijst toegestaan die u moet aanpassen.
Focus Assist zou nu moeten worden ingeschakeld in Windows 11, afhankelijk van de keuze die je hebt gemaakt.
Methode #2: Actiecentrum gebruiken
Klik op het actiecentrum met het pictogram van wifi, volume en batterij samen.

Net onder het Bluetooth-pictogram ziet u het Focus Assist- pictogram dat eruitziet als een halve maan.
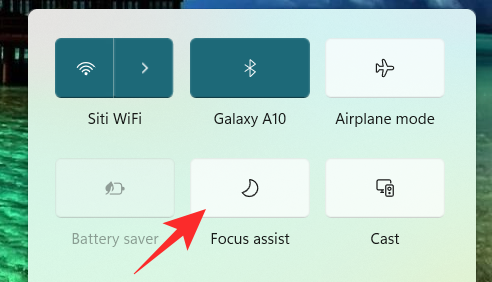
Standaard is de Focus Assist-functie uitgeschakeld. Klik erop en de functie wordt direct ingesteld op Alleen prioriteit .
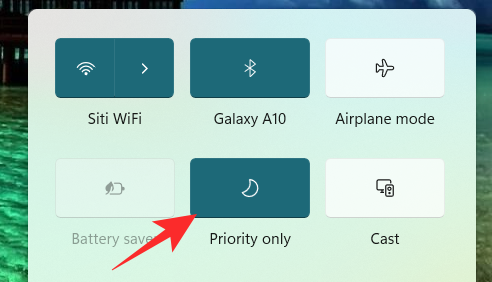
Klik er nogmaals op om de Focus Assist-functie in te stellen op Alleen alarmen .
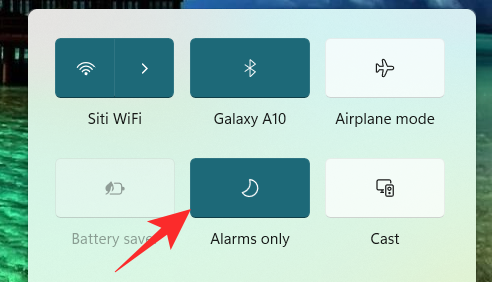
Om de Focus Assist-functie uit te schakelen, klikt u er nogmaals op.
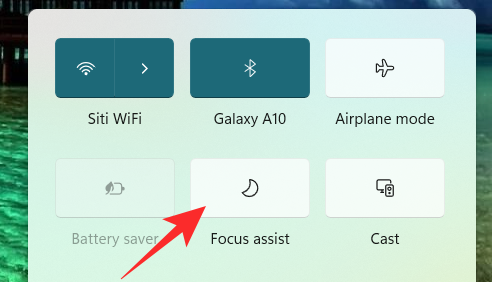
Door gewoon op het Focus Assist-pictogram in het actiecentrum te klikken, kunt u de functie wijzigen in uit, alleen prioriteit en alleen alarmen. Om echter andere noodzakelijke wijzigingen aan te brengen in de Focus Assist-instellingen vanuit het Action Center, klikt u met de rechtermuisknop op het Focus Assist- pictogram in het Action Center en klikt u op Ga naar Instellingen .
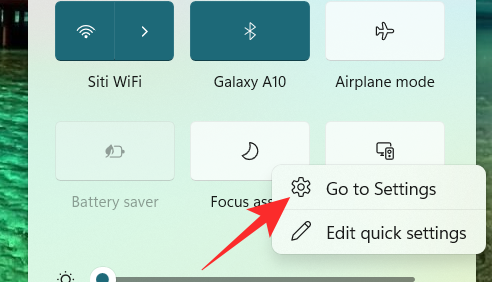
Hiermee gaat u naar de app Instellingen waar u eenvoudig alle beoogde wijzigingen kunt aanbrengen. En dat is het! Focushulp zou nu rechtstreeks vanuit het actiecentrum in Windows 11 moeten worden ingeschakeld.
Methode #3: Groepsbeleid-editor gebruiken
U kunt de modus Focushulp ook inschakelen met behulp van de Groepsbeleid-editor als u een beheerder bent. Gebruik de onderstaande gids om u te helpen bij het proces.
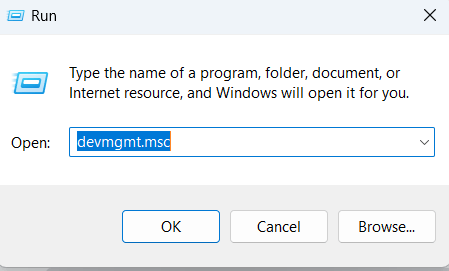
Druk Windows + Rop op uw toetsenbord en typ het volgende in het dialoogvenster Uitvoeren. Druk op enter op uw toetsenbord om de Groepsbeleid-editor te openen.
gpedit.msc
Navigeer naar het volgende knooppunt dat hieronder wordt vermeld.
User configuration > Administrative Templates > Start Menu and Taskbar > Notifications
Zoek en dubbelklik op de waarde 'Stilteuren uitschakelen' aan uw rechterkant.
Selecteer nu een van de volgende opties, afhankelijk van uw huidige behoeften, in de linkerbovenhoek van het eigenschappenvenster.
- Inschakelen: Hiermee wordt Focus assist op het geselecteerde systeem ingeschakeld.
- Uitschakelen: Hiermee wordt de focushulp voor het geselecteerde systeem uitgeschakeld.
En dat is het! Focushulp wordt nu in- of uitgeschakeld vanuit de Groepsbeleid-editor, afhankelijk van uw voorkeuren. Helaas kunt u als beheerder het Focus assist-gedrag niet aanpassen. Dat vermogen ligt nog steeds bij de gebruiker. U kunt de mogelijkheid om Focus Assist voor een systeem te gebruiken alleen in- of uitschakelen met behulp van de Groepsbeleid-editor.
Focushulp gebruiken
Focus assist heeft verschillende instellingen en aanpassingsopties die u kunnen helpen het gedrag aan te passen aan uw huidige behoeften. Gebruik een van de onderstaande handleidingen die het beste past bij uw huidige vereisten.
Methode #1: Schakel de modus Alleen alarmen in
In de modus Alleen alarmen in het venster Focus Assist kunt u alle meldingen verbergen, behalve het alarm. Volg de onderstaande stappen om de modus Alleen alarmen in te schakelen.
Klik op het pictogram Zoeken op de taakbalk.

Type Focushulp

Klik op Focushulp .

Klik onder Focus Assist op Alleen alarmen om geen meldingen meer te ontvangen, behalve alarmen.
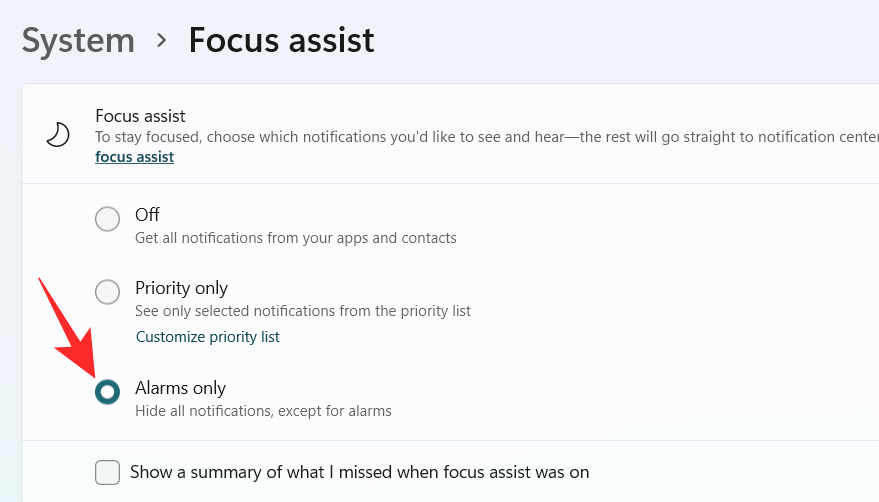
En dat is het! U wordt nu alleen geïnformeerd over alarmen op uw systeem. Alle andere meldingen, ongeacht hun prioriteit, worden in Windows 11 tot zwijgen gebracht.
Methode #2: Prioriteit alleen inschakelen met een aangepaste lijst
Het venster Personen verschijnt op het scherm. Kies je favoriete mensen door hun namen in de zoekbalk te typen.
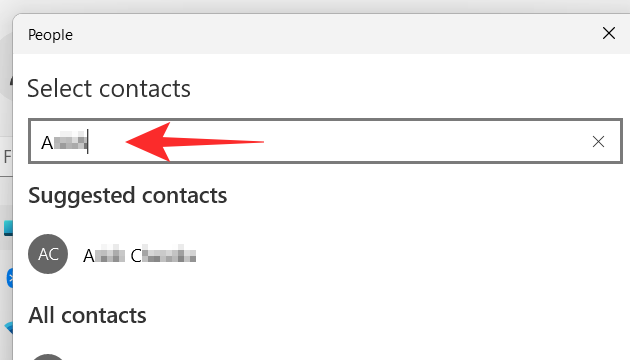
Klik op de naam van de persoon.
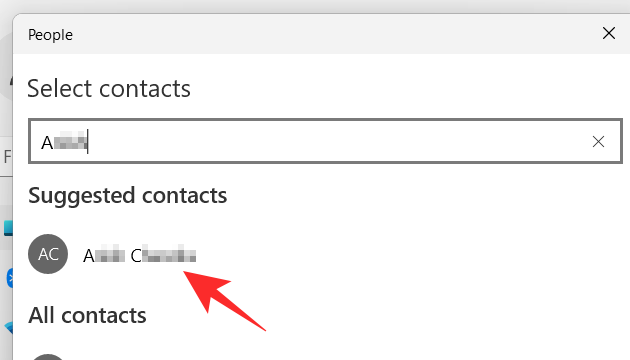
Klik op het vinkje in de rechterbenedenhoek van het venster Personen.
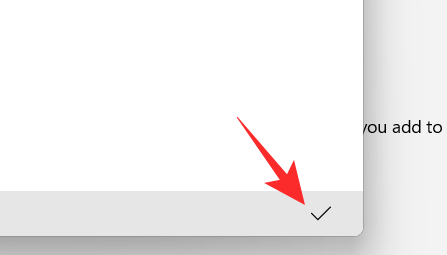
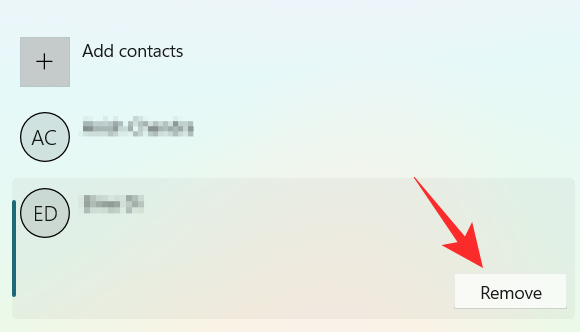
Uw prioriteitenlijst is gemaakt. Als u nu een contactpersoon uit uw prioriteitenlijst wilt verwijderen, klikt u op de contactpersoon onder Personen .

Klik op Verwijderen .
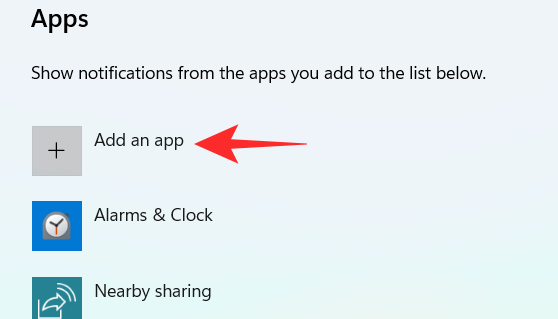
Nu kun je in het gedeelte Apps de apps selecteren die je rustige uren kunnen doorbreken. Om toe te staan dat de apps meldingen weergeven, klikt u op de knop Een app toevoegen .
Er verschijnt een lijst met apps op uw scherm. Klik op de app die u aan uw prioriteitenlijst wilt toevoegen.
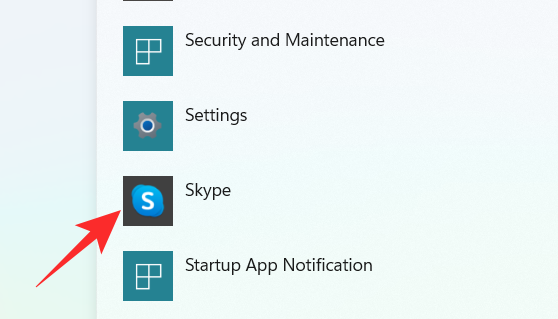
Ga door met dit proces totdat u klaar bent met het selecteren van de apps. Als u een app van uw prioriteitenlijst wilt verwijderen, klikt u eenvoudig op de app onder het gedeelte App .
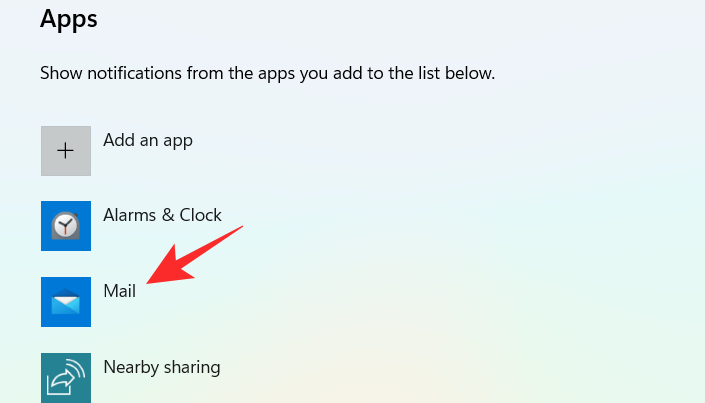
Klik op Verwijderen .
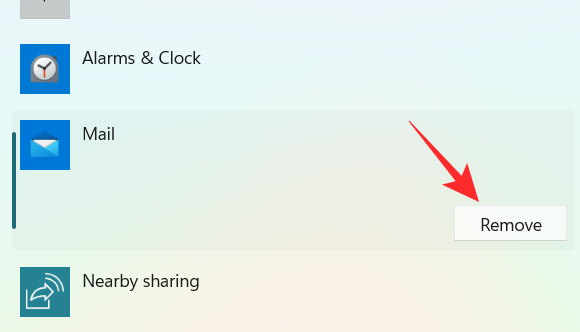
En zo kunt u de prioriteitenlijst in Focus assist aanpassen en in uw voordeel gebruiken om alleen meldingen van belangrijke contacten te ontvangen.
Methode #3: Schakel meldingsoverzicht in wanneer Focus assist is uitgeschakeld
Klik op het pictogram Zoeken op de taakbalk.

Type Focushulp

Klik op Focushulp .

Klik op de gewenste optie Alleen prioriteit of Alleen alarmen .
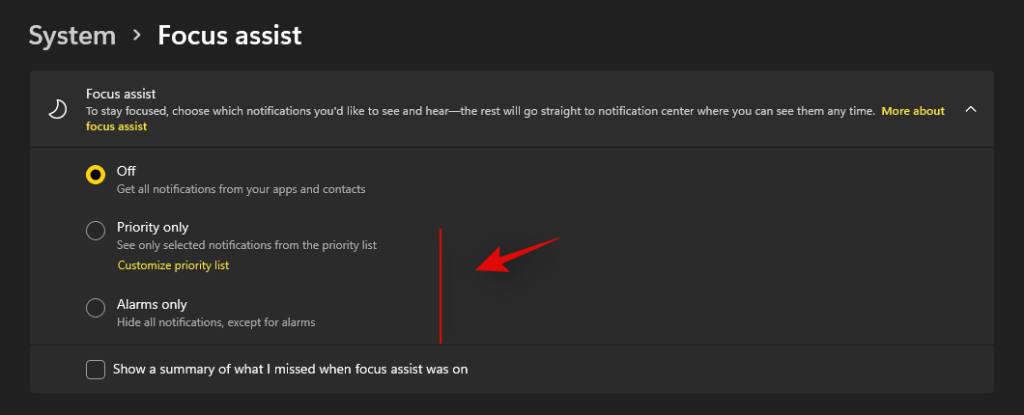
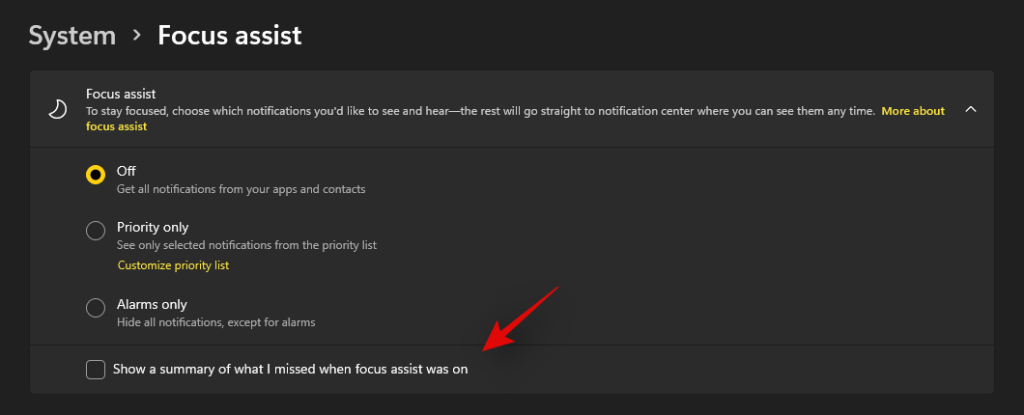
Vink het vakje aan Een samenvatting weergeven van wat ik heb gemist toen Focus assist was ingeschakeld .
Methode #4: Automatische focushulpregels in- of uitschakelen
Met de automatische regels in Focus assist kunt u bepalen onder welke voorwaarden de Focus assist automatisch kan worden geactiveerd. Er zijn vier verschillende automatische regels in het instellingenvenster van Focus Assist die kunnen worden aangepast. Bekijk de onderstaande stappen om automatische regels aan te passen in Focus assist.
Klik op het pictogram Zoeken op de taakbalk.

Type Focushulp

Klik op Focushulp .

Onder de sectie Automatische regels zijn er vier secties. Zet de tuimelschakelaar aan voor de optie die u wilt kiezen.
- Gedurende deze tijden – Met deze functie kunt u een specifiek tijdsbereik instellen, afhankelijk van het moment waarop de Focus Assist-functie zichzelf automatisch in- of uitschakelt.
- Wanneer ik mijn scherm dupliceer – Deze functie schakelt automatisch de Focus Assist in wanneer het detecteert dat uw scherm wordt gedeeld. Deze functie kun je vooral gebruiken om te voorkomen dat er notificaties verschijnen als je midden in een presentatie zit.
- Als ik een game speel – Terwijl je games speelt in de modus Volledig scherm, kan de Focus Assist met deze functie voorkomen dat de meldingen op het scherm verschijnen.
- Wanneer ik een app alleen in de modus Volledig scherm gebruik – Met deze functie kan de Focus Assist automatisch worden ingeschakeld wanneer wordt gedetecteerd dat u een app in de modus Volledig scherm gebruikt. U ontvangt geen meldingen totdat u een app op volledig scherm hebt geopend.
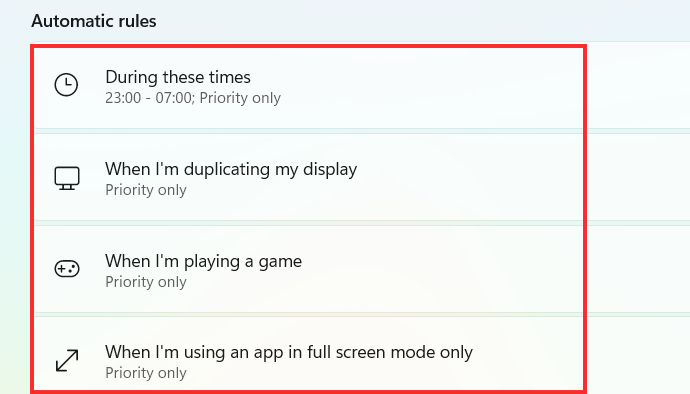
Laten we nu eens kijken hoe u de bovengenoemde opties onder Automatische regels kunt aanpassen.
1. Tijdens deze tijden
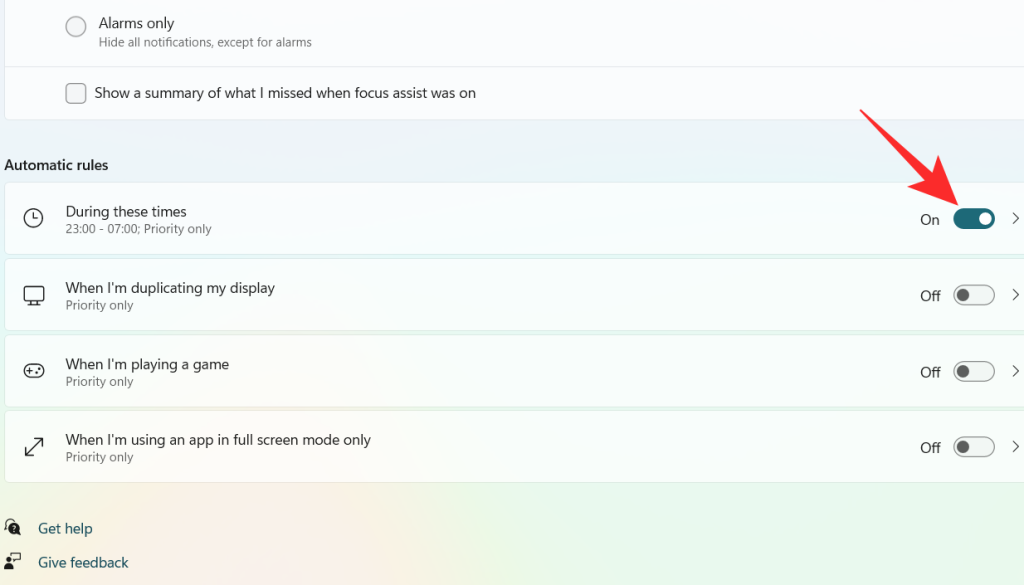
Zet de tuimelschakelaar aan, die uiterst rechts staat op het tabblad Gedurende deze tijden .
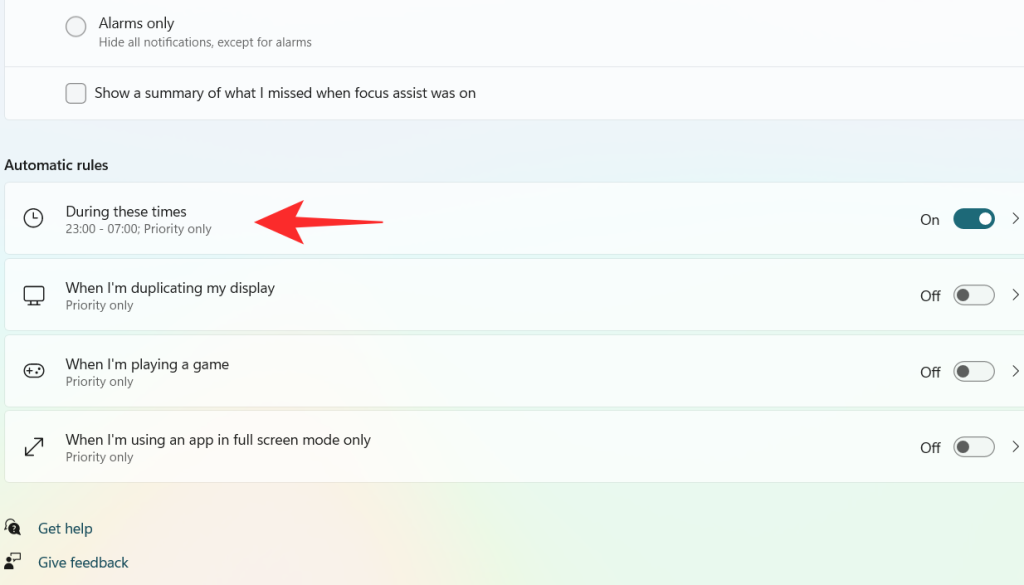
Klik op het tabblad Gedurende deze tijden .
Klik op het vakje onder Starttijd .
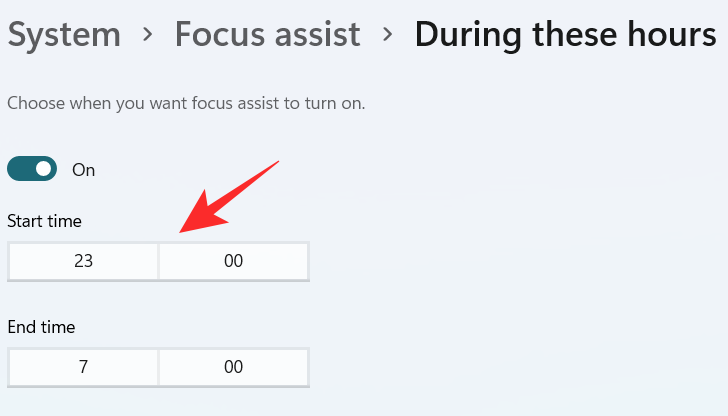
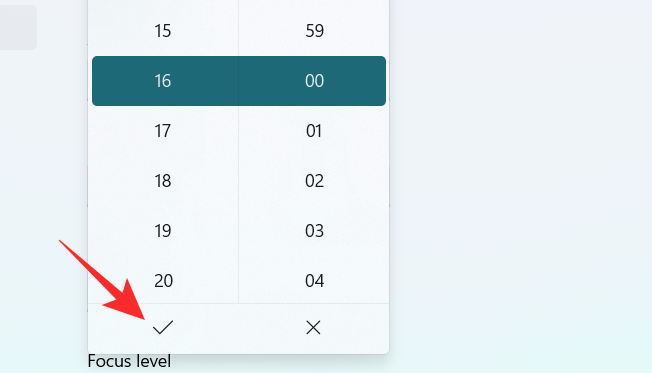
Selecteer het tijdstip waarop u de Focus Assist wilt inschakelen en klik op het vinkje onderaan het vervolgkeuzemenu.
Klik op het vakje onder Eindtijd .
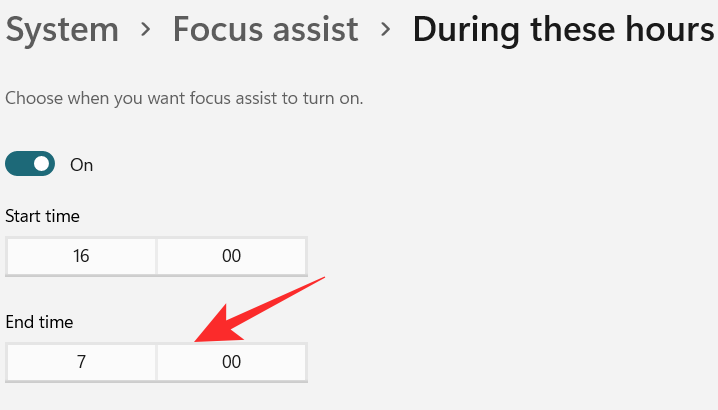
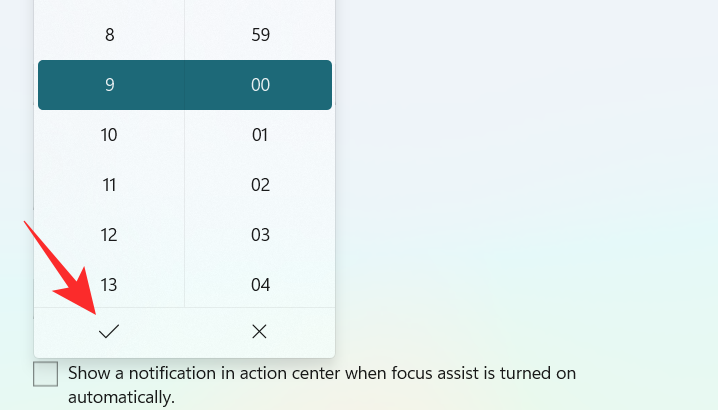
Selecteer het tijdstip waarop u de Focus Assist wilt uitschakelen en klik op het vinkje onderaan het vervolgkeuzemenu.
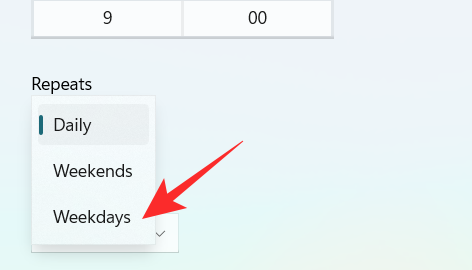
Klik op het vakje onder Herhalingen .
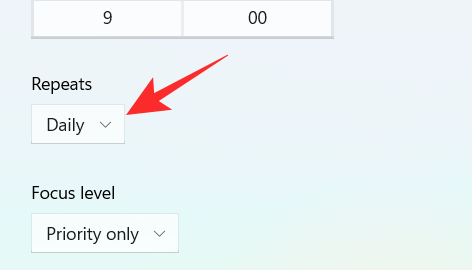
Er verschijnt een klein vervolgkeuzemenu. Stel het schema in op Dagelijks, Weekends of Weekdagen .
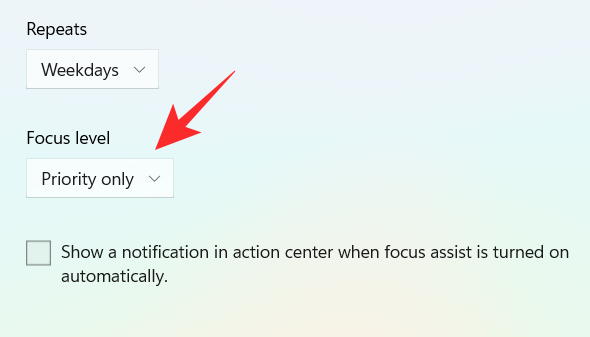
Klik op het vakje onder Focusniveau .
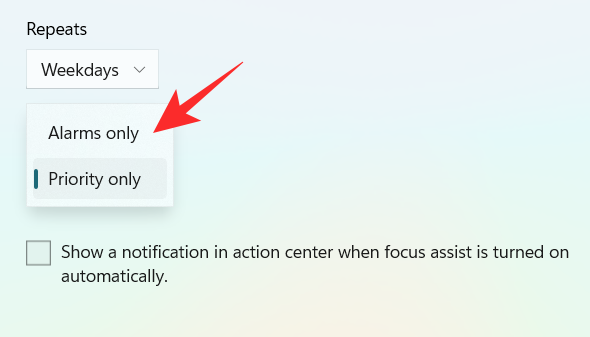
Er verschijnt een klein vervolgkeuzemenu. Kies tussen Alleen alarm of Alleen prioriteit .
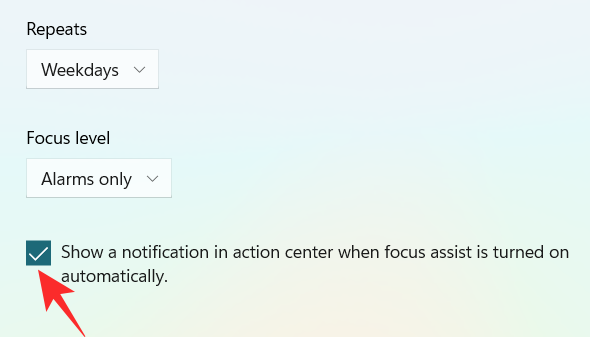
Als u ten slotte een melding wilt krijgen wanneer de Focus-assistentie is ingeschakeld, vinkt u het vakje " Toon een melding in actiecentrum wanneer Focus-assistentie automatisch wordt ingeschakeld " aan.
2. Wanneer ik mijn scherm dupliceer
Zet de tuimelschakelaar aan, die extreem rechts staat op het tabblad Wanneer ik mijn weergave dupliceer .
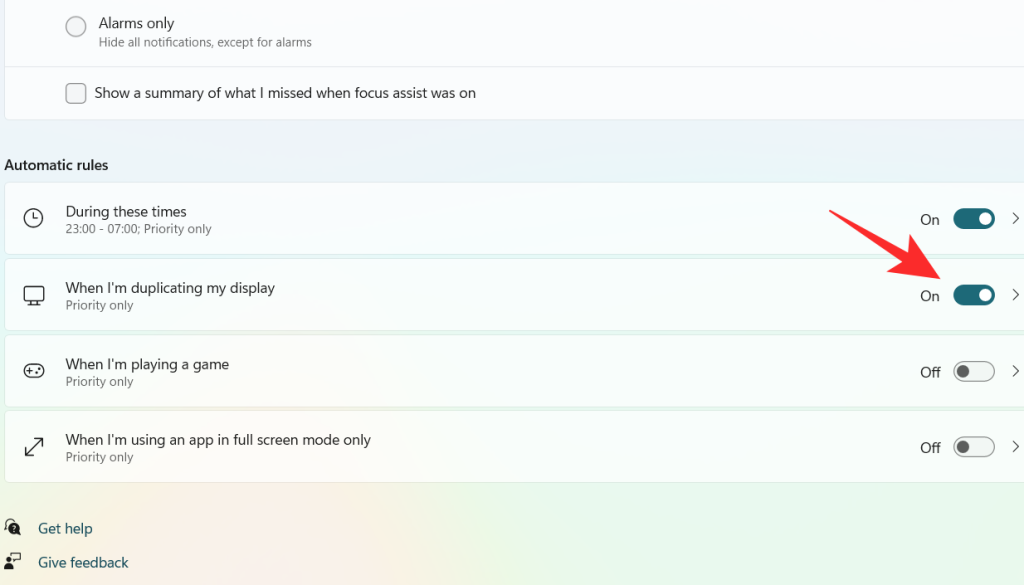
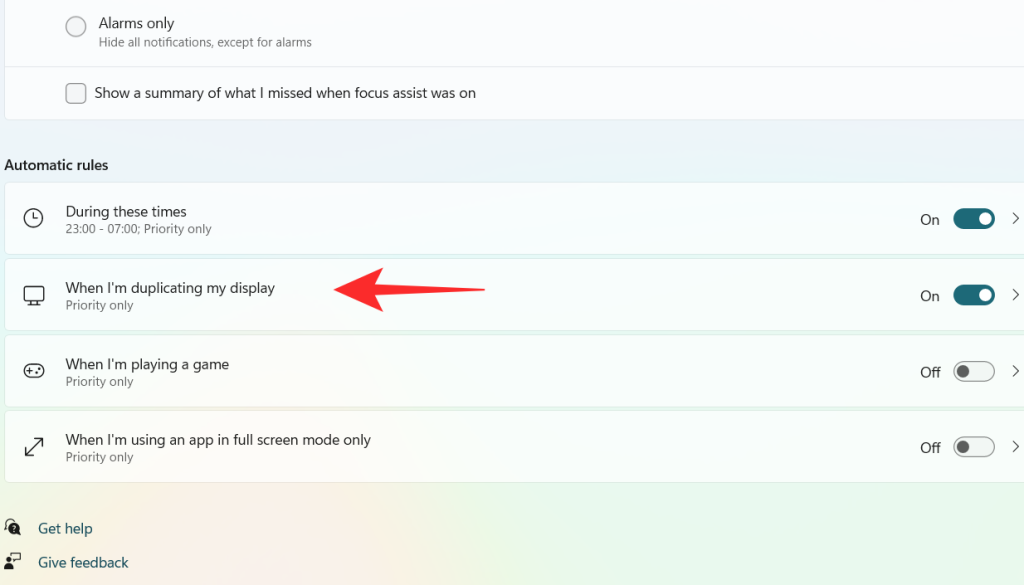
Klik op het tabblad Wanneer ik mijn weergave dupliceer .
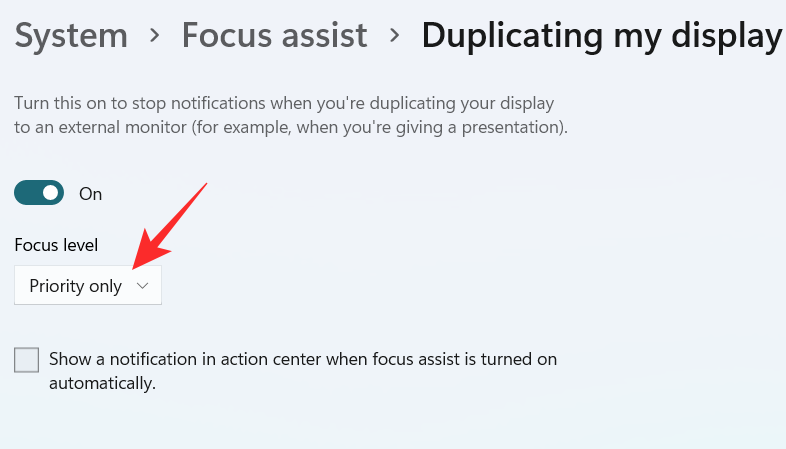
Klik op het vakje onder Focusniveau .
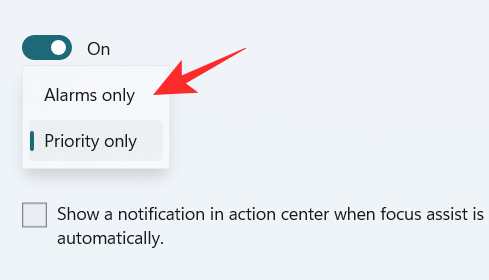
A dropdown menu appears, click on your desired option between Priority only and Alarms only.
To get a notification when the Focus assist is turned on, check the box “Show a notification in action center when Focus assist is turned on automatically“
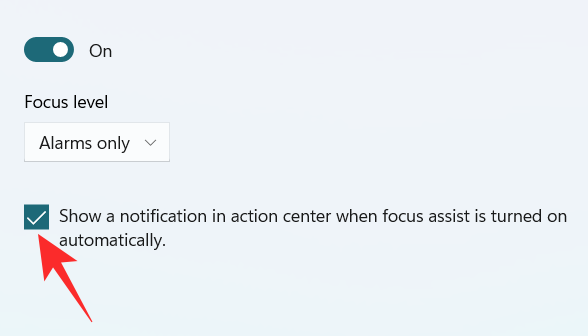
3. When I’m playing a game
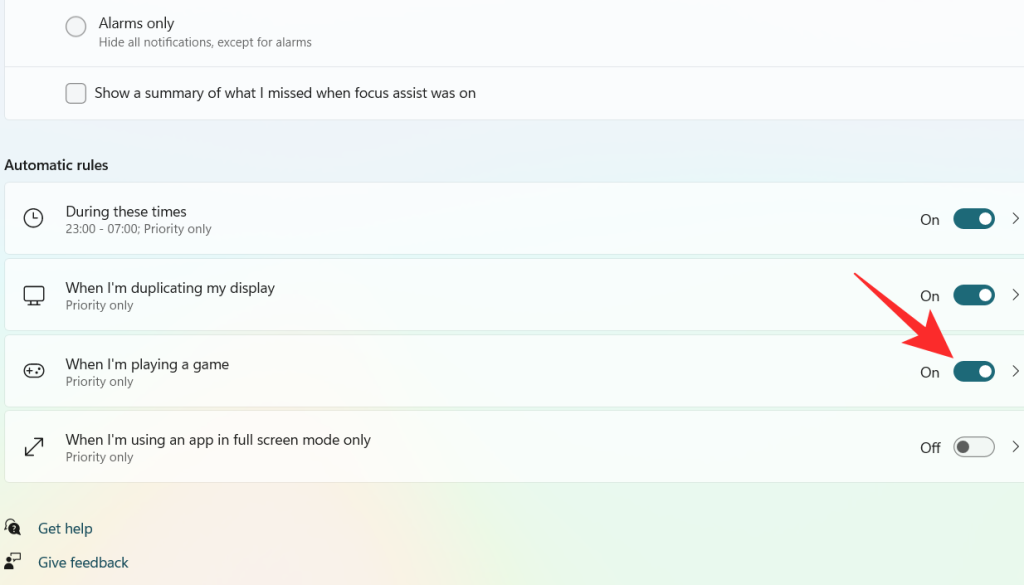
Turn on the toggle switch, which is extreme right to the When I’m playing a game tab.
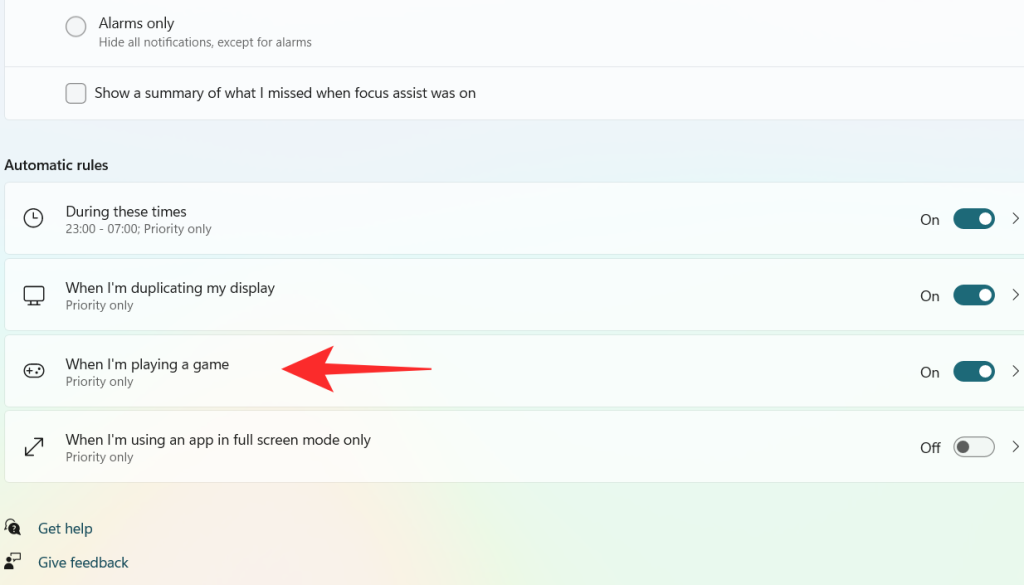
Click on the When I’m playing a game tab
Click on the box under Focus Level.
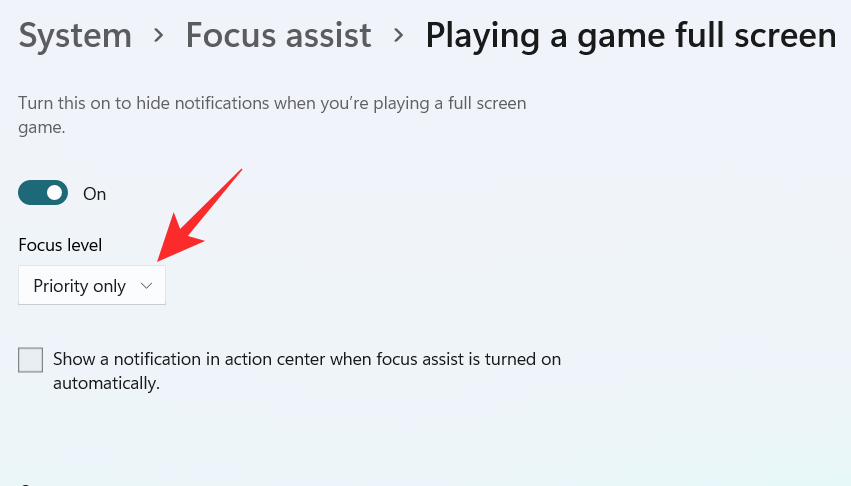
A dropdown menu appears, click on your desired option between Priority only and Alarms only.

To get a notification when the Focus assist is turned on, check the box “Show a notification in action center when Focus assist is turned on automatically“

4. When I’m using an app in full-screen mode only
Turn on the toggle switch, which is extreme right to the When I’m using an app in full-screen mode only tab.
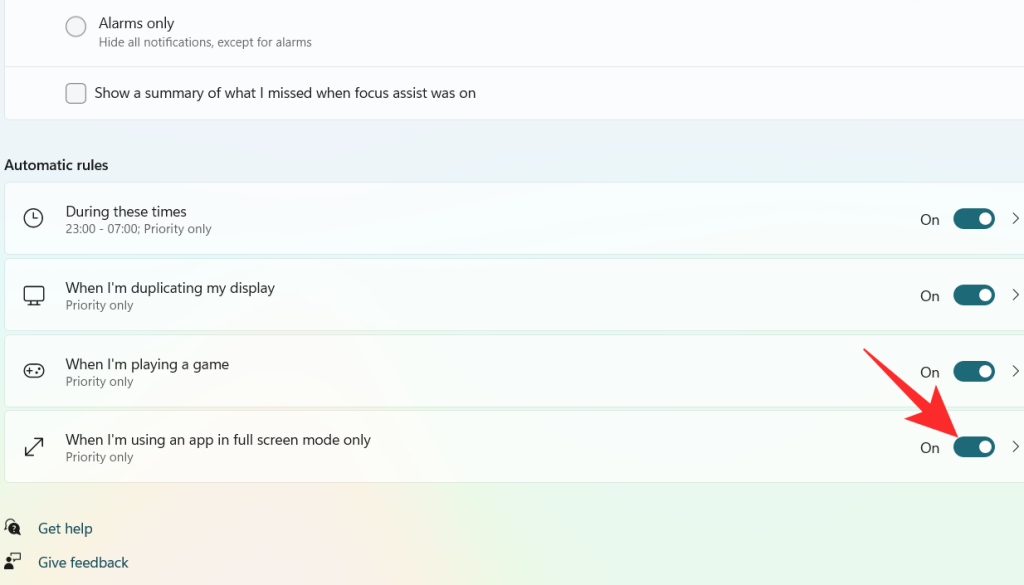
Click on the When I’m using an app in full-screen mode only tab
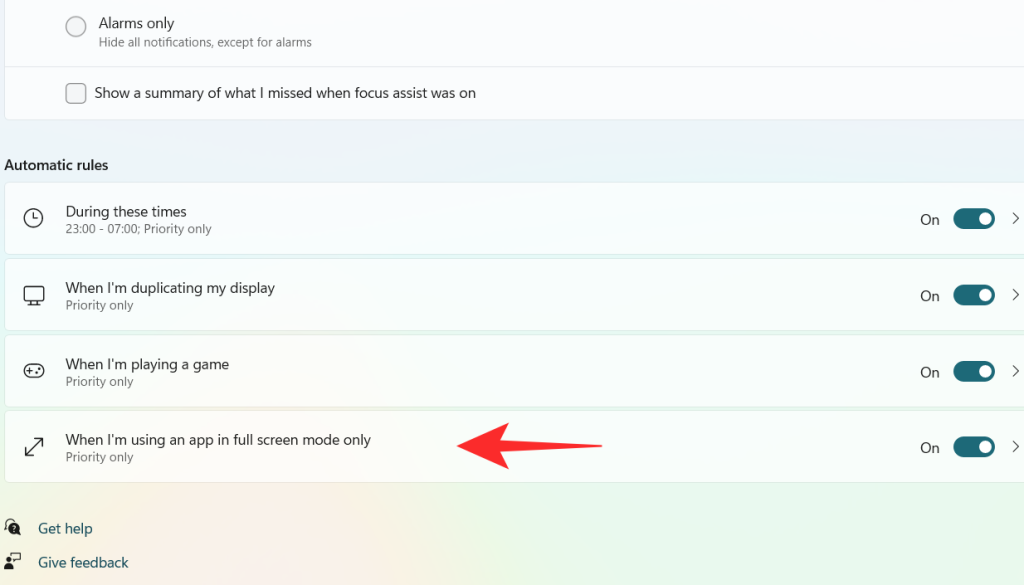
Click on the box under Focus Level.
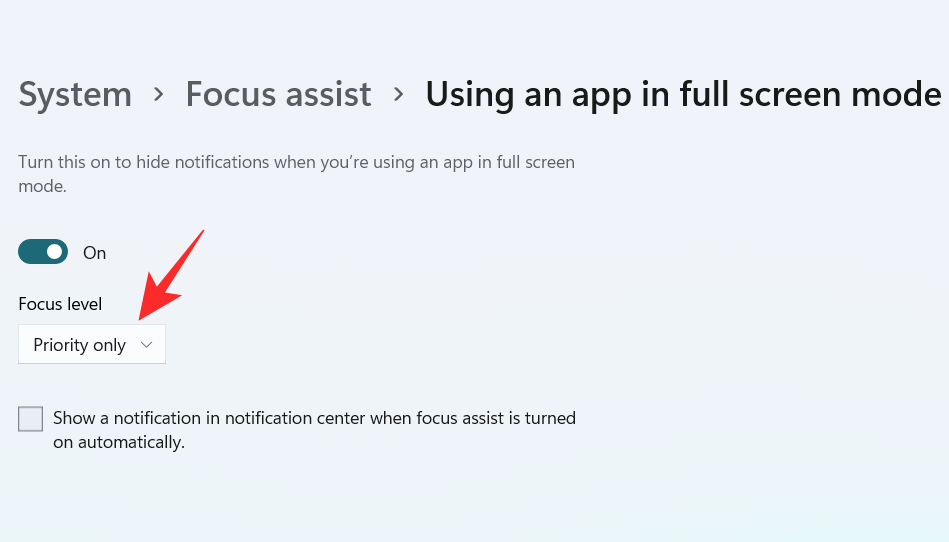
A dropdown menu appears, click on your desired option between Priority only and Alarms only.

To get a notification when the Focus assist is turned on, check the box “Show a notification in action center when Focus assist is turned on automatically“.

Using the above customizations, you can schedule and control Focus assist’s behavior according to your workflow for maximum efficiency no matter the task at hand.
Can you remove the Focus Assist icon from the Action Center?
Yes, you can easily remove the Focus Assist icon from the Action Center. Windows 11 brings a host of new cosmetic and UI changes and one of them has been the ability to customize your action center. You can now add or remove icons from the action center depending on your needs and opt for a more minimal or productive look depending on your workflow.
For now, you can only add and remove certain system modules but in the future, some users expect Microsoft to add the support for third-party apps as well. This would be a much welcome change that would allow you to manage dedicated system settings managed by third-party apps directly from your action center.
Customize your Focus assist icon in the action center
Depending on your current needs you can either remove or add the Focus assist module to the action center. Use one of the guides below depending on your current requirements.
1. Remove it
Click on the Action Center which shows the icon of Wifi, volume, and battery together.

Right-click on an empty place or on any icon and click on Edit quick settings.
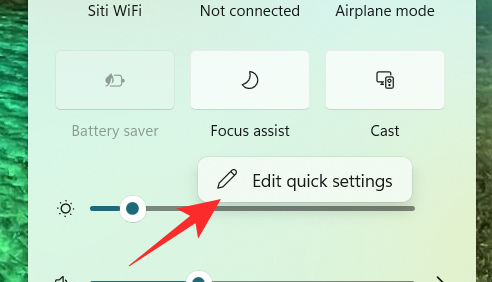
Click on the unpin symbol at the top right corner of the Focus Assist icon to remove the Focus Assist icon from the Action Center.
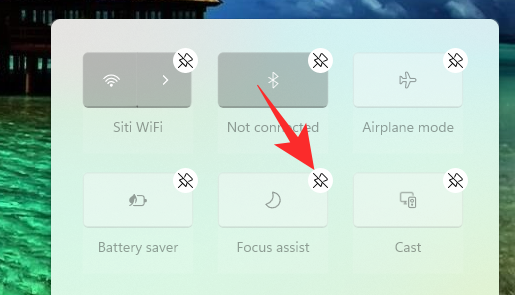
The Focus assist module should now have been removed from your action center. If not, we recommend you restart explorer.exe or your PC for the changes to take effect.
2. Restore it
Click on the Action Center which shows the icon of Wifi, volume, and battery together.

Right-click on an empty place or on any icon and click on Edit quick settings.
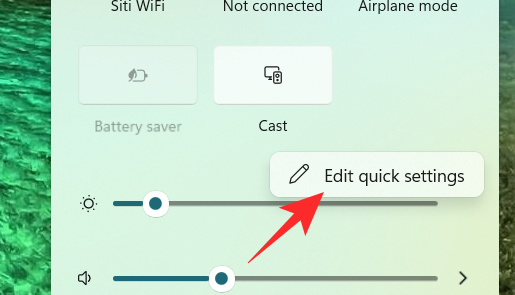
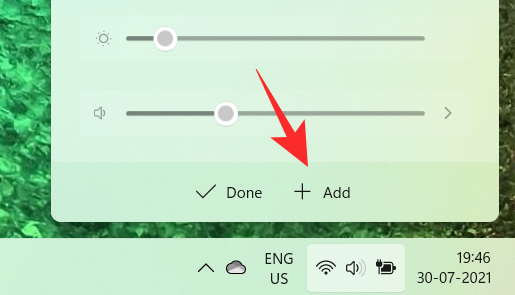
Now, click on the Add button at the bottom of the action center.
A list of different settings appears. Click on Focus Assist from the list and you will get to see the Focus Assist icon on the Action Center again.
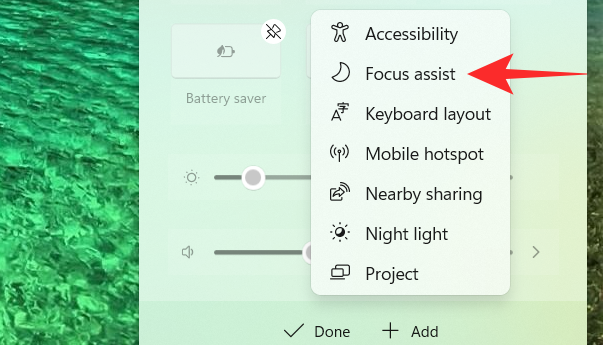
And that’s how you can add the Focus assist module back in the action center.
Focus assist keeps turning on automatically Issue: How to fix
If Focus assist keeps turning on automatically then there could be a couple of reasons for this behavior. Depending on its cause we can either fix it or use a workaround to manage the issue. Let’s find out why Focus assist keeps turning on automatically on your system.
Fix #1: Check Automatic Rules
Are you having this issue when projecting to a secondary display? Or when sharing your screen with a public computer? Then it is likely that focus assist is getting turned on automatically due to the default automatic rules in Windows 11.
By default, focus assist will silence all notifications in such scenarios to help maintain your privacy. But this can be counterproductive in case you are just trying to use a bigger display from a portable system like a laptop or an NUC.
It could also be that scheduled Focus assist was turned on your system by mistake which will enable and disable Focus assist automatically during certain hours. If any of these situations sounds like what you are facing then you can use the guide below to disable all automatic rules that enable Focus assist during certain scenarios and workflows on Windows 11. Let’s get started.
Press Windows + i on your keyboard to open the Settings app. Ensure ‘System’ is selected on your left and then click on ‘Focus Assist’ on your right.
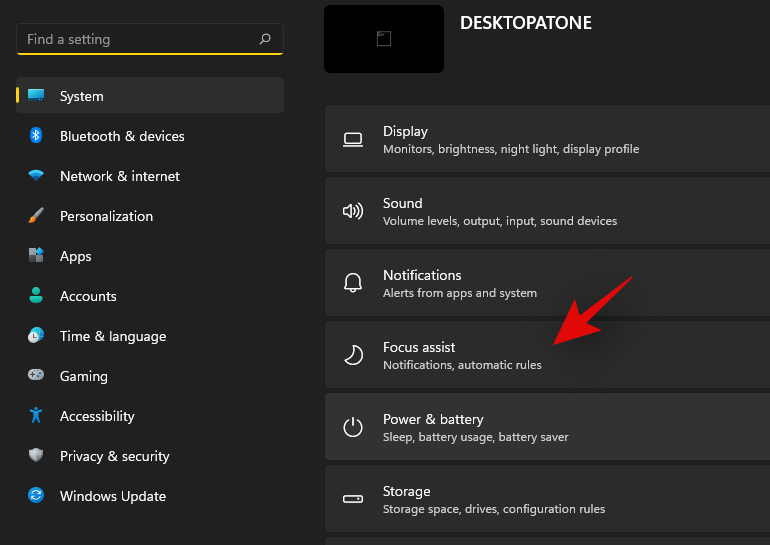
Go down to automatic rules and turn off the following toggles.
- During these times
- When I’m duplicating my display
- When I’m playing a game
- When I’m using an app in full-screen mode only
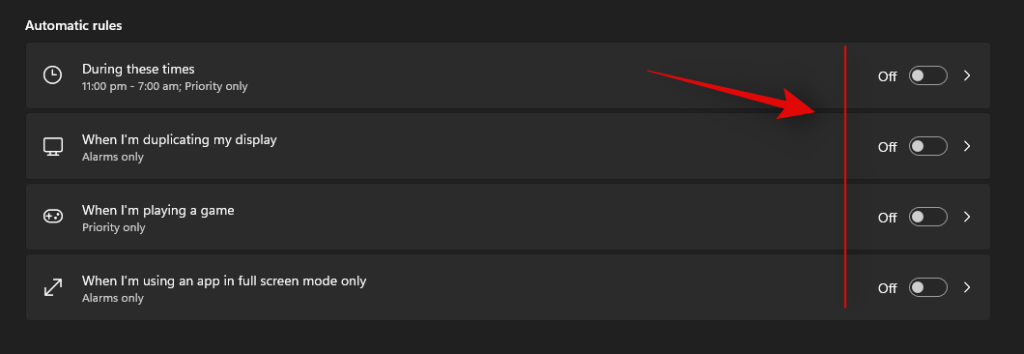
Once these rules are disabled, Windows 11 will not turn on Focus assist automatically on your system.
Fix #2: Turn of GeForce Overlay
This is another way to solve Focus assist misbehaving on your system. If you have a dGPU from Nvidia and are using the GeForce experience app then we recommend disabling its overlay option and restarting your system. With the automatic rule for ‘When I’m using an app in full-screen mode only’ turned on, Windows will mistake the Nvidia overlay detection on your desktop for a full-screen app which will trigger the Focus assist settings in return. You can also disable this automatic rule in case you wish to keep the Geforce Experience overlay enabled on your system.
Focus assist greyed out, option missing or not working; How to fix
Is the focus assist option missing from Windows 11 settings app? Is the module greyed out in the action center? This is a known bug that shows up occasionally with every feature update of Windows. Even certain versions of Windows 10 faced huge issues with this bug until a fix was released.
Fix #1: Enable in Group Policy Editor
If Focus assist seems to be missing from your system then it is likely disabled using the group policy editor. If your PC is managed by your organization or your workplace then it is likely disabled by your administrator. If you have access to the group policy editor then you can use the guide below to enable focus assist on your system. However, in case you have limited access, then you might need to get in touch with your administrator to enable Focus assist on your system.
Press Windows + R on your keyboard to bring up the Run dialog box and type in the following command to launch the Group Policy Editor. Click on ‘Ok’ once you are done.
gpedit.msc
Navigate to the following node.
User configuration > Administrative Templates > Start Menu and Taskbar > Notifications
Double click on ‘Turn off Quiet Hours’ on your right.
Click and select ‘Disabled’ in the top left corner.
Click on ‘Ok’ to save your changes.
And that’s it! Focus assist should now be enabled on your system in case it was disabled using the group policy editor.
Fix #2: Reinstall and repair default Windows UWP apps and system apps
If Focus assist is still missing from your system then let’s check if all the necessary apps and utilities are installed properly on your system. Use the guide below to check and repair Windows 11’s basic apps and functionality on your system.
Press Windows + S and search for PowerShell. Click on ‘Run as administrator’ once it shows up in your search results.
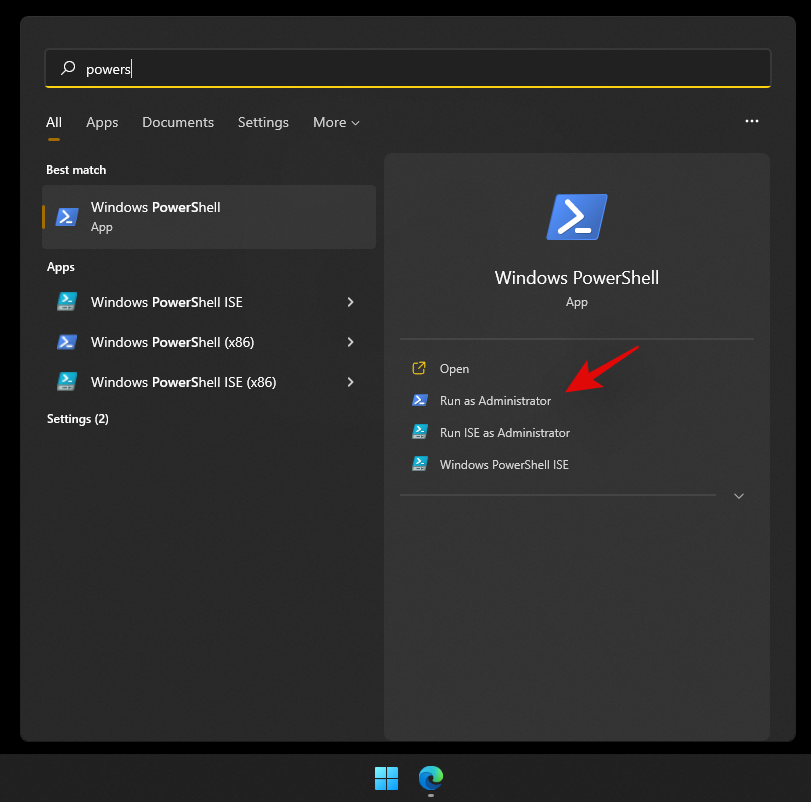
Once PowerShell is launched, execute the following command to reinstall all UWP apps and check and repair other default utilities required by Windows 11 in the background.
Get-AppXPackage -AllUsers | Foreach {Add-AppxPackage -DisableDevelopmentMode -Register "$ ($ _. InstallLocation) \ AppXManifest.xml"}

Wait for the process to finish and restart your PC for good measure. If Focus assist was corrupted or missing from your system, then this fix should help solve all your issues.
Fix #3: Check for a Windows Update
Haven’t updated in a while? We recommend checking for recent Windows Updates. While updates rarely disable major features like Focus assist, a new feature update installation can help refresh your registry, fix mismatched values and more importantly iron out bugs that could be preventing you from accessing Focus assist on your system. Use the guide below to check for recent Windows updates on your system.
Press Windows + i on your keyboard to open the Settings app and click on ‘Windows Update’ on your left.

Click on ‘Check for updates’.

In case any new updates show up, let them install on your system and restart if prompted. In case you are using a metered connection then you will need to click on ‘Download now’ manually to avoid any unexpected data charges.
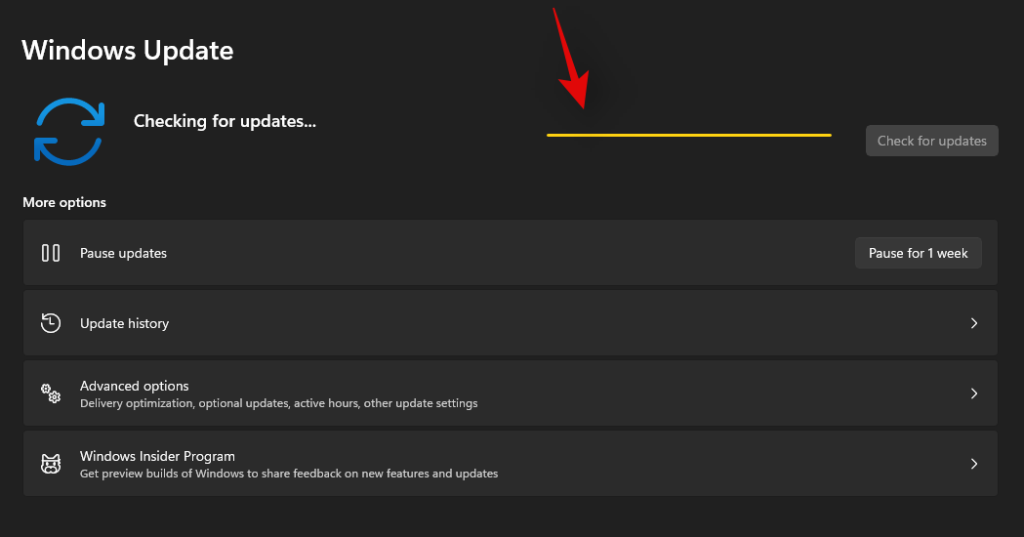
Once the necessary Windows updates are installed on your system, Focus assist should be restored in your action center and the Settings app.
Last Resort: Reset your PC
If Focus assist is still missing from your PC then this indicates a corrupted Windows installation on your system. The best way to fix this without wasting much time on troubleshooting would be to simply reset your PC while keeping all your files intact. This will refresh the entire Windows 11 installation and reinstall all the apps which should help restore functionality for all Windows features including Focus assist. Follow the guide below to reset your PC while keeping your files.
Note: The reset process will remove all installed applications and only retain files stored manually on your local storage. A list of all the removed apps will be available in .txt format on your desktop once your PC has been reset.
Press Windows + i on your keyboard and click on ‘Windows Update’ on your left.
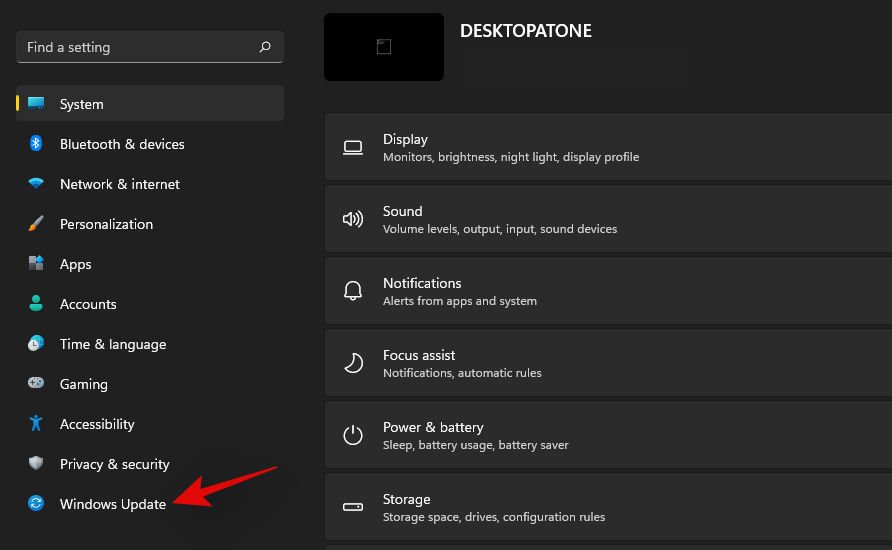
Click on ‘Advanced options’.
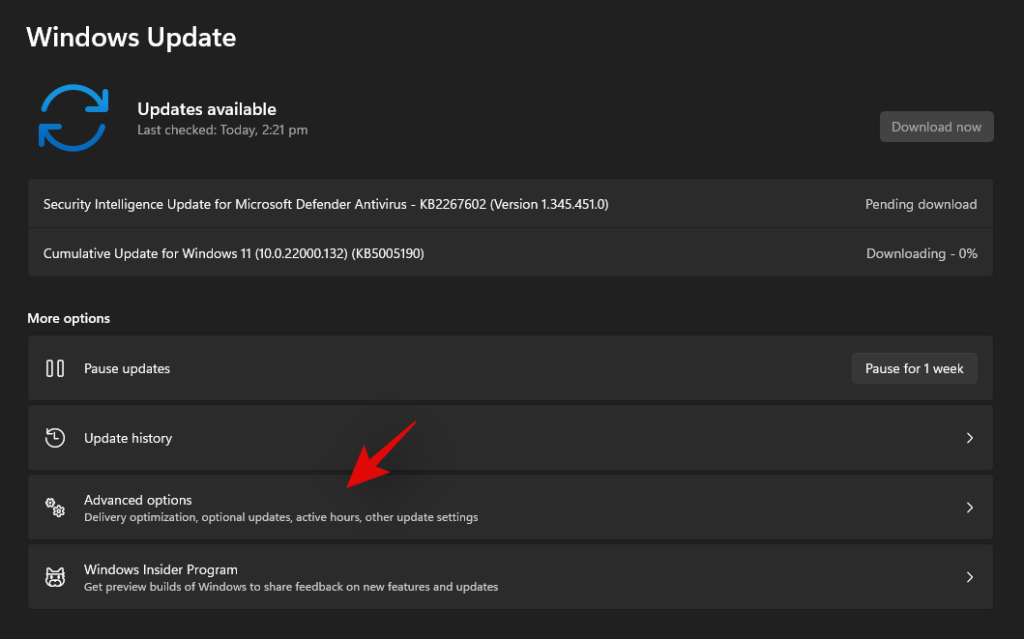
Click and select ‘Recovery’.
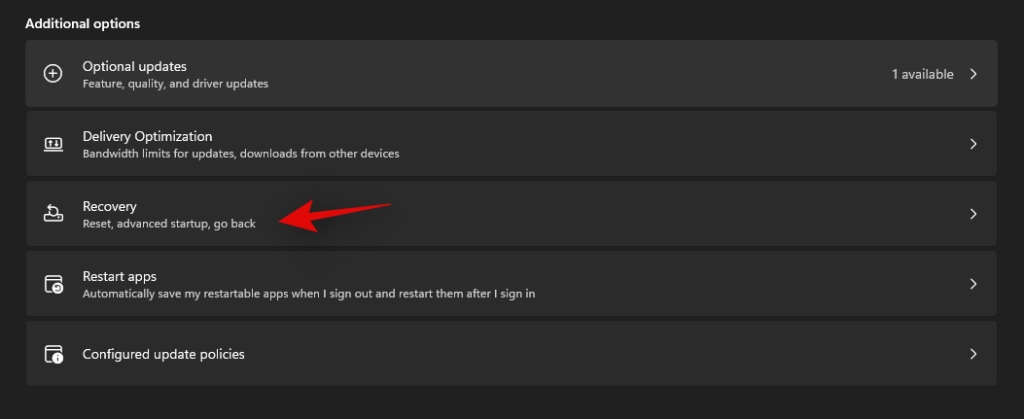
Click on ‘Reset PC’ beside Reset this PC.

Click on ‘Keep my files’.
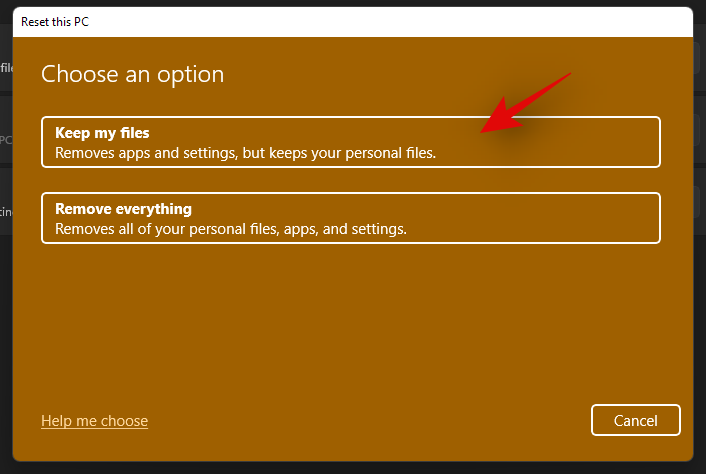
Windows will now process all the files on your local storage. Click on ‘Reset’.
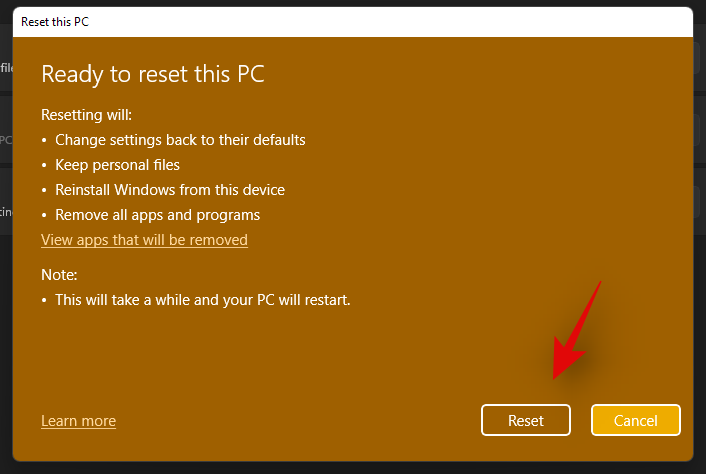
Note: If you are using Windows 11 Pro or higher then you will get the option to use a local installation/recovery media to reinstall Windows 11 as well. However, this option will be missing for Windows 11 Home users.
Windows will now reset your PC while retaining all your files. Your PC will restart several times during this process. This is completely normal and you should let Windows do its thing. If you are using a laptop or a portable NUC, then ensure that your unit is plugged into the power at all times during this process.
How to turn off Focus assist permanently
Do you wish to turn off Focus assist permanently in all scenarios? Then you can use the guide below to do so. The best way to disable Focus assist is by using the group policy editor. But in case you are using Windows 11 Home Edition, then you can use the first method in this guide to disable Focus assist permanently.
Method #1: Disable all settings and rules
Once you disable all the settings and rules for Focus assist, the feature should be turned off automatically on your system. Use the guide below to get you started.
Press Windows + i on your keyboard to open the Settings app and click on ‘Focus assist’ on your right.

Click and select ‘Off’ at the top.
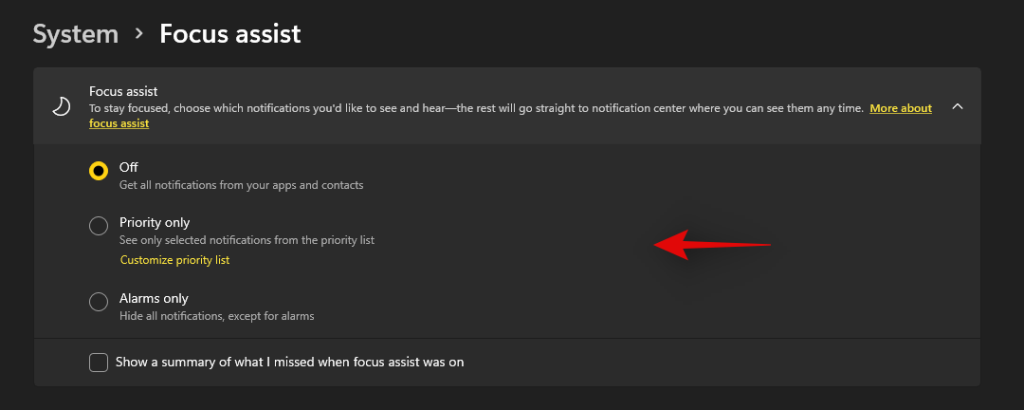
Uncheck the box for ‘Show a summary of what I missed when focus assist was on’.

Subsequently, disable all the toggles under ‘Automatic rules’ as shown below.

We also recommend turning off notifications for unnecessary apps using the guide after this section to avoid unnecessary notifications from interrupting you when focus assist is disabled.
Method #2: Using Group Policy Editor
The group policy editor will permanently disable focus assist on your system and even prevent you from accessing it in your settings. However, this method will only work on Windows 11 Pro or higher versions. In case you have the Windows 11 home edition, you can use the guide above to disable Focus assist instead.
Press Windows + R and type in the following to open Froup Policy EDitor. Click on ‘Ok’ once done.
gpedit.msc
Navigate to the following node.
User configuration > Administrative Templates > Start Menu and Taskbar > Notifications
Find and double-click on ‘Turn on Quiet Hours’ on your right.
Select ‘Enabled’ in the top left and click on ‘Ok’.
Focus assist will now be permanently disabled on the selected system. We recommend you restart your system or explorer.exe in case the changes do not take place immediately.
Is there any other way to disable notifications?
Yes, you can disable notifications individually on a per-app basis in Windows 11 to customize the notifications you receive. This is another way to ensure that you are only notified about the apps and notifications that you intended. Customizing your notifications this way will also allow you to retain the full functionality of the focus assist mode without having to disable certain rules to avoid mismatched scenarios in your workflow.
However, the only downside to managing your notifications this way is that you have to keep enabling and disabling notifications for apps every few months depending on your new installs and uninstalls. You can use the guide below to disable notifications on a per-app basis in Windows 11.
Disable notifications permanently on a per-app basis
Here’s how you can disable notifications on a per-app basis in Windows 11.
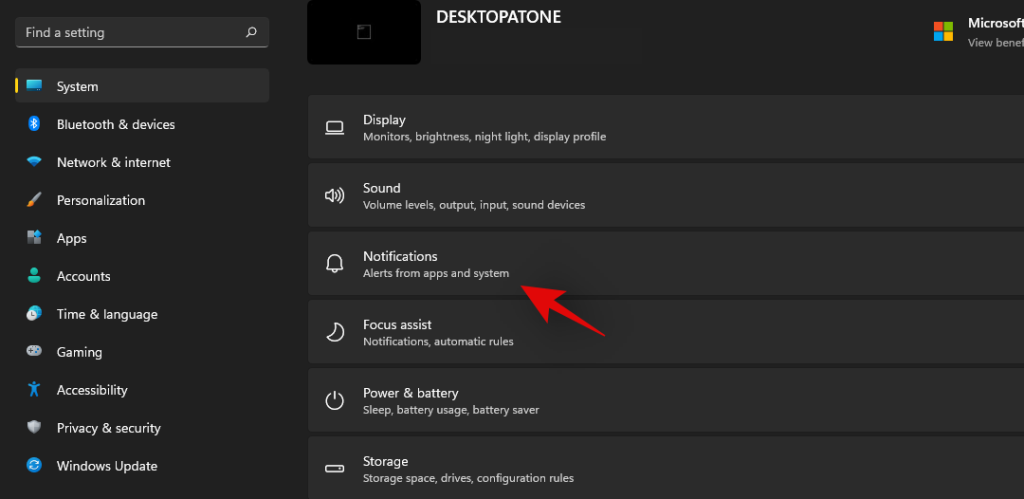
Press Windows + i on your keyboard to open the Settings app and then click on ‘Notifications’ on your right.
You will now get a list of all the apps that have the permission to deliver notifications on your system. Scroll the list to find the necessary apps and turn off the toggle beside them to disable notifications.

Repeat the steps above for all the intended apps to disable notifications.
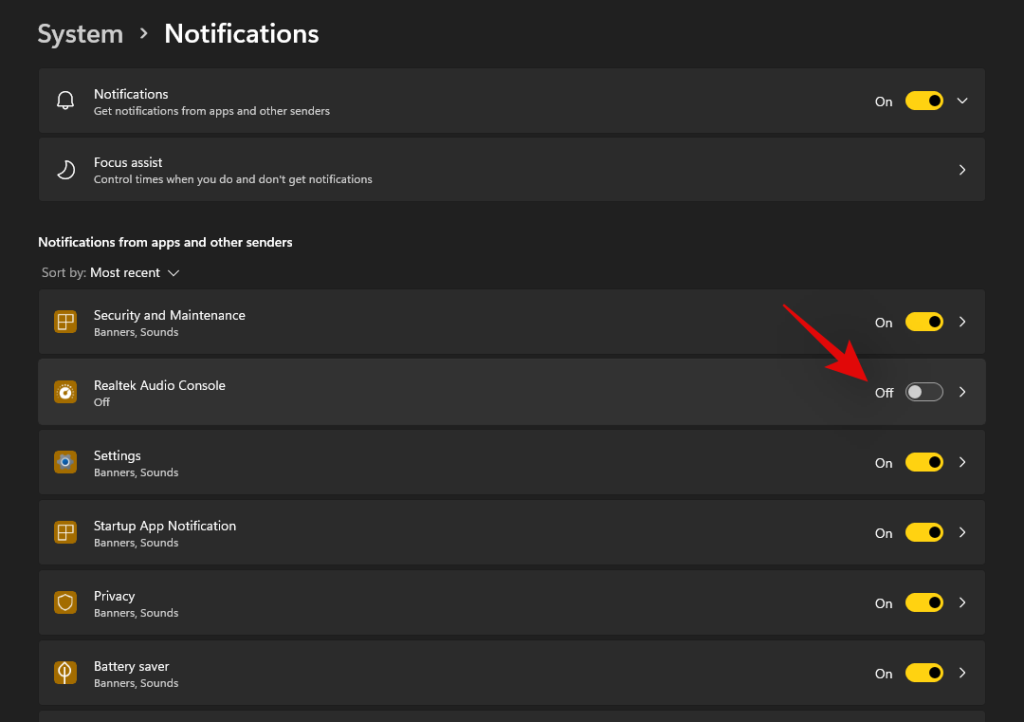
Close the Settings app and notifications for the selected apps should now be permanently disabled on your system.
Can you customize notifications in Windows 11?
Well, not exactly. Windows 11 currently has very limited options when it comes to customizing your notifications. You can not change the look, behavior, or color palette of your notifications without changing the accent color of your overall UI. However, you can customize the way your notifications sound. You can set a nice quiet notification sound that does not interrupt your workflow or opt for a quirky take that makes for a few good laughs each time you get a notification. The choice is completely up to you. Use the guide below to customize your Windows 11 notification sounds.
Required
- A .wav file for the sound you wish to set as your custom notification on Windows 11
Guide
Let’s start by first placing the .wav file in a compatible media folder so that you can set it as your default notification sound in Windows 11. Navigate to the concerned .wav file and copy it to your clipboard.
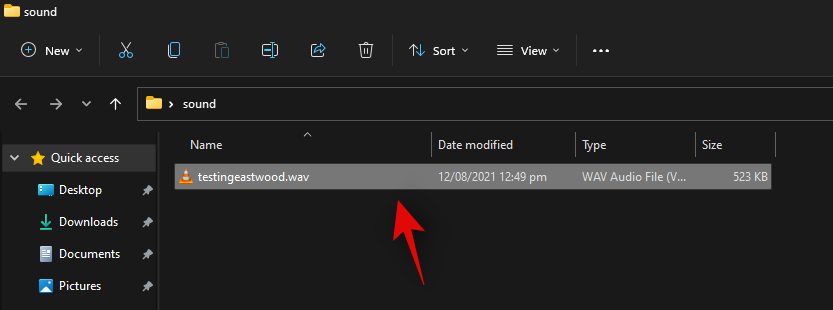
Now navigate to the following path given below. Paste your .wav file in this location. Click on ‘Continue’ when you will be prompted for administrator permission.
C:\Windows\media
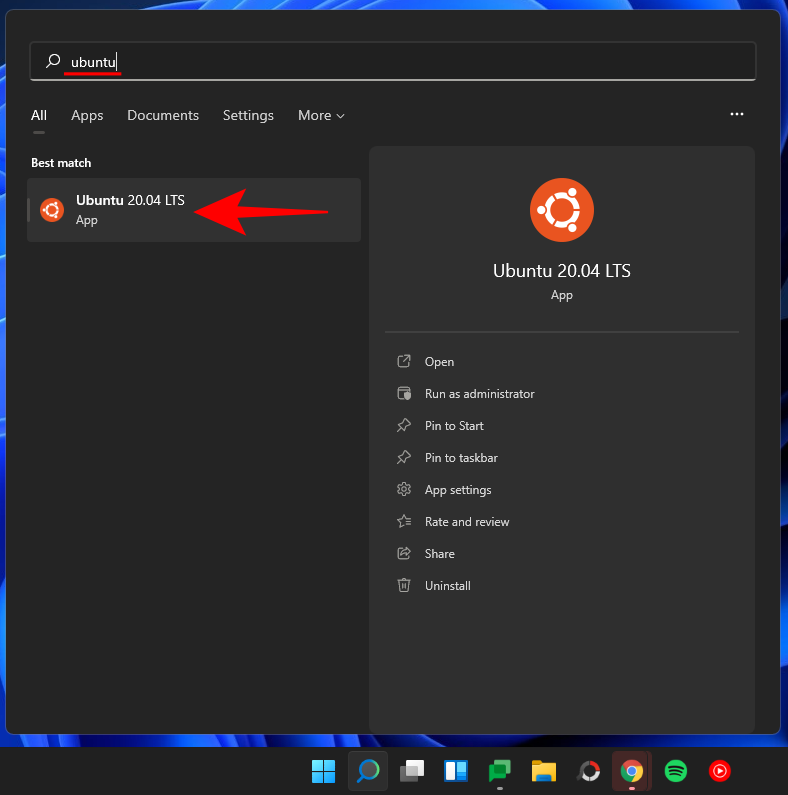
We can now use the .wav file as our default notification sound. Press Windows + i on your keyboard to open the Settings app and then click on ‘Sound’ on your right.
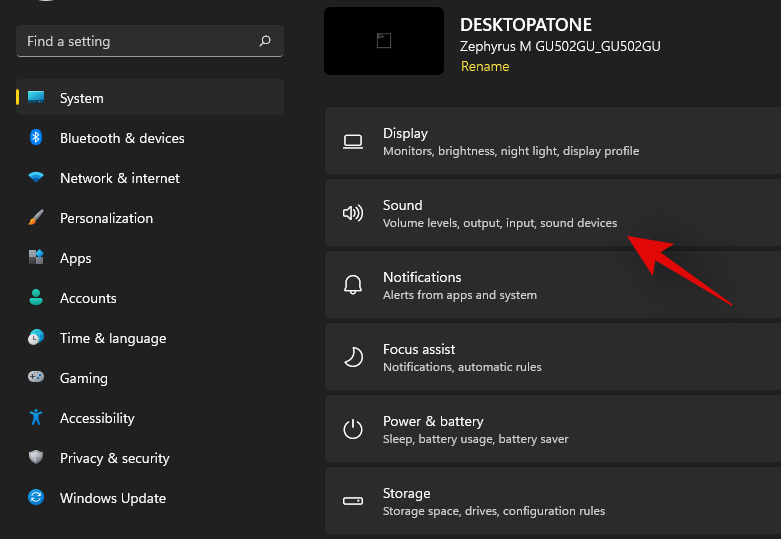
Scroll to the bottom and click on ‘More sound settings’.

Click and switch to the ‘Sounds’ tab at the top.
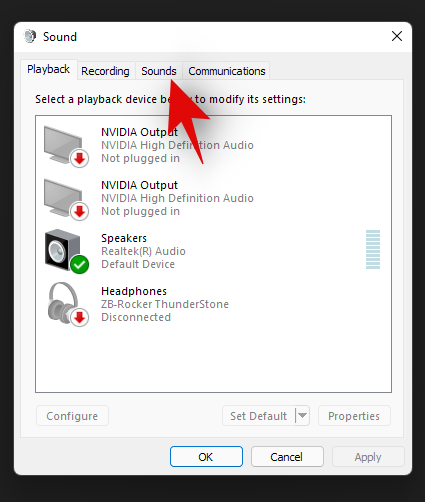
Under ‘Program Events’ scroll the list and find ‘Notifications’. Click on ‘Notifications’ to select it.
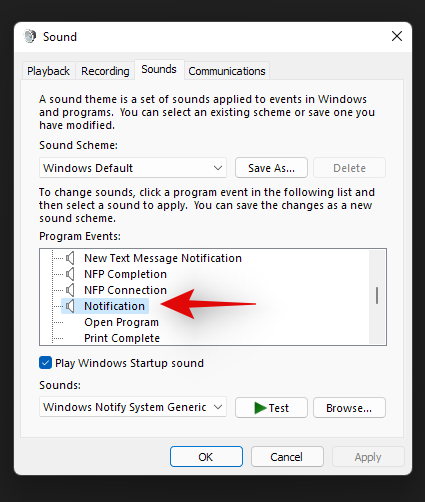
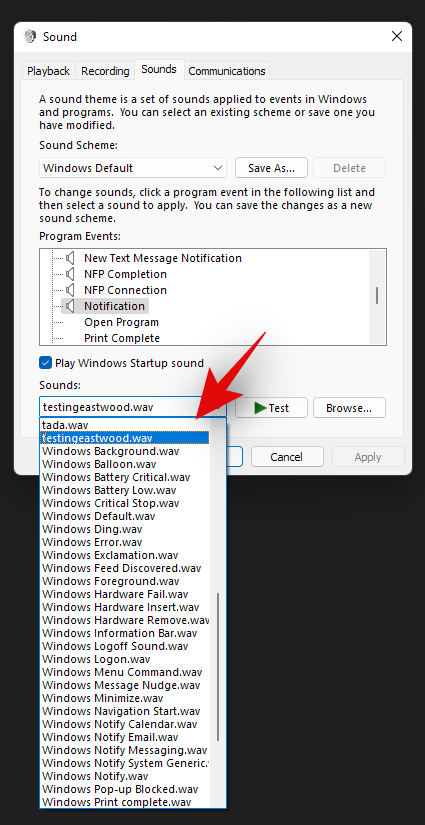
Now click on the drop-down arrow under Sounds and select the .wav file we pasted in the Media folder.
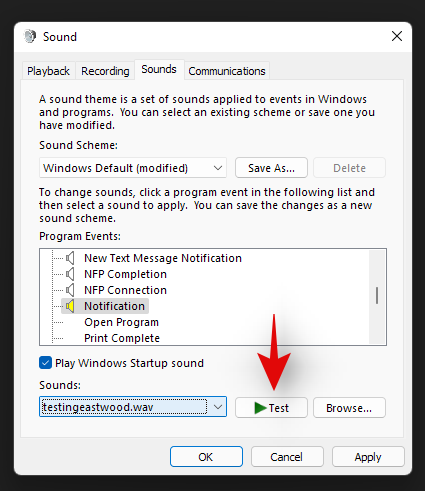
You can click on ‘Test’ to test your custom notification sound.
Click on ‘Ok’ to save your changes.
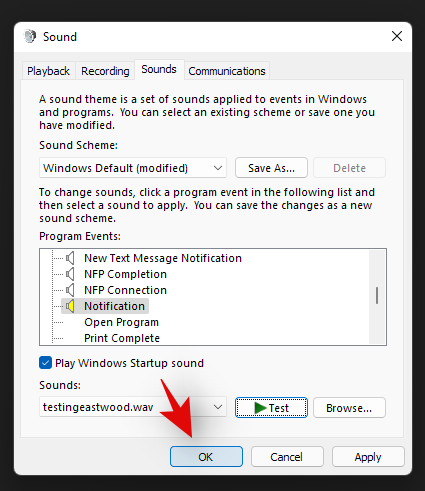
And that’s it! You will now have set a custom sound as your default notification sound in Windows 11.
Distractions from notifications are a huge problem especially when you are into some important work. Using the steps mentioned above, now, you can easily get rid of unnecessary notifications and work peacefully with full concentration.
Related:
