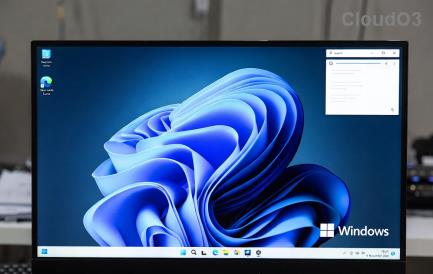
De Windows-taakbalk staat in het middelpunt van alle aandacht sinds het zijn nieuwe, vernieuwde uiterlijk kreeg met de release van Windows 11. U kunt nu uw taakbalk centreren, genieten van het nieuwe actiecentrum, de uitlijning wijzigen en het aan weerszijden van uw scherm plaatsen. Helaas is de implementatie van deze functie minder dan succesvol geweest en hebben steeds meer gebruikers moeite om hun taakbalk een paar maanden op Windows 11 te laten werken.
Hoewel Microsoft het probleem heeft erkend, een tijdelijke oplossing heeft gegeven en momenteel aan een oplossing werkt, lijken gebruikers de taakbalk nog steeds niet aan het werk te krijgen. Als u in hetzelfde schuitje zit, hebben we een lijst samengesteld met alle beschikbare oplossingen om uw taakbalk weer aan de gang te krijgen op Windows 11. Volg de onderstaande gids om u op weg te helpen.
Inhoud
Waarom wordt mijn taakbalk niet weergegeven?
De taakbalk van Windows 11 heeft een nieuwe look die voortkomt uit een vernieuwde kijk op de werking ervan. De taakbalk is nu afhankelijk van verschillende services en het Start-menu zelf om goed te werken. Het lijkt erop dat het upgradeproces van Windows 10 naar Windows 11 de taakbalk lijkt te verknoeien, afhankelijk van de versie van Windows 10 die u op uw systeem hebt geïnstalleerd en naar welke Windows 11-versie u bijwerkt.
Bovendien lijkt een recente Windows Update die vorige maand is uitgebracht dit probleem voor sommige gebruikers te veroorzaken, terwijl anderen hetzelfde probleem hebben vanwege een niet-overeenkomende systeemtijd, ondanks dat alles correct is ingesteld. Er zijn veel manieren om uw taakbalk te repareren en we raden u aan om met de onderstaande reparaties één voor één te beginnen.
12 manieren om problemen met de taakbalk op Windows 11 op te lossen
Gebruik de onderstaande methoden om uw taakbalk op Windows 11 te repareren. Als u al hebt geprobeerd uw systeem opnieuw op te starten, kunt u de eerste methode overslaan.
Fix #1: herstart pc
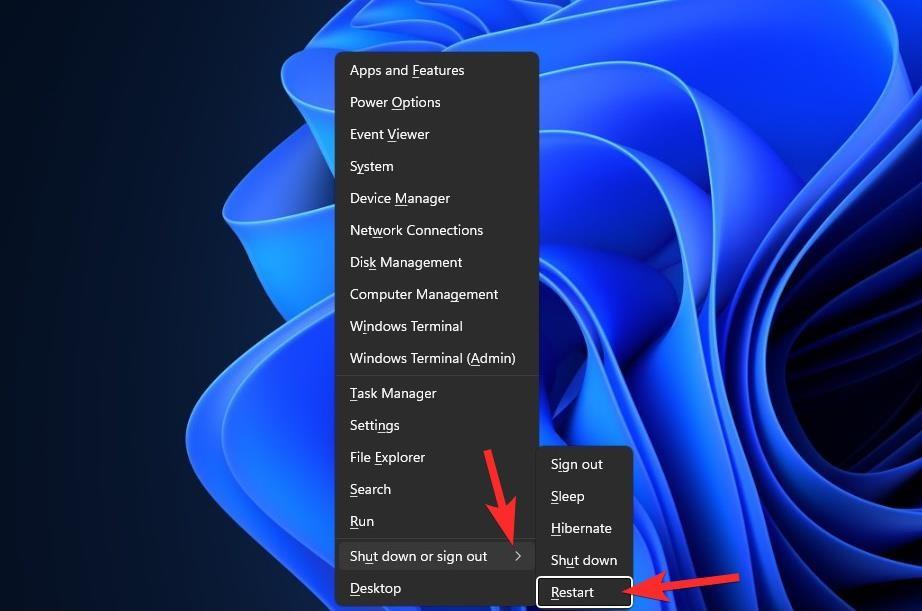
Voordat u iets speciaals uitprobeert, is het goed om eenvoudigere maatregelen uit te proberen, zoals het opnieuw opstarten van de pc of Windows Verkenner (zie hieronder). Als u dit doet, krijgt uw systeem een zachte reset, waardoor de gegevens opnieuw kunnen worden geladen en mogelijk problemen met de taakbalk en het menu Start kunnen worden opgelost.
Fix #2: Zorg ervoor dat 'De taakbalk automatisch verbergen' is uitgeschakeld
Druk Windows + iop je toetsenbord en klik links op 'Personalisatie'.
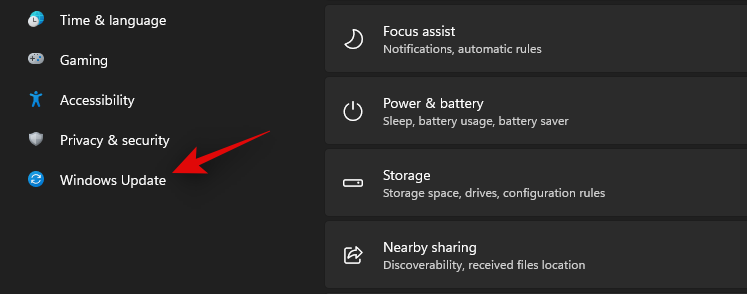
Klik op 'Taakbalk'.
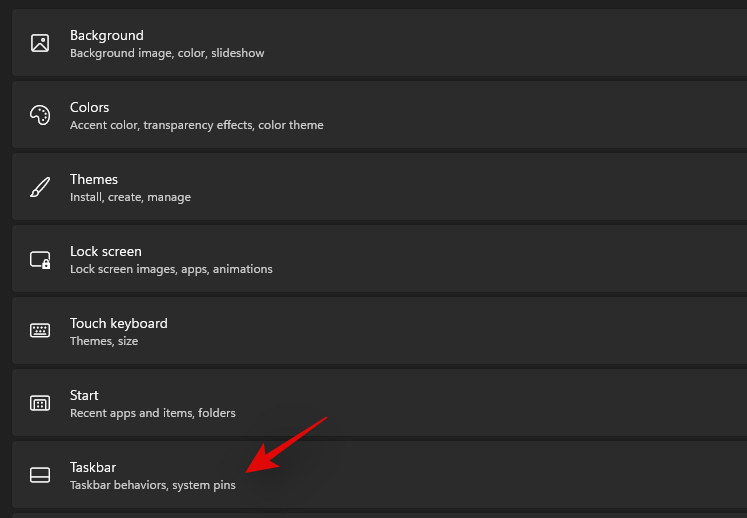
Klik nu op 'Taakbalkgedrag'.
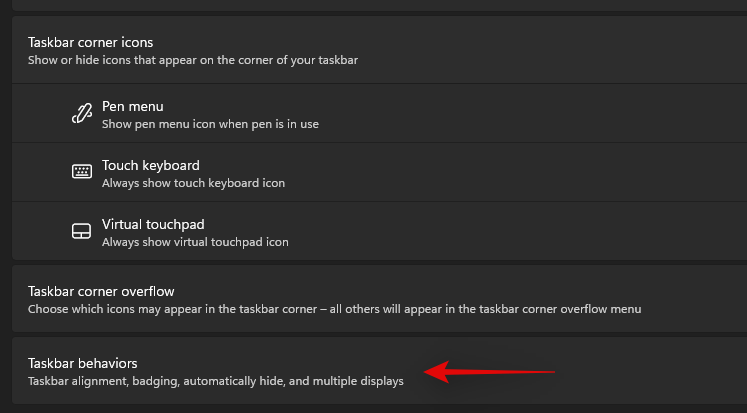
Haal het vinkje weg bij 'De taakbalk automatisch verbergen'.

Sluit nu de app Instellingen en als uw taakbalk automatisch werd verborgen, zou deze nu op uw systeem moeten zijn uitgeschakeld.
Fix #3: herstart noodzakelijke services
Zoals eerder vermeld, heeft Windows 11 de taakbalk vernieuwd, wat nu betekent dat het afhankelijk is van meerdere services om correct te werken op elk systeem. Laten we al deze services opnieuw opstarten om ervoor te zorgen dat een achtergrondconflict niet verhindert dat uw taakbalk correct werkt op uw systeem.
Druk Ctrl + Shift + Escop op uw systeem om Taakbeheer te starten. Ga naar het tabblad 'Details' bovenaan.
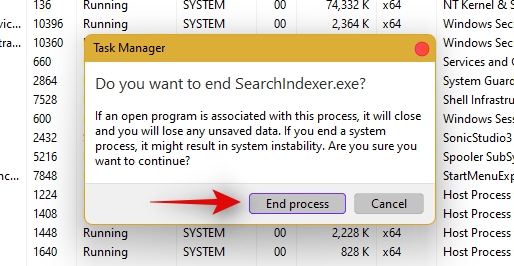
Zoek nu de volgende actieve services en selecteer ze door erop te klikken. Druk op 'Verwijderen' op je toetsenbord en bevestig je keuze door 'Proces beëindigen' te selecteren.
- Explorer.exe
- ShellExperienceHost.exe
- SearchIndexer.exe
- SearchHost.exe
- RuntimeBroker.exe
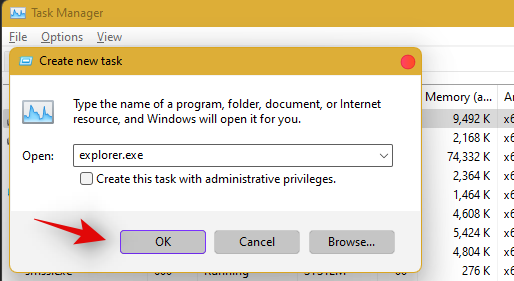
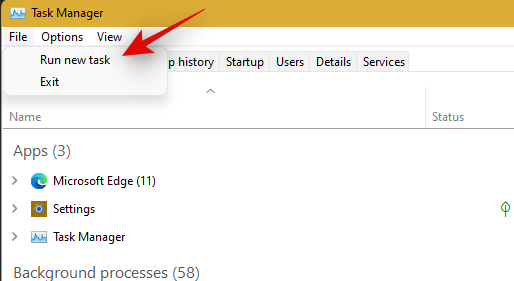
Laten we Windows Verkenner nu opnieuw starten. Klik op 'Bestand' in de linkerbovenhoek en selecteer 'Nieuwe taak uitvoeren'.
Typ 'explorer.exe' en druk op Enter op je toetsenbord. U kunt indien nodig ook op 'Ok' klikken.
Nadat de verkenner opnieuw is opgestart, start u eenvoudig uw pc opnieuw op om andere services op uw systeem opnieuw te starten.
De taakbalk zou nu moeten worden hersteld als een achtergrondserviceconflict de oorzaak van uw probleem was.
Fix #4: verwijder IrisService in het register en start opnieuw
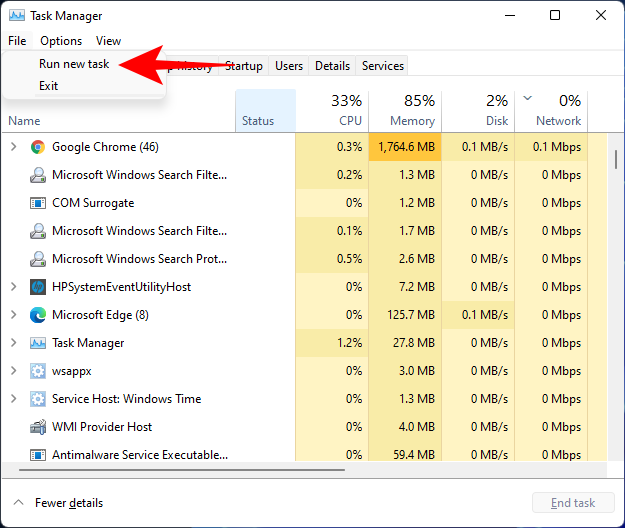
Druk Ctrl + Shift + Escop om Taakbeheer te openen. Klik vervolgens op Bestand in de linkerbovenhoek.
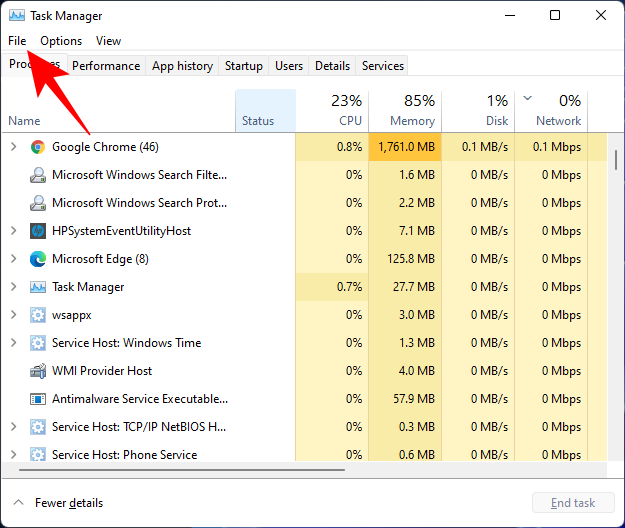
Selecteer Nieuwe taak uitvoeren .
Typ cmd en druk op Enter.
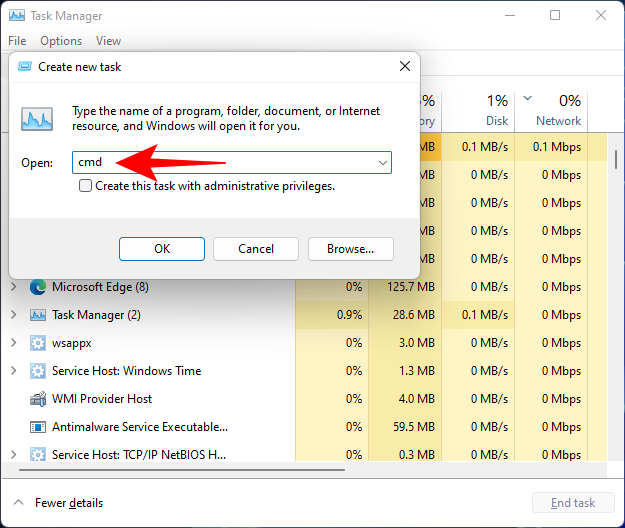
Hiermee wordt een verhoogde instantie van de opdrachtprompt geopend. Kopieer nu de volgende opdracht en plak deze in de opdrachtprompt:
reg delete HKCU\SOFTWARE\Microsoft\Windows\CurrentVersion\IrisService /f && shutdown -r -t 0

Druk vervolgens op Enter. Zodra u dit doet, wordt uw pc opnieuw opgestart. Zodra het weer is opgestart, zou alles weer normaal moeten zijn, inclusief de taakbalk.
Fix #5: UndockingDisabled toevoegen in het register
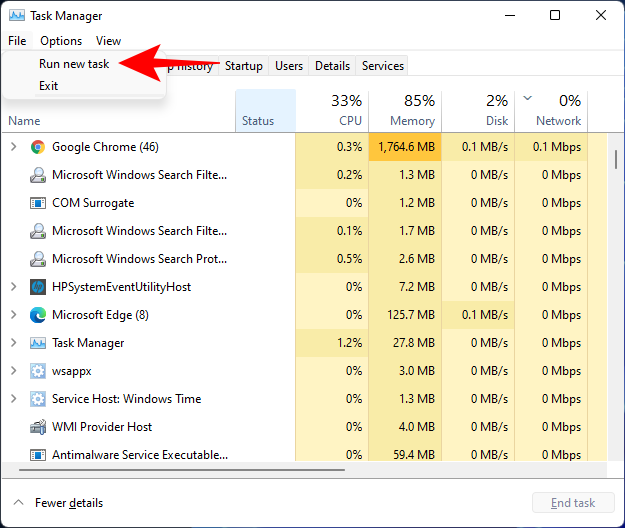
Druk Ctrl + Shift + Escop om Taakbeheer te openen. Klik vervolgens op Bestand (linksboven) en Voer een nieuwe taak uit .
Typ regedit en druk op Enter.
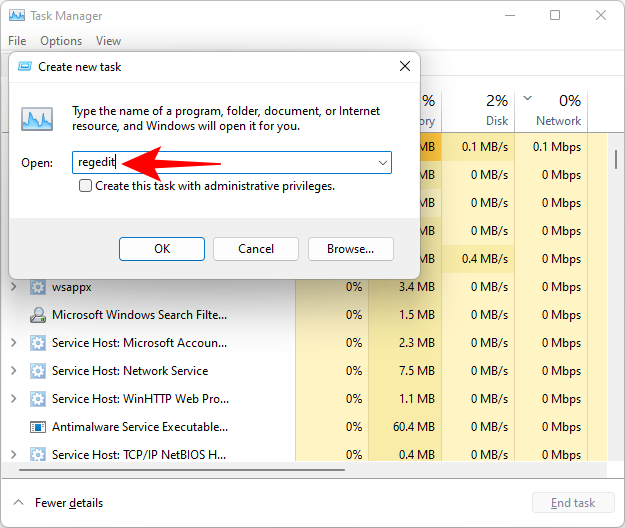
Hiermee wordt de Register-editor geopend. Navigeer nu naar het volgende adres:
Computer\HKEY_LOCAL_MACHINE\SOFTWARE\Microsoft\Windows\CurrentVersion\Shell\Update\Packages
U kunt ook het bovenstaande kopiëren en in de adresbalk van de Register-editor plakken, zoals:

Zodra u op Enter drukt, wordt u naar de opgegeven toets geleid. Klik aan de rechterkant met de rechtermuisknop op de spatie en selecteer Nieuw > DWORD (32-bits)-waarde .
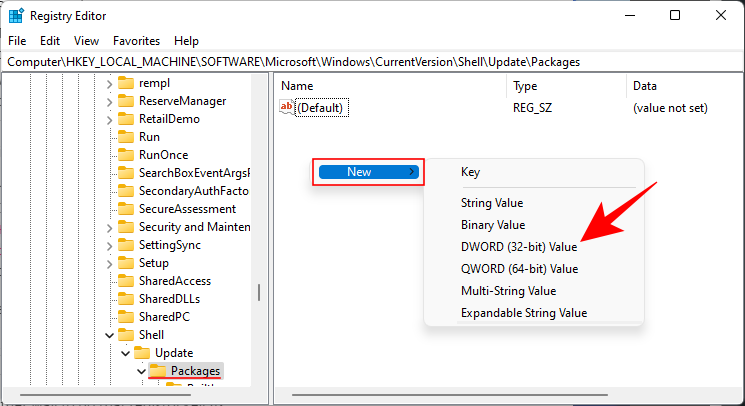
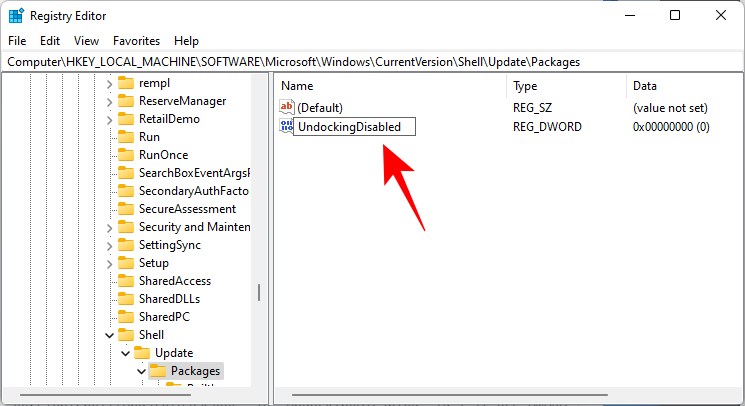
Noem deze nieuw gemaakte DWORD UndockingDisabled .
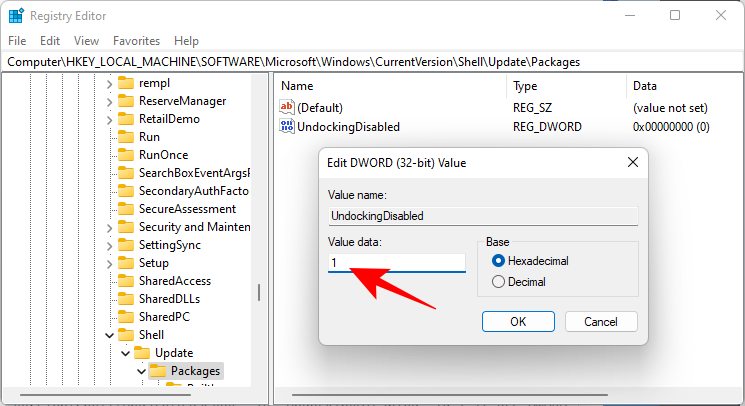
Dubbelklik er vervolgens op en wijzig de "Waardegegevens" in 1 . Klik vervolgens op OK .
Start uw pc opnieuw op om de wijzigingen door te voeren.
Fix #6: Voer SFC & DISM-opdrachten uit
Druk op Start, typ cmd en klik op Als administrator uitvoeren .
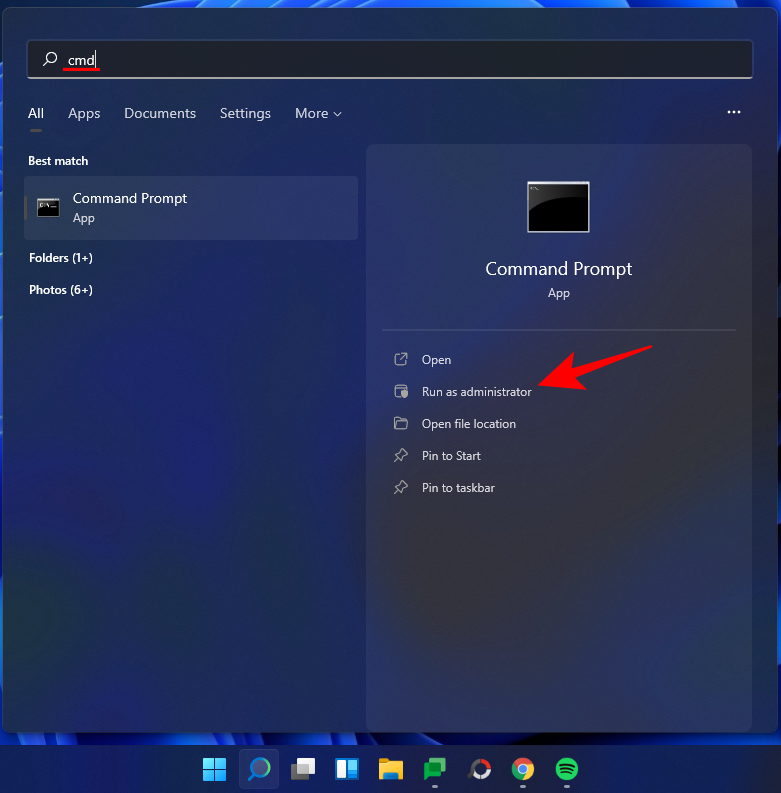
Typ nu het volgende commando:
sfc /scannow
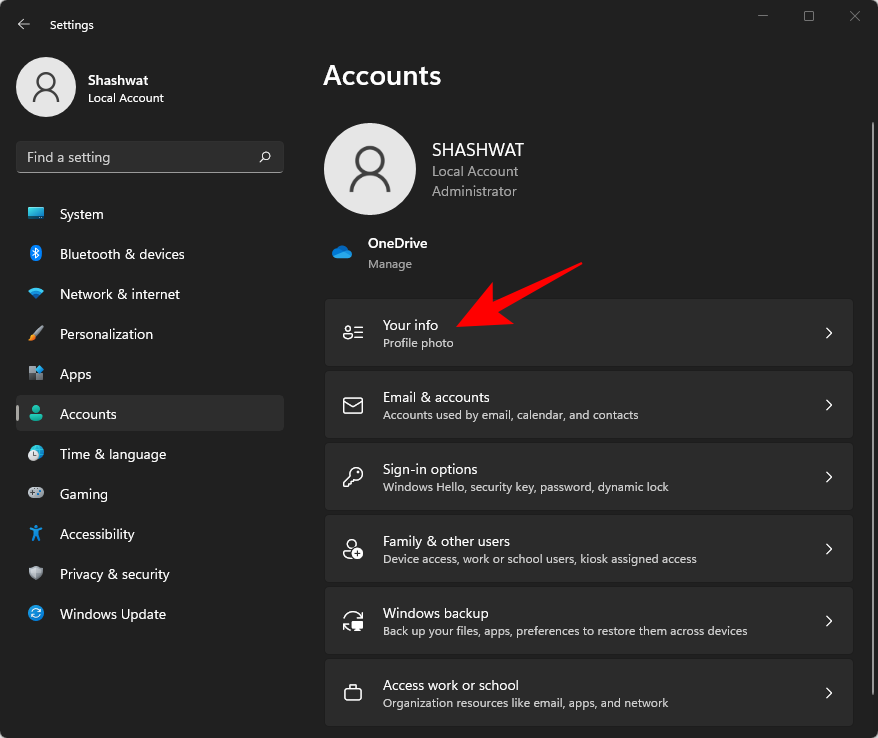
Druk op Enter. Wacht tot SFC klaar is met scannen en eventuele gevonden problemen oplost.

Voer vervolgens de volgende DISM-opdracht uit voor het hulpprogramma Deployment Image Servicing and Management:
dism /online /cleanup-image /scanhealth
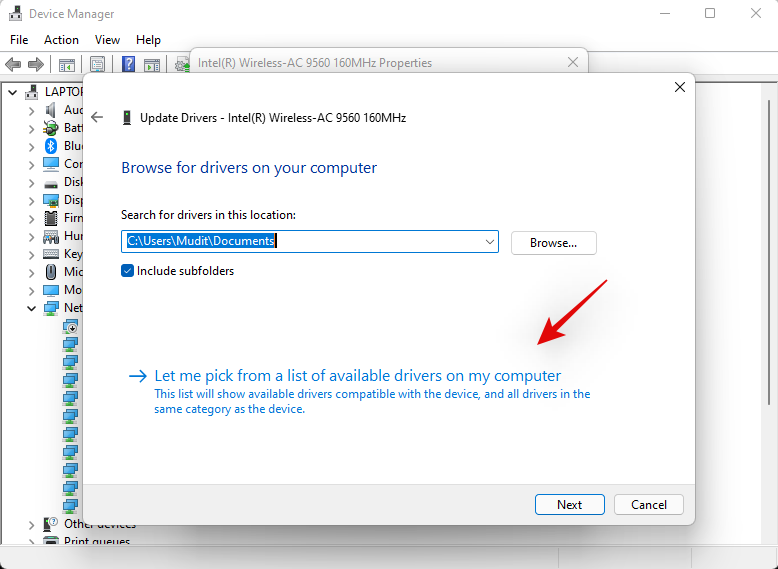
Druk vervolgens op Enter. Wacht opnieuw tot de scan is voltooid.

Voer nu de volgende DISM-opdracht uit:
dism /online /cleanup-image /restorehealth

Druk op Enter. Wacht tot DISM de gezondheid heeft hersteld.

Voer ten slotte de opdracht chkdsk uit om het hulpprogramma Schijf controleren uit te voeren:
chkdsk c: /r
Druk op Enter. Opdrachtprompt geeft een bericht weer met de mededeling dat het "de huidige schijf niet kan vergrendelen ... omdat het volume door een ander proces wordt gebruikt", en uw toestemming vraagt om een scan te plannen voor de volgende keer opstarten. Typ Yom te voldoen.

En druk op Enter. Start nu uw computer opnieuw op, laat het hulpprogramma Schijf controleren zijn werk doen en controleer of de taakbalk weer normaal functioneert.
Fix #7: installeer UWP opnieuw
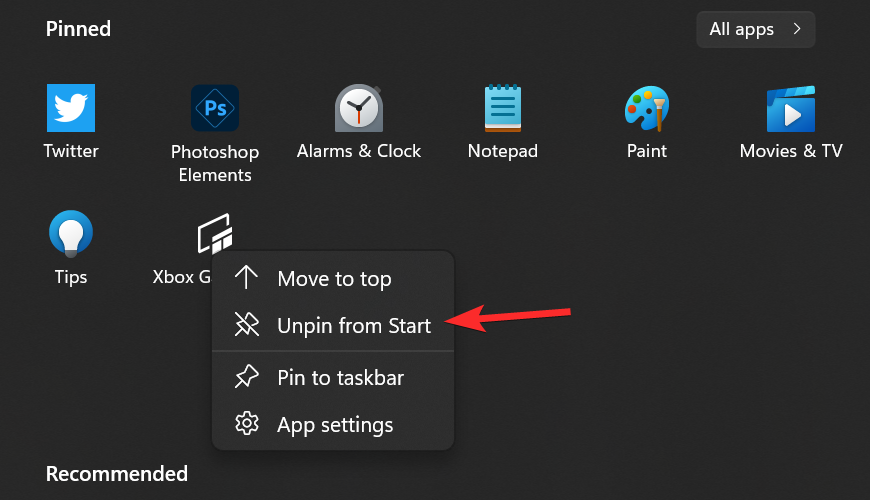
Druk Ctrl + Shift + Escop op uw toetsenbord om Taakbeheer te starten. Klik op 'Bestand' en selecteer 'Nieuwe taak uitvoeren'.
Typ 'PowerShell' in en druk Ctrl + Shift + Enterop op je toetsenbord.

PowerShell wordt nu gestart als beheerder op uw systeem. Typ de volgende opdracht:
Get-AppxPackage -AllUsers | Foreach {Add-AppxPackage -DisableDevelopmentMode -Register “$ ($ _. InstallLocation) \ AppXManifest.xml”}
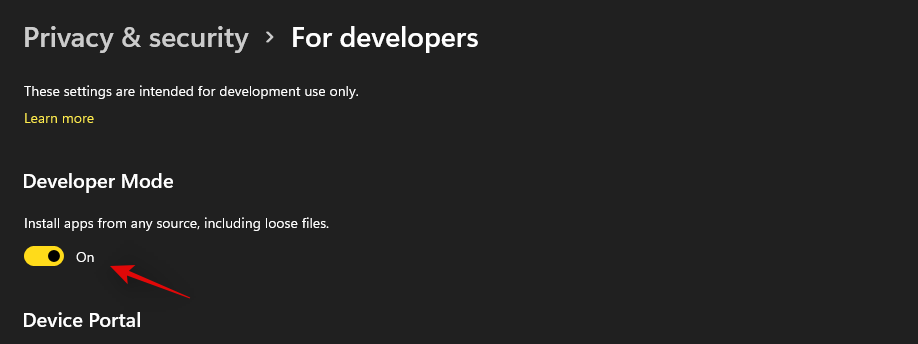
Druk op Enter. PowerShell zal een lopende lijst met berichten in rood weergeven. Maar maak je er geen zorgen over. Wacht gewoon tot het commando klaar is met uitvoeren.

Fix #8: controleer UAC en voeg indien nodig het register bewerken toe
UAC is een must-have voor alle moderne apps en functies, inclusief het startmenu en de taakbalk. U moet eerst UAC inschakelen als deze is uitgeschakeld en uw systeem opnieuw opstarten. Als de taakbalk nog steeds niet voor u werkt, raden we u aan een Xaml Start-menuwaarde toe te voegen aan uw Register-editor.
Het toevoegen van deze waarde lijkt de taakbalk-services opnieuw te starten en opnieuw te registreren, waardoor de taakbalk op de meeste systemen weer werkt. Volg de onderstaande gids om u op weg te helpen.
Controleer en schakel UAC in indien uitgeschakeld
Druk Ctrl + Shift + Escop op uw toetsenbord om Taakbeheer te starten. Klik nu op 'Bestand' in de linkerbovenhoek van uw scherm en selecteer 'Nieuwe taak uitvoeren'.

Typ 'cmd' en druk Ctrl + Shift + Enterop op je toetsenbord.
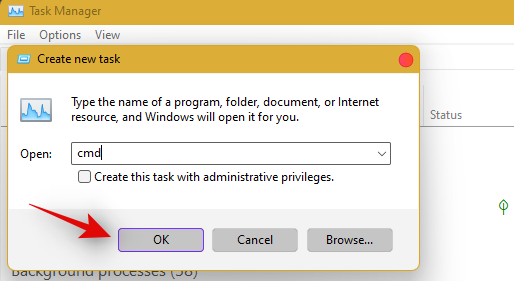
Typ nu de volgende opdracht en druk op Enter om de opdracht uit te voeren.
C:\Windows\System32\cmd.exe /k %windir%\System32\reg.exe ADD HKLM\SOFTWARE\Microsoft\Windows\CurrentVersion\Policies\System /v EnableLUA /t REG_DWORD /d 0 /f
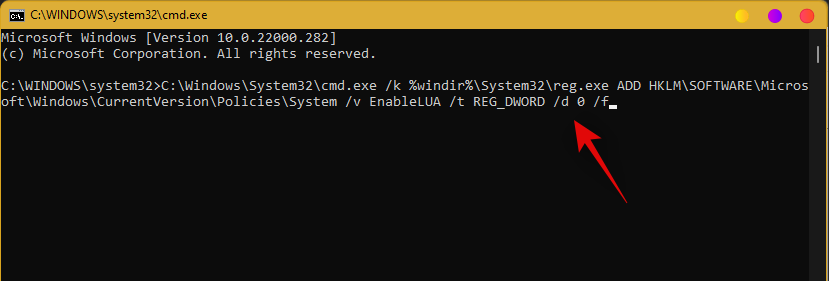
UAC wordt nu ingeschakeld voor uw systeem. Start uw pc opnieuw op om de wijzigingen op uw systeem door te voeren. Eenmaal opnieuw opgestart, zou de taakbalk op uw systeem moeten werken als UAC het probleem voor u was. Als dat niet het geval is, gebruikt u de onderstaande gids om de functionaliteit van de taakbalk op uw systeem te activeren.
Registerwaarde toevoegen
Druk Ctrl + Shift + Escop om Taakbeheer te starten. Klik nu op 'Bestand' in de linkerbovenhoek en selecteer 'Nieuwe taak uitvoeren'.

Typ 'cmd' en druk Ctrl + Shift + Enterop op je toetsenbord.

Typ nu de volgende opdracht en druk op Enter op uw toetsenbord.
REG ADD "HKCU\Software\Microsoft\Windows\CurrentVersion\Explorer\Advanced" /V EnableXamlStartMenu /T REG_DWORD /D 1 /F
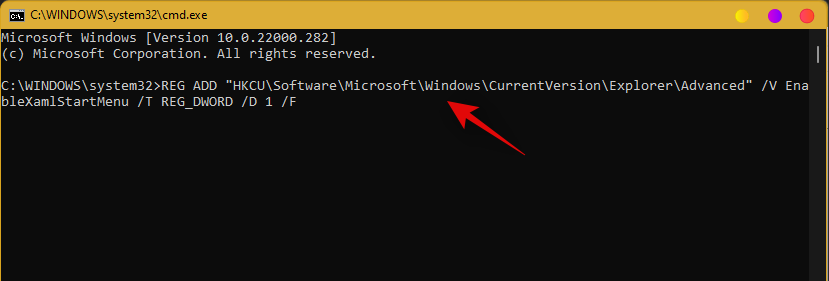
Ga nu terug naar Taakbeheer, zoek Windows Verkenner in de lijst en klik er met de rechtermuisknop op. Selecteer Opnieuw opstarten om explorer.exe opnieuw te starten.
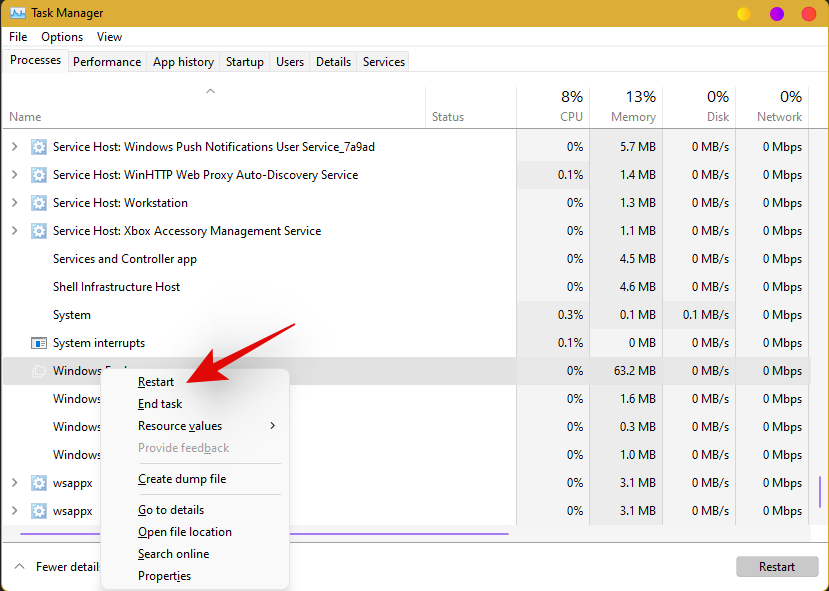
Probeer na het opnieuw opstarten toegang te krijgen tot uw taakbalk. De taakbalk zou nu beschikbaar moeten zijn op uw systeem.
Fix #9: bewerk datum en tijd om taakbalk te repareren
Datum- en tijdinstellingen lijken de belangrijkste oorzaak te zijn van problemen met de taakbalk in Windows 11. Gebruik de onderstaande gids om de volgende tijdcorrecties uit te proberen om te zien welke het beste voor u werkt.
Zorg ervoor dat uw tijd correct is gesynchroniseerd met de tijdserver
Druk Ctrl + Shift + Escop je toetsenbord en klik op 'Bestand'. Selecteer 'Nieuwe taak uitvoeren'.

Typ 'Control' en druk op Enter op je toetsenbord.
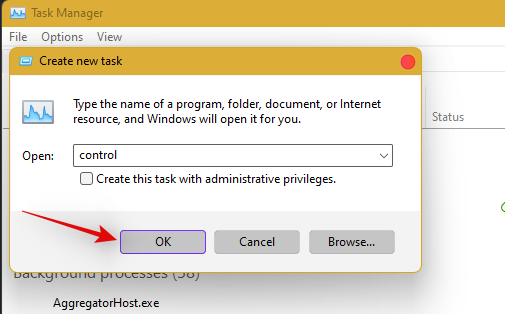
Klik op 'Datum en tijd'.
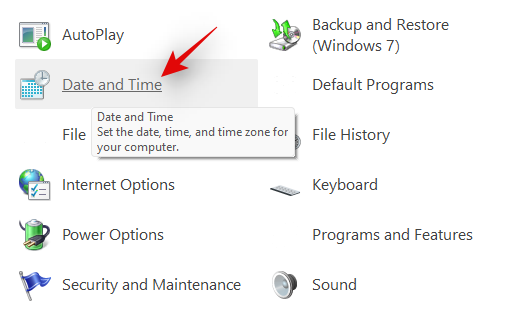
Selecteer bovenaan 'Internettijd'.
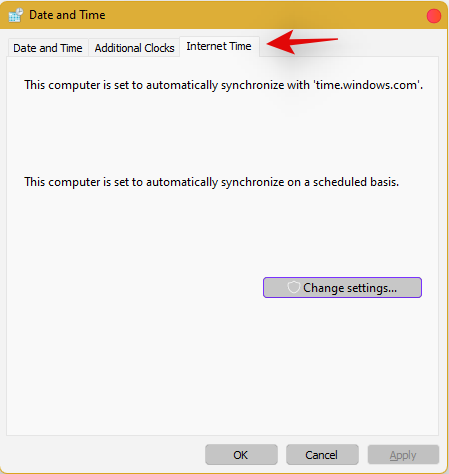
Klik op 'Instellingen wijzigen'.
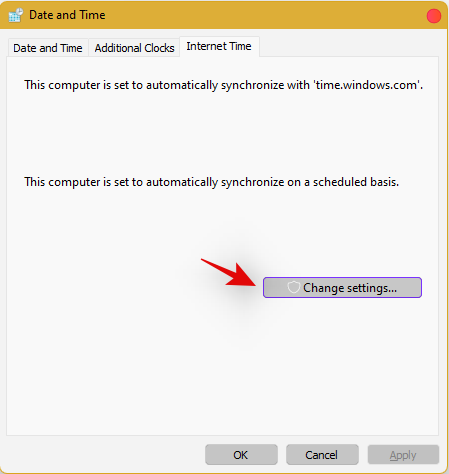
Haal het vinkje weg bij 'Synchroniseren met een internettijdserver'.

Klik op 'Ok' als je klaar bent.
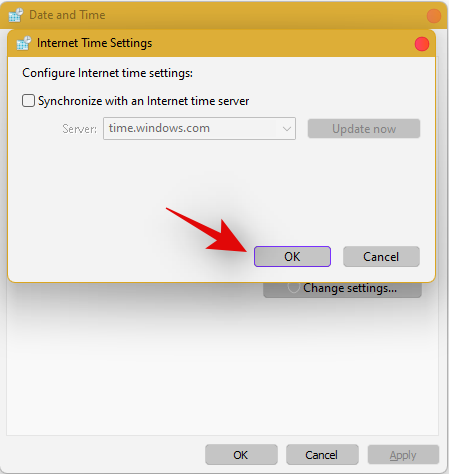
Start uw pc op dit punt opnieuw op en controleer uw taakbalk. Als het nog steeds is uitgeschakeld, hoeft u zich geen zorgen te maken, volg de bovenstaande stappen en schakel Synchronisatie met een internettijdserver opnieuw in.
Eenmaal ingeschakeld, drukt u Ctrl + Shift + Escop op uw toetsenbord en vindt u Windows Verkenner in de lijst op uw scherm. Klik met de rechtermuisknop op de vermelding en selecteer 'Opnieuw opstarten'.

Zodra de verkenner opnieuw is opgestart, probeert u de taakbalk te gebruiken. Als synchronisatie uw probleem was, zou het nu op uw systeem moeten zijn opgelost. Zo niet, ga dan verder met de andere tijdcorrecties die hieronder worden vermeld.
Datum wijzigen naar 1 dag vooruit
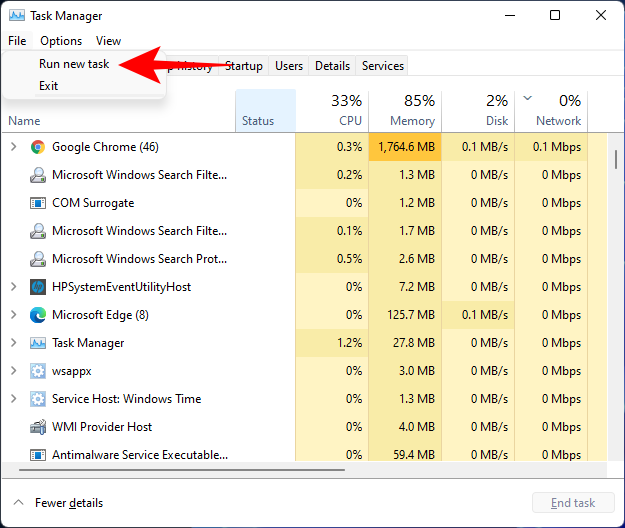
Open Taakbeheer door Ctrl + Shift + Esctegelijkertijd op te drukken . Klik vervolgens op Bestand .
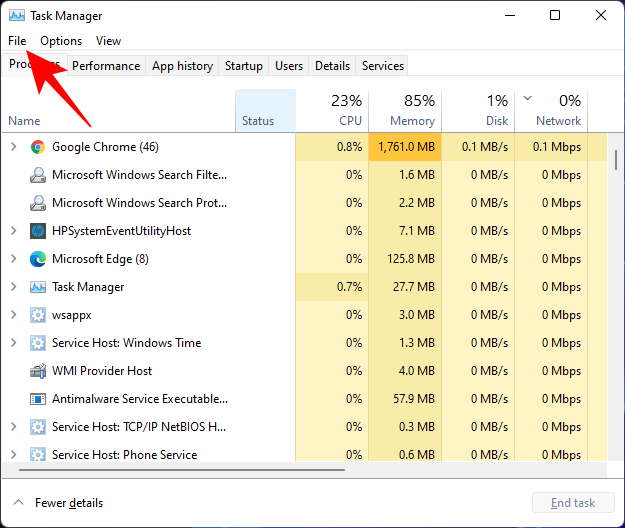
Klik op Nieuwe taak uitvoeren .
Typ configuratiescherm en druk op Enter.
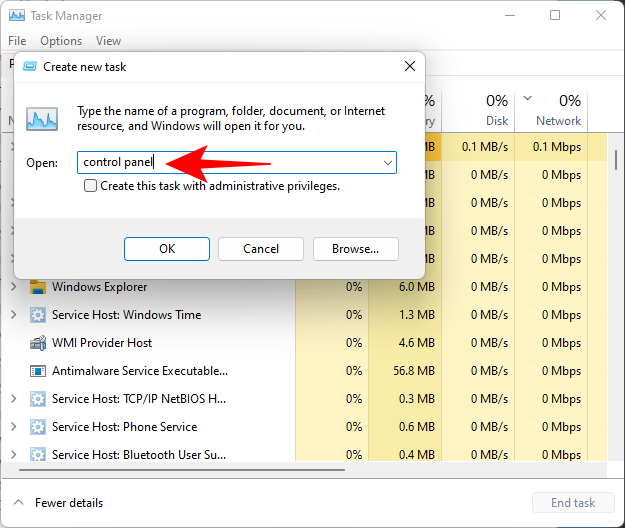
Klik nu op Klok en Regio .
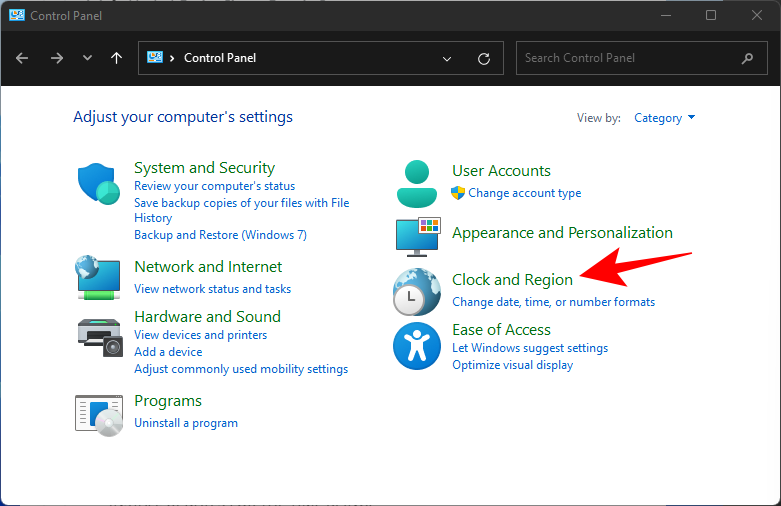
Klik onder "Datum en tijd" op Tijd en datum instellen .
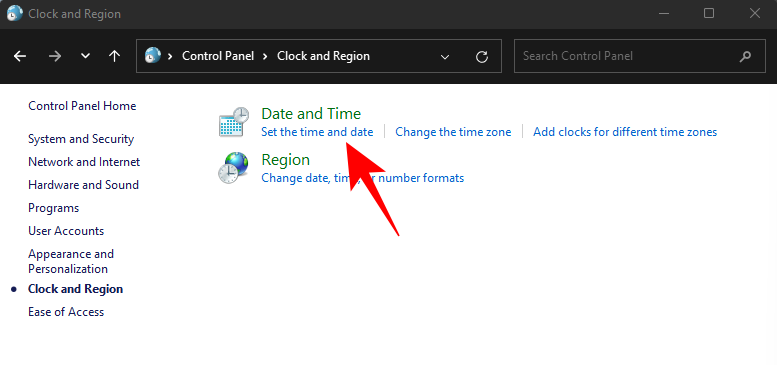
Klik op het tabblad Internettijd om ernaartoe te gaan.
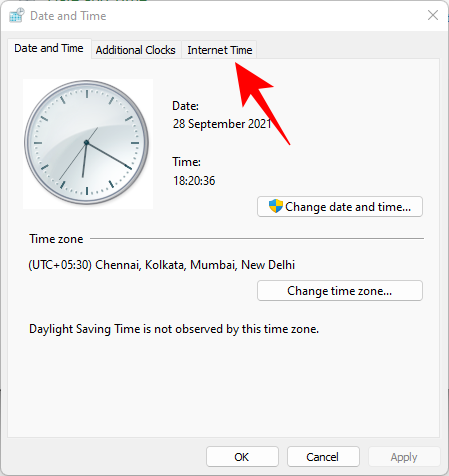
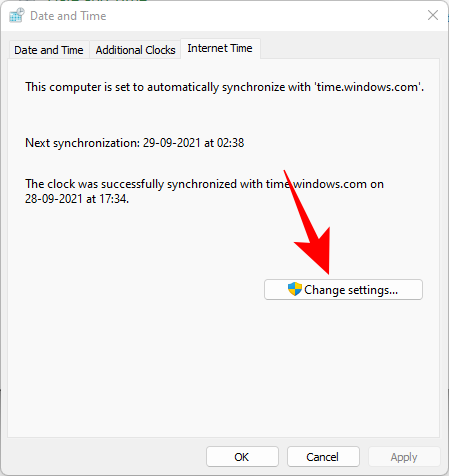
Click on Change settings…
Uncheck Synchronize with an Internet time server, then click OK.
Now click on the Date and Time tab to switch back to it.
Here, click on Change date and time…
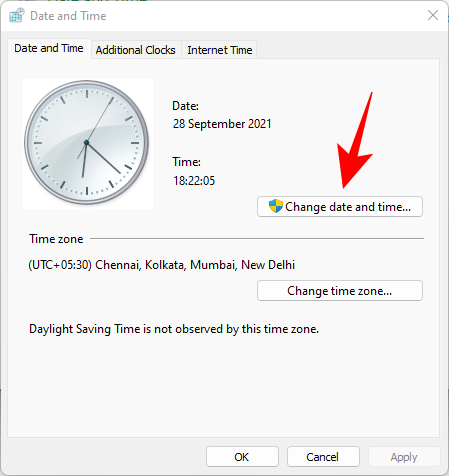
Now change the date and time to reflect tomorrow. As of writing this post, it is the 1st November so we will be changing the date to 2nd November.
Change Dates to last cumulative updates
If you are still unable to get the Taskbar working then you will have to jump through a few hoops to change your date and time multiple times and get the taskbar working on your system. Follow the guide below to get you started.
Press Ctrl + Shift + Esc on your keyboard, click on ‘File’ and select ‘Run new task’.

Type in ‘Control’ and press Enter on your keyboard.

Select ‘Date and Time’.

Switch to ‘Internet time’.

Click on ‘Change Settings’.

Uncheck the box for ‘Synchronize with an Internet Time Server’.

Click on ‘Ok’.

Switch back to ‘Date and Time’. Click on ‘Change Date and Time’ and select your date as 2nd September.
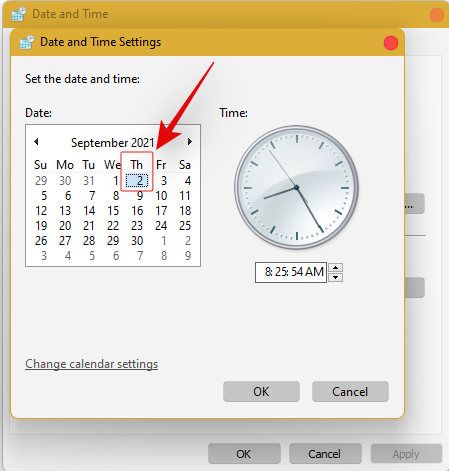
Close all windows and restart your system. Once restarted, open the ‘Date and Time’ dialog box again and change your date to 7th October this time.
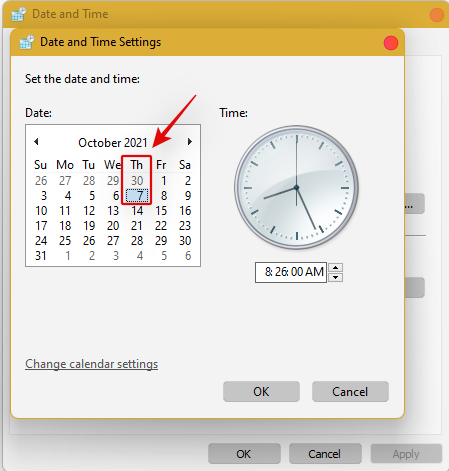
Restart your system again and Taskbar should now be back up and running on your system again. You can now enable synchronization for time again using the steps above on your system.
If synchronizing time does not work, move a month ahead to restore Taskbar
If you are still unable to get Taskbar up and running on your system again you can try the last date change fix. We recommend you use the steps above to change your date and time to a month ahead of your current date. Once changed, restart your system, and the taskbar should be up and running on your system now.
The downside of this fix is that if you revert to your normal date, Taskbar will stop working on your system. Having a mismatched date can cause issues with background syncs for various applications and cause some websites to malfunction. You will also have issues installing and getting the latest Windows Updates, so you will need to check all of these manually when updating in the future.
Fix #10: Uninstall the latest cumulative Windows Update ie: KB5006050
The cumulative update released in September for Windows 11 seems to also cause issues with the taskbar on some desktops and laptops. Use the guide below to uninstall the necessary update from your system.
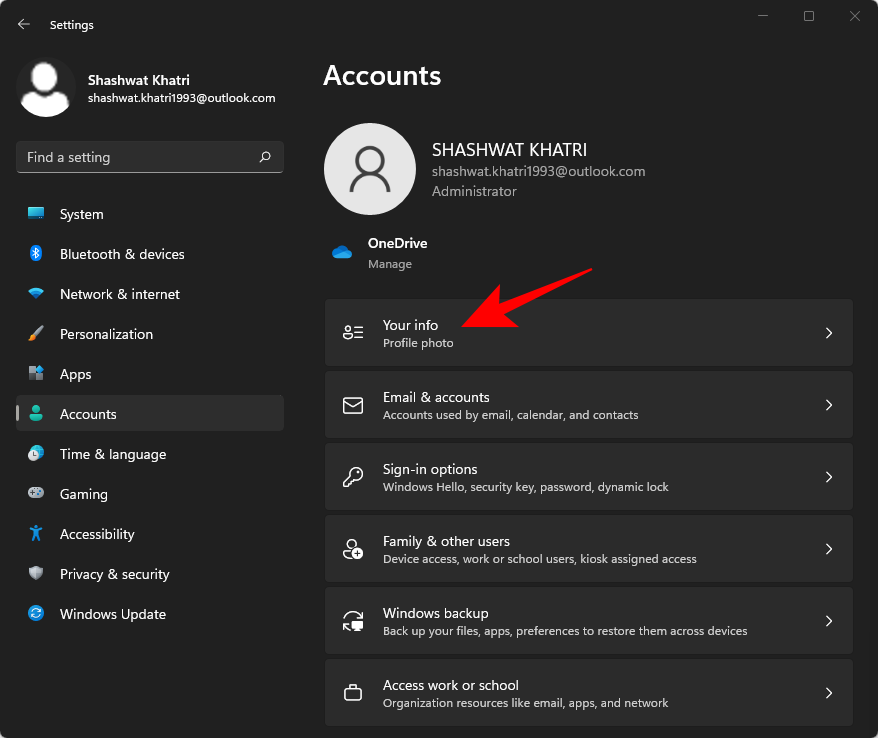
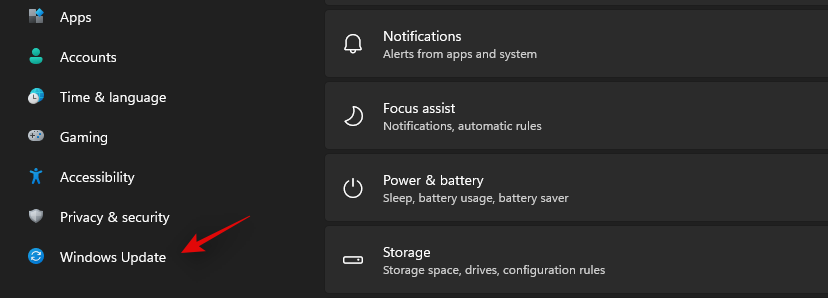
Press Windows + i and select Windows Update from the left.
Click on ‘Update history’.
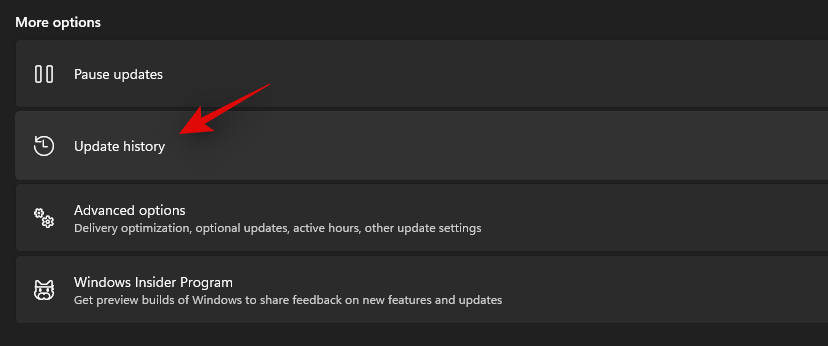
Now select ‘Uninstall updates’.
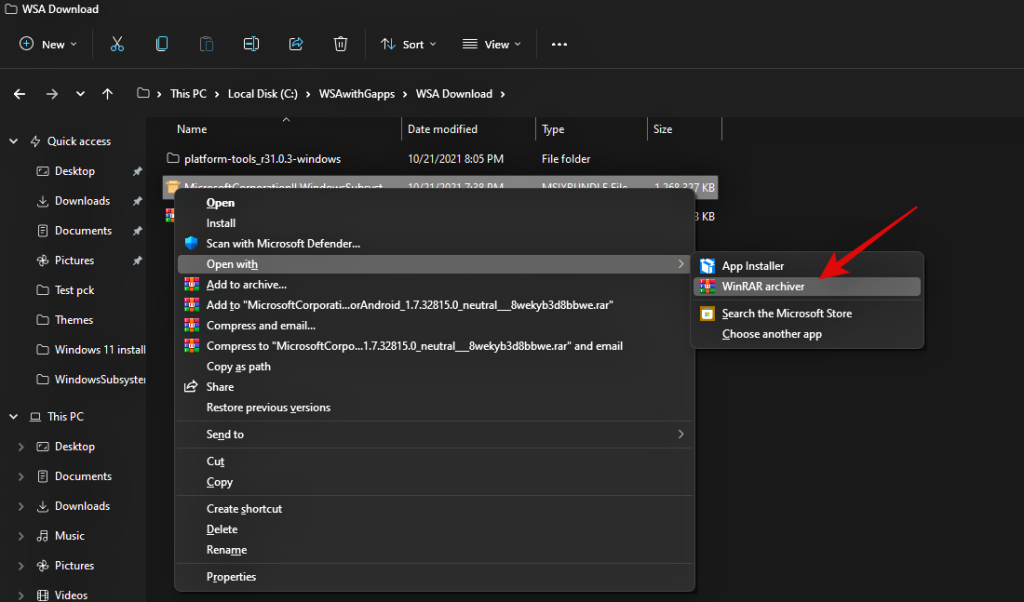
Click and select Windows Cumulative update KB5006050 from the list.

Now click on ‘Uninstall’ at the top and confirm your choice to uninstall the selected update.
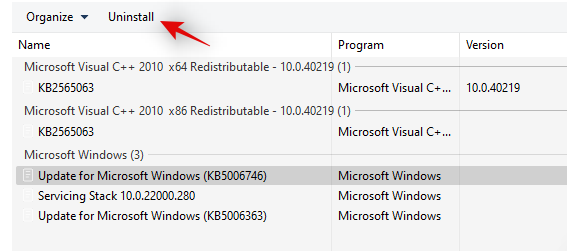
Restart your system and taskbar functionality should now be restored on your system.
Fix #11: Restore PC to a previous restore point
If you had the taskbar working at a previous point in time then we recommend you restore your PC to a previously available restore point on your system. Follow the guide below to get you started.
Press Ctrl + Shift + Esc on your keyboard and click on ‘File’. Select ‘Run new task’ once you are done.

Type in CMD and press Ctrl + Shift + Enter on your keyboard.

Now type in ‘rstrui.exe’ and press Enter on your keyboard.
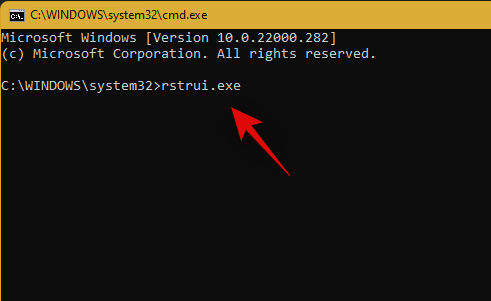
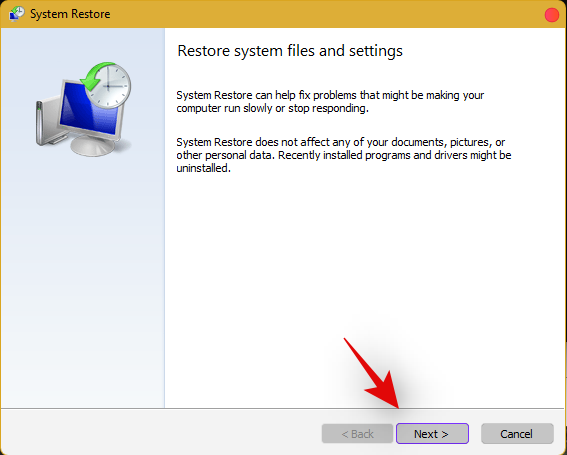
The system restore utility will now launch on your system. Click on ‘Next’.
Select the desired restore point from the list on your screen. Click on ‘Next’ once you are done.
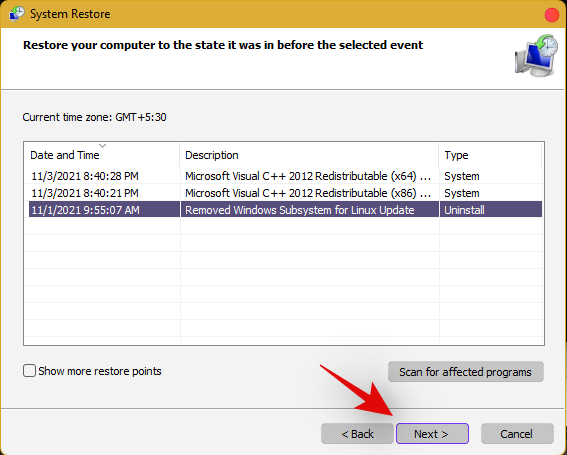
Tip: Click on ‘Scan for affected programs’ to view a list of installed programs that will be removed from your system during the restore process.
Click on ‘Finish’ once the restore finishes and restart your system.
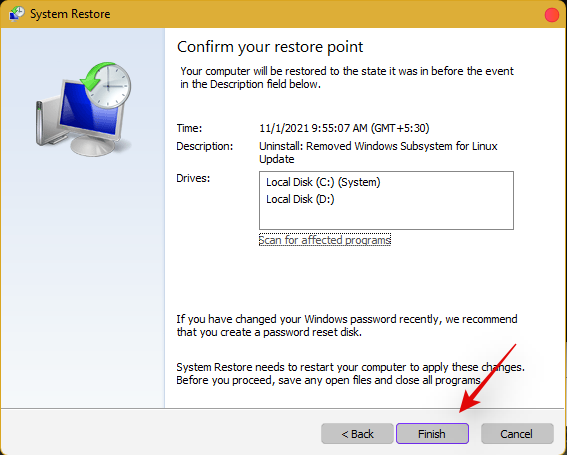
The taskbar should now be back up and running on your system again.
Fix #12: Last Resort: Create a new local admin account and transfer all your data
If by this point Taskbar still fails to work for you then it’s time for some drastic measures. You can create a new local admin account, check if Taskbar is working there, and then transfer all your data to the new account. This will be a tedious process but it is the next best way to get the taskbar working on your system without resetting your PC. Follow the guide below to get you started.
Create a new local admin account
Herre’s how you can create a new local admin account on your system.
Note: Most users facing the taskbar issue are unable to access the Settings app as well. Hence we will be using CMD to add a new local admin account to your PC. However, if the Settings app is available to you then you can use the same to add a new account as well.
Press Ctrl + Shift + Esc on your keyboard, click on ‘File’ and select ‘Run new task’.

Type in ‘cmd’ and press Ctrl + Shift + Enter on your keyboard.

CMD will now be launched as an administrator. Use the command below to add a new local admin account. Replace NAME with the Username of your choice for the new account. You can add a password later once you have confirmed that the taskbar is available in the new account.
net user /add NAME 
Once you have added the new user, use the command below to convert it to an administrator account on your PC. As usual, replace NAME with the Username for the new account you created earlier.
net localgroup Administrators NAME /add

Now type in the following to log out of your current account.
logoff

Once logged out, click on the newly added account to log in to the same. Once logged in, check if the taskbar is available in the new account. If it is, you can use the next section to transfer all your data. However, if the taskbar is still missing then you have no choice but to perform a fresh install of Windows 11 on your PC from a removable USB media drive.
Transfer all your data
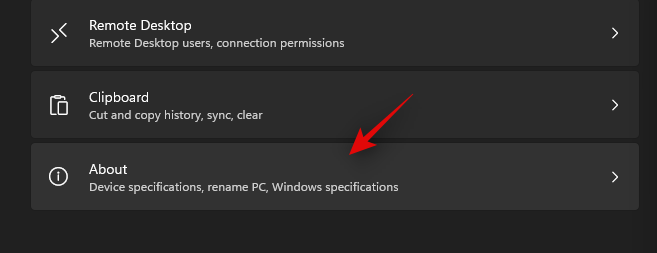
Press Windows + i on your keyboard and click on ‘About’ on your right.
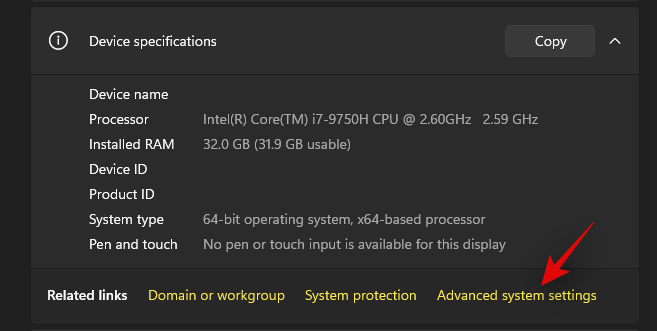
Click on ‘Advanced system settings’.
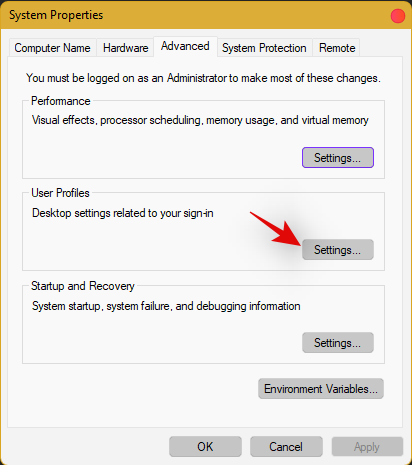
Click on ‘Settings’ under ‘User Profiles’.
Select your original profile by clicking on it and selecting ‘Copy To’.
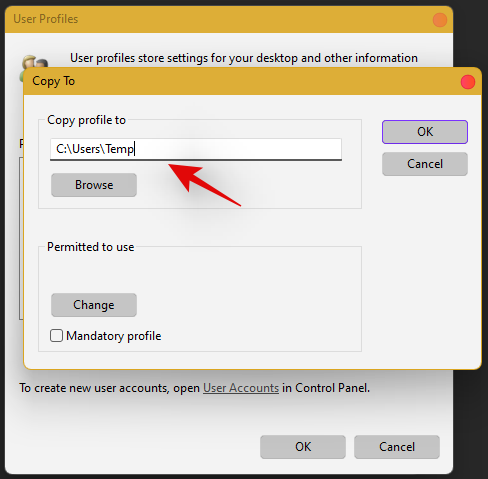
Now enter the following path under ‘Copy profile to’. Rename NAME to the username of your previous profile from where you wish to copy all your data.
C:\Users\NAME
Click on ‘Change’.
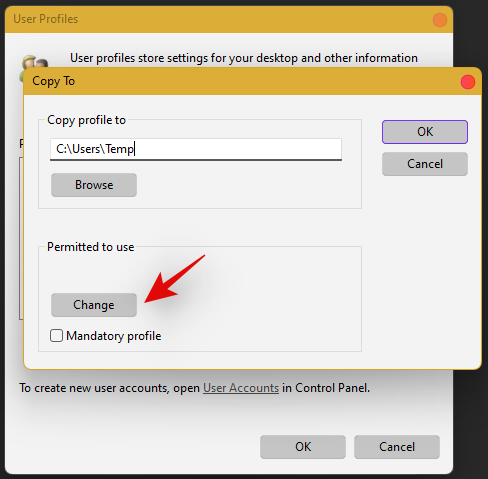
Enter the name for your new user profile and press Enter on your keyboard.
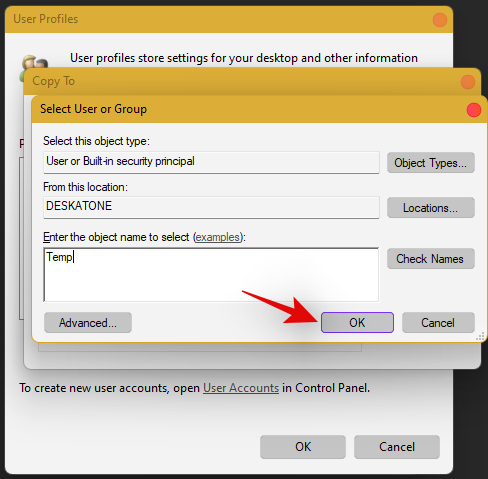
Click on ‘Ok’ once you are done.
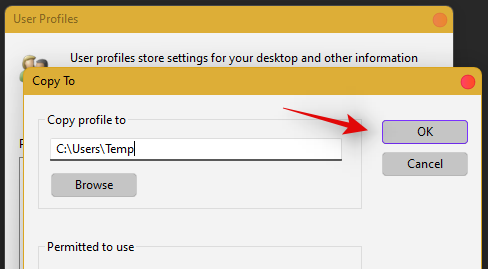
All your data will now be copied over to the new profile where the taskbar is functional on your PC. You can now delete your previous user account and set a password for your new account as well.
Frequently Asked Questions (FAQs):
With so many fixes, you are bound to have a few questions on your mind. Here are some commonly asked ones that should help you get up to speed.
How do I access Windows apps and Settings without a taskbar?
You can use the Task Manager to launch almost any program or Settings page on your system. To launch the desired program, launch the Taskbar > File > Run new task and enter the path to the program you wish to launch. Press Enter if you wish to launch the program normally or press Ctrl + Shift + Enter if you wish to launch the program with administrator privileges.
Is it safe to edit the Registry?
Registry edits are never safe as they have the potential to break your system. Fixes from trusted sources can help you avoid such issues but a good rule of thumb is to always back up your registry before making any edits. This way you can easily restore your Registry values in case some get messed up when editing the Registry.
When will Microsoft fix this issue?
Sadly, Microsoft is yet to release a proper fix for this issue. The company has tried to release a fix in the past cumulative updates to Windows 11 but they have been a hit and miss. We expect Microsoft to completely fix this issue in the upcoming feature update to Windows 11 when the OS gets the ability to run Android apps officially.
Can I update my Windows 11 after fixing the taskbar?
This will depend on the fix that you’re currently using. If you are using a date fix then you won’t be able to install updates until you restore to the current time. This will, however, cause the taskbar to be disabled again and the changes will be carried over after you update your PC. However, if you are using any other fix then you can easily update Windows.
For users with the date fix, you should try updating with the modified time first. If the update gets stuck on ‘Installing 0%’ or ‘Downloading 100%’ then change your date and time to the current date and time and update your PC. Ensure that you do not restart explorer or your PC during this process to keep the current instance of the taskbar alive on your system during the update process. This should help fix the issue for you once Microsoft officially releases an update to fix the issue.
We hope you were able to easily get the taskbar back up and running on your system using the guide above. If you face any more issues, feel free to reach out to us using the comments section below.
Related:


![Hoe Windows 11 Green Screen Error op te lossen [8 manieren] Hoe Windows 11 Green Screen Error op te lossen [8 manieren]](https://cloudo3.com/resources8/images31/image-5564-0105182715287.png)


