În timp ce notificările sunt esențiale în unele cazuri, uneori devin un element de distragere a atenției. La fel ca telefonul dvs., un computer vă poate distrage atenția cu notificări. Acesta este motivul pentru care Windows 11 include caracteristica Focus Assist, care vă permite să evitați notificările care distrag atenția. Folosind această funcție, vă puteți face munca cu concentrare deplină, în loc să vă distras de mesaje și notificări aleatorii. Notificările vă pot afecta, de asemenea, productivitatea și, prin urmare, trebuie suprimate la momentul potrivit.
Doar câteva clicuri pot ascunde toate notificările, alertele și mesajele de pe computer. Dacă ați actualizat recent sistemul la Windows 11 și nu reușiți să vă dați seama de noua interfață de utilizare, acest articol vă va ajuta cu un ghid cuprinzător despre cum să utilizați Focus Assist pe Windows 11 pentru a scăpa de notificări.
Înrudit: Cum să faci capturi de ecran pe Windows 11
Cuprins
Ce este Focus Assist pe Windows 11?
Focus Assist este pur și simplu un mod Nu deranjați pentru computerul dvs. - la fel ca cele pe care le aveți pe telefoanele dvs. Este o funcție utilă pe Windows 11, care vă permite să scăpați de notificările, mesajele și alertele inutile. Funcția de asistență la focalizare vă permite să vă personalizați lista de priorități, mai degrabă decât să vă baridicați computerul de la toate notificările.
Distragerea atenției vă poate afecta productivitatea. Prin urmare, cu funcția Focus Assist, puteți ascunde toate notificările, alertele și mesajele în timp ce lucrați la ceva important. În loc să vă alerteze, ei vor merge direct la centrul de acțiune. Puteți vizualiza notificările ascunse în centrul de acțiuni în timpul liber.
Cum funcționează Focus Assist pe Windows 11?
Focus Assist vă oferă flexibilitatea de a selecta când să blocați distracția, cum ar fi mesajele, notificările și alertele. Puteți activa oricând Focus Assist sau puteți programa, de asemenea, un interval de timp în Setări, care va activa automat Focus Assist.
Funcția de asistență la focalizare vă permite să creați o listă de priorități pentru a vă asigura că nu pierdeți nicio notificare de la cele mai importante persoane din contactul dvs. Persoanele de pe lista ta de priorități te pot contacta oricând, chiar și atunci când ești interesat de o muncă importantă. În cazul în care aveți nevoie de concentrare totală în timp ce lucrați, puteți opta și pentru blocarea tuturor notificărilor. Pentru a vedea toate notificările blocate pe care le-ați primit în timp ce lucrați, deschideți centrul de acțiuni al sistemului.
Înrudit: Cum să opriți ferestrele pop-up pe Windows 11
Cum să activați asistența la focalizare
Focus Assist este dezactivat în mod implicit. Dar dacă doriți să îl activați pentru a nu mai primi notificări, urmați pașii de mai jos.
Metoda #1: Utilizarea setărilor
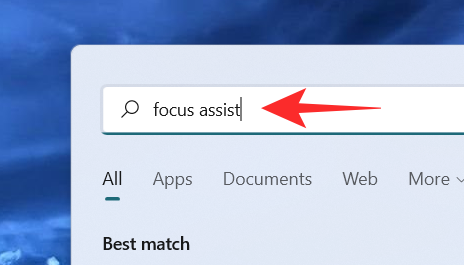
Faceți clic pe pictograma Căutare , care arată ca o lupă în bara de activități.

Introduceți asistență la focalizare în bara de căutare.
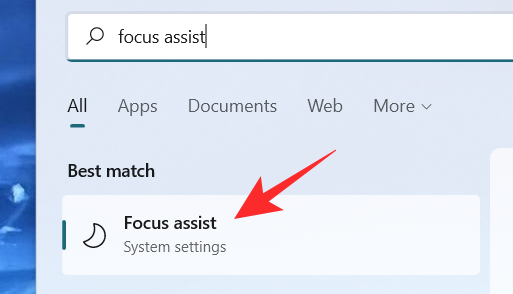
Faceți clic pe setările sistemului Focus Assist .
Pe ecran apare fereastra de setări ale sistemului Focus Assist. Sub Focus Assist , selectați una dintre aceste opțiuni:
- Dezactivat – Dezactivează funcția Focus Assist și vă permite să primiți notificări de la aplicații și persoane de contact.
- Numai alarme – Această funcție suprimă toate notificările, cu excepția alarmei.
- Numai cu prioritate – Această funcție permite notificări numai din lista dvs. de priorități pe care trebuie să le personalizați.
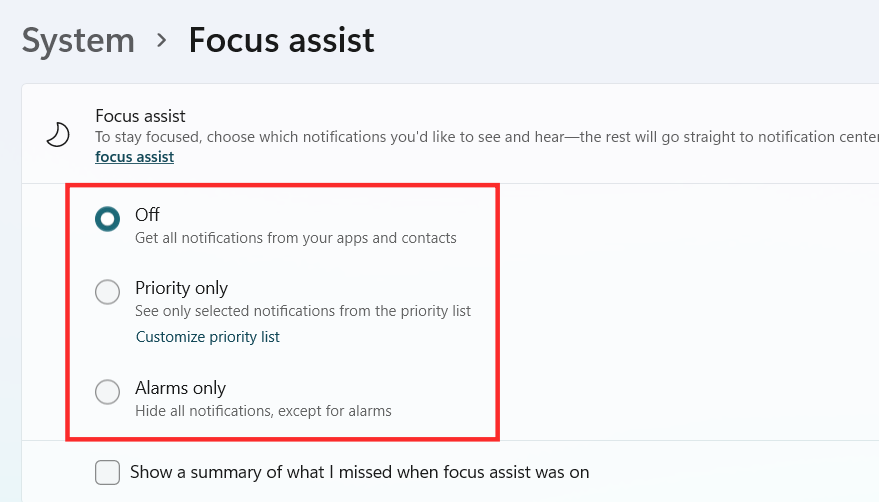
Focus Assist ar trebui să fie acum activat în Windows 11, în funcție de alegerea făcută.
Metoda #2: Utilizarea Centrului de acțiuni
Faceți clic pe Centrul de acțiune care arată pictograma Wifi, volum și baterie împreună.

Chiar sub pictograma Bluetooth, puteți vedea pictograma Focus Assist care arată ca o semilună.
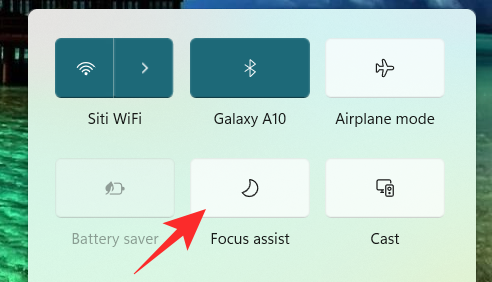
În mod implicit, caracteristica Focus Assist va fi dezactivată. Faceți clic pe el și funcția va fi setată direct doar la Prioritate .
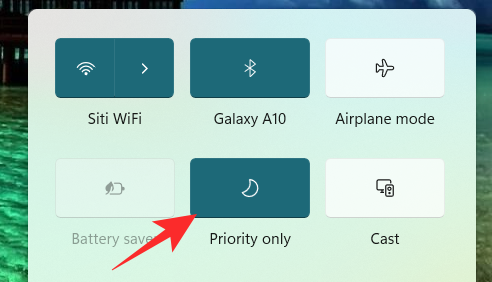
Faceți clic din nou pe el, pentru a seta caracteristica Focus Assist la numai alarme .
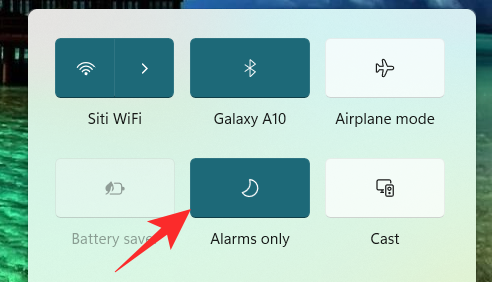
Pentru a dezactiva caracteristica Focus Assist, faceți clic din nou pe ea.
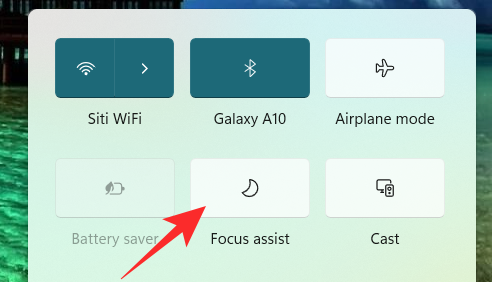
Făcând clic pe pictograma Focus Assist din Centrul de acțiuni, îi puteți schimba funcția la dezactivat, numai cu prioritate și numai pentru alarme. Cu toate acestea, pentru a face alte modificări necesare în setările Focus Assist din Centrul de acțiuni, faceți clic dreapta pe pictograma Focus Assist din Centrul de acțiuni și faceți clic pe Accesați Setări .
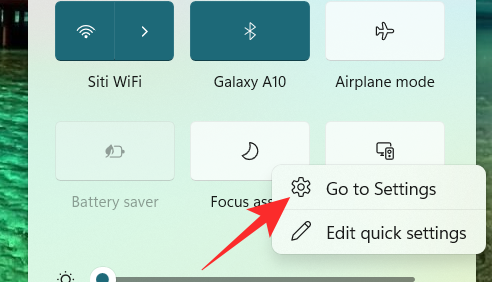
Acest lucru vă va duce la aplicația Setări, unde puteți face cu ușurință toate modificările dorite. Si asta e! Asistența la focalizare ar trebui să fie acum activată în Windows 11 direct din centrul de acțiune.
Metoda #3: Utilizarea Editorului de politici de grup
De asemenea, puteți activa modul de asistență Focus folosind Editorul de politici de grup, în cazul în care sunteți administrator. Utilizați ghidul de mai jos pentru a vă ajuta cu procesul.
Apăsați Windows + Rpe tastatură și introduceți următoarele în caseta de dialog Run. Apăsați Enter de pe tastatură pentru a deschide Editorul de politici de grup.
gpedit.msc
Navigați la următorul nod menționat mai jos.
User configuration > Administrative Templates > Start Menu and Taskbar > Notifications
Găsiți și faceți dublu clic pe valoarea „Dezactivați orele de liniște” din dreapta dumneavoastră.
Acum selectați una dintre următoarele opțiuni, în funcție de nevoile dvs. curente, în colțul din stânga sus al ferestrei de proprietăți.
- Activare: Aceasta va activa asistența la focalizare pe sistemul selectat.
- Dezactivare: Aceasta va dezactiva asistența la focalizare pentru sistemul selectat.
Si asta e! Asistența la focalizare va fi acum activată sau dezactivată din Editorul de politici de grup, în funcție de preferințele dvs. Din păcate, nu puteți personaliza comportamentul de asistență la Focus ca administrator. Această abilitate încă aparține utilizatorului. Puteți activa sau dezactiva numai capacitatea de a utiliza Focus Assist pentru un sistem folosind Editorul de politici de grup.
Cum se utilizează Focus Assist
Focus Assist are diverse setări și opțiuni de personalizare care vă pot ajuta să îi schimbați comportamentul în funcție de nevoile dvs. actuale. Utilizați unul dintre ghidurile de mai jos care se potrivește cel mai bine cerințelor dvs. actuale.
Metoda #1: Activați modul numai pentru alarme
Modul numai pentru alarme din fereastra Focus Assist vă permite să ascundeți toate notificările, cu excepția alarmei. Urmați pașii menționați mai jos pentru a activa modul numai pentru alarme.
Faceți clic pe pictograma Căutare din bara de activități.

Tip Focus Assist

Faceți clic pe Focus Assist .

Sub Focus Assist, faceți clic pe Alarms Only pentru a nu mai primi notificări, cu excepția alarmelor.
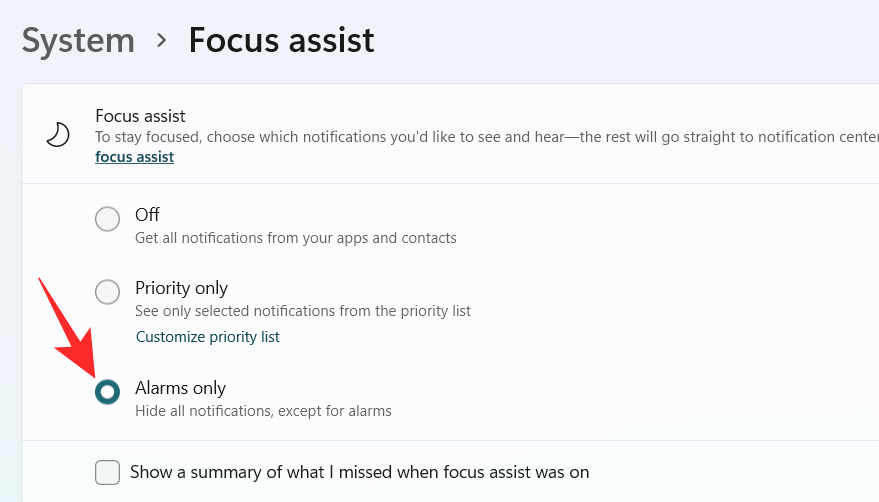
Si asta e! Acum veți fi informat doar despre alarmele din sistemul dumneavoastră. Toate celelalte notificări, indiferent de prioritatea lor, vor fi oprite în Windows 11.
Metoda #2: Activați Prioritatea numai cu o listă personalizată
Pe ecran va apărea fereastra Persoane . Alegeți persoanele preferate tastându-le numele în bara de căutare.
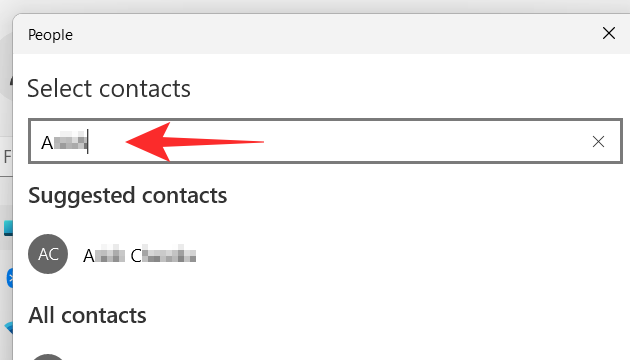
Faceți clic pe numele persoanei.
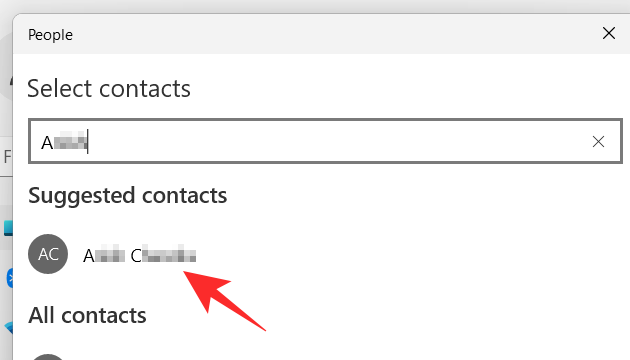
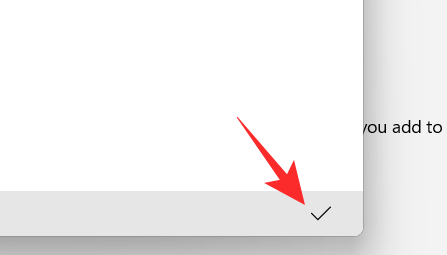
Faceți clic pe butonul de bifare din colțul din dreapta jos al ferestrei Persoane.
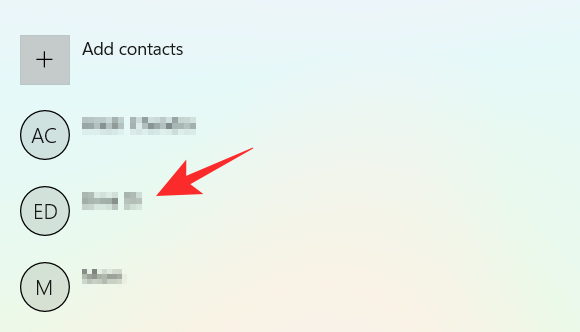
Lista dvs. de priorități a fost creată. Acum, dacă doriți să eliminați o persoană de contact din lista de priorități, faceți clic pe contactul de sub Persoane .
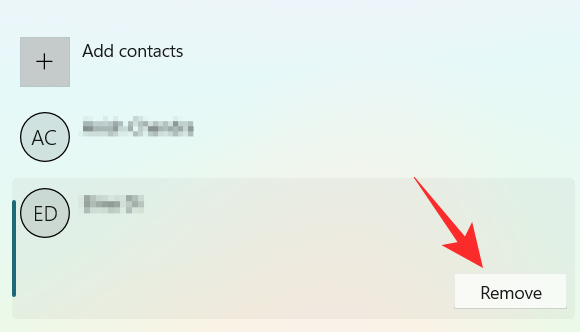
Faceți clic pe Eliminare .
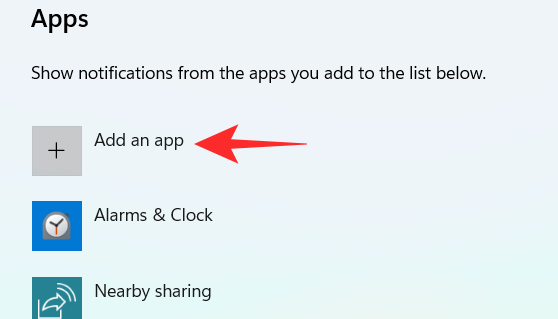
Acum, în secțiunea Aplicații , puteți selecta aplicațiile care vă pot sparge orele de liniște. Pentru a permite aplicațiilor să afișeze notificări, faceți clic pe butonul Adăugați o aplicație .
Pe ecran apare o listă de aplicații. Faceți clic pe aplicația pe care doriți să o adăugați la lista de priorități.
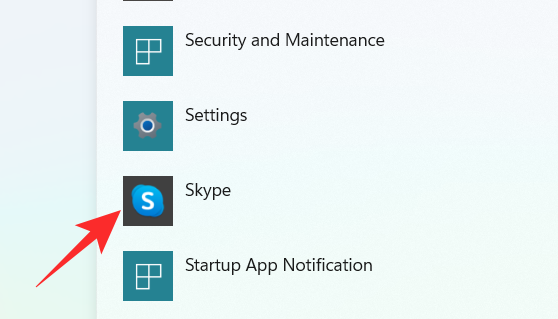
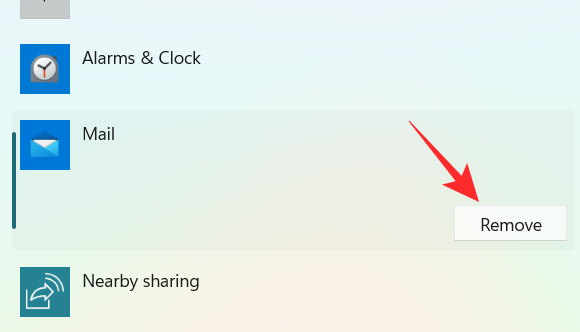
Continuați acest proces până când ați terminat de selectat aplicațiile. În cazul în care doriți să eliminați o aplicație din lista dvs. de priorități, puteți pur și simplu să faceți clic pe aplicație din secțiunea Aplicație .
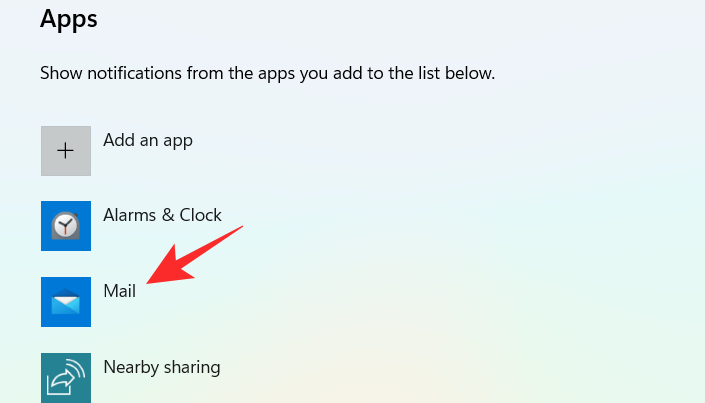
Faceți clic pe Eliminare .
Și așa poți personaliza lista de priorități în Focus assist și o poți folosi în avantajul tău pentru a primi notificări doar de la contacte importante.
Metoda #3: Activați rezumatul notificărilor când asistența la focalizare este dezactivată
Faceți clic pe pictograma Căutare din bara de activități.

Tip Focus Assist

Faceți clic pe Focus Assist .

Faceți clic pe opțiunea dorită Doar prioritate sau Numai alarme .
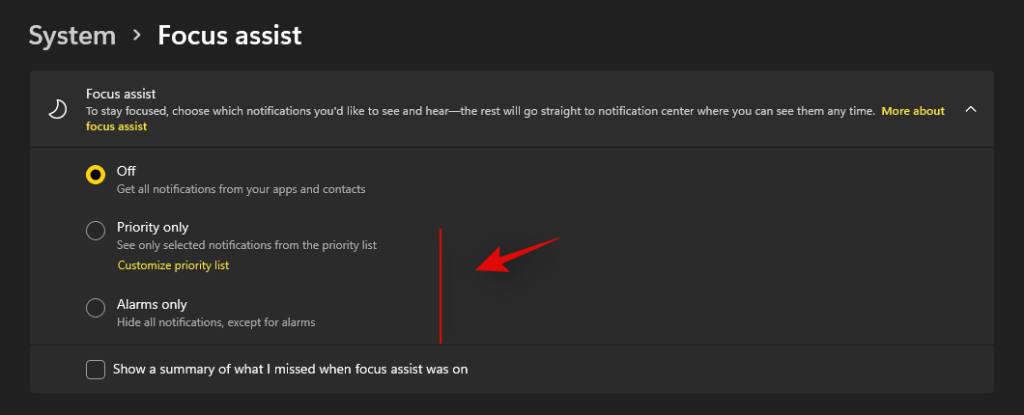
Bifați caseta Afișați un rezumat a ceea ce am omis când asistența la focalizare era activată .
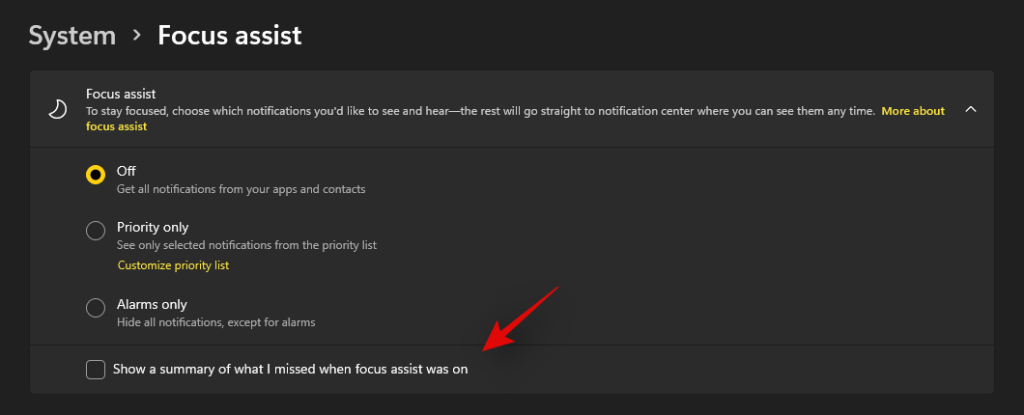
Metoda #4: Activați sau dezactivați regulile automate de asistență la focalizare
Regulile automate din Focus Assist vă permit să determinați condițiile care pot activa automat Focus Assist. Există patru reguli automate diferite în fereastra de setări Focus Assist care pot fi personalizate. Consultați pașii menționați mai jos pentru a personaliza regulile automate în Focus Assist.
Faceți clic pe pictograma Căutare din bara de activități.

Tip Focus Assist

Faceți clic pe Focus Assist .

În secțiunea Reguli automate , există patru secțiuni. Activați comutatorul de comutare pentru opțiunea pe care doriți să o alegeți.
- În aceste perioade – Această funcție vă permite să setați un interval de timp specific, în funcție de care caracteristica Focus Assist se activează sau dezactivează automat.
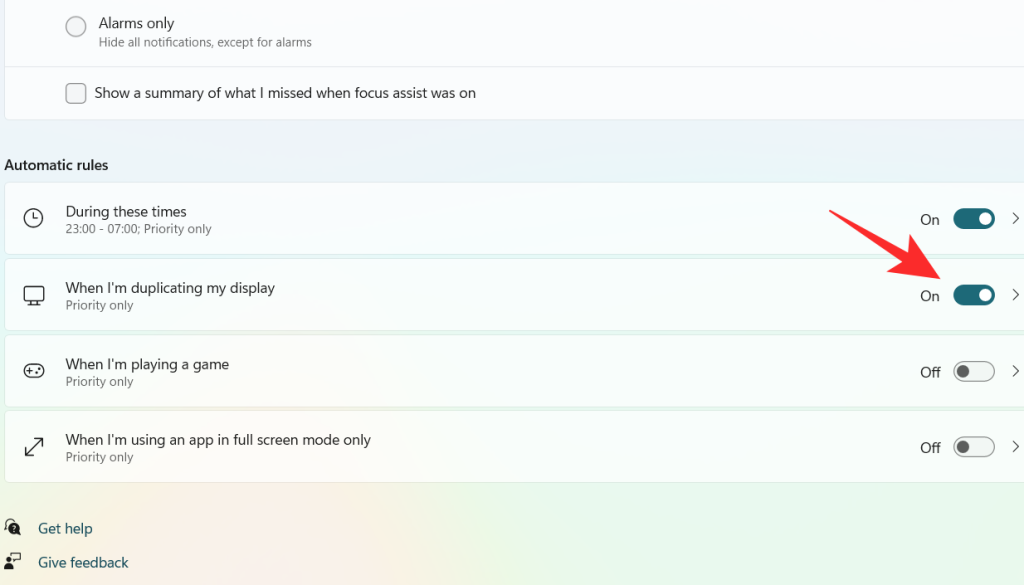
- Când îmi dublez afișajul – Această funcție pornește automat Focus Assist atunci când detectează că afișajul dvs. este partajat. Această funcție poate fi folosită în special pentru a preveni apariția notificărilor atunci când vă aflați în mijlocul unei prezentări.
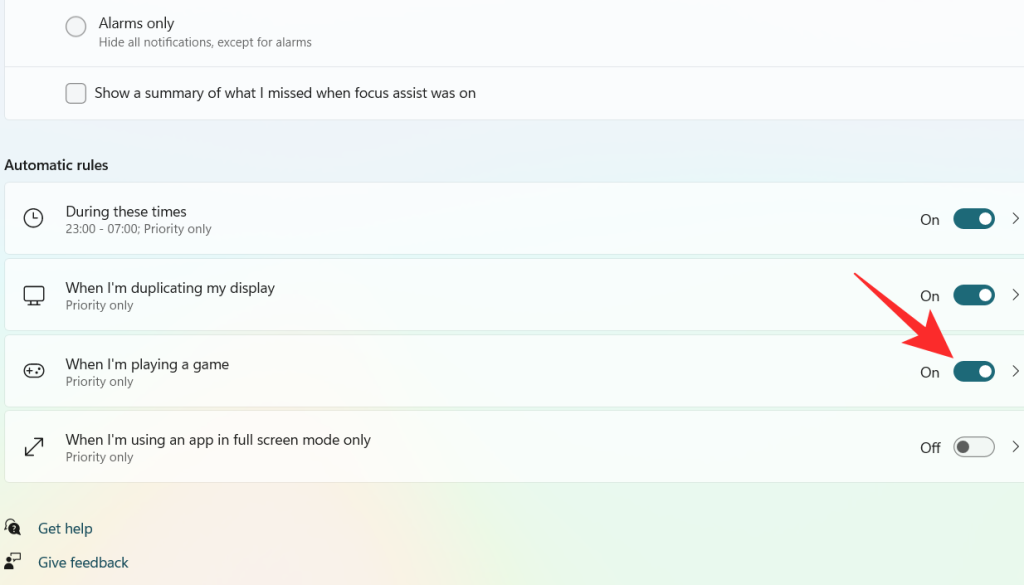
- Când joc un joc – În timp ce jucați jocuri în modul ecran complet, această funcție permite Focus Assist să suprime notificările care apar pe ecran.
- Când folosesc o aplicație numai în modul ecran complet – Această funcție permite ca Focus Assist să se activeze automat atunci când detectează că utilizați o aplicație în modul ecran complet. Nu veți primi notificări până când nu aveți o aplicație deschisă în modul ecran complet.
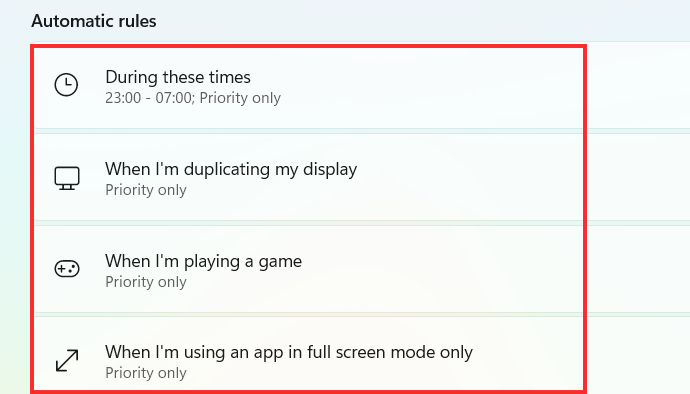
Acum, să aruncăm o privire la cum să personalizați opțiunile menționate mai sus în Reguli automate.
1. În aceste vremuri
Porniți comutatorul de comutare, care se află în extrema dreaptă a filei În acest timp .
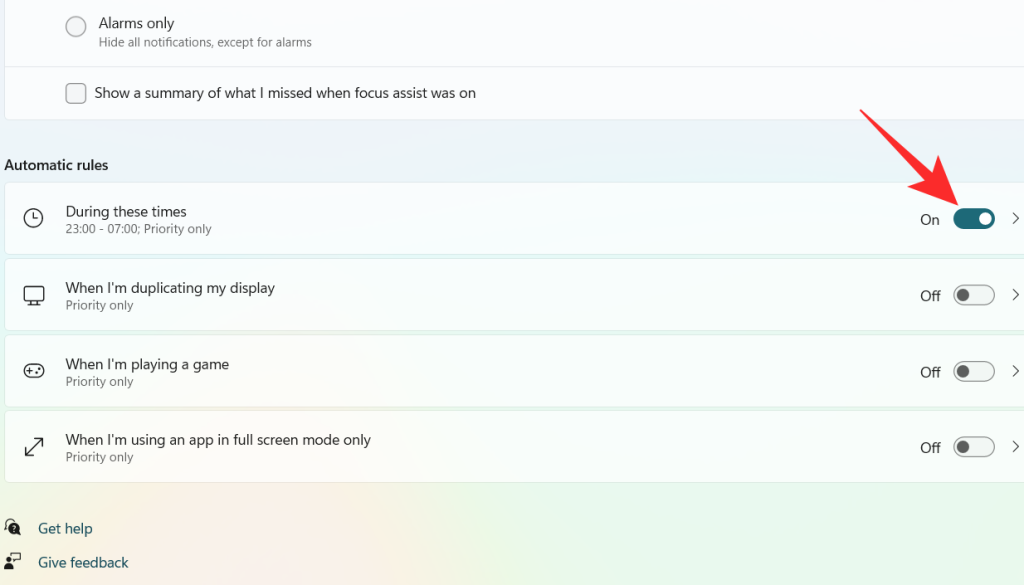
Faceți clic pe fila În acest timp .
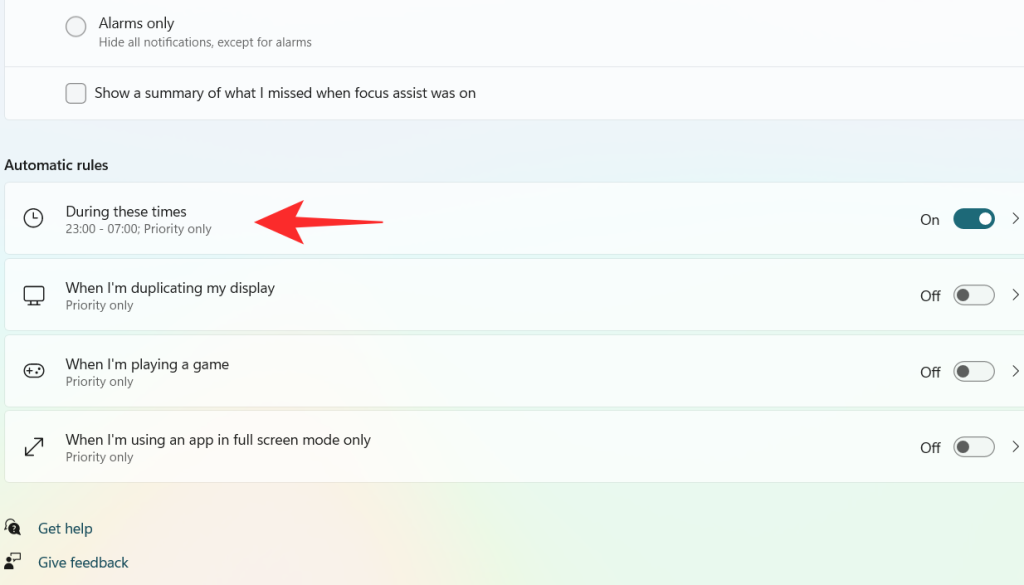
Faceți clic pe caseta de sub Ora de începere .
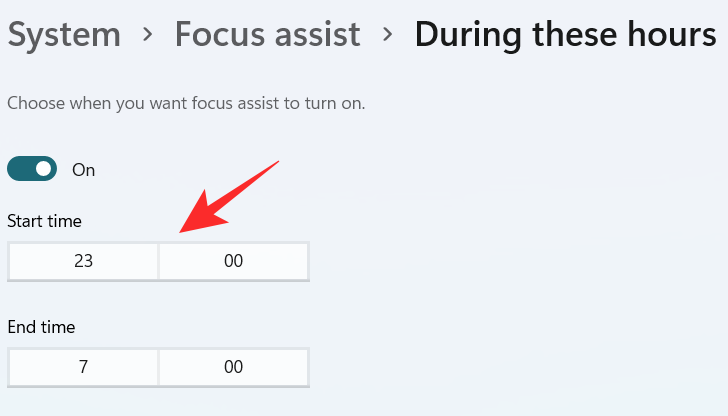
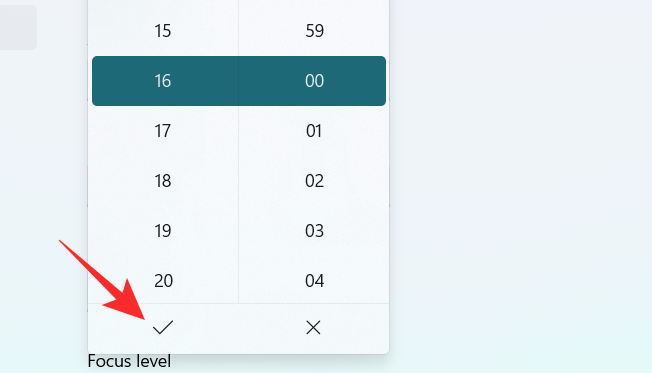
Selectați ora la care doriți să pornească Focus Assist și faceți clic pe bifa din partea de jos a meniului drop-down.
Faceți clic pe caseta de sub Ora de încheiere .
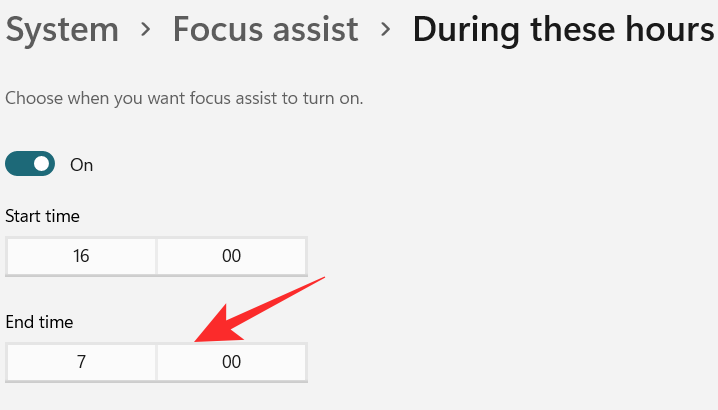
Selectați ora la care doriți să se oprească Focus Assist și faceți clic pe bifa din partea de jos a meniului drop-down.
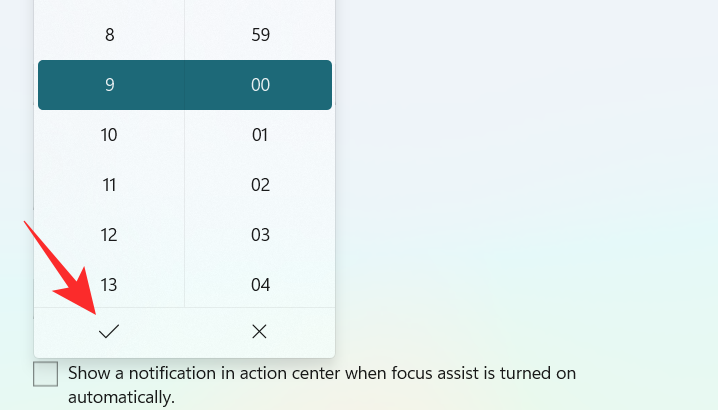
Faceți clic pe caseta de sub Repetări .
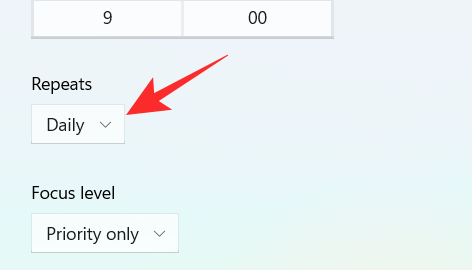
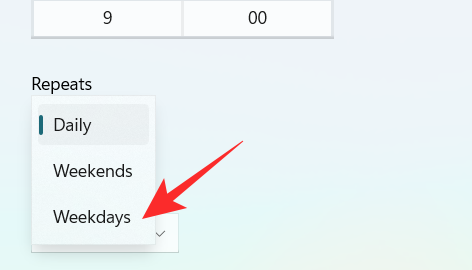
A small dropdown menu appears. Set the schedule to Daily, Weekends, or Weekdays.
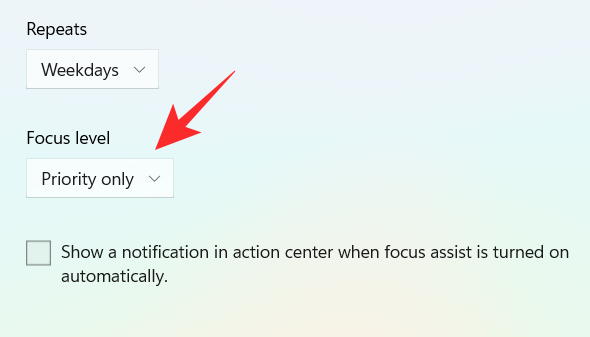
Click on the box under Focus level.
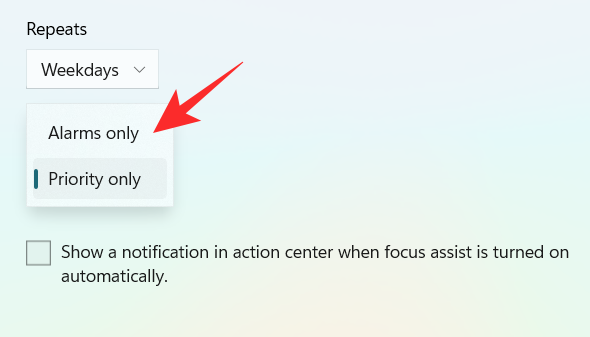
A small dropdown menu appears. Choose between Alarm only or Priority only.
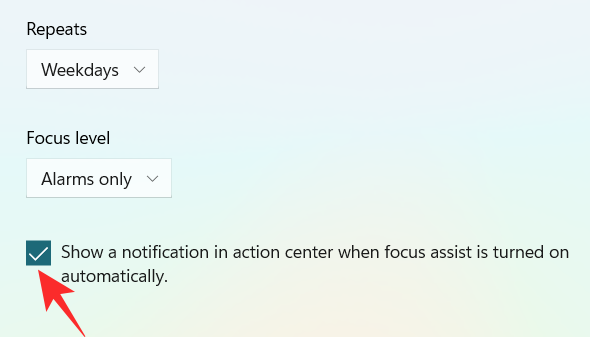
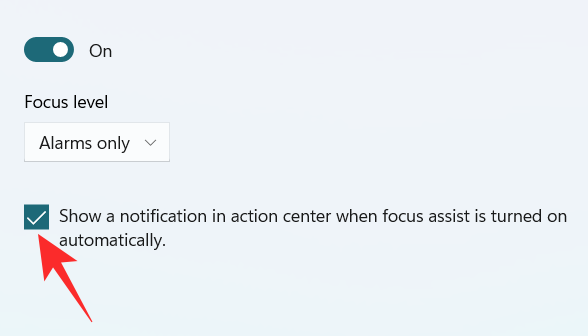
Finally, to get a notification when the Focus assist is turned on, check the box “Show a notification in action center when Focus assist is turned on automatically“.
2. When I’m duplicating my display
Turn on the toggle switch, which is extreme right to the When I’m duplicating my display tab.
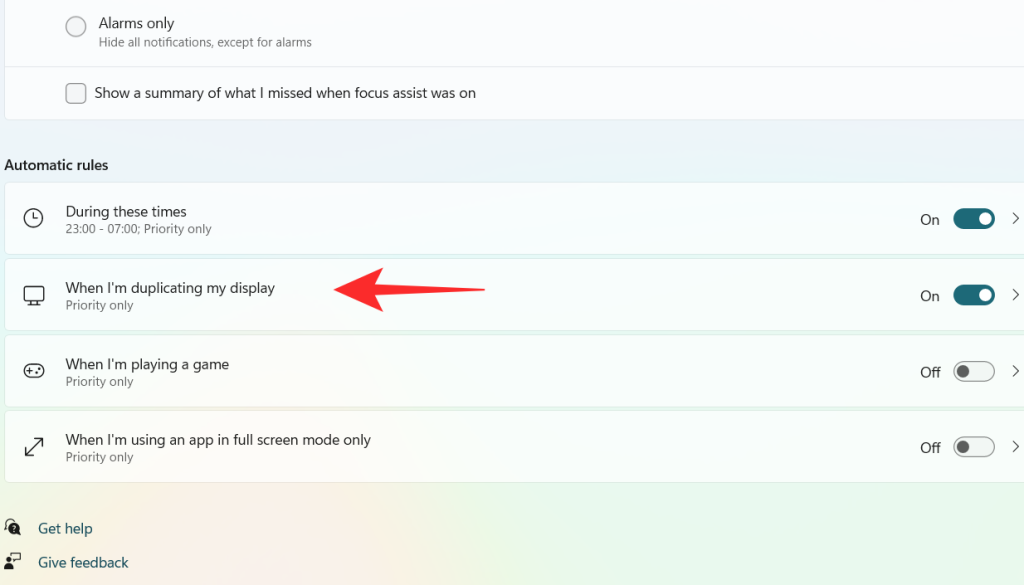
Click on the When I’m duplicating my display tab.
Click on the box under Focus level.
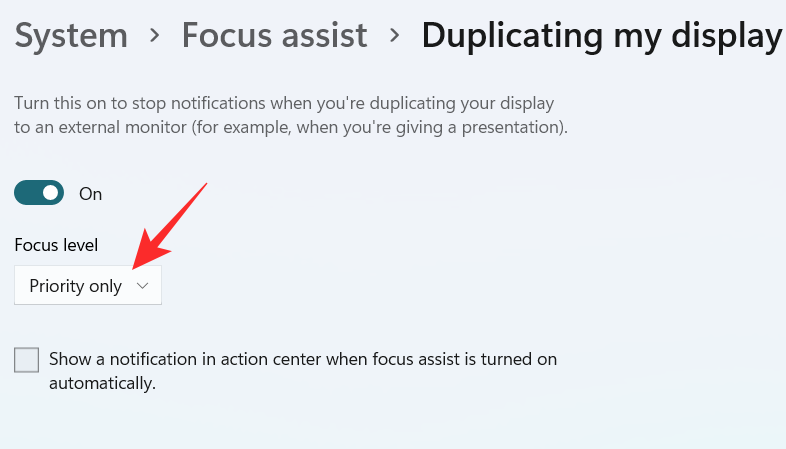
A dropdown menu appears, click on your desired option between Priority only and Alarms only.
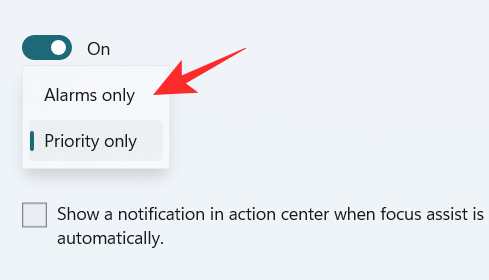
To get a notification when the Focus assist is turned on, check the box “Show a notification in action center when Focus assist is turned on automatically“
3. When I’m playing a game
Turn on the toggle switch, which is extreme right to the When I’m playing a game tab.
Click on the When I’m playing a game tab
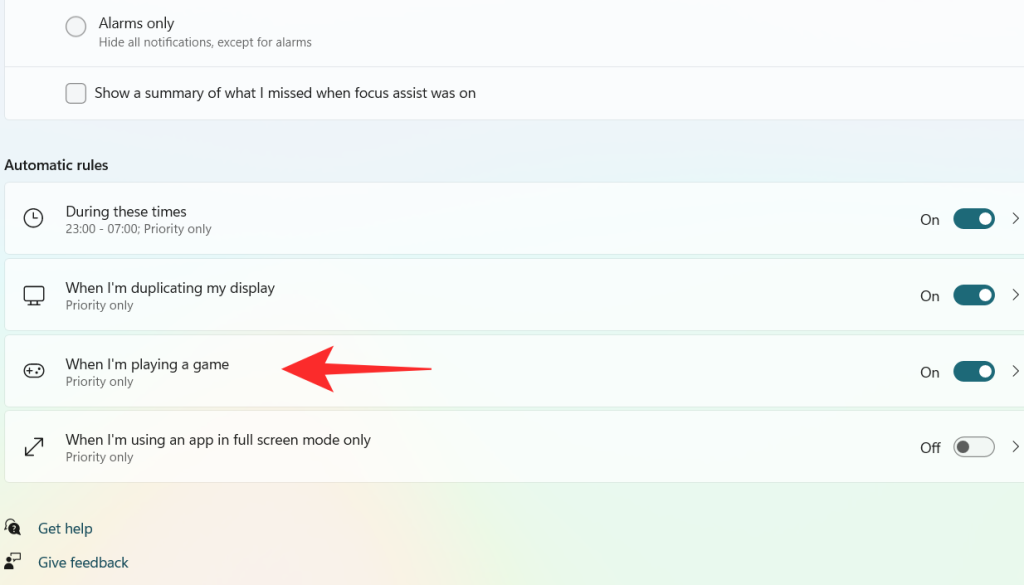
Click on the box under Focus Level.
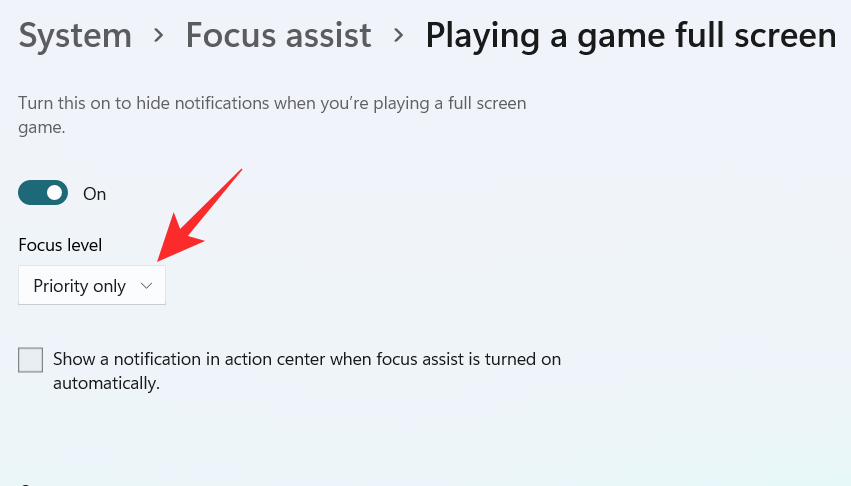
A dropdown menu appears, click on your desired option between Priority only and Alarms only.

To get a notification when the Focus assist is turned on, check the box “Show a notification in action center when Focus assist is turned on automatically“

4. When I’m using an app in full-screen mode only
Turn on the toggle switch, which is extreme right to the When I’m using an app in full-screen mode only tab.
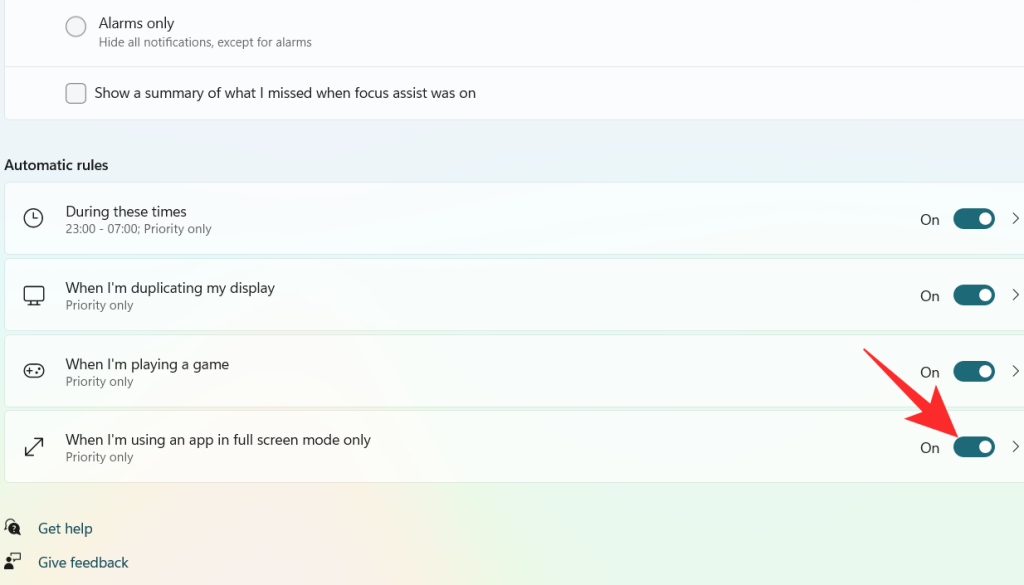
Click on the When I’m using an app in full-screen mode only tab
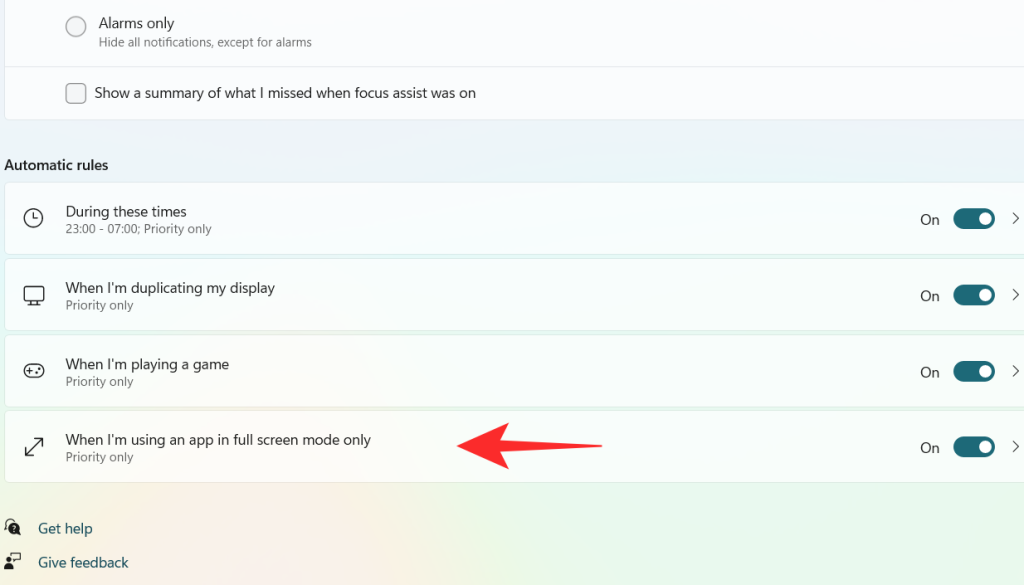
Click on the box under Focus Level.
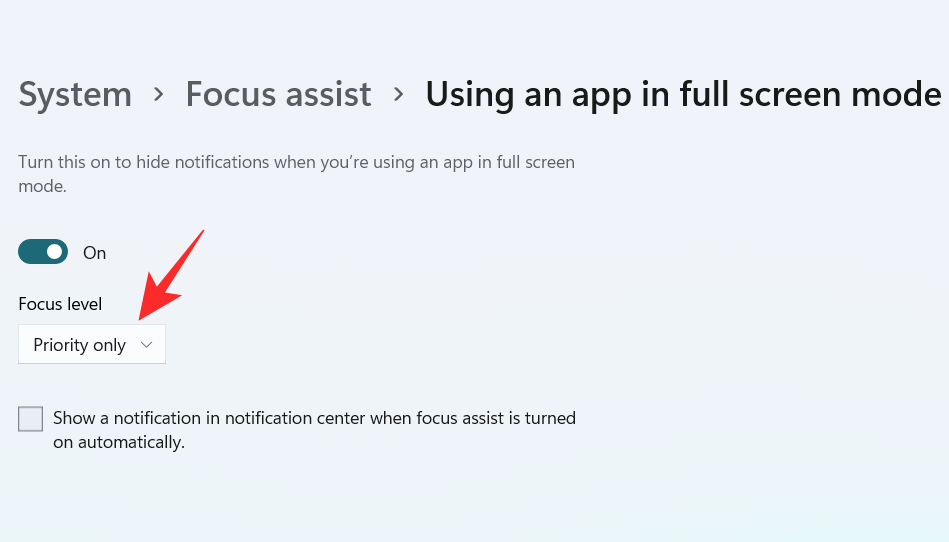
A dropdown menu appears, click on your desired option between Priority only and Alarms only.

To get a notification when the Focus assist is turned on, check the box “Show a notification in action center when Focus assist is turned on automatically“.

Using the above customizations, you can schedule and control Focus assist’s behavior according to your workflow for maximum efficiency no matter the task at hand.
Can you remove the Focus Assist icon from the Action Center?
Yes, you can easily remove the Focus Assist icon from the Action Center. Windows 11 brings a host of new cosmetic and UI changes and one of them has been the ability to customize your action center. You can now add or remove icons from the action center depending on your needs and opt for a more minimal or productive look depending on your workflow.
For now, you can only add and remove certain system modules but in the future, some users expect Microsoft to add the support for third-party apps as well. This would be a much welcome change that would allow you to manage dedicated system settings managed by third-party apps directly from your action center.
Customize your Focus assist icon in the action center
Depending on your current needs you can either remove or add the Focus assist module to the action center. Use one of the guides below depending on your current requirements.
1. Remove it
Click on the Action Center which shows the icon of Wifi, volume, and battery together.

Right-click on an empty place or on any icon and click on Edit quick settings.
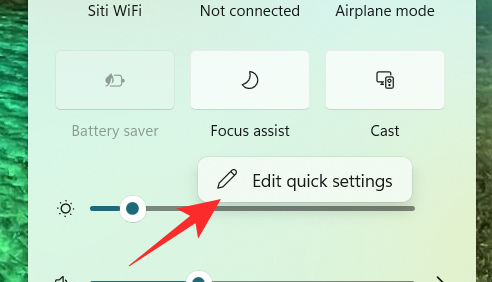
Click on the unpin symbol at the top right corner of the Focus Assist icon to remove the Focus Assist icon from the Action Center.
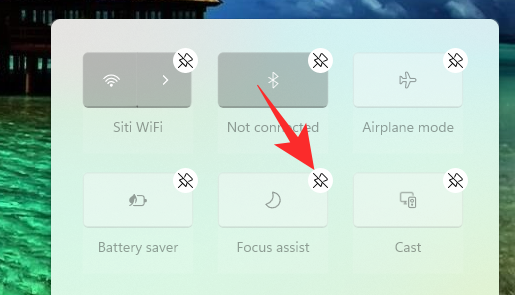
The Focus assist module should now have been removed from your action center. If not, we recommend you restart explorer.exe or your PC for the changes to take effect.
2. Restore it
Click on the Action Center which shows the icon of Wifi, volume, and battery together.

Right-click on an empty place or on any icon and click on Edit quick settings.
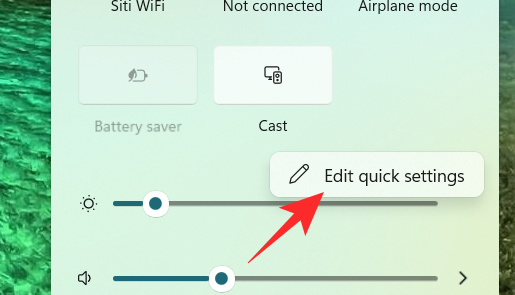
Now, click on the Add button at the bottom of the action center.
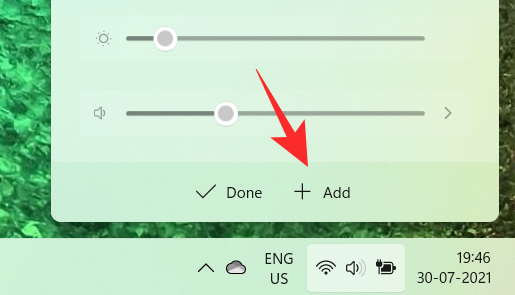
A list of different settings appears. Click on Focus Assist from the list and you will get to see the Focus Assist icon on the Action Center again.
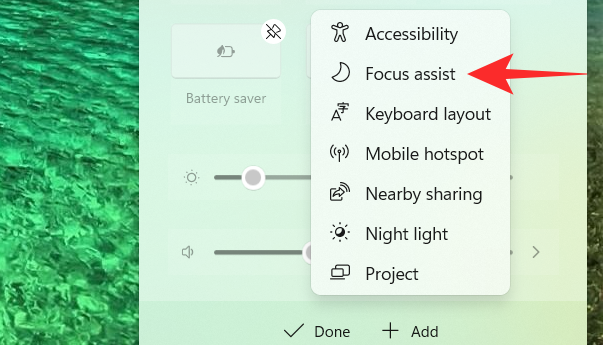
And that’s how you can add the Focus assist module back in the action center.
Focus assist keeps turning on automatically Issue: How to fix
If Focus assist keeps turning on automatically then there could be a couple of reasons for this behavior. Depending on its cause we can either fix it or use a workaround to manage the issue. Let’s find out why Focus assist keeps turning on automatically on your system.
Fix #1: Check Automatic Rules
Are you having this issue when projecting to a secondary display? Or when sharing your screen with a public computer? Then it is likely that focus assist is getting turned on automatically due to the default automatic rules in Windows 11.
By default, focus assist will silence all notifications in such scenarios to help maintain your privacy. But this can be counterproductive in case you are just trying to use a bigger display from a portable system like a laptop or an NUC.
It could also be that scheduled Focus assist was turned on your system by mistake which will enable and disable Focus assist automatically during certain hours. If any of these situations sounds like what you are facing then you can use the guide below to disable all automatic rules that enable Focus assist during certain scenarios and workflows on Windows 11. Let’s get started.
Press Windows + i on your keyboard to open the Settings app. Ensure ‘System’ is selected on your left and then click on ‘Focus Assist’ on your right.
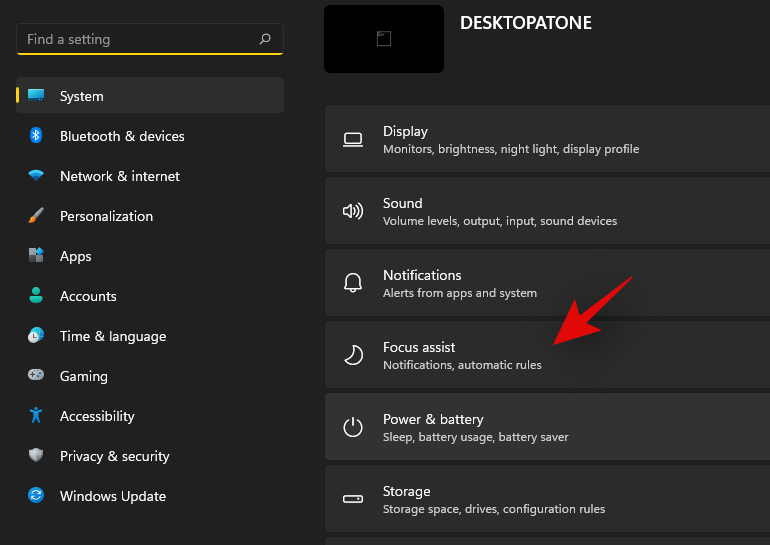
Go down to automatic rules and turn off the following toggles.
- During these times
- When I’m duplicating my display
- When I’m playing a game
- When I’m using an app in full-screen mode only
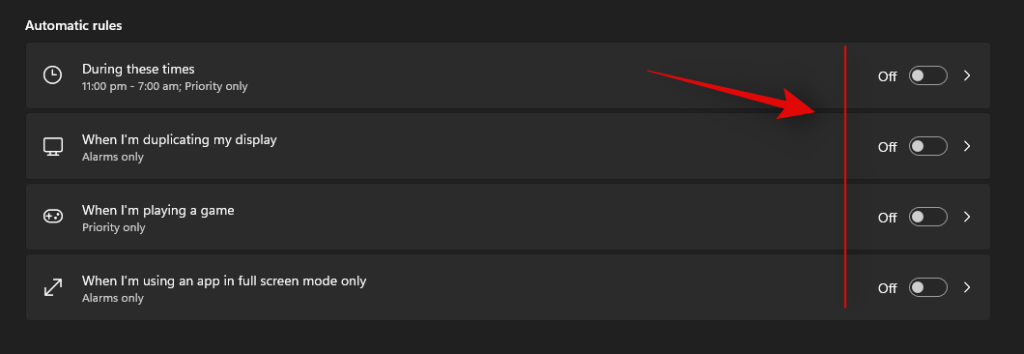
Once these rules are disabled, Windows 11 will not turn on Focus assist automatically on your system.
Fix #2: Turn of GeForce Overlay
This is another way to solve Focus assist misbehaving on your system. If you have a dGPU from Nvidia and are using the GeForce experience app then we recommend disabling its overlay option and restarting your system. With the automatic rule for ‘When I’m using an app in full-screen mode only’ turned on, Windows will mistake the Nvidia overlay detection on your desktop for a full-screen app which will trigger the Focus assist settings in return. You can also disable this automatic rule in case you wish to keep the Geforce Experience overlay enabled on your system.
Focus assist greyed out, option missing or not working; How to fix
Is the focus assist option missing from Windows 11 settings app? Is the module greyed out in the action center? This is a known bug that shows up occasionally with every feature update of Windows. Even certain versions of Windows 10 faced huge issues with this bug until a fix was released.
Fix #1: Enable in Group Policy Editor
If Focus assist seems to be missing from your system then it is likely disabled using the group policy editor. If your PC is managed by your organization or your workplace then it is likely disabled by your administrator. If you have access to the group policy editor then you can use the guide below to enable focus assist on your system. However, in case you have limited access, then you might need to get in touch with your administrator to enable Focus assist on your system.
Press Windows + R on your keyboard to bring up the Run dialog box and type in the following command to launch the Group Policy Editor. Click on ‘Ok’ once you are done.
gpedit.msc
Navigate to the following node.
User configuration > Administrative Templates > Start Menu and Taskbar > Notifications
Double click on ‘Turn off Quiet Hours’ on your right.
Click and select ‘Disabled’ in the top left corner.
Click on ‘Ok’ to save your changes.
And that’s it! Focus assist should now be enabled on your system in case it was disabled using the group policy editor.
Fix #2: Reinstall and repair default Windows UWP apps and system apps
If Focus assist is still missing from your system then let’s check if all the necessary apps and utilities are installed properly on your system. Use the guide below to check and repair Windows 11’s basic apps and functionality on your system.
Press Windows + S and search for PowerShell. Click on ‘Run as administrator’ once it shows up in your search results.
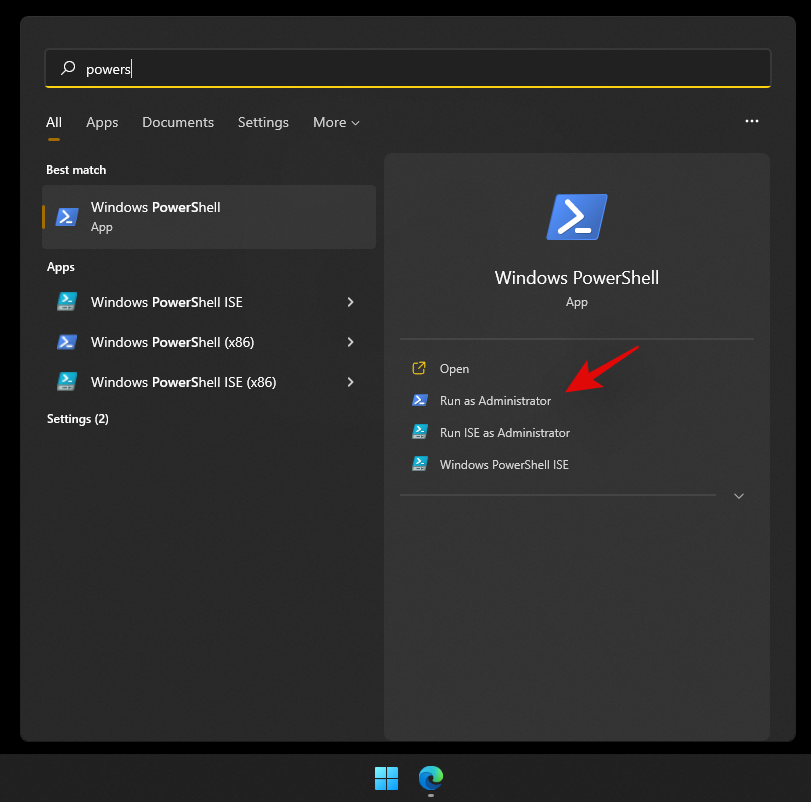
Once PowerShell is launched, execute the following command to reinstall all UWP apps and check and repair other default utilities required by Windows 11 in the background.
Get-AppXPackage -AllUsers | Foreach {Add-AppxPackage -DisableDevelopmentMode -Register "$ ($ _. InstallLocation) \ AppXManifest.xml"}

Wait for the process to finish and restart your PC for good measure. If Focus assist was corrupted or missing from your system, then this fix should help solve all your issues.
Fix #3: Check for a Windows Update
Haven’t updated in a while? We recommend checking for recent Windows Updates. While updates rarely disable major features like Focus assist, a new feature update installation can help refresh your registry, fix mismatched values and more importantly iron out bugs that could be preventing you from accessing Focus assist on your system. Use the guide below to check for recent Windows updates on your system.
Press Windows + i on your keyboard to open the Settings app and click on ‘Windows Update’ on your left.

Click on ‘Check for updates’.

In case any new updates show up, let them install on your system and restart if prompted. In case you are using a metered connection then you will need to click on ‘Download now’ manually to avoid any unexpected data charges.
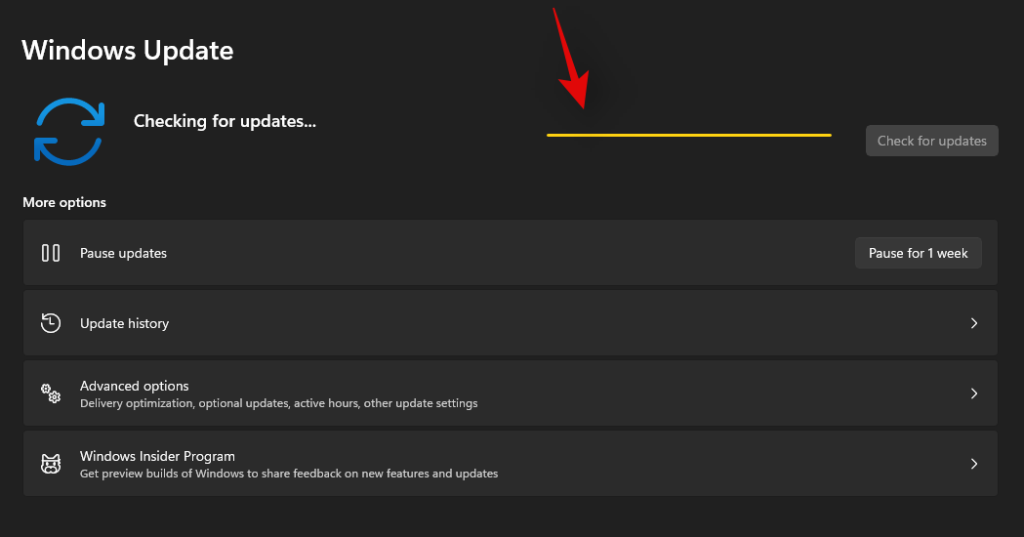
Once the necessary Windows updates are installed on your system, Focus assist should be restored in your action center and the Settings app.
Last Resort: Reset your PC
If Focus assist is still missing from your PC then this indicates a corrupted Windows installation on your system. The best way to fix this without wasting much time on troubleshooting would be to simply reset your PC while keeping all your files intact. This will refresh the entire Windows 11 installation and reinstall all the apps which should help restore functionality for all Windows features including Focus assist. Follow the guide below to reset your PC while keeping your files.
Note: The reset process will remove all installed applications and only retain files stored manually on your local storage. A list of all the removed apps will be available in .txt format on your desktop once your PC has been reset.
Press Windows + i on your keyboard and click on ‘Windows Update’ on your left.
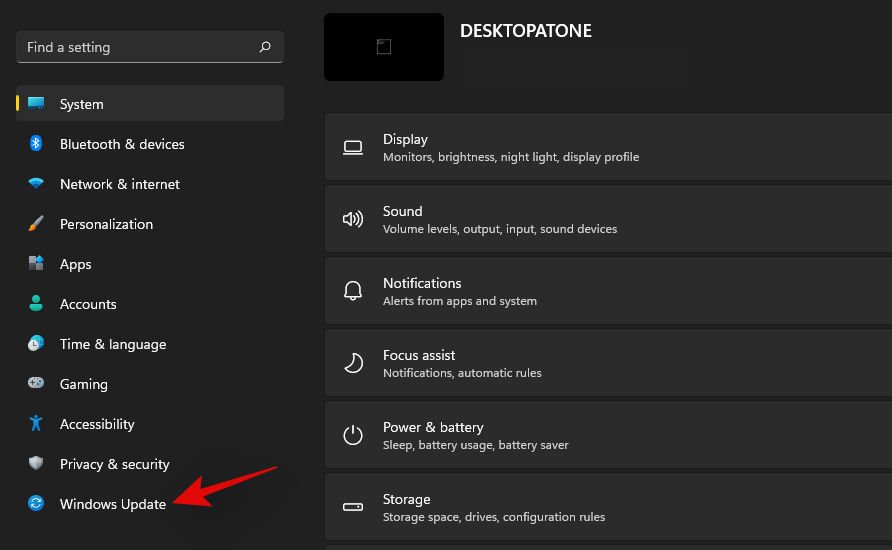
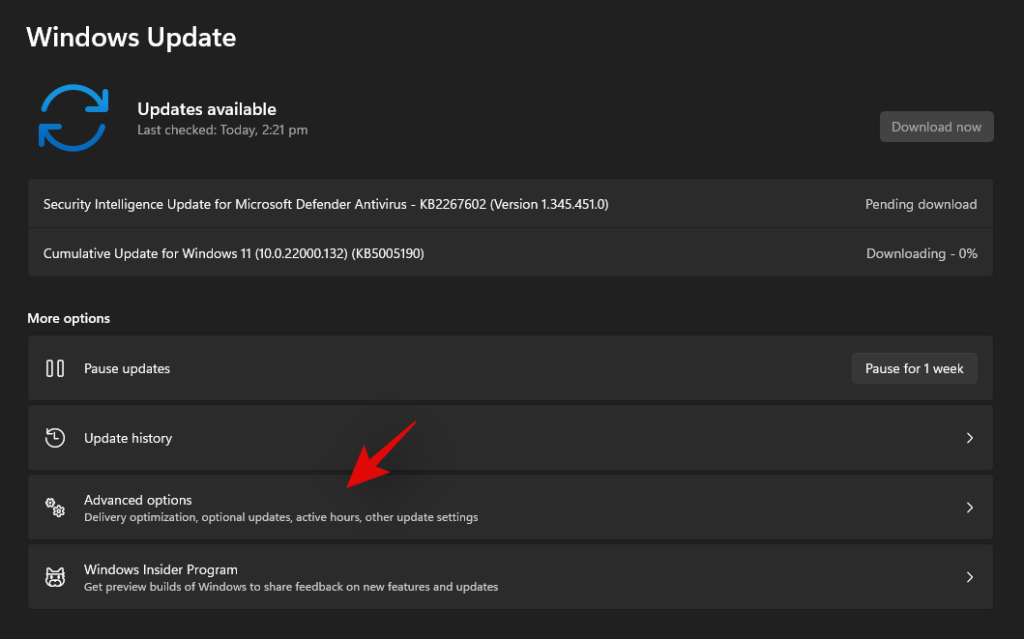
Click on ‘Advanced options’.
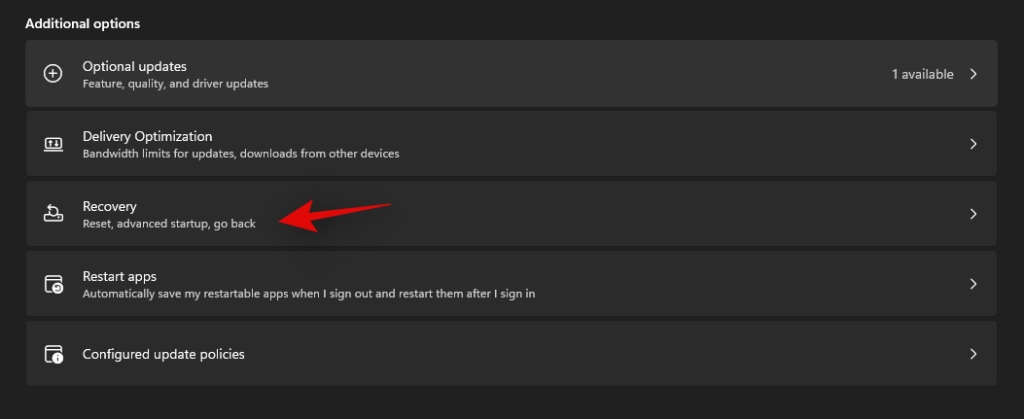
Click and select ‘Recovery’.
Click on ‘Reset PC’ beside Reset this PC.

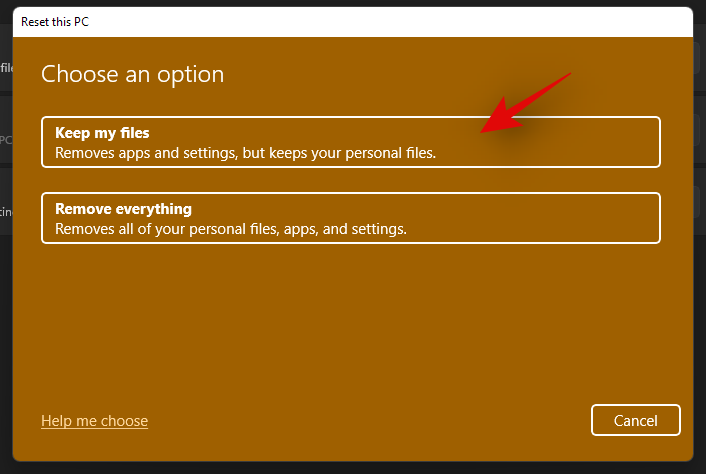
Click on ‘Keep my files’.
Windows will now process all the files on your local storage. Click on ‘Reset’.
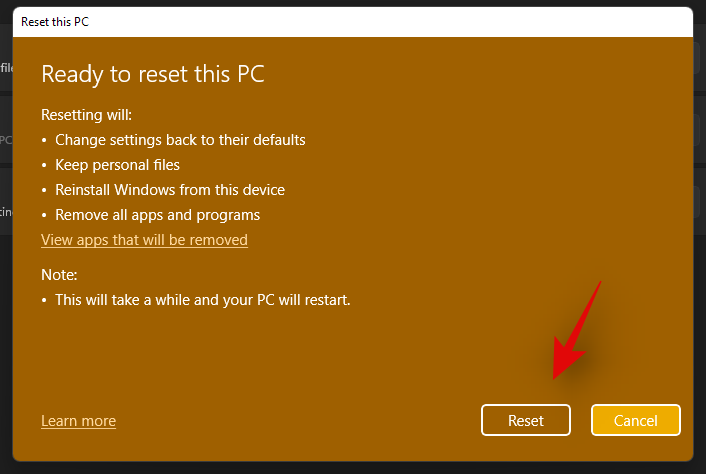
Note: If you are using Windows 11 Pro or higher then you will get the option to use a local installation/recovery media to reinstall Windows 11 as well. However, this option will be missing for Windows 11 Home users.
Windows will now reset your PC while retaining all your files. Your PC will restart several times during this process. This is completely normal and you should let Windows do its thing. If you are using a laptop or a portable NUC, then ensure that your unit is plugged into the power at all times during this process.
How to turn off Focus assist permanently
Do you wish to turn off Focus assist permanently in all scenarios? Then you can use the guide below to do so. The best way to disable Focus assist is by using the group policy editor. But in case you are using Windows 11 Home Edition, then you can use the first method in this guide to disable Focus assist permanently.
Method #1: Disable all settings and rules
Once you disable all the settings and rules for Focus assist, the feature should be turned off automatically on your system. Use the guide below to get you started.
Press Windows + i on your keyboard to open the Settings app and click on ‘Focus assist’ on your right.

Click and select ‘Off’ at the top.
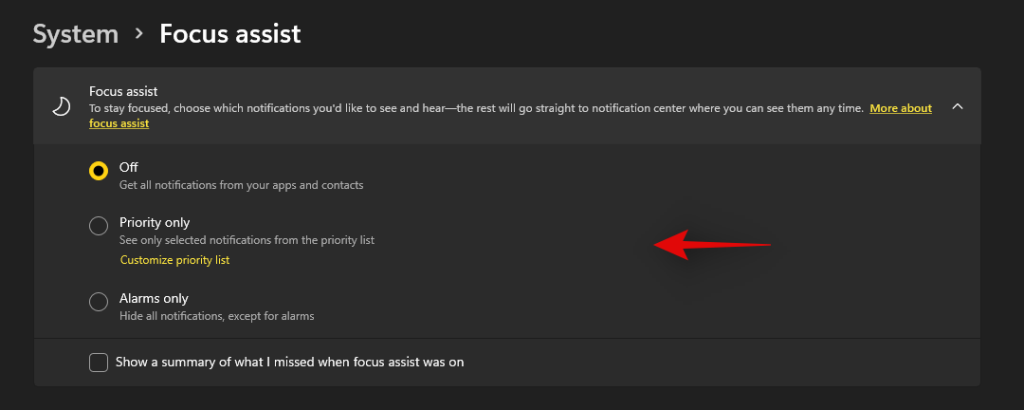
Uncheck the box for ‘Show a summary of what I missed when focus assist was on’.

Subsequently, disable all the toggles under ‘Automatic rules’ as shown below.

We also recommend turning off notifications for unnecessary apps using the guide after this section to avoid unnecessary notifications from interrupting you when focus assist is disabled.
Method #2: Using Group Policy Editor
The group policy editor will permanently disable focus assist on your system and even prevent you from accessing it in your settings. However, this method will only work on Windows 11 Pro or higher versions. In case you have the Windows 11 home edition, you can use the guide above to disable Focus assist instead.
Press Windows + R and type in the following to open Froup Policy EDitor. Click on ‘Ok’ once done.
gpedit.msc
Navigate to the following node.
User configuration > Administrative Templates > Start Menu and Taskbar > Notifications
Find and double-click on ‘Turn on Quiet Hours’ on your right.
Select ‘Enabled’ in the top left and click on ‘Ok’.
Focus assist will now be permanently disabled on the selected system. We recommend you restart your system or explorer.exe in case the changes do not take place immediately.
Is there any other way to disable notifications?
Yes, you can disable notifications individually on a per-app basis in Windows 11 to customize the notifications you receive. This is another way to ensure that you are only notified about the apps and notifications that you intended. Customizing your notifications this way will also allow you to retain the full functionality of the focus assist mode without having to disable certain rules to avoid mismatched scenarios in your workflow.
However, the only downside to managing your notifications this way is that you have to keep enabling and disabling notifications for apps every few months depending on your new installs and uninstalls. You can use the guide below to disable notifications on a per-app basis in Windows 11.
Disable notifications permanently on a per-app basis
Here’s how you can disable notifications on a per-app basis in Windows 11.
Press Windows + i on your keyboard to open the Settings app and then click on ‘Notifications’ on your right.
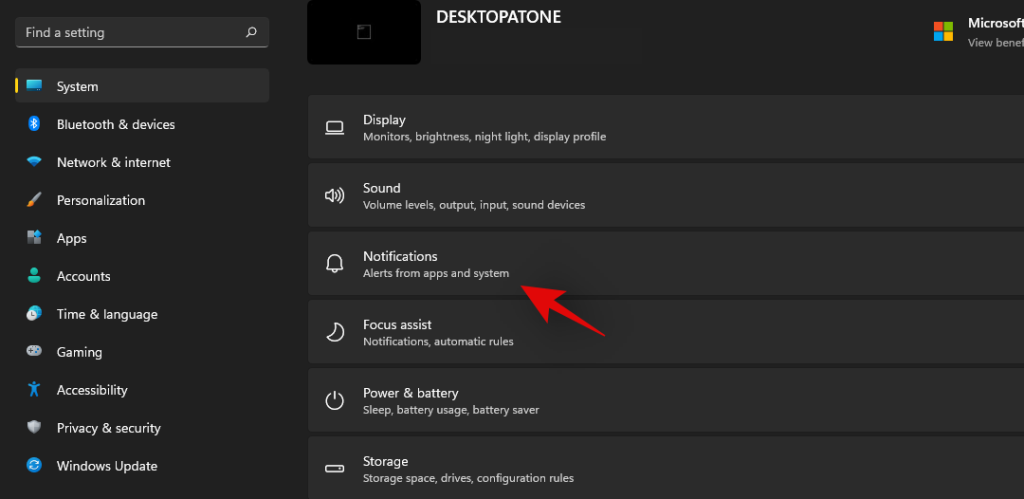
You will now get a list of all the apps that have the permission to deliver notifications on your system. Scroll the list to find the necessary apps and turn off the toggle beside them to disable notifications.

Repeat the steps above for all the intended apps to disable notifications.
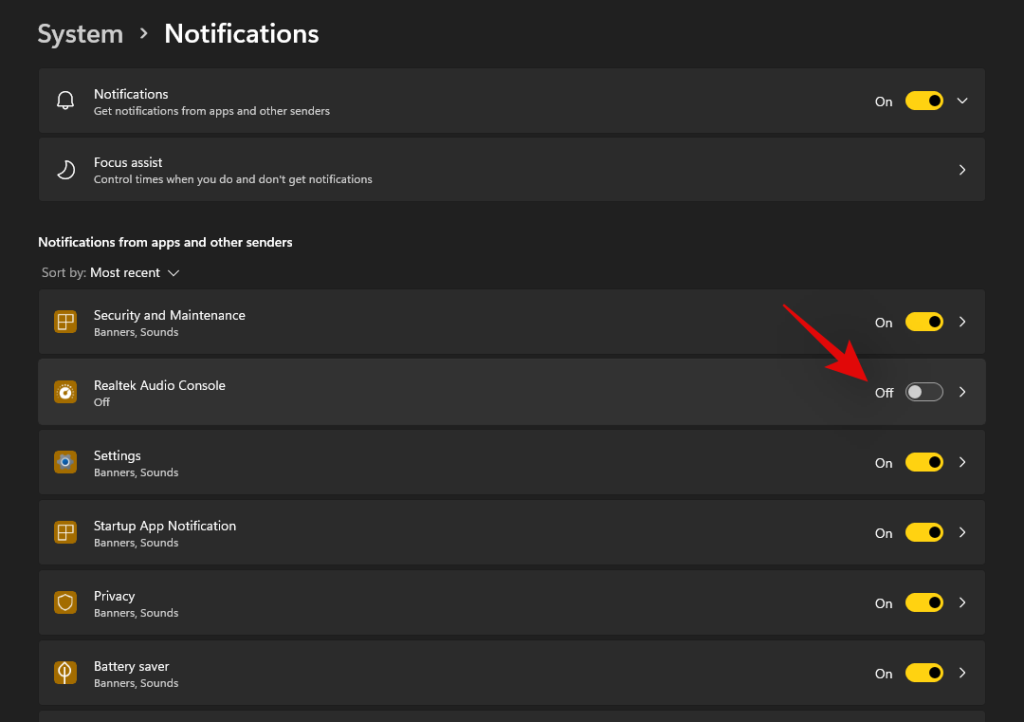
Close the Settings app and notifications for the selected apps should now be permanently disabled on your system.
Can you customize notifications in Windows 11?
Well, not exactly. Windows 11 currently has very limited options when it comes to customizing your notifications. You can not change the look, behavior, or color palette of your notifications without changing the accent color of your overall UI. However, you can customize the way your notifications sound. You can set a nice quiet notification sound that does not interrupt your workflow or opt for a quirky take that makes for a few good laughs each time you get a notification. The choice is completely up to you. Use the guide below to customize your Windows 11 notification sounds.
Required
- A .wav file for the sound you wish to set as your custom notification on Windows 11
Guide
Let’s start by first placing the .wav file in a compatible media folder so that you can set it as your default notification sound in Windows 11. Navigate to the concerned .wav file and copy it to your clipboard.
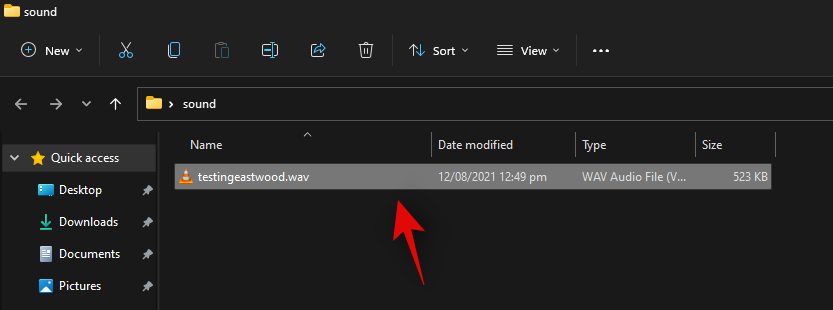
Now navigate to the following path given below. Paste your .wav file in this location. Click on ‘Continue’ when you will be prompted for administrator permission.
C:\Windows\media
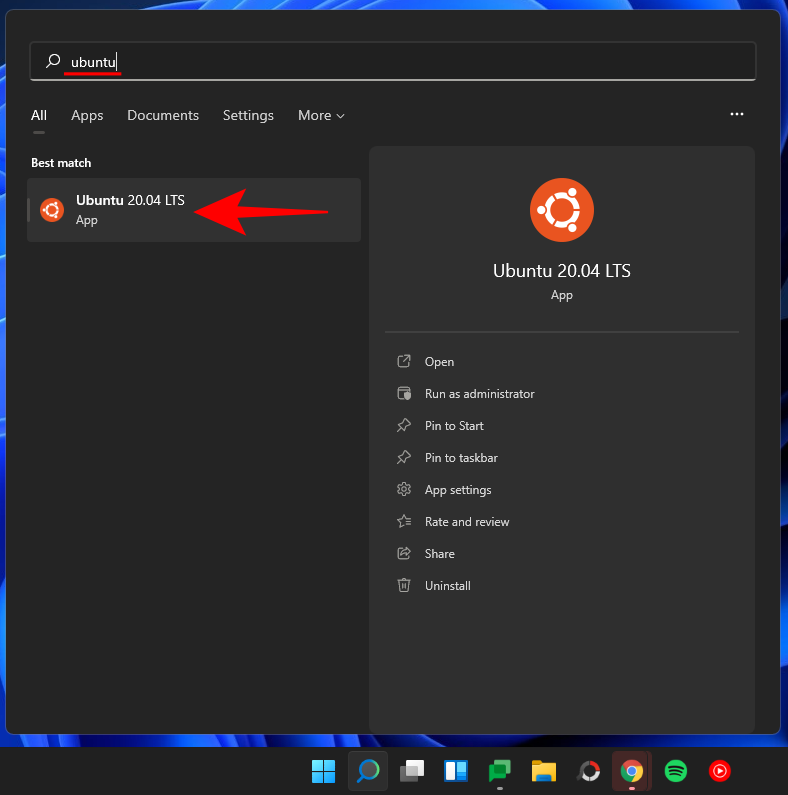
We can now use the .wav file as our default notification sound. Press Windows + i on your keyboard to open the Settings app and then click on ‘Sound’ on your right.
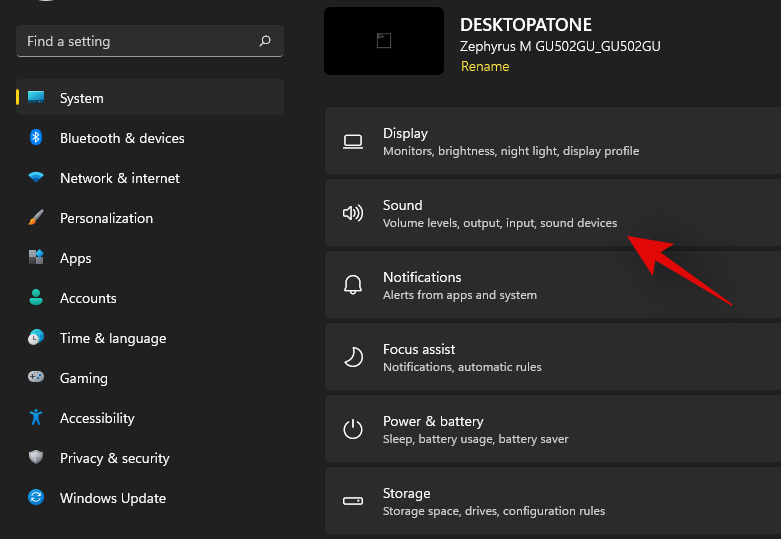
Scroll to the bottom and click on ‘More sound settings’.

Click and switch to the ‘Sounds’ tab at the top.
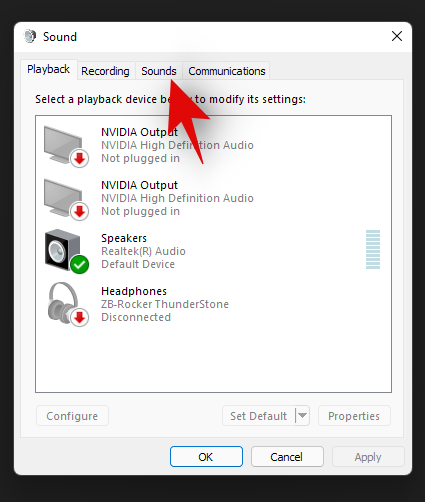
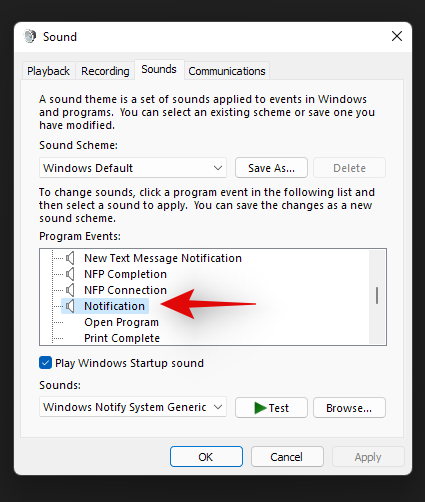
Under ‘Program Events’ scroll the list and find ‘Notifications’. Click on ‘Notifications’ to select it.
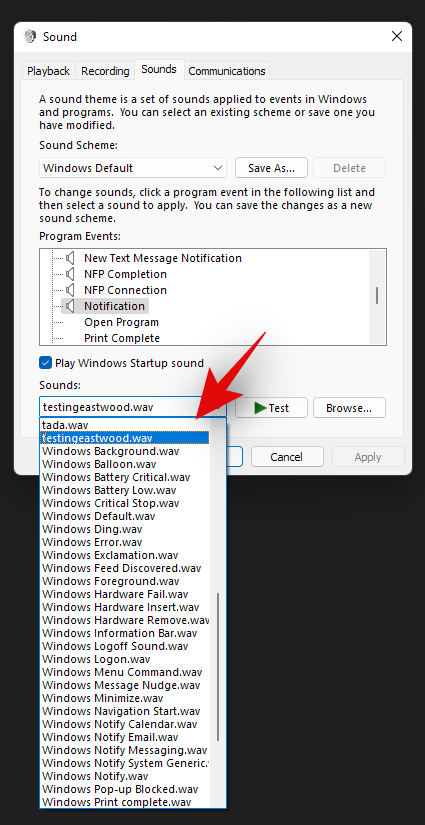
Now click on the drop-down arrow under Sounds and select the .wav file we pasted in the Media folder.
You can click on ‘Test’ to test your custom notification sound.
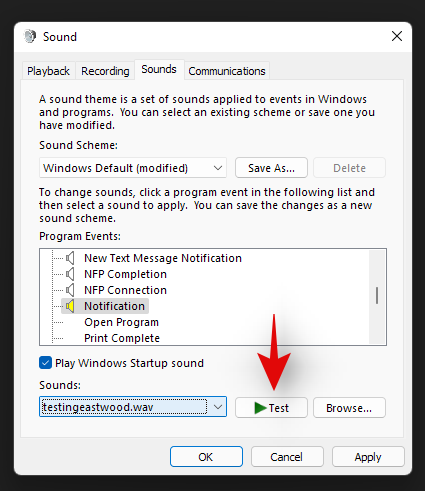
Click on ‘Ok’ to save your changes.
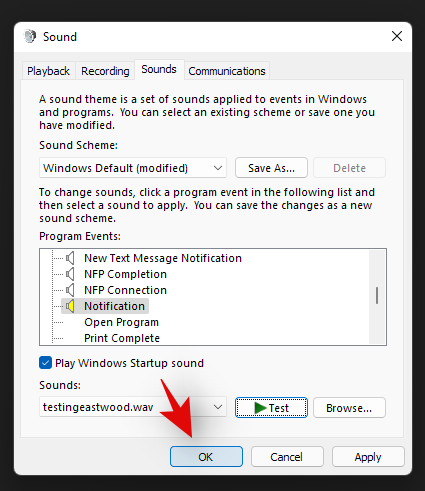
And that’s it! You will now have set a custom sound as your default notification sound in Windows 11.
Distractions from notifications are a huge problem especially when you are into some important work. Using the steps mentioned above, now, you can easily get rid of unnecessary notifications and work peacefully with full concentration.
Related:






![Cum să dezactivați notificările pe echipele Microsoft [AIO] Cum să dezactivați notificările pe echipele Microsoft [AIO]](https://cloudo3.com/resources8/images31/image-2249-0105182830838.png)


