Windows este un sistem de operare cuprinzător care vă permite să dictați și să gestionați permisiunile de acces pe baza contului activ în prezent. Acest lucru face ca administratorii să gestioneze mai ușor computerele din organizația lor, permițându-le să ofere permisiuni ridicate persoanelor selectate.
Dar dacă ai computerul tău? Cum gestionați conturile locale? Ce se întâmplă dacă nu ai un cont de administrator? Ești blocat pentru totdeauna? Dacă ați avut aceste întrebări sau v-ați confruntat recent cu o eroare în care ați solicitat permisiunea administratorului, atunci avem ghidul perfect pentru dvs.
Iată tot ce trebuie să știți despre conturile de administrator în Windows 11.
O notă despre compatibilitatea cu Windows 10: Ghidurile de pe această pagină au fost compilate folosind Windows 11, astfel încât interfața de utilizare utilizată în capturi de ecran este Windows 11. Dar aceste ghiduri funcționează complet și pe Windows 10. Deci, nu ezitați să utilizați ghidurile pe Windows 11, precum și pe Windows 10 PC.
Înrudit: Cum să cauți în Windows 11
Cuprins
Ce este un cont de administrator în Windows 11?
Un cont de administrator este cel mai înalt cont din Microsoft Windows cu cele mai înalte privilegii. Acest lucru vă permite, în calitate de administrator, să vă gestionați computerul, oricum doriți. Puteți face modificări la fișierele de sistem, puteți instala programe avansate, puteți modifica instalarea Windows, puteți configura automatizarea personalizată și multe altele. Permisiunea de a efectua astfel de sarcini nu este disponibilă pentru utilizatorii standard sau invitați. În plus, în calitate de administrator, puteți gestiona funcțiile Windows și puteți dicta care sunt disponibile și accesibile utilizatorilor dvs.
De ce ai nevoie de un cont de administrator?
Un cont de administrator este un cont cu cele mai mari privilegii din Windows. Aceasta înseamnă că puteți face modificări la nivel de sistem în sistemul dvs. de operare folosind un cont de administrator fără nicio restricție. Iată câteva dintre motivele comune pentru care este posibil să aveți nevoie de un cont de administrator pe computer.
- Pentru a face modificări la nivel de sistem sistemului dvs
- Pentru a edita/modifica sau repara fișierele de sistem
- Pentru a rula comenzi și scripturi la nivel de administrator
- Pentru a activa sau dezactiva funcțiile Windows
- Pentru a instala programe și ajustări la nivel de sistem
- Pentru a modifica sau reinstala driverele
- Pentru a accesa setările de personalizare din Windows
- Pentru a reseta sau modifica parolele contului local
si mult mai mult. Ar putea exista multe motive pentru care aveți nevoie de un cont de administrator în Windows 11, dar știați că există două tipuri de conturi de administrator în Windows. Ei bine, nu tocmai, dar iată tot ce trebuie să știi despre ele.
Înrudit: Cum să dezactivați sunetele de alertă Windows 11
Conectați-vă ca administrator: Lucruri pe care trebuie să le știți
Windows în mod implicit vine cu un cont de administrator încorporat, chiar dacă unul nu este disponibil pe ecranul de blocare. Acest cont implicit este creat în momentul instalării Windows pentru a aproba toate modificările de sistem făcute pe computer la configurarea Windows.
În plus, Windows vă permite să configurați un cont suplimentar de administrator din contul dvs. local dacă aveți permisiunile necesare. Puteți, de asemenea, să vă convertiți contul curent într-un cont de administrator dacă utilizați în prezent un cont standard în Windows 11.
Configurarea fiecăruia dintre aceste conturi are cerințe diferite și, în funcție de configurația curentă, puteți opta pentru oricare dintre setări. Dar în cazul în care încercați să recuperați parola contului local, atunci folosirea contului implicit de administrator este cel mai bun pariu, deoarece nu veți putea trece de ecranul de blocare în acest caz.
În plus, iată câteva lucruri comune de care ar trebui să țineți cont înainte de a continua cu ghidurile de mai jos.
- Administratorul implicit nu are o parolă de conectare decât dacă este personalizată de administrator
- Dacă unitatea dvs. a fost emisă de organizația sau institutul de învățământ, atunci metodele de mai jos probabil nu vor funcționa pentru dvs. Contul de administrator implicit va fi blocat de organizația dvs., iar contul dvs. actual nu va avea privilegiile necesare pentru a continua cu alte metode din acest ghid. Cel mai probabil, va trebui să luați legătura cu administratorul dumneavoastră dacă dețineți o astfel de unitate.
- Dacă partajați dispozitivul cu alți utilizatori, atunci ar trebui să dezactivați contul de administrator după ce ați făcut modificările necesare sistemului dvs. pentru a evita orice acces neautorizat la informații sensibile. De asemenea, este recomandat să setați o parolă pentru contul dvs. de administrator implicit în astfel de cazuri.
- Unele metode de mai jos necesită să aveți instalat pe sistemul dvs. Windows 11 Pro sau o versiune ulterioară. Dacă utilizați Windows 11 Home Edition, opțiunile dvs. vor fi limitate.
Diferența dintre contul de administrator implicit și acordarea accesului de administrator la un cont de utilizator
Contul implicit de administrator este un cont separat care se află în fiecare instalare de Windows, indiferent de dispozitivul dvs. sau de versiunea Windows. Pe de altă parte, un cont convertit este un cont standard sau de oaspete pe computerul dvs. care a fost ridicat la privilegii de administrator.
Odată ridicat, contul dvs. va aparține grupului Administrator și veți avea toate permisiunile de administrator necesare pentru a face modificări la nivel de sistem pe computer. Administratorul implicit este folosit mai ales atunci când încercați să recuperați parolele de cont pierdute pentru conturile de utilizator locale de pe computer.
Pe de altă parte, convertirea unui cont este un proces simplu de creștere a permisiunilor contului dvs. curent, care vă va permite să operați ca administrator al dispozitivului curent. Administratorul implicit poate fi dezactivat pe sistemul dumneavoastră cu o comandă simplă, în timp ce contul dumneavoastră local va trebui convertit din nou dacă doriți să anulați modificările. Utilizați una dintre metodele de mai jos care se potrivește cel mai bine nevoilor dvs. actuale.
Înrudit: Cum se dezactivează tastatura pe Windows 11
Cum să vă autentificați ca administrator în Windows 11
Vă puteți autentifica ca administrator în Windows 11 folosind diferitele metode pe care le-am abordat mai sus. Puteți fie să activați contul de administrator implicit dacă doriți să faceți modificări temporare pe computer sau să recuperați o parolă pierdută. De asemenea, puteți configura un nou cont de administrator pentru un utilizator nou în cazul în care doriți să partajați dispozitivul cu cineva. În cele din urmă, vă puteți converti contul local actual într-un cont de administrator dacă doriți să obțineți privilegii de administrator pe dispozitivul actual. Urmați una dintre metodele de mai jos care se potrivește cel mai bine nevoilor și cerințelor dvs. actuale.
Metoda #01: Utilizați contul implicit de administrator
Puteți utiliza contul implicit de administrator pe computerul dvs. cu Windows 11 pentru a face modificările necesare utilizând ghidul de mai jos. După ce ați făcut modificările, puteți dezactiva contul folosind ghidul următor. Să începem.
1.1 Activați contul de administrator implicit
Mai întâi va trebui să activăm/afișăm contul de administrator pe computer. Acest lucru se poate face folosind diferite metode. Dacă puteți trece de ecranul de blocare, puteți utiliza oricare dintre aceste metode. Cu toate acestea, dacă nu reușiți să treceți de ecranul de blocare, atunci va trebui să accesați CMD din ecranul de blocare și să utilizați ghidul de mai jos. În astfel de cazuri, puteți folosi ghidul din partea de jos pentru a activa CMD chiar de pe ecranul de pornire. Să începem.
1.1.1 Utilizarea CMD
Lansați CMD pe sistemul dvs. și introduceți comanda de mai jos. După ce ați terminat, apăsați Enter de pe tastatură pentru a-l executa.
net user administrator /active:yes

Comanda ar trebui să fie finalizată acum cu succes.

Apăsați tasta Windows de pe tastatură și faceți clic pe numele de utilizator din colțul din stânga jos. Un cont de administrator ar trebui să fie acum vizibil în această secțiune.

Aceasta înseamnă că procesul a avut succes. Acum vă puteți deconecta de la contul dvs. și vă puteți conecta la contul de administrator. Contul implicit de administrator nu are o parolă și veți fi întâmpinat de OOBE odată ce vă conectați la cont. Acum puteți utiliza ghidurile ulterioare pentru a vă reseta parola Windows dacă este necesar.
1.1.2 Utilizarea instrumentelor de administrare
Apăsați Windows + Rpe tastatură pentru a lansa caseta de dialog Run. Introduceți următorul termen odată lansat și apăsați Enter pe tastatură.
lusrmgr.msc

Managerul de grupuri locale va fi acum lansat pe computer. Începe prin a selecta „Utilizatori” din stânga ta.
Faceți clic pe Administrator din dreapta dvs. Acum, faceți clic pe Mai multe acțiuni și apoi pe Proprietăți .

O nouă fereastră se va deschide acum pe ecranul dvs. Debifați opțiunea „Contul este dezactivat”.

Faceți clic pe „Aplicați” și apoi pe „OK”.

Închideți managerul de grupuri locale și activați meniul Start. Acum faceți clic pe numele dvs. de utilizator din stânga jos și un nou cont „Administrator” ar trebui să fie acum disponibil în această secțiune. Acum vă puteți deconecta de la contul actual și vă puteți conecta la noul cont de administrator. Contul nu va avea o parolă și ar trebui să vă puteți conecta cu ușurință la el făcând clic pe „Conectați-vă”.
1.1.3 Utilizarea Editorului Registrului
Metoda editorului de registry este aplicabilă numai utilizatorilor cu Windows 11 Pro sau o versiune ulterioară instalată pe sistemele lor. Acest lucru se datorează faptului că calea de registry pe care trebuie să o accesăm pentru această metodă este disponibilă numai pentru utilizatorii Windows 11 Pro sau superior. Dacă sunteți un utilizator de Windows 11 Home, atunci puteți utiliza metoda CMD enumerată mai sus.
Apăsați Windows + Rpe tastatură și introduceți următorul termen. Apăsați Enter pe tastatură după ce ați terminat.
regedit

Acum navigați la următoarea cale. De asemenea, puteți copia și lipi același lucru în bara de adrese din partea de sus.
Computer\HKEY_LOCAL_MACHINE\SOFTWARE\Microsoft\Windows NT\CurrentVersion\Winlogon\SpecialAccounts\UserList

Cu UserList selectată în stânga, faceți clic dreapta pe o zonă goală din dreapta și selectați „Nou”.
Faceți clic pe „Valoare DWORD (32 de biți)”.
Denumiți valoarea „Administrator” și apăsați Enter de pe tastatură.
Odată ce valoarea este adăugată, închideți Editorul de registry și reporniți computerul pentru o măsură bună. Un cont de administrator ar trebui să fie acum disponibil în colțul din stânga jos al ecranului atunci când vă aflați în ecranul de blocare.
1.1.4 Utilizarea GPO
Dacă utilizați o mașină de întreprindere, puteți utiliza și Editorul de politici de grup pentru a activa contul de administrator implicit pe computer. Cu toate acestea, această opțiune nu va fi disponibilă pentru utilizatorii cu Windows 11 Home edition. Urmați ghidul de mai jos pentru a începe.
Apăsați Windows + R, introduceți următorul termen și apăsați Enter de pe tastatură pentru a deschide Editorul de politici de grup pe computer.
gpedit.msc
Navigați la următorul director folosind bara laterală din stânga.
Computer Configuration\Windows Settings\Security Settings\Local Policies\Security Options\

Acum dublu clic pe următoarea valoare din dreapta ta: Conturi: starea contului de administrator

Selectați „Activat”.

Faceți clic pe „Aplicați” și apoi pe „OK”.

Închideți fereastra GPO acum și apăsați tasta Windows de pe tastatură pentru a deschide meniul Start. Acum faceți clic pe numele dvs. de utilizator din colțul din stânga jos al ecranului și un nou cont de administrator ar trebui să vă fie acum disponibil.
1.2 Dezactivați contul de administrator implicit
Acum că ați terminat cu sarcinile administrative, este recomandat să vă dezactivați contul de administrator pentru a preveni accesul neautorizat la sistemul dumneavoastră. Utilizați una dintre metodele de mai jos care se potrivește cel mai bine nevoilor și cerințelor dvs. actuale. Să începem.
1.2.1 Utilizarea CMD
Activați CMD pe computerul dvs. în funcție de configurația dvs. curentă și introduceți următoarea comandă. Apăsați Enter de pe tastatură pentru a-l executa.
net user administrator /active:no

Si asta e! Contul implicit de administrator ar trebui să fie acum dezactivat pe computer.
1.2.2 Utilizarea instrumentelor de administrare
Apăsați Windows + Rși introduceți următorul termen în caseta de dialog Run. Apăsați Enter pe tastatură după ce ați terminat.
lusrmgr.msc

Selectați „Utilizatori” din bara laterală din stânga și faceți clic pe „Administrator” din dreapta dumneavoastră.
Bifați caseta de selectare pentru opțiunea „Contul este dezactivat”.

Faceți clic pe Aplicare și apoi pe OK .

Închideți fereastra instrumentelor de administrare și contul de administrator implicit ar trebui să fie acum dezactivat pe computer.
1.2.3 Utilizarea Editorului Registrului
Apăsați Windows + R, tastați următoarele și apăsați Enter pe tastatură pentru a deschide Editorul de registry pe computer.
regedit

Odată ce editorul de registry se deschide, navigați la calea de mai jos.
Computer\HKEY_LOCAL_MACHINE\SOFTWARE\Microsoft\Windows NT\CurrentVersion\Winlogon\SpecialAccounts\UserList

Faceți clic pe „Administrator” din dreapta dvs. și apăsați Del pe tastatură.
Confirmați alegerea făcând clic pe „Da”.
Reporniți computerul și contul de administrator implicit nu ar trebui să mai fie disponibil pe ecranul de blocare.
1.2.4 Utilizarea GPO
Apăsați Windows + Rși introduceți următoarele. Apăsați Enter pe tastatură după ce ați terminat.
gpedit.msc
Acum navigați la următoarea cale.
Computer Configuration\Windows Settings\Security Settings\Local Policies\Security Options\

Acum dublu clic pe următoarea valoare din dreapta ta: Conturi: starea contului de administrator

Selectați „Dezactivat”.

Faceți clic pe „Aplicați” și apoi pe „OK”.

Închideți fereastra GPO.
Contul implicit de administrator va fi acum dezactivat pe computer prin intermediul Editorului de politici de grup din Windows 11.
1.3 Conectați-vă ca administrator folosind promptul de comandă (nu pot trece de problema ecranului de blocare)
If you are locked out of Windows and would like to access the administrator account to reset your password then you will need to launch CMD from your lock screen first. You will need a recovery environment to proceed with this guide.
You will need to first access CMD using Windows installation media (a Windows bootable USB) for this guide and then follow the steps below. If using an installation media press Shift + F10 during the setup to launch CMD anywhere.
Follow the guide below to get you started once you have launched CMD as given above.
Once the command prompt launches, enter the following command and press Enter on your keyboard.
cd windows

You will now be taken to your default boot drive in CMD. Enter the following command and execute it by press Enter on your keyboard.
cd system32

You will now be in the System32 directory. Execute the command below to create a backup of utilman.exe.
copy utilman.exe utilman.exe.back

Execute the command below within CMD now.
copy cmd.exe cmd1.exe

Now let’s delete the default utilman.exe.
del utilman.exe

We will now rename CMD so that it can be accessed as utilman.exe.
rename cmd.exe utilman.exe

Once all the commands are executed successfully, close the command prompt by typing in the following command.
exit

Restart your PC and proceed to the Windows lock screen as you normally would. Click on the accessibility icon in the bottom right corner and you should now be able to access CMD on your lock screen. Follow the guide above to enable administrator account on your system. Once enabled, you can use the guide below to reset a local account’s password. Once you have reset your password it is highly recommended that you revert the changes we made to cmd.exe and utilman.exe earlier. Use the steps below to revert your changes.
Press Windows + S on your keyboard and search for CMD. Click on ‘Run as administrator’ once it shows up in your search results.

Now enter the following commands one by one and execute them to revert your changes. Make sure to execute each command one after the other without changing their order.


rename utilman.exe.back utilman.exe

CMD functionality should now be restored within Windows 11. You can check for the same by pressing Windows + R on your keyboard, typing in CMD, and hitting Enter on your keyboard. If CMD launches on your system then all the necessary changes have been reverted successfully.

However, if CMD does not launch, make sure that you executed each command successfully on your system by re-verifying each one in the list above.
And that’s it! You should now be able to access CMD from your lock screen.
1.4 Reset password for a local account
You can now reset your local account’s password with the default administrator account we just enabled. Follow the steps below to get you started.
Log in to the Windows administrator account and then press Windows + S on your keyboard. Search for Control Panel and click and launch the app once it shows up in your search results.

Click on ‘User Accounts’.

Click on ‘User Accounts’ again.

Click on ‘Manage another account’.

Click and select the account for which you wish to change the password.

Now click on ‘Change the password’.

Type in your new password and confirm the same in the respective text boxes

Set a password hint if needed.

Click on ‘Change password’ once you are done.

And that’s it! The password for the selected account should now be changed. You can now visit the lock screen and log into your local account using your new password. We recommend you revert any changes made at this point to maintain your security and privacy. You should revert any CMD changes made as well as disable the default administrator account on your system using the guides above.
Method #02: Create a new administrator account in Windows 11
If you wish to create a new administrator account in Windows 11, then you can follow the steps below. Please keep in mind that you will need administrator privileges to create a new administrator user account on your device. Follow the guide below to get you started.
Press Windows + i on your keyboard and select ‘Accounts’ from the left sidebar.

Click on ‘Family & other users’.

Click on ‘Add account’.

At this point, you can enter the Microsoft Account details of the new user and follow the on-screen steps to set up a new account. However, if you are looking to create a new local account then you can continue with the steps below.
Click on ‘I don’t have this person’s sign-in information’.

Click on ‘Add a user without a Microsoft account’.

Enter the name of the new user.

Now set a password and confirm the same.

Click on ‘Next’ once you are done.
 \
\
A new account will now be added to your PC. However, the newly added account is a standard account. Let’s convert it into an administrator account. Press Windows + S on your keyboard and search for Control Panel. Click and launch the app from your search results.

Click on ‘User Accounts’.

Click on ‘User Accounts’ again.

Click on ‘Manage another account’.

Now click and select the new account you just created.

Click on ‘Change the account type’.

Click and select ‘Administrator’.

Finally, click on ‘Change account type’.

And that’s it! You will now have created a new local administrator account on your device.
Method #03: Change a standard account to an administrator account
If you have a standard account then you can simply switch to an administrator account. If using the Windows Home edition then you can either use the Control Panel method or the ‘netplwiz’ method. On the other hand, Windows Pro and higher users can use either of the methods listed below. Let’s get started.
Note: If you are logged in as a standard user and would like to convert the same account to an administrator account then we recommend you use the netplwiz guide in the methods below.
3.1 Using Control Panel (Windows home)
Press Windows + S on your keyboard, search for Control Panel and launch the app once it shows up in your search results.

Click on ‘User Accounts’.

Click on ‘User Accounts’ again.

If you wish to change your own account’s type then click on ‘Change your account type’. If you wish to convert another local account then select ‘Manage another account’ and select the concerned account. Once selected, click on ‘Change account type’.

Select ‘Administrator’.

Click on ‘Change account type’.

And that’s it, the concerned account should now be an administrator account on your system.
3.2 Using netplwiz
You can also use netplwiz to your advantage and convert user accounts on your PC. Follow the guide below to get you started.
Press Windows + R on your keyboard to launch the run dialog box. Once launched, type in the following and press Enter on your keyboard.
netplwiz

Check the box for ‘Users must enter a user name and password to use this computer’ at the top.

Now click and select the user account you wish to convert from the list below.

Click on ‘Properties’.

Switch to the ‘Group Membership’ tab at the top.

Click and select ‘Administrator’.

Click on ‘Ok’ twice, once you are done.

If you converted the current local account that you are signed in with then you will be prompted to re-login to the account for the changes to take effect. Click on ‘Yes’ to confirm your choice.
You will now be taken to the lock screen. Login to the concerned account and you should now have administrator privileges within it.
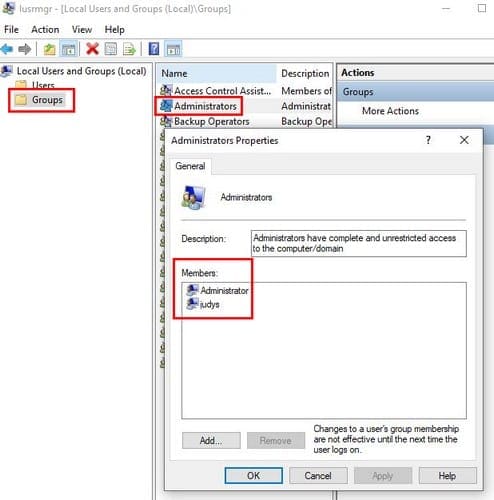
3.3 Using Local groups manager (Windows Pro and higher)
Press Windows + R on your keyboard, type in the following, and press Enter on your keyboard.
lusrmgr.msc
The local groups manager should now launch on your PC. Click and open ‘Users’ on your left.
Now select the desired User account that you wish to convert from your right and double click on it.
Switch to the ‘Member of’ tab and select the ‘Administrator’ group.
Click on ‘Ok’ once you are done.
And that’s it! The selected account will now have elevated administrator privileges within Windows.
Can you set or reset a password when logged in as an administrator?
Yes, you can easily reset your password as an administrator in Windows 11. This can be done in multiple ways and you can reset the password for a standard account or an administrator account using this method. This can be quite useful if you have forgotten your password and would like to get back into your system without losing your data.
However, you should keep in mind that this can be used by anyone to change your password and get access to your system. Hence, it is recommended that you set a secure password for your default account whenever possible.
For now, you can use the guide below to reset a password in Windows 11 when logged in as an administrator.
How to reset the password once logged in as an administrator
Resetting your password is quite easy when you are logged in to Windows 11 as an administrator. The best way to do this is by using either the Control Panel or CMD. Use one of the guides below that best fits your current needs and requirements. Follow any one of the guides below to get you started.
1. Using Control Panel
Press Windows + S and search for Control Panel. Click and launch the app from your search results.

Click on ‘User Accounts’.

Now click on ‘User Accounts’ again.

Click on ‘Manage another account’.

Now click and select your local account for which you wish to reset your password.

Click on ‘Change the password’.

Add a new password for your local account and confirm the same in their respective text boxes.

Now add a password hint if required.

Click on ‘Change password’ once done.

And that’s it! The password for the selected account should now be changed based on your preferences.
2. Using CMD
You can also reset a local account’s password using CMD. Follow the guide below to get you started.
Press Windows + S on your keyboard and search for CMD. Click on ‘Run as administrator’ once the app shows up in your search result.
Type in the following and press Enter on your keyboard.
net user

You will get a list of all the accounts currently available on your PC. Make a note of the desired account’s username and then type in the command below. Replace ‘NAME’ with the name you noted down earlier and replace ‘PASSWORD’ with your new password. Once done, press Enter on your keyboard.
net user NAME PASSWORD

And that’s it! Once the command is executed, the password for the desired account should be automatically changed on your PC.
How to add a password for the administrator account
If you are looking to secure your PC further then it is recommended that you add a password for the default administrator account. This will ensure that no one aware of this trick can access your Windows account without your authorization. We can add a password for your default admin account in several ways but we recommend you do so either via the advanced menu or via the CMD method. Follow any one of the guides below to get you started.
1. Using Ctrl + Alt + Del
Log in to the default administrator account and press Ctrl + Alt + Del on your keyboard.
Now click and select ‘Change password’.
Enter a new password and confirm the same in their respective fields.
Add a password hint or security question depending on your preferences.
Click on ‘Ok’ once you are done.
And that’s it! Your default administrator account’s password should now be changed on your PC.
2. Using CMD
Log in to the default administrator account and press Windows + S on your keyboard. Search for CMD and click on ‘Run as administrator’ once the app shows up in your search results.

Now enter the following command. Replace ‘PASSWORD’ with a password of your desired choice.
net user Administrator PASSWORD

And that’s it! The new password should now be set for your default administrator account.
Should you keep the administrator account enabled?
No, it is not recommended to keep your default/super administrator account enabled. This account has higher and more elevated privileges when compared to a normal administrator account in Windows. This account is used by Windows to perform system-level tasks in the background as well hence it could cause several privacy issues on your system.
In case somebody can access this account, they would have access to your entire data and hardware. The user could then proceed to take control of your entire system or simply infect it with malware, adware, and in the worst cases, ransomware.
We hope you were able to easily log in as an administrator in Windows 11 using the guide above. If you face any issues or have any more questions for us, feel free to reach out to us using the comments section below.
Related:


 \
\


