Tastele rapide de la laptop sunt instrumente esențiale atunci când încercați să accesați funcțiile de bază ale dispozitivului dvs. Acestea vă permit să vă controlați volumul, reglați luminozitatea , iluminarea de fundal a tastaturii, comportamentul touchpadului și multe altele. În funcție de dispozitivul dvs., puteți avea taste rapide suplimentare pentru funcții dedicate, cum ar fi activarea trecerii tastelor n, dezactivarea touchpadului, dezactivarea tastaturii , activarea modului avion, schimbarea modurilor de alimentare și multe altele.
Cu toate acestea, laptopul poate ajunge să-și piardă funcționalitatea și eficiența în cazul în care tastele rapide nu mai funcționează. Acest lucru v-ar obliga să modificați/editați fiecare setare folosind opțiunile lor dedicate din aplicația Setări Windows, care poate fi destul de greoaie. Dacă tastele rapide ale laptopului nu funcționează pe laptop, atunci puteți folosi metodele de mai jos pentru a remedia tastele rapide.
Înrudit: Cum să mutați bara de activități în partea de sus în Windows 11
Cuprins
De ce nu funcționează tastele rapide?

Tastele rapide de pe laptopul dvs. pot înceta să funcționeze din mai multe motive, dar, deoarece Windows 11 este destul de nou, cel mai frecvent motiv pare să fie conflictele de driver și conflictele de utilitare OEM în fundal. Acest lucru se datorează faptului că majoritatea driverelor lansate în prezent de OEM sunt proiectate pentru Windows 10. Windows 11 introduce mai multe modificări diferite în fundal și modul în care sunt gestionate driverele, care pare să rupă funcționalitatea tastelor rapide de pe multe dispozitive diferite.
Cele mai afectate unități par să fie de la Asus și Lenovo din cauza utilităților lor dedicate, cum ar fi Armory Crate Service, care trebuie actualizate pentru Windows 11. Acest lucru nu înseamnă că alți producători sunt scutiți de această problemă, multe unități Dell și Acer par să fie, de asemenea, își pierd funcționalitatea tastelor rapide cu Windows 11.
Dacă dețineți oricare dintre aceste dispozitive sau dacă tastele rapide ale laptopului dvs. nu funcționează în general pe Windows 11, atunci puteți utiliza metodele de mai jos pentru a încerca să vă remediați problema. Să începem.
Înrudit: Cum se creează un punct de restaurare în Windows 11
Cum să remediați tastele rapide pe laptopurile cu Windows 11
Puteți folosi următoarele metode pentru a încerca să faceți din nou tastele rapide să funcționeze pe laptop. Metodele au fost listate în ordinea priorității și cele mai comune remedieri au fost enumerate în partea de sus. Puteți începe cu prima remediere și puteți parcurge lista pentru a încerca să găsiți remedierea care funcționează pentru sistemul dvs. Să începem.
Metoda #1: Verificați actualizările OEM
Dacă aveți un utilitar de tastatură dedicat care vă gestionează tastele rapide în fundal, cum ar fi Armory Crate Service sau utilitarul Synaptics, atunci puteți încerca să vă actualizați driverele de pe site-ul OEM. Aceste utilitare sunt diferite de driverele specifice de tastatură și rulează servicii și sarcini în fundal care ajută la activarea tastelor rapide pe laptop.
Dacă oricare dintre aceste utilitare este defectă sau nu funcționează, atunci vă recomandăm să verificați cele mai recente actualizări sau să reinstalați versiunea curentă pe laptop. Utilizați linkurile de mai jos pentru a vizita site-ul de asistență pentru OEM și pentru a verifica cele mai recente actualizări ale utilitarului. Odată găsite, faceți clic pe ele și descărcați-le în stocarea locală și instalați-le pe laptop cel mai devreme.
Odată instalate, tastele rapide ar trebui să înceapă să funcționeze din nou pe laptop. Vă recomandăm să reporniți laptopul pentru a evita orice conflicte cu versiunile instalate anterior în fundal. Dacă tastele dvs. de acces rapid nu funcționează, atunci puteți utiliza ghidul de mai jos pentru a reseta și a reîmprospăta utilitățile OEM de pe laptop.
Înrudit: Cum să reparați Windows 11
Metoda #2: Asigurați-vă că utilitățile OEM funcționează corect
Dacă utilitățile OEM par să nu funcționeze în fundal, atunci iată câteva metode de depanare pentru a le restabili funcționalitatea. Să începem.
Apăsați Windows + ipe tastatură și faceți clic pe „Aplicații” din stânga dumneavoastră.

Faceți clic pe „Aplicații și funcții”.

Găsiți aplicația în cauză în această listă și faceți clic pe pictograma de meniu „3 puncte” de lângă ea.

Selectați „Opțiuni avansate”.

Acum urmați una dintre secțiunile de mai jos, în funcție de ceea ce doriți să faceți cu aplicația selectată.
2.1 Activați funcționalitatea de fundal
Faceți clic pe meniul derulant sub „Permisiuni aplicații de fundal” și selectați „Putere optimizată” sau „Întotdeauna”.

„Putere optimizată” va permite aplicației să funcționeze în fundal, în funcție de planul de alimentare curent. Pe de altă parte, „Întotdeauna” va acorda aplicației permisiunea de a rămâne activă și de a lucra în fundal, indiferent de planul de alimentare selectat în prezent.
2.2 Reparați aplicația
Windows 11 vă permite, de asemenea, să vă reparați aplicația. Pur și simplu derulați în partea de jos și faceți clic mai întâi pe „Terminați”.

Acum faceți clic pe „Reparare”.

Așteptați ca Windows să își facă treaba, odată ce apare o bifă lângă opțiune, încercați să lansați aplicația în cauză pe laptop.

Testați-vă tastele rapide acum, dacă o problemă minoră sau un conflict a făcut ca aplicația să nu funcționeze în fundal, atunci funcționalitatea tastelor rapide ar trebui să fie restabilită acum pe laptopul dvs.
2.3 Resetați aplicația
Dacă metodele de mai sus nu au funcționat pentru dvs., atunci puteți reseta aplicația OEM. Acest lucru va reseta datele și vă va oferi un nou început, ca și cum aplicația tocmai a fost instalată pe laptop. Acest lucru ar trebui să vă ajute să vă restabiliți funcționalitatea tastelor rapide în majoritatea cazurilor. Cu toate acestea, rețineți că datele aplicației dvs. vor fi resetate, ceea ce vă va obliga să vă reconectați la aplicație, dacă este cazul. În plus, orice modificări sau personalizări pe care le-ați făcut în aplicație vor fi, de asemenea, resetate. Urmați pașii de mai jos pentru a începe.
Faceți clic pe „Terminați” pentru a închide aplicația.

Acum faceți clic pe „Resetare”.

Faceți clic pe „Resetare” din nou pentru a confirma alegerea.

Aplicația va fi acum resetată pe laptop. Vă recomandăm să reporniți laptopul pentru o măsură bună și să încercați din nou să utilizați tastele rapide. Dacă aplicația nu funcționa corect pe Windows 11, atunci funcționalitatea tastelor rapide ar trebui să fie acum restaurată pe laptop.
Metoda #3: Actualizați driverele
Un alt motiv pentru funcționarea defectuoasă a tastaturii ar fi driverele învechite. Dacă nu ți-ai actualizat driverele de tastatură în trecut, atunci probabil că acesta este motivul pentru care tastele rapide de la tastatură nu funcționează în Windows 11. Windows 11 gestionează și instalează driverele în mod diferit, în plus, în unele cazuri, Windows 11 este cunoscut că înlocuiți driverul de tastatură OEM în favoarea unui driver generic, în cazul în care acesta este cel mai recent.
Dacă tastele rapide încă nu funcționează pentru dvs., atunci vă recomandăm să vă actualizați driverele și să instalați cele mai recente drivere pentru tastatură disponibile de la OEM. Pur și simplu vizitați site-ul dvs. OEM utilizând unul dintre linkurile de mai jos și descărcați driverul respectiv în stocarea locală.
Odată descărcat, instalați driverul și reporniți laptopul. Respinge orice actualizări ale driverelor de tastatură oferite de Windows 11, iar tastele rapide ar trebui să înceapă să funcționeze din nou. Utilizați linkurile de mai jos pentru a începe.
Dacă driverele pentru tastatură sunt încă învechite și tastele rapide nu funcționează, atunci ar fi timpul să verificați actualizările driverelor prin Windows. OEM-ul dumneavoastră vă va furniza probabil cele mai recente actualizări ale driverelor prin Actualizări Windows. Verificați actualizările driverului de tastatură în actualizările Windows de pe laptop folosind ghidul de mai jos. În primul rând, ne vom asigura că laptopul dvs. primește actualizări de driver prin Windows Update. Urmați ghidul de mai jos pentru a începe.
Apăsați Windows + Spe tastatură și căutați „Schimbați setările de instalare a dispozitivului”. Faceți clic și lansați aplicația odată ce aceasta apare în rezultatele căutării.

Selectați „Da (recomandat)”.

Faceți clic pe „Salvați modificările”.

Așteptați ca Windows să activeze actualizările de drivere pentru laptop. Odată activat, închideți fereastra de setări de instalare a dispozitivului și apăsați Windows + ipe tastatură. Selectați „Windows Update” din stânga.

Faceți clic pe „Verificați actualizările” din partea de sus și instalați toate actualizările care apar.

Odată instalat, faceți clic pe „Opțiuni avansate” din partea de jos.

Acum faceți clic pe „Actualizări opționale”.

Faceți clic și extindeți „Actualizări de driver (n)”, unde n reprezintă numărul actual de actualizări de driver disponibile pentru laptopul dumneavoastră. Bifați caseta pentru orice driver de tastatură care apar în această listă. Faceți clic pe „Descărcați și instalați” în partea de jos a ecranului. Reporniți laptopul pentru o măsură bună, chiar dacă nu este solicitat de o actualizare Windows.
Si asta e! Cele mai recente drivere de tastatură ar trebui să fie instalate acum pe laptopul dvs., ceea ce ar trebui să vă ajute să vă restabiliți funcționalitatea tastelor rapide. Dacă nu, puteți continua cu remediile de mai jos pentru a încerca să remediați tastele rapide.
Metoda #4: Reinstalați driverele pentru tastatură
Dacă niciuna dintre metodele de mai sus nu funcționează pentru dvs., atunci este timpul să reinstalați driverele pentru tastatură. În timp ce driverele rareori se confruntă cu conflicte în fundal, instalările greșite, componentele incompatibile și actualizările greșite vă pot distruge driverele de tastatură, mai ales dacă aveți iluminare de fundal RGB personalizată gestionată de un utilitar OEM.
Fiecare dintre aceste aplicații folosește un mod diferit de a se conecta la iluminarea de fundal a tastaturii pentru a vă ajuta să o personalizați în funcție de nevoile dvs. Aceste moduri de a vă conecta la sistem nu funcționează bine cu alte aplicații terță parte care vă gestionează maparea tastaturii, aspectul și multe altele. Reinstalarea driverului pentru tastatură poate ajuta la rezolvarea majorității acestor probleme și puteți face acest lucru fie instalând un driver dedicat de la OEM, fie utilizând un driver generic provenit de la Windows. Să începem.
4.1 Reinstalați driverul generic de tastatură
Apăsați Windows + Xpe tastatură și faceți clic pe „Manager dispozitive”.

Odată deschisă, găsiți tastatura în cauză în listă și faceți clic dreapta pe ea. Dacă nu vă puteți găsi tastatura sau aveți mai multe listări, atunci le puteți selecta și dezinstala pe toate. Odată dezinstalate, driverele rămase vor fi eliminate, în timp ce cele necesare vor fi re-descărcate automat.

Faceți clic pe „Dezinstalați dispozitivul”.

Faceți clic pe „Dezinstalare” din nou pentru a confirma alegerea.

Reporniți laptopul dacă vi se solicită și repetați pașii de mai sus pentru a elimina toate driverele de tastatură necesare instalate pe sistemul dvs. Odată dezinstalat, faceți clic dreapta pe o zonă goală și selectați „Scanați pentru modificări hardware”. De asemenea, puteți face clic pe pictograma dedicată pentru aceeași din bara de instrumente.

Windows va căuta acum driverele generice lipsă pentru tastatura nativă și le va reinstala automat pe laptop.
Dacă totuși, driverele dvs. nu sunt găsite de Windows, atunci puteți utiliza ghidul de mai jos pentru a instala manual driverele de tastatură dedicate de la OEM.
4.2 Reinstalați manual driverele pentru tastatură
Descărcați și instalați driverele de tastatură necesare pe stocarea locală. Asigurați-vă că extrageți fișierul în prealabil în cazul în care ați descărcat o arhivă. Ar trebui să găsiți un fișier .inf în interiorul căruia se află driverul pe care îl vom instala manual pe sistemul dumneavoastră. Urmați pașii de mai jos pentru a începe.
Apăsați Windows + Xpe tastatură și selectați „Manager dispozitive”.

Acum extindeți secțiunea „Tastaturi” și faceți clic dreapta pe tastatura în cauză. Dacă aveți mai multe dispozitive HID sub „Tastaturi”, atunci vă recomandăm să dezinstalați toate driverele inutile pentru a evita conflictele.

Selectați „Dezinstalați dispozitivul”.

Bifați caseta pentru „Încercare de eliminare a driverului pentru acest dispozitiv” dacă opțiunea este disponibilă. Faceți clic pe „Dezinstalare” pentru a confirma alegerea.

Tastatura selectată va fi acum dezinstalată din sistemul dumneavoastră. Tastatura dvs. nu va mai funcționa după ce driverul respectiv a fost dezinstalat. Acesta este un comportament normal, iar funcționalitatea tastaturii ar trebui restabilită odată ce reinstalăm driverele necesare. Repetați pașii de mai sus pentru toate dispozitivele HID pe care doriți să le eliminați. Odată ce dispozitivele necesare au fost eliminate, faceți clic pe pictograma „Adăugați drivere” din bara de instrumente.

Faceți clic pe „Răsfoiți”.

Navigați la folderul în care ați stocat driverele OEM și faceți clic pe „OK”.

Bifați caseta „Include subfolderele” doar pentru a fi în siguranță. Faceți clic pe „Următorul” după ce ați terminat.

Windows va scana acum locația pentru drivere compatibile și le va instala automat pe sistemul dumneavoastră.
Odată instalat, vă recomandăm să reporniți laptopul pentru o măsură bună.
Si asta e! Funcționalitatea tastelor rapide ar trebui acum să fie restabilită pe sistemul dvs. dacă un conflict de fundal a driverului a cauzat probleme în sistemul dumneavoastră.
Notă: Nu instalați în viitor niciun driver de tastatură prin Windows Update pentru a evita pierderea din nou a funcției tastelor rapide.
Metoda #5: Dezactivați modul de joc
Se știe că modul de joc din Windows cauzează probleme pe anumite laptop-uri. Modul de joc Microsoft a devenit mai inteligent, iar modul încearcă automat să aplice cele mai bune setări periferice pentru experiența ta de joc. Aceasta include ajustarea sunetului, setările mouse-ului, activarea trecerii tastelor n pe tastatură, blocarea tastelor Windows și multe altele.
Cu toate acestea, activarea automată a acestor setări necesită conectarea la drivere și instrumente dedicate, care sunt adesea gestionate de OEM. Acest lucru ar putea crea conflicte în fundal, care ar putea să vă împiedice să utilizați tastele rapide pe Windows 11. Utilizați ghidul de mai jos pentru a dezactiva modul de joc pe laptop.
Apăsați Windows + ipe tastatură și faceți clic pe „Personalizare” din stânga dumneavoastră.

Faceți clic pe „Utilizarea dispozitivului”.

Dezactivează comutatorul pentru „Jocuri”.

Faceți clic pe „Gaming” din stânga dumneavoastră acum.

Faceți clic pe „Modul de joc” din dreapta ta.

Dezactivează comutatorul pentru „Modul joc” din partea de sus a ecranului.

Închideți aplicația Setări și reporniți laptopul.
Dacă tastele dvs. rapide încep să funcționeze la repornire, atunci modul de joc a interferat probabil cu tastele dvs. rapide în fundal.
Metoda #6: Reporniți serviciul HID
You can also restart your HID service which should help restart all your HID or Human Interface Devices. This includes your keyboard and restarting the HID service should help fix your hotkeys if your custom software or mapper was unable to hook into the HID service. Use the guide below to get you started.
Press Windows + S and search for ‘Services’. Click and launch the app once it shows up in your search results.

Look for ‘Human Interface Device Service’ and right-click on it.

Select ‘Restart’.

Windows will now restart your HID service.

You can try testing out your hotkeys now. If a conflict in the background was preventing your custom software from hooking into the HID service, then this issue should now be fixed and your hotkey functionality should now be restored.
Method #7: Disable filter keys
Filter keys are another culprit within Windows that is known to cause issues on many devices. Ideally, Filter keys is an accessibility feature meant to be used so that you can avoid brief repeated key inputs which is quite useful for users with anxiety, hyperactivity, hand tremors, and other similar conditions.
However, if this feature has been enabled by mistake, then it could prevent Windows from detecting your hotkey inputs and combinations. You can check if Filter keys are enabled on your system and disable them using the guide below.
Press Windows + S and search for Control Panel. Click and launch the app once it shows up in your search results.

Switch to ‘Large icons’ by clicking on the drop-down menu in the top right corner.

Click on ‘Ease of Access Center’.

Click on ‘Make the keyboard easier to use’.

Now uncheck the box for ‘Turn on filter keys’.

Click on ‘Ok’ at the bottom.

And that’s it! Filter keys should now be disabled on your system. Check your hotkey combinations and their functionality should now be restored on your system.
Method #8: Disable Function (Fn) lock if available
Fn lock is a feature in most laptops that allows you to lock and use the Fn keys and their functionality. Most systems use Fn keys as alternate keys mapped to functions and utilities that will be needed to manage your system. For example, F7 could be used to increase brightness and F8 could be used to decrease brightness. If directly pressing these keys helps you manage your brightness then the Fn lock is disabled on your laptop.

However, if hitting F7 and F8 registers as the respective key then the Fn lock is enabled on your device. In such cases, your Fn keys will behave normally and you will need to use Fn + F7 or F8 combination to adjust your brightness. You can disable or toggle this lock using keyboard shortcuts on most laptops. Look for an ‘Fn Lock’ icon on one of your keys and pres Fn + the respective key, on your keyboard. This should help disable Fn lock on your keyboard if enabled, and restore your hotkeys functionality.
In case a key combination is not available on your device, then you will most likely need to access your BIOS. Most manufacturers allow you to disable and enable Fn lock from the BIOS for easy access. Simply press F2 on your splash screen once your laptop is booting to enter the BIOS menu. Once in the BIOS menu, find the relevant option and toggle the Fn lock for your laptop.
In case a BIOS menu option is also not available to you then your laptop most likely uses the default Fn lock combination which is ‘Fn + Esc’ on your keyboard. This will help toggle the Fn lock on your system which should help restore your hotkeys.
Method #9: Check the on-screen keyboard
On-Screen keyboard within Windows can help you determine if your hotkeys have actually stopped working or you are facing a software issue. Start by launching the on-screen keyboard on your laptop using the taskbar icon. If the icon is hidden, press Windows + S on your keyboard and search for ‘On-Screen Keyboard’. Click and launch the app from your search results.

Now try using a hotkey that does not use Fn keys on your keyboard as they would be unavailable on your on-screen keyboard. If not try testing out each key and see if it still works on your laptop.

If all your keys seem to be registering with hotkeys working via the on-screen keyboard, then this indicates a hardware issue with your keyboard. In such cases, we recommend you get in touch with your OEM support team and try to solve your issue. If however, you are unable to activate your hotkeys via the on-screen keyboard as well, then you can use the fixes below to try and solve your issue.
Method #10: Use Windows troubleshooter
If hotkeys still fail to work on your system then it’s time to run a dedicated Windows troubleshooter. Windows troubleshooters have become highly advanced in the past few years and they can help fix most issues with your system nowadays. Use the guide below to run a keyboard troubleshooter on Windows 11.
Press Windows + i on your keyboard and click on ‘Troubleshoot’ on your right.

Now click on ‘Other troubleshooters’.

Scroll down and click on ‘Run’ beside ‘Keyboard’.

Windows troubleshooter will now do its thing and try to find issues with your keyboard.

If any are found, follow the on-screen instructions to apply the relevant fixes. However, if the troubleshooter does not find anything then you can use the methods below to try and get your hotkeys working again.
Method #11: Run SFC scan
If hotkeys still aren’t working on your laptop then this might indicate an issue with your Windows installation. Let’s try to fix Windows system files and Windows 11 image on your laptop to try and fix hotkeys on your system. Use the guide below to get you started.
Press Windows + S on your keyboard and search for ‘CMD’. Click on ‘Run as administrator’ once it shows up in your search results.

Now type in the following command and press Enter on your keyboard to execute it.
sfc /scannow

Windows will now scan and verify all of your system files and replace corrupted ones with fresh system files. If a corrupted Windows 11 installation broke your hotkeys functionality, then this should help fix it on your laptop.
Method #12: Run DISM fixes to restore Windows image
If you got the following message after running the SFC scan above, then it is highly important to run the DISM commands to fix your Windows 11 image.
“Windows Resource Protection found corrupt files but was unable to fix some (or all) of them”
Additionally, if the SFC scan is completed successfully but your hotkeys still do not work, then you can use the DISM commands to try and fix your Windows image as well. This will restore system files and solve background conflicts that might be preventing you from using your hotkeys. Follow the steps below to get you started.
Press Windows + S on your keyboard, search for CMD and click on ‘Run as administrator’ once it shows up in your search results.

Type in the following command and press Enter on your keyboard to execute it.
DISM /Online /Cleanup-Image /RestoreHealth

Wait for the process to complete and restart your laptop for good measure.
If a corrupted Windows image was the cause of your issue, then hotkey functionality should now be restored on your laptop.
Method #13: Uninstall any third-party tools
If you have any third-party tools customizing your keyboard then we recommend you disable or uninstall them at once. This includes the likes of key mappers, macro customizers, keyboard backlighting customizers, keyboard layout changes, and more. Such apps use different ways to hook into your keyboard drivers via Windows and any one of these could be outdated and not compatible with Windows 11 on your system.
We recommend you uninstall any such tools from your system at the earliest and remove any additional leftover configuration files if available. You should also check for driver updates to your keyboard and roll back to a previously known driver to revert any major changes applicable to your system. Use the guide below to roll back your keyboard driver.
13.1 How to rollback your keyboard driver
Press Windows + X on your keyboard and click on ‘Device manager’.

Find the desired keyboard in your list of devices and right-click on it once found.

Select ‘Properties’.

Click and switch to the Driver tab.

Click on ‘Rollback driver’ if available.

Follow the on-screen instructions to finish rolling back your driver.
Restart your system if prompted.
Once the driver is reverted to its previous iteration hotkeys should start working on your system again.
However, if you don’t have the option to roll back your driver then you will need to uninstall the installed drivers for your keyboard and hope that Windows sources the correct drivers when it scans for new hardware on your system. If you have dedicated drivers available for your keyboard on your OEM support site, then you can install them manually. Follow Method #10 below to reinstall your keyboard drivers manually or through Windows in this case.
Method #14: Connect to a different USB port (external keyboards only)

If you are using an external keyboard then we recommend using a different USB port. Depending on your keyboard you might need a USB 2.0 or USB 3.0 port for compatibility and keyboard layout reasons. Additionally, if your keyboard uses fancy backlighting and other custom features then it likely requires a USB 3.0 port on your system to power all of its features.
In contrast, if you are trying to use a legacy keyboard via adapters then you will likely need to test USB 2.0 and USB 1.2 for best performance depending on your unit. Moreover, we recommend you ensure that your laptop is plugged into power so that it can power your USB ports properly.
If however, your external keyboard still fails to work then you can try reinstalling its drivers on your system using the guide in this post.
Method #15: Check GPO and re-enable hotkeys if disabled
If you are using Windows Pro or higher that has been issued by your organization or your educational institute then it is likely that hotkeys have been disabled on your system by your administrator. This could be a side effect due to a recent change, or it could be your new company policy.
Administrators tend to disable third-party apps on company-issued and education systems which also, in turn, disables hotkey functionality for most laptops. You can fix this issue by contacting your administrator and whitelisting your hotkey app in case you don’t have access to the Group Policy Editor. However,
If you are an administrator, with access to GPO, then you can use the guide below to re-enable hotkeys on your system.
Press Windows + R on your keyboard, type in the following term, and press Enter on your keyboard.
gpedit.msc

Navigate to the following path.
User Configuration > Administrative Templates > Windows Components > File Explorer
Double click on ‘Turn off Windows Key hotkeys’.

Click and select ‘Enabled’ in the top left. Then click ‘Apply’ in the bottom right and then click ‘OK’.

Restart your laptop for good measure and hotkey functionality will now be restored on your system. Please keep in mind that this will only work for OEMs that hook into Windows shortcuts natively to get hotkeys working again. For manufacturers that have dedicated utilities, you can use one of the guides below.
Fix hotkeys for Asus Users
If you are an Asus user with a ROG or a TUF unit, then it is likely that you are dealing with Armoury Crate. Armoury Crate is Asus’s utility that helps you manage your power plan, performance plan, overclocking, keyboard backlighting, and more depending on your laptop. Over the years Armoury Crate has grown to be quite finicky and has been riddled with telemetry and adware.
Moreover, the Aura Sync utility seems to be a hit or miss when syncing your peripherals’ backlighting with each other. If you have an Asus unit and hotkeys don’t seem to be working for you then it is likely that the Asus hotkeys app hasn’t been launching in the background. In this case, you can either try to manually start the app or reinstall AC service and the Asus System interface reconfigure your hotkeys and restore their functionality. Use one of the guides below that best fits your current needs and requirements.
Method #1: Try to manually start AsusHotkeyExec.exe
Press Ctrl + Shift + Esc on your system to open the Task Manager and switch to the ‘Details’ tab.

Depending on your preferences, the install location of AsusHotKeyExec.exe could vary. Hence we will use an already running process to find its install location. Start by right-clicking on either of the following ongoing tasks.

- AsusOptimization.exe
- AsusOptimizationStartupTask.exe
Select ‘Open file location’.

You should now be taken to the ‘C:\Windows\System32’ ideally, where you should find the ‘AsusHotkeyExec.exe’. Right-click on the app and select ‘Run as administrator’.

The app will now launch in the background and restore hotkey functionality on your system.
Try using one of your hotkeys now, if it seems to be working then, likely, AsusHotkeyExec.exe did not automatically launch in the background. This could be an isolated incident but if the app fails to launch even after a restart, then you will need to re-enable its auto start functionality.
You can do this by reinstalling Asus System Interface and Armoury Crate Service on your laptop using the guide below.
Method #2: Re-install Asus System Interface and Armoury Crate service
Asus System Control Interface is a prominent utility regularly updated by Asus that helps most tools like Armoury Crate, Armoury Crate Service, MyAsus System Diagnosis, and more to run properly on your system. Armoury Crate service on the other hand is your overclocking utility bundled with specific overclocking and power management configurations for your specific device. Depending on your ROG or TUF unit, AsusHotkeyExec.exe could be bundled with either of these services. Let’s re-install both of them on your system.
Visit the link above and click on ‘Laptops’.

Click on ‘Product Series’ and select your Series from the drop-down menu.

Click on the next drop-down menu and select your laptop from the list.

If your unit is not listed in this list, then you can search for it using the search bar at the top. Click on your laptop model once it shows up in your search results under ‘Products’.

Click on ‘Driver & Utility’.

Choose ‘Windows 10 64-bit’ as your OS.

Now scroll down to the ‘Software and Utility’ section and click on ‘Show all’.

Click on ‘Download’ beside the latest version of ASUS System Control Interface.

Similarly, click on ‘Download’ beside Armoury Crate Service.

Note: Asus has now started bundling the Armoury Crate app, Armoury Crate Service, Aura Sync app, and Aura Sync service in a single package for many laptops. If this is the case for your unit as well, then you can download this package.
Now let’s remove all installed services and packages that we are going to reinstall. Press Windows + i on your keyboard and click on ‘Apps’ on your left.

Click on ‘Apps and features’.

Now uninstall the following applications if you managed to source the Armoury Crate Service package from the download page.

- Armoury Crate Service
- Armoury Crate Service core
However, if you got a single package to install Armoury Crate, Armoury Crate Service, Aura Sync app, and Aura Sync service, then uninstall the following applications from your laptop.
- Armoury Crate
- Armoury Crate Service
- Armoury Crate Service core
- Aura Sync add-on x32
- Aura Sync add-on x64
- Game Visual or Asus Splendid
- Aura Sync
To uninstall an app, click on the 3-dot menu beside it and select ‘Uninstall’. Click on ‘Uninstall’ again to confirm your choice. Repeat the steps above to uninstall all the necessary apps from your system.
Note: Do not remove services like Refresh Rate service, Pointing device service, and more from your laptop during this process. Even though they hook into the Armoury crate, there is no need to uninstall them as the existing installation will work with your reinstalled Armoury Crate and its services.
We will now uninstall Asus System Control Interface from your system. The best way to do this is by using the Device Manager. Follow the guide below to get you started.
Press Windows + X on your keyboard instead and select ‘Device Manager’.

Click and expand ‘System devices’ in Device Manager.
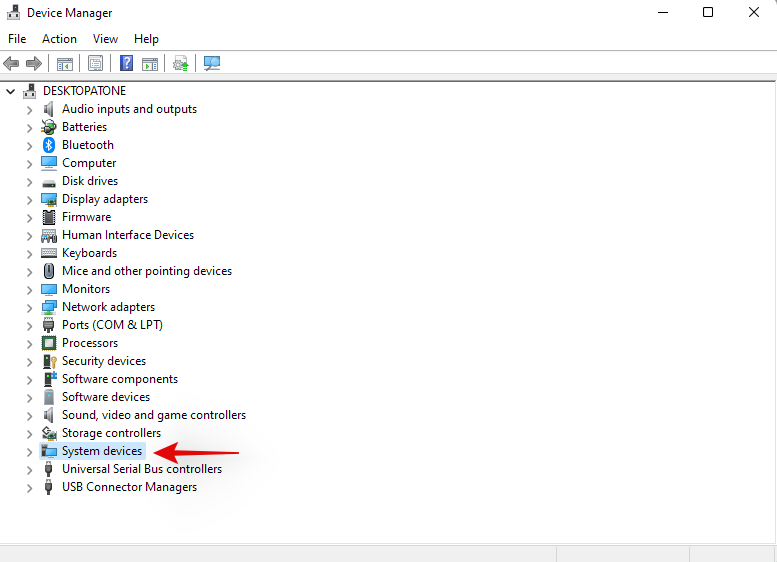
Right-click on ‘Asus System Control Interface’ and select ‘Uninstall device’.

Click on ‘Uninstall’ to confirm your choice. Additionally, check the box for ‘Attempt to remove the driver for this device’ if available.

If Asus System Control Interface is unavailable in your device manager then you can restart your laptop at this point. Once restarted, follow the subsequent steps to re-install Armoury Crate and Asus System Control Interface on your system. The concerned drivers will now be uninstalled from your system. You can now restart your laptop for the changes to take effect.
Once your laptop restarts, navigate to the packages we downloaded from Asus’s website on your local storage and start by installing Asus System Control Interface first. Double-click and launch the .exe file and follow the on-screen instructions to install Asus System Control Interface on your laptop. You will be prompted to restart your system once the process completes. We recommend you restart your system at this point before proceeding with the installation of Armoury Crate on your system.
Once your system restarts, double click and launch the Armoury Crate package.
Select the utilities you wish to install on your system. Unless you have other Asus peripherals that support RGB backlighting through Aura Sync, there is no point in installing Aura Sync. Once you have selected the desired utilities, click on ‘Next’.
Click on ‘Install’ to start the installation process.
The package will now connect to Asus’s servers, identify your laptop and install the necessary compatible utilities. Once installed, we recommend you restart your system for good measure.
And that’s it! Once your system restarts, hotkeys should be back up and running again on your system.
Fix hotkeys for Lenovo users
If you own a Lenovo unit especially from the ThinkPad or IdeaPad series, then you will need to try out the following fixes. Lenovo’s professional lineup of laptops is bundled with tons of hotkeys and there are mainly 3 fixes you can try to fix your issue. Let’s first verify if your hotkeys have actually stopped working. Follow the steps below to get you started.
Method #1: Disable all shortcuts and enhancements
Let’s start by disabling all keyboard shortcuts and keyboard enhancements within Windows for your laptop’s keyboard. Follow the guide below to get you started.
Press Windows + S on your keyboard and search for ‘Control Panel’. Click and launch the app from your search results.

Click on the drop-down menu in the top right corner and select ‘Large icons’.

Click on ‘Ease of access center’.

Click on ‘Make the keyboard easier to use’.

Uncheck all the options available on your screen.

Save your changes and restart your laptop for good measure.

If keyboard enhancements enabled by Windows were causing conflicts with your hotkeys, then your hotkey functionality should be restored on your laptop by now.
Method #2: Update your drivers using Lenovo support
You might have manually updated your drivers, you might have reinstalled and rolled back your drivers, but this isn’t similar to downloading and installing drivers through the support app. Most OEM support apps are designed to automatically scan for known issues with your hardware in the background and fix them automatically. These support app also come with hotfixes and patches that aren’t readily available to the end consumer. These hotfixes and patches are applied when downloading and installing the concerned driver or utility,
Hence we recommend that you download and reinstall the following drivers on your system through the Lenovo support app. Depending on your unit’s make and model, you could be using a different Lenovo app like Lenovo Vantage and more. The process is similar for all these apps and you simply need to manually uninstall your keyboard drivers first and then reinstall the corresponding ones from your support app.
Note: We won’t be removing your power management drivers and instead we will be simply reinstalling them. Removing power management drivers can end up harming your vital components especially if your laptop is doing some resource-heavy work in the background.
Press Windows + X and select ‘Device Manager’.

Find your keyboard under ‘Keyboards’ and right-click on it.

Select ‘Uninstall device’.

Check the box for ‘Attempt to remove the driver for this device’ if available. Click on ‘Uninstall’.

Your keyboard driver will now be uninstalled. Open the Lenovo System Update, Lenovo Vantage, or the corresponding Lenovo support app depending on your current laptop. We will be using the Lenovo System update app for this guide as that will be used by most modern systems currently and in the future. If you do not have the app installed on your unit, then you can use the link below to download it to your laptop.
Download and install the app on your system using the link above. Once installed, launch the app and log in with your device and account details if prompted.
Click on ‘Get new updates’ on your left.
Lenovo System update app will now detect your configuration and look for compatible upgrades accordingly. Once the process completes, all available updates will be shown on your screen according to their priority. Check each of the following sections and check the boxes for the updates you wish to install on your laptop. Your keyboard driver will also show up in this list as it is currently missing from your system. Ensure that you check the box for your keyboard driver before moving to the next step.
- Critical Updates
- Recommended Updates
- Optional Updates
Note: Do not check the boxes for your bios updates. We recommend you download and install bios updates, individually and separately so that your laptop does not face installation conflicts in the background during this process.
Click on ‘Download’ in the bottom right corner.
Lenovo system update will now download and install all the selected drivers on your system. Your laptop could automatically restart a few times during this process which is normal. Simply log back into your account and wait until the installation process has been completed.
Once all the drivers are installed on your system, try using your keyboard hotkeys again. In most cases for Lenovo devices, your hotkeys should be back up and running on your system again. Lenovo is known to apply certain patches in the background when installing hotkey drivers and create certain tasks to maintain the functionality of your hotkeys. A reinstallation should have reinitiated this process again which should have fixed your hotkeys.
Fix hotkeys for Acer users
If you are using an Acer system then there isn’t much you can do at this point. Acer is known to keep its hotkeys simple with minimal customization available to the end-user. This in turn means that if the above-stated general fixes did not work for you then it is unlikely that resetting the CMOS will. However, if you have overclocked your unit or have been messing around with voltage values, then you can try resetting your CMOS to get hotkeys back up and running on your system again.
Resetting the CMOS does a lot of things but it mainly helps reset changes to core system values like your voltage, frequency speed, and more. Resetting the CMOS also helps discharge capacitors on some laptops which can give you a sudo-fresh start which is known to solve many persistent errors and issues with systems in the past. Use this comprehensive guide by us to reset your CMOS on your Acer unit.
Check out: How to Reset BIOS in Windows 11
Facing error codes when restarting HID services? Try these fixes!

If you decided to restart your HID service using the guide at the top, then you could end up facing two common errors depending on how your system has been configured. These are known errors and can be fixed on your system using the guides below. Follow the steps to get you started.
Method #1: For error code 126
Error code 126 can be fixed by replacing the Hidserv.dll to your system 32 folder. Follow the guide below to get you started.
Note: You will need a Windows 11 installation media or ISO in case the .dll file is unavailable on your system. Make sure you have either of these handy before proceeding with the guide below. In case you do not have an installation media handy, then you can use the link below to download Hidserv.dll to your local storage.
Open the Windows installation media you have handy and search for Hidserv.dll using the search box in your top right corner.
Once found, copy the file to a convenient location on your local storage. If however, you downloaded the file to your local storage using the link above, then extract the archive to a convenient location and follow the steps below to edit its security permissions.

Right-click on the downloaded Hidserv.dll and select ‘Properties’.

We will now need to manually grant permissions to the necessary users and applications so that Hidserv.dll can work properly on your system. Switch to the Security tab at the top.

Click on ‘Edit’ at the top.

Click on ‘System’ at the top and check the box for ‘Write’

Click on ‘Apply’ once done. Select ‘Yes’ to confirm your choice. Repeat the steps above and restrict permissions for Administrators and other users in the list above. Once you are done, click on ‘Add’.

Now enter the following term and press Enter on your keyboard.
All Application Packages

Select the following permissions for ‘ALL APPLICATION PACKAGES’.

Similarly, click on ‘Add’ again.

Now enter the following term and click on ‘Ok’.
NT Service\TrustedInstaller

Check the boxes for the same permissions as we did for the application packages above.

We now need to add permissions for restricted UMP packages on your system. There is no way to do this using the Windows File Explorer, so we will be using a PowerShell script instead. Press Windows + S on your keyboard and search for PowerShell. Click on ‘Run as administrator’ once it shows up in your search results.

Once PowerShell launches, copy and paste the code below in your PowerShell window. Do not execute the commands just yet.

$user = [Security.Principal.NTAccount]::new("ALL RESTRICTED APPLICATION PACKAGES").Translate([System.Security.Principal.SecurityIdentifier])
$rule = [Security.AccessControl.FileSystemAccessRule]::new($user, "ReadAndExecute", "Allow")
$directory = PATH
$acl = Get-Acl $directory
$acl.SetAccessRule($rule)
Set-Acl -Path $directory -AclObject $acl
Now navigate to the Hidserv.dll file that we just edited the permissions for and right-click on it. Select ‘Copy as path’.

Go back to your PowerShell window and replace “PATH” with the path we just copied.

Once replaced, hit Enter on your keyboard to execute the command. Once completed, the new permissions for restricted application packages should now be added to your new Hidserv.dll file.

Note: If you are typing in the path manually then you will need to include in double-quotes as shown in the final screenshot. Pasting a copied path using the method above will automatically add double quotes to it.
It’s now time to replace or add the file to your boot directory. Navigate to the Hidserv.dll file we just created and copy it to your clipboard.

Press Windows + E on your keyboard and navigate to the following path.
C:\Windows\System32

Paste your file in this location. Click on ‘Replace the file in the destination’.

Click on ‘Yes’ to grant the necessary administrator permissions. Once the file is replaced, restart your system for good measure. You can now check your HID services in the Services app to see if it is back up and running again. If not, you can try starting it manually, and you should no longer be facing Error code 126 on your system.
Method #2: For Error code 2
If you are getting Error code 2 after trying to restart the HID service then there could be a couple of reasons why you are facing this error. The main reason is due to unwanted registry changes for the HID service. This could have happened due to recently applied manual hacks or registry cleaners used by you. We will need to check for these changes and revert them if any have been made on your system. Follow the guide below to get you started.
Press Windows + R on your keyboard, type in the following term, and hit Enter on your keyboard.
regedit

Navigate to the following registry key. You can also copy-paste the same in the address bar at the top of your screen.
Computer\HKEY_LOCAL_MACHINE\SYSTEM\ControlSet001\Services\hidserv
Double click on the ‘Type’ value on your right.

Set the value to ’20’ if it is something different and click on ‘Ok’.

Now click on ‘Parameters’ under Hidserv on your left.

Double click on ServiceDll on your right.
Enter the following path in its Value data field. Even if the same path exists, copy-paste the one below just to be sure. Ensure that there are no spaces at the starting or end of the path below.
%SystemRoot%\System32\hidserv.dll

Once done, repeat the steps above for the following registry locations given below.
- Computer\HKEY_LOCAL_MACHINE\SYSTEM\CurrentControlSet\Services\hidserv
Additionally, if folders named ControlSet002 or more exist in the location below, then we recommend repeating the steps above for the Hidserv folder in those locations as well.
- Computer\HKEY_LOCAL_MACHINE\SYSTEM\
Once you have made these changes, restart your system, and HID service should be automatically working on your laptop again. If not, launch the service manually and you should no longer face Error code 2 on your laptop.
Laptop hotkeys can be quite finicky and we hope you were able to get the back up and running again on your system using the guides above. If you face any issues or have any questions for us, feel free to reach out using the comments section below.
Related:






![Cum să dezactivați notificările pe echipele Microsoft [AIO] Cum să dezactivați notificările pe echipele Microsoft [AIO]](https://cloudo3.com/resources8/images31/image-2249-0105182830838.png)


