تعد مساحة التخزين أحد المكونات الأساسية لنظامك ، وسواء أحببت ذلك أم لا ، فمن المرجح أن تنفد منها في المستقبل. طريقة جيدة لتحرير مساحة التخزين الخاصة بك عن طريق إدارة أكبر الملفات الخاصة بك. يمكنك نقلها إلى محرك أقراص مختلف أو تخزين سحابي أو حتى حذفها إذا لم تعد هناك حاجة إليها.
في بعض الحالات ، يمكنك حتى ضغط ملفاتك إذا كنت لا ترغب في استخدامها في أي وقت قريبًا. لكن كيف تجد الملفات الكبيرة؟ يمكن أن يكون تصفح كل مجلد يدويًا أمرًا شاقًا واستخدام المنظف ليس فعالًا بما فيه الكفاية. لحسن الحظ ، هناك بعض الطرق الرائعة للعثور على الملفات الكبيرة على نظامك في Windows 11. استخدم الأدلة أدناه لتبدأ.
محتويات
البحث عن الملفات الكبيرة في Windows 11: تلميحات
يمكن فرز الملفات الكبيرة بناءً على النوع والنوع والتاريخ وغير ذلك. أفضل طريقة للقيام بذلك هي استخدام Windows Search في مستكشف الملفات. يمكنك استخدام مصطلحات مخصصة لتحديد الملفات التي تبحث عنها وتصفيتها بناءً على حجمها. يمكنك بعد ذلك استخدام خيارات فرز مستكشف الملفات للعثور على أكبرها في نتائج البحث.
وبالتالي ، إذا كان هذا لا يتناسب مع المعايير الخاصة بك أو لم تتمكن من العثور على الملفات التي تبحث عنها ، فيمكنك استخدام إحدى الطرق الأخرى المدرجة في هذا الدليل.
ذات صلة: كيفية تغيير لون شريط المهام على نظام التشغيل Windows 11
الطريقة رقم 01: استخدام البحث في المستكشف (موصى به)
سنبحث الآن عن الملفات الكبيرة بناءً على المعايير الخاصة بك.
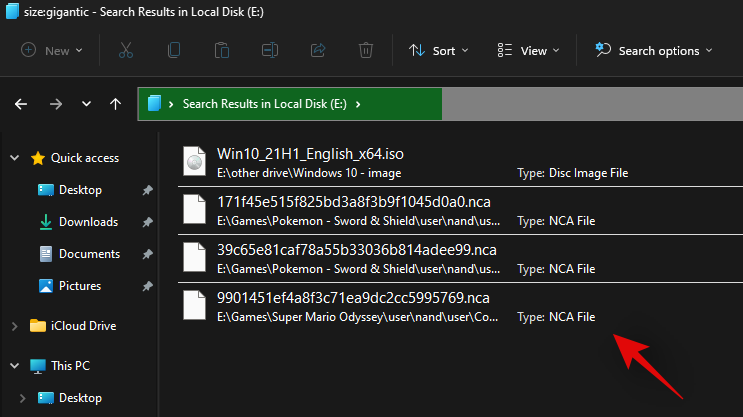
اضغط Windows + Eعلى لوحة المفاتيح لفتح مستكشف الملفات وانقر على مربع البحث في الزاوية اليمنى العليا. ابحث عن المصطلح التالي.
size:gigantic
سيتم الآن تصفية النتائج وسيتم الآن عرض الملفات الأكبر من 4 جيجابايت على شاشتك. حدد الملفات غير الضرورية التي لا تحتاجها على جهاز الكمبيوتر الخاص بك وقم ببساطة بحذفها لتحرير بعض المساحة. إذا كنت ترغب في استخدام حجم ملف أصغر ، فاستبدل كلمة "عملاق" بأحد المصطلحات أدناه حسب الحجم الذي تفضله.
- كبير: الملفات بين 128 ميجابايت و 1 جيجابايت
- ضخم: ملفات بين 1 غيغابايت إلى 4 غيغابايت
- متوسط: الملفات بين 1 ميجابايت إلى 128 ميجابايت
وهذا كل شيء! يمكنك استخدام Windows Search بهذه الطريقة لتصفية الملفات حسب حجمها والعثور على أكبر الملفات الموجودة حاليًا على جهاز الكمبيوتر الخاص بك.
ملاحظة: في حالة فهرسة جهاز الكمبيوتر الخاص بك وعرض ملفات النظام أيضًا ، فإننا نوصيك بمراجعة الملفات مرتين قبل حذفها لتجنب حذف أي ملفات نظام حيوية من نظامك.
ستجد الآن ملفات كبيرة على جهاز الكمبيوتر الخاص بك باستخدام Windows Search.
1.1 ماذا لو لم ينجح البحث بالنسبة لك: نصائح للمحاولة
إذا كانت كتابة "size: gigantic" لا تعمل من أجلك ، فستحتاج إلى التبديل إلى مستكشف الملفات القديم من Windows 10. استخدم الدليل أدناه لتبدأ.
بمجرد العودة إلى مستكشف الملفات القديم ، استخدم الدليل أعلاه للبحث عن الملفات الكبيرة. بمجرد العثور عليه ، استخدم الدليل التالي أدناه لإعادة مستكشف ملفات Windows 11 الجديد إلى نظامك.
1.1.1 قم بالتبديل إلى مستكشف الملفات القديم
اضغط Windows + Sعلى لوحة المفاتيح وابحث عن "Regedit". انقر فوق التطبيق وقم بتشغيله من نتائج البحث.
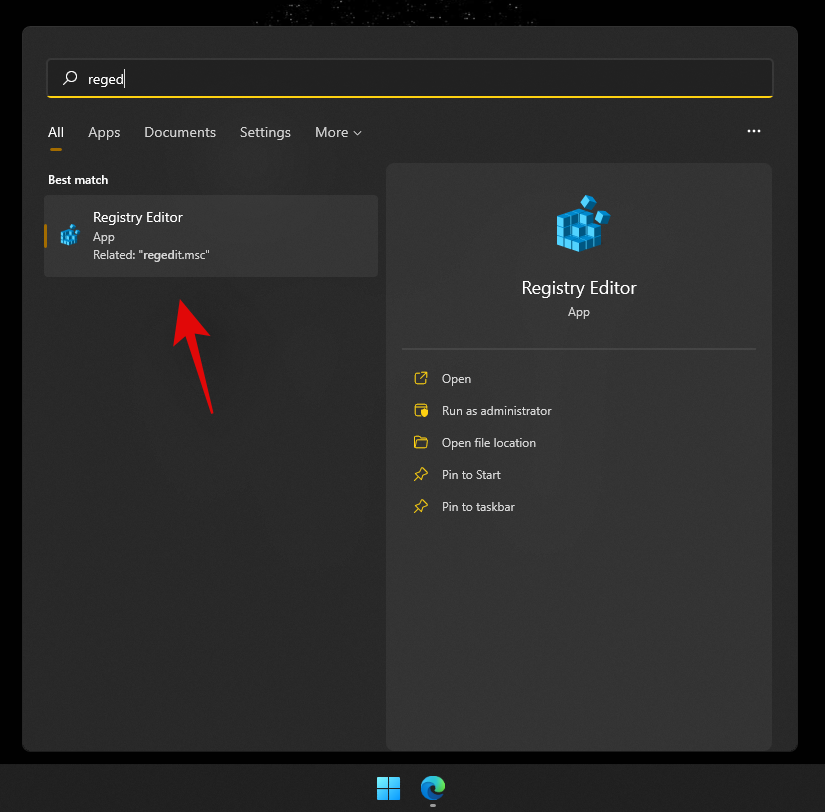
انتقل إلى الدليل التالي أو انسخ والصق العنوان أدناه في شريط العناوين.
HKEY_LOCAL_MACHINE\SOFTWARE\Microsoft\Windows\CurrentVersion\Shell Extensions
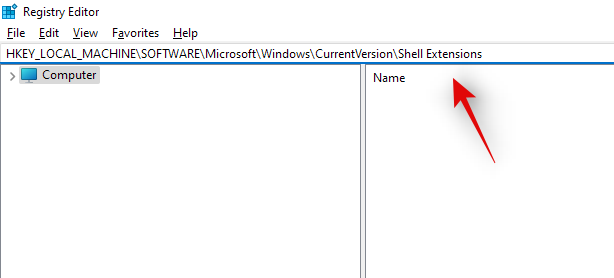
انقر فوق المجلد المسمى "محظور".
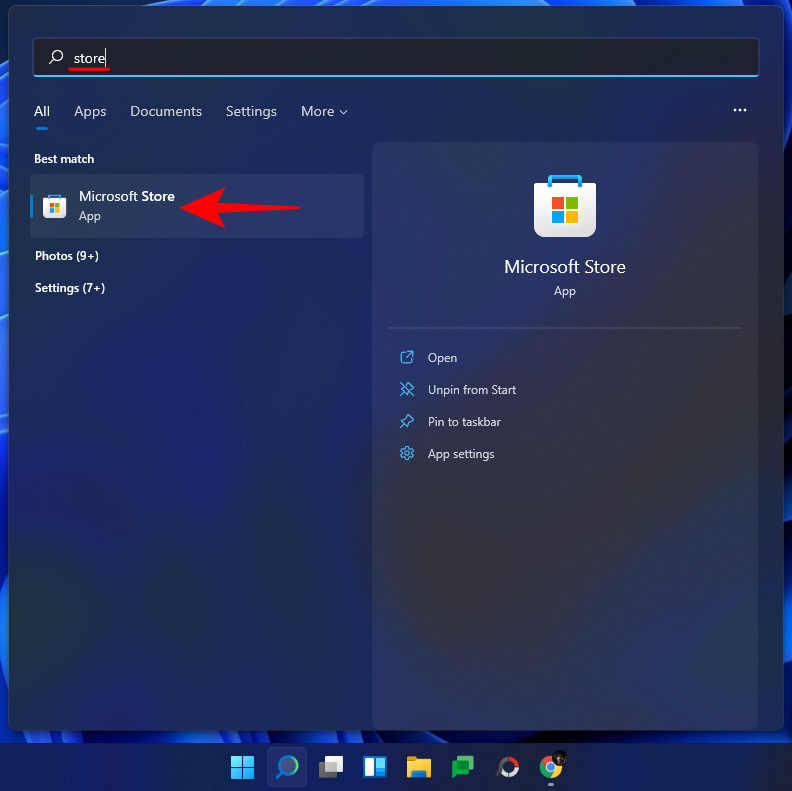
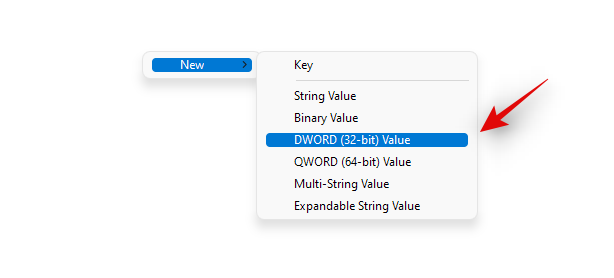
انقر بزر الماوس الأيمن فوق منطقة فارغة على يمينك ، وحدد "جديد" ، ثم انقر فوق "قيمة DWORD (32 بت)".
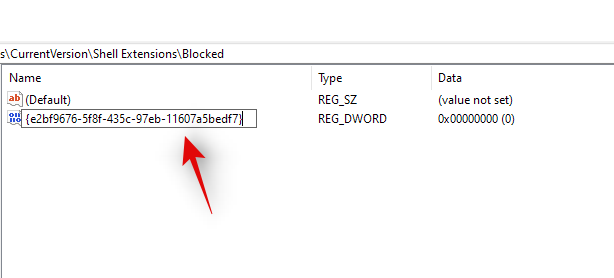
أدخل الاسم التالي واضغط على Enter بلوحة المفاتيح. نوصيك بنسخ ولصق نفس الشيء لتجنب أي أخطاء في التسمية.
{e2bf9676-5f8f-435c-97eb-11607a5bedf7}
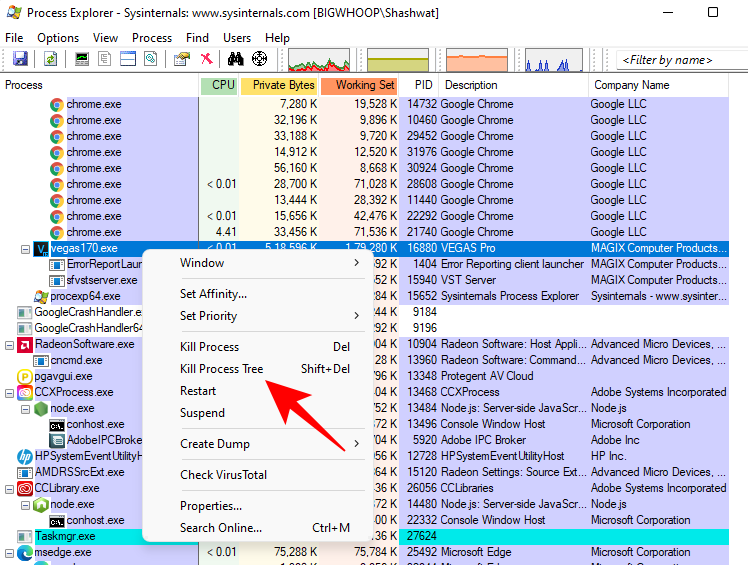
أغلق محرر التسجيل واضغط على Ctrl + Shift + Esc لفتح إدارة المهام. قم بالتبديل إلى علامة التبويب "التفاصيل".
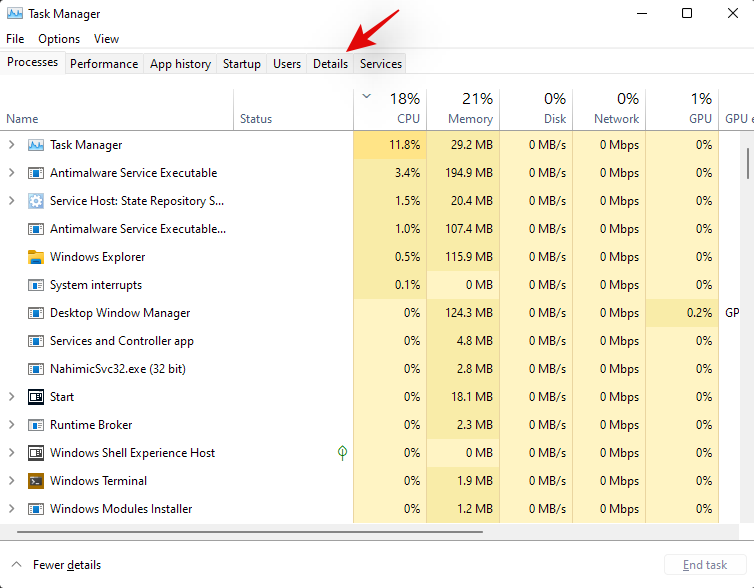
انقر فوق "Explorer.exe" واضغط على Del على لوحة المفاتيح.
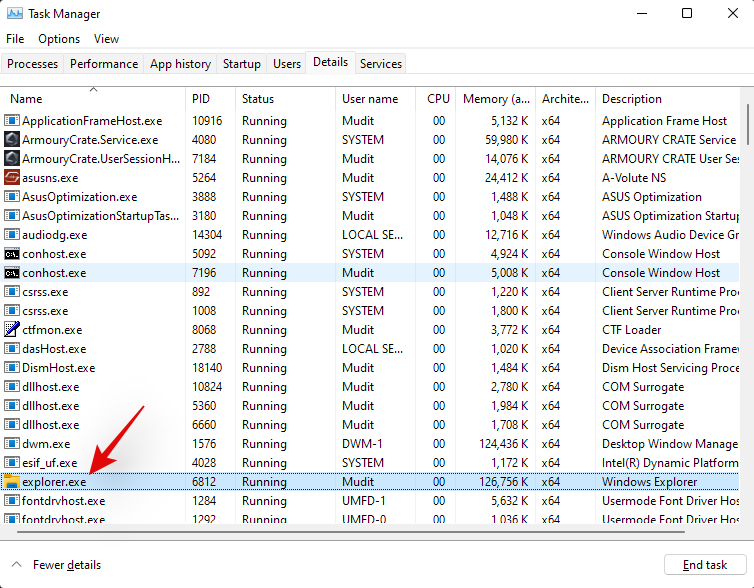
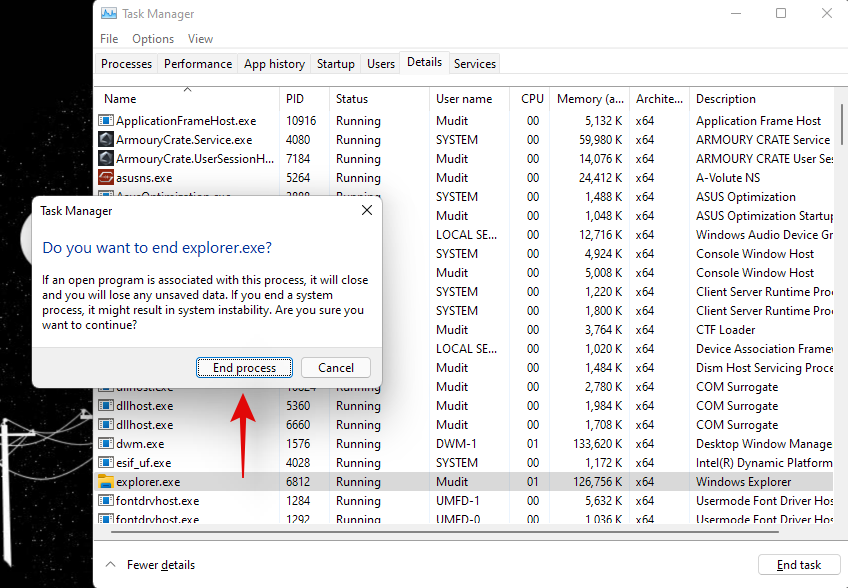
انقر فوق "إنهاء العملية" لتأكيد اختيارك.
انقر فوق "ملف" وحدد "تشغيل مهمة جديدة".
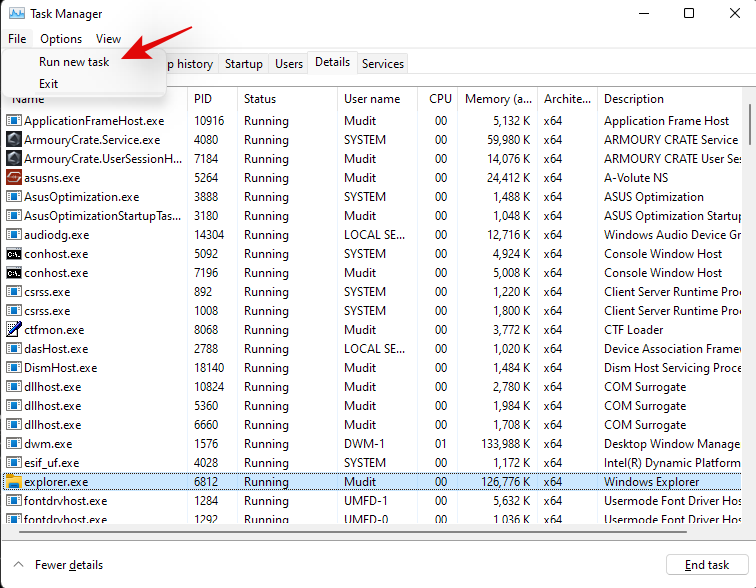
أدخل ما يلي في مربع النص وانقر على "موافق".
explorer.exe
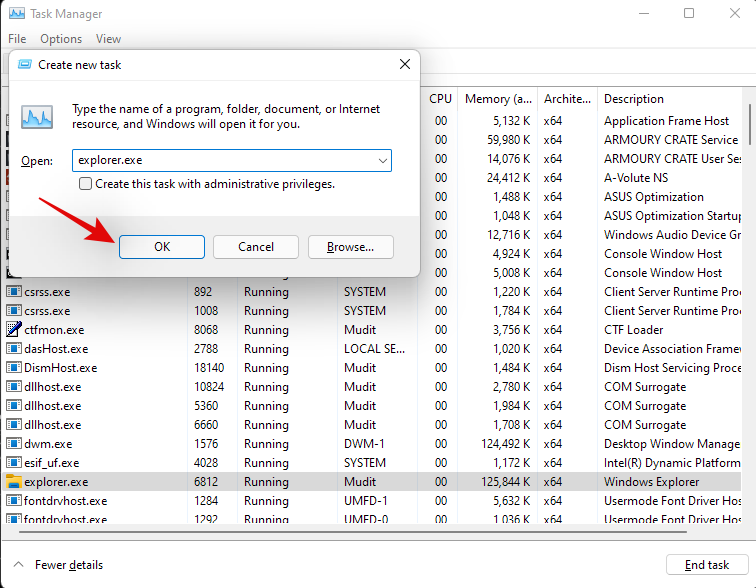
سيتم الآن إعادة تشغيل Windows File Explorer على نظامك ويجب إعادته إلى Windows 10 File Explorer. يمكنك فتح مجلد عشوائي للتحقق من ذلك. تأكد من عودتك إلى مستكشف الملفات القديم واستخدم الدليل أعلاه للعثور على الملفات الكبيرة على نظامك.
1.1.2 العودة إلى مستكشف الملفات الجديد
يمكننا الآن العودة إلى مستكشف الملفات القديم. اتبع الدليل أدناه لتبدأ.
اضغط Windows + Sعلى لوحة المفاتيح وابحث عن Regedit. انقر فوق التطبيق وقم بتشغيله بمجرد ظهوره في نتائج البحث.

انتقل إلى المسار التالي أدناه أو انسخه والصقه في شريط العنوان.
HKEY_LOCAL_MACHINE\SOFTWARE\Microsoft\Windows\CurrentVersion\Shell Extensions

ما عليك سوى النقر فوق قيمة DWORD (32 بت) التي أنشأناها مسبقًا واضغط على Del على لوحة المفاتيح. انقر فوق "نعم" لتأكيد اختيارك.

اضغط على Ctrl + Shift + Esc في لوحة المفاتيح وانتقل إلى علامة التبويب "التفاصيل".

انقر على "explorer.exe" واضغط على Del على لوحة المفاتيح.

انقر فوق "إنهاء العملية".

انقر فوق "ملف" وحدد "تشغيل مهمة جديدة".

اكتب "explorer.exe" واضغط على Enter بلوحة المفاتيح.

يمكنك إغلاق مدير المهام ومحرر التسجيل على جهاز الكمبيوتر الخاص بك الآن.
وهذا كل شيء! ستعود الآن إلى File Explorer الجديد على Windows 11. بصرف النظر عن معلمة الحجم ، يمكنك أيضًا استخدام الأوامر أدناه للبحث في ملفات مختلفة على جهاز الكمبيوتر الخاص بك وفرزها حسب الحجم. بهذه الطريقة يمكنك العثور على أكبرها في نظامك.
1.2 البحث عن طريق أنواع الملفات
على غرار الأمر أعلاه ، يمكنك استخدام المعلمة "kind:" للعثور على ملفات معينة في الدليل الحالي. ستسمح لك المعلمة "kind" بالبحث عن ملفات التقويم والمستندات النصية والصور وألعاب الفيديو والمزيد.
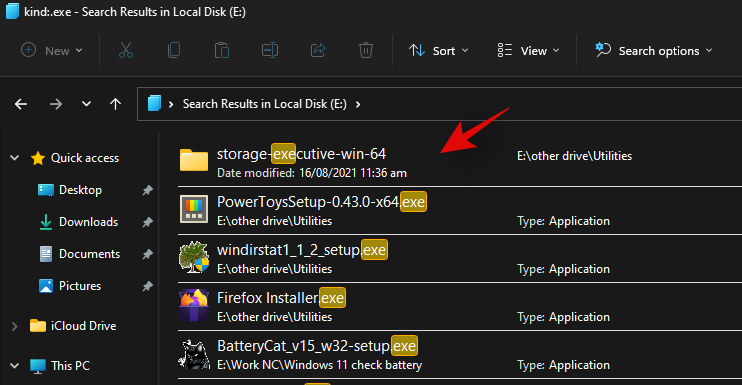
عند استخدام معلمة النوع بهذه الطريقة ، فأنت لست مقيدًا بفئات Windows المحددة مسبقًا ، بدلاً من ذلك يمكنك تحديد امتدادات ملفات معينة للعثور عليها على جهاز الكمبيوتر الخاص بك كما هو موضح أدناه.
kind:.exe
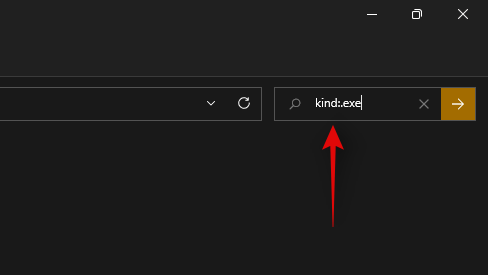
سيساعدك الأمر أعلاه في البحث عن الملفات التنفيذية في الدليل الحالي.
وبالمثل ، فإن استخدام الأمر أدناه سيساعدك في العثور على ملفات PDF في الدليل المحدد.
kind:.pdf
وهذا كل شيء! يمكنك استخدام هذه الأوامر للعثور على ملفات معينة على جهاز الكمبيوتر الخاص بك باستخدام Windows Search.
1.3 البحث عن الملفات حسب التاريخ
يمكنك أيضًا استخدام المعلمة "date:" للبحث عن الملفات التي تم إنشاؤها في تاريخ معين. بالإضافة إلى ذلك ، يمكن استخدام هذا الأمر مع عوامل التصفية المنطقية أدناه للعثور على الملفات التي تم إنشاؤها أو تعديلها قبل أو بعد تاريخ معين على جهاز الكمبيوتر الخاص بك. على سبيل المثال ، إذا كنت تبحث عن ملف تم إنشاؤه في الأول من يناير 2020 ، فيمكنك استخدام الأمر التالي أدناه.
date: 1/1/2020
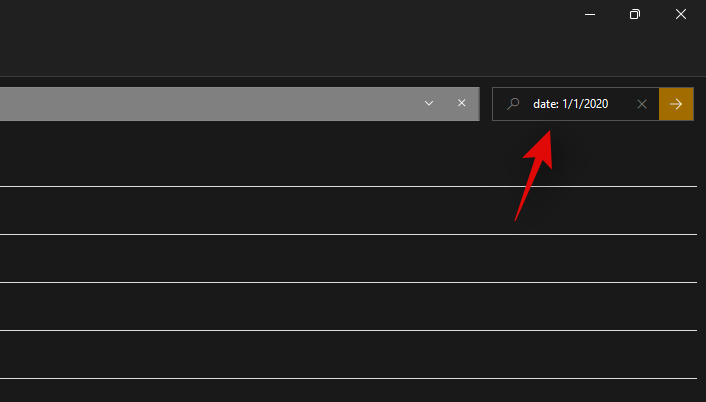
وبالمثل ، إذا كنت تبحث عن ملف تم إنشاؤه في الأول من يناير 2021 ، فيمكنك استخدام الأمر التالي.
date: 1/1/2021
1.4 استخدام المرشحات المنطقية
يمكن أن تساعدك عوامل التصفية المنطقية في البحث عن مصطلحات متعددة في وقت واحد أو مع بعضها البعض. استخدم المرشحات أدناه التي تناسب متطلباتك الحالية بشكل أفضل.
1.4.1 معلمة "AND"
You can use the AND parameter to search for two search terms together. This way you can look for a file containing both the terms and not either one of them which should help you filter out unwanted results containing either of the terms.
For example, if looking for a file containing the words ‘Samsung and ‘galaxy’ in its name then I can use the following term to search for your file.
Samsung AND galaxy
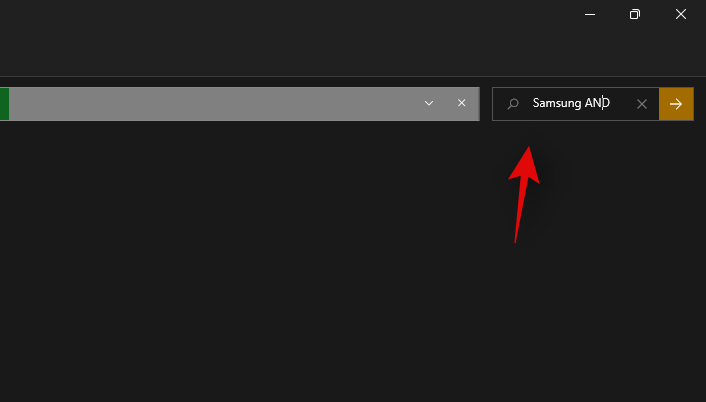
This will filter out files with only ‘Samsung’ and ‘Galaxy’ in their name. Files with either term will be filtered out.
The ‘OR’ parameter
The OR parameter is opposite to the AND parameter and allows you to search for files containing either of the terms in your search term. For example, if I wish to search for files with either ‘Apple’ or ‘Airpods’ in their name, then I can use the following search term.
apple OR airpods
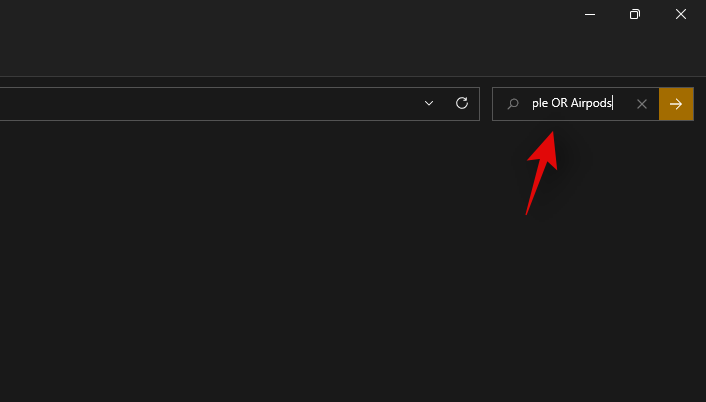
Similarly, if I am looking for PDF and EXE files in a particular directory, then I can use the following command below.
kind:.exe OR .pdf
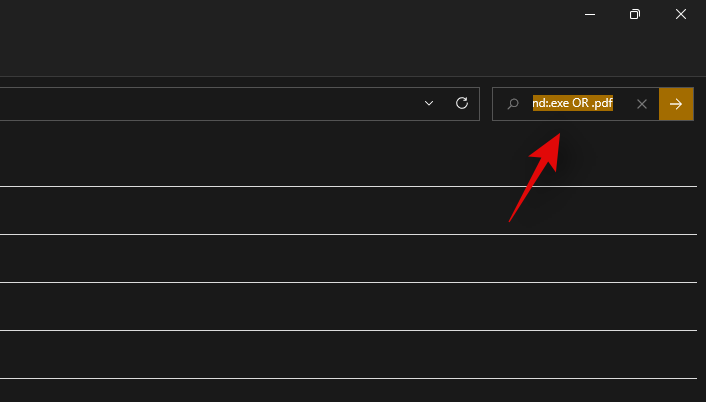
And that’s how you can use the OR parameter to look for multiple search terms in a single file name.
1.4.2 The ‘NOT’ parameter
If you are looking to filter out a certain search term or a filet type then you can use the NOT parameter. The NOT parameter will exclude the desired file type, kind, size, or name depending on your choice.
For example, if in a folder full of .docx files you are looking for other file types and wish to filter them all out, then you can use the following command.
kind: NOT .docx
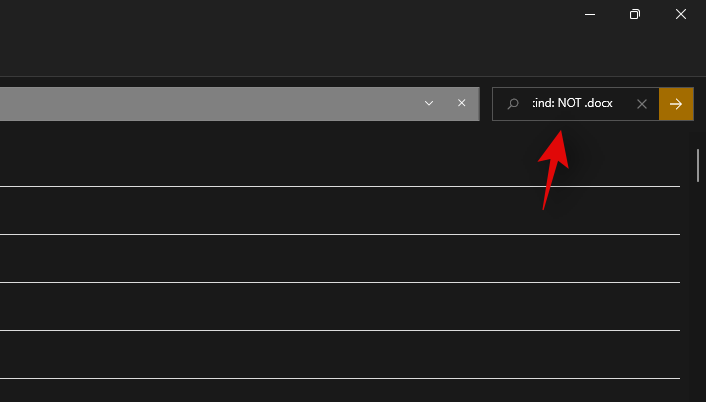
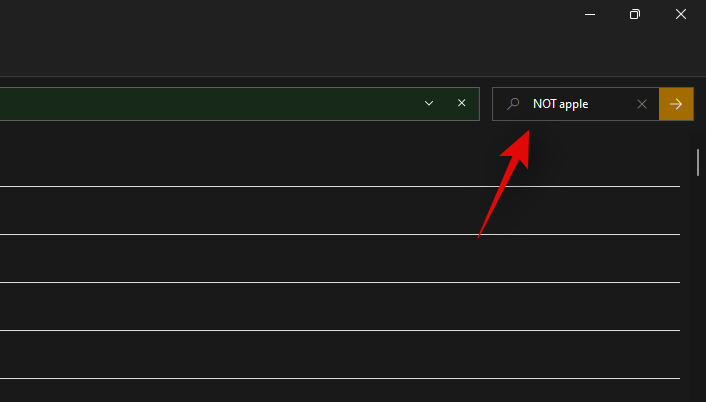
Similarly, if I am looking for a file that does not have ‘Apple” in its name then I can use the following search term.
NOT apple
1.4.3 Parentheses
Parentheses is a Boolean filter that is usually used when you are searching file contents as well. Anything included between the parentheses () is searched for and files with either or all of the terms are displayed on your screen.
For example, if looking for a file containing either ‘Apple, Samsung, Mi, Microsoft, and Dell’ or all of these terms, then you can use the following term.
(Apple Samsung Mi Microsoft Dell)
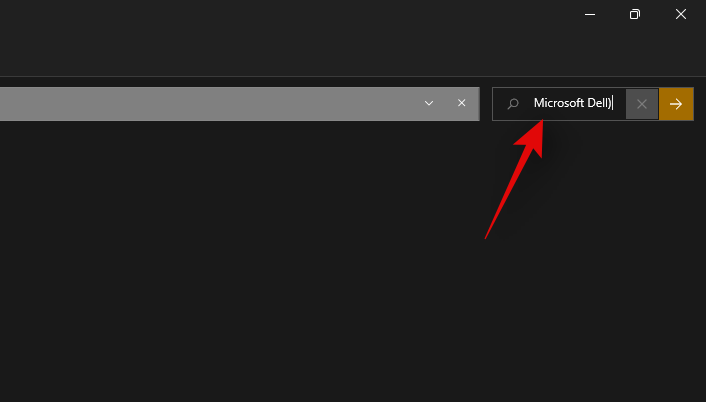
Similarly, you can use the following command if looking for multiple file types.
kind:(.exe .pdf .txt)
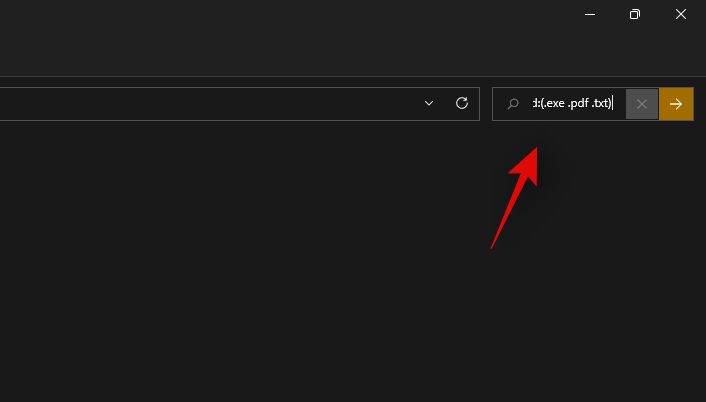
And that’s it! You will now have used parentheses to your advantage to look for multiple search terms in a particular file.
1.4.4 ‘>’ and ‘<‘>
These two Boolean filters are usually used when looking for file types or when sorting your results based on a parameter.
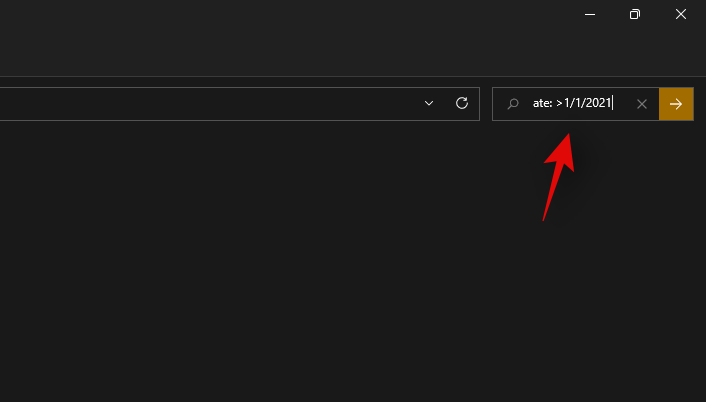
The greater than and less than parameters can be used to filter your results based on a number. For example, if looking for files dated after 1st January 2021 then you can use the following command.
date: >1/1/2021
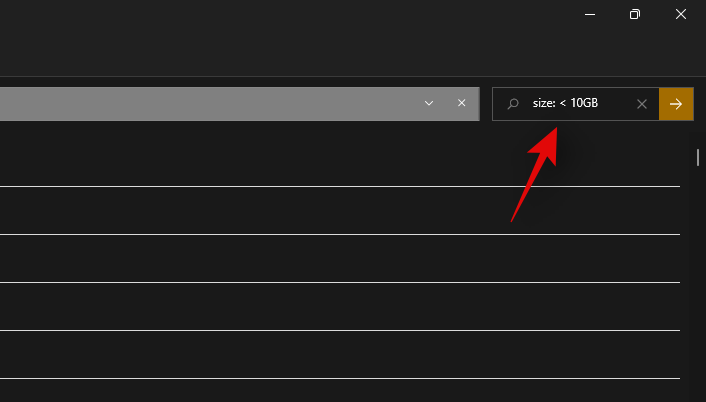
Similarly, if looking for files less than 10GB then you can use the following command.
size: <>
You can use the greater than and less than parameters to your advantage this way and find the desired files on your system.
Advanced methods to find large files on Windows
Some other ways in which you can find large files on your system have been listed below. Follow the guides to get you started.
Method #02: Using CMD
CMD can also help you find large files on your system. Use the guide below to get you started.
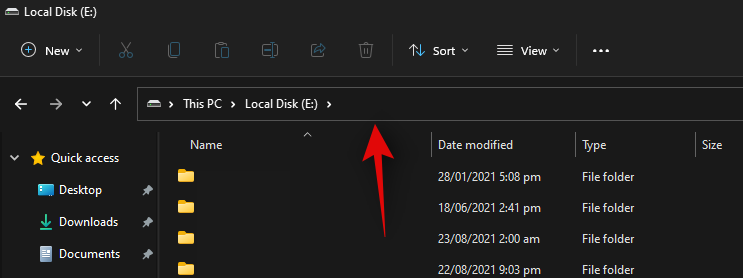
Press Windows + E on your keyboard and navigate to a location where you wish to search for large files and click on the address bar at the top.
Type in CMD and press Enter on your keyboard.
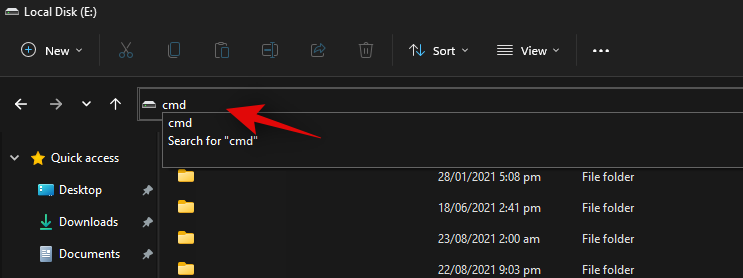
CMD will now be launched in the particular folder. Type in the following command and replace ‘PATH’ with the path we copied to your clipboard.
forfiles /S /M * /C “cmd /c if @fsize GEQ 1073741824 echo @path > largefiles.txt
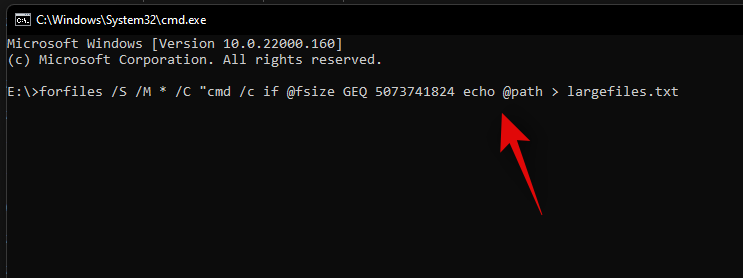
The above command will look for files larger than 1GB on your PC. If you wish to define a larger minimum size, then replace ‘1073741824’ with one of the following options below.
- 2GB: 2147483648
- 5GB: 5368709120
- 10GB: 10737418240
Execute the command with your desired variables and a text file will be created in the same location with a list of all the large files found on your system based on your criteria. You will also find the path for each file on your local storage in the text file.
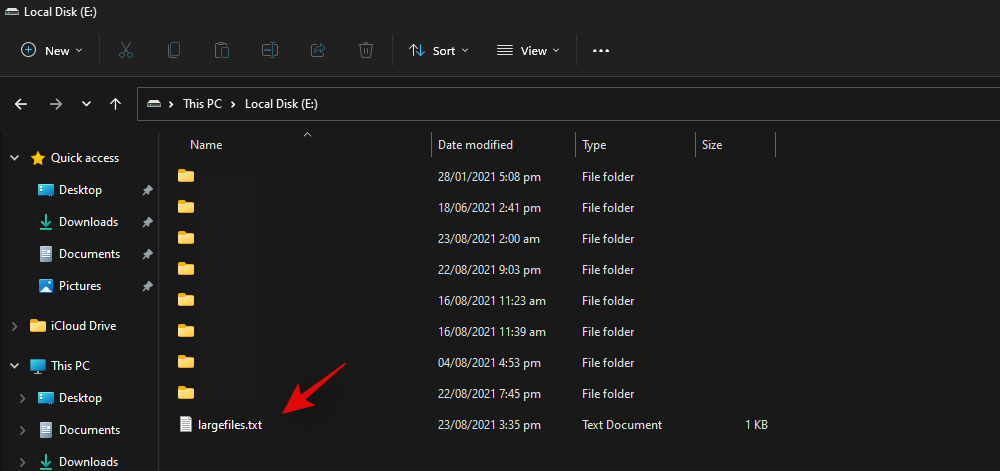
You can use this list to identify the largest files in the current location and then delete them at your discretion to free up some disk space on your system.
Method #03: Using PowerShell
You can also find large files on your system using PowerShell. Just like the command for CMD, PowerShell will scour your local files based on a minimum size and display all the files larger than it. Use the guide below to get you started.
Press Windows + E on your keyboard and navigate to the location where you wish to look for large files. Click on the address bar at the top and type in ‘PowerShell’. Press Enter on your keyboard once you are done.
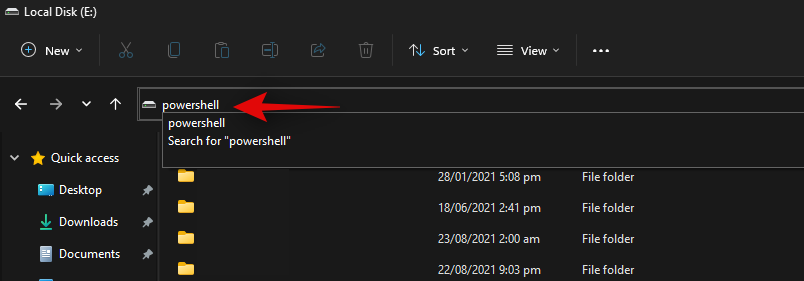
Copy-paste the command below in the PowerShell window and press Enter on your keyboard.
gci -r| sort -descending -property length | select -first 10 name, length

You will now get a list of the top 10 largest files currently taking the most disk space on your system. If you wish to view the top 20 files, then replace ‘select-first 10’ with ‘select-first 20’.
PowerShell will now find and display the 20 largest files on your system along with their size. The file size will be in bytes which can make it a bit difficult to judge the size of files in terms of gigabytes.
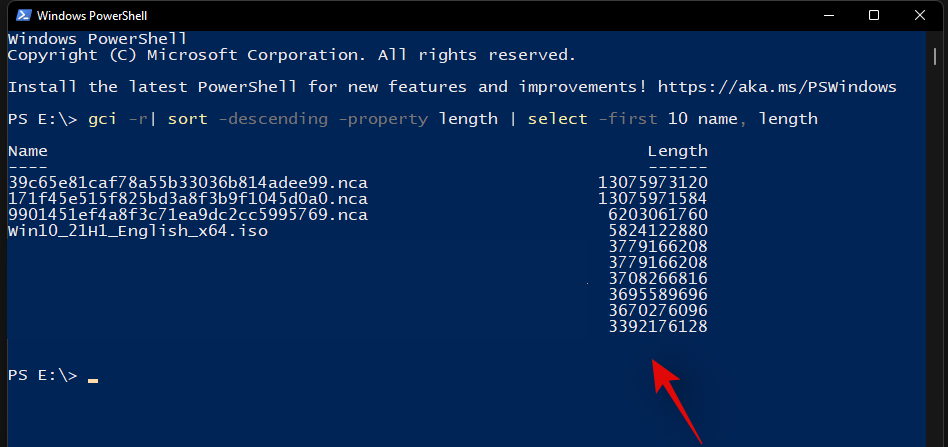
And that’s it! You will now have found the largest files on your PC using PowerShell in Windows 11.
2 Best apps to find large files on Windows
Many third-party tools allow you to view a visual representation of your PC’s disk usage.
This makes it much easier for you to identify large chunks of files taking significant space on your hard drive. Our recommended tools would be SpaceSniffer and WinDirStat. Use one of the guides below depending on the tool that you wish to use.
Method #04: Using SpaceSniffer
Space Sniffer is another popular third-party utility used to analyze disk space usage on Windows 11. SpaceSniffer can help you identify large files using huge amounts of space on your system. You can also find hidden files taking huge disk space on your PC using the SpaceSniffer. Use the guide below to get you started.
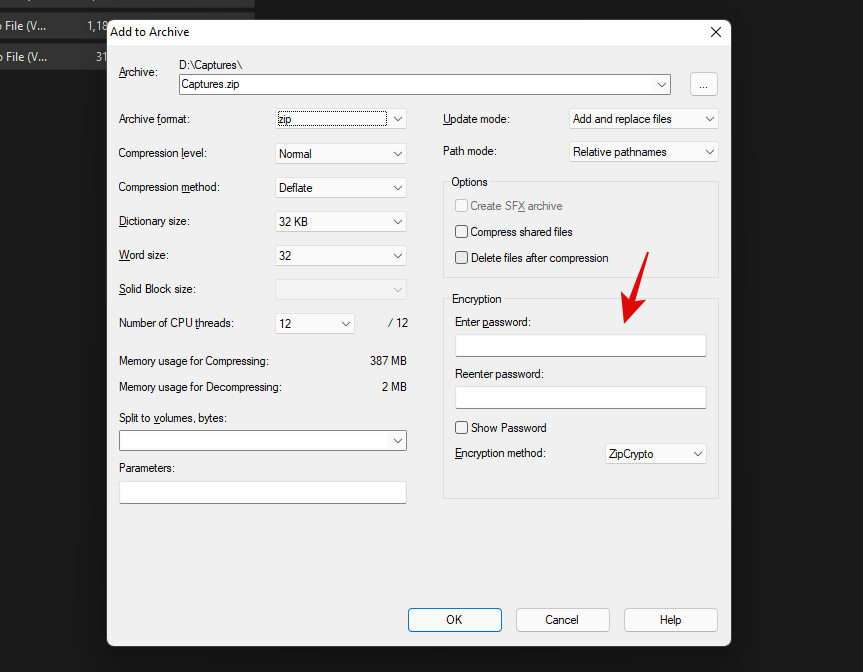
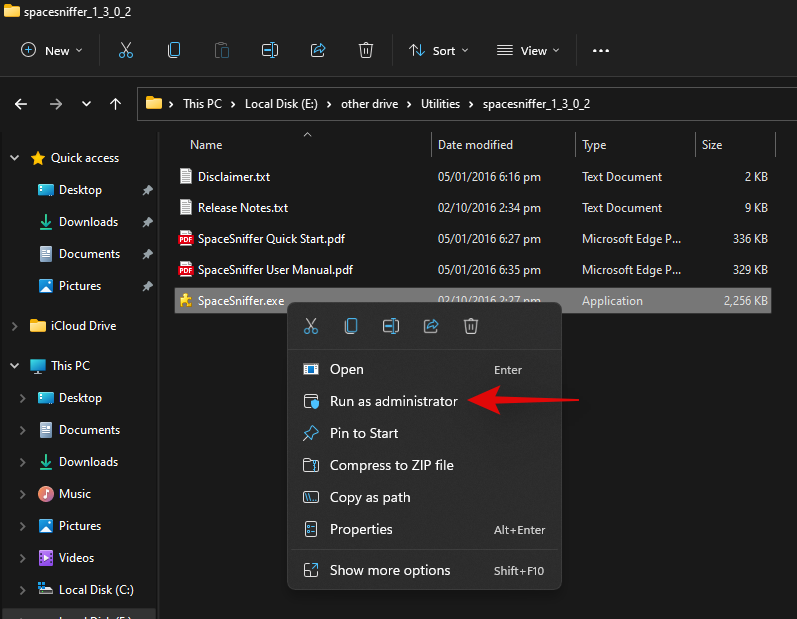
Download SpaceSniffer to your PC using the link above. A portable .exe will be downloaded to your system. Extract the archive and right-click on the .exe file.
Select ‘Run as administrator’.
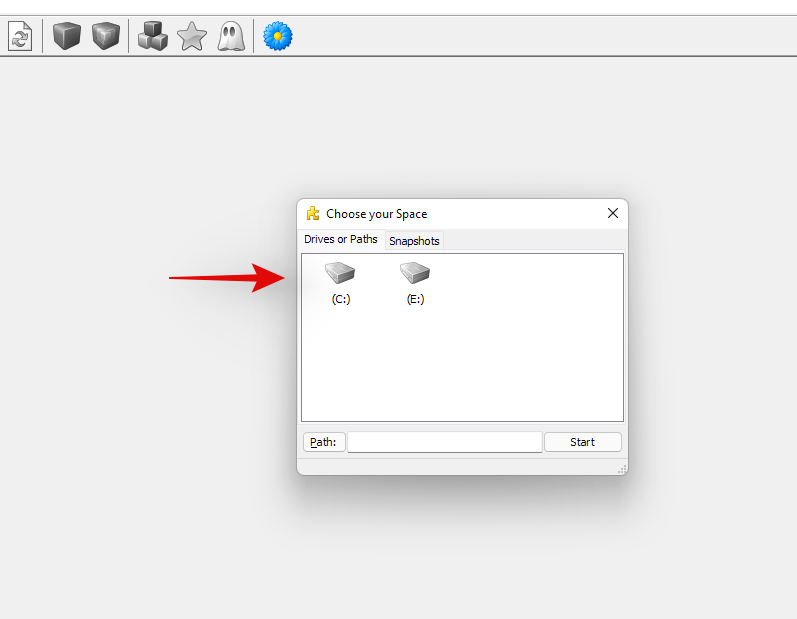
Now select the drive you wish to scan. If you wish to analyze and find large files in a particular directory, then you can enter its path in the text box below.
You will now be shown a graphical representation of your disk space usage on your screen. Simply hover over the largest chunk and you will be shown the name of the folder or file occupying that space.
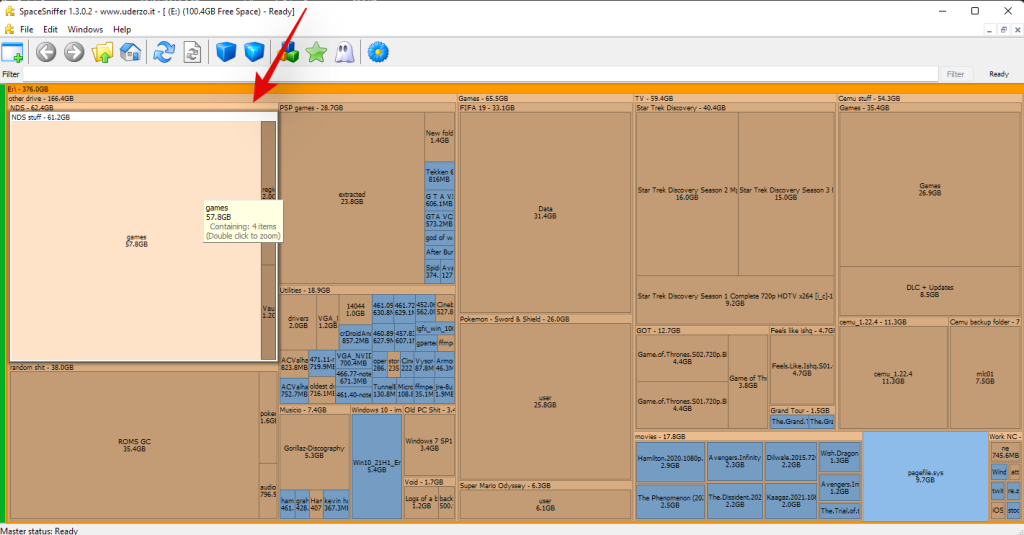
And that’s it! You can use SpaceSniffer this way to identify the largest files on your system by simply looking at the largest chunks on your screen.
Method #05: Using WinDirStat
WinDirStat is a popular open-source utility often used to generate a graphical representation of your local storage space in a user-friendly manner. This makes it easier to identify large chunks of your disk space occupied by a single file, folder, or archive, which in turn will make it easier for you to free up some space on your PC. Use the guide below to identify what is taking up space on your Windows 11 PC.
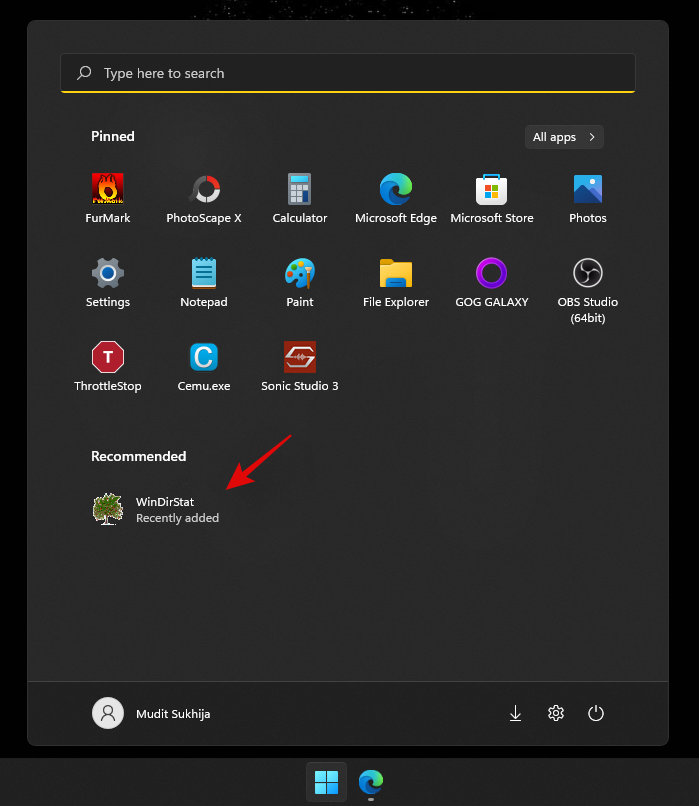
Download and install WinDirStat on your PC using the link above. Once installed, launch the app.
Now select one of the options that best suit your needs. If you only have a single drive installed on your system with a single partition, then you can skip this step. Click on ‘Ok’ once you are done.
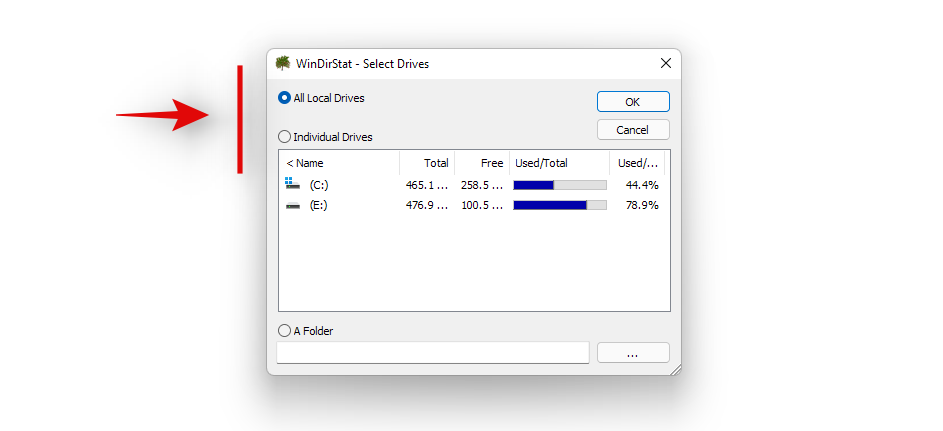
- All Local Drives: This will make WinDirStat analyze all your disks and display their data graphically.
- Individual Drives: Select one of your installed drives to be analyzed for disk space usage. You can select this option and then select the drive you wish to use.
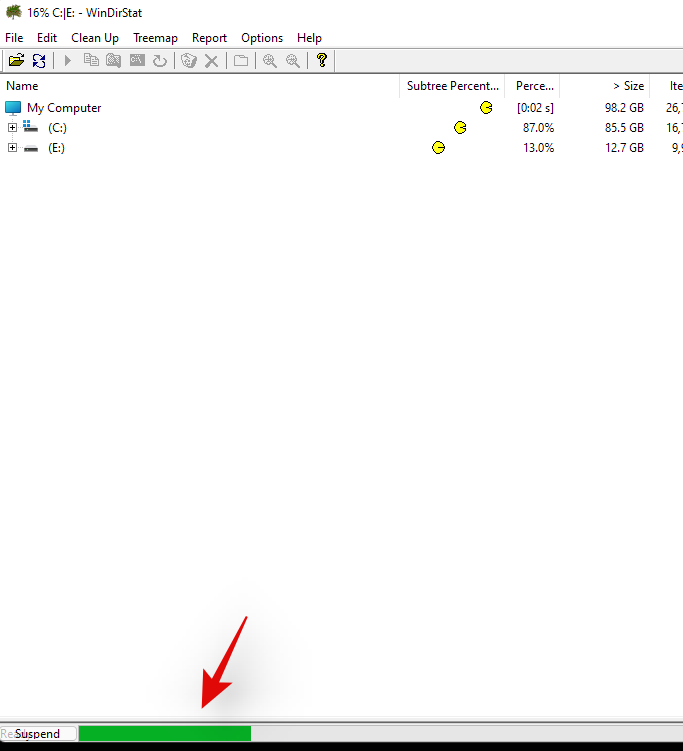
Your drives will now be analyzed and you can track the progress for the same at the bottom of the window.
Once analyzed, a color-coded graphical representation of the disk space usage on the selected drive(s) will be shown on your screen. Simply click on the largest chunks to identify the largest files.
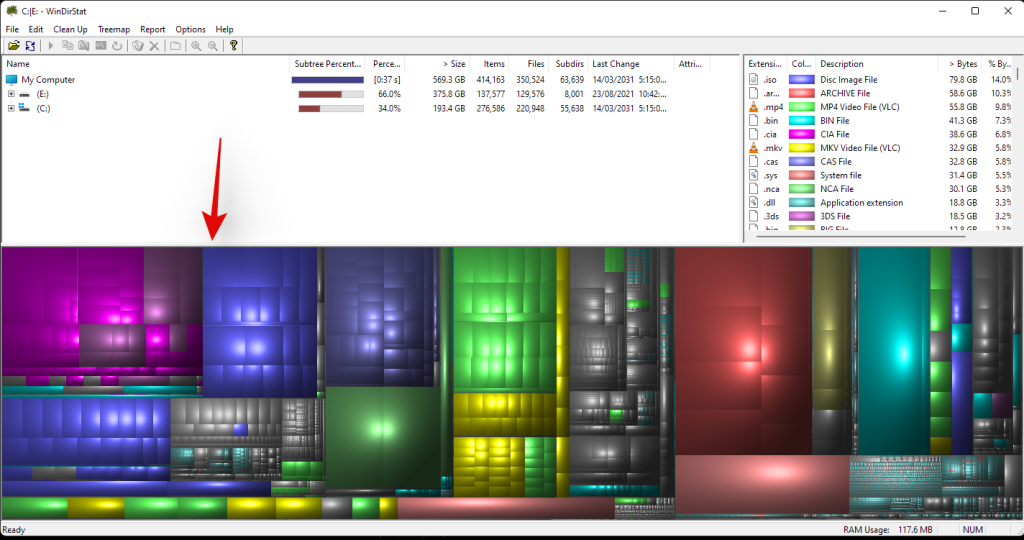
Press Del on your keyboard to delete the file. This will send it to your recycle bin and you can decide its fate when reviewing your recycle bin items. Alternatively, you can use Shift + Del to permanently delete the item from your system.
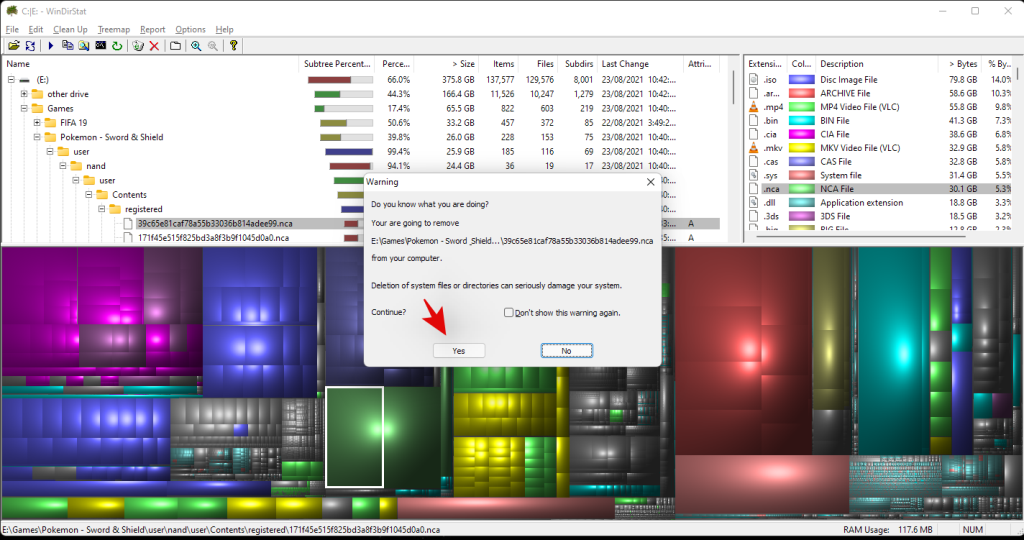
And that’s it! You can repeat the last steps to delete more of the largest files from your system.
Other Third-Party apps as alternative
The world of third-party alternatives is a huge one and thus, the above-mentioned tools are not the only ones that you can use to analyze your disk usage. Here are some alternatives with unique features that might be more suited for your current needs and requirements.
More ways to clear storage on Windows 11
If you’re looking to reclaim your storage space then there are tons of more things that you can do besides clearing or moving your largest files. You can clear caches, stop programs, reduce dedicated storage space, clear temporary files, remove leftover files, and much more. Refer to this dedicated guide by us that should help you clear space on Windows 11 in every way possible.
Should you use disk space analyzers?
Disk Space Analyzers have long been the ultimate utility to identify where exactly your disk space is being used. Most of them stem from long-standing communities while others have over decades of experience. If you’re divided on using disk space analyzers, then your best bet would be to opt for something that is open source.
The modern world of the internet is centered around data collection and like it or not, every service is gathering and collecting some type of data from your usage of their tool. Hence most disk analyzers nowadays, also have the option to share your usage data and more. Additionally, if you decide to opt for something new and untested then the risks are even higher.
Hence, we recommend you use disk space analyzers but do verify their origin and reputation before running them on your system. If you do not wish to go through the hassle of reading reviews, we recommend you simply try an open-source alternative from a trusted source.
We hope this guide helped you easily find the largest files using disk space on your system. If you face any issues or errors during the process, feel free to reach out to us using the comments section below.


