يعد إنشاء حساب مستخدم جديد أحد الأشياء الأولى التي يتعين عليك القيام بها عند إعداد Windows 11. ولكن سواء كنت تريد حسابًا محليًا (غير متصل) أو حساب Microsoft فهذا شيء يعتمد كليًا عليه أنت والميزات التي تتوقع الحصول عليها.
يمكنك أيضًا إنشاء وإضافة حساب مستخدم جديد ، محليًا وعبر الإنترنت أيضًا ، لشخص آخر يصل إلى نظامك. إليك كل ما تحتاج إلى معرفته لإنشاء حساب مستخدم جديد على Windows 11.
محتويات
عبر الإنترنت مقابل حسابات المستخدمين المحليين على Windows 11
قبل أن نبدأ في إنشاء حساب مستخدم جديد على Windows 11 ، دعنا نفكر في الاختلافات بين الحساب عبر الإنترنت والحساب المحلي ، ومزايا وعيوب الاثنين.
ما الذي تحصل عليه باستخدام حساب Microsoft (عبر الإنترنت)؟
باختصار ، أفضل تجربة Windows تقدمها Microsoft. إذا كنت تقوم بإنشاء حساب مستخدم جديد عن طريق تسجيل الدخول إلى حساب Microsoft الخاص بك ، فيمكنك بسهولة الترحيل من جهاز كمبيوتر إلى آخر دون الحاجة إلى القلق بشأن البدء من جديد في كل مرة. باستخدام حساب عبر الإنترنت ، يمكنك الحصول على مزامنة على مستوى النظام (مع جميع الإعدادات الشخصية وسجل المتصفح وغير ذلك الكثير) التي توفر راحة غير ممكنة مع حساب محلي.
يمكنك الوصول إلى التطبيقات وتنزيلها من Microsoft Store أيضًا وستظل مزامنة جميع تطبيقات Microsoft ، مثل MS Word و Excel و PowerPoint والتطبيقات الأخرى التي تعد جزءًا من Office Suite.
ماذا تحصل مع حساب محلي (غير متصل)؟
المكافئ غير المتصل ، بحكم التعريف ، لا يقدم خدمات المزامنة التي يقدمها حساب Microsoft ، ولا يسمح لك بالوصول إلى التطبيقات التي تعتمد على تكامل حساب MS.
لن تتمكن أيضًا من ترحيل إعداداتك المحفوظة من جهاز كمبيوتر إلى آخر. هذا يعني أنه في كل مرة تقوم فيها بتبديل أجهزة الكمبيوتر ، يجب عليك البدء من جديد. علاوة على ذلك ، كلما احتجت إلى تنزيل تطبيق من Microsoft Store ، سيُطلب منك تسجيل الدخول إلى حساب Microsoft الخاص بك.
ومع ذلك ، فإن الميزة الوحيدة التي تحصل عليها هي القدرة على إزالة كلمة مرور الحساب. على الرغم من عدم التوصية به ، يتيح لك هذا التمهيد مباشرة إلى نظام التشغيل.
الآن بعد أن أصبحت لديك فكرة عما يمكن توقعه من حساب مستخدم عبر الإنترنت وغير متصل ، فلنرى كيف يمكنك إنشاء حساب وإضافة مستخدم جديد على Windows 11.
ذات صلة: قائمة اختصارات Windows 11
قم بإنشاء مستخدم جديد على Windows 11 (عبر الإنترنت)
فيما يلي طريقتان لإنشاء وإضافة مستخدم جديد على Windows 11 باستخدام حساب Microsoft الخاص به. لاحظ أنك لست بحاجة إلى معرف بريد إلكتروني في Outlook لهذا الغرض. يمكنك أيضًا تسجيل الدخول باستخدام أي خدمة بريد إلكتروني أخرى.
الطريقة رقم 01: استخدام الإعدادات
اضغط Win + Iلفتح الإعدادات. ثم انقر فوق الحسابات في اللوحة اليسرى.

انقر فوق العائلة والمستخدمين الآخرين على اليمين.

ضمن "المستخدمون الآخرون" ، انقر فوق إضافة حساب .

سيؤدي هذا إلى فتح نافذة تسجيل دخول جديدة إلى Microsoft. أدخل بريدك الإلكتروني هنا وانقر فوق التالي .

انقر فوق " إنهاء" .

وهذا كل شيء. لن تضطر إلى إدخال أي تفاصيل أخرى. سيحتاج المستخدم الجديد إلى القيام بذلك عند تسجيل الدخول لأول مرة.
ذات صلة: كيفية إعادة تشغيل مستكشف Windows على نظام التشغيل Windows 11
الطريقة رقم 02: عند تثبيت Windows 11
إذا كنت تقوم بتثبيت نسخة جديدة من Windows 11 ، فيمكنك إضافة حساب Microsoft الخاص بك مباشرة من Windows 11 OOBE نفسه. للقيام بذلك ، انتقل إلى تعليمات OOBE ، وعندما تصل إلى "دعنا نضيف حساب Microsoft الخاص بك" ، أدخل حساب Microsoft الخاص بك ، وانقر فوق التالي .

ثم قم بتأكيد هويتك بكلمة المرور الخاصة بك. في مثالنا ، لدينا Microsoft Authenticator متصل بحسابنا لذلك نستخدم ذلك للقيام بذلك.

الآن ، انقر فوق إنشاء دبوس .

أدخل رقم التعريف الشخصي الخاص بك ، ثم انقر فوق " موافق" .

سيكون لديك الآن خيار "استعادة" الإعدادات وملفات OneDrive من الكمبيوتر الشخصي السابق أو "الإعداد كجهاز جديد". حدد الخيار الذي تريده وانقر فوق التالي للمضي قدمًا في مزيد من الإرشادات التي تظهر على الشاشة لإنشاء حساب مستخدم جديد على جهاز الكمبيوتر المثبت حديثًا الذي يعمل بنظام Windows 11.

ذات صلة: كيفية تغيير المسؤول Windows 10
قم بإنشاء مستخدم جديد على Windows 11 (غير متصل)
الآن ، دعنا نلقي نظرة على جميع الطرق التي يمكنك من خلالها إنشاء حساب محلي وإضافته على Windows 11.
الطريقة رقم 01: استخدام الإعدادات
اضغط Win + Iلفتح الإعدادات. ثم انقر فوق الحسابات في اللوحة اليسرى.

ثم حدد العائلة والمستخدمون الآخرون على اليمين.

ضمن "مستخدمون آخرون" ، انقر فوق إضافة حساب .

انقر فوق ليس لدي معلومات تسجيل الدخول لهذا الشخص .

ثم انقر فوق إضافة مستخدم بدون حساب Microsoft .

أدخل اسم المستخدم وكلمة المرور. يمكنك اختيار عدم إدخال أي كلمات مرور إذا كنت ترغب في ذلك. بمجرد الانتهاء ، انقر فوق التالي .

وهذا كل شيء. لقد قمت الآن بإنشاء حساب محلي جديد على Windows 11.

الطريقة # 02: استخدام حسابات المستخدمين
يمكنك أيضًا استخدام نوافذ "حسابات المستخدمين" بلوحة التحكم لإضافة حساب جديد غير متصل بالإنترنت. إليك الطريقة:
اضغط Win + Rلفتح نافذة RUN. ثم اكتب netplwiz واضغط على Enter.

انقر فوق إضافة .

انقر الآن على تسجيل الدخول بدون حساب Microsoft في الأسفل.

انقر فوق الحساب المحلي .

أدخل اسم المستخدم وكلمة المرور (أو اترك حقل كلمة المرور فارغًا إذا كنت تفضل عدم وجود واحد لهذا الحساب). ثم انقر فوق التالي .

تم الآن إنشاء حسابك المحلي الجديد. انقر فوق " إنهاء" .

الطريقة # 03: استخدام موجه الأوامر
بالنسبة لأولئك الذين يفضلون استخدام أجهزة Windows الطرفية ، إليك كيفية إضافة حساب Windows 11 محلي غير متصل باستخدام موجه الأوامر.
أولاً ، اضغط على ابدأ ، واكتب cmd ، ثم انقر فوق تشغيل كمسؤول .
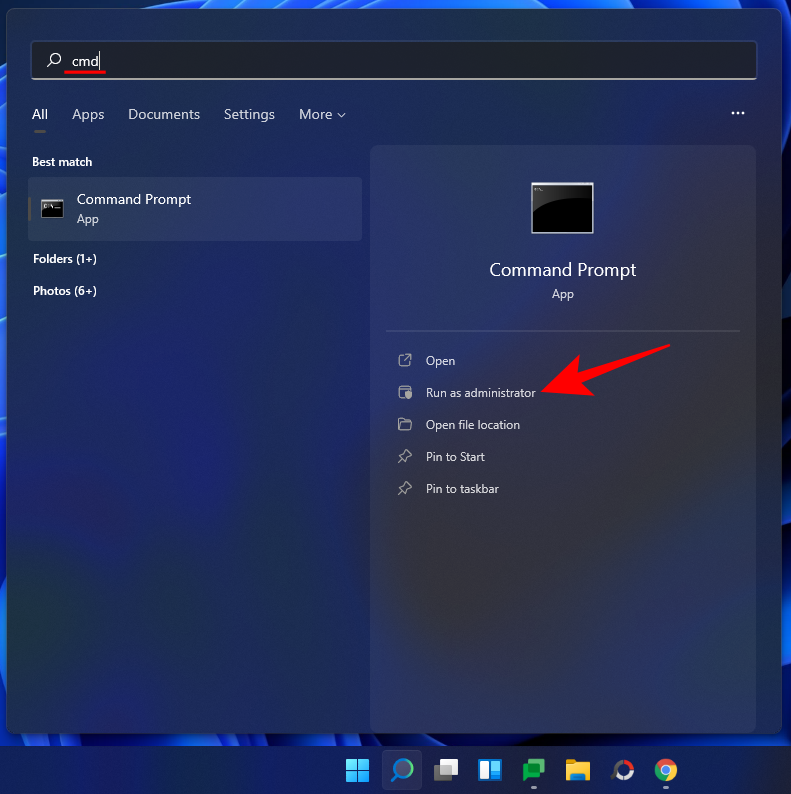
أدخل الآن الأمر التالي:
net user "UserName" "Password" /add
تأكد من استبدال "اسم المستخدم" و "كلمة المرور" باسم المستخدم وكلمة المرور الفعليين اللذين ترغب في إضافتهما.

ثم اضغط على Enter.
إذا كنت لا تريد إضافة كلمة مرور ، فما عليك سوى كتابة الأمر التالي:
net user "UserName" /add
مرة أخرى ، تأكد من استبدال "اسم المستخدم" بالاسم الذي تريده لحسابك غير المتصل / المحلي.
ثم اضغط على Enter. تم الآن إنشاء حسابك المحلي الجديد.
الطريقة رقم 04: استخدام الأداة المساعدة "المستخدمون المحليون والمجموعات المحلية"
الآن ، دعنا نرى كيفية تحقيق نفس الشيء باستخدام الأداة المساعدة "المستخدمون المحليون والمجموعات المحلية".
اضغط Win + Rلفتح مربع الحوار RUN. ثم اكتب lusrmgr.msc ، واضغط على Enter.

سيؤدي هذا إلى فتح الأداة المساعدة "المستخدمون المحليون والمجموعات المحلية". انقر فوق المستخدمون في اللوحة اليسرى.

الآن ، في اللوحة اليمنى ، انقر فوق المزيد من الإجراءات وحدد مستخدم جديد .

في النافذة الجديدة التي تفتح ، أدخل "اسم المستخدم" و "كلمة المرور".

If you want to keep this password set permanently, uncheck the box that says Users must change password at next logon.
Then click Create.

You should see the new account added to the list of accounts on your PC.

Method #05: When installing Windows 11
Windows 11 also gives you the option to create an offline account when you’re setting it up first. During the initial OOBE setup, when you come across the “Let’s add your Microsoft account” screen, click on Sign-in options.

Then select Offline account.

Then click Skip for now.

Then continue on with the rest of the instructions to set up your local Windows 11 account.
Switch from an online Windows 11 account to an offline account
If you’re already using an online Windows 11 account, you have the option to switch to change it to a local account instead. Here’s how:
Press Win + I to open Settings. Then click on Accounts in the left panel.

Then click on Your info.
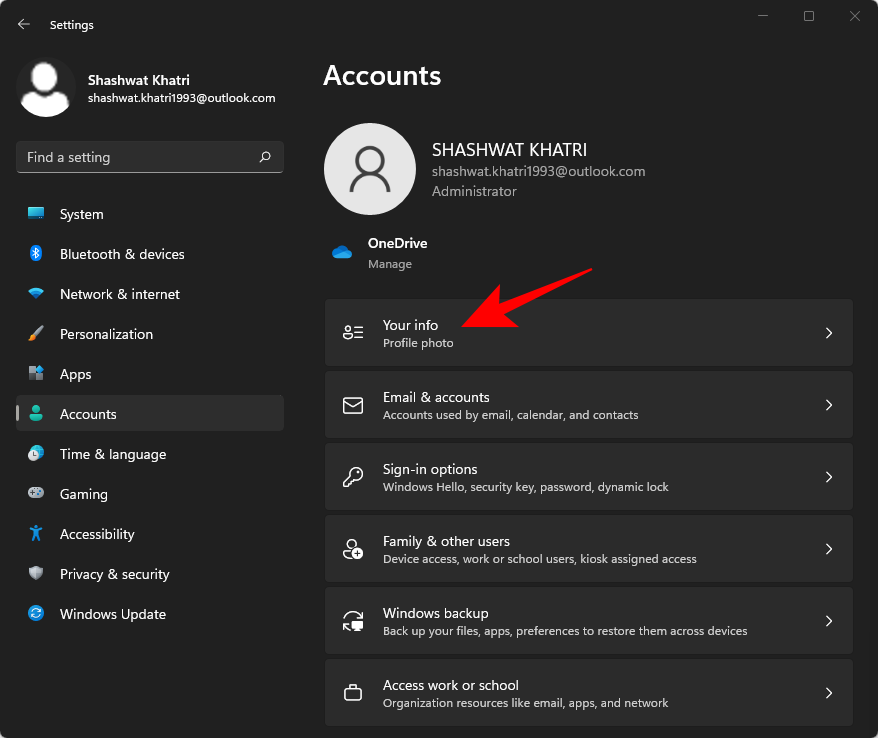
Under “Account settings” click on Sign in with a local account instead.

Click Next.
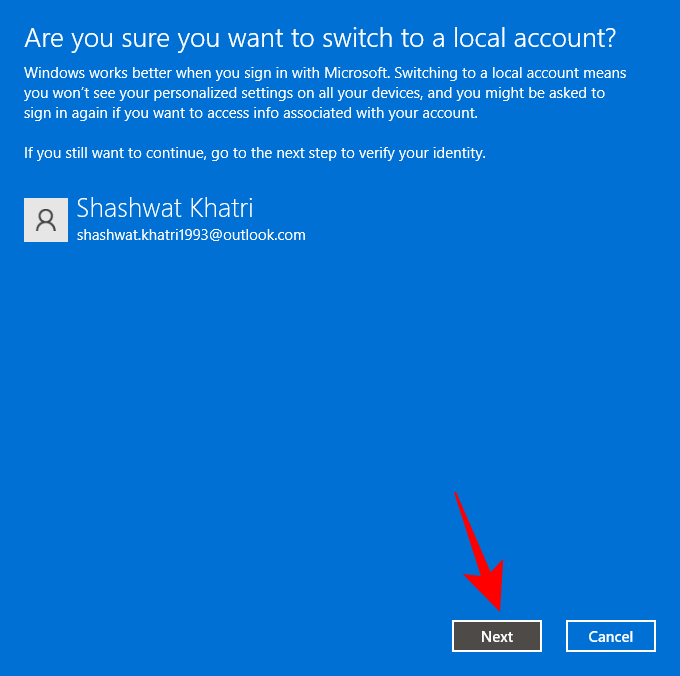
Enter your PIN/password.

Enter a new password if you wish. Then click Next.

Click on Sign out and finish.

Switching from an online Windows 11 account to an offline account doesn’t mean that you have to set up your account from the start. All your personal settings are data will be preserved. You will only be letting go of the Microsoft account integration and so won’t get any of the benefits associated with it.
Switch from an offline Windows 11 account to an online account
Now, if you have an offline or a local Windows 11 account, be it created by you or someone else, you can integrate your Microsoft account with it and avail the benefits associated with it. Here’s how to switch from an offline to an online account on Windows 11.
Press Win + I to open Settings. Then click on Accounts in the left pane.

Then click on Your info.
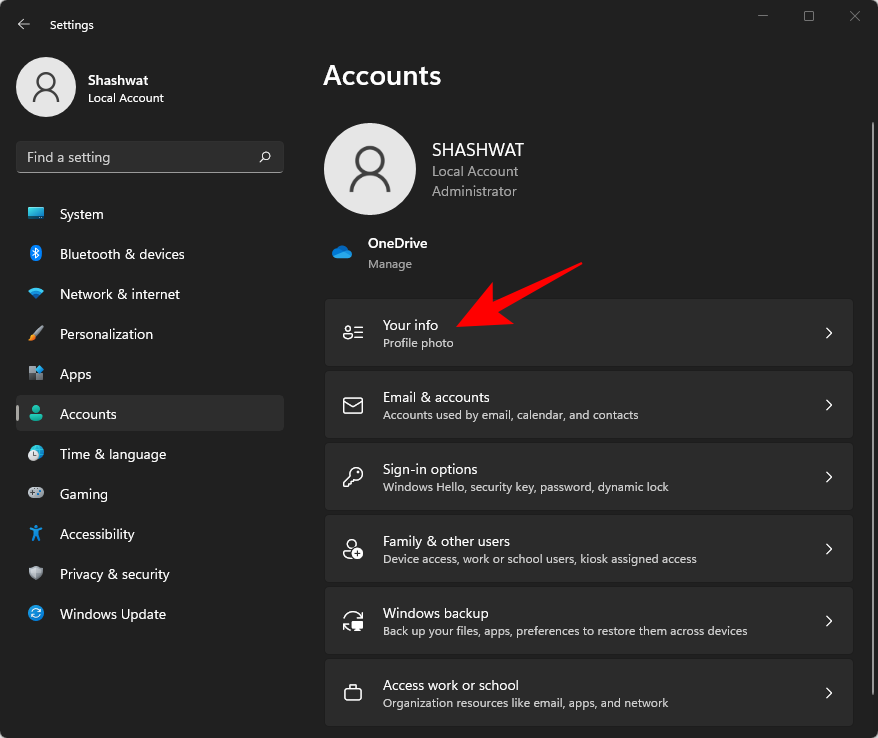
Under ‘Account settings’ click on Sign in with a Microsoft account instead.

Enter your email id, then click Next.

Confirm your identity.

Then type in your current Windows password (if you don’t have a password set, leave this field blank). Click Next.

Click Next.

Add a new PIN, then click OK.

And that’s it! You have now switched your offline account to an online one.
How to change a user account to an Administrator account
If you’ve created a standard account for someone else (or yourself) and would like to give it Administrator privileges, here’s how to do so:
Method #01: Using Settings
Press Win + I to open Settings. Click on Accounts in the left pane.

Select Family & other users.

Now click on the user account to which you want to give administrator privileges.

Click on Change account type.

Now click on the drop-down menu under “Account type”.

Select Administrator.

Click OK.
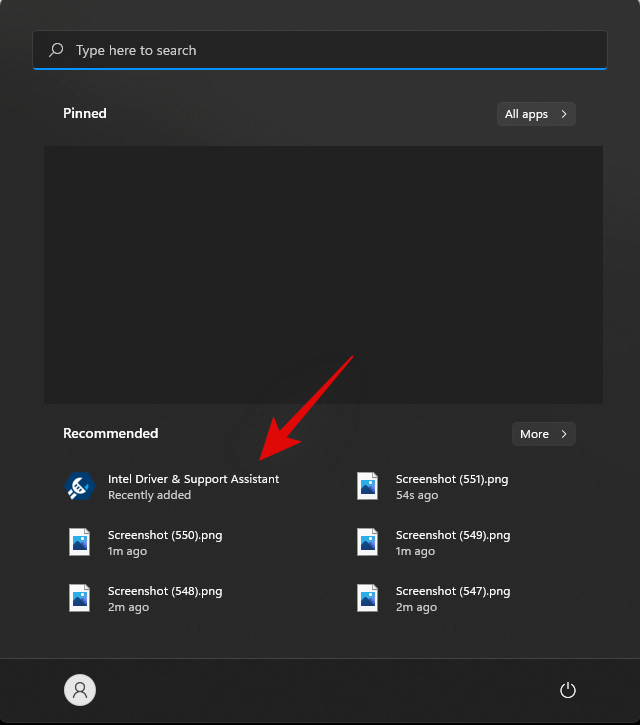
Now restart the PC for the changes to take effect.
Method #02: Using User Accounts
Press Win + R to open the RUN dialog box. Then type netplwiz and hit Enter.

Select the account that you want to change. Then click Properties.

Click on Group Membership to switch to it.

Select Administrator. Then click OK.

Method #03: Using the Command Prompt
Press Start, type cmd, and click on Run as administrator.

Type the following command:
net localgroup Administrator "account-name" /add
Make sure to change “account-name” to the actual name of the account that you want to give administrator privileges.

Then press Enter. Restart your PC for the changes to take effect.
Method #04: Using PowerShell
PowerShell users have a slightly different command to input to change an account type to make it an administrator account. Firstly, press Start, type powershell, then click on Run as administrator.

Now type the following command:
Add-LocalGroupMember -Group "Administrators" -Member "account-name"
Don’t forget to replace “account-name” with the actual name of the account that you want to change.

Then press Enter. And that’s it! You have now changed the user account to an administrator account.
Method #05: Using Control Panel
For those who still prefer sticking with legacy tools, Control Panel is another way to give a user account administrative privileges.
Press Start, type control panel, and select it.

Under “User Accounts”, click on Change account type.

Select the account that you want to change.

Click on Change the account type.

Select Administrator, then click on Change Account Type.

This user account will now have administrator privileges.
Frequently Asked Questions (FAQs)
With a lot of users installing Windows 11 for the first time, there are a lot of queries concerning setting up a user account or creating and adding new accounts. Here we answer a few commonly asked questions.
Can I set up Windows 11 Home without a Microsoft account?
For Home users, Windows 11 OOBE doesn’t have a screen to select a local account time when setting it up for the first time. However, there’s a simple way to get around this. When you come upon the screen where it asks you for internet and your Microsoft account, simply press Alt + F4 to close this bit.
Doing so will lead you straight to the local account setup page. Apart from that, you can always add a local account later through the ways mentioned in our guide above (Create a new user on Windows 11 – Offline).
Can I switch from a local account to a Microsoft account on Windows 11?
Yes, you can switch from a local account to a Microsoft account. Refer to the section “Switch from an offline Windows 11 account to an online account” in our guide above.
So these were the ways that you can create and add a new user on Windows 11, both locally as well as with a Microsoft account, switch between the two, and give the newly created account administrator privileges if you wish.
RELATED


