Las actualizaciones de Windows siempre han sido una molestia notoria para muchos usuarios desde los días de Windows XP. Afortunadamente, la entrega de actualizaciones de Windows ha mejorado drásticamente en los últimos años y muy pocas actualizaciones de funciones tienden a causar problemas importantes en la actualidad.
Puede configurar Windows para descargar y actualizar en segundo plano automáticamente e incluso reiniciarlo durante sus horas de inactividad. Todo esto es genial, pero ¿qué pasa si se instala una actualización que no necesita? ¿O qué pasa si recibe una actualización que degrada el rendimiento de su máquina? Bueno, en este caso, puede desinstalar las actualizaciones de Windows en Windows 11. Pero aquí hay un par de cosas que debe tener en cuenta antes de desinstalar las actualizaciones de su PC con Windows 11.
Relacionado Cómo deshabilitar las actualizaciones en Windows 11
Contenido
¿Por qué desinstalar las actualizaciones de Windows?
Puede haber varias razones por las que desea desinstalar las actualizaciones de Windows; estas son algunas de las más comunes. Si está solucionando errores después de una actualización reciente de Windows, también puede consultar esta lista.
En caso de que se enfrente a alguno de estos problemas en su sistema, puede intentar desinstalar la última actualización de Windows para intentar solucionar el problema.
- Rendimiento general degradado del sistema
- Actualizaciones de controladores defectuosas
- Funcionalidad rota de las características de Windows
- Recursos mal administrados en segundo plano
- Alto uso de CPU o disco
- Actualización de controlador no deseada que intentaba evitar
- Mal comportamiento de seguridad de Windows o UAC
- Configuración de región incorrecta que no se puede cambiar
- Faltan configuraciones u opciones dentro de Windows 11
y más. Puede haber toneladas de problemas que puede enfrentar al instalar una nueva actualización para Windows 11, especialmente si está suscrito al canal beta o interno. En tales casos, puede intentar desinstalar la actualización en cuestión usando la guía en esta publicación.
Relacionado Cómo cancelar una actualización de Windows Insider pendiente
¿Es seguro desinstalar las actualizaciones de Windows?
Sí, siempre que no fuerce la eliminación de las actualizaciones de Windows manualmente o use una utilidad desactualizada, debe estar seguro de desinstalar las actualizaciones de Windows de su sistema. Sin embargo, debe tener en cuenta que Microsoft usa actualizaciones de Windows para entregar parches de seguridad, revisiones y más para ayudar a proteger su sistema contra las últimas amenazas y vulnerabilidades de seguridad.
La eliminación de las actualizaciones de Windows también desinstalará dichos parches, lo que a su vez hará que su sistema sea vulnerable a las amenazas en línea. Este es especialmente el caso si está buscando desinstalar actualizaciones de seguridad recientes.
Por lo tanto, si bien es seguro desinstalar cualquier actualización, se recomienda revertir los cambios tan pronto como se solucione el error. Si su error o error persiste después de reinstalar la actualización, puede esperar hasta que Microsoft publique una actualización y corrección posteriores.
Relacionado Cómo quitar Bing de Windows 11
Cómo encontrar las actualizaciones que desea eliminar
Podemos eliminar las actualizaciones utilizando varios métodos, pero para encontrar qué actualización desea eliminar, debe identificarla en su PC. A cada actualización de Microsoft se le asigna un número de KB que ayuda a determinar e identificar la actualización en las PC de los consumidores, así como en los servidores de Microsoft. Podemos utilizar este número para nuestro beneficio y eliminar la actualización en cuestión de su sistema utilizando una de las guías a continuación. A continuación, le mostramos cómo puede identificar las actualizaciones recientes de Windows instaladas en su PC.
Método # 01: Uso de la configuración
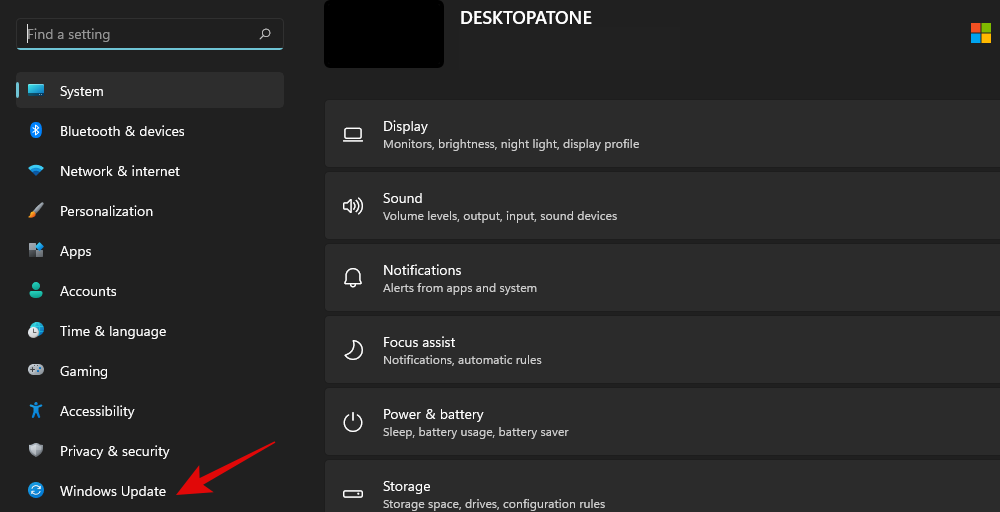
Presione Windows + ien su teclado y seleccione 'Actualización de Windows' a su izquierda.
Haga clic en "Historial de actualizaciones" ahora.
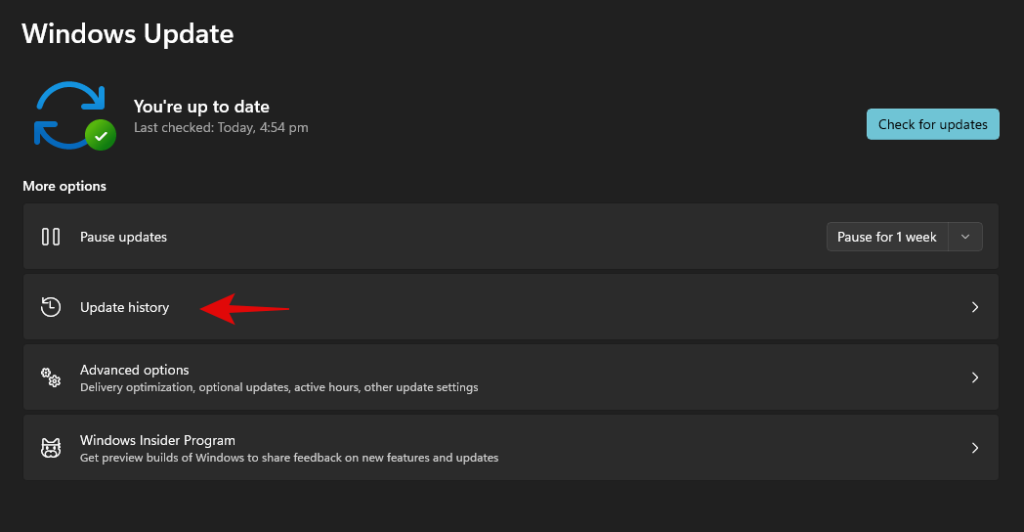
Ahora obtendrá una lista de las actualizaciones de Windows instaladas recientemente en su sistema.
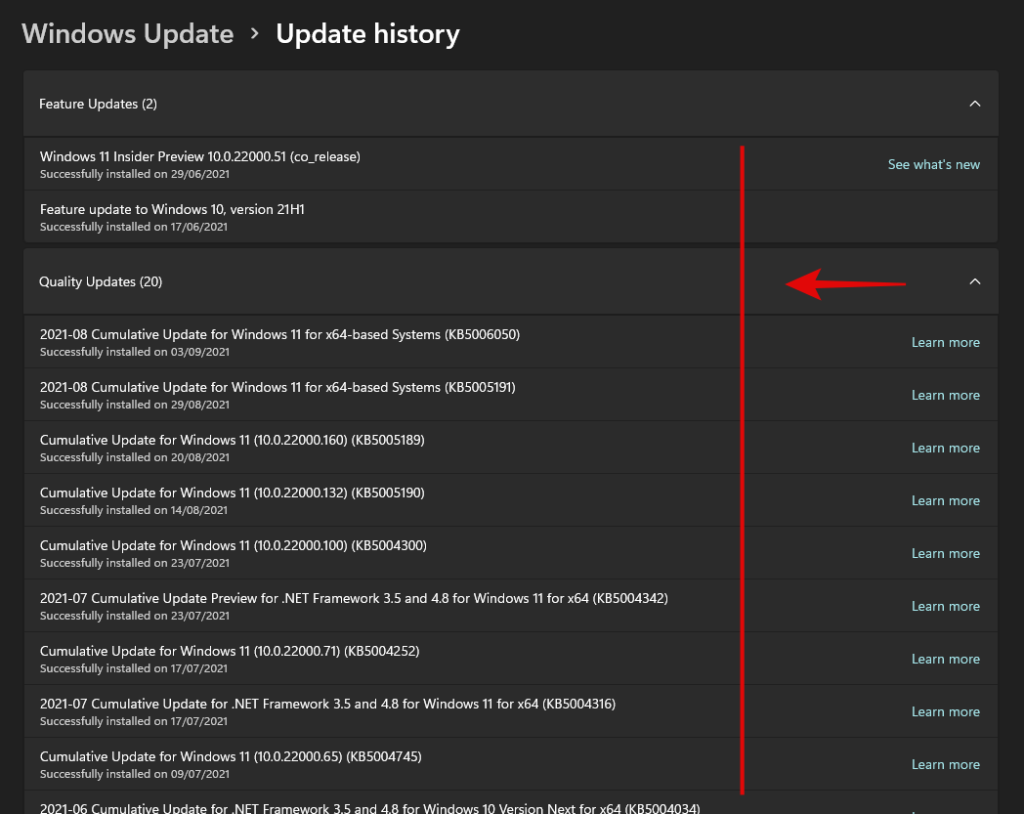
Simplemente anote el número de KB de la actualización que desea eliminar de su PC.
Método # 02: Usando CMD
Presione Windows + Sen su teclado y busque CMD. Haga clic en 'Ejecutar como administrador' una vez que la aplicación aparezca en sus resultados de búsqueda.
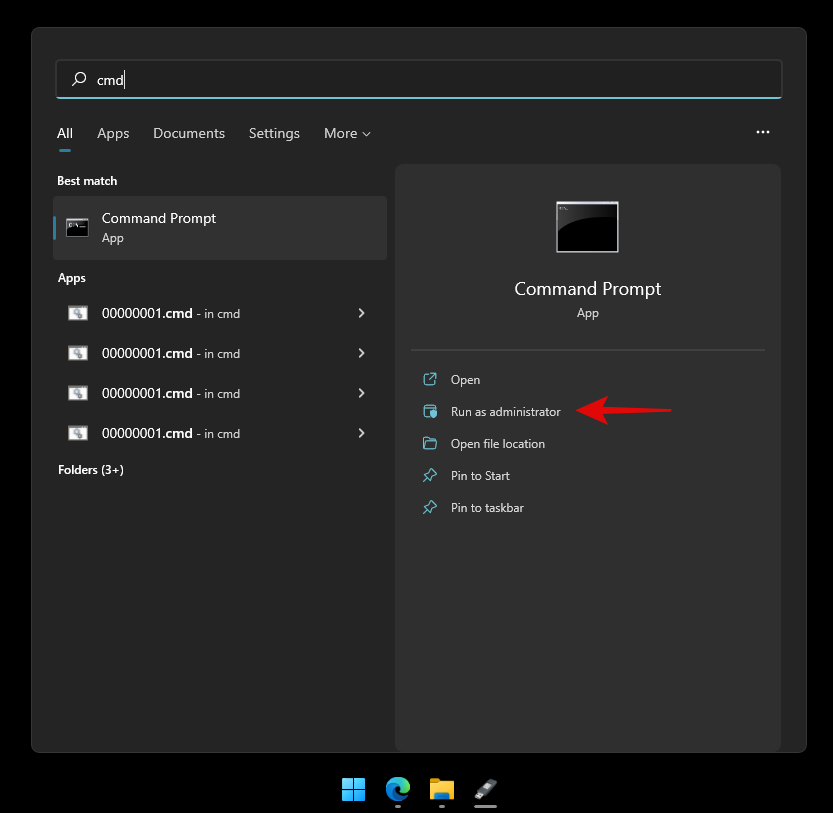
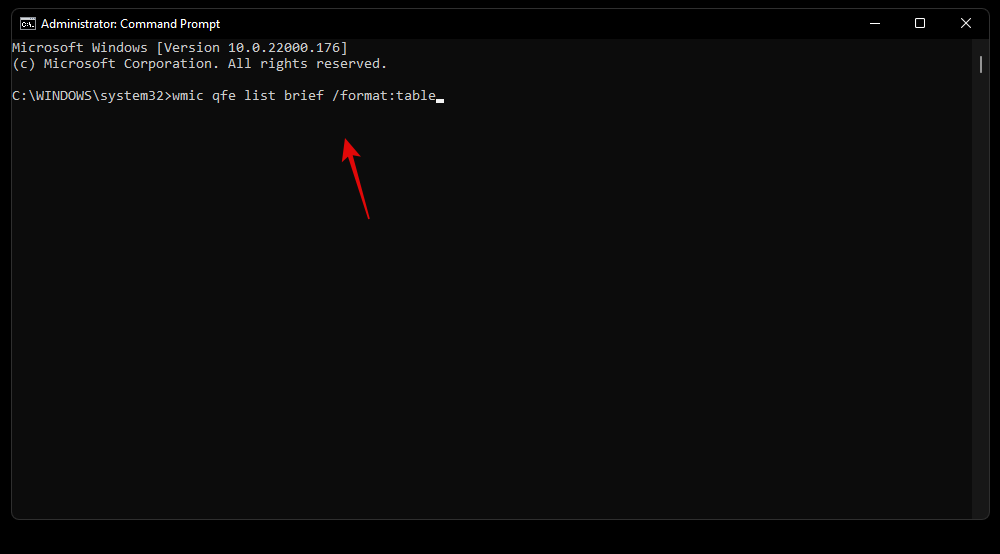
Escriba el siguiente comando y presione Entrar en su teclado.
wmic qfe list brief /format:table
Ahora obtendrá una lista de todas las actualizaciones recientes de Windows instaladas en su PC. Haga clic y expanda la categoría en cuestión de la lista a continuación.
- Actualizaciones de calidad: actualizaciones de funciones para Windows 11 que introducen cambios importantes en el sistema operativo.
- Actualizaciones de controladores: actualizaciones de controladores genéricos / OEM para sus periféricos y componentes entregadas a través de la actualización de Windows.
- Actualizaciones de definiciones: actualizaciones de definiciones de seguridad para ayudar a Microsoft Defender a identificar y poner en cuarentena las amenazas en su sistema.
- Otras actualizaciones: actualizaciones para productos, funciones y otras funciones OEM de Microsoft específicas para su dispositivo. Las características de Windows y los paquetes de experiencia también se actualizarán en esta categoría.
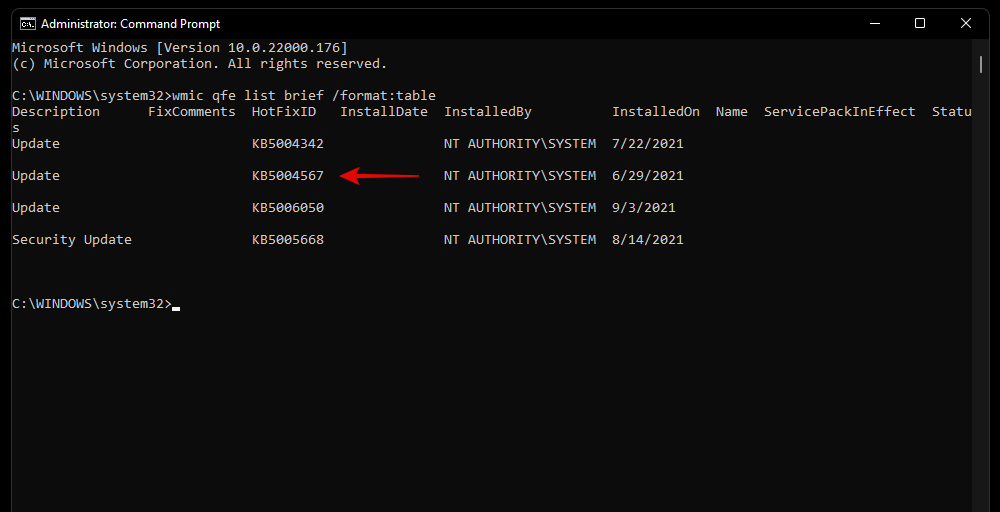
Identifique la actualización que desea eliminar y anote su 'HotFixID'. Usaremos esta ID para eliminar la actualización en cuestión usando la guía a continuación.
Cómo eliminar las actualizaciones de Windows de su PC
Puede eliminar las actualizaciones de Windows de su PC utilizando cualquiera de los métodos siguientes. Si no puede acceder a Windows o no puede arrancar desde su escritorio, le recomendamos que utilice el método Windows RE o el método CMD. Si puede acceder a su escritorio, puede usar la aplicación Configuración para eliminar fácilmente las actualizaciones de su sistema. Utilice las guías a continuación para comenzar según sus preferencias.
Método # 01: Uso de la configuración
Presione Windows + ien su teclado y haga clic en 'Actualización de Windows' en la barra lateral izquierda.

Haga clic en 'Historial de actualizaciones'.

Desplácese hasta la parte inferior y haga clic en 'Desinstalar actualizaciones'.
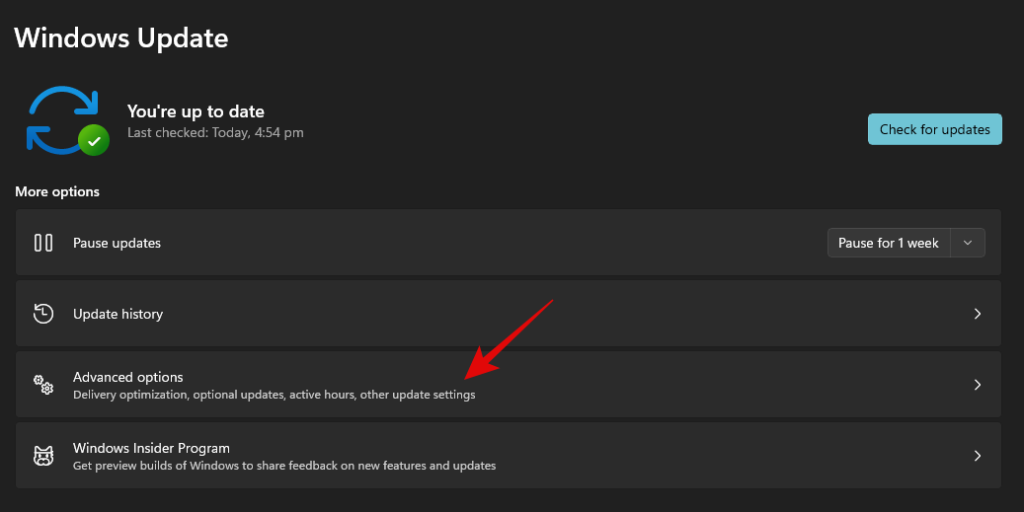
Ahora será redirigido al Panel de control, donde encontrará una lista de actualizaciones recientes que se pueden eliminar de su sistema.

Seleccione la actualización que desea eliminar y haga clic en 'Desinstalar' en la parte superior.

Siga las instrucciones en pantalla para desinstalar la actualización en cuestión de su PC.
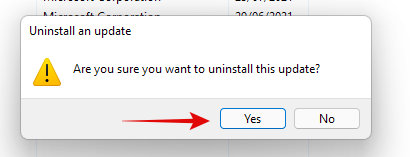
Ahora puede reiniciar su PC y cualquier problema que estuviera enfrentando debido a la actualización ahora debería solucionarse.
Método # 02: uso del solucionador de problemas de actualización de Windows
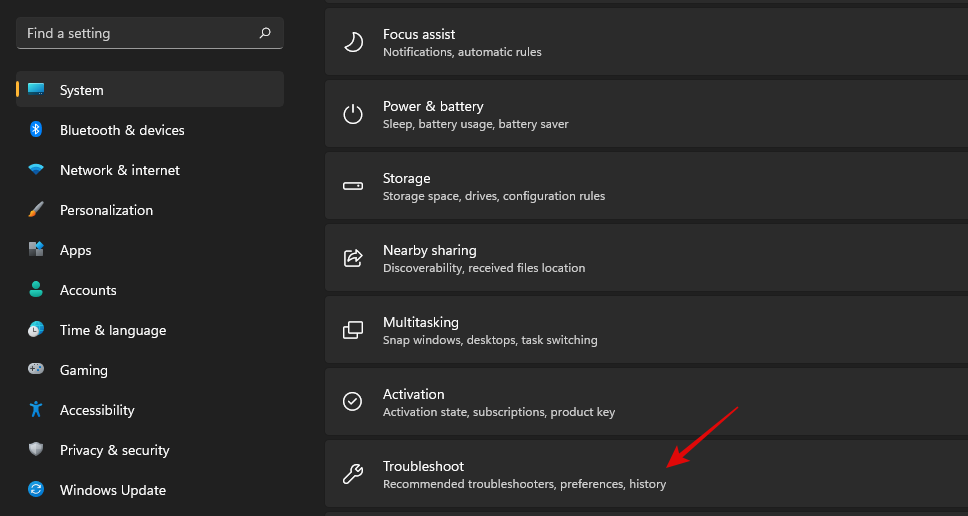
Presione Windows + ien su teclado y haga clic en 'Solucionar problemas'.
Haga clic en 'Otros solucionadores de problemas'.
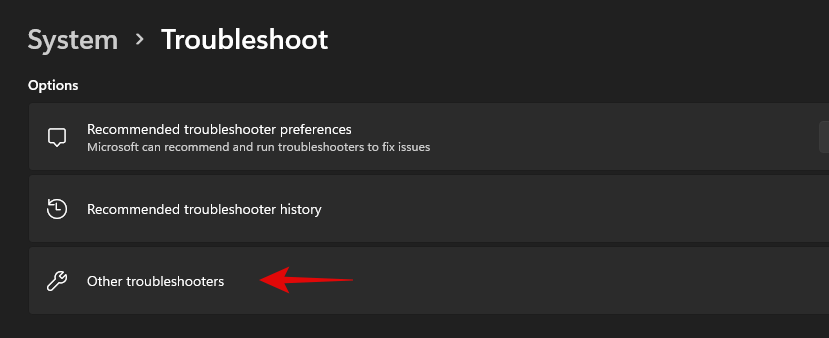
Haga clic en 'Ejecutar' junto a Windows Update.
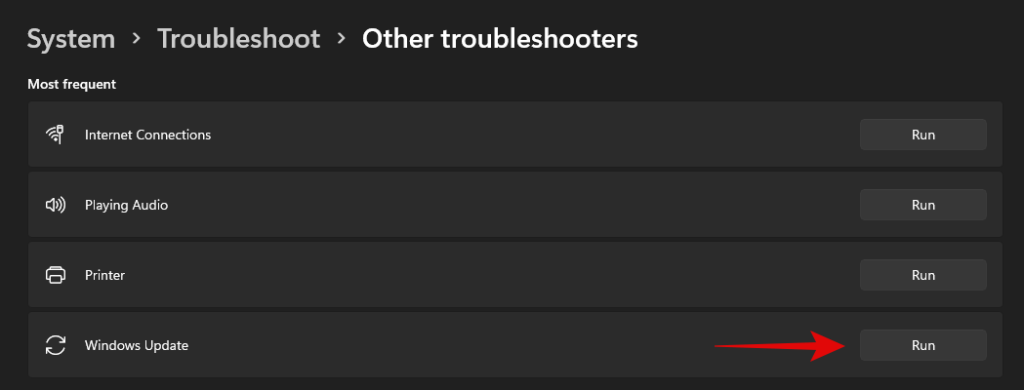
El solucionador de problemas de Windows ahora buscará problemas con las actualizaciones de Windows en su PC y causadas por ellas. Si encuentra alguno, el solucionador de problemas lo resolverá automáticamente. Si se descubre que una actualización reciente es la culpable, el solucionador de problemas le dará la opción de seleccionar y desinstalar la actualización de Windows necesaria. Siga las siguientes instrucciones en pantalla para eliminar por completo la actualización.
Una vez hecho esto, haga clic en 'Cerrar'.
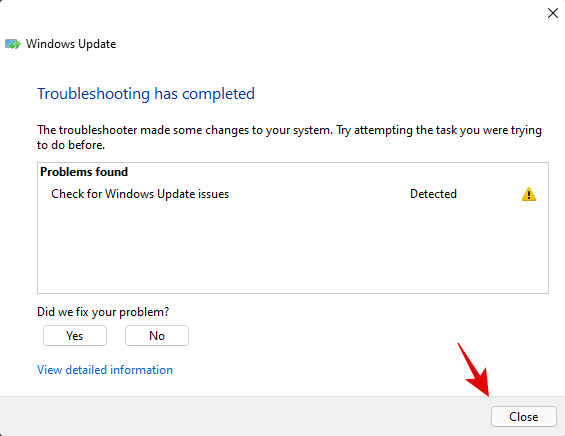
Reinicie su PC por si acaso y el problema ahora debería estar solucionado en este punto. De lo contrario, puede utilizar el método de PowerShell a continuación para desinstalar manualmente la actualización de Windows deseada de su sistema.
Método # 03: uso de PowerShell o CMD
Presione Windows + Sen su teclado y busque PowerShell. Haga clic en 'Ejecutar como administrador' una vez que la aplicación aparezca en sus resultados de búsqueda.
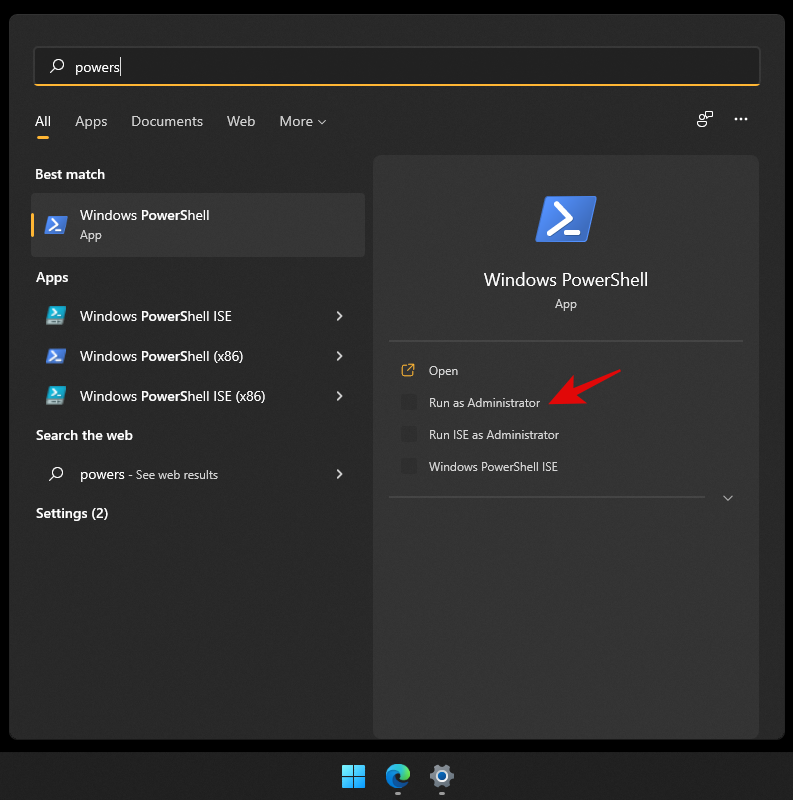
Escriba el siguiente comando y presione Entrar en su teclado para ejecutarlo.
wmic qfe list brief /format:table

Ahora obtendrá una lista de todas las actualizaciones de Windows instaladas recientemente en su sistema en un formato de tabla. Anote el número de KB para la actualización de Windows seleccionada.
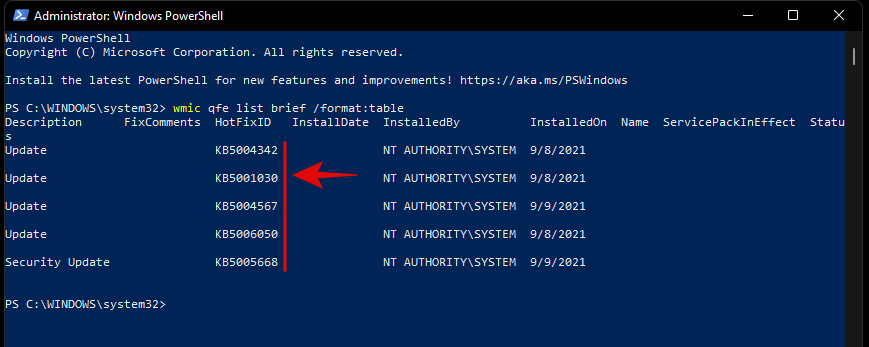
Nota: Solo necesita el número y no las letras anteriores.
Una vez hecho esto, escriba el comando a continuación y ejecútelo. Reemplace 'NÚMERO' con el número de KB que anotó anteriormente.
wusa /uninstall /kb:NUMBER
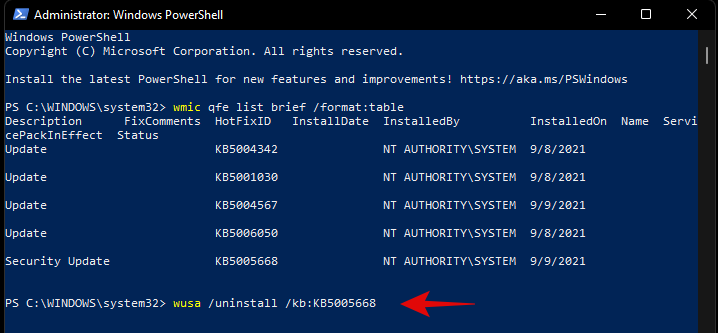
Una vez que se le solicite, confirme su elección.
Si se le solicita que reinicie, le recomendamos que reinicie su sistema lo antes posible mientras guarda su trabajo en segundo plano.
Sin embargo, si no desea recibir confirmaciones antes de la desinstalación y reinicio, puede usar el comando a continuación.
wusa /uninstall /kb:NUMBER /quiet
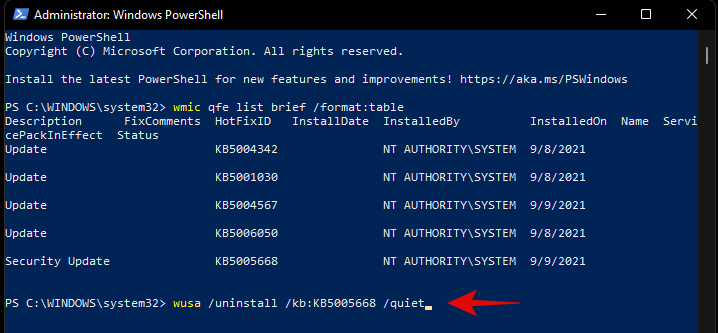
Si bien el comando anterior no solicitará confirmaciones, esperará a que sus aplicaciones se apaguen normalmente en segundo plano. Si está buscando forzar el cierre de sus aplicaciones y reiniciar su sistema de inmediato, puede usar el comando que se proporciona a continuación.
wusa /uninstall /kb:NUMBER /quiet /forcerestart
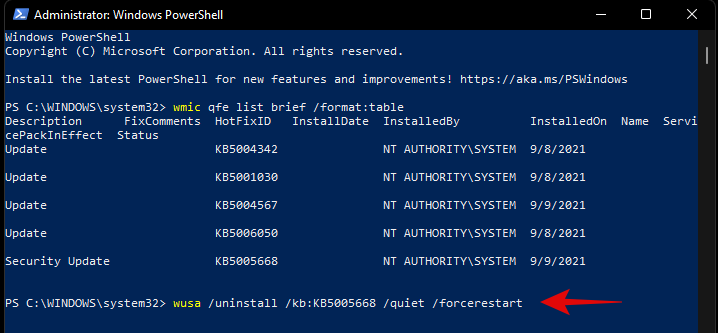
Posteriormente, si solo desea confirmar un reinicio, puede usar el comando a continuación.
wusa /uninstall /kb:NUMBER /quiet /promptrestart
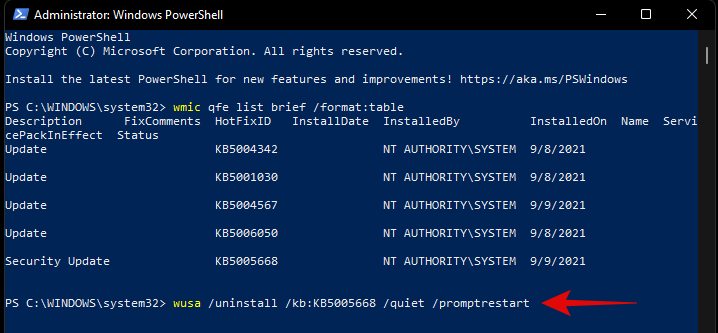
¡Y eso es! La actualización de Windows problemática ahora debería desinstalarse de su PC.
Método # 04: desde Windows RE
El entorno de recuperación de Windows también le permite desinstalar actualizaciones conflictivas. Use la guía a continuación para comenzar. Si se enfrenta a un BSOD y ya se encuentra en el entorno de recuperación, puede omitir los primeros pasos de esta guía.
Presione Windows + ien su teclado y seleccione Windows Update a su izquierda.
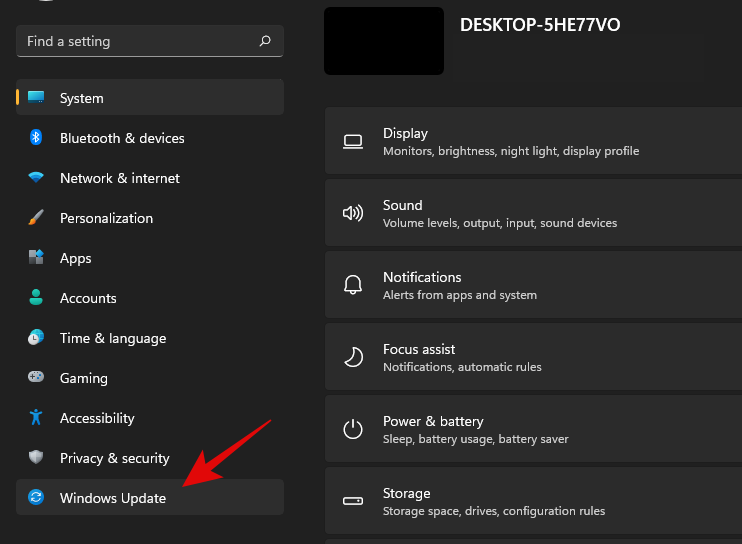
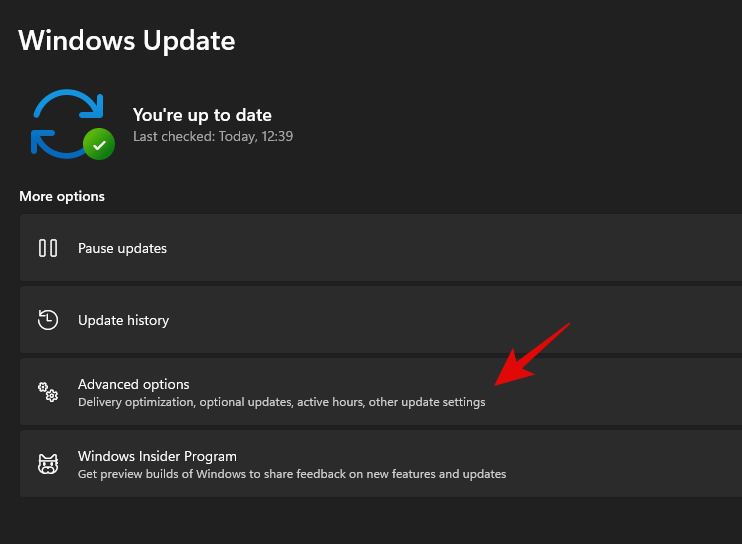
Haga clic en 'Opciones avanzadas' ahora.
Seleccione 'Recuperación'.
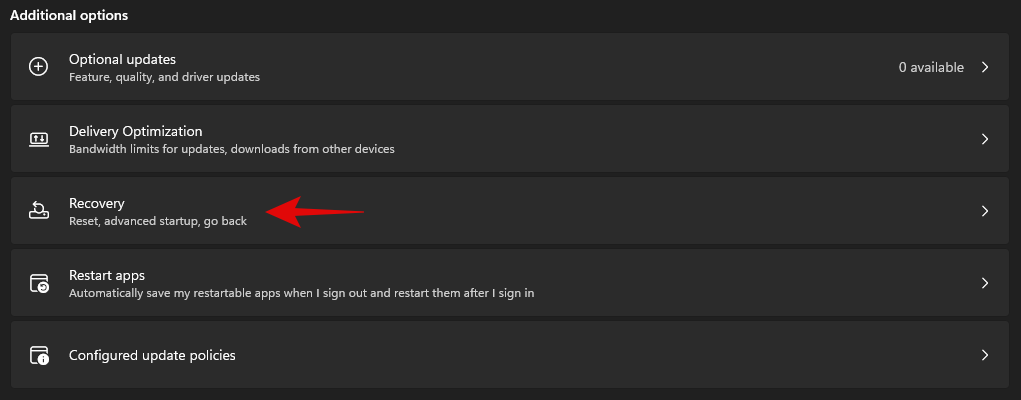
Click on ‘Restart now’ beside Advanced Startup.

You will now boot into the recovery environment. Click on ‘Troubleshoot’.
Now click on ‘Advanced Options’.
Select ‘Uninstall updates’.
Click and select the type of update you wish to install from the options on your screen.
- Uninstall latest quality update
- Uninstall latest feature update
Note: In case you are confused, feature updates refer to major updates to your Windows system that include new features, updated integrations, and sometimes new UI. Quality updates on the other hand encompass everything else including Security updates, Driver updates, Intelligence updates, Telemetry updates, and more.
Click on your administrator account and log in with your password.
Click on ‘Uninstall quality/feature’ update to confirm your choice.
Click on ‘Done’ once the process finishes.
Restart your PC and boot into Windows normally. You shouldn’t face any more issues caused by a problematic Windows update.
Method #05: Using DISM
DISM or Deployment Image Servicing and Management tool is an administrative tool within Windows that helps repair your Windows image and even mount images if needed. DISM supports image formats like .wim, .vhd, and more.
The tool can help you fix issues with your Windows installation and even remove problematic Windows updates. If you are looking to remove windows updates using DISM, then you can follow the steps below to get you started.
Note: DISM can be accessed via CMD and thus, you can use this guide from a recovery environment or an installation media as well. Follow the guide above to get CMD working on your lock screen or within Windows Recovery Environment.
Launch CMD and type in the following command. Press Enter on your keyboard once you are done.
dism /online /get-packages /format:table
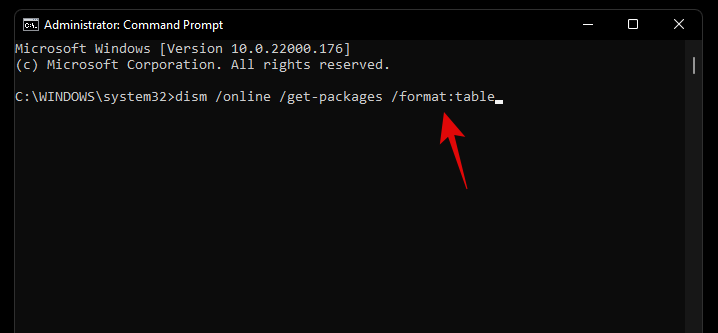
Unlike the WUSA commands we used earlier with PowerShell and CMD, you will need to note down the entire name of the Windows Update package we need to remove. Unfortunately, this includes special characters, spaces, and everything else included in the name. Thankfully you can easily copy the entire name to your clipboard by selecting it with your mouse and then using the keyboard shortcut. Once done, type in the command below and replace NAME with the package name you noted down earlier.
Note: This includes the term ‘Package_for_’ prefixed before some updates.
dism /online /Remove-Package /PackageName:NAME

The selected Windows Update will now be uninstalled from your system. In some cases, you will be prompted to restart your system, type in ‘Y’, and hit Enter on your keyboard to restart your system immediately.
How to stop receiving an update
While removing an update can help you, this does not mean that the broken Windows Update will stop showing up in your Updates section. This can be annoying and if you have automatic updates then you run the risk of automatically installing the problematic update in the background. In all such cases, you can try blocking Windows Updates on your system using the guides below depending on your preferences.
Method #01: Stop OEM driver updates through Windows update
OEM driver updates are delivered through Windows updates as well depending on their importance. Security vulnerabilities and bugs that have been recently found in components like CPU, GPU, or your wireless card, are instantly patched through such updates.
However, if you do not wish to install an OEM driver update provided by Windows update, then you can follow the guide below to block your OEM driver updates.
Press Windows + S on your keyboard and search for ‘Change device installation settings’. Click and launch the app from your search results.
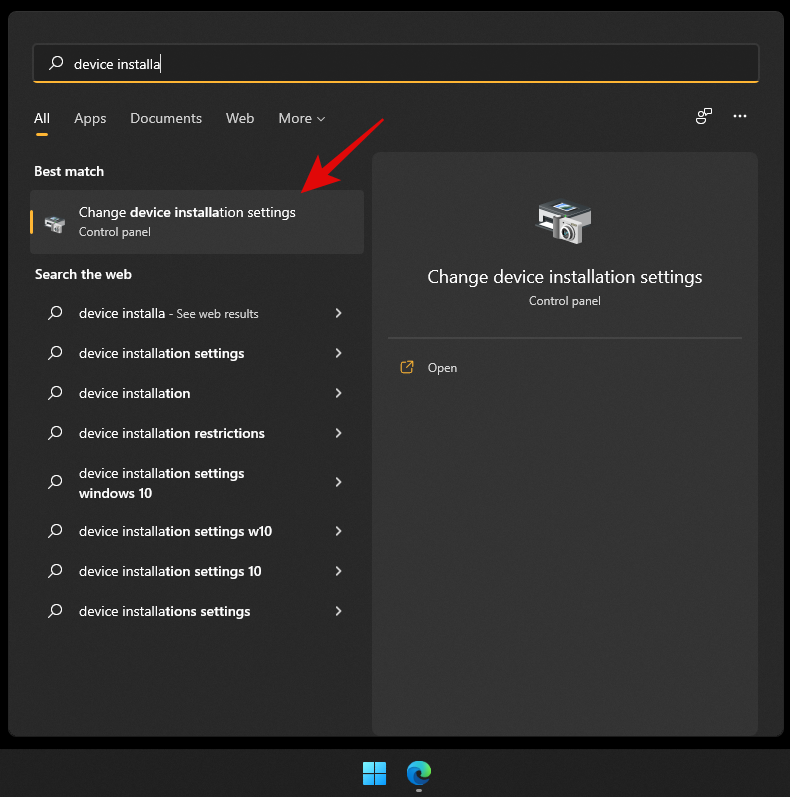
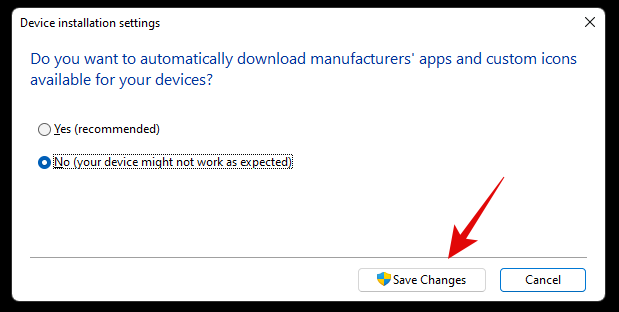
Select ‘No’.
Click on ‘Save changes’.
The changes will now be saved and you will no longer receive OEM driver updates through Windows Update.
Related: 6 Ways to Update Drivers on Windows 11
Method #02: Stop updates for Microsoft products
If you have been receiving constant updates for new Microsoft features and old products that keep messing up your system, then you can use the guide below to disable updates for Microsoft products via Windows Update.
Press Windows + i on your keyboard to open the Settings app and select ‘Windows Update’ from the left sidebar.

Click on ‘Advanced options’.

Now turn off the toggle for ‘Receive updates for other Microsoft products’ at the top.
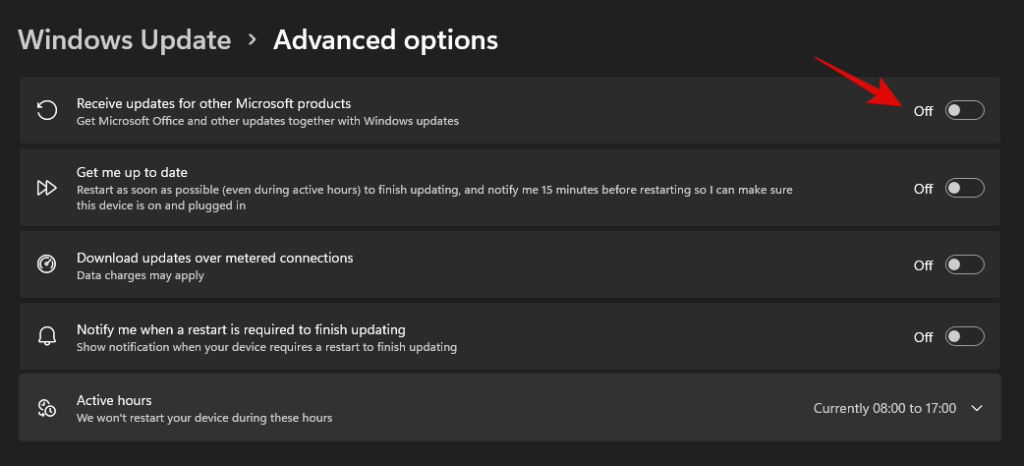
You will no longer receive updates for Microsoft products installed on your system via Windows update.
Method #03: Change active hours for background download and installation for updates
If you’re just looking to dismiss updates so that they don’t interfere with your work hours, then this is the perfect option for you. You can decide when Windows can download and update your PC in the background which will prevent Windows from interfering with your work hours. Follow the guide below to get you started.
Press Windows + i on your keyboard and click on ‘Windows Update’ on your left.

Click on ‘Advanced options’.

Now turn off the toggle for ‘Get me up to date’.
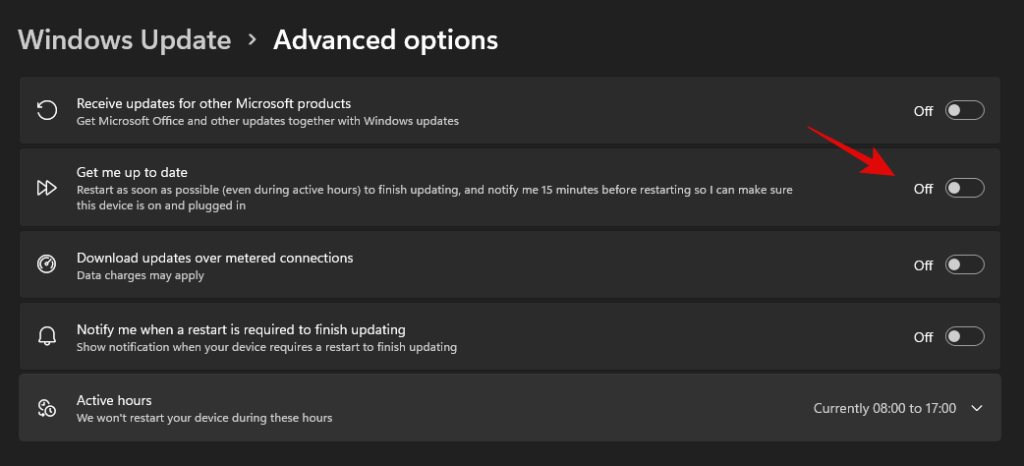
Click on ‘Active hours’.
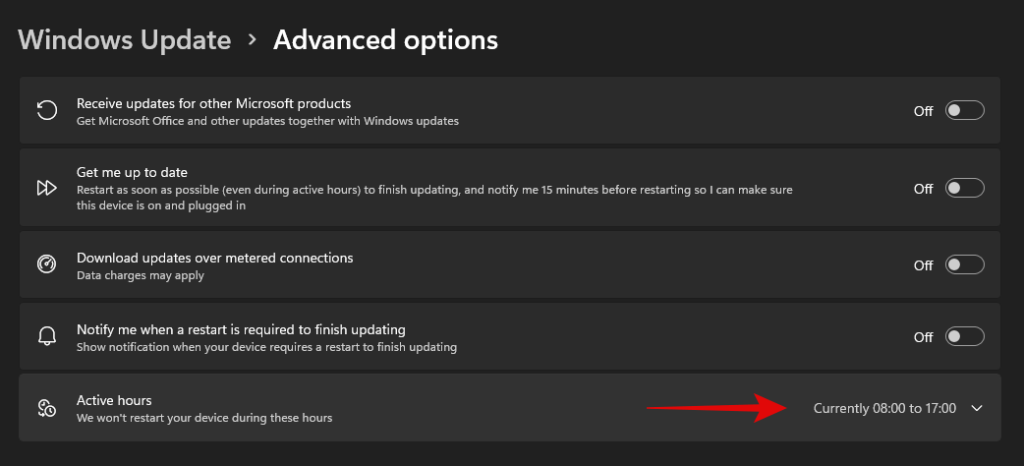
Click on the drop-down menu and select ‘Manually’.
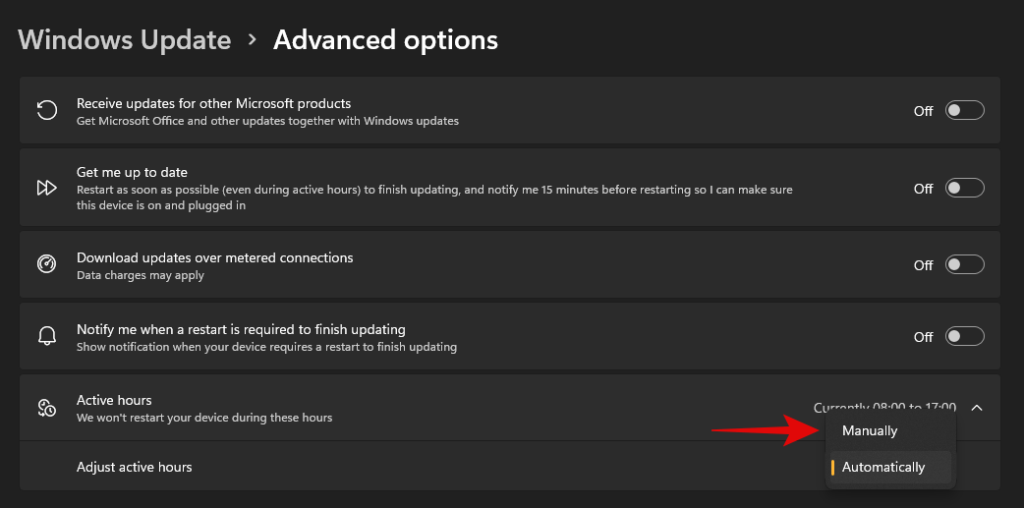
Define your desired start and end time. Windows won’t download updates and restart your PC during these hours.

And that’s it! Active hours should now be enabled for your system.
Method #04: Block Windows updates that you never wish to install
If you are receiving forced Windows updates that you don’t ever wish to install on your system then you can use a dedicated Windows troubleshooter to solve your issue.
This can be helpful in case you are trying to stop an update that disables a certain feature on your system that you don’t want disabled. This could be access to voltage controls, clock speed controls, turbo controls, fan controls, RGB control, and more. Follow the guide below to get you started.
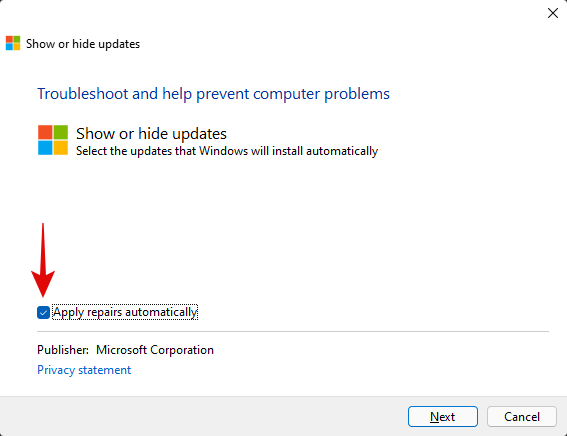
Download the Windows Update Show Hide troubleshooter using the link above and launch it on your PC. Click on ‘Advanced’.

Uncheck the option for ‘Apply repairs automatically’.
Click on ‘Next’.
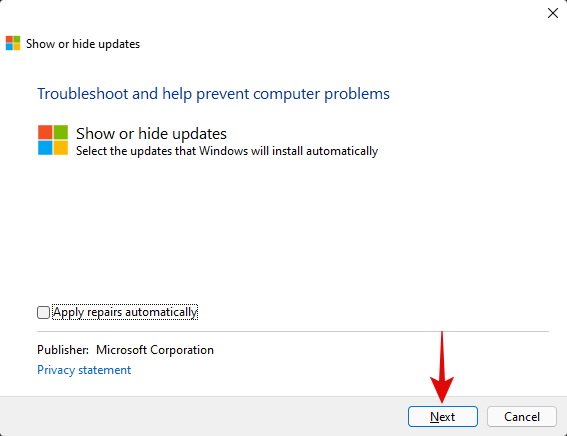
The troubleshooter will now look for pending updates and display them on your screen. Click on ‘Hide updates’.
Check the boxes for all the updates you don’t wish to receive on your PC.

Click on ‘Next’.
Ensure that ‘Hide updates’ is selected and click on ‘Next’.
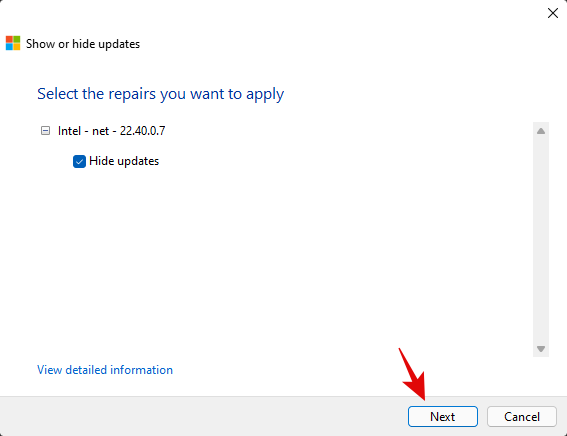
The troubleshooter will now hide the necessary Windows updates from your PC which in turn will prevent them from ever being downloaded on your PC. Click on ‘Close’.
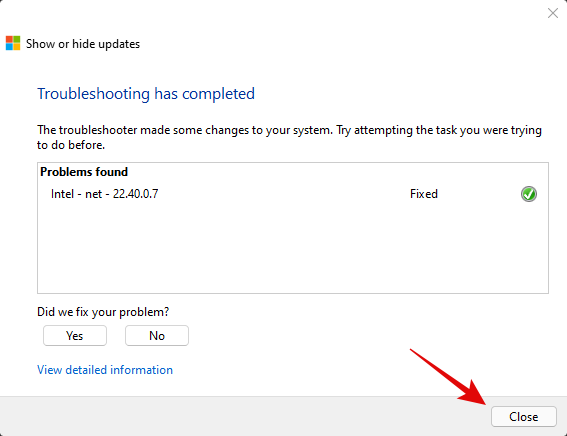
And that’s it! You will now have blocked the necessary updates on Windows 11.
Can you turn off Windows updates?
Yes, you can use certain workarounds and tricks to disable Windows updates on your PC. However, this isn’t recommended as you will lose out on important security patches which would leave you vulnerable to online threats including hackers, malware, adware, and more.
Hence we recommend you keep your PC updated or at least opt to install the latest security updates on your PC. Even if you are losing out on features it’s usually because of a hardware security vulnerability that would compromise your system.
However, if you still wish to disable Windows Updates on your PC, you can use this dedicated guide from us. If you face any issues, feel free to drop a comment.
Can’t uninstall Windows updates? Try these fixes!
If you are unable to install updates on your PC, then you can try the following fixes. However, if you are still unable to uninstall updates then this might indicate an issue with your Windows installation in which case resetting your PC might be the best option.
Follow the guides below to get you started.
Method #01: Reset Windows components and try again
If you have been unable to uninstall updates then you can try resetting your windows components. This will help fix corrupted system files in the background that might be preventing you from uninstalling updates on your system. We will be using a modified script from Mircosoft to help reset all components of Windows 11. The script was originally developed for Windows 10 or higher and hence will need some edits to work properly on Windows 11. This script will perform the following tasks on your system when executed;
- Remove older Windows updates folder
- Re-register Windows update files
- Reset your network connection
Follow the steps below to run the script on your system and reset Windows update components on your PC.
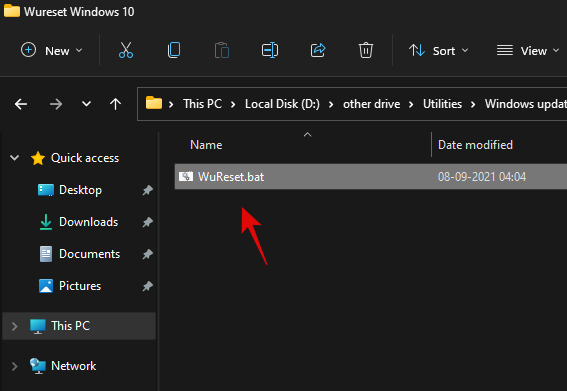
Download the script using the link above to your local storage and extract it to a convenient location. Once extracted right click on the script.
Click on ‘Show more options’.
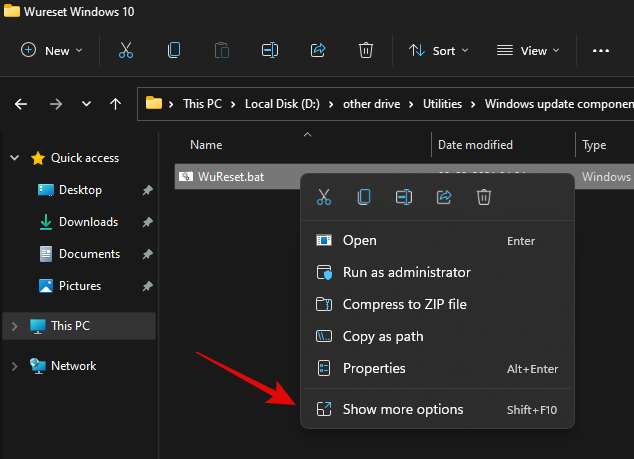
Select ‘Rename’.
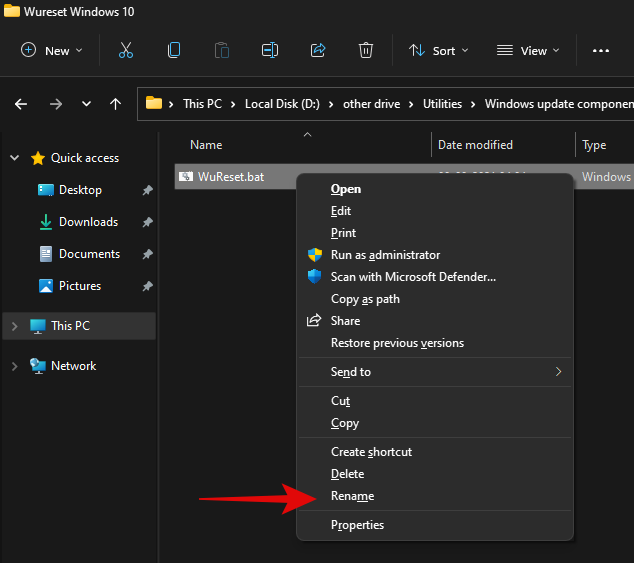
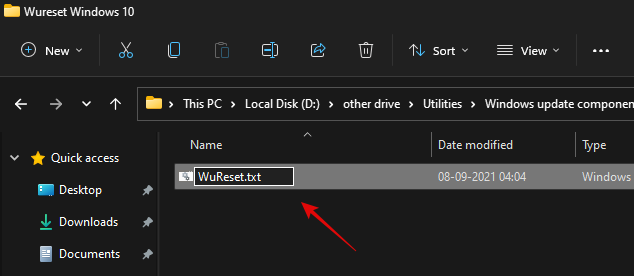
Replace ‘.bat’ with ‘.txt’.
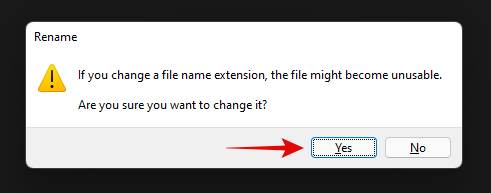
Click on ‘Yes’ to confirm your choice.
Now double click and open the file and it should open in your notepad. Once opened, scroll to the ‘:Reset’ section for resetting network commands and add the following line after the first delete command as shown below.
del /s /q /f "%SYSTEMROOT%\Logs\WindowsUpdate\*"
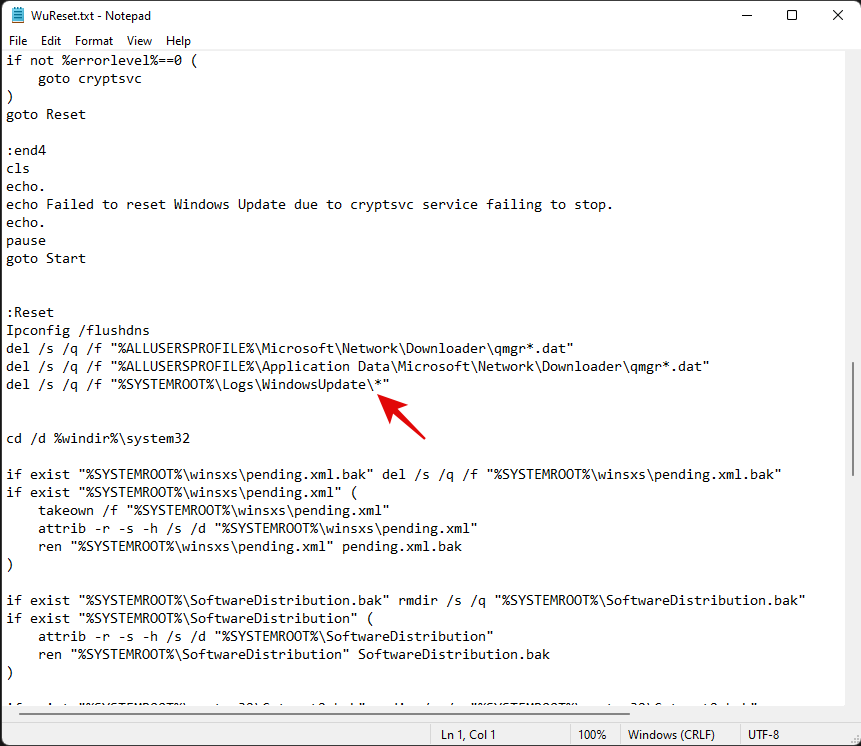
Once added, hit Ctrl + S on your keyboard. Ensure that there are no formatting changes or spaces before or after the line. The file will now be saved on your system along with its recent changes. We will now add some code to Reset Windows’s update policies on your system. Copy the lines below and paste them after your system commands. Ensure that two empty lines are available at either end of the code as shown below.
:: Windows Update policies resetting
reg delete "HKCU\SOFTWARE\Policies\Microsoft\Windows\WindowsUpdate" /f
reg delete "HKCU\SOFTWARE\Microsoft\Windows\CurrentVersion\Policies\WindowsUpdate" /f
reg delete "HKLM\SOFTWARE\Policies\Microsoft\Windows\WindowsUpdate" /f
reg delete "HKLM\SOFTWARE\Microsoft\Windows\CurrentVersion\Policies\WindowsUpdate" /f
gpupdate /force
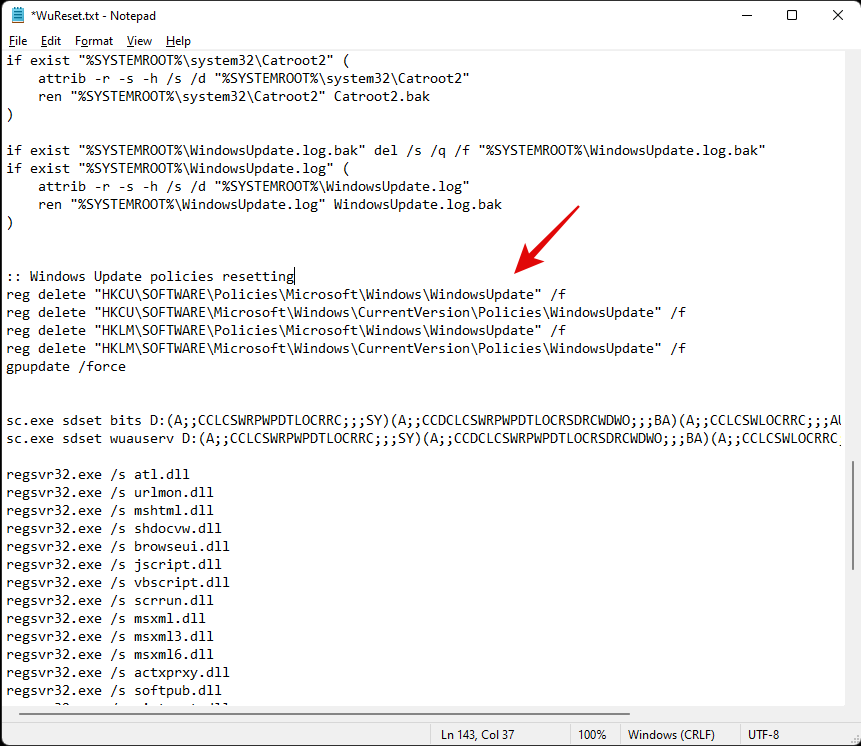
Lastly, let’s add some lines to ensure that the startup type for this service is set to ‘Automatic’. Copy the code below and add the lines after your winsock reset commands but before your service starting commands as shown below. Copy and paste the code in its respective location.
:: Set the startup type as automatic
sc config wuauserv start= auto
sc config bits start= auto
sc config DcomLaunch start= auto
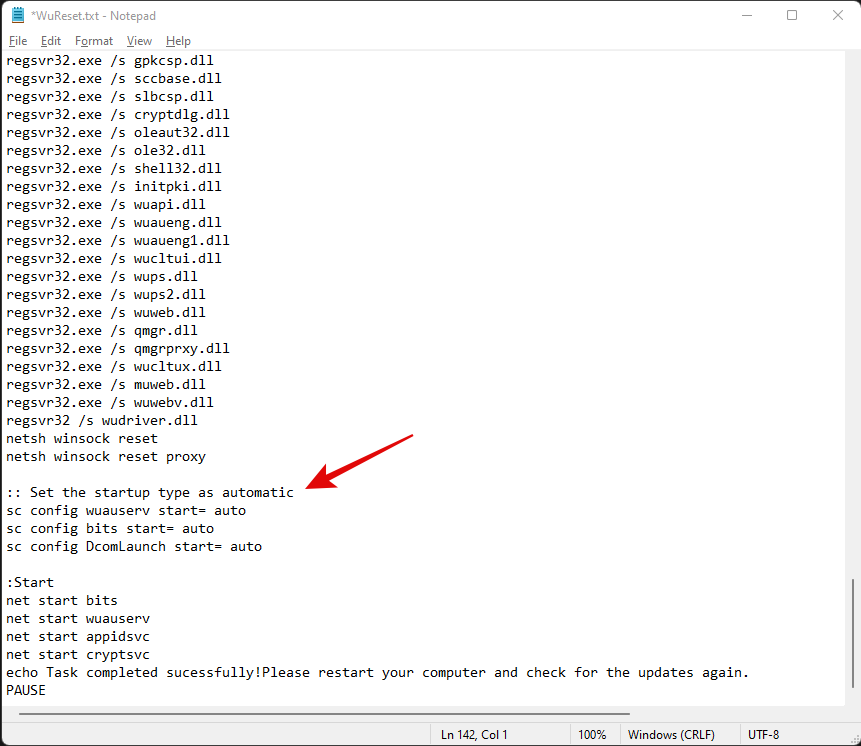
Once you are done, hit Ctrl + S on your keyboard to save your changes. Close the file and right-click on it again and select ‘Show more options’.
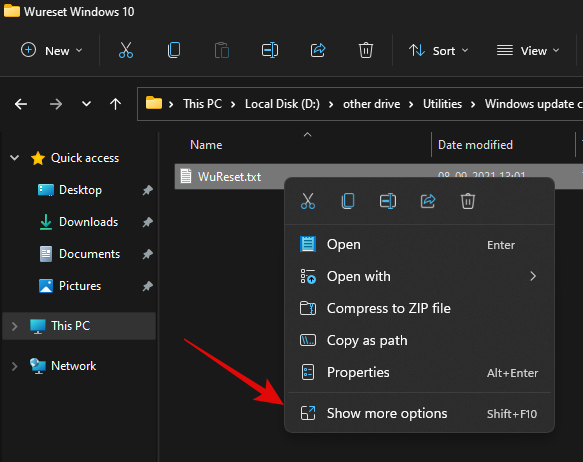
Click on ‘Rename’.
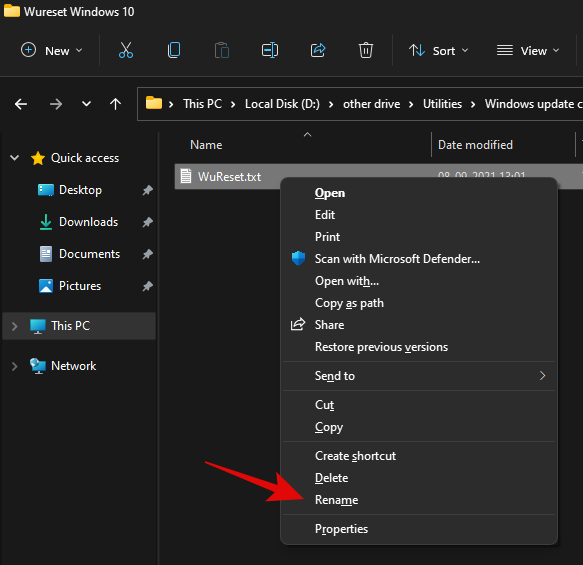
Replace ‘.txt’ with ‘.bat’.
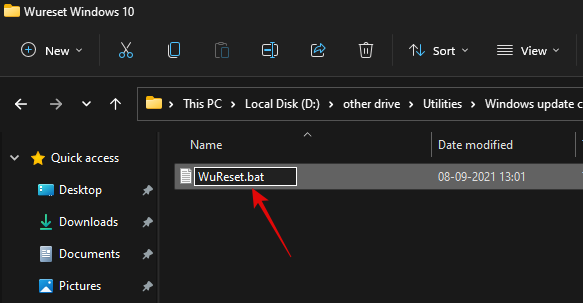
Once done, right-click on the file and select ‘Run as administrator’.
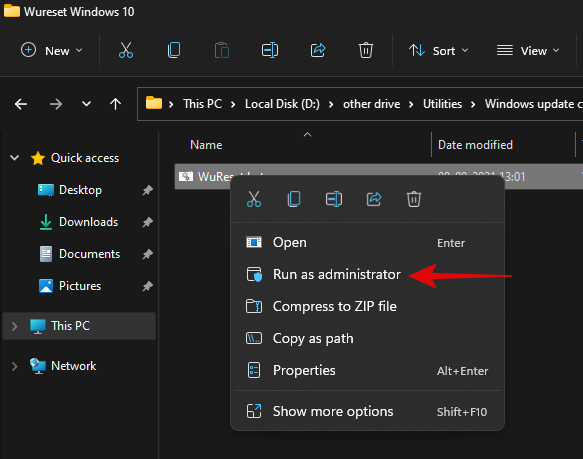
The batch script will now run on your PC and do its thing. Once the process completes, you will be asked to restart your PC. We highly recommend that you restart your PC at the earliest after running this script. Upon a restart, your Windows update should be reset and a fresh start should help you easily install pending Windows updates on your PC.
Method #02: Use DISM to uninstall the concerned packages
If you are still unable to uninstall specific Windows Update packages then simply use the DISM method to remove the concerned updates from your PC. This method force removes any available Windows updates from your PC without any issue. You will get a list of all the available updates in a table format which should make it much easier for you to find the culprit on your PC. Simply follow the guide at the top to get you started.
Method #03: Run SFC & DISM commands
At this point, if Windows still fails to update your system then you are facing a more serious issue than we anticipated earlier. This could indicate system-level corruption of files or missing system files from your system. In such cases, you can run SFC and DISM checks to fix corrupted files as well as restore missing system files. Follow the guide below to get you started.
Press Windows + S on your keyboard and search for CMD. Click on ‘Run as administrator’ once it shows up in your search results.
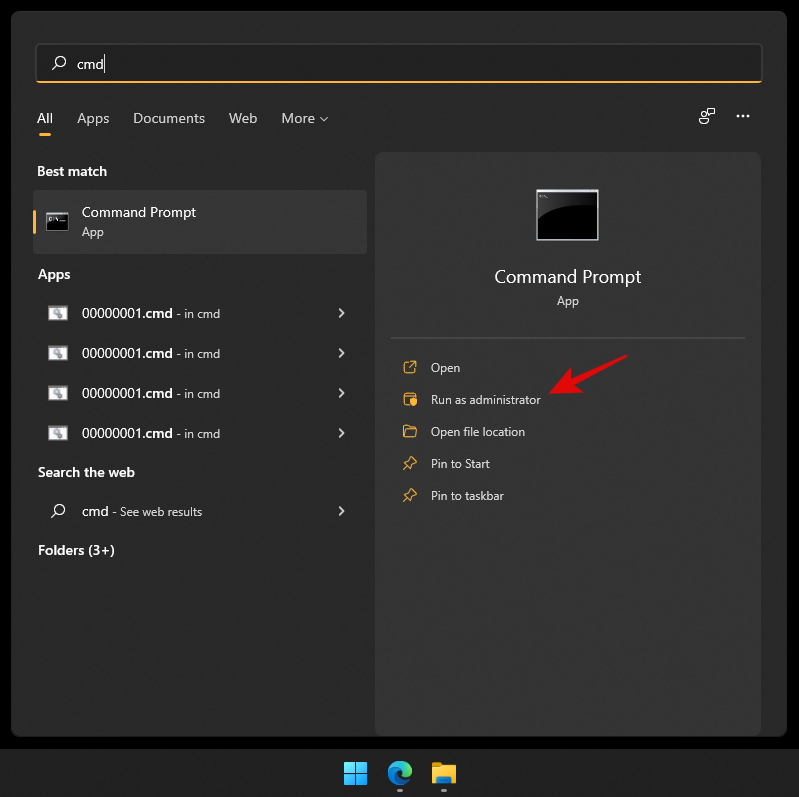
Type in the following command and press Enter on your PC.
sfc /scannow
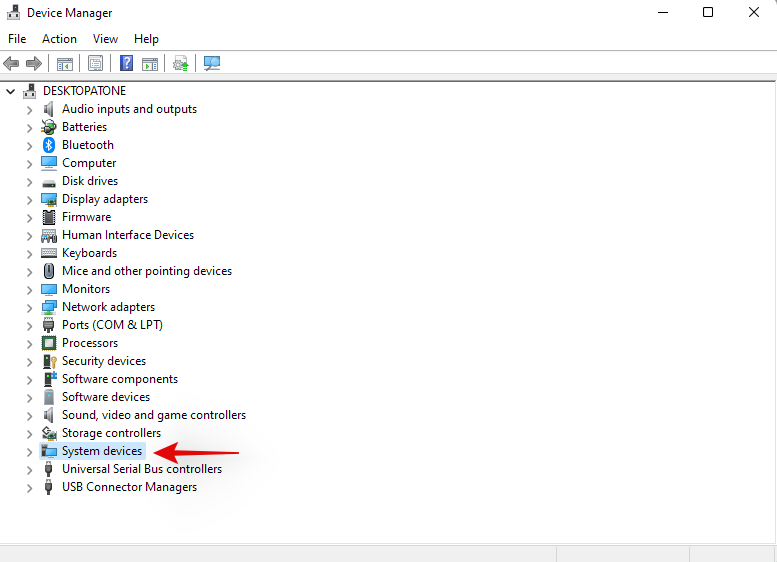
Once the SFC scan completes, type in the following command and execute it.
DISM /Online /Cleanup-Image /RestoreHealth
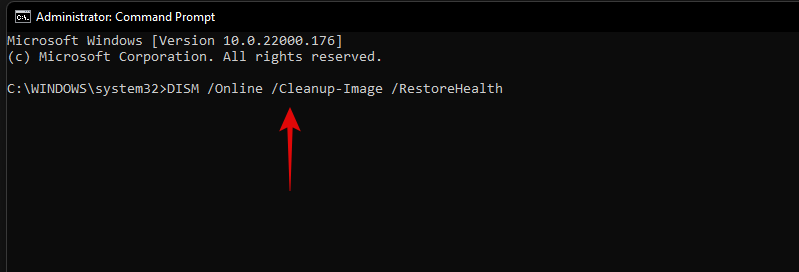
We recommend you restart your PC once the process completes.
Method #04: Last resort: Reset your PC
If nothing seems to be working for you then it might be time for a fresh installation of Windows 11 on your system. You can try getting in touch with your support team as well but if nothing works then a reset of your PC is the best option. In most cases, a reset while keeping your local files should help get Windows update working on your system.
Windows 11 connects to the update servers and updates your security definitions and drivers during OOBE. Windows will fix all update issues and reinstall necessary services on your system to get Windows update back up and running on your system during this process.
► You can use this dedicated guide from us to reset your Windows 11 PC.
We hope you were able to easily uninstall updates from your Windows 11 PC using the guide above. If you face any issues, feel free to drop a comment below.
Related:


![Cómo desinstalar McAfee en Windows 11 [5 formas] Cómo desinstalar McAfee en Windows 11 [5 formas]](https://cloudo3.com/resources8/images31/image-4917-0105182719945.png)


