Windows 11 ha suscitato molto scalpore da quando è stato annunciato alcuni mesi fa. Gli addetti ai lavori e i beta tester hanno molti aspetti positivi da dire e la nuova interfaccia utente e le funzionalità sembrano adattarsi bene a tutti. Pertanto, Windows 11 include molte modifiche alle funzionalità esistenti nel sistema operativo, tra cui la nuova ricerca di Windows. La ricerca è ora più completa, veloce ed efficiente. Se stai cercando di utilizzare Windows Search, ecco tutto ciò che devi sapere al riguardo. Iniziamo.
Contenuti
Cosa c'è di nuovo nella ricerca di Windows 11?
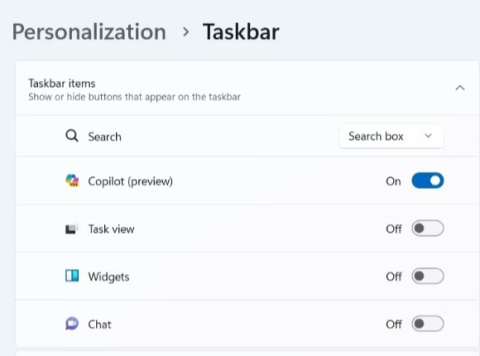
Windows 11 viene fornito con tonnellate di miglioramenti nascosti alla ricerca, tuttavia, non ci sono molte modifiche evidenti al funzionamento esterno di Windows Search. Tuttavia, puoi aspettarti le seguenti nuove modifiche con Windows Search.
- Nuova icona sulla barra delle applicazioni
- Ricerca del tipo di file dedicato
- Impostazioni di ricerca accessibili dal menu Start
- Supporto per la ricerca nel cloud in combinazione con i servizi di cloud storage
- Opzioni di indicizzazione complete
- Risultati più rapidi
- Indicizzazione efficiente con un basso utilizzo della batteria sui dispositivi mobili
E altro ancora. Mentre esplori Windows Search in Windows 11 troverai piccoli nuovi dettagli in ogni aspetto della funzionalità.
Correlati: Come condividere file e cartelle su Windows 11
Scorciatoia da tastiera per la ricerca di Windows 11

Puoi usare Windows + Ssulla tastiera per far apparire Windows Search direttamente sul tuo sistema. Puoi continuare a digitare per iniziare a cercare nel tuo sistema app, file e cartelle pertinenti. Inoltre, premendo Invio sulla tastiera si aprirà il primo risultato di ricerca sul PC.
Correlati: Come abilitare la virtualizzazione nel BIOS su Windows 11 o 10
Come usare la ricerca di Windows
È possibile utilizzare Ricerca di Windows utilizzando i seguenti metodi. Ogni metodo ha i suoi vantaggi e vantaggi, quindi a seconda del file che stai cercando, puoi utilizzare uno dei metodi seguenti.
Premi il tasto Windows sulla tastiera per aprire il menu Start. Puoi anche fare clic sull'icona nella barra delle applicazioni.

Una volta aperto, inizia a digitare il nome del file/programma che stai cercando, il file/cartella/programma dovrebbe apparire automaticamente nei risultati della ricerca. Se non vedi il tuo file in alto, prova a fare clic su una delle categorie sottostanti per espandere i risultati della ricerca.

Una volta trovato, fai clic sul risultato della ricerca per aprirlo. Puoi anche fare clic sulla freccia per visualizzare maggiori dettagli al riguardo. E questo è tutto! Ora avrai utilizzato la ricerca di Windows dal menu Start.
Correlati: Come aggiornare i driver su Windows 11
Utilizzo della scorciatoia da tastiera
Premi Windows + Ssulla tastiera per aprire la ricerca. Ora passa al tipo di file desiderato, se necessario.

Digita il termine di ricerca. Se necessario, fare clic sulla casella di testo.

Windows ora cercherà il tuo file/cartella e i risultati verranno visualizzati sullo schermo. Puoi fare clic ed espandere le categorie sottostanti per visualizzare più risultati.

Inoltre, se desideri visualizzare maggiori dettagli su un file o un programma, puoi fare clic sulla freccia accanto. Ora avrai utilizzato Windows Search utilizzando la scorciatoia da tastiera.
Utilizzo di Esplora file
Premi Windows + Esulla tastiera per aprire Esplora file. Passare all'unità/directory/cartella che si desidera cercare. Una volta aperto, fai clic sulla casella di ricerca nell'angolo in alto a destra dello schermo.

Digita ora il termine di ricerca e premi Invio sulla tastiera.

Windows cercherà ora la directory corrente per il termine di ricerca e quindi visualizzerà tutti i risultati sullo schermo. Ora puoi fare clic e avviare il file.

Puoi anche fare clic con il pulsante destro del mouse su di esso e selezionare "Apri posizione file" per visitare la sua directory corrente nella memoria locale.

Inoltre, puoi utilizzare le frecce a discesa in alto per ordinare i risultati della ricerca e trovare più facilmente il tuo file/cartella/programma.

E questo è tutto! Ora avrai utilizzato la ricerca di Windows tramite Esplora file.
Come aumentare l'indicizzazione per Windows Search
Windows Search per impostazione predefinita cercherà solo file e termini di ricerca in directory e percorsi selezionati. Questi percorsi predefiniti coprono le directory più comuni su Windows come il menu Start, documenti, musica, immagini e altro. Se desideri aumentare l'estensione dell'indicizzazione su Windows 11, puoi utilizzare la guida di seguito per iniziare.
Premi Windows + isulla tastiera per aprire l'app Impostazioni. Ora fai clic su "Privacy e sicurezza" alla tua sinistra.

Fai clic su "Ricerca in Windows" alla tua destra.

Fare clic ed espandere "Trova i miei file".

Seleziona "Migliorato".

Ora, se desideri escludere qualsiasi cartella dall'indicizzazione, fai clic su "Aggiungi una cartella esclusa".

Nota: Windows avrà aggiunto alcune cartelle per impostazione predefinita. Si consiglia di continuare a escludere queste cartelle per evitare l'utilizzo non necessario delle risorse per indicizzare i file di sistema.
Una volta escluse tutte le cartelle, ora possiamo iniziare a indicizzare tutte le tue unità. Fai clic su "Opzioni di indicizzazione avanzate" in basso.

Fare clic su "Modifica".

Seleziona ora le caselle per le tue unità.

Fare clic su "Ok" una volta fatto.

Fare clic su "Chiudi". E questo è tutto! Ora avrai aumentato le tue posizioni di indicizzazione all'interno di Windows Search. Se utilizzi un laptop, le tue nuove posizioni verranno indicizzate una volta che l'unità sarà collegata all'alimentazione.
Correlati: Come creare un punto di ripristino in Windows 11
Usa le opzioni di ricerca
Gli strumenti di ricerca esistono ormai da tempo in Esplora file e ti consentono di gestire i risultati della ricerca con molta più efficienza. Questo può aiutarti a trovare file di cui non ricordi il nome e ricordare solo alcuni dettagli al riguardo. Gli strumenti di ricerca ora sono stati rinominati "Opzioni di ricerca" in Windows 11 e ora viene invece visualizzato un menu a discesa per le opzioni. Inizia esplorando le tue opzioni e cercando un termine in Esplora file come faresti normalmente. Una volta visualizzati i risultati della ricerca, dovresti trovare "Opzioni di ricerca" nella parte superiore dello schermo. Ora usa le seguenti opzioni per filtrare i risultati della ricerca di conseguenza.
- Tutte le cartelle: cerca in tutte le cartelle nell'unità/partizione corrente il termine di ricerca.
- Cartella corrente: cerca solo la cartella corrente per il termine di ricerca.
Puoi anche dettare come sono ordinati i risultati della ricerca. Questo può aiutarti a trovare file di grandi dimensioni o file in base ai tipi di file. Usa una delle opzioni qui sotto
- Data di modifica: utilizzare questa opzione per ordinare i risultati in base all'ora in cui sono stati creati nella memoria locale.

- Tipo: puoi utilizzare questa opzione per ordinare i file in base al tipo. Puoi cercare file di calendario, cartelle, giochi, immagini, musica e altro. Puoi selezionare tra oltre 23 diversi tipi di file per ordinare i risultati della ricerca.

- Dimensione: usa questa opzione per filtrare i tuoi file in base alla loro dimensione. Avrai le seguenti opzioni tra cui scegliere.

-
- Vuoto: 0kb
- Piccolo: da 0kb a 16kb
- Piccolo: da 16 kb a 1 MB
- Medio: da 1 MB a 128 MB
- Grande: da 128 MB a 1 GB
- Huge: 1GB to 4GB
- Gigantic: Files greater than 4GB in size
Additionally, you get the following more options to filter your search results. These options will dictate where and which files will be searched by Windows. Simply click on the option to activate or deactivate it.
- System files
- Zipped (compressed) folders
- File contents
And that’s how you can use Search Options in Windows 11 to your advantage. We have a few more tips to help you make the most of Windows Search in Windows 11. You can use the section below to get started.
Related: How to Uninstall Apps on Windows 11
Tips to use Windows Search to your advantage
Windows Search has a few certain hidden shortcuts and key terms that can directly help you filter or sort your search results depending on your preferences. Here are a few tips to help you get the most out of Windows Search on Windows 11.
Find large files
You can find large files on a drive or in a folder easily by using the command ‘size:’. You can then use one of the terms from your Search Options to filter your files and display them based on their size. For example, if you wish to search for files larger than 4GB in size in the current directory then you can use the following command.
size:gigantic

Similarly, you can further filter your search results using Search Options to identify large movies, pictures, calendar files, games, or more taking up space on your PC.
Find file types
Similar to the command above, you can use the ‘kind:’ parameter to find certain files in the current directory. The ‘kind’ parameter will allow you to look for calendar files, text documents, pictures, videos games, and more. When using the kind parameter this way you are not restricted to Windows’s predefined categories, instead you can define specific file extensions as well to find them on your PC as shown below.
kind:.exe

The command above will help you look for executables in the current directory.

Similarly using the command below will help you find PDF files in the selected directory.
kind:.pdf

And that’s it! You can use these commands to find certain files on your PC using Windows Search.
Related: How to Hide Badges on Taskbar Icons on Windows 11
Find files by date
You can also use the ‘date:’ parameter to look for files created on a certain date. Additionally, this command can be used in conjunction with Boolean filters below to find files created or modified before or after a certain date on your PC. For example, if looking for a file created on the 1st of January 2020, then you can use the following command below.
date: 1/1/2020

Similarly if looking for a file created on the 1st January 2021, then you can use the following command.
date: 1/1/2021
Use Boolean Filters
Boolean filters can help you search multiple terms simultaneously or in conjunction with each other when using Windows Search. Here are the following Boolean filters that you can use to your advantage.
The ‘AND’ parameter
You can use the AND parameter to search for two search terms together. This way you can look for a file containing both the terms and not either one of them which should help you filter out unwanted results containing either of the terms. For example, if looking for a file containing the words ‘Samsung and ‘galaxy’ in its name then I can use the following term to search for your file.
Samsung AND galaxy

This will filter out files with only ‘Samsung’ and ‘Galaxy’ in their name. Files with either term will be filtered out.
The ‘OR’ parameter
The OR parameter is opposite to the AND parameter and allows you to search for files containing either of the terms in your search term. For example, if I wish to search for files with either ‘Apple’ or ‘Airpods’ in their name, then I can use the following search term.
apple OR airpods

Similarly, if I am looking for PDF and EXE files in a particular directory, then I can use the following command below.
kind:.exe OR .pdf

And that’s how you can use the OR parameter to look for multiple search terms in a single file name.
The ‘NOT’ parameter
If you are looking to filter out a certain search term or a filet type then you can use the NOT parameter. The NOT parameter will exclude the desired file type, kind, size, or name depending on your choice. For example, if in a folder full of .docx files you are looking for other file types and wish to filter them all out, then you can use the following command.
kind: NOT .docx

Similarly, if I am looking for a file that does not have ‘Apple” in its name then I can use the following search term.
NOT apple

Double Quotes
If you remember an exact term for the file that you are searching for then you can use double-quotes. This will force Windows Search to look for the exact search term with the specific formatting and case to find the file that you are looking for. For example, if looking for a file with ‘Apple 2019′ in its title then you can use the following command below.
“Apple 2019”

Parentheses
Parentheses is a Boolean filter that is usually used when you are searching file contents as well. Anything included between the parentheses () is searched for and files with either or all of the terms are displayed on your screen. For example, if looking for a file containing either ‘Apple, Samsung, Mi, Microsoft, and Dell’ or all of these terms, then you can use the following term.
(Apple Samsung Mi Microsoft Dell)

Similarly, you can use the following command if looking for multiple file types.
kind:(.exe .pdf .txt)

And that’s it! You will now have used parentheses to your advantage to look for multiple search terms in a particular file.
‘>’ and ‘<‘>
These two Boolean filters are usually used when looking for file types or when sorting your results based on a parameter. The greater than and less than parameters can be used to filter your results based on a number. For example, if looking for files dated after 1st January 2021 then you can use the following command.
date: >1/1/2021

Similarly, if looking for files less than 10GB then you can use the following command.
size: <>

You can use the greater than and less than parameters to your advantage this way and find the desired files on your system.
Related: How to Type Accents on Windows 11
Are there any Windows search alternatives?
Yes, there are a few Windows search alternatives out there developed by third parties that offer competitive indexing options and promise higher working efficiency when it comes to using your system’s resources. Windows Search, however, would still be our recommended tool for you as it has been installed natively on your system. Using a third-party tool will add additional workload to your PC unless Windows Search has been completely disabled. Hence, we recommend that you try PowerToys by Microsoft first to get a native utility on your PC that uses and enhances Windows Search instead. If that does not work out for you, you can then opt for any one of the third-party utilities listed below.
PowerToys
PowerToys is a collection of enhanced tools by Microsoft that offer you utilities like PowerToys Run (Windows Search), Color Picker, Power Renamer, and more to help increase your productivity and enhance your workflow. PowerToys Run is a spotlight-like search feature in PowerToys that uses Windows Search to index and display files on your PC. PowerToys Run gives you a more elegant way of using Search on your PC. Use the guide below to get you started.
Download and install PowerToys on your PC using the link above. Once installed, launch PowerToys from the taskbar as shown below.

Once PowerToys is launched, we recommend you click on each feature on your left and disable the ones that you don’t wish to use. PowerToys have comprehensive tools that can cause your system to behave unexpectedly if you do not know about them. Hence, disable all the features that you do not need or wish to use on your PC.

Click on ‘PowerToys Run’ on your left.

Enable the toggle at the top.

Set a custom shortcut if needed. By default, you can use Alt + Space to activate PowerToys Run.

Increase the number of search results you wish to view if needed.

Set a position for the search box if you have a multi-monitor setup.

Choose a custom theme if needed.

Additionally, PoweToys Run is highly capable and can help you access apps from within the search box itself. For example, you can enter equations in the search box, and you will automatically get a result from the calculator app as a search result as shown below.

Similarly, you can also execute commands from the search box itself. Ping is a good example that shows up in the search results as shown below.

However, if you are not going to be using these features then there is no point in having them enabled on your PC. Simply disabled the plugins in the PowerToys window as shown below.

And that’s it! You will now have configured PowerToys Run on your system as a Windows Search alternative.
Third-party apps
If PowerToys is not up to mark for you and you are looking for something a bit more comprehensive then you can check out the following Windows Search alternatives below.
We hope you were able to get familiar with Windows Search in Windows 11 using the guide above. If you face any errors or have any questions for us, feel free to reach out using the comments section below.
Can you disable Windows search in Windows 11?
No and yes. Windows does not offer a native way to disable Windows Search. However, this could be detrimental to older systems where Search could end up taking vital resources in the background that would in turn slow your system down. In such cases, and more, you can use a few workarounds to disable Windows Search in the background on Windows 11. You can use the guide below to disable Windows Search on Windows 11.
How to disable Windows search
If you wish to disable Windows Search then disabling the service is the easiest way. Follow the guide below to get you started.
Press Windows + R on your keyboard and type in the following. Press Enter on your keyboard once you are done.
services.msc

Search for a service named ‘Windows Search’ and right-click on it.

Select ‘Properties’.

Click on ‘Stop’.

Click on the drop-down menu and select ‘Disabled’.

Fare clic su "Ok".

Riavvia il sistema e Windows Search dovrebbe essere disabilitato sul tuo sistema.
Imparentato:
