Gli aggiornamenti di Windows sono sempre stati un noto fastidio per molti utenti sin dai tempi di Windows XP. Per fortuna, la consegna degli aggiornamenti di Windows è migliorata drasticamente negli ultimi anni e pochissimi aggiornamenti delle funzionalità tendono a causare gravi problemi al giorno d'oggi.
Puoi configurare Windows per il download e l'aggiornamento automatico in background e persino per riavviarlo durante le ore di inattività. Tutto questo è fantastico, ma cosa succede se viene installato un aggiornamento che non ti serviva? O cosa succede se ricevi un aggiornamento che degrada le prestazioni della tua macchina? Bene, in questo caso, puoi disinstallare gli aggiornamenti di Windows in Windows 11. Ma qui ci sono un paio di cose che dovresti tenere a mente prima di disinstallare gli aggiornamenti dal tuo PC Windows 11.
Correlati: Come disabilitare gli aggiornamenti su Windows 11
Contenuti
Perché disinstallare gli aggiornamenti di Windows?
Potrebbero esserci diversi motivi per cui desideri disinstallare gli aggiornamenti di Windows, ecco alcuni dei più comuni. Se stai risolvendo gli errori dopo un recente aggiornamento di Windows, puoi anche consultare questo elenco.
Nel caso in cui riscontri problemi di questo tipo sul tuo sistema, puoi provare a disinstallare l'ultimo aggiornamento di Windows per provare a risolvere il problema.
- Prestazioni complessive del sistema degradate
- Aggiornamenti driver difettosi
- Funzionalità danneggiata delle funzionalità di Windows
- Risorse mal gestite in background
- Utilizzo elevato della CPU o del disco
- Aggiornamento del driver indesiderato che stavi cercando di evitare
- Comportamento anomalo della sicurezza di Windows o dell'UAC
- Impostazioni della regione errate che non possono essere modificate
- Impostazioni o opzioni mancanti in Windows 11
e altro ancora. Ci possono essere un sacco di problemi che puoi affrontare durante l'installazione di un nuovo aggiornamento per Windows 11 soprattutto se sei iscritto al canale beta o insider. In questi casi, puoi provare a disinstallare l'aggiornamento in questione utilizzando la guida in questo post.
Correlati: Come annullare un aggiornamento di Windows Insider in sospeso
È sicuro disinstallare gli aggiornamenti di Windows?
Sì, fintanto che non stai rimuovendo forzatamente gli aggiornamenti di Windows manualmente o utilizzando un'utilità obsoleta, dovresti essere sicuro disinstallare gli aggiornamenti di Windows dal tuo sistema. Tuttavia, tieni presente che Microsoft utilizza gli aggiornamenti di Windows per fornire patch di sicurezza, hotfix e altro per proteggere il tuo sistema dalle minacce e dalle vulnerabilità di sicurezza più recenti.
La rimozione degli aggiornamenti di Windows disinstallerà anche tali patch che a loro volta finiranno per rendere il sistema vulnerabile alle minacce online. Questo è particolarmente vero se stai cercando di disinstallare gli aggiornamenti di sicurezza recenti.
Pertanto, mentre sei sicuro di disinstallare qualsiasi aggiornamento, ti consigliamo di ripristinare le modifiche non appena l'errore viene corretto. Se il tuo bug o errore persiste dopo aver reinstallato l'aggiornamento, puoi resistere fino a quando Microsoft non rilascerà un aggiornamento e una correzione successivi.
Correlati: Come rimuovere Bing da Windows 11
Come trovare gli aggiornamenti che si desidera rimuovere
Possiamo rimuovere gli aggiornamenti utilizzando vari metodi, ma per trovare quale aggiornamento desideri rimuovere, devi identificarlo sul tuo PC. A ogni aggiornamento Microsoft viene assegnato un numero KB che aiuta a determinare e identificare l'aggiornamento sui PC consumer e sui server Microsoft. Possiamo utilizzare questo numero a nostro vantaggio e rimuovere l'aggiornamento in questione dal tuo sistema utilizzando una delle guide di seguito. Ecco come puoi identificare gli aggiornamenti di Windows recenti installati sul tuo PC.
Metodo n. 01: utilizzo delle impostazioni
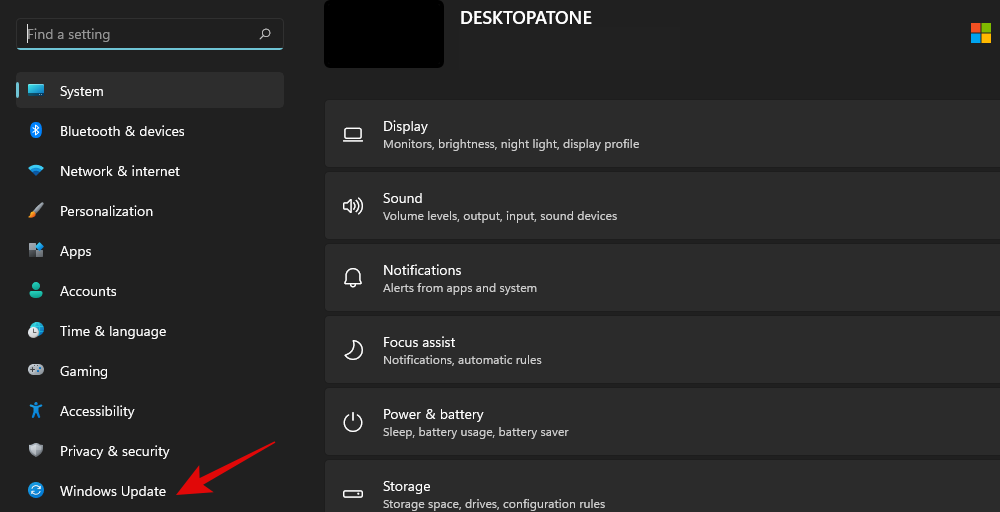
Premi Windows + isulla tastiera e seleziona "Aggiornamento Windows" alla tua sinistra.
Fare clic su "Aggiorna cronologia" ora.
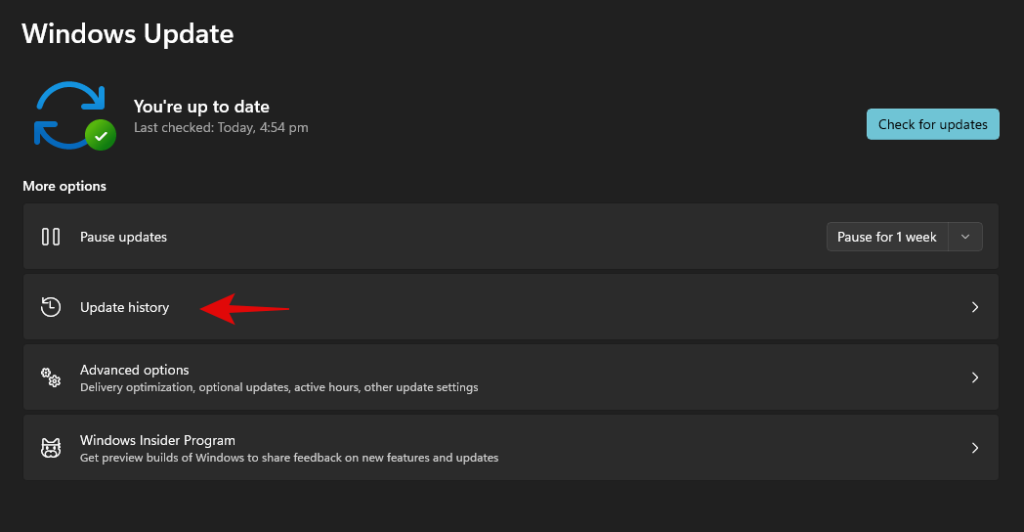
Ora otterrai un elenco degli aggiornamenti di Windows installati di recente sul tuo sistema.
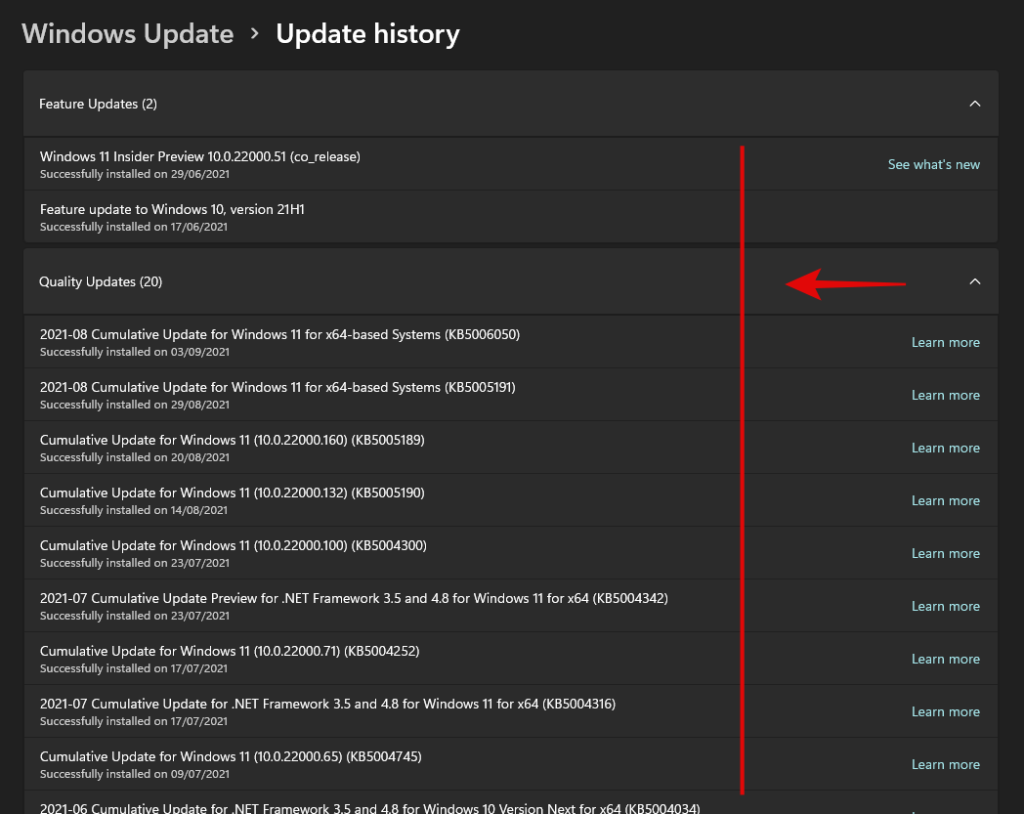
Annota semplicemente il numero di KB dell'aggiornamento che desideri rimuovere dal tuo PC.
Metodo n. 02: utilizzo di CMD
Premi Windows + Ssulla tastiera e cerca CMD. Fai clic su "Esegui come amministratore" quando l'app viene visualizzata nei risultati di ricerca.
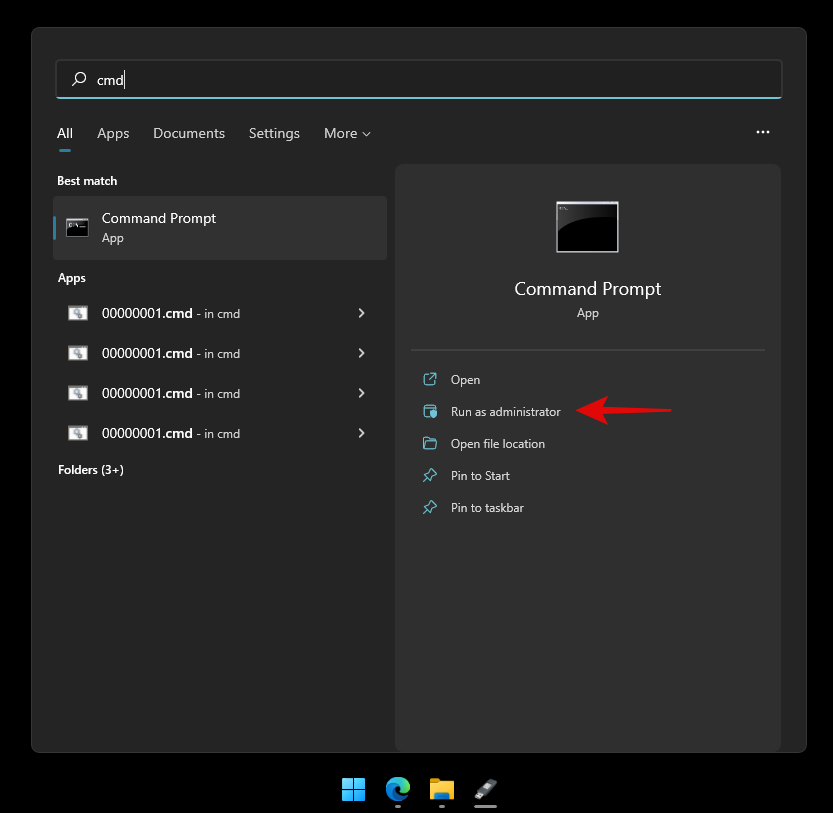
Digita il seguente comando e premi Invio sulla tastiera.
wmic qfe list brief /format:table
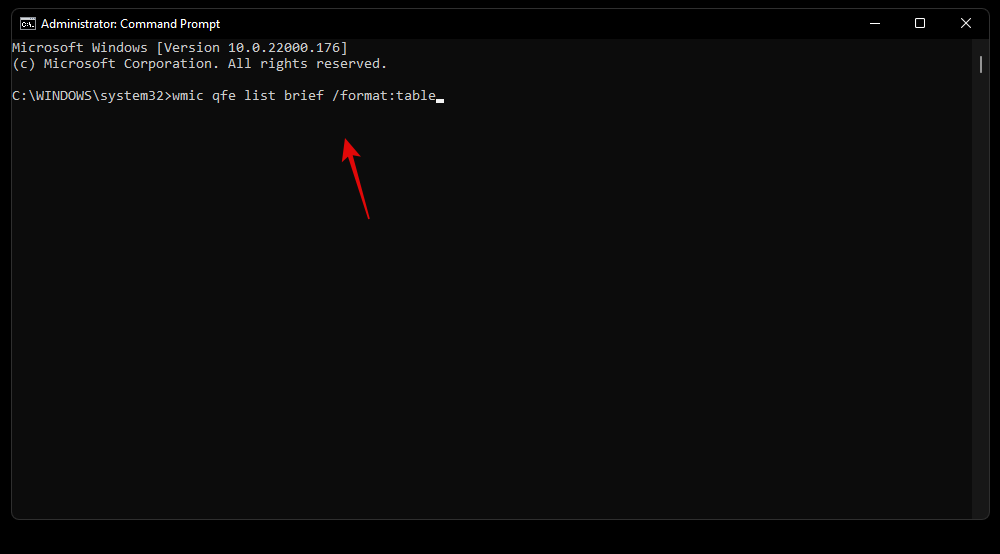
Ora otterrai un elenco di tutti i recenti aggiornamenti di Windows installati sul tuo PC. Fare clic ed espandere la categoria interessata dall'elenco sottostante.
- Aggiornamenti qualitativi: aggiornamenti delle funzionalità per Windows 11 che introducono importanti modifiche al sistema operativo.
- Aggiornamenti dei driver: aggiornamenti dei driver generici/OEM per le periferiche e i componenti forniti tramite l'aggiornamento di Windows.
- Aggiornamenti delle definizioni: aggiornamenti delle definizioni di sicurezza per aiutare Microsoft Defender a identificare e mettere in quarantena le minacce nel sistema.
- Altri aggiornamenti: aggiornamenti per prodotti Microsoft, funzionalità e altre funzionalità OEM specifiche per il tuo dispositivo. Anche le funzionalità di Windows e i pacchetti esperienza verranno aggiornati in questa categoria.
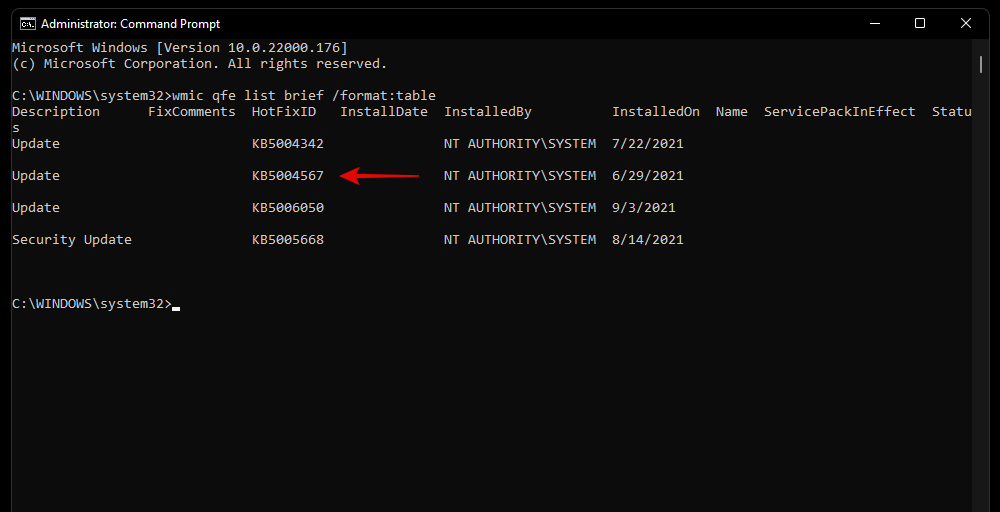
Identifica l'aggiornamento che desideri rimuovere e annota il suo "HotFixID". Utilizzeremo questo ID per rimuovere l'aggiornamento in questione utilizzando la guida di seguito.
Come rimuovere gli aggiornamenti di Windows dal tuo PC
Puoi rimuovere gli aggiornamenti di Windows dal tuo PC utilizzando uno dei metodi seguenti. Se sei bloccato da Windows o non riesci ad avviare il desktop, ti consigliamo di utilizzare il metodo Windows RE o il metodo CMD. Se puoi accedere al tuo desktop, puoi utilizzare l'app Impostazioni per rimuovere facilmente gli aggiornamenti dal tuo sistema. Utilizza le guide di seguito per iniziare in base alle tue preferenze.
Metodo n. 01: utilizzo delle impostazioni
Premi Windows + isulla tastiera e fai clic su "Aggiornamento Windows" nella barra laterale sinistra.

Fare clic su "Aggiorna cronologia".

Scorri fino in fondo e fai clic su "Disinstalla aggiornamenti".
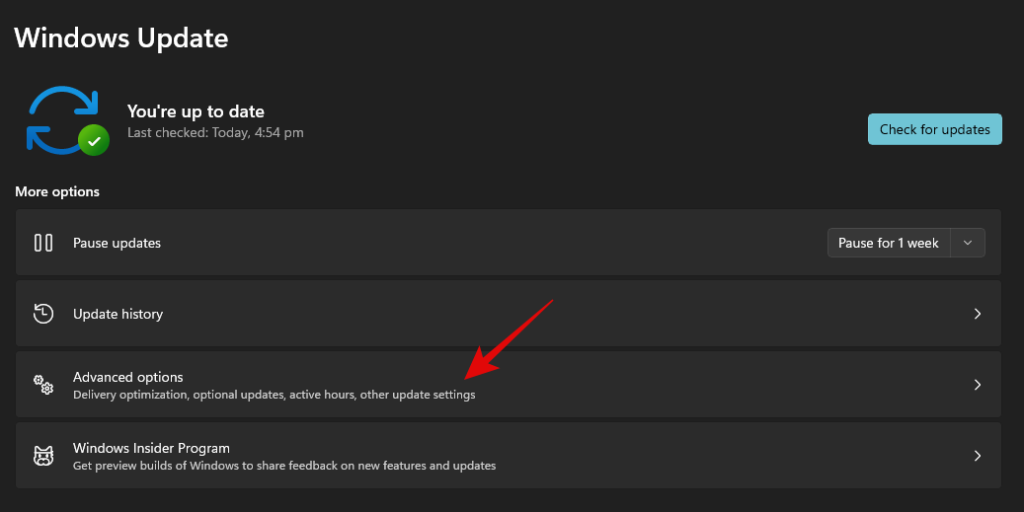
Verrai ora reindirizzato al Pannello di controllo dove troverai un elenco di aggiornamenti recenti che possono essere rimossi dal tuo sistema.

Seleziona l'aggiornamento che desideri rimuovere e fai clic su "Disinstalla" in alto.

Segui le istruzioni sullo schermo per disinstallare l'aggiornamento in questione dal tuo PC.
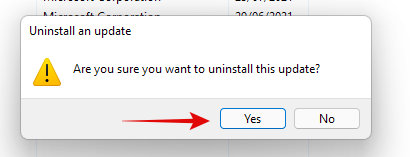
Ora puoi riavviare il PC e tutti i problemi che stavi affrontando a causa dell'aggiornamento dovrebbero essere risolti.
Metodo n. 02: utilizzo dello strumento di risoluzione dei problemi di aggiornamento di Windows
Premi Windows + isulla tastiera e fai clic su "Risoluzione dei problemi".
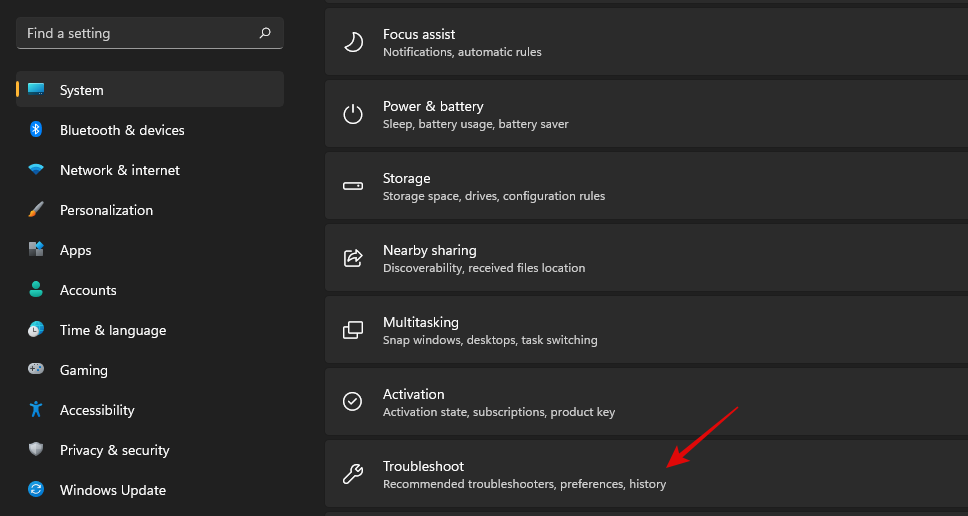
Fare clic su "Altri strumenti per la risoluzione dei problemi".
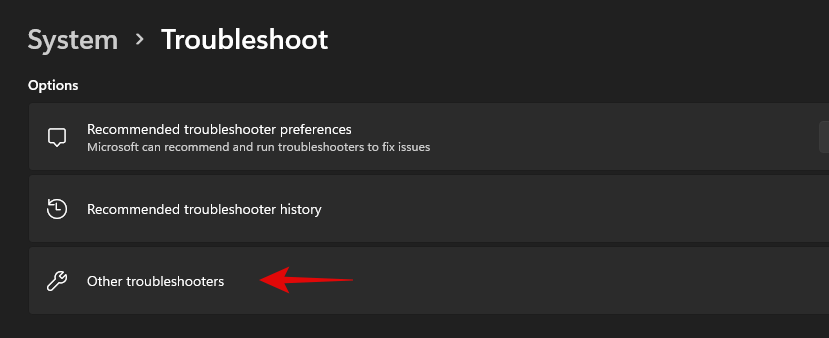
Fare clic su "Esegui" accanto a Windows Update.
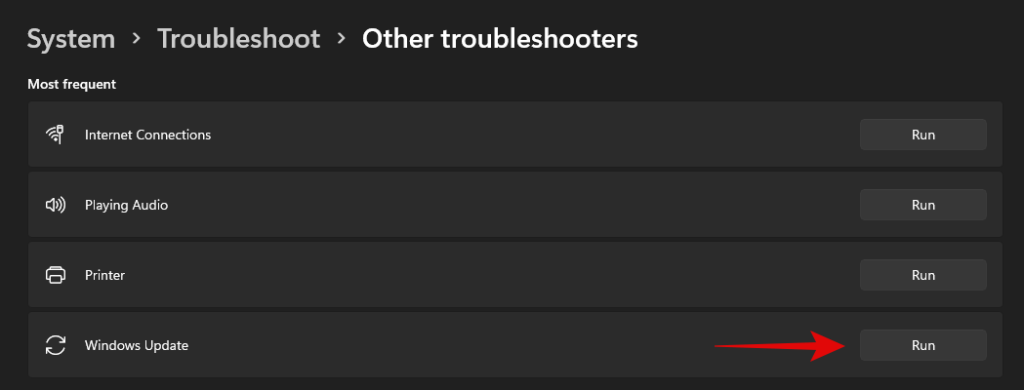
Lo strumento di risoluzione dei problemi di Windows ora cercherà problemi con e causati da Aggiornamenti di Windows sul tuo PC. Se ne vengono trovati, lo strumento di risoluzione dei problemi risolverà automaticamente il problema. Se si scopre che un aggiornamento recente è il colpevole, lo strumento di risoluzione dei problemi ti darà la possibilità di selezionare e disinstallare il necessario Windows Update. Segui le successive istruzioni sullo schermo per rimuovere completamente l'aggiornamento.
Al termine, fai clic su "Chiudi".
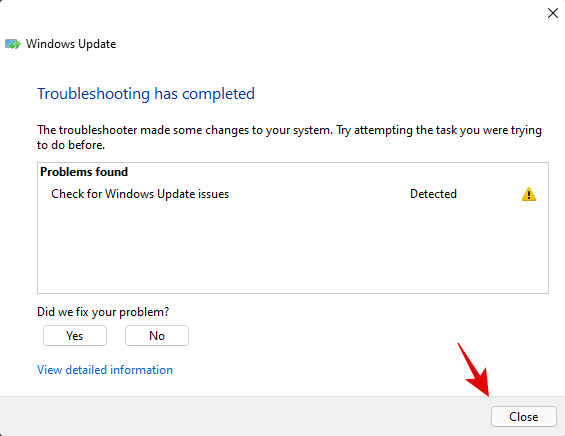
Riavvia il tuo PC per buona misura e il problema dovrebbe essere risolto a questo punto. In caso contrario, puoi utilizzare il metodo PowerShell di seguito per disinstallare manualmente il Windows Update desiderato dal tuo sistema.
Metodo #03: utilizzo di PowerShell o CMD
Premi Windows + Ssulla tastiera e cerca PowerShell. Fai clic su "Esegui come amministratore" quando l'app viene visualizzata nei risultati di ricerca.
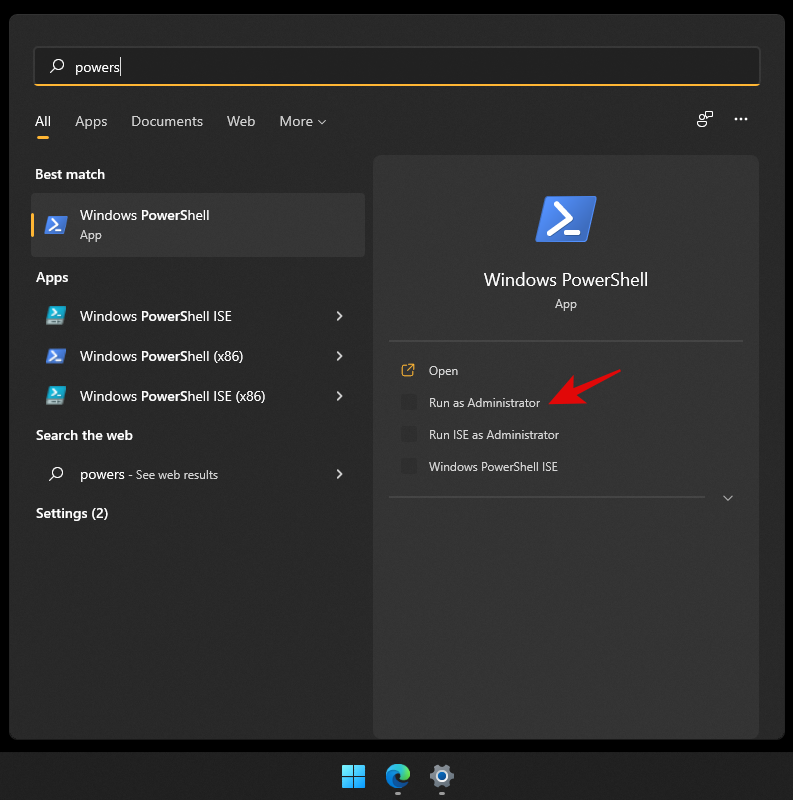
Type in the following command and press Enter on your keyboard to execute it.
wmic qfe list brief /format:table

You will now get a list of all the recently installed Windows Updates on your system in a table format. Note down the KB number for the selected Windows Update.
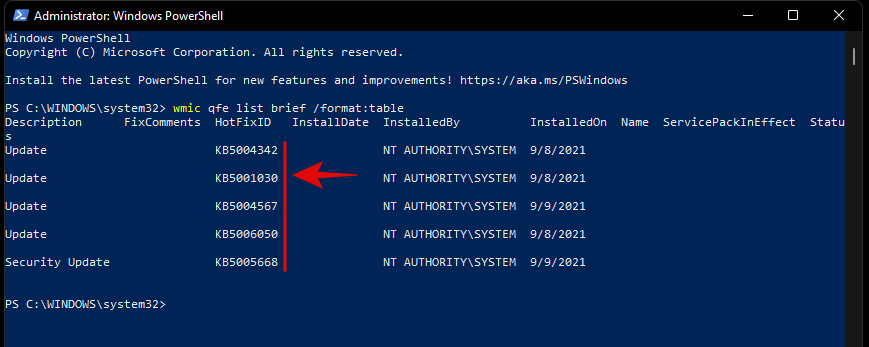
Note: You only need the number and not the letters before it.
Once done, type in the command below and execute it. Replace ‘NUMBER’ with the KB number you noted down earlier.
wusa /uninstall /kb:NUMBER
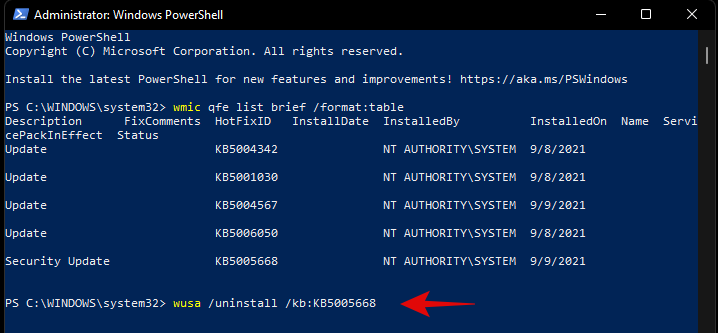
Once prompted, confirm your choice.
If prompted for a restart, we recommend you restart your system at the earliest while saving your work in the background.
If however, you do not wish to receive confirmations before uninstallation and a restart, then you can use the command below.
wusa /uninstall /kb:NUMBER /quiet
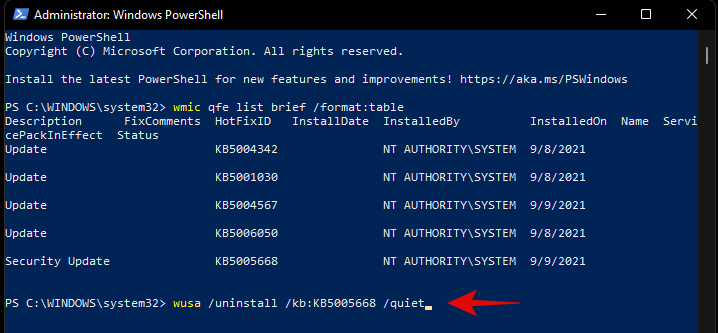
While the command above won’t prompt for confirmations, it will wait for your apps to shut down normally in the background. If you are looking to force close your apps and restart your system immediately, then you can use the command given below.
wusa /uninstall /kb:NUMBER /quiet /forcerestart
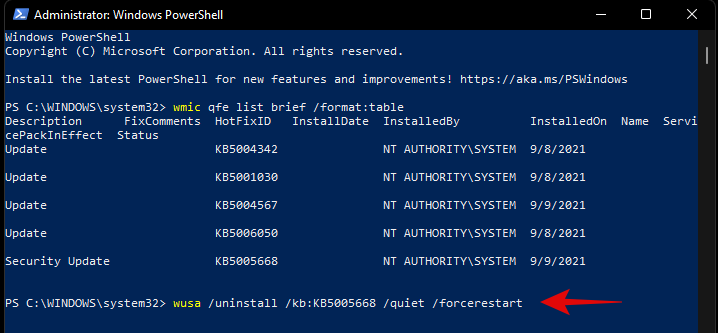
Subsequently, if you only wish to confirm a restart, then you can use the command below.
wusa /uninstall /kb:NUMBER /quiet /promptrestart
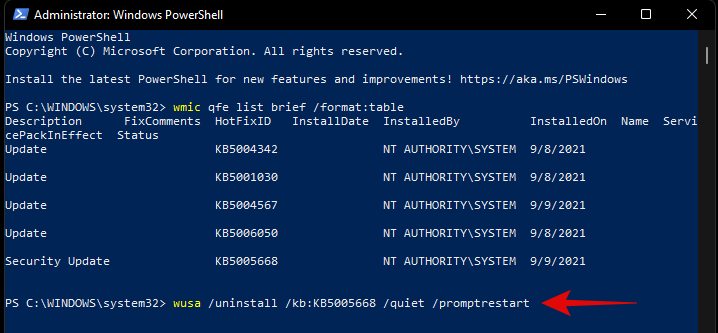
And that’s it! The problematic Windows Update should now be uninstalled from your PC.
Method #04: From Windows RE
Windows Recovery Environment also allows you to uninstall conflicting updates. Use the guide below to get you started. If you are facing a BSOD and are already in the Recovery Environment, then you can skip the first few steps of this guide.
Press Windows + i on your keyboard and select Windows Update from your left.
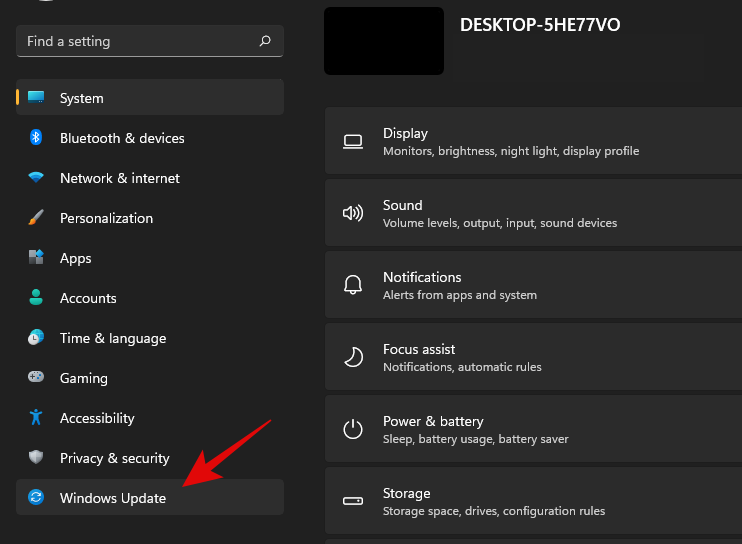
Click on ‘Advanced options’ now.
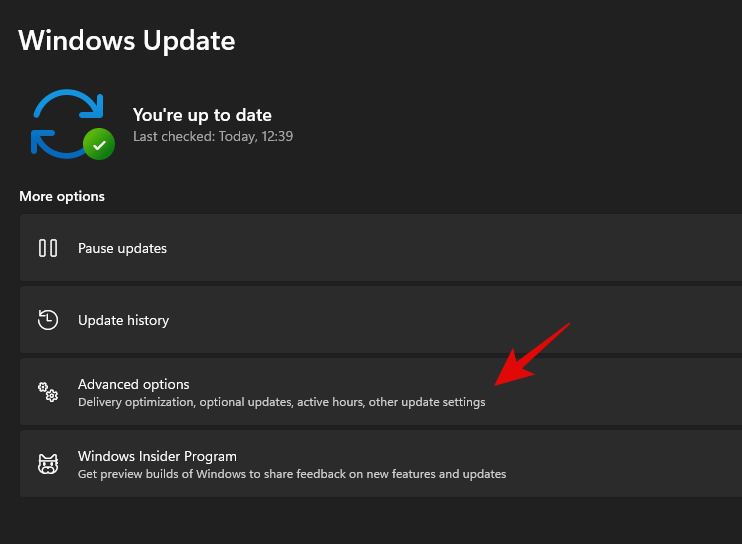
Select ‘Recovery’.
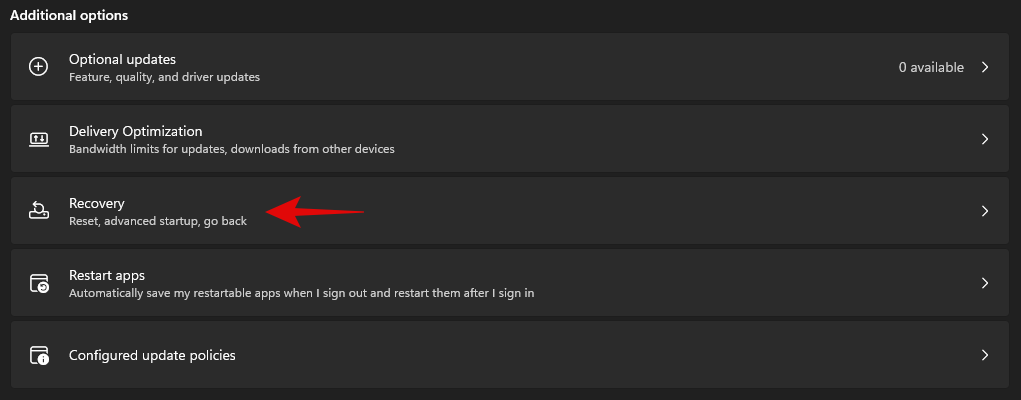
Click on ‘Restart now’ beside Advanced Startup.

You will now boot into the recovery environment. Click on ‘Troubleshoot’.
Now click on ‘Advanced Options’.
Select ‘Uninstall updates’.
Click and select the type of update you wish to install from the options on your screen.
- Uninstall latest quality update
- Uninstall latest feature update
Note: In case you are confused, feature updates refer to major updates to your Windows system that include new features, updated integrations, and sometimes new UI. Quality updates on the other hand encompass everything else including Security updates, Driver updates, Intelligence updates, Telemetry updates, and more.
Click on your administrator account and log in with your password.
Click on ‘Uninstall quality/feature’ update to confirm your choice.
Click on ‘Done’ once the process finishes.
Restart your PC and boot into Windows normally. You shouldn’t face any more issues caused by a problematic Windows update.
Method #05: Using DISM
DISM or Deployment Image Servicing and Management tool is an administrative tool within Windows that helps repair your Windows image and even mount images if needed. DISM supports image formats like .wim, .vhd, and more.
The tool can help you fix issues with your Windows installation and even remove problematic Windows updates. If you are looking to remove windows updates using DISM, then you can follow the steps below to get you started.
Note: DISM can be accessed via CMD and thus, you can use this guide from a recovery environment or an installation media as well. Follow the guide above to get CMD working on your lock screen or within Windows Recovery Environment.
Launch CMD and type in the following command. Press Enter on your keyboard once you are done.
dism /online /get-packages /format:table
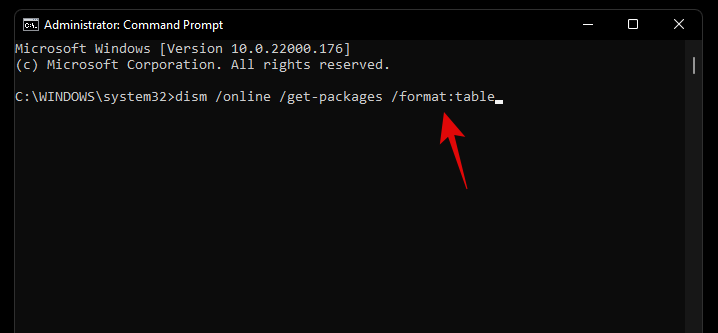
Unlike the WUSA commands we used earlier with PowerShell and CMD, you will need to note down the entire name of the Windows Update package we need to remove. Unfortunately, this includes special characters, spaces, and everything else included in the name. Thankfully you can easily copy the entire name to your clipboard by selecting it with your mouse and then using the keyboard shortcut. Once done, type in the command below and replace NAME with the package name you noted down earlier.
Note: This includes the term ‘Package_for_’ prefixed before some updates.
dism /online /Remove-Package /PackageName:NAME

The selected Windows Update will now be uninstalled from your system. In some cases, you will be prompted to restart your system, type in ‘Y’, and hit Enter on your keyboard to restart your system immediately.
How to stop receiving an update
While removing an update can help you, this does not mean that the broken Windows Update will stop showing up in your Updates section. This can be annoying and if you have automatic updates then you run the risk of automatically installing the problematic update in the background. In all such cases, you can try blocking Windows Updates on your system using the guides below depending on your preferences.
Method #01: Stop OEM driver updates through Windows update
OEM driver updates are delivered through Windows updates as well depending on their importance. Security vulnerabilities and bugs that have been recently found in components like CPU, GPU, or your wireless card, are instantly patched through such updates.
However, if you do not wish to install an OEM driver update provided by Windows update, then you can follow the guide below to block your OEM driver updates.
Press Windows + S on your keyboard and search for ‘Change device installation settings’. Click and launch the app from your search results.
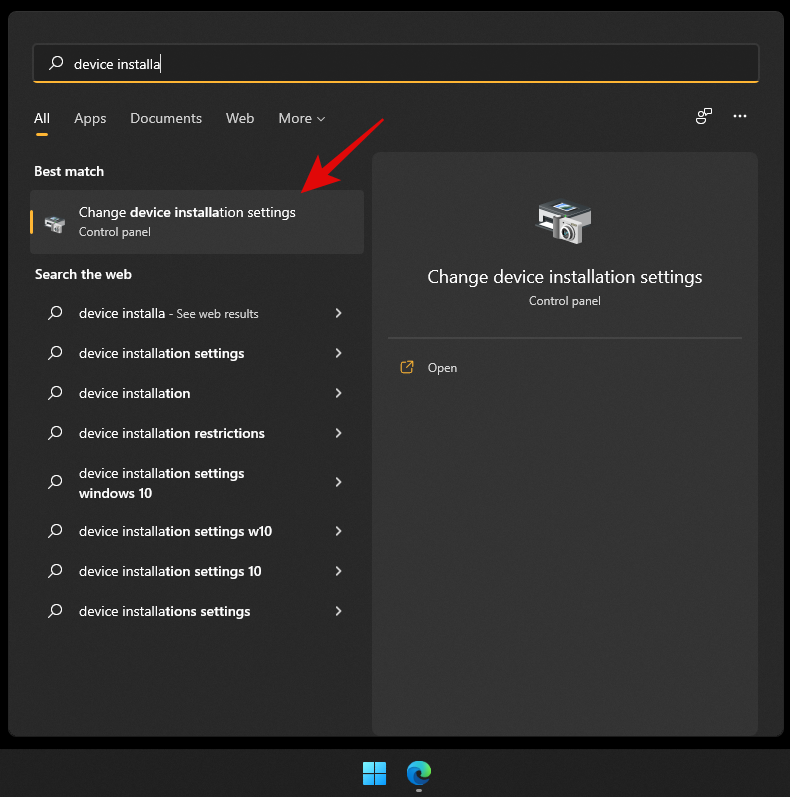
Select ‘No’.
Click on ‘Save changes’.
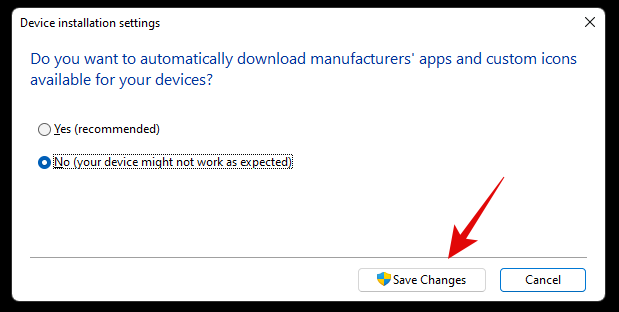
The changes will now be saved and you will no longer receive OEM driver updates through Windows Update.
Related: 6 Ways to Update Drivers on Windows 11
Method #02: Stop updates for Microsoft products
If you have been receiving constant updates for new Microsoft features and old products that keep messing up your system, then you can use the guide below to disable updates for Microsoft products via Windows Update.
Press Windows + i on your keyboard to open the Settings app and select ‘Windows Update’ from the left sidebar.

Click on ‘Advanced options’.

Now turn off the toggle for ‘Receive updates for other Microsoft products’ at the top.
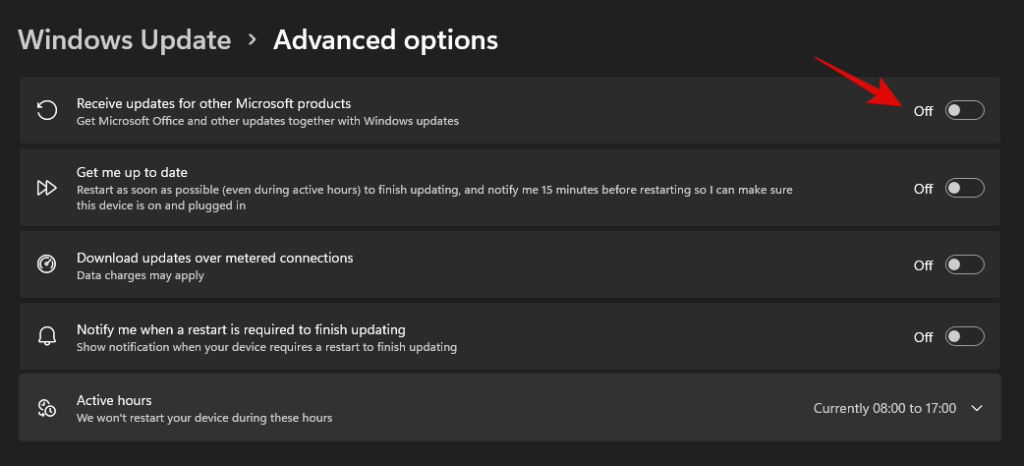
You will no longer receive updates for Microsoft products installed on your system via Windows update.
Method #03: Change active hours for background download and installation for updates
If you’re just looking to dismiss updates so that they don’t interfere with your work hours, then this is the perfect option for you. You can decide when Windows can download and update your PC in the background which will prevent Windows from interfering with your work hours. Follow the guide below to get you started.
Press Windows + i on your keyboard and click on ‘Windows Update’ on your left.

Click on ‘Advanced options’.

Now turn off the toggle for ‘Get me up to date’.
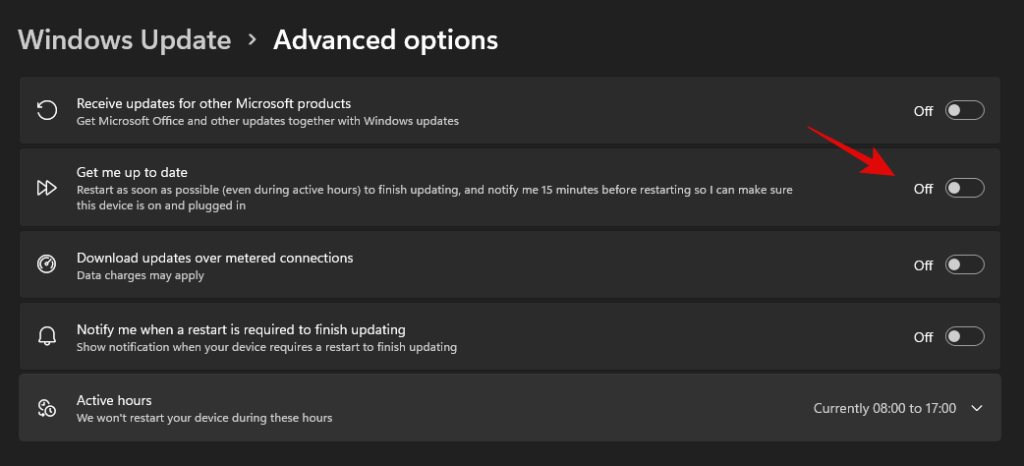
Click on ‘Active hours’.
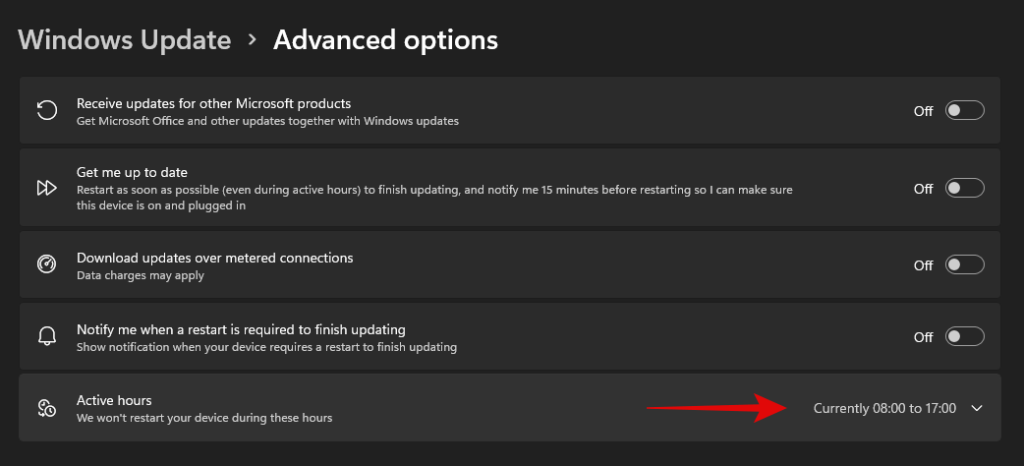
Click on the drop-down menu and select ‘Manually’.
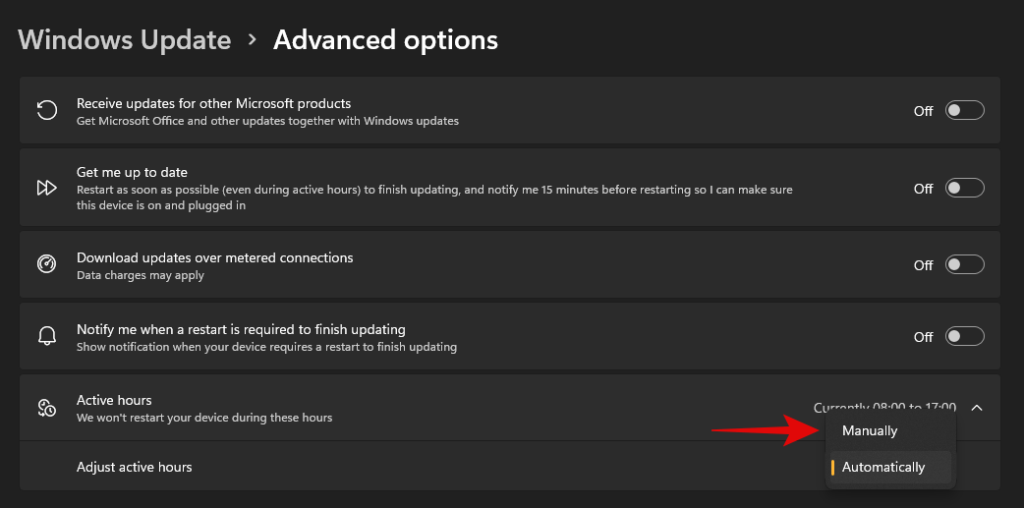
Define your desired start and end time. Windows won’t download updates and restart your PC during these hours.

And that’s it! Active hours should now be enabled for your system.
Method #04: Block Windows updates that you never wish to install
If you are receiving forced Windows updates that you don’t ever wish to install on your system then you can use a dedicated Windows troubleshooter to solve your issue.
This can be helpful in case you are trying to stop an update that disables a certain feature on your system that you don’t want disabled. This could be access to voltage controls, clock speed controls, turbo controls, fan controls, RGB control, and more. Follow the guide below to get you started.
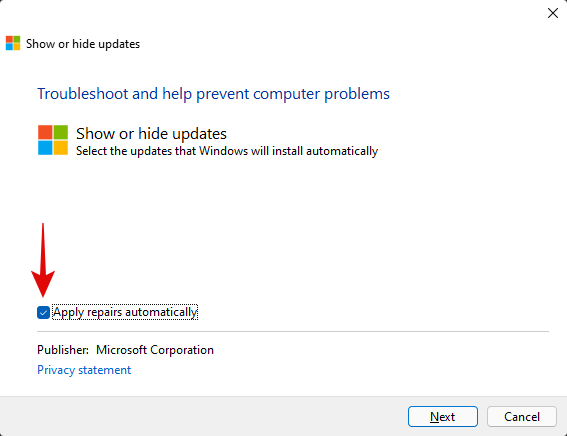
Download the Windows Update Show Hide troubleshooter using the link above and launch it on your PC. Click on ‘Advanced’.

Uncheck the option for ‘Apply repairs automatically’.
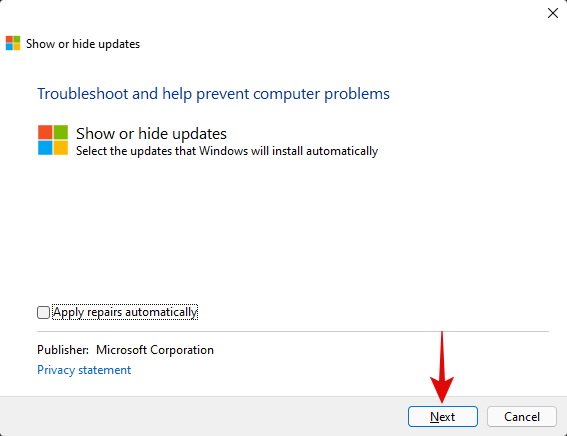
Click on ‘Next’.
The troubleshooter will now look for pending updates and display them on your screen. Click on ‘Hide updates’.
Check the boxes for all the updates you don’t wish to receive on your PC.

Click on ‘Next’.
Ensure that ‘Hide updates’ is selected and click on ‘Next’.
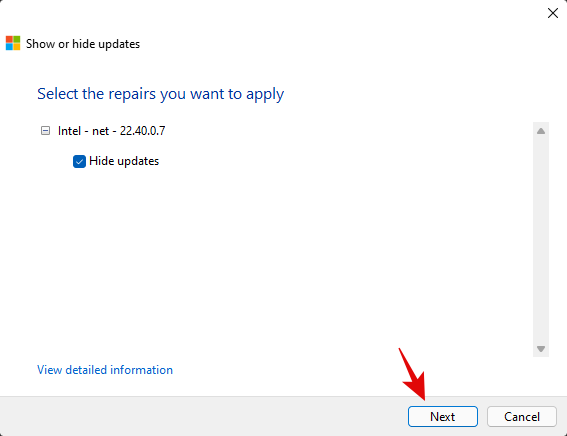
The troubleshooter will now hide the necessary Windows updates from your PC which in turn will prevent them from ever being downloaded on your PC. Click on ‘Close’.
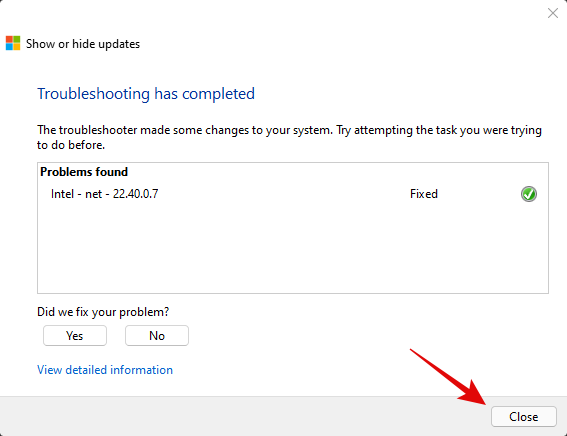
And that’s it! You will now have blocked the necessary updates on Windows 11.
Can you turn off Windows updates?
Yes, you can use certain workarounds and tricks to disable Windows updates on your PC. However, this isn’t recommended as you will lose out on important security patches which would leave you vulnerable to online threats including hackers, malware, adware, and more.
Hence we recommend you keep your PC updated or at least opt to install the latest security updates on your PC. Even if you are losing out on features it’s usually because of a hardware security vulnerability that would compromise your system.
However, if you still wish to disable Windows Updates on your PC, you can use this dedicated guide from us. If you face any issues, feel free to drop a comment.
Can’t uninstall Windows updates? Try these fixes!
If you are unable to install updates on your PC, then you can try the following fixes. However, if you are still unable to uninstall updates then this might indicate an issue with your Windows installation in which case resetting your PC might be the best option.
Follow the guides below to get you started.
Method #01: Reset Windows components and try again
If you have been unable to uninstall updates then you can try resetting your windows components. This will help fix corrupted system files in the background that might be preventing you from uninstalling updates on your system. We will be using a modified script from Mircosoft to help reset all components of Windows 11. The script was originally developed for Windows 10 or higher and hence will need some edits to work properly on Windows 11. This script will perform the following tasks on your system when executed;
- Remove older Windows updates folder
- Re-register Windows update files
- Reset your network connection
Follow the steps below to run the script on your system and reset Windows update components on your PC.
Download the script using the link above to your local storage and extract it to a convenient location. Once extracted right click on the script.
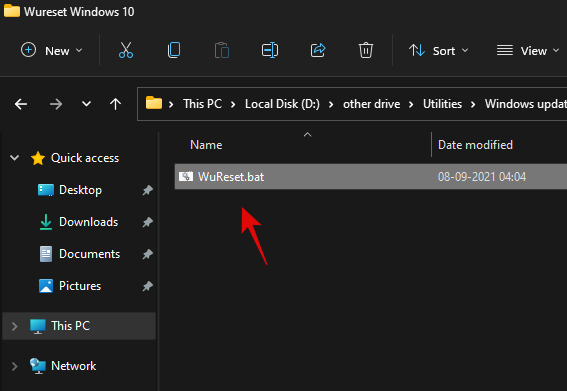
Click on ‘Show more options’.
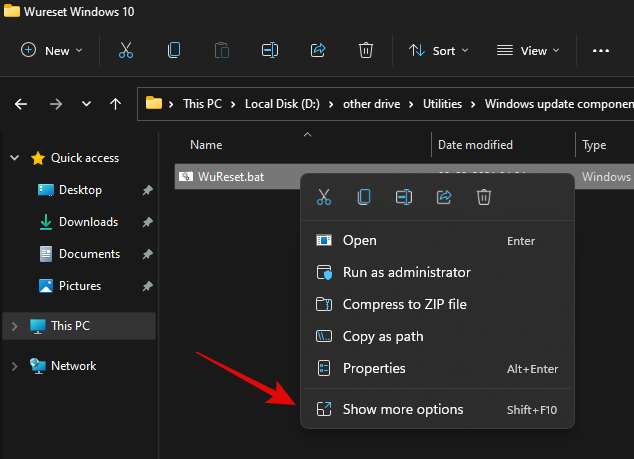
Select ‘Rename’.
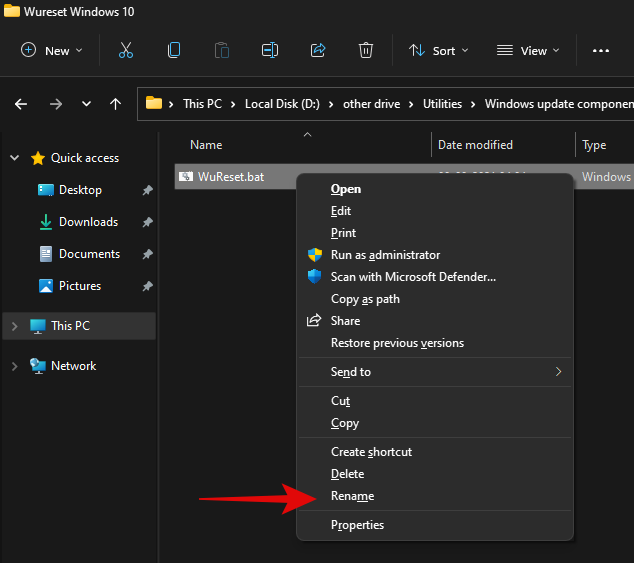
Replace ‘.bat’ with ‘.txt’.
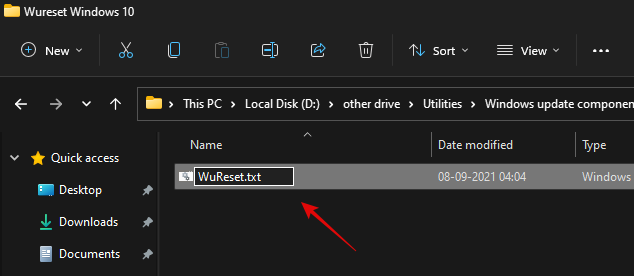
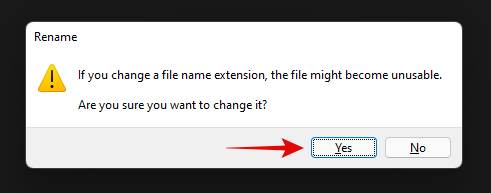
Click on ‘Yes’ to confirm your choice.
Now double click and open the file and it should open in your notepad. Once opened, scroll to the ‘:Reset’ section for resetting network commands and add the following line after the first delete command as shown below.
del /s /q /f "%SYSTEMROOT%\Logs\WindowsUpdate\*"
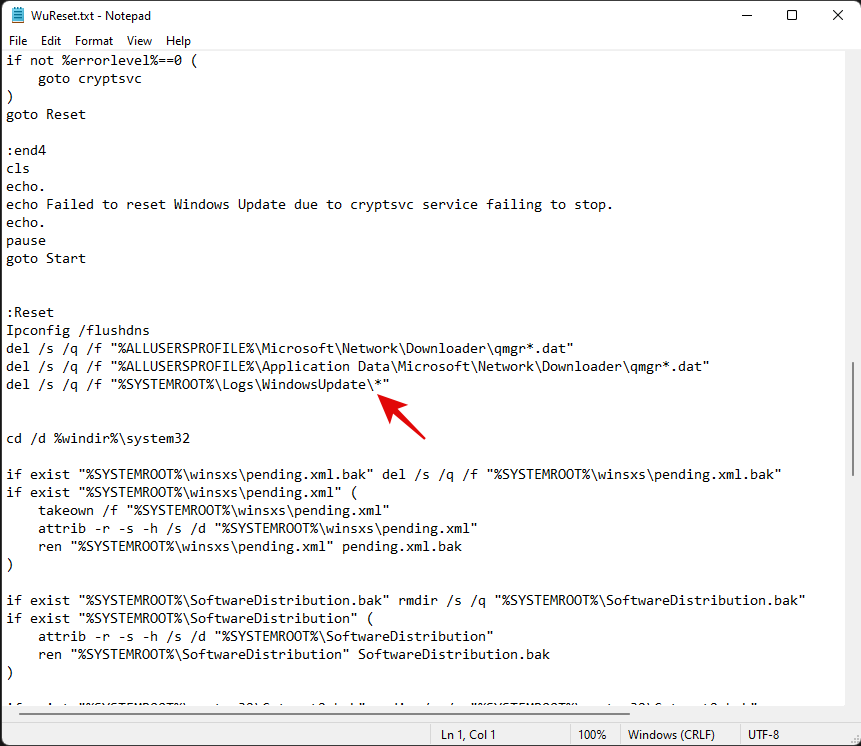
Once added, hit Ctrl + S on your keyboard. Ensure that there are no formatting changes or spaces before or after the line. The file will now be saved on your system along with its recent changes. We will now add some code to Reset Windows’s update policies on your system. Copy the lines below and paste them after your system commands. Ensure that two empty lines are available at either end of the code as shown below.
:: Windows Update policies resetting
reg delete "HKCU\SOFTWARE\Policies\Microsoft\Windows\WindowsUpdate" /f
reg delete "HKCU\SOFTWARE\Microsoft\Windows\CurrentVersion\Policies\WindowsUpdate" /f
reg delete "HKLM\SOFTWARE\Policies\Microsoft\Windows\WindowsUpdate" /f
reg delete "HKLM\SOFTWARE\Microsoft\Windows\CurrentVersion\Policies\WindowsUpdate" /f
gpupdate /force
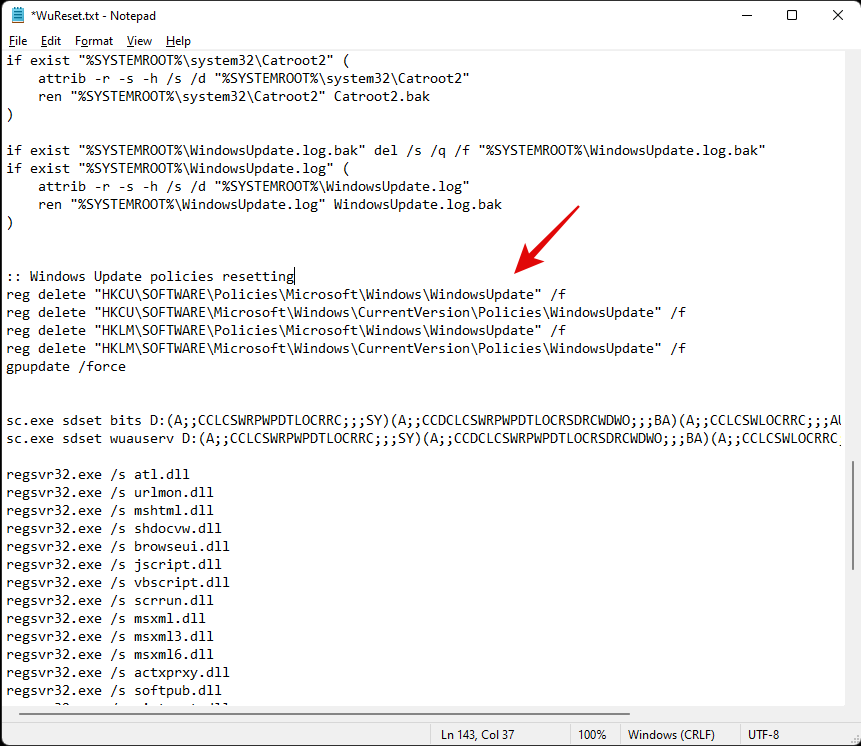
Lastly, let’s add some lines to ensure that the startup type for this service is set to ‘Automatic’. Copy the code below and add the lines after your winsock reset commands but before your service starting commands as shown below. Copy and paste the code in its respective location.
:: Set the startup type as automatic
sc config wuauserv start= auto
sc config bits start= auto
sc config DcomLaunch start= auto
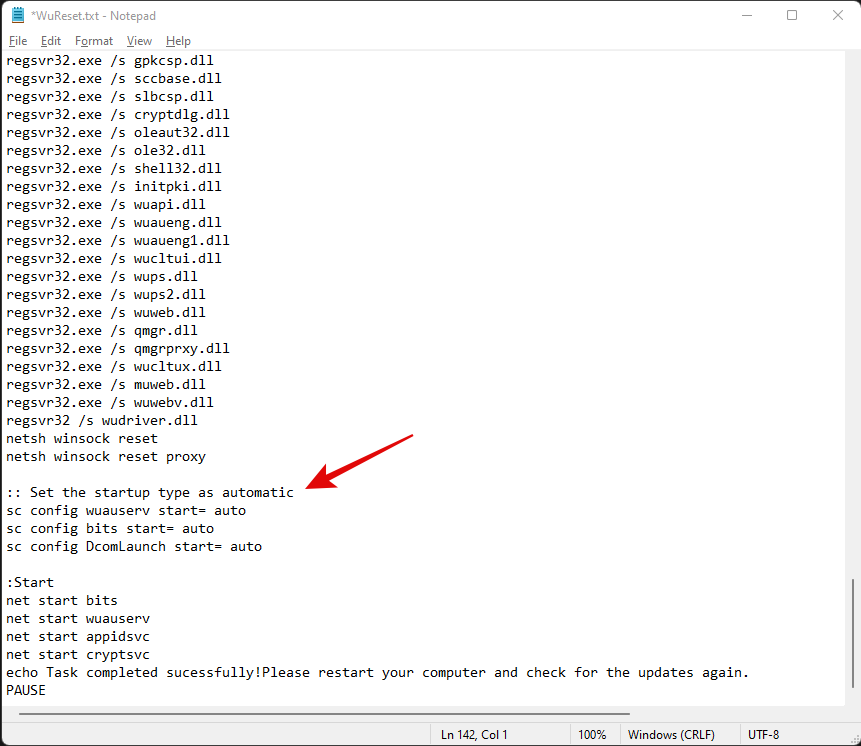
Once you are done, hit Ctrl + S on your keyboard to save your changes. Close the file and right-click on it again and select ‘Show more options’.
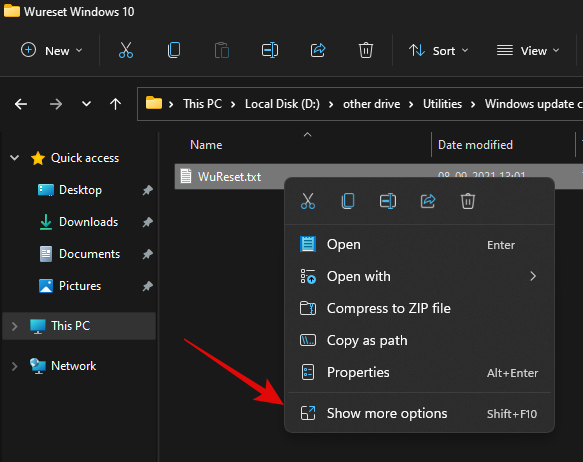
Click on ‘Rename’.
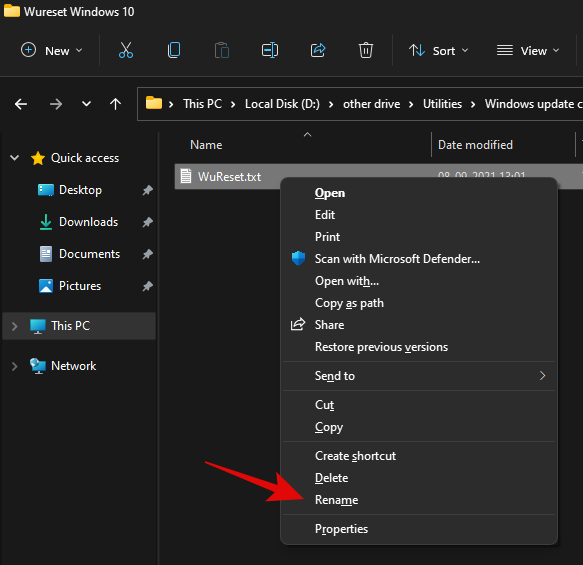
Replace ‘.txt’ with ‘.bat’.
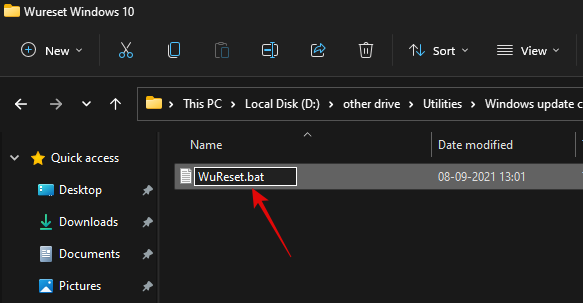
Once done, right-click on the file and select ‘Run as administrator’.
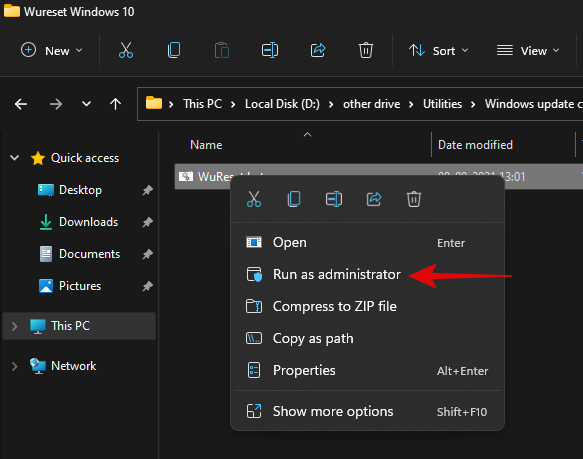
The batch script will now run on your PC and do its thing. Once the process completes, you will be asked to restart your PC. We highly recommend that you restart your PC at the earliest after running this script. Upon a restart, your Windows update should be reset and a fresh start should help you easily install pending Windows updates on your PC.
Method #02: Use DISM to uninstall the concerned packages
If you are still unable to uninstall specific Windows Update packages then simply use the DISM method to remove the concerned updates from your PC. This method force removes any available Windows updates from your PC without any issue. You will get a list of all the available updates in a table format which should make it much easier for you to find the culprit on your PC. Simply follow the guide at the top to get you started.
Method #03: Run SFC & DISM commands
At this point, if Windows still fails to update your system then you are facing a more serious issue than we anticipated earlier. This could indicate system-level corruption of files or missing system files from your system. In such cases, you can run SFC and DISM checks to fix corrupted files as well as restore missing system files. Follow the guide below to get you started.
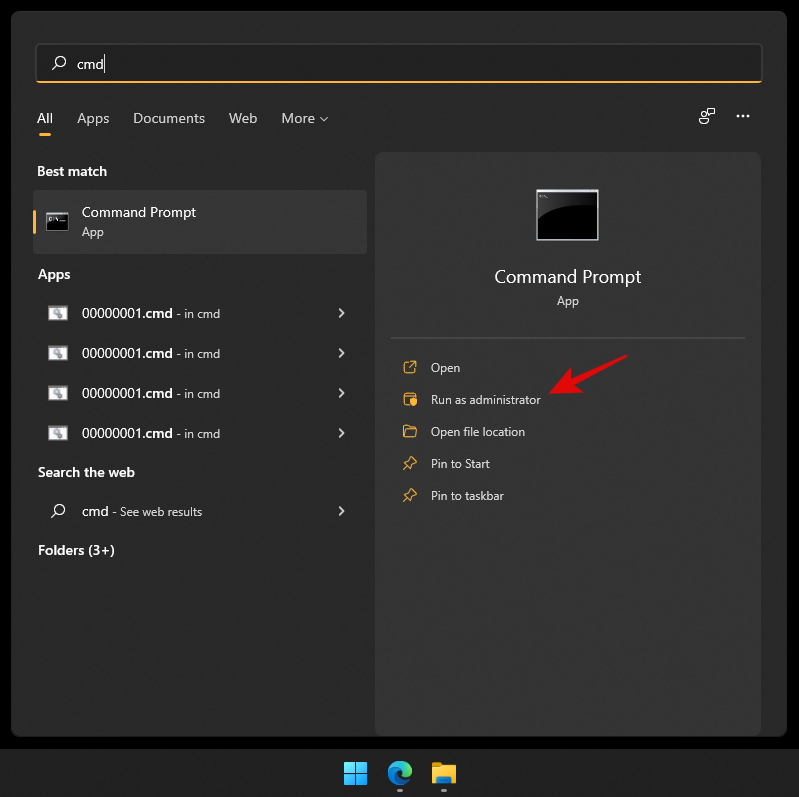
Press Windows + S on your keyboard and search for CMD. Click on ‘Run as administrator’ once it shows up in your search results.
Type in the following command and press Enter on your PC.
sfc /scannow
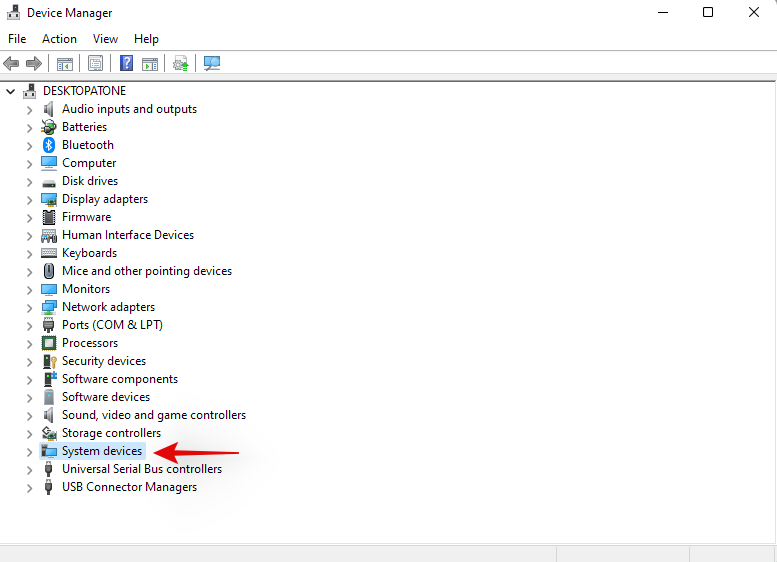
Once the SFC scan completes, type in the following command and execute it.
DISM /Online /Cleanup-Image /RestoreHealth
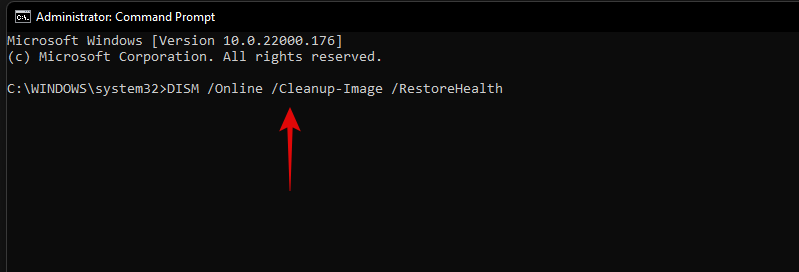
We recommend you restart your PC once the process completes.
Method #04: Last resort: Reset your PC
If nothing seems to be working for you then it might be time for a fresh installation of Windows 11 on your system. You can try getting in touch with your support team as well but if nothing works then a reset of your PC is the best option. In most cases, a reset while keeping your local files should help get Windows update working on your system.
Windows 11 connects to the update servers and updates your security definitions and drivers during OOBE. Windows will fix all update issues and reinstall necessary services on your system to get Windows update back up and running on your system during this process.
► You can use this dedicated guide from us to reset your Windows 11 PC.
We hope you were able to easily uninstall updates from your Windows 11 PC using the guide above. If you face any issues, feel free to drop a comment below.
Related:
![Come disinstallare McAfee su Windows 11 [5 modi] Come disinstallare McAfee su Windows 11 [5 modi]](https://cloudo3.com/resources8/images31/image-4917-0105182719945.png)


