Lo spazio su disco è sempre stato un lusso, sia ai vecchi tempi del DOS, dove tutto era archiviato su un floppy disk, sia ai nostri tempi moderni in cui troviamo difficile archiviare le nostre librerie musicali su un singolo disco. A seconda della configurazione attuale del sistema , potresti facilmente esaurire lo spazio mentre continui a utilizzare il sistema.
Questo spazio può essere utilizzato per file temporanei , file di paging, vecchi Windows , archivi di grandi dimensioni, file di download e altro ancora. Il modo migliore per liberare spazio tende ad essere quello di eliminare i file più grandi sul sistema, ma trovare questi file può rivelarsi una sfida. In questi casi, puoi utilizzare la nostra guida di seguito per identificare ed eliminare i file più grandi sul tuo sistema. Iniziamo.
Correlati: Come risolvere la ricerca di Windows per l'utilizzo elevato della CPU o del disco su Windows 11
Contenuti
Libera spazio su Windows 11
Puoi facilmente verificare la presenza di file di grandi dimensioni sul tuo sistema in Windows 11 (o 10) utilizzando vari metodi. Windows 11 è dotato anche di un'utilità integrata che ti aiuta a identificare i file che occupano grandi quantità di spazio di archiviazione sul tuo PC. Segui uno dei metodi seguenti che meglio si adatta alle tue esigenze e ai tuoi requisiti attuali.
Metodo n. 01: disinstallazione di app che occupano molto spazio
Premi Windows + i sulla tastiera per avviare l'app Impostazioni e fai clic su "Archiviazione" alla tua destra.
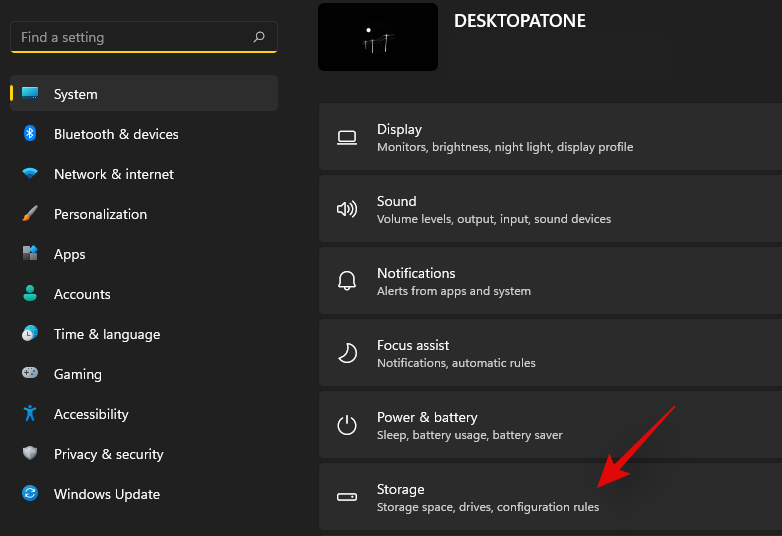
Ora otterrai un elenco di tutte le categorie che occupano grandi porzioni di spazio su disco sul tuo PC. Clicca sulla categoria di tua scelta per iniziare. Segui i passaggi seguenti a seconda della tua scelta.
Fai clic su "Ordina per" in alto.
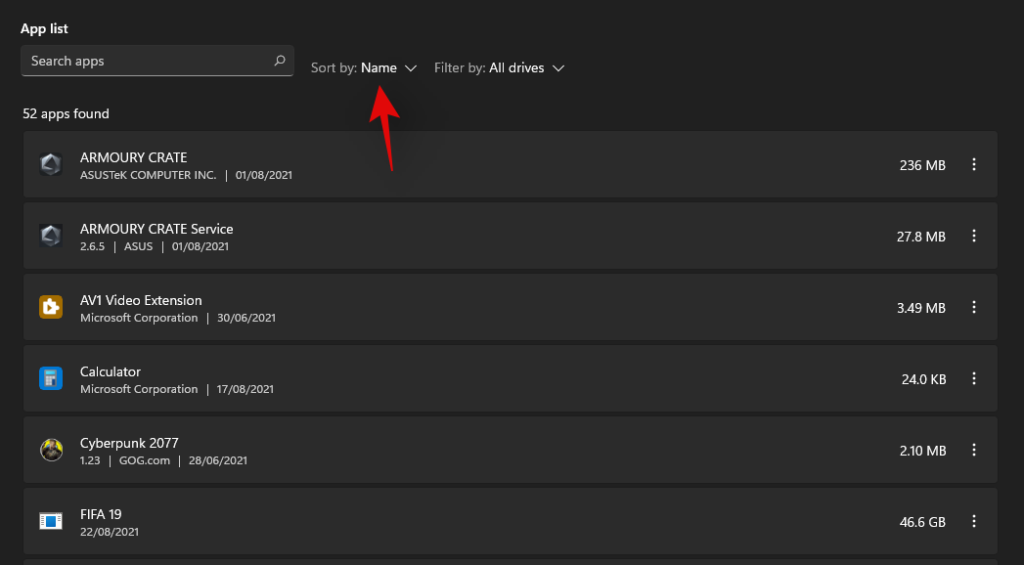
Seleziona la dimensione'.
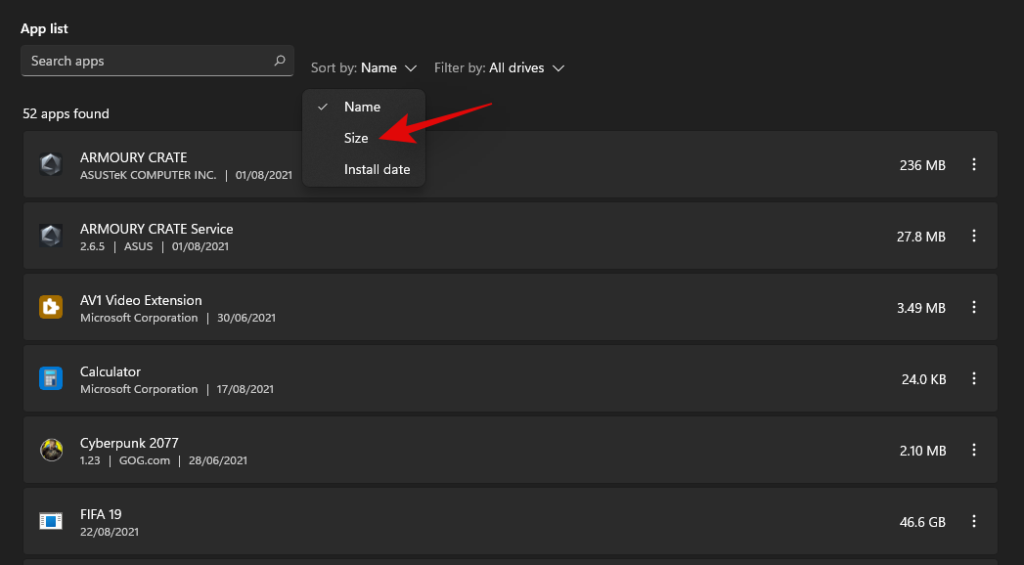
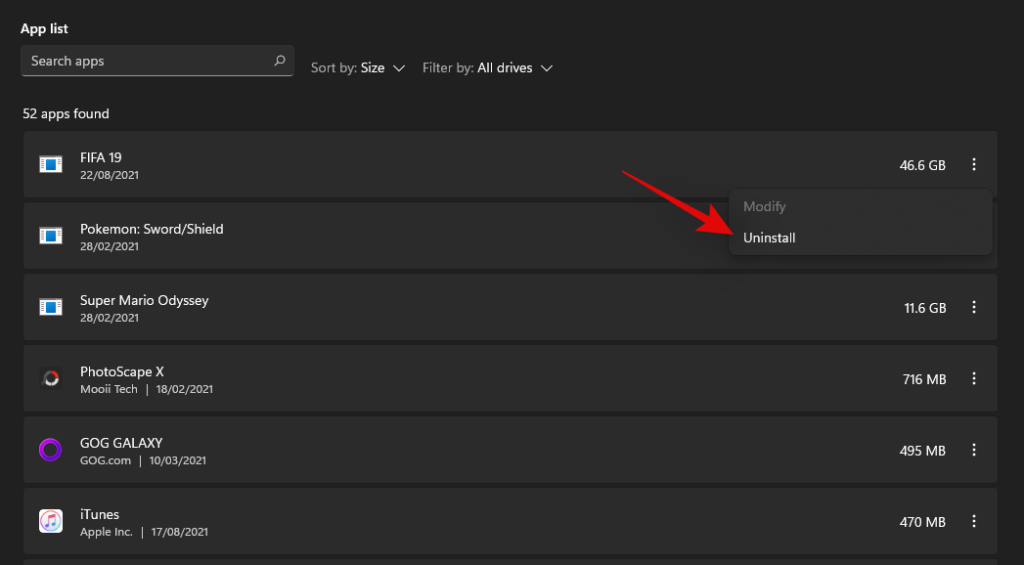
Le app e i programmi più grandi sul tuo sistema verranno ora elencati in ordine decrescente. Fare clic sull'icona del menu "3 punti" accanto all'app che si desidera rimuovere dal PC.

Seleziona "Disinstalla".
Fare nuovamente clic su "Disinstalla" per confermare la scelta.
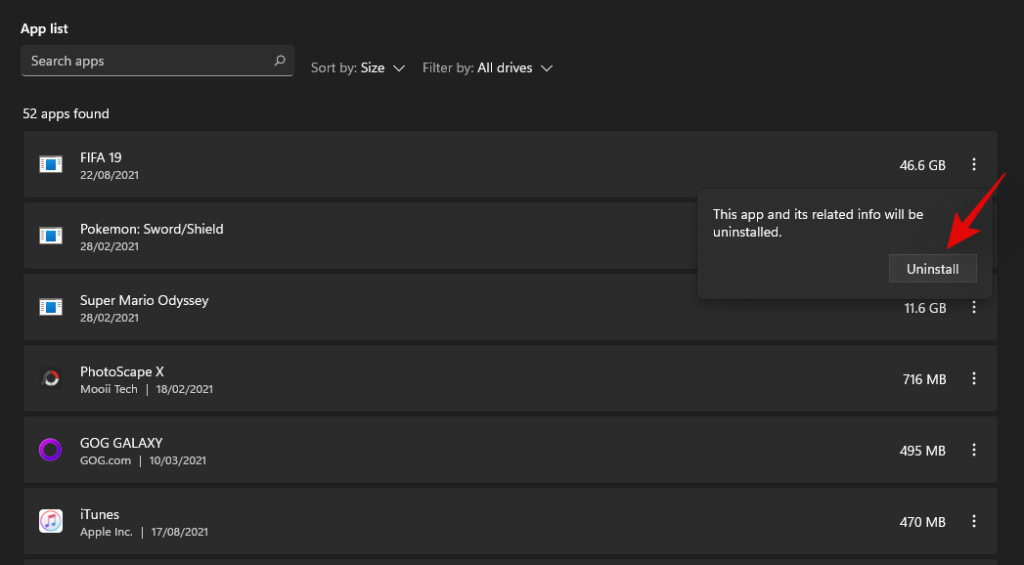
L'app dovrebbe ora essere disinstallata dal sistema.
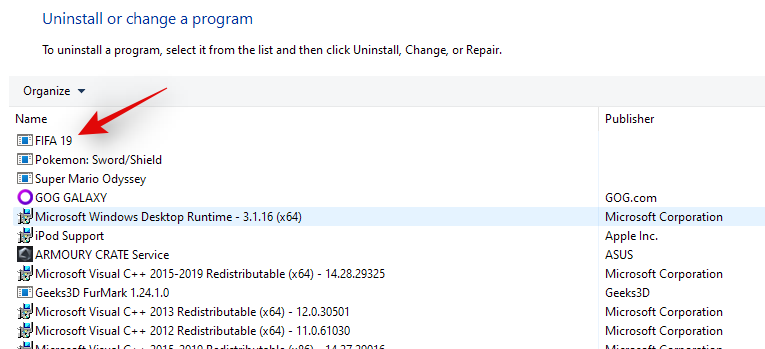
Se sei stato reindirizzato al Pannello di controllo
Fare clic e selezionare l'app che si desidera eliminare/disinstallare.
Fai clic su "Disinstalla" in alto.
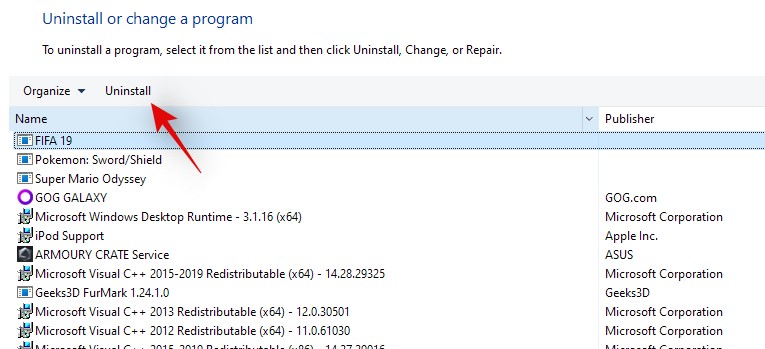
Il programma di disinstallazione dovrebbe ora avviarsi sul tuo PC. Segui le istruzioni sullo schermo per rimuovere il programma selezionato dal sistema.
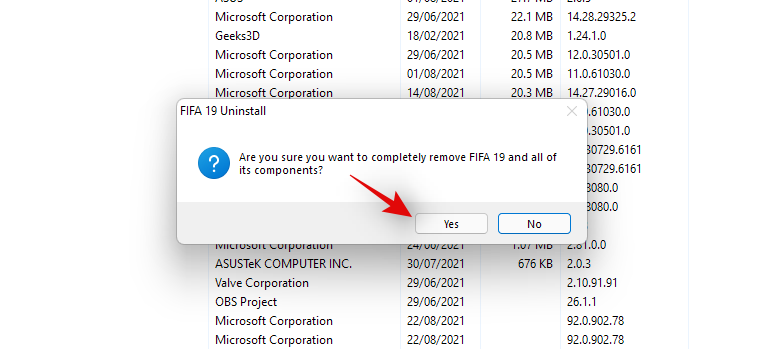
Il programma selezionato dovrebbe ora essere rimosso dal sistema.
Correlati: Come riparare Windows 11 [15 modi]
Metodo n. 02: liberare spazio utilizzando l'opzione "File temporanei" in Impostazioni di archiviazione
I tuoi file temporanei saranno già elencati in ordine decrescente in base alla loro dimensione. Seleziona le caselle per tutti i file temporanei che desideri rimuovere dal tuo PC.
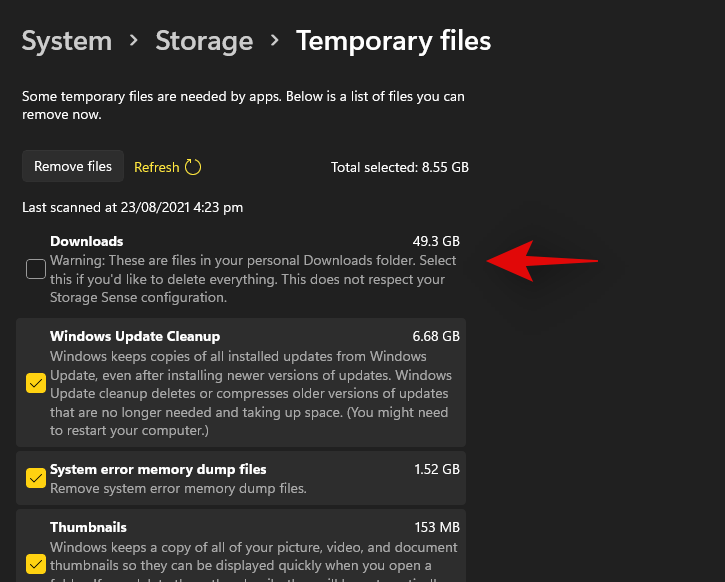
Nota: selezionando "Download" verranno eliminati i file personali archiviati nella cartella "Download".
Fai clic su "Rimuovi file" in alto per rimuovere i file temporanei selezionati dal tuo PC.
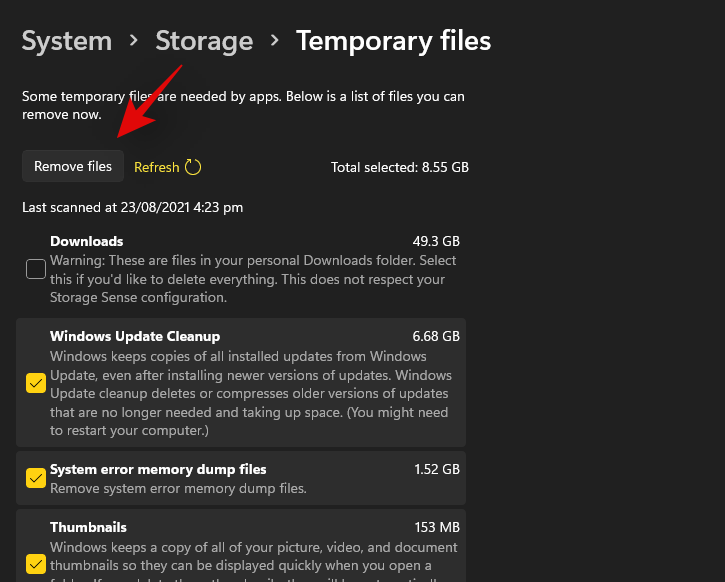
I file temporanei dovrebbero ora essere cancellati dal tuo sistema.
Correlati: Come eliminare i file temporanei in Windows 11
Metodo n. 03: libera spazio utilizzando altre opzioni in Impostazioni di archiviazione
Fai clic su "Visualizza desktop/musica/documenti/video" e verrai reindirizzato al desktop.
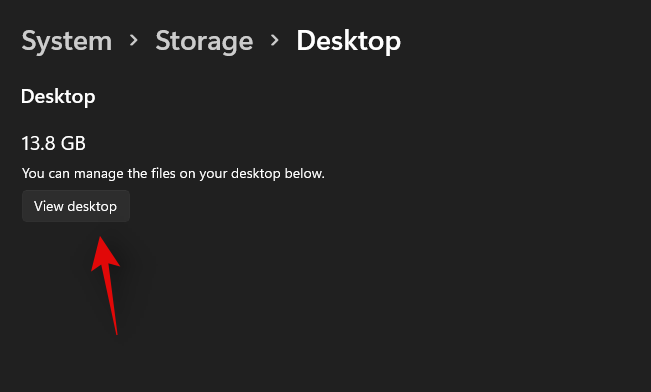
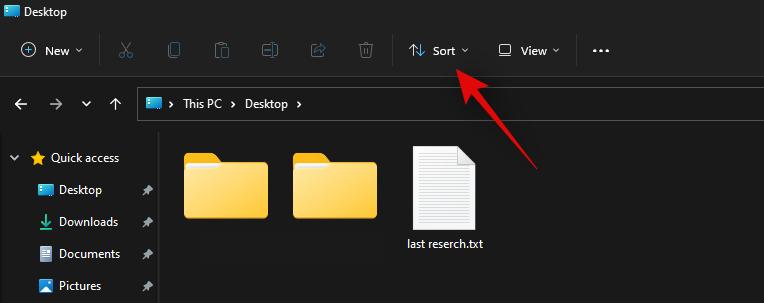
Fai clic su "Ordina" in alto.
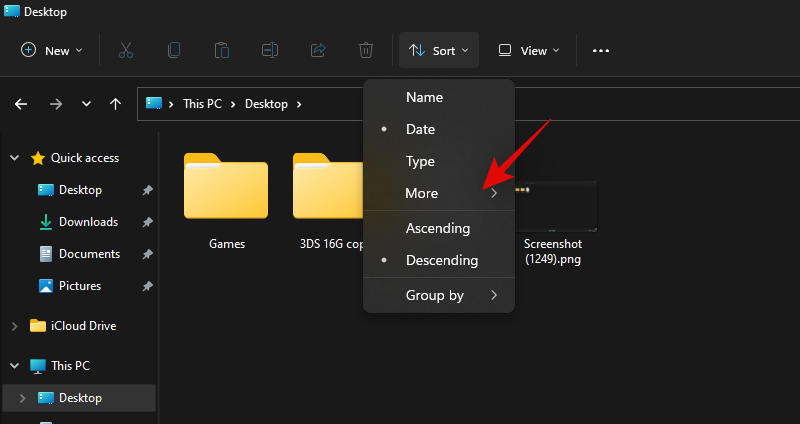
Fare clic su "Altro".
Ora seleziona "Taglia".
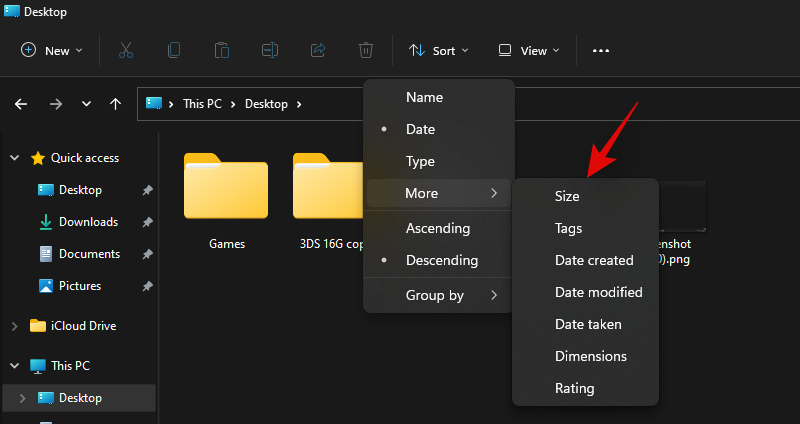
I tuoi file verranno ora elencati in ordine decrescente in base alla loro dimensione. Seleziona i file che desideri eliminare e premi Del sulla tastiera.
Ora fai clic su "Sì" per confermare la tua scelta.
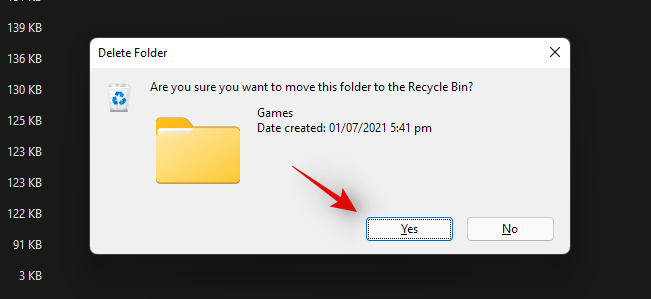
I file selezionati dovrebbero ora essere eliminati dalla cartella selezionata.
Metodo n. 04: utilizzo di WizDirStat
WizDirStat è una popolare utility open source spesso utilizzata per generare una rappresentazione grafica dello spazio di archiviazione locale in modo intuitivo. Ciò semplifica l'identificazione di grandi porzioni di spazio su disco occupate da un singolo file, cartella o archivio, il che a sua volta renderà più semplice liberare spazio sul PC. Usa la guida di seguito per identificare cosa sta occupando spazio sul tuo PC Windows 11.
Scarica e installa WinDirStat sul tuo PC utilizzando il link sopra. Una volta installato, avvia l'app.

Ora seleziona una delle opzioni più adatte alle tue esigenze. Se hai solo una singola unità installata sul tuo sistema con una singola partizione, puoi saltare questo passaggio. Fare clic su "Ok" una volta terminato.
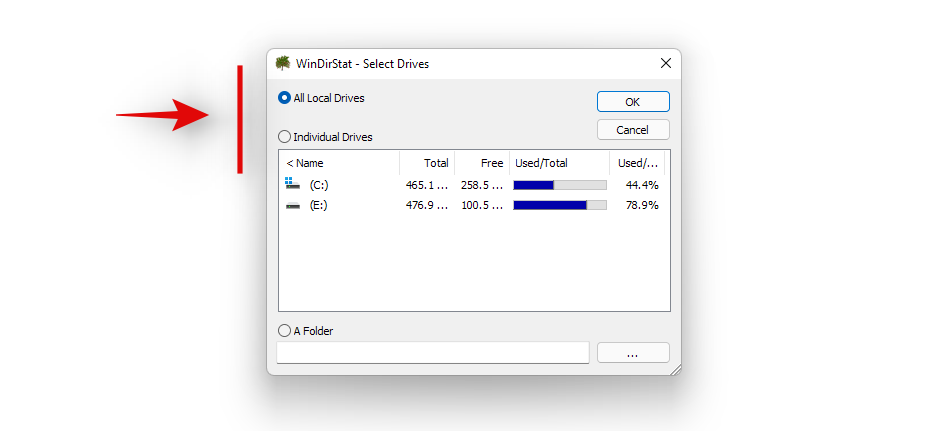
- All Local Drives: Questo farà in modo che WinDirStat analizzi tutti i tuoi dischi e visualizzerà i loro dati graficamente.
- Unità individuali: selezionare una delle unità installate da analizzare per l'utilizzo dello spazio su disco. È possibile selezionare questa opzione e quindi selezionare l'unità che si desidera utilizzare.
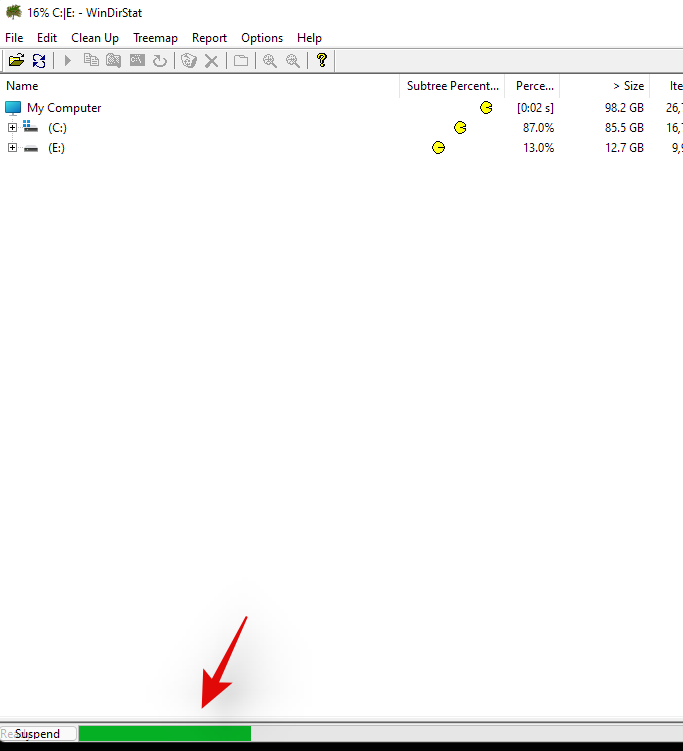
Le tue unità verranno ora analizzate e potrai monitorare lo stato di avanzamento della stessa nella parte inferiore della finestra.
Una volta analizzato, sullo schermo verrà mostrata una rappresentazione grafica codificata a colori dell'utilizzo dello spazio su disco sulle unità selezionate. Basta fare clic sui blocchi più grandi per identificare i file più grandi.
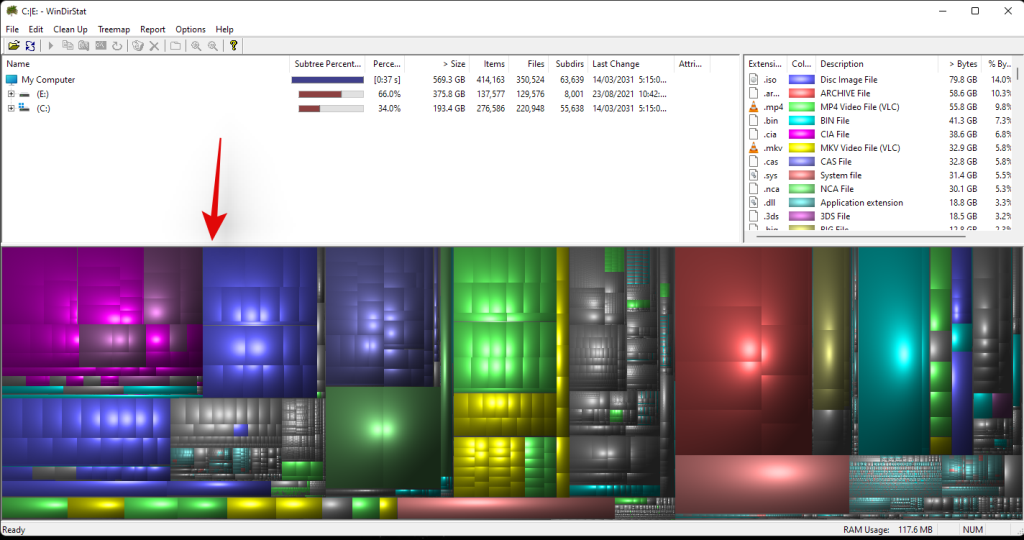
Premi Canc sulla tastiera per eliminare il file. Questo lo invierà al tuo cestino e potrai decidere il suo destino durante la revisione degli articoli del tuo cestino. In alternativa, puoi usare Maiusc + Canc per eliminare definitivamente l'elemento dal tuo sistema.
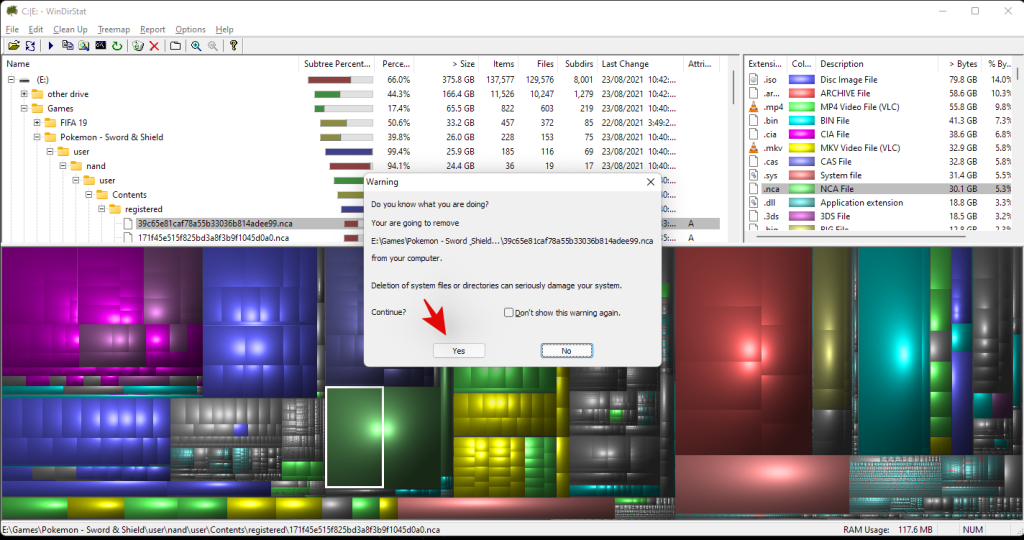
E questo è tutto! Puoi ripetere gli ultimi passaggi per eliminare più file di grandi dimensioni dal tuo sistema.
Metodo n. 05: utilizzare la ricerca di Windows per eliminare file di grandi dimensioni
Windows Search può anche aiutarti a identificare i file più grandi sul tuo sistema in Windows 11. Tuttavia, questo è un incostante per ora con il nuovo file explorer e, nel caso in cui il metodo non funzioni per te, dovrai temporaneamente torna a Esplora file di Windows 10. Non preoccuparti, una volta identificati e trovati i file più grandi, puoi annullare le modifiche e tornare al nuovo Esplora file di Windows 11. Usa le guide qui sotto per iniziare.
5.1 Ricerca di file di grandi dimensioni
Ora cercheremo file di grandi dimensioni in base ai tuoi criteri.
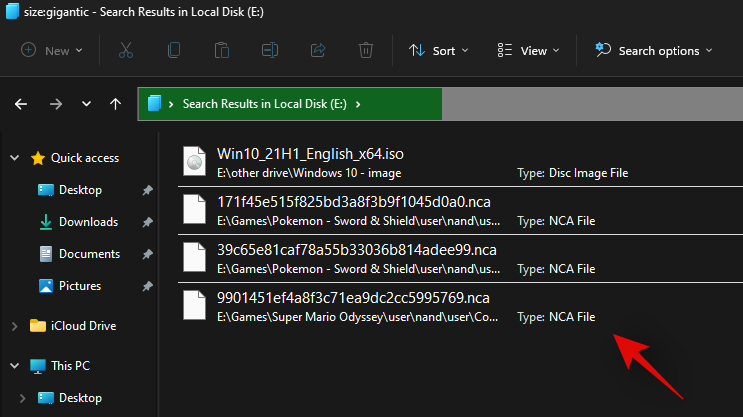
Premi Windows + Esulla tastiera per aprire Esplora file e fai clic sulla casella di ricerca nell'angolo in alto a destra. Cerca il termine seguente.
size:gigantic
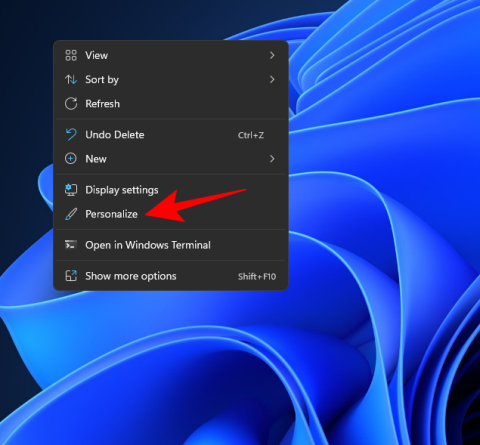
I risultati verranno ora filtrati e i file più grandi di 4 GB verranno ora visualizzati sullo schermo. Seleziona i file non necessari che non ti servono sul tuo PC ed eliminali semplicemente per liberare spazio. Se desideri utilizzare una dimensione minima del file più piccola, sostituisci "gigantesco" con uno dei termini seguenti a seconda della dimensione che preferisci.
- Grandi: file tra 128 MB e 1 GB
- Enorme: file da 1 GB a 4 GB
- Medio: file da 1 MB a 128 MB
E questo è tutto! Puoi utilizzare la ricerca di Windows in questo modo per filtrare i file in base alla loro dimensione e trovare quelli più grandi attualmente sul tuo PC.
Nota: nel caso in cui il tuo PC indicizzi e mostri anche i file di sistema, ti consigliamo di ricontrollare i file prima di eliminarli per evitare di eliminare tutti i file di sistema vitali dal tuo sistema.
Ora avrai trovato file di grandi dimensioni sul tuo PC utilizzando Windows Search.
5.2 Se il termine di ricerca non funziona per te
Se digitando "size:gigantic" non funziona per te, dovrai passare al vecchio file explorer da Windows 10. Usa la guida qui sotto per iniziare. Una volta tornato al vecchio file explorer, usa la guida sopra per cercare file di grandi dimensioni. Una volta trovato, usa la guida successiva di seguito per ripristinare il nuovo esploratore di file di Windows 11 sul tuo sistema.
Passa al vecchio file explorer
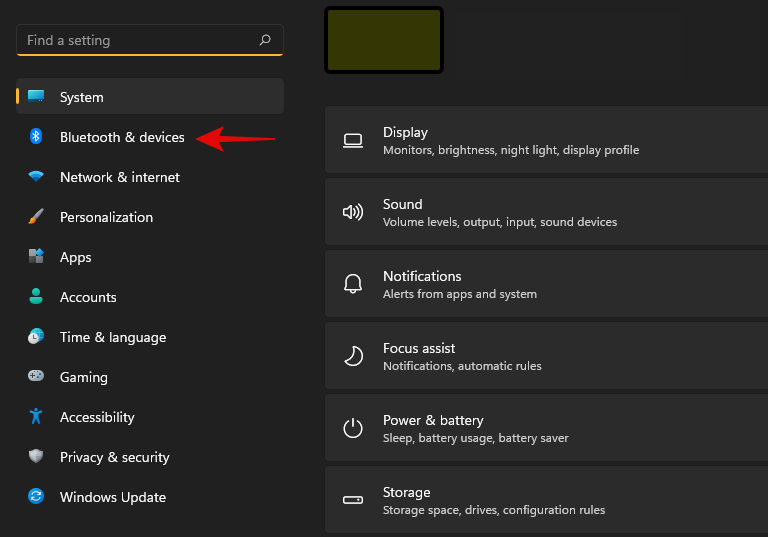
Premi Windows + Ssulla tastiera e cerca "Regedit". Fare clic e avviare l'app dai risultati della ricerca.
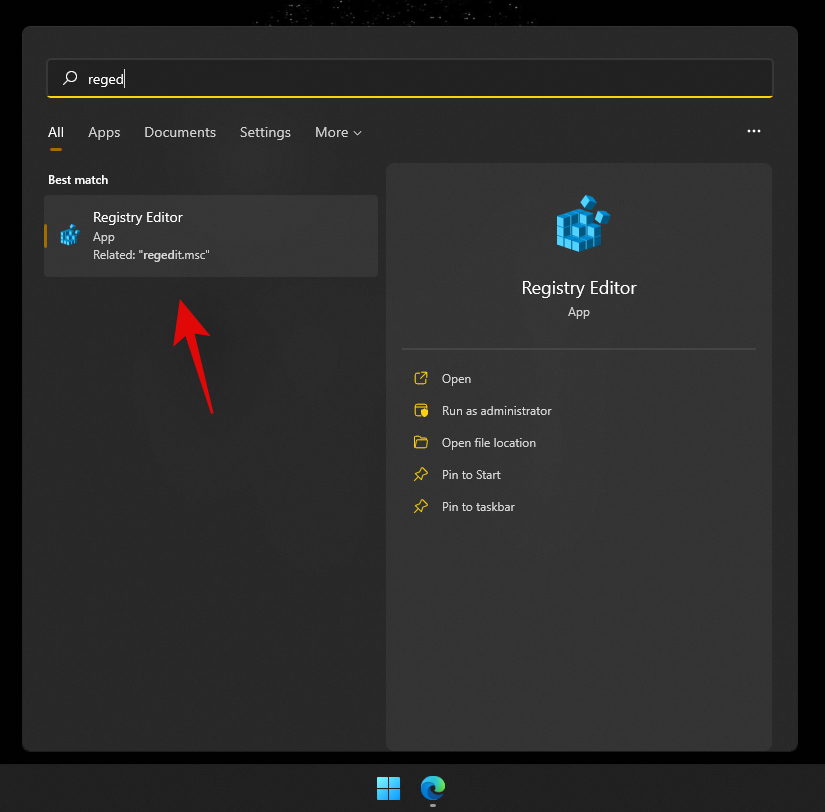
Passa alla directory seguente o copia e incolla l'indirizzo di seguito nella barra degli indirizzi.
HKEY_LOCAL_MACHINE\SOFTWARE\Microsoft\Windows\CurrentVersion\Shell Extensions
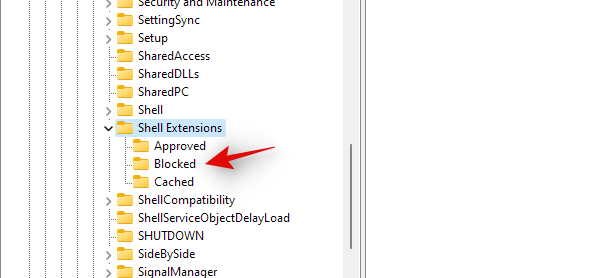
Fare clic sulla cartella denominata "Bloccato".
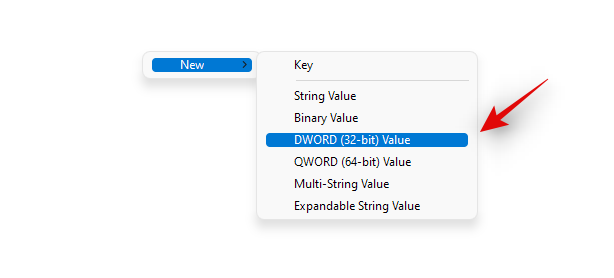
Fai clic con il pulsante destro del mouse su un'area vuota alla tua destra, seleziona "Nuovo" e quindi fai clic su "Valore DWORD (32 bit)".
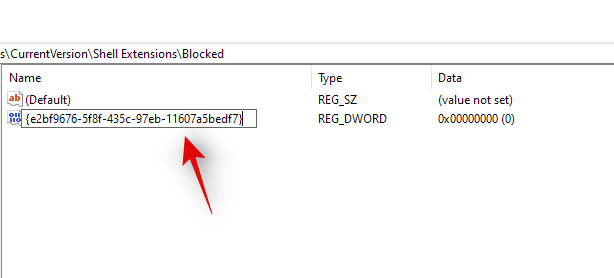
Enter the following name and press Enter on your keyboard. We recommend you copy-paste the same to avoid any naming errors.
{e2bf9676-5f8f-435c-97eb-11607a5bedf7}
Close the registry editor and press Ctrl + Shift + Esc to open the Task Manager. Switch to the ‘Details’ tab.
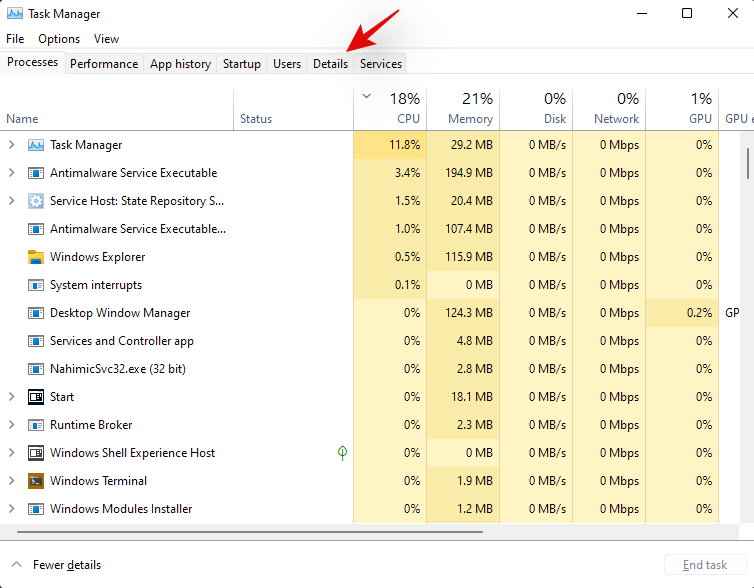
Click on ‘Explorer.exe’ and hit Del on your keyboard.
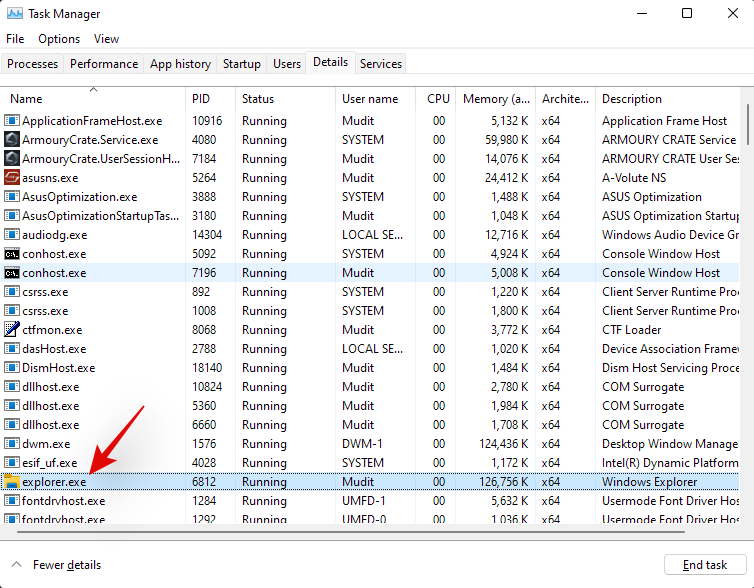
Click on ‘End process’ to confirm your choice.
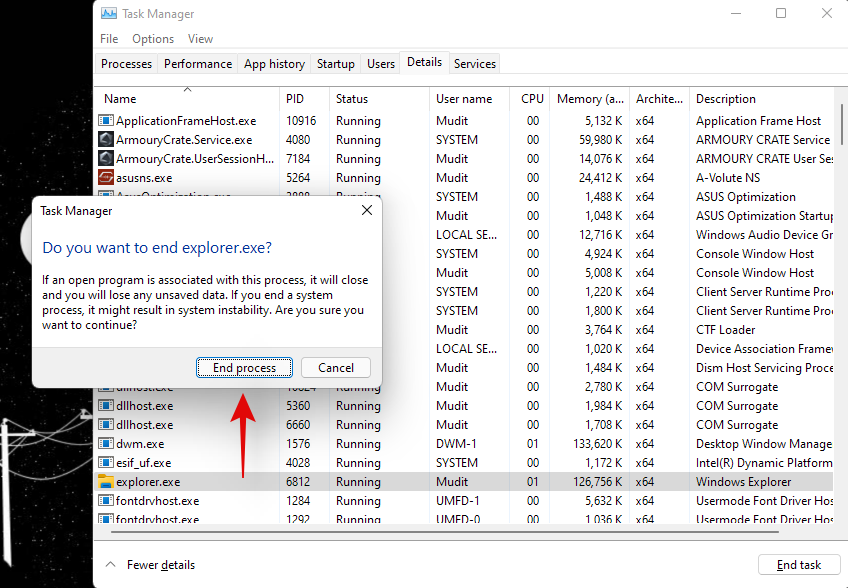
Click on ‘File’ and select ‘Run new task’.
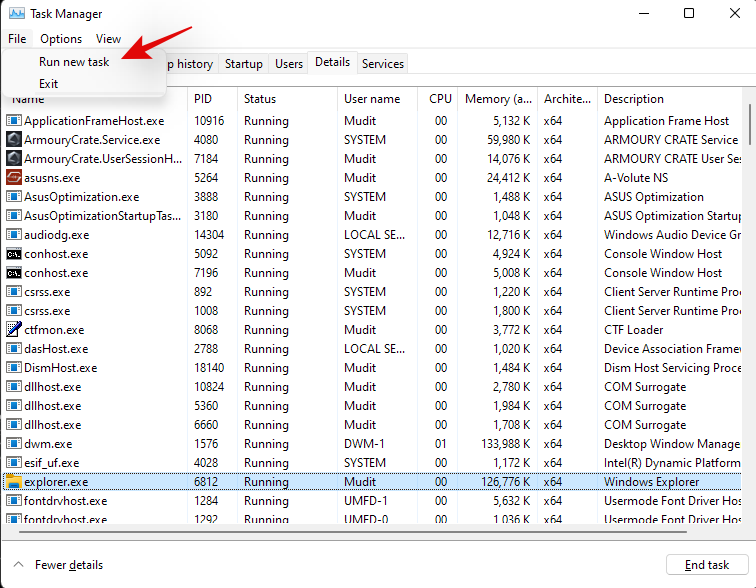
Enter the following in the text box and click on ‘Ok’.
explorer.exe
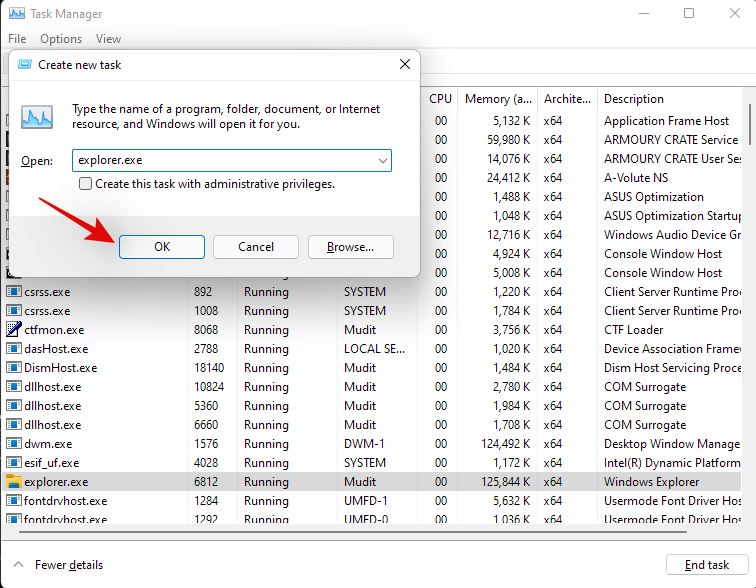
Windows File Explorer will now restart on your system and it should be reverted to the Windows 10 File Explorer. You can open a random folder to check the same. Confirm that you have gone back to the old file explorer and use the guide below to find large files on your system.
Switch to the new file explorer
We can now revert to the old file explorer. Follow the guide below to get you started.
Press Windows + S on your keyboard and search for Regedit. Click and launch the app once it shows up in your search results.

Navigate to the following path below or copy-paste it in your address bar.
HKEY_LOCAL_MACHINE\SOFTWARE\Microsoft\Windows\CurrentVersion\Shell Extensions

Simply click on the DWORD (32-bit) value we had created earlier and hit Del on your keyboard. Click on ‘Yes’ to confirm your choice.

Press Ctrl + Shift + Esc on your keyboard and switch to the ‘Details’ tab.

Click on ‘explorer.exe’ and hit Del on your keyboard.

Click on ‘End process’.

Click on ‘File’ and select ‘Run new task’.

Type in ‘explorer.exe’ and hit Enter on your keyboard.

You can close the task manager and registry editor on your PC now.
And that’s it! You will now have gone back to the new File Explorer on Windows 11.
Method #06: Using CMD (command prompt)
CMD can also help you find large files on your system. Use the guide below to get you started.
Press Windows + E on your keyboard and navigate to a location where you wish to search for large files and click on the address bar at the top.

Type in CMD and press Enter on your keyboard.
CMD will now be launched in the particular folder. Type in the following command and replace ‘PATH’ with the path we copied to your clipboard.
forfiles /S /M * /C “cmd /c if @fsize GEQ 1073741824 echo @path > largefiles.txt
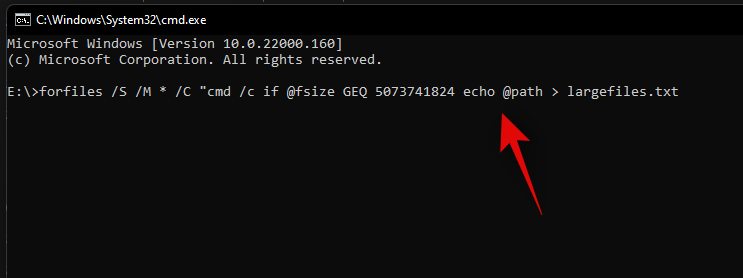
The above command will look for files larger than 1GB on your PC. If you wish to define a larger minimum size, then replace ‘1073741824’ with one of the following options below.
- 2GB: 2147483648
- 5GB: 5368709120
- 10GB: 10737418240
Execute the command with your desired variables and a text file will be created in the same location with a list of all the large files found on your system based on your criteria. You will also find the path for each file on your local storage in the text file.
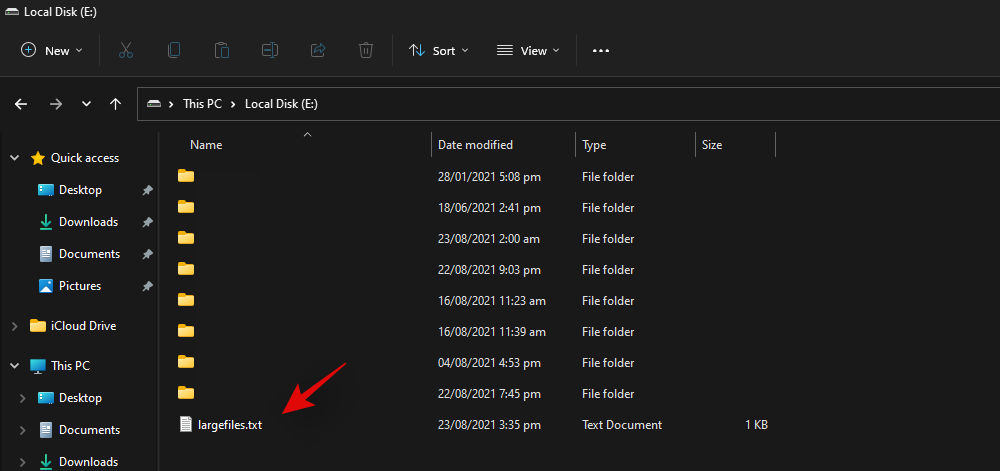
You can use this list to identify the largest files in the current location and then delete them at your discretion to free up some disk space on your system.
Method #07: Using PowerShell
You can also find large files on your system using PowerShell. Just like the command for CMD, PowerShell will scour your local files based on a minimum size and display all the files larger than it. Use the guide below to get you started.
Press Windows + E on your keyboard and navigate to the location where you wish to look for large files. Click on the address bar at the top and type in ‘PowerShell’. Press Enter on your keyboard once you are done.
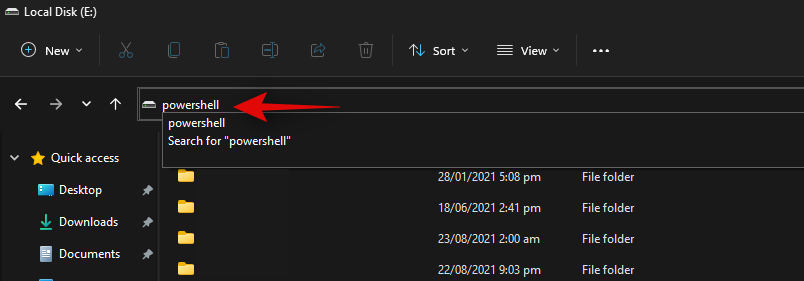
Copy-paste the command below in the PowerShell window and press Enter on your keyboard.
gci -r| sort -descending -property length | select -first 10 name, length
You will now get a list of the top 10 largest files currently taking the most disk space on your system. If you wish to view the top 20 files, then replace ‘select-first 10’ with ‘select-first 20’.
PowerShell will now find and display the 20 largest files on your system along with their size. The file size will be in bytes which can make it a bit difficult to judge the size of files in terms of gigabytes.
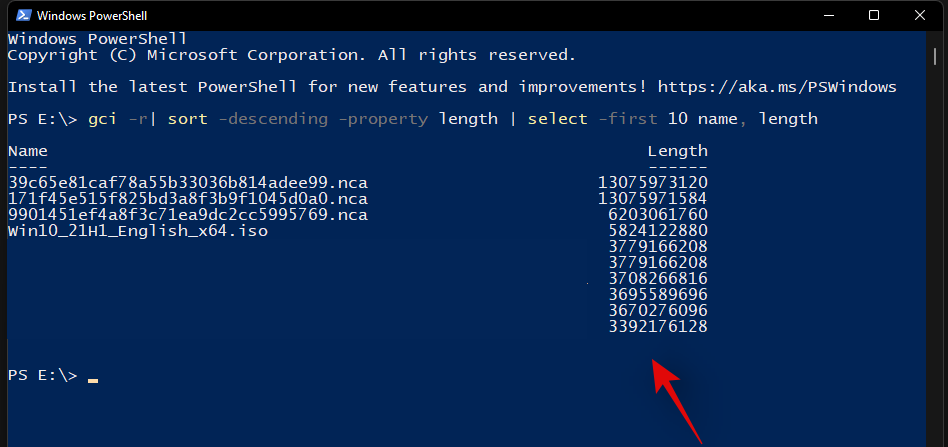
And that’s it! You will now have found the largest files on your PC using PowerShell in Windows 11.
Method #08: Using SpaceSniffer
Space Sniffer is another popular third-party utility used to analyze disk space usage on Windows 11. Space sniffer can help you identify large files using huge amounts of space on your system. You can also find hidden files taking huge disk space on your PC using the SpaceSniffer. Use the guide below to get you started.
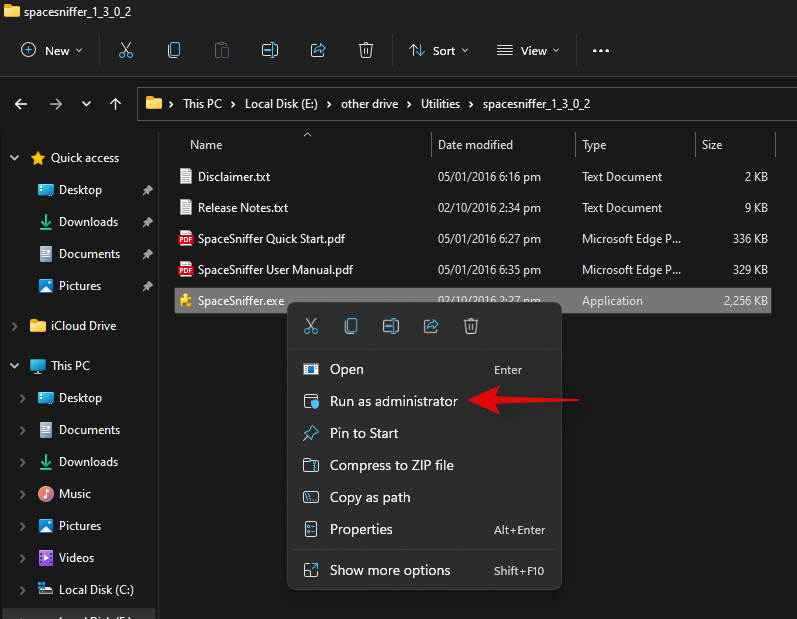
Download SpaceSniffer to your PC using the link above. A portable .exe will be downloaded to your system. Extract the archive and right-click on the .exe file.
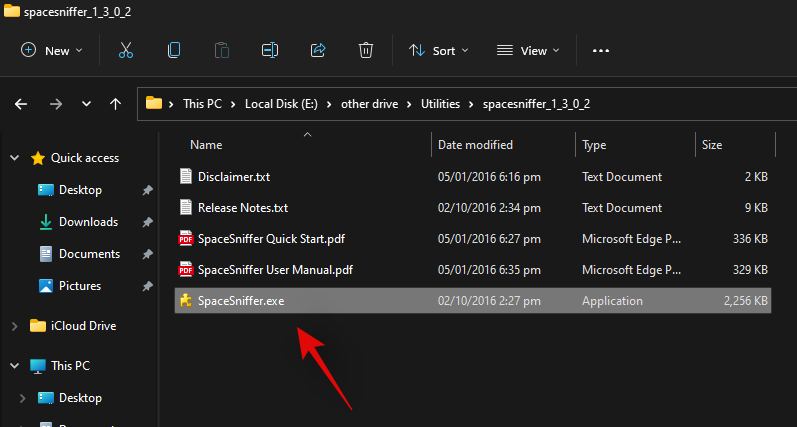
Select ‘Run as administrator’.
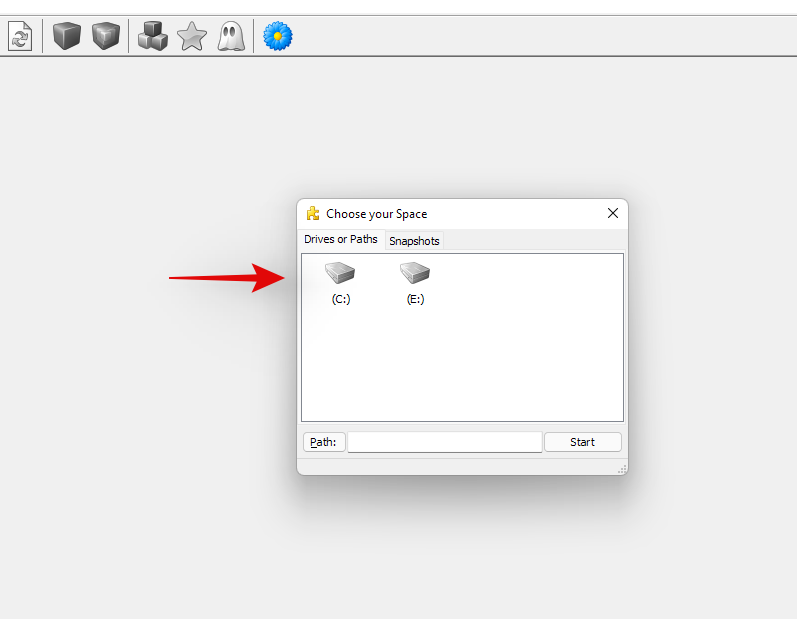
Now select the drive you wish to scan. If you wish to analyze and find large files in a particular directory, then you can enter its path in the text box below.
You will now be shown a graphical representation of your disk space usage on your screen. Simply hover over the largest chunk and you will be shown the name of the folder or file occupying that space.
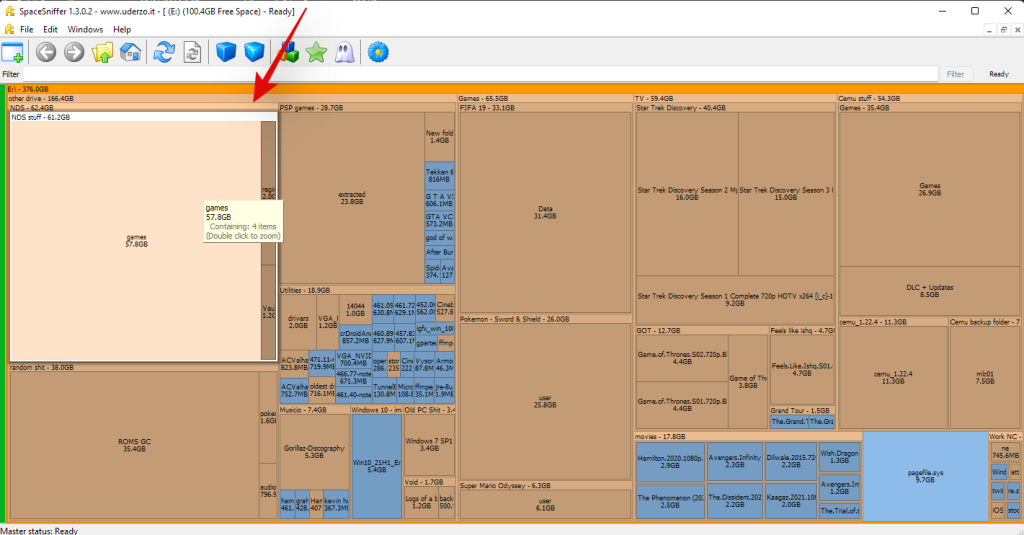
And that’s it! You can use SpaceSniffer this way to identify the largest files on your system by simply looking at the largest chunks on your screen.
Method #09: Other third-party tools you can use to analyze disk usage on Windows 11
The world of third-party tools is a rabbit hole. The more you look, the more programs you will find that claim to help you find and reclaim your disk space on Windows 11. This huge selection of programs can be quite daunting and challenging at first, making it difficult for you to find the perfect tools that fit your current needs and requirements. If you are not a fan of one of the programs used above, then you can opt for one of the alternatives listed below. You can find a few details about each program below their listing.
Tips to free storage space on Windows 11
If you are running low on disk space or have a smaller-sized drive that you are unable to currently upgrade, then you can use the following tips to save as much disk space on your PC as currently possible. Let’s get started.
- Use Disk Cleanup
- Run SFC & DISM commands to fix errors with your drives
- Uninstall unnecessary apps
- Delete or Archive unnecessary or currently unused files
- Use OneDrive or other cloud storage services to save space
- Use an external storage device to store your libraries
- Regularly free up your recycle bin
- Use Storage Sense on Windows 11
- Disable Hibernation to delete the hibernation file
- Rebuild your search index
- Delete additional users created on your system
And more. You can free up space on your PC using tons of ways but each usually comes with a compromise. If you are looking to avoid compromises, then upgrading your storage is the best option. SSDs are cheaper than ever and if you are looking to upgrade your storage, then an M.2 SSD could go a long way for your system.
Note: M.2 SSDs will work at their advertised capacity only if you have a compatible M.2 slot on your system. Not all M.2 slots are the same and not all of them are routed through the PCI lanes on your motherboard.
Free up disk space on Windows 11!
Using the numerous methods above, you can easily find what’s taking up space on your PC and fix it pretty easily. If the Windows-based solutions do not work for you, try using a free-ish software like TreeSize (or others mentioned above).
Se hai ancora bisogno di aiuto per liberare spazio su Windows 11, faccelo sapere nella casella dei commenti qui sotto. Spiega correttamente il tuo problema.
IMPARENTATO
![Come disinstallare McAfee su Windows 11 [5 modi] Come disinstallare McAfee su Windows 11 [5 modi]](https://cloudo3.com/resources8/images31/image-4917-0105182719945.png)


