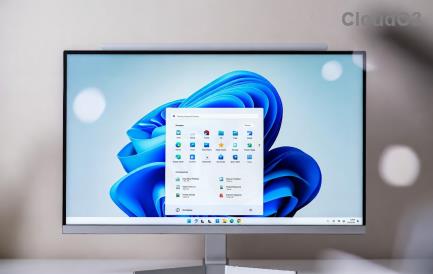
Per anni, Windows ha pubblicizzato la sua serie di nuove funzionalità e miglioramenti affermando che erano a portata di clic del menu Start. Ma cosa succede se il menu Start smette di aprirsi per te? Bene, può succedere che il menu Start su Windows 11 improvvisamente smetta di funzionare per te, rendendo così un po' faticoso svolgere le normali attività.
Se il menu Start non si apre su Windows 11, allora ci sono tutte le correzioni che potremmo pensare per aiutarti a risolvere il problema .
Correlati: Come disinstallare le app su Windows 11
NOTA: se le 17 (!) correzioni regolari fornite di seguito non riescono per te, prova la correzione n. 18 indicata di seguito nella sezione "Ultime località" che parla della creazione di un nuovo utente tramite riga di comando . Questo ti aiuta a creare un nuovo utente utilizzando CMD, quindi senza dover accedere all'app Impostazioni o al menu Start, che potrebbe non funzionare per te. Detto questo, la correzione n. 1 sul problema causato da "Windows Update KB5004300" è una nuova aggiunta, quindi forse controlla prima questo.
Contenuti
Abbiamo incluso un totale di 20 (!) correzioni per risolvere il problema con il menu Start su Windows 11 di seguito. 3 di queste sono correzioni generali che dovrebbero essere provate solo dopo essere sicuri che le 17 correzioni primarie non siano di aiuto.
17 correzioni primarie
Prova queste correzioni prima di provare le 3 correzioni generali (indicate anche di seguito).
Correzione n. 1: disinstallare e reinstallare Windows Update KB5004300
Una recente correzione scoperta da utenti attenti sembra risolvere facilmente il menu di avvio sui nuovi aggiornamenti di Windows 11. L'aggiornamento di Windows rilasciato con il nome KB5004300 sembra causare questo problema. La disinstallazione e la reinstallazione dello stesso sul tuo PC risolveranno il menu Start e la barra delle applicazioni per te. Segui la guida qui sotto per iniziare.
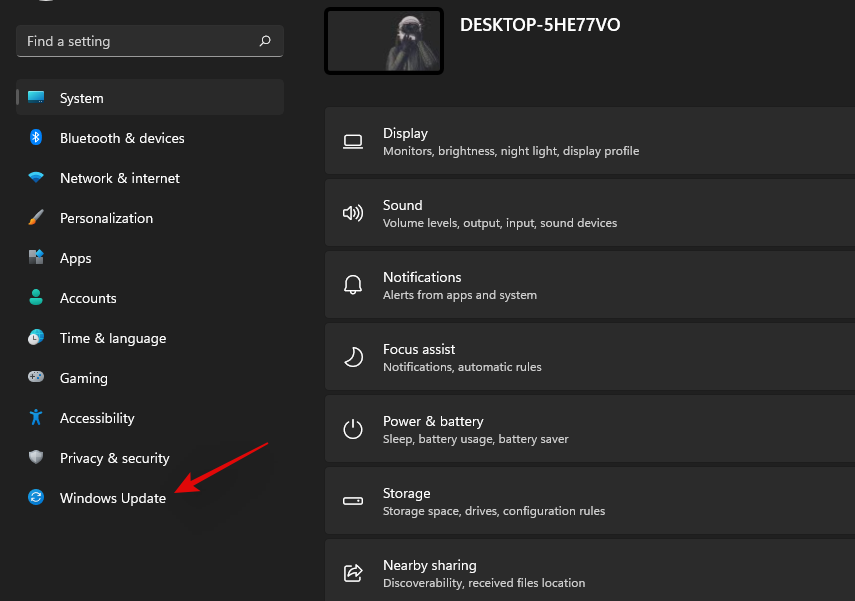
Premi Windows + isulla tastiera per aprire l'app Impostazioni. Fai clic su "Windows Update" alla tua sinistra.
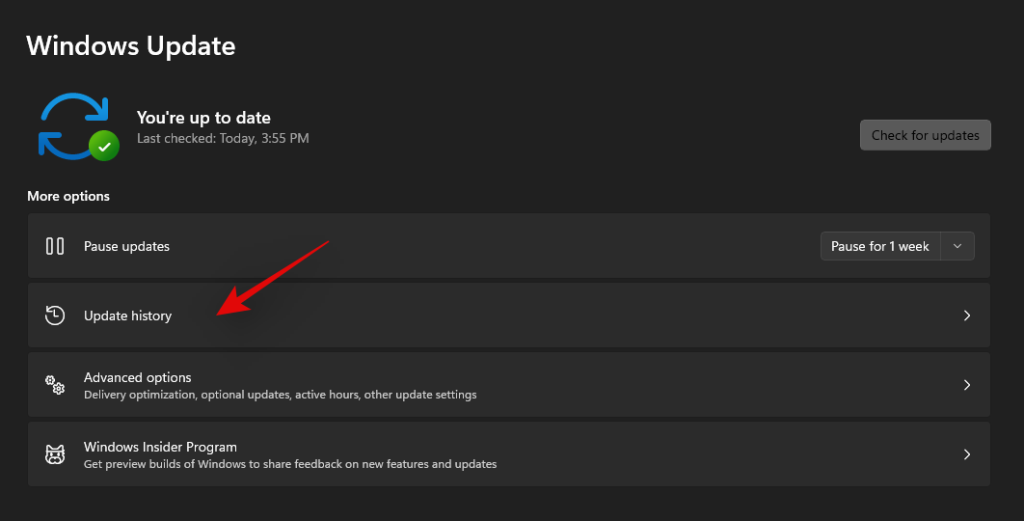
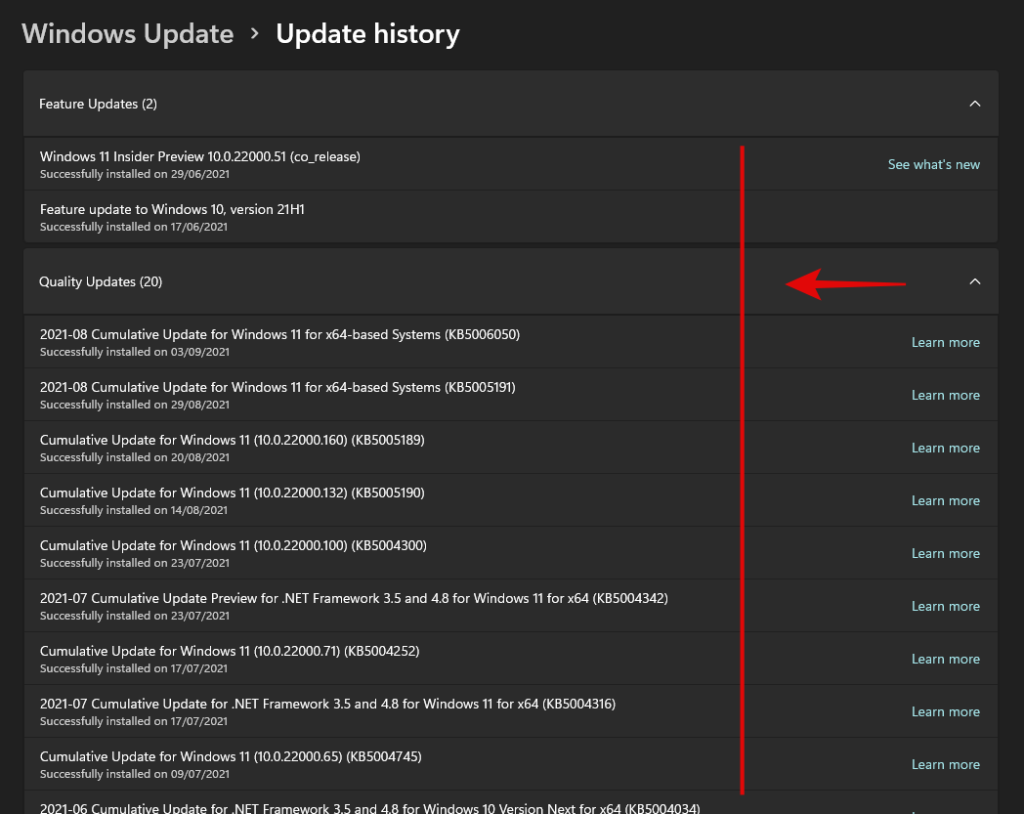
Ora fai clic su "Cronologia aggiornamenti".
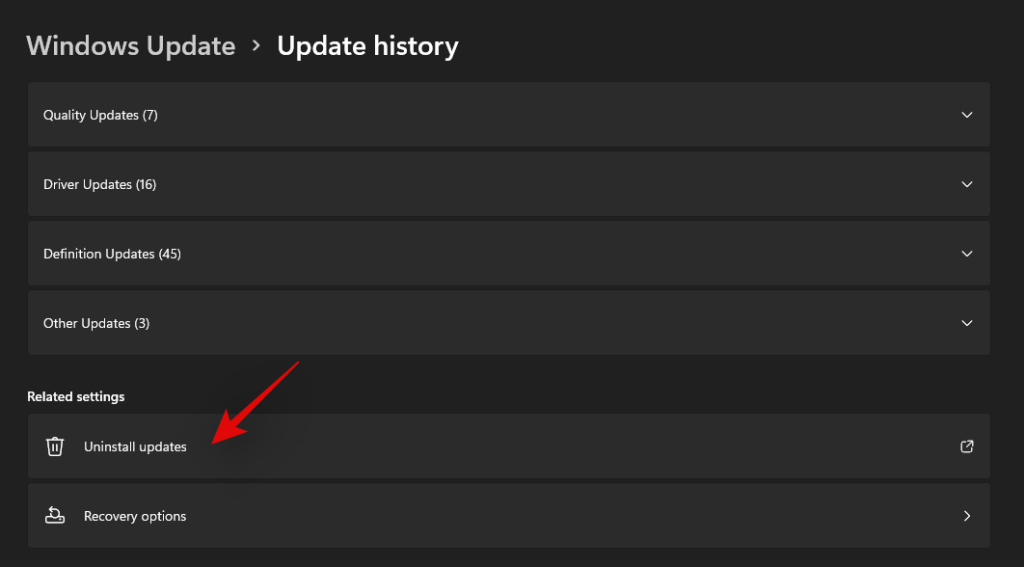
Fare clic su "Disinstalla aggiornamenti".
Verrai ora reindirizzato al Centro di controllo. Trova l'aggiornamento KB5004300 interessato nell'elenco, fai clic e selezionalo.
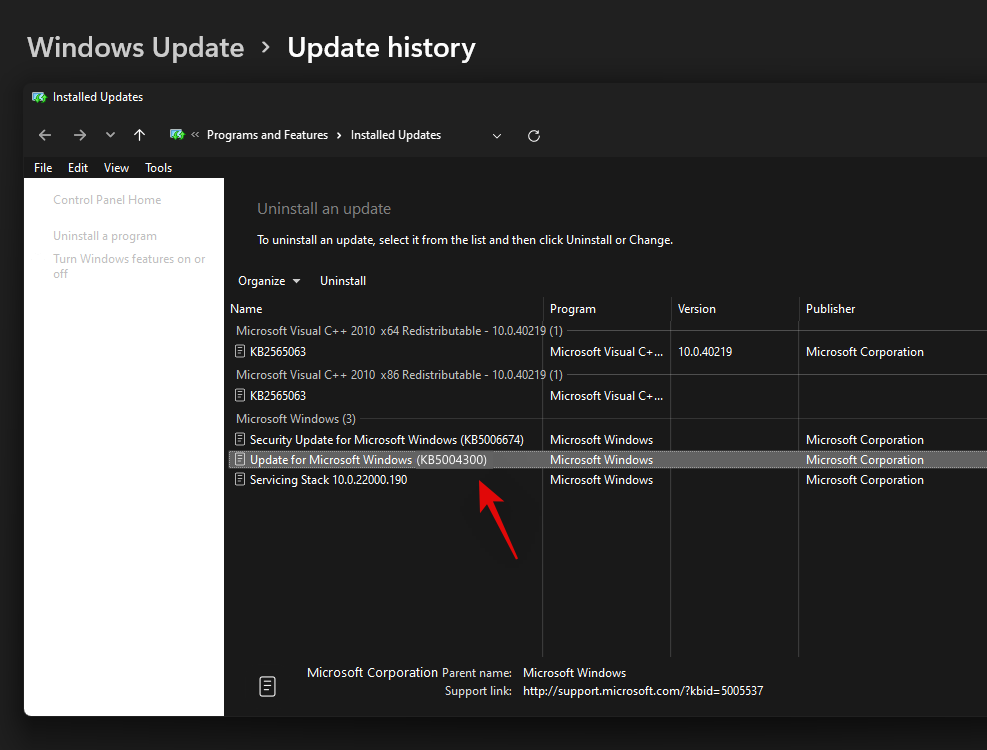
Ora fai clic su "Disinstalla" in alto.
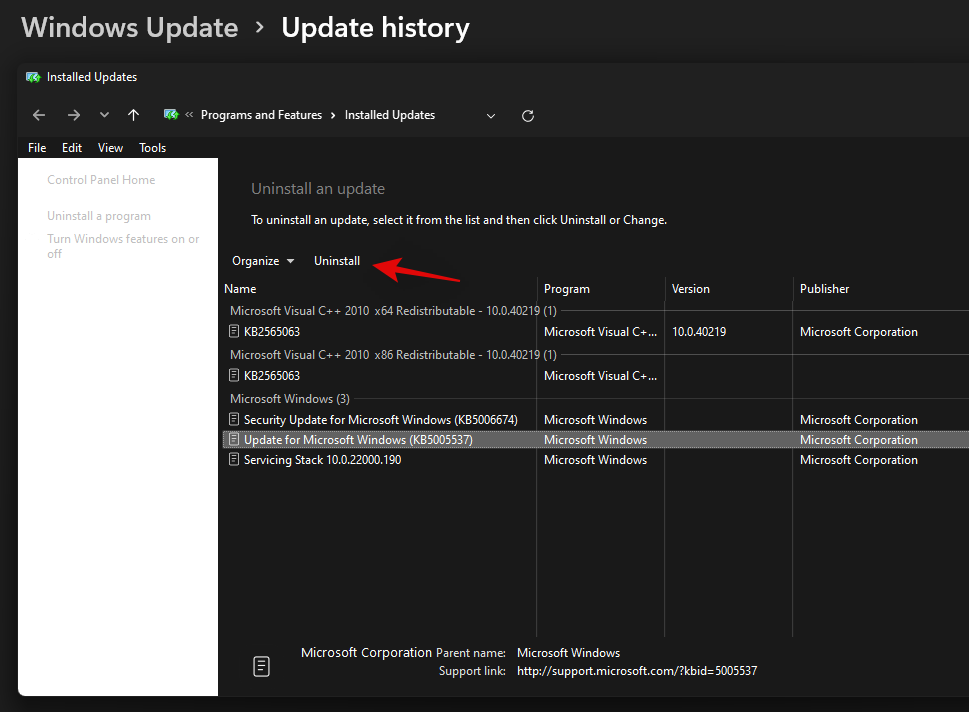
Segui le istruzioni sullo schermo per rimuovere l'aggiornamento dal tuo PC. Una volta aggiornato, riavvia il PC per buona misura.
Ora premi di Windows + inuovo una volta riavviato il PC e seleziona nuovamente Windows Update.

Verifica la disponibilità di aggiornamenti e ora dovresti avere la possibilità di installare nuovamente Windows Update KB 5004300 sul tuo PC.
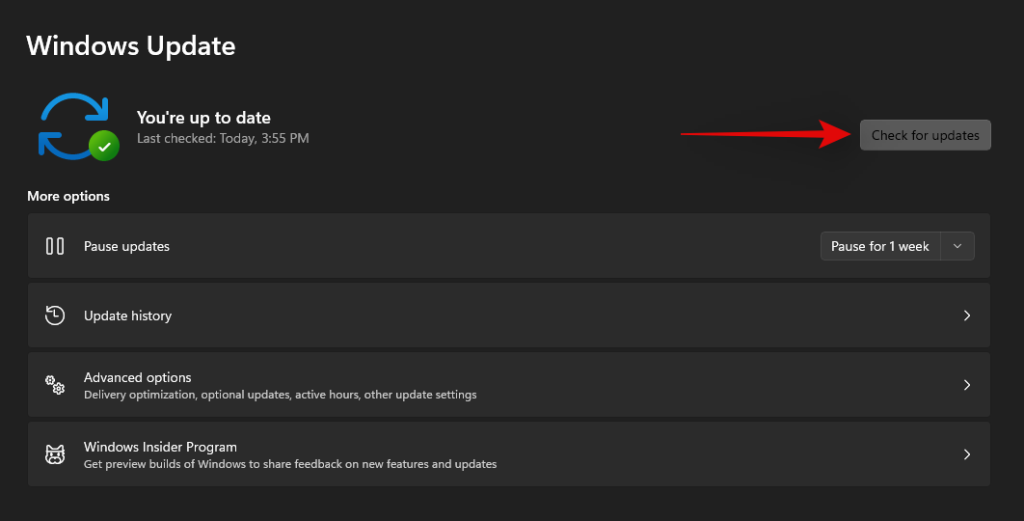
Scarica e installa l'aggiornamento e la funzionalità della barra delle applicazioni e del menu Start dovrebbe ora essere ripristinata in Windows 11.
Correzione n. 2: forza il riavvio del servizio Iris
Un recente aggiornamento alle build interne di Microsoft ha causato gravi problemi con la barra delle applicazioni e il menu Start per molti utenti. Se anche tu sei iscritto al canale Insider e hai riscontrato problemi durante l'aggiornamento al numero di build 22449 o successivo, puoi utilizzare la correzione menzionata di seguito.
Questo metodo eliminerà il valore del registro per il servizio Iris che dovrebbe forzare la reinstallazione al riavvio. Una reinstallazione sembra aiutare a risolvere questo problema per la maggior parte degli utenti. Anche se non sei sulle stesse build, vale la pena provare questa correzione. Segui la guida qui sotto per iniziare.
Nota: questo comando riavvierà immediatamente il PC. Se hai del lavoro in corso in background, assicurati di salvarlo prima di procedere con questa guida.
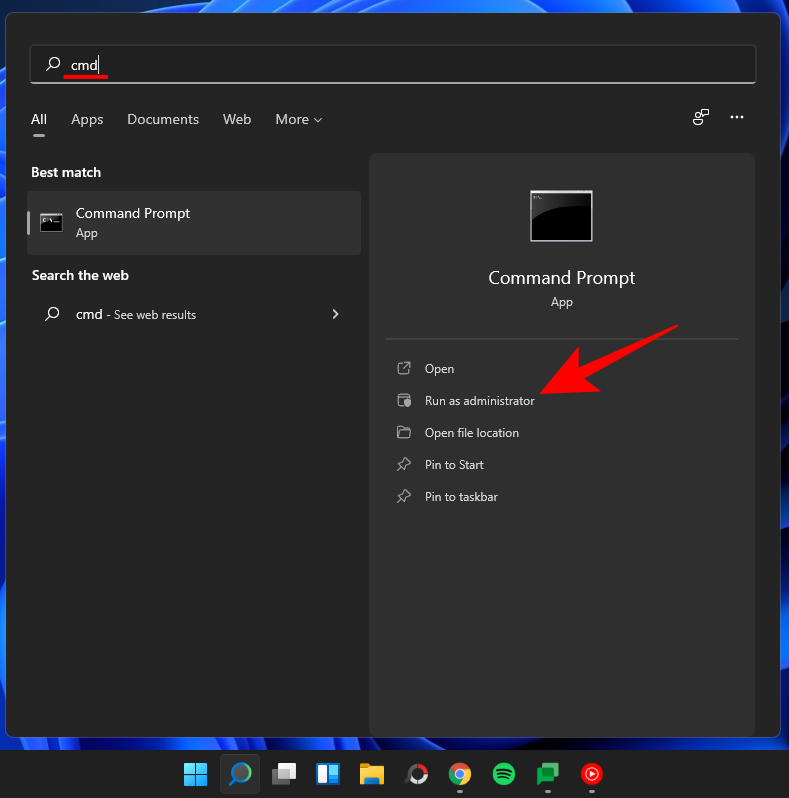
Premi Windows + S sulla tastiera e cerca CMD. Fare clic su "Esegui come amministratore" o premere Ctrl + Shift + Enter sulla tastiera.
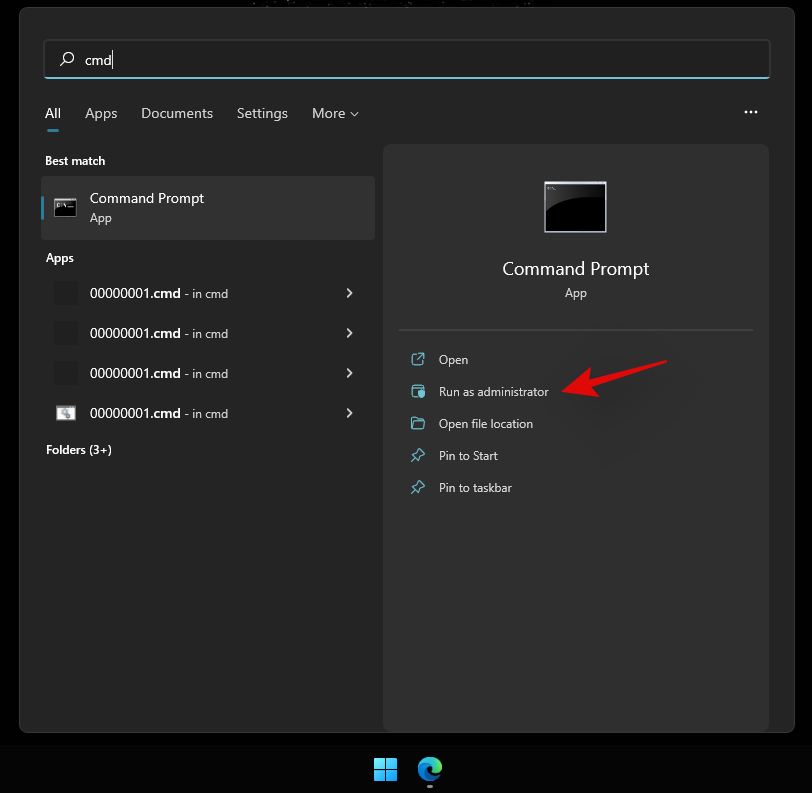
Immettere il seguente comando e premere Invio sulla tastiera.
reg delete HKCU\SOFTWARE\Microsoft\Windows\CurrentVersion\IrisService /f && shutdown -r -t 0

Il tuo PC ora si riavvierà. Accedi al tuo PC come al solito e la funzionalità del menu Start dovrebbe ora essere ripristinata sul tuo sistema.
Correzione n. 3: riavvia il PC
Questo è di gran lunga il metodo più semplice che viene in mente mentre si cerca di risolvere la maggior parte dei problemi su un PC Windows 11. Normalmente, quando si riavvia il sistema, si forza essenzialmente tutti i processi, incluso Windows, a riavviare tutti i loro servizi e processi. Questo riavvia anche il processo del menu Start che aiuterà a risolvere il problema con esso.
Se non è ovvio, ecco i passaggi per riavviare il PC.
Assicurati che tutte le app e i file siano chiusi. Oppure, vai semplicemente alla schermata del desktop premendo Windows key + D insieme. Ora, premi Alt + F4 insieme i tasti sulla tastiera per ottenere la schermata "Spegni Windows".
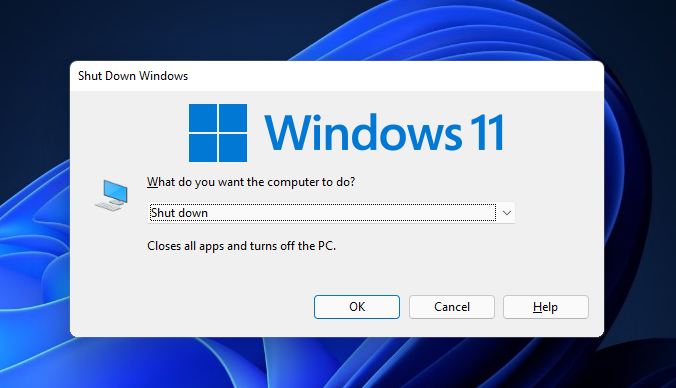
Fare clic sul menu a discesa, selezionare "Riavvia" e premere il pulsante "OK".
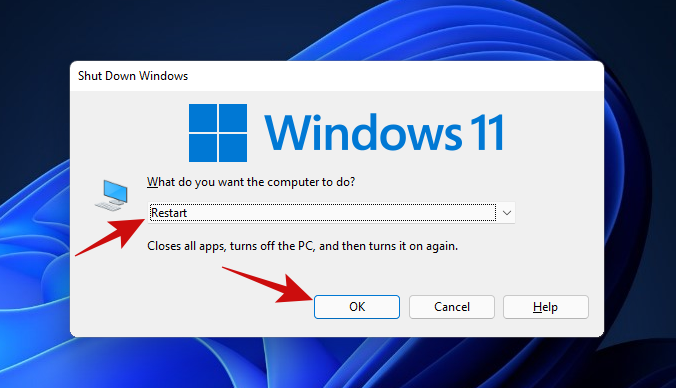
Una volta riavviato il PC, dovresti essere in grado di utilizzare nuovamente il menu Start. Se ancora non ci riesci, prova il metodo successivo.
Correzione n. 4: riavviare Esplora risorse utilizzando Task Manager
La prossima soluzione semplice per un menu Start bloccato utilizza Task Manager. Il Task Manager può essere lo strumento perfetto per gestire qualsiasi processo in esecuzione su un PC Windows.
Se hai un menu Start che non vuole rispondere ai tuoi clic, segui i passaggi indicati di seguito per vedere se risolve il problema.
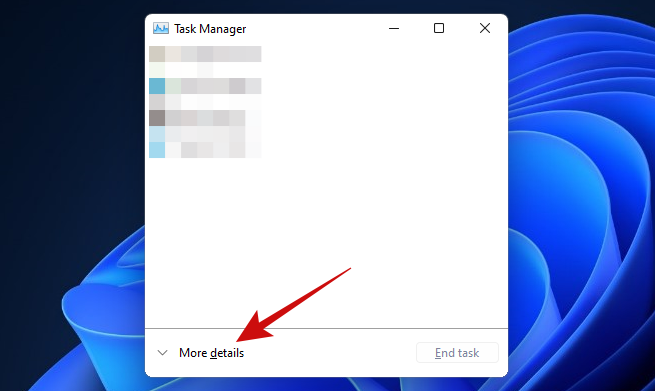
Premi i Ctrl + Shift + Esc tasti per attivare Task Manager. Se il tuo Task Manager ha questo aspetto, fai clic sul pulsante "Ulteriori dettagli" per accedere alla visualizzazione dettagliata.
Una volta all'interno del Task Manager, scorrere l'elenco Processi per trovare il processo "Esplora risorse". Fare clic con il pulsante destro del mouse sul processo e fare clic sull'opzione "Riavvia".
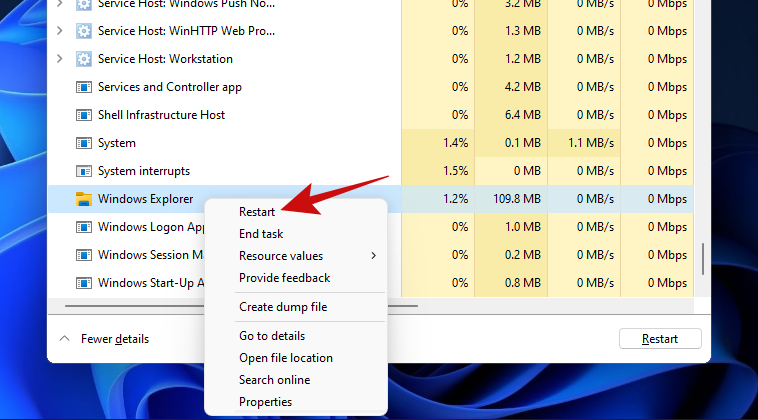
Una volta fatto clic, Windows dovrebbe riavviare il processo di Windows Explorer in un istante e questo dovrebbe correggere il menu di avvio.
Il riavvio del processo di Esplora risorse è abbastanza simile al riavvio del PC. L'unica differenza è che qui si riavvia solo un singolo processo, mentre con un riavvio si riavviano tutti i processi. Inoltre, molte persone in passato hanno avuto successo nel correggere il menu Start con questo metodo, il che vale la pena provare.
Correzione n. 5: verifica la disponibilità di aggiornamenti a Windows
Se ancora non riesci ad aprire il menu Start, dovresti provare Windows Update. Il problema potrebbe essere più diffuso di quanto pensi e Microsoft potrebbe aver rilasciato un hotfix per correggere il menu Start che non risponde.
Ecco come puoi farlo.
Apri l'app Impostazioni con i Win key + i tasti insieme. Una volta aperto, fai clic sull'opzione "Windows Update".
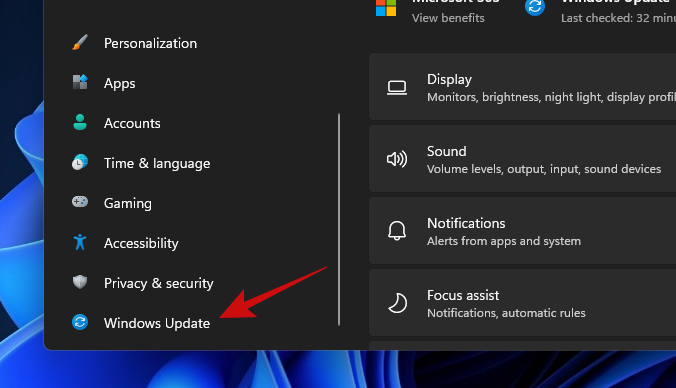
Fai clic sul grande pulsante "Verifica aggiornamenti" per iniziare a controllare eventuali aggiornamenti disponibili per Windows per il tuo PC. Se disponibile, lascia che Windows installi tutti gli aggiornamenti.
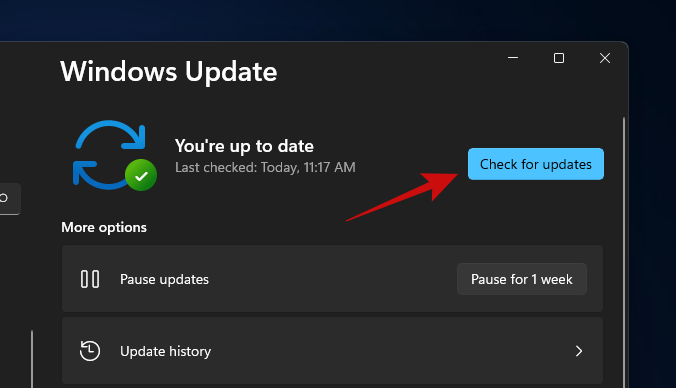
Quando Windows ha terminato l'aggiornamento del PC, riavvialo e prova ad aprire il menu Start. Se non riesci ancora ad aprire il menu Start, pensiamo che sia ora di cercare le correzioni più avanzate.
Correzione n. 6: eseguire DISM e SFC
DISM (Deployment Image Servicing and Management) e SFC (System File Checker) sono due degli strumenti più potenti per identificare e riparare installazioni Windows corrotte. Questi strumenti possono essere usati con il prompt dei comandi o Windows PowerShell. Per questa guida, li useremo con il prompt dei comandi.
Cominciamo con DISM. DISM può essere utilizzato per acquisire nuove copie di file Windows danneggiati.
Premere Win key + r per aprire la casella Esegui, digitare cmd e quindi premere Ctrl + Shift + Enter insieme (invece di premere invio) per aprire un prompt dei comandi con privilegi elevati.
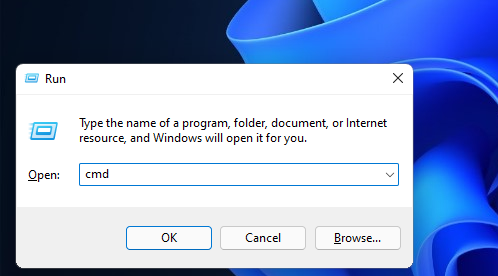
Una volta che sei all'interno del prompt dei comandi, incolla il codice sottostante e premi invio.
DISM /Online /Cleanup-Image /RestoreHealth
DISM ora proverà a ripristinare i file danneggiati (se presenti) dalla tua installazione corrente richiedendo una nuova copia di quel file dall'aggiornamento di Windows. L'intero processo richiederà circa 15-20 minuti. Ecco come appare il comando in azione.
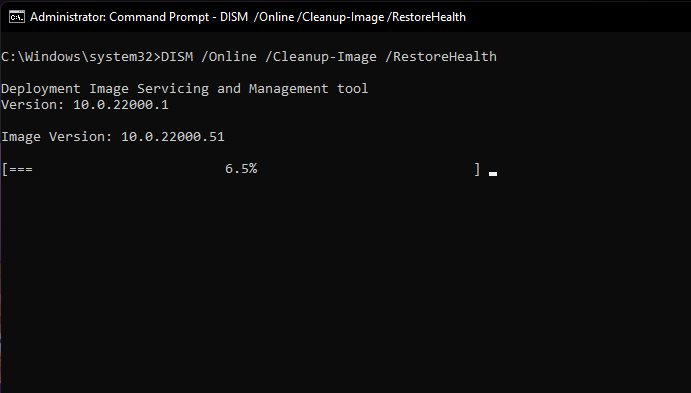
Una volta che il comando ha ripristinato tutti i file danneggiati, dovresti vedere qualcosa di simile.
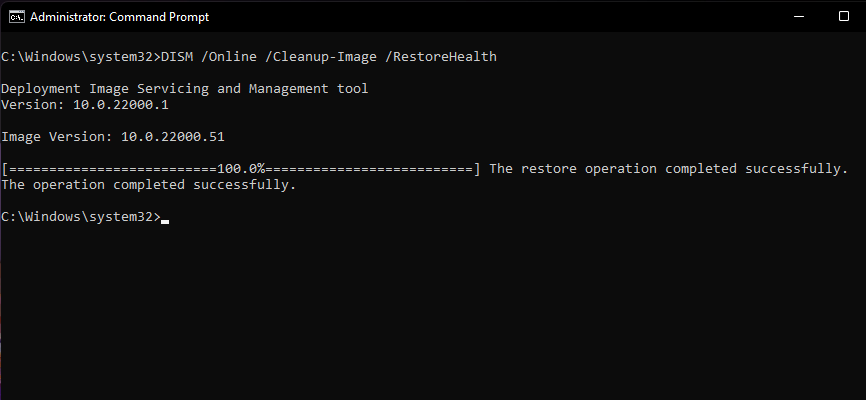
Una volta terminato questo passaggio, tieni aperta la finestra del prompt dei comandi per eseguire il comando successivo.
Il passaggio successivo consiste nel verificare l'integrità di tutti i file di Windows 11 per assicurarsi che siano in buone condizioni. Per questo, utilizzeremo lo strumento SFC.
Ecco come.
Incolla il codice seguente nella finestra del prompt dei comandi e premi invio.
sfc /scannow
Ecco come appare il comando.
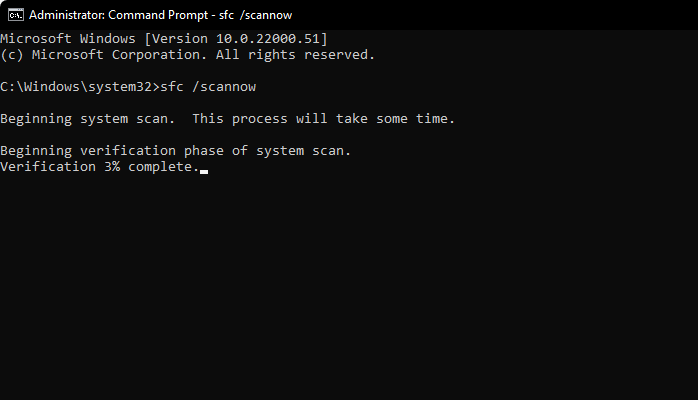
Il comando precedente impiegherà solo un paio di minuti per completare la scansione dell'integrità dei file di Windows. Una volta fatto, il risultato dovrebbe essere simile a questo.
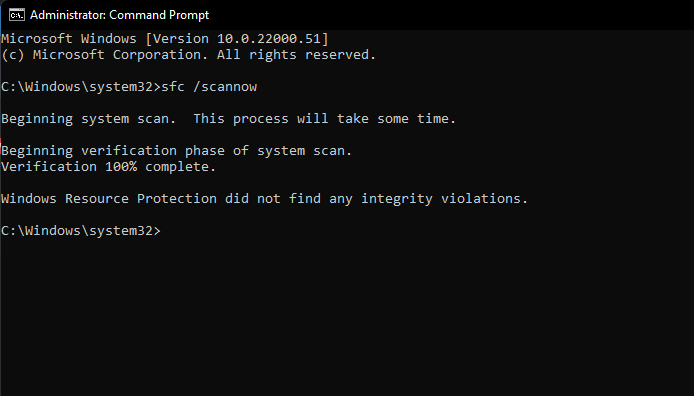
Suggerimento: assicurati che il tuo PC disponga di una connessione Internet stabile affinché questo metodo funzioni.
È ora di riavviare.
Ancora bloccato con un menu Start rotto, è ora di provare il metodo successivo.
Correlati: 6 modi per aggiornare i driver su Windows 11
Correzione n. 7: ricostruire l'indice di ricerca
Il menu Start e la ricerca di Windows sono strettamente integrati. Problemi con la ricerca e l'indicizzazione potrebbero essersi insinuati nel menu Start e averlo influenzato. Quindi, escludiamo anche questa possibilità.
Diamo un'occhiata ai passaggi per farlo.
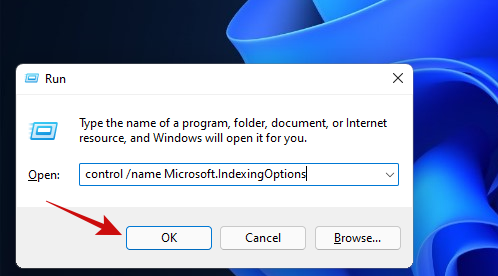
Aprire la casella Esegui premendo Win key + r. Quindi incolla il testo sottostante nella casella Esegui e premi invio.
control /name Microsoft.IndexingOptions
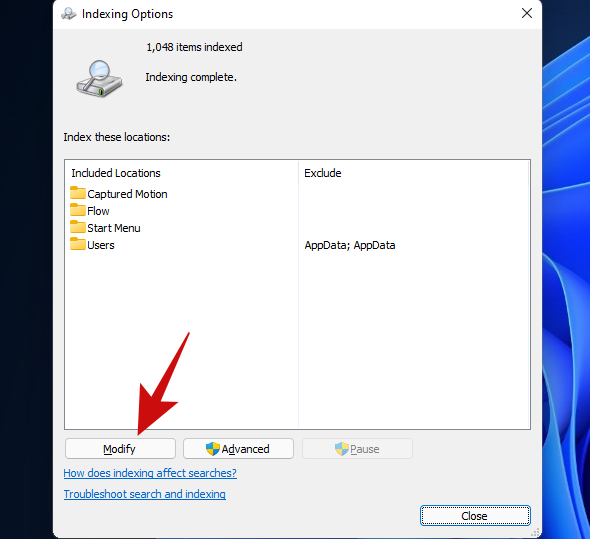
Dovresti vedere un popup intitolato "Opzioni di indicizzazione" aperto. Fare clic sul pulsante "Modifica".
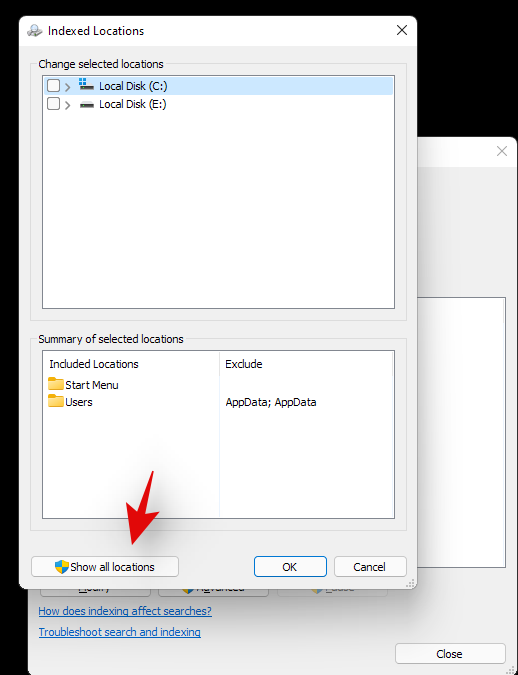
Fare clic sul pulsante "Mostra tutte le sedi".
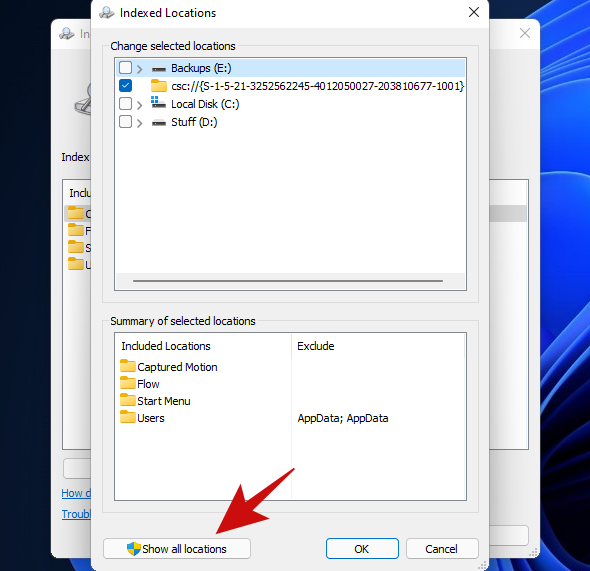
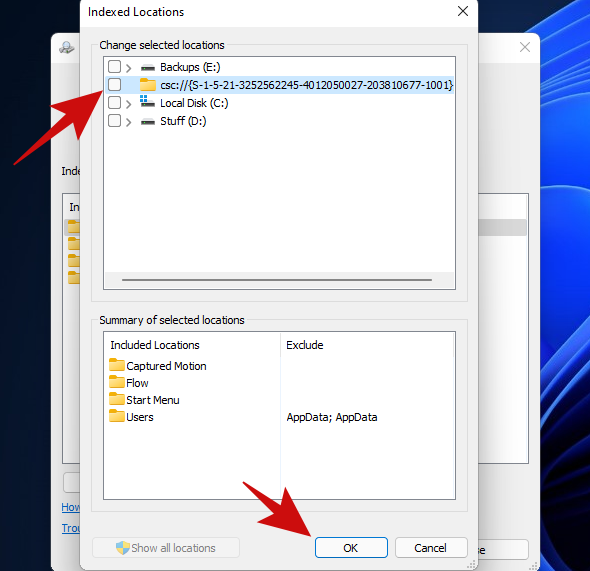
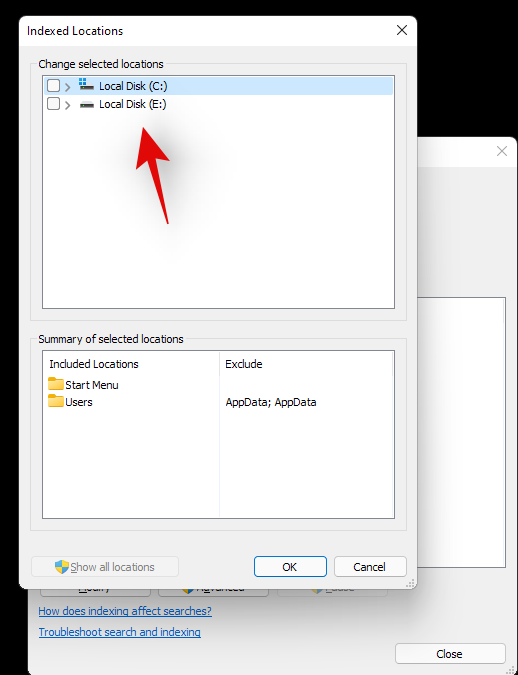
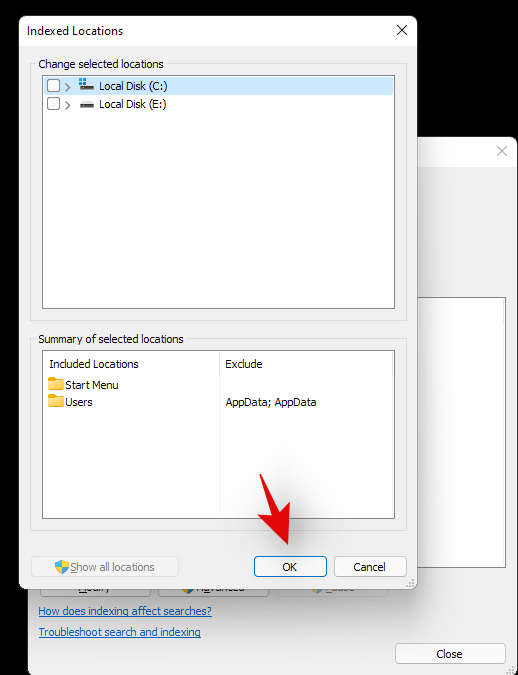
In questa schermata, deseleziona tutte le posizioni e fai clic sul pulsante "OK". La nostra aveva solo una posizione selezionata, quindi abbiamo deselezionato solo una posizione in questo elenco.
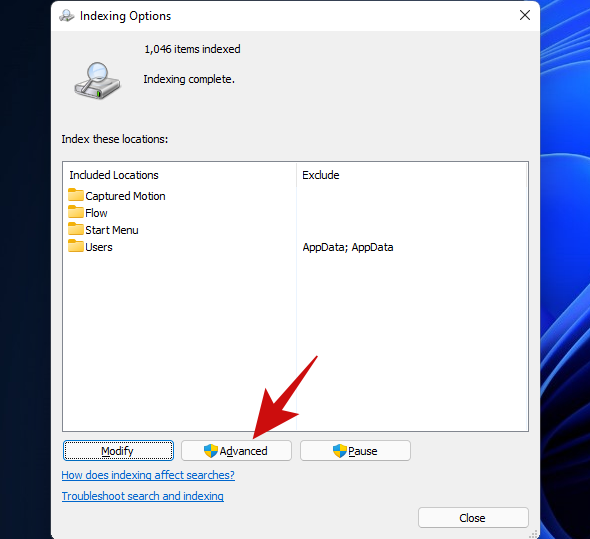
Fare clic sul pulsante "Avanzate".
Fare clic sul pulsante "Ricostruisci".
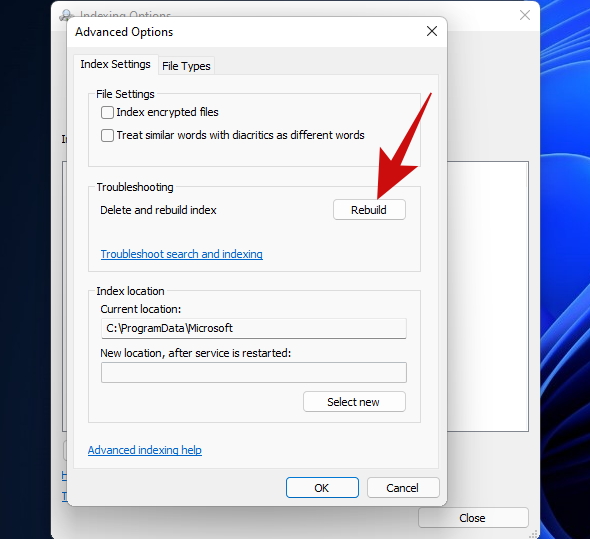
Windows inizierà ora a ricostruire l'indice di ricerca. State tranquilli, l'intero processo sarà ora gestito da Windows e non richiederà alcun input da parte dell'utente, anche se ci vorrà un po' di tempo per essere completato.
Quando Windows ha ricostruito il tuo indice di ricerca, riavvia il PC. Una volta che sei di nuovo all'interno di Windows, prova ad aprire il menu Start. Se ancora non funziona, pensiamo che sia ora di optare per un metodo più resiliente.
If you have installed any third-party programs to modify the look or functions of your start menu then we recommend removing all such programs. Likely, one of these programs is not compatible with the new Windows 11 start menu which is why you are facing issues with your system. If you have one of the following apps mentioned below, then we recommend you revert their settings and uninstall them as soon as possible. Most of these apps were designed for Windows 10 and are incompatible with the Windows 11 Start menu code to a certain extent. A recent Windows 11 update likely broke their compatibility causing the start menu to glitch out on your system.
- Open Shell
- Classic Start
- WinAero Tasbar
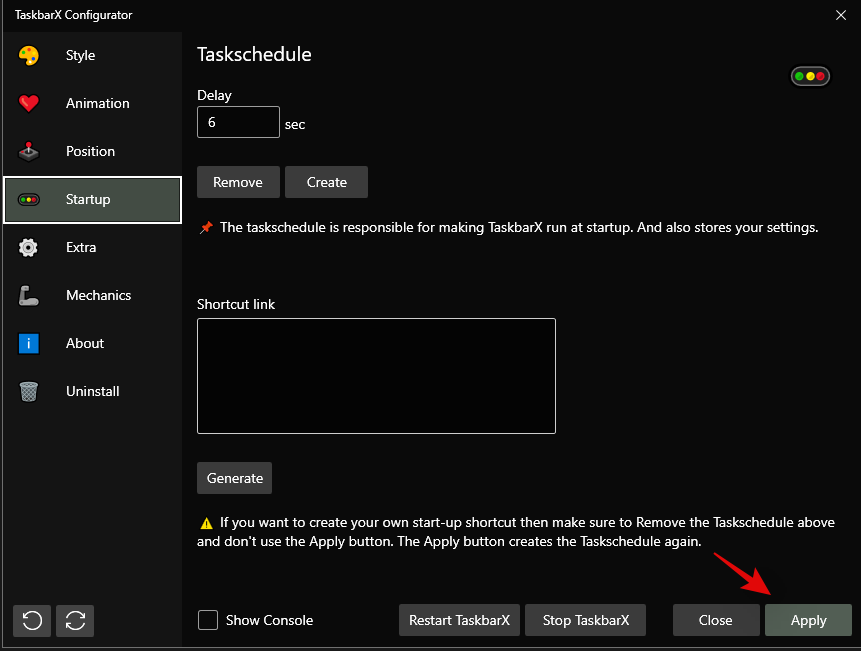
- TaskbarX
And more. If removing a third-party app that modifies your start menu helps restore its functionality then you can wait for a compatible update to use the app again.
Did you use a registry hack to get the older Windows 10 start menu on Windows 11? If so then it is likely that this registry hack’s functionality broke with a recent Windows 11 update. In such cases, you can use the guide below to revert the changes on your system.
Press Windows + R on your keyboard and type in the following in the Run dialog box.
regedit

Press Enter on your keyboard once you are done to launch the registry editor. You can also click on ‘Ok’ instead.
Now copy and paste the address given below in the address bar at the top of the registry editor and press ‘Enter’ on your keyboard.
Computer\HKEY_CURRENT_USER\Software\Microsoft\Windows\CurrentVersion\Explorer\Advanced
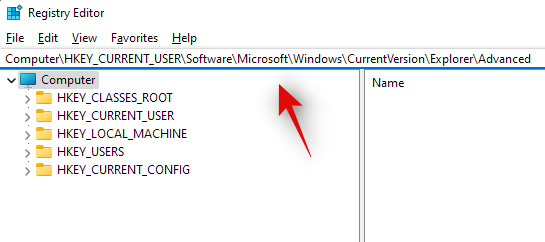
Look for ‘Show_StartClassicMode’ on your right and right-click on it.

Select ‘Modify’.

Change its value data to ‘0’ and click on ‘Ok’. Do not close the registry editor just yet.

Press Ctrl + Shift + Esc on your keyboard to launch the Task Manager. Now click and switch to the ‘Details’ tab at the top.
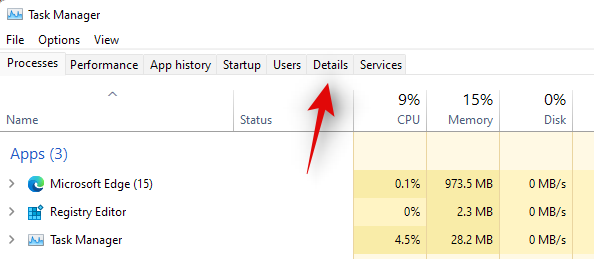
Click and select Explorrer.exe from the list and press Delete on your keyboard.

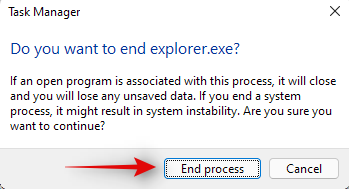
Confirm your choice by clicking on ‘End Process’.
Now click on ‘File’ in the top left corner and select ‘Run new task’.
Type in ‘Explorer.exe’ and press Enter on your keyboard. You can also click on ‘Ok’ instead.
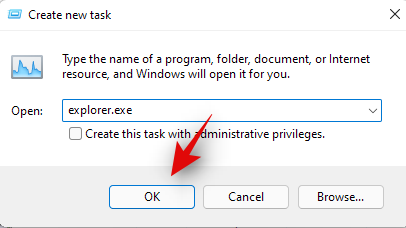
Explorer will now be restarted on your system. Switch back to the registry editor and click and select ‘Start_ShowClassicMode’.
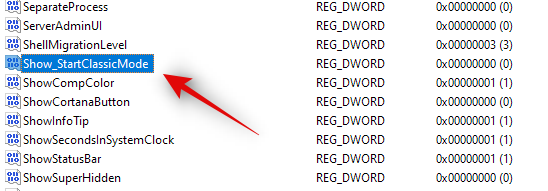
Press Delete on your keyboard and confirm your choice to delete the registry value.

Restart your system for good measure now.
If your Start menu wasn’t working due to a registry hack to get the older start menu then it should be fixed by now. You can check for the same by clicking on the Start menu icon in your taskbar.
Windows 11 has come a long way when compared to its predecessors. Background processes, tasks, and apps are more streamlined now and various features and elements seem to have their own dedicated packages. These dedicated packages make it easier for you to troubleshoot problems with certain features of Windows and even reinstall them in worst-case scenarios. If the start menu is still not working for you then you can reinstall basic elements of Windows 11 which will also reinstall the Start menu module on your system. This should help fix any background conflicts and get the Start menu back up and running on your system. Follow the guide below to get you started.
Press Windows + S on your keyboard and search for PowerShell. Click on ‘Run as administrator’ once the app shows up in your search results.
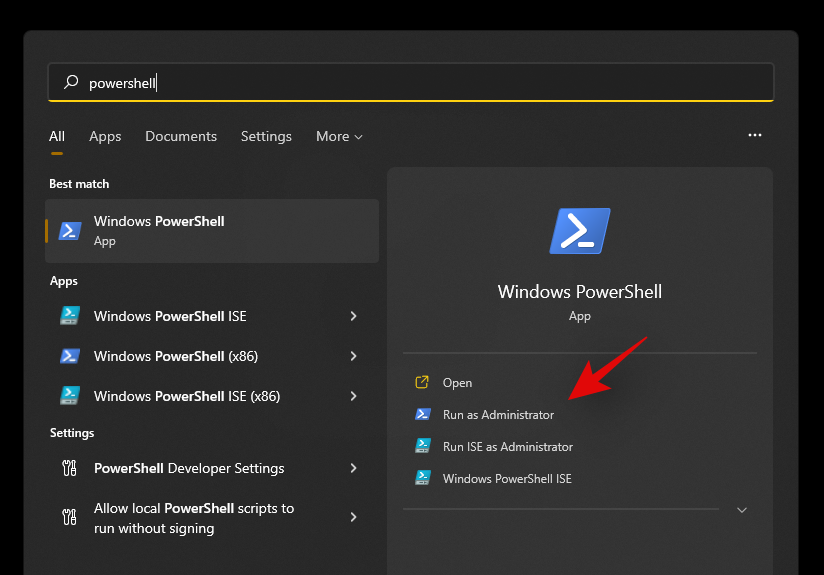
Now type in the following command and press ‘Enter’ on your keyboard.
Get-appxpackage -all *shellexperience* -packagetype bundle |% {add-appxpackage -register -disabledevelopmentmode ($_.installlocation + “\appxmetadata\appxbundlemanifest.xml”)}

Ignore any warnings that you get and continue with the process. Once complete, restart your system for good measure.
Now that the Start menu and other basic features have been reinstalled on your system, let’s rebuild your system’s index to get everything back up and running again. Press Windows + R on your keyboard to open the Run dialog box.
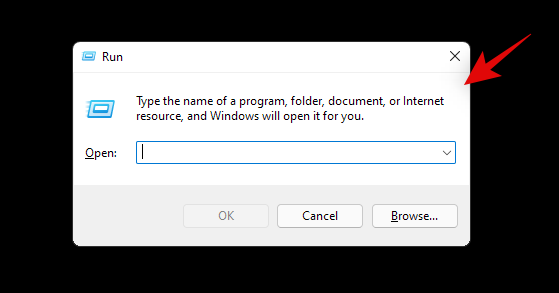
Type in the following command and press Enter on your keyboard.
control /name Microsoft.IndexingOptions
Click on ‘Modify’ and select ‘Show all locations’.
Uncheck all the boxes in the current list.
Click on ‘Ok’.
Click on ‘Advanced’ now.
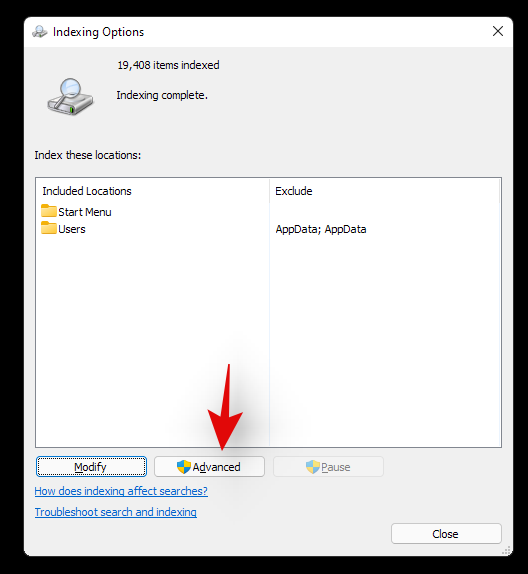
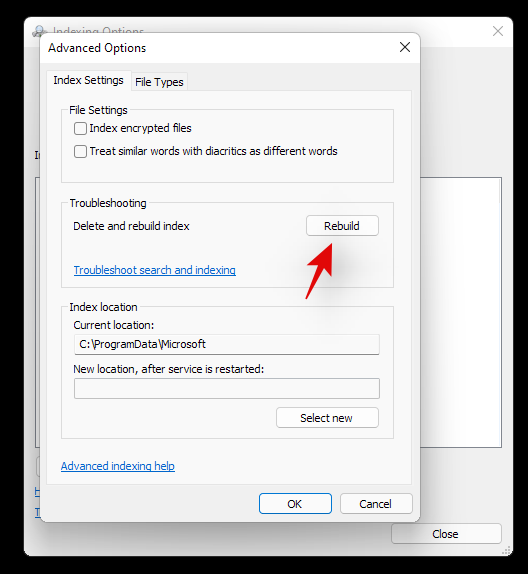
Select ‘Rebuild’ under troubleshooting.
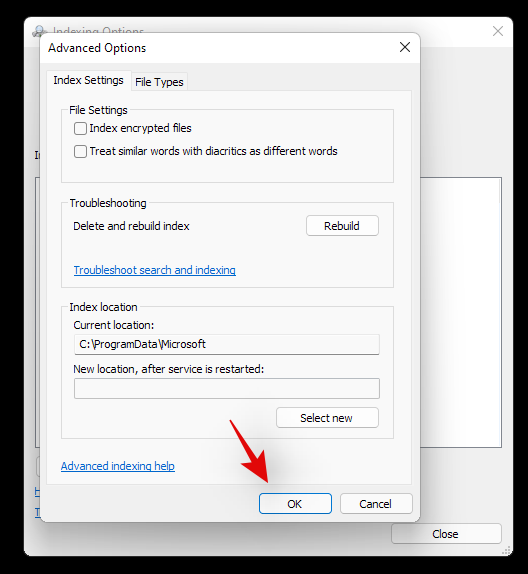
Click on ‘Ok’ once the warning pops up on your screen.
Once the process finishes, we highly recommend you restart your system.
You can now try clicking on the Start icon once your system restarts. Reinstalling the Start menu should help fix any issues with the Start menu on most systems.
Fix #11: Install any pending driver and Windows updates
This might be a bit obvious but you should definitely install any pending driver updates or Windows update on your system. This will help get you up and running on the latest drivers and help your system be compatible with all the hardware installed on your system. While drivers rarely cause issues with Windows features, you can never be too sure. Hence we recommend you install the latest available drivers on your system. You can use the link below to go to our detailed guide for updating drivers on Windows 11. If you are using a pre-built system or a laptop, then we recommend checking your OEM support page for dedicated driver updates as well.
There is a registry value that if modified, can disable your Start menu altogether. If you have been using registry modifiers, cleaners, and more, then it is likely that this registry value was modified which ended up disabling the Start menu on your system. Additionally, the Start menu’s functionality was moved to a Xaml process once Windows 10 was released. This process is known to glitch out
Use the guide below to check if the start menu is disabled on your system and re-enable it if needed.
Press Windows + R on your keyboard and type in the following command given below.
regedit
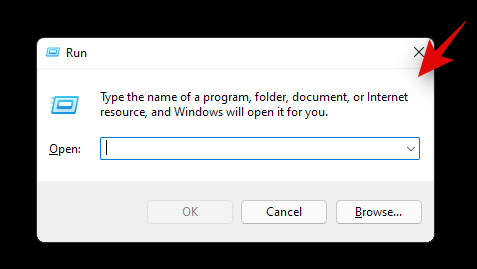
Now press Enter on your keyboard or click on ‘Ok’.
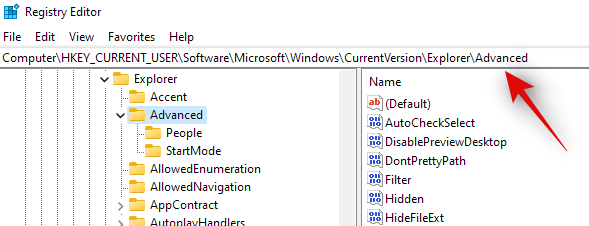
Copy and paste the following address in the address bar at the top of your registry editor.
HKEY_CURRENT_USER\Software\Microsoft\Windows\CurrentVersion\Explorer\Advanced
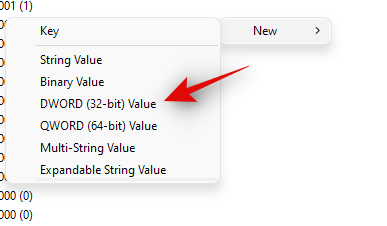
Now right-click on your right tab and select ‘New’.
Select ‘DWORD (32-bit value)’.
Enter the name as ‘EnableXamlStartMenu’.
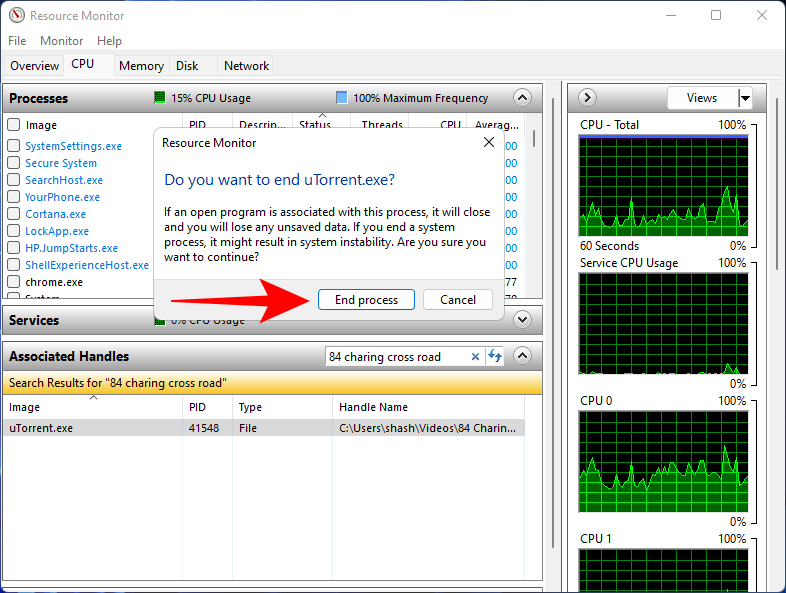
Enter the value as ‘0’.
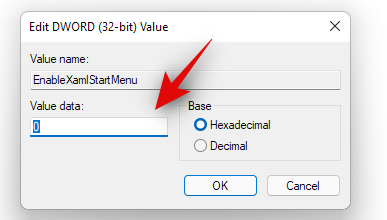
Restart your PC now.
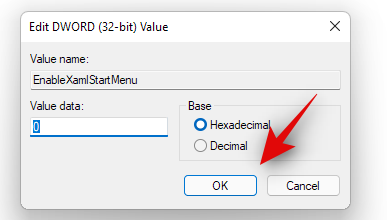
Once restarted try activating the Start menu now. If the Xaml process was facing conflicts, then they should be fixed now and the Start menu should be back up and running on your system again.
Fix #13: Restart Windows background services
If the Start menu still fails to launch then it’s time to restart all background Windows services. Usually restarting the ‘ShellExperienceHost.exe’ is enough but if that does not work for you, you can try restarting all the services listed below. This usually gets the Start menu back up and running on most systems.
Press Ctrl + Shift + Esc on your keyboard to open the ‘Task Manager’. Now click on ‘Details’ at the top to switch to the Details tab.
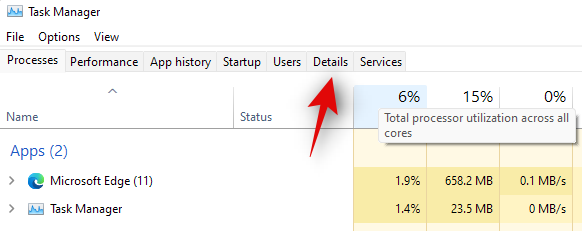
Find ‘StartMenuExperienceHost.exe’ in the list and click and select it.

Press Delete on your keyboard or click on ‘End Task’ in the bottom right corner. Click on ‘End Process’ again to confirm your choice.
ShellExperienceHost.exe will now be killed. The process should automatically restart within a few seconds. Once restarted, try activating the Start menu on your system. If the menu starts working then you are good to go. However, if it is still not working then use the guide above to restart the following services on your system as well.
- SearchIndexer.exe
- SearchHost.exe
- RuntimeBroker.exe
And that’s it! If a background process was stopping you from accessing the Start menu then the issue should be fixed for you by now.
Fix #14: Run a Windows Troubleshooter
During a Windows 1909 feature update back in 2019, the Start menu was essentially broken due to a background conflict. To fix this issue for the masses, a troubleshooter was released by Microsoft to help fix this issue. If the Start menu is still not working for you then you can try running this troubleshooter on your system. Use the guide below to download and run the troubleshooter on your system.
Download the archive linked above to a convenient location on your local storage and extract its contents.
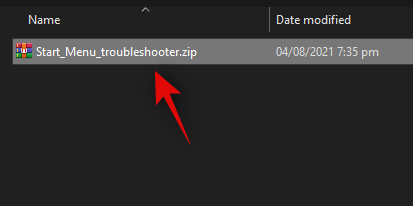
Now copy and paste the ‘startmenu.diagcab’ file on your desktop.

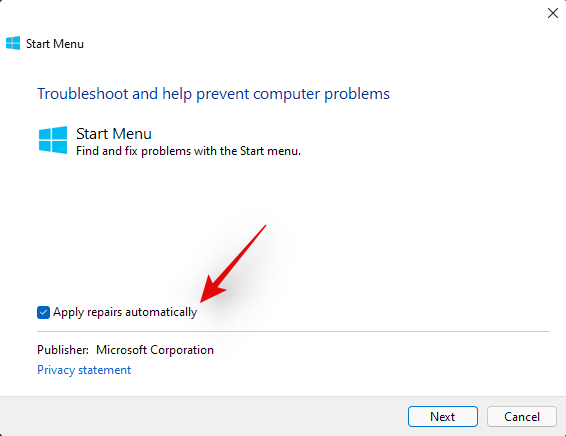
Double click and run the file from your desktop. Click on ‘Advanced’.
Check the box for ‘Apply repairs automatically’. Click on ‘Next’ once you are done.
The troubleshooter will now do its thing and try to fix the Start menu on your system. Any errors or issues found will be automatically fixed and the Start menu’s functionality should now be restored on your system.
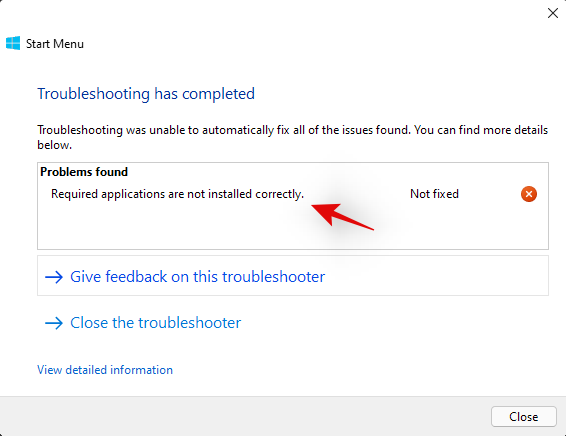
However, if the troubleshooter fails to fix the Start menu then this might indicate a more serious issue on your system. In such cases, let’s verify if Windows is actually able to access and initiate the process for the Start menu on your system. Use the checks below to help you along with the process.
We now need to check if the Start menu is actually available within your install of Windows 11. Let’s create a new local account that will help you verify its functionality. If the Start menu is working in the new account then it is likely an issue with your current user account.
Press Windows + i on your keyboard and click on ‘Accounts’ on your left.
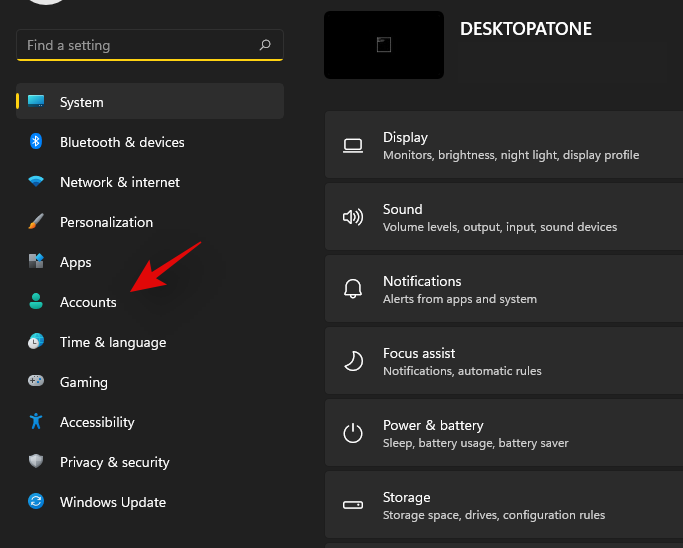
Click on ‘Family & other users’.
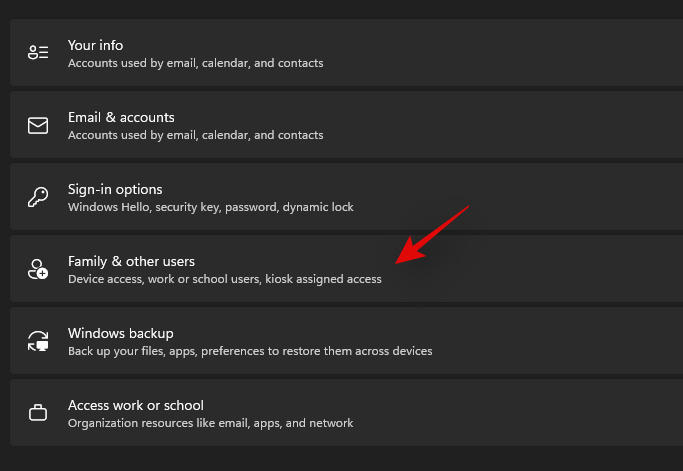
Now click on ‘Add account’ under other users.

Click on ‘I don’t have this person’s sign-in information’.
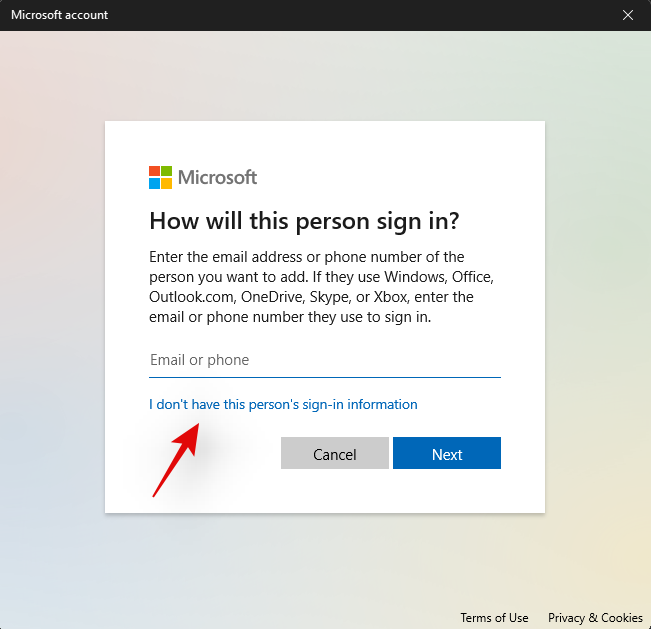
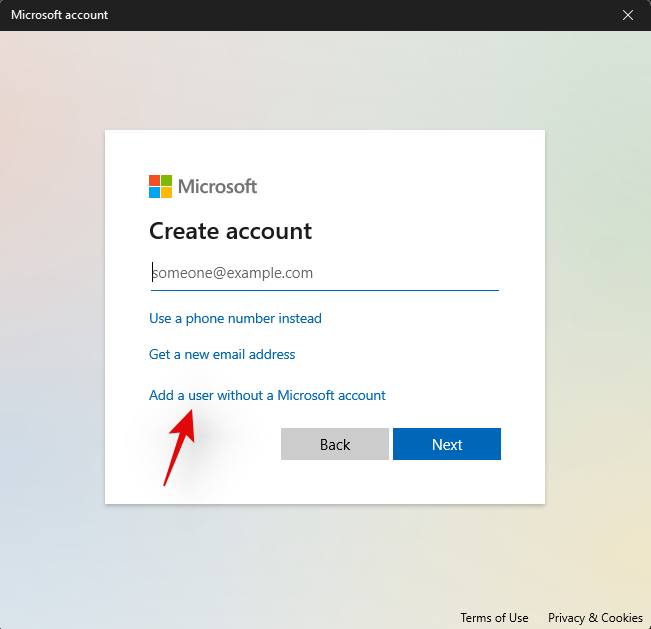
Click on ‘Add a user without a Microsoft Account’.
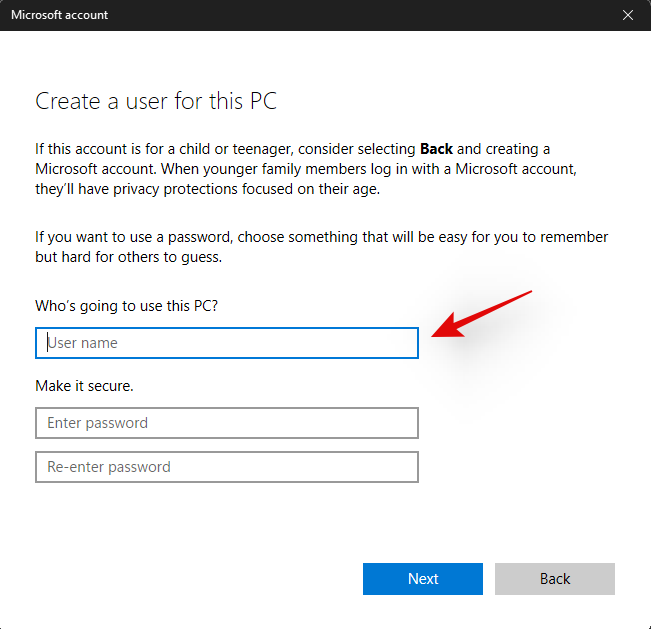
Now enter a username for the new account, and a password if needed.
Click on ‘Next’ once you are done.
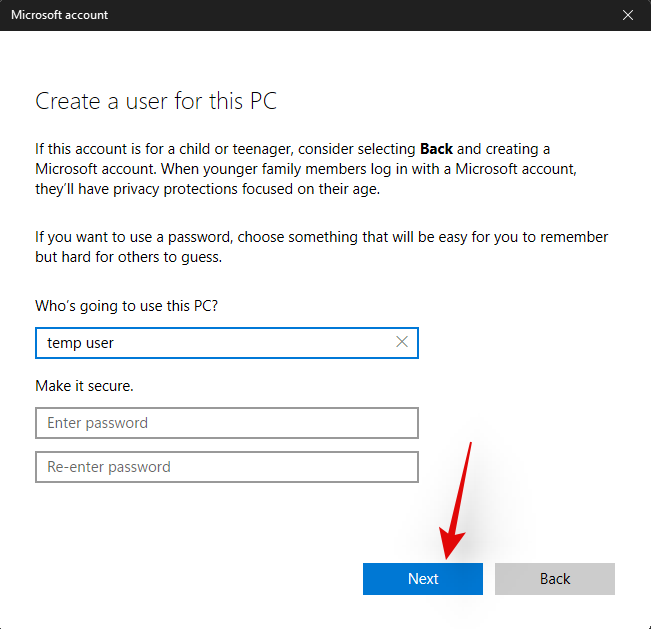
The new user account will now be created. Sign out of your current account and sign in to the new account.
Try to activate the Start menu now in the new temporary local account. If it is working then this is an issue specific to your user account. However, in case the Start menu fails to open, then this might indicate a more serious issue with your Windows 11 installation.
It’s now time to check if the Start menu is working in Safe mode. In case it is, then a third-party app is likely interfering with the Start menu’s functionality. You can remove any third-party apps used to modify the Start menu to try and fix this issue. Follow the guide below to activate Safe mode on Windows 11.
Press Windows + i on your keyboard and select ‘Windows Update’.
Now click on ‘Advanced options’.
Click and select ‘Recovery’.
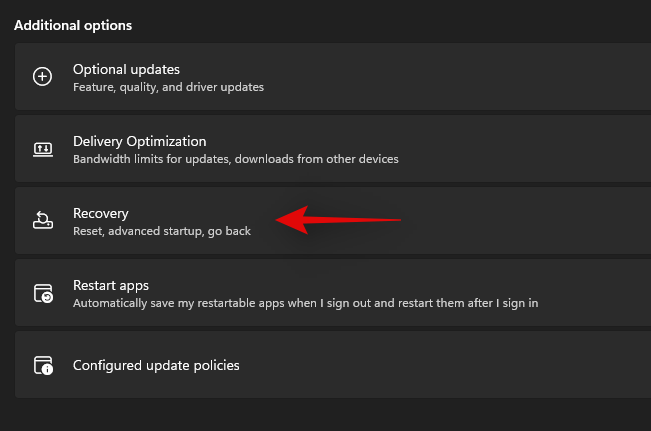
Now click on ‘Restart now’ beside ‘Advanced startup’.

Click on ‘Restart now’ again.
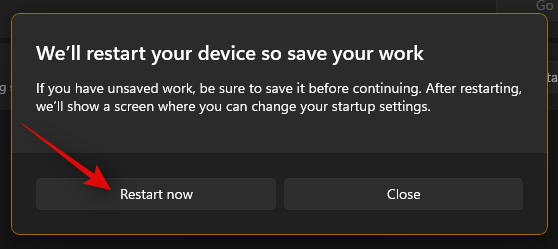
Your PC will now restart to the recovery screen. Click and select ‘Troubleshoot’.
Now click on ‘Advanced options’.
Click on ‘Startup Settings’.
Press ‘F4’ to start your PC in safe mode now.
Once your PC restarts, the safe mode should be active on your system. Now try to activate the start menu. If the menu activates, then it is likely that a third-party app is causing issues on your Windows 11 system. You can try removing apps used to customize the Start menu one by one to find the culprit on your system.
Fix #17: Run a malware and antivirus scan
We recommend you try and run a malware scan before opting for the last resort. If any malware or malicious service is causing issues with the Start menu, then a scan will help solve these issues. Use the guide below to run a malware scan through Windows Defender.
Press Windows + S on your keyboard and search for ‘Windows Security’. Click and launch the app once it shows up in your search results.

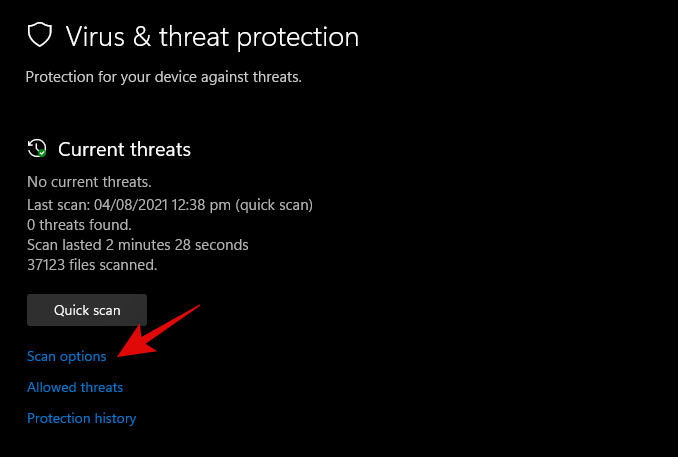
Click on ‘Virus & threat protection’.
Click on ‘Scan options’.
Select ‘Full Scan’.
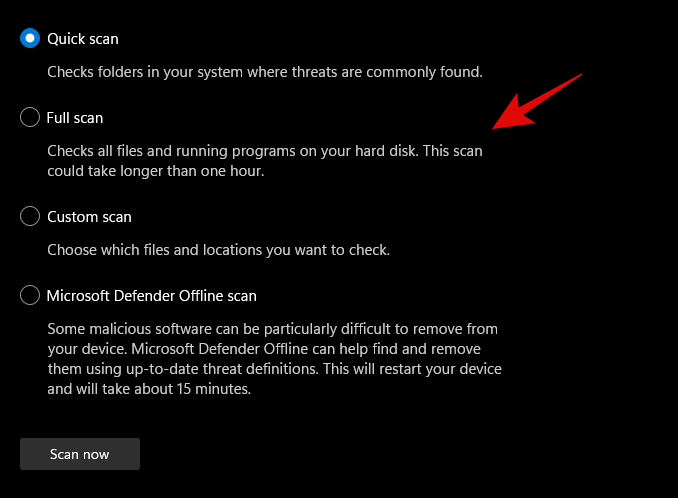
Finally, click on ‘Scan now’.
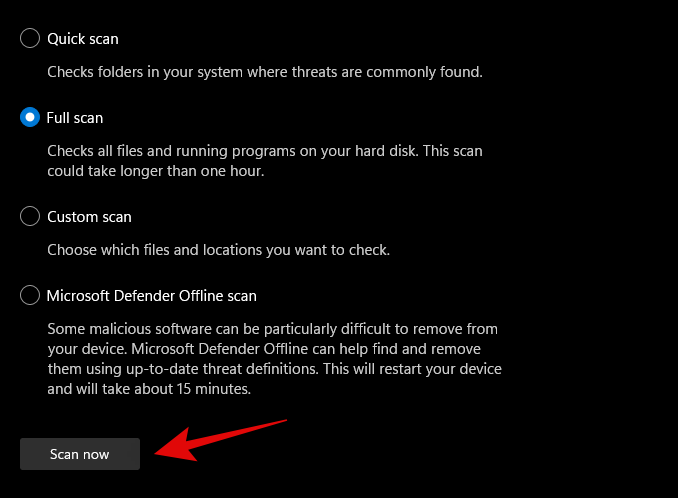
Windows Defender will now scan your entire PC for malware and malicious software. In case any are found, they will be automatically quarantined, and you will be prompted to take the necessary action as soon as possible.
3 General Fixes: Last Resort options
Fix #18: Create a new user via command prompt
If you’re facing an issue where you’re unable to add a local account via Settings to your PC then you can use the command prompt (CMD) for the same. Once added you can try and check if the Start menu is working for you. If it is, you can try the fixes below to restore it in your original account. However, if none of the fixes work for you then you can use the newly created account instead. The new account will be created with administrator privileges so you shouldn’t have problems moving your files and Settings. More on this below.
Press Windows + R to bring up the Run dialog box and type in the following. Press Ctrl + Shift + Enter on your keyboard once you are done.
cmd
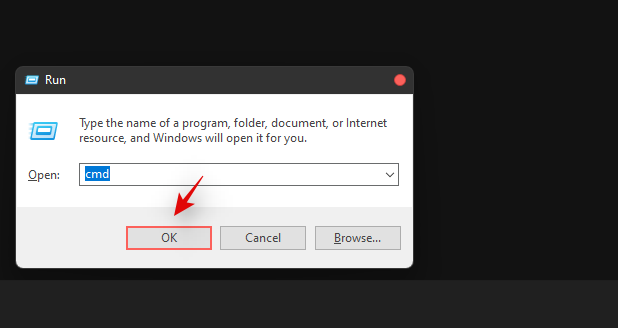
Type in the following command and press Enter on your keyboard. Replace ‘USER’ with your desired username for the new account. Similarly, replace ‘PASSWORD’ with your desired password.
net user /add USER PASSWORD
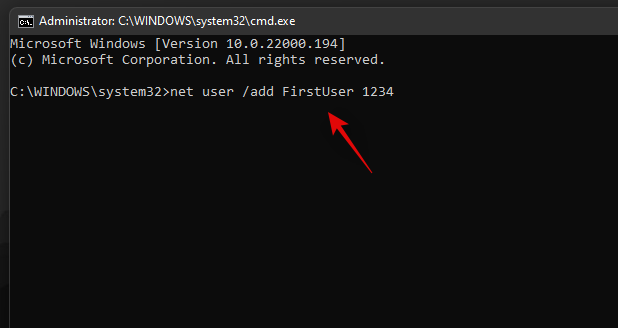
Now execute the following command as well and use the same username as above.
net localgroup administrators USER /add
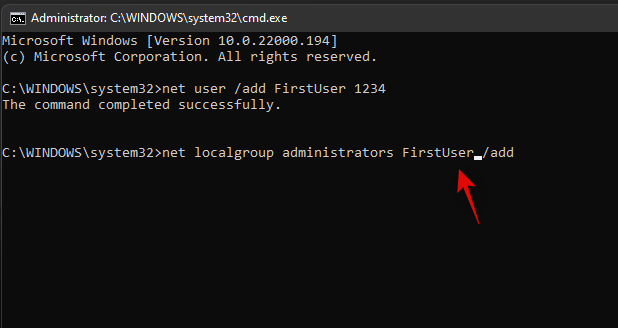
The user will now be added to your PC. Simply restart and log into the new account when the PC restarts.
The start menu should work alright now in the new user account. You can copy your files from the old user account to the new account.
To find your data in the old user account, open Windows Explorer and go to the User folder under the C Drive (or whichever drive you have installed Windows in).
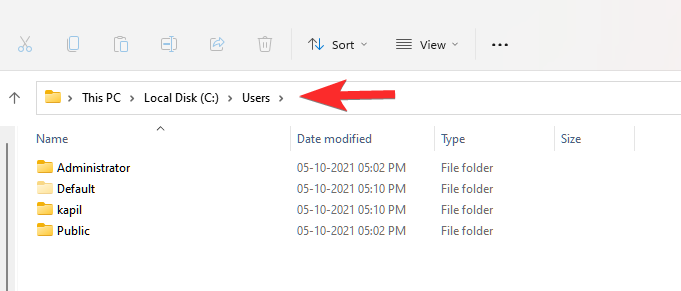
Click on the old user account. Now, copy all the files from here to your new user account that you can also find in the Users folder.
An easy method to transfer files from one user account (old one) to another user account (new one) is to copy the profile. Read more about it here.
Fix #19: Perform a Windows Reset
If you had zero luck with all of the previous methods, we think you should try a Windows Reset. It has been known to solve a host of problems in Windows 11 while keeping your personal files intact. Moreover, resetting Windows to its factory settings can give your PC a fresh start.
Here are the steps.
For this method, you’ll need an elevated PowerShell instance.
Press Win key + r to open the Run box, then type in ‘PowerShell and press Ctrl + Shift + Enter to open PowerShell as administrator.
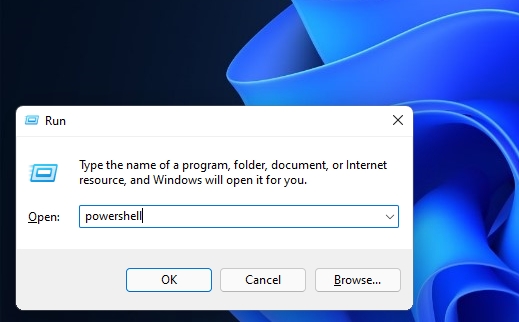
When opened correctly, you should already be inside the C:\Windows\system32 folder.
Now type in ‘system reset and press enter. You should be presented with two options, to either keep all your files or to remove everything. Click on ‘Keep my files’.
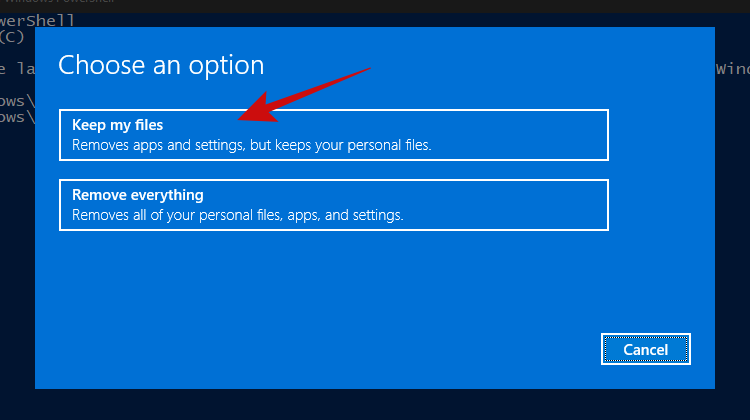
Within a few minutes, Windows should give you a list of apps that’ll be removed from your PC after the reset. Here’s how our list looks.
Once you’ve scrolled through the list of apps, simply click on the ‘Next’ button.
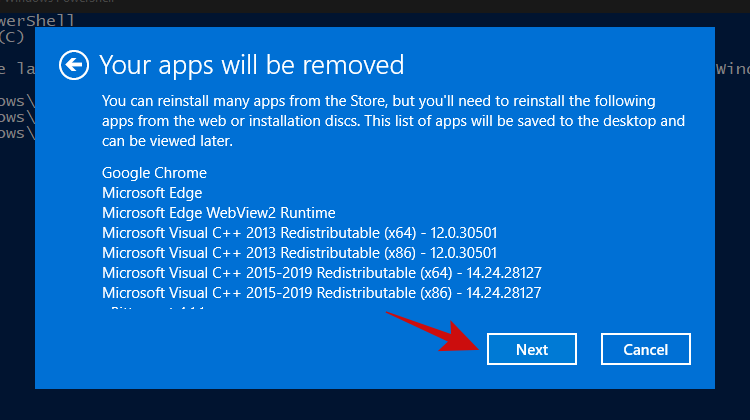
Windows should now start the reset process. Simply follow the instructions and your PC should be reset within a couple of minutes. The Start menu should be working now.
Fix #20: Re-install Windows from scratch
Well, if you’re really considering this method, it’s safe to assume that none of the other methods worked for you. At this point, we think it’s now time to go for a clean installation of Windows 11, which will probably wipe your current Windows partition (if you choose to).
Note: Before proceeding with this method, we recommend making a complete backup of all your files stored inside folders on the Windows drive, such as in Downloads, Documents, and the likes.
Once you have backed up all your files from the Windows drive, let’s take a look at the things you’ll need.
- A USB stick of 8GB or more (no external hard drives, unless you want to lose all your precious data)
- Rufus
Next, follow our guide on downloading and installing the Windows 11 ISO.
Read: How to Download and Install Official Windows 11 ISO
We hope that after following this guide, you were able to fix the annoying and unresponsive Start menu in Windows 11 and bring it back to life.
If you find yourself stuck at any point in this guide, let us know in the comments below.
Related:


![Come risolvere lerrore schermo verde di Windows 11 [8 modi] Come risolvere lerrore schermo verde di Windows 11 [8 modi]](https://cloudo3.com/resources8/images31/image-5564-0105182715287.png)


