Come modificare la password utilizzando PowerShell su Windows 11
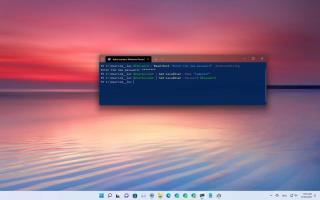
PowerShell ti consente di modificare rapidamente la password di qualsiasi account locale di Windows 11 con pochi comandi ed ecco come fare.
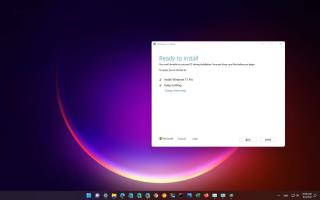
In Windows 11 (versione 21H2), un'installazione pulita si riferisce al processo di cancellazione del disco rigido e applicazione di una nuova copia del sistema operativo senza impostazioni, driver, app o file personalizzati. In genere, questo è l'approccio consigliato per eseguire l'aggiornamento all'ultima versione di Windows 11 su hardware compatibile per prevenire problemi di installazione e risolvere i problemi esistenti.
Ad esempio, se il computer ha la stessa configurazione da molto tempo, un'installazione pulita di Windows 11 può aiutare a risolvere problemi di prestazioni, problemi di spegnimento, avvio, memoria e app. Inoltre, questo tipo di installazione è il metodo migliore per eseguire l'aggiornamento da una versione precedente, come Windows 7 o Windows 8.1. Inoltre, puoi utilizzare questa opzione per eliminare il fastidioso bloatware che è stato precaricato con l'impostazione predefinita.
Microsoft supporta diversi modi per eseguire l'installazione pulita di Windows 11 , incluso l'utilizzo di un'unità flash USB per configurare il sistema operativo su un'unità SSD (unità a stato solido). È anche possibile utilizzare la funzione "Ripristina questo PC" per cancellare rapidamente il disco rigido e reinstallare il sistema operativo senza strumenti aggiuntivi. Oppure, se il dispositivo non si avvia, è possibile utilizzare le opzioni di avvio avanzate o montare il file ISO in Esplora file per avviare un'installazione pulita.
In questa guida imparerai sei modi diversi per eseguire un'installazione pulita di Windows 11 sul tuo computer. Tuttavia, prima di procedere con queste istruzioni, eseguire queste operazioni prima di installare .
Importante: questo processo eliminerà tutto sul tuo dispositivo. Si consiglia di eseguire un backup completo del computer prima di procedere. Sei stato avvisato. Inoltre, queste istruzioni hanno lo scopo di aiutarti a installare Windows 11 quando è ufficialmente disponibile, non prima.
Come pulire, installare Windows 11 da USB
Se scegli questo metodo, devi anche assicurarti che il dispositivo possa avviarsi da USB, il che significa che dovrai modificare le impostazioni del BIOS o UEFI. L'unico avvertimento è che poiché queste impostazioni sono diverse sulla maggior parte dei computer, dovrai controllare il sito Web di supporto del produttore per dettagli più specifici.
Per eseguire un'installazione pulita di Windows 11 da USB, attenersi alla seguente procedura:
Premere un tasto qualsiasi per continuare.
Fare clic sul pulsante Avanti .
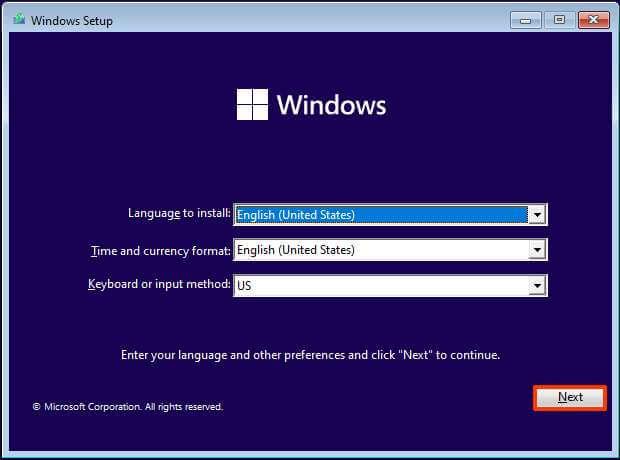
Installazione di Windows 11
Fare clic sul pulsante Installa ora .
Opzione di installazione di Windows 11
Fai clic sull'opzione Non ho un codice Product Key se stai eseguendo una reinstallazione. Se Windows 11 è stato precedentemente attivato dopo l'installazione, la riattivazione avverrebbe automaticamente.
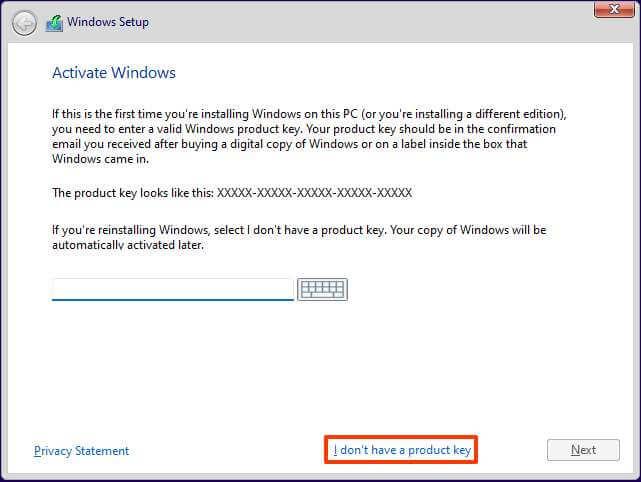
Salta l'opzione chiave di licenza
Seleziona l'edizione di "Windows 11" attivata dalla tua chiave di licenza (se applicabile).
Seleziona l' opzione Accetto i termini di licenza .
Fare clic sul pulsante Avanti .
Seleziona l' opzione Personalizzata: installa solo Windows (avanzata) .
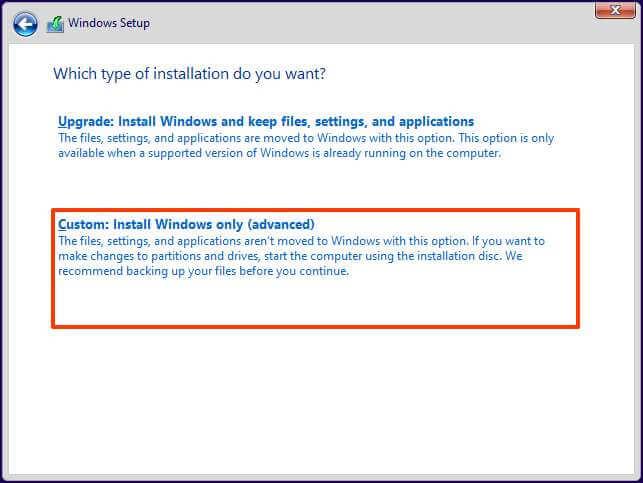
Opzione di installazione personalizzata di Windows 11
Seleziona ogni partizione nel disco rigido che desideri installare Windows 11 21H2 e fai clic sul pulsante Elimina . (Di solito, "Drive 0" è l'unità che contiene tutti i file di installazione.)
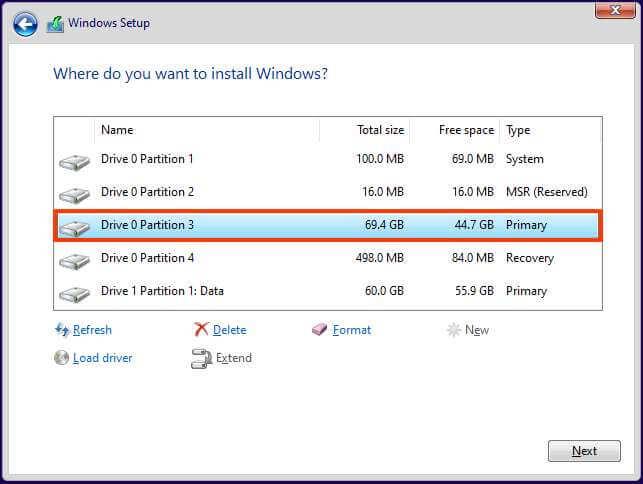
Elimina le partizioni Installazione di Windows 11
Avvertimento: quando si elimina una partizione, vengono eliminati anche tutti i dati sull'unità. Inoltre, non è necessario eliminare le partizioni da un disco rigido secondario.
Selezionare il disco rigido (spazio non allocato unità 0) per installare Windows 11.
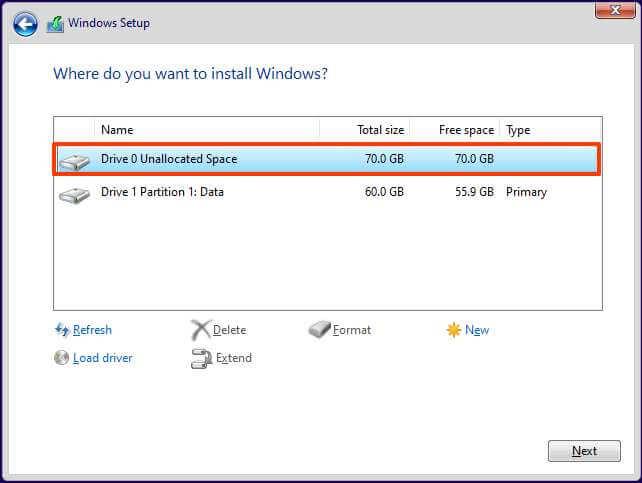
Installazione pulita di Windows 11 su spazio non allocato
Fare clic sul pulsante Avanti .
Seleziona l'impostazione della tua regione dopo l'installazione nella prima pagina dell'esperienza out-of-the-box (OOBE) .
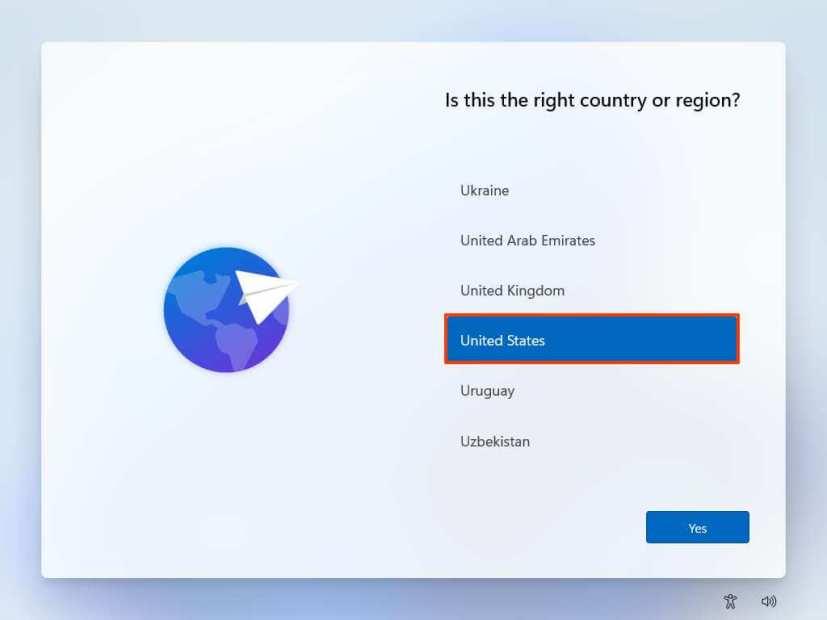
Regione di Windows 11 OOBE
Fare clic sul pulsante Sì .
Seleziona l'impostazione del layout della tastiera.
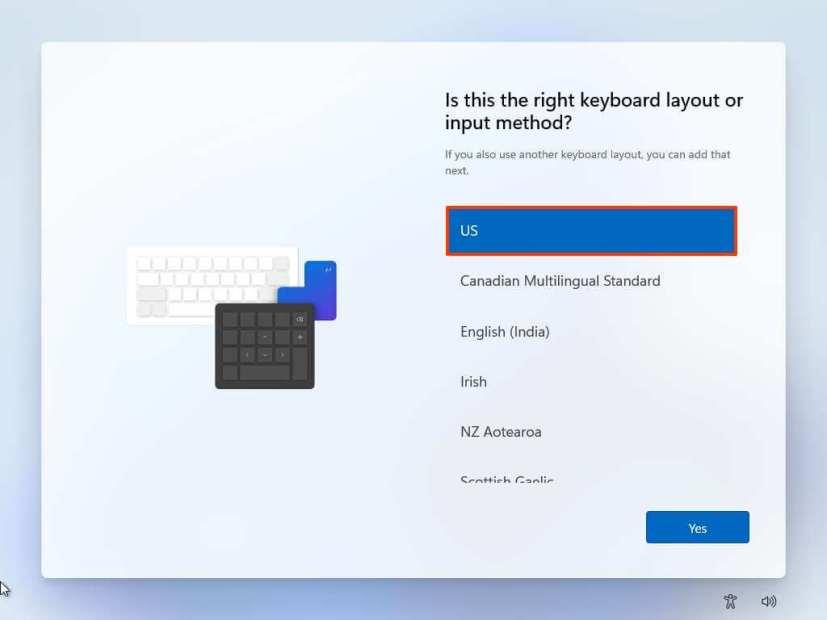
Layout della tastiera
Fare clic sul pulsante Sì .
Fare clic sul pulsante Salta se non è necessario configurare un secondo layout.
Se il computer utilizza una connessione Ethernet , si connetterà automaticamente alla rete. Se si dispone di una connessione wireless, sarà necessario configurare la connessione manualmente (potrebbe essere necessaria una chiave di sicurezza).
(Facoltativo) Conferma un nome per il computer.
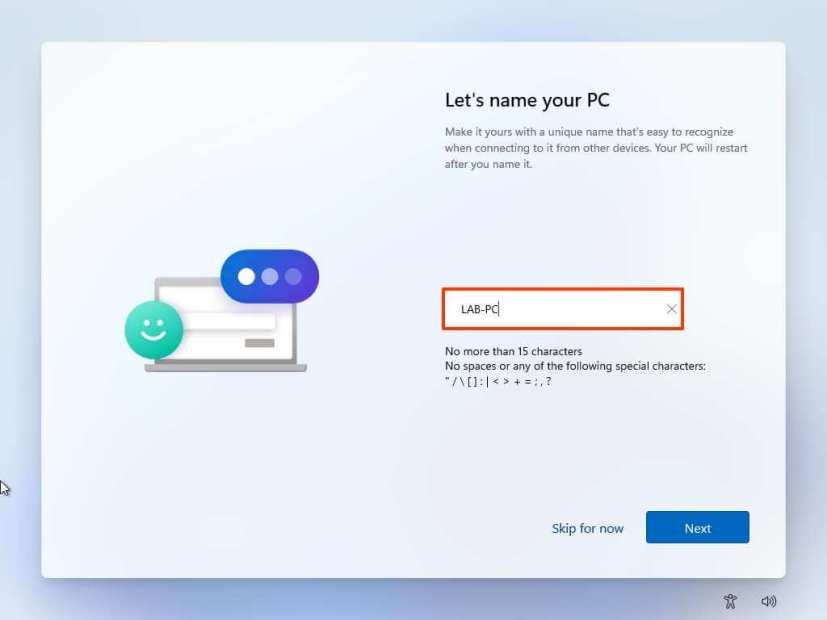
Fare clic sul pulsante Avanti . (Il dispositivo si riavvierà automaticamente.)
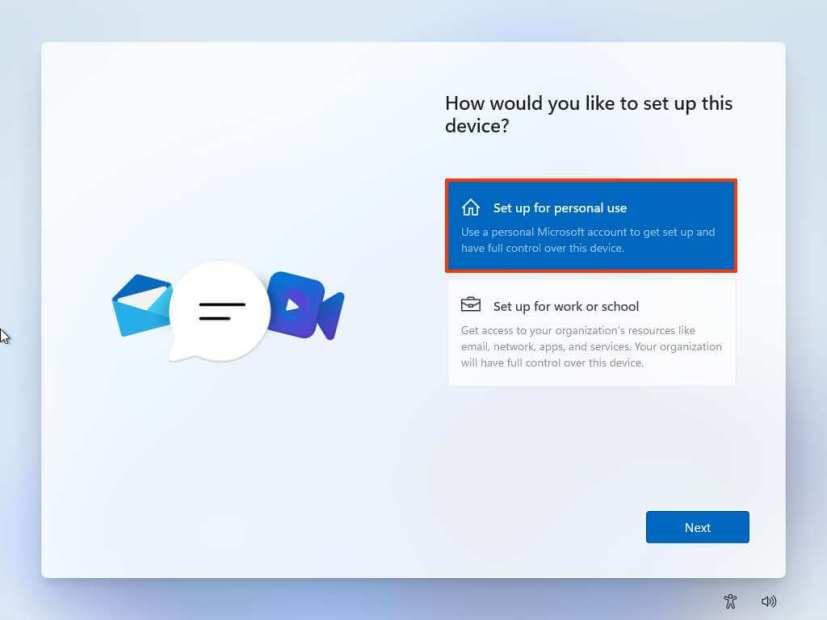
Seleziona l' opzione Configura per uso personale se stai configurando Windows 11 Pro. L'edizione "Home" non ha questa opzione.
Tipi di installazione di Windows 11
Fare clic sul pulsante Avanti .
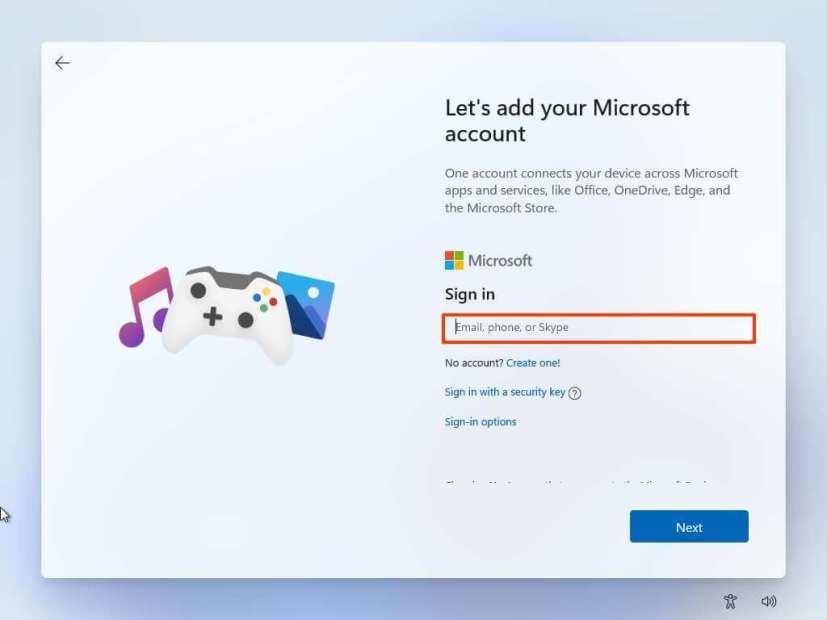
Conferma l'e-mail dell'account Microsoft, il numero di telefono o l'identificazione Skype per creare un account.
Crea un account Windows 11
Fare clic sul pulsante Avanti .
Conferma la password del tuo account Microsoft.
Fare clic sul pulsante Avanti .
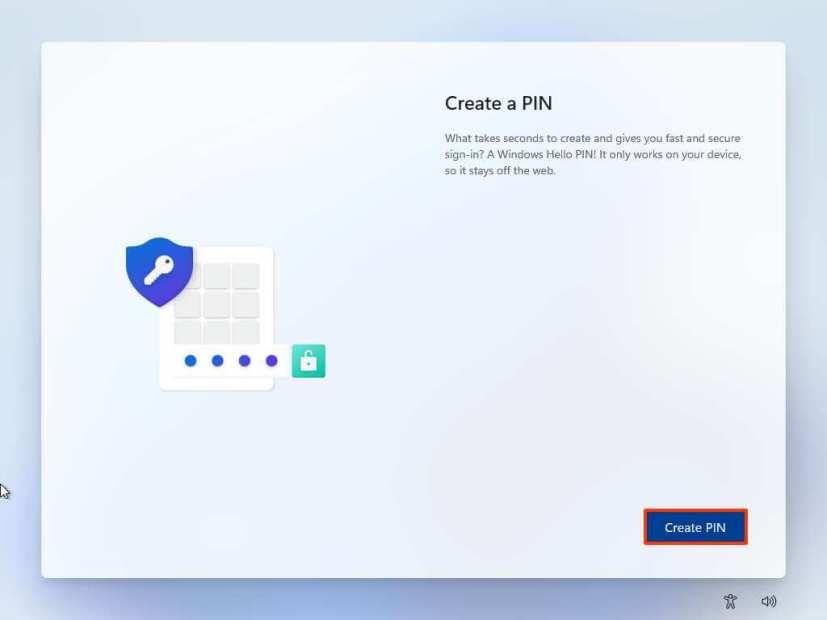
Fare clic sul pulsante Crea PIN .
Configurazione guidata di Windows 11 crea PIN
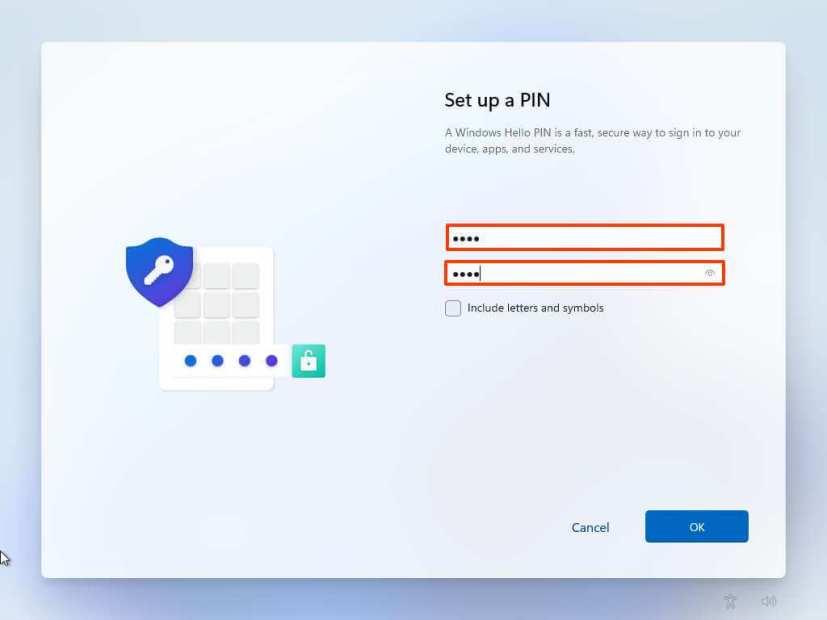
Crea un nuovo PIN a quattro cifre.
Crea il PIN dell'account
Fare clic sul pulsante OK .
Seleziona l' opzione "Configura come nuovo dispositivo" . Oppure seleziona per ripristinare le impostazioni da un'installazione precedente.
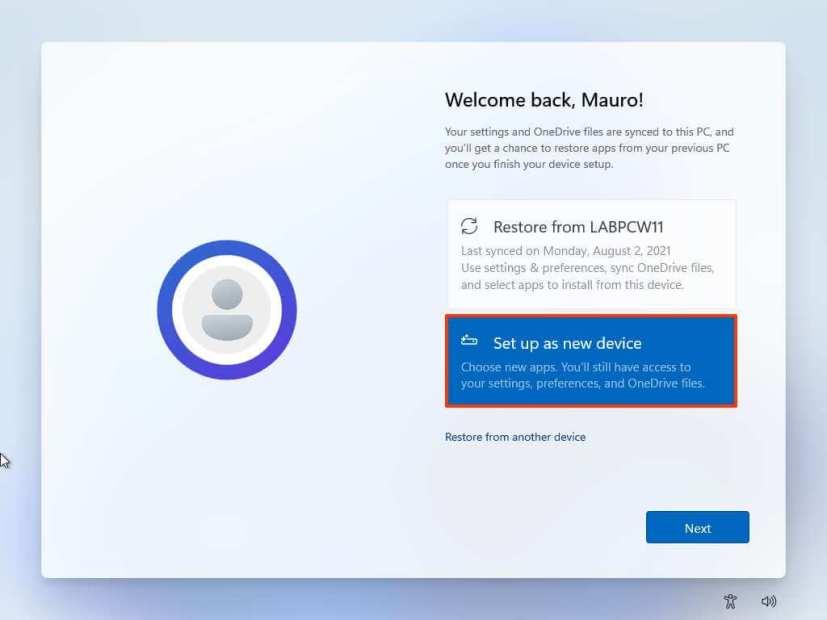
Impostazioni di ripristino OOBE di Windows 11
Fare clic sul pulsante Avanti .
Conferma le impostazioni sulla privacy più adatte alla tua situazione attivando o disattivando l'interruttore per ciascuna impostazione.
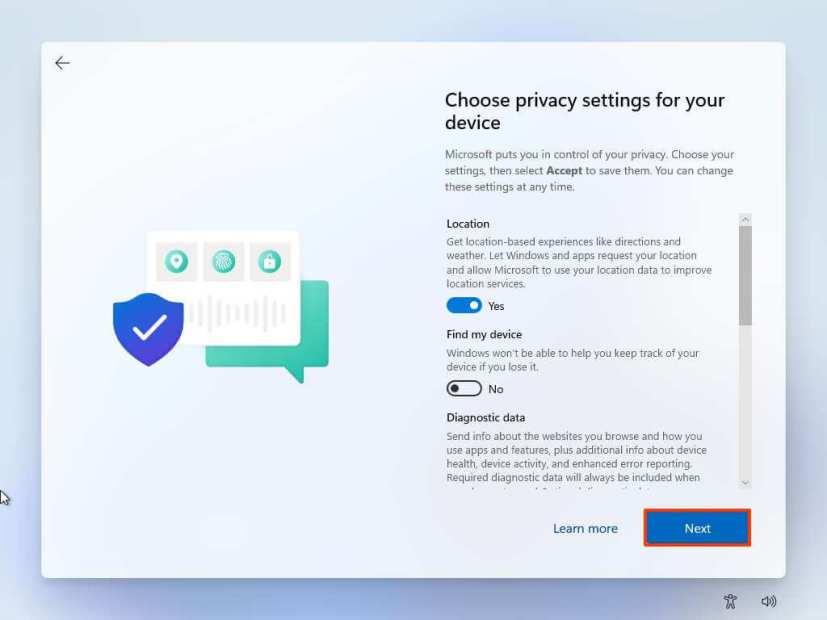
Impostazioni sulla privacy di Windows 11 OOBE
Fare clic sul pulsante Avanti .
Fare nuovamente clic sul pulsante Avanti .
Fare clic sul pulsante Accetta .
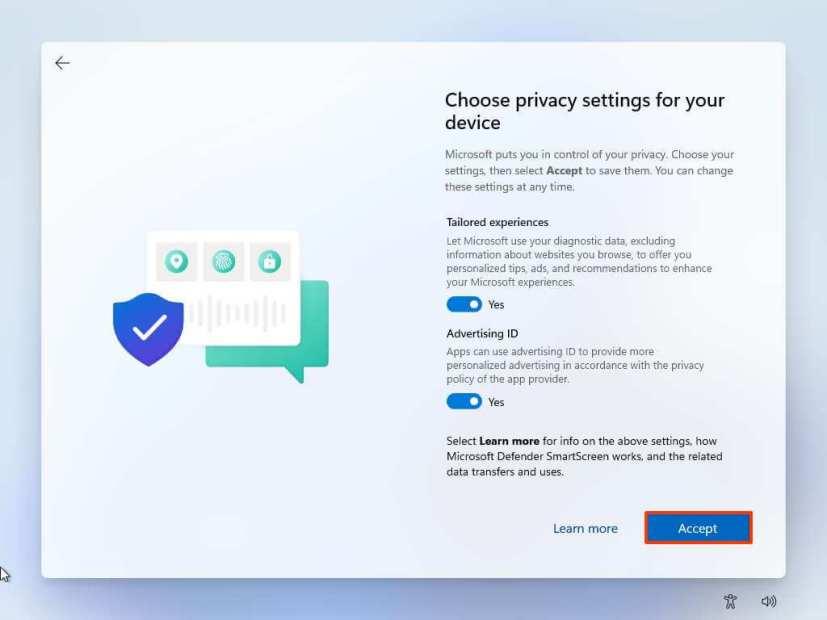
Impostazioni sulla privacy continuate
(Facoltativo) Nella pagina "Personaliamo la tua esperienza", seleziona uno o più modi in cui prevedi di utilizzare il dispositivo per consentire alla configurazione di suggerire strumenti e personalizzazione dei servizi durante questa esperienza.
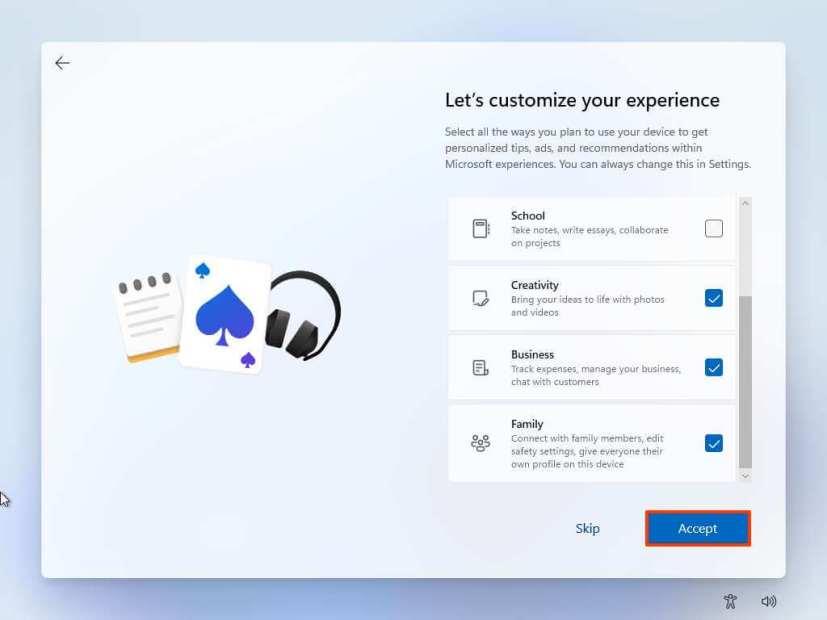
Windows 11 OOBE personalizza le opzioni dell'esperienza
Fare clic sul pulsante Accetta per continuare. Oppure fai clic sul pulsante Salta per saltare questa parte della configurazione.
Seleziona l' opzione "Esegui il backup dei miei file con OneDrive" per caricare automaticamente le cartelle Desktop, Immagini e Documenti sul cloud. Oppure seleziona l' opzione "Salva file solo su questo PC" .
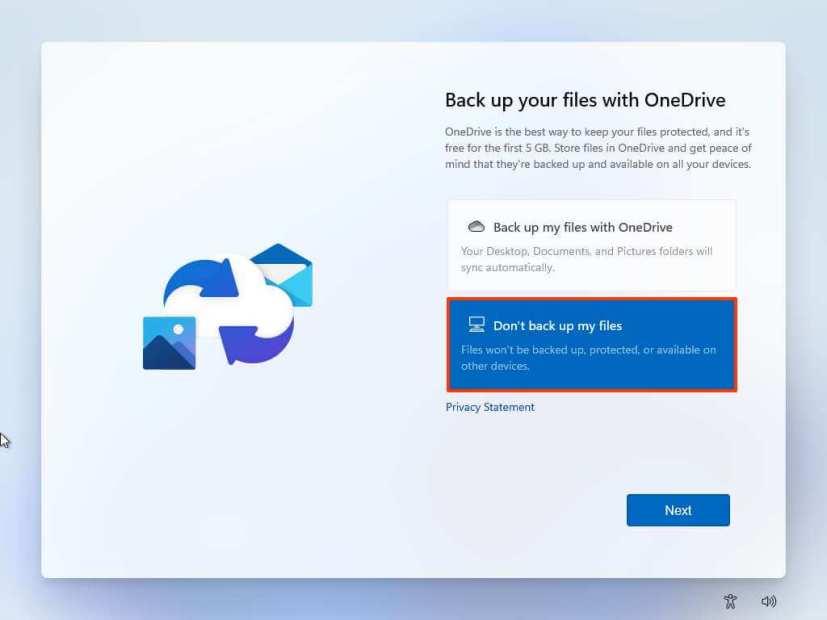
File di backup OOBE di Windows 11 su OneDrive
Fare clic sul pulsante Avanti .
Fare clic sul pulsante No, grazie per saltare la configurazione di Microsoft 365.
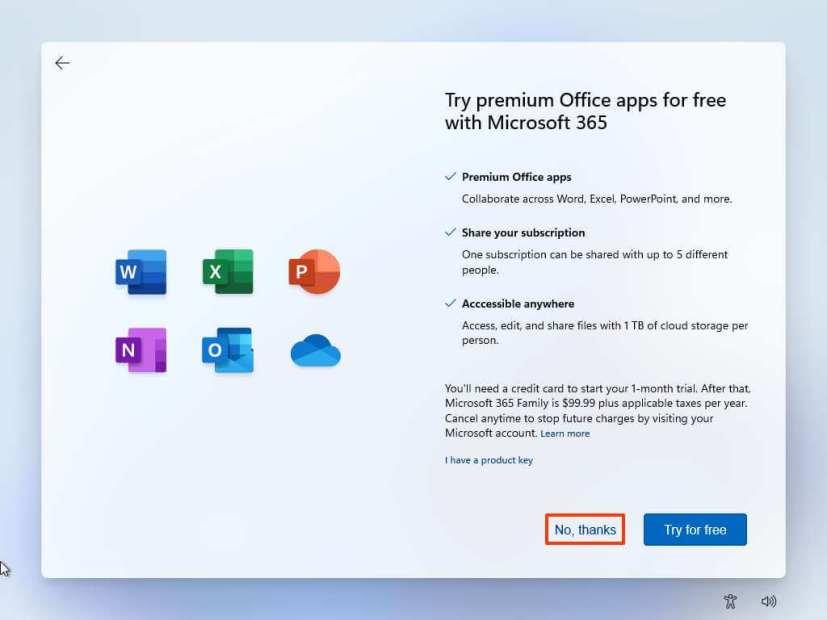
Salta l'installazione di Office
Una volta completati i passaggi, Windows 11 continuerà l'installazione sul computer.
Come pulire l'installazione di Windows 11 dal file ISO
In alternativa, puoi montare l'ISO in Esplora file per avviare un'installazione pulita o un aggiornamento sul posto su un dispositivo con il sistema operativo già installato.
Per pulire l'installazione di Windows 11 con un file ISO, attenersi alla seguente procedura:
Nella sezione "Scarica immagine disco (ISO) di Windows 11", seleziona l' opzione Windows 11 .
Fare clic sul pulsante Scarica .
Seleziona la lingua di installazione.
Fare clic sul pulsante Conferma .
Fare clic sul pulsante Download per salvare il file ISO di Windows 11 sul dispositivo.
Fare clic con il pulsante destro del mouse sul file ISO e selezionare l' opzione Monta .
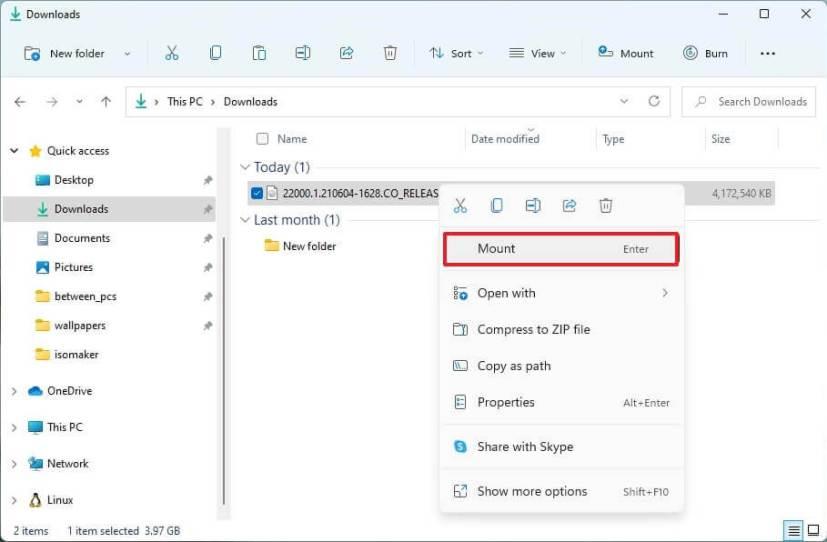
Opzione ISO per il montaggio di Esplora file
Seleziona l'unità virtuale dal riquadro di navigazione a sinistra.
Fare doppio clic sul file di installazione per avviare l'installazione di Windows 11 21H2.
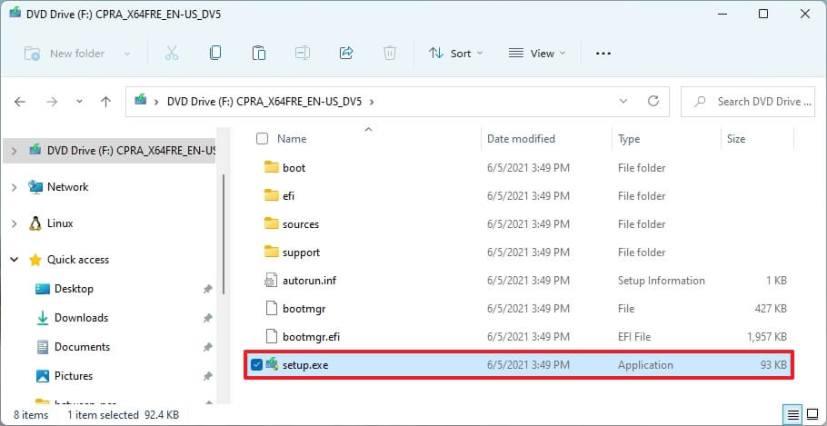
Windows 11 setup.exe
(Facoltativo) Fare clic sull'opzione Modifica come l'installazione di Windows scarica gli aggiornamenti .
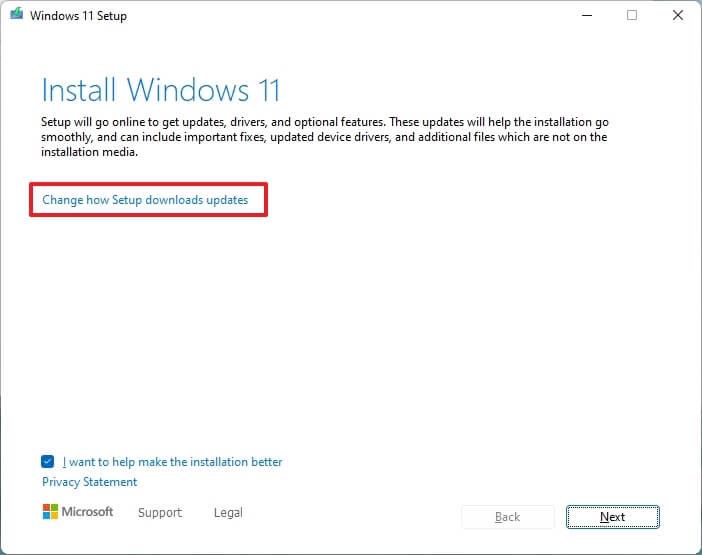
Opzioni di aggiornamento dell'installazione di Windows 11
Seleziona l' opzione Non in questo momento .
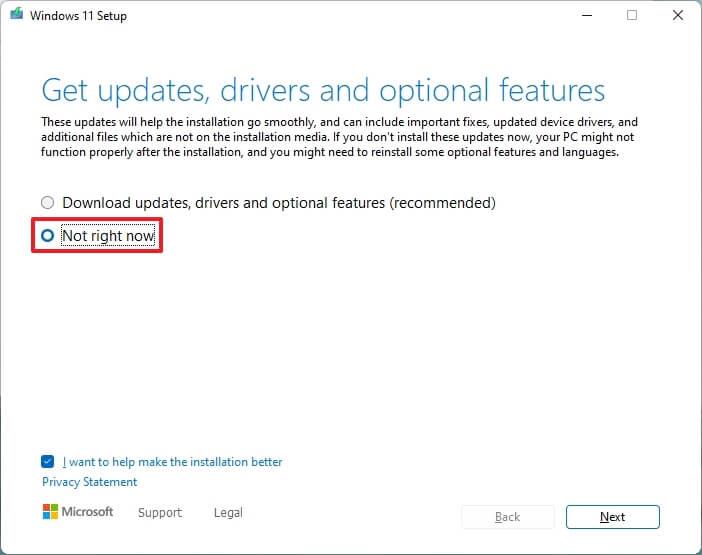
Disabilita gli aggiornamenti durante l'installazione
Fare clic sul pulsante Avanti .
Fare clic sul pulsante Accetta per accettare i termini.
Fare clic sull'opzione Modifica cosa conservare .
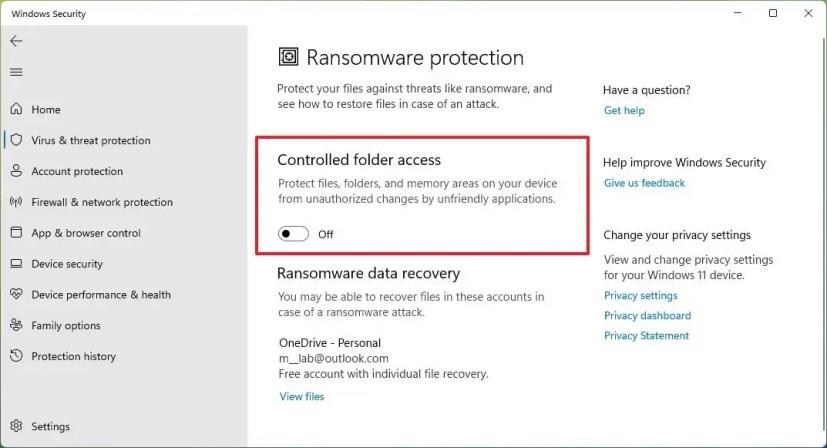
Impostazioni dello strumento di creazione multimediale
Seleziona l' opzione Niente .
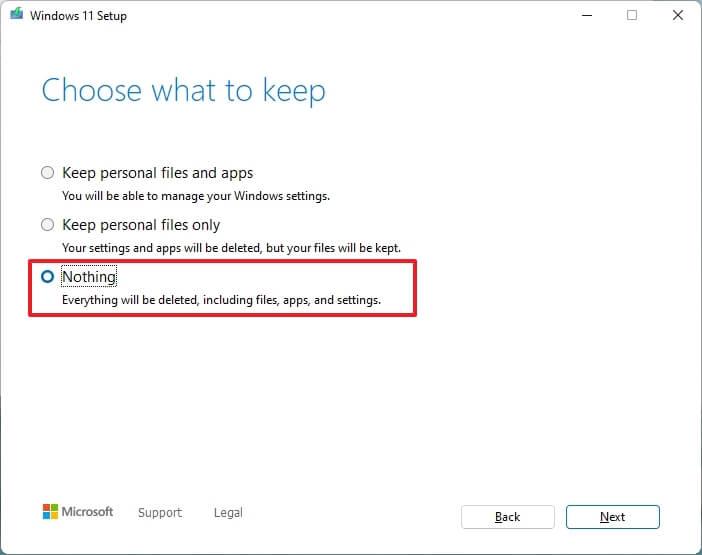
Niente opzione
Fare clic sul pulsante Avanti .
Fare clic sul pulsante Installa .
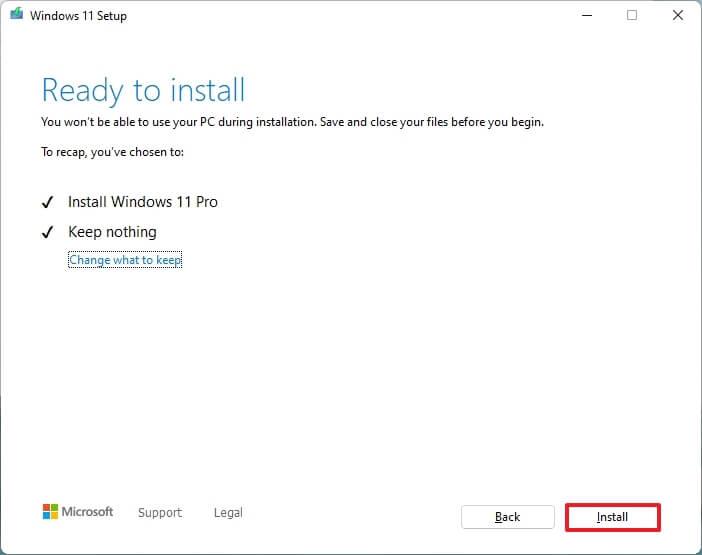
Configurazione dell'installazione pulita ISO di Windows 11
Seleziona l'impostazione della tua regione dopo l'installazione nella prima pagina dell'esperienza out-of-the-box (OOBE) .

Regione di Windows 11 OOBE
Fare clic sul pulsante Sì .
Seleziona l'impostazione del layout della tastiera.

Layout della tastiera
Fare clic sul pulsante Sì .
Fare clic sul pulsante Salta se non è necessario configurare un secondo layout.
Se il computer utilizza una connessione Ethernet , si connetterà automaticamente alla rete. Se si dispone di una connessione wireless, sarà necessario configurare la connessione manualmente (potrebbe essere necessaria una chiave di sicurezza).
(Facoltativo) Conferma un nome per il computer.

Fare clic sul pulsante Avanti . (Il dispositivo si riavvierà automaticamente.)
Select the Set up for personal use option if you are configuring Windows 11 Pro. The “Home” edition does not have this option.

Windows 11 setup types
Click the Next button.
Confirm your Microsoft account email, phone number, or Skype identification to create an account.

Create Windows 11 account
Click the Next button.
Confirm your Microsoft account password.
Click the Next button.
Click the Create PIN button.

Windows 11 OOBE create PIN
Create a new four-digit PIN.

Create account PIN
Click the OK button.
Select the “Set up as new device” option. Or select to restore your settings from a previous installation.

Windows 11 OOBE restore settings
Click the Next button.
Confirm your privacy settings that best suit your situation by turning on or off the toggle switch for each setting.

Windows 11 OOBE privacy settings
Click the Next button.
Click the Next button again.
Click the Accept button.

Privacy settings continued
(Optional) On the “Let’s customize your experience” page, select one or more ways you plan to use the device to allow the setup to suggest tools and services customization during this experience.

Windows 11 OOBE customize experience
Click the Accept button to continue. Or click the Skip button to skip this part of the setup.
Select the “Back up my files with OneDrive” option to automatically upload your Desktop, Pictures, and Documents folders to the cloud. Or Select the “Only save file to this PC” option.

Windows 11 OOBE backup files to OneDrive
Click the Next button.
Click the No, thanks button to skip the Microsoft 365 setup.

Skip Office installation
Once you complete the steps, the clean installation process will begin, similar to using the Media Creation Tools or USB flash drive to upgrade the system.
How to clean install Windows 11 using Reset this PC local image
The recovery settings offer another method to start fresh with a clean copy of Windows 11. Unlike the Media Creation Tool, bootable flash drive, and ISO file options, you can only use this method to reinstall Windows 11 on a computer already running the same OS.
If you plan to upgrade a computer running Windows 10, Windows 8.1, or Windows 7, you will have to use one of the previous alternative methods.
To clean install Windows 11 with the local recovery image, use these steps:
Open Settings on Windows 11.
Click on System.
Click on Recovery on the right side.
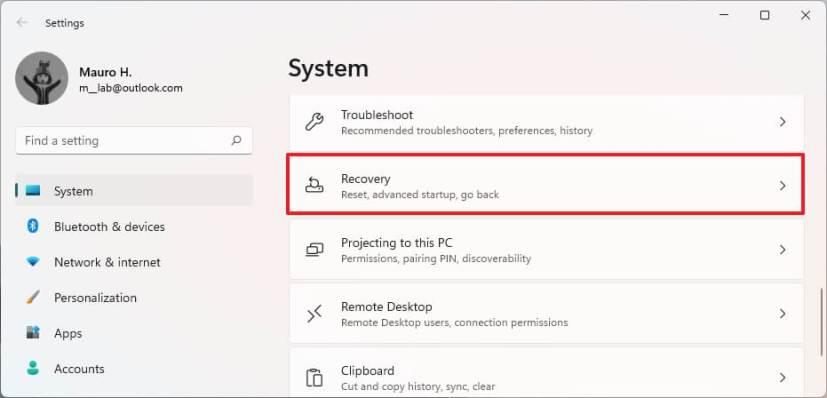
Windows 11 recovery
Under the “Recovery options” section, in the “Reset this PC” setting, click the Reset PC button.
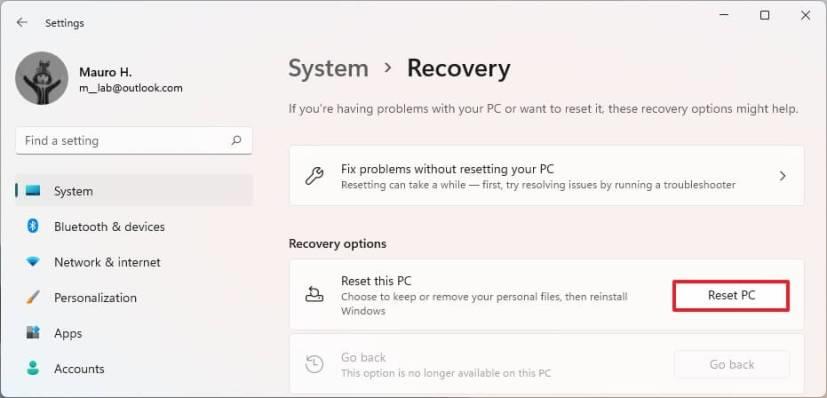
Reset This PC
Click the Remove everything option to perform a fresh install of Windows 11.
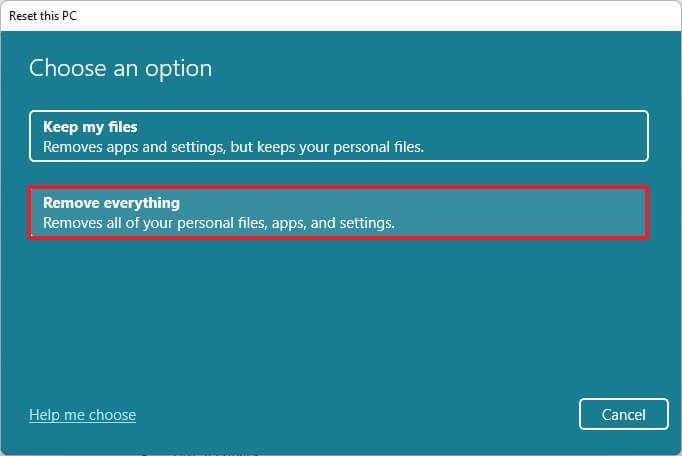
Hard drive wipe out option
Click the Local reinstall option.
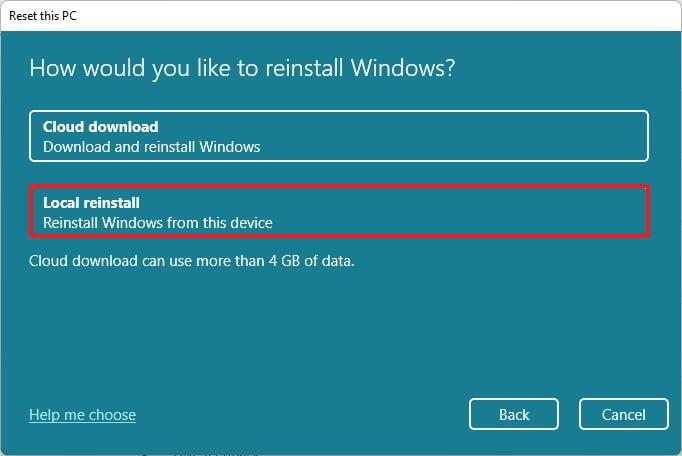
Local reinstall option
(Optional) Click the Change settings option.
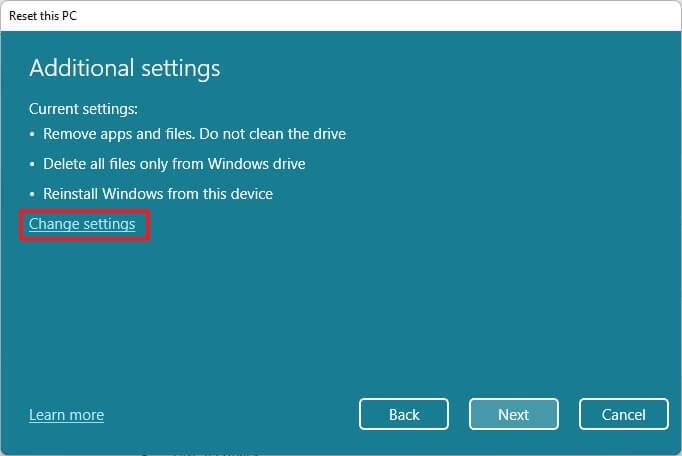
Change reset settings
Configure the reinstallation options:
Click the Confirm button.
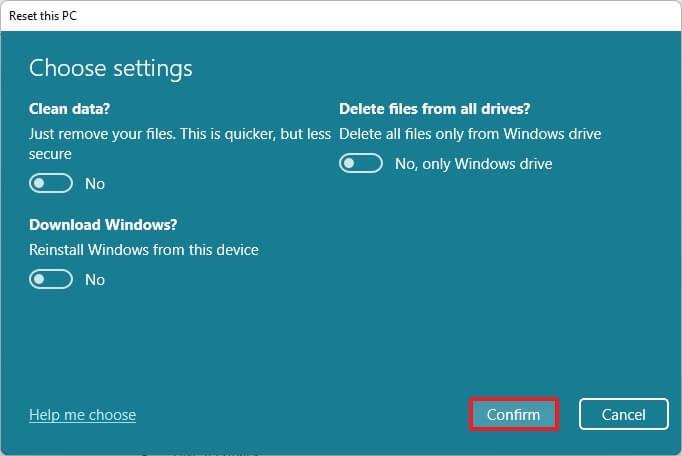
Choose reset settings
Click the Next button.
Click the Reset button.
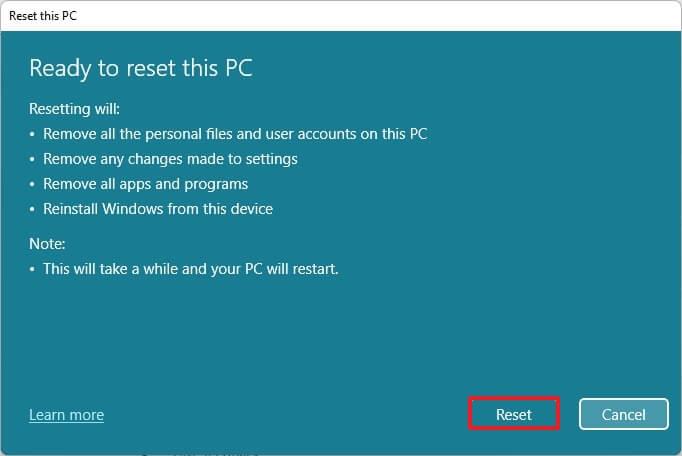
Windows 11 clean install with Local reinstall option
Select your region setting after the installation on the first page of the out-of-the-box experience (OOBE).

Windows 11 OOBE region
Click the Yes button.
Select your keyboard layout setting.

Keyboard layout
Click the Yes button.
Click the Skip button if you do not need to configure a second layout.
If the computer uses an Ethernet connection, it will automatically connect to the network. If you have a wireless connection, you will need to set up the connection manually (a security key may be required).
(Optional) Confirm a name for the computer.

Click the Next button. (The device will restart automatically.)
Select the Set up for personal use option if you are configuring Windows 11 Pro. The “Home” edition does not have this option.

Windows 11 setup types
Click the Next button.
Confirm your Microsoft account email, phone number, or Skype identification to create an account.

Create Windows 11 account
Click the Next button.
Confirm your Microsoft account password.
Click the Next button.
Click the Create PIN button.

Windows 11 OOBE create PIN
Create a new four-digit PIN.

Create account PIN
Click the OK button.
Select the “Set up as new device” option. Or select to restore your settings from a previous installation.

Windows 11 OOBE restore settings
Click the Next button.
Confirm your privacy settings that best suit your situation by turning on or off the toggle switch for each setting.

Windows 11 OOBE privacy settings
Click the Next button.
Click the Next button again.
Click the Accept button.

Privacy settings continued
(Optional) On the “Let’s customize your experience” page, select one or more ways you plan to use the device to allow the setup to suggest tools and services customization during this experience.

Windows 11 OOBE customize experience
Click the Accept button to continue. Or click the Skip button to skip this part of the setup.
Select the “Back up my files with OneDrive” option to automatically upload your Desktop, Pictures, and Documents folders to the cloud. Or Select the “Only save file to this PC” option.

Windows 11 OOBE backup files to OneDrive
Click the Next button.
Click the No, thanks button to skip the Microsoft 365 setup.

Skip Office installation
Once you complete the steps, the recovery feature will continue with the reinstallation using the locally available image of Windows 11. If you have a computer from HP, Dell, Acer, or another brand, this process will restore the original settings. This means the factory settings, drivers, applications, and tools the manufacturer included in the custom image.
If you don’t want to reinstall the custom manufacturer image, use the “Cloud Download” option (see steps below).
How to clean install Windows 11 using Reset this PC Cloud download
The Reset this PC feature also includes the “Cloud Download” option, which allows you to reset a computer with a clean installation, removing apps, files, and settings similar to the local image option. The only difference is that the feature will download the installation files from the Microsoft server.
The option is available to reinstall Windows 11 when the local image is not working or you do not want to use the same installation settings provided by the manufacturer. If you select the “Cloud download” option, the feature will download the same version already installed on the computer, which means you cannot use this method to upgrade to a newer version. Also, if the device was using a custom image from the manufacturer, the new installation won’t include the custom settings, drivers, or tools.
To reinstall Windows 11 with the “Cloud Download” option, use these steps:
Open Settings on Windows 11.
Click on System.
Click on Recovery on the right side.

Windows 11 recovery
Under the “Recovery options” section, in the “Reset this PC” setting, click the Reset PC button.

Reset This PC
Click the Remove everything option to perform a fresh install of Windows 11.

Hard drive wipe out option
Click the Cloud reinstall option.
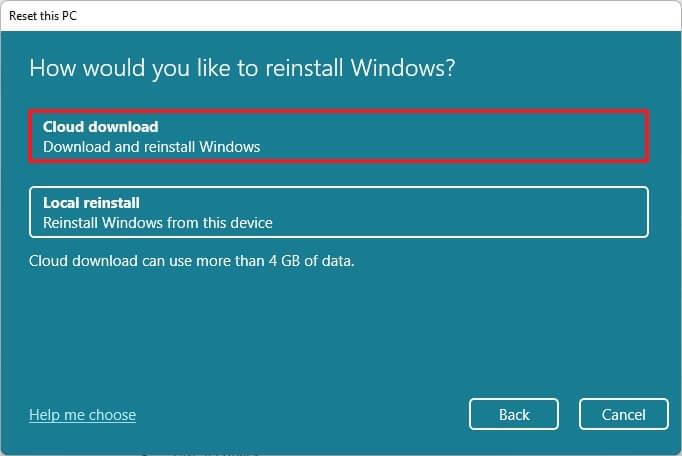
Cloud download reinstall option
(Optional) Click the Change settings option.

Change reset settings
Configure the reinstallation options:
Click the Confirm button.
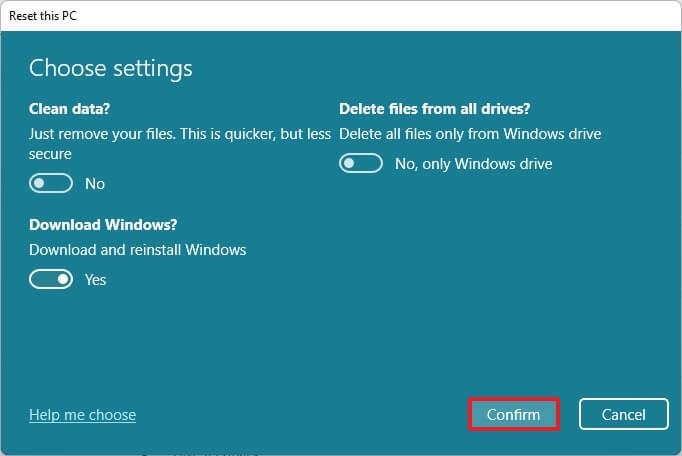
Windows 11 download option
Click the Next button.
Click the Reset button.

Windows 11 clean install with Local reinstall option
Select your region setting after the installation on the first page of the out-of-the-box experience (OOBE).

Windows 11 OOBE region
Click the Yes button.
Select your keyboard layout setting.

Keyboard layout
Click the Yes button.
Click the Skip button if you do not need to configure a second layout.
If the computer uses an Ethernet connection, it will automatically connect to the network. If you have a wireless connection, you will need to set up the connection manually (a security key may be required).
(Optional) Confirm a name for the computer.

Click the Next button. (The device will restart automatically.)
Select the Set up for personal use option if you are configuring Windows 11 Pro. The “Home” edition does not have this option.

Windows 11 setup types
Click the Next button.
Confirm your Microsoft account email, phone number, or Skype identification to create an account.

Create Windows 11 account
Click the Next button.
Confirm your Microsoft account password.
Click the Next button.
Click the Create PIN button.

Windows 11 OOBE create PIN
Create a new four-digit PIN.

Create account PIN
Click the OK button.
Select the “Set up as new device” option. Or select to restore your settings from a previous installation.

Windows 11 OOBE restore settings
Click the Next button.
Confirm your privacy settings that best suit your situation by turning on or off the toggle switch for each setting.

Windows 11 OOBE privacy settings
Click the Next button.
Click the Next button again.
Click the Accept button.

Privacy settings continued
(Optional) On the “Let’s customize your experience” page, select one or more ways you plan to use the device to allow the setup to suggest tools and services customization during this experience.

Windows 11 OOBE customize experience
Click the Accept button to continue. Or click the Skip button to skip this part of the setup.
Select the “Back up my files with OneDrive” option to automatically upload your Desktop, Pictures, and Documents folders to the cloud. Or Select the “Only save file to this PC” option.

Windows 11 OOBE backup files to OneDrive
Click the Next button.
Click the No, thanks button to skip the Microsoft 365 setup.

Skip Office installation
After you complete the steps, the feature will reset the computer by erasing and reinstalling a fresh copy of Windows 11 downloaded from the cloud.
How to clean install Windows 11 from Advanced startup options
If the computer does not boot, the Advanced startup options environment includes the same options included with the “Reset this PC” feature.
You can only use this option to reinstall the same version of the OS already installed on the computer. If you want to upgrade to the latest version, you need to use the USB flash drive, Media Creation Tool, or ISO file options.
To clean install Windows 11 from the Advanced startup options, use these steps:
Start device.
Immediately after the Power-On Self-Test (POST), press the Power button again to shut down.
Repeat steps No. 1 and 2 twice, and in the third restart, the operating system should enter the Windows Recovery Environment (Windows RE).
Quick note: Windows 11 has multiple ways to open the Advanced startup settings. If you cannot access the recovery environment, you can use these other options.
Click the Advanced options button.

Advanced startup
Click on Troubleshoot.
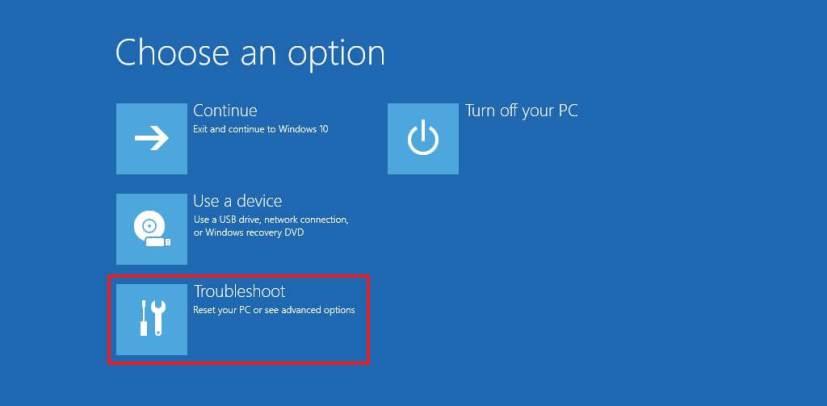
Troubleshoot option
Click on Reset this PC option.
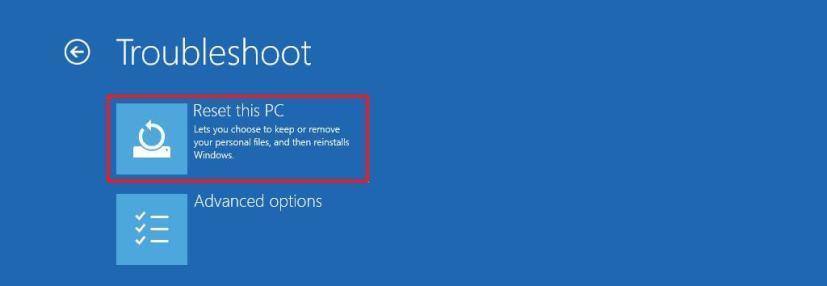
Reset this PC option
Select the Remove everything option.
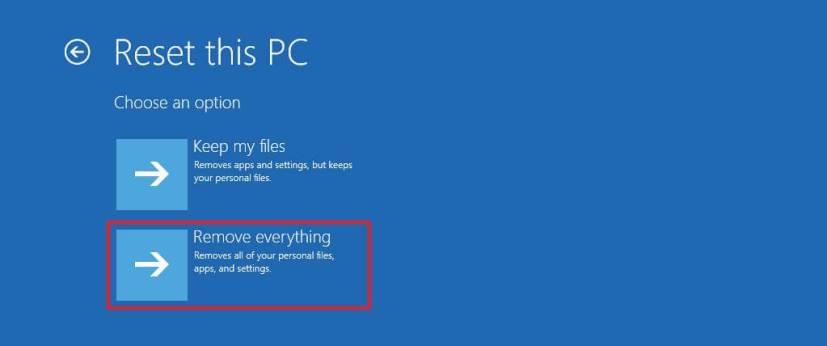
Remove everything option
Click the Cloud download or Local reinstall option. Cloud download: Downloads a fresh image from the Microsoft servers and performs a fresh installation. Local reinstall: Uses the locally available image to install a clean copy of Windows 11.
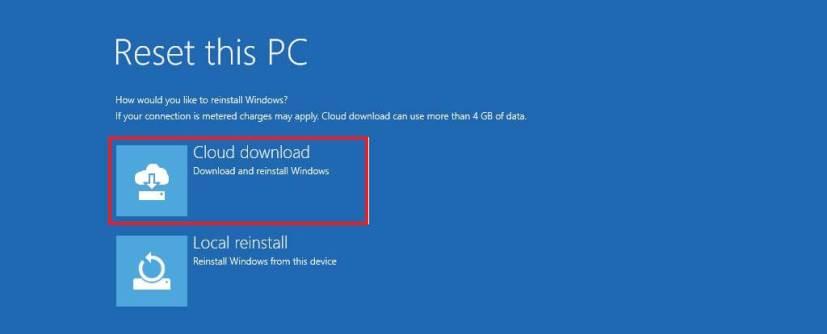
Advanced startup cloud download option
Select the “Only the drive where Windows is installed” option. (The All drives option will delete the data on all drives. This option is usually recommended only when you have to decommission the device.)
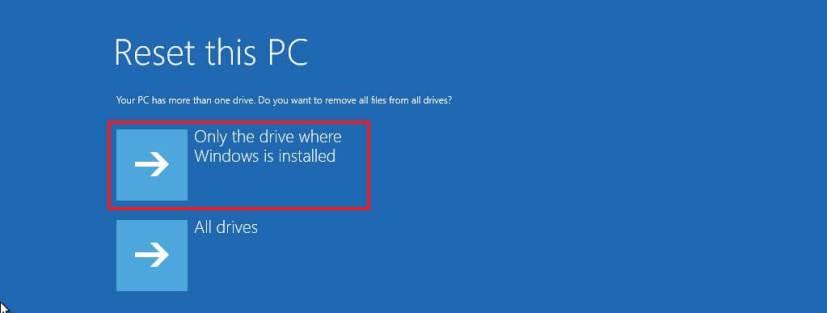
Delete drive data option
Select the “Just remove my files” or “Full clean the drive” option.
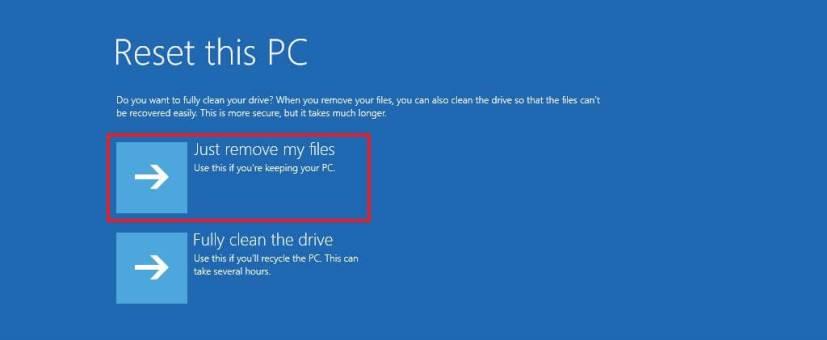
Just remove files option
Click the Reset button.
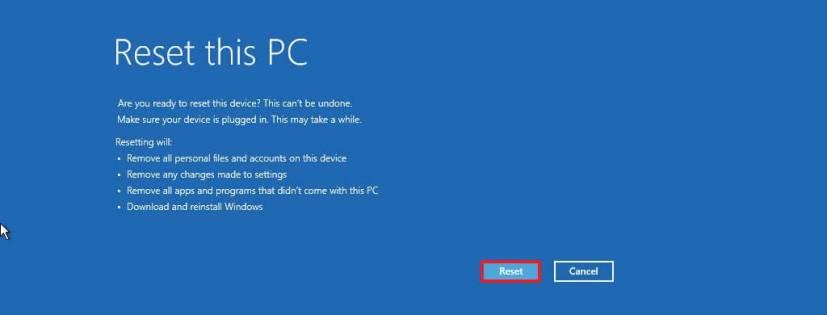
Windows 11 clean install with the advanced startup option
Select your region setting after the installation on the first page of the out-of-the-box experience (OOBE).

Windows 11 OOBE region
Click the Yes button.
Select your keyboard layout setting.

Keyboard layout
Click the Yes button.
Click the Skip button if you do not need to configure a second layout.
If the computer uses an Ethernet connection, it will automatically connect to the network. If you have a wireless connection, you will need to set up the connection manually (a security key may be required).
(Optional) Confirm a name for the computer.

Click the Next button. (The device will restart automatically.)
Select the Set up for personal use option if you are configuring Windows 11 Pro. The “Home” edition does not have this option.

Windows 11 setup types
Click the Next button.
Confirm your Microsoft account email, phone number, or Skype identification to create an account.

Create Windows 11 account
Click the Next button.
Confirm your Microsoft account password.
Click the Next button.
Click the Create PIN button.

Windows 11 OOBE create PIN
Create a new four-digit PIN.

Create account PIN
Click the OK button.
Select the “Set up as new device” option. Or select to restore your settings from a previous installation.

Windows 11 OOBE restore settings
Click the Next button.
Confirm your privacy settings that best suit your situation by turning on or off the toggle switch for each setting.

Windows 11 OOBE privacy settings
Click the Next button.
Click the Next button again.
Click the Accept button.

Privacy settings continued
(Optional) On the “Let’s customize your experience” page, select one or more ways you plan to use the device to allow the setup to suggest tools and services customization during this experience.

Windows 11 OOBE customize experience
Click the Accept button to continue. Or click the Skip button to skip this part of the setup.
Select the “Back up my files with OneDrive” option to automatically upload your Desktop, Pictures, and Documents folders to the cloud. Or Select the “Only save file to this PC” option.

Windows 11 OOBE backup files to OneDrive
Click the Next button.
Click the No, thanks button to skip the Microsoft 365 setup.

Skip Office installation
Once you complete the steps, Windows 11 will reinstall, resolving the existing problems. The completion time will depend on your computer hardware configuration and the selected reset configuration.
How to clean install Windows 11 using Media Creation Tool
Starting with Windows 11, the Media Creation Tool no longer includes an option to perform a clean installation or in-place upgrade. You can only use the tool to create a bootable media to perform an installation using a USB flash drive or ISO file.
If you want to proceed with the Media Creation Tool, you can use it to create an installation media, and then you can launch the setup from the USB flash drive.
To use the Media Creation Tool to create a bootable USB install media and proceed with the setup, use these steps:
Under the “Create Windows 11 installation media” section, click the Download Now button.
Fare doppio clic sul file MediaCrationToolW11.exe per avviare lo strumento.
Fare clic sul pulsante Accetta .
Fare clic sul pulsante Avanti .
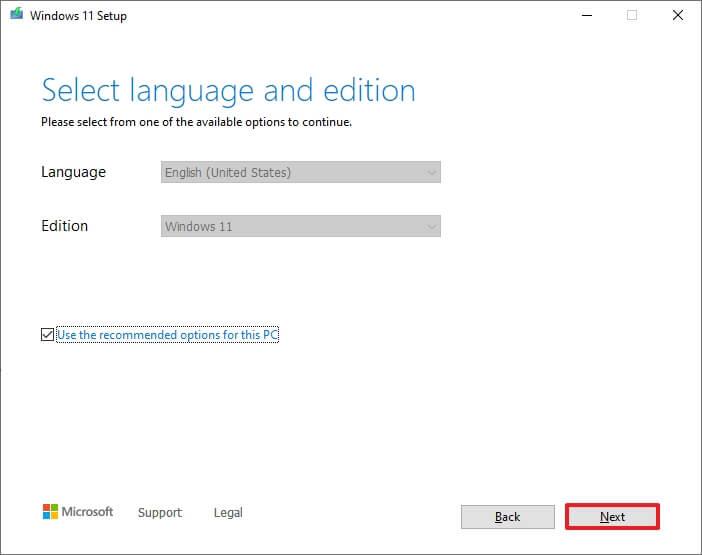
Nota rapida: se stai creando una USB Windows 11 per un altro dispositivo, puoi anche deselezionare l'opzione " Utilizza le opzioni consigliate per questo PC" per selezionare la lingua, l'architettura e l'edizione corrette.
Seleziona l' opzione dell'unità flash USB .
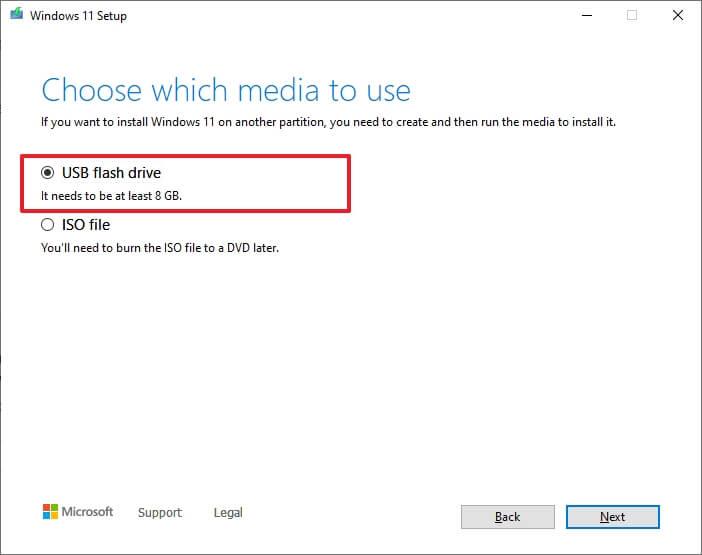
Fare clic sul pulsante Avanti .
Seleziona l'unità flash USB dall'elenco, ma assicurati che non contenga file importanti, poiché questo processo cancellerà tutto su di essa.
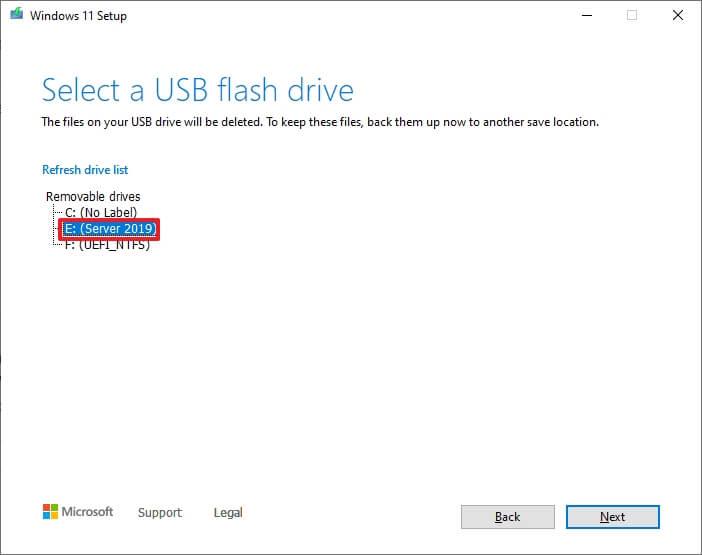
Fare clic sul pulsante Avanti .
Fare clic sul pulsante Fine .
Aprire il supporto di installazione con Esplora file.
Fare doppio clic sul file di installazione per avviare l'installazione di Windows 11.

Windows 11 setup.exe
(Facoltativo) Fare clic sull'opzione Modifica come l'installazione di Windows scarica gli aggiornamenti .

Opzioni di aggiornamento dell'installazione di Windows 11
Seleziona l' opzione Non in questo momento .

Disabilita gli aggiornamenti durante l'installazione
Fare clic sul pulsante Avanti .
Fare clic sul pulsante Accetta per accettare i termini.
Fare clic sull'opzione Modifica cosa conservare .

Impostazioni dello strumento di creazione multimediale
Seleziona l' opzione Niente .

Niente opzione
Fare clic sul pulsante Avanti .
Fare clic sul pulsante Installa .

Configurazione dell'installazione pulita ISO di Windows 11
Seleziona l'impostazione della tua regione dopo l'installazione nella prima pagina dell'esperienza out-of-the-box (OOBE) .

Regione di Windows 11 OOBE
Fare clic sul pulsante Sì .
Seleziona l'impostazione del layout della tastiera.

Layout della tastiera
Fare clic sul pulsante Sì .
Fare clic sul pulsante Salta se non è necessario configurare un secondo layout.
Se il computer utilizza una connessione Ethernet , si connetterà automaticamente alla rete. Se si dispone di una connessione wireless, sarà necessario configurare la connessione manualmente (potrebbe essere necessaria una chiave di sicurezza).
(Facoltativo) Conferma un nome per il computer.

Fare clic sul pulsante Avanti . (Il dispositivo si riavvierà automaticamente.)
Seleziona l' opzione Configura per uso personale se stai configurando Windows 11 Pro. L'edizione "Home" non ha questa opzione.

Tipi di installazione di Windows 11
Fare clic sul pulsante Avanti .
Conferma l'e-mail dell'account Microsoft, il numero di telefono o l'identificazione Skype per creare un account.

Crea un account Windows 11
Fare clic sul pulsante Avanti .
Conferma la password del tuo account Microsoft.
Fare clic sul pulsante Avanti .
Fare clic sul pulsante Crea PIN .

Configurazione guidata di Windows 11 crea PIN
Crea un nuovo PIN a quattro cifre.

Crea il PIN dell'account
Fare clic sul pulsante OK .
Seleziona l' opzione "Configura come nuovo dispositivo" . Oppure seleziona per ripristinare le impostazioni da un'installazione precedente.

Impostazioni di ripristino OOBE di Windows 11
Fare clic sul pulsante Avanti .
Conferma le impostazioni sulla privacy più adatte alla tua situazione attivando o disattivando l'interruttore per ciascuna impostazione.

Impostazioni sulla privacy di Windows 11 OOBE
Fare clic sul pulsante Avanti .
Fare nuovamente clic sul pulsante Avanti .
Fare clic sul pulsante Accetta .

Impostazioni sulla privacy continuate
(Facoltativo) Nella pagina "Personaliamo la tua esperienza", seleziona uno o più modi in cui prevedi di utilizzare il dispositivo per consentire alla configurazione di suggerire strumenti e personalizzazione dei servizi durante questa esperienza.

Windows 11 OOBE personalizza l'esperienza
Fare clic sul pulsante Accetta per continuare. Oppure fai clic sul pulsante Salta per saltare questa parte della configurazione.
Seleziona l' opzione "Esegui il backup dei miei file con OneDrive" per caricare automaticamente le cartelle Desktop, Immagini e Documenti sul cloud. Oppure seleziona l' opzione "Salva file solo su questo PC" .

File di backup OOBE di Windows 11 su OneDrive
Fare clic sul pulsante Avanti .
Fare clic sul pulsante No, grazie per saltare la configurazione di Microsoft 365.

Salta l'installazione di Office
Dopo aver completato i passaggi, l'installazione continuerà con la nuova installazione di Windows 11.
Aggiornamento del 27 maggio 2022: la guida è stata inizialmente pubblicata ad agosto 2021 ed è stata aggiornata a maggio 2022 per assicurarsi che tutti i passaggi siano ancora accurati.
PowerShell ti consente di modificare rapidamente la password di qualsiasi account locale di Windows 11 con pochi comandi ed ecco come fare.
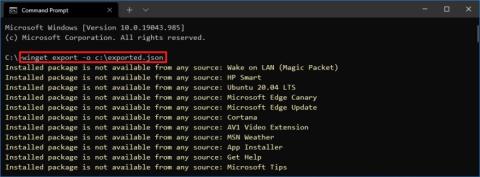
In Windows 11 o Windows 10, puoi esportare le app installate in un file JSON utilizzando il comando Winget. Puoi anche importare app. Passaggi qui.
Per rimuovere la sezione Consigliati dal menu Start su Windows 11, abilitare la sezione Rimuovi Consigliati dai Criteri di gruppo del menu Start.
Per consentire un file o un'app che è stato bloccato da Microsoft Defender Antivirus, segui questi passaggi in Windows 10.
Windows Terminal 1.6 ha una nuova interfaccia utente delle impostazioni ed ecco come abilitare l'esperienza per modificare le impostazioni senza modificare il file settings.json.
Per aprire una posizione di una cartella da Esplora file nel prompt dei comandi come amministratore, devi modificare il Registro di sistema per aggiungere l'opzione del menu di scelta rapida.
Per correggere l'accesso remoto con un account Microsoft per accedere alla cartella condivisa o al desktop remoto su Windows 11, attenersi alla seguente procedura:
Puoi cancellare il disco rigido e reinstallare Windows 10 in due modi utilizzando l'opzione Ripristina questo PC o l'unità flash USB. Ecco come.
Quando ricevi uno degli errori 0xC1900101 durante l'installazione di Windows 10, di solito significa problemi di driver: ecco come risolvere il problema.
In Windows 10, gli errori 0xC1900200 – 0x20008 e 0xC1900202 – 0x20008 indicano che il tuo PC non soddisfa i requisiti minimi. Controlla la risoluzione del problema
Per consentire l'esecuzione degli script su PowerShell, è necessario modificare i criteri di esecuzione. Il Set-ExecutionPolicy RemoteSigned consente gli script.
Per DISINSTALLARE un DRIVER su Windows 11, utilizzare l'app Impostazioni, il Pannello di controllo o Gestione dispositivi. Ecco le istruzioni per ogni metodo.
Per abilitare la modalità IE su Microsoft Edge, puoi usare le nuove impostazioni di compatibilità o l'Editor criteri di gruppo. Ecco come su Windows 11 o 10.
Se Windows 10 mostra Questi file potrebbero essere dannosi per il tuo computer o non possiamo verificare chi ha creato questo messaggio di file, usa queste correzioni.
Su Windows 11, puoi riportare il classico menu della barra multifunzione in Esplora file, ed ecco come modificando il Registro di sistema.
Windows Terminal ti consente di cambiare il carattere del carattere globalmente e individualmente per ciascuna console, ed ecco come farlo.
Display Driver Uninstaller elimina completamente i driver grafici Nvidia e AMD quando altri falliscono o si desidera un'eliminazione completa su Windows 10.
Macrium Reflect è un ottimo strumento per la clonazione dell'unità, sia che tu stia sostituendo un HDD con un SSD o creando un backup completo. Ecco come usarlo.
Se l'adattatore wireless continua a disconnettersi su Windows 10 e viene visualizzato un triangolo giallo, si tratta di un problema di compatibilità del driver. Ecco la correzione.
Stai riscontrando il fastidioso errore di violazione del watchdog DPC su Windows 11? Scopri soluzioni comprovate e dettagliate per risolvere rapidamente questo problema BSOD e far funzionare di nuovo il tuo PC senza problemi. Non sono richieste competenze tecniche!
Hai problemi con l'errore di reimpostazione del PIN di Windows Hello in Windows 11? Scopri i passaggi comprovati per risolvere rapidamente questo problema e ripristinare l'accesso sicuro al tuo dispositivo. Aggiornato con le ultime correzioni.
Hai problemi con l'elevato utilizzo di Pagefile.sys in Windows 11? Scopri soluzioni comprovate per risolvere questo problema, ottimizzare la memoria virtuale e ripristinare le prestazioni ottimali del tuo PC. Soluzioni semplici per principianti ed esperti.
Problemi con gli errori Classic Shell o Start11 su Windows 11? Scopri soluzioni dettagliate per crash, problemi di compatibilità e altro ancora per ripristinare il tuo menu Start personalizzato. Aggiornato con gli ultimi suggerimenti per la risoluzione dei problemi.
Hai problemi con l'errore del catalogo di Windows Update in Windows 11? Scopri soluzioni comprovate e dettagliate per ripristinare gli aggiornamenti senza problemi. Riporta rapidamente il tuo sistema alla normalità, senza bisogno di competenze tecniche!
Hai problemi con gli errori dei driver della scheda madre di Windows 11? Scopri i passaggi comprovati per risolvere crash, schermate blu e problemi di prestazioni. Fai funzionare il tuo PC senza problemi con la nostra guida esperta.
Hai problemi con gli effetti Acrylic e Mica di Windows 11 che non vengono visualizzati? Scopri soluzioni comprovate per ripristinare queste straordinarie funzionalità visive e migliorare l'esperienza desktop senza sforzo.
Hai problemi con la sezione Consigliati del menu Start di Windows 11 che non viene visualizzata? Questa guida completa alla risoluzione dei problemi illustra i problemi più comuni, fornisce soluzioni dettagliate e suggerimenti per ottimizzare la tua esperienza e ottenere un flusso di lavoro più fluido. Ripristina subito i file e le app consigliati.
Problemi con i suoni di sistema mancanti in Windows 11? Scopri soluzioni comprovate e dettagliate per ripristinare notifiche, avvisi e feedback audio. Torna a un'esperienza completamente immersiva senza frustrazioni!
Hai problemi con l'errore della funzionalità Sandbox di Windows 11? Scopri soluzioni comprovate e dettagliate per far funzionare senza problemi il tuo ambiente di test isolato. Non sono necessarie competenze tecniche!
