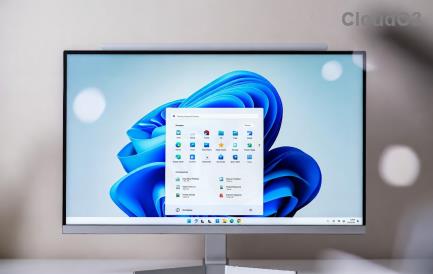
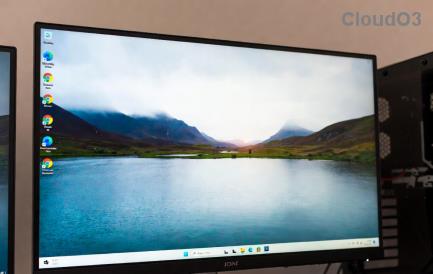
La barra delle applicazioni di Windows è stata al centro di tutta l'attenzione da quando ha ottenuto il suo nuovo aspetto rinnovato con il rilascio di Windows 11. Ora puoi centrare la barra delle applicazioni, goderti il nuovo centro operativo, modificarne l'allineamento e posizionarlo su entrambi i lati dello schermo. Purtroppo l'implementazione di questa funzionalità non ha avuto successo con sempre più utenti che lottano per far funzionare la loro barra delle applicazioni su Windows 11 per alcuni mesi.
Sebbene Microsoft abbia riconosciuto il problema, emesso una soluzione alternativa e stia attualmente lavorando a una soluzione, gli utenti sembrano ancora non essere in grado di far funzionare nuovamente la barra delle applicazioni. Se ti trovi nella stessa barca, abbiamo compilato un elenco di tutte le correzioni disponibili per ripristinare e far funzionare nuovamente la barra delle applicazioni su Windows 11. Segui la guida di seguito per iniziare.
Contenuti
Perché la mia barra delle applicazioni non viene visualizzata?
La barra delle applicazioni di Windows 11 ha un nuovo aspetto che deriva da una versione rinnovata del suo funzionamento. La barra delle applicazioni ora si basa su diversi servizi e sul menu Start stesso per funzionare correttamente. Sembra che il processo di aggiornamento da Windows 10 a Windows 11 sembri rovinare la barra delle applicazioni a seconda della versione di Windows 10 che hai installato sul tuo sistema e della versione di Windows 11 a cui stai aggiornando.
Inoltre, anche un recente aggiornamento di Windows rilasciato il mese scorso sembra causare questo problema per alcuni utenti mentre altri si trovano ad affrontare lo stesso problema a causa dell'ora di sistema non corrispondente nonostante tutto sia configurato correttamente. Esistono molti modi per correggere la barra delle applicazioni e ti consigliamo di iniziare con le correzioni di seguito una per una.
12 modi per risolvere i problemi della barra delle applicazioni su Windows 11
Usa i metodi seguenti per iniziare a riparare la barra delle applicazioni su Windows 11. Se hai già provato a riavviare il sistema, puoi saltare il primo metodo.
Correzione n. 1: riavvia il PC
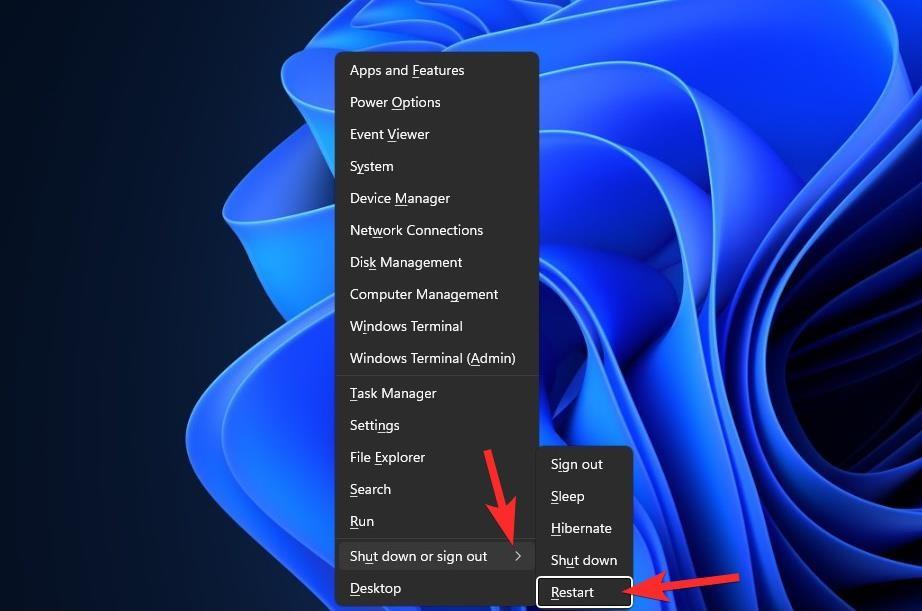
Prima di provare qualcosa di stravagante, è bene provare misure più semplici, come riavviare il PC o Esplora risorse (vedi sotto). In questo modo il tuo sistema eseguirà un soft reset, consentendo il ricaricamento dei dati e, possibilmente, risolvendo i problemi con la barra delle applicazioni e il menu Start.
Correzione n. 2: assicurarsi che "Nascondi automaticamente la barra delle applicazioni" sia disabilitato
Premi Windows + isulla tastiera e fai clic su "Personalizzazione" alla tua sinistra.
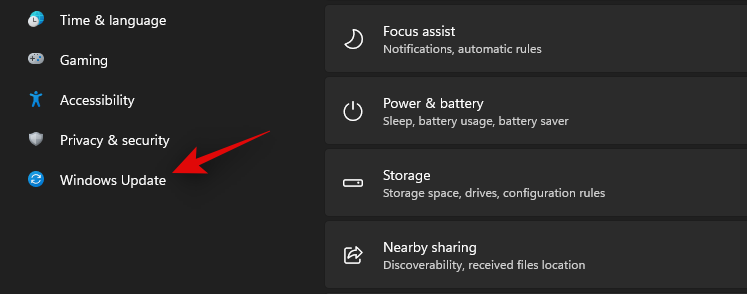
Fare clic su "Barra delle applicazioni".
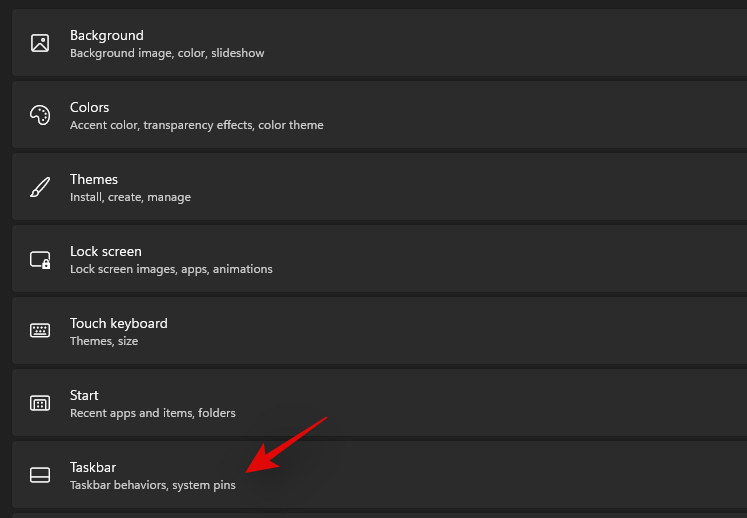
Ora fai clic su "Comportamenti della barra delle applicazioni".
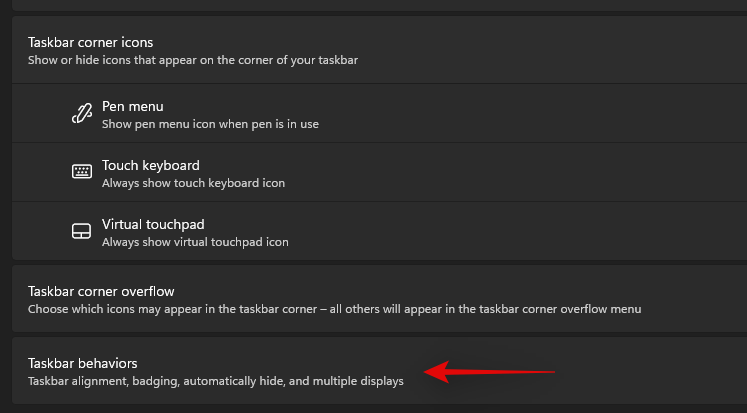
Deseleziona la casella "Nascondi automaticamente la barra delle applicazioni".

Ora chiudi l'app Impostazioni e se la barra delle applicazioni veniva nascosta automaticamente, ora dovrebbe essere disabilitata sul tuo sistema.
Correzione n. 3: riavviare i servizi necessari
Come accennato in precedenza, Windows 11 ha rinnovato la barra delle applicazioni, il che ora significa che si basa su più servizi per funzionare correttamente su qualsiasi sistema. Riavviamo tutti questi servizi per assicurarci che un conflitto in background non impedisca alla barra delle applicazioni di funzionare correttamente sul sistema.
Premi Ctrl + Shift + Escsul tuo sistema per avviare il Task Manager. Passa alla scheda "Dettagli" in alto.
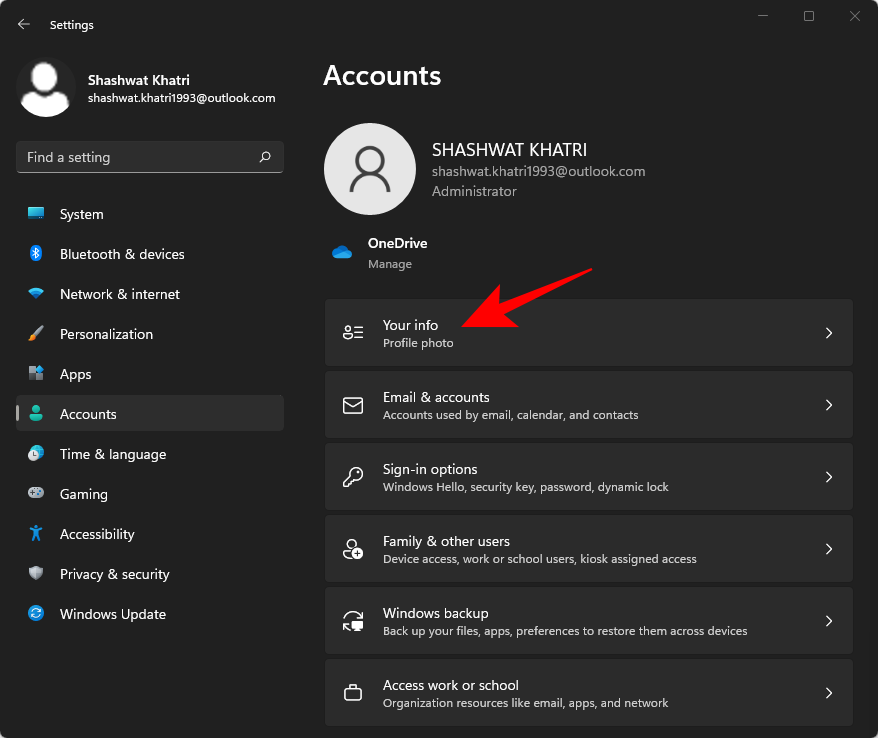
Ora trova i seguenti servizi in esecuzione e selezionali facendo clic su di essi. Premi "Elimina" sulla tastiera e conferma la tua scelta selezionando "Termina processo".
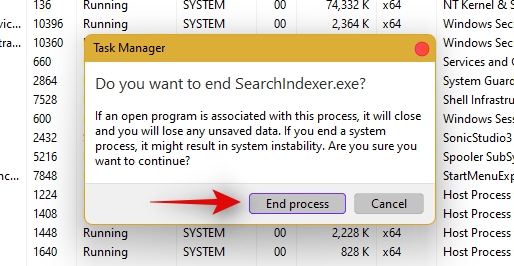
- Explorer.exe
- ShellExperienceHost.exe
- SearchIndexer.exe
- SearchHost.exe
- RuntimeBroker.exe
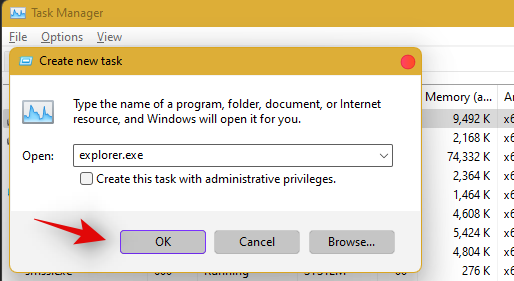
Riavviamo Windows Explorer ora. Fare clic su "File" nell'angolo in alto a sinistra e selezionare "Esegui nuova attività".
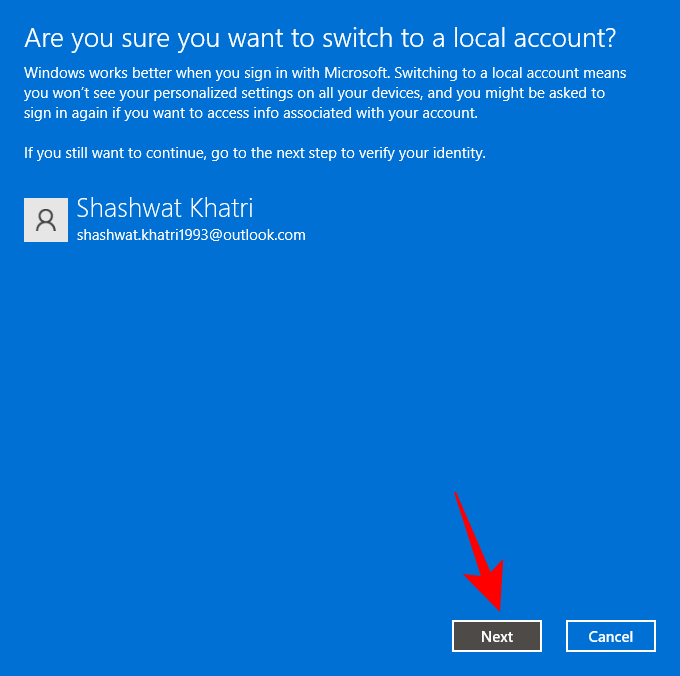
Digita "explorer.exe" e premi Invio sulla tastiera. Se necessario, puoi anche fare clic su "Ok".
Una volta riavviato explorer, riavvia semplicemente il PC per riavviare altri servizi sul tuo sistema.
La barra delle applicazioni dovrebbe ora essere ripristinata se un conflitto di servizi in background è stata la causa del problema.
Correzione n. 4: eliminare IrisService nel registro e riavviare
Premere Ctrl + Shift + Escper aprire il Task Manager. Quindi fare clic su File nell'angolo in alto a sinistra.
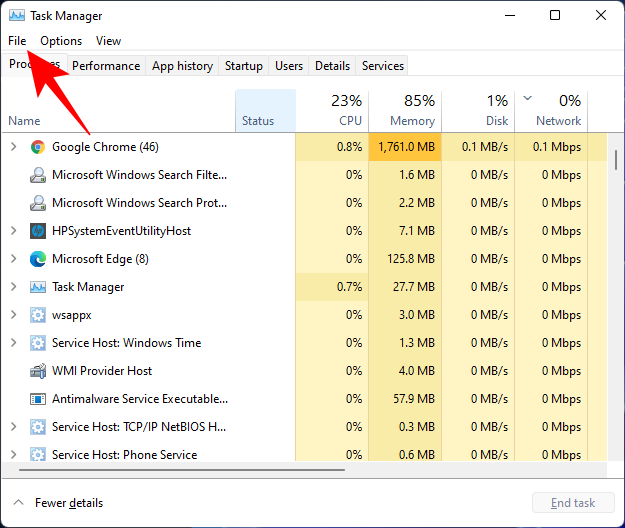
Seleziona Esegui nuova attività .
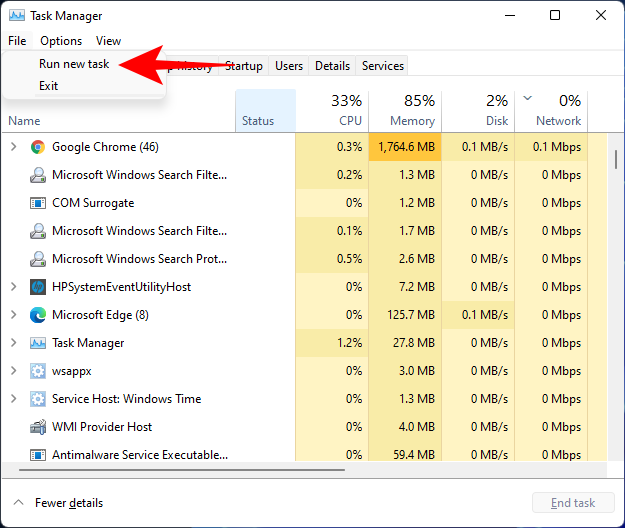
Digita cmd e premi Invio.
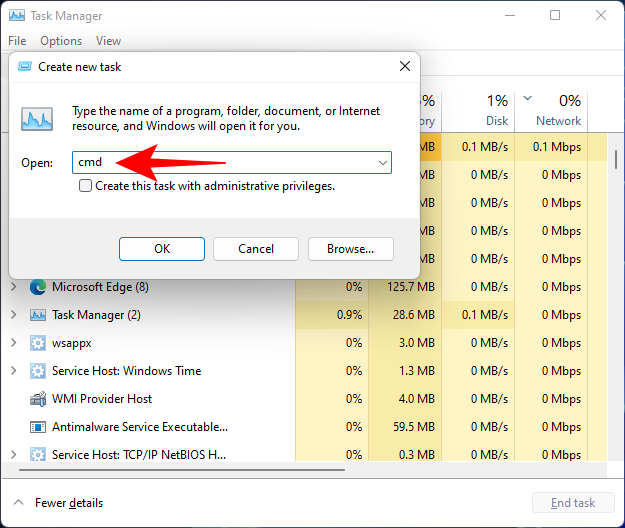
Questo aprirà un'istanza elevata del prompt dei comandi. Ora copia il seguente comando e incollalo nel prompt dei comandi:
reg delete HKCU\SOFTWARE\Microsoft\Windows\CurrentVersion\IrisService /f && shutdown -r -t 0

Quindi premere Invio. Non appena lo fai, il tuo PC si riavvierà. Una volta riavviato, le cose dovrebbero tornare alla normalità, inclusa la barra delle applicazioni.
Correzione n. 5: aggiungi sgancio disabilitato nel registro
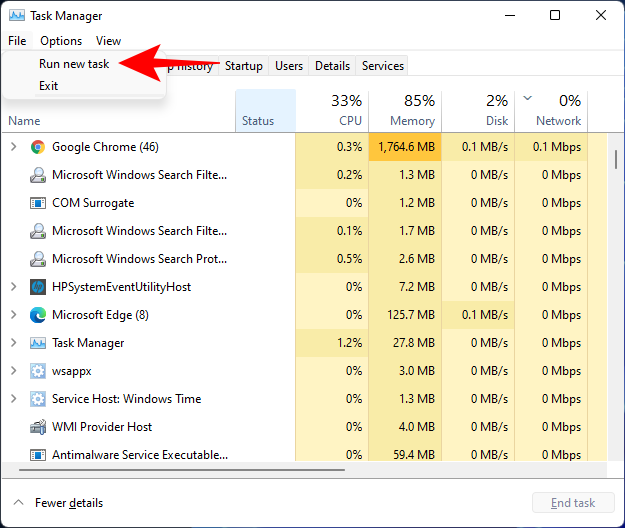
Premere Ctrl + Shift + Escper aprire il Task Manager. Quindi fare clic su File (angolo in alto a sinistra) ed Esegui una nuova attività .
Digita regedit e premi Invio.
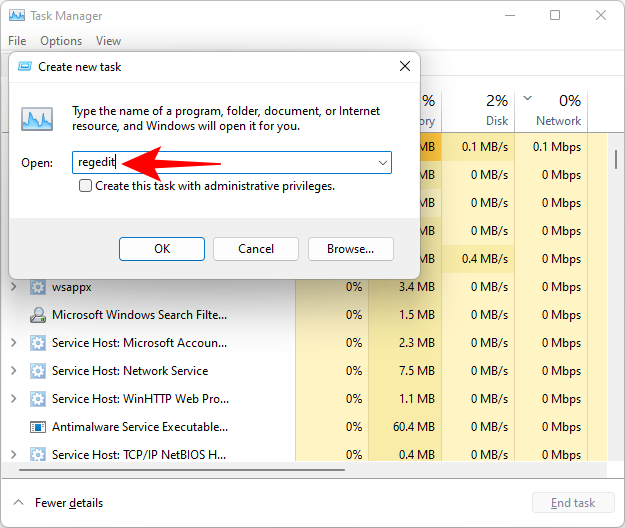
Questo aprirà l'editor del registro. Ora vai al seguente indirizzo:
Computer\HKEY_LOCAL_MACHINE\SOFTWARE\Microsoft\Windows\CurrentVersion\Shell\Update\Packages
In alternativa, copia quanto sopra e incollalo nella barra degli indirizzi dell'editor del registro, in questo modo:

Dopo aver premuto Invio, verrai indirizzato al tasto specificato. A destra, fai clic con il pulsante destro del mouse sullo spazio e seleziona Nuovo > Valore DWORD (32 bit) .
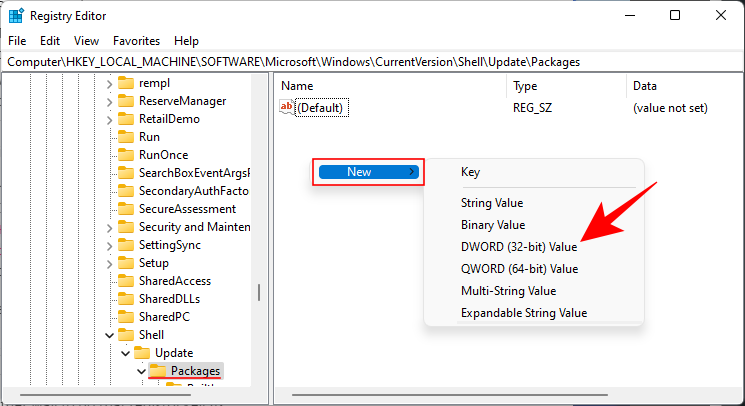
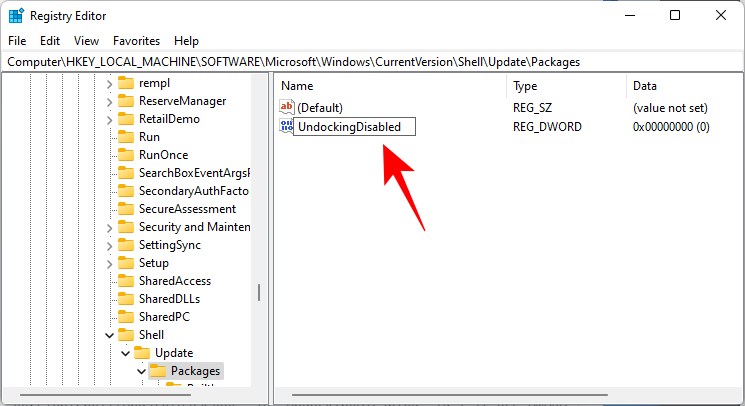
Assegna un nome a questo DWORD UndockingDisabled appena creato .
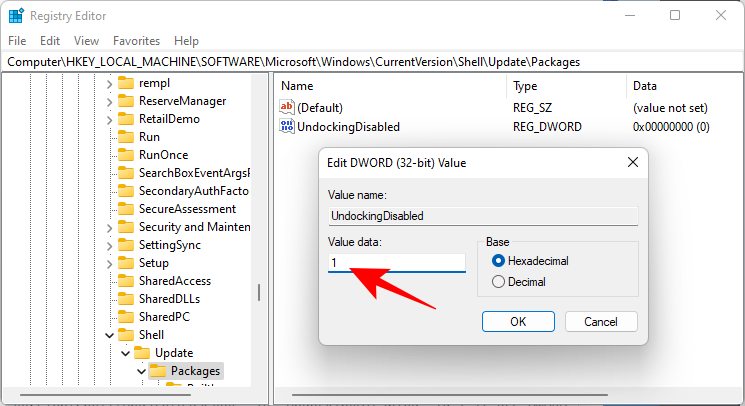
Quindi fai doppio clic su di esso e modifica i "Dati valore" su 1 . Quindi fare clic su OK .
Riavvia il PC per rendere effettive le modifiche.
Correzione n. 6: esegui i comandi SFC e DISM
Premi Start, digita cmd e fai clic su Esegui come amministratore .
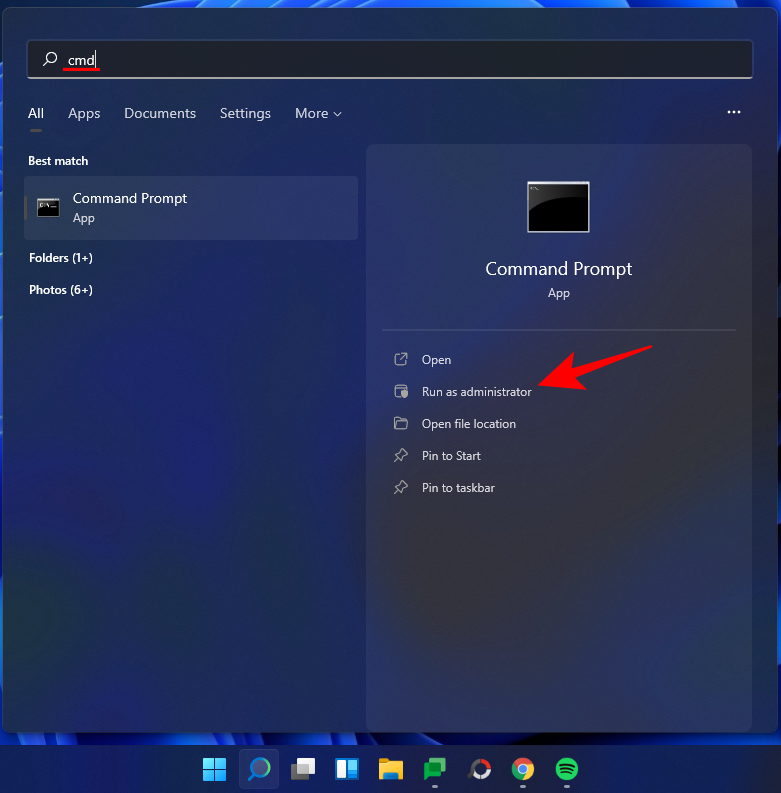
Ora digita il seguente comando:
sfc /scannow
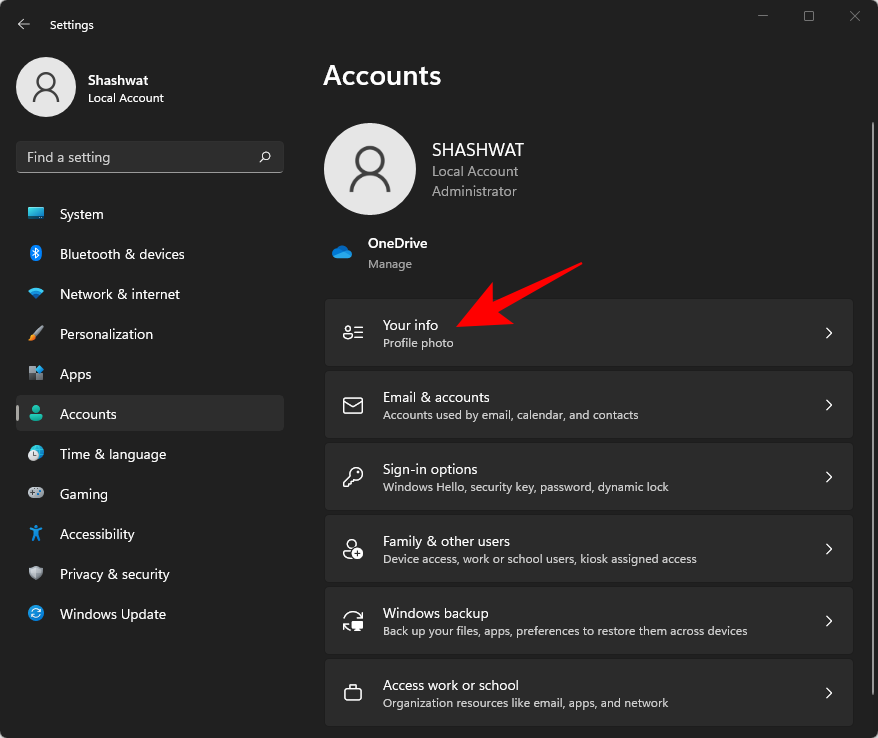
Premere Invio. Attendi che SFC termini la scansione e risolva gli eventuali problemi rilevati.

Successivamente, esegui il seguente comando DISM per lo strumento Gestione e manutenzione immagini distribuzione:
dism /online /cleanup-image /scanhealth
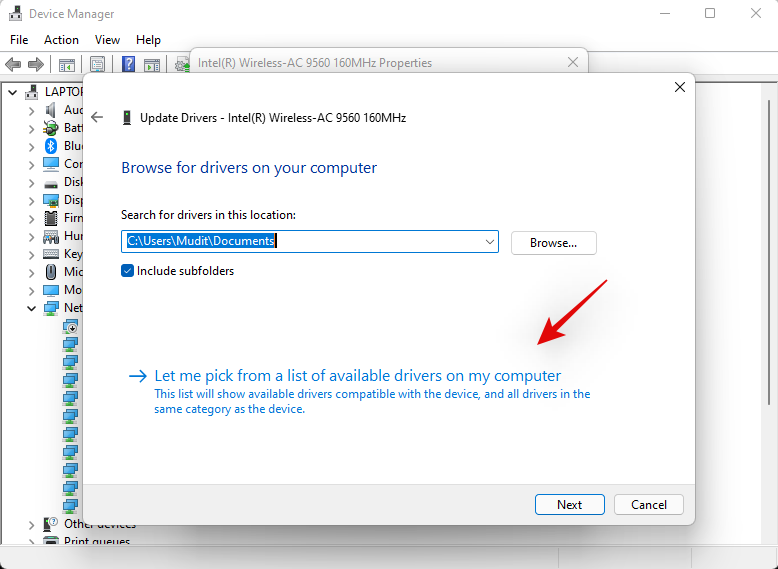
Quindi premere Invio. Ancora una volta, attendi il completamento della scansione.

Ora, esegui il seguente comando DISM:
dism /online /cleanup-image /restorehealth

Premere Invio. Attendi che DISM ripristini la salute.

Infine, esegui il comando chkdsk per eseguire l'utility Check Disk:
chkdsk c: /r
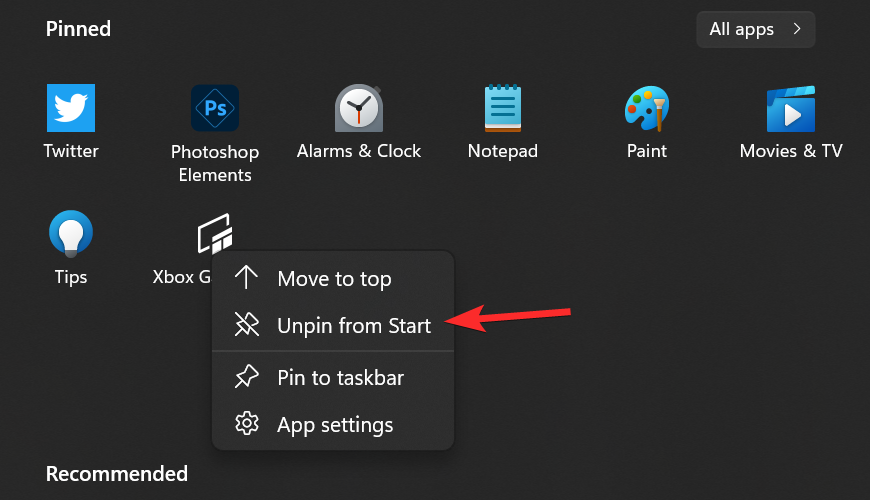
Premere Invio. Il prompt dei comandi visualizzerà un messaggio che ti dice che "non può bloccare l'unità corrente ... perché il volume è in uso da un altro processo" e ti chiederà il permesso di pianificare una scansione prima del prossimo avvio. Tipo Yda rispettare.

And press Enter. Now restart your computer, let the Check Disk tool do its job, and check if the taskbar has resumed normal functioning.
Fix #7: Reinstall UWP
Press Ctrl + Shift + Esc on your keyboard to launch the Task Manager. Click on ‘File’ and select ‘Run new task’.
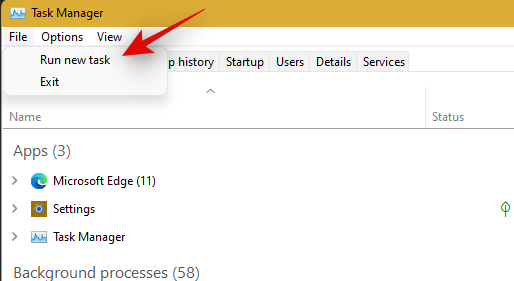
Type in ‘PowerShell’ and press Ctrl + Shift + Enter on your keyboard.

PowerShell will now be launched as an administrator on your system. Type the following command:
Get-AppxPackage -AllUsers | Foreach {Add-AppxPackage -DisableDevelopmentMode -Register “$ ($ _. InstallLocation) \ AppXManifest.xml”}
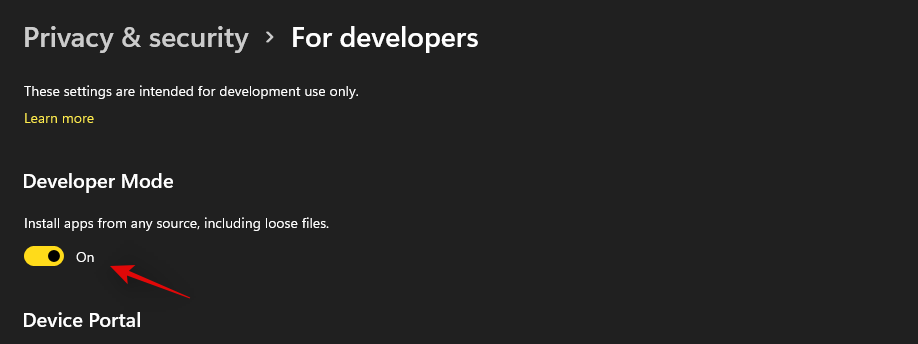
Press Enter. PowerShell will throw up a running list of messages in red. But don’t worry about it. Just wait for the command to finish executing.

Fix #8: Check UAC and add edit Registry if needed
UAC is a must-have for all modern apps and features including the Start Menu and the taskbar. You should first enable UAC if it is disabled and restart your system. If the Taskbar still fails to work for you, then we recommend you try adding a Xaml Start menu value to your Registry Editor.
Adding this value seems to restart and re-register Taskbar services which seem to get Taskbar working again on most systems. Follow the guide below to get you started.
Check and enable UAC if disabled
Press Ctrl + Shift + Esc on your keyboard to launch the task manager. Now click on ‘File’ in the top left corner of your screen and select ‘Run new task’.

Type in ‘cmd’ and press Ctrl + Shift + Enter on your keyboard.
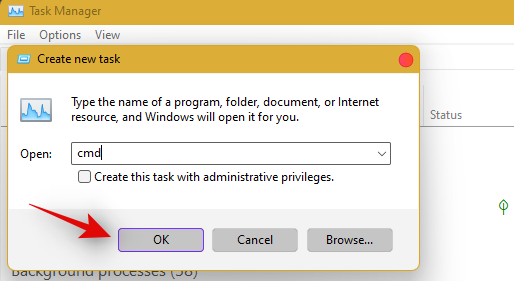
Now type in the following command and press Enter to execute the command.
C:\Windows\System32\cmd.exe /k %windir%\System32\reg.exe ADD HKLM\SOFTWARE\Microsoft\Windows\CurrentVersion\Policies\System /v EnableLUA /t REG_DWORD /d 0 /f
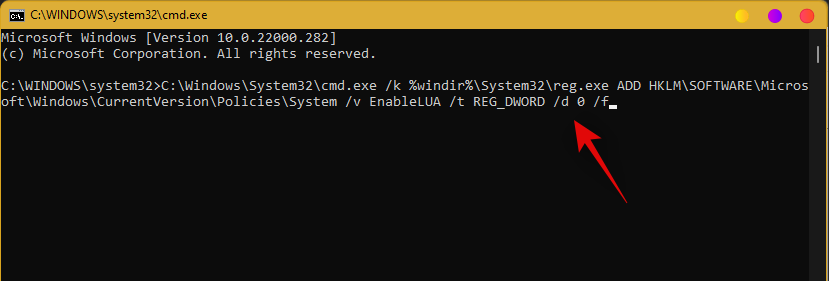
UAC will now be enabled for your system. Restart your PC for the changes to take effect on your system. Once restarted, Taskbar should be up and running on your system if UAC was the issue for you. If not, use the guide below to trigger the taskbar’s functionality on your system.
Add Registry Value
Press Ctrl + Shift + Esc to launch the task manager. Now click on ‘File’ in the top left corner and select ‘Run new task’.

Type in ‘cmd’ and press Ctrl + Shift + Enter on your keyboard.

Now type in the following command and press Enter on your keyboard.
REG ADD "HKCU\Software\Microsoft\Windows\CurrentVersion\Explorer\Advanced" /V EnableXamlStartMenu /T REG_DWORD /D 1 /F
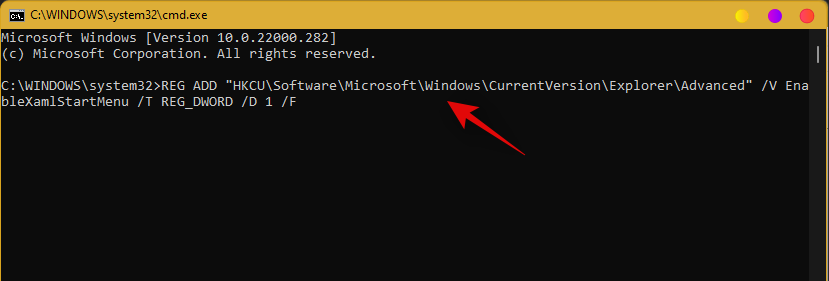
Go back to the task manager now, find Windows Explorer in the list, and right-click on it. Select Restart to restart explorer.exe.
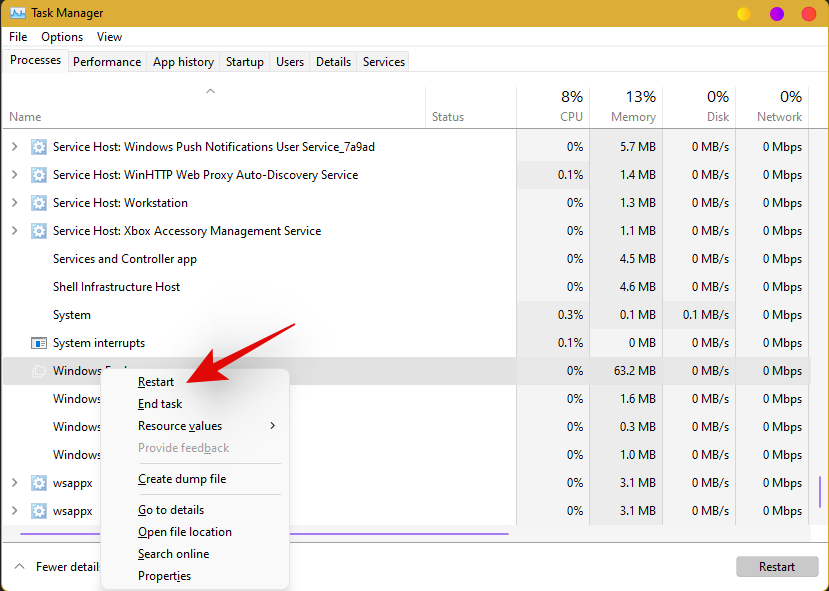
Once restarted, try to access your taskbar. The taskbar should now be available on your system.
Fix #9: Edit date and time to fix Taskbar
Date and Time settings seem to be the major cause of issues with the taskbar in Windows 11. Use the guide below to try out the following time fixes to see which one works the best for you.
Ensure that your time is correctly synchronized with the time server
Press Ctrl + Shift + Esc on your keyboard and click on ‘File’. Select ‘Run new task’.

Type in ‘Control’ and hit Enter on your keyboard.
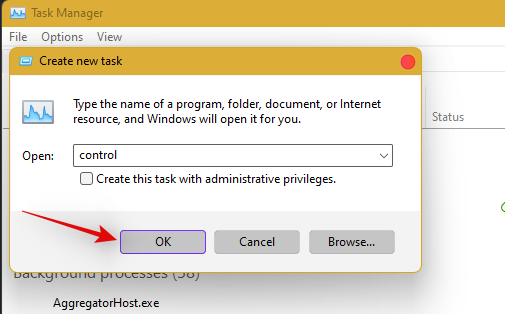
Click on ‘Date and Time’.
Select ‘Internet Time’ from the top.
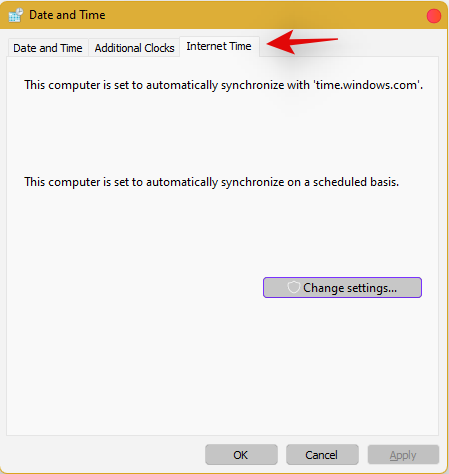
Click on ‘Change Settings’.
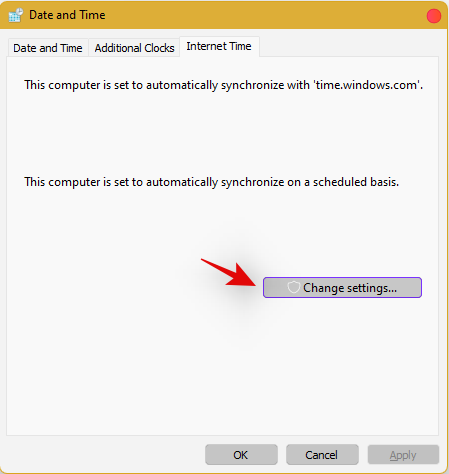
Uncheck the box for ‘Synchronize with an Internet time server’.

Click on ‘Ok’ once you are done.
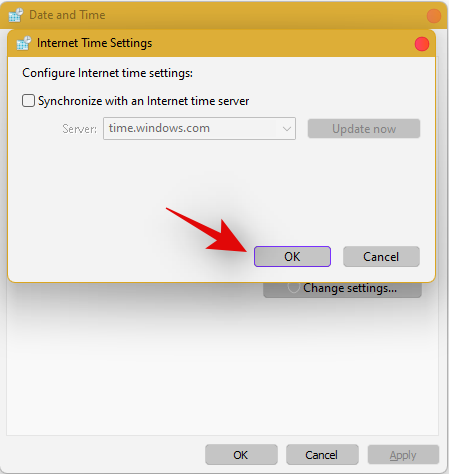
Restart your PC at this point and check your taskbar. If it is still disabled, do not fret, follow the steps above and enable Synchronization with an Internet Time Server again.
Once enabled, press Ctrl + Shift + Esc on your keyboard, and find Windows Explorer in the list on your screen. Right-click the listing and select ‘Restart’.

Once explorer restarts, try using the Taskbar. If synchronization was your issue, then it should now be fixed on your system. If not, continue with the other time fixes mentioned below.
Change date to 1 day ahead
Open the Task Manager by pressing Ctrl + Shift + Esc simultaneously. Then click on File.
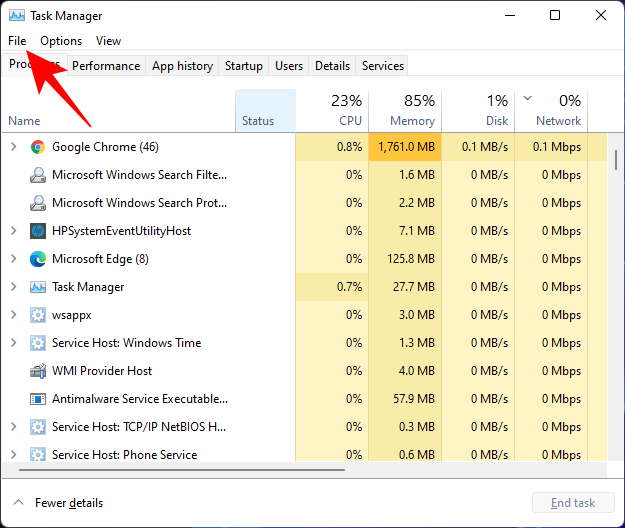
Click on Run new task.
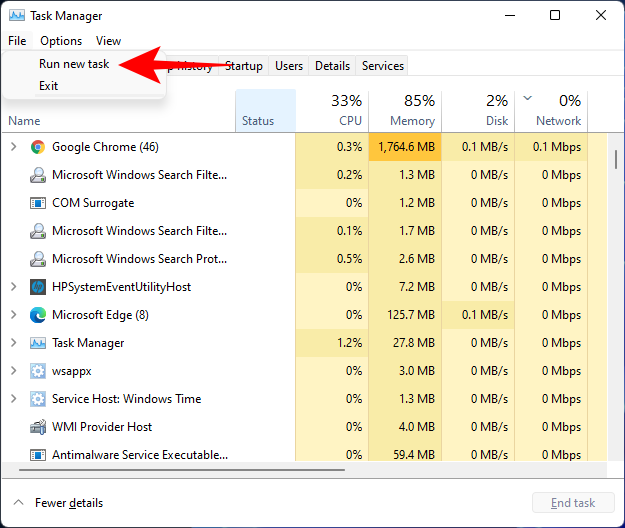
Type control panel and hit Enter.
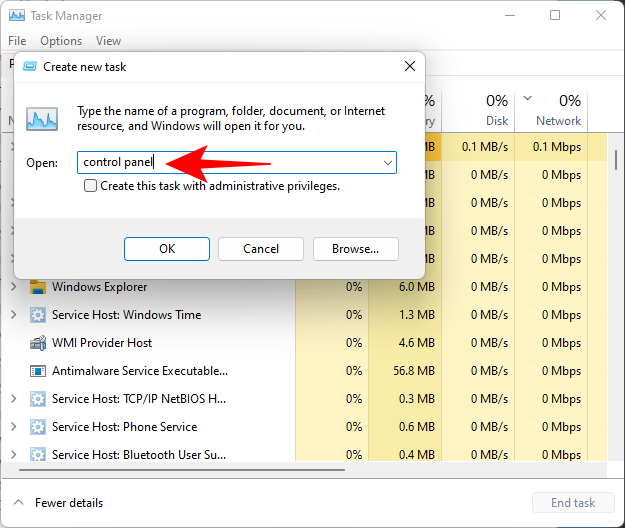
Now click on Clock and Region.
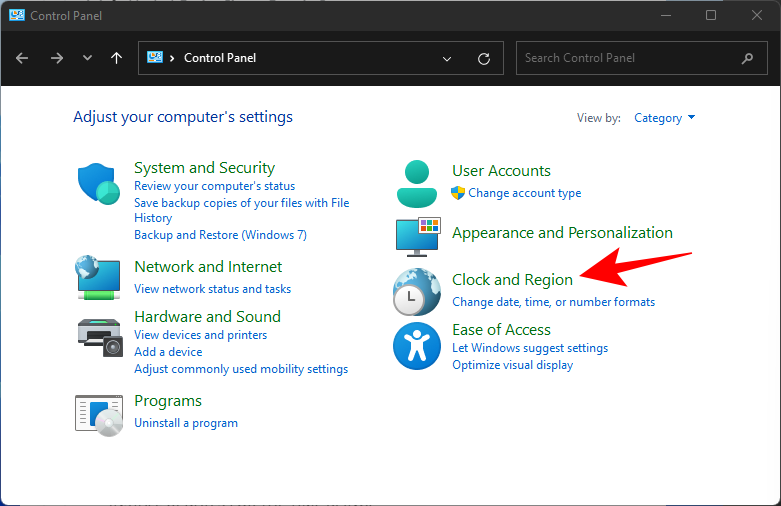
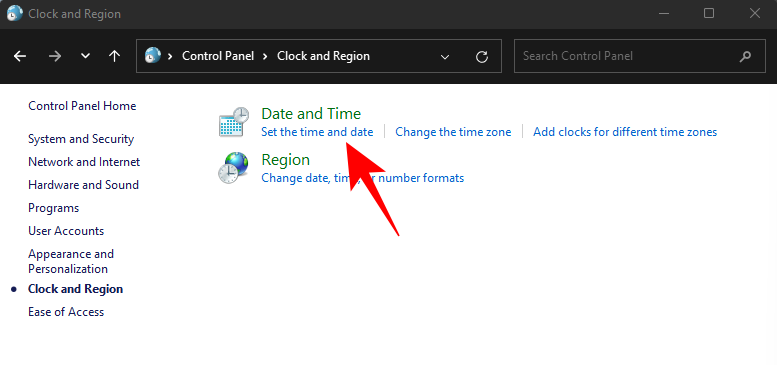
Under “Date and Time”, click on Set the time and date.
Click on the Internet Time tab to switch to it.
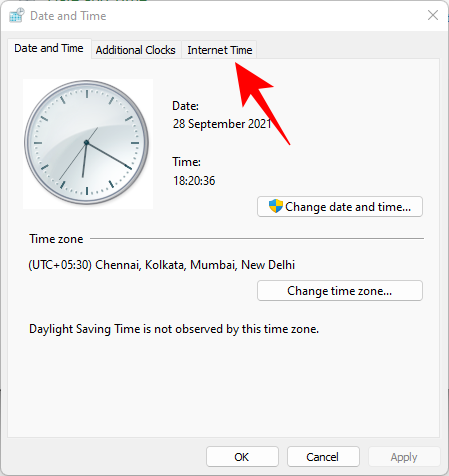
Click on Change settings…
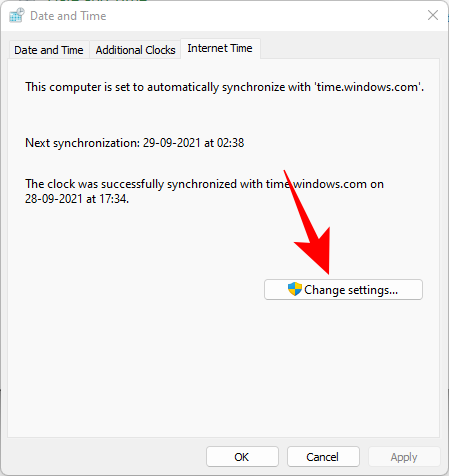
Uncheck Synchronize with an Internet time server, then click OK.
Now click on the Date and Time tab to switch back to it.
Here, click on Change date and time…
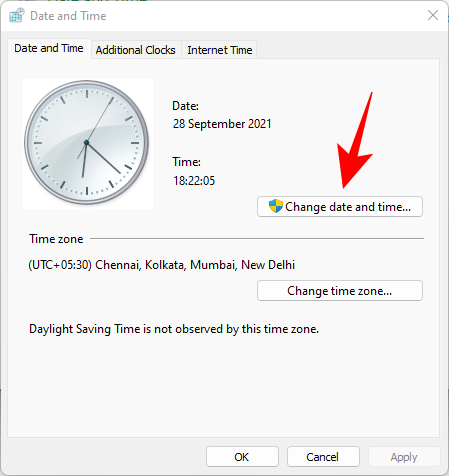
Now change the date and time to reflect tomorrow. As of writing this post, it is the 1st November so we will be changing the date to 2nd November.
Change Dates to last cumulative updates
If you are still unable to get the Taskbar working then you will have to jump through a few hoops to change your date and time multiple times and get the taskbar working on your system. Follow the guide below to get you started.
Press Ctrl + Shift + Esc on your keyboard, click on ‘File’ and select ‘Run new task’.

Type in ‘Control’ and press Enter on your keyboard.

Select ‘Date and Time’.

Switch to ‘Internet time’.

Click on ‘Change Settings’.

Uncheck the box for ‘Synchronize with an Internet Time Server’.

Click on ‘Ok’.

Switch back to ‘Date and Time’. Click on ‘Change Date and Time’ and select your date as 2nd September.
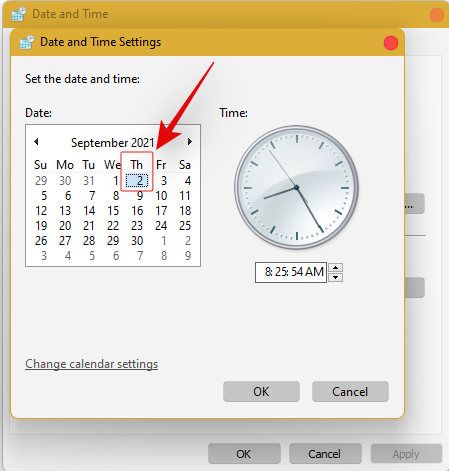
Close all windows and restart your system. Once restarted, open the ‘Date and Time’ dialog box again and change your date to 7th October this time.
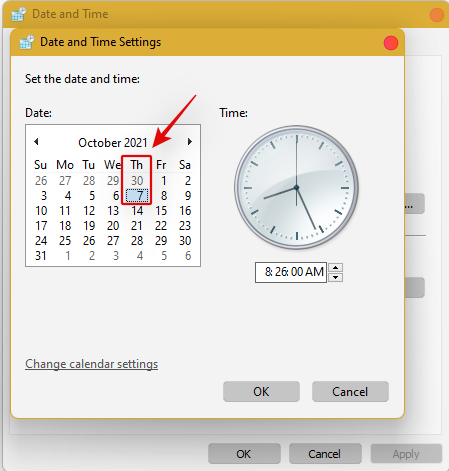
Restart your system again and Taskbar should now be back up and running on your system again. You can now enable synchronization for time again using the steps above on your system.
If synchronizing time does not work, move a month ahead to restore Taskbar
If you are still unable to get Taskbar up and running on your system again you can try the last date change fix. We recommend you use the steps above to change your date and time to a month ahead of your current date. Once changed, restart your system, and the taskbar should be up and running on your system now.
The downside of this fix is that if you revert to your normal date, Taskbar will stop working on your system. Having a mismatched date can cause issues with background syncs for various applications and cause some websites to malfunction. You will also have issues installing and getting the latest Windows Updates, so you will need to check all of these manually when updating in the future.
Fix #10: Uninstall the latest cumulative Windows Update ie: KB5006050
The cumulative update released in September for Windows 11 seems to also cause issues with the taskbar on some desktops and laptops. Use the guide below to uninstall the necessary update from your system.
Press Windows + i and select Windows Update from the left.
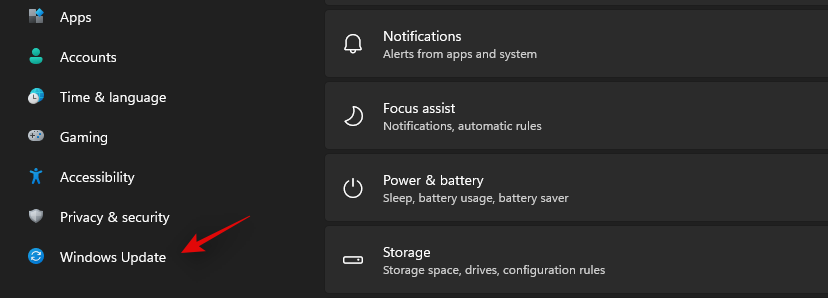
Click on ‘Update history’.
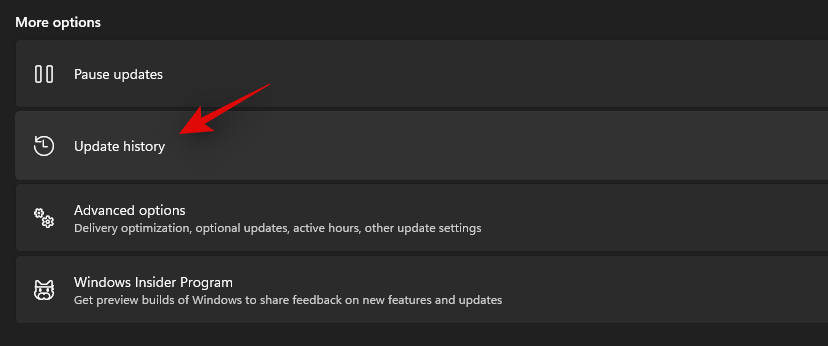
Now select ‘Uninstall updates’.
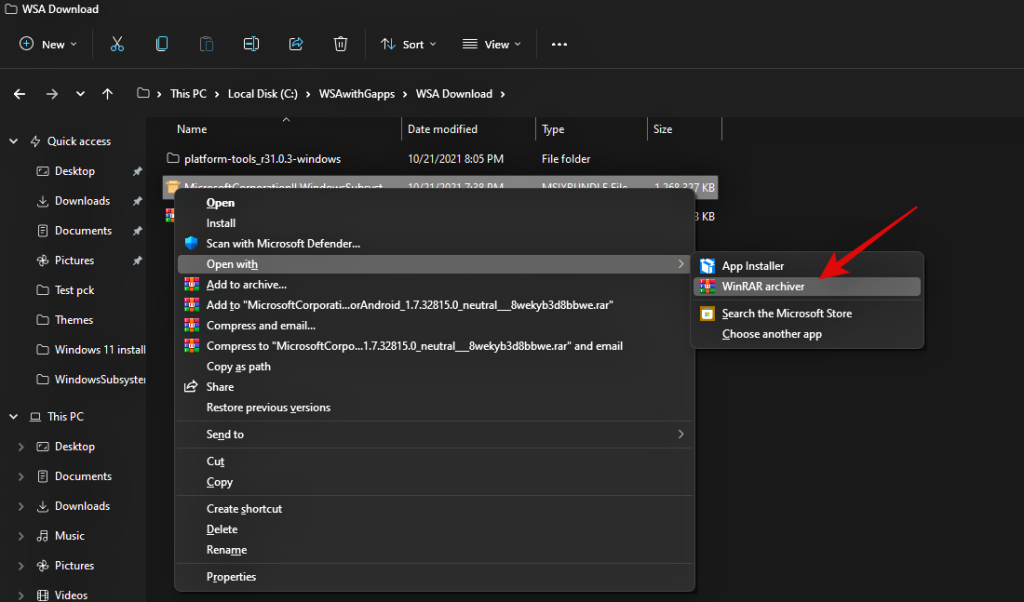
Click and select Windows Cumulative update KB5006050 from the list.

Now click on ‘Uninstall’ at the top and confirm your choice to uninstall the selected update.
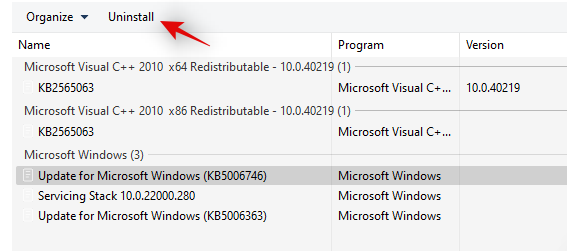
Restart your system and taskbar functionality should now be restored on your system.
Fix #11: Restore PC to a previous restore point
If you had the taskbar working at a previous point in time then we recommend you restore your PC to a previously available restore point on your system. Follow the guide below to get you started.
Press Ctrl + Shift + Esc on your keyboard and click on ‘File’. Select ‘Run new task’ once you are done.

Type in CMD and press Ctrl + Shift + Enter on your keyboard.

Now type in ‘rstrui.exe’ and press Enter on your keyboard.
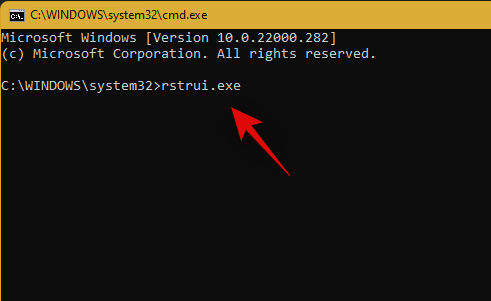
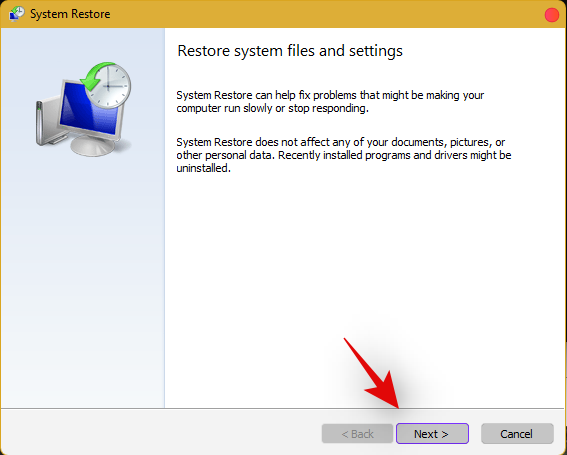
The system restore utility will now launch on your system. Click on ‘Next’.
Select the desired restore point from the list on your screen. Click on ‘Next’ once you are done.
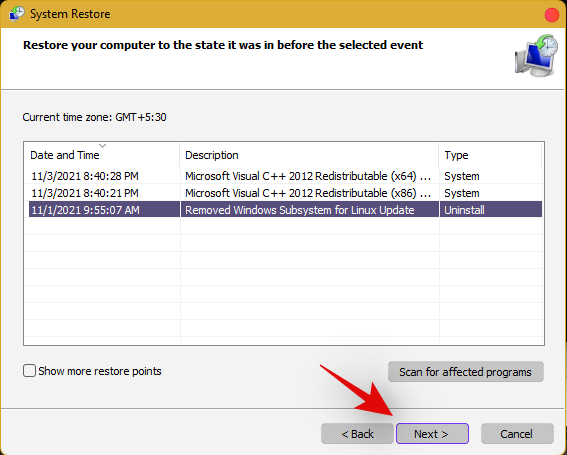
Tip: Click on ‘Scan for affected programs’ to view a list of installed programs that will be removed from your system during the restore process.
Click on ‘Finish’ once the restore finishes and restart your system.
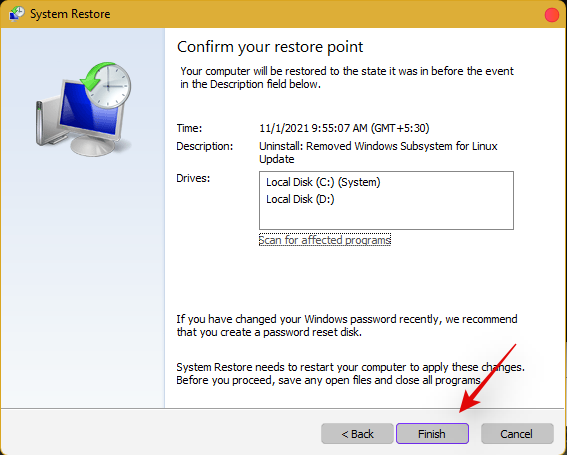
The taskbar should now be back up and running on your system again.
Fix #12: Last Resort: Create a new local admin account and transfer all your data
If by this point Taskbar still fails to work for you then it’s time for some drastic measures. You can create a new local admin account, check if Taskbar is working there, and then transfer all your data to the new account. This will be a tedious process but it is the next best way to get the taskbar working on your system without resetting your PC. Follow the guide below to get you started.
Create a new local admin account
Herre’s how you can create a new local admin account on your system.
Note: Most users facing the taskbar issue are unable to access the Settings app as well. Hence we will be using CMD to add a new local admin account to your PC. However, if the Settings app is available to you then you can use the same to add a new account as well.
Press Ctrl + Shift + Esc on your keyboard, click on ‘File’ and select ‘Run new task’.

Type in ‘cmd’ and press Ctrl + Shift + Enter on your keyboard.

CMD will now be launched as an administrator. Use the command below to add a new local admin account. Replace NAME with the Username of your choice for the new account. You can add a password later once you have confirmed that the taskbar is available in the new account.
net user /add NAME 
Once you have added the new user, use the command below to convert it to an administrator account on your PC. As usual, replace NAME with the Username for the new account you created earlier.
net localgroup Administrators NAME /add

Now type in the following to log out of your current account.
logoff

Once logged out, click on the newly added account to log in to the same. Once logged in, check if the taskbar is available in the new account. If it is, you can use the next section to transfer all your data. However, if the taskbar is still missing then you have no choice but to perform a fresh install of Windows 11 on your PC from a removable USB media drive.
Transfer all your data
Press Windows + i on your keyboard and click on ‘About’ on your right.
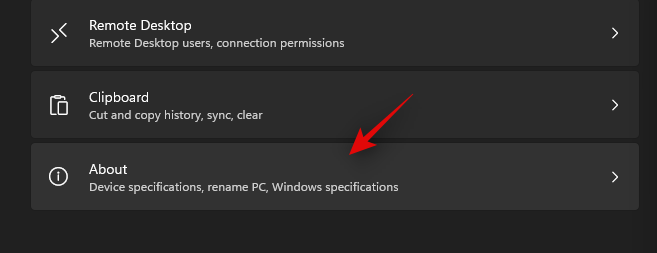
Click on ‘Advanced system settings’.
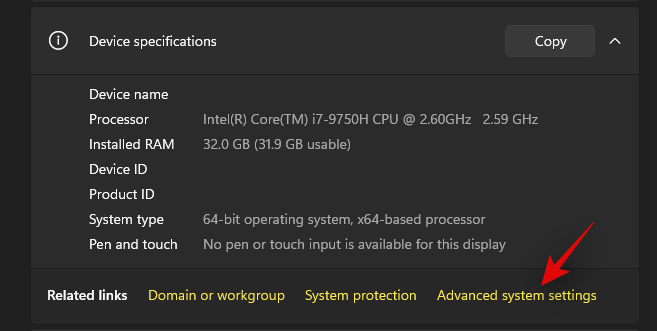
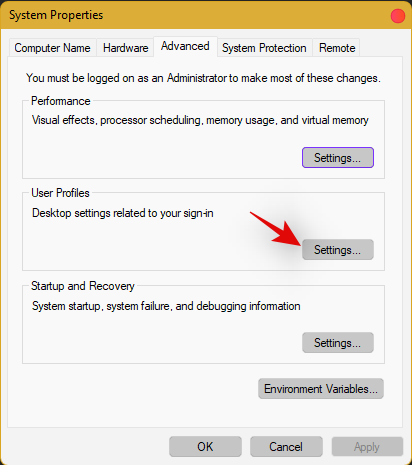
Click on ‘Settings’ under ‘User Profiles’.
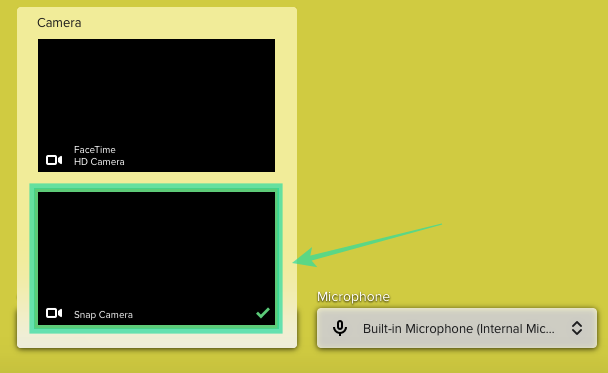
Select your original profile by clicking on it and selecting ‘Copy To’.
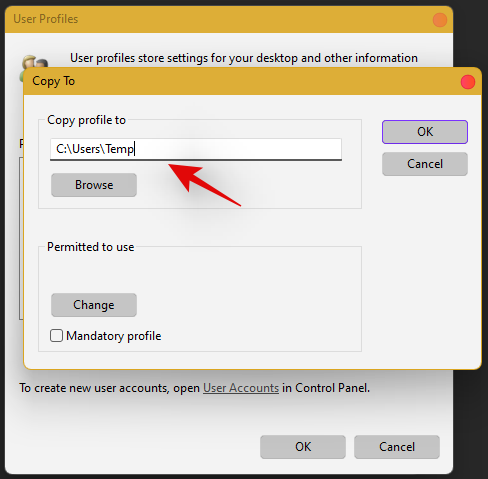
Now enter the following path under ‘Copy profile to’. Rename NAME to the username of your previous profile from where you wish to copy all your data.
C:\Users\NAME
Click on ‘Change’.
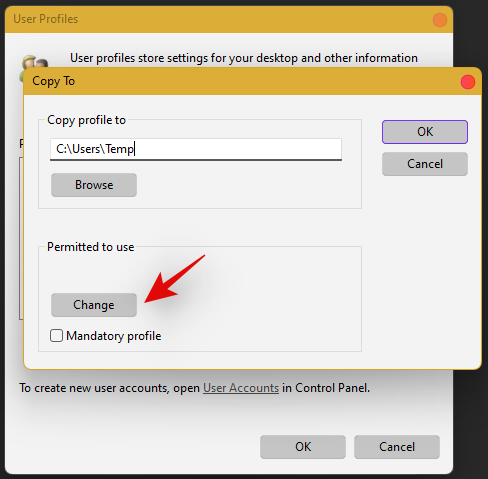
Enter the name for your new user profile and press Enter on your keyboard.
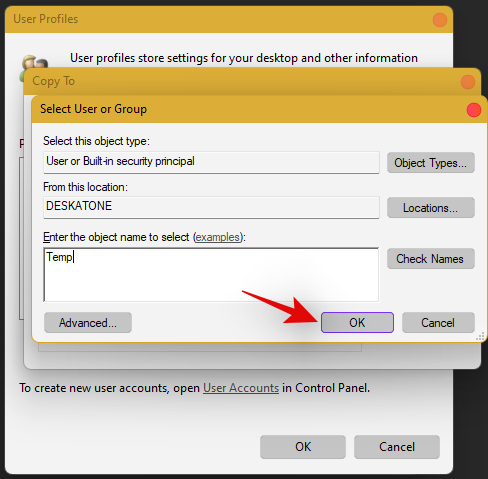
Click on ‘Ok’ once you are done.
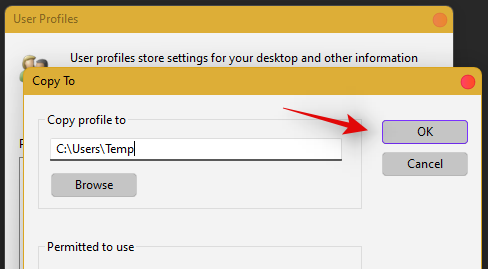
All your data will now be copied over to the new profile where the taskbar is functional on your PC. You can now delete your previous user account and set a password for your new account as well.
Frequently Asked Questions (FAQs):
With so many fixes, you are bound to have a few questions on your mind. Here are some commonly asked ones that should help you get up to speed.
How do I access Windows apps and Settings without a taskbar?
You can use the Task Manager to launch almost any program or Settings page on your system. To launch the desired program, launch the Taskbar > File > Run new task and enter the path to the program you wish to launch. Press Enter if you wish to launch the program normally or press Ctrl + Shift + Enter if you wish to launch the program with administrator privileges.
Is it safe to edit the Registry?
Registry edits are never safe as they have the potential to break your system. Fixes from trusted sources can help you avoid such issues but a good rule of thumb is to always back up your registry before making any edits. This way you can easily restore your Registry values in case some get messed up when editing the Registry.
When will Microsoft fix this issue?
Sadly, Microsoft is yet to release a proper fix for this issue. The company has tried to release a fix in the past cumulative updates to Windows 11 but they have been a hit and miss. We expect Microsoft to completely fix this issue in the upcoming feature update to Windows 11 when the OS gets the ability to run Android apps officially.
Can I update my Windows 11 after fixing the taskbar?
This will depend on the fix that you’re currently using. If you are using a date fix then you won’t be able to install updates until you restore to the current time. This will, however, cause the taskbar to be disabled again and the changes will be carried over after you update your PC. However, if you are using any other fix then you can easily update Windows.
For users with the date fix, you should try updating with the modified time first. If the update gets stuck on ‘Installing 0%’ or ‘Downloading 100%’ then change your date and time to the current date and time and update your PC. Ensure that you do not restart explorer or your PC during this process to keep the current instance of the taskbar alive on your system during the update process. This should help fix the issue for you once Microsoft officially releases an update to fix the issue.
We hope you were able to easily get the taskbar back up and running on your system using the guide above. If you face any more issues, feel free to reach out to us using the comments section below.
Related:


![Come risolvere lerrore schermo verde di Windows 11 [8 modi] Come risolvere lerrore schermo verde di Windows 11 [8 modi]](https://cloudo3.com/resources8/images31/image-5564-0105182715287.png)


