Windows11のタスクバーからMicrosoftTeamsチャットを削除する方法

Teamsを使用するようにMicrosoftが最善を尽くしているにもかかわらず、それでも気に入らない場合は、タスクバーから削除することをお勧めします。さて、あなたはそれを簡単に行うことができ、より多くのスペースを得ることができます…

Windows 11が一般にリリースされており、この長期実行OSの新しいアップデートは、いくつかのすばらしいレビューを得ているようです。Microsoftはプライバシーを強化し、セキュリティは新しいUIを追加し、AndroidアプリをWindows 11にインストールする機能を追加しました。しかし、いつものように、Windowsには、ほとんどすべてのユーザーに関係のない多くのプリインストールされたものが付属しています。
また、構築済みのシステムまたはラップトップを購入した場合は、システムに追加の広告ソフトウェアがインストールされている可能性があり、それらを削除することをお勧めします。Windows上のほとんどのアプリは、クリックするだけで簡単に削除およびアンインストールできますが、プログラム、Windowsストアアプリ、Windows Update、およびシステムアプリにアクセスすると、状況が少し複雑になります。恐れることはありません。以下のガイドに従って、現在の設定に関係なく、Windowsシステムからすべての種類のアプリを削除できます。始めましょう。
コンテンツ
Windows11でアプリをアンインストールする方法[8つの方法]
Windows 11PCからアプリをアンインストールするすべての方法は次のとおりです。システムアプリのアンインストールについては、このセクションの後にある以下の専用セクションと特別な方法を参照してください。
方法01:設定の使用
以下のガイドに従って、システムから[設定]からアプリをアンインストールします。デフォルトのアプリをアンインストールしようとしている場合は、アンインストールオプションがグレー表示されないように、事前にアプリを変更することをお勧めします。Windows 11でデフォルトのアプリを変更することに気付いていない場合は、以下のガイドに従うことができます。
ステップ1:最初にデフォルトのアプリを変更しますか?[オプション]
注:デフォルトのアプリを置き換えるために、事前にシステムに代替アプリがインストールされていることを確認してください。たとえば、ブラウザをMicrosoft Edgeから変更する場合は、使用する別のブラウザをシステムにインストールして、代わりにデフォルトのブラウザとして選択できるようにする必要があります。
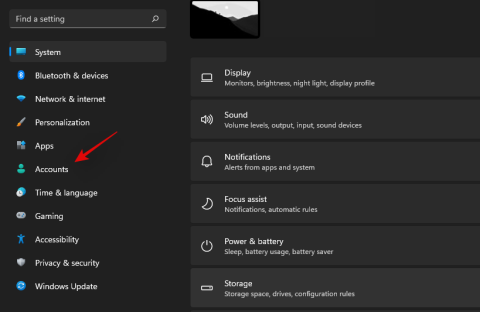
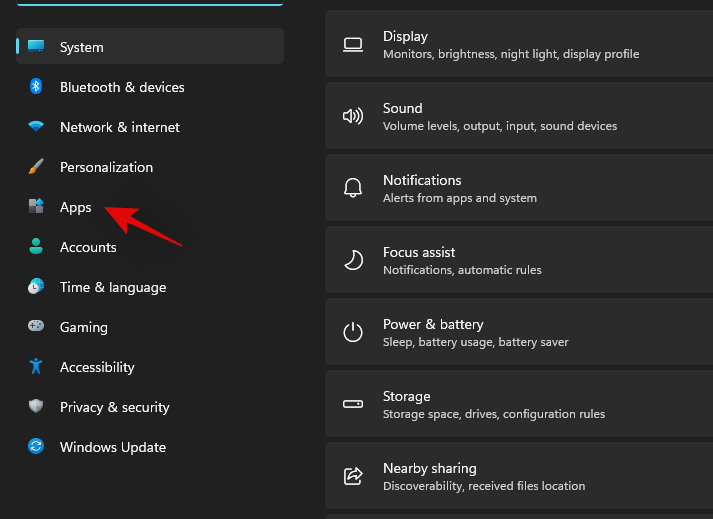
Windows + iキーボードを押して、設定アプリを開きます。次に、左側のサイドバーにある[アプリ]をクリックします。
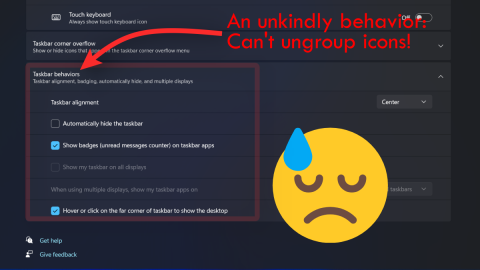
右側の[デフォルトのアプリ]をクリックして選択します。
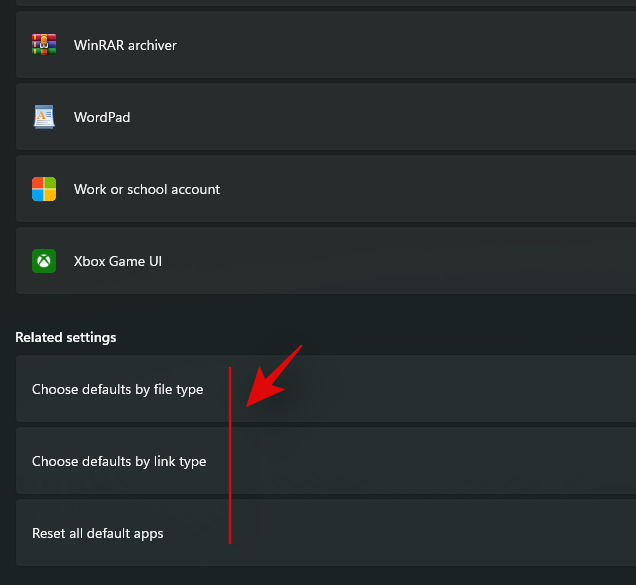
次に、削除するアプリをデフォルトのアプリとして選択し、クリックします。デフォルトのアプリをファイルタイプで変更する場合は、以下に示すように、下部にある[ファイルタイプでデフォルトを選択]をクリックします。
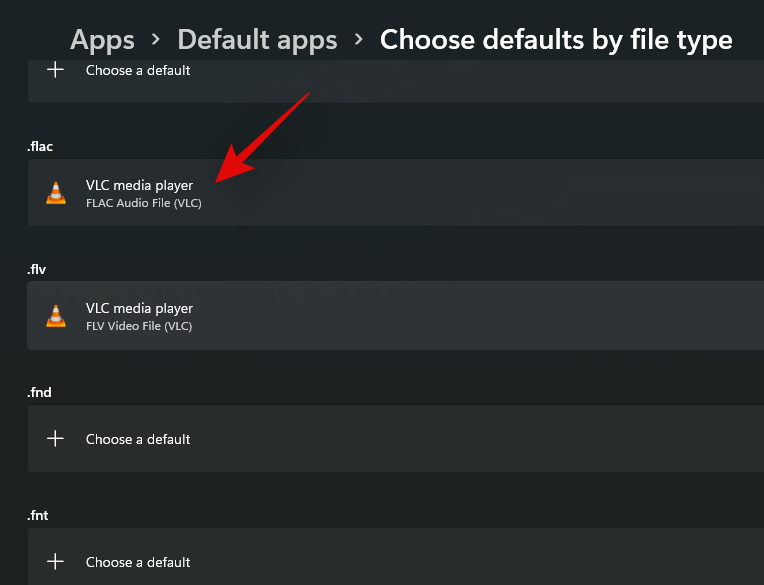
次に、目的のファイルタイプ/拡張子をクリックして、選択したアプリを選択します。
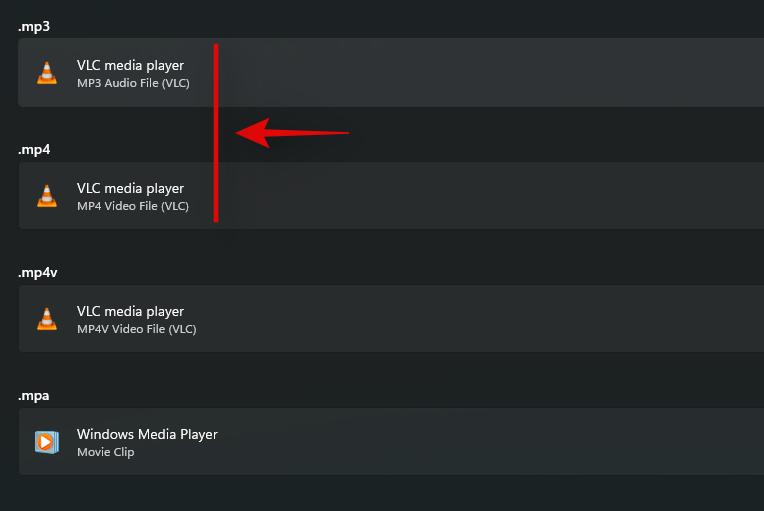
必要なすべてのファイルタイプ/拡張子について、上記の手順を繰り返します。
設定アプリを閉じて、システムを再起動してください。
以上です!システムが再起動したら、デフォルトのアプリを変更する必要があります。これで、以下のガイドを使用して、システムの[設定]から必要なアプリをアンインストールできます。
ステップ2:設定からアプリをアンインストールします
Windows + iキーボードを押して、左側から[アプリ]を選択します。

次に、右側の[アプリと機能]をクリックします。
リストをスクロールして、アンインストールするアプリを見つけます。見つかったら、右側の「3ドット」メニューアイコンをクリックします。
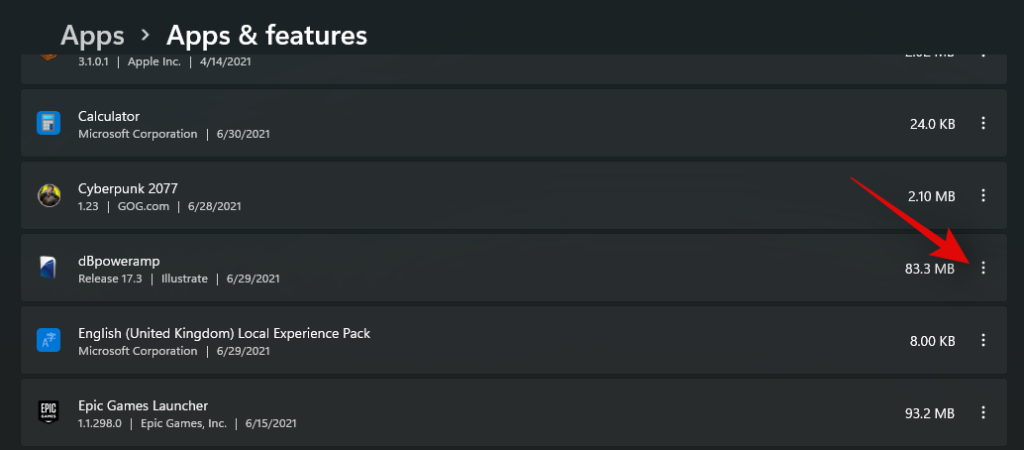
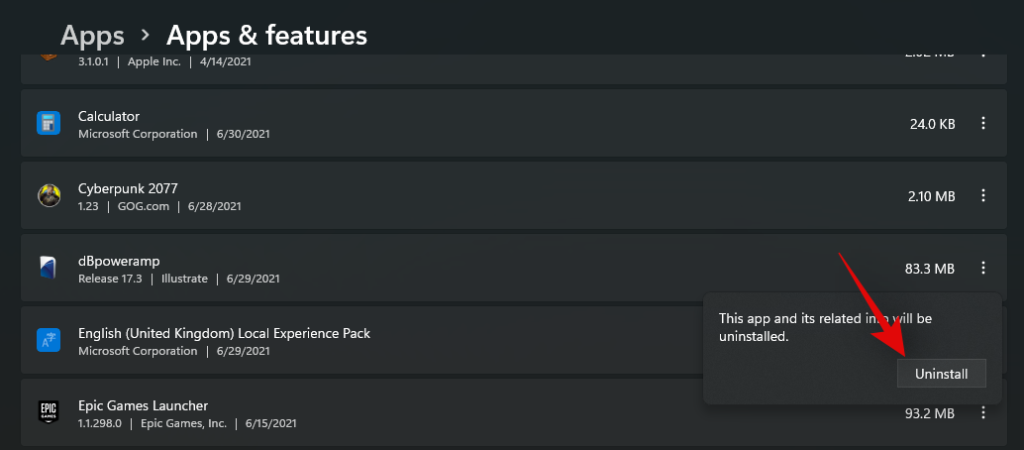
[アンインストール]をクリックして選択します。
次に、画面の指示に従ってアプリをアンインストールします。プリインストールされたアプリまたはWindowsStoreアプリをアンインストールする場合は、バックグラウンドで自動的にアンインストールされます。ただし、それがWindowsによって検出されたプログラムである場合、プログラムに応じて、Windowsはバックグラウンドでアンインストールするか、「uninstall.exe」または「setup.msi」を起動して、自分でアンインストールできるようにします。必要な設定で。ログファイル、ユーザーデータ、データの保存、写真などの設定に遭遇したときに、一部のデータを保持/保存できる場合があります。
または、プログラムに関連するすべてのものをシステムから完全に削除することもできます。
以上です!選択したアプリがシステムからアンインストールされます。重いプログラムをアンインストールした場合、特にプログラムが30 GB以上のサイズを超えた場合は、このガイドを使用してキャッシュをクリアすることをお勧めします。
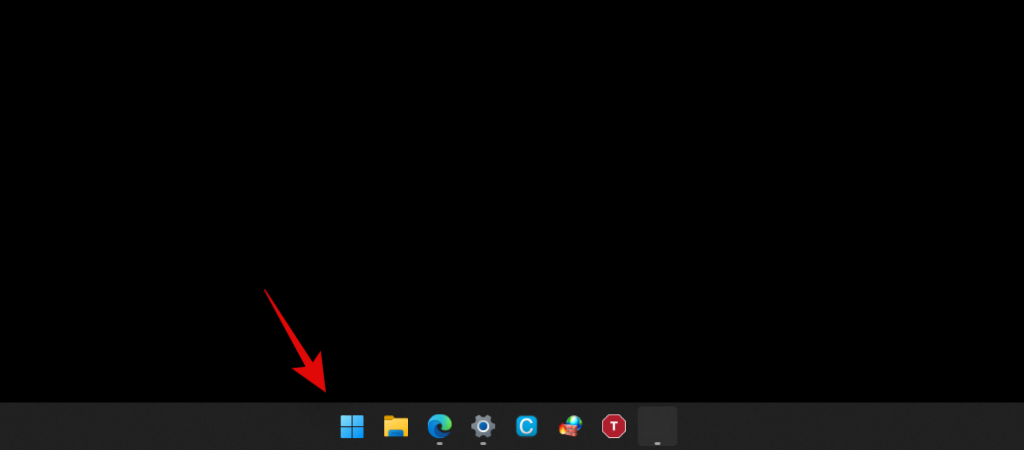
キーボードの「Windows」ボタンを押して、「スタート」メニューを表示します。または、「タスクバー」のアイコンをクリックすることもできます。
アンインストールするアプリを見つけて右クリックします。
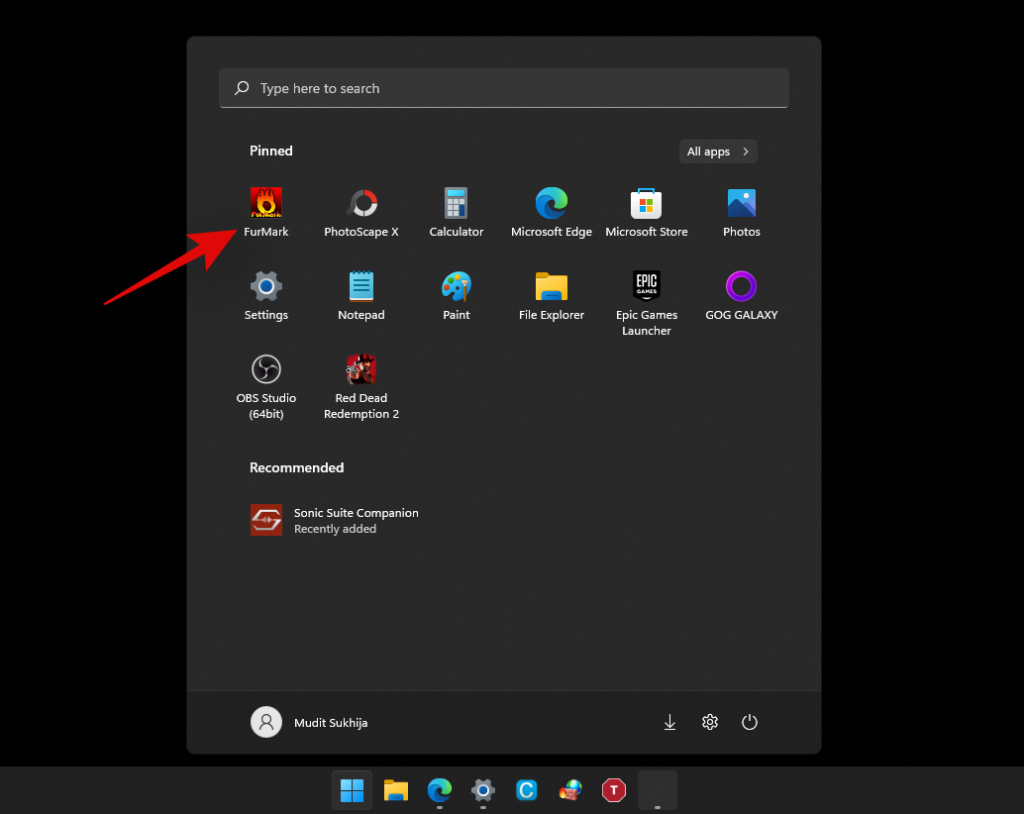
次に、[アンインストール]をクリックします。必要に応じて、画面の指示に従ってアンインストールプロセスを完了します。
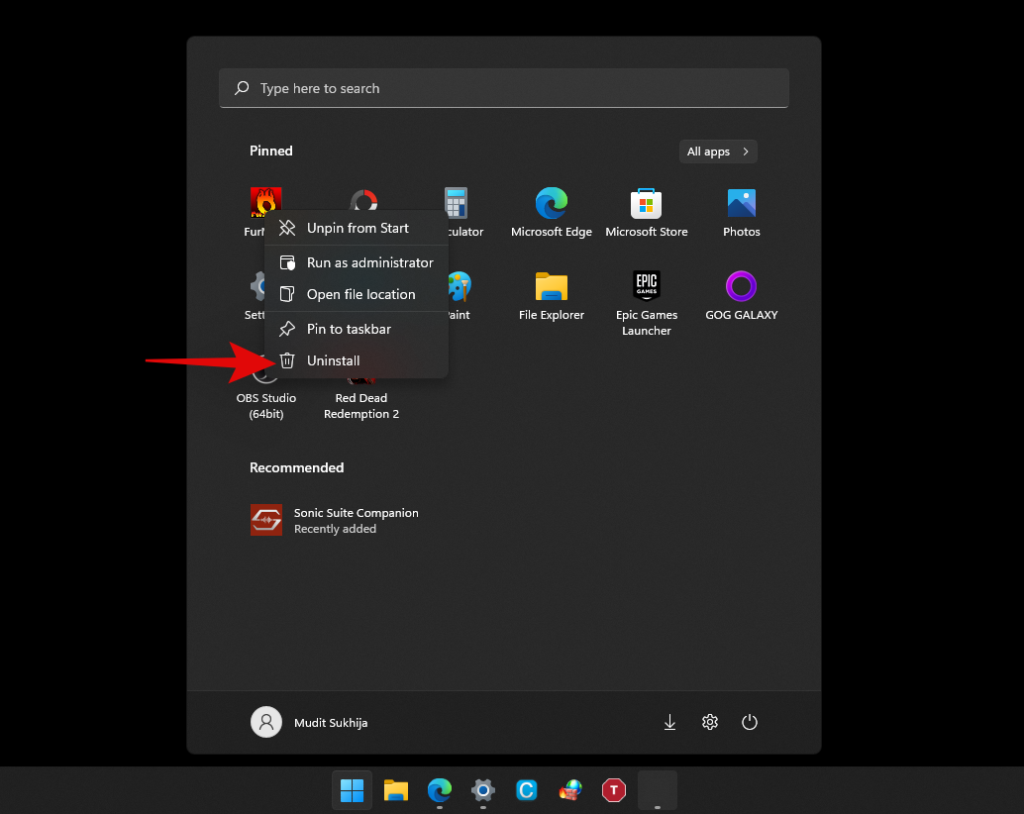
以上です!これで、[スタート]メニューからシステムからアプリがアンインストールされました。
方法#03:アンインストール '.exe'ファイルを使用する
理想的には、プログラムのアンインストール実行可能ファイルを手動で起動する必要はありませんが、古いプログラムのように、システムにアンインストールオプションが設定のどこにも表示されないプログラムがインストールされている場合があります。このような場合は、以下のガイドを使用して、アンインストールファイルを自分で起動できます。
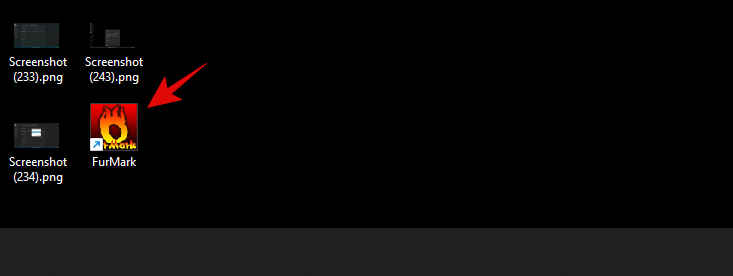
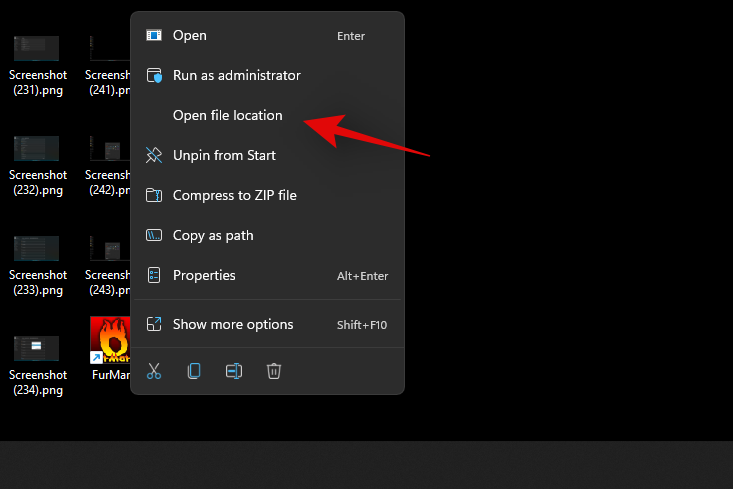
プログラムの.exeファイル、またはプログラムの起動に通常使用するショートカットを見つけて、右クリックします。
[ファイルの場所を開く]を選択します。このオプションが表示されない場合は、プロパティを選択してください。以下に示すように、[全般]タブに[ファイルの場所を開く]オプションが表示されます。
これで、プログラムのインストールディレクトリに移動します。次の名前または同様の名前の.exeファイルを探します。
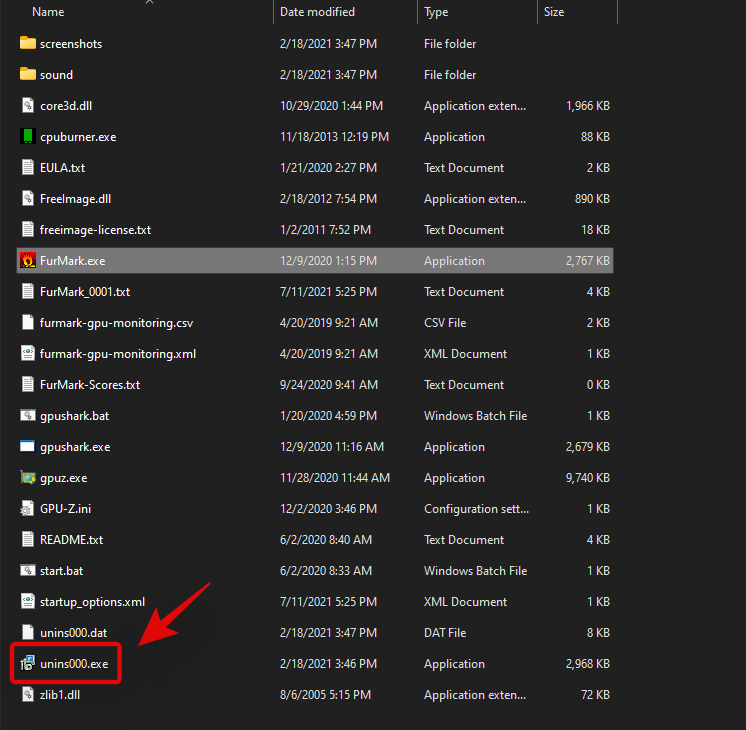
もっと。アンインストールプログラム/セットアップも同様の名前になります。起動したら、画面の指示に従ってシステムからアンインストールできます。
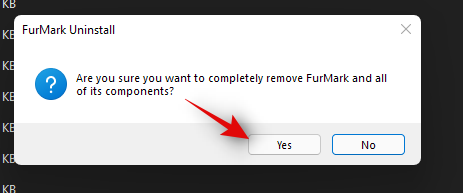
場合によっては、アンインストールと一緒にプログラムを修復、再インストール、または変更するオプションが表示されることもあります。目的のオプションを選択して、意図したとおりにセットアップを進めることができます。
方法#04:コントロールパネルの使用
コントロールパネルからプログラムやアプリを簡単に削除することもできます。インストールされているすべてのアプリがここに表示されるわけではないため、コントロールパネルを使用してレガシープログラムと最新プログラムのみをアンインストールすることをお勧めします。以下のガイドに従って、コントロールパネルからプログラムをアンインストールしてください。
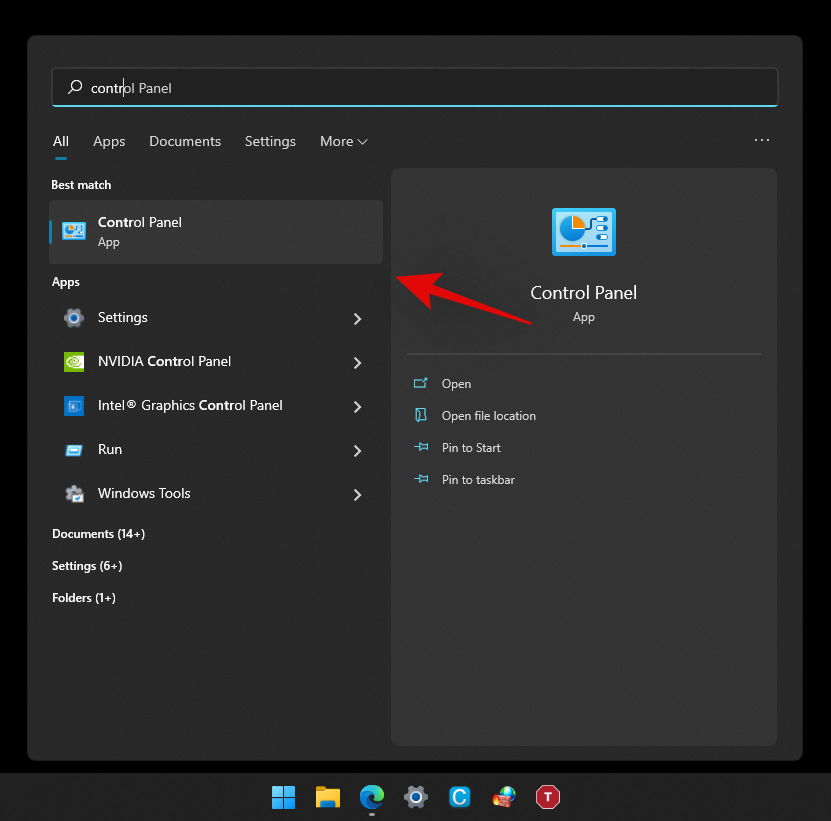
Windows + sキーボードを押して、「コントロールパネル」と入力します。アプリが検索結果に表示されたら、クリックしてアプリを起動します。
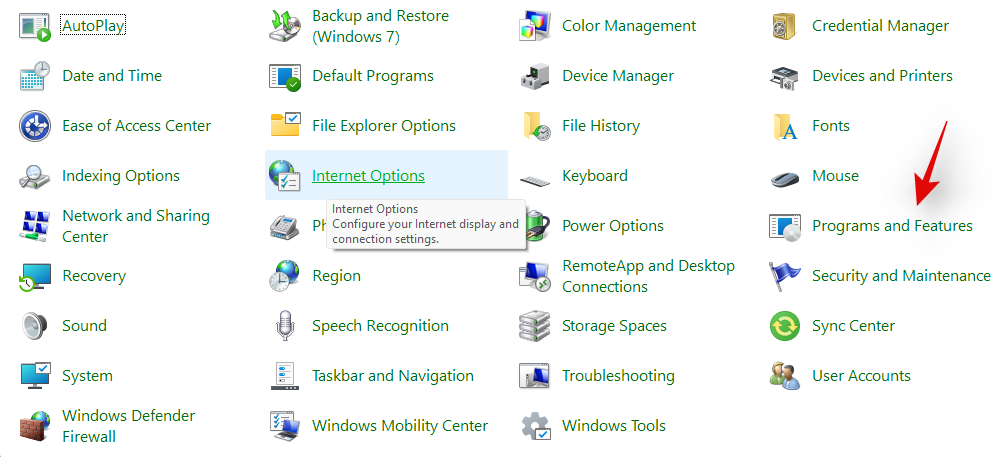
次に、[プログラムと機能]をクリックします。
これで、現在システムにインストールされているすべてのプログラムのリストが表示されます。アンインストールするプログラムを見つけてクリックします。
次に、上部にある[アンインストール]を選択します。

画面の指示に従って、インストールプロセスを完了します。場合によっては、これは自動化されたプロセスになりますが、他の場合には、既存のインストールを修復するか、保持するデータと削除するデータを選択するオプションが表示される場合があります。
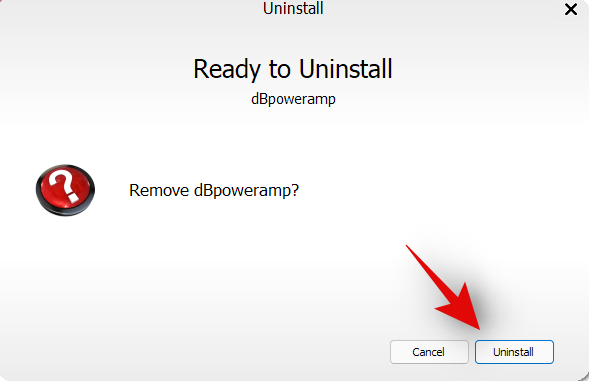
選択が完了すると、アンインストールプロセスが実行され、プロセスが完了したらプログラムをシステムから削除する必要があります。
方法#05:PowerShellを使用する
Windows 11の昇格されたPowerShellを介してアプリをアンインストールすることもできます。アンインストールコマンドは非常に簡単ですが、関連するアプリまたはプログラムのパッケージ名を取得することは簡単ではありません。したがって、以下のガイドでは、パッケージ名をお持ちの場合にPowerShellを介してアプリをアンインストールする方法を説明しています。
ただし、完全なパッケージ名を取得する方法がわからない場合は、同じ方法について詳しく説明している以下のシステムアプリガイドに従うことをお勧めします。始めましょう。
Windows + sキーボードを押して、「PowerShell」と入力します。検索結果に表示されたら、[管理者として実行]をクリックします。
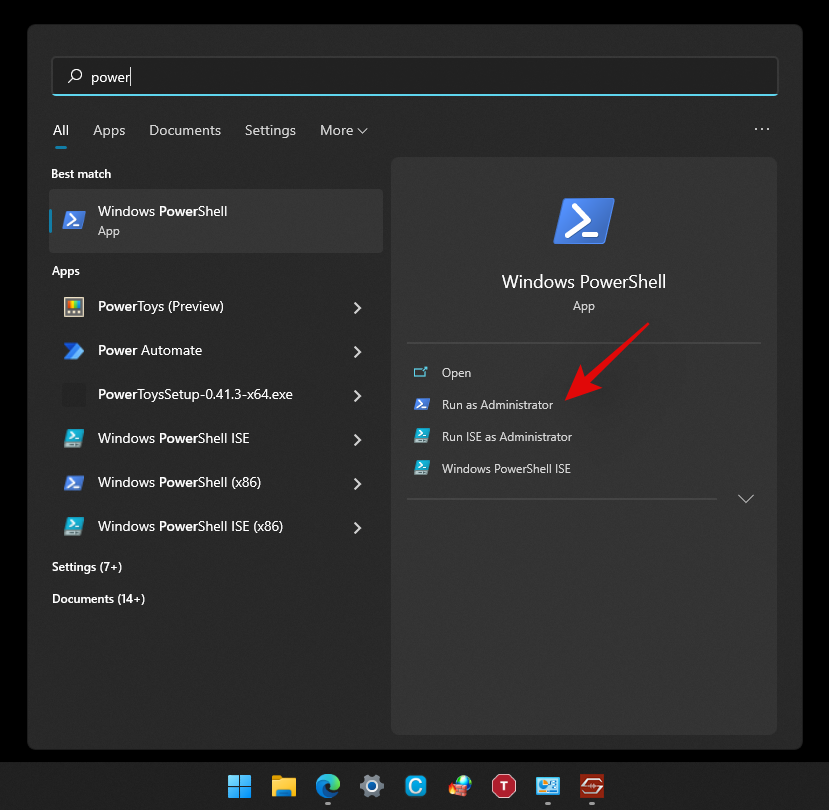
デスクトップにPowerShellウィンドウが表示されたら、次のコマンドを入力して、キーボードの[Enter]キーを押します。'[Name]'を関連するアプリの完全なパッケージ名に置き換えてください。
Remove-AppxPackage [Name]

以上です!これで、Powershellはその魔法を実行し、関連するアプリをシステムからアンインストールします。
方法#06:CMDを使用する
Windows 11のコマンドプロンプトを使用して、システムからアプリをアンインストールすることもできます。以下のガイドに従って開始してください。
Windows + sキーボードを押して、「CMD」を検索します。検索結果に表示されたら、[管理者として実行]をクリックします。
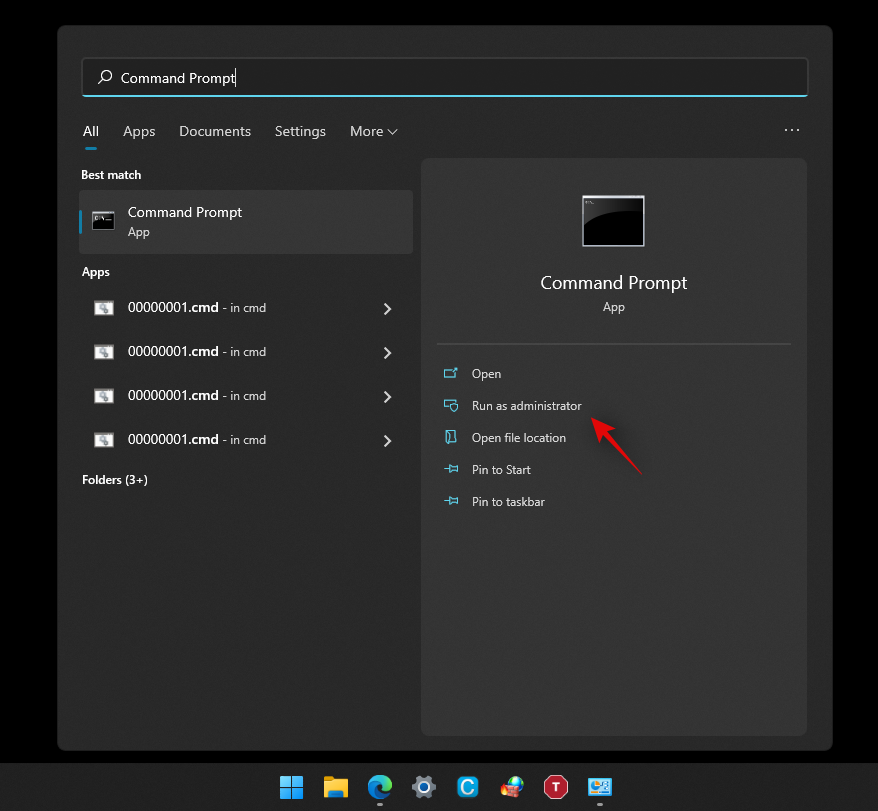
CMDが起動したら、次のコマンドを入力して、キーボードの「Enter」を押します。
wmic

次のコマンドを入力して、システムにインストールされているすべてのアプリとプログラムのリストを取得します。
product get name

すべてのプログラムのリストを取得したら、このリストからアンインストールするプログラムを見つけます。見つかったら、便利な場所にその名前全体をメモします。
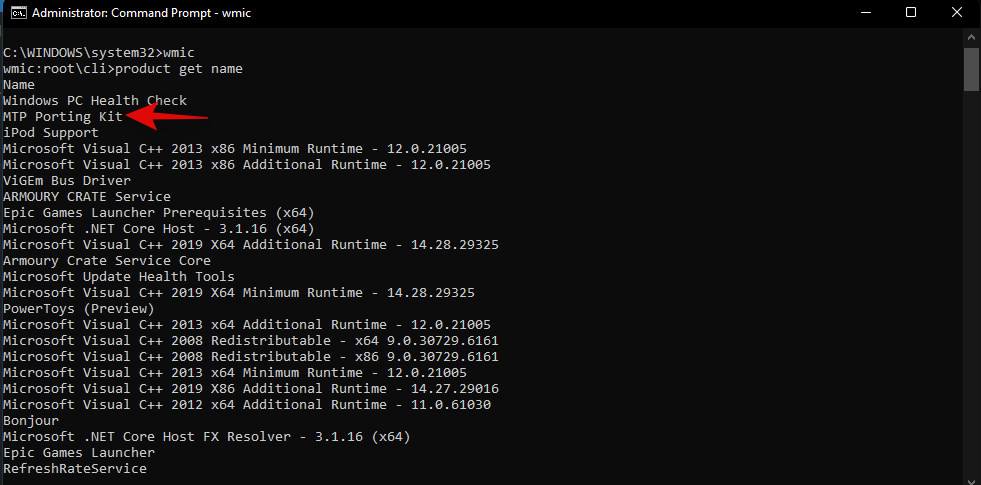
次のコマンドを入力し、AppNameを前に書き留めたアプリの名前に置き換えます。
product where name="AppName" call uninstall/nointeractive
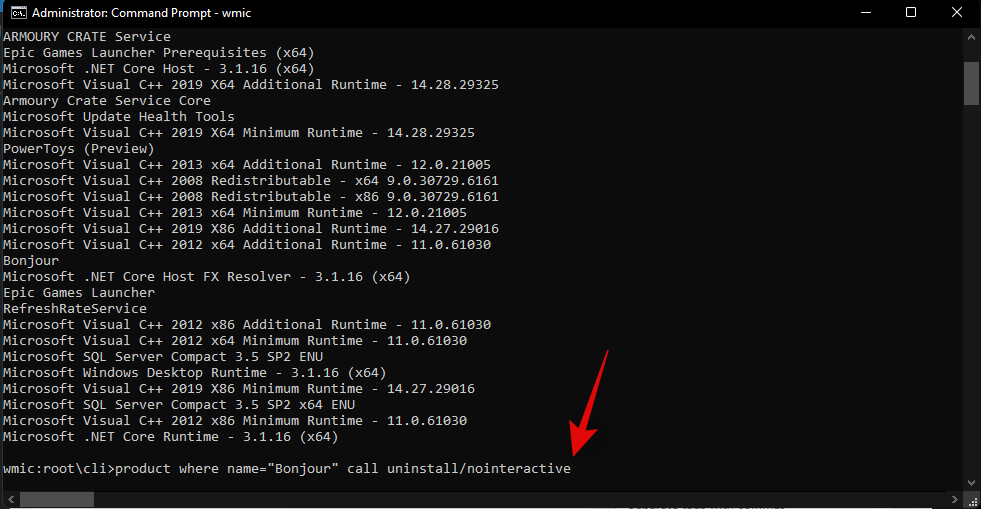
注:この構文に必要な引用符は、コマンドから削除しないでください。
キーボードの「Enter」を押してコマンドを実行します。
Command Promptはバックグラウンドで必要なプロセスを実行します。プロセスが完了すると、以下に示すような確認が表示されます。
以上です!これで、コマンドプロンプトを介してシステムからアプリがアンインストールされました。
方法#07:setup.msiを使用する
プログラムに.exeではなく.msi拡張子が付いたセットアップファイルが付属している場合は、同じファイルを使用してプログラムをアンインストールすることもできます。.msiファイルについてもう少し詳しく調べて、それらの機能を理解しやすくしましょう。
.msiファイルとは何ですか?
従来、インストーラーには.exe拡張子が付いています。これらは、セットアップファイルがバンドルされたプログラムをシステムにインストールするように設計されたプログラムです。MSIファイルは、複数のインストーラーを同じファイルにバンドルできるようにすることで、これをさらに一歩進めます。
これにより、バンドルされたインストーラーのおかげで、MSIファイルがさまざまな機能を実行できるようになります。これには、更新インストーラー、ソフトウェアインストーラー、プログラム修復プログラム、プログラム修飾子、アンインストーラーなどが含まれます。したがって、プログラムに.msiセットアップファイルが付属している場合は、以下のガイドを使用して同じファイルを使用し、システムからプログラムをアンインストールできます。
注:古い.msiファイルが、同じソフトウェアの新しいインストールで機能することはめったにありません。プログラムを以前のバージョンにダウングレードしようとしている場合に備えて、このことに注意してください。
.msiファイルを介してアンインストールします
ローカルストレージで.msiセットアップファイルを見つけ、ダブルクリックしてアプリを起動します。
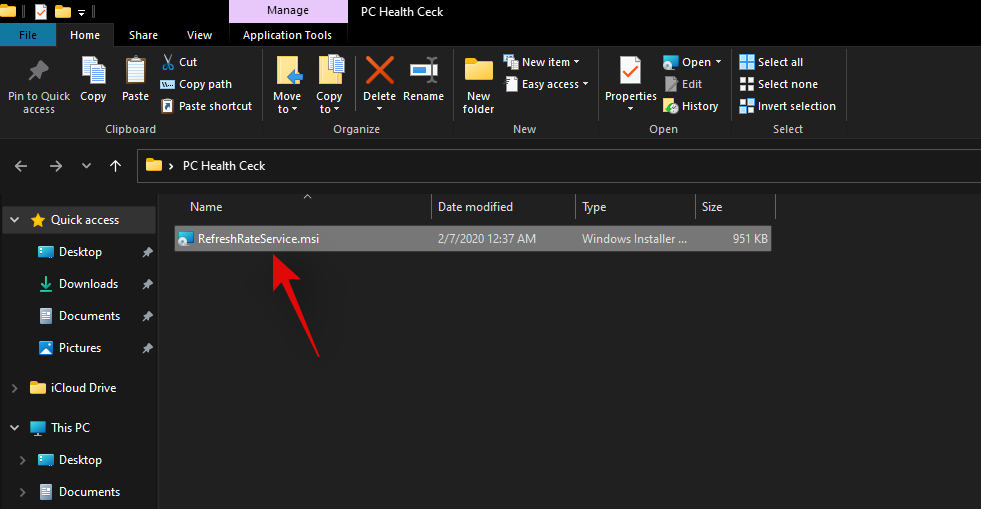
アクションのコースの1つを選択するように求められるまで、画面の指示に従います。
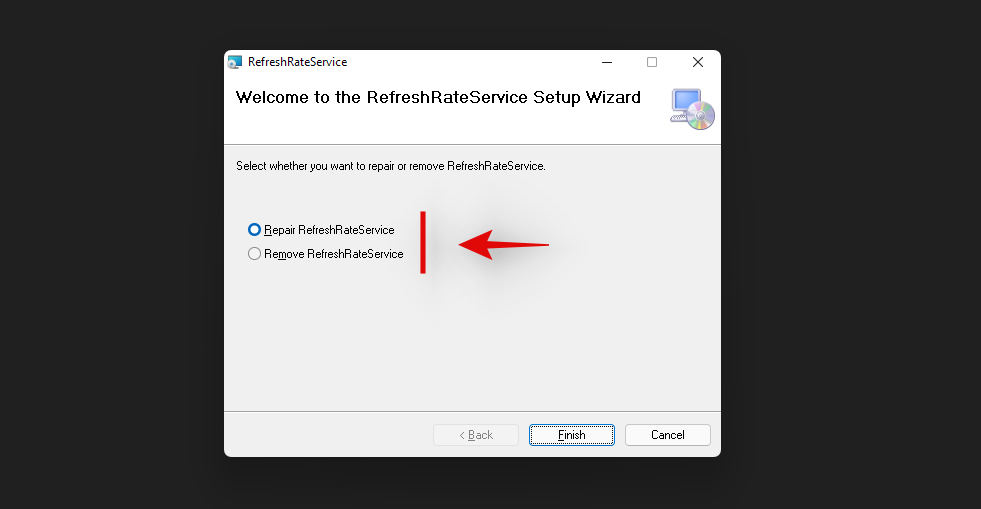
目的のオプションを選択し、画面の指示に進んでアンインストールプロセスを完了します。
以上です!選択したプログラムは、.msiセットアップファイルを介してシステムから削除されます。
方法#08:サードパーティのアンインストーラーを使用する
市場にはさまざまなサードパーティのアンインストーラーもあります。これらのアプリは、システム上のすべてのシステムおよびサードパーティのアプリを識別するのに役立ちます。これらのアプリは、クリックするだけでPCからアンインストールできます。これらのプログラムのほとんどでは、ソフトウェアのプレミアムモデルを選択した後、システムアプリを削除できます。
無料版を使用する場合、ほとんどの場合、アンインストールの回数は一定に制限されます。これは冗長に聞こえるかもしれませんが、これらのユーティリティは、シングルクリックで複数のプログラムをアンインストールする必要がある専門家や技術者にとって非常に便利です。これらのアンインストーラーのほとんどは一括アンインストールをサポートしており、オフィス環境に複数のシステムをセットアップする場合に非常に便利です。以下に、最も人気のある2つのサードパーティアンインストーラーをリンクしました。Windows11からプログラムをアンインストールするための探求に役立つことを願っています。
Windows11でシステムアプリをアンインストールする方法[2つの方法]
昇格されたPowerShellを介して、またはサードパーティのPowerShellスクリプトを使用して、Windows11のシステムアプリをアンインストールできます。PowerShellメソッドを使用することをお勧めします。より複雑に見えるかもしれませんが、システムで昇格された特権を持つサードパーティのスクリプトを実行する必要はありません。
ただし、それでも自動スクリプトを使用する場合は、スクリプトが実行されたら、実行ポリシーを通常に戻すようにしてください。実行ポリシーを変更しないままにしておくと、悪意のあるユーザーがシステム上でPowerShellスクリプトを簡単に実行できる可能性があるため、これはシステムのセキュリティにとって最も重要です。開始するには、現在のニーズと要件に最も適した以下の方法の1つを使用してください。
方法#01:Powershellを使用する
プログラムのPowerShellアンインストールプロセスには2つのプロセスがあります。まず、関連するアプリの完全なパッケージ名を取得し、次にPowerShellを使用して関連するアプリをアンインストールします。アプリがPowerShellリストに表示されない場合は、以下のサードパーティスクリプトを使用して、関連するアプリをシステムから削除する必要があります。始めましょう。
ステップ1:ソースの完全なパッケージ名
Windows + sキーボードを押して、「PowerShell」を検索します。検索結果に表示されたら、[管理者として実行]をクリックします。

PowerShellが起動したら、以下のコマンドを入力して、画面で[Enter]キーを押します。
get-appxpackage
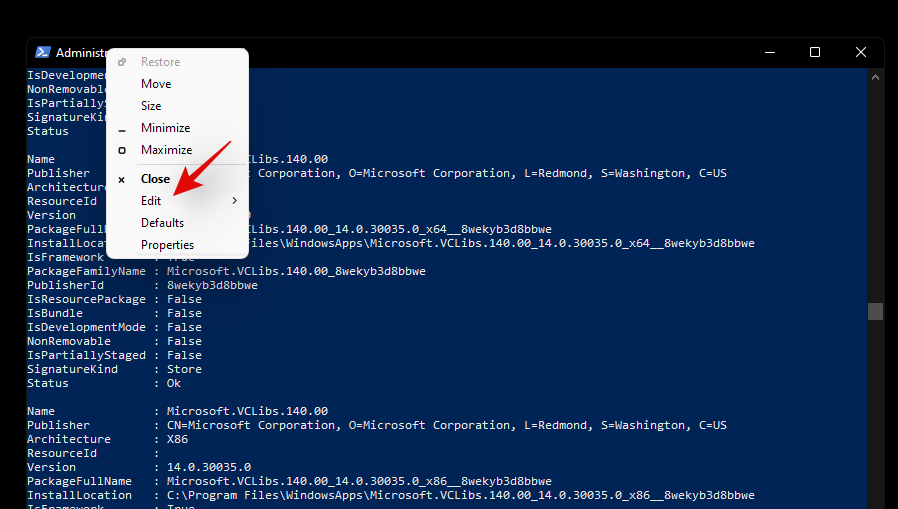
PowerShellは、組み込みのOEMアプリやWindowsアプリを含む、システムにインストールされているすべてのアプリのリストを生成して表示します。リストをスクロールしてアプリを見つけますが、これが面倒だと思われる場合は、上部のタイトルバーを右クリックすることから始めます。
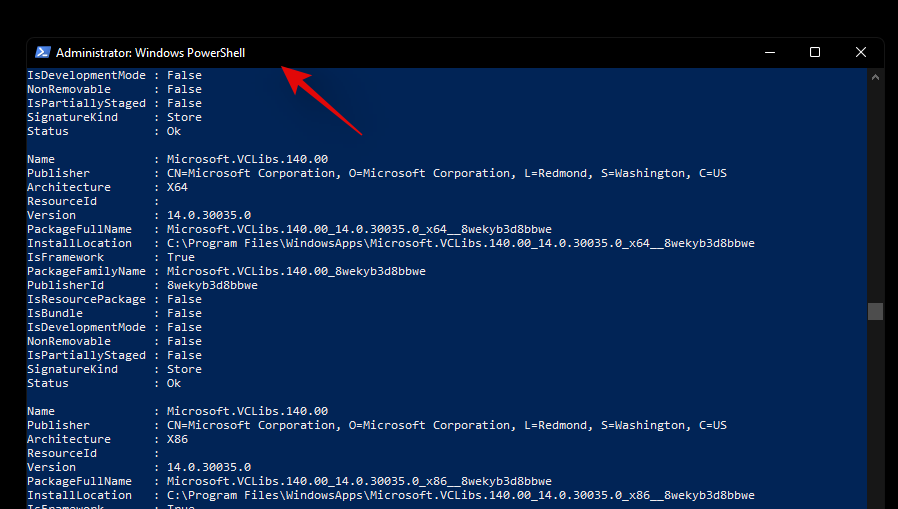
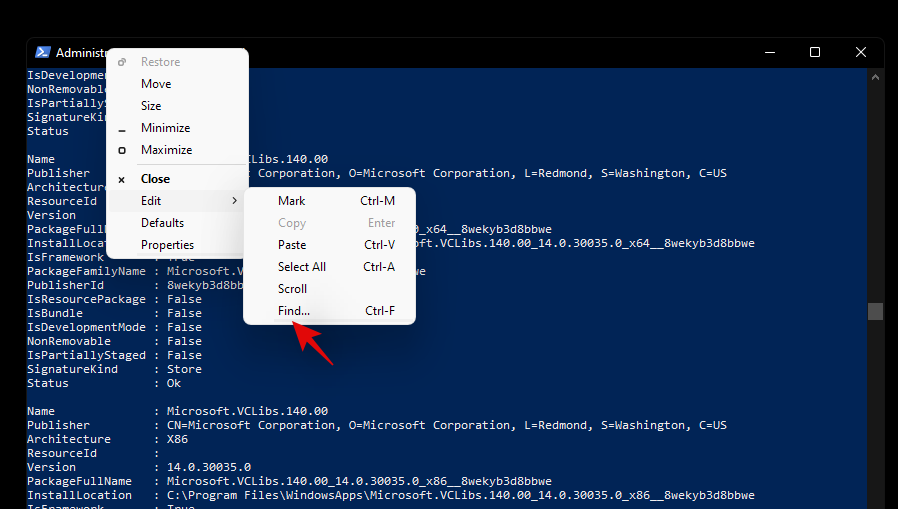
次に、[編集]を選択します。
「検索」をクリックします。
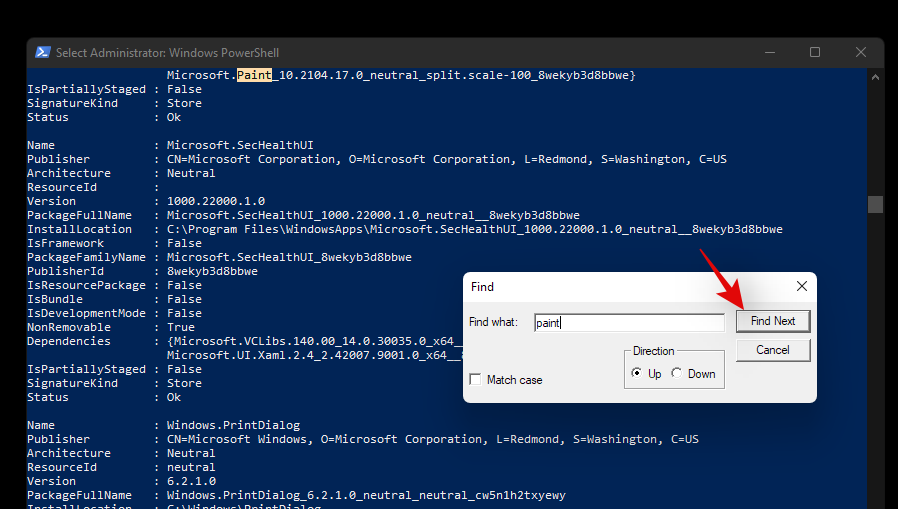
次に、アプリの一般名を検索すると、「検索」機能により、リスト内のアプリに自動的に移動します。
以下に示すように、関連するアプリの「FullPackageName」を書き留めます。
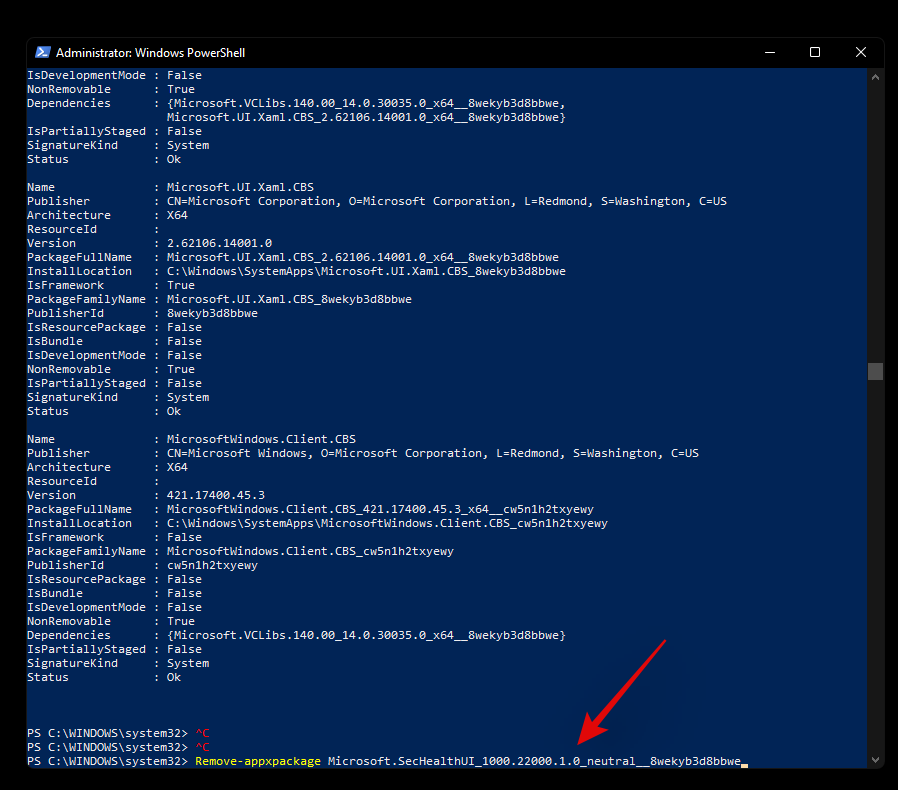
以上です!これで、システム上の関連するアプリの完全なパッケージ名が提供されます。これで、以下のガイドを使用して、システムからアンインストールできます。
ステップ2:PowerShellを介してアプリをアンインストールする
上記のガイドを使用して、昇格されたPowerShellを開きます。画面上ですでに開いている場合は、次のコマンドを入力することから始めます。'[PackageName]'を、上記で入手したアプリの完全なパッケージ名に置き換えてください。
Remove-Appxpackage [PackageName]

完了したら、キーボードの「Enter」を押します。これでPowerShellが機能し、アプリはすぐにシステムからインストールされます。
PowerShellを使用してアプリを削除できませんか?直し方
PowerShellを使用してアプリを削除できない場合は、次のチェックを行って問題を解決することをお勧めします。
You should be able to solve your issue by crosschecking the above-stated checks. However, if you are still unable to uninstall the concerned app, then you can use the third-party script below.
Method #02: Using a third party script
You can also use a third-party script to remove system apps from your Windows 11 system. These scripts have been quite popular lately and have been the go-to choice for many users when setting up fresh installations of Windows. Use the guide below to get started.
Note: While this is a Windows 10 script, it has been verified to remove system apps on Windows 11 as well. However, we recommend you keep checking the download page for updates that should be better compatible with Windows 11. We recommend using the script to only remove system apps and nothing else offered by the script. Other features could potentially break Windows 11 until a compatible script for the same is released in the future.
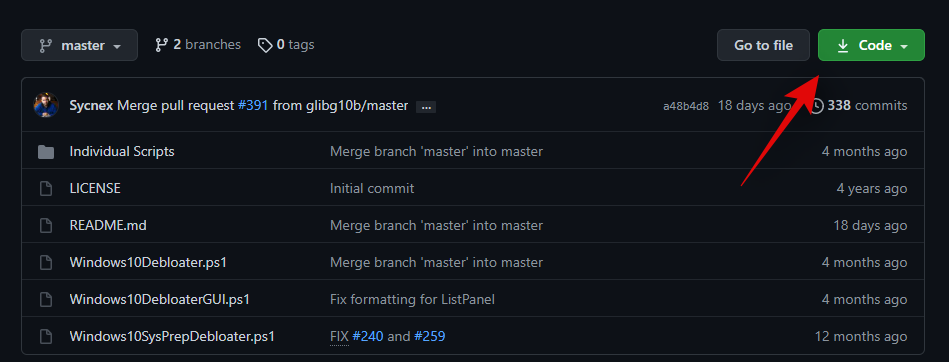
Visit the link above and you will be taken to the GitHub page for the script. Click on ‘Code’ in the top right corner.
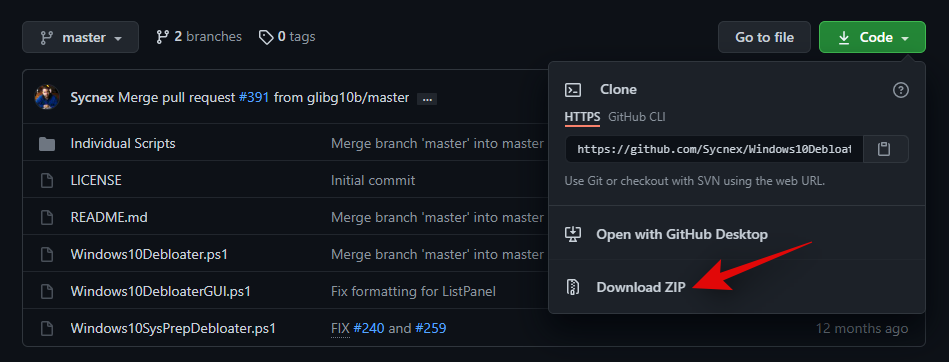
Now click and select ‘Download ZIP’.
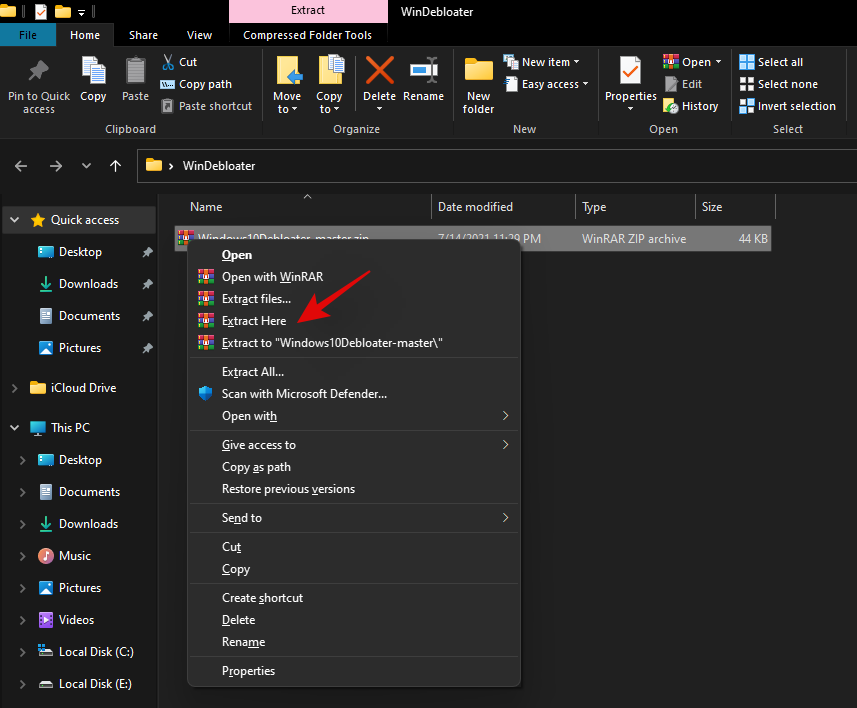
A Zip file will now be downloaded to your local storage. Extract the files to a convenient location.
Once extracted, open the folder and click on ”File’ in the top left corner.
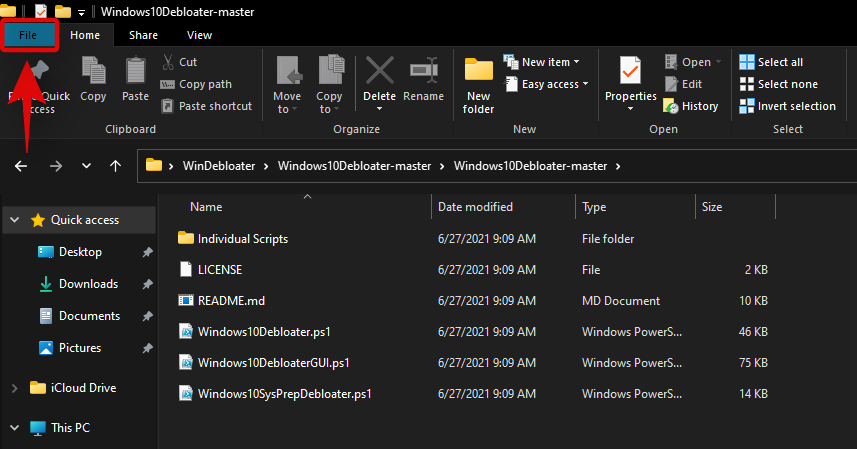
Hover over ‘Open Windows PowerShell’ and select ‘Open Windows PowerShell as administrator’.
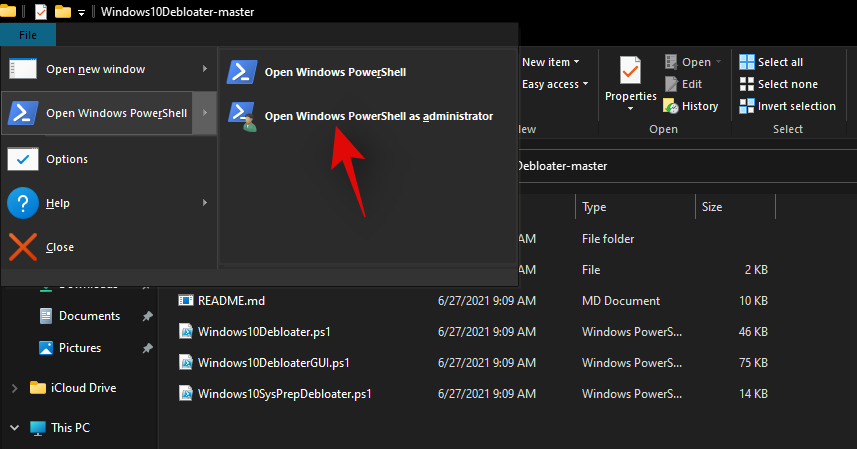
An elevated PowerShell window will now launch on your system. Start by executing the following command given below.
Set-ExecutionPolicy Unrestricted -Force

This will set your script execution policy as unrestricted which will allow us to use the script on your system. Once executed, enter the following command in the window and press ‘Enter’ on your keyboard once you are done.
.\Windows10DebloaterGUI.ps1

This will execute the debloat script and you should now get a graphical interface for it on your screen. Click on ‘Customize Blacklist’ at the top.
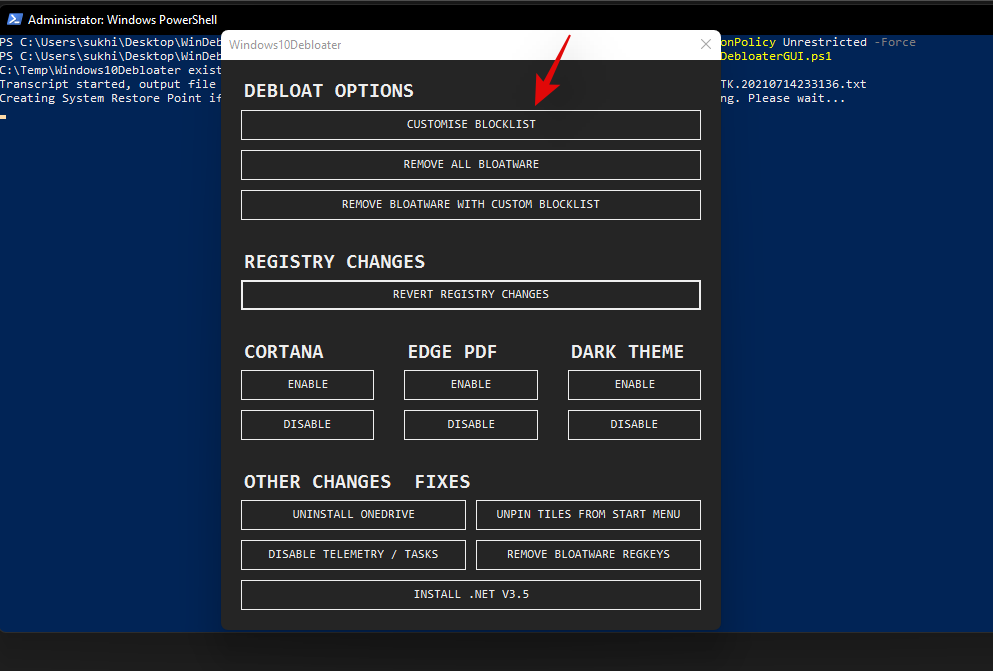
You will now get a list of all the apps installed on your system. Check the box for the apps you wish to uninstall and uncheck the box for the apps you wish to keep on your device. Ensure that you go through the entire list to remove any default selections made by the script for the programs that you wish to keep on your device.
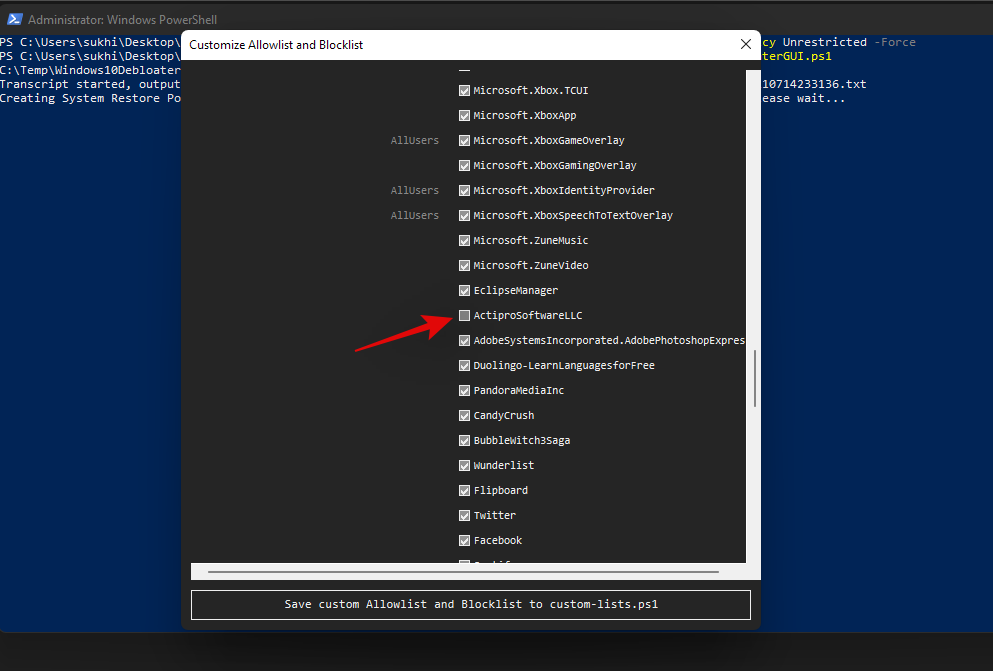
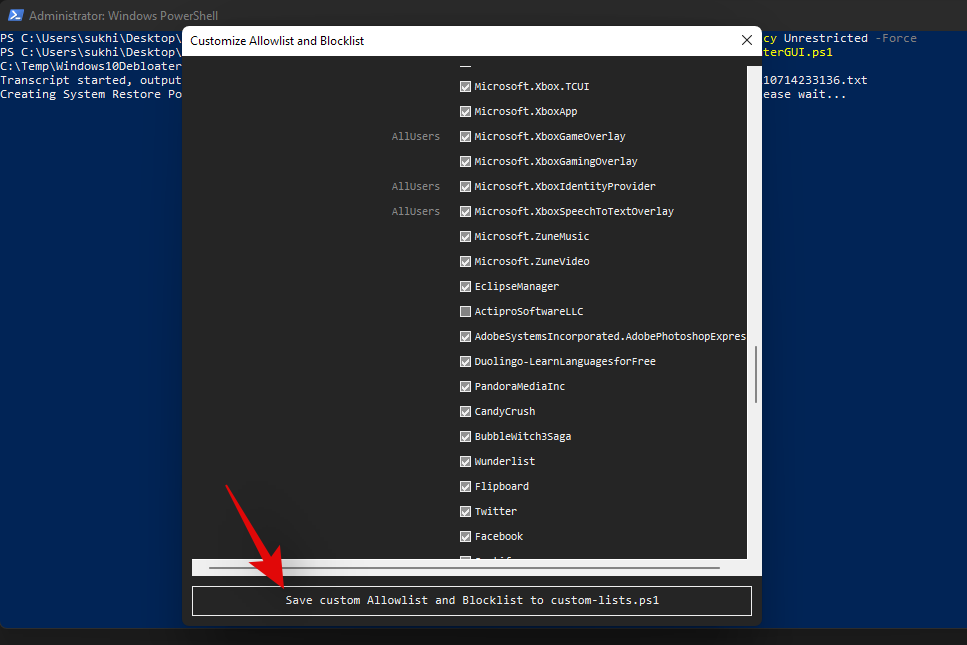
Once you have edited your list, simply click on ‘Save custom Whitelist and Blacklist to custom-lists.ps1’ at the top. You can now close this app selection window.
Now click on ‘Remove Bloatware with Customized Blacklist’. Keep an eye on the PowerShell window on the background once the command executes.
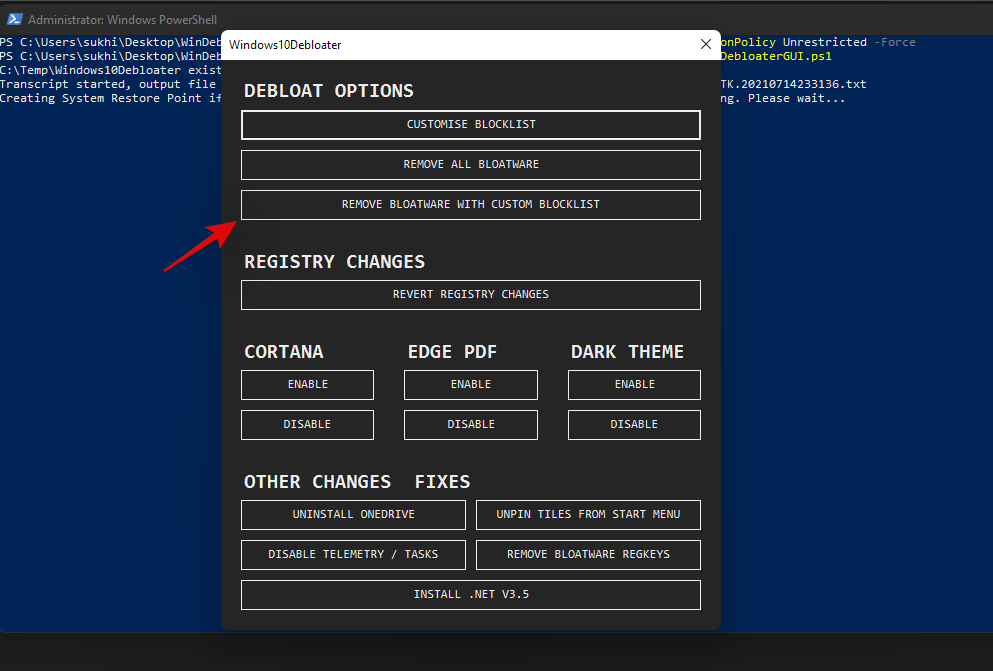
Once all programs have been removed, you will get a confirmation for the same in the PowerShell window in the background. Close the graphical interface by clicking on the ‘X’ in the top right corner.
Now go back to your PowerShell window and execute the following command.
Set-ExecutionPolicy Restricted -Force

This will revert changes to your execution policy and revert the changes we made earlier. Doing this is quite important to maintain proper security on your Windows system.
And that’s it! You will now have uninstalled system apps from your system via a third-party PowerShell script.
Can’t uninstall apps on Windows 11? How to fix
There could be a few reasons why you are unable to uninstall apps on your system. Here are a few workarounds that should help you uninstall persistent apps from your system easily.
Method #01: Close instance in task manager and try again
Chances are that the app has an instance or a process open in the background which is preventing it from being uninstalled. In such cases, you can try finding processes related to the app and kill them on your own. Once the processes have been killed, you can then try to uninstall the app again. Follow the guide below to find and kill the process.
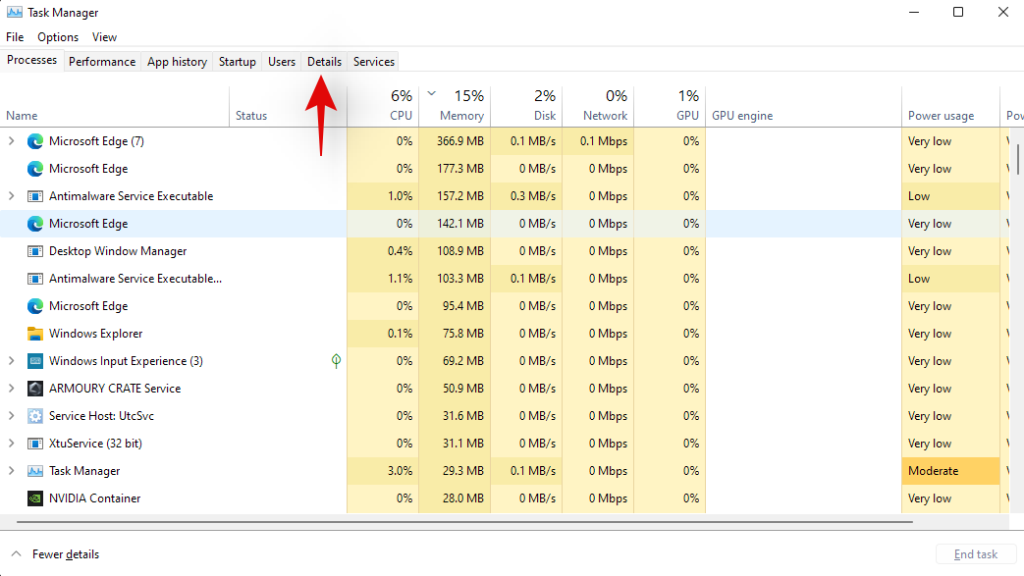
Press Ctrl + Shift + Esc on your keyboard to open the ‘Task Manager’. Switch to the ‘Details’ tab by clicking on it.
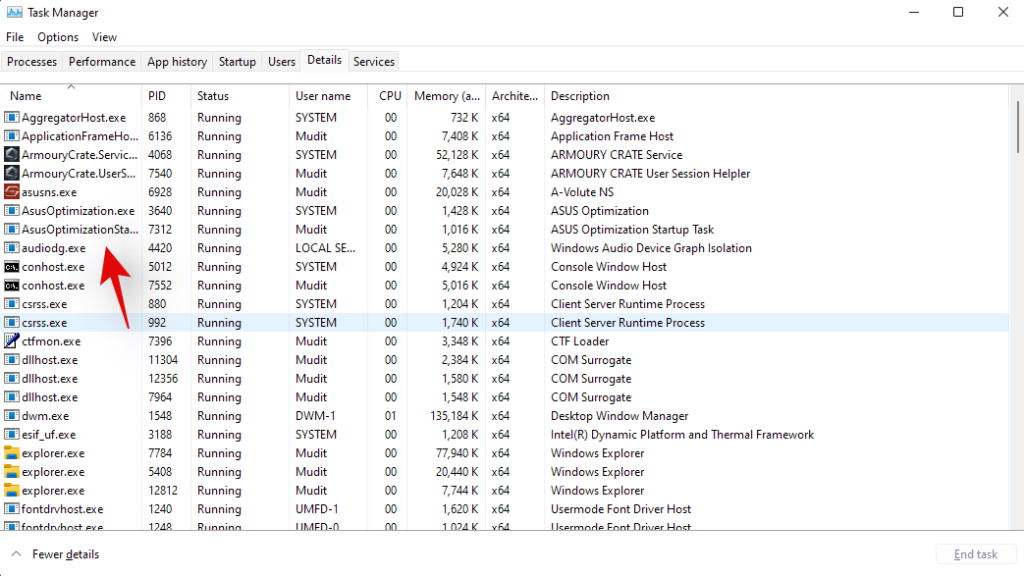
Now look for a process in the list for the concerned app. In our case, we are looking to uninstall ‘AsusOptimization’, hence we will look for a PowerToys process. Once found, click and select the process.
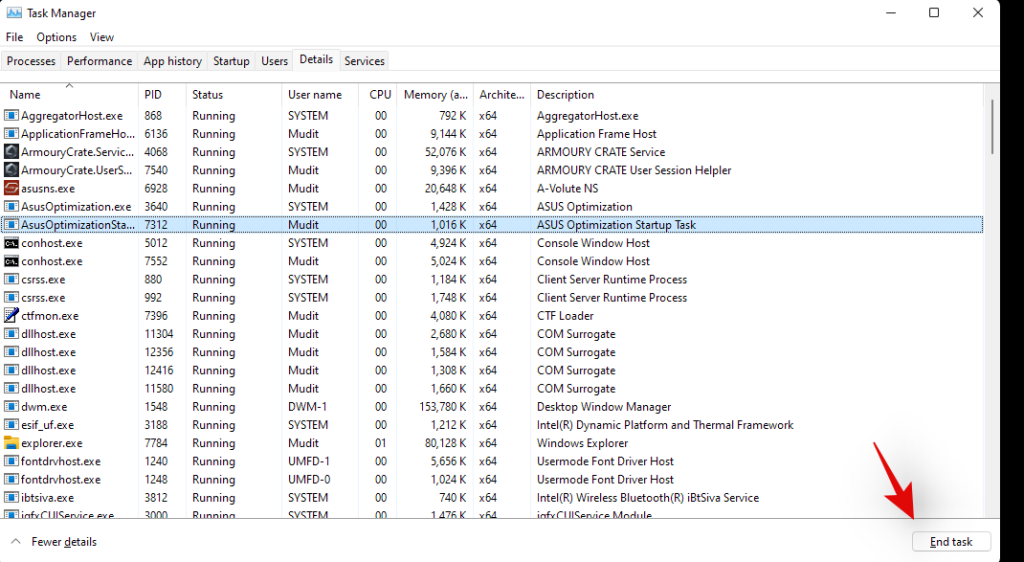
Hit delete on your keyboard or click on ‘End Task’.
Confirm your choice by selecting ‘End Process’.
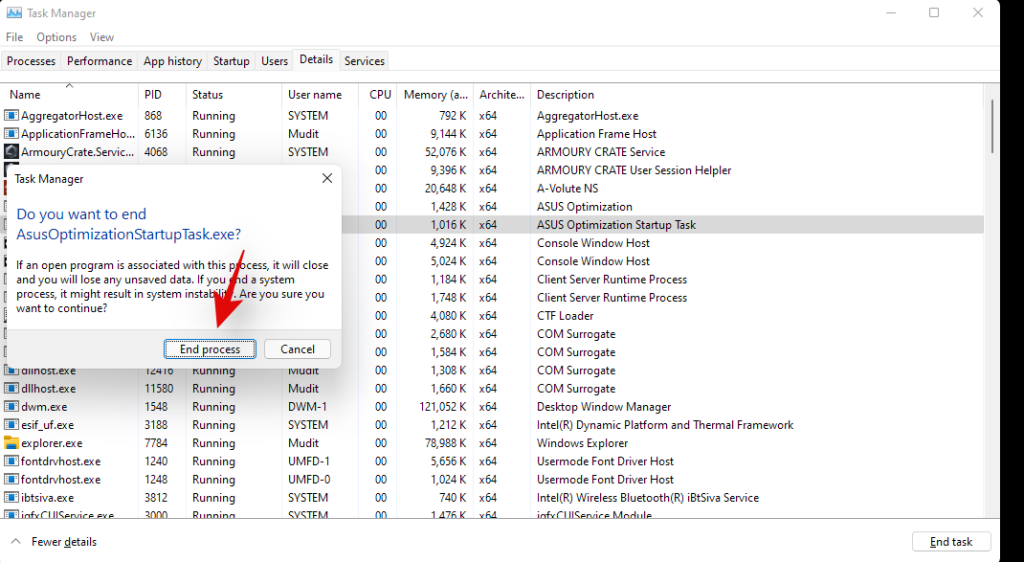
And that’s it! the process should now be killed and you can now try uninstalling the concerned app again.
Method #02: Uninstall in Safe mode
Another way to ensure that no third-party apps are launched or used in the background is to launch your system in safe mode and then try to uninstall your concerned app. You can use this comprehensive guide by us to enter safe mode on Windows 11.
Once in safe mode, follow the guide below to get the installer service back up and running on your system. Once the service is running in the background, you can use either of the methods above to uninstall the concerned app from your system.
Press Windows key + S key to open Windows Search and type in ‘cmd’. Click on ‘Run as administrator’ when the command prompt shows in your search results.
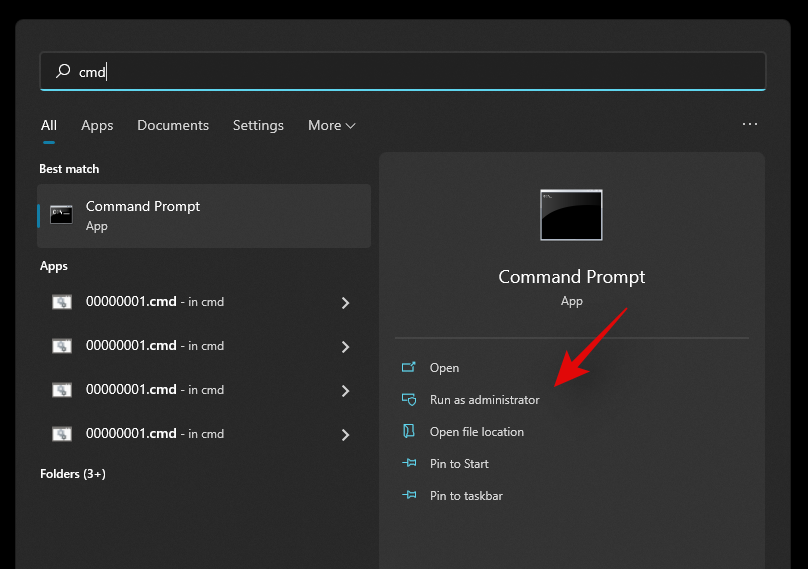
Enter the following commands in the command prompt one by one and hit Enter on your keyboard to execute each one of them.
REG ADD "HKLM\SYSTEM\CurrentControlSet\Control\SafeBoot\Minimal\MSIServer" /VE /T REG_SZ /F /D "Service"
REG ADD "HKLM\SYSTEM\CurrentControlSet\Control\SafeBoot\Network\MSIServer" /VE /T REG_SZ /F /D "Service"
net start msiserver

And that’s it! The installer service should now be running on your system and you should now be able to uninstall the concerned app using either one of the methods above.
Method #03: Run the Microsoft Uninstaller troubleshooter
You can also run a Microsoft Troubleshooter to try and fix uninstaller issues. Microsoft troubleshooters have come a long way since they were first introduced and can now fix most software and driver incompatibility issues without any user intervention.
Microsoft has also made it much easier for you to now launch any troubleshooter to try and solve your current issue. Use the guide below to launch an uninstaller troubleshooter on your Windows 11 system.
Required
Guide
Download the troubleshooter using the link above to your PC. Once downloaded, extract the .zip file to a convenient location. If you have trouble extracting the .zip file or it seems to be blocked, use the guide below to unblock it, else you can skip the guide and jump to the next guide.
Unblock the .zip file
Right-click on the .zip file and select ‘Properties’.
Check the box for ‘Unblock’ at the bottom of the Window.
Click on ‘Ok’.
Provide administrator permission to make the necessary change.
The file should now be unblocked on your system and you should now be able to extract it like any other .zip file on your system.
Run the troubleshooter
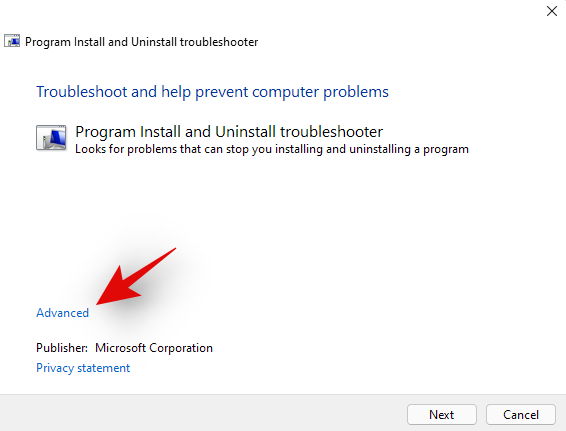
Navigate to the extracted files on your local storage. Cut the file named ‘MicrosoftProgram_Install_and_Uninstall.meta.diagcab’ and paste it on your desktop. Double click and run the file from your desktop. Click on ‘Advanced’ at the bottom once the troubleshooter is launched.
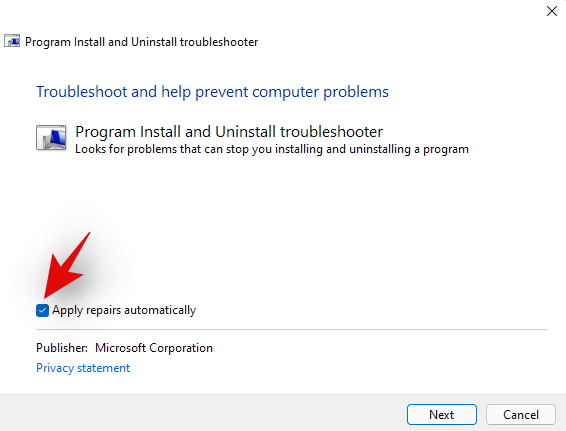
Check the box for ‘Apply repairs automatically’. Click on ‘Next’ once you are done.
Select ‘Uninstallting’ on the next step.
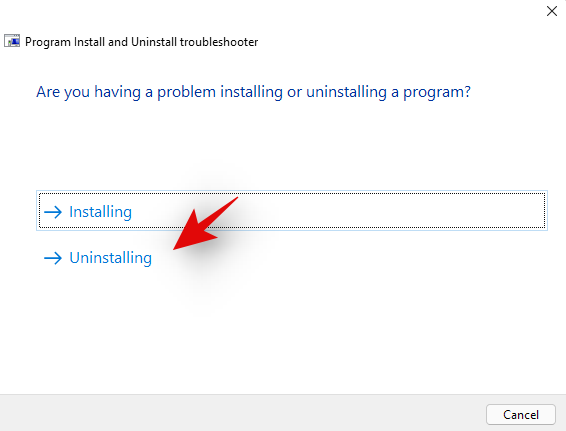
Select the concerned program from the list provided on your screen. If your program does not appear in the list, click on ‘Not Listed’.
Now follow the on-screen instructions depending on your choice to complete the troubleshooting process.
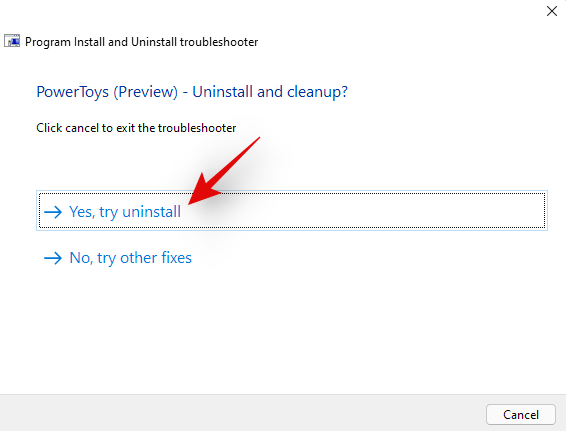
And that’s it! In most cases, the troubleshooter will detect your issue and solve it automatically. A report for the same will be presented to you at the end of the process with all the details.
Method #04: Use a restore point
If you are still having issues uninstalling the software from your system then it is time for some drastic steps as this could be malicious in nature. Let’s restore your PC to a restore point before the concerned app or program was installed on your system.
However, if you do not have a restore point then you can jump to one of the other methods listed below. Here’s how you can use a restore point to restore your PC to its previous state.
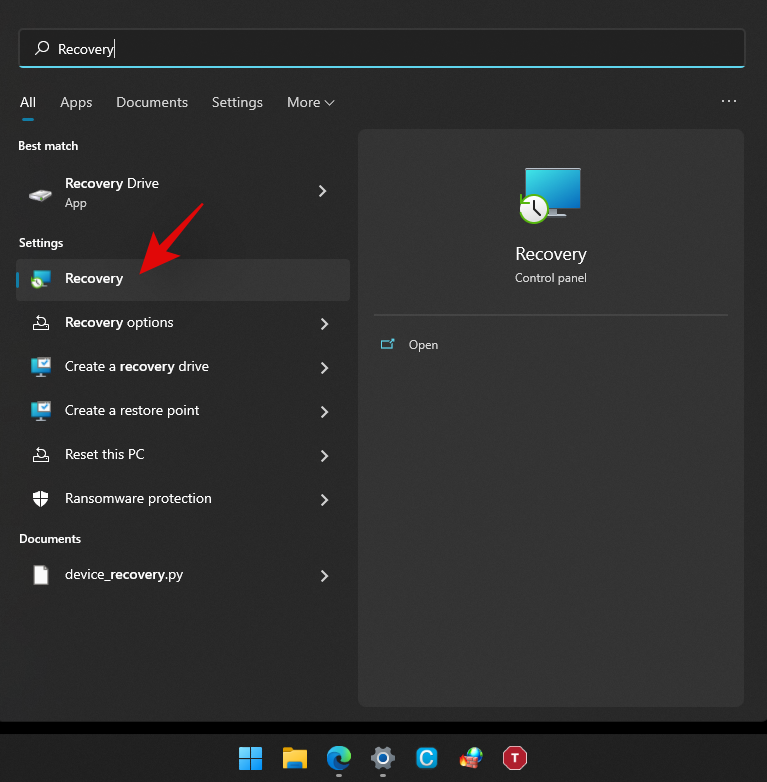
Press Windows + S on your keyboard and search for ‘Recovery’. Click and launch the app link once it shows up in your search results.
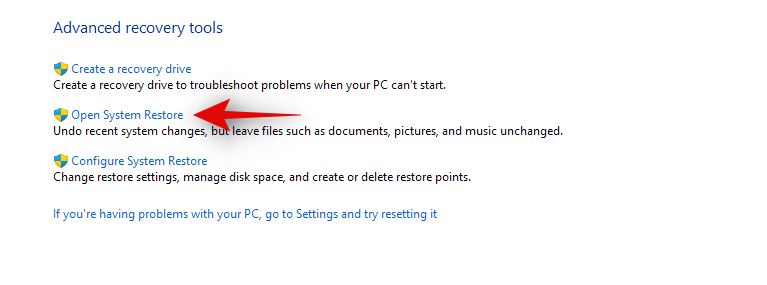
Click on ‘Open System Restore’.
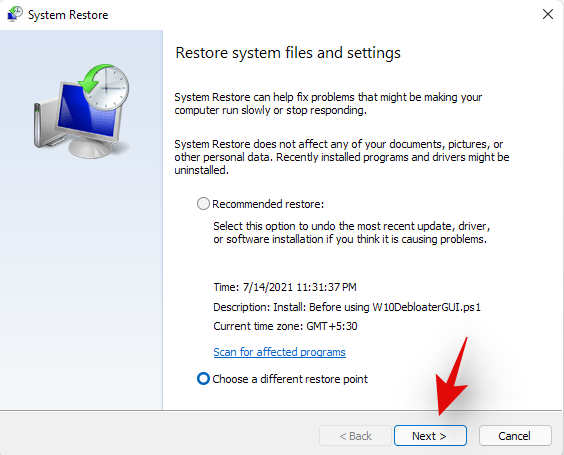
You will now be suggested a recent system restore point if you have one. Select that if needed, or click on ‘Choose a different restore point’ if you wish to choose an older one.
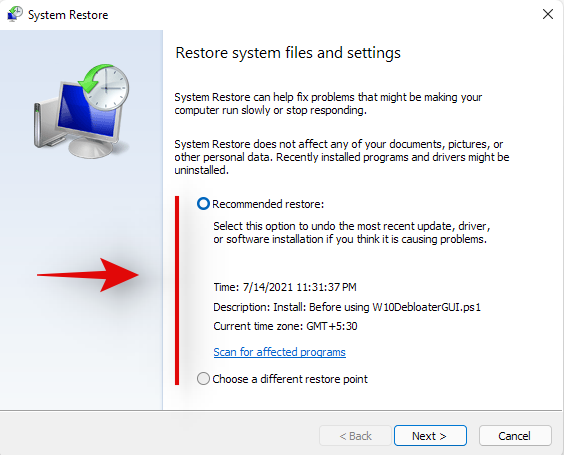
Select ‘Next’ or hit ‘Enter’ on your keyboard.
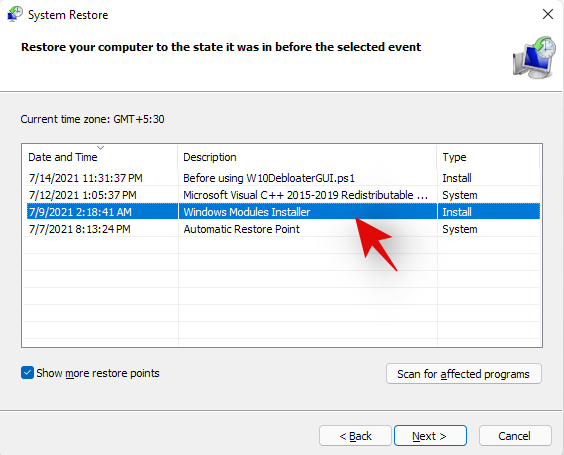
You can now select the desired Restore Point from the list at the top. You can check the box for ‘Show more restore points’ if you wish to look at more restore points.
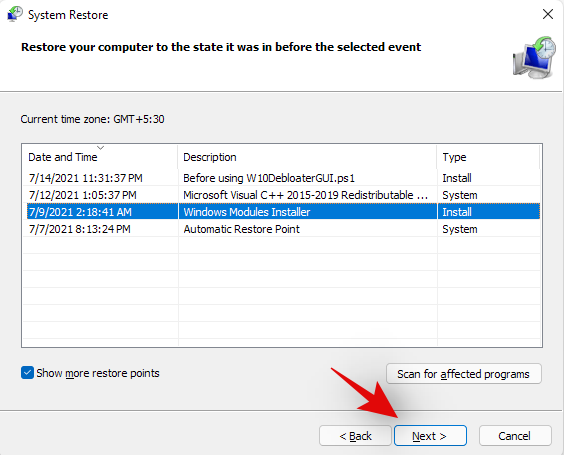
Once selected, click on ‘Next’.
Finally, click on ‘Finish’.
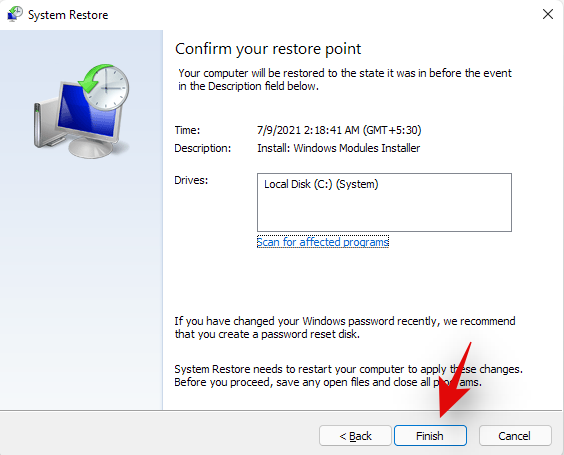
Windows 11 will now restore your system to the selected restore point and the concerned app should no longer be on your system once the process is completed.
Method #05: Contact Windows Support
If you are still unable to get the app uninstalled from your system then it might be time to contact Microsoft Support. Microsoft Support executives are trained to solve such issues with more expertise and can even remotely takeover your system if needed. It might be time to get in touch with the support team to solve your issue. Additionally, if you purchased a pre-built system, you can use your OEM support for some help as well. Use the link below to get in touch with Microsoft Support.
Uninstall programs on Windows 11: FAQs
Can you uninstall pre-installed apps?
Well, officially, you can not and it is not recommended by Microsoft. But still, if you wish to remove preinstalled apps, you can easily do so depending on the type of the app. If you wish to remove a system app then the process is a bit complicated. Else, if you wish to remove third-party pre-installed apps then you can simply do so by uninstalling them like any other app from your Windows 11 Pc using the guide below.
Can you uninstall system apps?
Yes, you can uninstall system apps but not officially. Officially Windows 11 or any Windows for that matter, doesn’t allow you to remove system apps from the OS. However, there are many workarounds to circumvent this restriction and uninstall preinstalled system apps from your system.
This includes using command prompt/PowerShell or a third-party software. Using these methods you should be able to easily uninstall system apps from your system. Follow our guides below for each of the methods depending on your current needs and requirements.
Can you uninstall apps downloaded from the Microsoft Store?
Yes, apps downloaded from the Microsoft Store can be uninstalled easily using either of the methods listed below. This includes Android apps that you may have downloaded on your system but did not find appealing enough. We recommend uninstalling Windows Store apps either via Settings or Start.
Chances are that the Store app will now show up in the Control Panel and if uninstalled via CMD or PowerShell, you could end up with leftover files including empty Start menu folders. Hence, use Powershell or CMD for Windows Store apps only if you are facing an issue uninstalling them via the Settings or the Start menu.
What happens when you uninstall a program?
Uninstallation is the process of removing a program or an app from your system. While apps are installed singularly with all dependencies available to them in a sandbox, programs operate differently. Programs usually have scheduled tasks, customized registry values to execute them, and dependencies for various Windows features and extensions that they need for their own installation process to create and place every file and task correctly.
Hence the removal process for all these things created by a program when it is first installed on your system is called uninstallation. All scheduled tasks, registered services, registry keys, executables, temporary files, log files, and more are removed once you uninstall a program from your system. In some cases, you will be leftover with settings and save files so that you don’t have to set up the program entirely when installing it in the future.
These files can be cleared by clearing your Windows Cache and temporary files in most cases. However, if you still suspect leftover files from a program on your system, then we recommend checking the following places for any leftover files. If found, you can simply delete them like any other file on your system.
How to remove data of uninstalled programs
If you still see the remaining files and folders or context menu options for a removed program or app, then you can try the fixes below to solve your issue.
Method #01: Clear cache and temporary files from Windows
You should first try clearing cache and temporary files from your Windows 11 system. In most cases, this will help the overall File Explorer UI to refresh itself which should automatically remove leftover files and context menu items for removed programs from your system.
You can use this comprehensive guide by us to easily clear your Windows 11 cache and storage. You can also use the same guide to free up storage space on your system as well by deleting other large files and installations that show up in the list.
Method #02: Check for leftover files manually
You can also check and delete all leftover files manually for the removed program or app. You should start by using Windows Search to look for any files or folders associated with the uninstalled program. You can then delete these manually from your local storage.
Once you have deleted all the files and folders that show up in the search, you can proceed to manually check the locations listed below. If they contain any leftover files or folders from the removed program, then you can simply select them and delete them from your system.
Method #03: Run a third-party uninstaller/cleaner
If you are still left with the remaining files and context menus for the program then it is time to use a third-party uninstaller or cleaner. These programs are specifically designed to identify and remove leftover files from previously uninstalled programs on your system. We recommend you give Revo uninstaller a try as even the free model for the app will help you identify the location of leftover files which can then be deleted by you manually. You can also use something like CCleaner that is designed to remove leftover files and free up storage and processing space on your system.
Method #04: Try to remove the app via PowerShell
If nothing works, then chances are that the concerned app was installed on your system using elevated privileges which prevents some files and folders from being removed from your system.
In such cases, we recommend you try to remove the app via PowerShell. You can use our guide above to remove system apps from Windows 11 via PowerShell. You will first need to source the full package name for your app or program, which can then be used to force uninstall it from your system.
Can you uninstall Windows Updates?
Yes you can easily uninstall Windows Update from your system. New updates can often introduce compatibility issues on older hardware and having the option to uninstall updates can always help. You can use the guide below to uninstall recently installed updates from your system.
How to uninstall Windows Updates
Follow the guide below to uninstall recently installed Windows Updates from your Windows 11 system.
Press Windows + i on your keyboard to open the Settings app. Click on ‘Windows Update’ on your left.
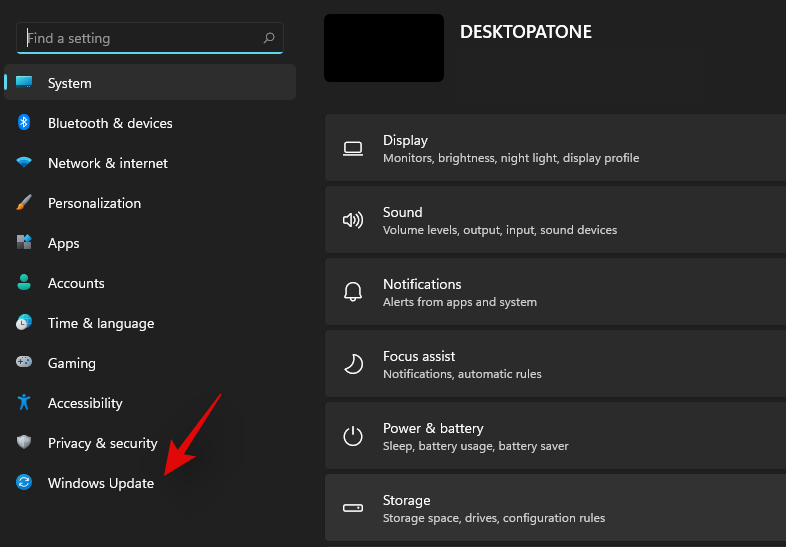
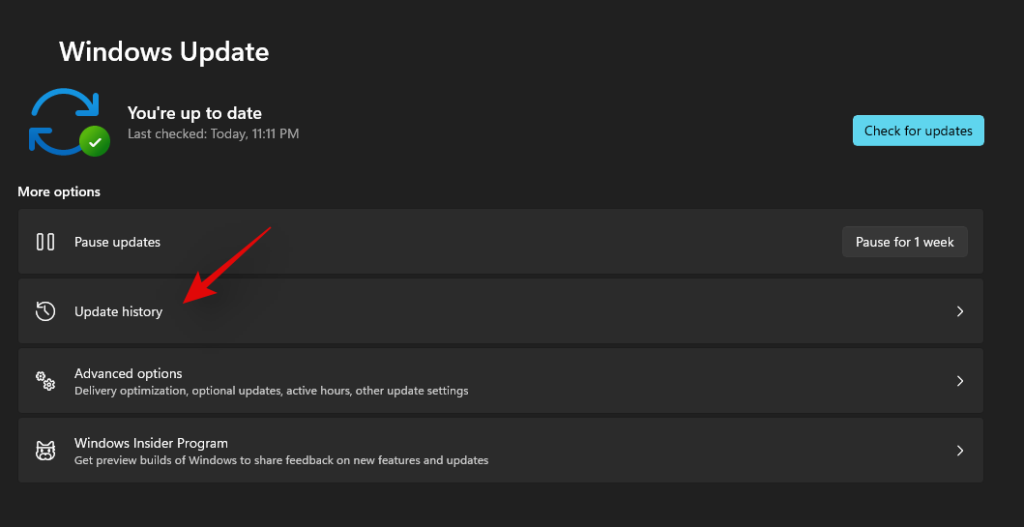
Now click on ‘Update history’.
Scroll to the bottom on your right and click on ‘Uninstall Updates’.
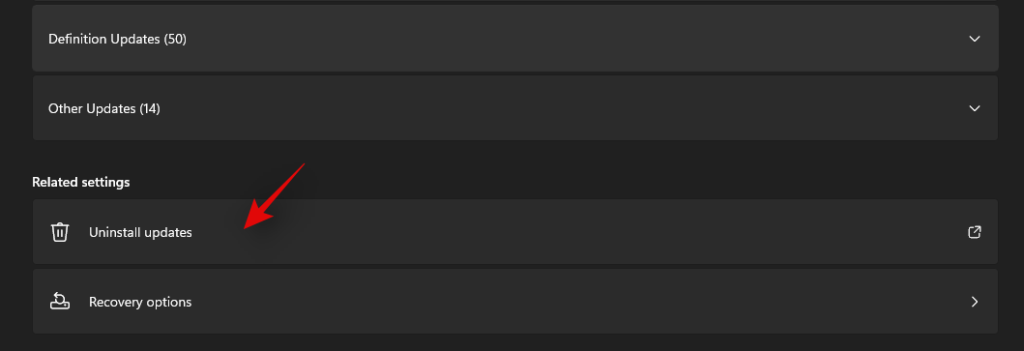
You will now get a list of all the recent updates installed on your system. Click and select the update you wish to uninstall.
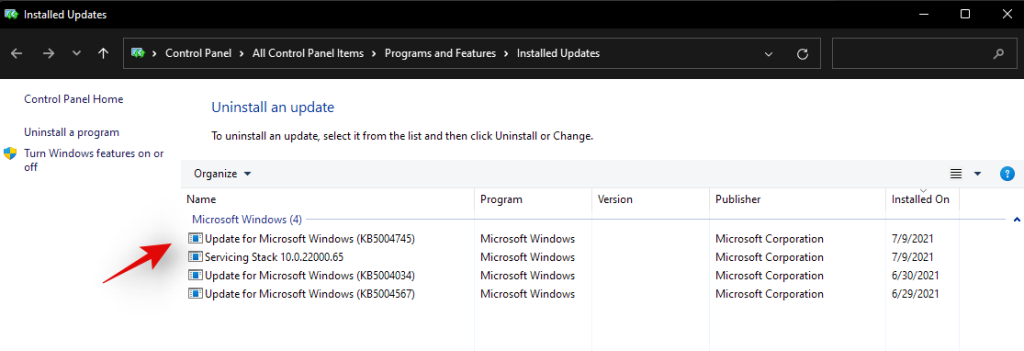
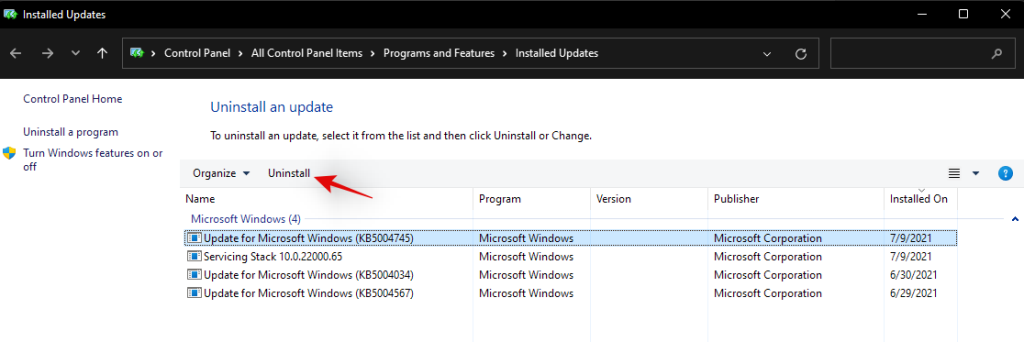
Click on ‘Uninstall’ at the top now.
Follow the on-screen instructions to complete the process.
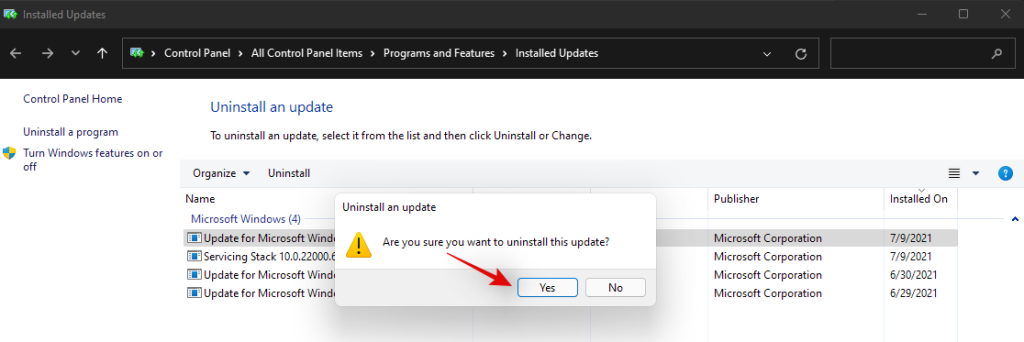
And that’s it! Your selected Windows update should now be uninstalled from your system.
We hope this guide helped you uninstall the concerned apps or programs from your system. If you still face issues, feel free to reach out to us using the comments section below.
Teamsを使用するようにMicrosoftが最善を尽くしているにもかかわらず、それでも気に入らない場合は、タスクバーから削除することをお勧めします。さて、あなたはそれを簡単に行うことができ、より多くのスペースを得ることができます…
Windowsの最新のイテレーションは、技術愛好家が望んでいたすべてのものです。アプリの互換性の向上からゴージャスなユーザーインターフェースまで、さまざまなことがあります。しかし、そこには…
コンピューターはこれまで以上に私たちの生活に統合されてきました。そのため、メーカーはモバイルデバイスの電力を節約するための新しい方法を探しています。ただし、試行錯誤された手動スリープw…
通知は私たちの生活の不可欠な部分になっています。彼らは私たちを最新の状態に保ち、私たちのスケジュールを維持するのを助け、そして何よりも私たちが最新かつ最高のニュースを得るのを助けます。しかし、企業は…
Windows 11がリリースされたばかりで、最新のOSをインストールしようとした場合は、セキュアブートとTPMの必要性に気付いたかもしれません。これらの設定は簡単に見つけて有効にすることができます…
Windows Insiderビルドとベータビルドは、今後のアップデートを味わうのに最適な方法です。今後のWindows11リリースにより、世界中の多くのユーザーがインサイダープログラムに参加して…
Windows 11でBattle.netエージェントのスリープエラーに悩まされていませんか?ゲームを再びスムーズに動作させるための、実証済みの解決策をご紹介します。スムーズなゲームプレイのためのステップバイステップのトラブルシューティング。
Windows 11のDirectStorageをゲームに活用して、読み込み時間を短縮し、パフォーマンスを向上させる方法をご紹介します。設定を最適化して、よりスムーズなゲームプレイを実現するためのヒントをまとめたステップバイステップガイドです。
Windows 11でコア分離がオンにならないことにお困りですか?この重要なセキュリティ機能を有効にし、よくある問題を解決してPCのパフォーマンスを向上させるためのステップバイステップの修正方法をご紹介します。
Windows 11 セキュリティセンターサービスが見つからなくてお困りですか? 実証済みのステップバイステップの修復方法で、安全に復元し、手間をかけずにPCを保護できます。最適な保護を実現する最新の方法にアップデートされています。
Windows 11 が起動ロゴから先に進まなくて困っていませんか?この 2026 年の包括的なトラブルシューティング ガイドでは、セーフ モードから高度な修復まで、実証済みの修正方法を網羅し、問題を迅速かつ簡単に解決するのに役立ちます。
Windows 11のTaskbarXでアイコンが中央に表示されないエラーでお困りですか?アイコンを簡単に中央に配置し、機能を回復し、タスクバーを最適化するための実証済みの修正方法をご紹介します。最新のソリューションでシームレスなパフォーマンスを実現します。
Windows 11のwgetコマンドとcurlコマンドのエラーでお困りですか?このステップバイステップガイドでは、よくある問題、簡単な解決策、そして効率的に解決するためのプロのヒントをご紹介します。今すぐダウンロードとAPI呼び出しをコントロールしましょう。
Windows 11のウェブカメラのプライバシーシャッターエラーに悩まされていませんか?実証済みのステップバイステップの解決策で、カメラへのアクセスを迅速かつ安全に復元できます。今すぐプライバシーを取り戻しましょう!
Windows 11の仮想メモリ不足エラーに悩まされていませんか?システムを強化するための、実証済みのステップバイステップの解決策を見つけましょう。
Windows 11の「TPM構成証明がサポートされていません」というエラーでお困りですか?TPM要件を回避し、スムーズにアップグレードするための実証済みの解決策をご紹介します。ステップバイステップのガイドで、手間なくインストールできます。

