As atualizações são importantes. Eles corrigem problemas de segurança, melhoram o desempenho, introduzem novos recursos e muito mais. Por padrão, o Windows fará o download e se atualizará assim que forem disponibilizados, e essa é uma pequena operação conveniente.
No entanto, isso se torna um problema porque essas atualizações são impingidas aos usuários, mesmo quando eles preferem não tê-las. Não é segredo que algumas atualizações contêm bugs que podem prejudicar a funcionalidade normal do Windows. Deve-se ter o controle e a opção de desabilitar e interromper as atualizações, se necessário.
Portanto, com isso em mente, aqui está tudo o que você precisa saber sobre como desabilitar atualizações no Windows 11.
Relacionado: Como usar o Focus Assist no Windows 11
Conteúdo
O que acontece quando você desativa as atualizações no Windows 11?
Se você sabe para que está desativando as atualizações, siga em frente e use nossos métodos recomendados acima para fazer isso. Mas se você está em dúvida quanto a desabilitar as atualizações do Windows, talvez um pouco mais de informações sobre elas devam ajudá-lo a decidir.
Obviamente, você não obterá as atualizações cumulativas regulares para o Windows 11 ao ativar as atualizações do Windows, nem obterá nenhum dos patches de segurança ou correções de bugs que são lançados com frequência.
Por algum tempo, você também pode não obter atualizações para os drivers do sistema. Se você deseja instalar drivers e patches enquanto as atualizações do Windows estão desativadas, você terá que fazer isso manualmente.
Relacionado: Como reparar o Windows 11 [15 maneiras]
Como interromper as atualizações no Windows 11
Antes que qualquer coisa seja dita e feita, saiba que as atualizações do Windows, em sua maioria, são bastante seguras e é recomendável mantê-las ativadas se quiser aproveitar todas as atualizações cumulativas e aumentos de desempenho que as acompanham.
Mas de vez em quando, você pode obter um patch ruim que apresenta recursos de bugs e interrupções. Portanto, se você gosta de revisar as atualizações antes de baixá-las e instalá-las, ou gostaria de interrompê-las completamente, aqui está como fazer isso no Windows 11.
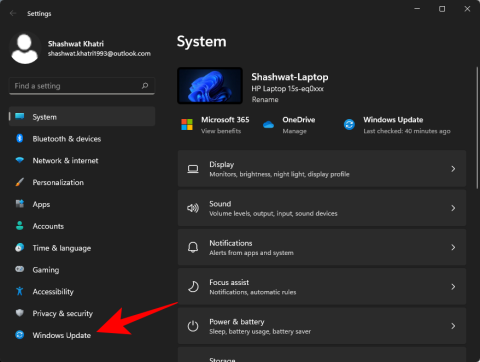
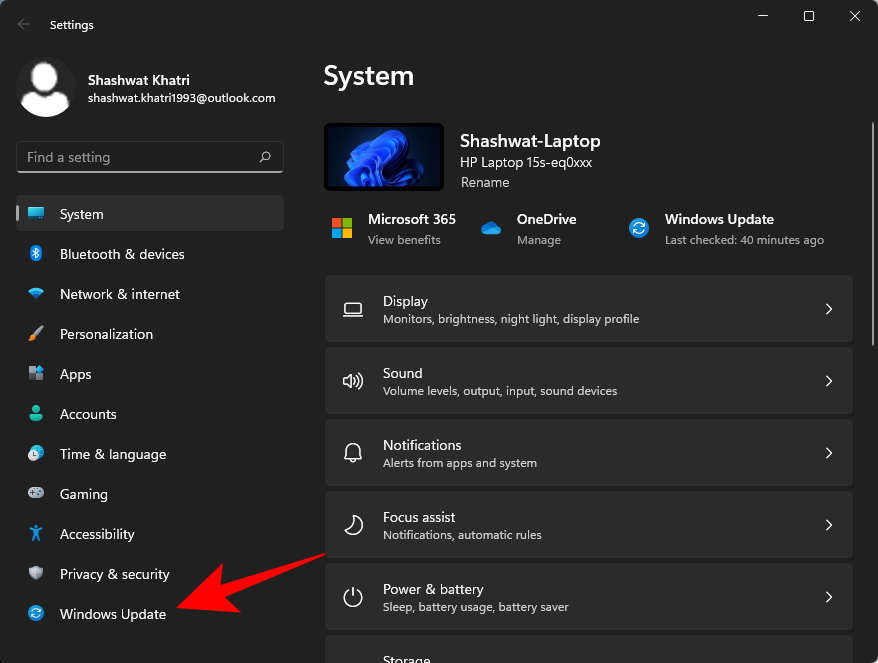
Pressione Win + Ipara abrir Configurações e clique em Windows Update no painel esquerdo.
À direita, ao lado de 'Pausar atualizações', clique em Pausar por 1 semana .
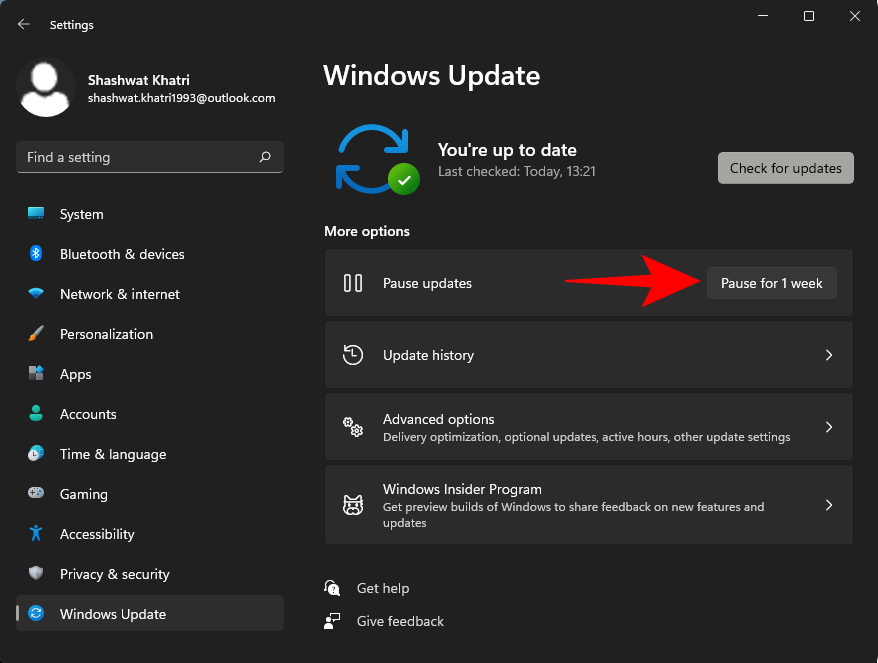
Atualmente, como o Windows 11 ainda está em sua fase de desenvolvimento, você não terá nenhuma outra opção de intervalo de tempo para pausar as atualizações, nem pode especificar uma. Esperamos obter mais opções de 'Pausar atualizações' à medida que novas compilações do Windows 11 forem lançadas - adivinhou - as atualizações do Windows.
Método # 02: desative o serviço Windows Update
Para desativar completamente a atualização do Windows 11, você terá que usar a janela 'Serviços'. Veja como fazer isso:
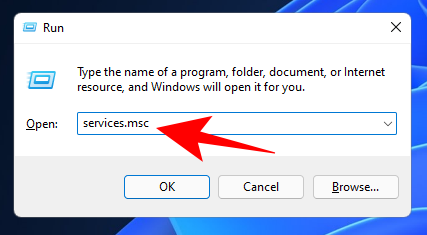
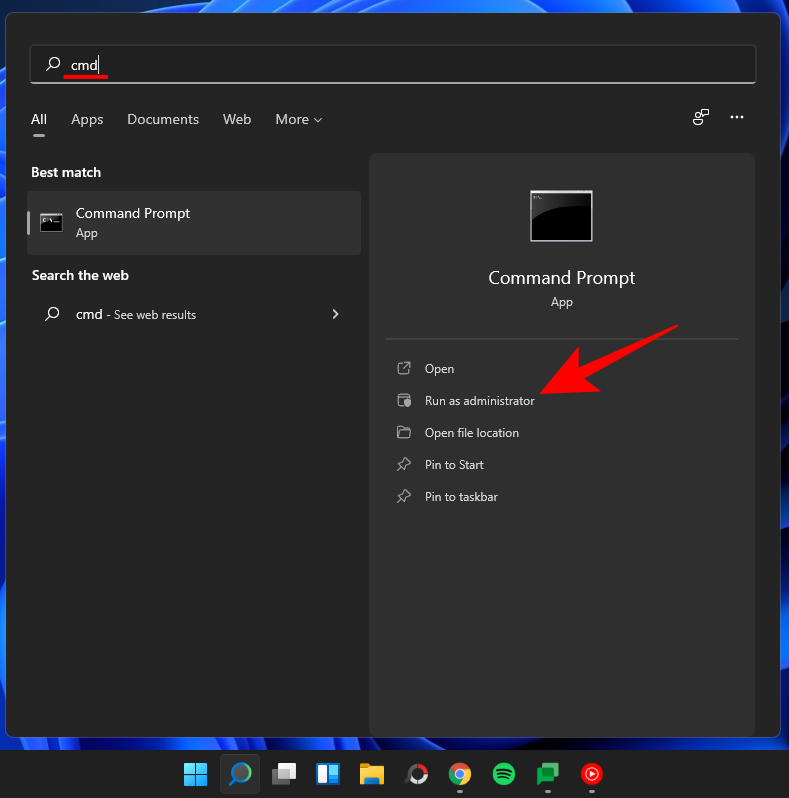
Pressione Win + Rpara abrir a caixa de diálogo RUN, digite services.msc e pressione Enter.
Agora, role para baixo e clique duas vezes em Windows Update .
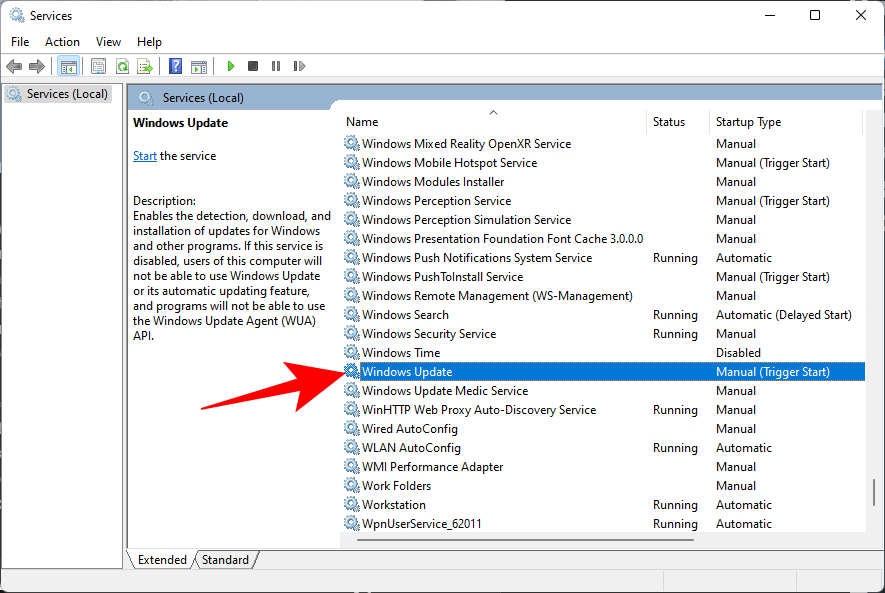
Se estiver em execução, clique em Parar .
Em seguida, clique no menu suspenso ao lado de 'Tipo de inicialização'.
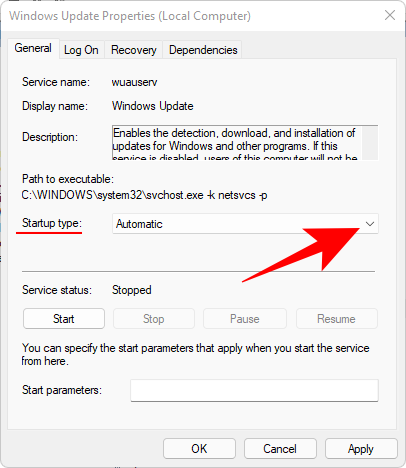
Selecione Desativado .
Clique OK .
Relacionado: Como descompactar arquivos no Windows 11
Método nº 03: Desabilite ou limite as atualizações com o Editor de Política de Grupo
O Editor de Diretiva de Grupo é uma ferramenta útil para as edições Professional, Enterprise e Education do Windows. Veja como você pode limitar as atualizações do Windows ou desativá-las totalmente:
Pressione Win + Rpara abrir a caixa RUN, digite gpedit.msc e pressione Enter.
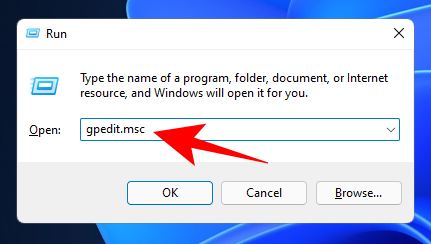
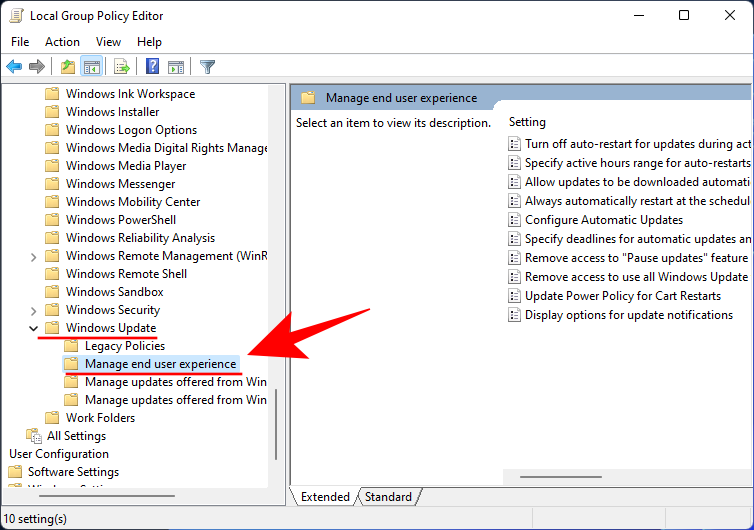
Em seguida, navegue até o seguinte caminho no painel esquerdo:
Computer Configuration > Administrative Templates > Windows Components > Windows Update > Manage end user experience
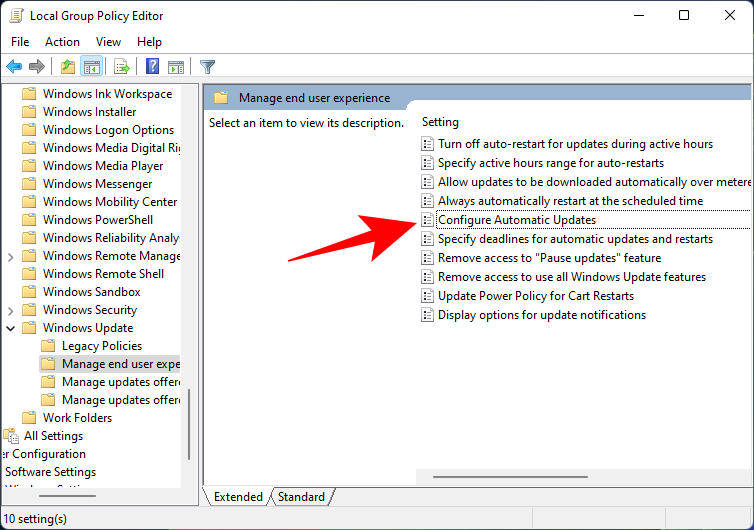
Agora, à direita, clique duas vezes em Configure Automatic Updates .
Para desabilitar completamente as atualizações do Windows, selecione Desabilitado .
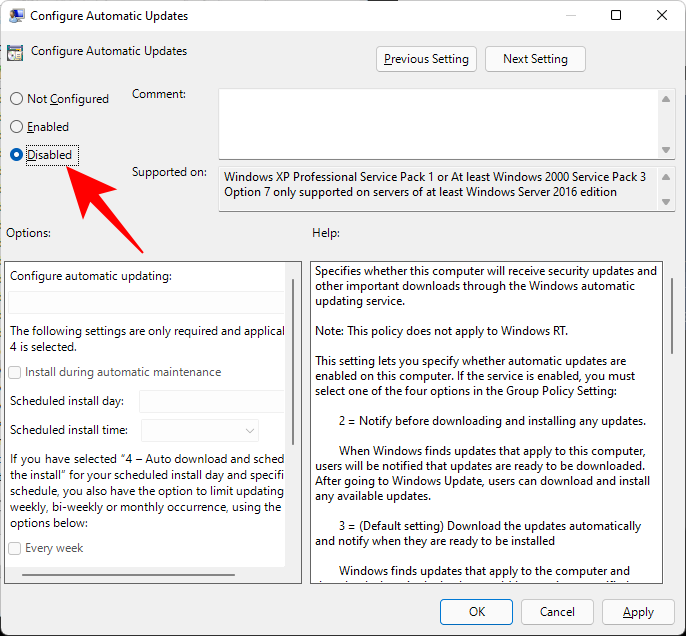
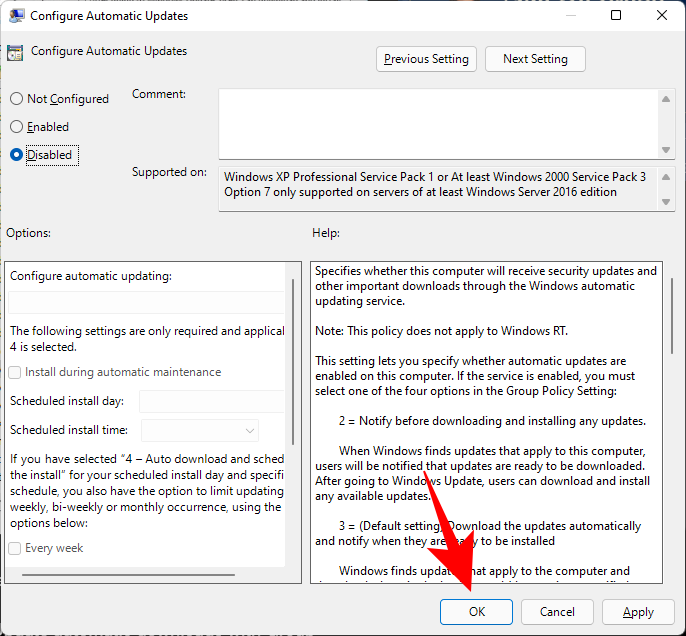
Em seguida, clique em OK .
Se você não deseja desabilitar completamente as atualizações do Windows 11, existem algumas outras configurações de atualização do Windows que você pode examinar. Veja como:
Na mesma janela de política 'Configurar atualizações automáticas', primeiro, selecione Ativado .
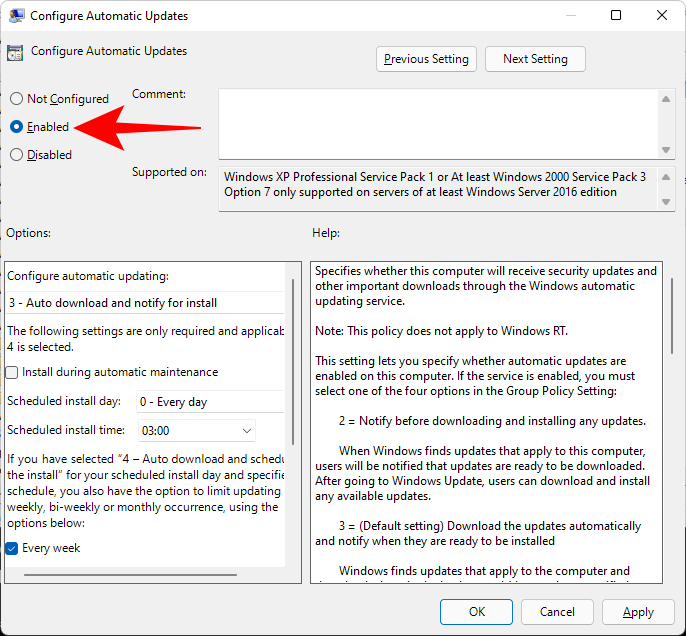
Em seguida, em 'Configurar atualização automática', clique no menu suspenso e selecione uma das seguintes opções:
- 2 - Notificar para download e instalação automática. (recomendado)
- 3 - Download automático e notificação para instalação.
- 4 - Faça o download automático e agende a instalação.
- 5 - Permitir que o administrador local escolha as configurações.
- 7 - Permitir download, Notificar para instalar, Notificar para reiniciar.
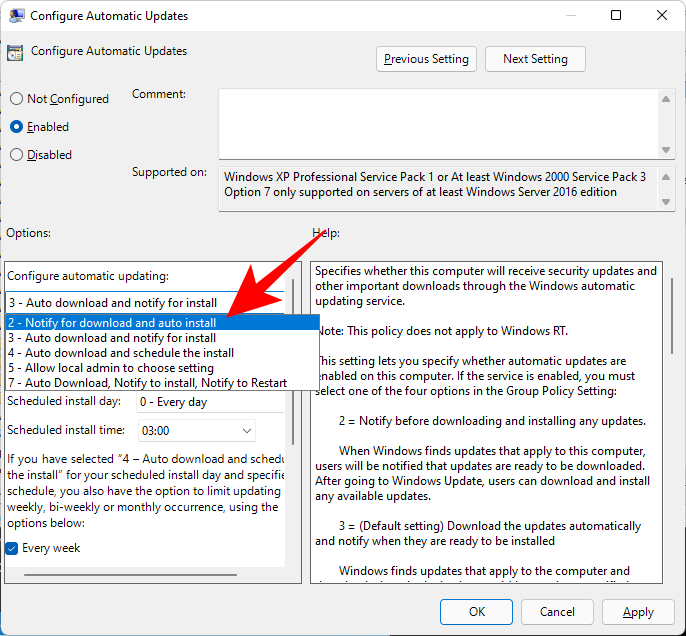
Vamos com o número recomendado 2 - 'Notificar para download e instalação automática'. Com esta opção, as atualizações não são baixadas automaticamente. Em vez disso, você terá que acioná-los manualmente na página de configurações do Windows Update.
Depois de selecionar a configuração de atualização do Windows, clique em OK .
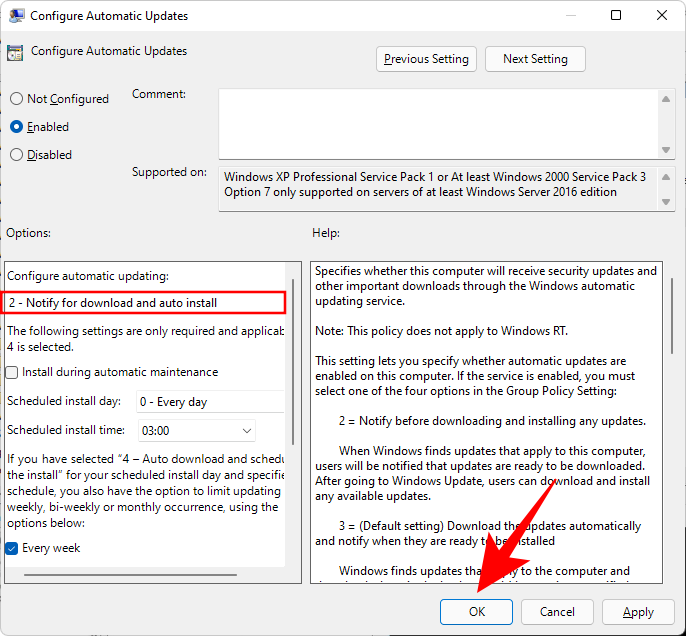
Reinicie o seu computador para que as alterações tenham efeito.
Método # 04: desative ou limite as atualizações do registro
Semelhante ao método anterior, você também pode desabilitar a atualização do Windows totalmente ou ajustar a configuração de atualização do Windows no Registro. Veja como:
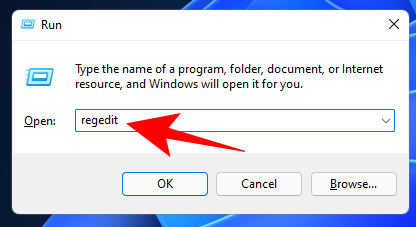
Pressione Win + Rpara abrir a caixa RUN, digite regedit e pressione Enter.
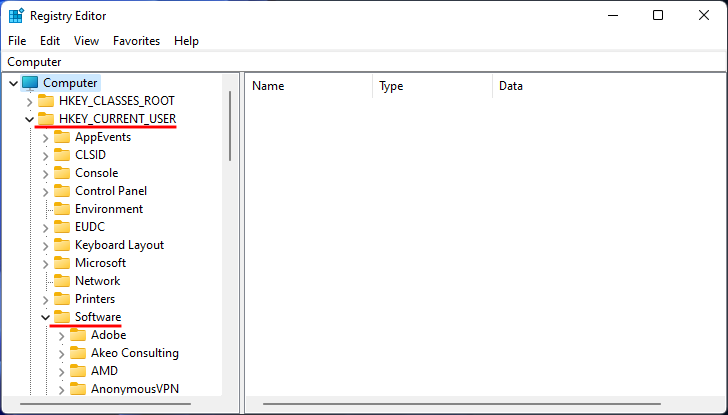
Navegue até a seguinte chave:
Computer\HKEY_LOCAL_MACHINE\SOFTWARE\Policies\Microsoft\Windows
Como alternativa, você pode copiar o texto acima e colá-lo na barra de endereço do Editor do Registro e pressionar Enter.
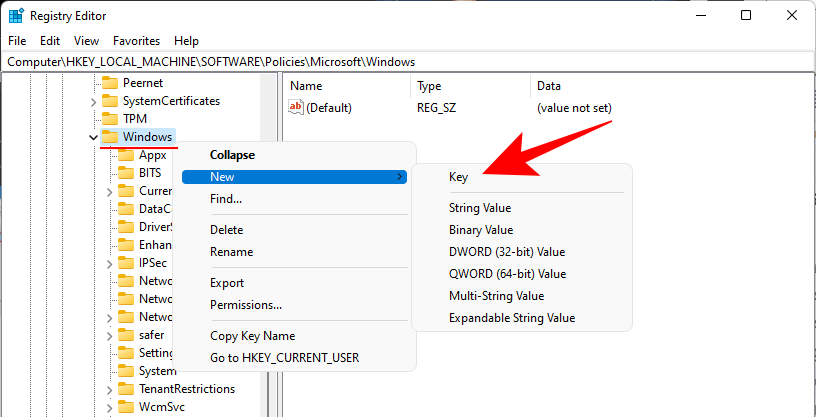
Agora, clique com o botão direito na pasta 'Windows' selecionada e selecione Novo> Chave .
Nomeie essa chave como WindowsUpdate e pressione Enter.
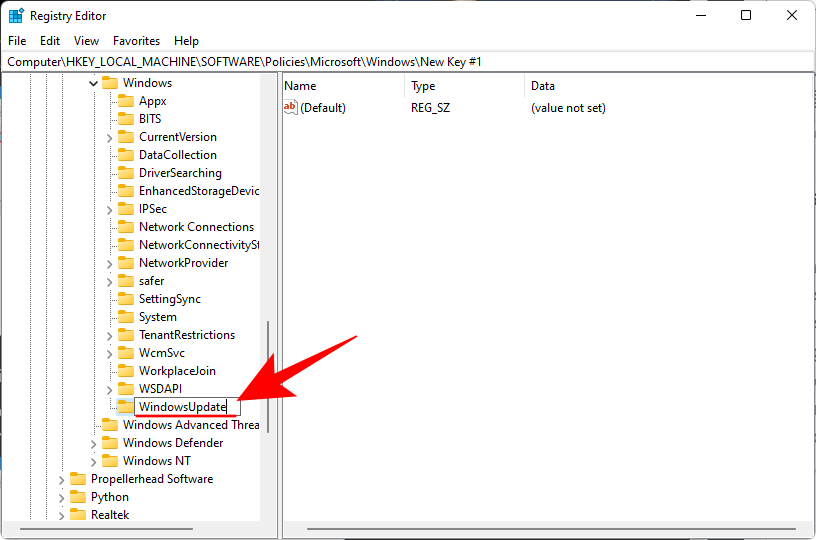
Agora, clique com o botão direito nesta chave e crie uma subchave via Novo> Chave .
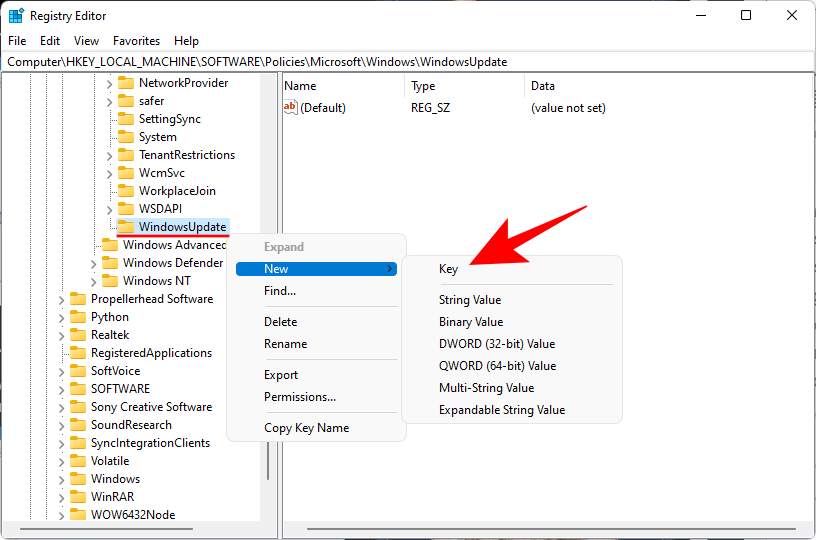
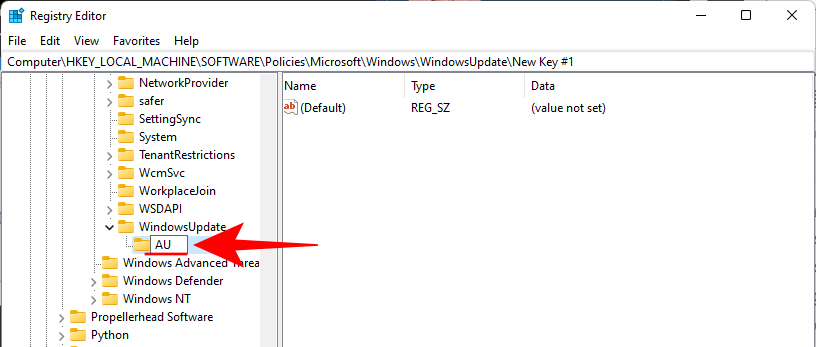
Nomeie essa chave como AU .
Com a chave AU recém-criada selecionada, clique com o botão direito no espaço vazio à direita e selecione Novo> Valor DWORD (32 bits) .
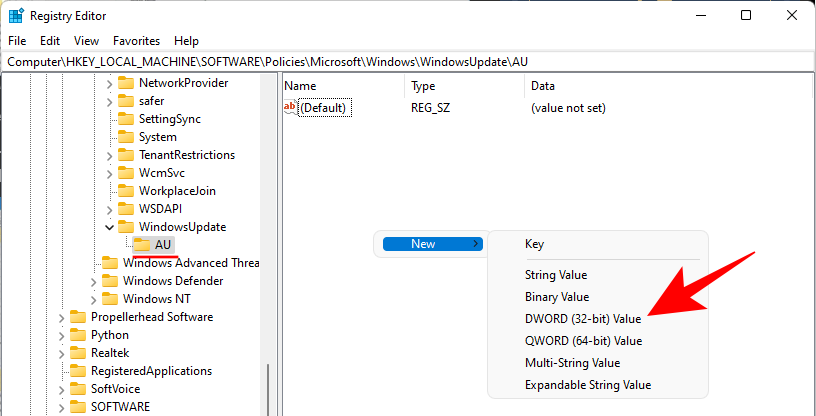
Nomeie esta chave AUOptions .
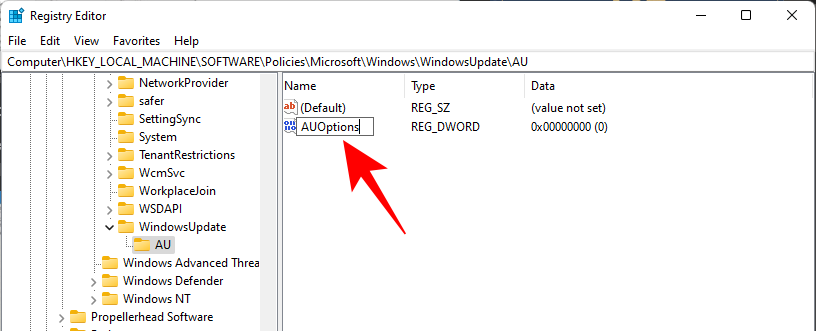
Clique duas vezes em 'AUOptions' e altere seu valor para um dos seguintes números (a alteração correspondente é mencionada abaixo):
- 2 - Notificar para download e instalação automática. (recomendado)
- 3 – Auto download and notify for install.
- 4 – Auto download and schedule the install.
- 5 – Allow local admin to choose settings.
- 7 – Allow download, Notify to install, Notify to restart.
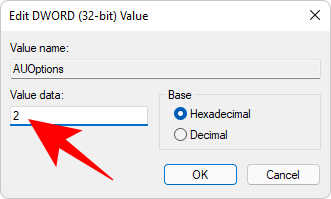
Make sure to only enter the number, depending on how you want the Windows updates to be configured. For instance, we want to be notified for download and auto install so we’re changing the value to ‘2‘. Then click OK.
Note that these options work exactly like the Group Policy method but with the sole exception of not being able to completely disable updates. The only option that comes close to disabling Windows Updates is the recommended option number 2. Restart your computer for the changes to take effect.
Method #05: Set a Metered Connection
Another way to prevent Windows from updating automatically is to set up a metered connection. This will tell Windows that you’re on limited bandwidth and that updates are not your priority. Here’s how you can set it up:
Press Win + I to open Setings, then click on Network & internet in the left panel.
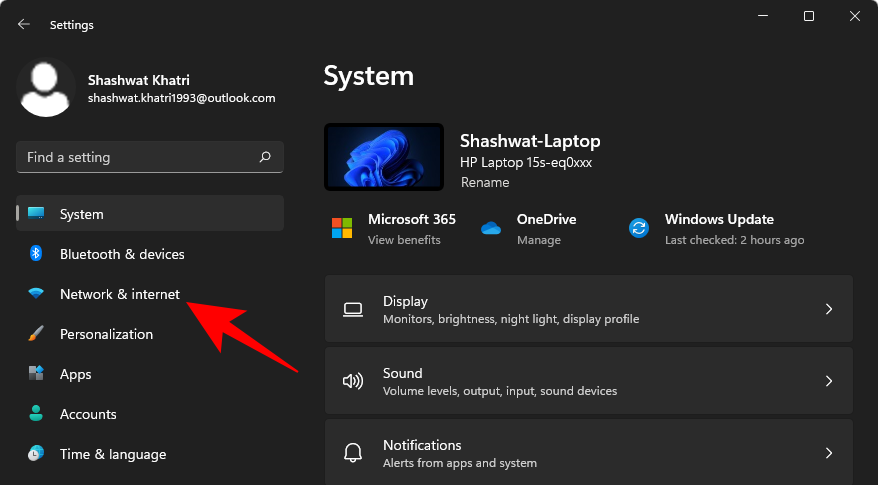
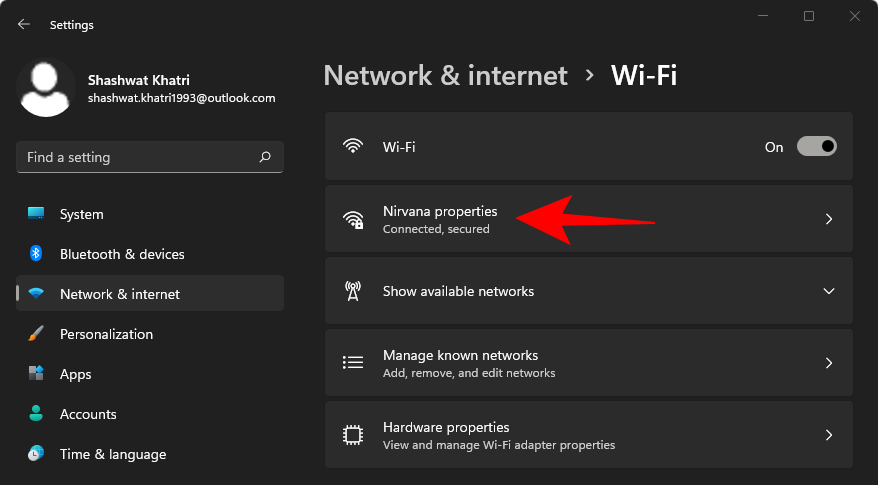
Click on Wi-Fi.
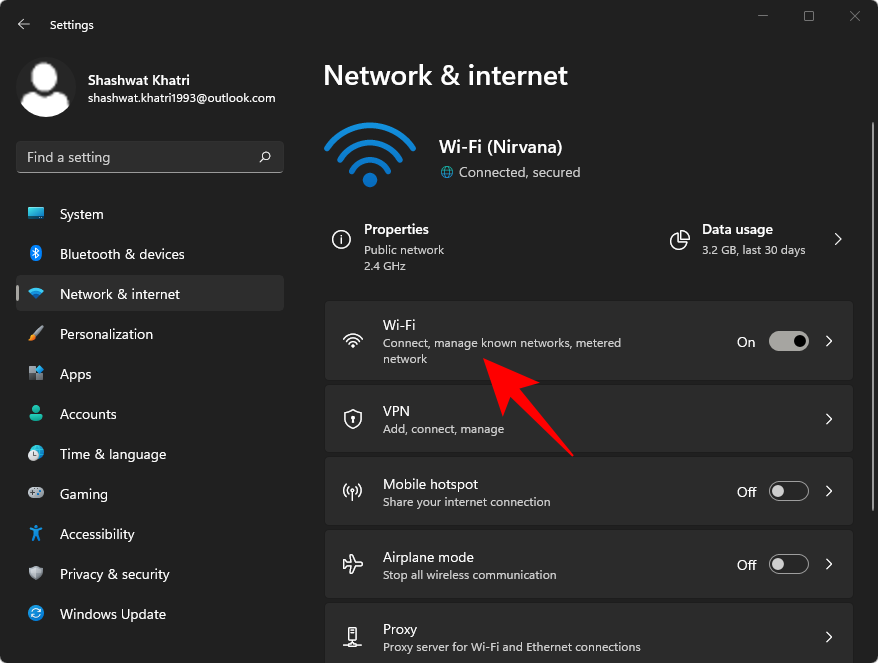
Select your Wi-Fi connection.
Toggle On Metered connection.
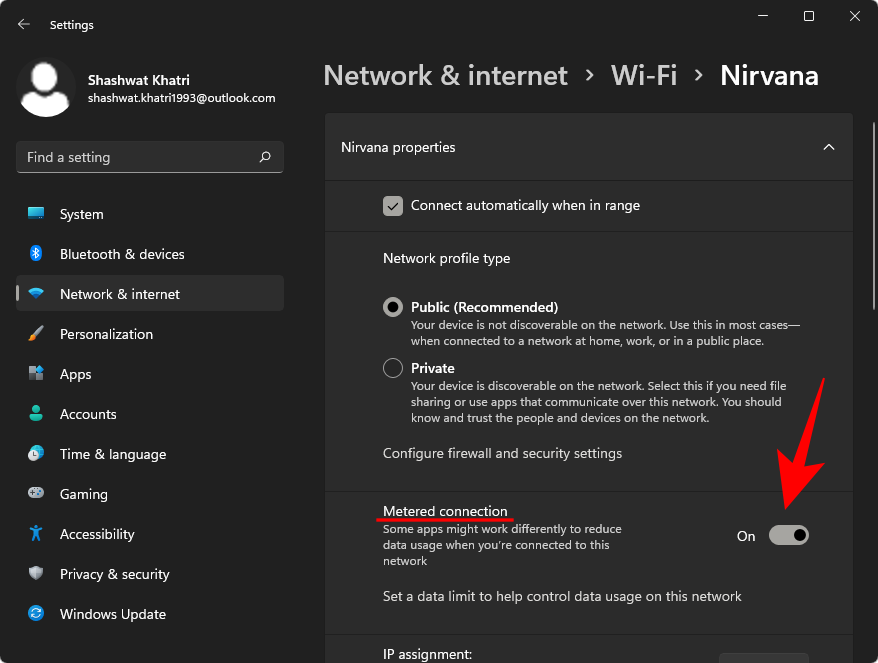
And that’s it! You’ve now set up a metered connection and Windows updates will be temporarily disabled. However, this is not the ideal solution for stopping Windows updates as important security updates can still be downloaded and installed. On top of that, some important apps may not be updated with a metered connection, such as OneDrive or any of the ‘Store apps’.
Method #06: Hide Updates with Microsoft’s Show/Hide troubleshooter
Microsoft has a Windows update troubleshooter tool that lets you hide (or show) specific updates that you don’t want to be installed while keeping everything else up to date.
Download: wushowhide.diagcab
After downloading the show/hide tool from the above link, run the tool and click Next.
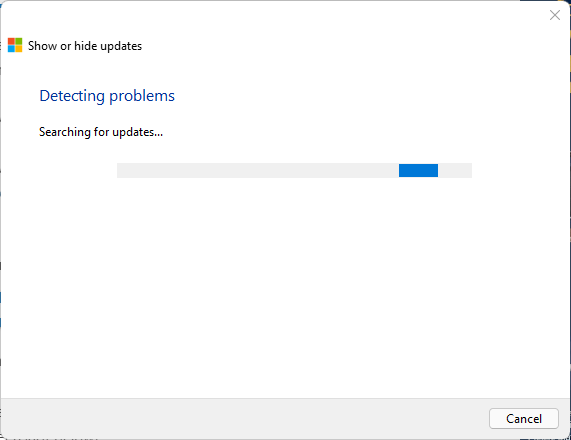
The troubleshooter will now begin.
Click on Hide updates.
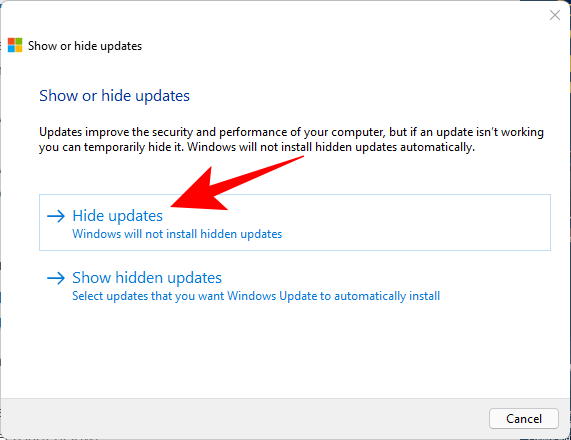
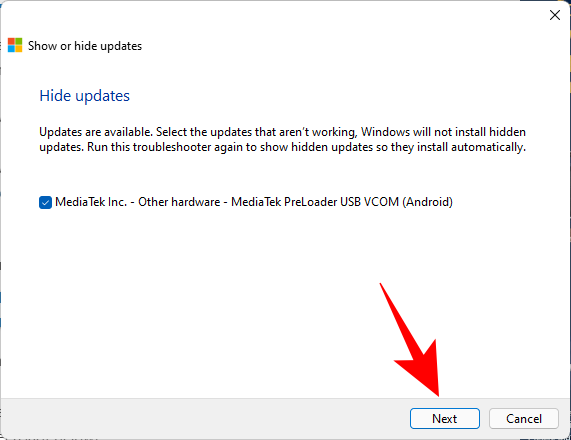
Now select the available update that you want to hide. These will not be installed anymore. Then click Next.
Once the selected updates are hidden, click on Close.
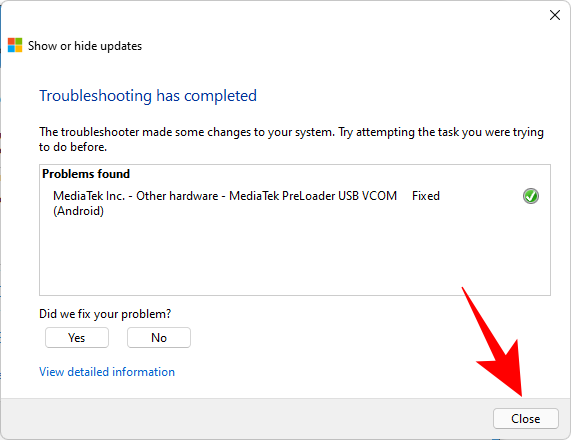
The only caveat with this troubleshooter tool is that the updates have to be downloaded before and waiting to be installed.
If you think you’ve hidden an update by accident, open the troubleshooter tool again but this time select Show updates.
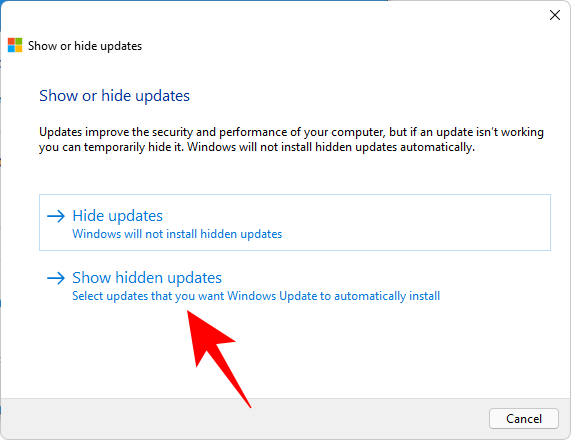
Select your hidden update and click Next.
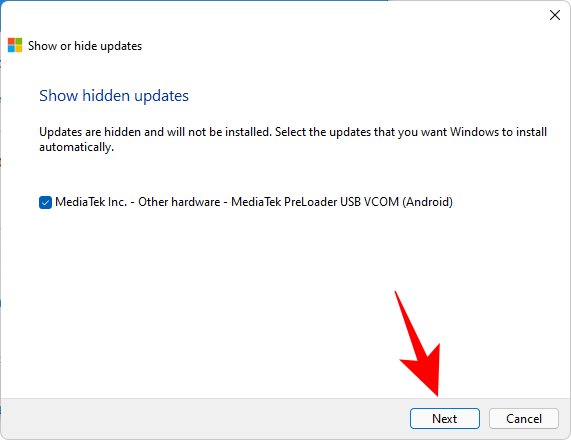
Your hidden update should now become available again.
Method #07: Use a third-party app to disable or stop updates on Windows 11
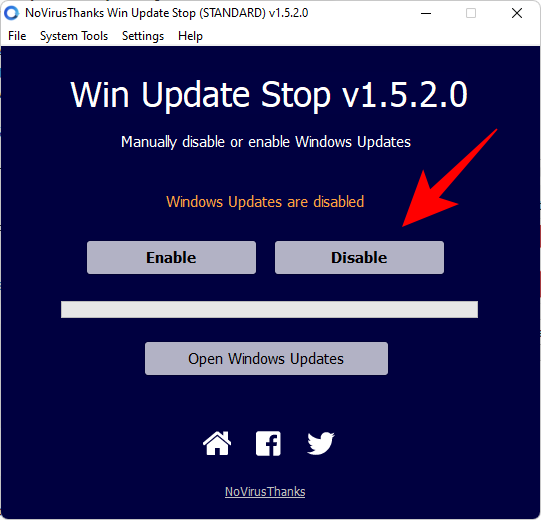
There are various third-party apps that can disable or stop updates entirely on Windows 11. Apart from the Show/Hide troubleshooter that we saw before, the Win Update Stop application is another tool that you can use to disable updates.
All you have to do is run the setup, run the application, and use its one-click interface to quickly enable or disable updates.
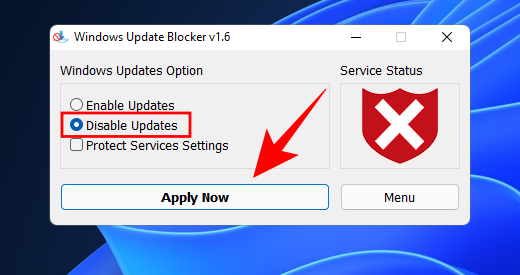
You may also want to give Windows Update Blocker a go – a portable application that lets you disable updates in a flash. Use the link above to download the file, then extract the contents and run the application. Thereafter, all you have to do is ensure that ‘Disable Updates’ is selected and then click ‘Apply Now’.
Why you may want to disable Windows updates
Though turning off Windows updates is not generally recommended, there are cases when it becomes necessary to do so.
It isn’t a rare thing to receive updates that bring their own set of security vulnerabilities and bugs, and many have had to suffer because of it in the past.
Similarly, if you don’t want Windows automatically updating your hardware drivers because, say, the latest version is causing you trouble and you’ve opted for an older one, you may benefit from keeping Windows updates disabled.
Some users also like having more granular control over their updates and configure Windows updates to notify them before downloading and installing any so they can review them and decide which ones to let through.
How to stop updates for other Microsoft products
If you don’t want to receive Windows updates mainly because you don’t want other Microsoft products to get updated, there is a dedicated option to configure that.
Press Win + I to open Settings and click on Windows Update on the left.
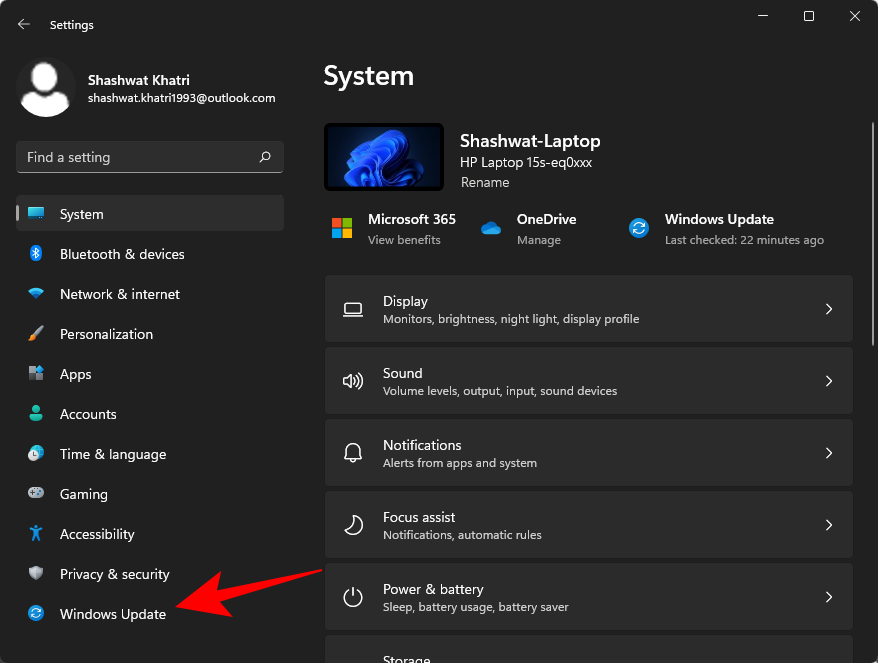
Click on Advanced options.
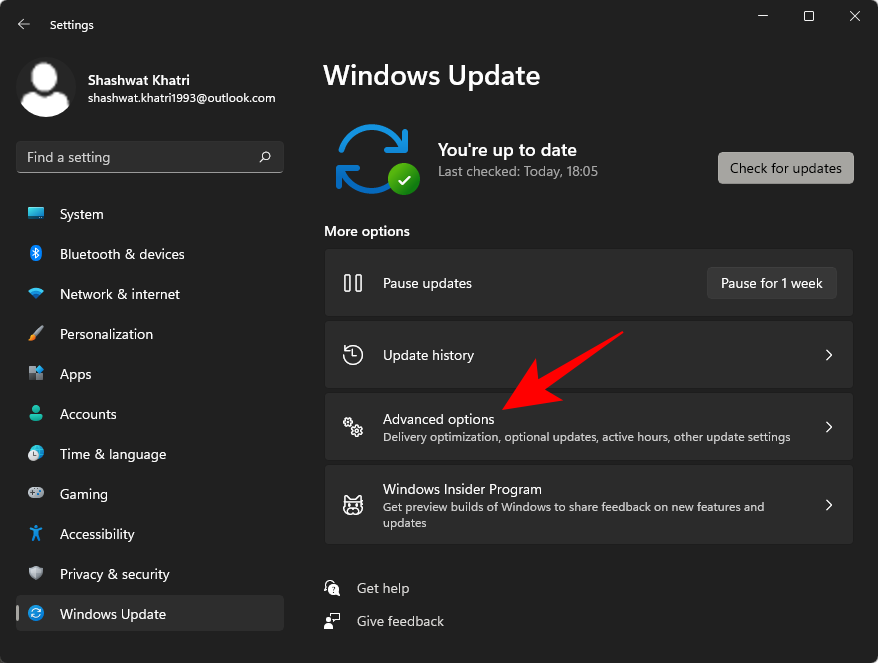
Then toggle Off Receive updates for other Microsoft products.
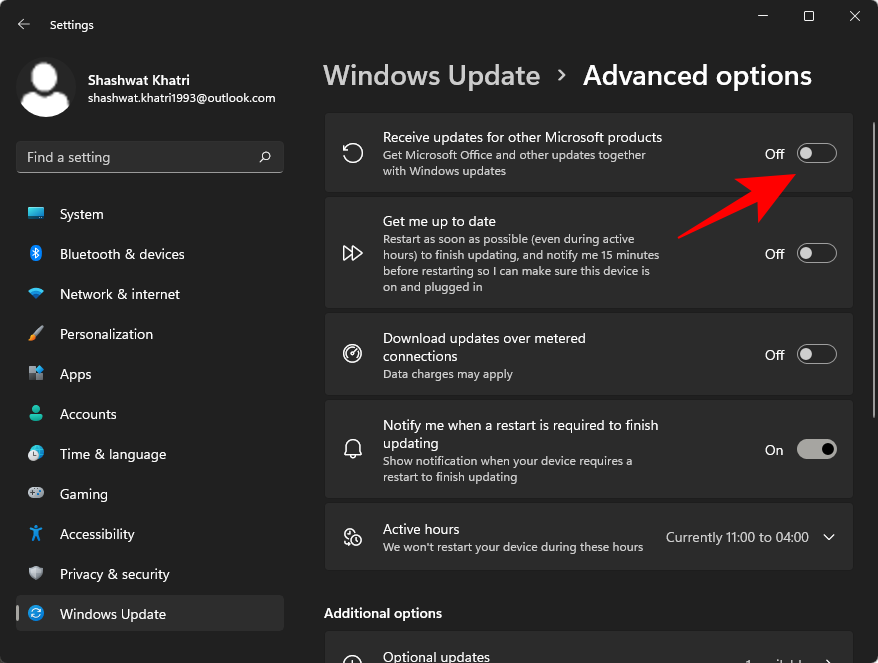
Exactly which Microsoft products get their updates this way is a hard guess as Microsoft has never made it clear. But from what can be surmised over the years, Office and Silverlight are definitely among them.
How to uninstall Windows 11 updates
Sometimes, disabling Windows updates entirely can seem a bit excessive if you’re doing so only because you’ve received a bad update. There’s a much more practical ‘Uninstall updates’ option that you can use instead. Here’s how:
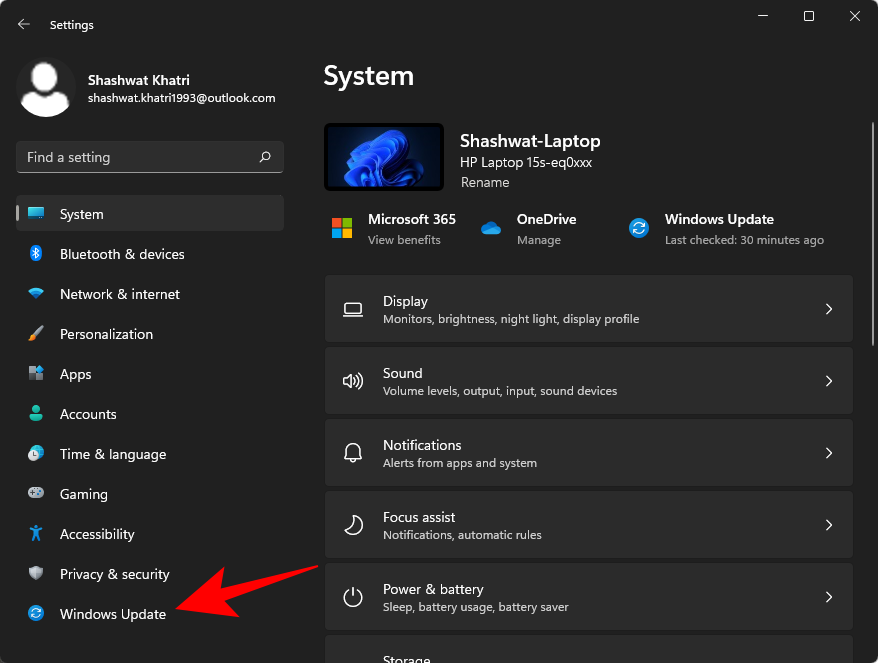
Press Win + I to open Settings and click on Windows Update on the left.
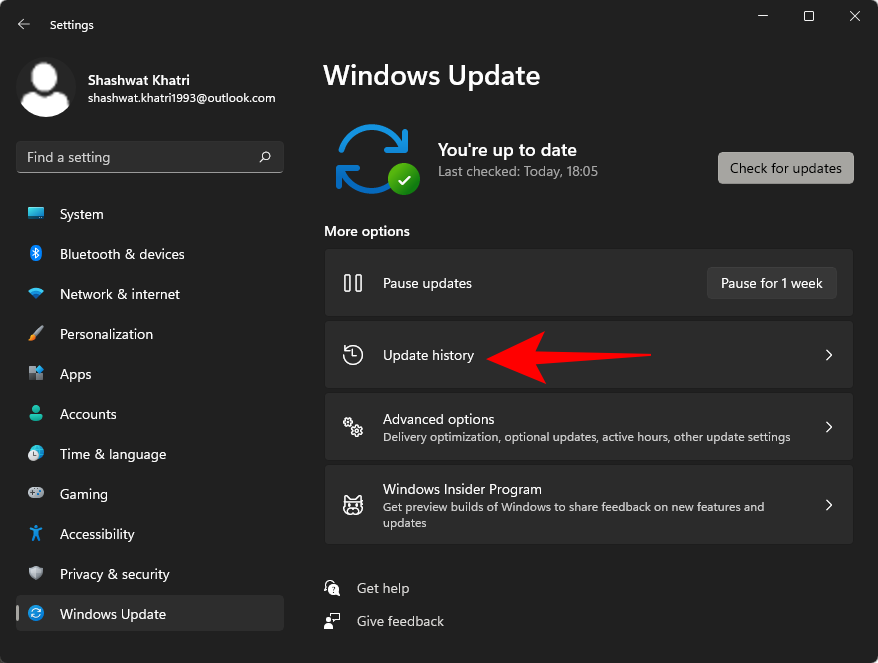
Then click on Update history.
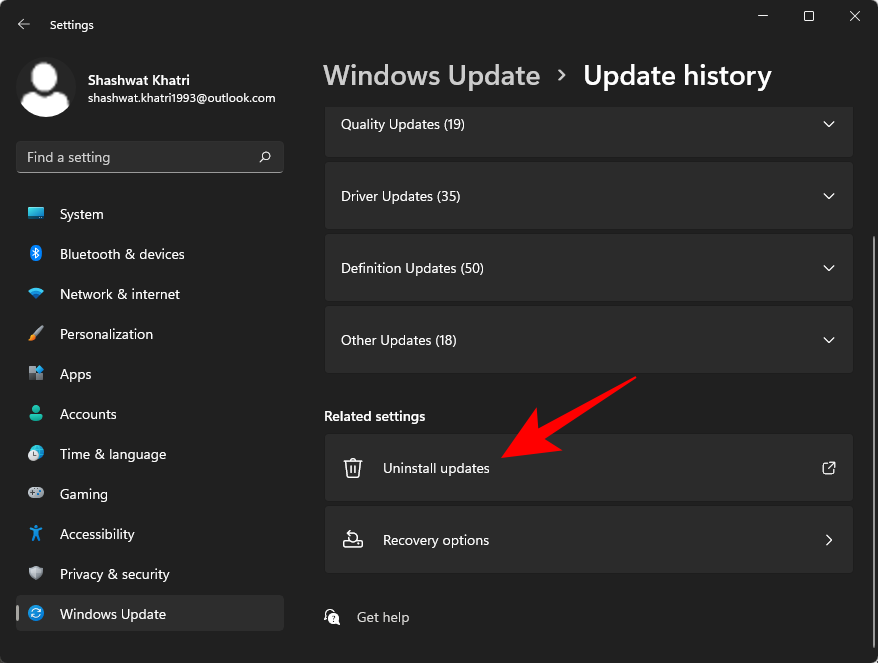
Scroll down and click on Uninstall updates.
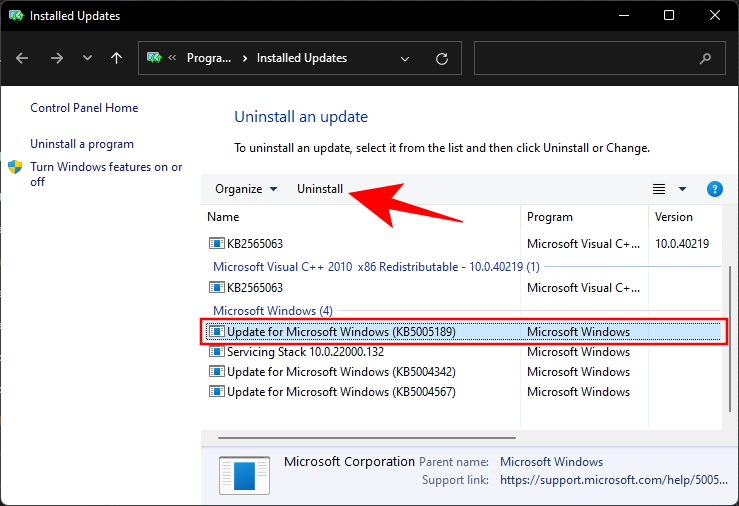
Here, find the update that’s bugging you and select it. Then click on Uninstall.
Confirm with a Yes.
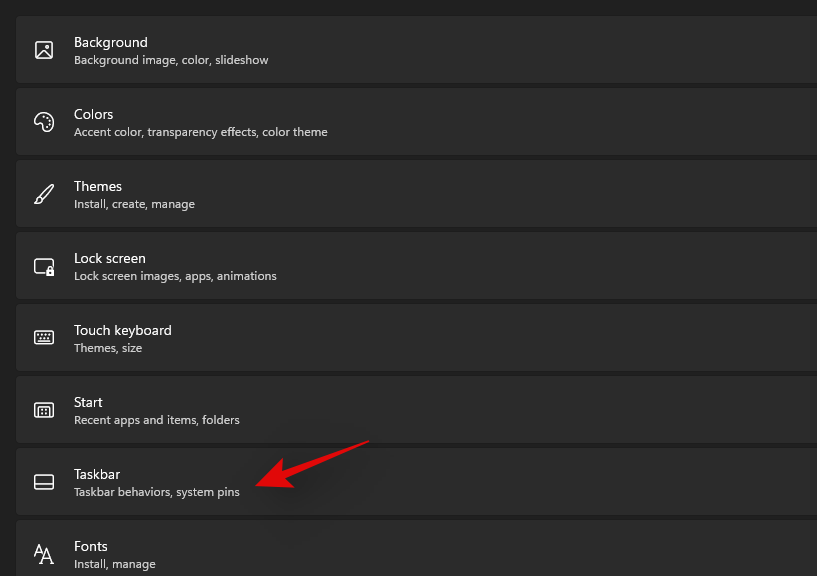
Note: Some minor updates may not have the ‘Uninstall’ button.
Frequently Asked Questions (FAQs):
Let’s take a look at some common queries concerning Windows updates.
Should I disable Windows updates?
Windows Updates should be disabled only if there’s a great need for it. If you’re not suffering from any buggy patches and if all your drivers are functioning without a hitch, keep Windows updates on. Though the updates that you get aren’t always perfect, they are the only source of future security patches and cumulative updates that you’re invariably going to need sooner or later.
Can I permanently disable updates?
Sim, você pode desativar as atualizações permanentemente. Mesmo que a Microsoft seja bastante agressiva ao forçar os usuários a manter o Windows atualizado, e por boas razões também, os métodos mencionados neste guia o ajudarão a evitar isso.
RELACIONADO
