Bara de activități Windows a fost în centrul atenției de când și-a primit noul aspect reînnoit odată cu lansarea Windows 11. Acum puteți să vă centrați bara de activități, să vă bucurați de noul centru de acțiune, să-i schimbați alinierea și să-l plasați pe fiecare parte a ecranului. Din păcate, implementarea acestei funcții a fost mai puțin de succes, din ce în ce mai mulți utilizatori care se luptă să își facă bara de activități să funcționeze pe Windows 11 timp de câteva luni.
Deși Microsoft a recunoscut problema, a emis o soluție și lucrează în prezent la o remediere, utilizatorii par să nu reușească să lucreze din nou bara de activități. Dacă vă aflați în aceeași barcă, atunci am compilat o listă cu toate remediile disponibile pentru a vă reporni și a rula din nou bara de activități pe Windows 11. Urmați ghidul de mai jos pentru a începe.
Cuprins
De ce nu se afișează bara mea de activități?
Bara de activități Windows 11 are un aspect nou, care provine dintr-o abordare reînnoită a funcționării sale. Bara de activități se bazează acum pe mai multe servicii și pe meniul Start în sine pentru a funcționa corect. Se pare că procesul de upgrade de la Windows 10 la Windows 11 pare să încurce bara de activități, în funcție de versiunea de Windows 10 pe care ați instalat-o pe sistemul dvs. și de versiunea de Windows 11 la care actualizați.
În plus, o actualizare recentă Windows lansată luna trecută pare să cauzeze această problemă pentru unii utilizatori, în timp ce alții se confruntă cu același lucru din cauza timpului de sistem nepotrivit, în ciuda faptului că au totul configurat corect. Există multe modalități de a vă remedia bara de activități și vă recomandăm să începeți cu remediile de mai jos, unul câte unul.
12 moduri de a rezolva problemele barei de activități pe Windows 11
Utilizați metodele de mai jos pentru a începe să vă remediați bara de activități pe Windows 11. Dacă ați încercat deja să reporniți sistemul, atunci puteți sări peste prima metodă.
Remedierea nr. 1: Reporniți computerul
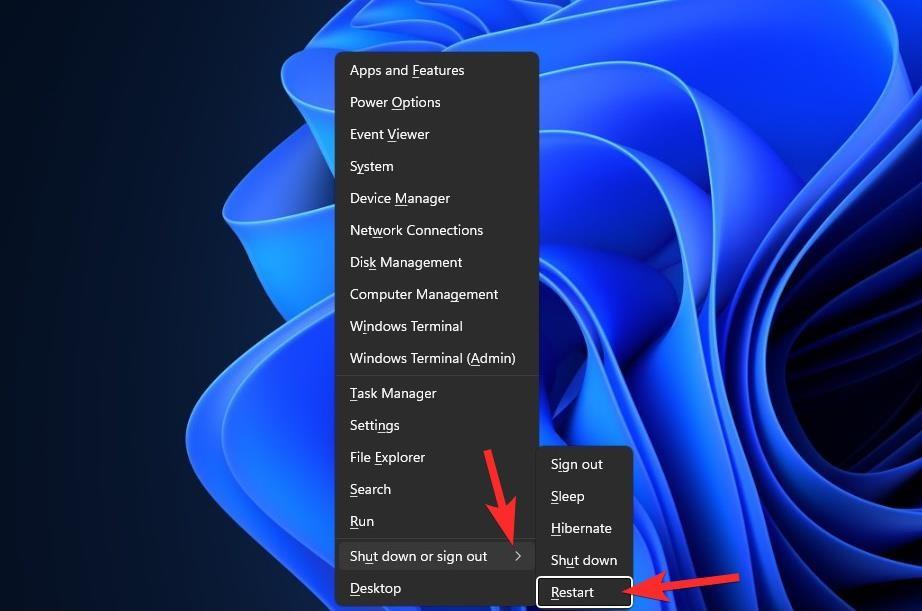
Înainte de a încerca ceva elegant, este bine să încercați măsuri mai simple, cum ar fi repornirea computerului sau a Windows Explorer (vezi mai jos). Procedând astfel, sistemul dumneavoastră va avea o resetare soft, permițând reîncărcarea datelor și, eventual, remedierea problemelor cu bara de activități și meniul Start.
Remedierea nr. 2: Asigurați-vă că „Ascundeți automat bara de activități” este dezactivată
Apăsați Windows + ipe tastatură și faceți clic pe „Personalizare” din stânga dumneavoastră.
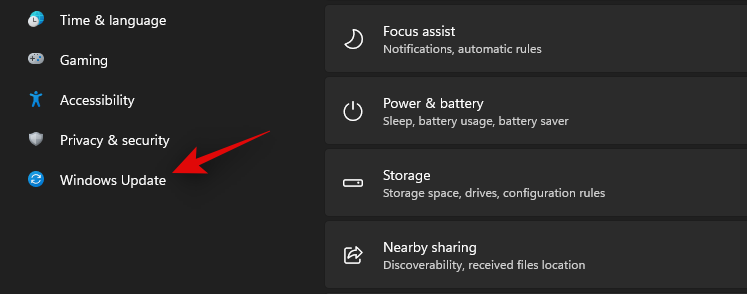
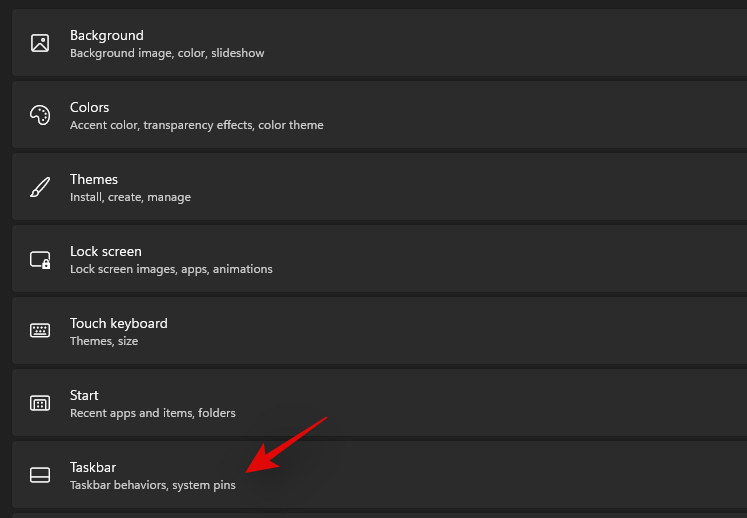
Faceți clic pe „Bara de activități”.
Acum faceți clic pe „Comportamente din bara de activități”.
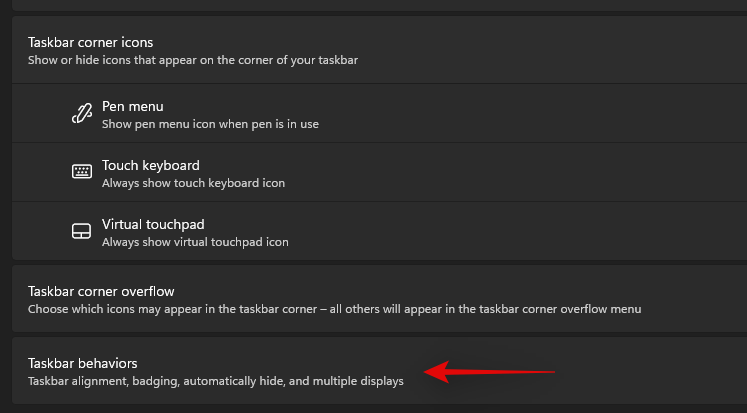
Debifați caseta pentru „Ascundeți automat bara de activități”.

Acum închideți aplicația Setări și dacă bara de activități a fost ascunsă automat, atunci ar trebui să fie acum dezactivată pe sistemul dvs.
Remedierea nr. 3: Reporniți serviciile necesare
După cum am menționat mai devreme, Windows 11 a reînnoit bara de activități, ceea ce înseamnă că acum se bazează pe mai multe servicii pentru a funcționa corect pe orice sistem. Să repornim toate aceste servicii pentru a ne asigura că un conflict de fundal nu împiedică bara de activități să funcționeze corect pe sistemul dumneavoastră.
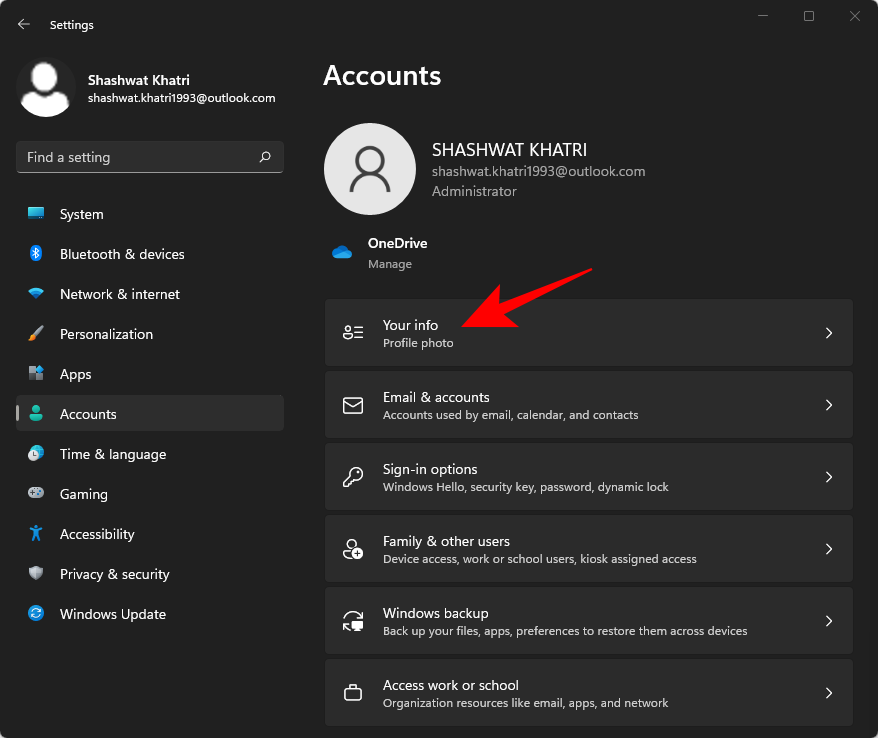
Apăsați Ctrl + Shift + Escpe sistemul dvs. pentru a lansa Managerul de activități. Treceți la fila „Detalii” din partea de sus.
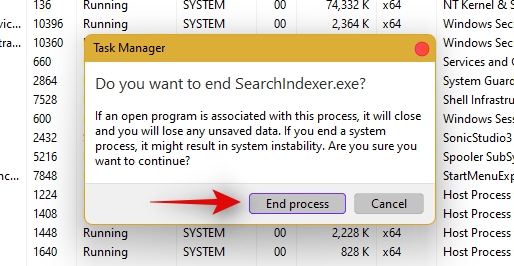
Acum găsiți următoarele servicii care rulează și selectați-le făcând clic pe ele. Apăsați „Șterge” de pe tastatură și confirmați alegerea selectând „Încheierea procesului”.
- Explorer.exe
- ShellExperienceHost.exe
- SearchIndexer.exe
- SearchHost.exe
- RuntimeBroker.exe
Să repornim Windows Explorer acum. Faceți clic pe „Fișier” în colțul din stânga sus și selectați „Run new task”.
Tastați „explorer.exe” și apăsați Enter pe tastatură. De asemenea, puteți face clic pe „Ok”, dacă este necesar.
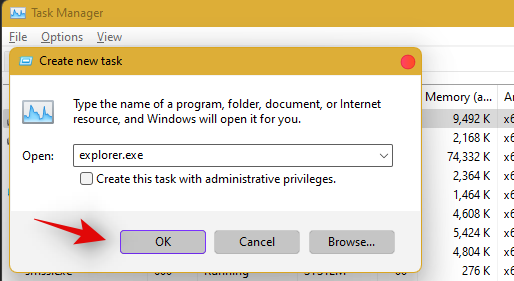
Odată ce exploratorul este repornit, pur și simplu reporniți computerul pentru a reporni alte servicii de pe sistem.
Bara de activități ar trebui acum să fie restabilită dacă un conflict de servicii de fundal a fost cauza problemei dvs.
Remedierea nr. 4: Ștergeți IrisService din Registry și reporniți
Apăsați Ctrl + Shift + Escpentru a deschide Managerul de activități. Apoi faceți clic pe Fișier în colțul din stânga sus.
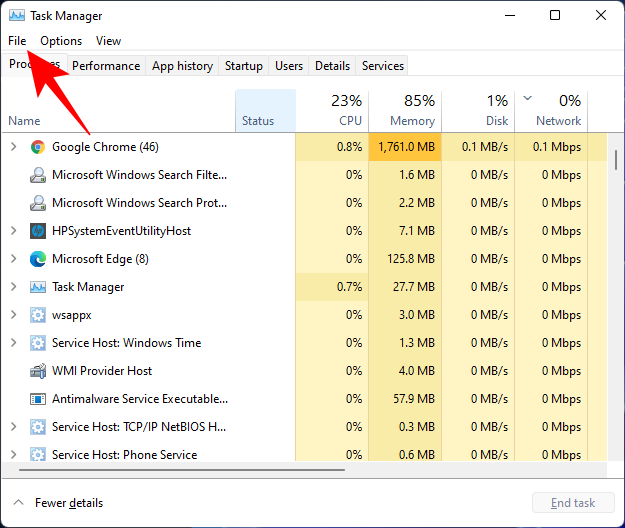
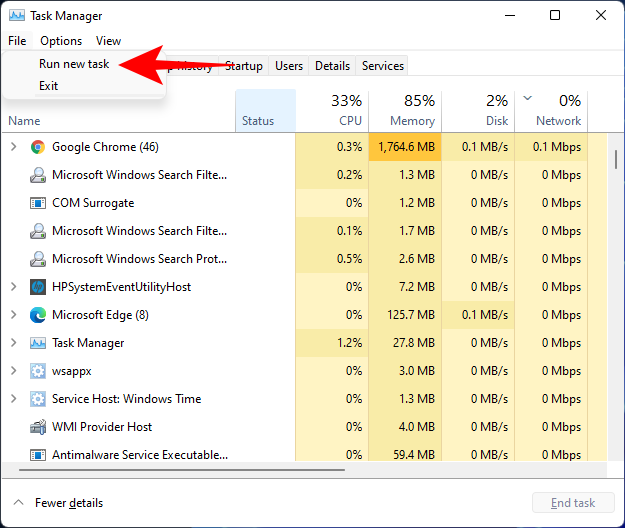
Selectați Run new task .
Tastați cmd și apăsați Enter.
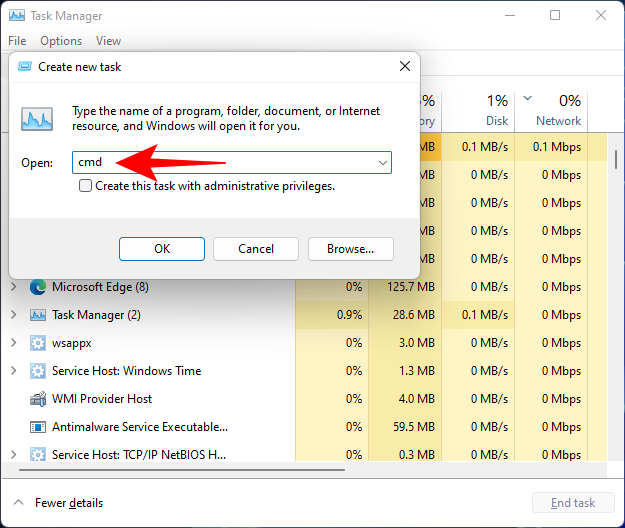
Aceasta va deschide o instanță ridicată a promptului de comandă. Acum copiați următoarea comandă și inserați-o în linia de comandă:
reg delete HKCU\SOFTWARE\Microsoft\Windows\CurrentVersion\IrisService /f && shutdown -r -t 0

Apoi apăsați Enter. De îndată ce faceți acest lucru, computerul se va reporni. Odată ce a pornit din nou, lucrurile ar trebui să revină la normal, inclusiv bara de activități.
Remedierea #5: Adăugați UndockingDisabled în Registry
Apăsați Ctrl + Shift + Escpentru a deschide Managerul de activități. Apoi faceți clic pe Fișier (colțul din stânga sus) și Rulați o nouă sarcină .
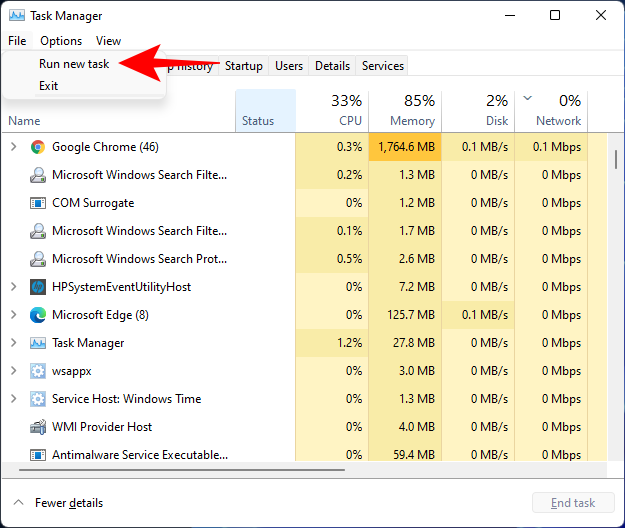
Tastați regedit și apăsați Enter.
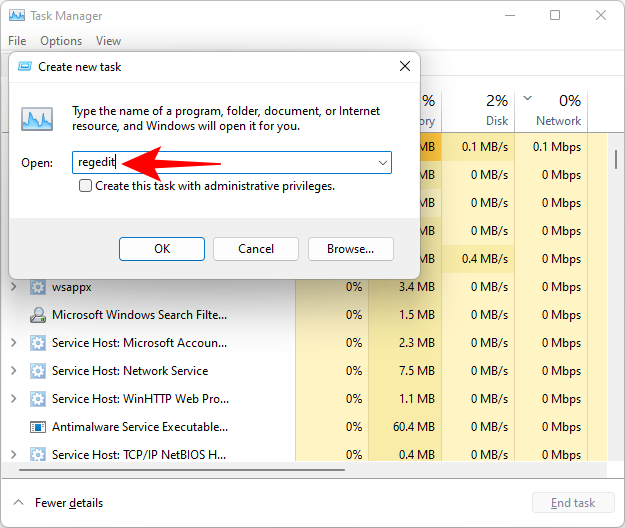
Aceasta va deschide Editorul Registrului. Acum navigați la următoarea adresă:
Computer\HKEY_LOCAL_MACHINE\SOFTWARE\Microsoft\Windows\CurrentVersion\Shell\Update\Packages
Alternativ, copiați cele de mai sus și lipiți-l în bara de adrese a Editorului de registru, astfel:

După ce apăsați Enter, veți fi direcționat către tasta specificată. În dreapta, faceți clic dreapta pe spațiu și selectați Nou > Valoare DWORD (32 de biți) .
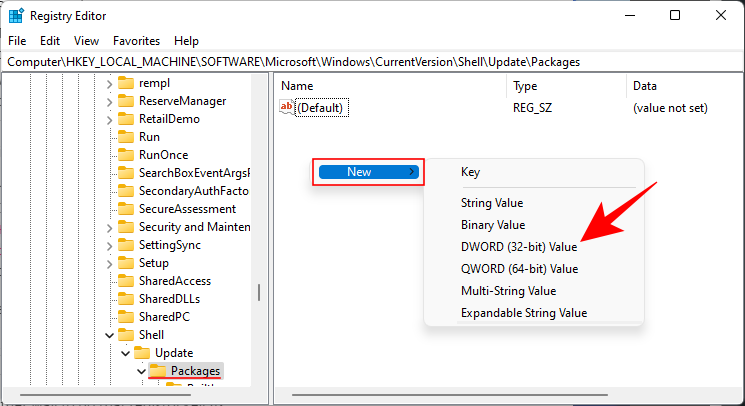
Denumiți acest DWORD nou creat UndockingDisabled .
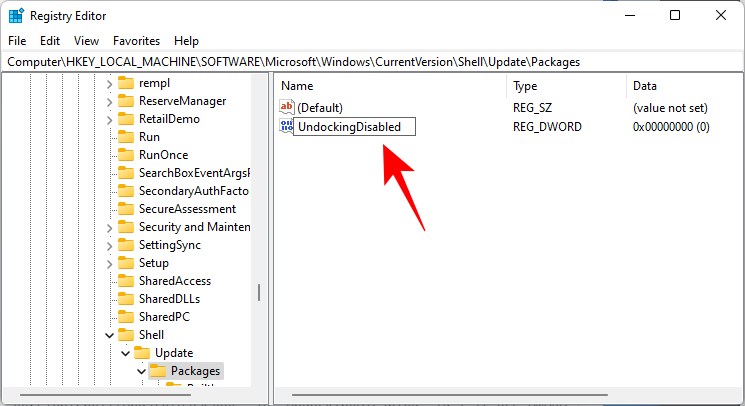
Apoi faceți dublu clic pe el și schimbați „Date valori” la 1 . Apoi faceți clic pe OK .
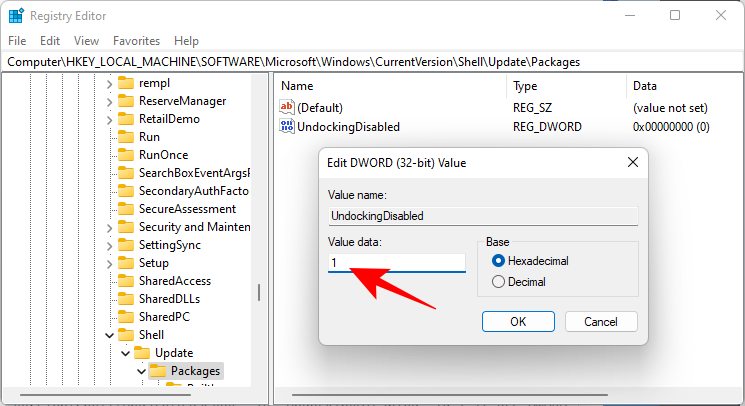
Reporniți computerul pentru ca modificările să intre în vigoare.
Remedierea nr. 6: Rulați comenzile SFC și DISM
Apăsați Start, tastați cmd și faceți clic pe Executare ca administrator .
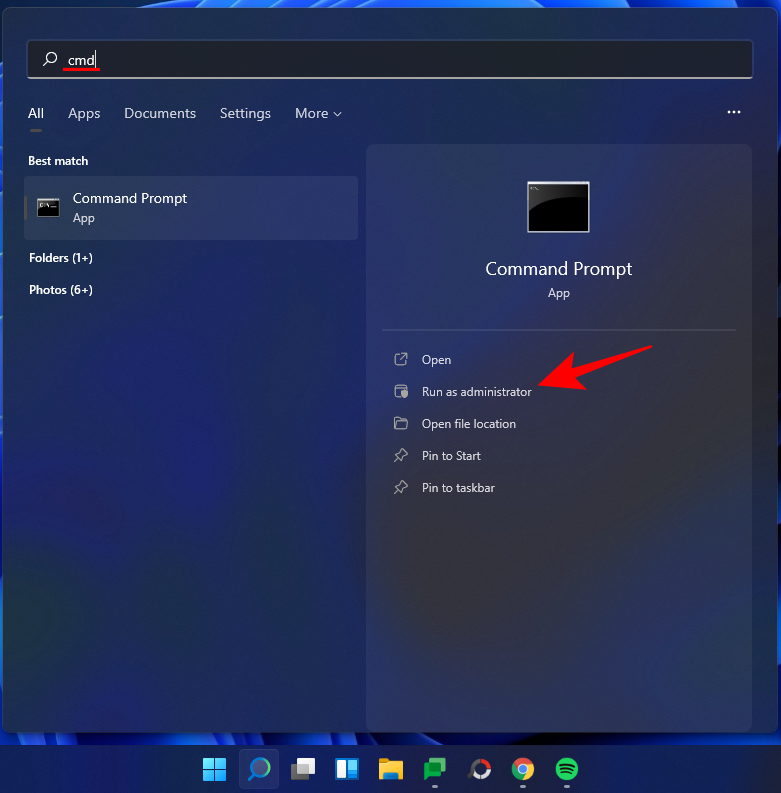
Acum tastați următoarea comandă:
sfc /scannow
Apasa Enter. Așteptați ca SFC să termine scanarea și remediați problemele găsite.

În continuare, rulați următoarea comandă DISM pentru instrumentul Deployment Image Service and Management:
dism /online /cleanup-image /scanhealth
Apoi apăsați Enter. Din nou, așteptați finalizarea scanării.

Acum, rulați următoarea comandă DISM:
dism /online /cleanup-image /restorehealth

Apasa Enter. Așteptați ca DISM să restabilească sănătatea.

În cele din urmă, rulați comanda chkdsk pentru a rula utilitarul Check Disk:
chkdsk c: /r
Apasa Enter. Linia de comandă va afișa un mesaj care vă va spune că „nu poate bloca unitatea curentă... deoarece volumul este utilizat de un alt proces” și vă va cere permisiunea de a programa o scanare înainte de următoarea pornire. Tastați Ypentru a se conforma.

Și apăsați Enter. Acum reporniți computerul, lăsați instrumentul Verificare disc să-și facă treaba și verificați dacă bara de activități și-a reluat funcționarea normală.
Remedierea nr. 7: Reinstalați UWP
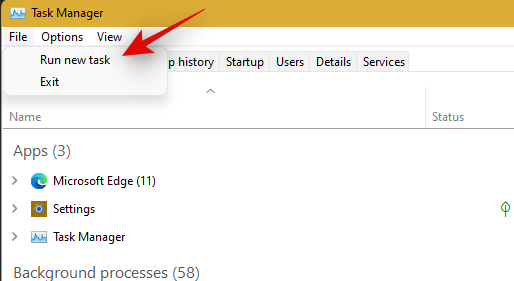
Apăsați Ctrl + Shift + Escpe tastatură pentru a lansa Managerul de activități. Faceți clic pe „Fișier” și selectați „Run new task”.
Tastați „PowerShell” și apăsați Ctrl + Shift + Enterpe tastatură.

PowerShell va fi acum lansat ca administrator pe sistemul dumneavoastră. Tastați următoarea comandă:
Get-AppxPackage -AllUsers | Foreach {Add-AppxPackage -DisableDevelopmentMode -Register “$ ($ _. InstallLocation) \ AppXManifest.xml”}
Apasa Enter. PowerShell va afișa o listă de mesaje în roșu. Dar nu-ți face griji pentru asta. Așteptați doar ca comanda să termine executarea.

Remedierea nr. 8: Verificați UAC și adăugați Registry de editare dacă este necesar
UAC este o necesitate pentru toate aplicațiile și funcțiile moderne, inclusiv meniul Start și bara de activități. Mai întâi ar trebui să activați UAC dacă este dezactivat și să reporniți sistemul. Dacă bara de activități încă nu funcționează pentru dvs., atunci vă recomandăm să încercați să adăugați o valoare a meniului Xaml Start la Editorul dvs. de registry.
Adăugarea acestei valori pare să repornească și să reînregistreze serviciile Taskbar, care par să facă Bara de activități să funcționeze din nou pe majoritatea sistemelor. Urmați ghidul de mai jos pentru a începe.
Verificați și activați UAC dacă este dezactivat
Apăsați Ctrl + Shift + Escpe tastatură pentru a lansa managerul de activități. Acum faceți clic pe „Fișier” în colțul din stânga sus al ecranului și selectați „Run new task”.

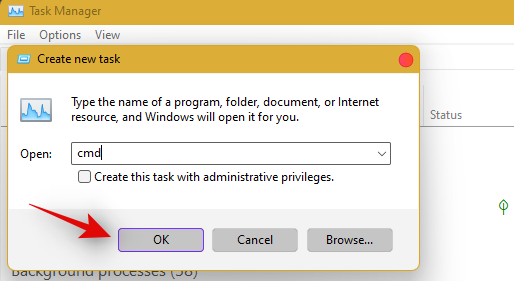
Tastați „cmd” și apăsați Ctrl + Shift + Enterpe tastatură.
Acum tastați următoarea comandă și apăsați Enter pentru a executa comanda.
C:\Windows\System32\cmd.exe /k %windir%\System32\reg.exe ADD HKLM\SOFTWARE\Microsoft\Windows\CurrentVersion\Policies\System /v EnableLUA /t REG_DWORD /d 0 /f
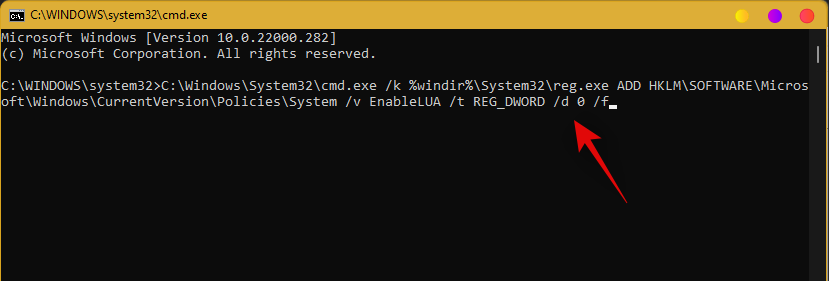
UAC va fi acum activat pentru sistemul dvs. Reporniți computerul pentru ca modificările să aibă efect asupra sistemului dvs. Odată repornită, bara de activități ar trebui să fie activă și să ruleze pe sistemul dvs. dacă UAC a fost problema pentru dvs. Dacă nu, utilizați ghidul de mai jos pentru a declanșa funcționalitatea barei de activități pe sistemul dvs.
Adăugați valoarea de registru
Apăsați Ctrl + Shift + Escpentru a lansa managerul de activități. Acum faceți clic pe „Fișier” în colțul din stânga sus și selectați „Run new task”.

Tastați „cmd” și apăsați Ctrl + Shift + Enterpe tastatură.

Acum introduceți următoarea comandă și apăsați Enter pe tastatură.
REG ADD "HKCU\Software\Microsoft\Windows\CurrentVersion\Explorer\Advanced" /V EnableXamlStartMenu /T REG_DWORD /D 1 /F
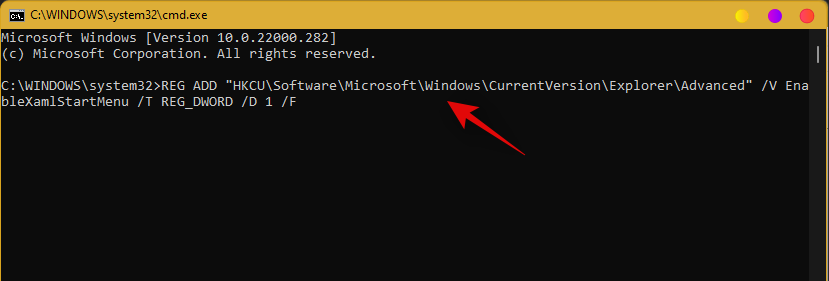
Reveniți acum la managerul de activități, găsiți Windows Explorer în listă și faceți clic dreapta pe el. Selectați Restart pentru a reporni explorer.exe.
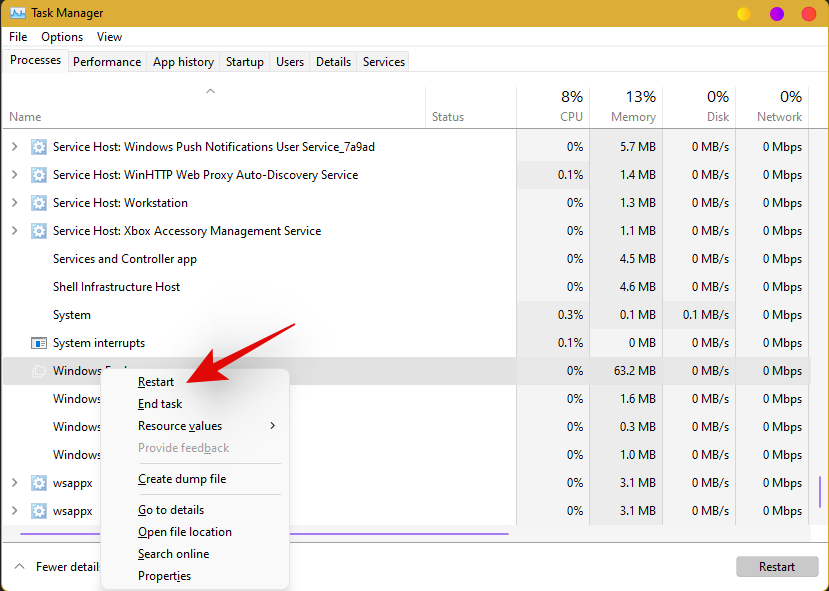
Odată repornit, încercați să accesați bara de activități. Bara de activități ar trebui să fie acum disponibilă pe sistemul dvs.
Remedierea nr. 9: Editați data și ora pentru a remedia bara de activități
Setările de dată și oră par să fie cauza majoră a problemelor cu bara de activități în Windows 11. Utilizați ghidul de mai jos pentru a încerca următoarele remedieri de timp pentru a vedea care funcționează cel mai bine pentru dvs.
Asigurați-vă că ora dvs. este sincronizată corect cu serverul de timp
Apăsați Ctrl + Shift + Escpe tastatură și faceți clic pe „Fișier”. Selectați „Run new task”.

Tastați „Control” și apăsați Enter pe tastatură.
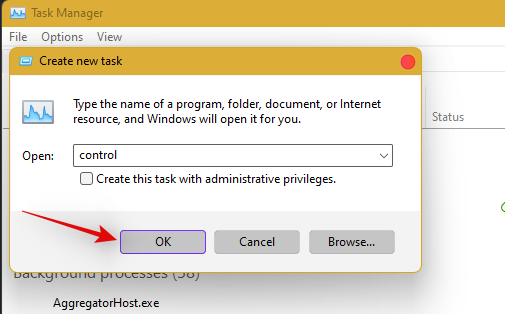
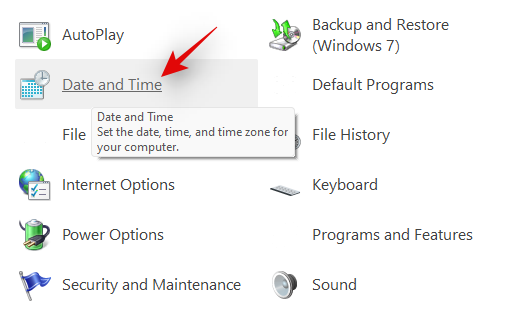
Faceți clic pe „Dată și oră”.
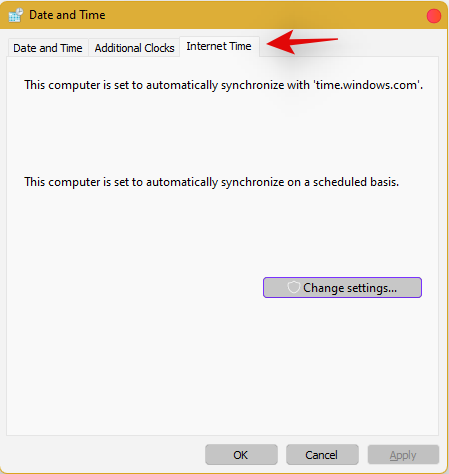
Selectați „Ora Internet” din partea de sus.
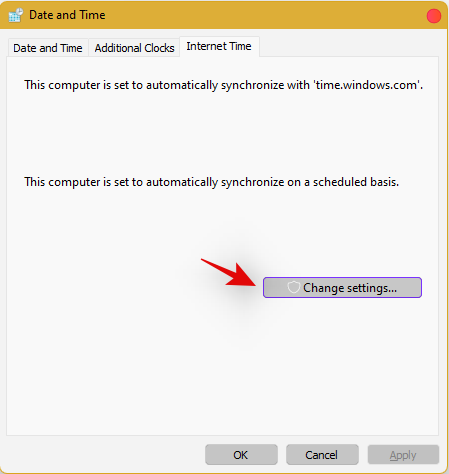
Faceți clic pe „Modificați setările”.
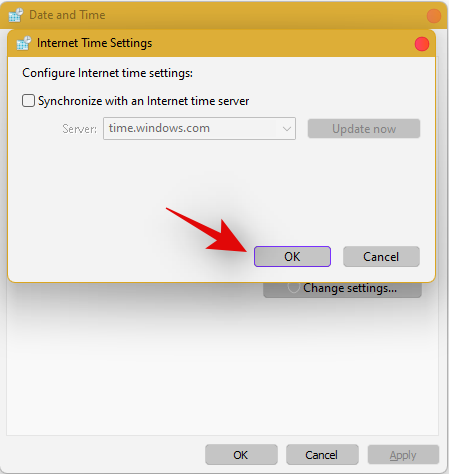
Debifați caseta pentru „Sincronizare cu un server de timp pe Internet”.

Faceți clic pe „Ok” după ce ați terminat.
Reporniți computerul în acest moment și verificați bara de activități. Dacă este încă dezactivat, nu vă îngrijorați, urmați pașii de mai sus și activați din nou Sincronizarea cu un Internet Time Server.
Once enabled, press Ctrl + Shift + Esc on your keyboard, and find Windows Explorer in the list on your screen. Right-click the listing and select ‘Restart’.

Once explorer restarts, try using the Taskbar. If synchronization was your issue, then it should now be fixed on your system. If not, continue with the other time fixes mentioned below.
Change date to 1 day ahead
Open the Task Manager by pressing Ctrl + Shift + Esc simultaneously. Then click on File.
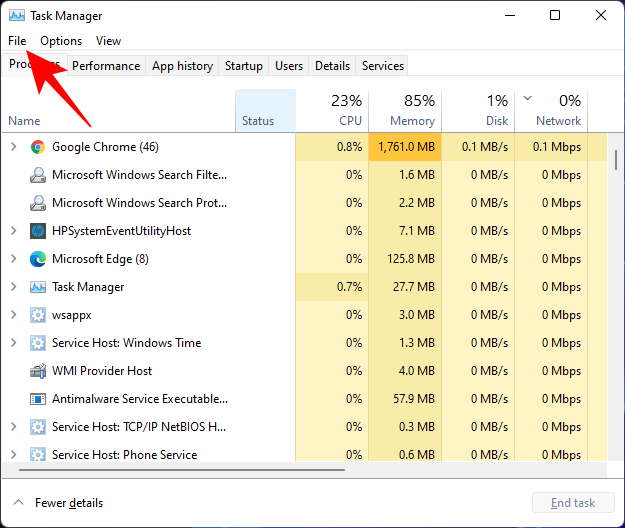
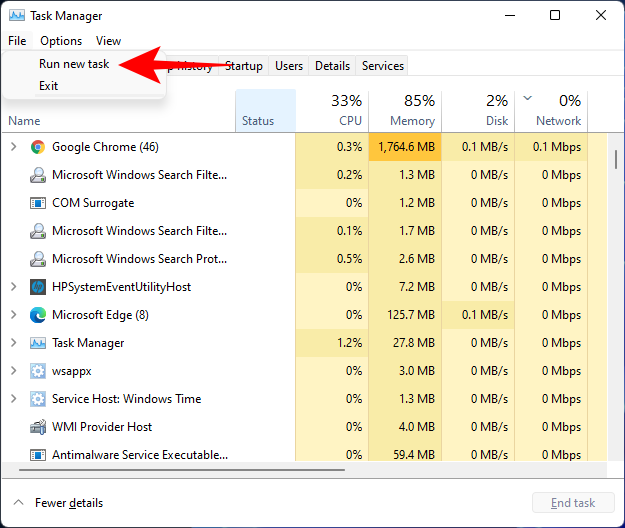
Click on Run new task.
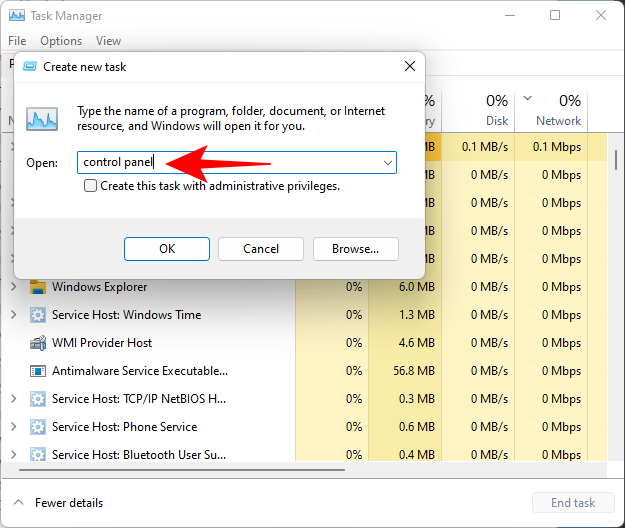
Type control panel and hit Enter.
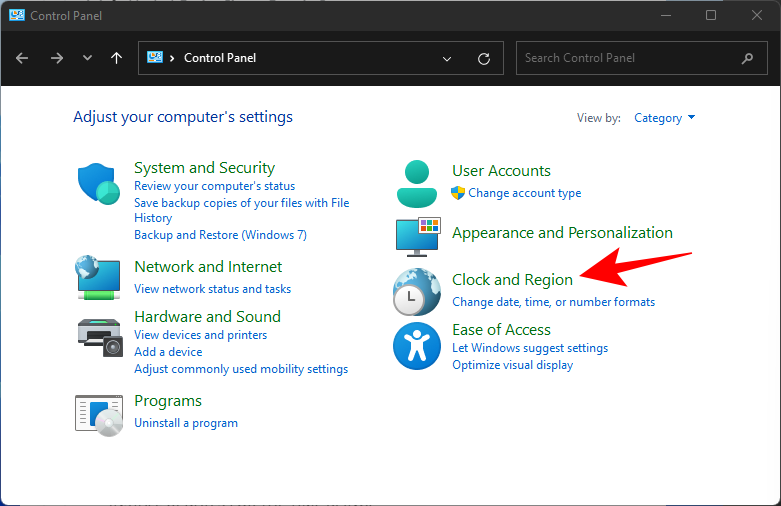
Now click on Clock and Region.
Under “Date and Time”, click on Set the time and date.
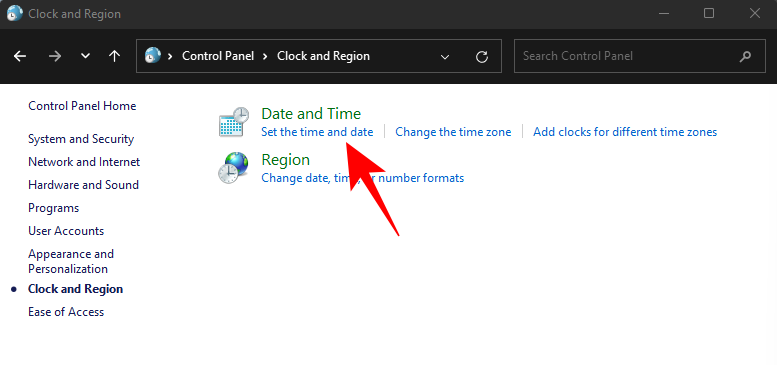
Click on the Internet Time tab to switch to it.
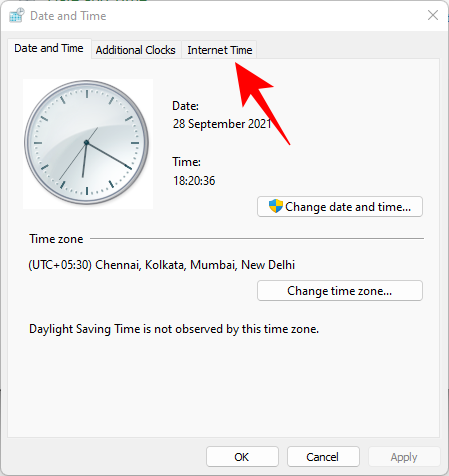
Click on Change settings…
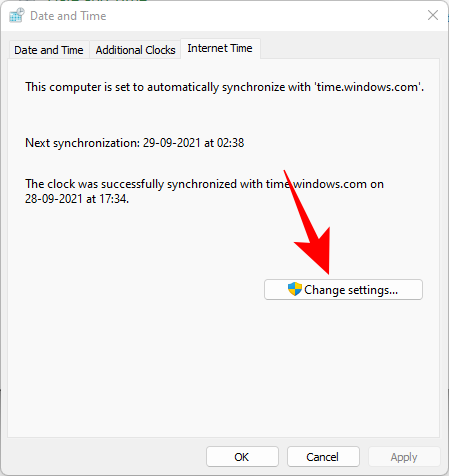
Uncheck Synchronize with an Internet time server, then click OK.

Now click on the Date and Time tab to switch back to it.
Here, click on Change date and time…
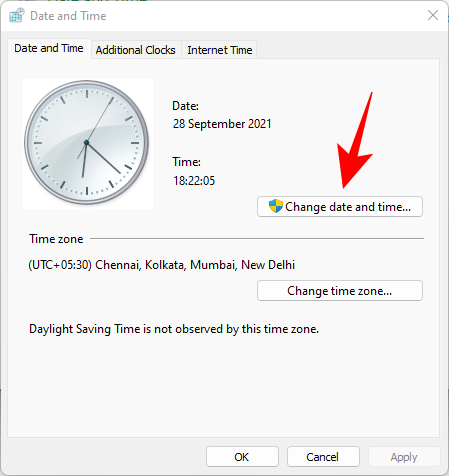
Now change the date and time to reflect tomorrow. As of writing this post, it is the 1st November so we will be changing the date to 2nd November.
Change Dates to last cumulative updates
If you are still unable to get the Taskbar working then you will have to jump through a few hoops to change your date and time multiple times and get the taskbar working on your system. Follow the guide below to get you started.
Press Ctrl + Shift + Esc on your keyboard, click on ‘File’ and select ‘Run new task’.

Type in ‘Control’ and press Enter on your keyboard.

Select ‘Date and Time’.

Switch to ‘Internet time’.

Click on ‘Change Settings’.

Uncheck the box for ‘Synchronize with an Internet Time Server’.

Click on ‘Ok’.

Switch back to ‘Date and Time’. Click on ‘Change Date and Time’ and select your date as 2nd September.
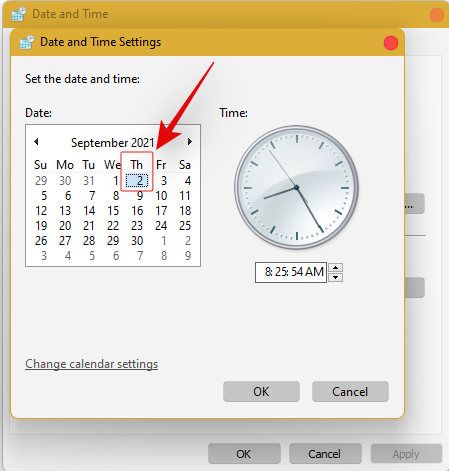
Close all windows and restart your system. Once restarted, open the ‘Date and Time’ dialog box again and change your date to 7th October this time.
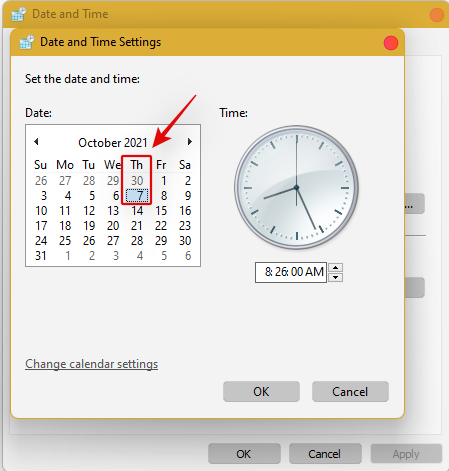
Restart your system again and Taskbar should now be back up and running on your system again. You can now enable synchronization for time again using the steps above on your system.
If synchronizing time does not work, move a month ahead to restore Taskbar
If you are still unable to get Taskbar up and running on your system again you can try the last date change fix. We recommend you use the steps above to change your date and time to a month ahead of your current date. Once changed, restart your system, and the taskbar should be up and running on your system now.
The downside of this fix is that if you revert to your normal date, Taskbar will stop working on your system. Having a mismatched date can cause issues with background syncs for various applications and cause some websites to malfunction. You will also have issues installing and getting the latest Windows Updates, so you will need to check all of these manually when updating in the future.
Fix #10: Uninstall the latest cumulative Windows Update ie: KB5006050
The cumulative update released in September for Windows 11 seems to also cause issues with the taskbar on some desktops and laptops. Use the guide below to uninstall the necessary update from your system.
Press Windows + i and select Windows Update from the left.
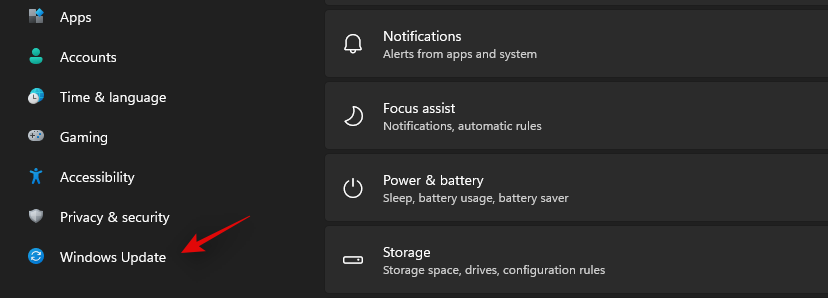
Click on ‘Update history’.
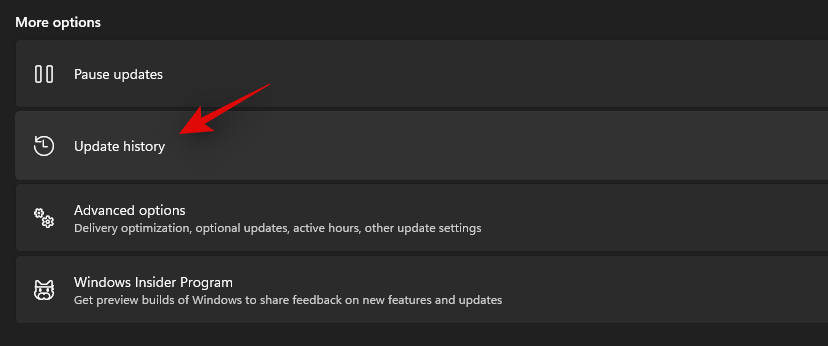
Now select ‘Uninstall updates’.
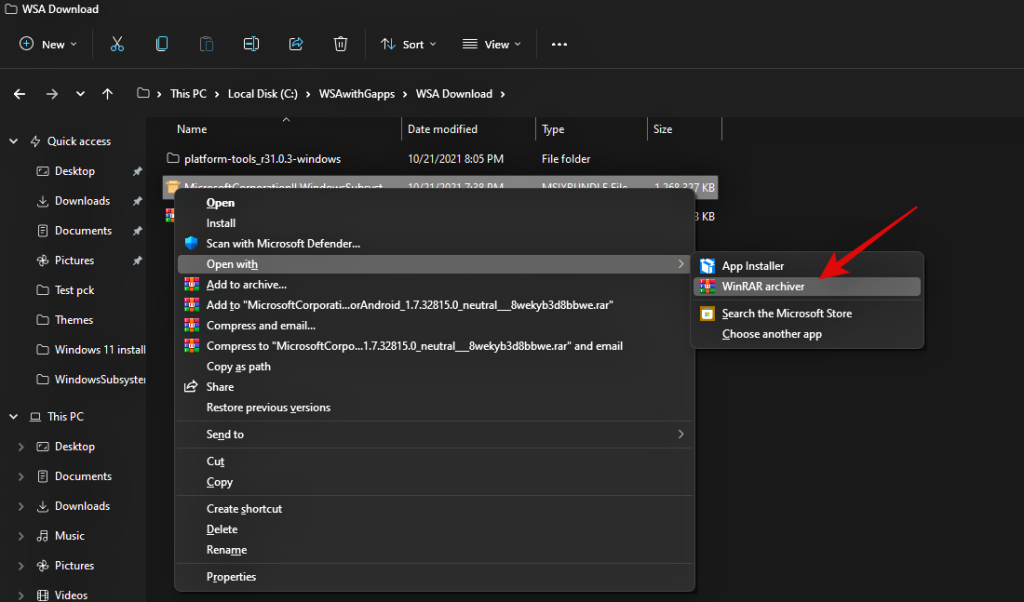
Click and select Windows Cumulative update KB5006050 from the list.

Now click on ‘Uninstall’ at the top and confirm your choice to uninstall the selected update.
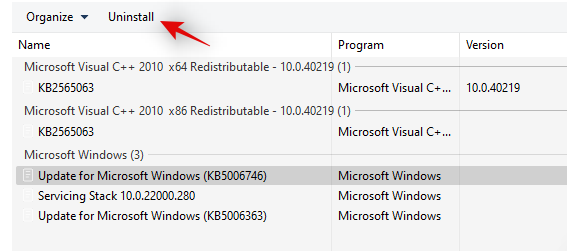
Restart your system and taskbar functionality should now be restored on your system.
Fix #11: Restore PC to a previous restore point
If you had the taskbar working at a previous point in time then we recommend you restore your PC to a previously available restore point on your system. Follow the guide below to get you started.
Press Ctrl + Shift + Esc on your keyboard and click on ‘File’. Select ‘Run new task’ once you are done.

Type in CMD and press Ctrl + Shift + Enter on your keyboard.

Now type in ‘rstrui.exe’ and press Enter on your keyboard.
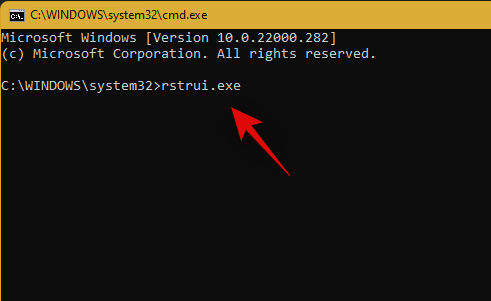
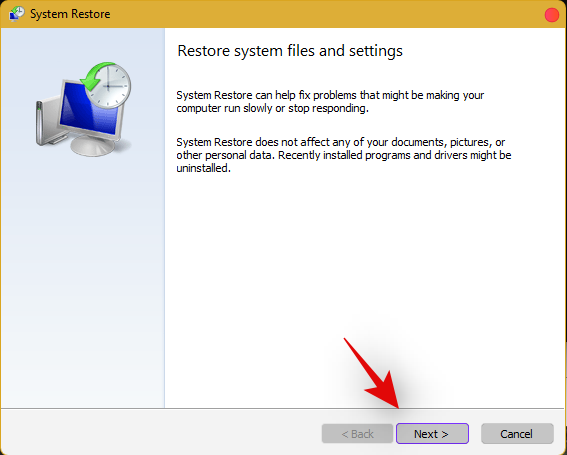
The system restore utility will now launch on your system. Click on ‘Next’.
Select the desired restore point from the list on your screen. Click on ‘Next’ once you are done.
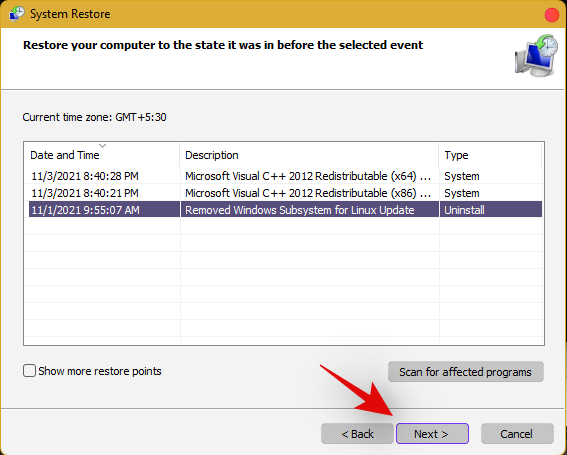
Tip: Click on ‘Scan for affected programs’ to view a list of installed programs that will be removed from your system during the restore process.
Click on ‘Finish’ once the restore finishes and restart your system.
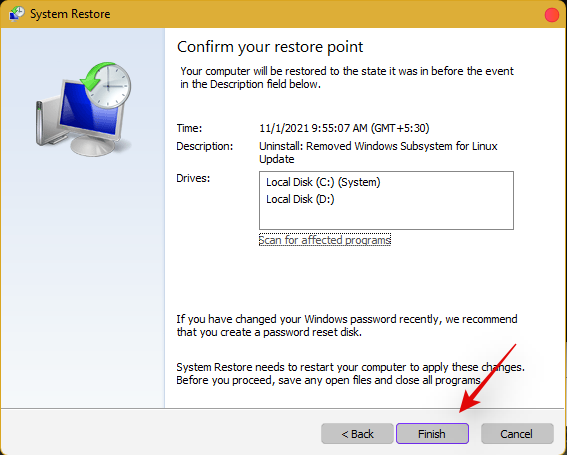
The taskbar should now be back up and running on your system again.
Fix #12: Last Resort: Create a new local admin account and transfer all your data
If by this point Taskbar still fails to work for you then it’s time for some drastic measures. You can create a new local admin account, check if Taskbar is working there, and then transfer all your data to the new account. This will be a tedious process but it is the next best way to get the taskbar working on your system without resetting your PC. Follow the guide below to get you started.
Create a new local admin account
Herre’s how you can create a new local admin account on your system.
Note: Most users facing the taskbar issue are unable to access the Settings app as well. Hence we will be using CMD to add a new local admin account to your PC. However, if the Settings app is available to you then you can use the same to add a new account as well.
Press Ctrl + Shift + Esc on your keyboard, click on ‘File’ and select ‘Run new task’.

Type in ‘cmd’ and press Ctrl + Shift + Enter on your keyboard.

CMD will now be launched as an administrator. Use the command below to add a new local admin account. Replace NAME with the Username of your choice for the new account. You can add a password later once you have confirmed that the taskbar is available in the new account.
net user /add NAME 
Once you have added the new user, use the command below to convert it to an administrator account on your PC. As usual, replace NAME with the Username for the new account you created earlier.
net localgroup Administrators NAME /add

Now type in the following to log out of your current account.
logoff

Once logged out, click on the newly added account to log in to the same. Once logged in, check if the taskbar is available in the new account. If it is, you can use the next section to transfer all your data. However, if the taskbar is still missing then you have no choice but to perform a fresh install of Windows 11 on your PC from a removable USB media drive.
Transfer all your data
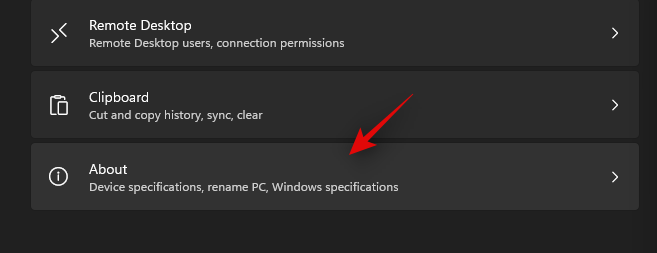
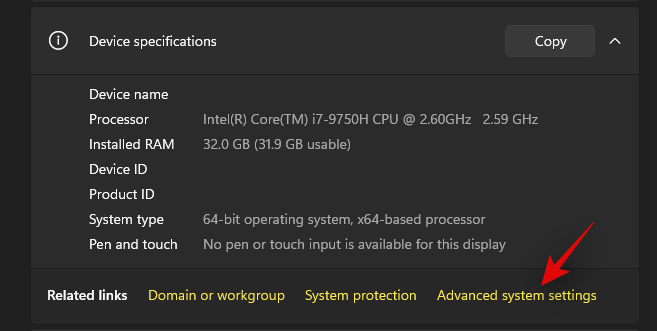
Press Windows + i on your keyboard and click on ‘About’ on your right.
Click on ‘Advanced system settings’.
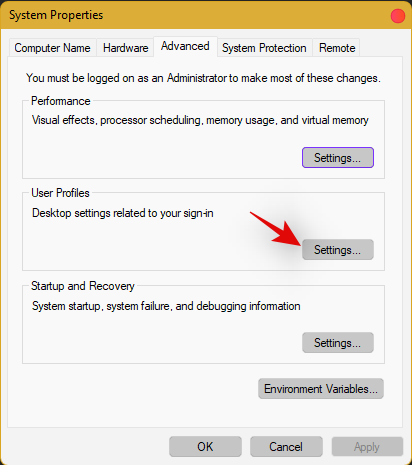
Click on ‘Settings’ under ‘User Profiles’.
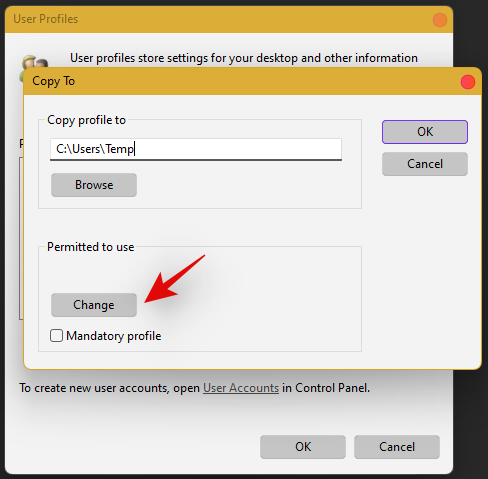
Select your original profile by clicking on it and selecting ‘Copy To’.
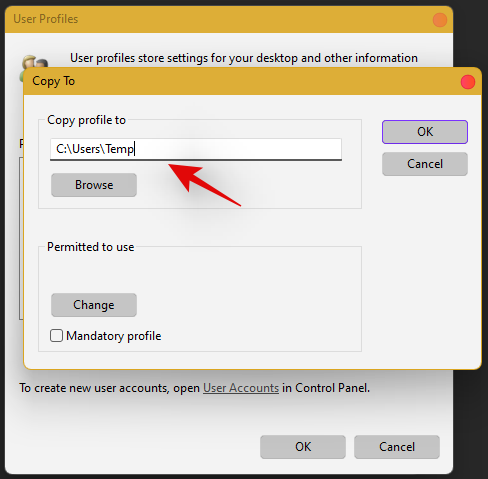
Now enter the following path under ‘Copy profile to’. Rename NAME to the username of your previous profile from where you wish to copy all your data.
C:\Users\NAME
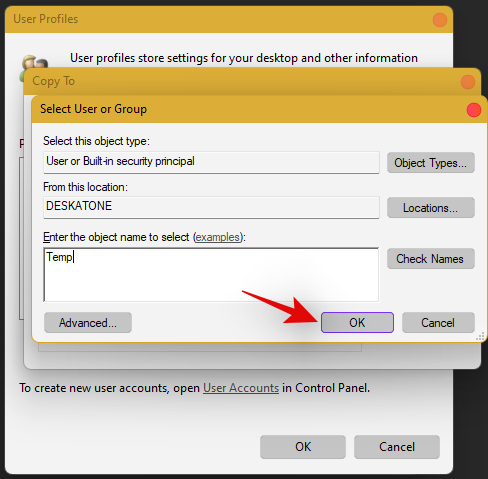
Click on ‘Change’.
Enter the name for your new user profile and press Enter on your keyboard.
Click on ‘Ok’ once you are done.
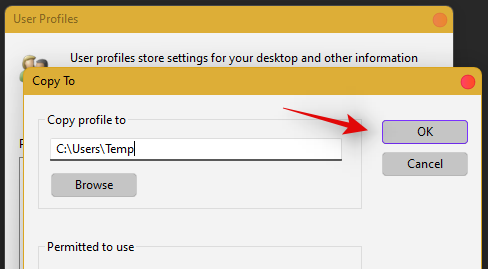
All your data will now be copied over to the new profile where the taskbar is functional on your PC. You can now delete your previous user account and set a password for your new account as well.
Frequently Asked Questions (FAQs):
With so many fixes, you are bound to have a few questions on your mind. Here are some commonly asked ones that should help you get up to speed.
How do I access Windows apps and Settings without a taskbar?
You can use the Task Manager to launch almost any program or Settings page on your system. To launch the desired program, launch the Taskbar > File > Run new task and enter the path to the program you wish to launch. Press Enter if you wish to launch the program normally or press Ctrl + Shift + Enter if you wish to launch the program with administrator privileges.
Is it safe to edit the Registry?
Registry edits are never safe as they have the potential to break your system. Fixes from trusted sources can help you avoid such issues but a good rule of thumb is to always back up your registry before making any edits. This way you can easily restore your Registry values in case some get messed up when editing the Registry.
When will Microsoft fix this issue?
Sadly, Microsoft is yet to release a proper fix for this issue. The company has tried to release a fix in the past cumulative updates to Windows 11 but they have been a hit and miss. We expect Microsoft to completely fix this issue in the upcoming feature update to Windows 11 when the OS gets the ability to run Android apps officially.
Can I update my Windows 11 after fixing the taskbar?
This will depend on the fix that you’re currently using. If you are using a date fix then you won’t be able to install updates until you restore to the current time. This will, however, cause the taskbar to be disabled again and the changes will be carried over after you update your PC. However, if you are using any other fix then you can easily update Windows.
For users with the date fix, you should try updating with the modified time first. If the update gets stuck on ‘Installing 0%’ or ‘Downloading 100%’ then change your date and time to the current date and time and update your PC. Ensure that you do not restart explorer or your PC during this process to keep the current instance of the taskbar alive on your system during the update process. This should help fix the issue for you once Microsoft officially releases an update to fix the issue.
We hope you were able to easily get the taskbar back up and running on your system using the guide above. If you face any more issues, feel free to reach out to us using the comments section below.
Related:


![Cum să remediați eroarea ecranului verde Windows 11 [8 moduri] Cum să remediați eroarea ecranului verde Windows 11 [8 moduri]](https://cloudo3.com/resources8/images31/image-5564-0105182715287.png)


![[Actualizare: 8 noiembrie] Instrumentul de tăiere nu funcționează pe Windows 11? Cum să remediați erorile „Această aplicație nu se poate deschide” sau comenzile rapide [Actualizare: 8 noiembrie] Instrumentul de tăiere nu funcționează pe Windows 11? Cum să remediați erorile „Această aplicație nu se poate deschide” sau comenzile rapide](https://cloudo3.com/resources8/images31/image-6552-0105182756436.jpg)

