🚀 卡在 Microsoft Teams 歡迎介面?幾分鐘內修復錯誤 2026 – 終極指南!

還在為 Microsoft Teams 歡迎介面卡在錯誤代碼 2026 而煩惱嗎?我們提供經過驗證的逐步修復方案,幫助您快速解決問題。清除快取、重置應用程式等等——立即讓 Teams 流暢運行!

本文檔介紹如何配置團隊直接路由託管模型,並僅參考奧科 SBC 配置。
3.3.1 LAN 上帶有 SIP Trunk 的拓撲中的網絡接口
團隊直接路由
Teams Direct Routing允許將客戶提供的 SBC 連接到 Microsoft Phone 系統。客戶提供的 SBC 可以連接到幾乎任何電話中繼,或連接第三方 PSTN 設備。
該連接允許:
奧科 SBC 產品系列
奧科的 SBC 設備系列可在企業的 VoIP 網絡和服務提供商的 VoIP 網絡之間實現可靠的連接性和安全性。SBC 提供外圍防禦,作為保護企業免受惡意 VoIP 攻擊的一種方式;允許將任何 PBX 和/或 IP-PBX 連接到任何服務提供商的調解;服務質量和可管理性的服務保證。
SBC 設計為具有成本效益的設備,基於經過現場驗證的 VoIP 和具有本地主機處理器的網絡服務,允許創建專用的多服務設備,提供與雲服務的平滑連接,具有集成的服務質量、SLA監控、安全性和可管理性。SBC 的本機實施提供了許多獨立 SBC 設備無法提供的附加功能,例如 VoIP 調解、PSTN 訪問生存能力和第三方增值服務應用程序。這使企業能夠利用融合網絡的優勢並消除對獨立設備的需求。
奧科的 SBC 可作為在其經過現場驗證的 Mediant 媒體網關和多服務商業路由器平台之上運行的集成解決方案,或作為與第三方硬件一起部署的純軟件解決方案。SBC 可以作為虛擬化 SBC 提供,支持以下平台:Hyper-V、AWS、AZURE、AWP、KVM 和 VMWare。
配置奧科 SBC
本部分介紹如何配置 AudioCodes 的 SBC 以與 Teams Direct Routing 進行互聯。下圖顯示了託管模型的連接拓撲示例。多個連接實體如圖:

租戶域結構:

先決條件
在開始配置之前,請確保您為要配對的每個 Hosting SBC 擁有這些:
運營商租戶中的 SBC 域名
SBC 域名必須來自在租戶的“域”中註冊的名稱之一。您不能使用 *.onmicrosoft.com 租戶作為域名。
管理員為運營商租戶註冊的 DNS 名稱:

註冊 DNS 名稱示例:

為了激活域,Hosting Provider 需要從為租戶註冊的 SIP 域中添加至少一個用戶。例如,如果此名稱已為此租戶註冊,您可以為用戶 [email protected] 提供域 FQDN Customers.aceducation.info。您應該至少創建一個屬於您如上所述添加的 SBC 域的許可用戶。
屬於 SBC 運營商域的用戶示例:

客戶租戶中的 SBC 域名
對於每個客戶的租戶,您應該添加一個屬於指向客戶租戶的運營商的域。

客戶域中運營商 SBC 的用戶示例:

以下 IP 地址和 FQDN 用作本指南中的示例:

每個客戶需要從為租戶註冊的運營商的 SIP 域中添加至少一個用戶。例如,您可以為用戶 [email protected] 提供域 FQDN sbc2.Customers.aceducation.info,只要此名稱已為此租戶註冊。您應該創建至少一個屬於您在上述步驟中添加的 SBC 域的許可用戶。
SBC 配置概念
下圖說明了奧科 SBC 設備配置背後的概念。

從 SIP 中繼到直接路由的路由取決於 4 類交換機路由方法。路由決策可以基於:
本文檔中顯示的配置基於使用撥號計劃的客戶 DID 範圍。
配置 LAN 和 WAN IP 接口
本節介紹如何配置 SBC 的 IP 網絡接口。部署 SBC 有多種方法。SBC 與以下 IP 實體接口:
LAN 上具有 SIP 中繼的拓撲中的網絡接口

驗證物理端口和以太網組的配置
SBC 會自動檢測物理端口。以太網組也自動分配給端口。在此步驟中,只需要進行參數驗證。
要驗證物理端口:

要驗證以太網組:

配置 LAN 和 WAN VLAN
本節介紹如何為以下每個接口定義 VLAN:
要配置 VLAN:

配置網絡接口
本節介紹如何為以下每個接口配置 IP 網絡接口:
為 LAN 和 WAN 接口配置網絡參數:

配置的 IP 網絡接口如下所示。

配置 TLS 上下文
本節中的配置說明基於以下域結構,該域結構必須作為必須加載到主機 SBC 的證書的一部分來實現:
CN:customers.ACeducation.info
SAN:*.customers.ACeducation.info
該證書模塊基於服務提供商自己的 TLS 證書。

Teams 直接路由接口僅允許來自 SBC 設備的 TLS 連接,用於使用由受信任的證書頒發機構之一簽署的證書進行 SIP 流量。當前支持的證書頒發機構可以在Microsoft 網站上找到。
配置 NTP 服務器地址
本節介紹如何配置 NTP 服務器的 IP 地址。建議實現 NTP 服務器(Microsoft NTP 服務器或其他全局服務器)以確保 SBC 接收當前日期和時間。這對於驗證遠程方的證書是必要的。重要的是,NTP 服務器將位於 OAMP IP 接口(在我們的例子中為 LAN_IF)或可通過它訪問。
配置 NTP 服務器地址:

為團隊直接路由創建 TLS 上下文
下面以 DigiCert Global Root CA 為例,介紹如何為 SBC WAN 接口申請證書並進行配置。SBC 使用該證書來驗證與 Teams 直接路由的連接。該過程包括以下主要步驟:
為團隊直接路由創建 TLS 上下文:

注意:上表舉例說明了側重於互連 SIP 和媒體的配置。您可能希望根據公司的政策配置其他參數。例如,您可能想要配置在線證書狀態協議 (OCSP) 以檢查在線服務器中提供的 SBC 證書是否仍然有效或已撤銷。

生成 CSR 並從支持的 CA 獲取證書
本節介紹如何生成證書籤名請求 (CSR) 並從受支持的證書頒發機構獲取證書。
要生成證書籤名請求 (CSR) 並從支持的證書頒發機構獲取證書:
在證書籤名請求組下,執行以下操作:

在 SBC 上部署 SBC 和根/中間證書
從 CA 獲得 SBC 簽名和受信任的根/中間證書後,安裝以下內容:
要安裝 SBC 證書:


The above method creates a signed certificate for an explicit device, on which a Certificate Sign Request was generated (and signed with private key). To be able to use the same wildcard certificate on multiple devices, use following methods.
Method of Generating and Installing the Wildcard Certificate
To use the same certificate on multiple devices, you may prefer using 3rd party application (e.g., DigiCert Certificate Utility for Windows) to process the certificate request from your Certificate Authority on another machine, with this utility installed.
After you’ve processed the certificate request and response using the DigiCert utility, test the certificate private key and chain and then export the certificate with private key and assign a password.
To install the certificate:
Deploy Baltimore Trusted Root Certificate
Loading Baltimore Trusted Root Certificates to AudioCodes’ SBC is mandatory for implementing an MTLS connection with the Microsoft Teams network.
The DNS name of the Teams Direct Routing interface is sip.pstnhub.microsoft.com. In this interface, a certificate is presented which is signed by Baltimore Cyber Baltimore CyberTrust Root with Serial Number: 02 00 00 b9 and SHA fingerprint: d4:de:20:d0:5e:66:fc: 53:fe:1a:50:88:2c:78:db:28:52:ca:e4:74. To trust this certificate, your SBC must have the certificate in Trusted Certificates storage. Download the certificate from and follow the steps above to import the certificate to the Trusted Root storage.
Before importing the Baltimore root certificate into AudioCodes’ SBC, make sure it’s in .PEM or .PFX format. If it isn’t, you need to convert it to .PEM or .PFX format, otherwise the ‘Failed to load new certificate’ error message is displayed. To convert to PEM format, use Windows local store on any Windows OS and then export it as ‘Base-64 encoded X.509 (.CER) certificate’.
Configure Media Realms
Media Realms allow dividing the UDP port ranges for use on different interfaces. In the example below, two Media Realms are configured:
To configure Media Realms:

The configured Media Realms are shown in the figure below.
Configure SIP Signaling Interfaces
This section shows on how to configure a SIP Signaling Interfaces. A SIP Interface defines a listening port and type (UDP, TCP, or TLS) for SIP signaling traffic on a specific logical IP network interface (configured in the Interface Table above) and Media Realm.
Note that the configuration of a SIP interface for the SIP Trunk shows as an example and your configuration might be different. For specific configuration of interfaces pointing to SIP trunks and/or a third-party PSTN environment connected to the SBC, see the trunk / environment vendor documentation.
AudioCodes also offers a comprehensive suite of documents covering the interconnection between different trunks and equipment.
To configure a SIP interfaces:

The configured SIP Interfaces are shown in the figure below.

Configure Proxy Sets
The Proxy Set and Proxy Address defines TLS parameters, IP interfaces, FQDN and the remote entity’s port. Proxy Sets can also be used to configure load balancing between multiple servers. The example below covers configuration of a Proxy Sets for Teams Direct Routing and SIP Trunk. Note that the configuration of a Proxy Set for the SIP Trunk shows as an example and your configuration might be different.
For specific configuration of interfaces pointing to SIP trunks and/or the third-party PSTN environment connected to the SBC. AudioCodes also offers a comprehensive suite of documents covering the interconnection between different trunks and the equipment.
The Proxy Sets will later be applied to the VoIP network by assigning them to IP Groups.
To configure a Proxy Sets:


Configure a Proxy Address
This section shows on how to configure a Proxy Address.
To configure a Proxy Address for SIP Trunk:


To configure a Proxy Address for Teams:


Configure the Dial Plan
For deployments requiring hundreds of routing rules (which may exceed the maximum number of rules that can be configured in the IP-to-IP Routing table), you can employ tags to represent the many different calling (source URI user name) and called (destination URI user name) prefix numbers in your routing rules.
Tags are typically implemented when you have users of many different called and/or calling numbers that need to be routed to the same destination (e.g., IP Group or IP address). In such a scenario, instead of configuring many routing rules to match all the required prefix numbers, you need only to configure a single routing rule using the tag to represent all the possible prefix numbers.
The Dial Plan (e.g., TeamsTenants) will be configured with a customer tenant FQDN tag per prefix.
To configure Dial Plans:


Configure Call Setup Rules
This section describes on how to configure Call Setup Rules based on customer DID range (Dial Plan). Call Setup rules define various sequences that are run upon receipt of an incoming call (dialog) at call setup, before the device routes the call to its destination.
Configured Call Setup Rules need be assigned to specific IP Group.
To configure a Call Setup Rules based on customer DID range (Dial Plan):


Configure Message Manipulation Rules
This section describes on how to configure SIP message manipulation rules. SIP message manipulation rules can include insertion, removal, and/or modification of SIP headers. Manipulation rules are grouped into Manipulation Sets, enabling you to apply multiple rules to the same SIP message (IP entity).
Once you have configured the SIP message manipulation rules, you need to assign them to the relevant IP Group (in the IP Group table) and determine whether they must be applied to inbound or outbound messages.
To configure SIP message manipulation rule for Teams:


Configure a Coder Group
This section describes on how to configure coders (termed Coder Groups). As Teams Direct Routing supports the SILK and OPUS coders while the network connection to the SIP Trunk may restrict operation with a dedicated coders list, you need to add a Coder Group with the supported coders for each leg, the Teams Direct Routing and the SIP Trunk.
Note that the Coder Group ID for this entity will be assigned to its corresponding IP Profile in the next section.
To configure a Coder Group:

Configure an IP Profile
This section describes on how to configure IP Profiles. An IP Profile is a set of parameters with user-defined settings related to signaling (e.g., SIP message terminations such as REFER) and media (e.g., coder type). An IP Profile need be assigned to specific IP Group.
To configure an IP Profile:
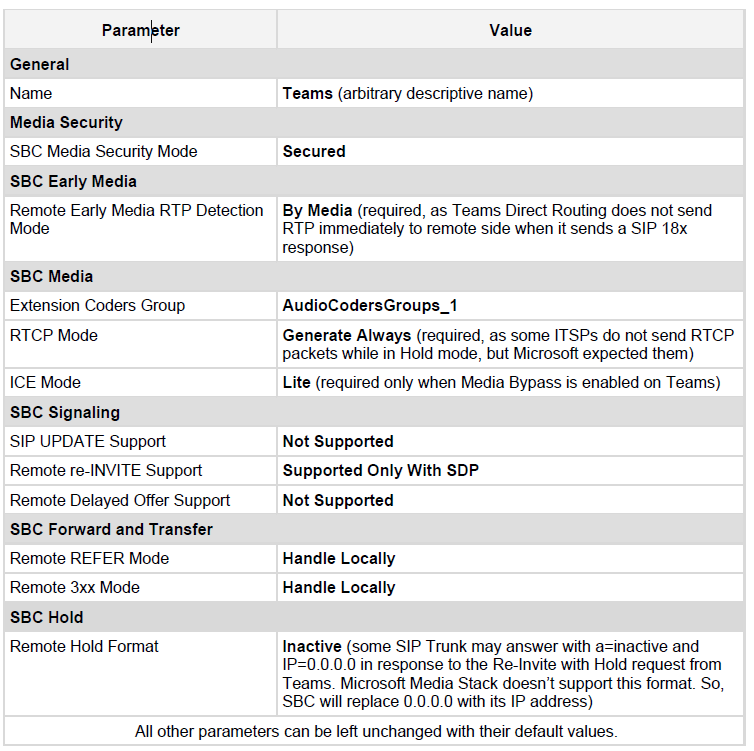

配置 IP 組
本節介紹如何配置 IP 組。IP 組代表網絡上與 SBC 通信的 IP 實體。這可以是一個服務器(例如,IP-PBX 或 SIP 中繼),也可以是一組用戶(例如,LAN IP 電話)。對於服務器,IP 組通常用於通過將其與代理集關聯來定義服務器的 IP 地址。配置 IP 組後,它們將用於配置 IP 到 IP 路由規則,以指示呼叫的來源和目的地。
要配置 IP 組:


配置 SRTP
本節介紹如何配置媒體安全。Direct Routing Interface 只需要使用 SRTP,因此您需要將 SBC 配置為以相同的方式運行。默認情況下,SRTP 被禁用。
要啟用 SRTP:

配置消息條件規則
本節介紹如何配置消息條件規則。消息條件定義傳入 SIP 消息的特殊條件(先決條件)。這些規則可用作 IP 到 IP 路由表中 IP 到 IP 路由規則的附加匹配條件。
要配置消息條件規則:


配置分類規則
本節介紹如何配置分類規則。分類規則將傳入的 SIP 對話發起請求(例如,INVITE 消息)分類到“源”IP 組。源 IP 組是發送 SIP 對話請求的 SIP 實體。分類後,設備使用 IP 組來處理呼叫(操作和路由)。
您還可以使用分類表對成功分類的呼叫使用 SIP 級訪問控制,方法是使用白名單和黑名單設置配置分類規則。如果分類規則配置為白名單(“允許”),則設備接受 SIP 對話並處理呼叫。如果分類規則配置為黑名單(“拒絕”),設備將拒絕 SIP 對話。
要配置分類規則:


配置 IP 到 IP 呼叫路由規則
本節介紹如何配置 IP 到 IP 呼叫路由規則。這些規則定義了將從一個 IP 實體接收到的 SIP 消息(例如,INVITE)轉發到另一個 IP 實體的路由。SBC 選擇其配置的輸入特徵(例如,IP 組)與傳入 SIP 消息匹配的規則。如果輸入特徵與表中的第一條規則不匹配,則將它們與第二條規則進行比較,依此類推,直到找到匹配的規則。如果沒有匹配的規則,則消息被拒絕。下面顯示的示例僅涵蓋 IP 到 IP 路由,但您可以將呼叫從 SIP 中繼路由到團隊,反之亦然。
將定義以下 IP 到 IP 路由規則:
要配置 IP 到 IP 路由規則:


注意:路由配置可能會根據您的特定部署拓撲而改變。
配置防火牆設置
作為額外的安全措施,有一個選項可以為奧科 SBC 上的傳入流量配置流量過濾規則(訪問列表)。對於在配置的網絡接口上接收到的每個數據包,SBC 從上到下搜索表,直到找到第一個匹配規則。匹配的規則可以允許(允許)或拒絕(阻止)數據包。一旦找到表格中的規則,表格下方的後續規則將被忽略。如果在沒有匹配的情況下到達表的末尾,則接受該數據包。請注意,防火牆是無狀態的。阻止規則將適用於所有傳入的數據包,包括 UDP 或 TCP 響應。
要配置防火牆規則:

注意:請注意,如果在您的配置中,與 SIP 中繼(或其他實體)的連接是通過與團隊相同的 IP 接口(在我們的示例中為 WAN_IF)執行的,您必須添加規則以允許來自這些實體的流量。
驗證 SBC 和直接路由之間的配對
使用 New-CsOnlinePSTNGateway PowerShell 命令將 SBC 與直接路由配對後,驗證 SBC 是否可以成功地與直接路由交換 OPTION。
要使用 SIP 選項驗證配對:

撥打測試電話
安裝完成後,您可以從 SBC 向註冊用戶運行測試呼叫,也可以在另一個方向上運行。運行測試呼叫將有助於執行診斷並檢查連接以供將來的支持呼叫或設置自動化。
可以使用奧科 SBC 不可或缺的測試代理執行測試呼叫。測試代理使您能夠遠程驗證 SIP UA 之間的連接、語音質量和 SIP 消息流。
可以在 SBC 上配置模擬端點來測試 SBC 和遠程目的地之間的呼叫的 SIP 信令。此功能非常有用,因為它可以遠程驗證 SIP 消息流,而無需遠程端參與調試過程。SIP 測試呼叫模擬 SIP 信令過程:呼叫建立、SIP 1xx 響應,直到完成 200 OK 的 SIP 事務。
測試呼叫將 Syslog 消息發送到 Syslog 服務器,顯示 SIP 消息流、音頻信號(例如,DTMF)、終止原因以及語音質量統計和閾值(例如,MOS)。
要配置測試代理:
要開始、停止和重新開始測試呼叫:
租戶配置腳本
下面的 powershell 腳本基於此配置實現了直接路由租戶。
該腳本基於這樣的假設,即已經配置了永久配置,而不是特定於特定直接路由租戶的唯一配置(例如,代理集表、條件表、IP 到 IP 路由等)。
紅色 = 必須為每個租戶設置/更改的變量。
綠色 = 此配置獨有的常量
使用 Telnet 管理員憑據訪問 powershell。
如果客戶使用直接撥入 (DID) 服務,則應執行以下腳本。

SIP 代理直接路由要求
Teams 直接路由具有三個 FQDN:
sip.pstnhub.microsoft.com [全球 FQDN。SBC 嘗試將其用作第一優先區域。當 SBC 發送解析此名稱的請求時,Microsoft Azure DNS 服務器會返回一個指向分配給 SBC 的主要 Azure 數據中心的 IP 地址。該分配基於數據中心的性能指標和與 SBC 的地理接近度。返回的 IP 地址對應於主要 FQDN。]
sip2.pstnhub.microsoft.com [次要 FQDN。地理上映射到第二個優先區域。]
sip3.pstnhub.microsoft.com [第三級 FQDN。地理上映射到第三個優先區域。]
這三個 FQDN 必須按上面顯示的順序放置,以提供最佳體驗質量(負載更少,並且最接近通過查詢第一個 FQDN 分配的 SBC 數據中心)。如果建立從 SBC 到遇到臨時問題的數據中心的連接,這三個 FQDN 將提供故障轉移。
故障轉移機制
現在輪到你了:
這就是配置團隊直接路由的工作方式。
您覺得今天報告中的哪個發現最有趣?或者,也許您對我所涵蓋的內容有疑問。
不管怎樣,我想听聽你的意見。所以繼續在下面發表評論。
還在為 Microsoft Teams 歡迎介面卡在錯誤代碼 2026 而煩惱嗎?我們提供經過驗證的逐步修復方案,幫助您快速解決問題。清除快取、重置應用程式等等——立即讓 Teams 流暢運行!
還在為 Microsoft Teams 歡迎介面啟動循環而煩惱嗎?請參考我們經過驗證的故障排除指南,快速解決 Windows、Mac 和網頁版的問題。無需任何技術知識,即可立即恢復高效聊天。
在公共 Wi-Fi 環境下使用 Microsoft Teams 時遇到網路錯誤?了解如何逐步修復,恢復流暢的視訊通話,包括 VPN 設定調整、DNS 變更等等。快速恢復網路連線!
使用 Microsoft Teams 時遇到聲音模糊或無聲的問題?了解適用於 Windows、Mac 等系統的麥克風問題解決方案。快速恢復流暢通話!
還在為 Microsoft Teams 快捷鍵錯誤和啟動崩潰而煩惱嗎?本文提供逐步修復方案,協助您解決 Microsoft Teams 快捷鍵錯誤、清除崩潰問題,並恢復流暢協作。已更新至最新解決方案。
遇到 Microsoft Teams Web 錯誤 503「服務不可用」?了解如何快速解決 Microsoft Teams 503 錯誤。清除快取、檢查狀態等等,確保團隊協作順暢無阻。適用於最新版瀏覽器!
還在為 Microsoft Teams 聊天訊息發送失敗而煩惱嗎?按照我們的逐步指南,快速解決「發送失敗」錯誤。我們提供行之有效的解決方案,確保團隊溝通順暢。
厭倦了 Microsoft Teams 黑屏分享錯誤導致會議中斷?取得 Teams 螢幕錯誤的逐步修復方案,從快速調整到專業解決方案,幫助您實現流暢共享。適用於最新版本!
還在為 Microsoft Teams Win 7 錯誤導致通話受阻而煩惱嗎?取得 Windows 7 相容性問題的逐步故障排除指南。經過證實有效的修復方案,可協助您恢復流暢的團隊協作-已更新至最新修補程式!
遇到 Microsoft Teams msvcp140.dll 缺失錯誤?了解快速、逐步的修復方法,包括安裝 Visual C++ 可再發行元件套件、修復 Teams 等。快速解決 DLL 錯誤!

