لماذا لا يمكنني تحرير رسالة أو حذفها في Microsoft Teams

تعد Microsoft Teams أداة تعاون رائعة للفرق والأعضاء الذين يعملون معًا عن بُعد في مشروع. يمنحك القدرة على التواصل بسلاسة مع بعضكما البعض ، ومشاركة الملفات ، ...

لطالما كانت تحديثات Windows مصدر إزعاج سيء السمعة للعديد من المستخدمين منذ أيام Windows XP. لحسن الحظ ، تحسن تسليم تحديثات Windows بشكل كبير في السنوات القليلة الماضية ، وتميل القليل جدًا من تحديثات الميزات إلى التسبب في مشكلات كبيرة في الوقت الحاضر.
يمكنك تكوين Windows للتنزيل والتحديث في الخلفية تلقائيًا وحتى إعادة تشغيله خلال ساعات عدم النشاط. كل هذا رائع ولكن ماذا لو تم تثبيت تحديث لا تحتاجه؟ أو ماذا لو حصلت على تحديث يحط من أداء جهازك؟ حسنًا ، في هذه الحالة ، يمكنك إلغاء تثبيت تحديثات Windows في Windows 11. ولكن إليك بعض الأشياء التي يجب أن تضعها في اعتبارك قبل إلغاء تثبيت التحديثات من جهاز الكمبيوتر الذي يعمل بنظام Windows 11.
ذات صلة: كيفية تعطيل التحديثات على Windows 11
محتويات
لماذا إلغاء تثبيت تحديثات Windows؟
قد تكون هناك عدة أسباب وراء رغبتك في إلغاء تثبيت تحديثات Windows ، وهنا بعض من أكثرها شيوعًا. إذا كنت تقوم باستكشاف الأخطاء وإصلاحها بعد تحديث Windows حديثًا ، فيمكنك أيضًا الاطلاع على هذه القائمة.
في حالة مواجهة أي مشكلات من هذا القبيل على نظامك ، يمكنك محاولة إلغاء تثبيت آخر تحديثات Windows لمحاولة إصلاح مشكلتك.
و اكثر. يمكن أن يكون هناك الكثير من المشكلات التي يمكنك مواجهتها عند تثبيت تحديث جديد لنظام التشغيل Windows 11 خاصة إذا كنت مشتركًا في القناة التجريبية أو الداخلية. في مثل هذه الحالات ، يمكنك محاولة إلغاء تثبيت التحديث المعني باستخدام الدليل الموجود في هذا المنشور.
ذات صلة: كيفية إلغاء تحديث Windows Insider معلق
هل من الآمن إلغاء تثبيت تحديثات Windows؟
نعم ، طالما أنك لا تقوم بإزالة تحديثات Windows يدويًا أو تستخدم أداة قديمة ، يجب أن تكون آمنًا عند إلغاء تثبيت تحديثات Windows من نظامك. ومع ذلك ، يجب أن تضع في اعتبارك أن Microsoft تستخدم تحديثات Windows لتقديم تصحيحات الأمان والإصلاحات العاجلة والمزيد للمساعدة في حماية نظامك من أحدث التهديدات والثغرات الأمنية.
ستؤدي إزالة تحديثات Windows أيضًا إلى إلغاء تثبيت هذه التصحيحات والتي بدورها ستجعل نظامك عرضة للتهديدات عبر الإنترنت. هذا هو الحال بشكل خاص إذا كنت تبحث عن إزالة تثبيت تحديثات الأمان الأخيرة.
وبالتالي ، بينما تكون آمنًا لإلغاء تثبيت أي تحديث ، يوصى بإعادة التغييرات بمجرد إصلاح الخطأ. إذا كان الخطأ أو الخطأ مستمرًا بعد إعادة تثبيت التحديث ، فيمكنك الانتظار حتى يتم إصدار تحديث وإصلاح لاحق بواسطة Microsoft.
ذات صلة: كيفية إزالة Bing من Windows 11
كيف تجد التحديثات التي تريد إزالتها
يمكننا إزالة التحديثات باستخدام طرق مختلفة ولكن للعثور على التحديث الذي ترغب في إزالته ، تحتاج إلى تحديده على جهاز الكمبيوتر الخاص بك. يتم تعيين رقم قاعدة المعارف لكل تحديث من تحديثات Microsoft والذي يساعد في تحديد وتعريف التحديث على أجهزة الكمبيوتر الشخصية للمستهلكين بالإضافة إلى خوادم Microsoft. يمكننا استخدام هذا الرقم لصالحنا وإزالة التحديث المعني من نظامك باستخدام أحد الأدلة أدناه. إليك كيفية تحديد تحديثات Windows الأخيرة المثبتة على جهاز الكمبيوتر الخاص بك.
الطريقة رقم 01: استخدام الإعدادات
اضغط Windows + iعلى لوحة المفاتيح وحدد "تحديث Windows" على يسارك.
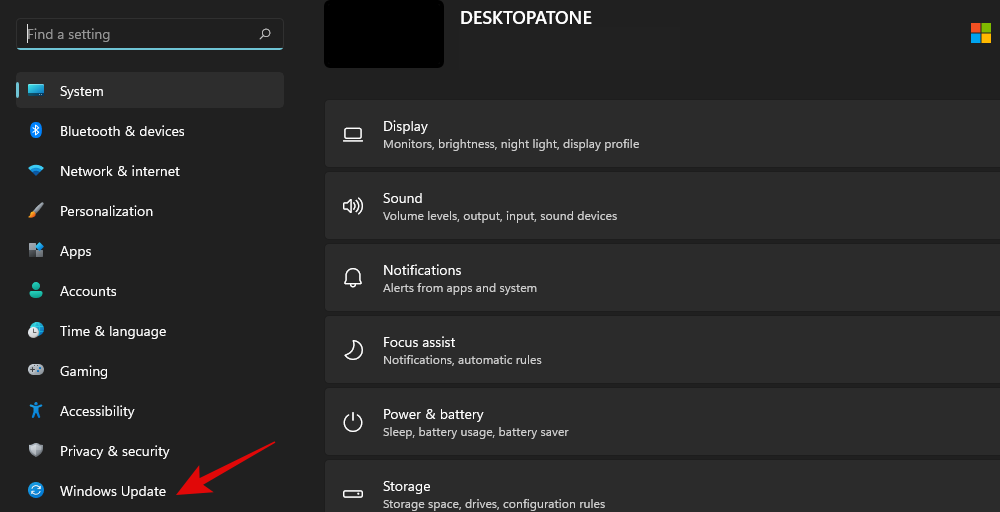
انقر فوق "تحديث السجل" الآن.
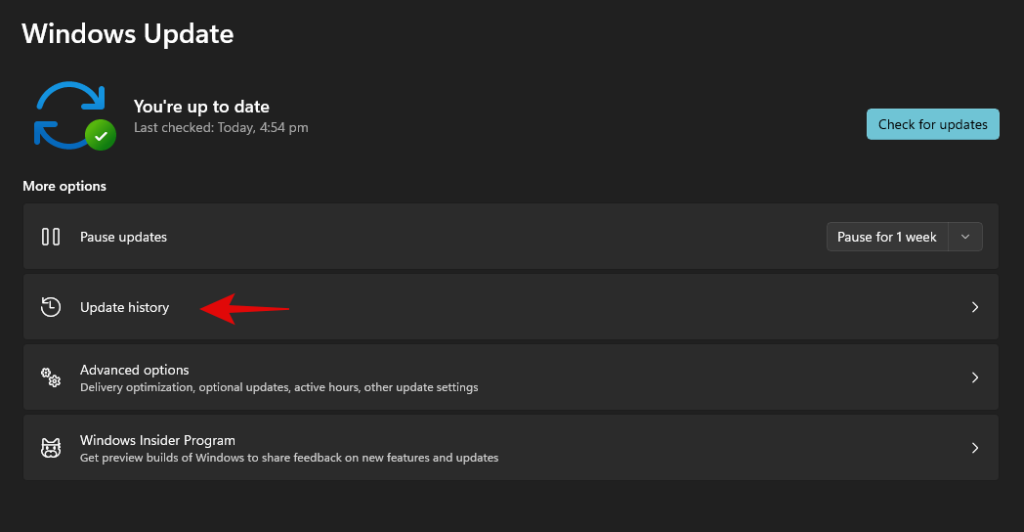
ستحصل الآن على قائمة بتحديثات Windows المثبتة مؤخرًا على نظامك.
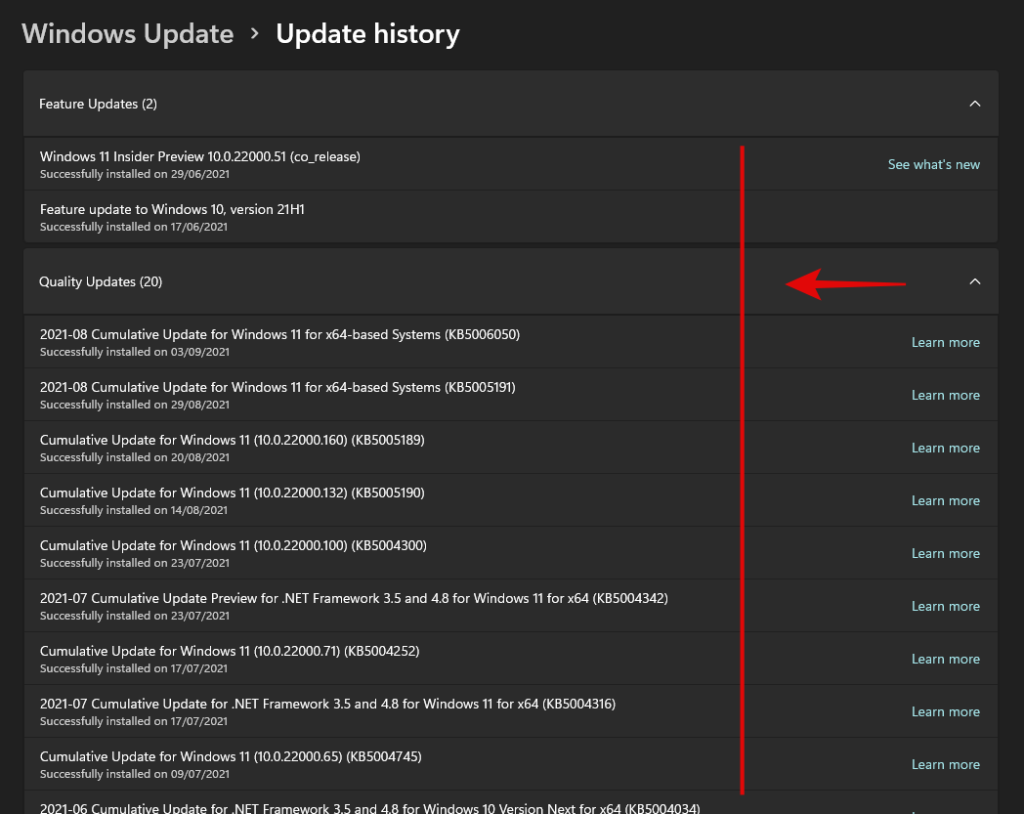
ما عليك سوى تدوين رقم KB للتحديث الذي ترغب في إزالته من جهاز الكمبيوتر الخاص بك.
الطريقة رقم 02: استخدام CMD
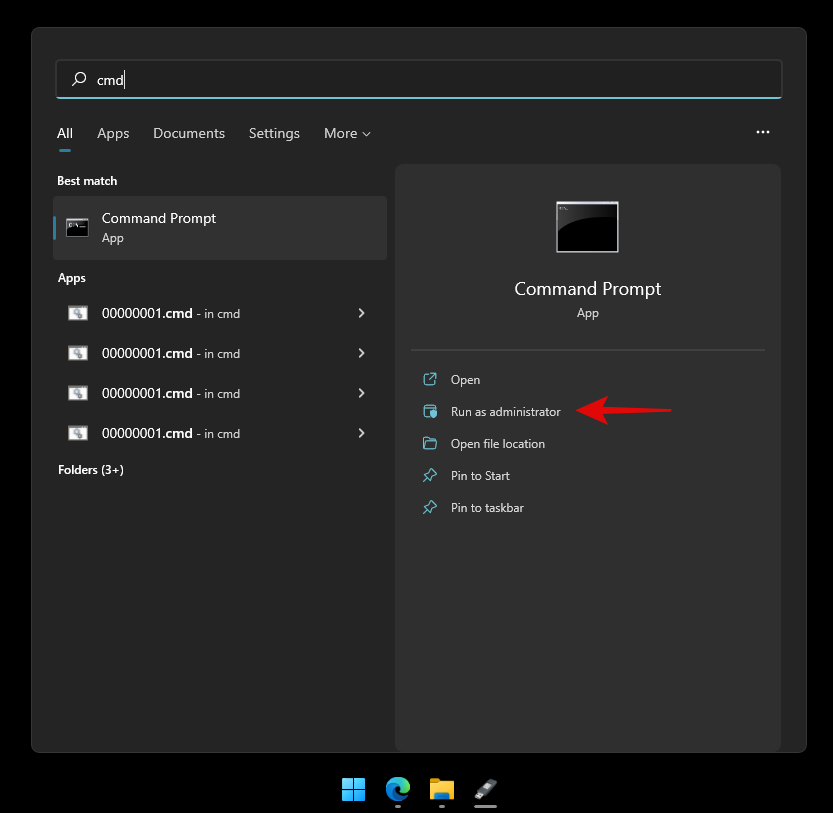
اضغط Windows + Sعلى لوحة المفاتيح وابحث عن CMD. انقر فوق "تشغيل كمسؤول" بمجرد ظهور التطبيق في نتائج البحث.
اكتب الأمر التالي واضغط على Enter بلوحة المفاتيح.
wmic qfe list brief /format:table
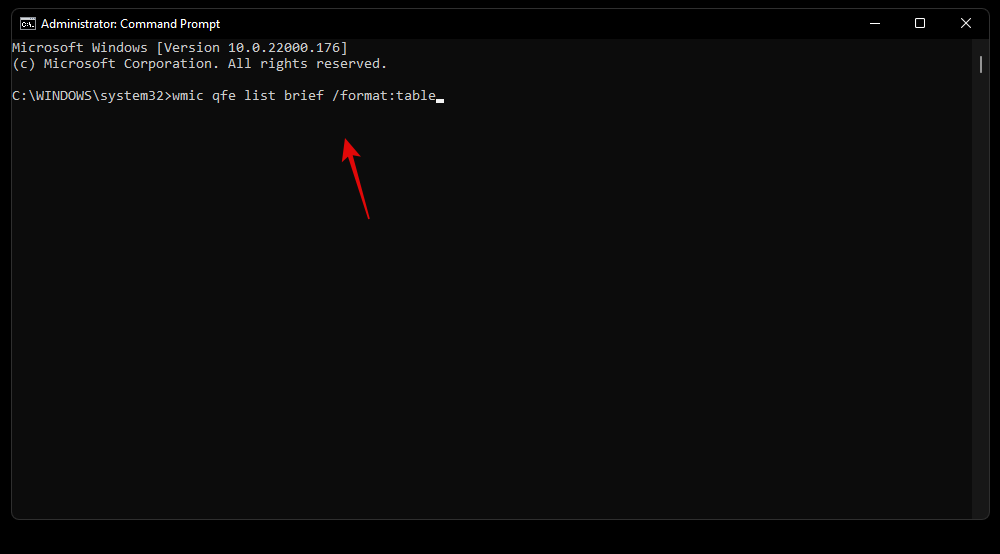
ستحصل الآن على قائمة بجميع تحديثات Windows الأخيرة المثبتة على جهاز الكمبيوتر الخاص بك. انقر وقم بتوسيع الفئة المعنية من القائمة أدناه.
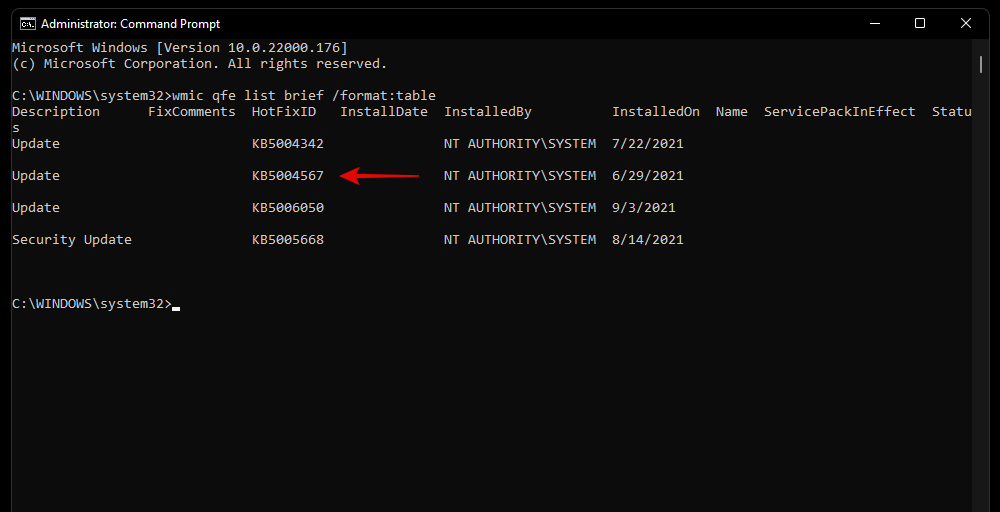
حدد التحديث الذي ترغب في إزالته وقم بتدوين "HotFixID" الخاص به. سنستخدم هذا المعرف لإزالة التحديث المعني باستخدام الدليل أدناه.
كيفية إزالة تحديثات Windows من جهاز الكمبيوتر الخاص بك
يمكنك إزالة تحديثات Windows من جهاز الكمبيوتر الخاص بك باستخدام أي من الطرق أدناه. إذا تم قفل Windows أو تعذر عليك التمهيد إلى سطح المكتب ، فنحن نوصي باستخدام طريقة Windows RE أو طريقة CMD. إذا كان بإمكانك الوصول إلى سطح المكتب الخاص بك ، فيمكنك استخدام تطبيق الإعدادات لإزالة التحديثات بسهولة من نظامك. استخدم الأدلة أدناه لتبدأ بناءً على تفضيلاتك.
الطريقة رقم 01: استخدام الإعدادات
اضغط Windows + iعلى لوحة المفاتيح وانقر على "تحديث Windows" في الشريط الجانبي الأيسر.

انقر فوق "تحديث المحفوظات".

قم بالتمرير إلى أسفل وانقر فوق "إلغاء تثبيت التحديثات".
ستتم إعادة توجيهك الآن إلى لوحة التحكم حيث ستجد قائمة بالتحديثات الأخيرة التي يمكن إزالتها من نظامك.

حدد التحديث الذي ترغب في إزالته وانقر فوق "إلغاء التثبيت" في الأعلى.

اتبع الإرشادات التي تظهر على الشاشة لإلغاء تثبيت التحديث المعني من جهاز الكمبيوتر الخاص بك.
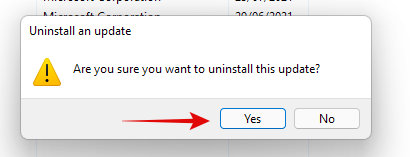
يمكنك الآن إعادة تشغيل جهاز الكمبيوتر الخاص بك وأي مشكلات كنت تواجهها بسبب التحديث يجب أن يتم إصلاحها الآن.
الطريقة رقم 02: استخدام مستكشف أخطاء Windows Update ومصلحها
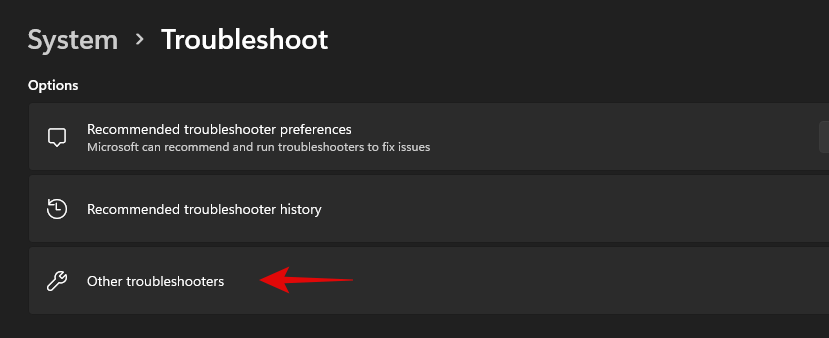
اضغط Windows + iعلى لوحة المفاتيح الخاصة بك وانقر على "استكشاف الأخطاء وإصلاحها".
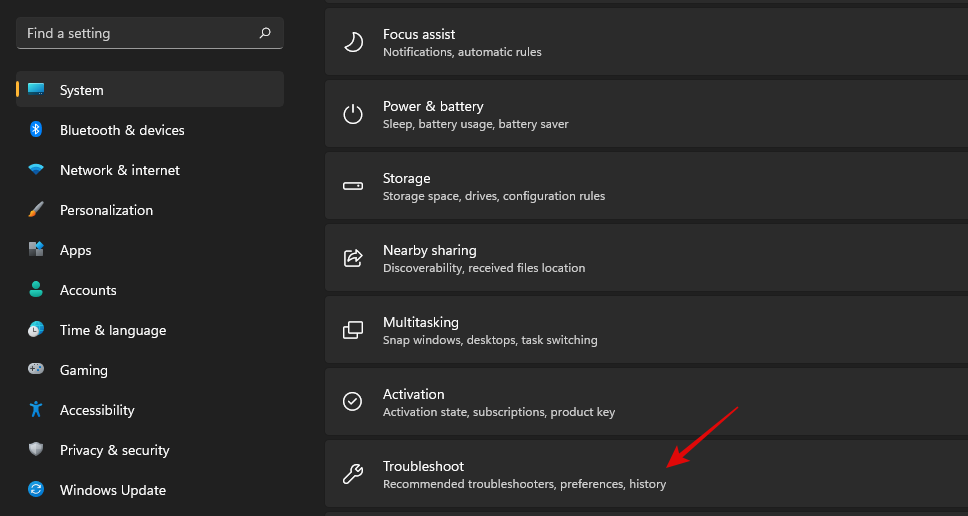
انقر فوق "مستكشفات أخطاء أخرى ومصلحاتها".
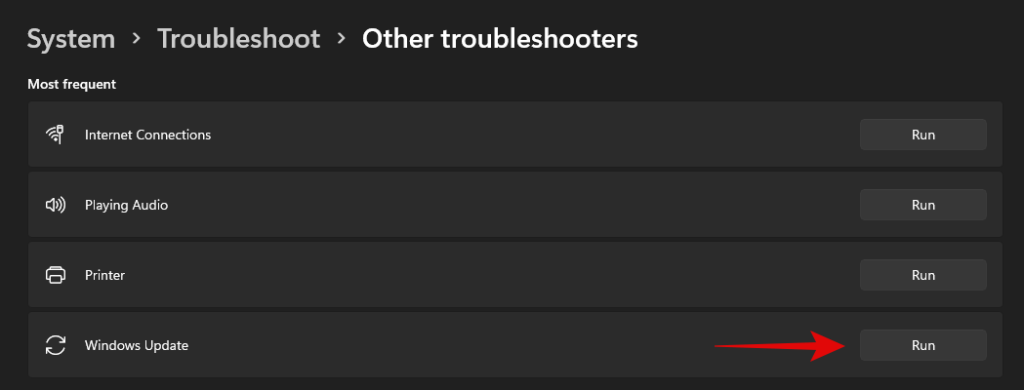
انقر فوق "تشغيل" بجانب Windows Update.
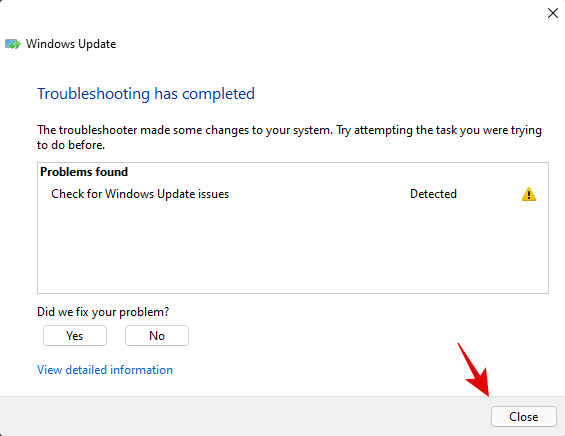
سيبحث مستكشف أخطاء Windows ومصلحها الآن عن المشكلات المتعلقة بتحديثات Windows على جهاز الكمبيوتر وتسببها. إذا تم العثور على أي منها ، فسيقوم مستكشف الأخطاء ومصلحها بحل المشكلة تلقائيًا. إذا تبين أن أحد التحديثات الأخيرة هو الجاني ، فسيمنحك مستكشف الأخطاء ومصلحها خيار تحديد وإلغاء تثبيت Windows Update الضروري. اتبع الإرشادات التالية التي تظهر على الشاشة لإزالة التحديث بالكامل.
بمجرد الانتهاء ، انقر فوق "إغلاق".
أعد تشغيل جهاز الكمبيوتر الخاص بك لإجراء قياس جيد ويجب الآن حل المشكلة في هذه المرحلة. إذا لم يكن الأمر كذلك ، فيمكنك استخدام طريقة PowerShell أدناه لإلغاء تثبيت Windows Update المطلوب يدويًا من نظامك.
الطريقة رقم 03: استخدام PowerShell أو CMD
اضغط Windows + Sعلى لوحة المفاتيح وابحث عن PowerShell. انقر فوق "تشغيل كمسؤول" بمجرد ظهور التطبيق في نتائج البحث.
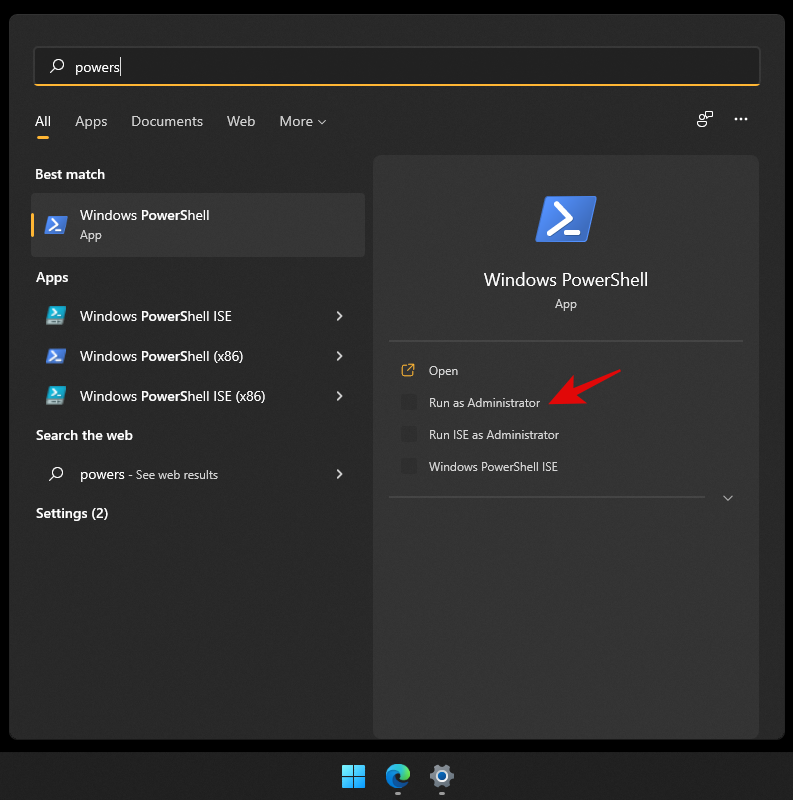
اكتب الأمر التالي واضغط على Enter بلوحة المفاتيح لتنفيذه.
wmic qfe list brief /format:table

ستحصل الآن على قائمة بجميع تحديثات Windows المثبتة مؤخرًا على نظامك بتنسيق جدول. قم بتدوين رقم KB الخاص بتحديث Windows المحدد.
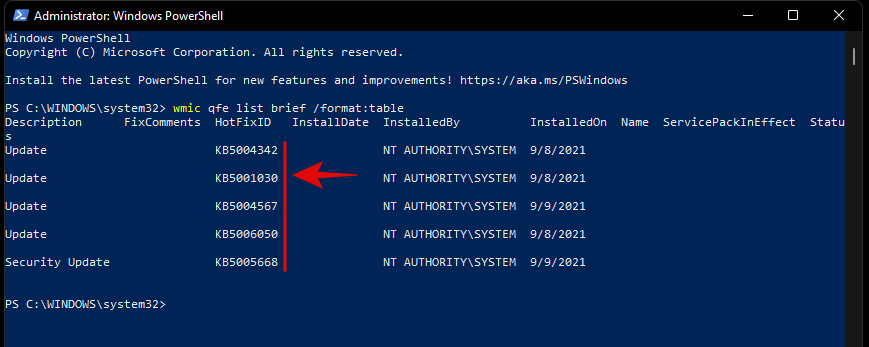
ملاحظة: ما عليك سوى الرقم وليس الأحرف التي تسبقه.
بمجرد الانتهاء من ذلك ، اكتب الأمر أدناه وقم بتنفيذه. استبدل "NUMBER" برقم KB الذي سجلته سابقًا.
wusa /uninstall /kb:NUMBER
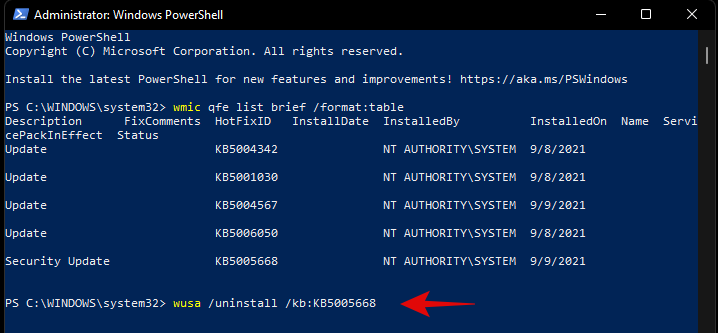
بمجرد المطالبة ، قم بتأكيد اختيارك.
إذا طُلب منك إعادة التشغيل ، نوصيك بإعادة تشغيل النظام في أقرب وقت ممكن مع حفظ عملك في الخلفية.
ومع ذلك ، إذا كنت لا ترغب في تلقي تأكيدات قبل إلغاء التثبيت وإعادة التشغيل ، فيمكنك استخدام الأمر أدناه.
wusa /uninstall /kb:NUMBER /quiet
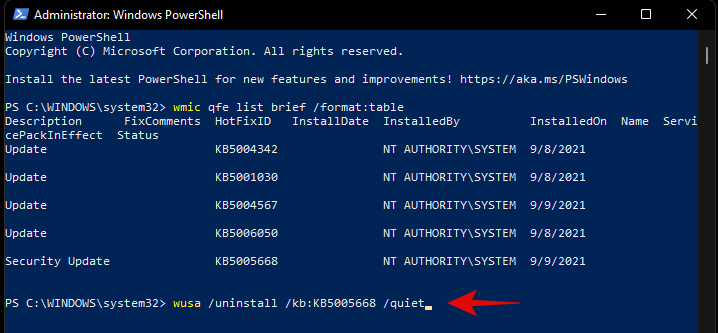
While the command above won’t prompt for confirmations, it will wait for your apps to shut down normally in the background. If you are looking to force close your apps and restart your system immediately, then you can use the command given below.
wusa /uninstall /kb:NUMBER /quiet /forcerestart
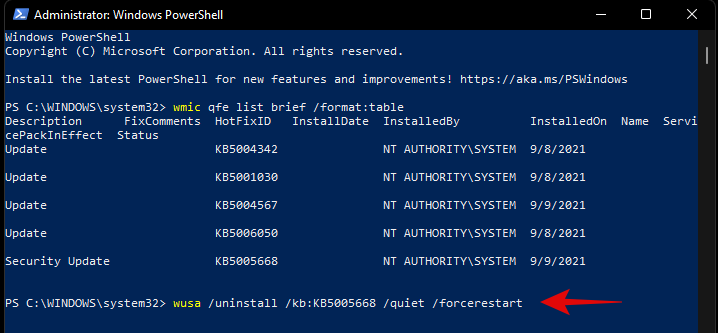
Subsequently, if you only wish to confirm a restart, then you can use the command below.
wusa /uninstall /kb:NUMBER /quiet /promptrestart
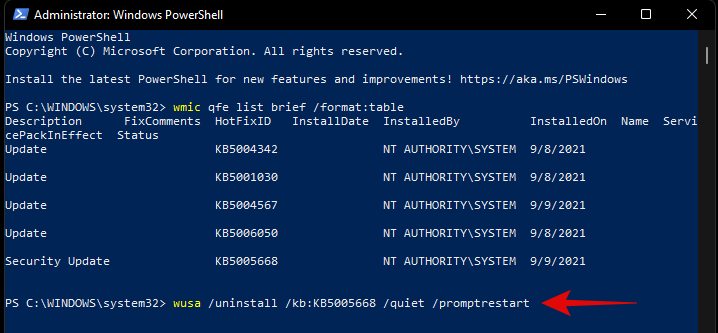
And that’s it! The problematic Windows Update should now be uninstalled from your PC.
Method #04: From Windows RE
Windows Recovery Environment also allows you to uninstall conflicting updates. Use the guide below to get you started. If you are facing a BSOD and are already in the Recovery Environment, then you can skip the first few steps of this guide.
Press Windows + i on your keyboard and select Windows Update from your left.
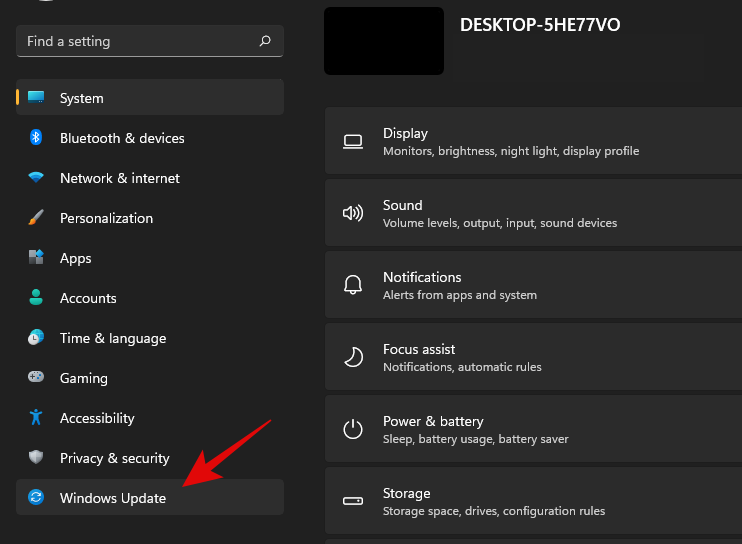
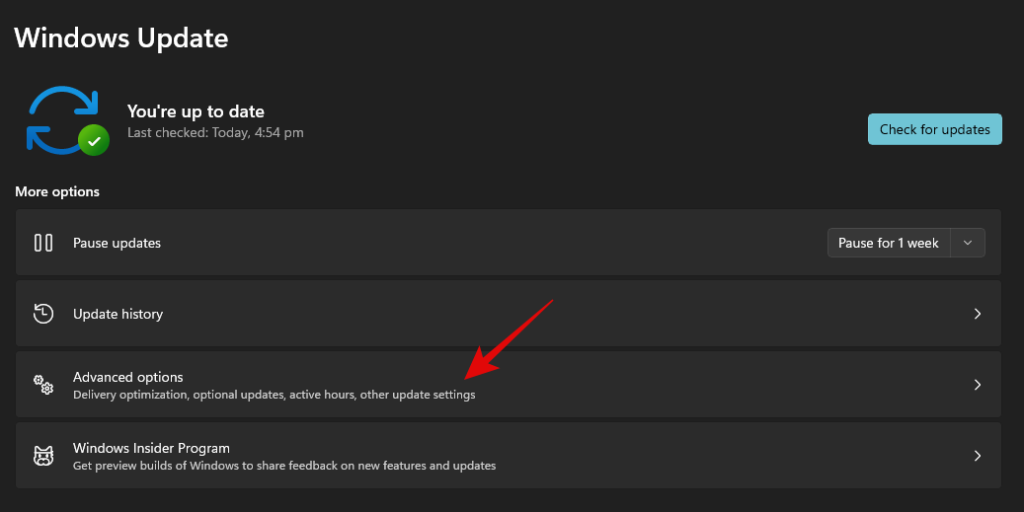
Click on ‘Advanced options’ now.
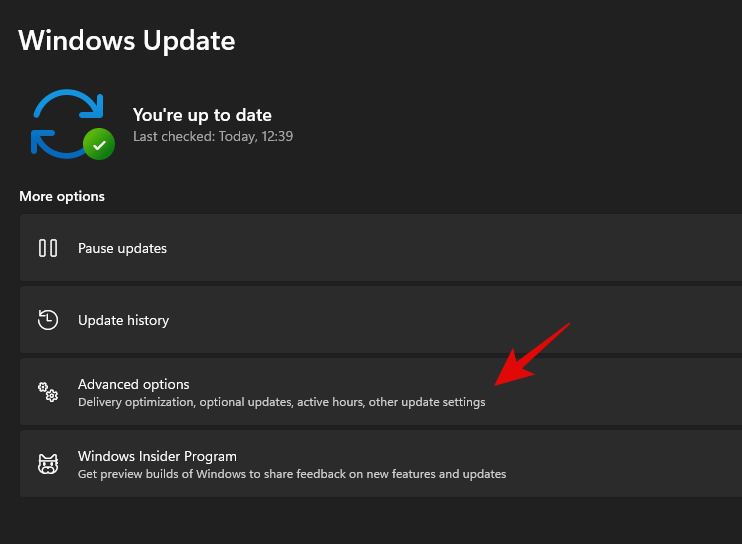
Select ‘Recovery’.
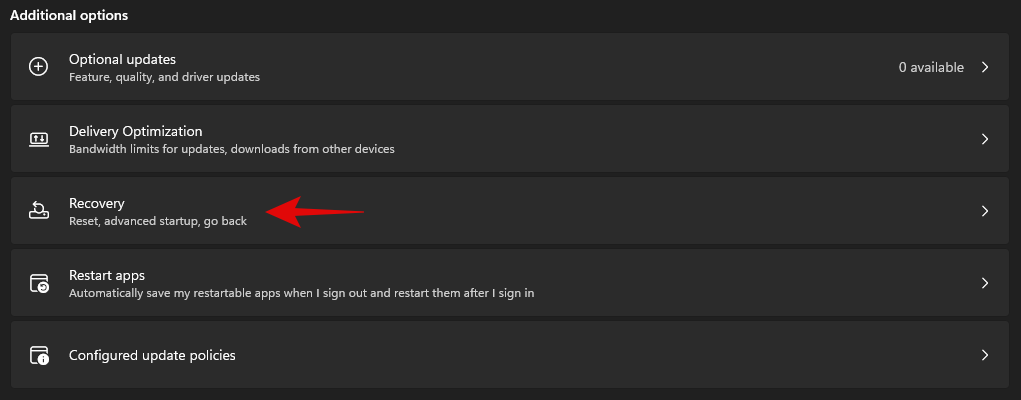
Click on ‘Restart now’ beside Advanced Startup.

You will now boot into the recovery environment. Click on ‘Troubleshoot’.
Now click on ‘Advanced Options’.
Select ‘Uninstall updates’.
Click and select the type of update you wish to install from the options on your screen.
Note: In case you are confused, feature updates refer to major updates to your Windows system that include new features, updated integrations, and sometimes new UI. Quality updates on the other hand encompass everything else including Security updates, Driver updates, Intelligence updates, Telemetry updates, and more.
Click on your administrator account and log in with your password.
Click on ‘Uninstall quality/feature’ update to confirm your choice.
Click on ‘Done’ once the process finishes.
Restart your PC and boot into Windows normally. You shouldn’t face any more issues caused by a problematic Windows update.
Method #05: Using DISM
DISM or Deployment Image Servicing and Management tool is an administrative tool within Windows that helps repair your Windows image and even mount images if needed. DISM supports image formats like .wim, .vhd, and more.
The tool can help you fix issues with your Windows installation and even remove problematic Windows updates. If you are looking to remove windows updates using DISM, then you can follow the steps below to get you started.
Note: DISM can be accessed via CMD and thus, you can use this guide from a recovery environment or an installation media as well. Follow the guide above to get CMD working on your lock screen or within Windows Recovery Environment.
Launch CMD and type in the following command. Press Enter on your keyboard once you are done.
dism /online /get-packages /format:table
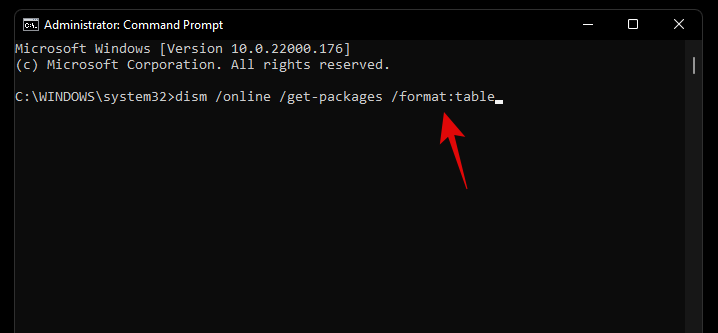
Unlike the WUSA commands we used earlier with PowerShell and CMD, you will need to note down the entire name of the Windows Update package we need to remove. Unfortunately, this includes special characters, spaces, and everything else included in the name. Thankfully you can easily copy the entire name to your clipboard by selecting it with your mouse and then using the keyboard shortcut. Once done, type in the command below and replace NAME with the package name you noted down earlier.
Note: This includes the term ‘Package_for_’ prefixed before some updates.
dism /online /Remove-Package /PackageName:NAME

The selected Windows Update will now be uninstalled from your system. In some cases, you will be prompted to restart your system, type in ‘Y’, and hit Enter on your keyboard to restart your system immediately.
How to stop receiving an update
While removing an update can help you, this does not mean that the broken Windows Update will stop showing up in your Updates section. This can be annoying and if you have automatic updates then you run the risk of automatically installing the problematic update in the background. In all such cases, you can try blocking Windows Updates on your system using the guides below depending on your preferences.
Method #01: Stop OEM driver updates through Windows update
OEM driver updates are delivered through Windows updates as well depending on their importance. Security vulnerabilities and bugs that have been recently found in components like CPU, GPU, or your wireless card, are instantly patched through such updates.
However, if you do not wish to install an OEM driver update provided by Windows update, then you can follow the guide below to block your OEM driver updates.
Press Windows + S on your keyboard and search for ‘Change device installation settings’. Click and launch the app from your search results.
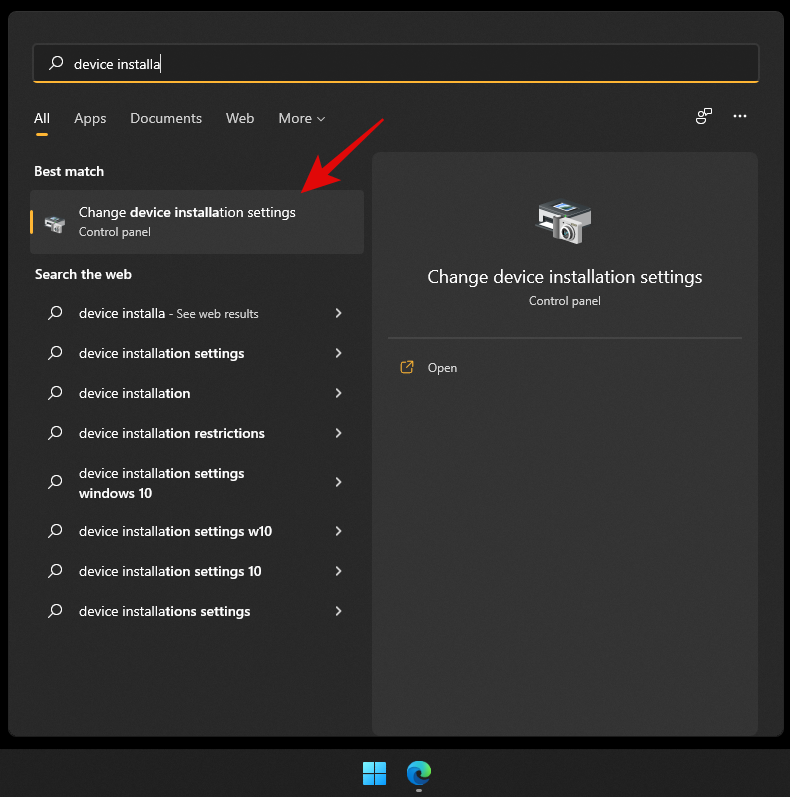
Select ‘No’.
Click on ‘Save changes’.
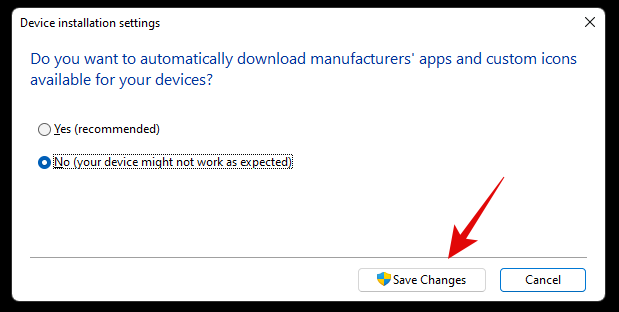
The changes will now be saved and you will no longer receive OEM driver updates through Windows Update.
Related: 6 Ways to Update Drivers on Windows 11
Method #02: Stop updates for Microsoft products
If you have been receiving constant updates for new Microsoft features and old products that keep messing up your system, then you can use the guide below to disable updates for Microsoft products via Windows Update.
Press Windows + i on your keyboard to open the Settings app and select ‘Windows Update’ from the left sidebar.

Click on ‘Advanced options’.

Now turn off the toggle for ‘Receive updates for other Microsoft products’ at the top.
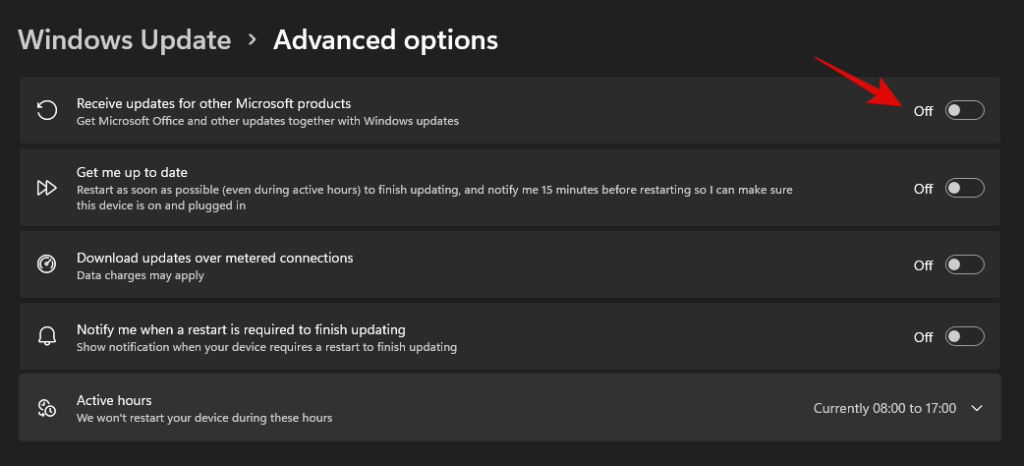
You will no longer receive updates for Microsoft products installed on your system via Windows update.
Method #03: Change active hours for background download and installation for updates
If you’re just looking to dismiss updates so that they don’t interfere with your work hours, then this is the perfect option for you. You can decide when Windows can download and update your PC in the background which will prevent Windows from interfering with your work hours. Follow the guide below to get you started.
Press Windows + i on your keyboard and click on ‘Windows Update’ on your left.

Click on ‘Advanced options’.

Now turn off the toggle for ‘Get me up to date’.
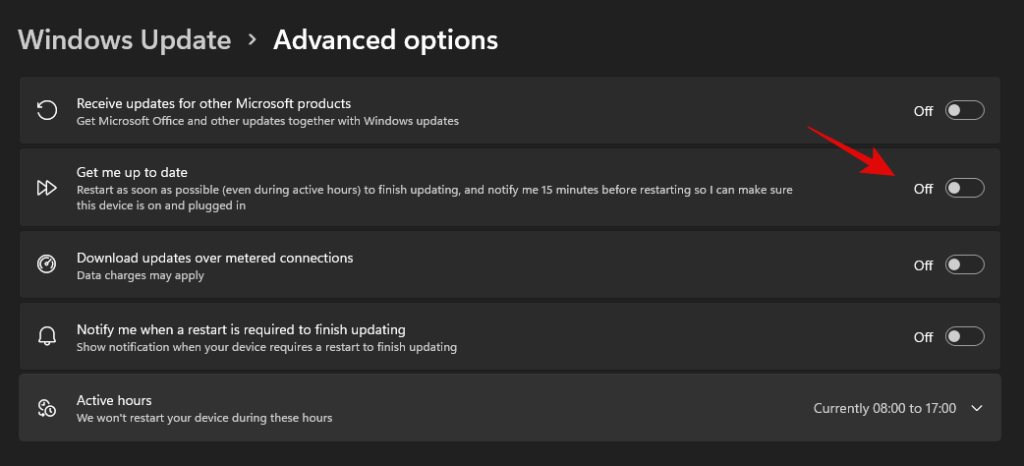
Click on ‘Active hours’.
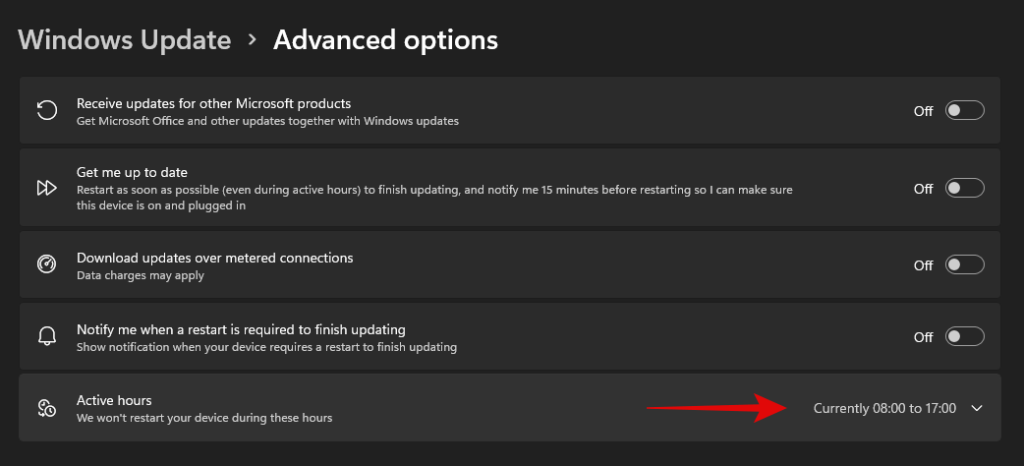
Click on the drop-down menu and select ‘Manually’.
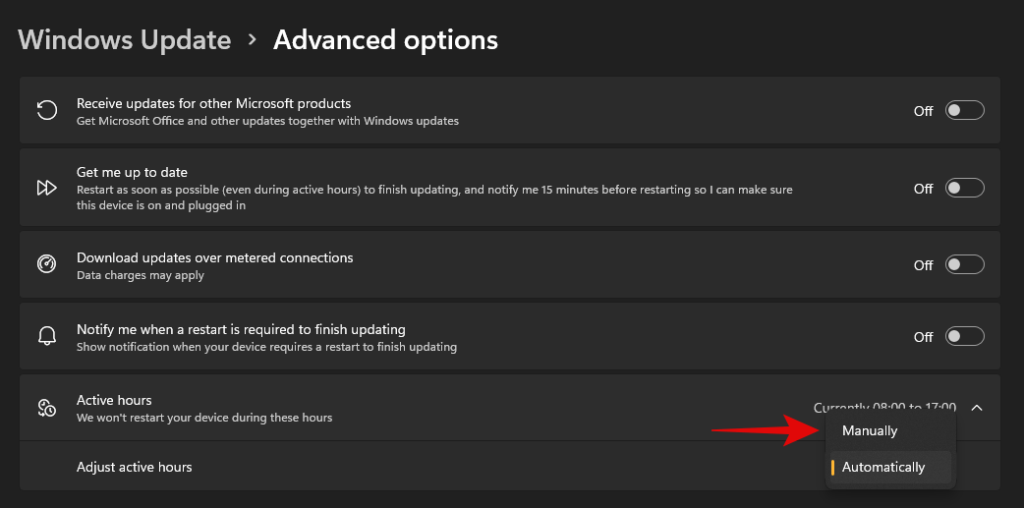
Define your desired start and end time. Windows won’t download updates and restart your PC during these hours.

And that’s it! Active hours should now be enabled for your system.
Method #04: Block Windows updates that you never wish to install
If you are receiving forced Windows updates that you don’t ever wish to install on your system then you can use a dedicated Windows troubleshooter to solve your issue.
This can be helpful in case you are trying to stop an update that disables a certain feature on your system that you don’t want disabled. This could be access to voltage controls, clock speed controls, turbo controls, fan controls, RGB control, and more. Follow the guide below to get you started.
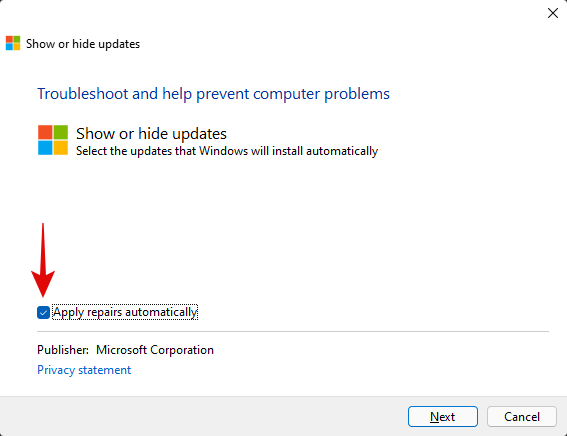
Download the Windows Update Show Hide troubleshooter using the link above and launch it on your PC. Click on ‘Advanced’.

Uncheck the option for ‘Apply repairs automatically’.
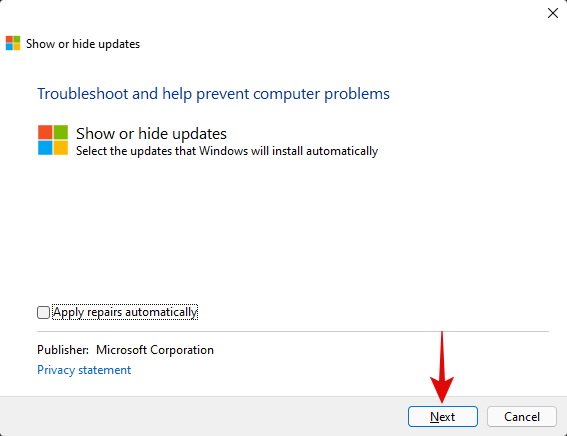
Click on ‘Next’.
The troubleshooter will now look for pending updates and display them on your screen. Click on ‘Hide updates’.
Check the boxes for all the updates you don’t wish to receive on your PC.

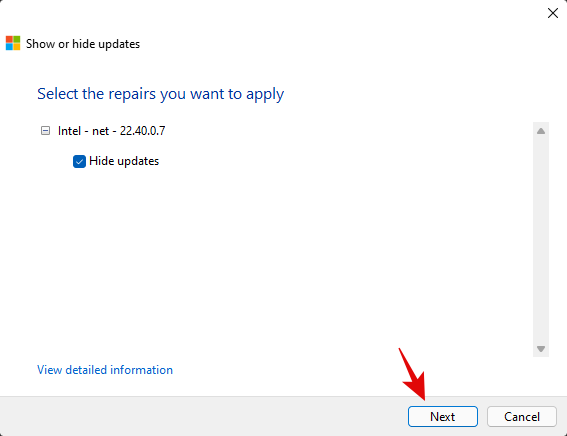
Click on ‘Next’.
Ensure that ‘Hide updates’ is selected and click on ‘Next’.
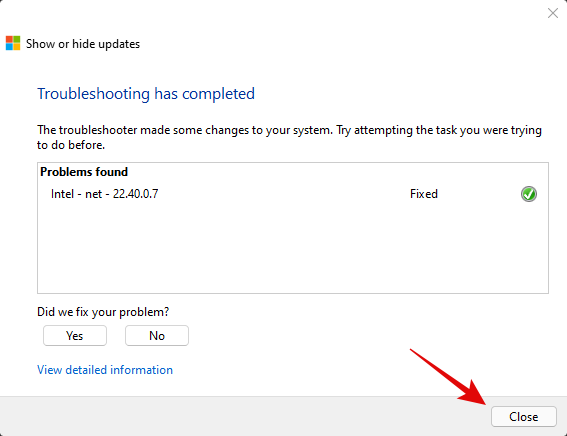
The troubleshooter will now hide the necessary Windows updates from your PC which in turn will prevent them from ever being downloaded on your PC. Click on ‘Close’.
And that’s it! You will now have blocked the necessary updates on Windows 11.
Can you turn off Windows updates?
Yes, you can use certain workarounds and tricks to disable Windows updates on your PC. However, this isn’t recommended as you will lose out on important security patches which would leave you vulnerable to online threats including hackers, malware, adware, and more.
Hence we recommend you keep your PC updated or at least opt to install the latest security updates on your PC. Even if you are losing out on features it’s usually because of a hardware security vulnerability that would compromise your system.
However, if you still wish to disable Windows Updates on your PC, you can use this dedicated guide from us. If you face any issues, feel free to drop a comment.
Can’t uninstall Windows updates? Try these fixes!
If you are unable to install updates on your PC, then you can try the following fixes. However, if you are still unable to uninstall updates then this might indicate an issue with your Windows installation in which case resetting your PC might be the best option.
Follow the guides below to get you started.
Method #01: Reset Windows components and try again
If you have been unable to uninstall updates then you can try resetting your windows components. This will help fix corrupted system files in the background that might be preventing you from uninstalling updates on your system. We will be using a modified script from Mircosoft to help reset all components of Windows 11. The script was originally developed for Windows 10 or higher and hence will need some edits to work properly on Windows 11. This script will perform the following tasks on your system when executed;
Follow the steps below to run the script on your system and reset Windows update components on your PC.
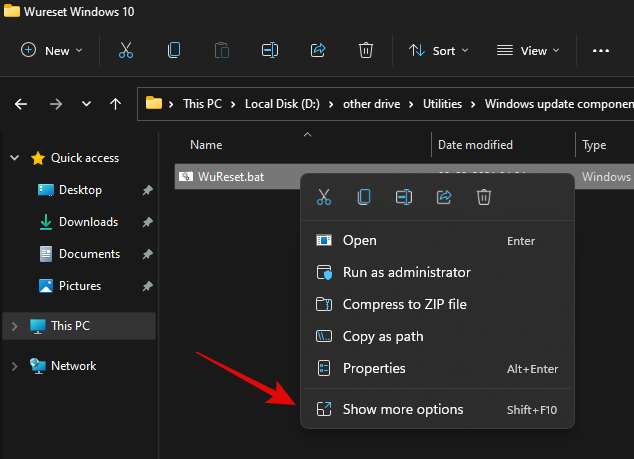
Download the script using the link above to your local storage and extract it to a convenient location. Once extracted right click on the script.
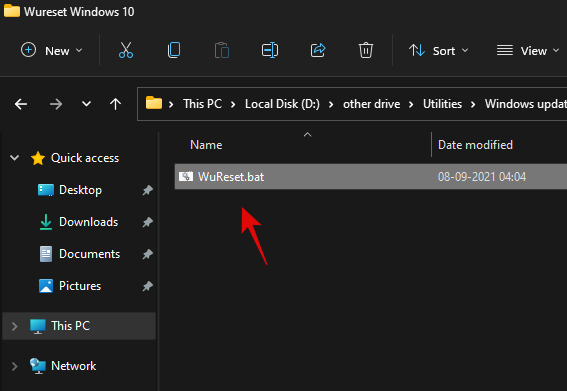
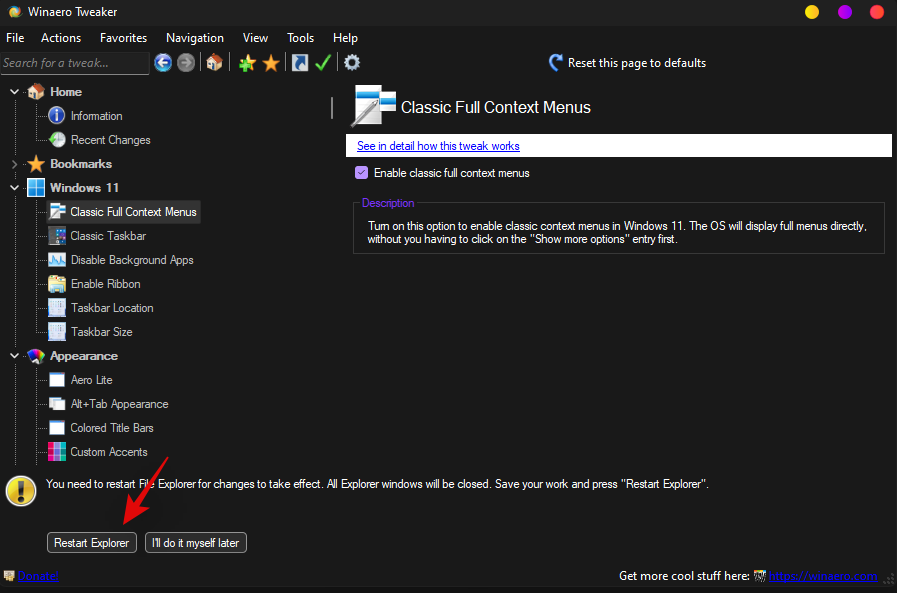
Click on ‘Show more options’.
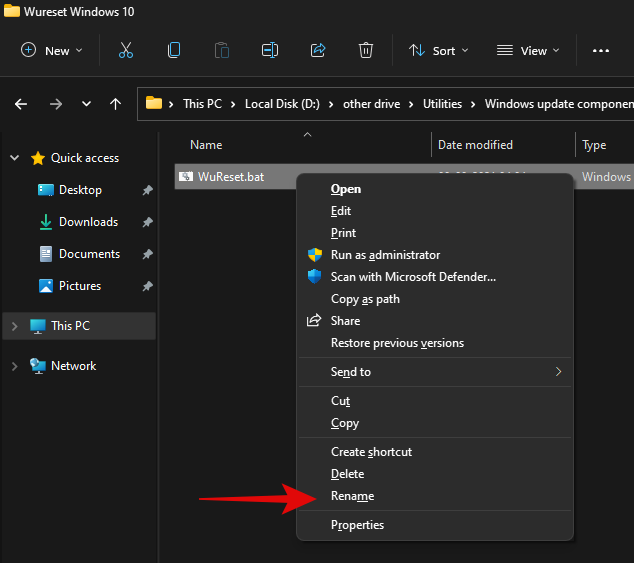
Select ‘Rename’.
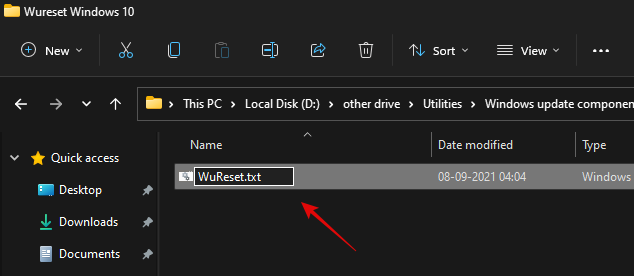
Replace ‘.bat’ with ‘.txt’.
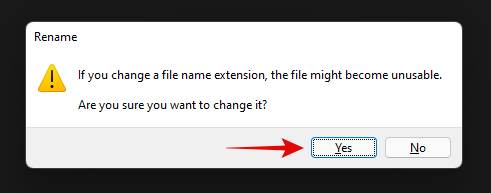
Click on ‘Yes’ to confirm your choice.
Now double click and open the file and it should open in your notepad. Once opened, scroll to the ‘:Reset’ section for resetting network commands and add the following line after the first delete command as shown below.
del /s /q /f "%SYSTEMROOT%\Logs\WindowsUpdate\*"
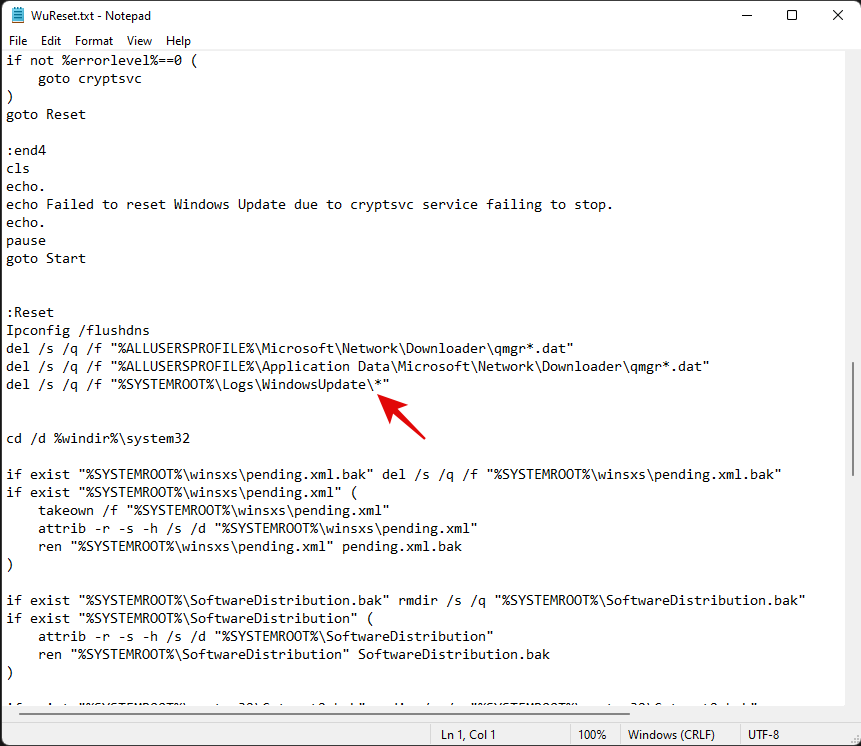
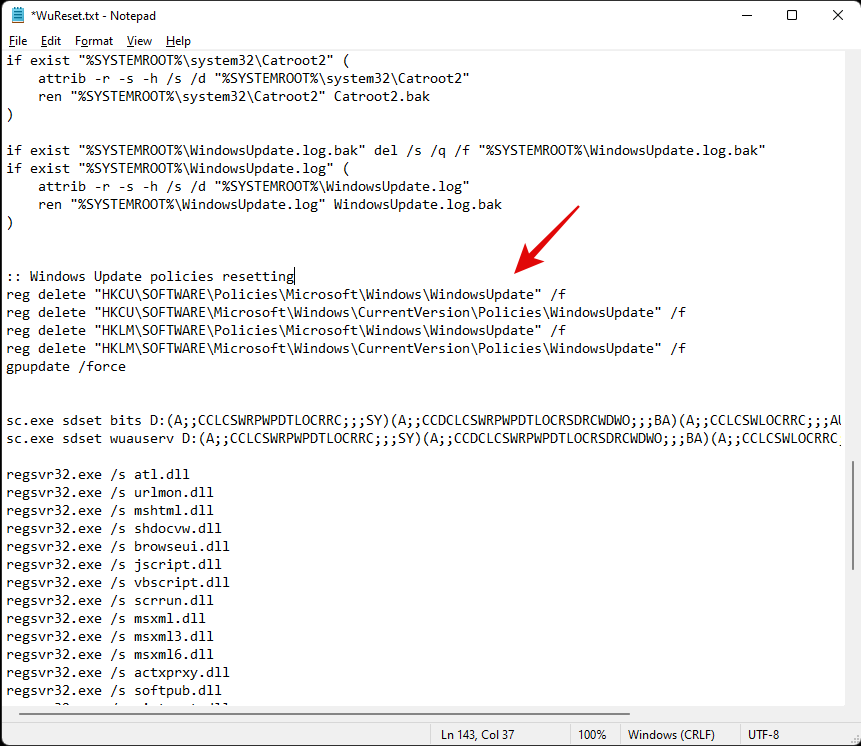
Once added, hit Ctrl + S on your keyboard. Ensure that there are no formatting changes or spaces before or after the line. The file will now be saved on your system along with its recent changes. We will now add some code to Reset Windows’s update policies on your system. Copy the lines below and paste them after your system commands. Ensure that two empty lines are available at either end of the code as shown below.
:: Windows Update policies resetting
reg delete "HKCU\SOFTWARE\Policies\Microsoft\Windows\WindowsUpdate" /f
reg delete "HKCU\SOFTWARE\Microsoft\Windows\CurrentVersion\Policies\WindowsUpdate" /f
reg delete "HKLM\SOFTWARE\Policies\Microsoft\Windows\WindowsUpdate" /f
reg delete "HKLM\SOFTWARE\Microsoft\Windows\CurrentVersion\Policies\WindowsUpdate" /f
gpupdate /force
Lastly, let’s add some lines to ensure that the startup type for this service is set to ‘Automatic’. Copy the code below and add the lines after your winsock reset commands but before your service starting commands as shown below. Copy and paste the code in its respective location.
:: Set the startup type as automatic
sc config wuauserv start= auto
sc config bits start= auto
sc config DcomLaunch start= auto
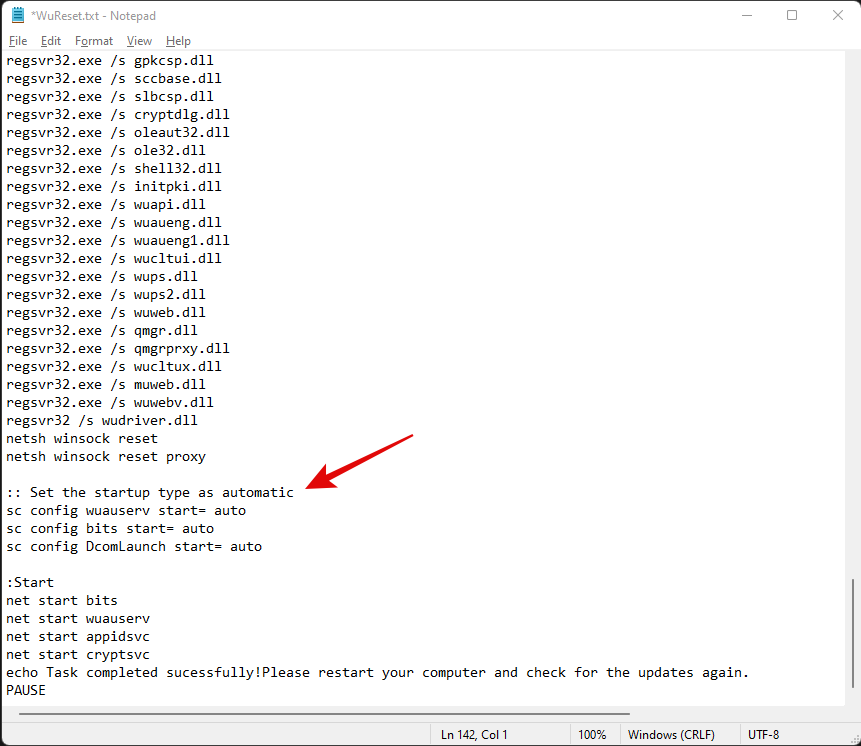
Once you are done, hit Ctrl + S on your keyboard to save your changes. Close the file and right-click on it again and select ‘Show more options’.
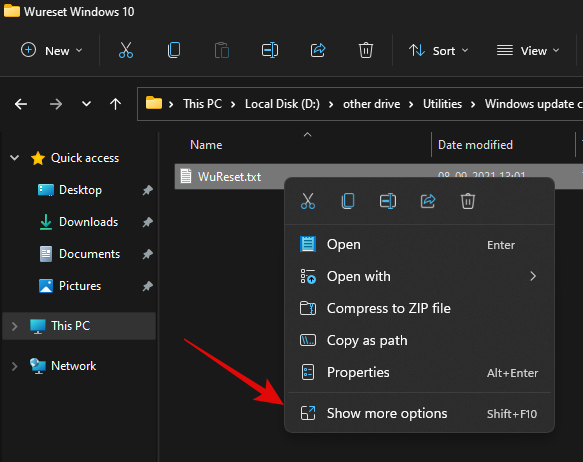
Click on ‘Rename’.
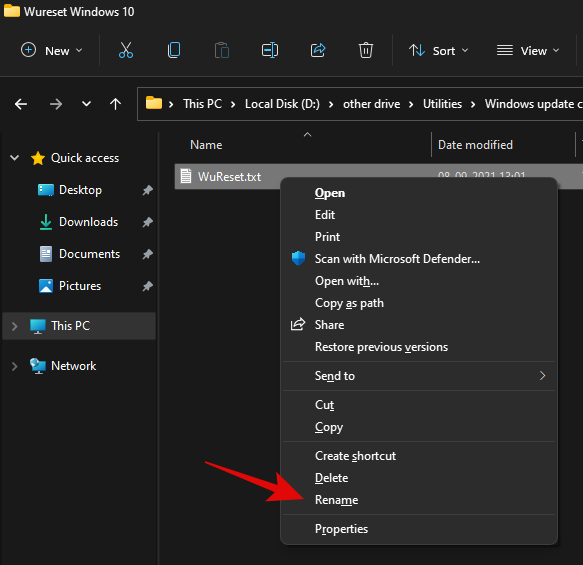
Replace ‘.txt’ with ‘.bat’.
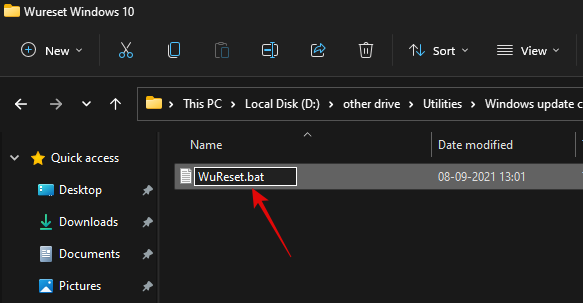
Once done, right-click on the file and select ‘Run as administrator’.
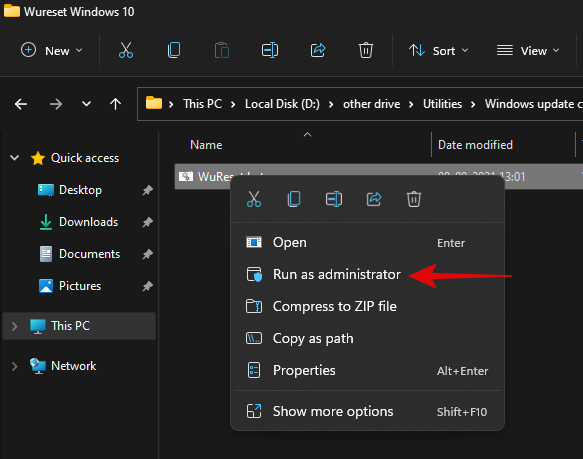
The batch script will now run on your PC and do its thing. Once the process completes, you will be asked to restart your PC. We highly recommend that you restart your PC at the earliest after running this script. Upon a restart, your Windows update should be reset and a fresh start should help you easily install pending Windows updates on your PC.
Method #02: Use DISM to uninstall the concerned packages
If you are still unable to uninstall specific Windows Update packages then simply use the DISM method to remove the concerned updates from your PC. This method force removes any available Windows updates from your PC without any issue. You will get a list of all the available updates in a table format which should make it much easier for you to find the culprit on your PC. Simply follow the guide at the top to get you started.
Method #03: Run SFC & DISM commands
At this point, if Windows still fails to update your system then you are facing a more serious issue than we anticipated earlier. This could indicate system-level corruption of files or missing system files from your system. In such cases, you can run SFC and DISM checks to fix corrupted files as well as restore missing system files. Follow the guide below to get you started.
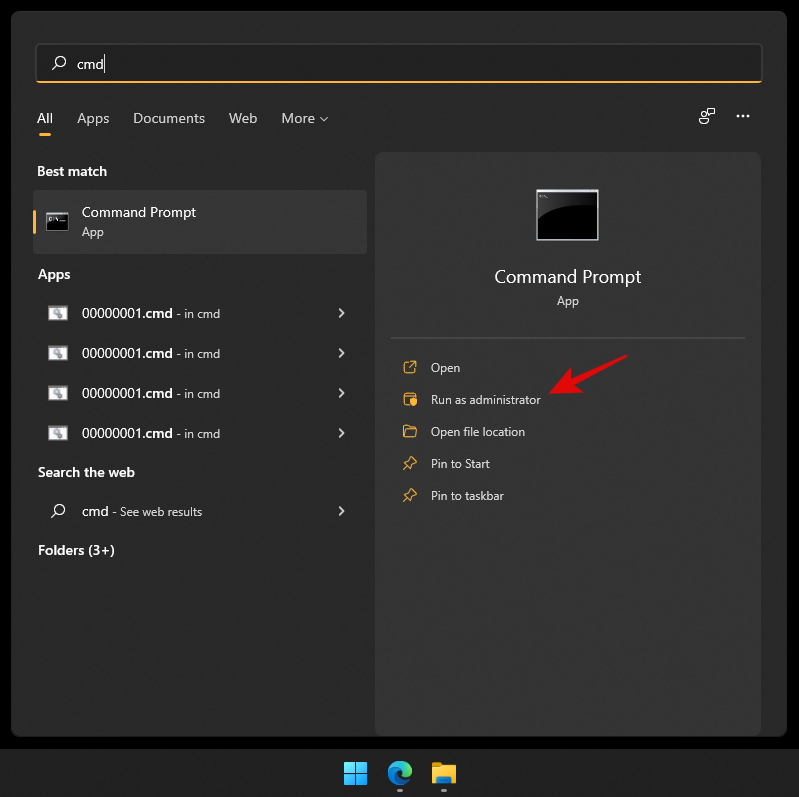
Press Windows + S on your keyboard and search for CMD. Click on ‘Run as administrator’ once it shows up in your search results.
Type in the following command and press Enter on your PC.
sfc /scannow
Once the SFC scan completes, type in the following command and execute it.
DISM /Online /Cleanup-Image /RestoreHealth
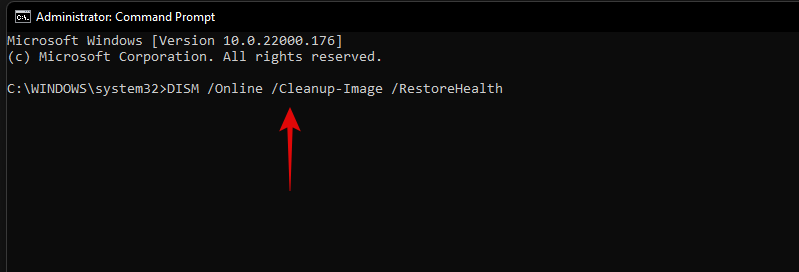
We recommend you restart your PC once the process completes.
Method #04: Last resort: Reset your PC
If nothing seems to be working for you then it might be time for a fresh installation of Windows 11 on your system. You can try getting in touch with your support team as well but if nothing works then a reset of your PC is the best option. In most cases, a reset while keeping your local files should help get Windows update working on your system.
Windows 11 connects to the update servers and updates your security definitions and drivers during OOBE. Windows will fix all update issues and reinstall necessary services on your system to get Windows update back up and running on your system during this process.
► You can use this dedicated guide from us to reset your Windows 11 PC.
We hope you were able to easily uninstall updates from your Windows 11 PC using the guide above. If you face any issues, feel free to drop a comment below.
Related:
تعد Microsoft Teams أداة تعاون رائعة للفرق والأعضاء الذين يعملون معًا عن بُعد في مشروع. يمنحك القدرة على التواصل بسلاسة مع بعضكما البعض ، ومشاركة الملفات ، ...
تعد Microsoft Teams واحدة من أكثر الأدوات شيوعًا التي تساعد الفرق على التعاون من المنزل. يمكنك التواصل عبر الرسائل المباشرة والجماعية ، ومؤتمر الفيديو مع أعضاء فريقك ومشاركة الملفات من خلال ...
يبدو أن كل شركة مصنعة لأجهزة الكمبيوتر الأخرى تقريبًا لديها إعجاب ببرنامج حماية نظام McAfee وترفض تمامًا شحن أجهزة الكمبيوتر الخاصة بها بدونها. لكن الكثير من الناس ليسوا مغرمين بشكل خاص بـ McAfee ...
لطالما كانت مساحة القرص ترفًا ، سواء كانت في الأيام الخوالي لنظام DOS حيث تم تخزين كل شيء على قرص مرن أو في عصرنا الحديث حيث نجد صعوبة في تخزين مكتبات الموسيقى الخاصة بنا على قرص واحد ...
على عكس أمثال Zoom و Google Meet ، تتبع Microsoft Teams بعض اللياقة عندما يتعلق الأمر بإعداد مكان عملك. يسمح لك بإدارة منظمات متعددة من التطبيق ...
هل تواجه مشكلة في نظام التشغيل ويندوز 11 بسبب خطأ "برنامج تشغيل Precision مفقود"؟ اكتشف حلولاً مجربة لاستعادة دقة لوحة اللمس والماوس. دليل خطوة بخطوة لحل المشكلة بسهولة.
هل تعاني من تأخر في الألعاب على نظام ويندوز 11 بسبب تقنيتي VBS وHVCI؟ اكتشف خطوات فعّالة لحل المشكلة وتحسين الأداء، وتقليل التقطيع، وزيادة معدل الإطارات دون المساس بالأمان. حلول سهلة للاعبين.
هل تواجه مشكلة في إعادة تعيين رمز PIN الخاص بـ Windows Hello في نظام Windows 11؟ اكتشف خطوات استكشاف الأخطاء وإصلاحها المجربة لحل هذه المشكلة بسرعة واستعادة الوصول الآمن إلى جهازك. تم التحديث بأحدث الإصلاحات.
هل تواجه مشكلة في ميزة "بيئة الاختبار المعزولة" في نظام التشغيل ويندوز 11؟ اكتشف حلولاً مجربة وفعّالة خطوة بخطوة لتشغيل بيئة الاختبار المعزولة بسلاسة. لا حاجة لأي خبرة تقنية!
هل تعاني من صوت مكتوم من الميكروفون الداخلي في نظام ويندوز 11؟ اكتشف حلولاً مجربة وفعّالة خطوة بخطوة لاستعادة جودة صوت نقية وواضحة دون عناء. اجعل ميكروفونك يعمل بكفاءة تامة اليوم!
هل تواجه مشكلة في بطاقة التقاط الفيديو في ويندوز 11 حيث لا تظهر إشارة عند 60 إطارًا في الثانية؟ اكتشف حلولًا مجربة لاستعادة سلاسة البث والتسجيل. دليل خطوة بخطوة لإعداد سهل وسريع.
هل تواجه مشكلة في تثبيت برنامج تشغيل مجموعة الشرائح في ويندوز 11؟ اكتشف حلولاً مجربة وفعّالة خطوة بخطوة لحل هذه المشكلة المزعجة بسرعة وتشغيل نظامك بسلاسة. مُحدّث بأحدث الحلول.
هل تواجه مشكلة في كتالوج تحديثات ويندوز 11؟ اكتشف حلولاً مجربة وفعّالة خطوة بخطوة لاستعادة التحديثات بسلاسة. أعد نظامك إلى وضعه الطبيعي بسرعة - لا حاجة لأي خبرة تقنية!
هل تواجه مشاكل في تحديد موضع واجهة Rainmeter على نظام التشغيل Windows 11؟ اكتشف حلولاً مجربة وفعّالة خطوة بخطوة لاستعادة مظهر سطح المكتب المثالي. تم تحديثه بأحدث التحسينات لتخصيص سلس.
هل تواجه مشاكل في زمن استجابة برنامج التسجيل الصوتي الرقمي (DAW) ونقص البيانات المخزنة مؤقتًا على نظام ويندوز 11؟ اكتشف حلولًا مجربة لتحسين إعدادات الصوت، وتقليل التأخير، وتعزيز الأداء لإنتاج موسيقي سلس. مُحدَّث بأحدث النصائح.

![كيفية إلغاء تثبيت McAfee على Windows 11 [5 طرق] كيفية إلغاء تثبيت McAfee على Windows 11 [5 طرق]](https://cloudo3.com/resources8/images31/image-4917-0105182719945.png)


