Cómo avanzar automáticamente en PowerPoint 365

Un tutorial que muestra cómo hacer que Microsoft PowerPoint 365 reproduzca tu presentación automáticamente configurando el tiempo para avanzar las diapositivas.

Esta es una guía completa para realizar la migración de inquilino a inquilino de Office 365.
2 o más semanas antes de la migración
1. Verifique la propiedad del dominio y capture la información y guárdela.
2. Capture todos los registros DNS utilizando este enlace .
3. Identifique y capture los registros DNS que son relevantes para Exchange (si realiza una transferencia de dominio): TXT , MX y SPF .
4. En cada registro MX, tome nota del valor TTL
5. Consulta la disponibilidad del dominio a través de este enlace .


6. Determine qué servicios de Microsoft 365 son necesarios para el dominio.
7. Decisión necesaria: discuta los requisitos de dominio y DNS
Nombre de dominio:
Registros DNS:
Copia de TODOS los registros (no solo de Exchange) para configurar los registros en los servidores DNS de destino.
8. Discuta con el equipo del proyecto qué elementos NO se migran con la herramienta de migración de BitTitan.
9. Solicite derechos de administrador de dominio para el portal de administración de O365 en el origen
Se requieren derechos de administrador como parte del proceso que necesitamos para eliminar el dominio del portal de administración en Origen y luego agregar el dominio a Destino.
10. Inicie sesión en el Portal de administración de O365 en Source y revise las Reglas y conectores de correo EXO
11. Verifique que los dominios/direcciones IP NO estén en la lista negra utilizando las listas negras de mxtoolbox .
Importante : si está en la lista negra, cuando incluyamos en la lista blanca los dominios/direcciones IP.
12. Inicie sesión en el Portal de administración de O365 en el origen y exporte los dominios aceptados, los grupos, los buzones de correo, los recursos, los buzones de correo compartidos y la lista de usuarios a EXCEL.
13. Revise el tamaño de cada buzón que se va a migrar.
14. Revisa la configuración del correo
15. Finalice la Lista de Usuarios, Grupos y los buzones compartidos a migrar
16. Cree todos los buzones de correo de usuario, buzones de correo compartidos, grupos de distribución, grupos de seguridad, contactos y recursos en el destino.
17. Agregar acceso de delegado a buzones/calendarios en el destino
18. Crea comunicaciones de usuario
19. Crear 2 cuentas de prueba en origen
20. Rellene las 2 cuentas de prueba en origen con los siguientes datos
21. Crear 2 cuentas de prueba en el destino
22. Otorgue a la cuenta de administrador global acceso completo a los buzones:
Get-Mailbox -ResultSize ilimitado | Add-MailboxPermission -Usuario "cuenta de administrador" -AccessRights FullAccess -InheritanceType All -AutoMapping $false
23. EWS debe estar funcionando en el servidor Source Exchange
24. Pruebe el acceso al buzón abriendo cualquier otro buzón con la cuenta de administrador usando OWA
25. Agregue la cuenta nombredeinquilino.onmicrosoft.com como una dirección de proxy a cada buzón en Origen.
Necesitamos realizar esto. Eliminaremos las direcciones de correo electrónico del dominio de todos los buzones antes de que podamos eliminar el dominio del inquilino.
26. Conéctese a EXO Powershell en SOURCE
27. Exporte y actualice las direcciones de proxy para incluir @tenantname.onmicrosoft.com
Get-Mailbox -ResultSize Unlimited -Filter “emailaddresses -notlike '*@tenantname.onmicrosoft.com'” | seleccione alias, dirección principal de smt, direcciones de correo electrónico | exportación-csv -NoTypeInformation "C:\Temp\mailboxes_output.csv"
Importar-csv C:\Temp\mailboxes_output.csv| ForEach-Object {
$ID = $_.PrimarySmtpAddress
$alias = $_.Alias
$365Email = $alias + “@tenantname.onmicrosoft.com”
Set-Mailbox -Identity $ID -EmailAddresses @{add = $365Email}
}
28. Confirme que todos los buzones se hayan actualizado. Los resultados deben ser cero.
Get-Mailbox -ResultSize Unlimited -Filter “emailaddresses -notlike '*@tenantname.onmicrosoft.com'” | seleccione alias, dirección de correo electrónico principal, direcciones de correo electrónico
29. Otorgue a la cuenta de administrador acceso completo a los buzones de correo en Destino
30. Conéctese a EXO Powershell en el destino
Otorgue acceso completo al buzón de la cuenta de servicio de BitTitan sobre todos los buzones de dominio adquiridos en el destino.
Add-MailboxPermission -Identidad "Buzón de correo de destino -Usuario "Cuenta de servicio de BitTitan" -AccessRights FullAccess -InheritanceType All -AutoMapping $false
31. Pruebe el acceso al buzón abriendo cualquier otro buzón con la cuenta de administrador usando OWA
32. Requisitos de licencia de BitTitan
Nota:
Una licencia se puede utilizar hasta 10 veces por buzón. Esto supone que el punto final no cambia.
Si está probando la migración de BitTitan con cuentas de prueba, asegúrese de incluir la cantidad total de cuentas de prueba necesarias en el recuento de licencias.
33. Canjear licencias
Nota : Regístrese para obtener una cuenta BitTitan si no tiene una cuenta, asegúrese de que su cuenta esté activa verificando su dirección de correo electrónico.
34. Crear proyecto BitTitan
35. En la configuración de origen:
36. En la configuración de destino:
37. En la migración de inquilino a inquilino
38. Migrar cuentas de prueba a destino usando BitTitan: migración previa a la etapa
39. Perform a Pre-Stage Migration
Important:
40. Resolve any BitTitan error messages
41. Use OWA to confirm the mailboxes contain the migrated data
42. At Source: Use OWA to send and receive additional email
43. Perform a full migration
44. Resolve any BitTitan error messages
45. Use OWA to confirm the mailboxes contain the migrated data
46. Liaise with the business and confirms date and time of migration. Confirm other resources are available for migration
47. If the decision was made to take ownership of the domain and DNS before migration, initiate the transfer
1 week before migration
Export Exchange objects from Source:
48. Log into EXO Powershell at Source
49. Mailboxes: Export UPN, Alias, SMTP and Proxy addresses
Get-Mailbox -ResultSize Unlimited | select userprincipalname,alias,primarysmtpaddress,emailaddresses | export-csv -NoTypeInformation “Backup_Source_Mailboxes.csv”
50. Groups: Export Alias, SMTP and Proxy addresses
Get-DistributionGroup -ResultSize Unlimited | select alias,primarysmtpaddress,emailaddresses | export-csv -NoTypeInformation “Backup_ Source_Groups.csv”
51. Calendar Delegation:
Get-Mailbox | foreach {
write-host -fore green “Processing $_”
Get-MailboxFolderPermission -Identity “$($_.alias):\Calendar” | where {$_.User -notlike “Anonymous” -and $_.User -notlike “Default”}} | select Identity,User,@{name=’AccessRights’;expression={$_.AccessRights -join ‘,’}} | Export-Csv -NoTypeInformation “Backup_ Source_Calendar_Delegation.csv”
Export Exchange objects from Destination:
52. Log into EXO Powershell at Destination
53. Contacts: Export Name and Email addresses
Get-Recipient -Filter {RecipientType -eq “MailContact” -and EmailAddresses -like ‘domainname‘} | select DisplayName,RecipientType,ExternalEmailAddress,EmailAddresses | export-csv -NoTypeInformation “Backup_Destination_Contacts.csv”
54. Mailboxes: Export Forwarding
For each MAILBOX:
get-Mailbox -Identity | select UserPrincipalName,DeliverToMailboxAndForward,ForwardingAddress,ForwardingSmtpAddress | export-csv -notypeinformation ‘Backup_Destination_Forwarding.csv’ -append
55. Pre-Stage Migration of all Mailboxes – email older than 10 days
Important: For the Source, use the onmicrosoft.com address
Select the Project Name
Click on the drop-down arrow beside “Add” and select “Bulk Add”
Click on “Select File”, locate the CSV file created in step 1 then click “Open”
The contents of the CSV will get imported and displayed on screen, click “Save”
Pre-stage migration:
Important:
Allow time for the migration to complete
The Pre-Stage migrates emails only
Calendars, contacts, journals, notes, and tasks will only migrate during a full migration
56. Resolve any BitTitan error messages
57. Add the domain then request a TXT record to verify we own the domain
58. Setup IM federation so you have chat communications during pre-cutover
Important: Cannot migrate any IM contacts to Microsoft Teams.
59. 1 day before migration
Migrate mailboxes – Full migration
Important: Allow time for the migration to complete.
60. Resolve any BitTitan error messages
61. Migration day
[Optional] Change the TTL value on each MX record
Remove domain dependencies from Source:
62. Log into Azure AD and EXO Powershell at Source
[Optional] Change FEDERATED domains to MANAGED, if applicable.
63. Run the following cmdlet to determine which domains are FEDERATED or MANAGED
Get-MsolDomain
If FEDERATED change to MANAGED:
Set-MsolADFSContext -Computer ADFS_Server_FQDN
Convert-MsolDomainToStandard -DomainName “Domain Name Here” -SkipUserConversion:$true -PasswordFile C:\passwords.txt
64. Run the following cmdlets to verify the domains are managed
Get-MsolDomain
[If Applicable] Disable the directory synchronization
Set-MsolDirSyncEnabled -EnableDirSync $false
[If Applicable] SharePoint Online public website
65. If you had also set up your domain with a SharePoint Online public website, then before you can remove the domain, you first have to set the website’s URL back to the initial domain.
[If Applicable] Skype for Business and Teams
Remove all Skype for Business and Teams licenses from the users in the source tenant. This will remove the SIP attribute from their proxy addresses.
66. Set the default domain in source tenant to domainname.onmicrosoft.com
67. Change all Mailboxes UPNs to domainname .onmicrosoft.com domain. Replace the domainname with your domain name.
Get-MsolUser -all | select-object UserPrincipalName,ObjectID | export-csv -NoTypeInformation “User.csv”
Import-csv User.csv| ForEach-Object {
$ID = $_.UserPrincipalName
$ObjectID = $_.ObjectID
$365Email = $ID.Split(“@”)[0] + “@ domainname.onmicrosoft.com”
Set-MsolUserPrincipalName -ObjectId $ObjectID -NewUserPrincipalName $365Email}
68. Confirm the UPNs have been updated
Get-MsolUser -all | select-object UserPrincipalName,ObjectID
69. Change all Distribution Groups Primary SMTP address to domainname.onmicrosoft.com domain. Replace the domainname with your domain name.
Get-DistributionGroup -ResultSize Unlimited | select-object PrimarySMTPAddress | export-csv -NoTypeInformation “DL.csv”
Import-csv DL.csv| ForEach-Object {
$ID = $_.PrimarySmtpAddress
$365Email = $ID.Split(“@”)[0] + “@domainname.onmicrosoft.com”
Set-DistributionGroup -Identity $ID -primarysmtpaddress $365Email}
70. Confirm the primary smtp’s have been updated
Get-DistributionGroup -ResultSize Unlimited | select-object PrimarySMTPAddress
71. As we changed every mailboxes UPN, the primary SMTP addresses has also been updated to domainname.onmicrosoft.com. Now remove all aliases from every mailbox using this script:
$users = Get-Mailbox -ResultSize Unlimited | Where {$_.Emailaddresses.count -gt 1}
foreach ($user in $users) {
foreach ($email in $user.emailaddresses){
if ($email -ne “SMTP:”+$user.PrimarySmtpAddress){
Set-Mailbox -Identity $user.name -EmailAddresses @{Remove=$email}
}
}
Write-host $user.primarysmtpaddress “has been processed”
}
72. Confirm the Primary and Alias addresses are both domainname.onmicrosoft.com ONLY
Get-Mailbox | select PrimarySmtpAddress,EmailAddresses
73. Remove all aliases from every distribution group
$groups = Get-DistributionGroup -ResultSize Unlimited | Where {$_.Emailaddresses.count -gt 1}
foreach ($group in $groups) {
foreach ($email in $group.emailaddresses){
if ($email -ne “SMTP:”+$group.PrimarySmtpAddress){
Set-DistributionGroup -Identity $group.name -EmailAddresses @{Remove=$email}
}
}
Write-host $group.primarysmtpaddress “has been processed”
}
74. Confirm the Primary and Alias addresses are both domainname.onmicrosoft.com ONLY
Get-DistributionGroup | select PrimarySmtpAddress,EmailAddresses
[If Required] O365 Groups: User the cmdlets below to remove the domain:
Get-UnifiedGroup -Identity “name” | select primarysmtpaddress,emailaddresses
Set-UnifiedGroup -Identity “name” -PrimarySMTPAddress [email protected]
Set-UnifiedGroup -Identity “name” -EmailAddresses @{remove=”smtp:[email protected]”}
75. Confirm all dependencies have been removed. Replace the domainname with your domain name.
Get-MsolUser -DomainName domainname.com -all
Important:
76. Remove the domain from the source Microsoft 365 tenant
Important:
77. Add Mail Rules and Connectors at Destination
[If required]
78. Verify the domain
79. Verify changes
80. Check Domain
To check everything is setup as it should be, wait around an hour for all updates to take effect then launch: https://centralops.net/co/
Type in the domain name and check all records are set as in ‘View DNS Settings’ above.
81. Remove Email Forwarding at Destination
Log into EXO Powershell at Destination and run the following cmdlets for each user:
Set-Mailbox -Identity “DestinationUserEmailAddress” -ForwardingAddress $null -DeliverToMailboxAndForward $false
82. Add aliases for each user at Destination:
Set-RemoteMailbox -Identity “[email protected]” -EmailAddresses @{Add=”smtp:name1@domain”,”smtp:name2@domain”}
83. For each GROUP:
Set-DistributionGroup -Identity “groupname” -EmailAddresses @{add=”[email protected]”}
84. Change the TTL value on each MX record back to the original setting eg 1 hour
85. Migrate Mailboxes – Final Migration
Important: Allow time for the migration to complete
86. Resolve any BitTitan error messages
87. Delete Contacts at Destination
Connect to EXO at Destination and run the following cmdlet:
Import-csv “Backup_Destination_Contacts.csv”| ForEach-Object {
$DisplayName = $_.DisplayName
Remove-MailContact -Identity $Displayname}
88. Confirm the Contact has been deleted:
Import-csv “Backup_Destination_Contacts.csv”| ForEach-Object {
$DisplayName = $_.DisplayName
Get-MailContact -Identity $Displayname}
89. Set the default email address at Destination
For each USER:
Set-RemoteMailbox “[email protected]” -PrimarySmtpAddress “[email protected]”
90. For each GROUP:
Set-DistributionGroup -Identity ‘DisplayName’ -PrimarySmtpAddress “[email protected]” -EmailAddressPolicyEnabled $false
91. For each SHARED MAILBOX:
Important: Allow time for all changes to sync to O365.
Post-Migration Activities
92. Verify delegates / aliases have been correctly populated
Migrate Mailboxes – Final Migration
Important: Allow time for the migration to complete.
93. Resolve any BitTitan error messages
Select the accounts that errored
Click on the down arrow beside “Start” and select “Retry Errors”
In the “Retry Errors” window, review the settings
Click “Retry Errors”
Click on the “Refresh list” icon to get a status of the migration or click on the dashboard on the left-hand side menu
94. Execute End User Test Plan
Launch Outlook at Destination and verify the contents of the following:
Calendario de
contactos de correo electrónico
Envíe y reciba correos electrónicos INTERNAMENTE y verifique que se hayan recibido .
Envíe y reciba correos electrónicos EXTERNAMENTE y verifique que se hayan recibido
. Verifique la dirección de correo electrónico del remitente.
Envíe y reciba correos electrónicos desde un BUZÓN COMPARTIDO y confirme que se han recibido.
Verifique la dirección de correo electrónico del remitente.
Envíe una invitación de calendario de prueba a un colega y confirme que se recibió la invitación.
95. Inicie sesión en EXO Powershell en Destino
Para cada buzón, elimine la cuenta de servicio
Remove-MailboxPermission -Identity "User1" -User "BitTitan service account" -AccessRights FullAccess -InheritanceType All
96. Tomar posesión de los registros de dominio y DNS
[Si aún no lo ha hecho]: si el propietario actual realizó los cambios necesarios en el DNS, asuma la propiedad de los dominios y los registros DNS.
Plan de retirada
97. Cambiar la dirección de correo electrónico predeterminada a la dirección de correo electrónico anterior
Set-RemoteMailbox “nombre de [email protected]” -PrimarySmtpAddress “[email protected]”
98. Para cada USUARIO:
Inicie sesión en el servidor de Exchange local.
Ejecute Exchange powershell y ejecute los siguientes cmdlets:
Set-RemoteMailbox “[email protected]” -EmailAddresses @{remove=”[email protected]”}
99. Para cada GRUPO:
Inicie sesión en el servidor de Exchange local.
Ejecute Exchange powershell y ejecute los siguientes cmdlets:
Set-DistributionGroup -Identity "groupname" -EmailAddresses @{remove=”[email protected]”}
100. Verifique que los atributos se hayan actualizado:
Get-RemoteMailbox-Identidad | seleccione userprincipalname,alias,primarysmtpaddress,emailaddresses
101. Volver a crear contactos en el destino:
Inicie sesión en EXO Powershell en Destination y ejecute los siguientes cmdlets:
Importar-csv “Backup_Destination_Contacts.csv”| Para cada objeto {
$DisplayName = $_.DisplayName
$Email = $_.EmailAddresses
New-MailContact -Name $Displayname -ExternalEmailAddress $Email}
102. Habilitación del reenvío de Destino a CONTACTO
Inicie sesión en EXO Powershell en Destination
Ejecute los siguientes cmdlets:
Set-Mailbox -Identidad “nombre de [email protected]” -DeliverToMailboxAndForward $true -Dirección de reenvío “[email protected]”
103. Cambios de DNS inversos
104. Confirme que se hayan eliminado todas las dependencias. Reemplace el nombre de dominio con su nombre de dominio.
Get-MsolUser -DomainName nombrededominio.com -todos
105. Eliminar el dominio del inquilino de Microsoft 365 de destino
Importante :
Espere hasta 60 minutos antes de agregar los dominios al inquilino de destino
O365 aún puede pensar que el dominio todavía está en uso
106. Agregue el dominio en Origen y luego solicite un registro TXT para verificar que somos dueños del dominio
107. Verifica el dominio
108. Verificar cambios
109. Comprobar dominio
Para verificar que todo esté configurado como debería, espere alrededor de una hora para que todas las actualizaciones surtan efecto y luego inicie: http://centralops.net/co/
Escriba el nombre de dominio y verifique que todos los registros estén configurados como en 'Ver configuración de DNS ' arriba.
110. Si corresponde, agregue todas las licencias de Skype Empresarial y Teams de los usuarios en el arrendatario de origen. Esto agregará el atributo SIP a sus direcciones de proxy.
111. Restaurar la dirección de proxy original para todos los usuarios:
Set-Mailbox -Identity "alias" -EmailAddresses SMTP:[email protected],smtp:[email protected]
112. Restore the UPN for all users:
Import-csv “Backup_Mailboxes.csv”| ForEach-Object {
$NewUPN = $_.PrimarySmtpAddress
$alias = $_.Alias
$OldUPN = $alias + “@vivacityhealth.onmicrosoft.com”
Set-MsolUserPrincipalName -UserPrincipalName $OldUPN -NewUserPrincipalName $Newupn
}
113. Verify UPN, Email and Proxy Address have been updated:
Get-Mailbox -Identity | select userprincipalname,alias,primarysmtpaddress,emailaddresses
114. Change all Distribution Groups SMTP address to domainname.onmicrosoft.com domain. Replace the domainname with your domain name.
Get-DistributionGroup -ResultSize Unlimited | select-object PrimarySMTPAddress | export-csv -NoTypeInformation “DL.csv”
Import-csv DL.csv| ForEach-Object {
$ID = $_.PrimarySmtpAddress
$365Email = $ID.Split(“@”)[0] + “@domainname.onmicrosoft.com”
Set-DistributionGroup -Identity $ID -primarysmtpaddress $365Email}
115. Remove all aliases from every distribution group
$groups = Get-DistributionGroup -ResultSize Unlimited | Where {$_.Emailaddresses.count -gt 1}
foreach ($group in $groups) {
foreach ($email in $group.emailaddresses){
if ($email -ne “SMTP:”+$group.PrimarySmtpAddress){
Set-DistributionGroup -Identity $group.name -EmailAddresses @{Remove=$email}
}
}
Write-host $group.primarysmtpaddress “has been processed” $
}
That’s how tenant to tenant migration Office 365 works.
Un tutorial que muestra cómo hacer que Microsoft PowerPoint 365 reproduzca tu presentación automáticamente configurando el tiempo para avanzar las diapositivas.
Los conjuntos de estilos pueden dar a todo su documento un aspecto pulido y consistente al instante. Aquí se explica cómo usar conjuntos de estilos en Word y dónde encontrarlos.
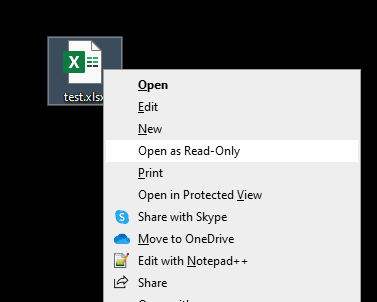
Forzar un aviso en tus archivos de Microsoft Excel para Office 365 que diga Abrir como solo lectura con esta guía.
Te mostramos un truco que puedes usar para exportar fácilmente todos tus contactos de Microsoft Outlook 365 a archivos vCard.
Aprende a habilitar o deshabilitar la visualización de fórmulas en celdas en Microsoft Excel.
Aprenda a bloquear y desbloquear celdas en Microsoft Excel 365 con este tutorial.
Es común que la opción de Correo no deseado esté deshabilitada en Microsoft Outlook. Este artículo te muestra cómo solucionarlo.
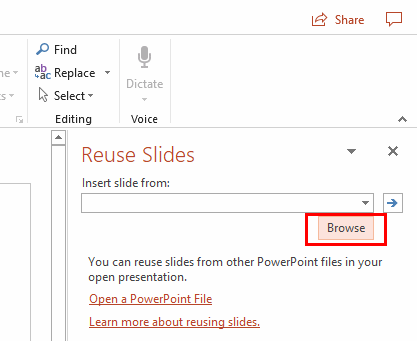
Un tutorial que muestra cómo importar diapositivas de otro archivo de presentación de Microsoft PowerPoint 365.
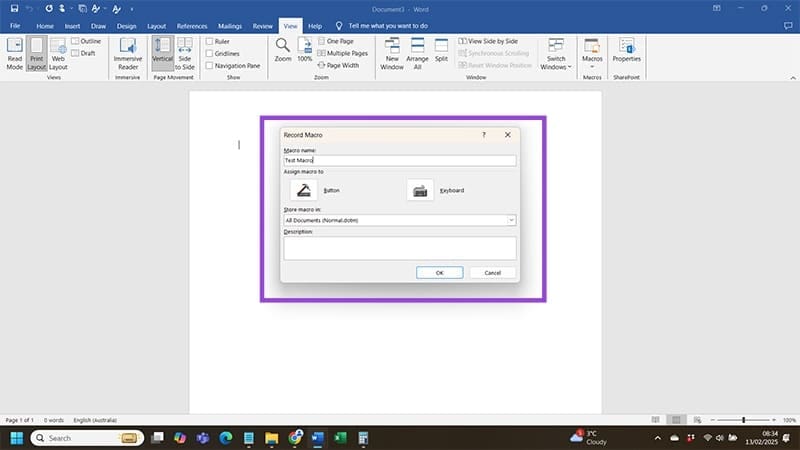
Descubre cómo crear un Macro en Word para facilitar la ejecución de tus funciones más utilizadas en menos tiempo.
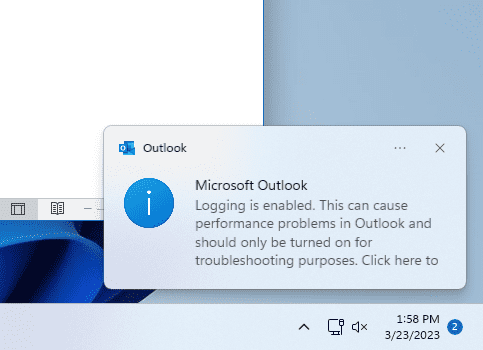
¿Microsoft Support le pidió que comparta el registro de errores de la aplicación Outlook pero no sabe cómo hacerlo? Encuentre aquí los pasos para el registro global y avanzado de Outlook.


