Si bien las notificaciones son esenciales en algunos casos, a veces se convierte en un elemento de distracción. Al igual que su teléfono, una PC también puede distraerlo con notificaciones. Es por eso que Windows 11 incluye la función Focus Assist, que le permite evitar notificaciones que le distraigan. Con esta función, puede hacer su trabajo con total concentración en lugar de distraerse con mensajes y notificaciones aleatorios. Las notificaciones también pueden dañar su productividad y, por lo tanto, deben suprimirse en el momento adecuado.
Con solo unos pocos clics se pueden ocultar todas las notificaciones, alertas y mensajes en su PC. Si ha actualizado recientemente su sistema a Windows 11 y no puede descubrir la nueva interfaz de usuario, este artículo lo ayudará con una guía completa sobre cómo usar Focus Assist en Windows 11 para deshacerse de las notificaciones.
Relacionado: Cómo tomar capturas de pantalla en Windows 11
Contenido
¿Qué es Focus Assist en Windows 11?
Focus Assist es simplemente un modo No molestar para su PC, como los que tiene en sus teléfonos. Es una función útil en Windows 11 que le permite deshacerse de notificaciones, mensajes y alertas innecesarios. La función de asistencia de enfoque le permite personalizar su lista de prioridades en lugar de bloquear su PC de todas las notificaciones.
La distracción puede dañar su productividad. Por lo tanto, con la función Focus Assist, puede ocultar todas las notificaciones, alertas y mensajes mientras trabaja en algo importante. En lugar de alertarlo, irán directamente al centro de acción. Puede ver las notificaciones ocultas en el centro de actividades en su propio tiempo.
¿Cómo funciona Focus Assist en Windows 11?
Focus Assist le brinda la flexibilidad de seleccionar cuándo bloquear distracciones como mensajes, notificaciones y alertas. Puede activar Focus Assist en cualquier momento o también puede programar un intervalo de tiempo en la Configuración que activará el Focus Assist automáticamente.
La función de asistencia de enfoque le permite crear una lista de prioridades para asegurarse de que no se pierda ninguna notificación de las personas más importantes de su contacto. Las personas en su lista de prioridades siempre pueden comunicarse con usted, incluso cuando se encuentre en un trabajo importante. En caso de que necesite una concentración total mientras trabaja, también puede optar por bloquear todas las notificaciones. Para ver todas las notificaciones bloqueadas que recibió mientras estaba en su trabajo, abra el centro de acción de su sistema.
Relacionado Cómo detener ventanas emergentes en Windows 11
Cómo habilitar la asistencia de enfoque
Focus Assist está desactivado de forma predeterminada. Pero si desea habilitarlo para que deje de recibir notificaciones, siga los pasos a continuación.
Método n. ° 1: uso de la configuración
Haga clic en el icono de búsqueda , que parece una lupa en la barra de tareas.

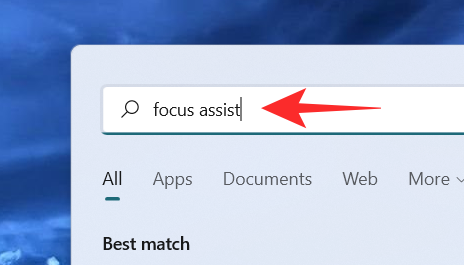
Escribe ayuda de enfoque en la barra de búsqueda.
Haga clic en la configuración del sistema Focus Assist .
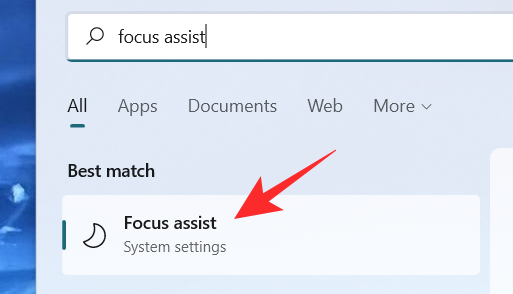
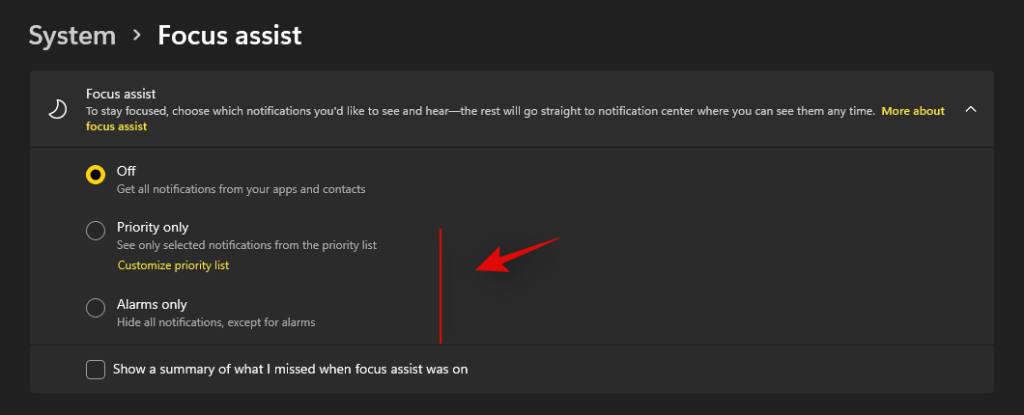
La ventana de configuración del sistema Focus Assist aparece en la pantalla. En Focus Assist , seleccione una de estas opciones:
- Desactivado : desactiva la función Focus Assist y le permite recibir notificaciones de aplicaciones y contactos.
- Solo alarmas : esta función suprime todas las notificaciones, excepto la alarma.
- Solo prioridad : esta función permite notificaciones solo de su lista de prioridades que necesita personalizar.
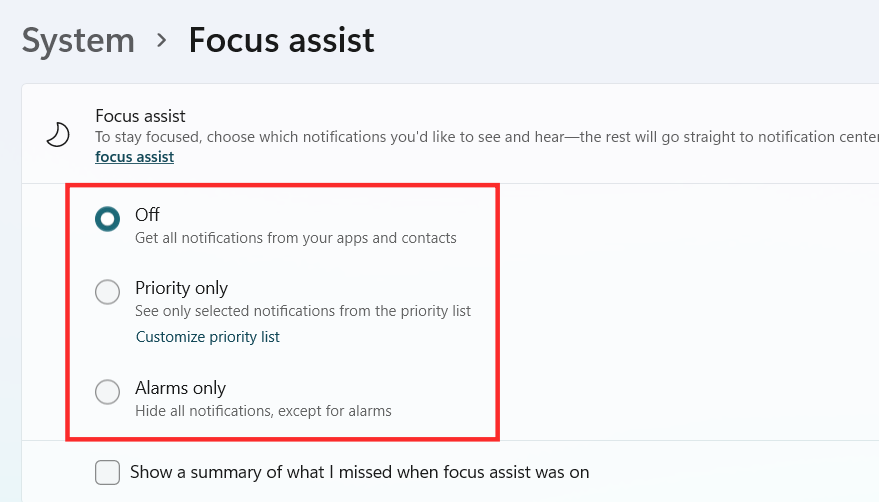
Focus Assist ahora debería estar habilitado dentro de Windows 11 dependiendo de la elección que haya hecho.
Método n. ° 2: uso del centro de actividades
Haga clic en el Centro de actividades que muestra el icono de Wifi, volumen y batería juntos.

Justo debajo del ícono de Bluetooth, puede ver el ícono de Asistencia de enfoque que parece una luna creciente.
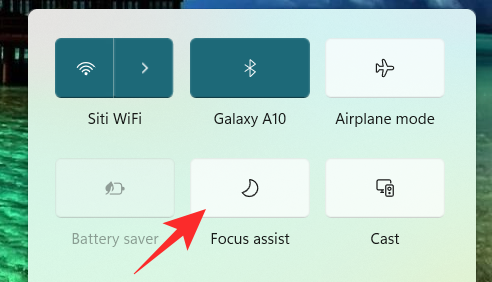
De forma predeterminada, la función Focus Assist estará desactivada. Haga clic en él y la función se establecerá directamente en Prioridad solamente .
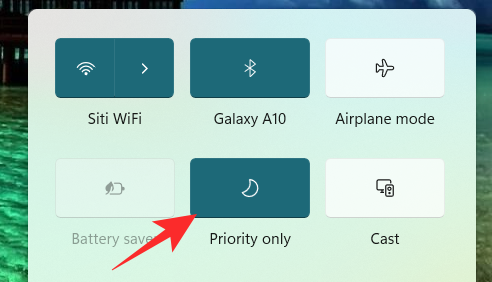
Vuelva a hacer clic en él para configurar la función Asistencia de enfoque en Solo alarmas .
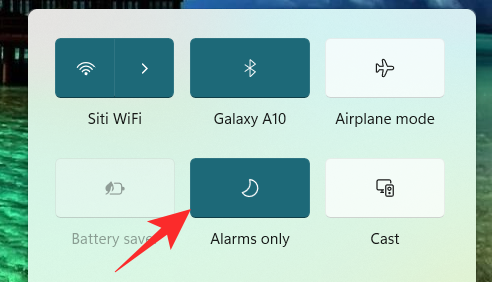
Para desactivar la función Focus Assist, vuelva a hacer clic en ella.
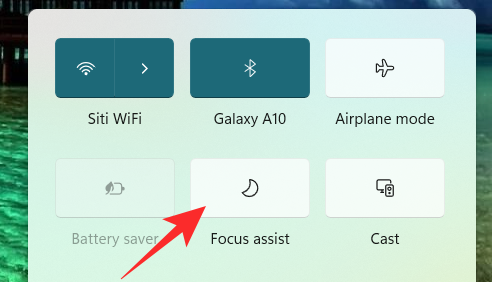
Con solo hacer clic en el icono de Asistencia de enfoque en el Centro de actividades, puede cambiar su función a desactivada, solo prioridad y solo alarmas. Sin embargo, para realizar otros cambios necesarios en la configuración de Asistencia de enfoque desde el Centro de actividades, haga clic con el botón derecho en el icono de Asistencia de enfoque en el Centro de actividades y haga clic en Ir a Configuración .
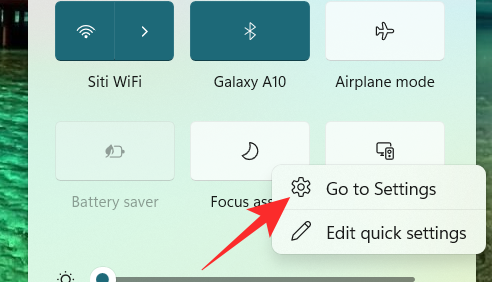
Esto lo llevará a la aplicación Configuración, donde puede realizar fácilmente todos los cambios previstos. ¡Y eso es! La asistencia de enfoque ahora debería estar habilitada en Windows 11 directamente desde el centro de actividades.
Método n. ° 3: uso del editor de políticas de grupo
También puede habilitar el modo de asistencia de enfoque utilizando el Editor de políticas de grupo en caso de que sea un administrador. Use la guía a continuación para ayudarlo con el proceso.
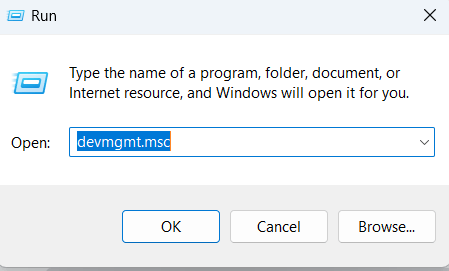
Presione Windows + Ren su teclado y escriba lo siguiente en el cuadro de diálogo Ejecutar. Presione Intro en su teclado para abrir el Editor de políticas de grupo.
gpedit.msc
Navegue al siguiente nodo mencionado a continuación.
User configuration > Administrative Templates > Start Menu and Taskbar > Notifications
Busque y haga doble clic en el valor 'Desactivar Horas Silenciosas' a su derecha.
Ahora seleccione una de las siguientes opciones según sus necesidades actuales en la esquina superior izquierda de la ventana de propiedades.
- Habilitar: Esto habilitará la asistencia de enfoque en el sistema seleccionado.
- Desactivar: esto desactivará la asistencia de enfoque para el sistema seleccionado.
¡Y eso es! La asistencia de enfoque ahora se habilitará o deshabilitará desde el Editor de políticas de grupo según sus preferencias. Desafortunadamente, no puede personalizar el comportamiento de asistencia de Focus como administrador. Esa capacidad aún recae en el usuario. Solo puede habilitar o deshabilitar la capacidad de usar Focus Assist para un sistema usando el Editor de políticas de grupo.
Cómo utilizar Focus Assist
El asistente de enfoque tiene varias configuraciones y opciones de personalización que pueden ayudarlo a cambiar su comportamiento de acuerdo con sus necesidades actuales. Utilice una de las guías siguientes que mejor se adapte a sus necesidades actuales.
Método n. ° 1: habilite el modo solo alarmas
El modo Solo alarmas en la ventana Focus Assist le permite ocultar todas las notificaciones excepto la alarma. Siga los pasos que se mencionan a continuación para habilitar el modo Solo alarmas.
Haga clic en el icono de búsqueda en la barra de tareas.

Tipo Asistencia de enfoque

Haga clic en Focus Assist .

En Focus Assist, haga clic en Solo alarmas para dejar de recibir notificaciones, excepto las alarmas.
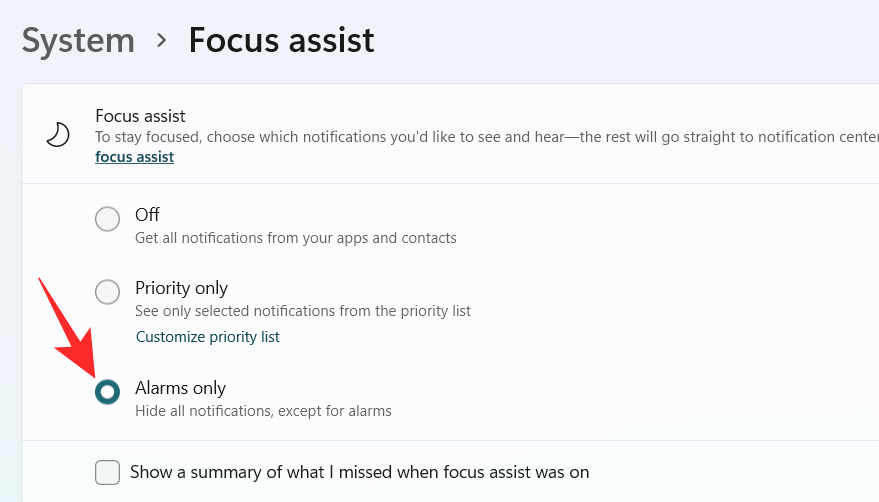
¡Y eso es! Ahora solo se le informará sobre las alarmas de su sistema. Todas las demás notificaciones, independientemente de su prioridad, se silenciarán en Windows 11.
Método n. ° 2: habilite la prioridad solo con una lista personalizada
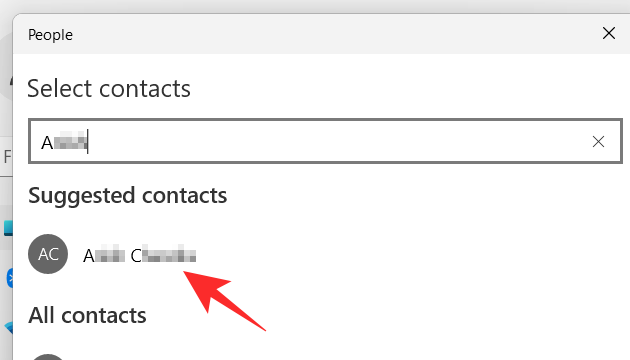
La ventana Personas aparecerá en la pantalla. Elija sus personas preferidas escribiendo sus nombres en la barra de búsqueda.
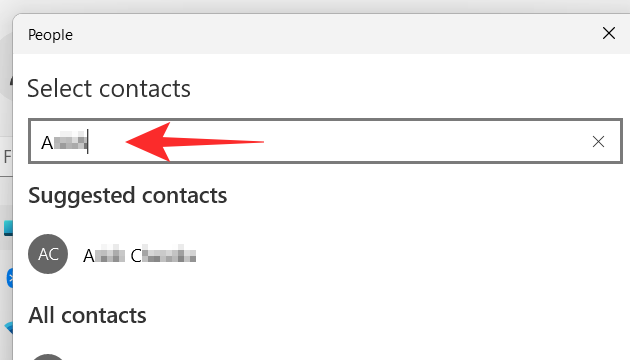
Haga clic en el nombre de la persona.
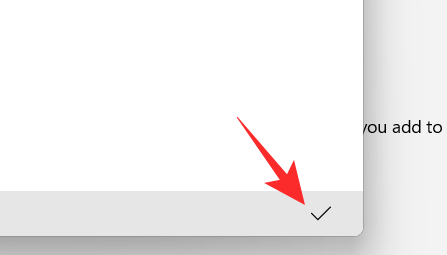
Haga clic en el botón de marca en la esquina inferior derecha de la ventana Personas.
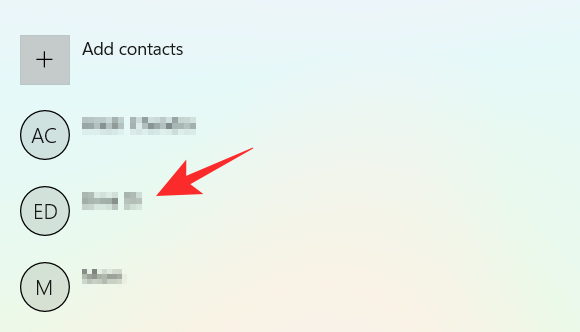
Se ha creado su lista de prioridades. Ahora, si desea eliminar un contacto de su lista de prioridades, haga clic en el contacto en Personas .
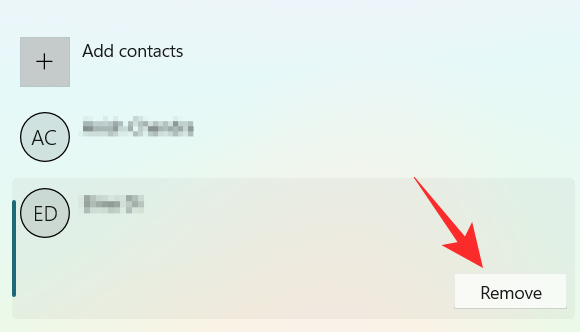
Haga clic en Eliminar .
Ahora, en la sección Aplicaciones , puede seleccionar las aplicaciones que pueden atravesar sus horas de tranquilidad. Para permitir que las aplicaciones muestren notificaciones, haga clic en el botón Agregar una aplicación .
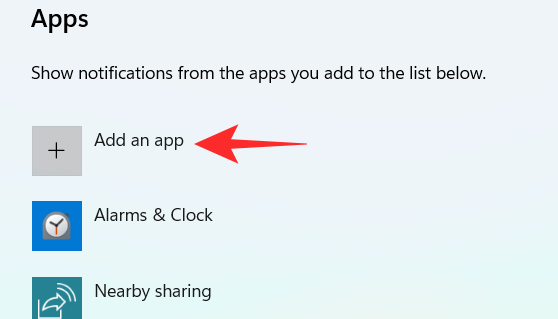
Aparece una lista de aplicaciones en su pantalla. Haga clic en la aplicación que desea agregar a su lista de prioridades.
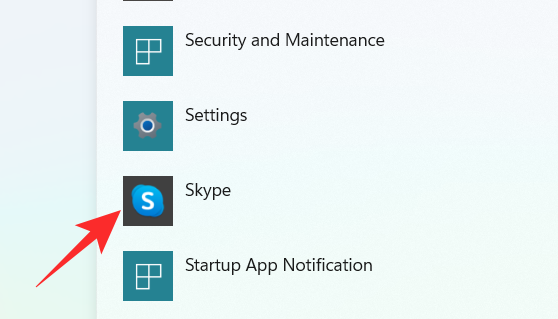
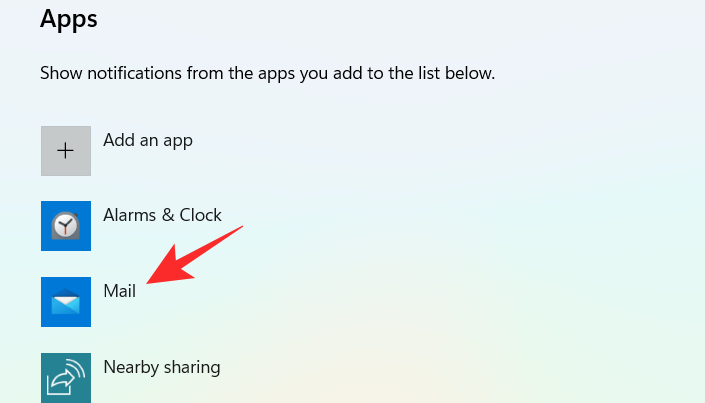
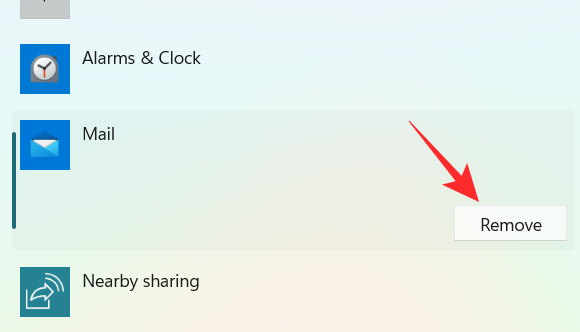
Continúe con este proceso hasta que haya terminado de seleccionar las aplicaciones. En caso de que desee eliminar una aplicación de su lista de prioridades, simplemente haga clic en la aplicación en la sección Aplicación .
Haga clic en Eliminar .
Y así es como puede personalizar la lista de prioridades en Focus Assist y usarla a su favor para recibir notificaciones solo de contactos importantes.
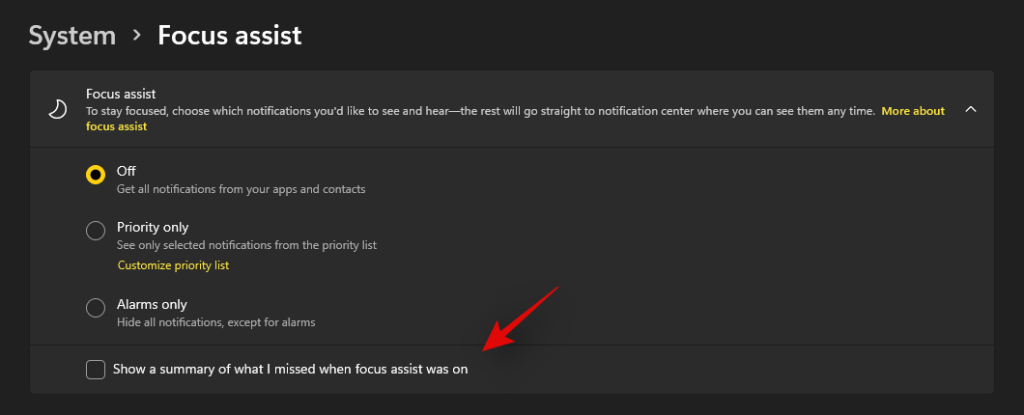
Método n. ° 3: habilite el resumen de notificación cuando la asistencia de enfoque esté deshabilitada
Haga clic en el icono de búsqueda en la barra de tareas.

Tipo Asistencia de enfoque

Haga clic en Focus Assist .

Haga clic en la opción deseada Solo prioridad o Solo alarmas .
Marque la casilla Mostrar un resumen de lo que me perdí cuando la asistencia de enfoque estaba activada .
Método n. ° 4: habilitar o deshabilitar las reglas automáticas de asistencia al enfoque
The Automatic rules in Focus assist allow you to determine the conditions that can activate the Focus assist automatically. There are four different automatic rules in the Focus Assist settings window that can be customized. Check out the steps mentioned below to customize automatic rules in Focus assist.
Click on the Search icon on the taskbar.

Type Focus assist

Click on Focus Assist.

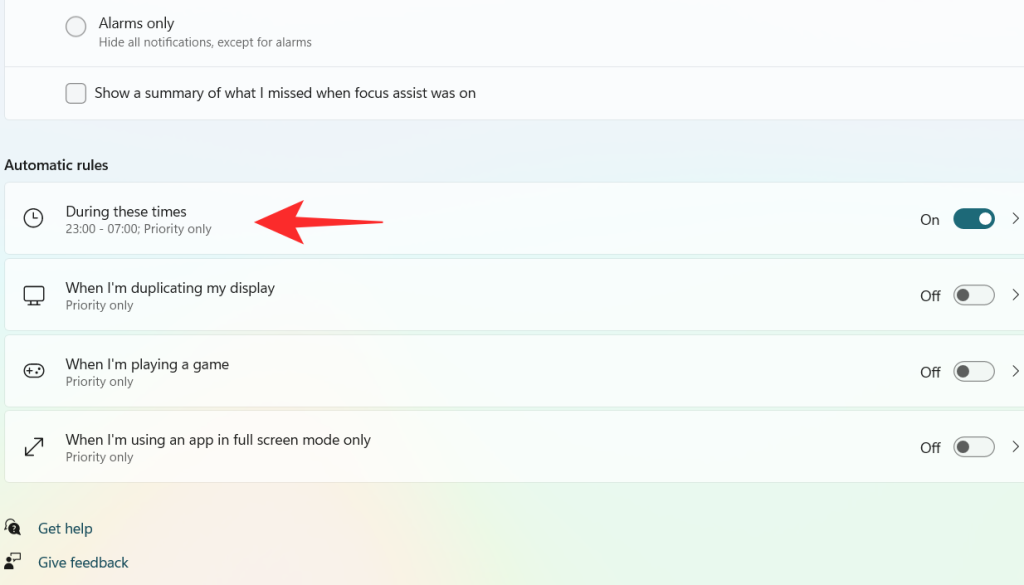
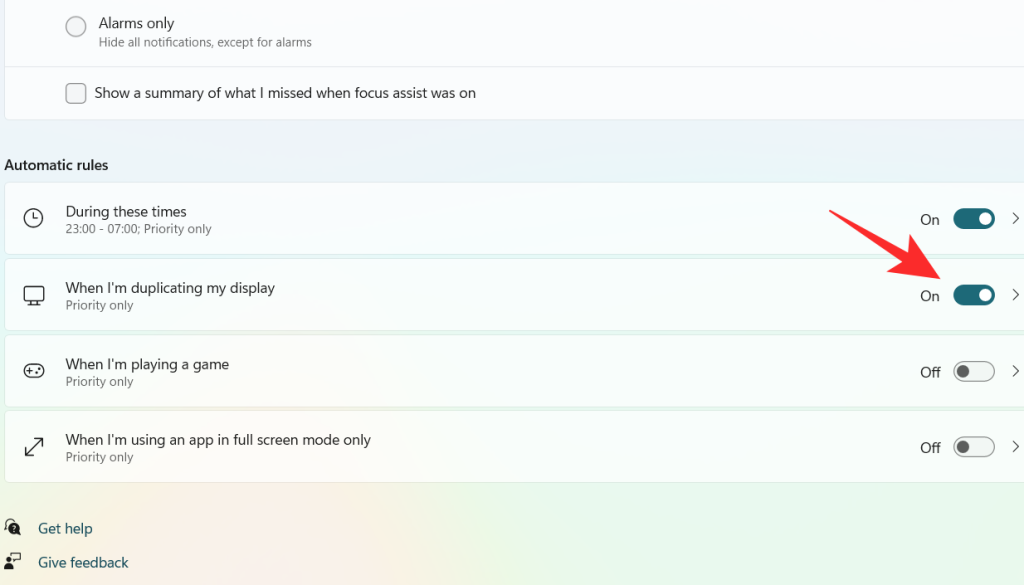
Under the Automatic rules section, there are four sections. Turn on the toggle switch for the option you want to choose.
- During these times – This function allows you to set a specific time range depending on which the Focus Assist feature automatically turns itself on or off.
- When I’m duplicating my display – This function automatically turns on the Focus Assist when it detects that your display is being shared. This function can be used especially to prevent notifications from popping up when you are in the middle of a presentation.
- When I’m playing a game – While you are playing games on a full-screen mode, this function allows the Focus Assist to suppress the notifications from popping up on the screen.
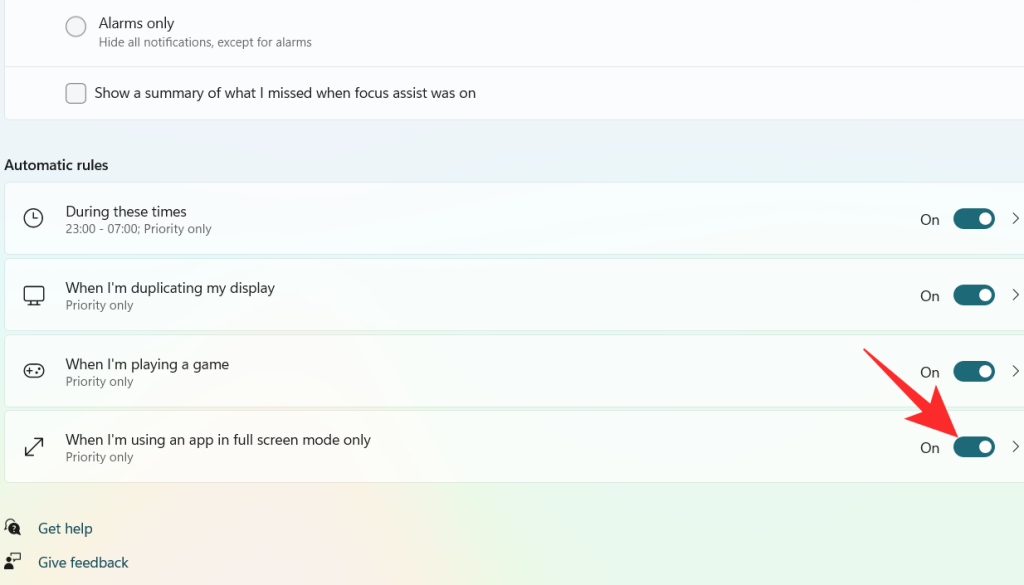
- When I’m using an app in full-screen mode only – This function enables the Focus Assist to turn on automatically when it detects that you’re using an app in full-screen mode. You will not receive any notifications until you have an app opened on a full-screen mode.
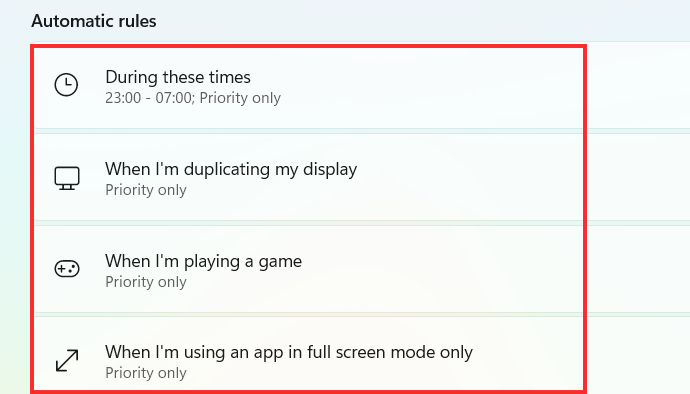
Now, let’s have a look at how to customize the above-mentioned options under Automatic rules.
1. During these times
Turn on the toggle switch, which is extreme right to the During these times tab.
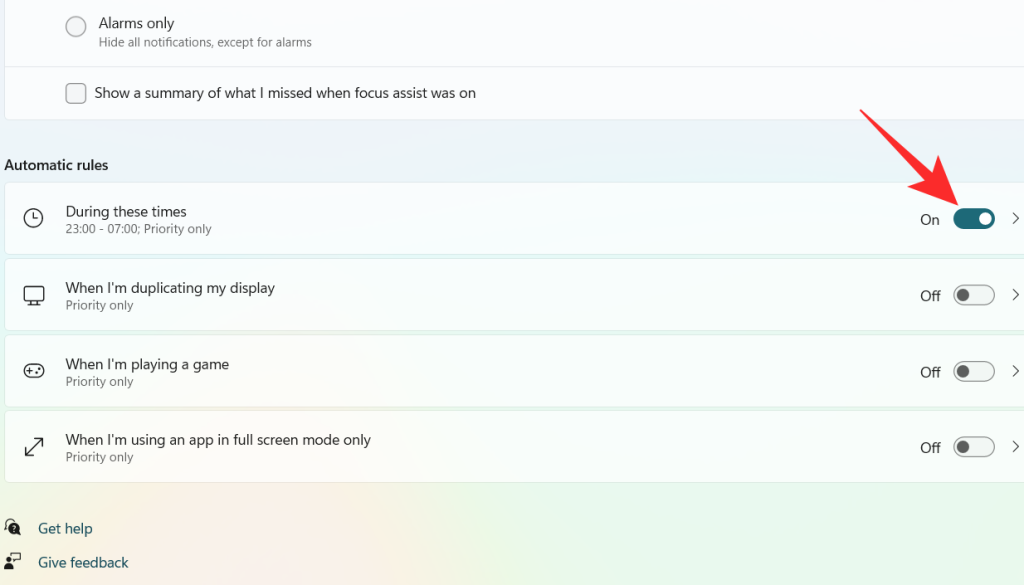
Click on the During these times tab.
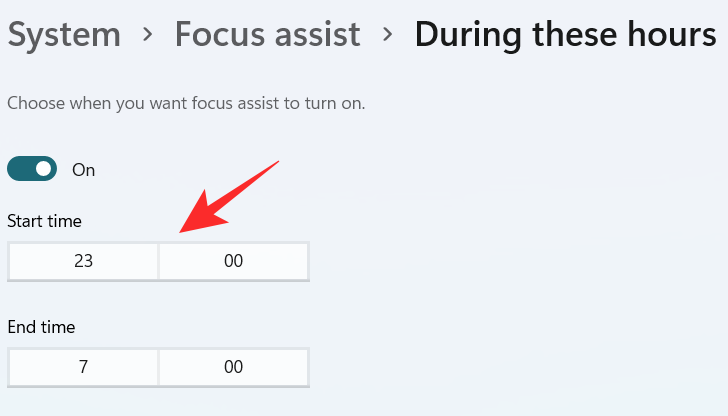
Click on the box under Start time.
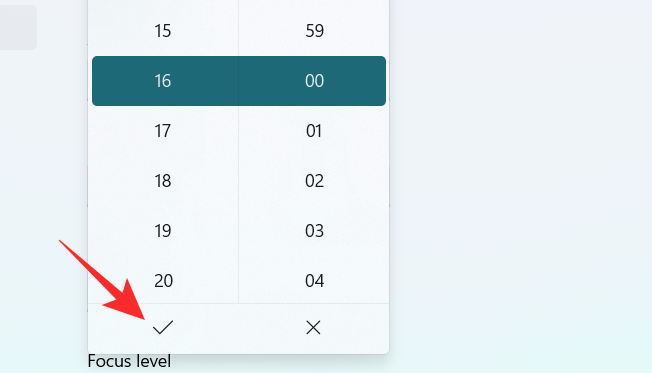
Select the time when you want the Focus Assist to turn on and click on the tick on the bottom of the dropdown menu.
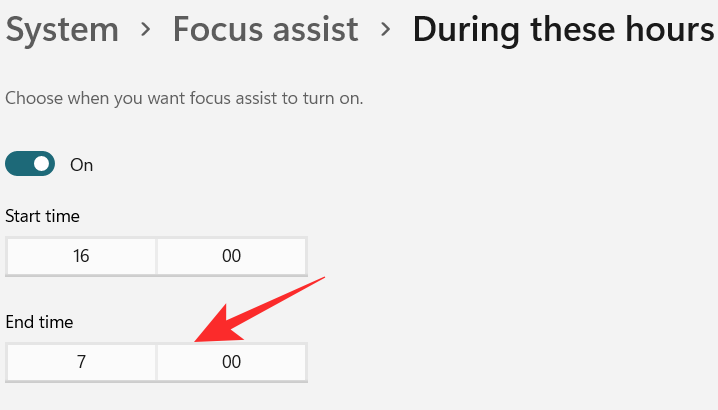
Click on the box under End time.
Select the time when you want the Focus Assist to turn off and click on the tick on the bottom of the dropdown menu.
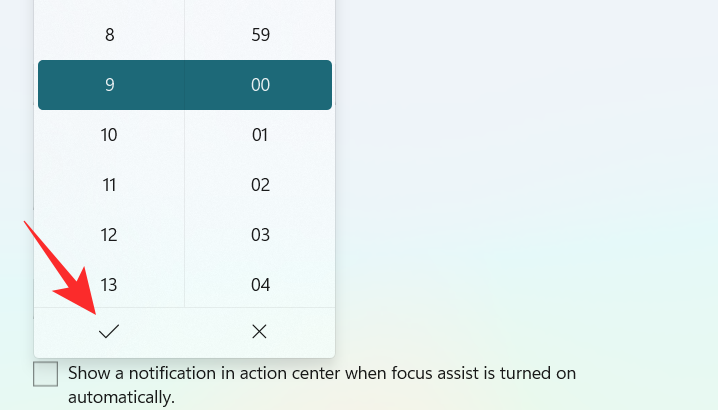
Click on the box under Repeats.
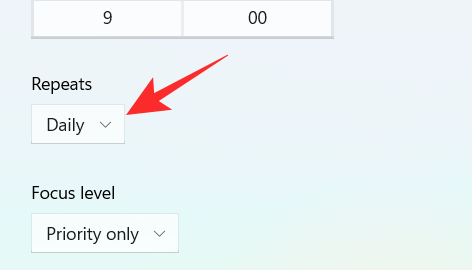
A small dropdown menu appears. Set the schedule to Daily, Weekends, or Weekdays.
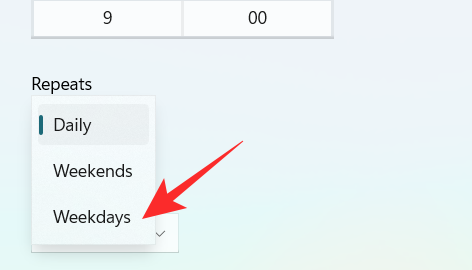
Click on the box under Focus level.
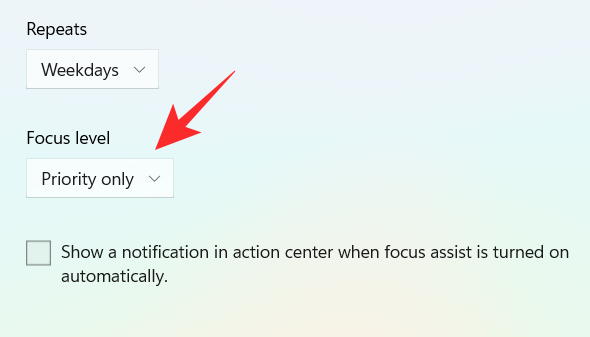
A small dropdown menu appears. Choose between Alarm only or Priority only.
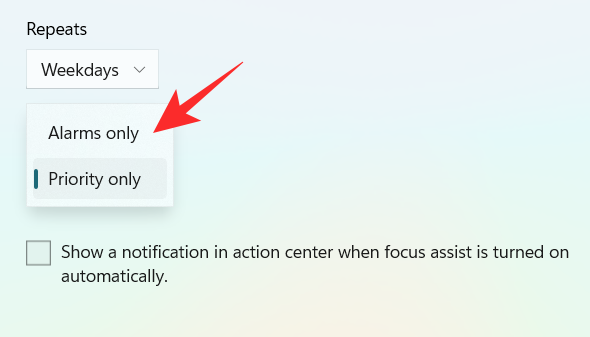
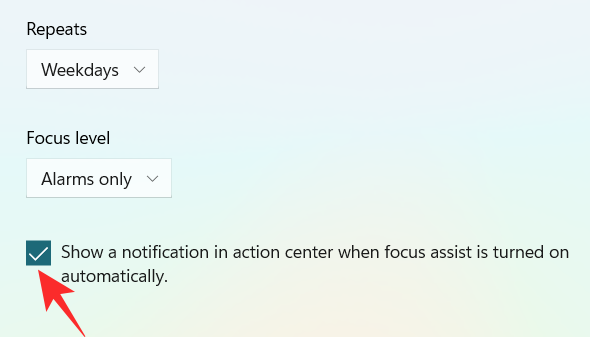
Finally, to get a notification when the Focus assist is turned on, check the box “Show a notification in action center when Focus assist is turned on automatically“.
2. When I’m duplicating my display
Turn on the toggle switch, which is extreme right to the When I’m duplicating my display tab.
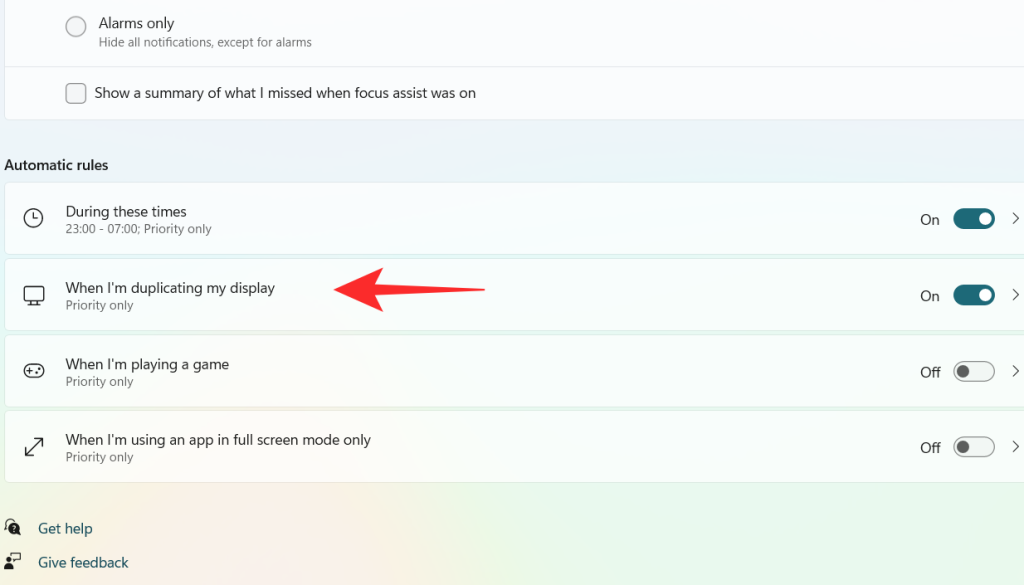
Click on the When I’m duplicating my display tab.
Click on the box under Focus level.
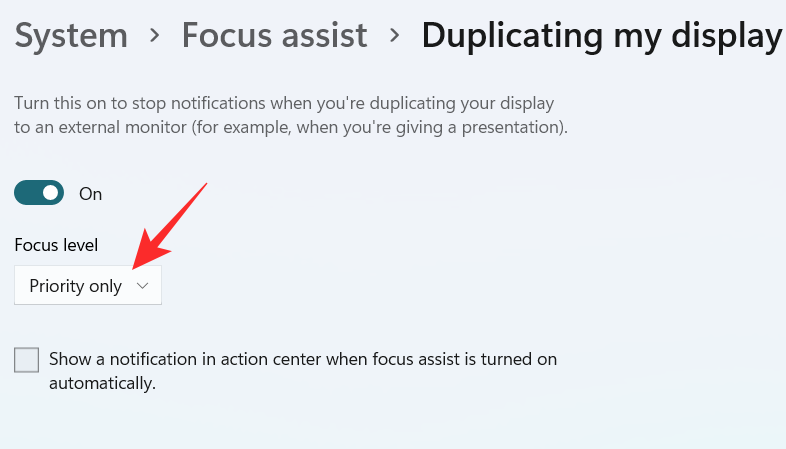
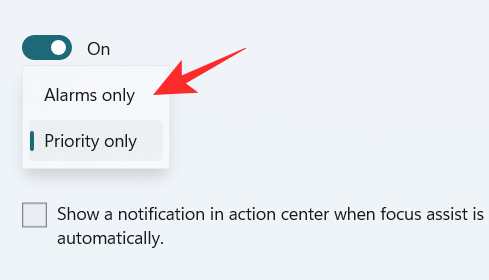
A dropdown menu appears, click on your desired option between Priority only and Alarms only.
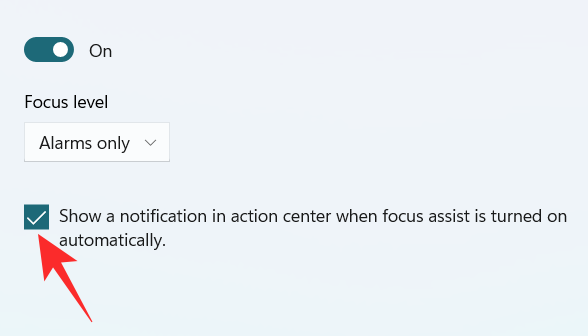
To get a notification when the Focus assist is turned on, check the box “Show a notification in action center when Focus assist is turned on automatically“
3. When I’m playing a game
Turn on the toggle switch, which is extreme right to the When I’m playing a game tab.
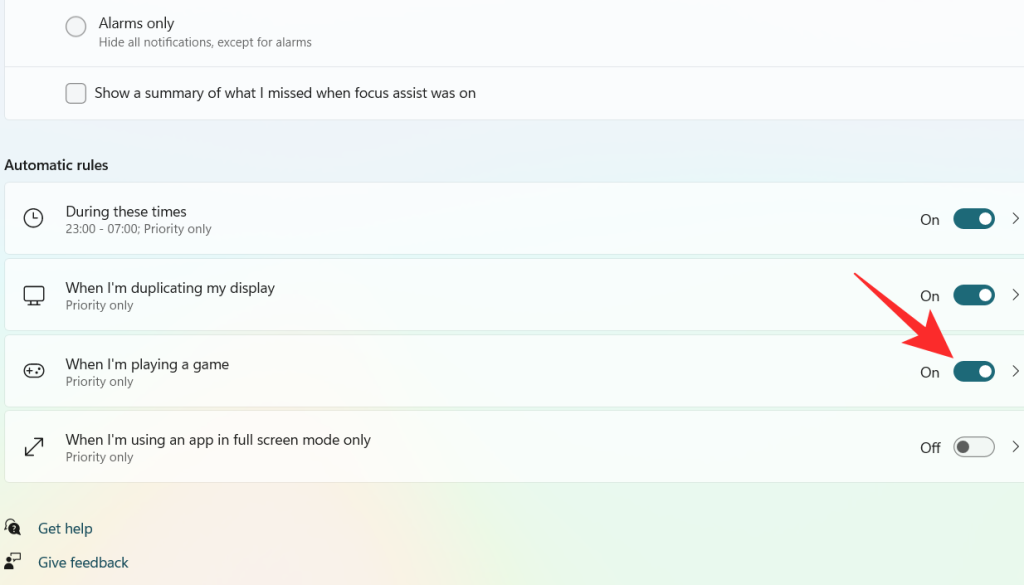
Click on the When I’m playing a game tab
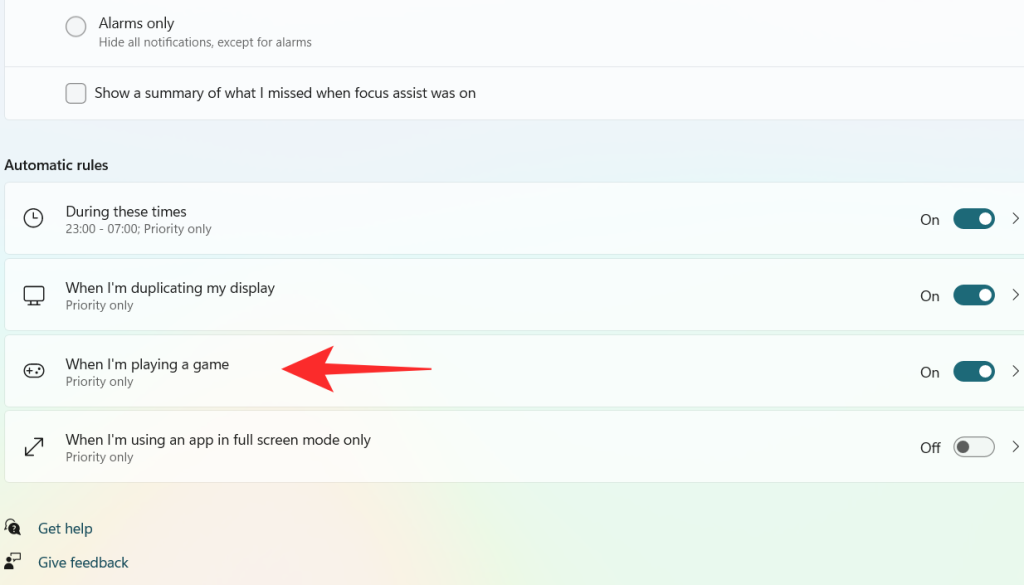
Click on the box under Focus Level.
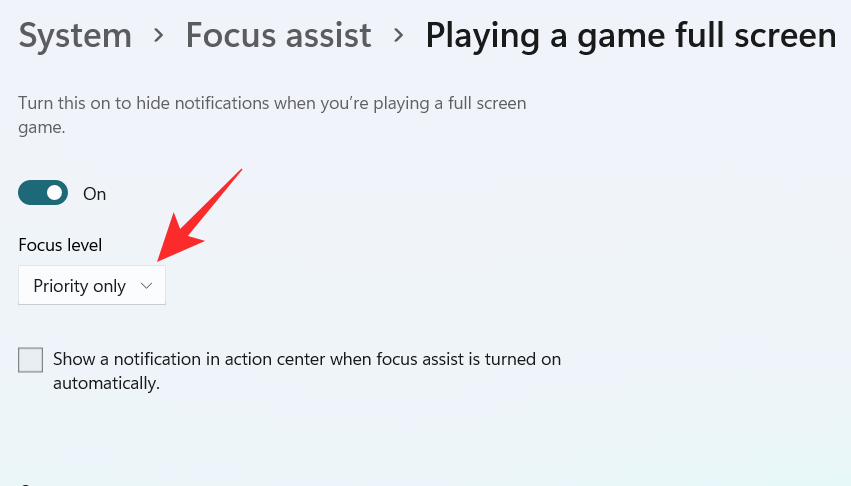
A dropdown menu appears, click on your desired option between Priority only and Alarms only.

To get a notification when the Focus assist is turned on, check the box “Show a notification in action center when Focus assist is turned on automatically“

4. When I’m using an app in full-screen mode only
Turn on the toggle switch, which is extreme right to the When I’m using an app in full-screen mode only tab.
Click on the When I’m using an app in full-screen mode only tab
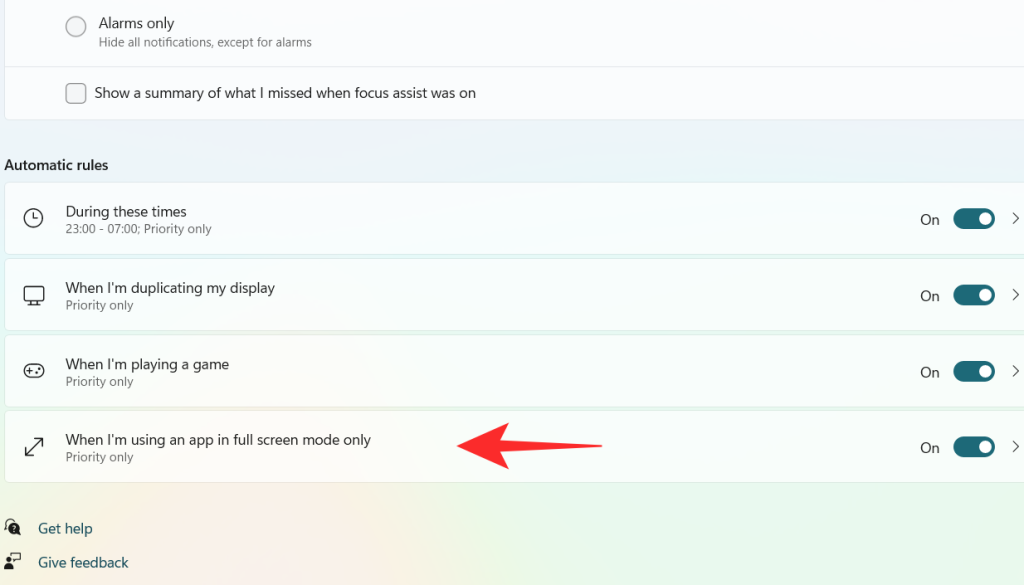
Click on the box under Focus Level.
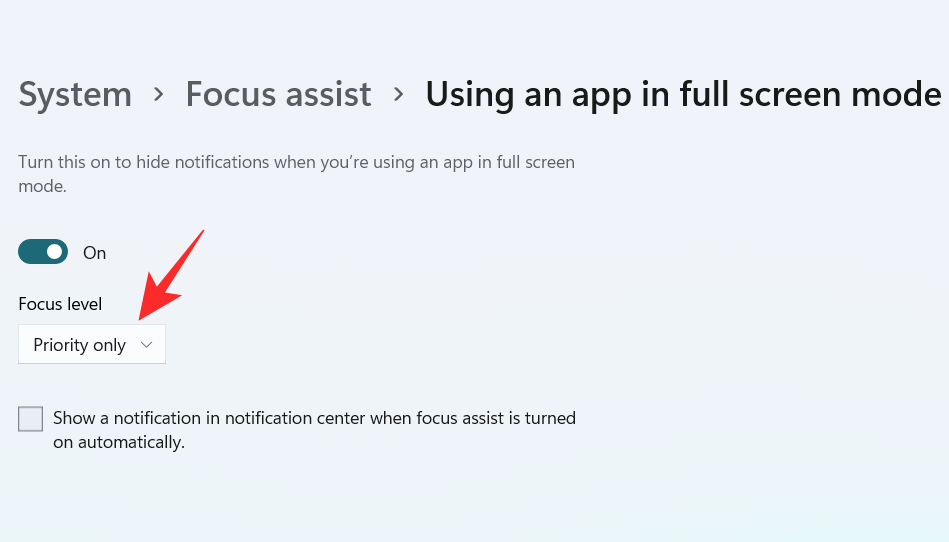
A dropdown menu appears, click on your desired option between Priority only and Alarms only.

To get a notification when the Focus assist is turned on, check the box “Show a notification in action center when Focus assist is turned on automatically“.

Using the above customizations, you can schedule and control Focus assist’s behavior according to your workflow for maximum efficiency no matter the task at hand.
Can you remove the Focus Assist icon from the Action Center?
Yes, you can easily remove the Focus Assist icon from the Action Center. Windows 11 brings a host of new cosmetic and UI changes and one of them has been the ability to customize your action center. You can now add or remove icons from the action center depending on your needs and opt for a more minimal or productive look depending on your workflow.
For now, you can only add and remove certain system modules but in the future, some users expect Microsoft to add the support for third-party apps as well. This would be a much welcome change that would allow you to manage dedicated system settings managed by third-party apps directly from your action center.
Customize your Focus assist icon in the action center
Depending on your current needs you can either remove or add the Focus assist module to the action center. Use one of the guides below depending on your current requirements.
1. Remove it
Click on the Action Center which shows the icon of Wifi, volume, and battery together.

Right-click on an empty place or on any icon and click on Edit quick settings.
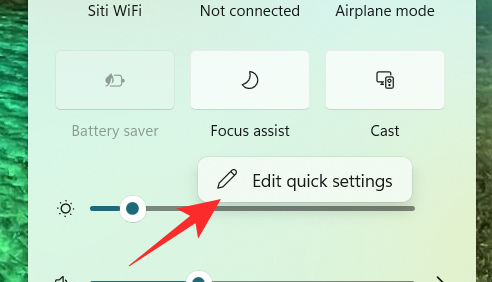
Click on the unpin symbol at the top right corner of the Focus Assist icon to remove the Focus Assist icon from the Action Center.
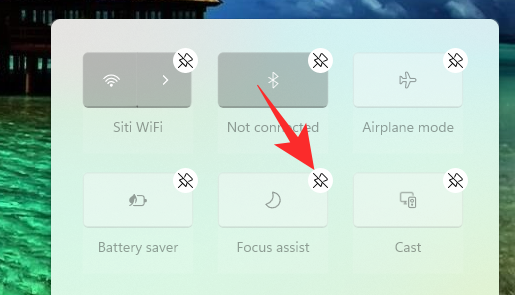
The Focus assist module should now have been removed from your action center. If not, we recommend you restart explorer.exe or your PC for the changes to take effect.
2. Restore it
Click on the Action Center which shows the icon of Wifi, volume, and battery together.

Right-click on an empty place or on any icon and click on Edit quick settings.
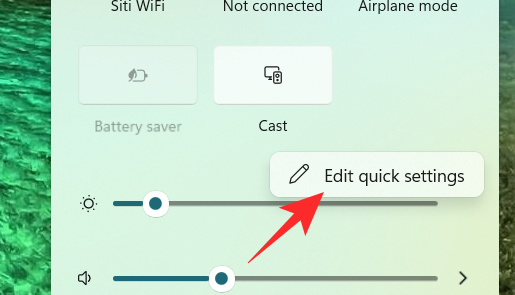
Now, click on the Add button at the bottom of the action center.
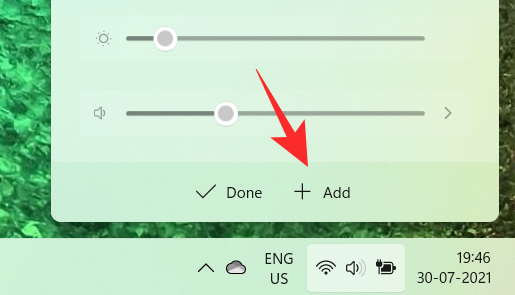
A list of different settings appears. Click on Focus Assist from the list and you will get to see the Focus Assist icon on the Action Center again.
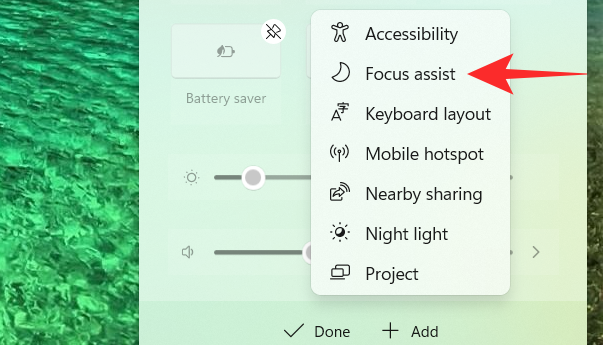
And that’s how you can add the Focus assist module back in the action center.
Focus assist keeps turning on automatically Issue: How to fix
If Focus assist keeps turning on automatically then there could be a couple of reasons for this behavior. Depending on its cause we can either fix it or use a workaround to manage the issue. Let’s find out why Focus assist keeps turning on automatically on your system.
Fix #1: Check Automatic Rules
Are you having this issue when projecting to a secondary display? Or when sharing your screen with a public computer? Then it is likely that focus assist is getting turned on automatically due to the default automatic rules in Windows 11.
By default, focus assist will silence all notifications in such scenarios to help maintain your privacy. But this can be counterproductive in case you are just trying to use a bigger display from a portable system like a laptop or an NUC.
It could also be that scheduled Focus assist was turned on your system by mistake which will enable and disable Focus assist automatically during certain hours. If any of these situations sounds like what you are facing then you can use the guide below to disable all automatic rules that enable Focus assist during certain scenarios and workflows on Windows 11. Let’s get started.
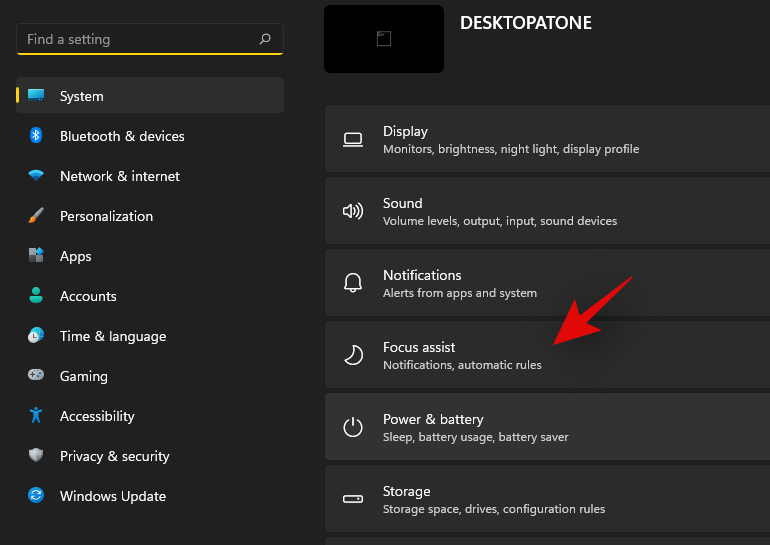
Press Windows + i on your keyboard to open the Settings app. Ensure ‘System’ is selected on your left and then click on ‘Focus Assist’ on your right.
Go down to automatic rules and turn off the following toggles.
- During these times
- When I’m duplicating my display
- When I’m playing a game
- When I’m using an app in full-screen mode only
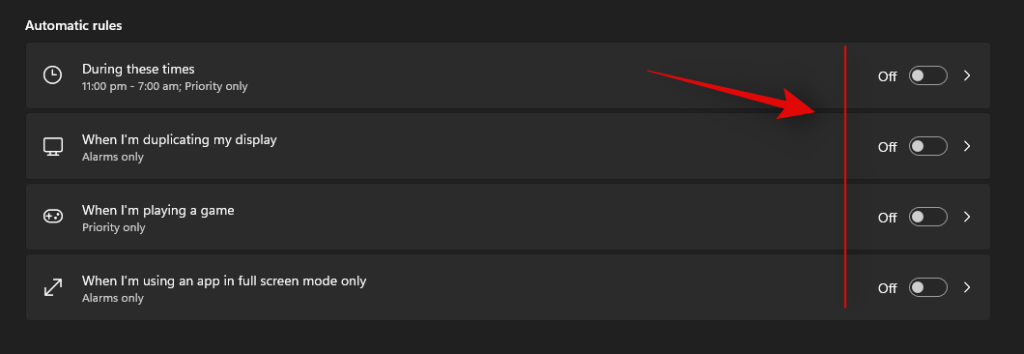
Once these rules are disabled, Windows 11 will not turn on Focus assist automatically on your system.
Fix #2: Turn of GeForce Overlay
This is another way to solve Focus assist misbehaving on your system. If you have a dGPU from Nvidia and are using the GeForce experience app then we recommend disabling its overlay option and restarting your system. With the automatic rule for ‘When I’m using an app in full-screen mode only’ turned on, Windows will mistake the Nvidia overlay detection on your desktop for a full-screen app which will trigger the Focus assist settings in return. You can also disable this automatic rule in case you wish to keep the Geforce Experience overlay enabled on your system.
Focus assist greyed out, option missing or not working; How to fix
Is the focus assist option missing from Windows 11 settings app? Is the module greyed out in the action center? This is a known bug that shows up occasionally with every feature update of Windows. Even certain versions of Windows 10 faced huge issues with this bug until a fix was released.
Fix #1: Enable in Group Policy Editor
If Focus assist seems to be missing from your system then it is likely disabled using the group policy editor. If your PC is managed by your organization or your workplace then it is likely disabled by your administrator. If you have access to the group policy editor then you can use the guide below to enable focus assist on your system. However, in case you have limited access, then you might need to get in touch with your administrator to enable Focus assist on your system.
Press Windows + R on your keyboard to bring up the Run dialog box and type in the following command to launch the Group Policy Editor. Click on ‘Ok’ once you are done.
gpedit.msc
Navigate to the following node.
User configuration > Administrative Templates > Start Menu and Taskbar > Notifications
Double click on ‘Turn off Quiet Hours’ on your right.
Click and select ‘Disabled’ in the top left corner.
Click on ‘Ok’ to save your changes.
And that’s it! Focus assist should now be enabled on your system in case it was disabled using the group policy editor.
Fix #2: Reinstall and repair default Windows UWP apps and system apps
If Focus assist is still missing from your system then let’s check if all the necessary apps and utilities are installed properly on your system. Use the guide below to check and repair Windows 11’s basic apps and functionality on your system.
Press Windows + S and search for PowerShell. Click on ‘Run as administrator’ once it shows up in your search results.
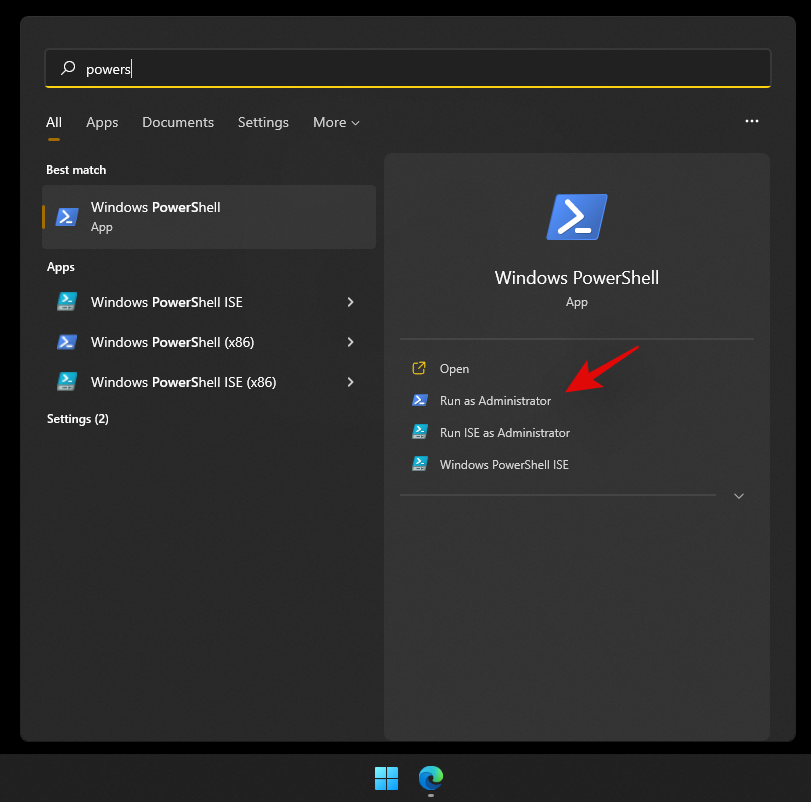
Once PowerShell is launched, execute the following command to reinstall all UWP apps and check and repair other default utilities required by Windows 11 in the background.
Get-AppXPackage -AllUsers | Foreach {Add-AppxPackage -DisableDevelopmentMode -Register "$ ($ _. InstallLocation) \ AppXManifest.xml"}

Wait for the process to finish and restart your PC for good measure. If Focus assist was corrupted or missing from your system, then this fix should help solve all your issues.
Fix #3: Check for a Windows Update
Haven’t updated in a while? We recommend checking for recent Windows Updates. While updates rarely disable major features like Focus assist, a new feature update installation can help refresh your registry, fix mismatched values and more importantly iron out bugs that could be preventing you from accessing Focus assist on your system. Use the guide below to check for recent Windows updates on your system.
Press Windows + i on your keyboard to open the Settings app and click on ‘Windows Update’ on your left.

Click on ‘Check for updates’.

In case any new updates show up, let them install on your system and restart if prompted. In case you are using a metered connection then you will need to click on ‘Download now’ manually to avoid any unexpected data charges.
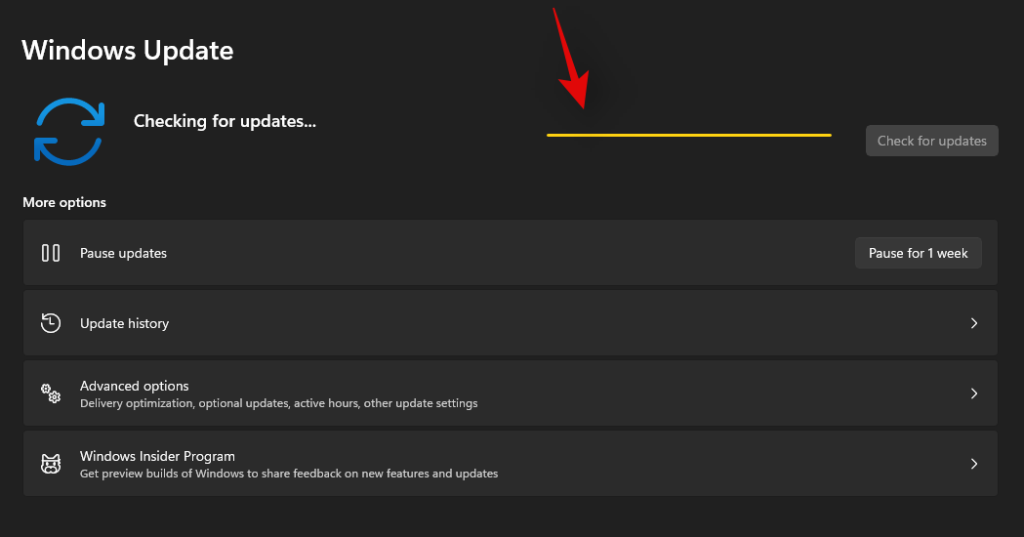
Once the necessary Windows updates are installed on your system, Focus assist should be restored in your action center and the Settings app.
Last Resort: Reset your PC
If Focus assist is still missing from your PC then this indicates a corrupted Windows installation on your system. The best way to fix this without wasting much time on troubleshooting would be to simply reset your PC while keeping all your files intact. This will refresh the entire Windows 11 installation and reinstall all the apps which should help restore functionality for all Windows features including Focus assist. Follow the guide below to reset your PC while keeping your files.
Note: The reset process will remove all installed applications and only retain files stored manually on your local storage. A list of all the removed apps will be available in .txt format on your desktop once your PC has been reset.
Press Windows + i on your keyboard and click on ‘Windows Update’ on your left.
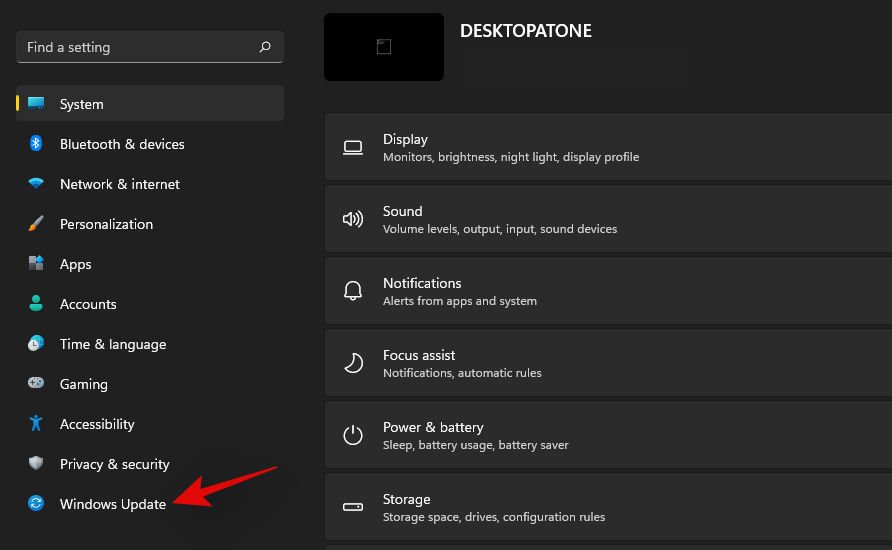
Click on ‘Advanced options’.
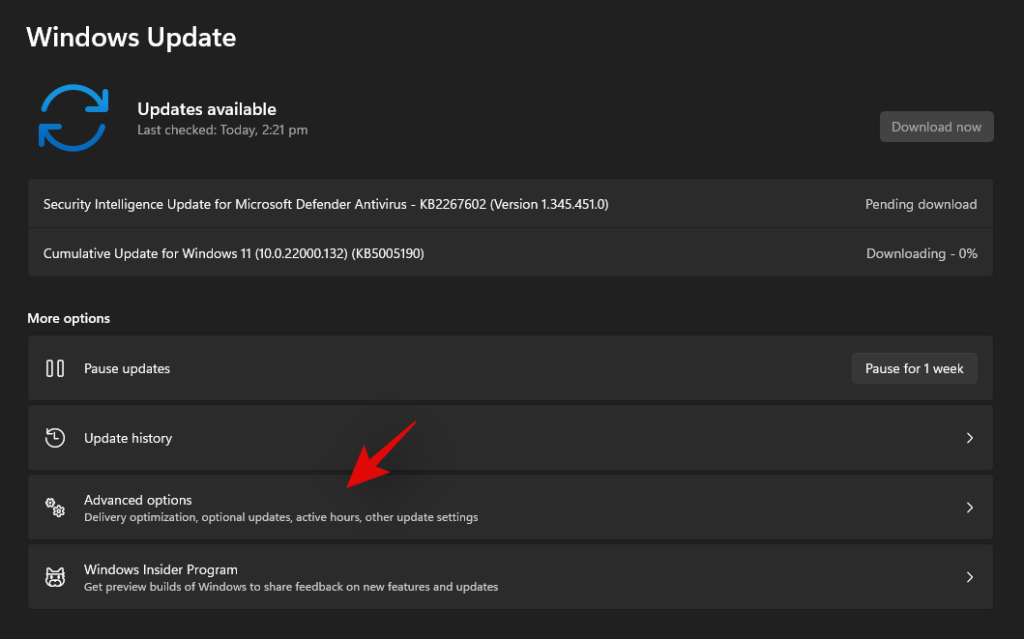
Click and select ‘Recovery’.
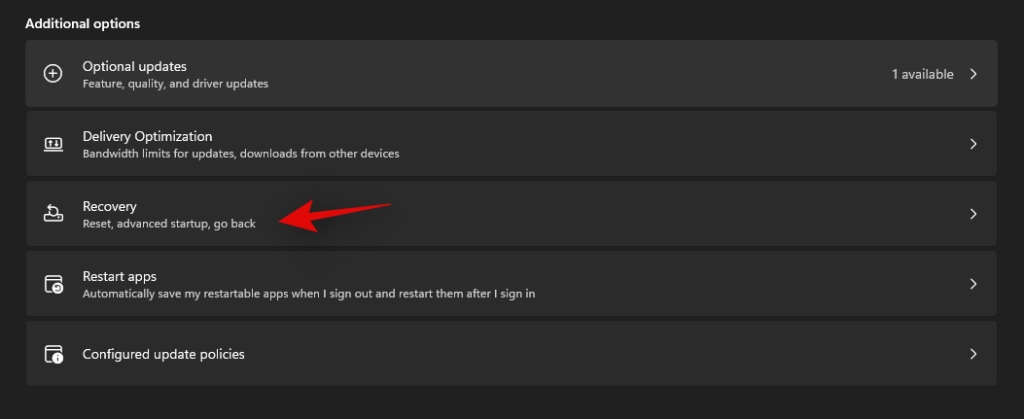
Click on ‘Reset PC’ beside Reset this PC.

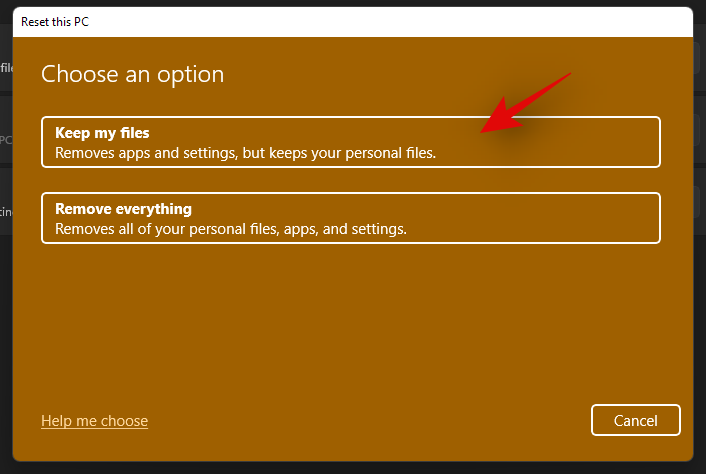
Click on ‘Keep my files’.
Windows will now process all the files on your local storage. Click on ‘Reset’.
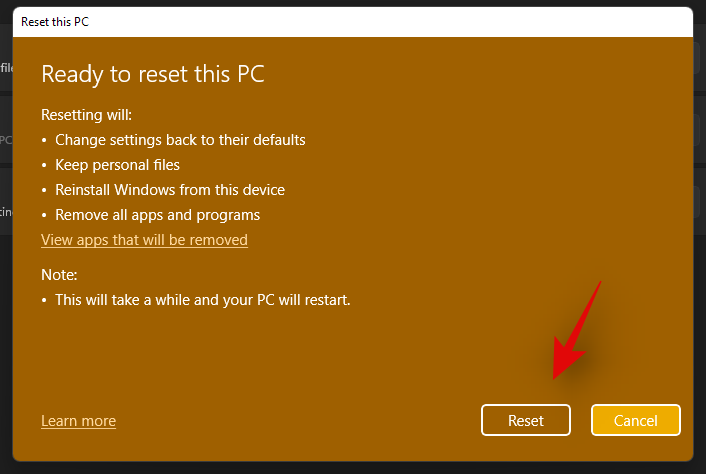
Note: If you are using Windows 11 Pro or higher then you will get the option to use a local installation/recovery media to reinstall Windows 11 as well. However, this option will be missing for Windows 11 Home users.
Windows will now reset your PC while retaining all your files. Your PC will restart several times during this process. This is completely normal and you should let Windows do its thing. If you are using a laptop or a portable NUC, then ensure that your unit is plugged into the power at all times during this process.
How to turn off Focus assist permanently
Do you wish to turn off Focus assist permanently in all scenarios? Then you can use the guide below to do so. The best way to disable Focus assist is by using the group policy editor. But in case you are using Windows 11 Home Edition, then you can use the first method in this guide to disable Focus assist permanently.
Method #1: Disable all settings and rules
Once you disable all the settings and rules for Focus assist, the feature should be turned off automatically on your system. Use the guide below to get you started.
Press Windows + i on your keyboard to open the Settings app and click on ‘Focus assist’ on your right.

Click and select ‘Off’ at the top.
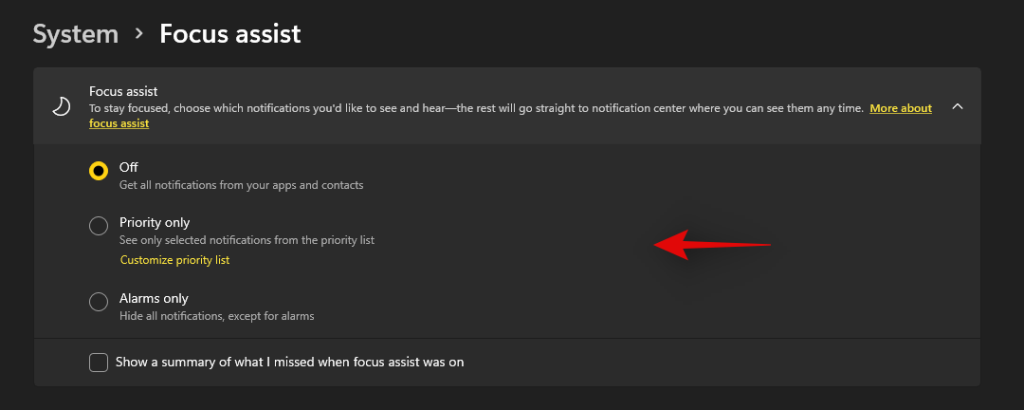
Uncheck the box for ‘Show a summary of what I missed when focus assist was on’.

Subsequently, disable all the toggles under ‘Automatic rules’ as shown below.

We also recommend turning off notifications for unnecessary apps using the guide after this section to avoid unnecessary notifications from interrupting you when focus assist is disabled.
Method #2: Using Group Policy Editor
The group policy editor will permanently disable focus assist on your system and even prevent you from accessing it in your settings. However, this method will only work on Windows 11 Pro or higher versions. In case you have the Windows 11 home edition, you can use the guide above to disable Focus assist instead.
Press Windows + R and type in the following to open Froup Policy EDitor. Click on ‘Ok’ once done.
gpedit.msc
Navigate to the following node.
User configuration > Administrative Templates > Start Menu and Taskbar > Notifications
Find and double-click on ‘Turn on Quiet Hours’ on your right.
Select ‘Enabled’ in the top left and click on ‘Ok’.
Focus assist will now be permanently disabled on the selected system. We recommend you restart your system or explorer.exe in case the changes do not take place immediately.
Is there any other way to disable notifications?
Yes, you can disable notifications individually on a per-app basis in Windows 11 to customize the notifications you receive. This is another way to ensure that you are only notified about the apps and notifications that you intended. Customizing your notifications this way will also allow you to retain the full functionality of the focus assist mode without having to disable certain rules to avoid mismatched scenarios in your workflow.
However, the only downside to managing your notifications this way is that you have to keep enabling and disabling notifications for apps every few months depending on your new installs and uninstalls. You can use the guide below to disable notifications on a per-app basis in Windows 11.
Disable notifications permanently on a per-app basis
Here’s how you can disable notifications on a per-app basis in Windows 11.
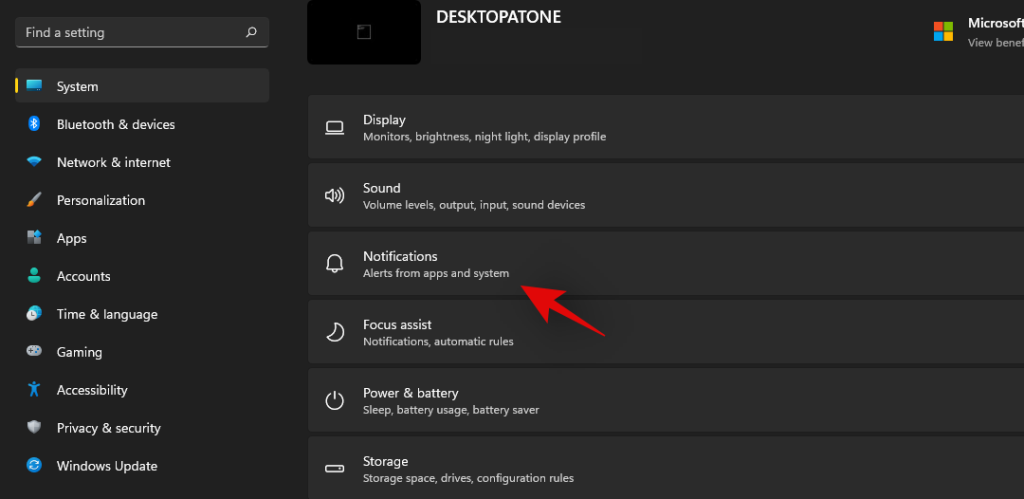
Press Windows + i on your keyboard to open the Settings app and then click on ‘Notifications’ on your right.
You will now get a list of all the apps that have the permission to deliver notifications on your system. Scroll the list to find the necessary apps and turn off the toggle beside them to disable notifications.

Repeat the steps above for all the intended apps to disable notifications.
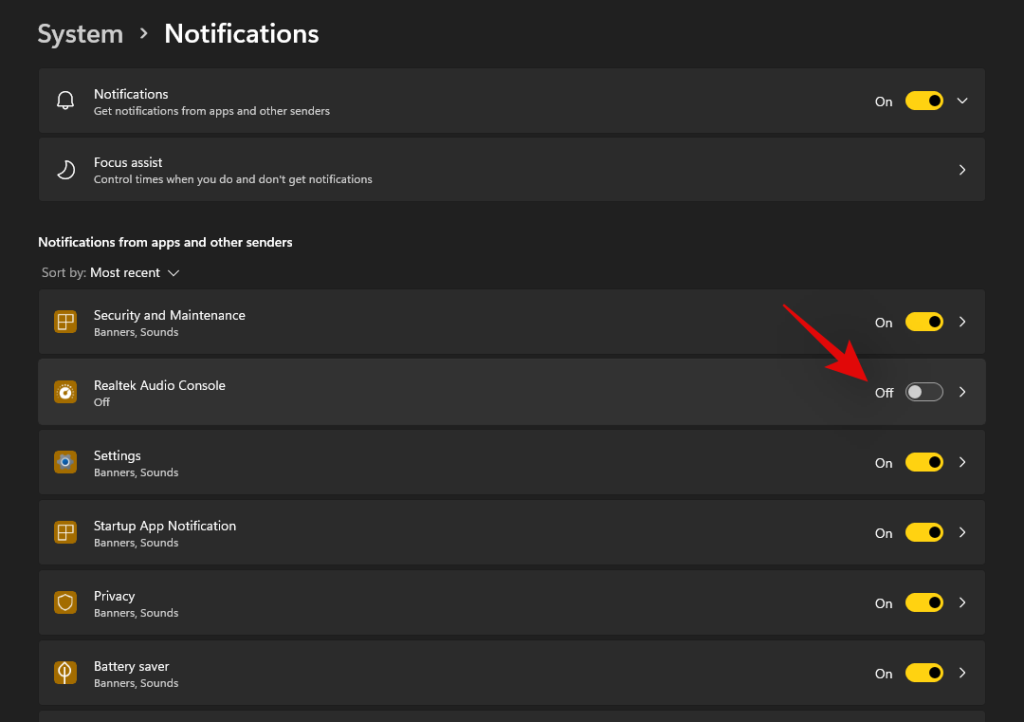
Close the Settings app and notifications for the selected apps should now be permanently disabled on your system.
Can you customize notifications in Windows 11?
Well, not exactly. Windows 11 currently has very limited options when it comes to customizing your notifications. You can not change the look, behavior, or color palette of your notifications without changing the accent color of your overall UI. However, you can customize the way your notifications sound. You can set a nice quiet notification sound that does not interrupt your workflow or opt for a quirky take that makes for a few good laughs each time you get a notification. The choice is completely up to you. Use the guide below to customize your Windows 11 notification sounds.
Required
- A .wav file for the sound you wish to set as your custom notification on Windows 11
Guide
Let’s start by first placing the .wav file in a compatible media folder so that you can set it as your default notification sound in Windows 11. Navigate to the concerned .wav file and copy it to your clipboard.
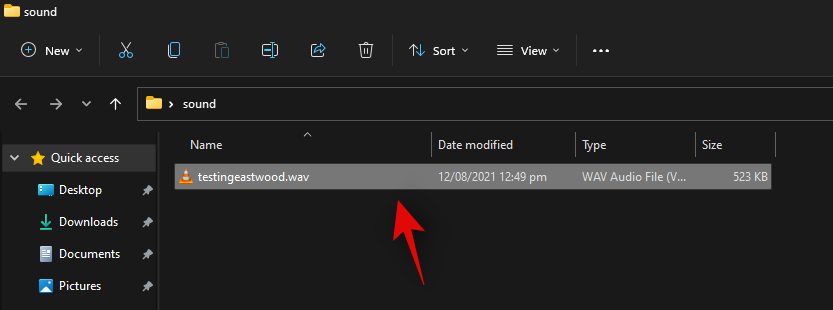
Now navigate to the following path given below. Paste your .wav file in this location. Click on ‘Continue’ when you will be prompted for administrator permission.
C:\Windows\media
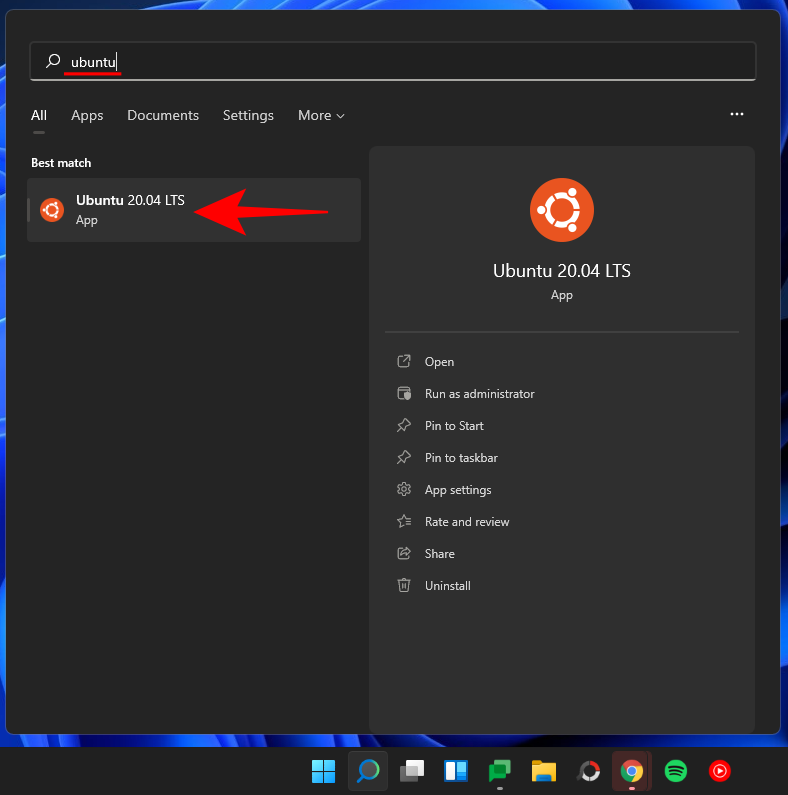
We can now use the .wav file as our default notification sound. Press Windows + i on your keyboard to open the Settings app and then click on ‘Sound’ on your right.
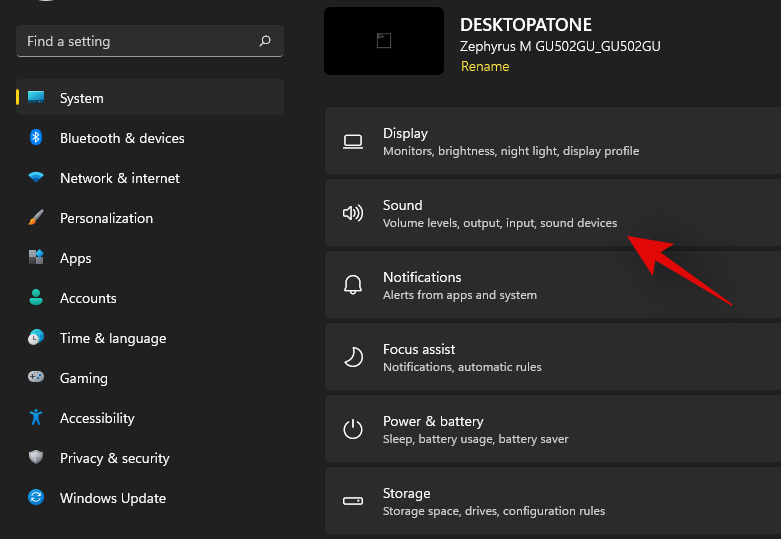
Scroll to the bottom and click on ‘More sound settings’.

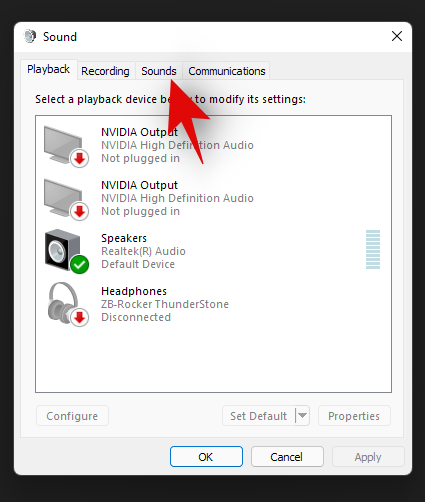
Click and switch to the ‘Sounds’ tab at the top.
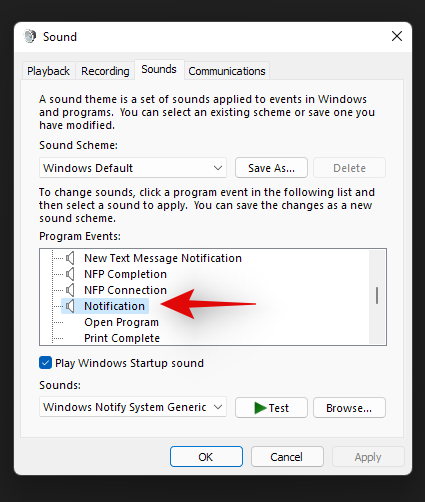
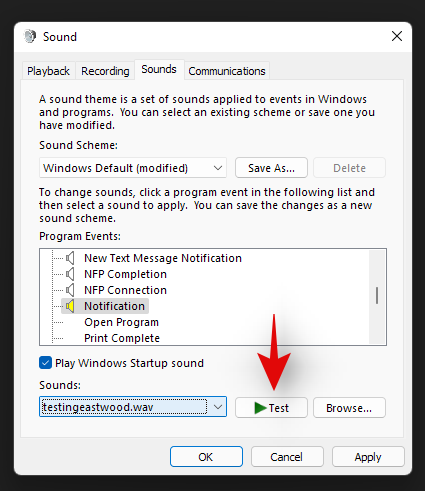
Under ‘Program Events’ scroll the list and find ‘Notifications’. Click on ‘Notifications’ to select it.
Now click on the drop-down arrow under Sounds and select the .wav file we pasted in the Media folder.
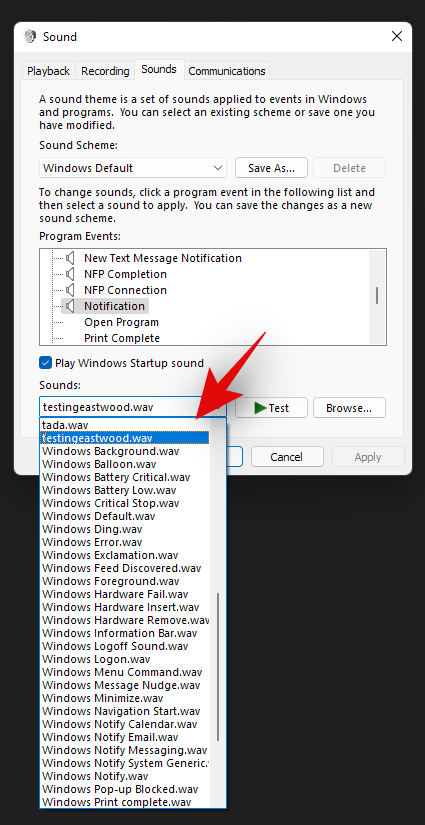
You can click on ‘Test’ to test your custom notification sound.
Click on ‘Ok’ to save your changes.
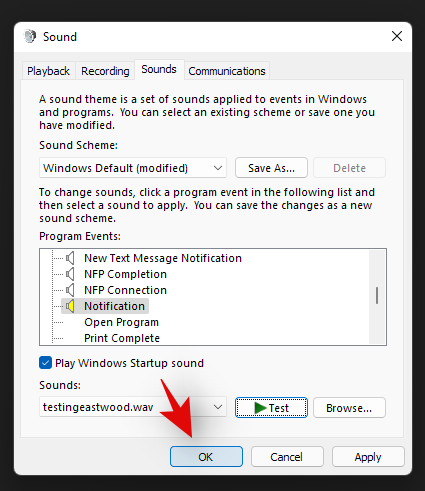
And that’s it! You will now have set a custom sound as your default notification sound in Windows 11.
Distractions from notifications are a huge problem especially when you are into some important work. Using the steps mentioned above, now, you can easily get rid of unnecessary notifications and work peacefully with full concentration.
Related:
