Excelでセルの数式の表示を有効/無効にする方法
Microsoft Excelでセル内の数式の表示を有効または無効にする方法を学びます。

ラップトップのホットキーは、デバイスの基本機能にアクセスしようとするときに不可欠なツールです。音量を制御して、明るさ、キーボードのバックライト、タッチパッドの動作などを調整できます。デバイスによっては、nキーのロールオーバーの有効化、タッチパッドの無効化、キーボードの無効化、機内モードのアクティブ化、電源モードの変更など、専用機能用の追加のホットキーを用意できます。
ただし、ホットキーが機能しなくなった場合、ラップトップの機能と効率が失われる可能性があります。これにより、Windows設定アプリの専用オプションを使用して各設定を変更/編集する必要があり、非常に面倒な場合があります。ラップトップのホットキー がラップトップで機能しない場合は、以下の方法を使用してホットキーを修正できます。
関連: Windows11でタスクバーを一番上に移動する方法
コンテンツ
ホットキーが機能しないのはなぜですか?

ラップトップのホットキーはいくつかの理由で機能しなくなる可能性がありますが、Windows 11は非常に新しいため、最も一般的な理由は、バックグラウンドでのドライバーの競合とOEMユーティリティの競合のようです。これは、現在OEMによってリリースされているほとんどのドライバーがWindows 10用に設計されているためです。Windows11では、バックグラウンドでいくつかの異なる変更が導入され、ドライバーの処理方法が変更され、多くの異なるデバイスのホットキーの機能が損なわれるようです。
最も影響を受けたユニットは、Windows11用に更新する必要があるArmoryCrate Serviceなどの専用ユーティリティのためにAsusとLenovoからのもののようです。これは、他のメーカーがこの問題を免除されていることを意味するわけではありません。 Windows11ではホットキー機能が失われます。
これらのデバイスのいずれかを所有している場合、またはラップトップのホットキーがWindows 11で一般的に機能しない場合は、以下の方法を使用して問題を解決してください。始めましょう。
Windows11ラップトップでホットキーを修正する方法
次の方法を使用して、ラップトップでホットキーを再度機能させることができます。メソッドは優先度の高い順にリストされており、最も一般的な修正が一番上にリストされています。最初の修正から始めて、リストを進めて、システムで機能する修正を見つけてください。始めましょう。
方法1:OEMアップデートを確認する
Armory Crate ServiceやSynapticsユーティリティなど、バックグラウンドでホットキーを管理する専用のキーボードユーティリティがある場合は、OEMのWebサイトからドライバを更新してみてください。これらのユーティリティは特定のキーボードドライバとは異なり、ラップトップでホットキーを有効にするのに役立つサービスとタスクをバックグラウンドで実行します。
これらのユーティリティのいずれかが壊れているか、機能していない場合は、最新のアップデートを確認するか、ラップトップに現在のバージョンを再インストールすることをお勧めします。以下のリンクを使用して、OEMのサポートサイトにアクセスし、最新のユーティリティアップデートを確認してください。見つかったら、クリックしてローカルストレージにダウンロードし、できるだけ早くラップトップにインストールします。
インストールすると、ホットキーがラップトップで再び機能し始めます。バックグラウンドで以前にインストールされたバージョンとの競合を避けるために、ラップトップを再起動することをお勧めします。それでもホットキーが機能しない場合は、以下のガイドを使用して、ラップトップのOEMユーティリティをリセットおよび更新できます。
関連: Windows11を修復する方法
方法2:OEMユーティリティが正しく機能していることを確認します
OEMユーティリティがバックグラウンドで機能しないように思われる場合は、機能を復元するためのトラブルシューティング方法をいくつか示します。始めましょう。
Windows + iキーボードを押して、左側の[アプリ]をクリックします。

「アプリと機能」をクリックします。

このリストで関連するアプリを見つけて、その横にある「3ドット」メニューアイコンをクリックします。

[詳細オプション]を選択します。

次に、選択したアプリで何をしたいかに応じて、以下のセクションのいずれかに従ってください。
2.1バックグラウンド機能を有効にする
[バックグラウンドアプリの権限]の下にあるドロップダウンメニューをクリックし、[電力最適化]または[常に]を選択します。

「電力最適化」により、現在の電力計画に応じてアプリがバックグラウンドで動作できるようになります。一方、「常に」は、現在選択されている電源プランに関係なく、アプリがアクティブでバックグラウンドで動作し続けることを許可します。
2.2アプリを修復する
Windows 11では、アプリを修復することもできます。一番下までスクロールして、最初に[終了]をクリックします。

次に、[修復]をクリックします。

Windowsがその処理を実行するのを待ちます。オプションの横にチェックマークが表示されたら、ラップトップで関連するアプリを起動してみてください。

今すぐホットキーをテストしてください。小さな問題や競合が原因でアプリがバックグラウンドで動作しなくなった場合は、ラップトップでホットキー機能を復元する必要があります。
2.3アプリをリセットする
上記の方法がうまくいかなかった場合は、OEMアプリをリセットできます。これにより、データがリセットされ、アプリがラップトップにインストールされたかのように新たなスタートを切ることができます。これは、ほとんどの場合、ホットキー機能を復元するのに役立ちます。ただし、アプリのデータがリセットされるため、該当する場合はアプリに再ログインする必要があることに注意してください。さらに、アプリで行った変更やカスタマイズもリセットされます。以下の手順に従って開始してください。
「終了」をクリックしてアプリを閉じます。

次に、[リセット]をクリックします。

[リセット]をもう一度クリックして、選択を確認します。

これで、ラップトップでアプリがリセットされます。ラップトップを再起動して、ホットキーをもう一度使用することをお勧めします。アプリがWindows11で正しく機能していなかった場合は、ホットキー機能がラップトップに復元されているはずです。
方法3:ドライバーを更新する
キーボードが誤動作するもう1つの理由は、古いドライバーです。過去にキーボードドライバーを更新したことがない場合は、キーボードホットキーがWindows 11で機能しない理由である可能性があります。さらに、Windows 11はドライバーの管理とインストールを異なる方法で行い、場合によっては、Windows11は最新のドライバーである場合は、OEMキーボードドライバーを汎用ドライバーに置き換えます。
それでもホットキーが機能しない場合は、ドライバーを更新し、OEMから入手できる最新のキーボードドライバーをインストールすることをお勧めします。以下のリンクのいずれかを使用してOEMサイトにアクセスし、それぞれのドライバーをローカルストレージにダウンロードするだけです。
ダウンロードしたら、ドライバーをインストールしてラップトップを再起動します。Windows 11が提供するキーボードドライバーの更新を拒否すると、ホットキーが再び機能し始めます。以下のリンクを使用して開始してください。
キーボードドライバがまだ古く、ホットキーが機能していない場合は、Windowsを介してドライバの更新を確認する必要があるかもしれません。OEMは、WindowsUpdateを介して最新のドライバー更新を提供している可能性があります。以下のガイドを使用して、ラップトップのWindowsUpdateでキーボードドライバーの更新を確認してください。まず、ラップトップがWindowsUpdateを介してドライバーの更新を受信していることを確認します。以下のガイドに従って開始してください。
Windows + Sキーボードを押して、「デバイスのインストール設定の変更」を検索します。アプリが検索結果に表示されたら、クリックしてアプリを起動します。

「はい(推奨)」を選択します。

[変更を保存]をクリックします。

Windowsがラップトップのドライバー更新を有効にするのを待ちます。有効になったら、デバイスのインストール設定ウィンドウを閉じてWindows + i、キーボードを押します。左側から[WindowsUpdate]を選択します。

上部にある[更新の確認]をクリックして、表示される更新をインストールします。

インストールしたら、下部にある[詳細オプション]をクリックします。

次に、[オプションの更新]をクリックします。

[ドライバーの更新(n)]をクリックして展開します。ここで、nは、ラップトップで使用可能なドライバーの更新の現在の数を表します。このリストに表示されるキーボードドライバのチェックボックスをオンにします。画面の下部にある[ダウンロードしてインストール]をクリックします。Windows Updateでプロンプトが表示されない場合でも、ラップトップを再起動してください。
以上です!これで、最新のキーボードドライバーがラップトップにインストールされ、ホットキー機能を復元できるようになります。そうでない場合は、以下の修正を続行して、ホットキーを修正してみてください。
方法4:キーボードドライバーを再インストールする
上記の方法のいずれも機能しない場合は、キーボードドライバを再インストールします。ドライバーがバックグラウンドで競合に直面することはめったにありませんが、インストールの失敗、互換性のないコンポーネント、および間違った更新は、特にOEMユーティリティによって管理されるカスタムRGBバックライトを使用している場合、キーボードドライバーを混乱させる可能性があります。
これらのアプリはそれぞれ、キーボードのバックライトに接続するさまざまな方法を使用して、ニーズに応じてキーボードのバックライトをカスタマイズします。システムに接続するこれらの方法は、キーボードのマッピングやレイアウトなどを管理する他のサードパーティ製アプリではうまく機能しません。キーボードドライバーを再インストールすると、このような問題のほとんどを解決できます。これを行うには、OEMから専用ドライバーをインストールするか、Windowsから提供された汎用ドライバーを使用します。始めましょう。
4.1汎用キーボードドライバーを再インストールします
Windows + Xキーボードを押して、「デバイスマネージャ」をクリックします。

開いたら、リストから目的のキーボードを見つけて右クリックします。キーボードが見つからない場合、または複数のリストがある場合は、それらすべてを選択してアンインストールできます。アンインストールすると、残ったドライバーは削除され、必要なドライバーは自動的に再ダウンロードされます。

「デバイスのアンインストール」をクリックします。

[アンインストール]をもう一度クリックして、選択を確認します。

プロンプトが表示されたらラップトップを再起動し、上記の手順を繰り返して、システムにインストールされている必要なキーボードドライバをすべて削除します。アンインストールしたら、空の領域を右クリックして、[ハードウェアの変更をスキャン]を選択します。ツールバーの同じ専用アイコンをクリックすることもできます。

Windowsは、ネイティブキーボード用の一般的な不足しているドライバーを探し、ラップトップに自動的に再インストールします。
ただし、Windowsでドライバーが見つからない場合は、以下のガイドを使用して、OEMから専用のキーボードドライバーを手動でインストールできます。
4.2キーボードドライバを手動で再インストールします
必要なキーボードドライバをダウンロードして、ローカルストレージにインストールします。アーカイブをダウンロードした場合に備えて、事前にファイルを抽出してください。システムに手動でインストールされるドライバーである.infファイルが含まれているはずです。以下の手順に従って開始してください。
Windows + Xキーボードを押して、[デバイスマネージャー]を選択します。

次に、[キーボード]セクションを展開し、目的のキーボードを右クリックします。「キーボード」の下に複数のHIDデバイスがある場合は、競合を避けるために不要なドライバーをすべてアンインストールすることをお勧めします。

[デバイスのアンインストール]を選択します。

オプションが利用可能な場合は、[このデバイスのドライバーを削除しよう]のチェックボックスをオンにします。「アンインストール」をクリックして、選択を確認します。

選択したキーボードがシステムからアンインストールされます。関連するドライバがアンインストールされると、キーボードは機能しなくなります。これは正常な動作であり、必要なドライバを再インストールしたら、キーボードの機能を復元する必要があります。削除するすべてのHIDデバイスについて、上記の手順を繰り返します。必要なデバイスを取り外したら、ツールバーの[ドライバーの追加]アイコンをクリックします。

「参照」をクリックします。

OEMドライバーを保存したフォルダーに移動し、[OK]をクリックします。

安全のために、[サブフォルダを含める]チェックボックスをオンにします。完了したら、[次へ]をクリックします。

これで、Windowsは互換性のあるドライバーの場所をスキャンし、それらをシステムに自動的にインストールします。
インストールしたら、ラップトップを再起動することをお勧めします。
以上です!これで、バックグラウンドドライバーの競合がシステムで問題を引き起こしていた場合に、ホットキー機能をシステムに復元する必要があります。
注:ホットキー機能が再び失われないように、今後WindowsUpdateを介してキーボードドライバーをインストールしないでください。
方法5:ゲームモードを無効にする
Windows内のゲームモードは、特定のラップトップで問題を引き起こすことが知られています。Microsoftのゲームモードはよりスマートになり、モードは自動的にゲーム体験に最適な周辺機器設定を適用しようとします。これには、オーディオの調整、マウス設定、キーボードでのnキーロールオーバーの有効化、Windowsキーロックなどが含まれます。
ただし、これらの設定を自動的に有効にするには、OEMによって管理されることが多い専用のドライバーとツールに接続する必要があります。これにより、バックグラウンドで競合が発生し、Windows 11でホットキーを使用できなくなる可能性があります。以下のガイドを使用して、ラップトップでゲームモードを無効にしてください。
Windows + iキーボードを押して、左側の[パーソナライズ]をクリックします。

「デバイスの使用」をクリックします。

「ゲーム」のトグルを無効にします。

今すぐ左側の「ゲーム」をクリックしてください。

右側の「ゲームモード」をクリックします。

画面上部の「ゲームモード」の切り替えを無効にします。

設定アプリを閉じて、ラップトップを再起動します。
再起動時にホットキーが機能し始めた場合は、ゲームモードがバックグラウンドでホットキーに干渉している可能性があります。
方法6:HIDサービスを再起動する
HIDサービスを再起動することもできます。これにより、すべてのHIDまたはヒューマンインターフェイスデバイスを再起動できます。これにはキーボードが含まれ、HIDサービスを再起動すると、カスタムソフトウェアまたはマッパーがHIDサービスにフックできなかった場合にホットキーを修正するのに役立ちます。以下のガイドを使用して開始してください。
を押しWindows + Sて「サービス」を検索します。アプリが検索結果に表示されたら、クリックしてアプリを起動します。

「HumanInterfaceDevice Service」を探して、右クリックします。

「再起動」を選択します。

これで、WindowsはHIDサービスを再起動します。

今すぐホットキーをテストしてみることができます。バックグラウンドでの競合によりカスタムソフトウェアがHIDサービスにフックできなくなった場合は、この問題を修正し、ホットキー機能を復元する必要があります。
方法7:フィルターキーを無効にする
Filter keys are another culprit within Windows that is known to cause issues on many devices. Ideally, Filter keys is an accessibility feature meant to be used so that you can avoid brief repeated key inputs which is quite useful for users with anxiety, hyperactivity, hand tremors, and other similar conditions.
However, if this feature has been enabled by mistake, then it could prevent Windows from detecting your hotkey inputs and combinations. You can check if Filter keys are enabled on your system and disable them using the guide below.
Press Windows + S and search for Control Panel. Click and launch the app once it shows up in your search results.

Switch to ‘Large icons’ by clicking on the drop-down menu in the top right corner.

Click on ‘Ease of Access Center’.

Click on ‘Make the keyboard easier to use’.

Now uncheck the box for ‘Turn on filter keys’.

Click on ‘Ok’ at the bottom.

And that’s it! Filter keys should now be disabled on your system. Check your hotkey combinations and their functionality should now be restored on your system.
Method #8: Disable Function (Fn) lock if available
Fn lock is a feature in most laptops that allows you to lock and use the Fn keys and their functionality. Most systems use Fn keys as alternate keys mapped to functions and utilities that will be needed to manage your system. For example, F7 could be used to increase brightness and F8 could be used to decrease brightness. If directly pressing these keys helps you manage your brightness then the Fn lock is disabled on your laptop.

However, if hitting F7 and F8 registers as the respective key then the Fn lock is enabled on your device. In such cases, your Fn keys will behave normally and you will need to use Fn + F7 or F8 combination to adjust your brightness. You can disable or toggle this lock using keyboard shortcuts on most laptops. Look for an ‘Fn Lock’ icon on one of your keys and pres Fn + the respective key, on your keyboard. This should help disable Fn lock on your keyboard if enabled, and restore your hotkeys functionality.
In case a key combination is not available on your device, then you will most likely need to access your BIOS. Most manufacturers allow you to disable and enable Fn lock from the BIOS for easy access. Simply press F2 on your splash screen once your laptop is booting to enter the BIOS menu. Once in the BIOS menu, find the relevant option and toggle the Fn lock for your laptop.
In case a BIOS menu option is also not available to you then your laptop most likely uses the default Fn lock combination which is ‘Fn + Esc’ on your keyboard. This will help toggle the Fn lock on your system which should help restore your hotkeys.
Method #9: Check the on-screen keyboard
On-Screen keyboard within Windows can help you determine if your hotkeys have actually stopped working or you are facing a software issue. Start by launching the on-screen keyboard on your laptop using the taskbar icon. If the icon is hidden, press Windows + S on your keyboard and search for ‘On-Screen Keyboard’. Click and launch the app from your search results.

Now try using a hotkey that does not use Fn keys on your keyboard as they would be unavailable on your on-screen keyboard. If not try testing out each key and see if it still works on your laptop.

If all your keys seem to be registering with hotkeys working via the on-screen keyboard, then this indicates a hardware issue with your keyboard. In such cases, we recommend you get in touch with your OEM support team and try to solve your issue. If however, you are unable to activate your hotkeys via the on-screen keyboard as well, then you can use the fixes below to try and solve your issue.
Method #10: Use Windows troubleshooter
If hotkeys still fail to work on your system then it’s time to run a dedicated Windows troubleshooter. Windows troubleshooters have become highly advanced in the past few years and they can help fix most issues with your system nowadays. Use the guide below to run a keyboard troubleshooter on Windows 11.
Press Windows + i on your keyboard and click on ‘Troubleshoot’ on your right.

Now click on ‘Other troubleshooters’.

Scroll down and click on ‘Run’ beside ‘Keyboard’.

Windows troubleshooter will now do its thing and try to find issues with your keyboard.

If any are found, follow the on-screen instructions to apply the relevant fixes. However, if the troubleshooter does not find anything then you can use the methods below to try and get your hotkeys working again.
Method #11: Run SFC scan
If hotkeys still aren’t working on your laptop then this might indicate an issue with your Windows installation. Let’s try to fix Windows system files and Windows 11 image on your laptop to try and fix hotkeys on your system. Use the guide below to get you started.
Press Windows + S on your keyboard and search for ‘CMD’. Click on ‘Run as administrator’ once it shows up in your search results.

Now type in the following command and press Enter on your keyboard to execute it.
sfc /scannow

Windows will now scan and verify all of your system files and replace corrupted ones with fresh system files. If a corrupted Windows 11 installation broke your hotkeys functionality, then this should help fix it on your laptop.
Method #12: Run DISM fixes to restore Windows image
If you got the following message after running the SFC scan above, then it is highly important to run the DISM commands to fix your Windows 11 image.
“Windows Resource Protection found corrupt files but was unable to fix some (or all) of them”
Additionally, if the SFC scan is completed successfully but your hotkeys still do not work, then you can use the DISM commands to try and fix your Windows image as well. This will restore system files and solve background conflicts that might be preventing you from using your hotkeys. Follow the steps below to get you started.
Press Windows + S on your keyboard, search for CMD and click on ‘Run as administrator’ once it shows up in your search results.

Type in the following command and press Enter on your keyboard to execute it.
DISM /Online /Cleanup-Image /RestoreHealth

Wait for the process to complete and restart your laptop for good measure.
If a corrupted Windows image was the cause of your issue, then hotkey functionality should now be restored on your laptop.
Method #13: Uninstall any third-party tools
If you have any third-party tools customizing your keyboard then we recommend you disable or uninstall them at once. This includes the likes of key mappers, macro customizers, keyboard backlighting customizers, keyboard layout changes, and more. Such apps use different ways to hook into your keyboard drivers via Windows and any one of these could be outdated and not compatible with Windows 11 on your system.
We recommend you uninstall any such tools from your system at the earliest and remove any additional leftover configuration files if available. You should also check for driver updates to your keyboard and roll back to a previously known driver to revert any major changes applicable to your system. Use the guide below to roll back your keyboard driver.
13.1 How to rollback your keyboard driver
Press Windows + X on your keyboard and click on ‘Device manager’.

Find the desired keyboard in your list of devices and right-click on it once found.

Select ‘Properties’.

Click and switch to the Driver tab.

Click on ‘Rollback driver’ if available.

Follow the on-screen instructions to finish rolling back your driver.
Restart your system if prompted.
Once the driver is reverted to its previous iteration hotkeys should start working on your system again.
However, if you don’t have the option to roll back your driver then you will need to uninstall the installed drivers for your keyboard and hope that Windows sources the correct drivers when it scans for new hardware on your system. If you have dedicated drivers available for your keyboard on your OEM support site, then you can install them manually. Follow Method #10 below to reinstall your keyboard drivers manually or through Windows in this case.
Method #14: Connect to a different USB port (external keyboards only)

If you are using an external keyboard then we recommend using a different USB port. Depending on your keyboard you might need a USB 2.0 or USB 3.0 port for compatibility and keyboard layout reasons. Additionally, if your keyboard uses fancy backlighting and other custom features then it likely requires a USB 3.0 port on your system to power all of its features.
In contrast, if you are trying to use a legacy keyboard via adapters then you will likely need to test USB 2.0 and USB 1.2 for best performance depending on your unit. Moreover, we recommend you ensure that your laptop is plugged into power so that it can power your USB ports properly.
If however, your external keyboard still fails to work then you can try reinstalling its drivers on your system using the guide in this post.
Method #15: Check GPO and re-enable hotkeys if disabled
If you are using Windows Pro or higher that has been issued by your organization or your educational institute then it is likely that hotkeys have been disabled on your system by your administrator. This could be a side effect due to a recent change, or it could be your new company policy.
Administrators tend to disable third-party apps on company-issued and education systems which also, in turn, disables hotkey functionality for most laptops. You can fix this issue by contacting your administrator and whitelisting your hotkey app in case you don’t have access to the Group Policy Editor. However,
If you are an administrator, with access to GPO, then you can use the guide below to re-enable hotkeys on your system.
Press Windows + R on your keyboard, type in the following term, and press Enter on your keyboard.
gpedit.msc

Navigate to the following path.
User Configuration > Administrative Templates > Windows Components > File Explorer
Double click on ‘Turn off Windows Key hotkeys’.

Click and select ‘Enabled’ in the top left. Then click ‘Apply’ in the bottom right and then click ‘OK’.

Restart your laptop for good measure and hotkey functionality will now be restored on your system. Please keep in mind that this will only work for OEMs that hook into Windows shortcuts natively to get hotkeys working again. For manufacturers that have dedicated utilities, you can use one of the guides below.
Fix hotkeys for Asus Users
If you are an Asus user with a ROG or a TUF unit, then it is likely that you are dealing with Armoury Crate. Armoury Crate is Asus’s utility that helps you manage your power plan, performance plan, overclocking, keyboard backlighting, and more depending on your laptop. Over the years Armoury Crate has grown to be quite finicky and has been riddled with telemetry and adware.
Moreover, the Aura Sync utility seems to be a hit or miss when syncing your peripherals’ backlighting with each other. If you have an Asus unit and hotkeys don’t seem to be working for you then it is likely that the Asus hotkeys app hasn’t been launching in the background. In this case, you can either try to manually start the app or reinstall AC service and the Asus System interface reconfigure your hotkeys and restore their functionality. Use one of the guides below that best fits your current needs and requirements.
Method #1: Try to manually start AsusHotkeyExec.exe
Press Ctrl + Shift + Esc on your system to open the Task Manager and switch to the ‘Details’ tab.

Depending on your preferences, the install location of AsusHotKeyExec.exe could vary. Hence we will use an already running process to find its install location. Start by right-clicking on either of the following ongoing tasks.

Select ‘Open file location’.

You should now be taken to the ‘C:\Windows\System32’ ideally, where you should find the ‘AsusHotkeyExec.exe’. Right-click on the app and select ‘Run as administrator’.

The app will now launch in the background and restore hotkey functionality on your system.
Try using one of your hotkeys now, if it seems to be working then, likely, AsusHotkeyExec.exe did not automatically launch in the background. This could be an isolated incident but if the app fails to launch even after a restart, then you will need to re-enable its auto start functionality.
You can do this by reinstalling Asus System Interface and Armoury Crate Service on your laptop using the guide below.
Method #2: Re-install Asus System Interface and Armoury Crate service
Asus System Control Interface is a prominent utility regularly updated by Asus that helps most tools like Armoury Crate, Armoury Crate Service, MyAsus System Diagnosis, and more to run properly on your system. Armoury Crate service on the other hand is your overclocking utility bundled with specific overclocking and power management configurations for your specific device. Depending on your ROG or TUF unit, AsusHotkeyExec.exe could be bundled with either of these services. Let’s re-install both of them on your system.
Visit the link above and click on ‘Laptops’.

Click on ‘Product Series’ and select your Series from the drop-down menu.

Click on the next drop-down menu and select your laptop from the list.

If your unit is not listed in this list, then you can search for it using the search bar at the top. Click on your laptop model once it shows up in your search results under ‘Products’.

Click on ‘Driver & Utility’.

Choose ‘Windows 10 64-bit’ as your OS.

Now scroll down to the ‘Software and Utility’ section and click on ‘Show all’.

Click on ‘Download’ beside the latest version of ASUS System Control Interface.

Similarly, click on ‘Download’ beside Armoury Crate Service.

Note: Asus has now started bundling the Armoury Crate app, Armoury Crate Service, Aura Sync app, and Aura Sync service in a single package for many laptops. If this is the case for your unit as well, then you can download this package.
Now let’s remove all installed services and packages that we are going to reinstall. Press Windows + i on your keyboard and click on ‘Apps’ on your left.

Click on ‘Apps and features’.

Now uninstall the following applications if you managed to source the Armoury Crate Service package from the download page.

However, if you got a single package to install Armoury Crate, Armoury Crate Service, Aura Sync app, and Aura Sync service, then uninstall the following applications from your laptop.
To uninstall an app, click on the 3-dot menu beside it and select ‘Uninstall’. Click on ‘Uninstall’ again to confirm your choice. Repeat the steps above to uninstall all the necessary apps from your system.
Note: Do not remove services like Refresh Rate service, Pointing device service, and more from your laptop during this process. Even though they hook into the Armoury crate, there is no need to uninstall them as the existing installation will work with your reinstalled Armoury Crate and its services.
We will now uninstall Asus System Control Interface from your system. The best way to do this is by using the Device Manager. Follow the guide below to get you started.
Press Windows + X on your keyboard instead and select ‘Device Manager’.

Click and expand ‘System devices’ in Device Manager.
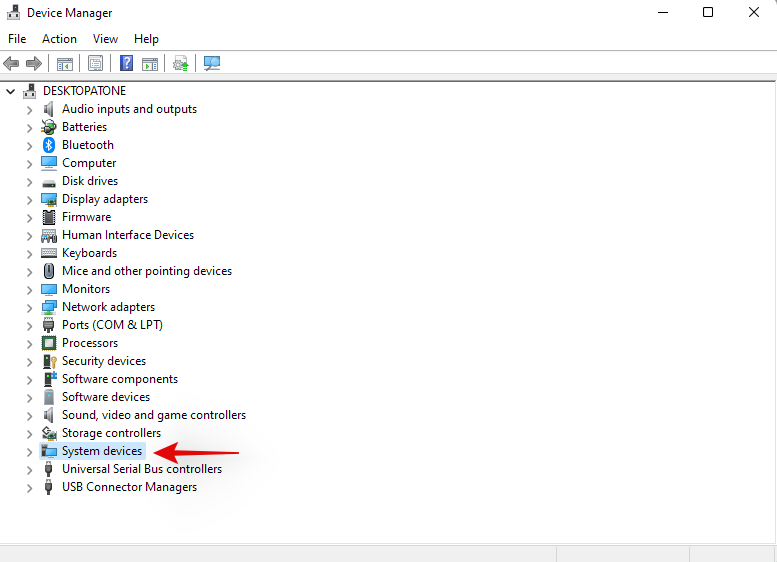
Right-click on ‘Asus System Control Interface’ and select ‘Uninstall device’.

Click on ‘Uninstall’ to confirm your choice. Additionally, check the box for ‘Attempt to remove the driver for this device’ if available.

If Asus System Control Interface is unavailable in your device manager then you can restart your laptop at this point. Once restarted, follow the subsequent steps to re-install Armoury Crate and Asus System Control Interface on your system. The concerned drivers will now be uninstalled from your system. You can now restart your laptop for the changes to take effect.
Once your laptop restarts, navigate to the packages we downloaded from Asus’s website on your local storage and start by installing Asus System Control Interface first. Double-click and launch the .exe file and follow the on-screen instructions to install Asus System Control Interface on your laptop. You will be prompted to restart your system once the process completes. We recommend you restart your system at this point before proceeding with the installation of Armoury Crate on your system.
Once your system restarts, double click and launch the Armoury Crate package.
Select the utilities you wish to install on your system. Unless you have other Asus peripherals that support RGB backlighting through Aura Sync, there is no point in installing Aura Sync. Once you have selected the desired utilities, click on ‘Next’.
Click on ‘Install’ to start the installation process.
The package will now connect to Asus’s servers, identify your laptop and install the necessary compatible utilities. Once installed, we recommend you restart your system for good measure.
And that’s it! Once your system restarts, hotkeys should be back up and running again on your system.
Fix hotkeys for Lenovo users
If you own a Lenovo unit especially from the ThinkPad or IdeaPad series, then you will need to try out the following fixes. Lenovo’s professional lineup of laptops is bundled with tons of hotkeys and there are mainly 3 fixes you can try to fix your issue. Let’s first verify if your hotkeys have actually stopped working. Follow the steps below to get you started.
Method #1: Disable all shortcuts and enhancements
Let’s start by disabling all keyboard shortcuts and keyboard enhancements within Windows for your laptop’s keyboard. Follow the guide below to get you started.
Press Windows + S on your keyboard and search for ‘Control Panel’. Click and launch the app from your search results.

Click on the drop-down menu in the top right corner and select ‘Large icons’.

Click on ‘Ease of access center’.

Click on ‘Make the keyboard easier to use’.

Uncheck all the options available on your screen.

Save your changes and restart your laptop for good measure.

If keyboard enhancements enabled by Windows were causing conflicts with your hotkeys, then your hotkey functionality should be restored on your laptop by now.
Method #2: Update your drivers using Lenovo support
You might have manually updated your drivers, you might have reinstalled and rolled back your drivers, but this isn’t similar to downloading and installing drivers through the support app. Most OEM support apps are designed to automatically scan for known issues with your hardware in the background and fix them automatically. These support app also come with hotfixes and patches that aren’t readily available to the end consumer. These hotfixes and patches are applied when downloading and installing the concerned driver or utility,
Hence we recommend that you download and reinstall the following drivers on your system through the Lenovo support app. Depending on your unit’s make and model, you could be using a different Lenovo app like Lenovo Vantage and more. The process is similar for all these apps and you simply need to manually uninstall your keyboard drivers first and then reinstall the corresponding ones from your support app.
Note: We won’t be removing your power management drivers and instead we will be simply reinstalling them. Removing power management drivers can end up harming your vital components especially if your laptop is doing some resource-heavy work in the background.
Press Windows + X and select ‘Device Manager’.

Find your keyboard under ‘Keyboards’ and right-click on it.

Select ‘Uninstall device’.

Check the box for ‘Attempt to remove the driver for this device’ if available. Click on ‘Uninstall’.

Your keyboard driver will now be uninstalled. Open the Lenovo System Update, Lenovo Vantage, or the corresponding Lenovo support app depending on your current laptop. We will be using the Lenovo System update app for this guide as that will be used by most modern systems currently and in the future. If you do not have the app installed on your unit, then you can use the link below to download it to your laptop.
Download and install the app on your system using the link above. Once installed, launch the app and log in with your device and account details if prompted.
Click on ‘Get new updates’ on your left.
Lenovo System update app will now detect your configuration and look for compatible upgrades accordingly. Once the process completes, all available updates will be shown on your screen according to their priority. Check each of the following sections and check the boxes for the updates you wish to install on your laptop. Your keyboard driver will also show up in this list as it is currently missing from your system. Ensure that you check the box for your keyboard driver before moving to the next step.
Note: Do not check the boxes for your bios updates. We recommend you download and install bios updates, individually and separately so that your laptop does not face installation conflicts in the background during this process.
Click on ‘Download’ in the bottom right corner.
Lenovo system update will now download and install all the selected drivers on your system. Your laptop could automatically restart a few times during this process which is normal. Simply log back into your account and wait until the installation process has been completed.
Once all the drivers are installed on your system, try using your keyboard hotkeys again. In most cases for Lenovo devices, your hotkeys should be back up and running on your system again. Lenovo is known to apply certain patches in the background when installing hotkey drivers and create certain tasks to maintain the functionality of your hotkeys. A reinstallation should have reinitiated this process again which should have fixed your hotkeys.
Fix hotkeys for Acer users
If you are using an Acer system then there isn’t much you can do at this point. Acer is known to keep its hotkeys simple with minimal customization available to the end-user. This in turn means that if the above-stated general fixes did not work for you then it is unlikely that resetting the CMOS will. However, if you have overclocked your unit or have been messing around with voltage values, then you can try resetting your CMOS to get hotkeys back up and running on your system again.
Resetting the CMOS does a lot of things but it mainly helps reset changes to core system values like your voltage, frequency speed, and more. Resetting the CMOS also helps discharge capacitors on some laptops which can give you a sudo-fresh start which is known to solve many persistent errors and issues with systems in the past. Use this comprehensive guide by us to reset your CMOS on your Acer unit.
Check out: How to Reset BIOS in Windows 11
Facing error codes when restarting HID services? Try these fixes!

If you decided to restart your HID service using the guide at the top, then you could end up facing two common errors depending on how your system has been configured. These are known errors and can be fixed on your system using the guides below. Follow the steps to get you started.
Method #1: For error code 126
Error code 126 can be fixed by replacing the Hidserv.dll to your system 32 folder. Follow the guide below to get you started.
Note: You will need a Windows 11 installation media or ISO in case the .dll file is unavailable on your system. Make sure you have either of these handy before proceeding with the guide below. In case you do not have an installation media handy, then you can use the link below to download Hidserv.dll to your local storage.
Open the Windows installation media you have handy and search for Hidserv.dll using the search box in your top right corner.
Once found, copy the file to a convenient location on your local storage. If however, you downloaded the file to your local storage using the link above, then extract the archive to a convenient location and follow the steps below to edit its security permissions.

Right-click on the downloaded Hidserv.dll and select ‘Properties’.

We will now need to manually grant permissions to the necessary users and applications so that Hidserv.dll can work properly on your system. Switch to the Security tab at the top.

Click on ‘Edit’ at the top.

Click on ‘System’ at the top and check the box for ‘Write’

Click on ‘Apply’ once done. Select ‘Yes’ to confirm your choice. Repeat the steps above and restrict permissions for Administrators and other users in the list above. Once you are done, click on ‘Add’.

Now enter the following term and press Enter on your keyboard.
All Application Packages

Select the following permissions for ‘ALL APPLICATION PACKAGES’.

Similarly, click on ‘Add’ again.

Now enter the following term and click on ‘Ok’.
NT Service\TrustedInstaller

Check the boxes for the same permissions as we did for the application packages above.

We now need to add permissions for restricted UMP packages on your system. There is no way to do this using the Windows File Explorer, so we will be using a PowerShell script instead. Press Windows + S on your keyboard and search for PowerShell. Click on ‘Run as administrator’ once it shows up in your search results.

Once PowerShell launches, copy and paste the code below in your PowerShell window. Do not execute the commands just yet.

$user = [Security.Principal.NTAccount]::new("ALL RESTRICTED APPLICATION PACKAGES").Translate([System.Security.Principal.SecurityIdentifier])
$rule = [Security.AccessControl.FileSystemAccessRule]::new($user, "ReadAndExecute", "Allow")
$directory = PATH
$acl = Get-Acl $directory
$acl.SetAccessRule($rule)
Set-Acl -Path $directory -AclObject $acl
Now navigate to the Hidserv.dll file that we just edited the permissions for and right-click on it. Select ‘Copy as path’.

Go back to your PowerShell window and replace “PATH” with the path we just copied.

Once replaced, hit Enter on your keyboard to execute the command. Once completed, the new permissions for restricted application packages should now be added to your new Hidserv.dll file.

Note: If you are typing in the path manually then you will need to include in double-quotes as shown in the final screenshot. Pasting a copied path using the method above will automatically add double quotes to it.
It’s now time to replace or add the file to your boot directory. Navigate to the Hidserv.dll file we just created and copy it to your clipboard.

Press Windows + E on your keyboard and navigate to the following path.
C:\Windows\System32

Paste your file in this location. Click on ‘Replace the file in the destination’.

Click on ‘Yes’ to grant the necessary administrator permissions. Once the file is replaced, restart your system for good measure. You can now check your HID services in the Services app to see if it is back up and running again. If not, you can try starting it manually, and you should no longer be facing Error code 126 on your system.
Method #2: For Error code 2
If you are getting Error code 2 after trying to restart the HID service then there could be a couple of reasons why you are facing this error. The main reason is due to unwanted registry changes for the HID service. This could have happened due to recently applied manual hacks or registry cleaners used by you. We will need to check for these changes and revert them if any have been made on your system. Follow the guide below to get you started.
Press Windows + R on your keyboard, type in the following term, and hit Enter on your keyboard.
regedit

Navigate to the following registry key. You can also copy-paste the same in the address bar at the top of your screen.
Computer\HKEY_LOCAL_MACHINE\SYSTEM\ControlSet001\Services\hidserv
Double click on the ‘Type’ value on your right.

Set the value to ’20’ if it is something different and click on ‘Ok’.

Now click on ‘Parameters’ under Hidserv on your left.

Double click on ServiceDll on your right.
Enter the following path in its Value data field. Even if the same path exists, copy-paste the one below just to be sure. Ensure that there are no spaces at the starting or end of the path below.
%SystemRoot%\System32\hidserv.dll

Once done, repeat the steps above for the following registry locations given below.
Additionally, if folders named ControlSet002 or more exist in the location below, then we recommend repeating the steps above for the Hidserv folder in those locations as well.
Once you have made these changes, restart your system, and HID service should be automatically working on your laptop again. If not, launch the service manually and you should no longer face Error code 2 on your laptop.
Laptop hotkeys can be quite finicky and we hope you were able to get the back up and running again on your system using the guides above. If you face any issues or have any questions for us, feel free to reach out using the comments section below.
Related:
Microsoft Excelでセル内の数式の表示を有効または無効にする方法を学びます。
Windows 11のナレーター機能にイライラしていますか?複数の簡単な方法でナレーター音声を無効にする方法を学びましょう。
一般にchkdskとして知られているCheckDiskは、ディスクの状態を監視するための重要なWindowsユーティリティです。ハードドライブのエラー修正に役立つ手段を探します。
Windows11のレジストリをクリーンアップする方法を学び、パフォーマンスを向上させましょう。
Microsoft Teamsのようなサービスは、最新のセキュリティプロトコルを確保しながら、最新の機能を提供するために常に更新されています。更新手順を確認しましょう。
Googleフォトで重複する写真を削除したい場合の最良の方法について解説します。
Appleのエコシステム内で、AirPlayはコンテンツを共有する便利な手段です。iPhoneからAirPlayを簡単にオフにする方法を解説します。
iPhoneで電卓の履歴を確認する方法を紹介。電卓アプリは履歴保存機能がないが、便利な代替手段を使って過去の計算結果をチェックできます。
ビデオ会議が日常業務の一部になっているので、ZoomIDを保護する方法として、2要素認証を導入することが不可欠です。
Windows 11の自動シャットダウン機能を利用する方法を解説します。徒労感を軽減し、作業効率を向上させるためのタイマー設定方法を学びましょう。
Windows 11からBingを削除する方法を詳細に説明します。検索エンジンを変更し、検索結果を整理しましょう。
Windows 11でのファイルタイプの変更方法を詳しく説明し、MP3やDOCX、JPGなどのファイル拡張子を扱う際のヒントを提供します。
Microsoft Outlookにズームを追加する方法。ズームを利用すれば、組織や教育機関での効率的な会議が実現できます。
Windows 11の通知音を無効にする方法や、様々なシステムサウンドを管理する手段について詳しく解説しています。
Windows 11でボリュームラベルを簡単に変更する方法を学びましょう。ファイルエクスプローラーやPowerShellを使ってカスタマイズできます。
Microsoft Teams Togetherモードについての完全ガイド。新機能や使用方法、システム要件などを詳しく解説します。
Windows11で古いゲームを実行する方法 - 古いゲームをプレイするための8つの効果的な方法
ファイルの種類を変更したいですか? Windows 11 デバイスでファイルの種類 (拡張子) を変更できる 4 つの簡単な方法を紹介します。
お使いのコンピュータの Bing 検索エンジンが気に入らないですか?ここでは、Windows 11 から Bing を削除する 5 つの方法を紹介します。
Windows 11では新しいコンテキストメニューが実装されていますが、重要な圧縮ツールであるWinRARや7-Zipを追加する方法を学ぶことができます。
Windows 11でBattle.netエージェントのスリープエラーに悩まされていませんか?ゲームを再びスムーズに動作させるための、実証済みの解決策をご紹介します。スムーズなゲームプレイのためのステップバイステップのトラブルシューティング。
Windows 11のDirectStorageをゲームに活用して、読み込み時間を短縮し、パフォーマンスを向上させる方法をご紹介します。設定を最適化して、よりスムーズなゲームプレイを実現するためのヒントをまとめたステップバイステップガイドです。
Windows 11でコア分離がオンにならないことにお困りですか?この重要なセキュリティ機能を有効にし、よくある問題を解決してPCのパフォーマンスを向上させるためのステップバイステップの修正方法をご紹介します。
Windows 11 セキュリティセンターサービスが見つからなくてお困りですか? 実証済みのステップバイステップの修復方法で、安全に復元し、手間をかけずにPCを保護できます。最適な保護を実現する最新の方法にアップデートされています。
Windows 11 が起動ロゴから先に進まなくて困っていませんか?この 2026 年の包括的なトラブルシューティング ガイドでは、セーフ モードから高度な修復まで、実証済みの修正方法を網羅し、問題を迅速かつ簡単に解決するのに役立ちます。
Windows 11のTaskbarXでアイコンが中央に表示されないエラーでお困りですか?アイコンを簡単に中央に配置し、機能を回復し、タスクバーを最適化するための実証済みの修正方法をご紹介します。最新のソリューションでシームレスなパフォーマンスを実現します。
Windows 11のwgetコマンドとcurlコマンドのエラーでお困りですか?このステップバイステップガイドでは、よくある問題、簡単な解決策、そして効率的に解決するためのプロのヒントをご紹介します。今すぐダウンロードとAPI呼び出しをコントロールしましょう。
Windows 11のウェブカメラのプライバシーシャッターエラーに悩まされていませんか?実証済みのステップバイステップの解決策で、カメラへのアクセスを迅速かつ安全に復元できます。今すぐプライバシーを取り戻しましょう!
Windows 11の仮想メモリ不足エラーに悩まされていませんか?システムを強化するための、実証済みのステップバイステップの解決策を見つけましょう。
Windows 11の「TPM構成証明がサポートされていません」というエラーでお困りですか?TPM要件を回避し、スムーズにアップグレードするための実証済みの解決策をご紹介します。ステップバイステップのガイドで、手間なくインストールできます。

![Windows11でレジストリをクリーンアップする方法[4つの方法] Windows11でレジストリをクリーンアップする方法[4つの方法]](https://cloudo3.com/resources8/images31/image-9744-0105182733836.png)

