壊れたWindowsアップデートの修正方法4つ
最近のアップデートをインストールした後に問題が発生した場合に壊れたWindowsアップデートを修正する複数の方法を発見してください。

Windows 11のリリースで外観が一新されて以来、Windowsタスクバーは注目を集めています。タスクバーを中央に配置し、新しいアクションセンターを楽しんだり、配置を変更したり、画面の両側に配置したりできるようになりました。残念ながら、この機能の展開は成功していません。数か月間、Windows11でタスクバーを機能させるのに苦労するユーザーが増えています。
Microsoftはこの問題を認識し、回避策を発行し、現在修正に取り組んでいますが、ユーザーはタスクバーを再び機能させることができないようです。同じボートに乗っている場合は、Windows 11でタスクバーを元に戻して再度実行するために利用可能なすべての修正のリストをまとめました。以下のガイドに従って、開始してください。
コンテンツ
タスクバーが表示されないのはなぜですか?
Windows 11のタスクバーの外観が新しくなり、機能が刷新されました。タスクバーは、正しく機能するために、いくつかのサービスと[スタート]メニュー自体に依存するようになりました。システムにインストールしたWindows10のバージョンと、更新するWindows 11のバージョンによっては、Windows10からWindows11へのアップグレードプロセスでタスクバーが混乱するようです。
さらに、先月リリースされた最近のWindows Updateでも、一部のユーザーにこの問題が発生しているようですが、すべてが適切に設定されているにもかかわらず、システム時刻が一致しないために他のユーザーも同じ問題に直面しています。タスクバーを修正する方法はたくさんありますが、以下の修正から1つずつ開始することをお勧めします。
Windows11でタスクバーの問題を修正する12の方法
以下の方法を使用して、Windows 11でタスクバーの修正を開始します。すでにシステムを再起動しようとしている場合は、最初の方法をスキップできます。
修正#1:PCを再起動する
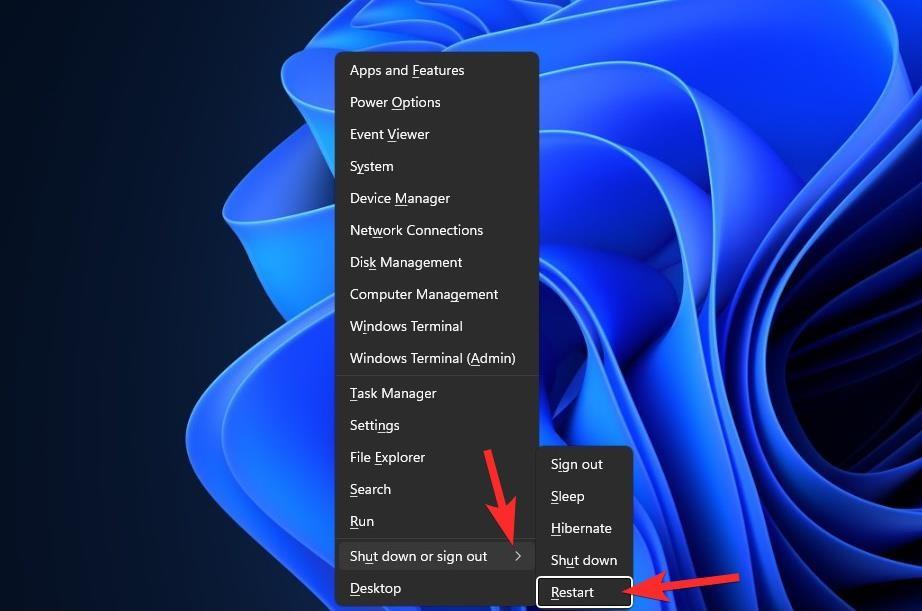
何か凝ったことを試す前に、PCやWindowsエクスプローラーを再起動するなどの簡単な方法を試すことをお勧めします(以下を参照)。そうすることで、システムがソフトリセットされ、データを再ロードできるようになり、場合によっては、タスクバーと[スタート]メニューの問題が修正されます。
修正#2:「タスクバーを自動的に非表示にする」が無効になっていることを確認する
Windows + iキーボードを押して、左側の[パーソナライズ]をクリックします。
「タスクバー」をクリックします。
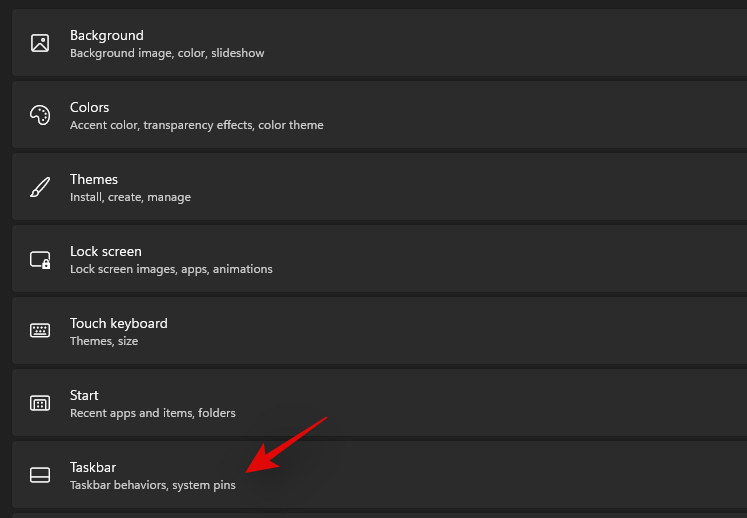
次に、[タスクバーの動作]をクリックします。
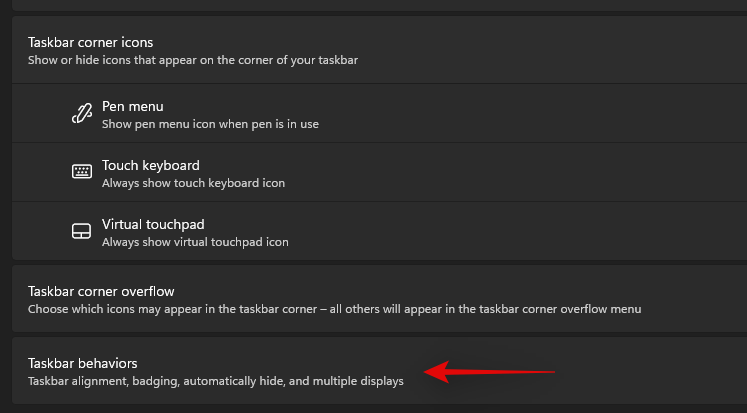
「タスクバーを自動的に非表示にする」のチェックボックスをオフにします。

次に、設定アプリを閉じます。タスクバーが自動的に非表示になっている場合は、システムで無効になっているはずです。
修正#3:必要なサービスを再開する
前述のように、Windows 11はタスクバーを刷新しました。これは、どのシステムでも正しく機能するために複数のサービスに依存していることを意味します。これらすべてのサービスを再起動して、バックグラウンドの競合がタスクバーのシステムでの正常な動作を妨げていないことを確認しましょう。
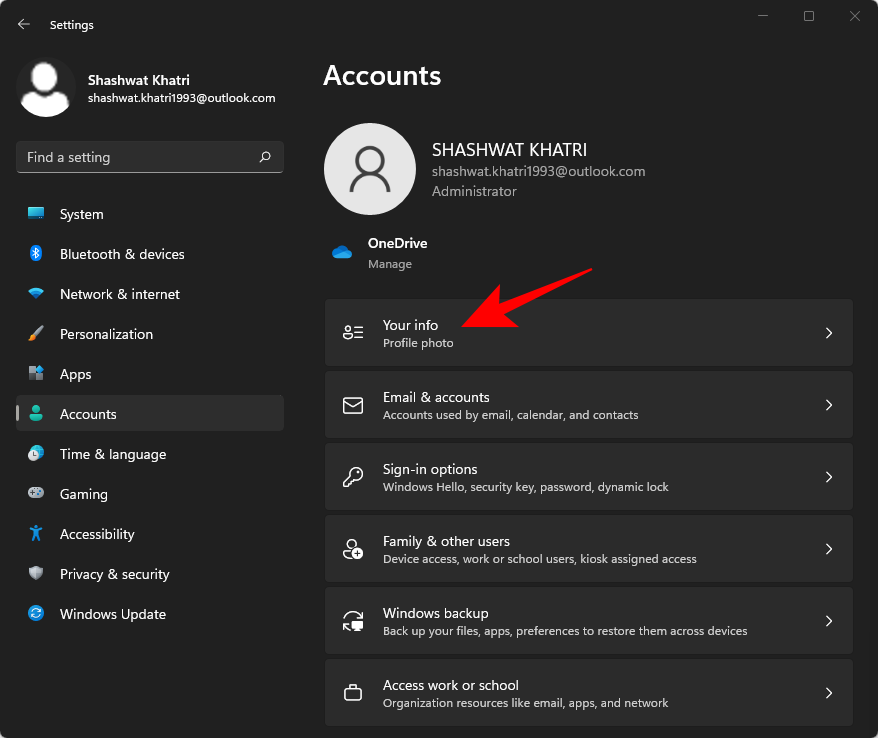
Ctrl + Shift + Escシステムを押して、タスクマネージャを起動します。上部の[詳細]タブに切り替えます。
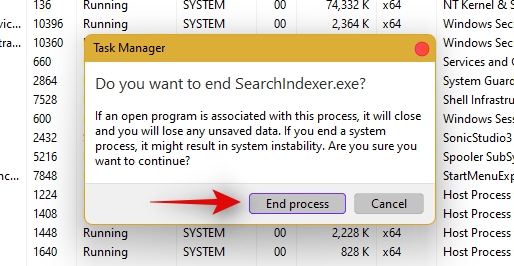
次に、実行中の次のサービスを見つけて、クリックして選択します。キーボードの「削除」を押し、「プロセスの終了」を選択して選択を確認します。
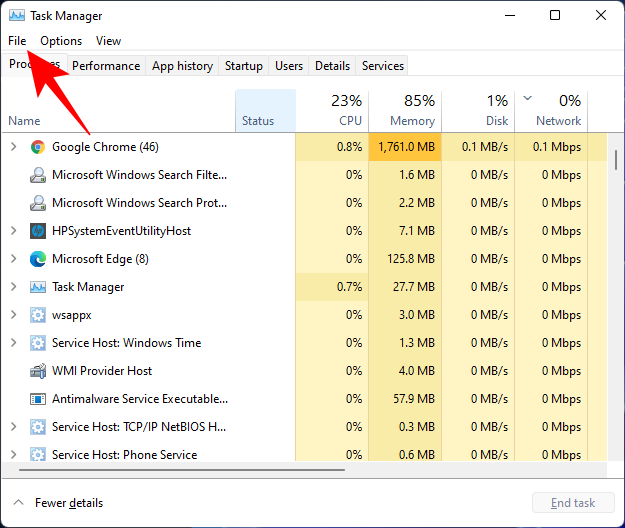
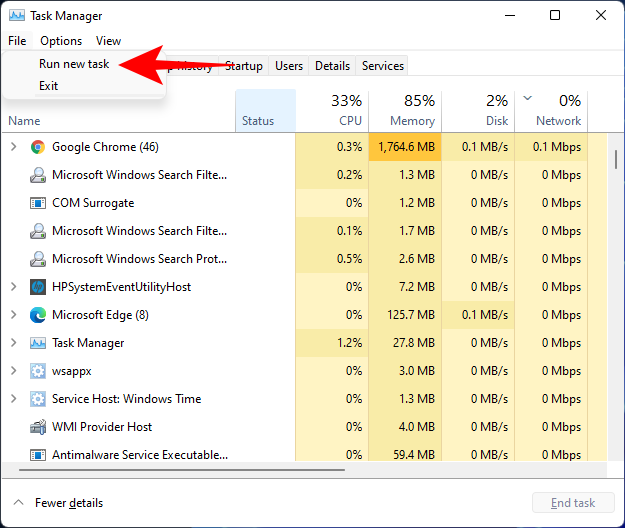
ここでWindowsエクスプローラを再起動しましょう。左上隅の[ファイル]をクリックし、[新しいタスクの実行]を選択します。
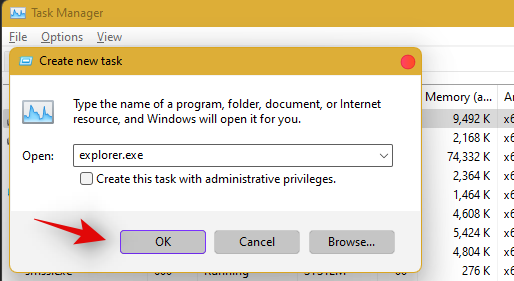
'explorer.exe'と入力し、キーボードのEnterキーを押します。必要に応じて、[OK]をクリックすることもできます。
エクスプローラーを再起動したら、PCを再起動するだけで、システム上の他のサービスを再起動できます。
バックグラウンドサービスの競合が問題の原因であった場合は、タスクバーを復元する必要があります。
修正#4:レジストリでIrisServiceを削除し、再起動します
を押しCtrl + Shift + Escてタスクマネージャを開きます。次に、左上隅にある[ファイル]をクリックし ます 。
[新しいタスクの実行]を選択し ます。
入力 cmdとし、Enterキーを押します。
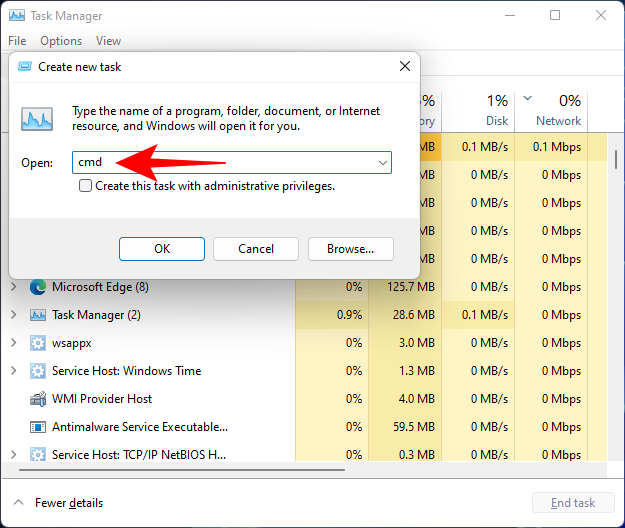
これにより、コマンドプロンプトの昇格されたインスタンスが開きます。次のコマンドをコピーして、コマンドプロンプトに貼り付けます。
reg delete HKCU\SOFTWARE\Microsoft\Windows\CurrentVersion\IrisService /f && shutdown -r -t 0

次に、Enterキーを押します。そうするとすぐに、PCが再起動します。バックアップを開始すると、タスクバーを含め、通常の状態に戻るはずです。
修正#5:レジストリにUndockingDisabledを追加
を押しCtrl + Shift + Escてタスクマネージャを開きます。次に、[ファイル ] (左上隅)をクリックして 、新しいタスクを 実行します。
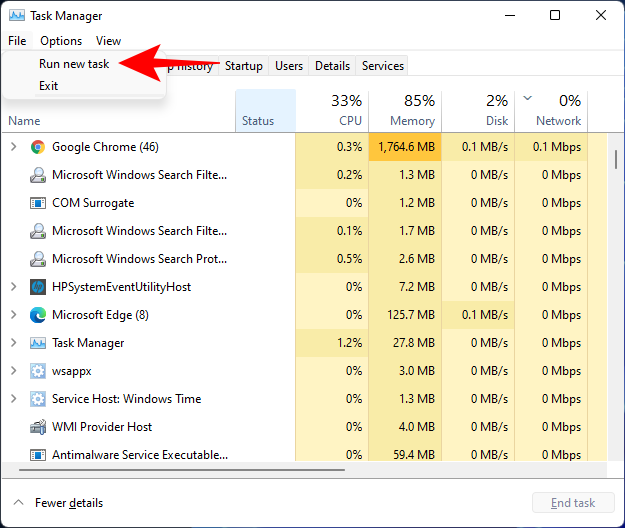
入力 regeditとし、Enterキーを押します。
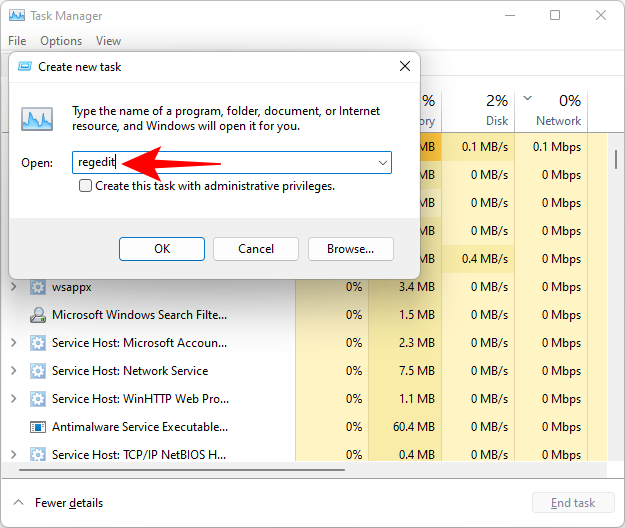
これにより、レジストリエディタが開きます。次に、次のアドレスに移動します。
Computer\HKEY_LOCAL_MACHINE\SOFTWARE\Microsoft\Windows\CurrentVersion\Shell\Update\Packages
または、上記をコピーして、次のようにレジストリエディタのアドレスバーに貼り付けます。

Enterキーを押すと、指定したキーに移動します。右側で、スペースを右クリックして、[新規] > [DWORD(32ビット)値]を選択します。
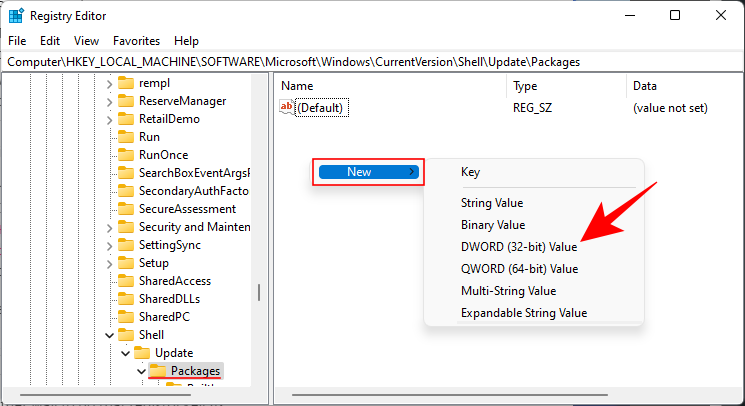
この新しく作成したDWORD名前UndockingDisabledを。
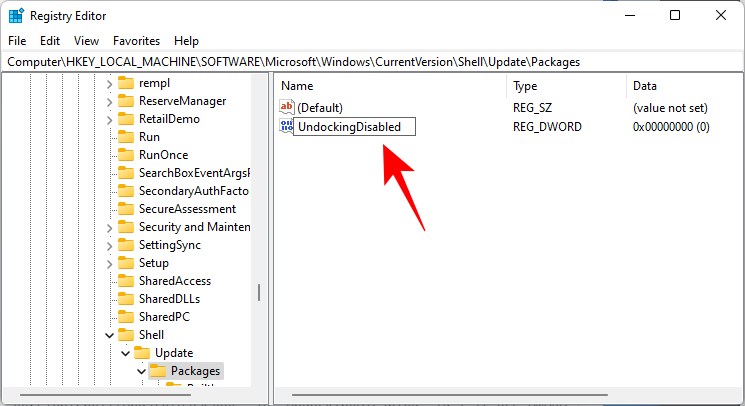
次に、それをダブルクリックして、「値データ」を 1に変更します。次に、[ OK ]をクリックします 。
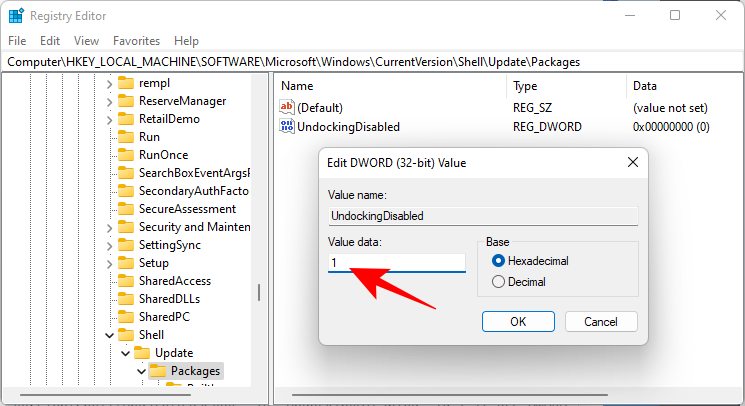
変更を有効にするためにPCを再起動します。
修正#6:SFCおよびDISMコマンドを実行する
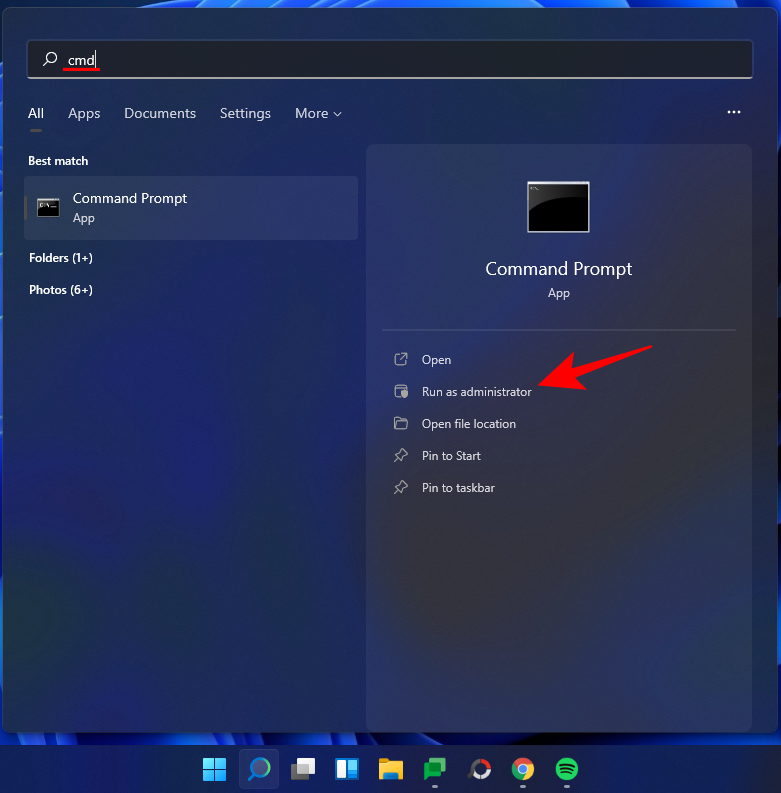
[スタート]を押し、「 cmd」と入力して、[管理者として実行]をクリックし ます。
次に、次のコマンドを入力します。
sfc /scannow
Enterキーを押します。SFCがスキャンを終了し、見つかった問題を修正するのを待ちます。

次に、Deployment Image Servicing andManagementツールに対して次のDISMコマンドを実行します。
dism /online /cleanup-image /scanhealth
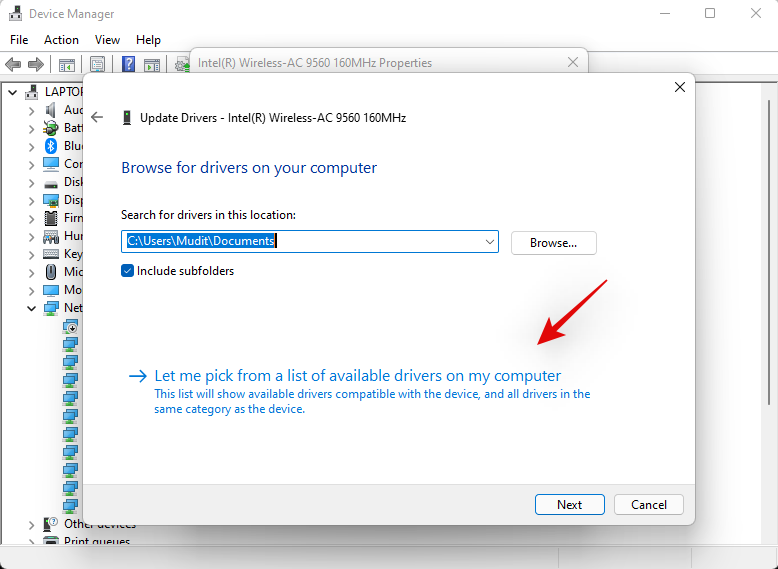
次に、Enterキーを押します。繰り返しますが、スキャンが完了するのを待ちます。

次に、次のDISMコマンドを実行します。
dism /online /cleanup-image /restorehealth

Enterキーを押します。DISMがヘルスを回復するのを待ちます。

最後に、chkdskコマンドを実行して、ディスクのチェックユーティリティを実行します。
chkdsk c: /r
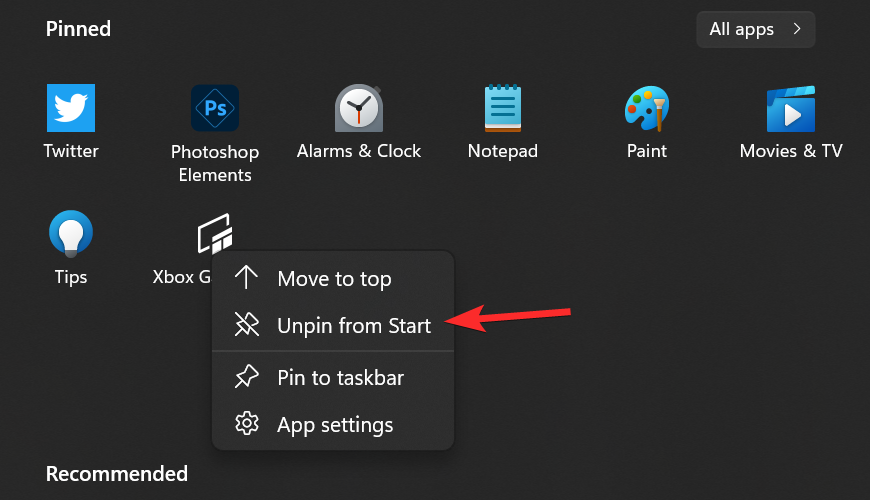
Enterキーを押します。コマンドプロンプトは、「ボリュームが別のプロセスによって使用されているため、現在のドライブをロックできません」というメッセージをスローし、次の起動前にスキャンをスケジュールする許可を求めます。Y準拠するように入力します。

そして、Enterキーを押します。次に、コンピュータを再起動し、ディスクのチェックツールにその仕事をさせ、タスクバーが通常の機能を再開したかどうかを確認します。
修正#7:UWPを再インストールする
Ctrl + Shift + Escキーボードを押して、タスクマネージャを起動します。「ファイル」をクリックし、「新しいタスクの実行」を選択します。
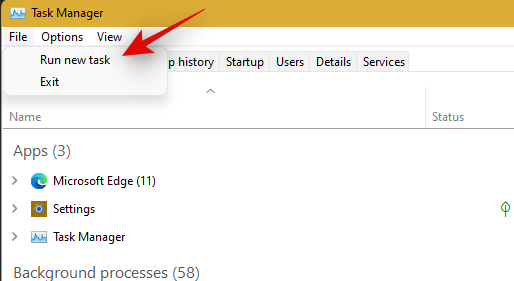
「PowerShell」と入力しCtrl + Shift + Enterて、キーボードを押します。

これで、PowerShellがシステムの管理者として起動されます。次のコマンドを入力します。
Get-AppxPackage -AllUsers | Foreach {Add-AppxPackage -DisableDevelopmentMode -Register “$ ($ _. InstallLocation) \ AppXManifest.xml”}
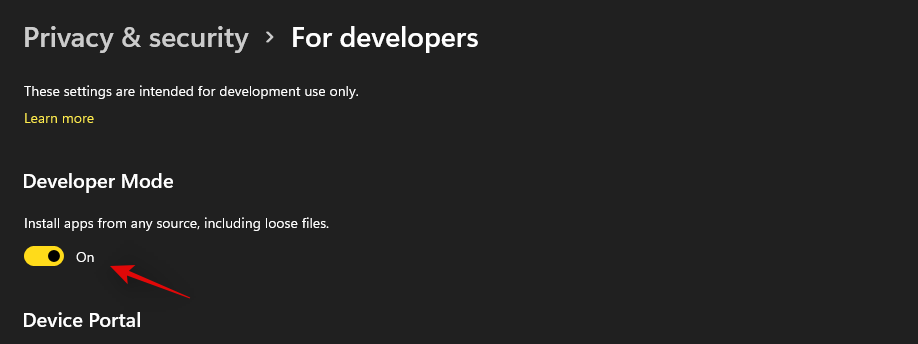
Enterキーを押します。PowerShellは、実行中のメッセージのリストを赤で表示します。しかし、それについて心配する必要はありません。コマンドの実行が終了するのを待つだけです。

修正#8:UACを確認し、必要に応じてレジストリの編集を追加する
UACは、スタートメニューやタスクバーを含むすべての最新のアプリと機能に必須です。UACが無効になっている場合は、最初に有効にして、システムを再起動する必要があります。それでもタスクバーが機能しない場合は、レジストリエディタにXamlスタートメニューの値を追加してみることをお勧めします。
この値を追加すると、タスクバーサービスが再起動して再登録され、ほとんどのシステムでタスクバーが再び機能するようになります。以下のガイドに従って開始してください。
無効になっている場合は、UACを確認して有効にします
Ctrl + Shift + Escキーボードを押して、タスクマネージャを起動します。次に、画面の左上隅にある[ファイル]をクリックして、[新しいタスクの実行]を選択します。

'cmd'と入力しCtrl + Shift + Enter、キーボードを押します。
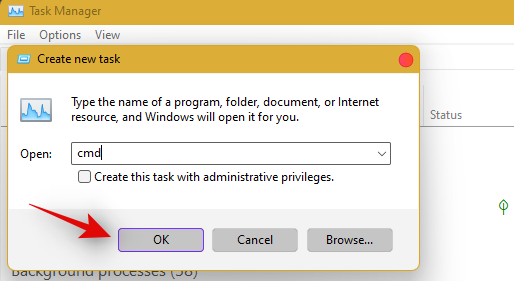
次のコマンドを入力し、Enterキーを押してコマンドを実行します。
C:\Windows\System32\cmd.exe /k %windir%\System32\reg.exe ADD HKLM\SOFTWARE\Microsoft\Windows\CurrentVersion\Policies\System /v EnableLUA /t REG_DWORD /d 0 /f
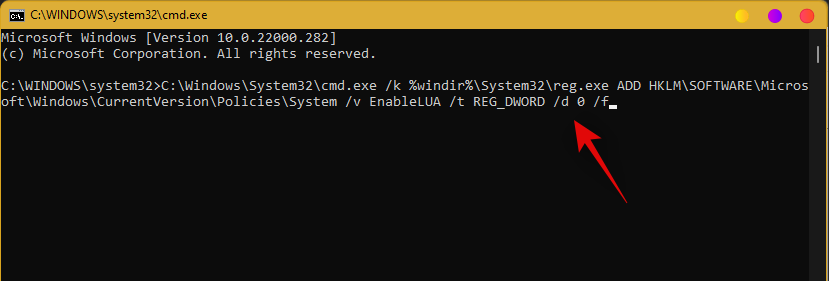
これで、システムでUACが有効になります。変更をシステムに反映させるには、PCを再起動します。再起動すると、UACが問題になった場合は、タスクバーがシステムで稼働しているはずです。そうでない場合は、以下のガイドを使用して、システムでタスクバーの機能をトリガーします。
レジストリ値の追加
を押しCtrl + Shift + Escてタスクマネージャを起動します。次に、左上隅の[ファイル]をクリックして、[新しいタスクの実行]を選択します。

'cmd'と入力しCtrl + Shift + Enter、キーボードを押します。

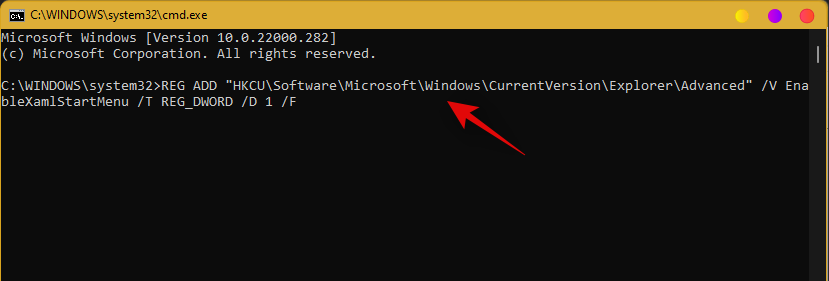
次のコマンドを入力して、キーボードのEnterキーを押します。
REG ADD "HKCU\Software\Microsoft\Windows\CurrentVersion\Explorer\Advanced" /V EnableXamlStartMenu /T REG_DWORD /D 1 /F
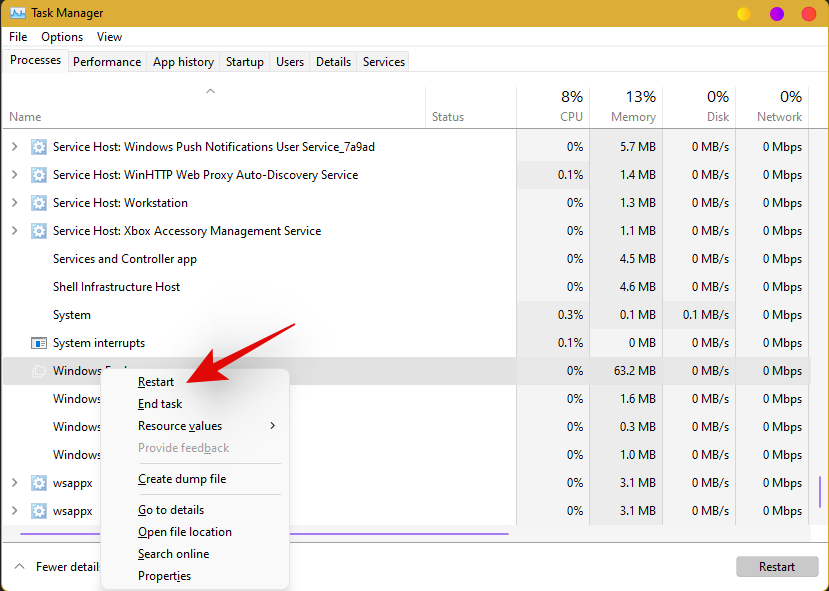
ここでタスクマネージャーに戻り、リストからWindowsエクスプローラーを見つけて、右クリックします。[再起動]を選択して、explorer.exeを再起動します。
再起動したら、タスクバーにアクセスしてみてください。これで、タスクバーがシステムで使用できるようになります。
修正#9:タスクバーを修正するために日付と時刻を編集する
日付と時刻の設定は、Windows 11のタスクバーの問題の主な原因のようです。以下のガイドを使用して、次の時刻修正を試して、どれが最適かを確認してください。
時刻がタイムサーバーと正しく同期されていることを確認します
Ctrl + Shift + Escキーボードを押して、「ファイル」をクリックします。[新しいタスクの実行]を選択します。

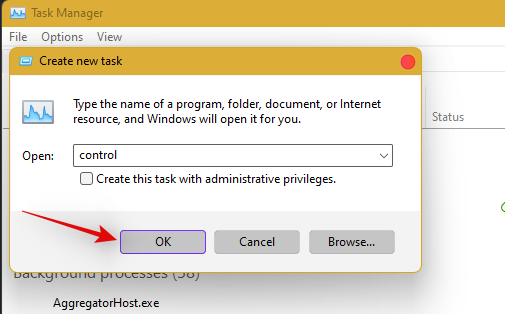
「Control」と入力し、キーボードのEnterキーを押します。
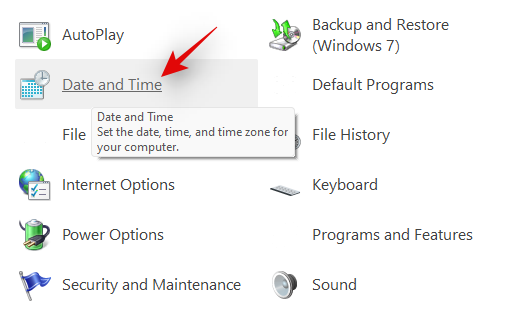
「日付と時刻」をクリックします。
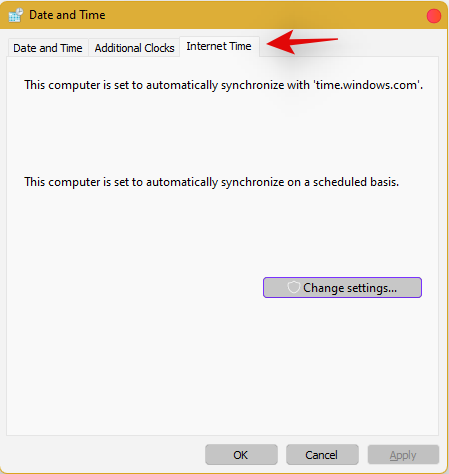
上から「インターネット時間」を選択します。
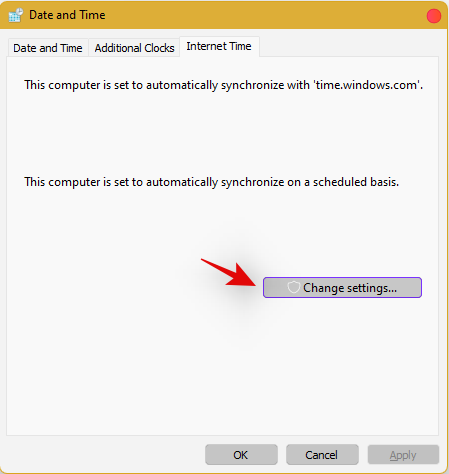
[設定の変更]をクリックします。
[インターネットタイムサーバーと同期する]チェックボックスをオフにします。

完了したら、[OK]をクリックします。
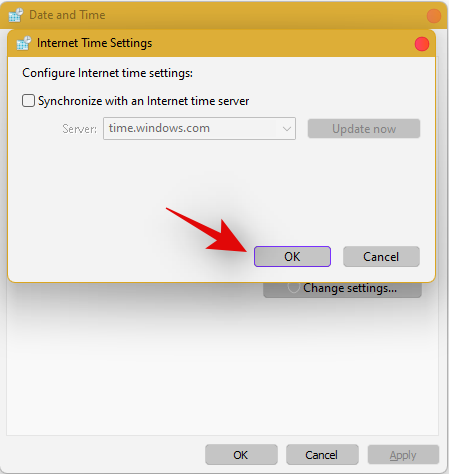
この時点でPCを再起動し、タスクバーを確認します。それでも無効になっている場合は、心配する必要はありません。上記の手順に従って、インターネットタイムサーバーとの同期を再度有効にしてください。
有効になったらCtrl + Shift + Esc、キーボードを押して、画面のリストでWindowsエクスプローラーを見つけます。リストを右クリックして、[再起動]を選択します。

エクスプローラーが再起動したら、タスクバーを使用してみてください。同期が問題だった場合は、システムで修正されているはずです。そうでない場合は、以下に記載されている他の時間修正を続行します。
日付を1日前に変更します
をCtrl + Shift + Esc同時に押して、タスクマネージャを開きます。次に、[ファイル]をクリックし ます。
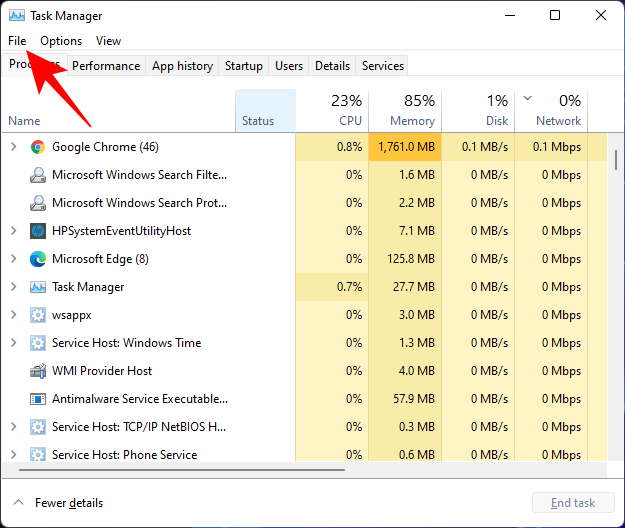
[新しいタスクの実行]をクリックし ます。
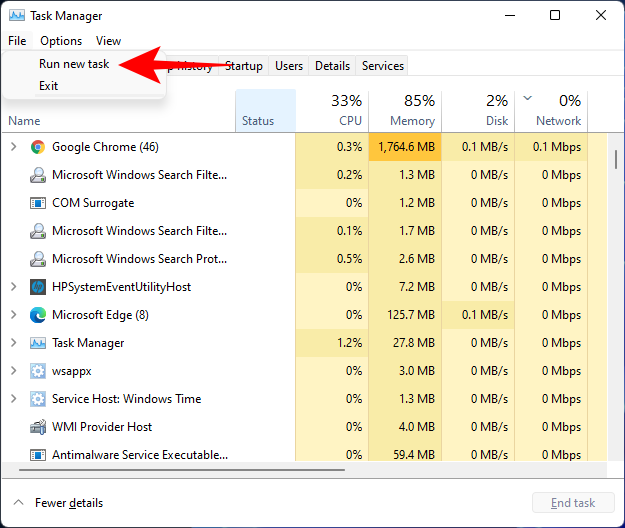
入力 コントロールパネル とヒットを入力します。
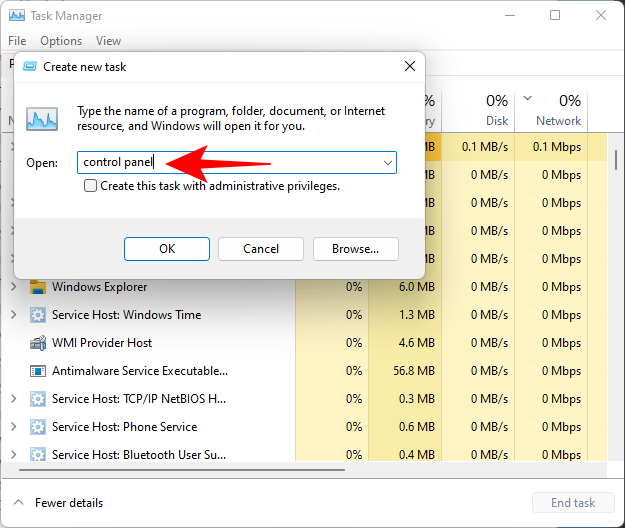
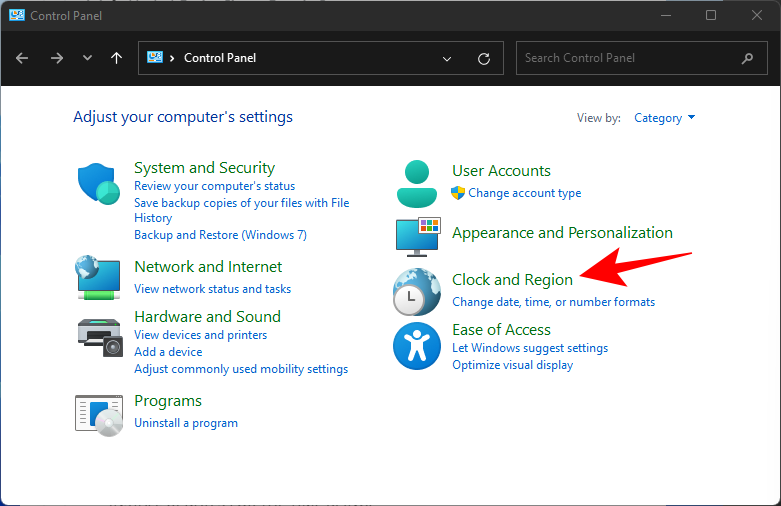
次に、[時計と地域]をクリックします 。
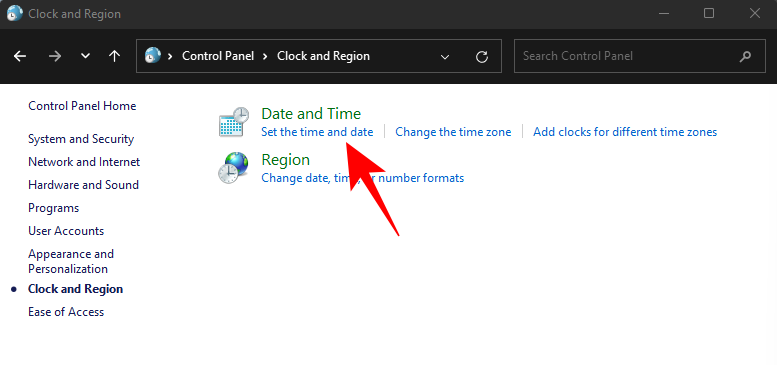
「日付と時刻」の下で、「時刻と日付の設定」をクリックし ます。
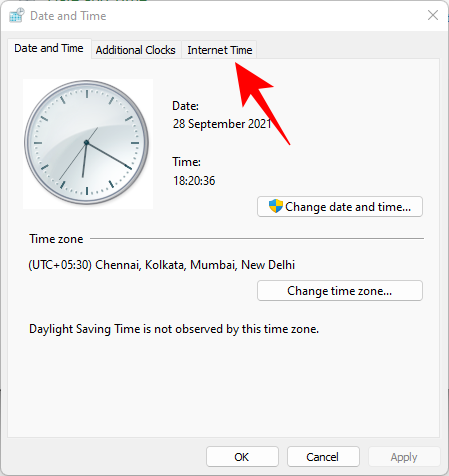
[インターネット時間 ]タブをクリックし て切り替えます。
[設定の変更...]をクリックし ます
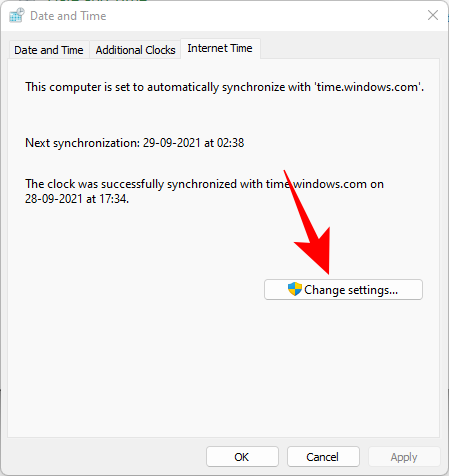
[インターネットタイムサーバーと同期する]チェックボックスをオフに して、 [ OK ]をクリックします 。
次に、[日付と時刻 ]タブをクリックして、 元に戻します。
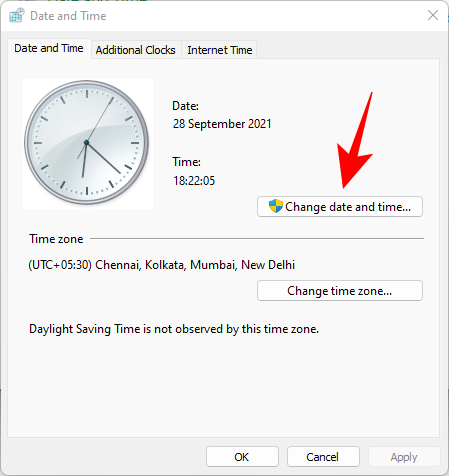
ここで、[日時の変更]をクリックします …
次に、明日を反映するように日付と時刻を変更します。この記事を書いている時点では11月1日なので、日付を11月2日に変更します。
日付を最後の累積更新に変更します
それでもタスクバーを機能させることができない場合は、いくつかのフープをジャンプして日付と時刻を複数回変更し、システムでタスクバーを機能させる必要があります。以下のガイドに従って開始してください。
Ctrl + Shift + Escキーボードを押し、[ファイル]をクリックして、[新しいタスクの実行]を選択します。

Type in ‘Control’ and press Enter on your keyboard.

Select ‘Date and Time’.

Switch to ‘Internet time’.

Click on ‘Change Settings’.

Uncheck the box for ‘Synchronize with an Internet Time Server’.

Click on ‘Ok’.

Switch back to ‘Date and Time’. Click on ‘Change Date and Time’ and select your date as 2nd September.
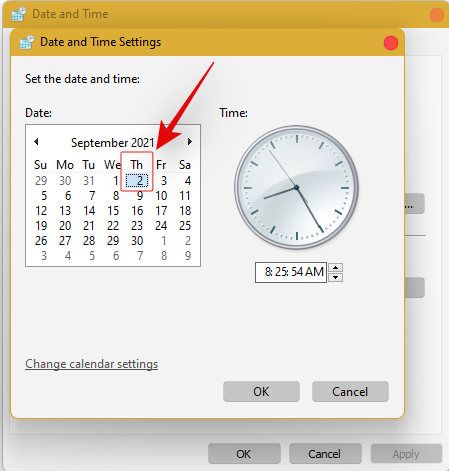
Close all windows and restart your system. Once restarted, open the ‘Date and Time’ dialog box again and change your date to 7th October this time.
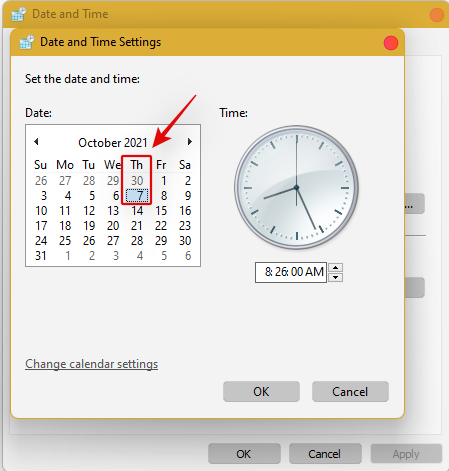
Restart your system again and Taskbar should now be back up and running on your system again. You can now enable synchronization for time again using the steps above on your system.
If synchronizing time does not work, move a month ahead to restore Taskbar
If you are still unable to get Taskbar up and running on your system again you can try the last date change fix. We recommend you use the steps above to change your date and time to a month ahead of your current date. Once changed, restart your system, and the taskbar should be up and running on your system now.
The downside of this fix is that if you revert to your normal date, Taskbar will stop working on your system. Having a mismatched date can cause issues with background syncs for various applications and cause some websites to malfunction. You will also have issues installing and getting the latest Windows Updates, so you will need to check all of these manually when updating in the future.
Fix #10: Uninstall the latest cumulative Windows Update ie: KB5006050
The cumulative update released in September for Windows 11 seems to also cause issues with the taskbar on some desktops and laptops. Use the guide below to uninstall the necessary update from your system.
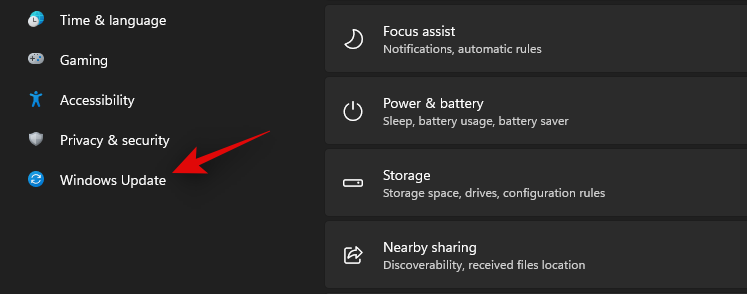
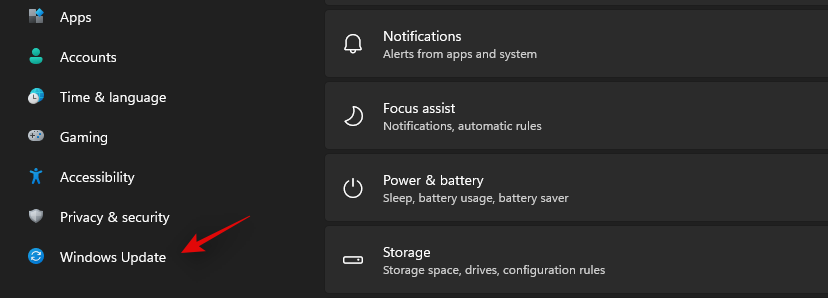
Press Windows + i and select Windows Update from the left.
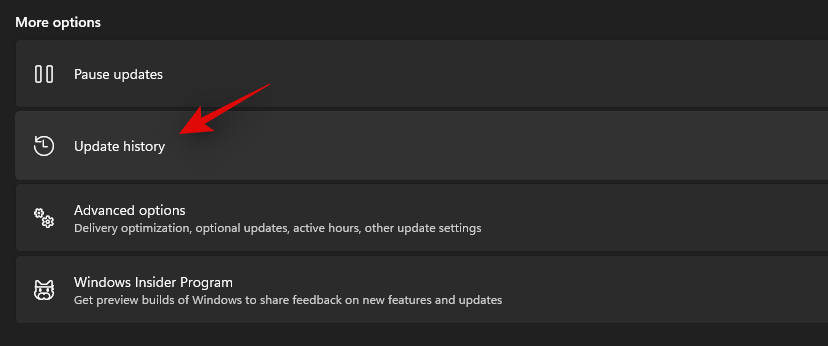
Click on ‘Update history’.
Now select ‘Uninstall updates’.
Click and select Windows Cumulative update KB5006050 from the list.

Now click on ‘Uninstall’ at the top and confirm your choice to uninstall the selected update.
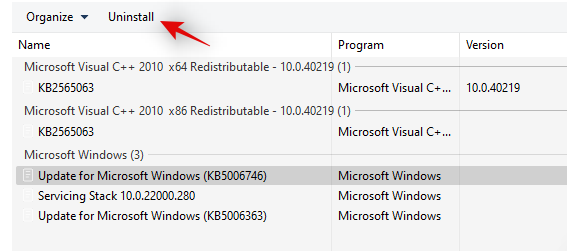
Restart your system and taskbar functionality should now be restored on your system.
Fix #11: Restore PC to a previous restore point
If you had the taskbar working at a previous point in time then we recommend you restore your PC to a previously available restore point on your system. Follow the guide below to get you started.
Press Ctrl + Shift + Esc on your keyboard and click on ‘File’. Select ‘Run new task’ once you are done.

Type in CMD and press Ctrl + Shift + Enter on your keyboard.

Now type in ‘rstrui.exe’ and press Enter on your keyboard.
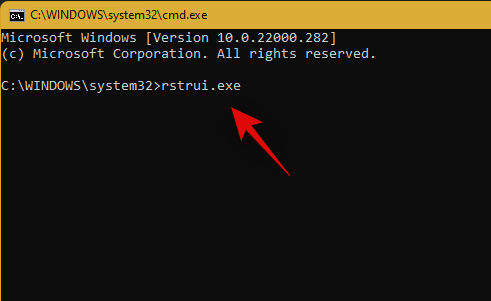
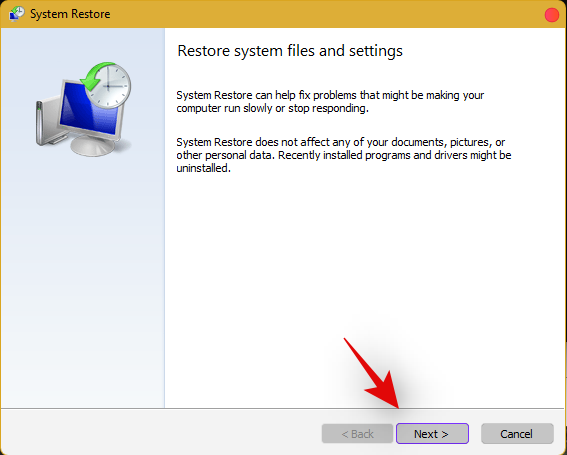
The system restore utility will now launch on your system. Click on ‘Next’.
Select the desired restore point from the list on your screen. Click on ‘Next’ once you are done.
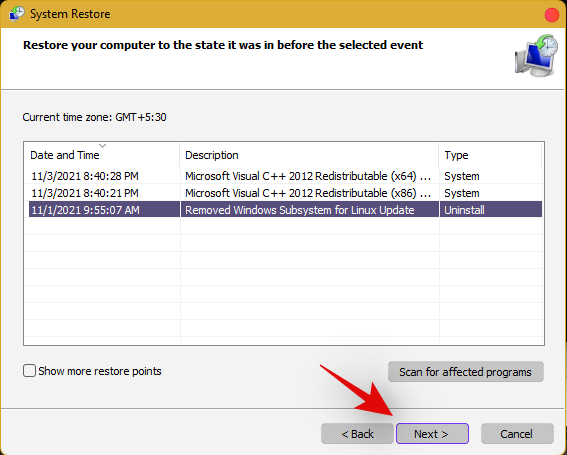
Tip: Click on ‘Scan for affected programs’ to view a list of installed programs that will be removed from your system during the restore process.
Click on ‘Finish’ once the restore finishes and restart your system.
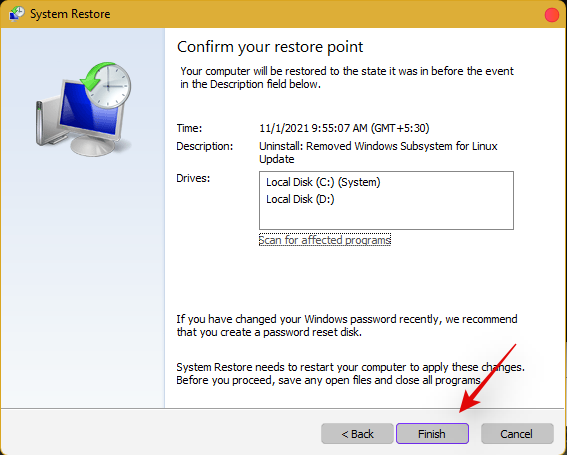
The taskbar should now be back up and running on your system again.
Fix #12: Last Resort: Create a new local admin account and transfer all your data
If by this point Taskbar still fails to work for you then it’s time for some drastic measures. You can create a new local admin account, check if Taskbar is working there, and then transfer all your data to the new account. This will be a tedious process but it is the next best way to get the taskbar working on your system without resetting your PC. Follow the guide below to get you started.
Create a new local admin account
Herre’s how you can create a new local admin account on your system.
Note: Most users facing the taskbar issue are unable to access the Settings app as well. Hence we will be using CMD to add a new local admin account to your PC. However, if the Settings app is available to you then you can use the same to add a new account as well.
Press Ctrl + Shift + Esc on your keyboard, click on ‘File’ and select ‘Run new task’.

Type in ‘cmd’ and press Ctrl + Shift + Enter on your keyboard.

CMD will now be launched as an administrator. Use the command below to add a new local admin account. Replace NAME with the Username of your choice for the new account. You can add a password later once you have confirmed that the taskbar is available in the new account.
net user /add NAME 
Once you have added the new user, use the command below to convert it to an administrator account on your PC. As usual, replace NAME with the Username for the new account you created earlier.
net localgroup Administrators NAME /add

Now type in the following to log out of your current account.
logoff

Once logged out, click on the newly added account to log in to the same. Once logged in, check if the taskbar is available in the new account. If it is, you can use the next section to transfer all your data. However, if the taskbar is still missing then you have no choice but to perform a fresh install of Windows 11 on your PC from a removable USB media drive.
Transfer all your data
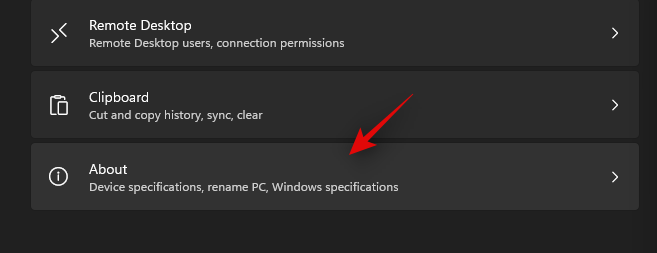
Press Windows + i on your keyboard and click on ‘About’ on your right.
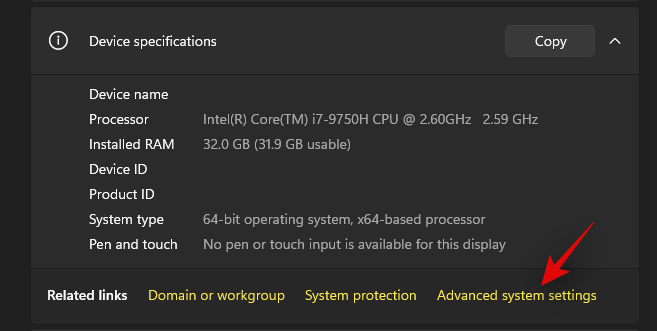
Click on ‘Advanced system settings’.
Click on ‘Settings’ under ‘User Profiles’.
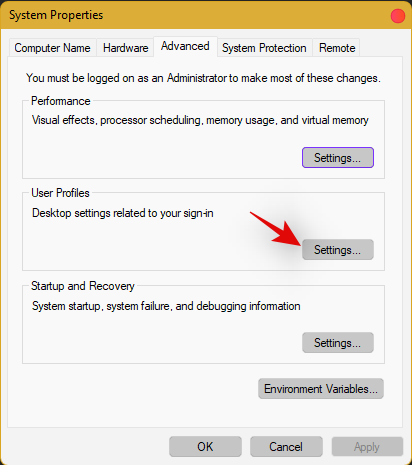
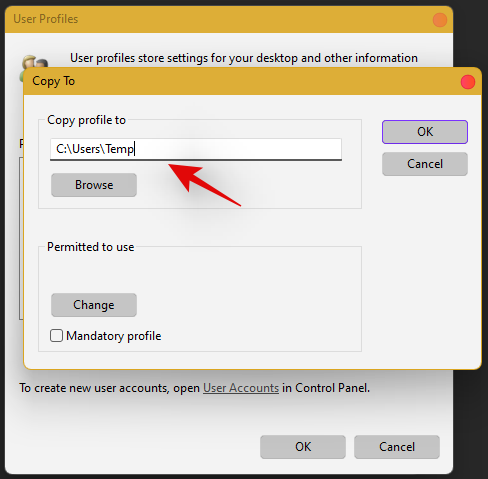
Select your original profile by clicking on it and selecting ‘Copy To’.
Now enter the following path under ‘Copy profile to’. Rename NAME to the username of your previous profile from where you wish to copy all your data.
C:\Users\NAME
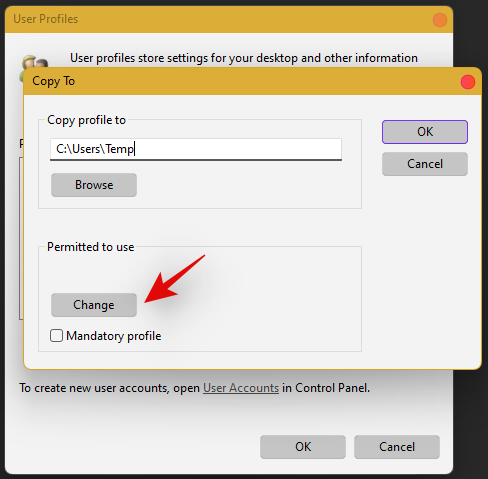
Click on ‘Change’.
Enter the name for your new user profile and press Enter on your keyboard.
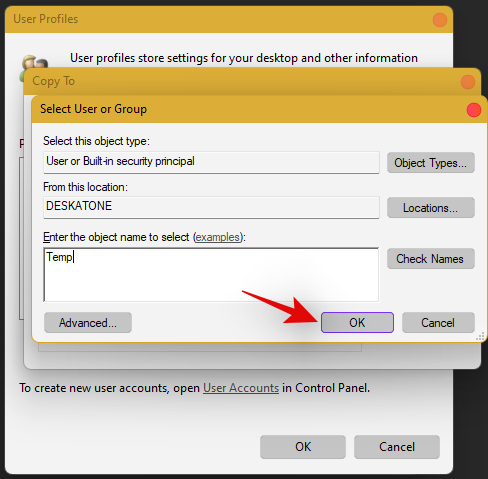
Click on ‘Ok’ once you are done.
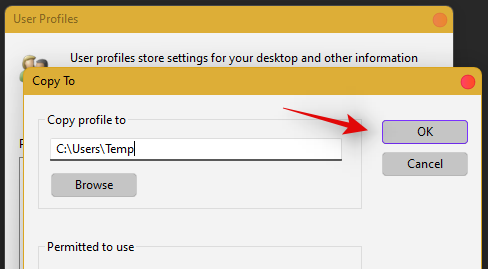
All your data will now be copied over to the new profile where the taskbar is functional on your PC. You can now delete your previous user account and set a password for your new account as well.
Frequently Asked Questions (FAQs):
With so many fixes, you are bound to have a few questions on your mind. Here are some commonly asked ones that should help you get up to speed.
How do I access Windows apps and Settings without a taskbar?
You can use the Task Manager to launch almost any program or Settings page on your system. To launch the desired program, launch the Taskbar > File > Run new task and enter the path to the program you wish to launch. Press Enter if you wish to launch the program normally or press Ctrl + Shift + Enter if you wish to launch the program with administrator privileges.
Is it safe to edit the Registry?
Registry edits are never safe as they have the potential to break your system. Fixes from trusted sources can help you avoid such issues but a good rule of thumb is to always back up your registry before making any edits. This way you can easily restore your Registry values in case some get messed up when editing the Registry.
When will Microsoft fix this issue?
Sadly, Microsoft is yet to release a proper fix for this issue. The company has tried to release a fix in the past cumulative updates to Windows 11 but they have been a hit and miss. We expect Microsoft to completely fix this issue in the upcoming feature update to Windows 11 when the OS gets the ability to run Android apps officially.
Can I update my Windows 11 after fixing the taskbar?
This will depend on the fix that you’re currently using. If you are using a date fix then you won’t be able to install updates until you restore to the current time. This will, however, cause the taskbar to be disabled again and the changes will be carried over after you update your PC. However, if you are using any other fix then you can easily update Windows.
For users with the date fix, you should try updating with the modified time first. If the update gets stuck on ‘Installing 0%’ or ‘Downloading 100%’ then change your date and time to the current date and time and update your PC. Ensure that you do not restart explorer or your PC during this process to keep the current instance of the taskbar alive on your system during the update process. This should help fix the issue for you once Microsoft officially releases an update to fix the issue.
We hope you were able to easily get the taskbar back up and running on your system using the guide above. If you face any more issues, feel free to reach out to us using the comments section below.
Related:
最近のアップデートをインストールした後に問題が発生した場合に壊れたWindowsアップデートを修正する複数の方法を発見してください。
このガイドでは、Microsoft Outlookで添付ファイルのプレビューを試みる際に発生する一般的な問題に対する複数の解決策を提供します。
時々、メールがMicrosoft Outlook 365の送信トレイに詰まってしまいます。このガイドでは、それを解決する方法を示します。
Windows 11でエラーコード0x80070070を修正する方法を見つけてください。これにより、新しいWindowsの更新をインストールする際によく発生します。
Windows 11でタスクバーが機能しない場合の対処法を確認し、実証済みの解決策やトラブルシューティングのヒントを見つけましょう。
BeRealアプリの一般的な問題によってソーシャルエクスペリエンスが中断されないように、ここではBeRealアプリが正常に動作しない問題を修正する9つの方法を紹介します。
Facebook Messenger の通知が消えない問題を解決するための効率的な8つの方法を紹介します。
iPhone で iMessage が配信されないエラーを修正するための包括的なガイドです。その解決策を9つご紹介します。
ChatGPT アカウントにサインアップできない場合の解決策が知りたいですか?このガイドでは、ChatGPT にサインアップできない主な問題とその対策を紹介します。
Windows 11 で「重要な Steam コンポーネントが応答していません」エラーが発生しましたか?それを修正するには、次の 8 つの方法を試してください。
Microsoft TeamsでのBSODエラーの問題を解決するための包括的なガイド。古いドライバーや外部デバイスの干渉が原因かもしれません。
Gboard GIFが機能しない問題を解決するための実用的な修正方法を紹介します。
Windows 11が世に出たとき、誰もが最初に注目したのはスナップレイアウトでした。これを修正するための方法を知りましょう。
Windows 11のユーザー向けに、0x80888002エラーの解決策を提供します。最新の修正方法と安全性について詳しく解説。
Windows ログイン画面にユーザーの切り替えが表示されませんか? 問題を迅速に修正するためのベストな方法を解説します。
着信Skype通話が通過しない場合は、Skypeプライバシー設定が連絡先以外の人からの通話をブロックしている可能性があります。
Twitchのエラーコード3000に直面しているストリーマーや視聴者のための解決策を紹介します。
このガイドを使用して、Office 365エラーコード700003を修正します:問題が発生しました。組織がこのデバイスを削除しました。
ChatGPTは、GPT-4言語モデルを利用したOpenAIの革新的なAIチャットボットです。タイムアウトエラーに直面するユーザーを助けるための有益な情報が含まれています。
TikTokのプッシュ通知に関する問題にイライラすることがあります。 TikTok通知が機能しない問題を解決する主な方法は次のとおりです。
Windows 11でBattle.netエージェントのスリープエラーに悩まされていませんか?ゲームを再びスムーズに動作させるための、実証済みの解決策をご紹介します。スムーズなゲームプレイのためのステップバイステップのトラブルシューティング。
Windows 11のDirectStorageをゲームに活用して、読み込み時間を短縮し、パフォーマンスを向上させる方法をご紹介します。設定を最適化して、よりスムーズなゲームプレイを実現するためのヒントをまとめたステップバイステップガイドです。
Windows 11でコア分離がオンにならないことにお困りですか?この重要なセキュリティ機能を有効にし、よくある問題を解決してPCのパフォーマンスを向上させるためのステップバイステップの修正方法をご紹介します。
Windows 11 セキュリティセンターサービスが見つからなくてお困りですか? 実証済みのステップバイステップの修復方法で、安全に復元し、手間をかけずにPCを保護できます。最適な保護を実現する最新の方法にアップデートされています。
Windows 11 が起動ロゴから先に進まなくて困っていませんか?この 2026 年の包括的なトラブルシューティング ガイドでは、セーフ モードから高度な修復まで、実証済みの修正方法を網羅し、問題を迅速かつ簡単に解決するのに役立ちます。
Windows 11のTaskbarXでアイコンが中央に表示されないエラーでお困りですか?アイコンを簡単に中央に配置し、機能を回復し、タスクバーを最適化するための実証済みの修正方法をご紹介します。最新のソリューションでシームレスなパフォーマンスを実現します。
Windows 11のwgetコマンドとcurlコマンドのエラーでお困りですか?このステップバイステップガイドでは、よくある問題、簡単な解決策、そして効率的に解決するためのプロのヒントをご紹介します。今すぐダウンロードとAPI呼び出しをコントロールしましょう。
Windows 11のウェブカメラのプライバシーシャッターエラーに悩まされていませんか?実証済みのステップバイステップの解決策で、カメラへのアクセスを迅速かつ安全に復元できます。今すぐプライバシーを取り戻しましょう!
Windows 11の仮想メモリ不足エラーに悩まされていませんか?システムを強化するための、実証済みのステップバイステップの解決策を見つけましょう。
Windows 11の「TPM構成証明がサポートされていません」というエラーでお困りですか?TPM要件を回避し、スムーズにアップグレードするための実証済みの解決策をご紹介します。ステップバイステップのガイドで、手間なくインストールできます。
