As atualizações do Windows sempre foram um incômodo notório para muitos usuários desde os dias do Windows XP. Felizmente, a entrega de atualizações do Windows melhorou drasticamente nos últimos anos e muito poucas atualizações de recursos tendem a causar grandes problemas hoje em dia.
Você pode configurar o Windows para baixar e atualizar em segundo plano automaticamente e até mesmo reiniciá-lo durante as horas inativas. Tudo isso é ótimo, mas e se for instalada uma atualização de que você não precisa? Ou se você obtiver uma atualização que prejudique o desempenho de sua máquina? Bem, neste caso, você pode desinstalar as atualizações do Windows no Windows 11. Mas aqui estão algumas coisas que você deve ter em mente antes de desinstalar as atualizações do seu PC com Windows 11.
Relacionado: Como desativar atualizações no Windows 11
Conteúdo
Por que desinstalar as atualizações do Windows?
Pode haver vários motivos pelos quais você deseja desinstalar as atualizações do Windows; aqui estão alguns dos mais comuns. Se estiver solucionando erros após uma atualização recente do Windows, você também pode consultar esta lista.
Caso esteja enfrentando algum desses problemas em seu sistema, você pode tentar desinstalar a atualização mais recente do Windows para tentar corrigir o problema.
- Desempenho geral do sistema degradado
- Atualizações de driver defeituosas
- Funcionalidade quebrada de recursos do Windows
- Recursos mal gerenciados em segundo plano
- Alto uso de CPU ou disco
- Atualização de driver indesejada que você estava tentando evitar
- Segurança do Windows ou UAC com comportamento incorreto
- Configurações de região incorretas que não podem ser alteradas
- Configurações ou opções ausentes no Windows 11
e mais. Pode haver toneladas de problemas que você pode enfrentar ao instalar uma nova atualização para o Windows 11, especialmente se você estiver inscrito no canal beta ou interno. Nesses casos, você pode tentar desinstalar a atualização em questão usando o guia desta postagem.
Relacionado: Como cancelar uma atualização pendente do Windows Insider
É seguro desinstalar as atualizações do Windows?
Sim, contanto que você não force a remoção das atualizações do Windows manualmente ou usando um utilitário desatualizado, deve ser seguro desinstalar as atualizações do Windows de seu sistema. No entanto, você deve ter em mente que a Microsoft usa atualizações do Windows para fornecer patches de segurança, hotfixes e muito mais para ajudar a proteger seu sistema contra as ameaças e vulnerabilidades de segurança mais recentes.
A remoção das atualizações do Windows também desinstala esses patches, o que, por sua vez, torna o seu sistema vulnerável a ameaças online. Este é especialmente o caso se você estiver procurando desinstalar atualizações de segurança recentes.
Portanto, embora você esteja seguro para desinstalar qualquer atualização, é recomendável reverter suas alterações assim que o erro for corrigido. Se o bug ou erro persistir após reinstalar a atualização, você poderá esperar até que uma atualização e correção subsequentes sejam lançadas pela Microsoft.
Relacionado: Como remover o Bing do Windows 11
Como encontrar as atualizações que deseja remover
Podemos remover atualizações usando vários métodos, mas para descobrir qual atualização você deseja remover, é necessário identificá-la em seu PC. Cada atualização da Microsoft recebe um número KB que ajuda a determinar e identificar a atualização em PCs de consumo, bem como em servidores da Microsoft. Podemos usar esse número a nosso favor e remover a atualização em questão de seu sistema usando um dos guias abaixo. Veja como você pode identificar as atualizações recentes do Windows instaladas em seu PC.
Método nº 01: usando configurações
Pressione Windows + ino teclado e selecione 'Atualização do Windows' à sua esquerda.
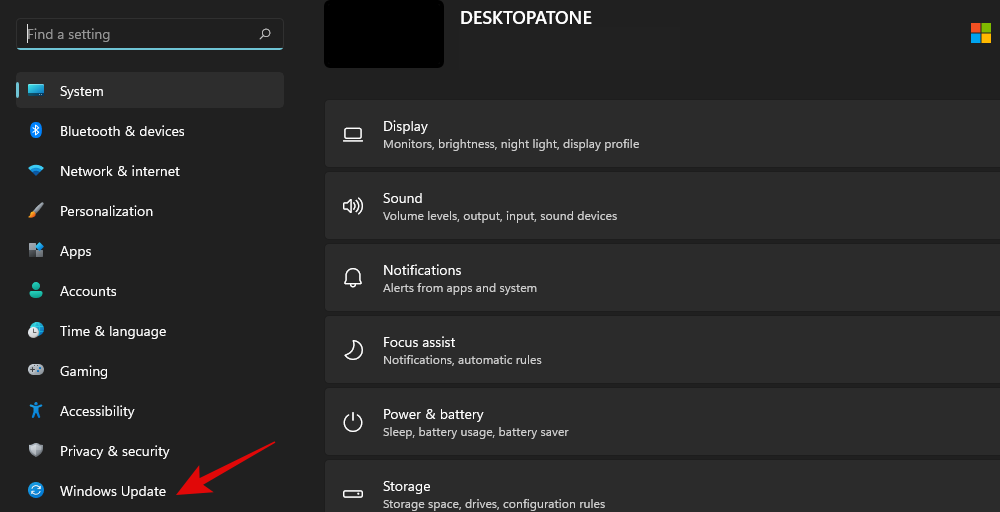
Clique em 'Atualizar histórico' agora.
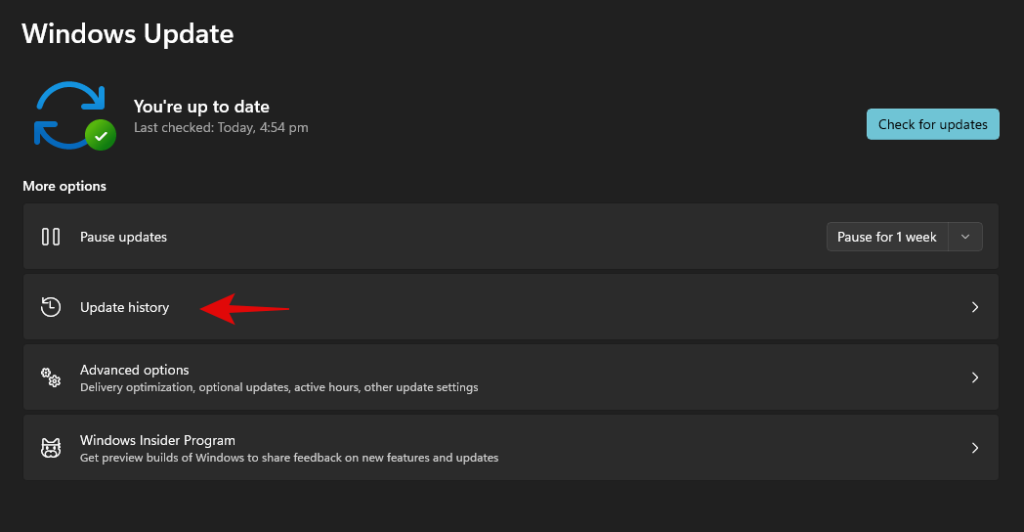
Agora você obterá uma lista de atualizações do Windows instaladas recentemente em seu sistema.
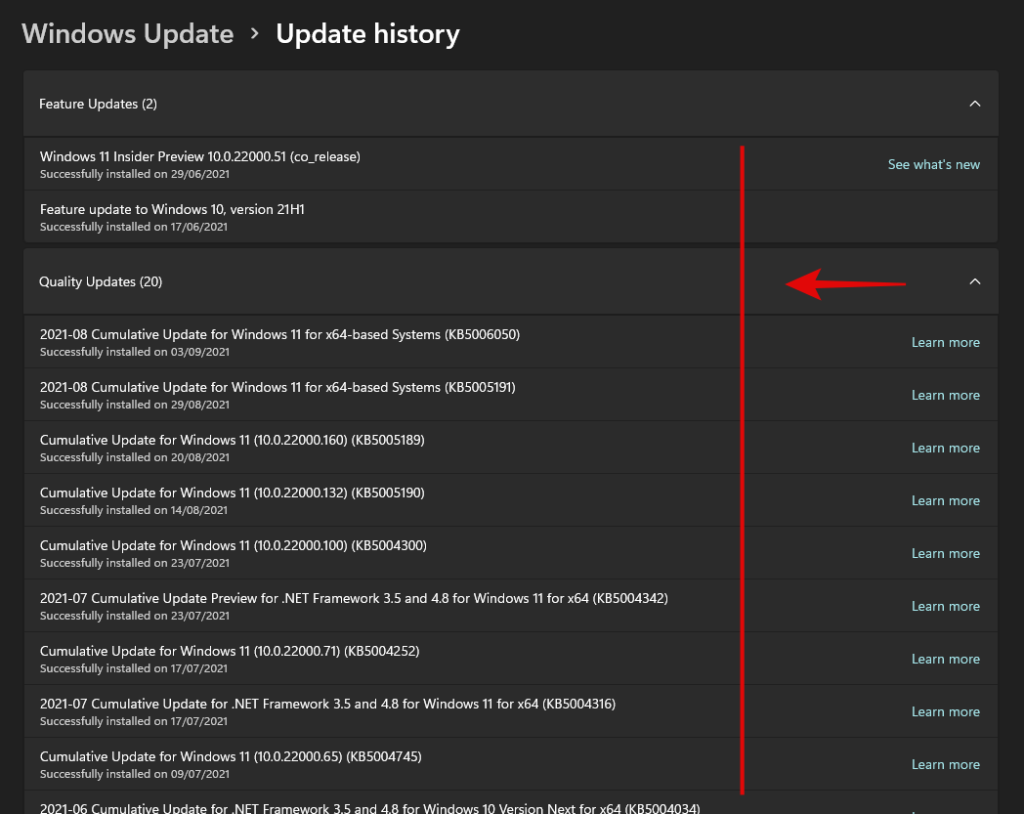
Basta anotar o número KB da atualização que deseja remover do seu PC.
Método # 02: Usando CMD
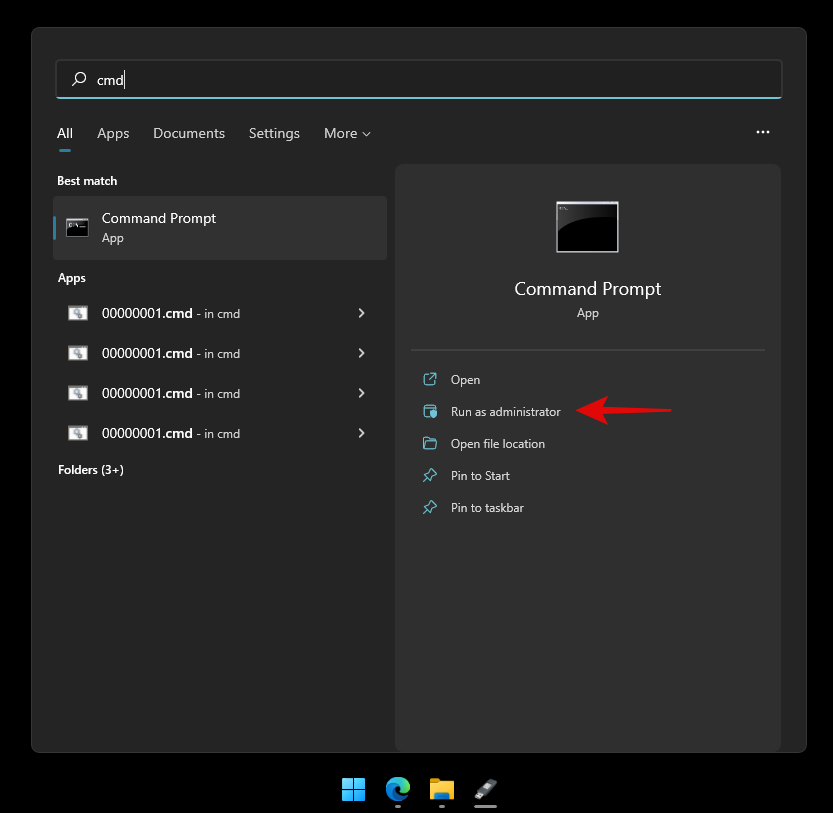
Pressione Windows + Sno teclado e pesquise por CMD. Clique em 'Executar como administrador' assim que o aplicativo aparecer nos resultados da pesquisa.
Digite o seguinte comando e pressione Enter no teclado.
wmic qfe list brief /format:table
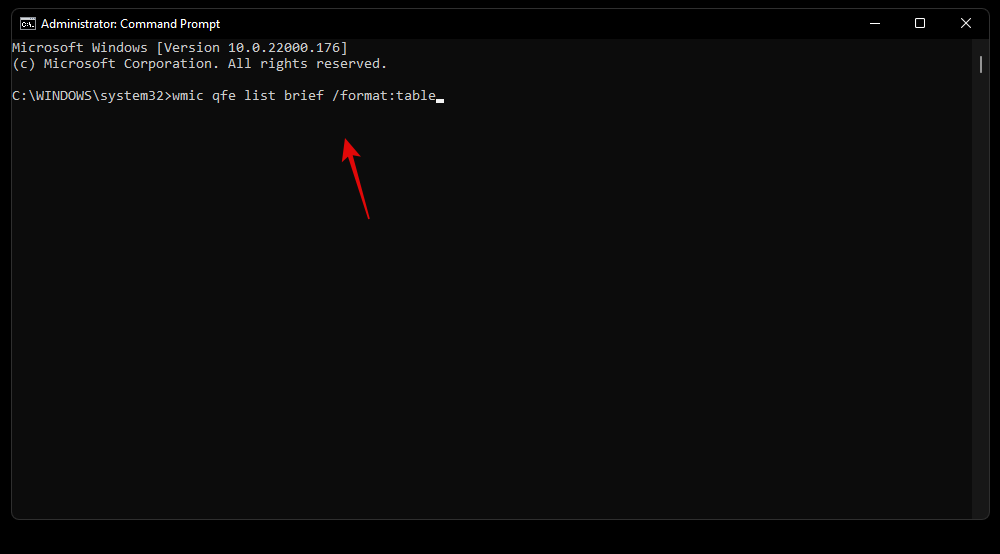
Você obterá agora uma lista de todas as atualizações recentes do Windows instaladas no seu PC. Clique e expanda a categoria em questão na lista abaixo.
- Atualizações de qualidade: atualizações de recursos para o Windows 11 que introduzem mudanças importantes no sistema operacional.
- Atualizações de driver: atualizações de driver genéricas / OEM para seus periféricos e componentes fornecidos por meio de atualização do Windows.
- Atualizações de definições: atualizações de definições de segurança para ajudar o Microsoft Defender a identificar e colocar em quarentena as ameaças em seu sistema.
- Outras atualizações: atualizações para produtos, recursos e outros recursos OEM específicos do seu dispositivo da Microsoft. Os recursos e pacotes de experiência do Windows também serão atualizados nesta categoria.
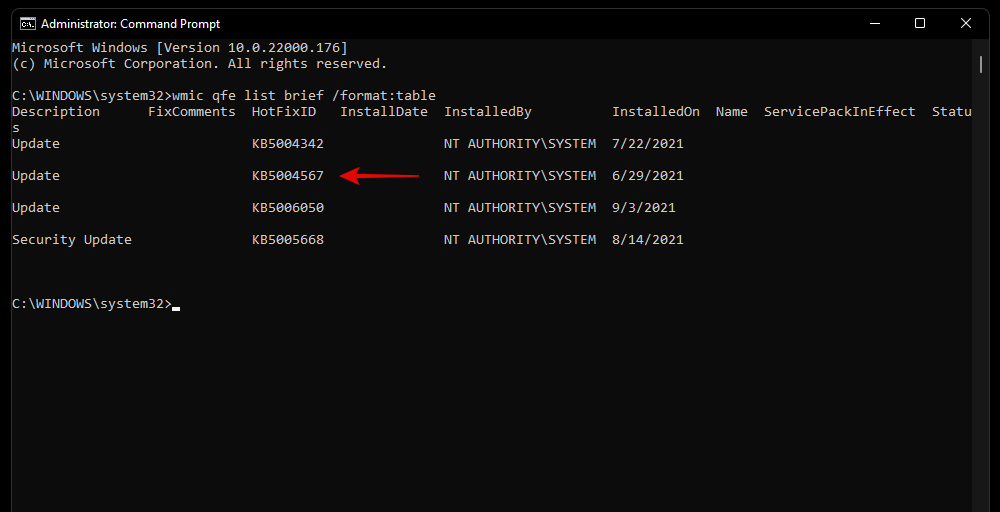
Identifique a atualização que deseja remover e anote seu 'HotFixID'. Usaremos esse ID para remover a atualização em questão usando o guia abaixo.
Como remover atualizações do Windows do seu PC
Você pode remover as atualizações do Windows do seu PC usando um dos métodos abaixo. Se você não consegue acessar o Windows ou não consegue inicializar na área de trabalho, recomendamos o uso do método Windows RE ou CMD. Se você pode acessar sua área de trabalho, você pode usar o aplicativo Configurações para remover facilmente as atualizações do seu sistema. Use os guias abaixo para começar, dependendo de suas preferências.
Método nº 01: usando configurações
Pressione Windows + ino teclado e clique em 'Atualização do Windows' na barra lateral esquerda.

Clique em 'Atualizar histórico'.

Role até a parte inferior e clique em 'Desinstalar atualizações'.
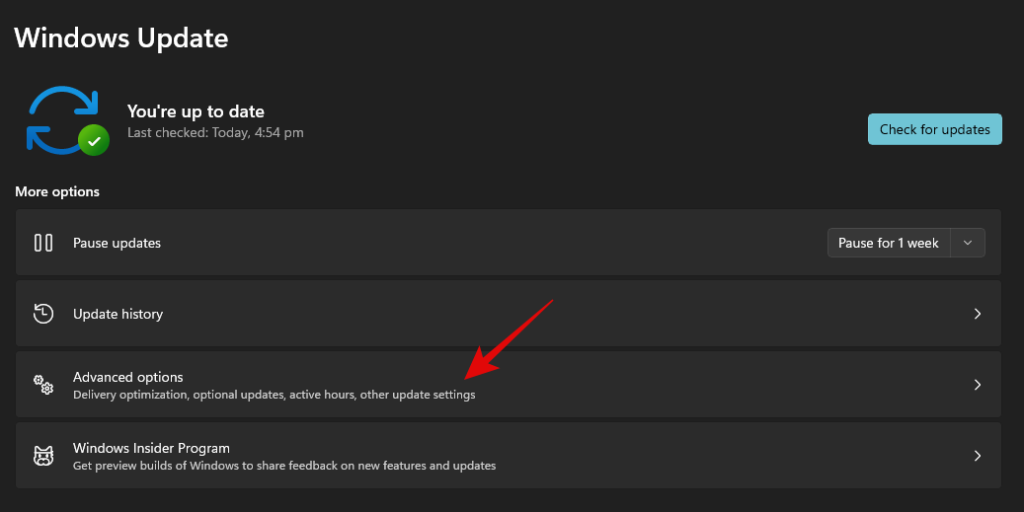
Agora você será redirecionado para o Painel de Controle, onde encontrará uma lista de atualizações recentes que podem ser removidas do seu sistema.

Selecione a atualização que deseja remover e clique em 'Desinstalar' na parte superior.

Siga as instruções na tela para desinstalar a atualização em questão do seu PC.
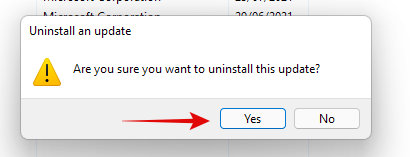
Agora você pode reiniciar o seu PC e quaisquer problemas que você estava enfrentando devido à atualização agora devem ser corrigidos.
Método # 02: usando o solucionador de problemas de atualização do Windows
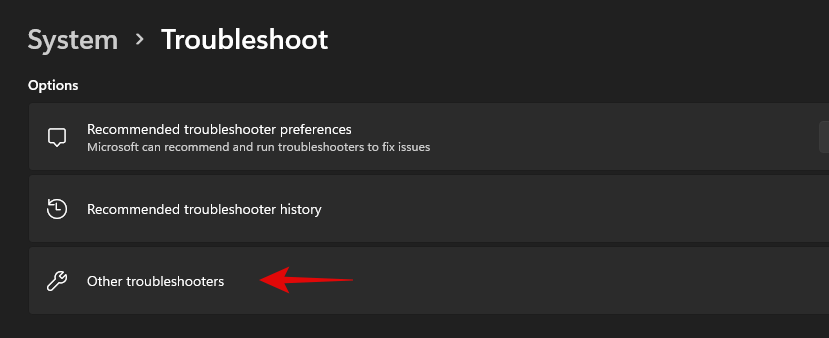
Pressione Windows + ino teclado e clique em 'Solucionar problemas'.
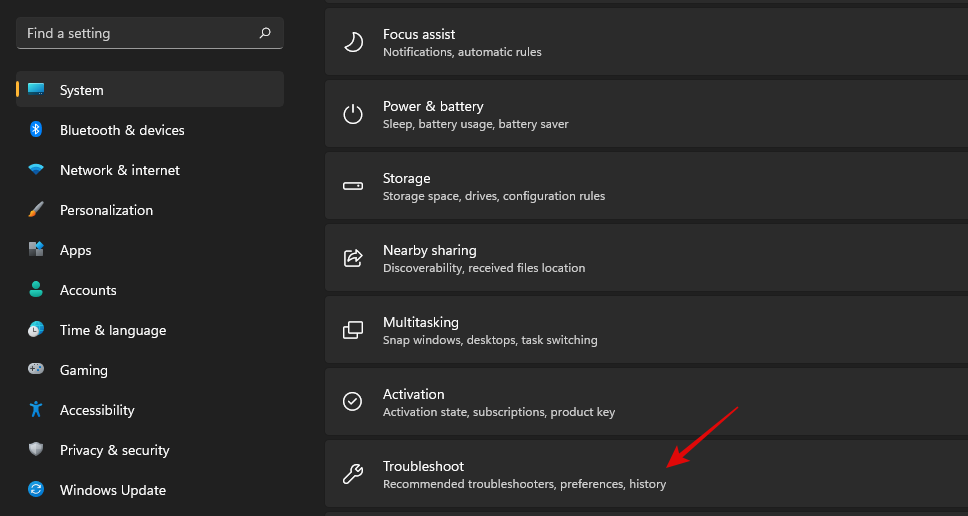
Clique em 'Outros solucionadores de problemas'.
Clique em 'Executar' ao lado do Windows Update.
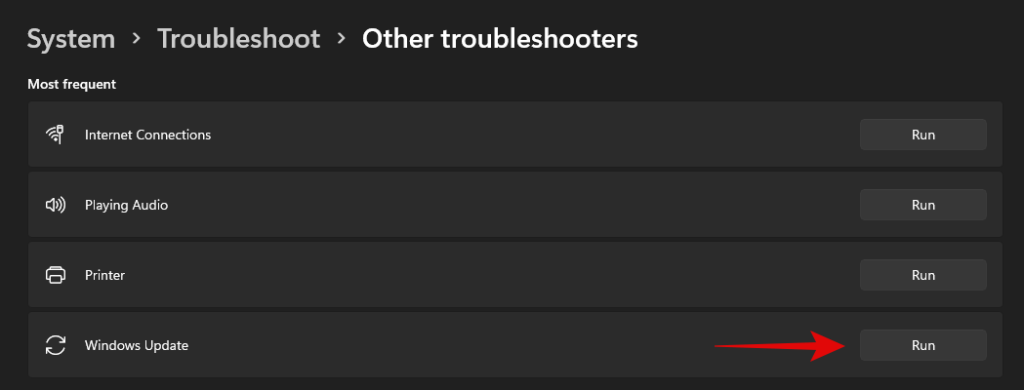
O solucionador de problemas do Windows irá agora procurar problemas causados por atualizações do Windows em seu PC. Se algum for encontrado, o solucionador de problemas resolverá o problema automaticamente. Se uma atualização recente for considerada a culpada, o solucionador de problemas lhe dará a opção de selecionar e desinstalar o Windows Update necessário. Siga as instruções subsequentes na tela para remover completamente a atualização.
Uma vez feito isso, clique em 'Fechar'.
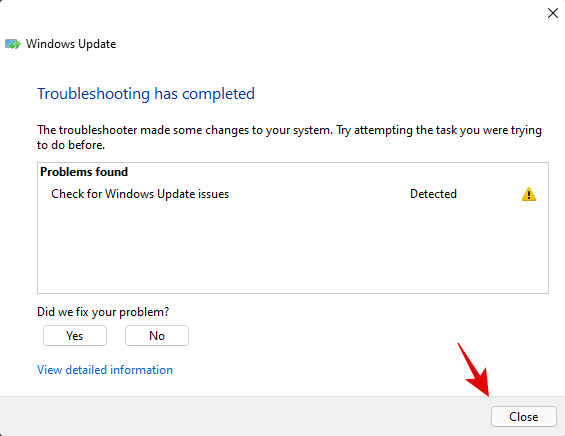
Reinicie seu PC para uma boa medida e o problema agora deve ser corrigido neste ponto. Caso contrário, você pode usar o método PowerShell abaixo para desinstalar manualmente o Windows Update desejado de seu sistema.
Método nº 03: Usando PowerShell ou CMD
Pressione Windows + Sno teclado e pesquise PowerShell. Clique em 'Executar como administrador' assim que o aplicativo aparecer nos resultados da pesquisa.
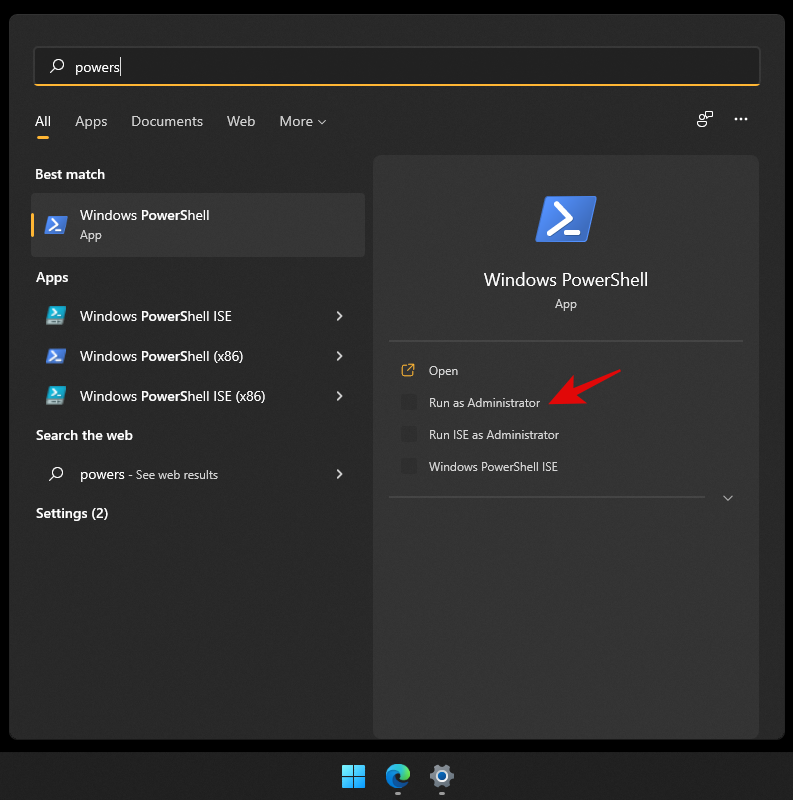
Type in the following command and press Enter on your keyboard to execute it.
wmic qfe list brief /format:table

You will now get a list of all the recently installed Windows Updates on your system in a table format. Note down the KB number for the selected Windows Update.
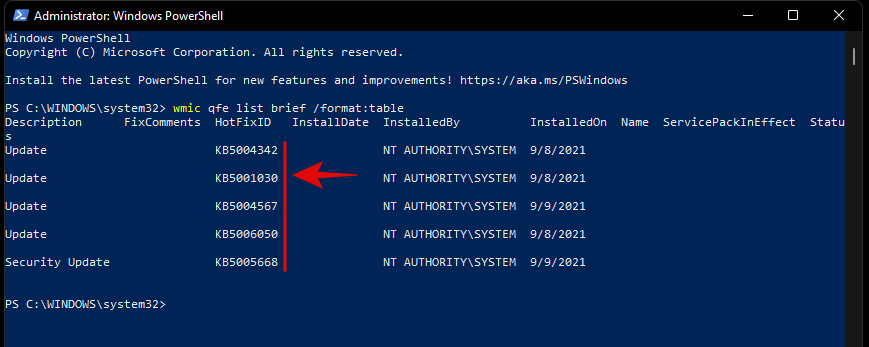
Note: You only need the number and not the letters before it.
Once done, type in the command below and execute it. Replace ‘NUMBER’ with the KB number you noted down earlier.
wusa /uninstall /kb:NUMBER
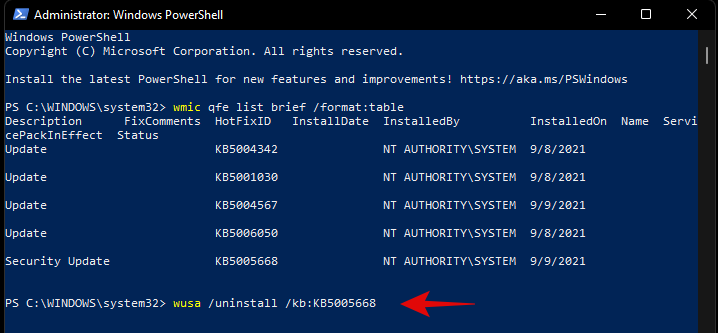
Once prompted, confirm your choice.
If prompted for a restart, we recommend you restart your system at the earliest while saving your work in the background.
If however, you do not wish to receive confirmations before uninstallation and a restart, then you can use the command below.
wusa /uninstall /kb:NUMBER /quiet
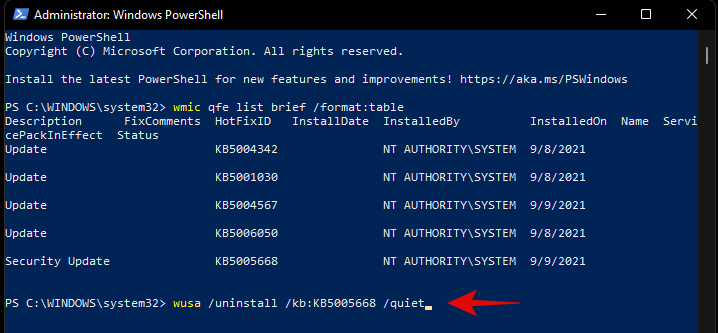
While the command above won’t prompt for confirmations, it will wait for your apps to shut down normally in the background. If you are looking to force close your apps and restart your system immediately, then you can use the command given below.
wusa /uninstall /kb:NUMBER /quiet /forcerestart
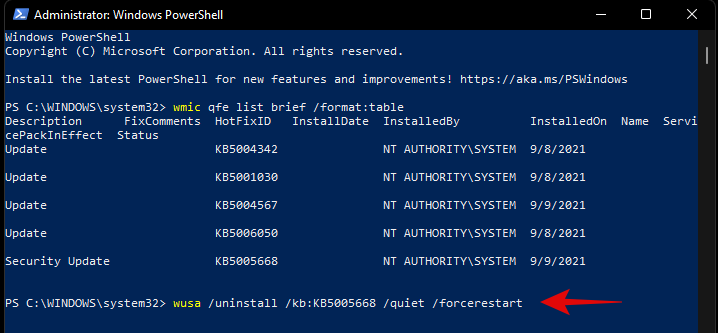
Subsequently, if you only wish to confirm a restart, then you can use the command below.
wusa /uninstall /kb:NUMBER /quiet /promptrestart
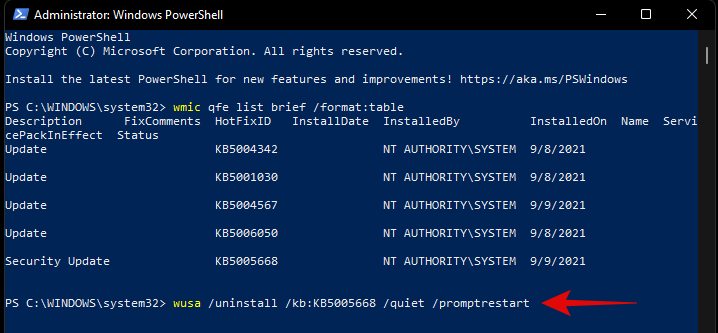
And that’s it! The problematic Windows Update should now be uninstalled from your PC.
Method #04: From Windows RE
Windows Recovery Environment also allows you to uninstall conflicting updates. Use the guide below to get you started. If you are facing a BSOD and are already in the Recovery Environment, then you can skip the first few steps of this guide.
Press Windows + i on your keyboard and select Windows Update from your left.
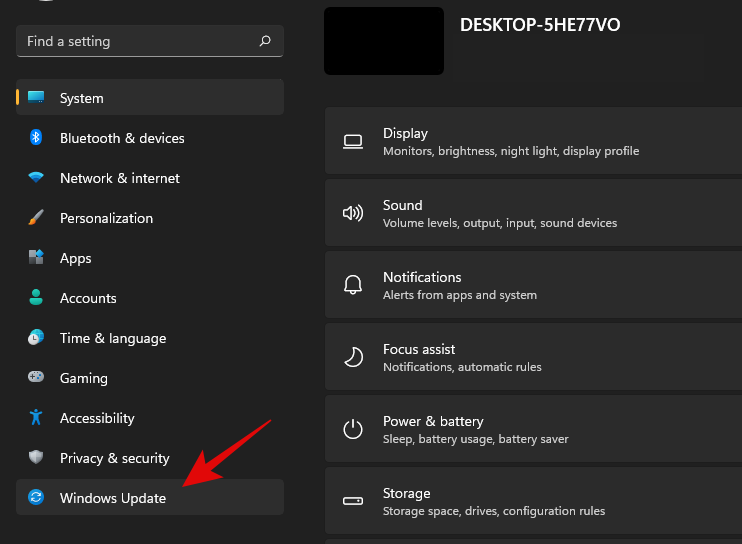
Click on ‘Advanced options’ now.
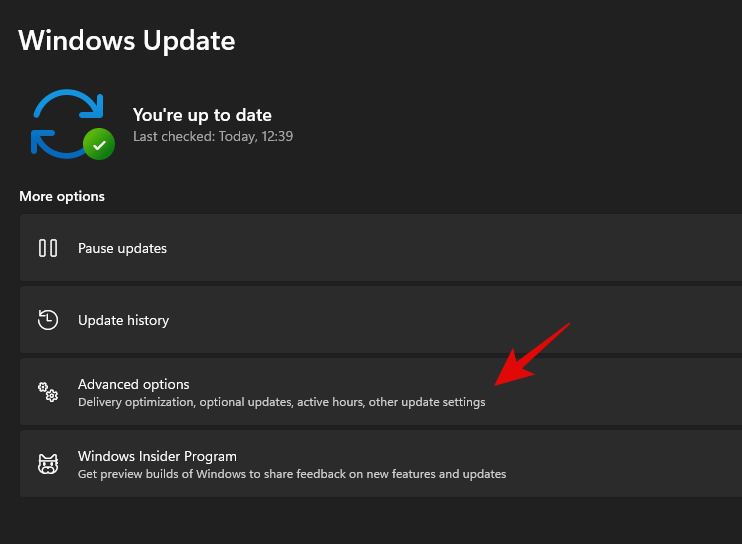
Select ‘Recovery’.
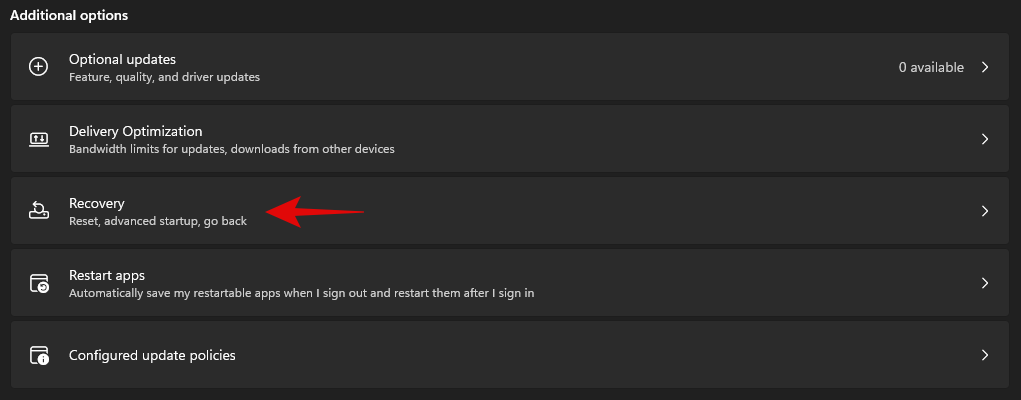
Click on ‘Restart now’ beside Advanced Startup.

You will now boot into the recovery environment. Click on ‘Troubleshoot’.
Now click on ‘Advanced Options’.
Select ‘Uninstall updates’.
Click and select the type of update you wish to install from the options on your screen.
- Uninstall latest quality update
- Uninstall latest feature update
Note: In case you are confused, feature updates refer to major updates to your Windows system that include new features, updated integrations, and sometimes new UI. Quality updates on the other hand encompass everything else including Security updates, Driver updates, Intelligence updates, Telemetry updates, and more.
Click on your administrator account and log in with your password.
Click on ‘Uninstall quality/feature’ update to confirm your choice.
Click on ‘Done’ once the process finishes.
Restart your PC and boot into Windows normally. You shouldn’t face any more issues caused by a problematic Windows update.
Method #05: Using DISM
DISM or Deployment Image Servicing and Management tool is an administrative tool within Windows that helps repair your Windows image and even mount images if needed. DISM supports image formats like .wim, .vhd, and more.
The tool can help you fix issues with your Windows installation and even remove problematic Windows updates. If you are looking to remove windows updates using DISM, then you can follow the steps below to get you started.
Note: DISM can be accessed via CMD and thus, you can use this guide from a recovery environment or an installation media as well. Follow the guide above to get CMD working on your lock screen or within Windows Recovery Environment.
Launch CMD and type in the following command. Press Enter on your keyboard once you are done.
dism /online /get-packages /format:table
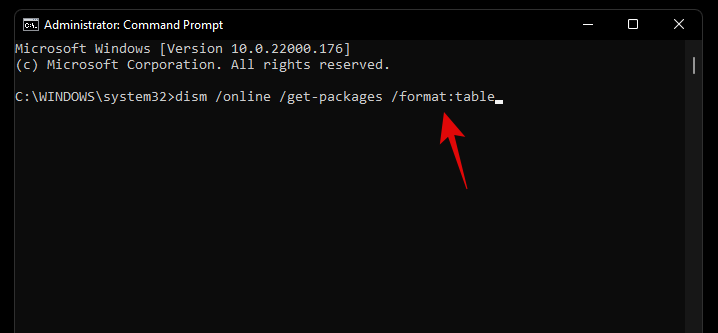
Unlike the WUSA commands we used earlier with PowerShell and CMD, you will need to note down the entire name of the Windows Update package we need to remove. Unfortunately, this includes special characters, spaces, and everything else included in the name. Thankfully you can easily copy the entire name to your clipboard by selecting it with your mouse and then using the keyboard shortcut. Once done, type in the command below and replace NAME with the package name you noted down earlier.
Note: This includes the term ‘Package_for_’ prefixed before some updates.
dism /online /Remove-Package /PackageName:NAME

The selected Windows Update will now be uninstalled from your system. In some cases, you will be prompted to restart your system, type in ‘Y’, and hit Enter on your keyboard to restart your system immediately.
How to stop receiving an update
While removing an update can help you, this does not mean that the broken Windows Update will stop showing up in your Updates section. This can be annoying and if you have automatic updates then you run the risk of automatically installing the problematic update in the background. In all such cases, you can try blocking Windows Updates on your system using the guides below depending on your preferences.
Method #01: Stop OEM driver updates through Windows update
OEM driver updates are delivered through Windows updates as well depending on their importance. Security vulnerabilities and bugs that have been recently found in components like CPU, GPU, or your wireless card, are instantly patched through such updates.
However, if you do not wish to install an OEM driver update provided by Windows update, then you can follow the guide below to block your OEM driver updates.
Press Windows + S on your keyboard and search for ‘Change device installation settings’. Click and launch the app from your search results.
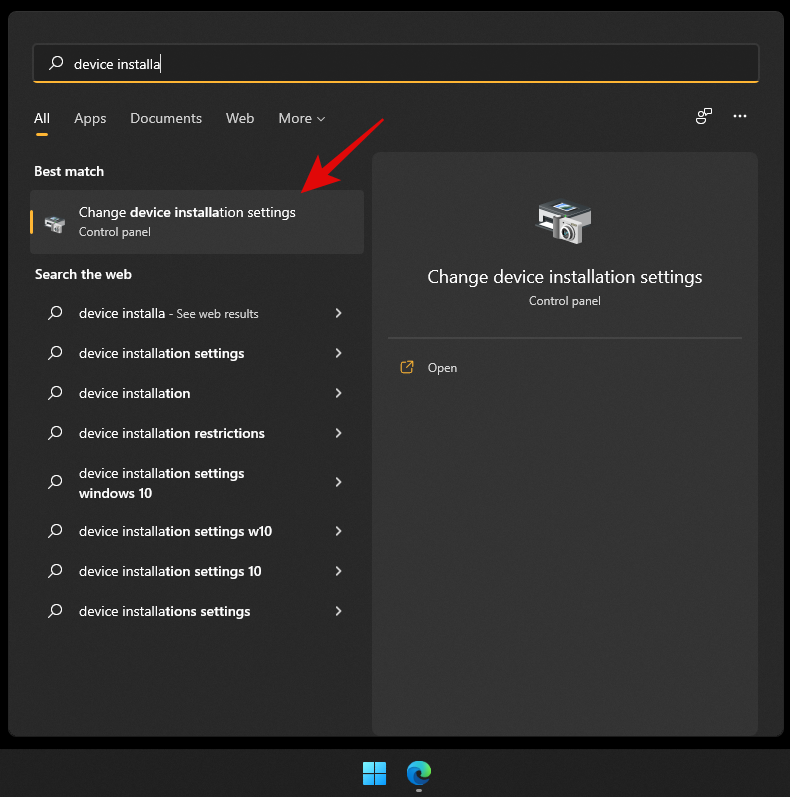
Select ‘No’.
Click on ‘Save changes’.
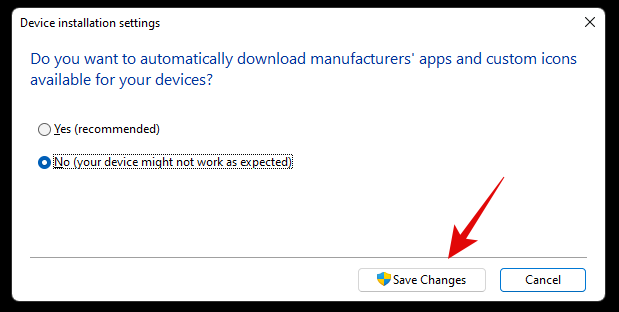
The changes will now be saved and you will no longer receive OEM driver updates through Windows Update.
Related: 6 Ways to Update Drivers on Windows 11
Method #02: Stop updates for Microsoft products
If you have been receiving constant updates for new Microsoft features and old products that keep messing up your system, then you can use the guide below to disable updates for Microsoft products via Windows Update.
Press Windows + i on your keyboard to open the Settings app and select ‘Windows Update’ from the left sidebar.

Click on ‘Advanced options’.

Now turn off the toggle for ‘Receive updates for other Microsoft products’ at the top.
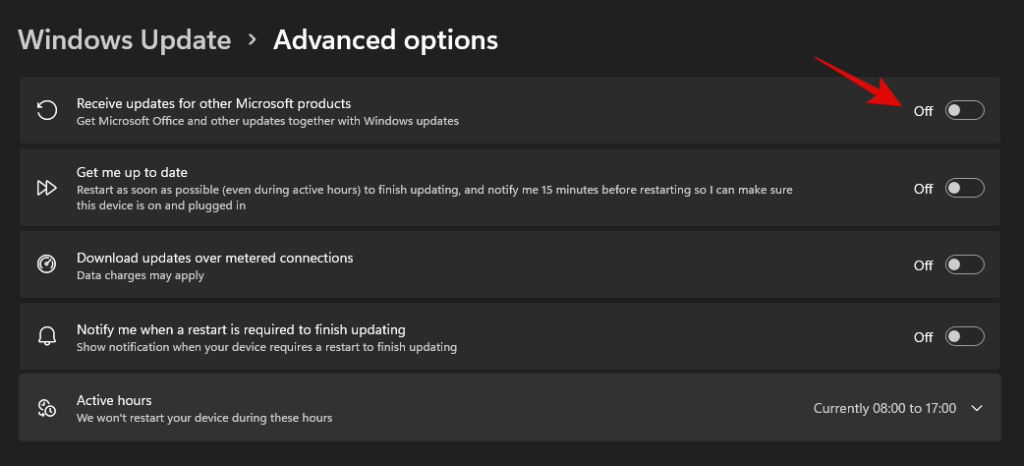
You will no longer receive updates for Microsoft products installed on your system via Windows update.
Method #03: Change active hours for background download and installation for updates
If you’re just looking to dismiss updates so that they don’t interfere with your work hours, then this is the perfect option for you. You can decide when Windows can download and update your PC in the background which will prevent Windows from interfering with your work hours. Follow the guide below to get you started.
Press Windows + i on your keyboard and click on ‘Windows Update’ on your left.

Click on ‘Advanced options’.

Now turn off the toggle for ‘Get me up to date’.
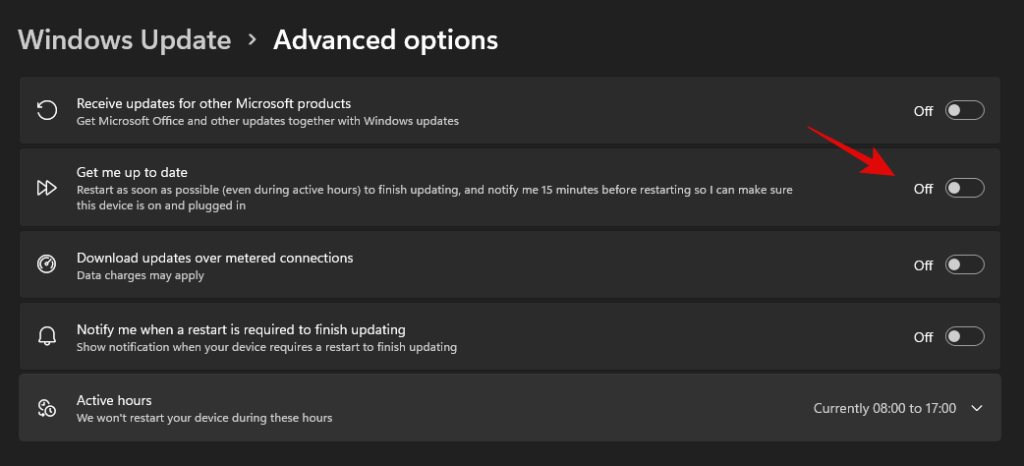
Click on ‘Active hours’.
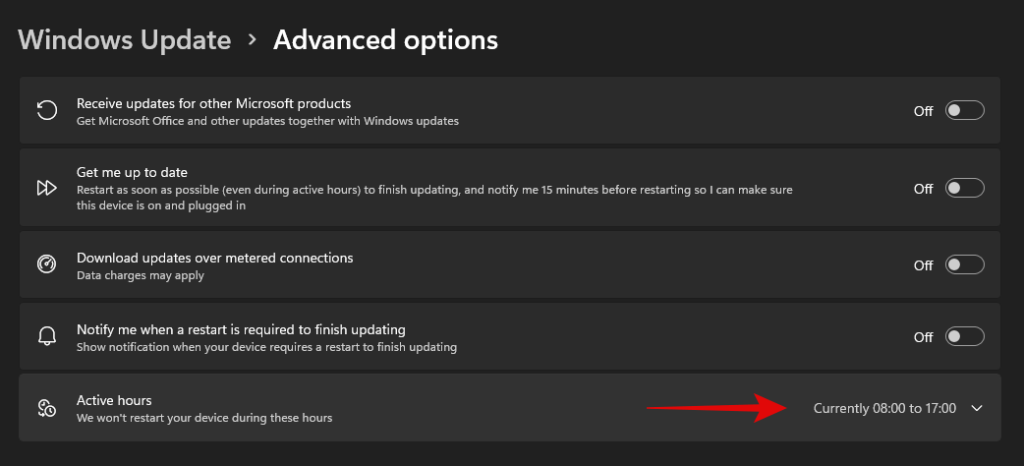
Click on the drop-down menu and select ‘Manually’.
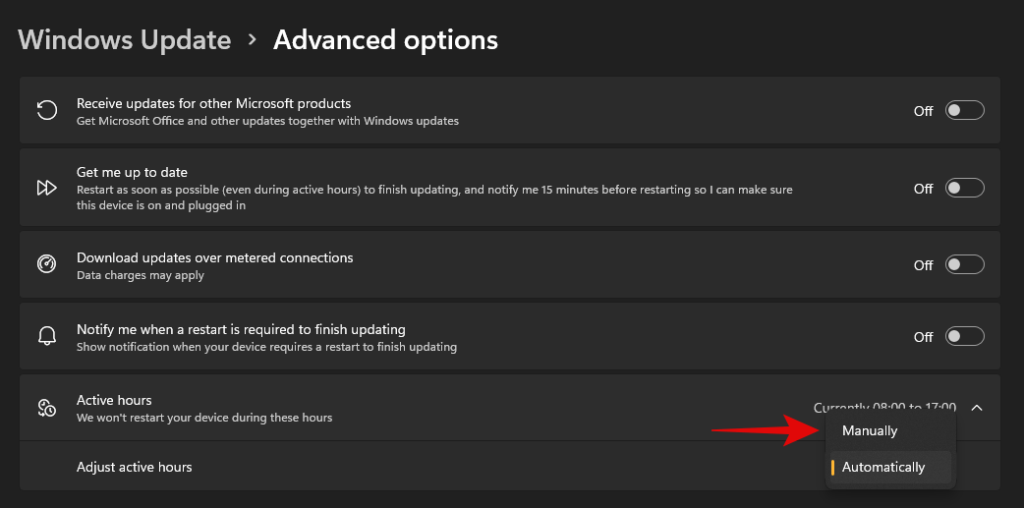
Define your desired start and end time. Windows won’t download updates and restart your PC during these hours.

And that’s it! Active hours should now be enabled for your system.
Method #04: Block Windows updates that you never wish to install
If you are receiving forced Windows updates that you don’t ever wish to install on your system then you can use a dedicated Windows troubleshooter to solve your issue.
This can be helpful in case you are trying to stop an update that disables a certain feature on your system that you don’t want disabled. This could be access to voltage controls, clock speed controls, turbo controls, fan controls, RGB control, and more. Follow the guide below to get you started.
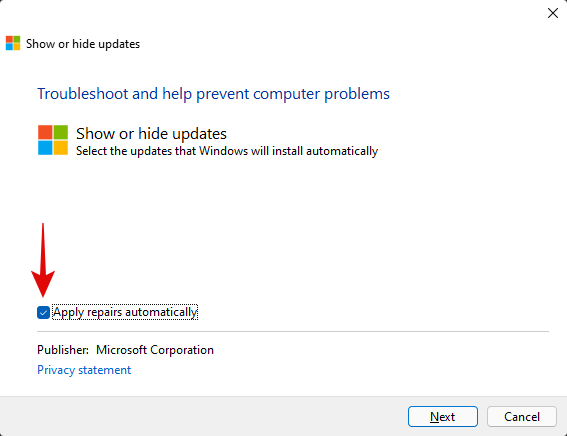
Download the Windows Update Show Hide troubleshooter using the link above and launch it on your PC. Click on ‘Advanced’.

Uncheck the option for ‘Apply repairs automatically’.
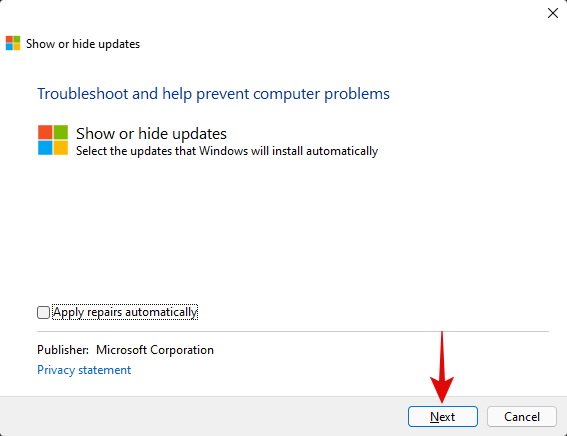
Click on ‘Next’.
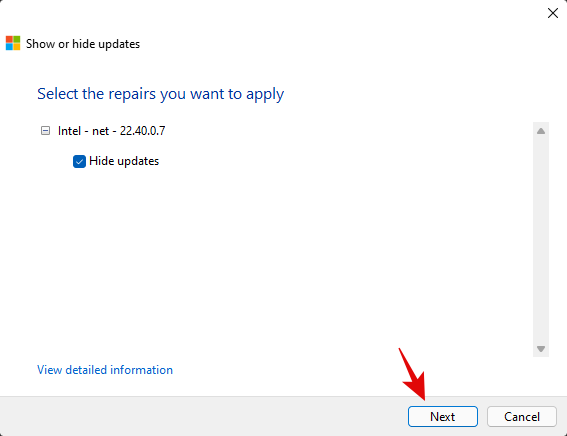
The troubleshooter will now look for pending updates and display them on your screen. Click on ‘Hide updates’.
Check the boxes for all the updates you don’t wish to receive on your PC.

Click on ‘Next’.
Ensure that ‘Hide updates’ is selected and click on ‘Next’.
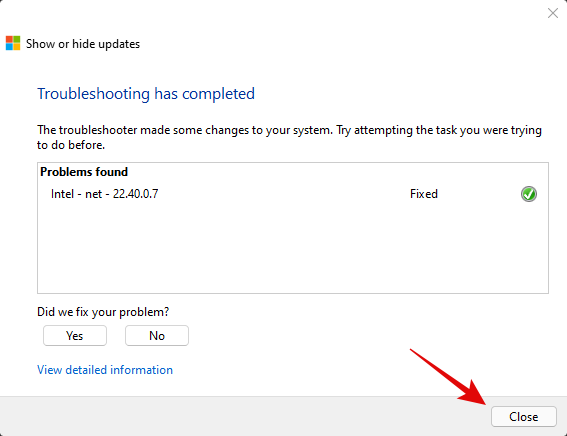
The troubleshooter will now hide the necessary Windows updates from your PC which in turn will prevent them from ever being downloaded on your PC. Click on ‘Close’.
And that’s it! You will now have blocked the necessary updates on Windows 11.
Can you turn off Windows updates?
Yes, you can use certain workarounds and tricks to disable Windows updates on your PC. However, this isn’t recommended as you will lose out on important security patches which would leave you vulnerable to online threats including hackers, malware, adware, and more.
Hence we recommend you keep your PC updated or at least opt to install the latest security updates on your PC. Even if you are losing out on features it’s usually because of a hardware security vulnerability that would compromise your system.
However, if you still wish to disable Windows Updates on your PC, you can use this dedicated guide from us. If you face any issues, feel free to drop a comment.
Can’t uninstall Windows updates? Try these fixes!
If you are unable to install updates on your PC, then you can try the following fixes. However, if you are still unable to uninstall updates then this might indicate an issue with your Windows installation in which case resetting your PC might be the best option.
Follow the guides below to get you started.
Method #01: Reset Windows components and try again
If you have been unable to uninstall updates then you can try resetting your windows components. This will help fix corrupted system files in the background that might be preventing you from uninstalling updates on your system. We will be using a modified script from Mircosoft to help reset all components of Windows 11. The script was originally developed for Windows 10 or higher and hence will need some edits to work properly on Windows 11. This script will perform the following tasks on your system when executed;
- Remove older Windows updates folder
- Re-register Windows update files
- Reset your network connection
Follow the steps below to run the script on your system and reset Windows update components on your PC.
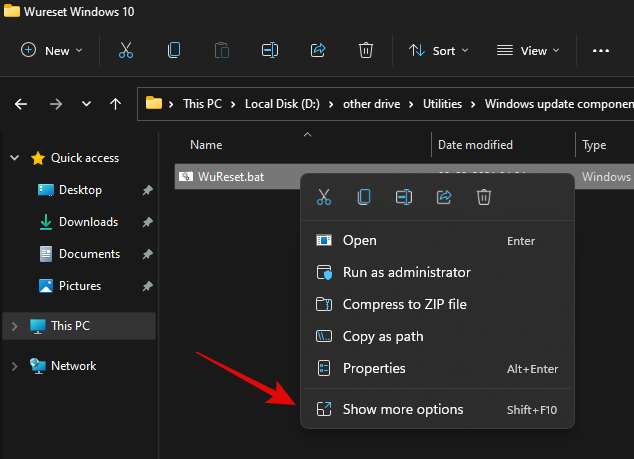
Download the script using the link above to your local storage and extract it to a convenient location. Once extracted right click on the script.
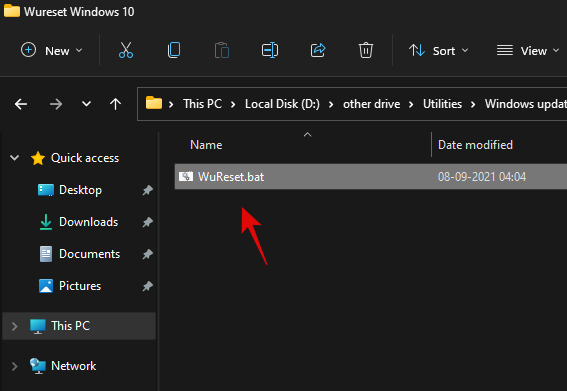
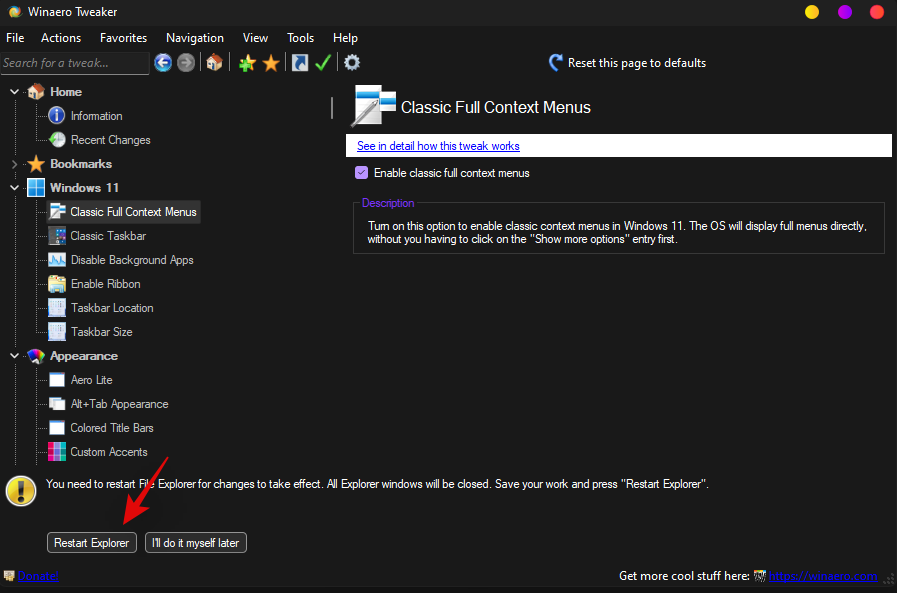
Click on ‘Show more options’.
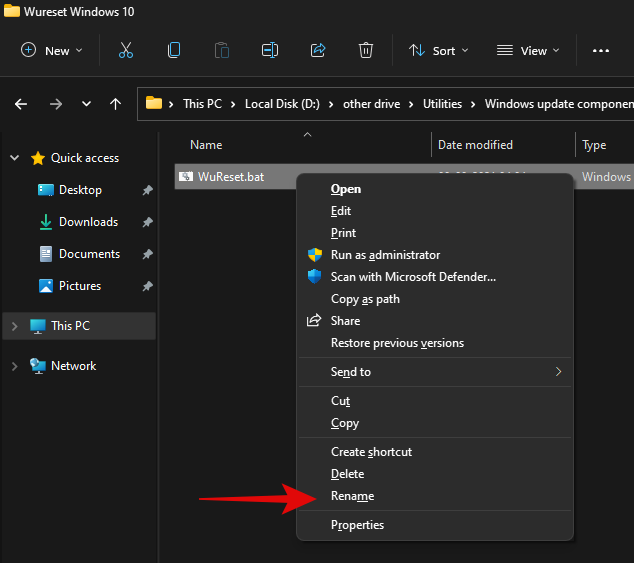
Select ‘Rename’.
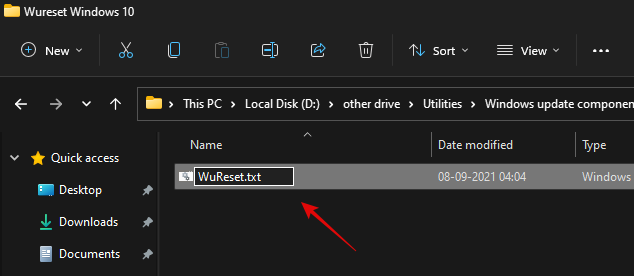
Replace ‘.bat’ with ‘.txt’.
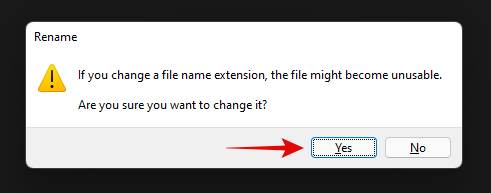
Click on ‘Yes’ to confirm your choice.
Now double click and open the file and it should open in your notepad. Once opened, scroll to the ‘:Reset’ section for resetting network commands and add the following line after the first delete command as shown below.
del /s /q /f "%SYSTEMROOT%\Logs\WindowsUpdate\*"
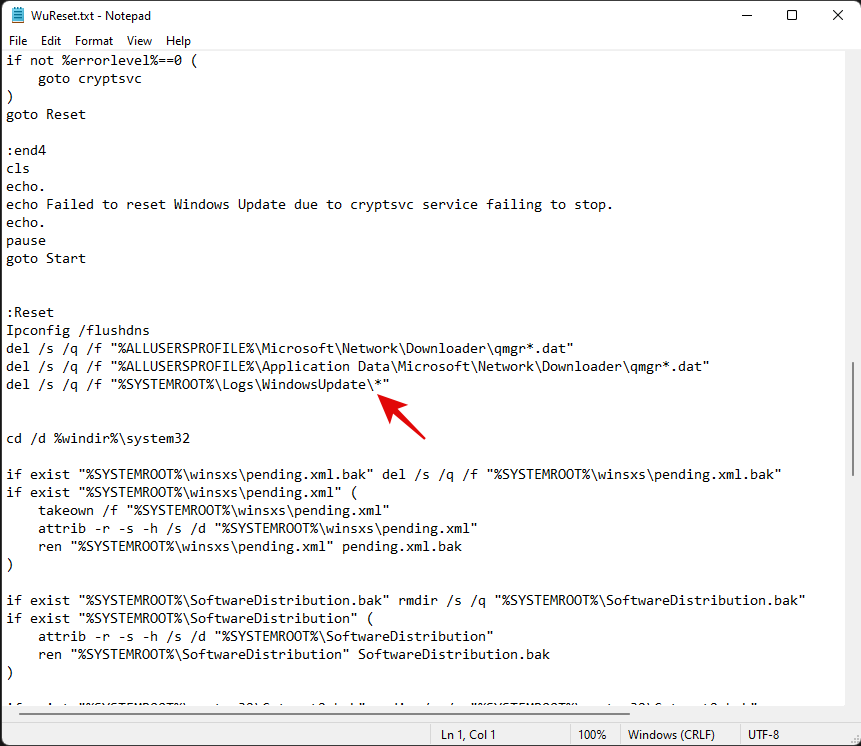
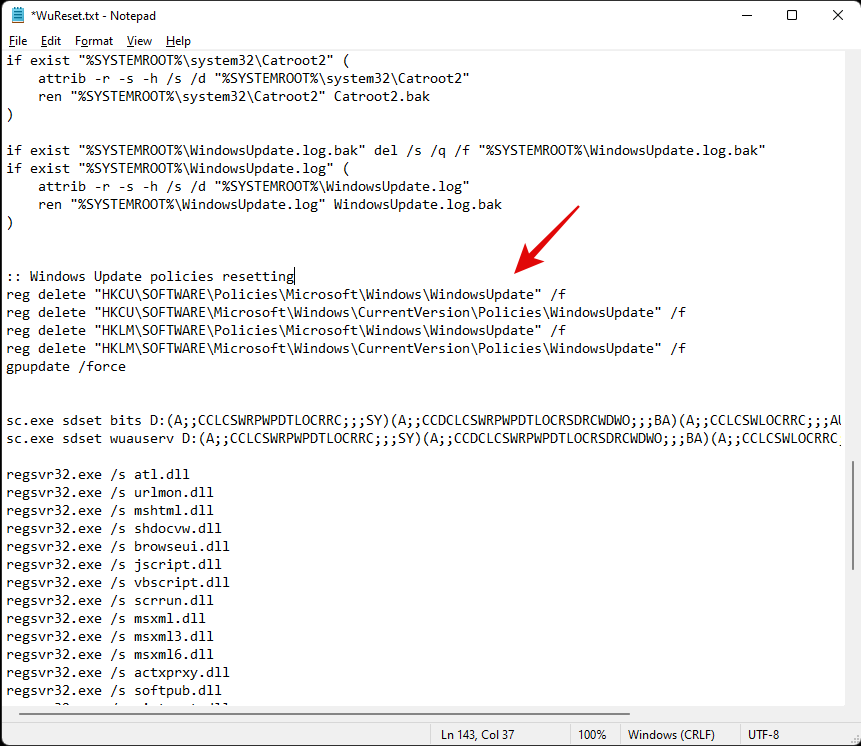
Once added, hit Ctrl + S on your keyboard. Ensure that there are no formatting changes or spaces before or after the line. The file will now be saved on your system along with its recent changes. We will now add some code to Reset Windows’s update policies on your system. Copy the lines below and paste them after your system commands. Ensure that two empty lines are available at either end of the code as shown below.
:: Windows Update policies resetting
reg delete "HKCU\SOFTWARE\Policies\Microsoft\Windows\WindowsUpdate" /f
reg delete "HKCU\SOFTWARE\Microsoft\Windows\CurrentVersion\Policies\WindowsUpdate" /f
reg delete "HKLM\SOFTWARE\Policies\Microsoft\Windows\WindowsUpdate" /f
reg delete "HKLM\SOFTWARE\Microsoft\Windows\CurrentVersion\Policies\WindowsUpdate" /f
gpupdate /force
Lastly, let’s add some lines to ensure that the startup type for this service is set to ‘Automatic’. Copy the code below and add the lines after your winsock reset commands but before your service starting commands as shown below. Copy and paste the code in its respective location.
:: Set the startup type as automatic
sc config wuauserv start= auto
sc config bits start= auto
sc config DcomLaunch start= auto
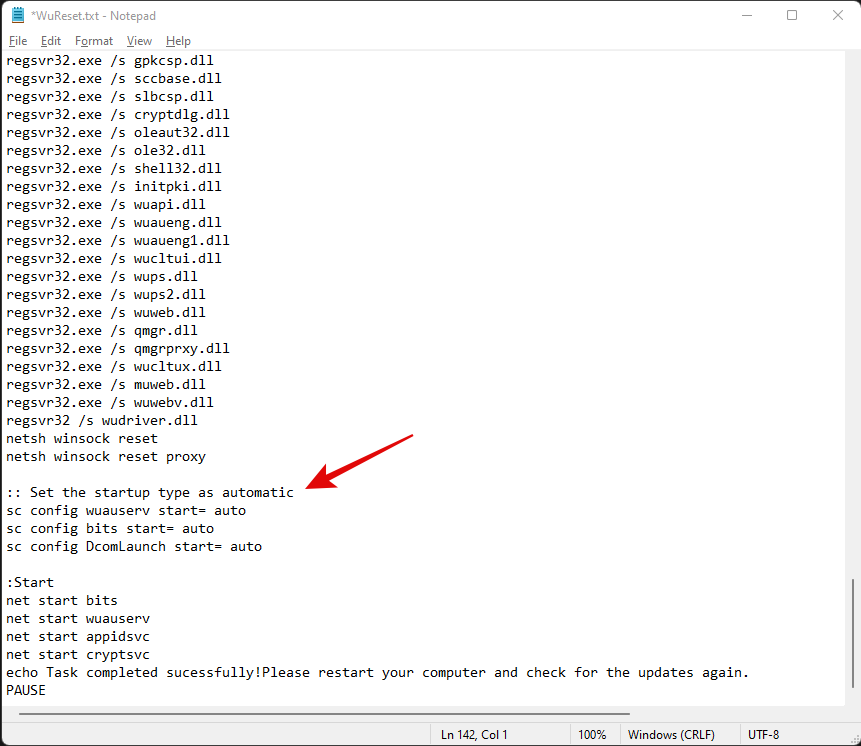
Once you are done, hit Ctrl + S on your keyboard to save your changes. Close the file and right-click on it again and select ‘Show more options’.
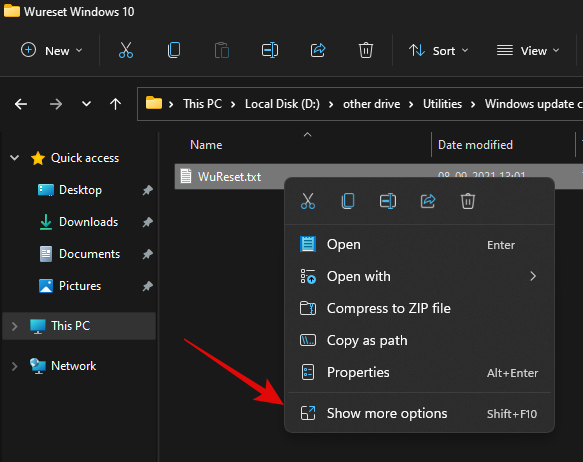
Click on ‘Rename’.
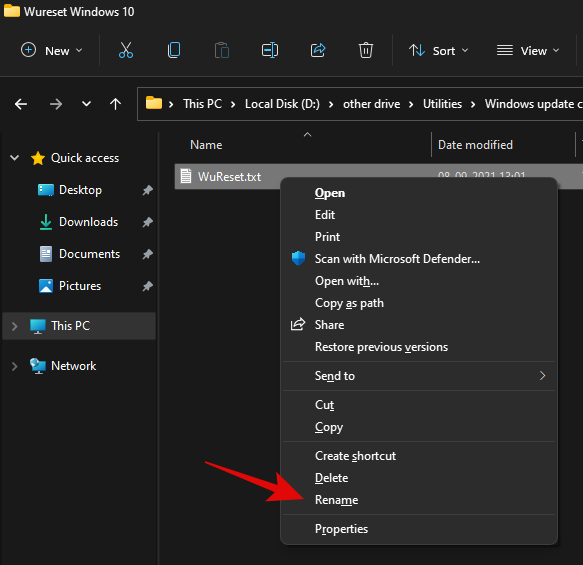
Replace ‘.txt’ with ‘.bat’.
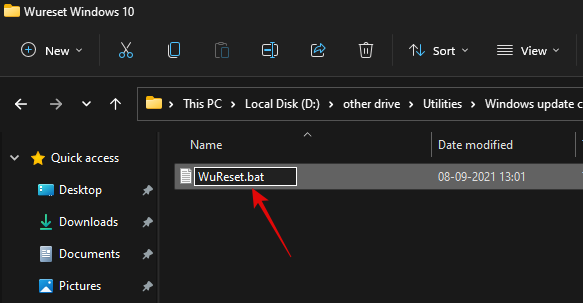
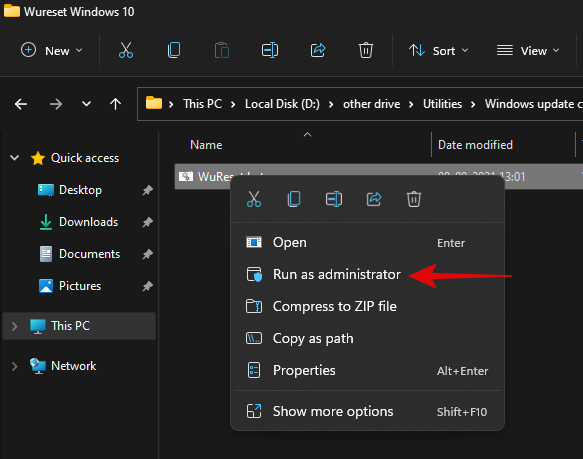
Once done, right-click on the file and select ‘Run as administrator’.
The batch script will now run on your PC and do its thing. Once the process completes, you will be asked to restart your PC. We highly recommend that you restart your PC at the earliest after running this script. Upon a restart, your Windows update should be reset and a fresh start should help you easily install pending Windows updates on your PC.
Method #02: Use DISM to uninstall the concerned packages
If you are still unable to uninstall specific Windows Update packages then simply use the DISM method to remove the concerned updates from your PC. This method force removes any available Windows updates from your PC without any issue. You will get a list of all the available updates in a table format which should make it much easier for you to find the culprit on your PC. Simply follow the guide at the top to get you started.
Method #03: Run SFC & DISM commands
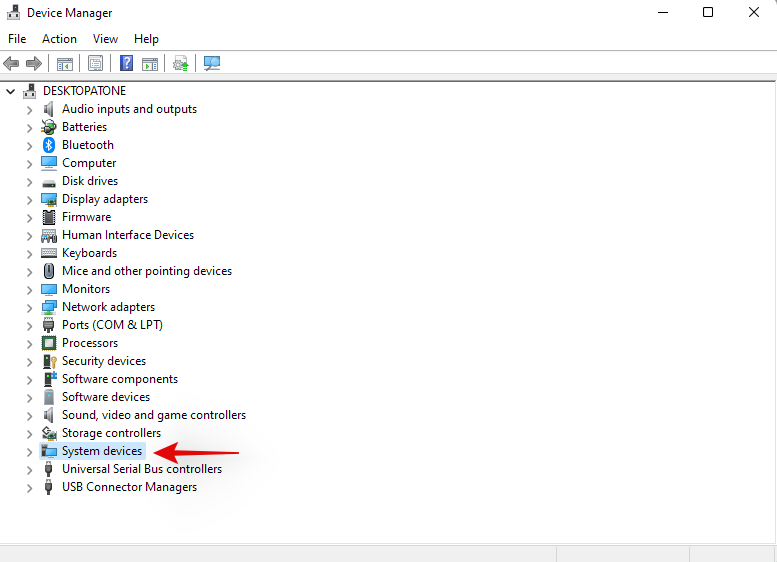
At this point, if Windows still fails to update your system then you are facing a more serious issue than we anticipated earlier. This could indicate system-level corruption of files or missing system files from your system. In such cases, you can run SFC and DISM checks to fix corrupted files as well as restore missing system files. Follow the guide below to get you started.
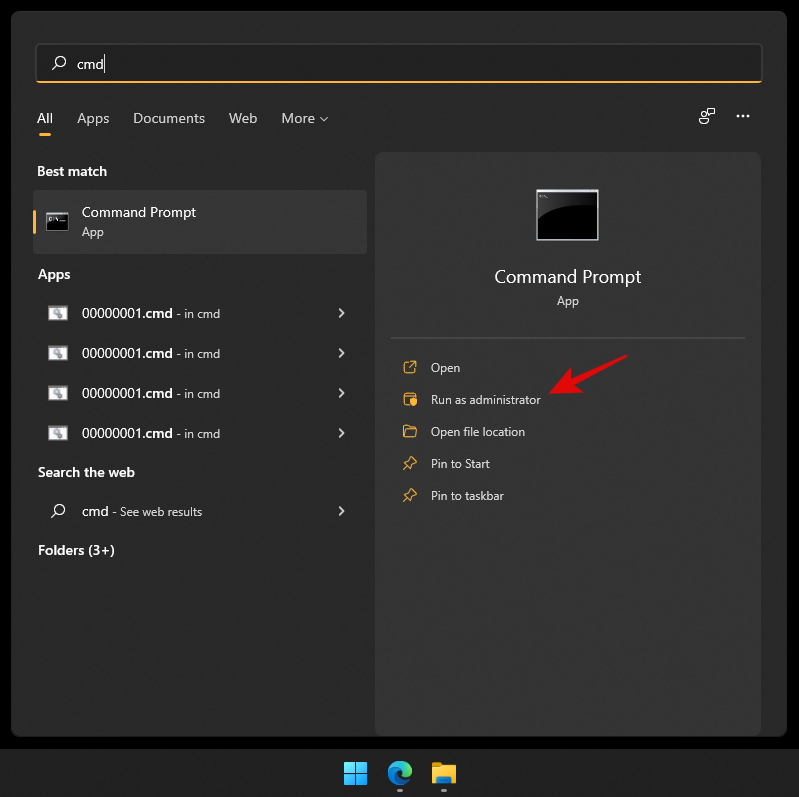
Press Windows + S on your keyboard and search for CMD. Click on ‘Run as administrator’ once it shows up in your search results.
Type in the following command and press Enter on your PC.
sfc /scannow
Once the SFC scan completes, type in the following command and execute it.
DISM /Online /Cleanup-Image /RestoreHealth
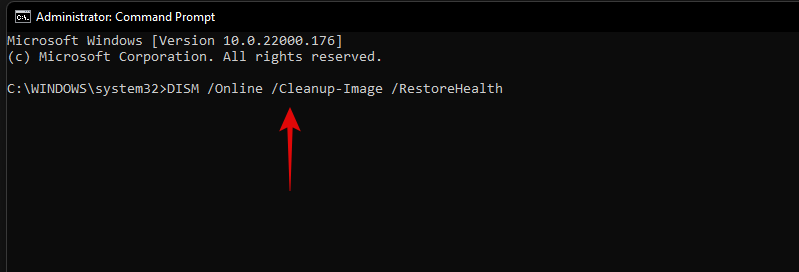
We recommend you restart your PC once the process completes.
Method #04: Last resort: Reset your PC
If nothing seems to be working for you then it might be time for a fresh installation of Windows 11 on your system. You can try getting in touch with your support team as well but if nothing works then a reset of your PC is the best option. In most cases, a reset while keeping your local files should help get Windows update working on your system.
Windows 11 connects to the update servers and updates your security definitions and drivers during OOBE. Windows will fix all update issues and reinstall necessary services on your system to get Windows update back up and running on your system during this process.
► You can use this dedicated guide from us to reset your Windows 11 PC.
We hope you were able to easily uninstall updates from your Windows 11 PC using the guide above. If you face any issues, feel free to drop a comment below.
Related:
![Como desinstalar o McAfee no Windows 11 [5 maneiras] Como desinstalar o McAfee no Windows 11 [5 maneiras]](https://cloudo3.com/resources8/images31/image-4917-0105182719945.png)


