การอัปเดต Windows เป็นสิ่งที่สร้างความรำคาญให้กับผู้ใช้จำนวนมากมาโดยตลอดนับตั้งแต่ Windows XP โชคดีที่การส่งมอบการอัปเดต Windows ได้รับการปรับปรุงอย่างมากในช่วงไม่กี่ปีที่ผ่านมา และการอัปเดตฟีเจอร์น้อยมากมักจะทำให้เกิดปัญหาใหญ่ในปัจจุบัน
คุณสามารถกำหนดค่า Windows ให้ดาวน์โหลดและอัปเดตในพื้นหลังโดยอัตโนมัติและแม้กระทั่งให้รีสตาร์ทในช่วงเวลาที่ไม่ได้ใช้งานของคุณ ทั้งหมดนี้ยอดเยี่ยม แต่ถ้ามีการติดตั้งการอัปเดตที่คุณไม่ต้องการล่ะ หรือจะเกิดอะไรขึ้นถ้าคุณได้รับการอัปเดตที่ทำให้ประสิทธิภาพของเครื่องลดลง ในกรณีนี้ คุณสามารถถอนการติดตั้งการอัปเดต Windows ใน Windows 11 ได้ แต่นี่คือสิ่งที่คุณควรจำไว้ก่อนที่จะถอนการติดตั้งการอัปเดตจากพีซี Windows 11 ของคุณ
ที่เกี่ยวข้อง: วิธีปิดใช้งานการอัปเดตใน Windows 11
สารบัญ
เหตุใดจึงถอนการติดตั้งการอัปเดต Windows
อาจมีสาเหตุหลายประการที่คุณต้องการถอนการติดตั้งการอัปเดต Windows ต่อไปนี้เป็นสาเหตุที่พบบ่อยที่สุด หากคุณกำลังแก้ไขปัญหาข้อผิดพลาดหลังจากอัปเดต Windows ล่าสุด คุณสามารถดูรายการนี้ได้เช่นกัน
ในกรณีที่คุณประสบปัญหาดังกล่าวในระบบของคุณ คุณสามารถลองถอนการติดตั้งการอัปเดต Windows ล่าสุดเพื่อลองแก้ไขปัญหาของคุณ
- ประสิทธิภาพของระบบโดยรวมลดลง
- การอัปเดตไดรเวอร์ผิดพลาด
- ฟังก์ชั่นที่ใช้งานไม่ได้ของคุณสมบัติของ Windows
- ทรัพยากรที่มีการจัดการผิดพลาดในพื้นหลัง
- การใช้งาน CPU หรือดิสก์สูง
- การอัปเดตไดรเวอร์ที่ไม่ต้องการซึ่งคุณพยายามหลีกเลี่ยง
- การทำงานผิดปกติของ Windows Security หรือ UAC
- การตั้งค่าภูมิภาคไม่ถูกต้องที่ไม่สามารถเปลี่ยนแปลงได้
- ไม่มีการตั้งค่าหรือตัวเลือกภายใน Windows 11
และอื่น ๆ. อาจมีปัญหามากมายที่คุณเผชิญเมื่อติดตั้งการอัปเดตใหม่สำหรับ Windows 11 โดยเฉพาะอย่างยิ่งหากคุณสมัครรับข้อมูลจากช่องเบต้าหรือช่องภายใน ในกรณีดังกล่าว คุณสามารถลองและถอนการติดตั้งการอัปเดตที่เกี่ยวข้องโดยใช้คำแนะนำในโพสต์นี้
ที่เกี่ยวข้อง: วิธียกเลิก Windows Insider Update ที่รอดำเนินการ
การถอนการติดตั้งการอัปเดต Windows ปลอดภัยหรือไม่
ได้ ตราบใดที่คุณไม่ได้บังคับลบการอัปเดต Windows ด้วยตนเองหรือใช้ยูทิลิตี้ที่ล้าสมัย คุณควรถอนการติดตั้งการอัปเดต Windows จากระบบของคุณอย่างปลอดภัย อย่างไรก็ตาม คุณควรจำไว้ว่า Microsoft ใช้การอัปเดตของ Windows เพื่อส่งแพตช์ความปลอดภัย โปรแกรมแก้ไขด่วน และอื่นๆ เพื่อช่วยปกป้องระบบของคุณจากภัยคุกคามและช่องโหว่ด้านความปลอดภัยล่าสุด
การลบการอัปเดต Windows จะถอนการติดตั้งแพตช์ดังกล่าวด้วย ซึ่งจะทำให้ระบบของคุณเสี่ยงต่อภัยคุกคามออนไลน์ โดยเฉพาะอย่างยิ่งในกรณีที่คุณต้องการถอนการติดตั้งการอัปเดตความปลอดภัยล่าสุด
ดังนั้น ในขณะที่คุณปลอดภัยที่จะถอนการติดตั้งการอัปเดตใดๆ ขอแนะนำให้คุณยกเลิกการเปลี่ยนแปลงของคุณทันทีที่แก้ไขข้อผิดพลาด หากจุดบกพร่องหรือข้อผิดพลาดของคุณยังคงอยู่หลังจากติดตั้งการอัปเดตใหม่อีกครั้ง คุณสามารถรอจนกว่าการอัปเดตและการแก้ไขที่ตามมาจะออกโดย Microsoft
ที่เกี่ยวข้อง: วิธีลบ Bing ออกจาก Windows 11
วิธีค้นหาการอัปเดตที่คุณต้องการลบ
เราสามารถลบการอัปเดตโดยใช้วิธีการต่างๆ ได้ แต่หากต้องการทราบว่าต้องการลบการอัปเดตใด คุณจะต้องระบุการอัปเดตในพีซีของคุณ การอัปเดตของ Microsoft แต่ละรายการจะได้รับหมายเลข KB ซึ่งช่วยระบุและระบุการอัปเดตบนพีซีสำหรับผู้บริโภครวมถึงเซิร์ฟเวอร์ของ Microsoft เราสามารถใช้หมายเลขนี้เพื่อประโยชน์ของเราและลบการอัปเดตที่เกี่ยวข้องออกจากระบบของคุณโดยใช้คำแนะนำด้านล่าง ต่อไปนี้คือวิธีระบุการอัปเดต Windows ล่าสุดที่ติดตั้งบนพีซีของคุณ
วิธี #01: การใช้การตั้งค่า
กดWindows + iบนแป้นพิมพ์และเลือก 'Windows Update' ทางด้านซ้ายของคุณ
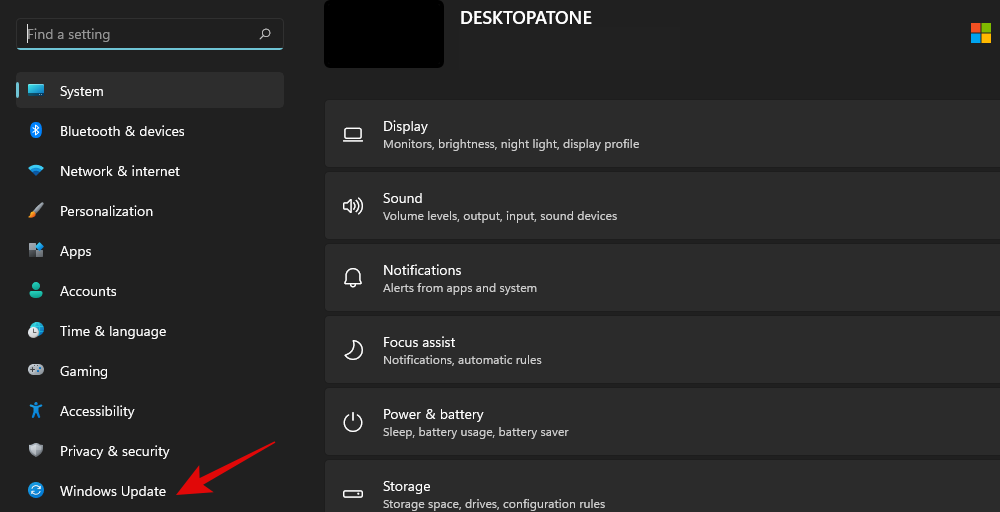
คลิกที่ 'อัปเดตประวัติ' ทันที
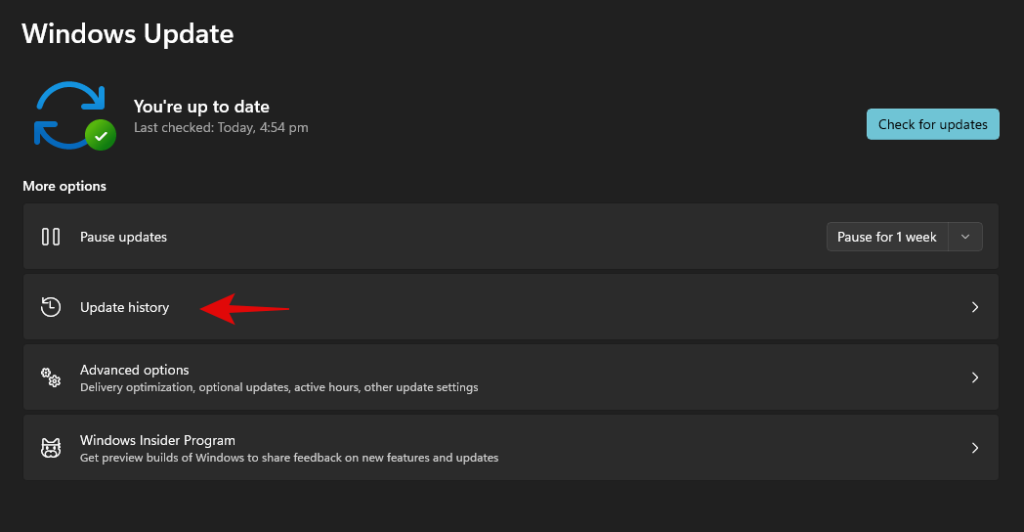
ตอนนี้ คุณจะได้รับรายการอัปเดต Windows ที่เพิ่งติดตั้งล่าสุดในระบบของคุณ
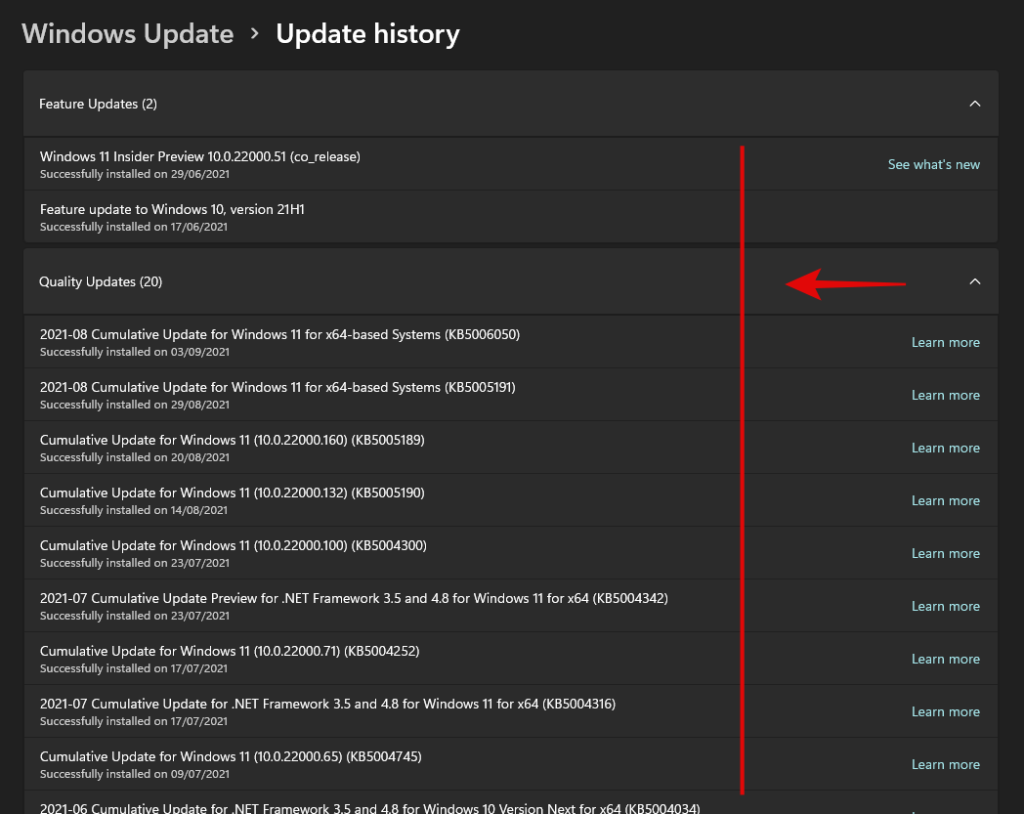
เพียงจดหมายเลข KB ของการอัปเดตที่คุณต้องการลบออกจากพีซีของคุณ
วิธี #02: การใช้ CMD
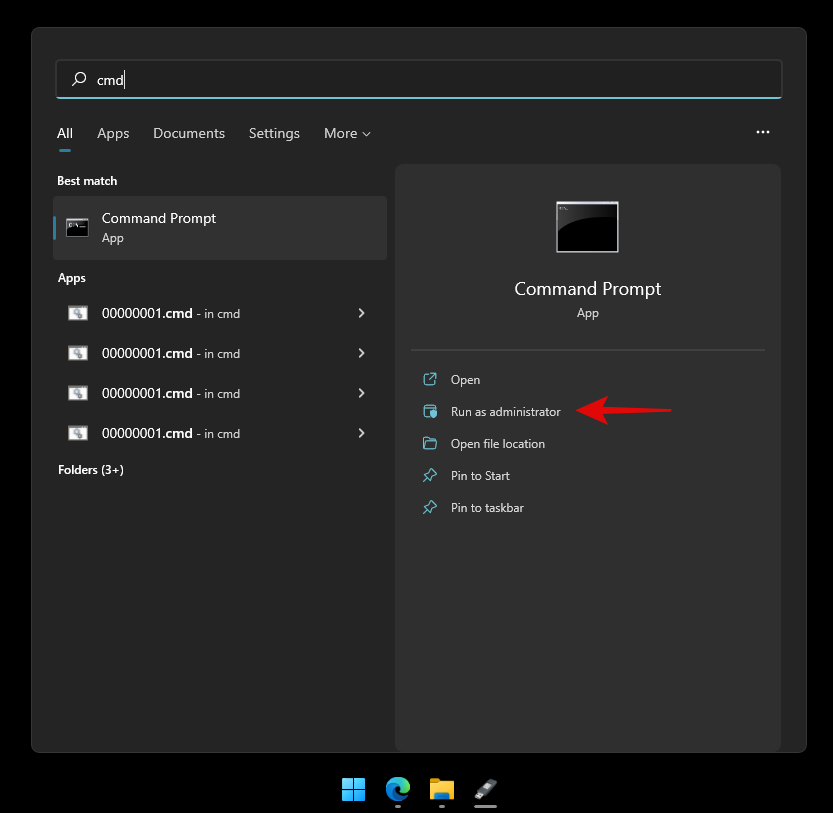
กดWindows + Sบนแป้นพิมพ์และค้นหา CMD คลิกที่ 'เรียกใช้ในฐานะผู้ดูแลระบบ' เมื่อแอปปรากฏในผลการค้นหาของคุณ
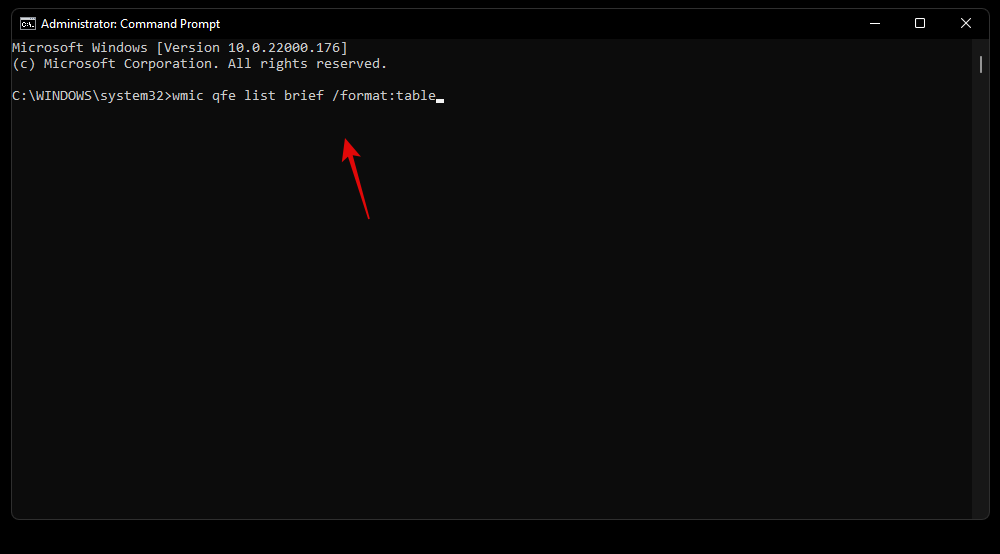
พิมพ์คำสั่งต่อไปนี้แล้วกด Enter บนแป้นพิมพ์ของคุณ
wmic qfe list brief /format:table
ตอนนี้ คุณจะได้รับรายการอัปเดต Windows ล่าสุดทั้งหมดที่ติดตั้งบนพีซีของคุณ คลิกและขยายหมวดหมู่ที่เกี่ยวข้องจากรายการด้านล่าง
- การอัปเดตคุณภาพ: การอัปเดตฟีเจอร์สำหรับ Windows 11 ท���่แนะนำการเปลี่ยนแปลงที่สำคัญในระบบปฏิบัติการ
- การอัปเดตไดรเวอร์: การอัปเดตไดรเวอร์ Generic/OEM สำหรับอุปกรณ์ต่อพ่วงและส่วนประกอบของคุณผ่านการอัปเดต Windows
- การอัปเดตข้อกำหนด: การอัปเดตข้อกำหนดด้านความปลอดภัยเพื่อช่วย Microsoft Defender ระบุและกักกันภัยคุกคามในระบบของคุณ
- การอัปเดตอื่นๆ:การอัปเดตสำหรับผลิตภัณฑ์ คุณลักษณะ และคุณลักษณะ OEM อื่นๆ ของ Microsoft เฉพาะสำหรับอุปกรณ์ของคุณ ฟีเจอร์และชุดประสบการณ์ของ Windows จะได้รับการอัปเดตในหมวดหมู่นี้ด้วย
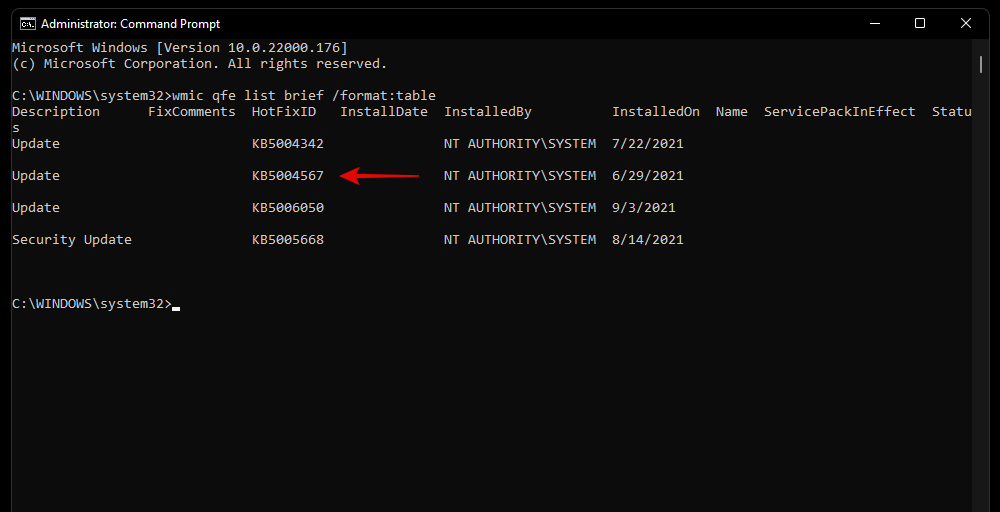
ระบุการอัปเดตที่คุณต้องการลบและจด 'HotFixID' เราจะใช้ ID นี้เพื่อลบการอัปเดตที่เกี่ยวข้องโดยใช้คำแนะนำด้านล่าง
วิธีลบการอัปเดต Windows ออกจากพีซีของคุณ
คุณสามารถลบการอัปเดต Windows ออกจากพีซีของคุณโดยใช้วิธีใดวิธีหนึ่งด้านล่าง หากคุณถูกล็อกไม่ให้ใช้งาน Windows หรือไม่สามารถบู๊ตไปยังเดสก์ท็อปได้ เราขอแนะนำให้คุณใช้วิธี Windows RE หรือวิธี CMD หากคุณสามารถเข้าถึงเดสก์ท็อปของคุณได้ คุณสามารถใช้แอปการตั้งค่าเพื่อลบการอัปเดตออกจากระบบของคุณได้อย่างง่ายดาย ใช้คำแนะนำด้านล่างเพื่อเริ่มต้นโดยขึ้นอยู่กับค่ากำหนดของคุณ
วิธี #01: การใช้การตั้งค่า
กดWindows + iบนแป้นพิมพ์ของคุณและคลิกที่ 'Windows Update' ในแถบด้านข้างทางซ้าย

คลิกที่ 'อัปเดตประวัติ'

เลื่อนไปที่ด้านล่างแล้วคลิก "ถอนการติดตั้งการอัปเดต"
ตอนนี้คุณจะถูกเปลี่ยนเส้นทางไปยังแผงควบคุม ซึ่งคุณจะพบรายการอัปเดตล่าสุดที่สามารถลบออกจากระบบของคุณได้

เลือกการอัปเดตที่คุณต้องการลบและคลิก "ถอนการติดตั้ง" ที่ด้านบน

ทำตามคำแนะนำบนหน้าจอเพื่อถอนการติดตั้งการอัปเดตที่เกี่ยวข้องจากพีซีของคุณ
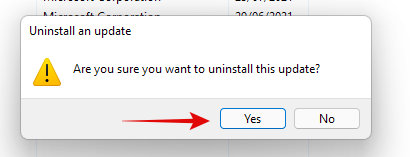
ตอนนี้คุณสามารถรีสตาร์ทพีซีของคุณและปัญหาใด ๆ ที่คุณกำลังเผชิญเนื่องจากการอัพเดทควรได้รับการแก้ไข
วิธี #02: การใช้ตัวแก้ไขปัญหาการอัปเดต Windows
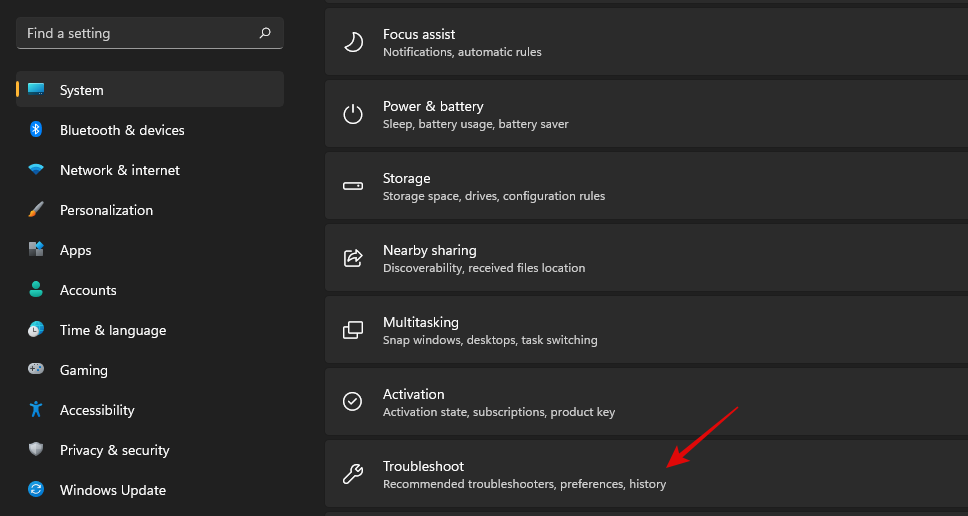
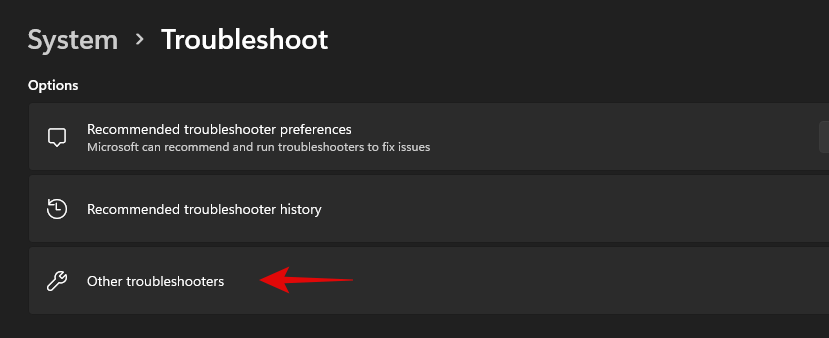
กดWindows + iบนแป้นพิมพ์ของคุณและคลิกที่ 'แก้ไขปัญหา'
คลิกที่ 'ตัวแก้ไขปัญหาอื่นๆ'
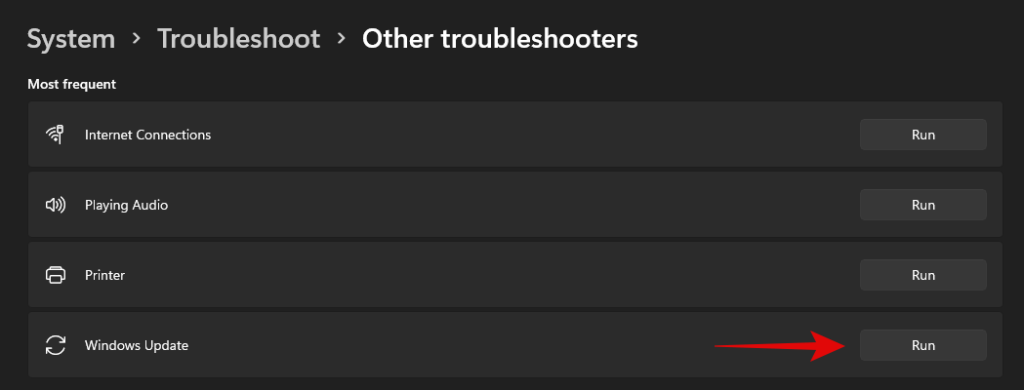
คลิกที่ 'เรียกใช้' ข้าง Windows Update
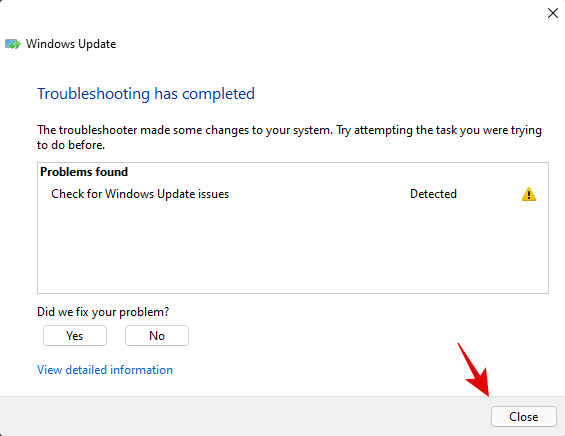
ตัวแก้ไขปัญหาของ Windows จะค้นหาปัญหาที่เกิดและเกิดจาก Windows Updates บนพีซีของคุณ หากพบสิ่งใด เครื่องมือแก้ปัญหาจะแก้ไขปัญหาโดยอัตโนมัติ หากพบว่าการอัปเดตล่าสุดเป็นตัวการ ตัวแก้ไขปัญหาจะให้ตัวเลือกแก่คุณในการเลือกและถอนการติดตั้ง Windows Update ที่จำเป็น ทำตามคำแนะนำบนหน้าจอเพื่อลบการอัปเดตอย่างสมบูรณ์
เมื่อเสร็จแล้วให้คลิกที่ 'ปิด'
รีสตาร์ทพีซีของคุณเพื่อวัดผลที่ดีและปัญหาควรได้รับการแก้ไข ณ จุดนี้ ถ้าไม่ คุณสามารถใช้วิธี PowerShell ด้านล่างเพื่อถอนการติดตั้ง Windows Update ที่ต้องการจากระบบของคุณด้วยตนเอง
วิธี #03: การใช้ PowerShell หรือ CMD
กดWindows + Sบนแป้นพิมพ์และค้นหา PowerShell คลิกที่ 'เรียกใช้ในฐานะผู้ดูแลระบบ' เมื่อแอปปรากฏในผลการค้นหาของคุณ
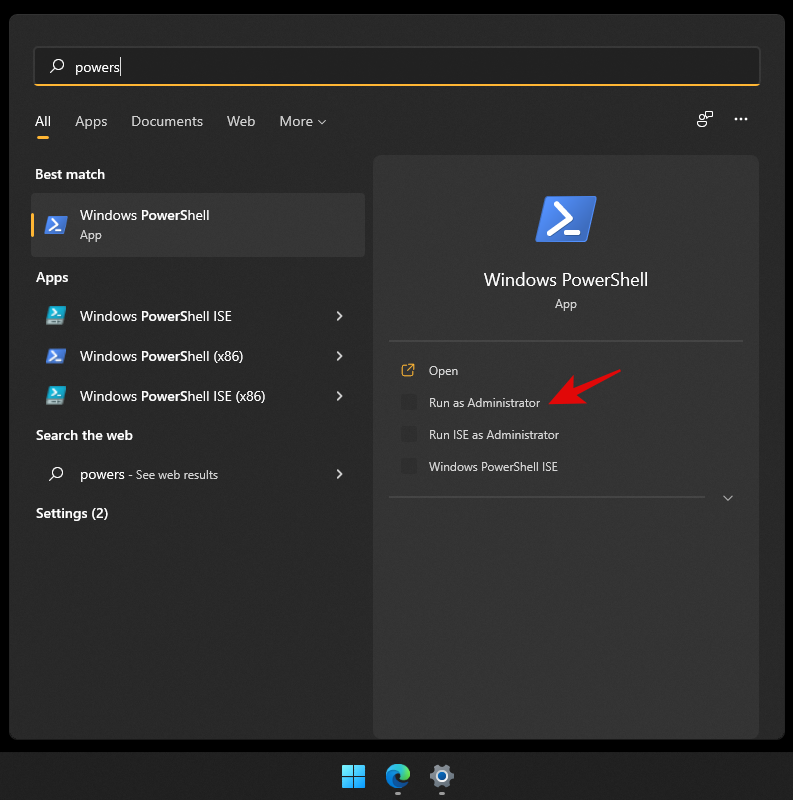
พิมพ์คำสั่งต่อไปนี้แล้วกด Enter บนแป้นพิมพ์เพื่อดำเนินการ
wmic qfe list brief /format:table

ตอนนี้ คุณจะได้รับรายการ Windows Updates ที่ติดตั้งล่าสุดทั้งหมดบนระบบของคุณในรูปแบบตาราง จดหมายเลข KB สำหรับ Windows Update ที่เลือก
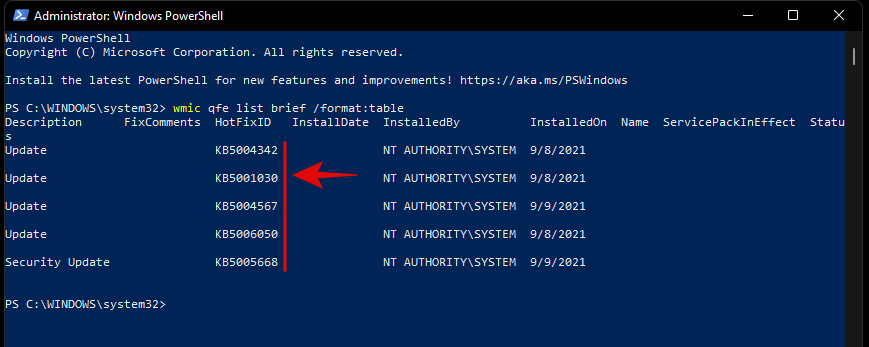
หมายเหตุ:คุณต้องใช้ตัวเลขเท่านั้น ไม่ใช่ตัวอักษรที่อยู่ข้างหน้า
เมื่อเสร็จแล้วให้พิมพ์คำสั่งด้านล่างและดำเนินการ แทนที่ 'NUMBER' ด้วยหมายเลข KB ที่คุณจดบันทึกไว้ก่อนหน้านี้
wusa /uninstall /kb:NUMBER
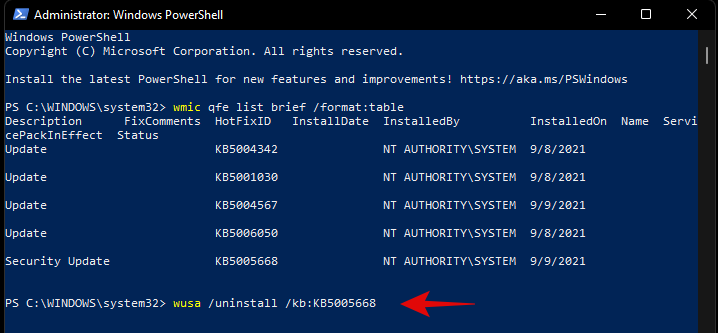
เมื่อได้รับแจ้ง ให้ยืนยันการเลือกของคุณ
หากได้รับแจ้งให้รีสตาร์ท เราขอแนะนำให้คุณรีสตาร์ทระบบโดยเร็วที่สุดในขณะที่บันทึกงานของคุณในเบื้องหลัง
อย่างไรก็ตาม หากคุณไม่ต้องการได้รับการยืนยันก่อนถอนการติดตั้งและรีสตาร์ท คุณสามารถใช้คำสั่งด้านล่างได้
wusa /uninstall /kb:NUMBER /quiet
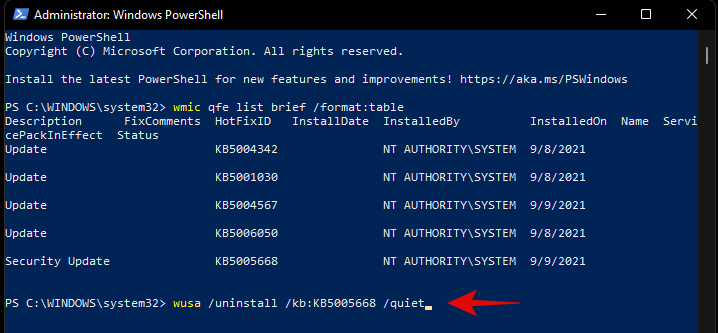
แม้ว่าคำสั่งด้านบนจะไม่แสดงข้อความยืนยัน แต่จะรอให้แอปของคุณปิดตามปกติในเบื้องหลัง หากคุณต้องการบังคับปิดแอปและรีสตาร์ทระบบทันที คุณสามารถใช้คำสั่งด้านล่าง
wusa /uninstall /kb:NUMBER /quiet /forcerestart
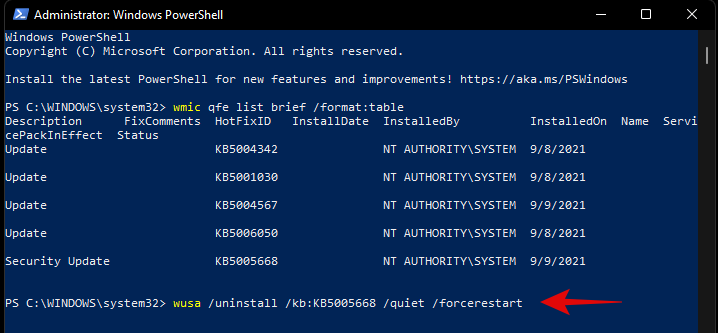
ต่อจากนั้น หากคุณต้องการเพียงยืนยันการรีสตาร์ท คุณสามารถใช้คำสั่งด้านล่าง
wusa /uninstall /kb:NUMBER /quiet /promptrestart
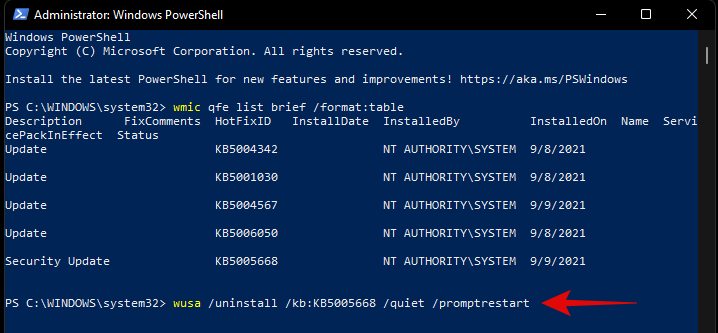
และนั่นแหล่ะ! ตอนนี้ควรถอนการติดตั้ง Windows Update ที่มีปัญหาจากพีซีของคุณ
วิธี #04: จาก Windows RE
Windows Recovery Environment ยังอนุญาตให้คุณถอนการติดตั้งการอัปเดตที่ขัดแย้งกัน ใช้คำแนะนำด้านล่างเพื่อเริ่มต้น หากคุณกำลังเผชิญกับ BSOD และอยู่ใน Recovery Environment แล้ว คุณสามารถข้ามสองสามขั้นตอนแรกของคู่มือนี้
กดWindows + iบนแป้นพิมพ์และเลือก Windows Update จากด้านซ้ายของคุณ
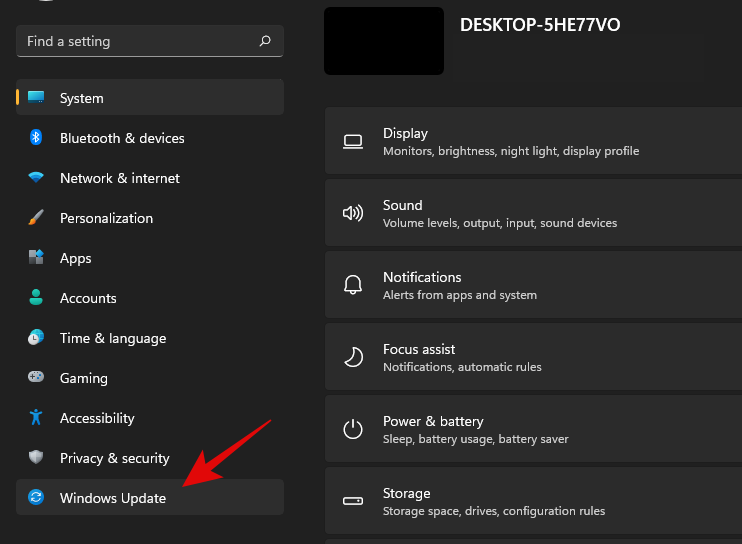
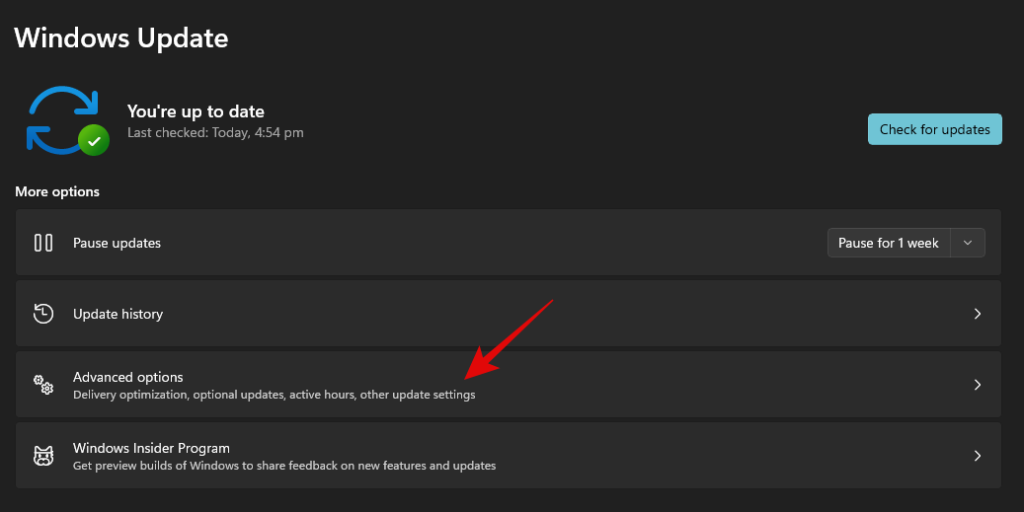
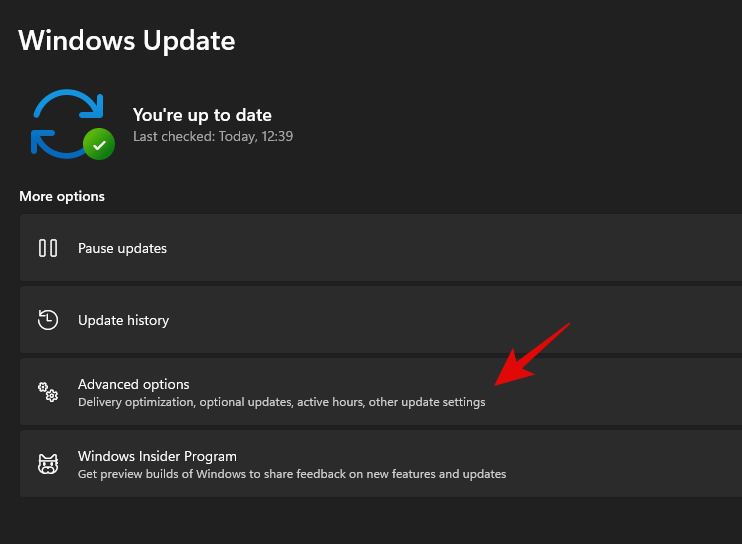
คลิกที่ 'ตัวเลือกขั้นสูง' ทันที
เลือก 'การกู้คืน'
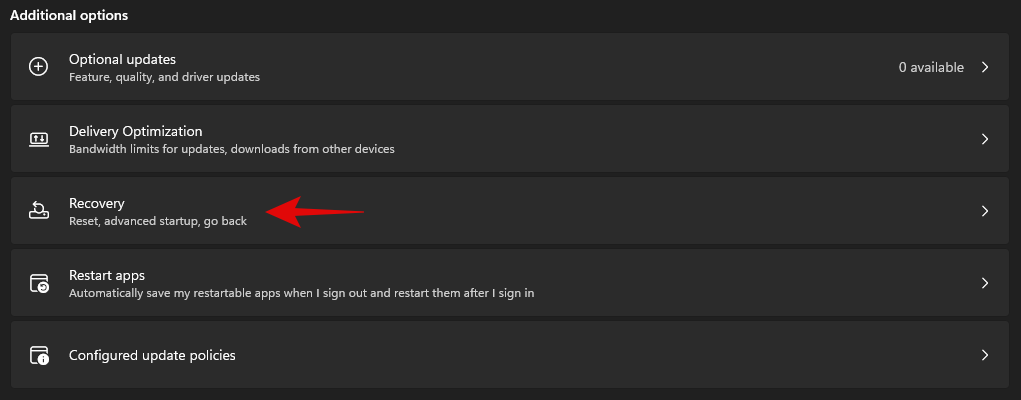
คลิกที่ 'รีสตาร์ททันที' ข้าง Advanced Startup

ตอนนี้คุณจะบูตเข้าสู่สภาพแวดล้อมการกู้คืน คลิกที่ 'แก้ไขปัญหา'
ตอนนี้คลิกที่ 'ตัวเลือกขั้นสูง'
เลือก 'ถอนการติดตั้งการอัปเดต'
คลิกและเลือกประเภทของการอัปเดตที่คุณต้องการติดตั้งจากตัวเลือกบนหน้าจอของคุณ
- ถอนการติดตั้งการอัปเดตคุณภาพล่าสุด
- ถอนการติดตั้งการอัปเดตฟีเจอร์ล่าสุด
หมายเหตุ:ในกรณีที่คุณสับสน การอัปเดตคุณลักษณะหมายถึงการอัปเดตที่สำคัญสำหรับระบบ Windows ของคุณซึ่งรวมถึงคุณลักษณะใหม่ การผสานการทำงานที่อัปเดต และ UI แบบใหม่ในบางครั้ง ในทางกลับกัน การอัปเดตคุณภาพจะรวมทุกอย่างรวมถึงการอัปเดตความปลอดภัย การอัปเดตไดรเวอร์ การอัปเดตข่าวกรอง การอัปเดต Telemetry และอีกมากมาย
คลิกที่บัญชีผู้ดูแลระบบของคุณและเข้าสู่ระบบด้วยรหัสผ่านของคุณ
คลิกที่ 'ถอนการติดตั้งคุณภาพ/คุณสมบัติ' เพื่อยืนยันการเลือกของคุณ
คลิกที่ 'เสร็จสิ้น' เมื่อกระบวนการเสร็จสิ้น
รีสตาร์ทพีซีและบูตเข้าสู่ Windows ตามปกติ คุณไม่ควรประสบปัญหาใดๆ อีกที่เกิดจากการอัปเดต Windows ที่มีปัญหา
วิธี #05: การใช้ DISM
เครื่องมือ DISM หรือ Deployment Image Servicing and Management เป็นเครื่องมือการดูแลระบบภายใน Windows ที่ช่วยซ่อมแซมอิมเมจ Windows ของคุณและแม้แต่เมานต์อิมเมจหากจำเป็น DISM รองรับรูปแบบรูปภาพ เช่น .wim, .vhd และอื่นๆ
เครื่องมือนี้สามารถช่วยคุณแก้ไขปัญหาเกี่ยวกับการติดตั้ง Windows และแม้กระทั่งลบการอัปเดต Windows ที่มีปัญหา หากคุณต้องการลบการอัปเดต Windows โดยใช้ DISM คุณสามารถทำตามขั้นตอนด้านล่างเพื่อเริ่มต้นใช้งาน
หมายเหตุ:สามารถเข้าถึง DISM ได้ผ่าน CMD ดังนั้น คุณสามารถใช้คู่มือนี้จากสภาพแวดล้อมการกู้คืนหรือสื่อการติดตั้งได้เช่นกัน ทำตามคำแนะนำด้านบนเพื่อให้ CMD ทำงานบนหน้าจอเมื่อล็อกหรือภายใน Windows Recovery Environment
เรียกใช้ CMD และพิมพ์คำสั่งต่อไปนี้ กด Enter บนแป้นพิมพ์ของคุณเมื่อคุณทำเสร็จแล้ว
dism /online /get-packages /format:table
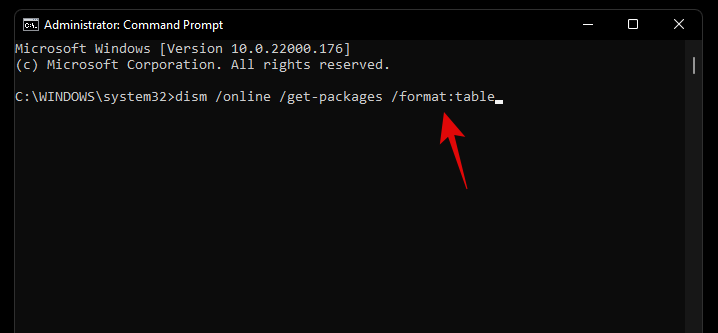
ต่างจากคำสั่ง WUSA ที่เราใช้ก่อนหน้านี้กับ PowerShell และ CMD คุณจะต้องจดชื่อทั้งหมดของแพ็คเกจ Windows Update ที่เราจำเป็นต้องลบออก ขออภัย ซึ่งรวมถึงอักขระพิเศษ ช่องว่าง และทุกอย่างในชื่อ โชคดีที่คุณสามารถคัดลอกชื่อทั้งหมดไปยังคลิปบอร์ดได้ง่ายๆ โดยเลือกด้วยเมาส์แล้วใช้แป้นพิมพ์ลัด เมื่อเสร็จแล้ว ให้พิมพ์คำสั่งด้านล่างและแทนที่ NAME ด้วยชื่อแพ็คเกจที่คุณจดบันทึกไว้ก่อนหน้านี้
หมายเหตุ:ซึ่งรวมถึงคำว่า 'Package_for_' ที่นำหน้าก่อนการอัปเดตบางอย่าง
dism /online /Remove-Package /PackageName:NAME

Windows Update ที่เลือกจะถูกถอนการติดตั้งจากระบบของคุณ ในบางกรณี คุณจะได้รับแจ้งให้รีสตาร์ทระบบ พิมพ์ 'Y' แล้วกด Enter บนแป้นพิมพ์เพื่อรีสตาร์ทระบบทันที
วิธีหยุดรับการอัปเดต
การลบการอัปเดตสามารถช่วยคุณได้ แต่ไม่ได้หมายความว่า Windows Update ที่ใช้งานไม่ได้จะหยุดแสดงในส่วนการอัปเดตของคุณ สิ่งนี้อาจสร้างความรำคาญได้ และหากคุณมีการอัปเดตอัตโนมัติ คุณอาจเสี่ยงที่จะติดตั้งการอัปเดตที่มีปัญหาในเบื้องหลังโดยอัตโนมัติ ในกรณีดังกล่าวทั้งหมด คุณสามารถลองบล็อก Windows Updates ในระบบของคุณโดยใช้คำแนะนำด้านล่าง ทั้งนี้ขึ้นอยู่กับการตั้งค่าของคุณ
วิธี #01: หยุดการอัปเดตไดรเวอร์ OEM ผ่าน Windows update
การอัปเดตไดรเวอร์ OEM จะจัดส่งผ่านการอัปเดต Windows เช่นกันโดยขึ้นอยู่กับความสำคัญ ช่องโหว่ด้านความปลอดภัยและจุดบกพร่องที่เพิ่งพบในส่วนประกอบต่างๆ เช่น CPU, GPU หรือการ์ดไร้สายของคุณ จะถูกแก้ไขโดยทันทีผ่านการอัปเดตดังกล่าว
อย่างไรก็ตาม หากคุณไม่ต้องการติดตั้งการอัปเดตไดรเวอร์ OEM ที่ได้รับจากการอัปเดต Windows คุณสามารถทำตามคำแนะนำด้านล่างเพื่อบล็อกการอัปเดตไดรเวอร์ OEM ของคุณ
กดWindows + Sบนแป้นพิมพ์และค้นหา "เปลี่ยนการตั้งค่าการติดตั้งอุปกรณ์" คลิกและเปิดแอปจากผลการค้นหาของคุณ
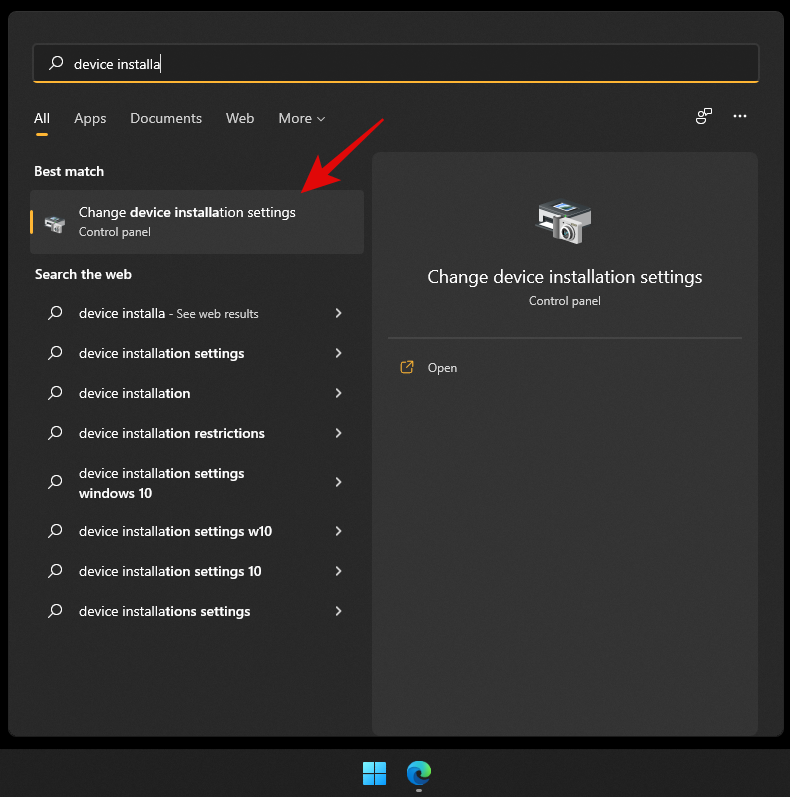
เลือก 'ไม่'
คลิกที่ 'บันทึกการเปลี่ยนแปลง'
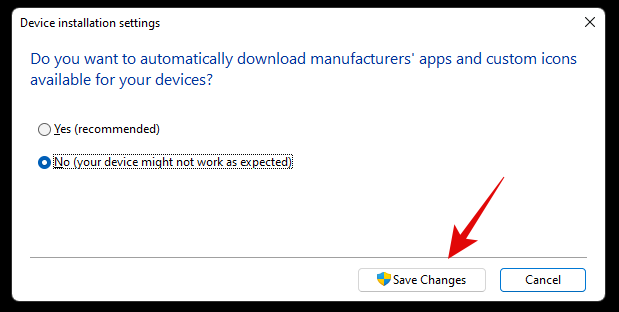
การเปลี่ยนแปลงจะถูกบันทึก และคุณจะไม่ได้รับการอัปเดตไดรเวอร์ OEM ผ่าน Windows Update อีกต่อไป
ที่เกี่ยวข้อง: 6 วิธีในการอัปเดตไดรเวอร์ใน Windows 11
วิธี #02: หยุดการอัปเดตสำหรับผลิตภัณฑ์ของ Microsoft
If you have been receiving constant updates for new Microsoft features and old products that keep messing up your system, then you can use the guide below to disable updates for Microsoft products via Windows Update.
Press Windows + i on your keyboard to open the Settings app and select ‘Windows Update’ from the left sidebar.

Click on ‘Advanced options’.

Now turn off the toggle for ‘Receive updates for other Microsoft products’ at the top.
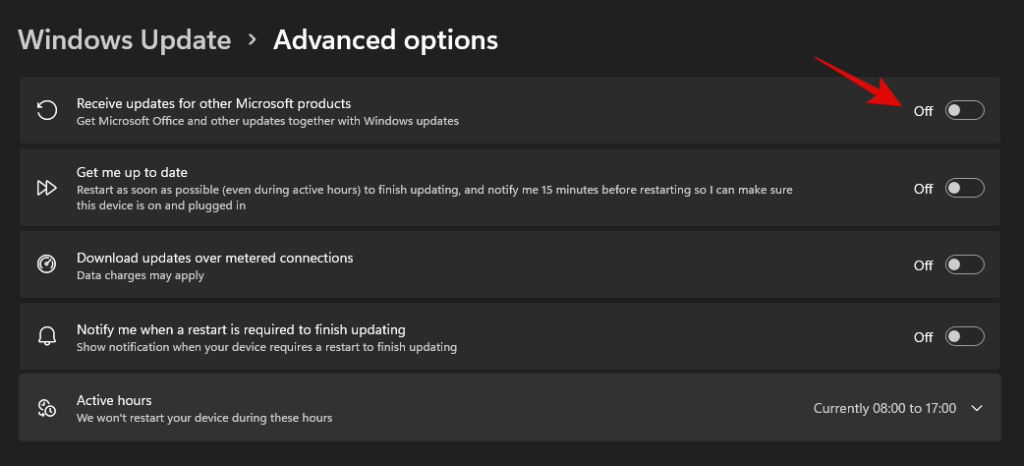
You will no longer receive updates for Microsoft products installed on your system via Windows update.
Method #03: Change active hours for background download and installation for updates
If you’re just looking to dismiss updates so that they don’t interfere with your work hours, then this is the perfect option for you. You can decide when Windows can download and update your PC in the background which will prevent Windows from interfering with your work hours. Follow the guide below to get you started.
Press Windows + i on your keyboard and click on ‘Windows Update’ on your left.

Click on ‘Advanced options’.

Now turn off the toggle for ‘Get me up to date’.
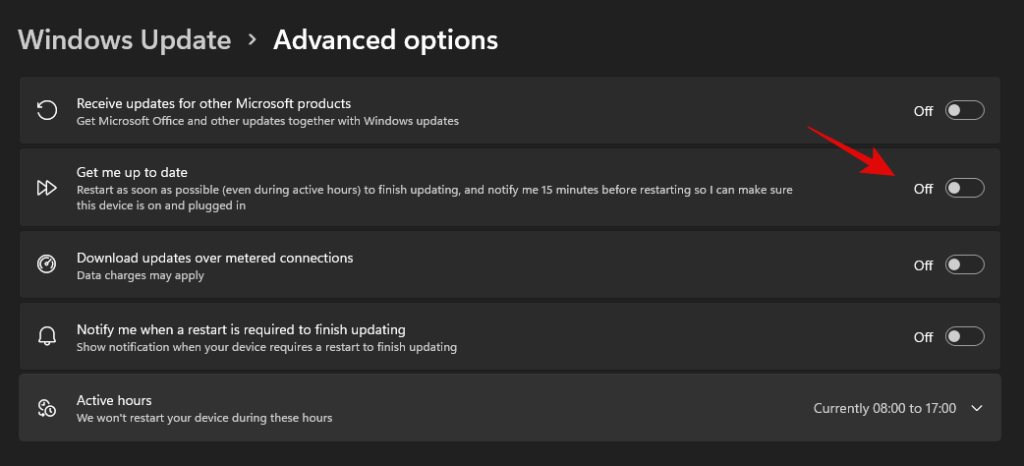
Click on ‘Active hours’.
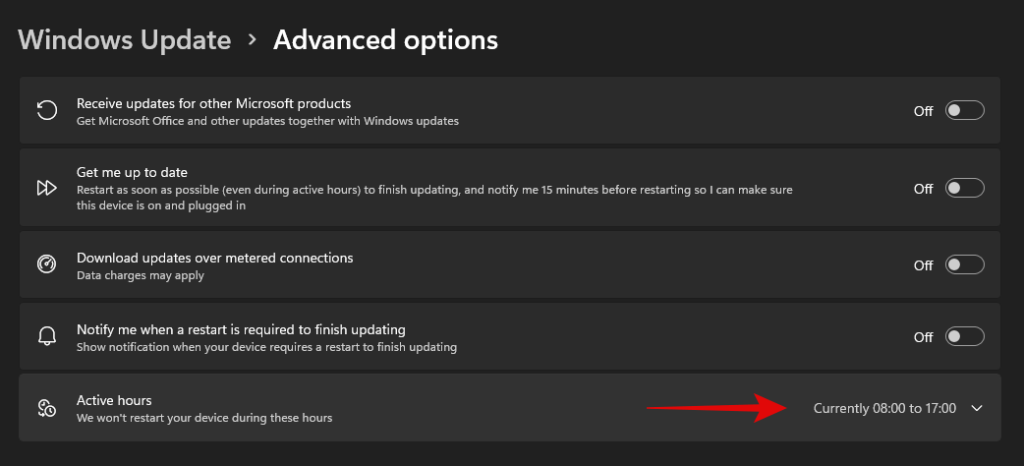
Click on the drop-down menu and select ‘Manually’.
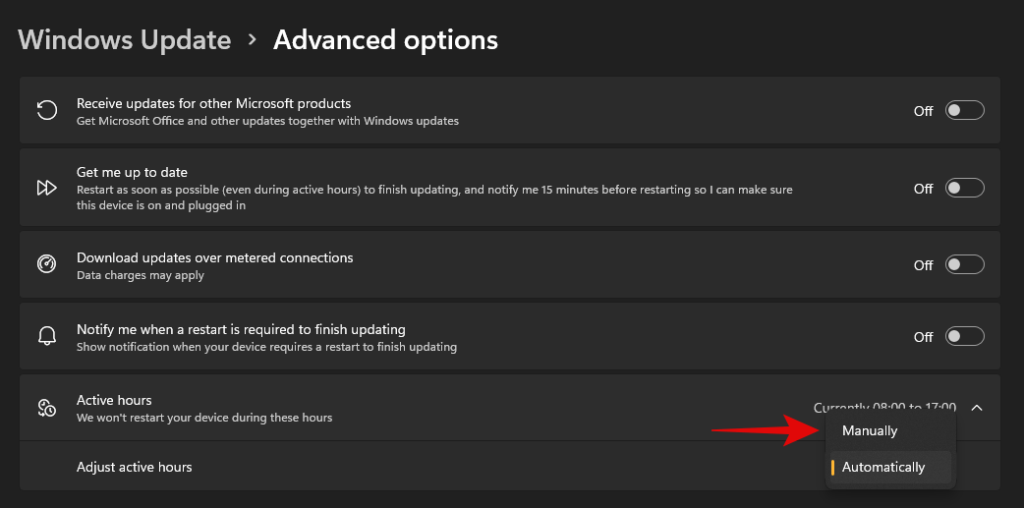
Define your desired start and end time. Windows won’t download updates and restart your PC during these hours.

And that’s it! Active hours should now be enabled for your system.
Method #04: Block Windows updates that you never wish to install
If you are receiving forced Windows updates that you don’t ever wish to install on your system then you can use a dedicated Windows troubleshooter to solve your issue.
This can be helpful in case you are trying to stop an update that disables a certain feature on your system that you don’t want disabled. This could be access to voltage controls, clock speed controls, turbo controls, fan controls, RGB control, and more. Follow the guide below to get you started.
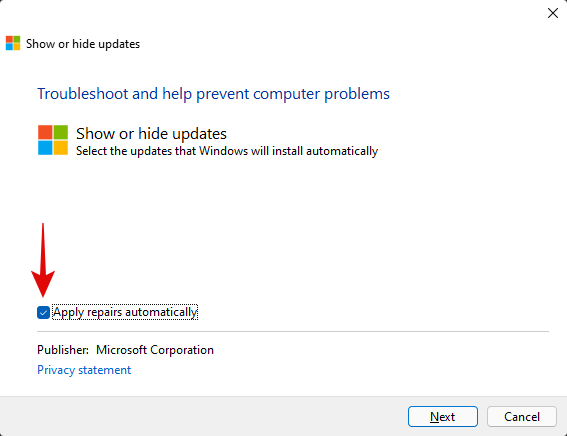
Download the Windows Update Show Hide troubleshooter using the link above and launch it on your PC. Click on ‘Advanced’.

Uncheck the option for ‘Apply repairs automatically’.
Click on ‘Next’.
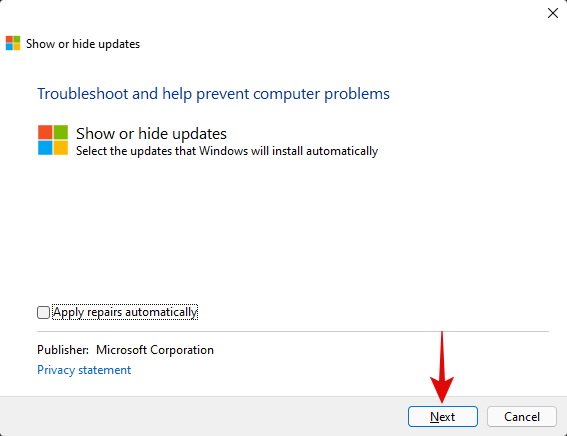
The troubleshooter will now look for pending updates and display them on your screen. Click on ‘Hide updates’.
Check the boxes for all the updates you don’t wish to receive on your PC.

Click on ‘Next’.
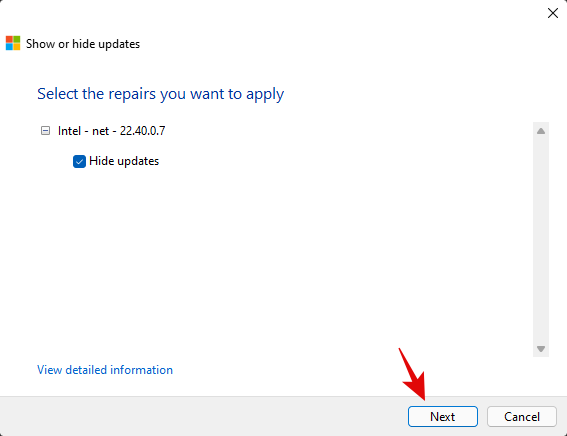
Ensure that ‘Hide updates’ is selected and click on ‘Next’.
The troubleshooter will now hide the necessary Windows updates from your PC which in turn will prevent them from ever being downloaded on your PC. Click on ‘Close’.
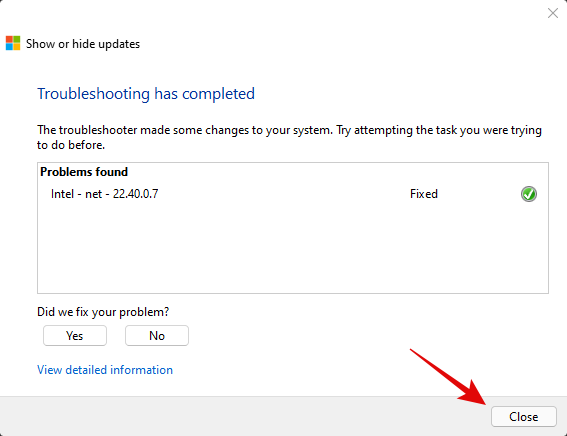
And that’s it! You will now have blocked the necessary updates on Windows 11.
Can you turn off Windows updates?
Yes, you can use certain workarounds and tricks to disable Windows updates on your PC. However, this isn’t recommended as you will lose out on important security patches which would leave you vulnerable to online threats including hackers, malware, adware, and more.
Hence we recommend you keep your PC updated or at least opt to install the latest security updates on your PC. Even if you are losing out on features it’s usually because of a hardware security vulnerability that would compromise your system.
However, if you still wish to disable Windows Updates on your PC, you can use this dedicated guide from us. If you face any issues, feel free to drop a comment.
Can’t uninstall Windows updates? Try these fixes!
If you are unable to install updates on your PC, then you can try the following fixes. However, if you are still unable to uninstall updates then this might indicate an issue with your Windows installation in which case resetting your PC might be the best option.
Follow the guides below to get you started.
Method #01: Reset Windows components and try again
If you have been unable to uninstall updates then you can try resetting your windows components. This will help fix corrupted system files in the background that might be preventing you from uninstalling updates on your system. We will be using a modified script from Mircosoft to help reset all components of Windows 11. The script was originally developed for Windows 10 or higher and hence will need some edits to work properly on Windows 11. This script will perform the following tasks on your system when executed;
- Remove older Windows updates folder
- Re-register Windows update files
- Reset your network connection
Follow the steps below to run the script on your system and reset Windows update components on your PC.
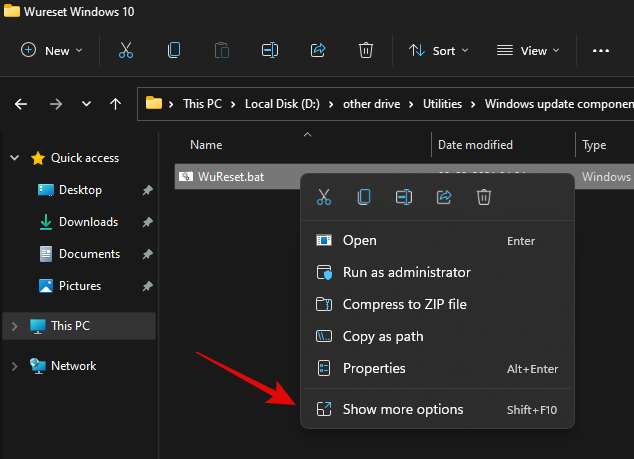
Download the script using the link above to your local storage and extract it to a convenient location. Once extracted right click on the script.
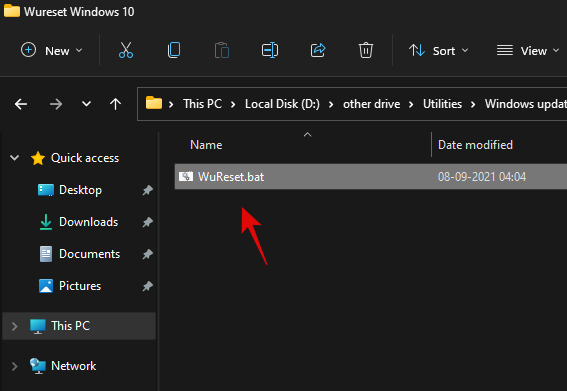
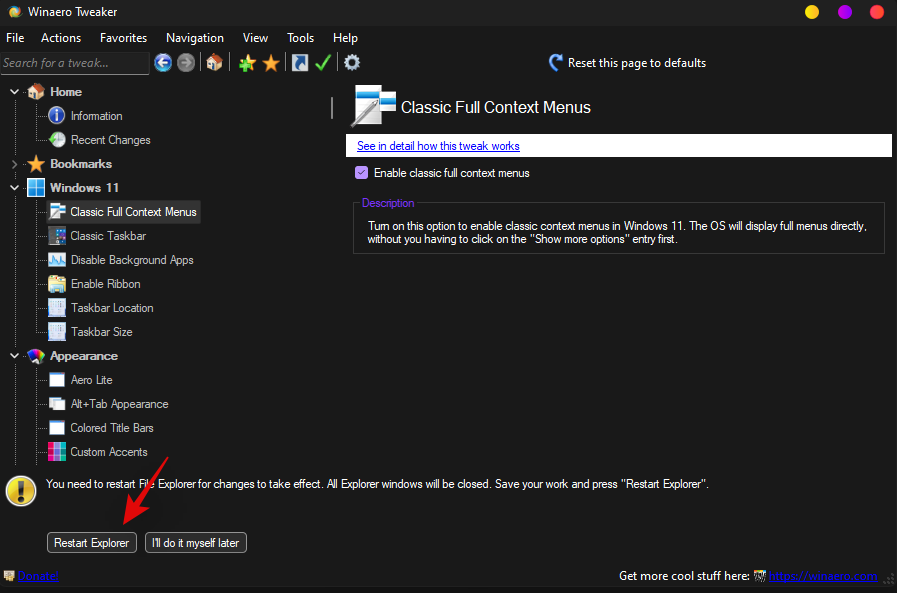
Click on ‘Show more options’.
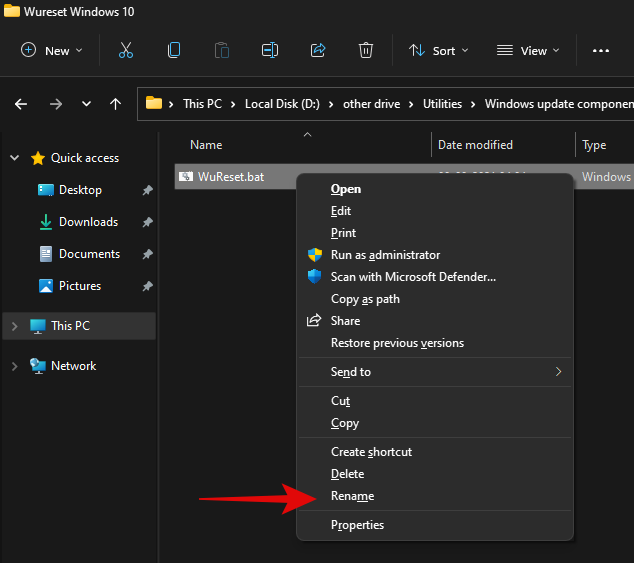
Select ‘Rename’.
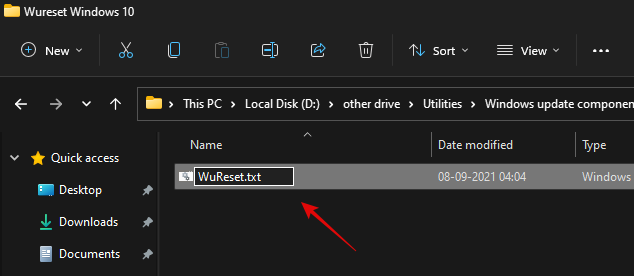
Replace ‘.bat’ with ‘.txt’.
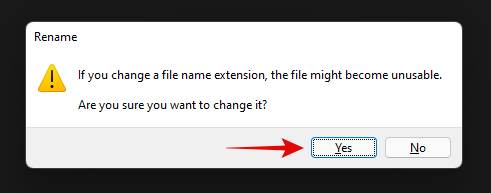
Click on ‘Yes’ to confirm your choice.
Now double click and open the file and it should open in your notepad. Once opened, scroll to the ‘:Reset’ section for resetting network commands and add the following line after the first delete command as shown below.
del /s /q /f "%SYSTEMROOT%\Logs\WindowsUpdate\*"
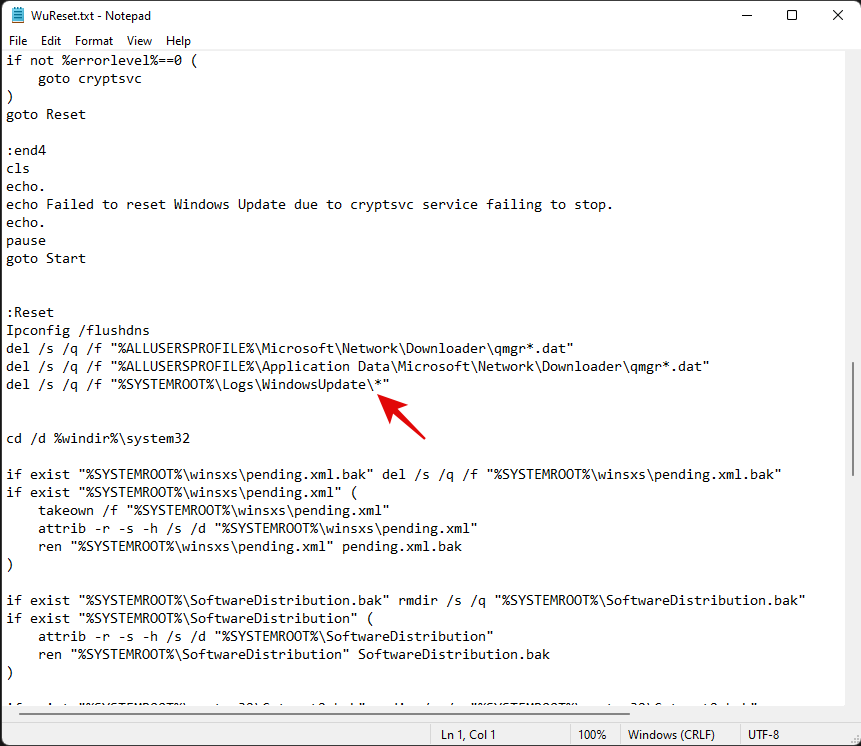
Once added, hit Ctrl + S on your keyboard. Ensure that there are no formatting changes or spaces before or after the line. The file will now be saved on your system along with its recent changes. We will now add some code to Reset Windows’s update policies on your system. Copy the lines below and paste them after your system commands. Ensure that two empty lines are available at either end of the code as shown below.
:: Windows Update policies resetting
reg delete "HKCU\SOFTWARE\Policies\Microsoft\Windows\WindowsUpdate" /f
reg delete "HKCU\SOFTWARE\Microsoft\Windows\CurrentVersion\Policies\WindowsUpdate" /f
reg delete "HKLM\SOFTWARE\Policies\Microsoft\Windows\WindowsUpdate" /f
reg delete "HKLM\SOFTWARE\Microsoft\Windows\CurrentVersion\Policies\WindowsUpdate" /f
gpupdate /force
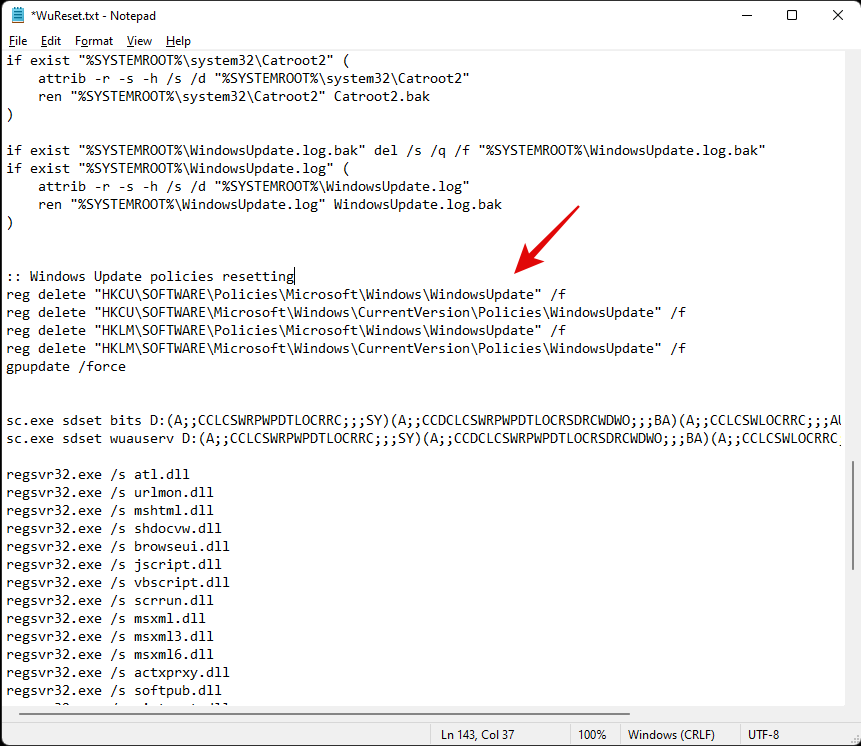
Lastly, let’s add some lines to ensure that the startup type for this service is set to ‘Automatic’. Copy the code below and add the lines after your winsock reset commands but before your service starting commands as shown below. Copy and paste the code in its respective location.
:: Set the startup type as automatic
sc config wuauserv start= auto
sc config bits start= auto
sc config DcomLaunch start= auto
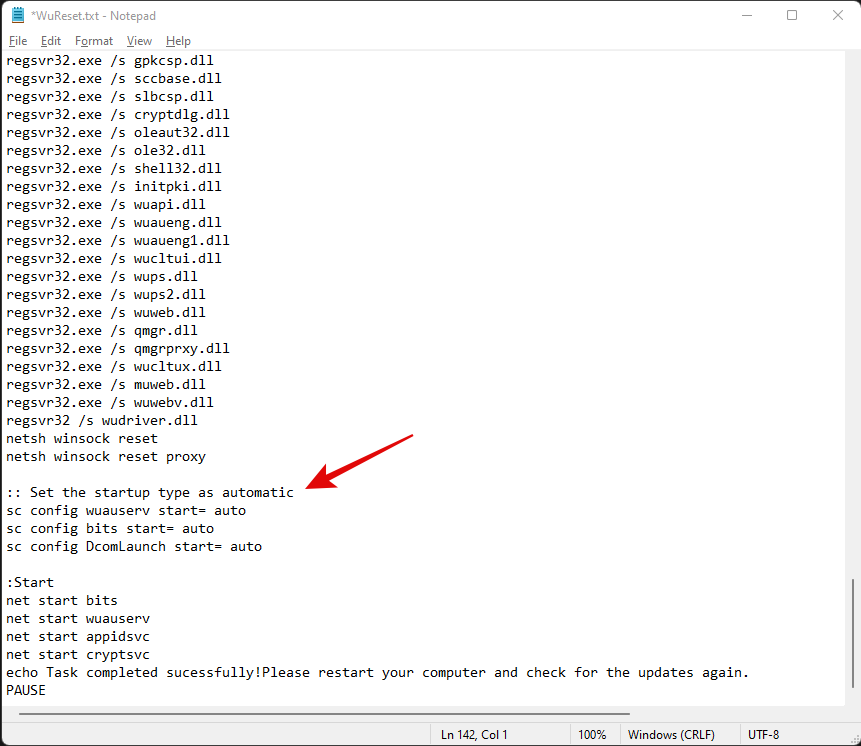
Once you are done, hit Ctrl + S on your keyboard to save your changes. Close the file and right-click on it again and select ‘Show more options’.
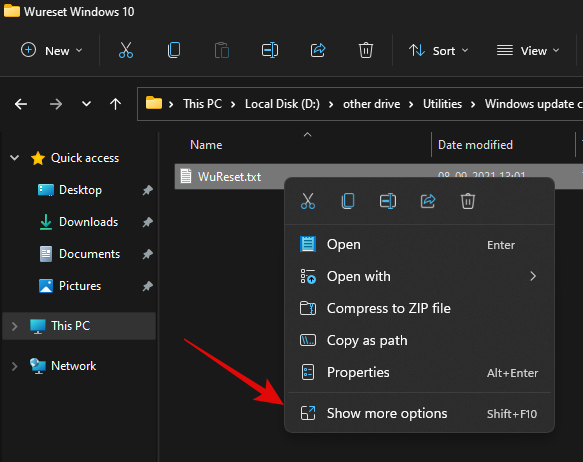
Click on ‘Rename’.
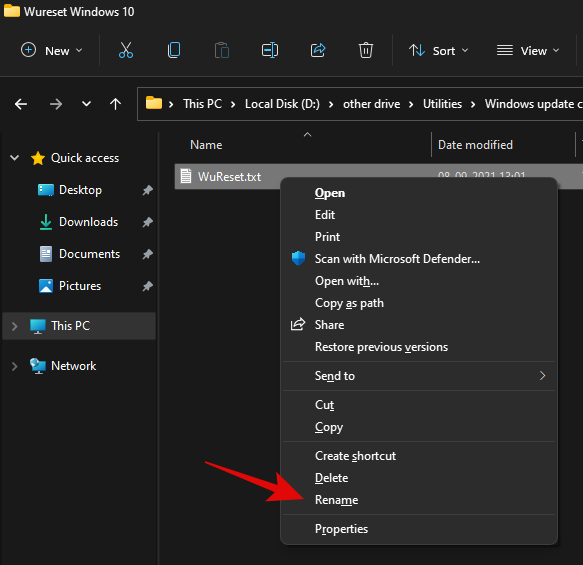
Replace ‘.txt’ with ‘.bat’.
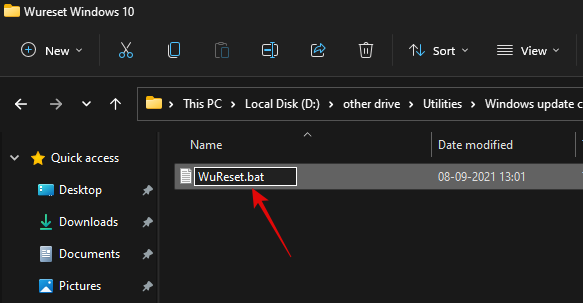
Once done, right-click on the file and select ‘Run as administrator’.
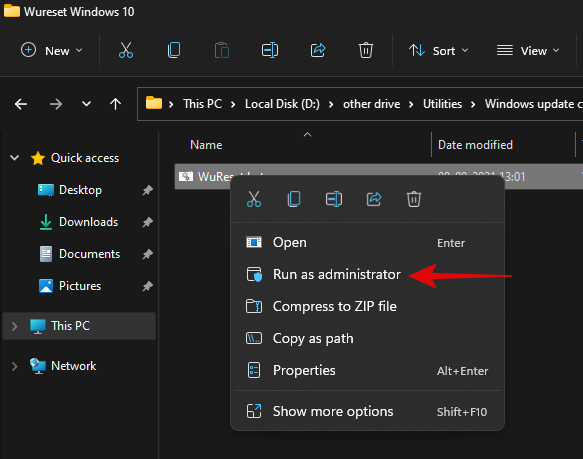
The batch script will now run on your PC and do its thing. Once the process completes, you will be asked to restart your PC. We highly recommend that you restart your PC at the earliest after running this script. Upon a restart, your Windows update should be reset and a fresh start should help you easily install pending Windows updates on your PC.
Method #02: Use DISM to uninstall the concerned packages
If you are still unable to uninstall specific Windows Update packages then simply use the DISM method to remove the concerned updates from your PC. This method force removes any available Windows updates from your PC without any issue. You will get a list of all the available updates in a table format which should make it much easier for you to find the culprit on your PC. Simply follow the guide at the top to get you started.
Method #03: Run SFC & DISM commands
At this point, if Windows still fails to update your system then you are facing a more serious issue than we anticipated earlier. This could indicate system-level corruption of files or missing system files from your system. In such cases, you can run SFC and DISM checks to fix corrupted files as well as restore missing system files. Follow the guide below to get you started.
Press Windows + S on your keyboard and search for CMD. Click on ‘Run as administrator’ once it shows up in your search results.
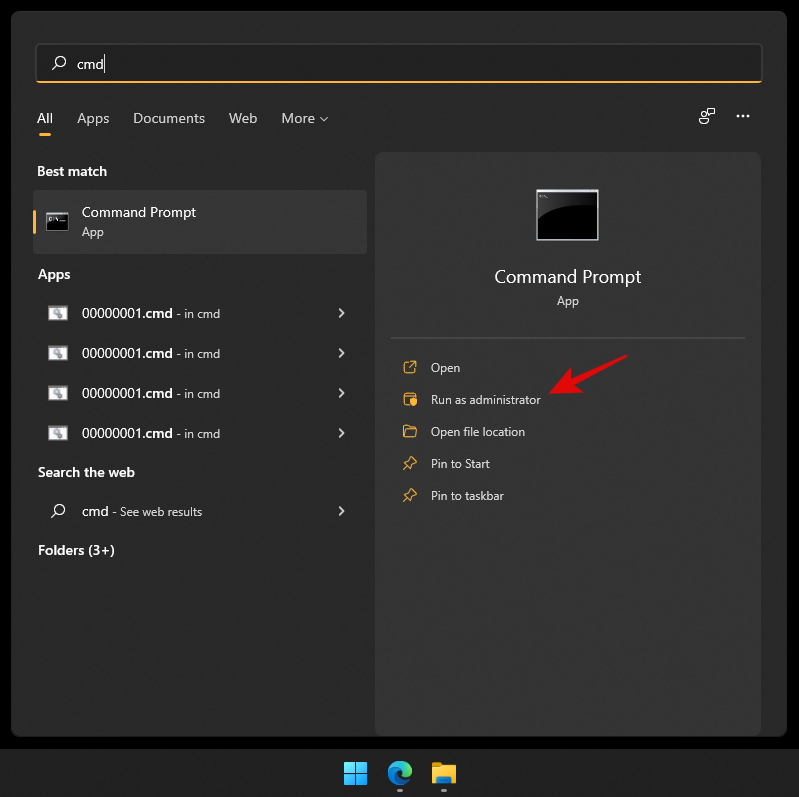
Type in the following command and press Enter on your PC.
sfc /scannow
Once the SFC scan completes, type in the following command and execute it.
DISM /Online /Cleanup-Image /RestoreHealth
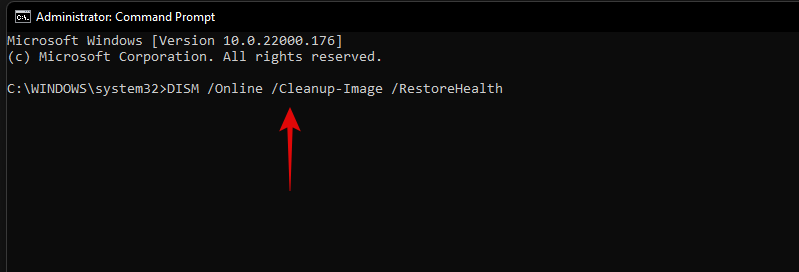
We recommend you restart your PC once the process completes.
Method #04: Last resort: Reset your PC
If nothing seems to be working for you then it might be time for a fresh installation of Windows 11 on your system. You can try getting in touch with your support team as well but if nothing works then a reset of your PC is the best option. In most cases, a reset while keeping your local files should help get Windows update working on your system.
Windows 11 connects to the update servers and updates your security definitions and drivers during OOBE. Windows will fix all update issues and reinstall necessary services on your system to get Windows update back up and running on your system during this process.
► You can use this dedicated guide from us to reset your Windows 11 PC.
We hope you were able to easily uninstall updates from your Windows 11 PC using the guide above. If you face any issues, feel free to drop a comment below.
Related:


![วิธีถอนการติดตั้ง McAfee บน Windows 11 [5 วิธี] วิธีถอนการติดตั้ง McAfee บน Windows 11 [5 วิธี]](https://cloudo3.com/resources8/images31/image-4917-0105182719945.png)


