كيفية إصلاح مشكلة شاشة تحميل Skyrim Infinite؟
تعرف على طرق فعالة لحل مشكلة شاشة التحميل اللانهائية المحبطة في Skyrims، مما يضمن تجربة لعب أكثر سلاسة ودون انقطاع.

في حين أن الإشعارات ضرورية في بعض الحالات ، فإنها تصبح أحيانًا عنصر إلهاء. يمكن لجهاز الكمبيوتر أيضًا تشتيت انتباهك بالإشعارات تمامًا مثل هاتفك. هذا هو السبب في أن Windows 11 يتضمن ميزة Focus Assist ، والتي تتيح لك تجنب الإخطارات المشتتة للانتباه. باستخدام هذه الميزة ، يمكنك القيام بعملك بتركيز كامل بدلاً من تشتيت انتباهك بالرسائل والإشعارات العشوائية. قد تؤدي الإشعارات أيضًا إلى الإضرار بإنتاجيتك وبالتالي ، يجب قمعها في الوقت المناسب.
يمكنك إخفاء جميع الإخطارات والتنبيهات والرسائل الموجودة على جهاز الكمبيوتر الخاص بك ببضع نقرات. إذا قمت مؤخرًا بترقية نظامك إلى Windows 11 ولم تتمكن من اكتشاف واجهة المستخدم الجديدة ، فستساعدك هذه المقالة في الحصول على دليل شامل حول كيفية استخدام Focus Assist على Windows 11 للتخلص من الإشعارات.
ذات صلة: كيفية التقاط لقطات شاشة على Windows 11
محتويات
ما هي مساعدة التركيز على نظام التشغيل Windows 11؟
Focus Assist هو ببساطة وضع عدم الإزعاج لجهاز الكمبيوتر الخاص بك - تمامًا مثل تلك الموجودة على هواتفك. إنها ميزة مفيدة في Windows 11 تتيح لك التخلص من الإشعارات والرسائل والتنبيهات غير الضرورية. تمكّنك ميزة مساعدة التركيز من تخصيص قائمة أولوياتك بدلاً من حجب جهاز الكمبيوتر الخاص بك عن جميع الإخطارات.
يمكن أن يتسبب الإلهاء في الإضرار بإنتاجيتك. وبالتالي ، باستخدام ميزة Focus Assist ، يمكنك إخفاء جميع الإخطارات والتنبيهات والرسائل أثناء عملك على شيء مهم. بدلاً من تنبيهك ، سيذهبون مباشرة إلى مركز العمل. يمكنك عرض الإخطارات المخفية في مركز العمل في وقتك الخاص.
كيف تعمل مساعدة التركيز على نظام التشغيل Windows 11؟
يوفر لك Focus Assist المرونة لتحديد وقت حظر عوامل التشتيت مثل الرسائل والإشعارات والتنبيهات. يمكنك تشغيل Focus Assist في أي وقت أو يمكنك أيضًا جدولة نطاق زمني في الإعدادات والذي سيؤدي إلى تشغيل مساعدة التركيز تلقائيًا.
تتيح لك ميزة مساعدة التركيز إنشاء قائمة أولويات للتأكد من عدم تفويت أي إشعارات من الأشخاص الأكثر أهمية في جهة الاتصال الخاصة بك. يمكن للأشخاص الموجودين في قائمة أولوياتك الوصول إليك دائمًا ، حتى عندما تكون في بعض الأعمال المهمة. إذا كنت بحاجة إلى تركيز كامل أثناء العمل ، يمكنك أيضًا اختيار حظر جميع الإشعارات. لعرض جميع الإخطارات المحظورة التي تلقيتها أثناء عملك ، افتح مركز الإجراءات في نظامك.
ذات صلة: كيفية إيقاف النوافذ المنبثقة على نظام التشغيل Windows 11
كيفية تمكين التركيز المساعد
يتم إيقاف تشغيل Focus Assist افتراضيًا. ولكن إذا كنت تريد تمكينه لإيقاف تلقي الإشعارات ، فاتبع الخطوات أدناه.
الطريقة الأولى: استخدام الإعدادات
انقر فوق أيقونة البحث ، التي تبدو وكأنها عدسة مكبرة على شريط المهام.

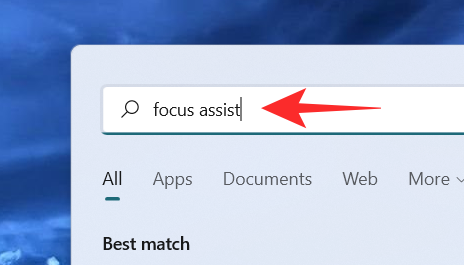
اكتب مساعدة التركيز في شريط البحث.
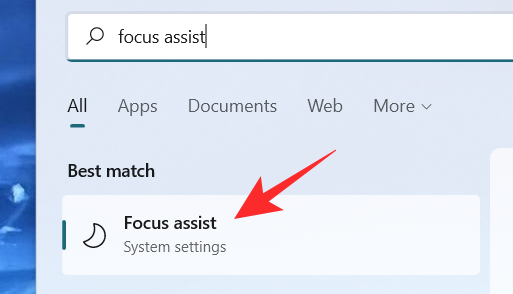
انقر فوق إعدادات نظام Focus Assist .
تظهر نافذة إعدادات نظام Focus Assist على الشاشة. ضمن Focus Assist ، حدد أحد هذه الخيارات:
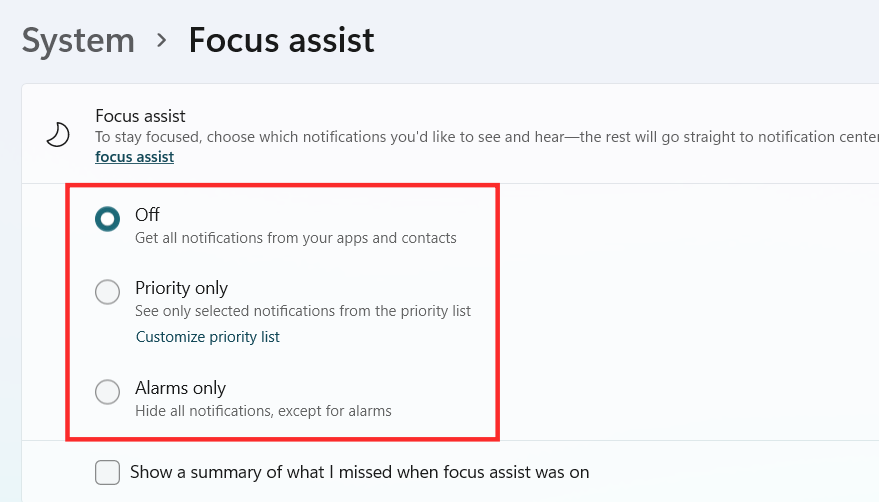
يجب الآن تمكين Focus Assist داخل Windows 11 بناءً على اختيارك.
الطريقة الثانية: استخدام مركز الصيانة
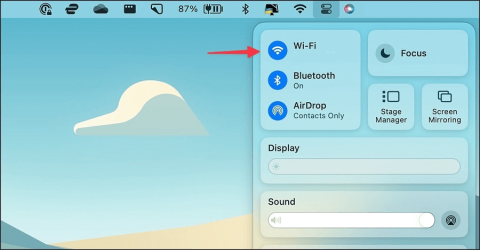
انقر فوق مركز العمل الذي يعرض رمز Wifi والحجم والبطارية معًا.

أسفل رمز Bluetooth مباشرةً ، يمكنك رؤية رمز Focus Assist الذي يشبه الهلال.
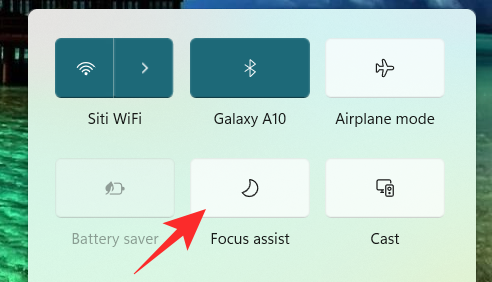
بشكل افتراضي ، سيتم تعطيل ميزة Focus Assist. انقر عليها وسيتم تعيين الميزة مباشرة على الأولوية فقط .
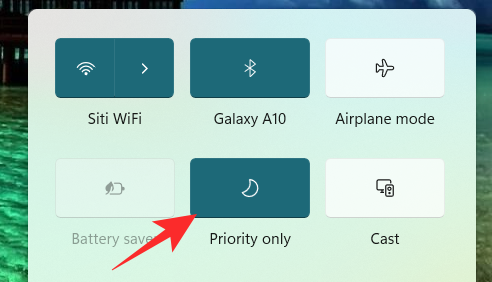
انقر فوقه مرة أخرى ، لتعيين ميزة Focus Assist على الإنذارات فقط .
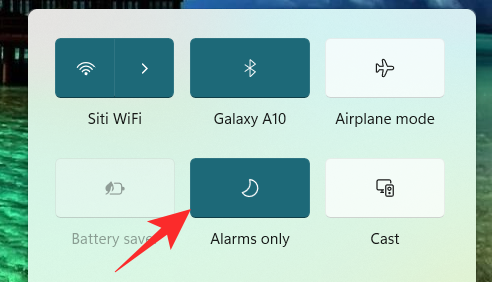
لتعطيل ميزة Focus Assist ، انقر عليها مرة أخرى.
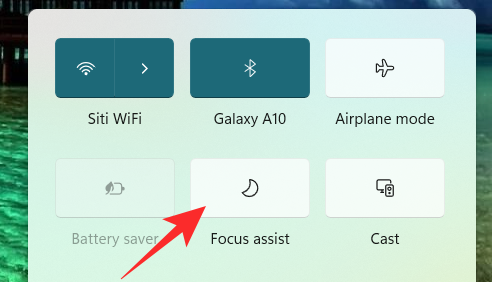
فقط من خلال النقر على أيقونة Focus Assist في Action Center ، يمكنك تغيير وظيفتها إلى وضع الإيقاف ، والأولوية فقط ، والإنذارات فقط. ومع ذلك ، لإجراء تغييرات ضرورية أخرى في إعدادات Focus Assist من Action Center ، انقر بزر الماوس الأيمن على أيقونة Focus Assist في مركز العمل وانقر على Go to Settings .
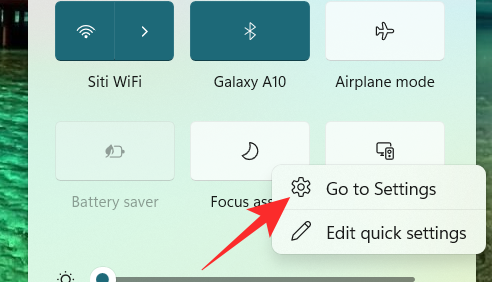
سينقلك هذا إلى تطبيق الإعدادات حيث يمكنك بسهولة إجراء جميع التغييرات المقصودة. وهذا كل شيء! يجب الآن تمكين مساعدة التركيز داخل Windows 11 مباشرة من مركز الصيانة.
الطريقة الثالثة: استخدام محرر نهج المجموعة
يمكنك أيضًا تمكين وضع مساعدة التركيز باستخدام محرر نهج المجموعة في حال كنت مسؤولاً. استخدم الدليل أدناه لمساعدتك في العملية.
اضغط Windows + Rعلى لوحة المفاتيح واكتب ما يلي في مربع الحوار "تشغيل". اضغط على Enter بلوحة المفاتيح لفتح محرر نهج المجموعة.
gpedit.msc
انتقل إلى العقدة التالية المذكورة أدناه.
User configuration > Administrative Templates > Start Menu and Taskbar > Notifications
ابحث عن قيمة "Turn off Quiet Hours" وانقر عليها نقرًا مزدوجًا على يمينك.
حدد الآن أحد الخيارات التالية وفقًا لاحتياجاتك الحالية في الزاوية العلوية اليسرى من نافذة الخصائص.
وهذا كل شيء! سيتم الآن تمكين أو تعطيل مساعدة التركيز من محرر نهج المجموعة وفقًا لتفضيلاتك. لسوء الحظ ، لا يمكنك تخصيص سلوك مساعدة التركيز كمسؤول. هذه القدرة لا تزال تقع على عاتق المستخدم. يمكنك فقط تمكين أو تعطيل القدرة على استخدام Focus Assist لنظام باستخدام محرر نهج المجموعة.
كيفية استخدام التركيز البؤري
مساعدة التركيز لديها العديد من الإعدادات وخيارات التخصيص التي يمكن أن تساعدك على تغيير سلوكها وفقًا لاحتياجاتك الحالية. استخدم أحد الأدلة أدناه التي تناسب متطلباتك الحالية على أفضل وجه.
الطريقة الأولى: تفعيل وضع التنبيهات فقط
يسمح لك وضع الإنذارات فقط في نافذة Focus Assist بإخفاء جميع الإخطارات باستثناء التنبيه. اتبع الخطوات المذكورة أدناه لتمكين وضع الإنذارات فقط.
انقر فوق أيقونة البحث في شريط المهام.

اكتب مساعدة التركيز

انقر فوق مساعدة التركيز .

ضمن مساعدة التركيز ، انقر فوق الإنذارات فقط لإيقاف تلقي الإشعارات ، باستثناء التنبيهات.
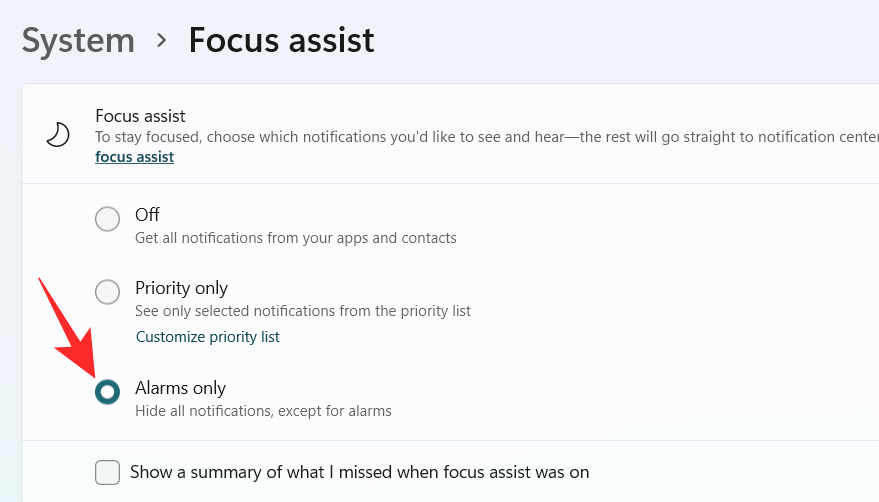
وهذا كل شيء! سيتم إخطارك الآن فقط عن الإنذارات الموجودة على نظامك. سيتم إسكات جميع الإشعارات الأخرى بغض النظر عن أولويتها داخل Windows 11.
الطريقة الثانية: تمكين الأولوية فقط بقائمة مخصصة
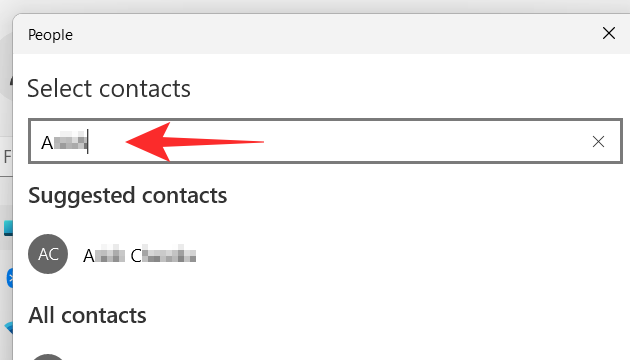
و الناس سوف تظهر نافذة على الشاشة. اختر الأشخاص المفضلين لديك عن طريق كتابة أسمائهم في شريط البحث.
اضغط على اسم الشخص.
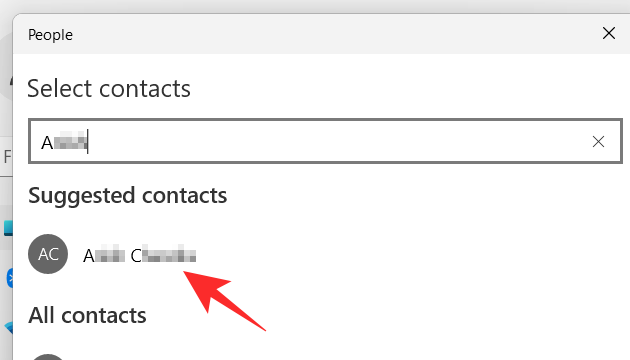
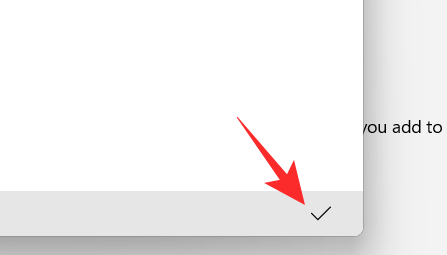
انقر فوق زر التجزئة الموجود في الركن الأيمن السفلي من نافذة الأشخاص.
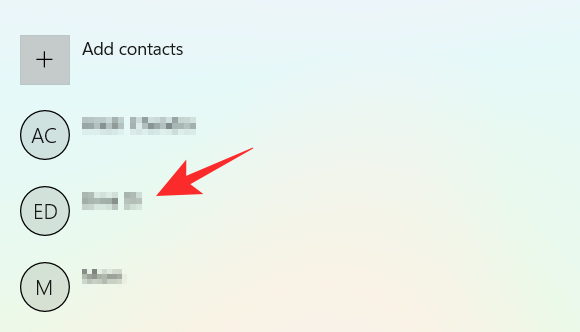
Your priority list has been created. Now, if you want to remove a contact from your priority list, click on the contact under People.
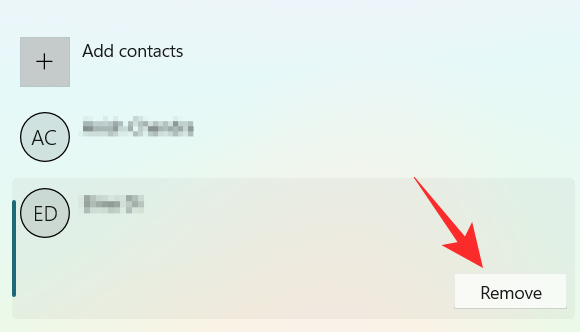
Click on Remove.
Now, in the Apps section, you can select the apps that can break through your quiet hours. To allow the apps to show notifications, click on the Add an app button.
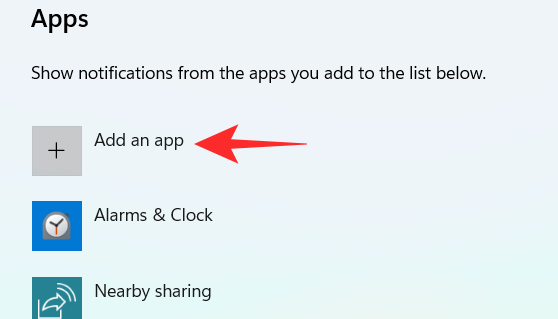
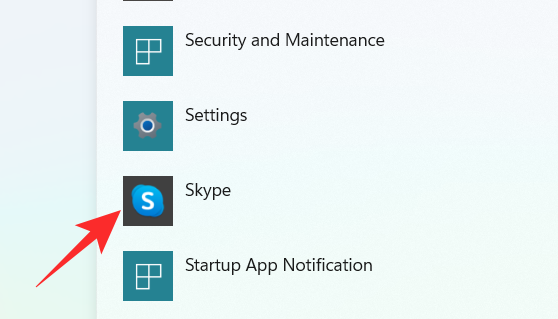
A list of apps appears on your screen. Click on the app you want to add to your priority list.
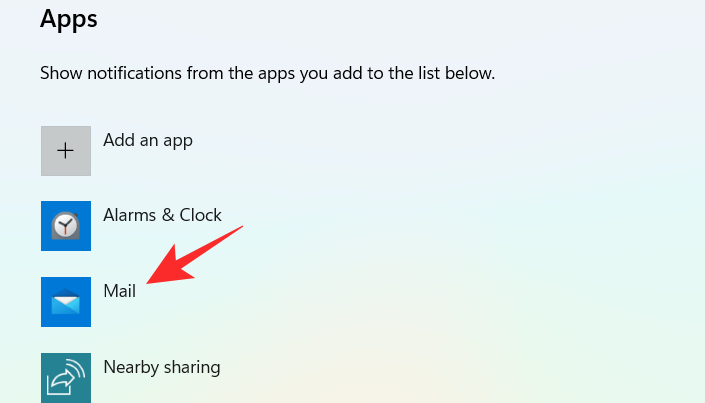
Continue this process until you are done selecting the apps. In case you want to remove an app from your priority list, you can simply click on the app under the App section.
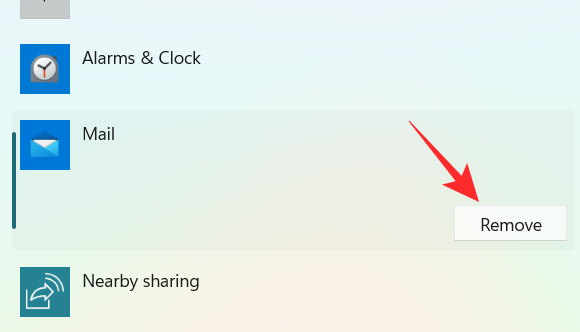
Click on Remove.
And that’s how you can customize the priority list in Focus assist and use it to your advantage to receive notifications only from important contacts.
Method #3: Enable notification summary when Focus assist is disabled
Click on the Search icon on the taskbar.

Type Focus assist

Click on Focus Assist.

Click on your desired option Priority only or Alarms only.
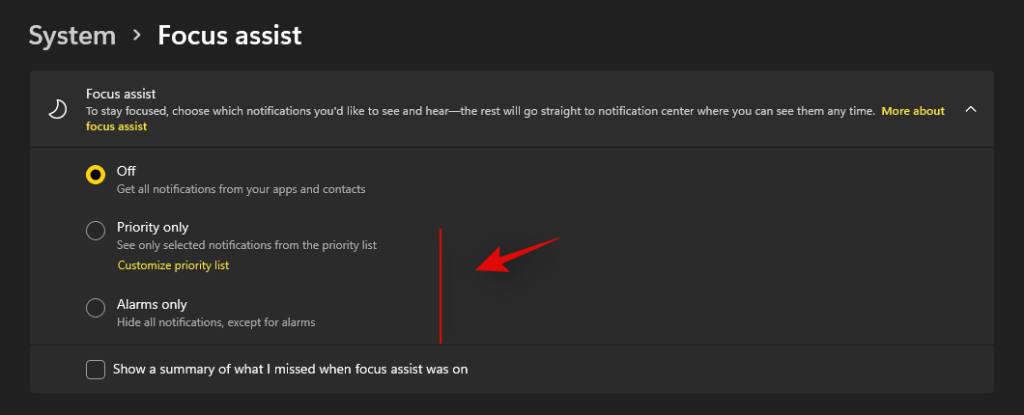
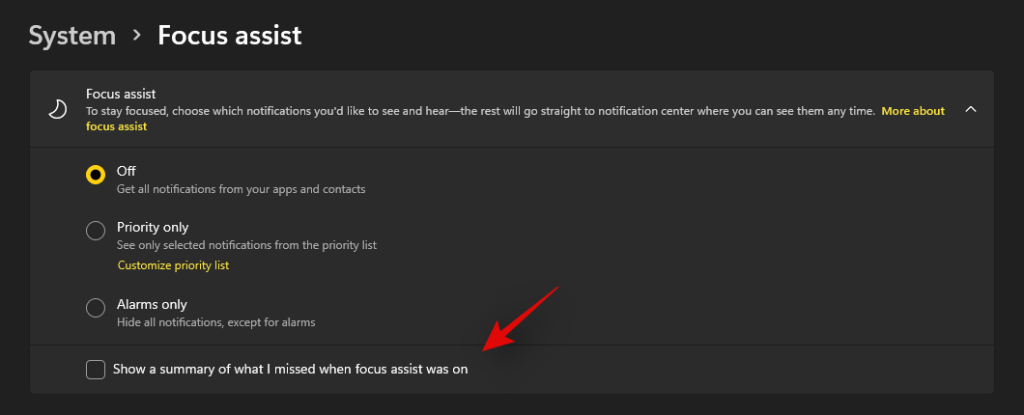
Check the box Show a summary of what I missed when Focus assist was on.
Method #4: Enable or disable automatic Focus assist rules
The Automatic rules in Focus assist allow you to determine the conditions that can activate the Focus assist automatically. There are four different automatic rules in the Focus Assist settings window that can be customized. Check out the steps mentioned below to customize automatic rules in Focus assist.
Click on the Search icon on the taskbar.

Type Focus assist

Click on Focus Assist.

Under the Automatic rules section, there are four sections. Turn on the toggle switch for the option you want to choose.
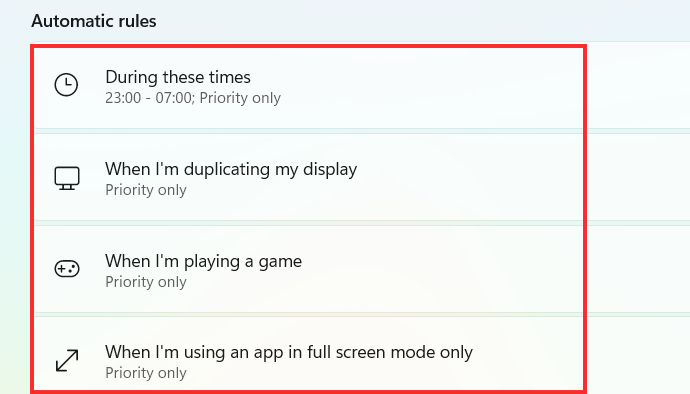
Now, let’s have a look at how to customize the above-mentioned options under Automatic rules.
1. During these times
Turn on the toggle switch, which is extreme right to the During these times tab.
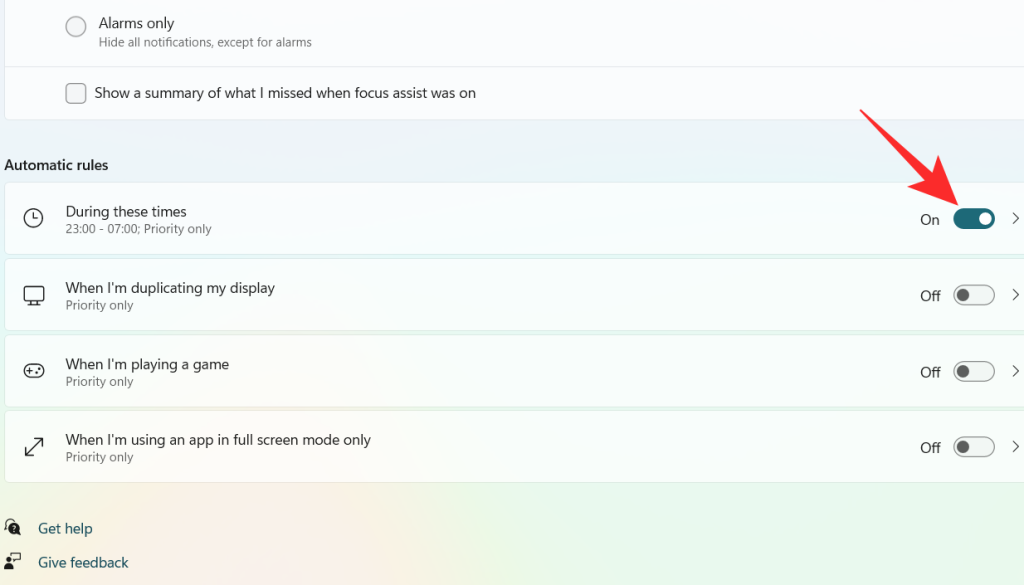
Click on the During these times tab.
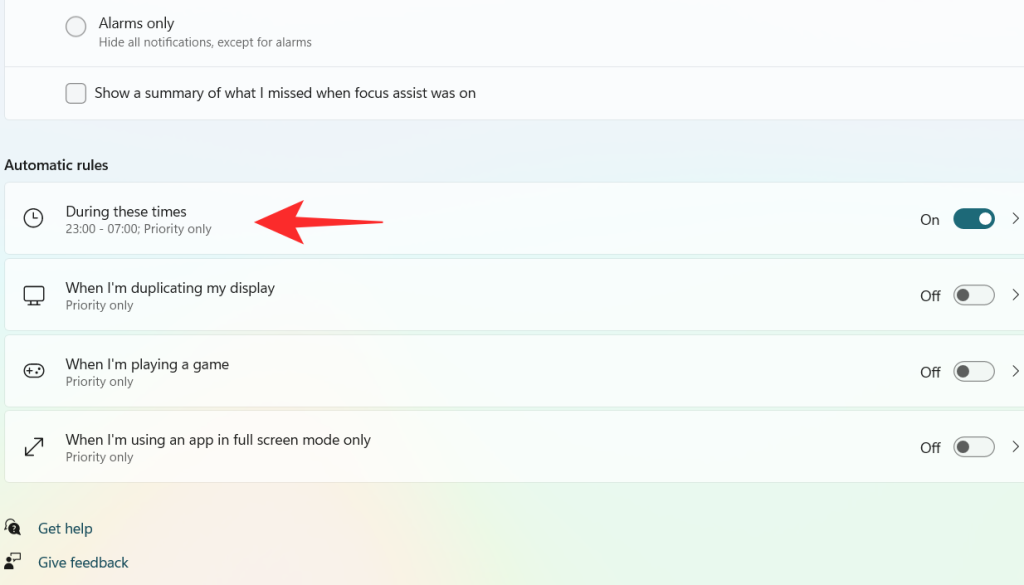
Click on the box under Start time.
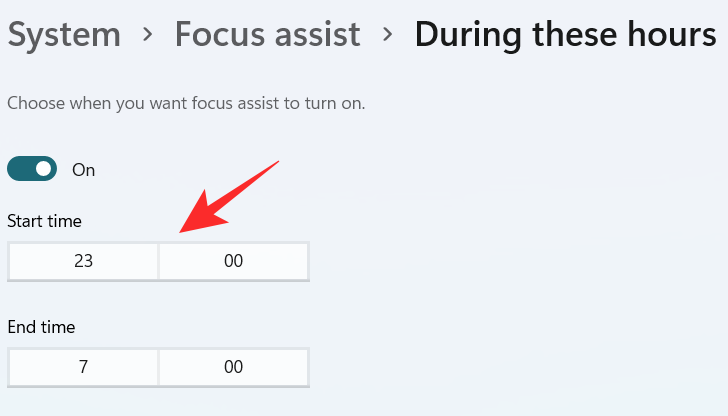
Select the time when you want the Focus Assist to turn on and click on the tick on the bottom of the dropdown menu.
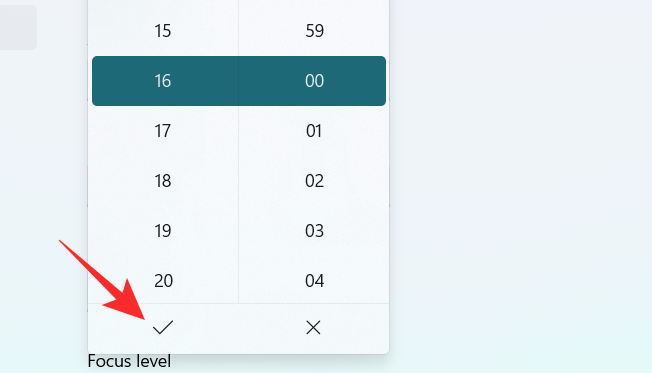
Click on the box under End time.
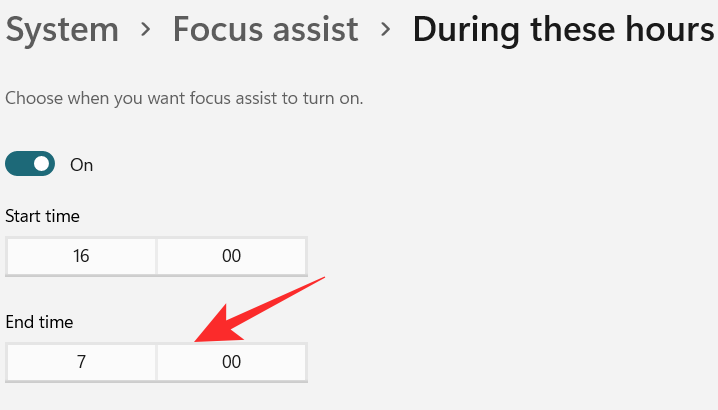
Select the time when you want the Focus Assist to turn off and click on the tick on the bottom of the dropdown menu.
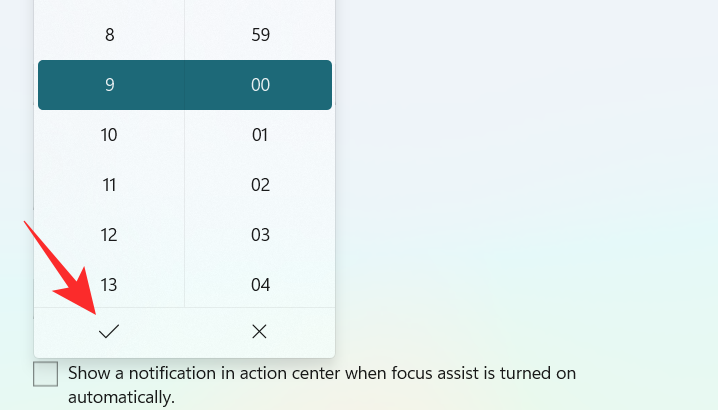
Click on the box under Repeats.
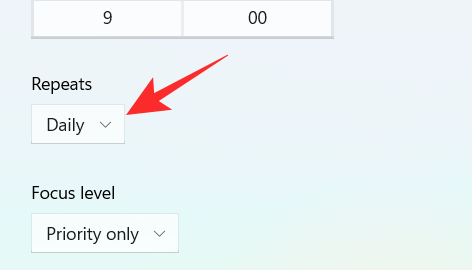
A small dropdown menu appears. Set the schedule to Daily, Weekends, or Weekdays.
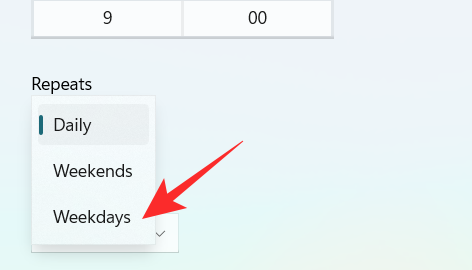
Click on the box under Focus level.
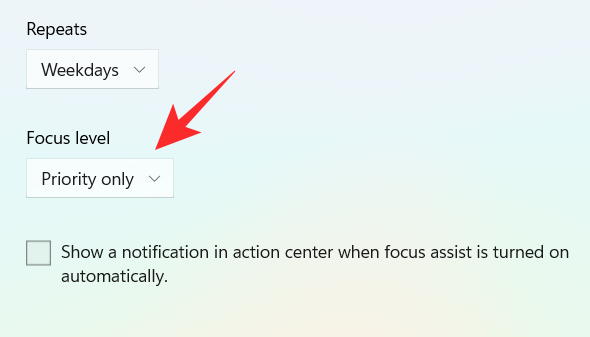
A small dropdown menu appears. Choose between Alarm only or Priority only.
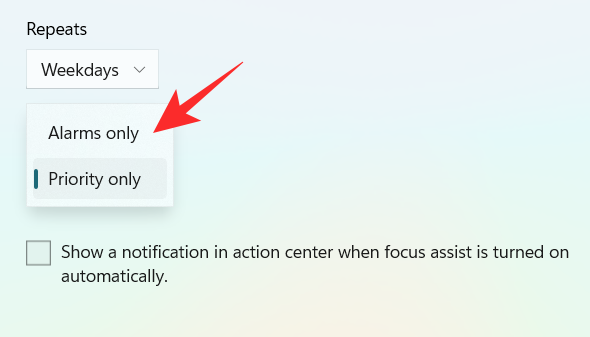
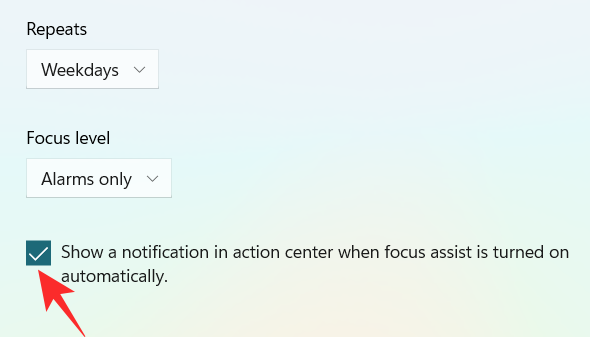
Finally, to get a notification when the Focus assist is turned on, check the box “Show a notification in action center when Focus assist is turned on automatically“.
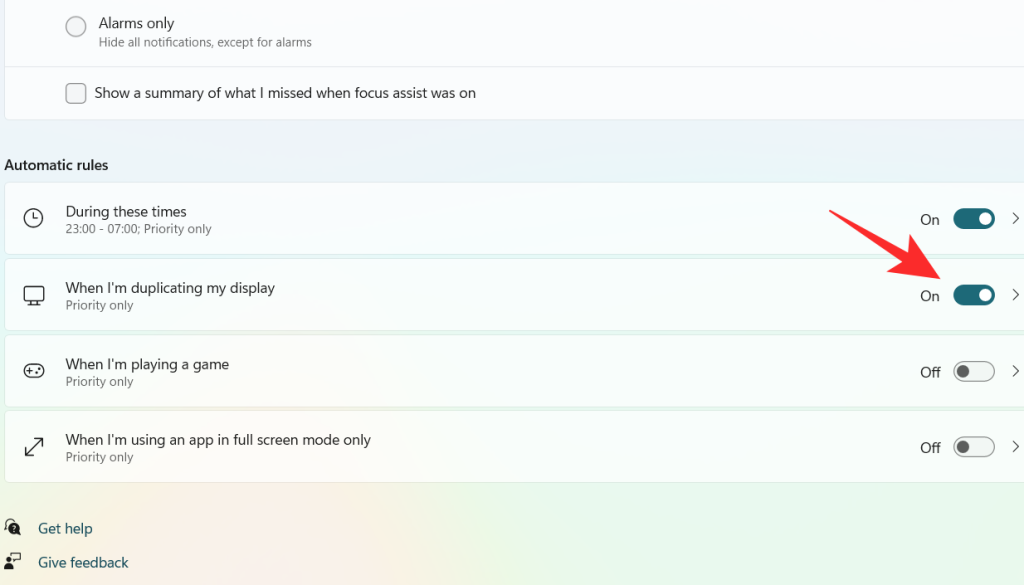
2. When I’m duplicating my display
Turn on the toggle switch, which is extreme right to the When I’m duplicating my display tab.
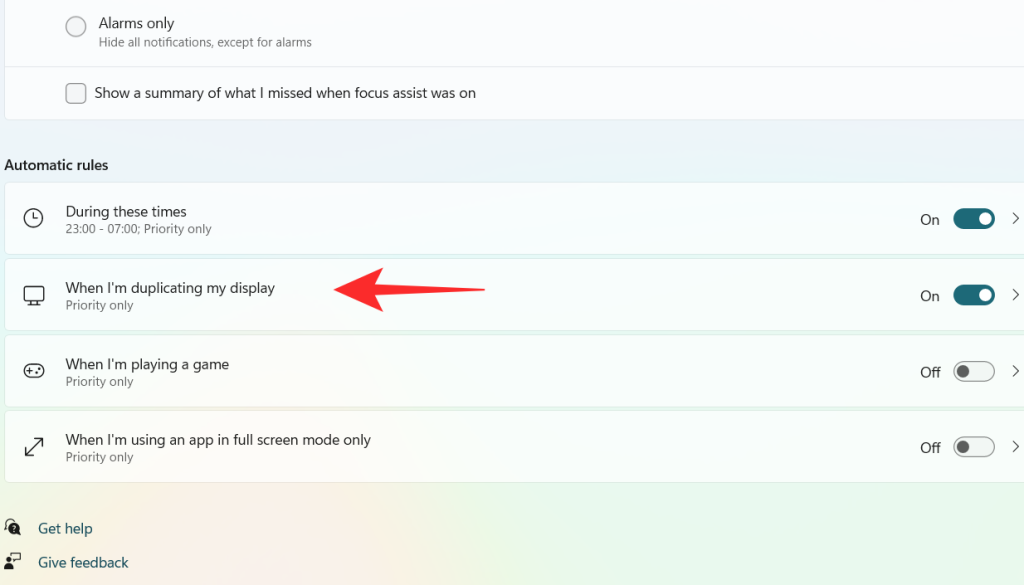
Click on the When I’m duplicating my display tab.
Click on the box under Focus level.
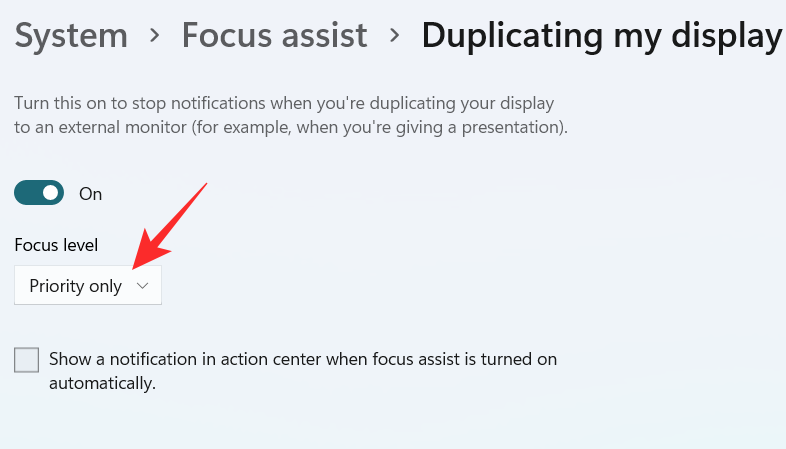
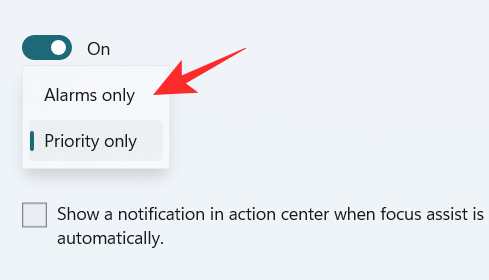
A dropdown menu appears, click on your desired option between Priority only and Alarms only.
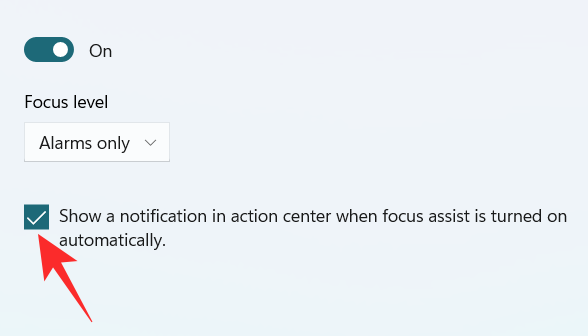
To get a notification when the Focus assist is turned on, check the box “Show a notification in action center when Focus assist is turned on automatically“
3. When I’m playing a game
Turn on the toggle switch, which is extreme right to the When I’m playing a game tab.
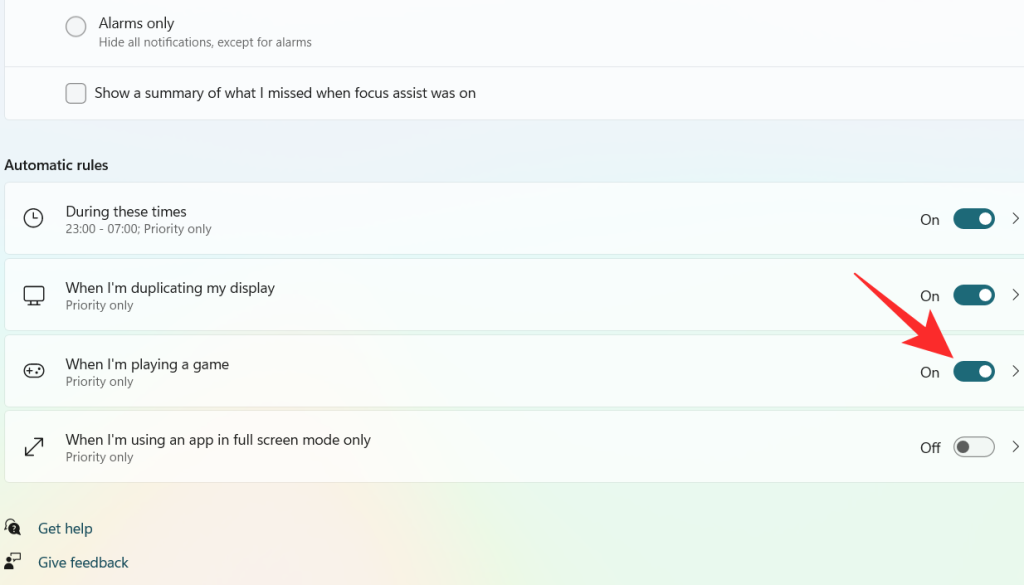
Click on the When I’m playing a game tab
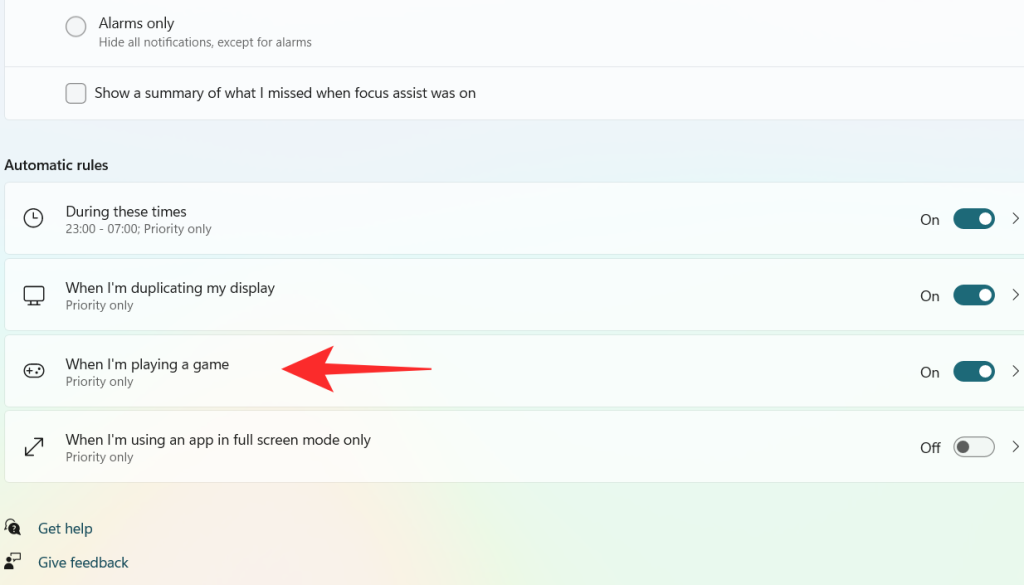
Click on the box under Focus Level.
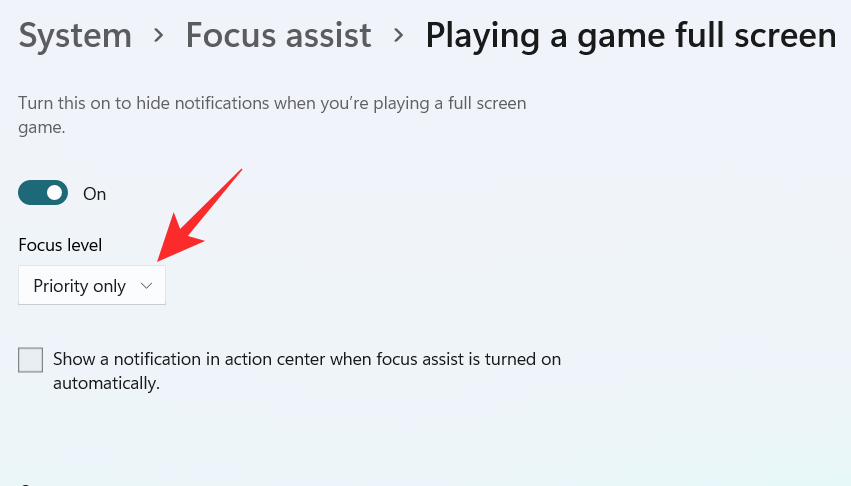
A dropdown menu appears, click on your desired option between Priority only and Alarms only.

To get a notification when the Focus assist is turned on, check the box “Show a notification in action center when Focus assist is turned on automatically“

4. When I’m using an app in full-screen mode only
Turn on the toggle switch, which is extreme right to the When I’m using an app in full-screen mode only tab.
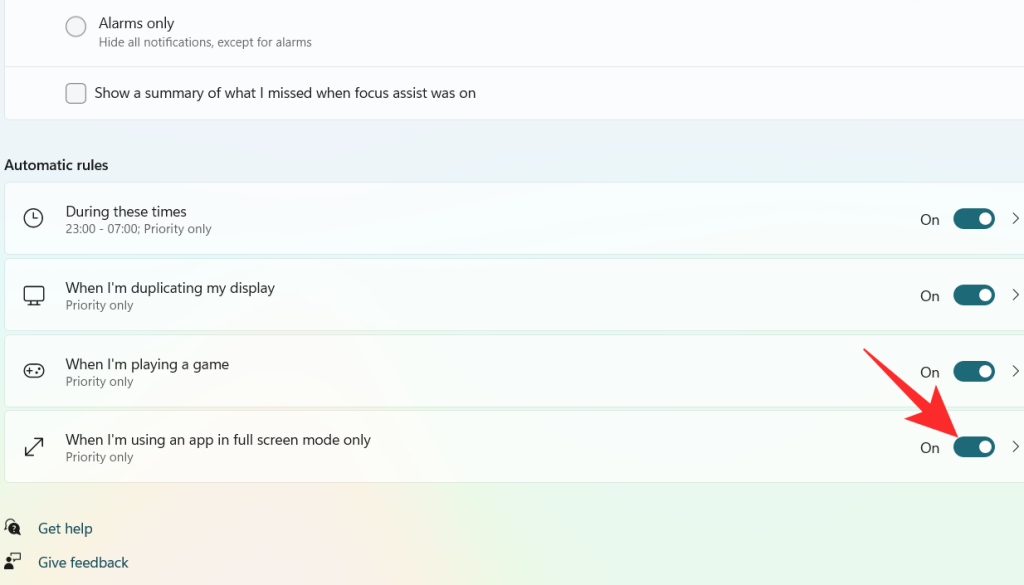
Click on the When I’m using an app in full-screen mode only tab
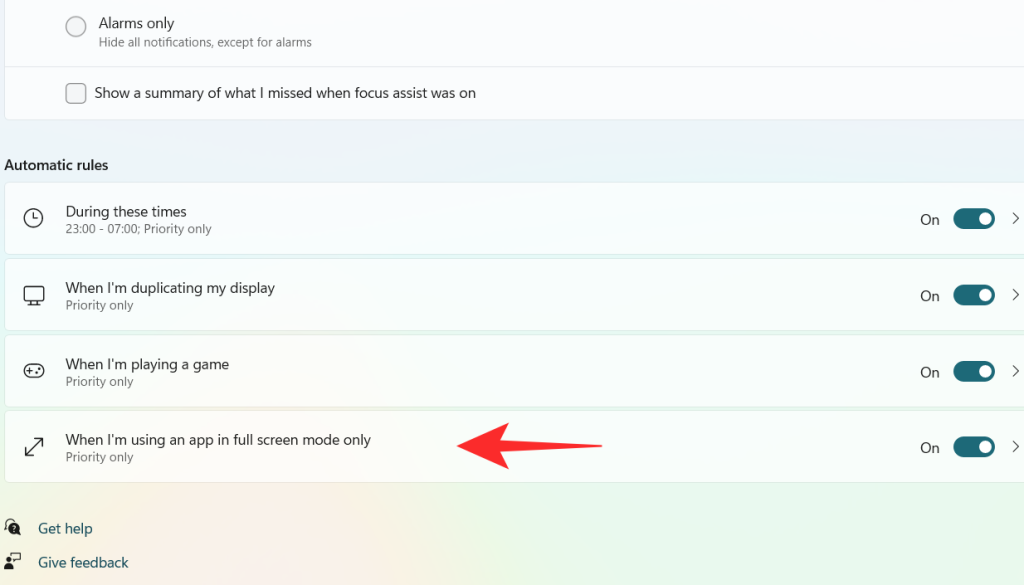
Click on the box under Focus Level.
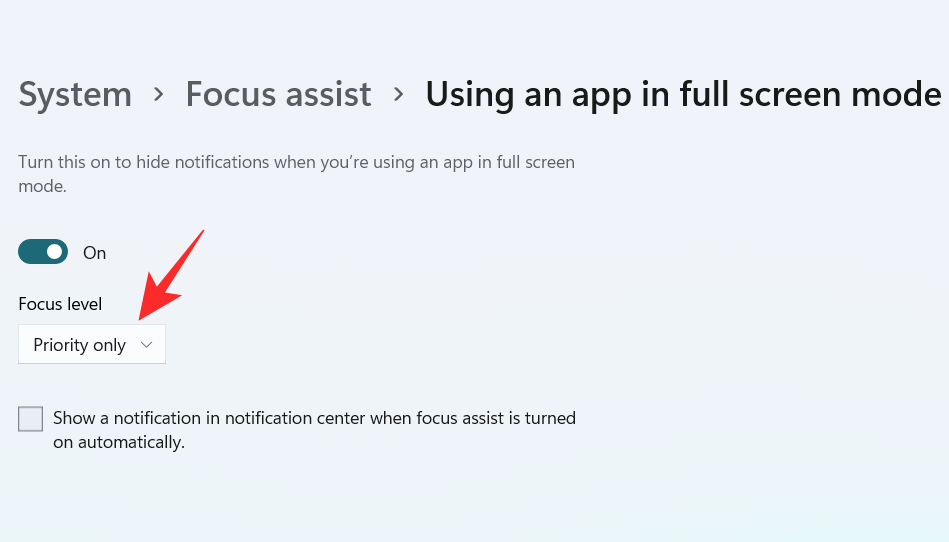
A dropdown menu appears, click on your desired option between Priority only and Alarms only.

To get a notification when the Focus assist is turned on, check the box “Show a notification in action center when Focus assist is turned on automatically“.

Using the above customizations, you can schedule and control Focus assist’s behavior according to your workflow for maximum efficiency no matter the task at hand.
Can you remove the Focus Assist icon from the Action Center?
Yes, you can easily remove the Focus Assist icon from the Action Center. Windows 11 brings a host of new cosmetic and UI changes and one of them has been the ability to customize your action center. You can now add or remove icons from the action center depending on your needs and opt for a more minimal or productive look depending on your workflow.
For now, you can only add and remove certain system modules but in the future, some users expect Microsoft to add the support for third-party apps as well. This would be a much welcome change that would allow you to manage dedicated system settings managed by third-party apps directly from your action center.
Customize your Focus assist icon in the action center
Depending on your current needs you can either remove or add the Focus assist module to the action center. Use one of the guides below depending on your current requirements.
1. Remove it
Click on the Action Center which shows the icon of Wifi, volume, and battery together.

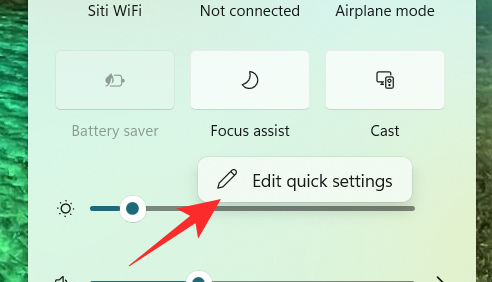
Right-click on an empty place or on any icon and click on Edit quick settings.
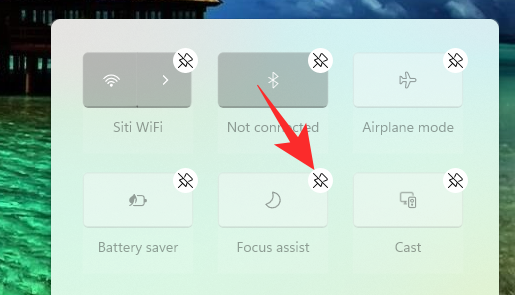
Click on the unpin symbol at the top right corner of the Focus Assist icon to remove the Focus Assist icon from the Action Center.
The Focus assist module should now have been removed from your action center. If not, we recommend you restart explorer.exe or your PC for the changes to take effect.
2. Restore it
Click on the Action Center which shows the icon of Wifi, volume, and battery together.

Right-click on an empty place or on any icon and click on Edit quick settings.
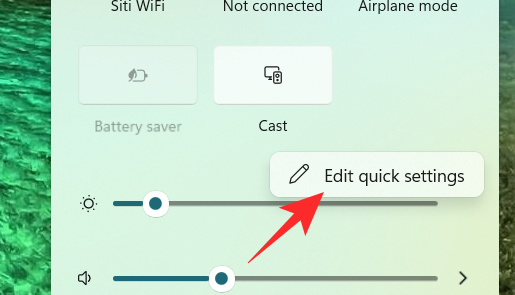
Now, click on the Add button at the bottom of the action center.
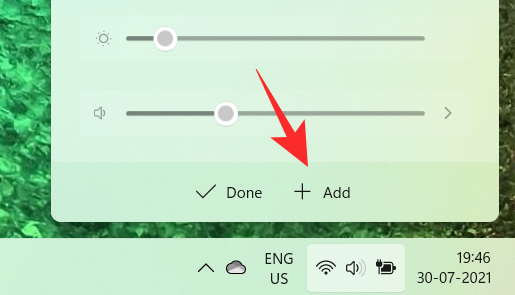
A list of different settings appears. Click on Focus Assist from the list and you will get to see the Focus Assist icon on the Action Center again.
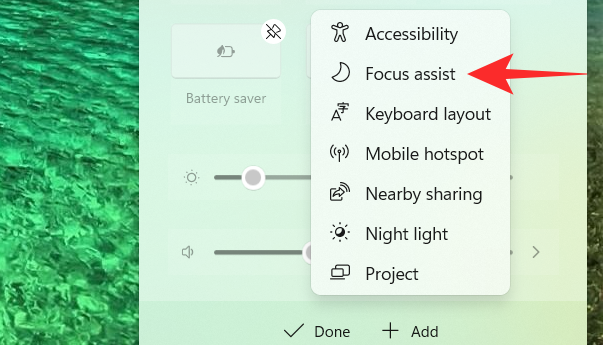
And that’s how you can add the Focus assist module back in the action center.
Focus assist keeps turning on automatically Issue: How to fix
If Focus assist keeps turning on automatically then there could be a couple of reasons for this behavior. Depending on its cause we can either fix it or use a workaround to manage the issue. Let’s find out why Focus assist keeps turning on automatically on your system.
Fix #1: Check Automatic Rules
Are you having this issue when projecting to a secondary display? Or when sharing your screen with a public computer? Then it is likely that focus assist is getting turned on automatically due to the default automatic rules in Windows 11.
By default, focus assist will silence all notifications in such scenarios to help maintain your privacy. But this can be counterproductive in case you are just trying to use a bigger display from a portable system like a laptop or an NUC.
It could also be that scheduled Focus assist was turned on your system by mistake which will enable and disable Focus assist automatically during certain hours. If any of these situations sounds like what you are facing then you can use the guide below to disable all automatic rules that enable Focus assist during certain scenarios and workflows on Windows 11. Let’s get started.
Press Windows + i on your keyboard to open the Settings app. Ensure ‘System’ is selected on your left and then click on ‘Focus Assist’ on your right.
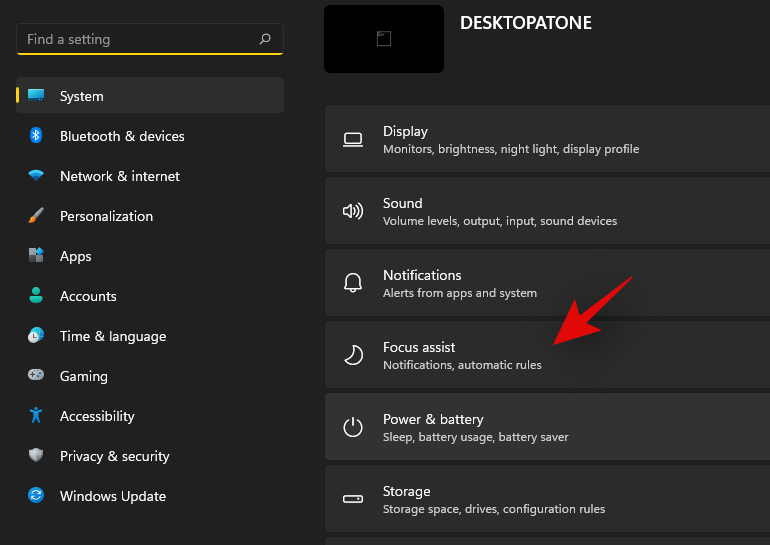
Go down to automatic rules and turn off the following toggles.
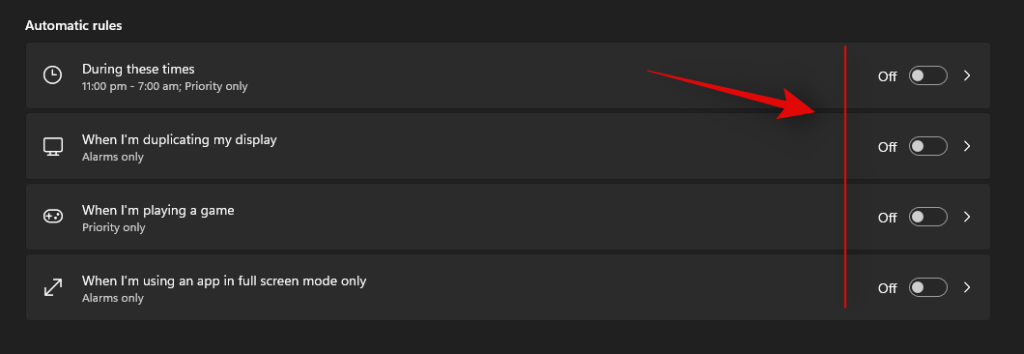
Once these rules are disabled, Windows 11 will not turn on Focus assist automatically on your system.
Fix #2: Turn of GeForce Overlay
This is another way to solve Focus assist misbehaving on your system. If you have a dGPU from Nvidia and are using the GeForce experience app then we recommend disabling its overlay option and restarting your system. With the automatic rule for ‘When I’m using an app in full-screen mode only’ turned on, Windows will mistake the Nvidia overlay detection on your desktop for a full-screen app which will trigger the Focus assist settings in return. You can also disable this automatic rule in case you wish to keep the Geforce Experience overlay enabled on your system.
Focus assist greyed out, option missing or not working; How to fix
Is the focus assist option missing from Windows 11 settings app? Is the module greyed out in the action center? This is a known bug that shows up occasionally with every feature update of Windows. Even certain versions of Windows 10 faced huge issues with this bug until a fix was released.
Fix #1: Enable in Group Policy Editor
If Focus assist seems to be missing from your system then it is likely disabled using the group policy editor. If your PC is managed by your organization or your workplace then it is likely disabled by your administrator. If you have access to the group policy editor then you can use the guide below to enable focus assist on your system. However, in case you have limited access, then you might need to get in touch with your administrator to enable Focus assist on your system.
Press Windows + R on your keyboard to bring up the Run dialog box and type in the following command to launch the Group Policy Editor. Click on ‘Ok’ once you are done.
gpedit.msc
Navigate to the following node.
User configuration > Administrative Templates > Start Menu and Taskbar > Notifications
Double click on ‘Turn off Quiet Hours’ on your right.
Click and select ‘Disabled’ in the top left corner.
Click on ‘Ok’ to save your changes.
And that’s it! Focus assist should now be enabled on your system in case it was disabled using the group policy editor.
Fix #2: Reinstall and repair default Windows UWP apps and system apps
If Focus assist is still missing from your system then let’s check if all the necessary apps and utilities are installed properly on your system. Use the guide below to check and repair Windows 11’s basic apps and functionality on your system.
Press Windows + S and search for PowerShell. Click on ‘Run as administrator’ once it shows up in your search results.
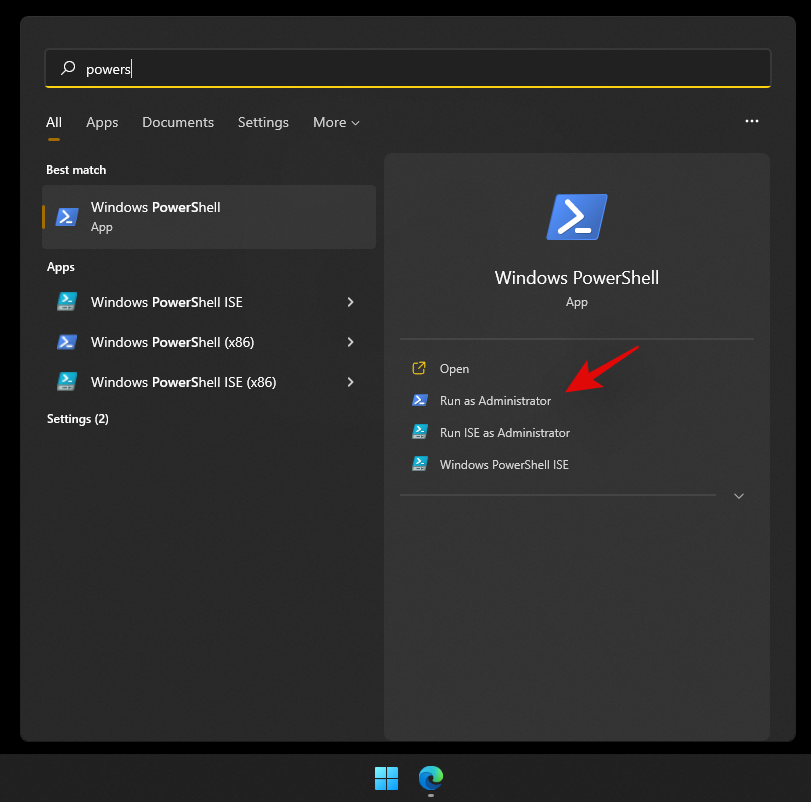
Once PowerShell is launched, execute the following command to reinstall all UWP apps and check and repair other default utilities required by Windows 11 in the background.
Get-AppXPackage -AllUsers | Foreach {Add-AppxPackage -DisableDevelopmentMode -Register "$ ($ _. InstallLocation) \ AppXManifest.xml"}

Wait for the process to finish and restart your PC for good measure. If Focus assist was corrupted or missing from your system, then this fix should help solve all your issues.
Fix #3: Check for a Windows Update
Haven’t updated in a while? We recommend checking for recent Windows Updates. While updates rarely disable major features like Focus assist, a new feature update installation can help refresh your registry, fix mismatched values and more importantly iron out bugs that could be preventing you from accessing Focus assist on your system. Use the guide below to check for recent Windows updates on your system.
Press Windows + i on your keyboard to open the Settings app and click on ‘Windows Update’ on your left.

Click on ‘Check for updates’.

In case any new updates show up, let them install on your system and restart if prompted. In case you are using a metered connection then you will need to click on ‘Download now’ manually to avoid any unexpected data charges.
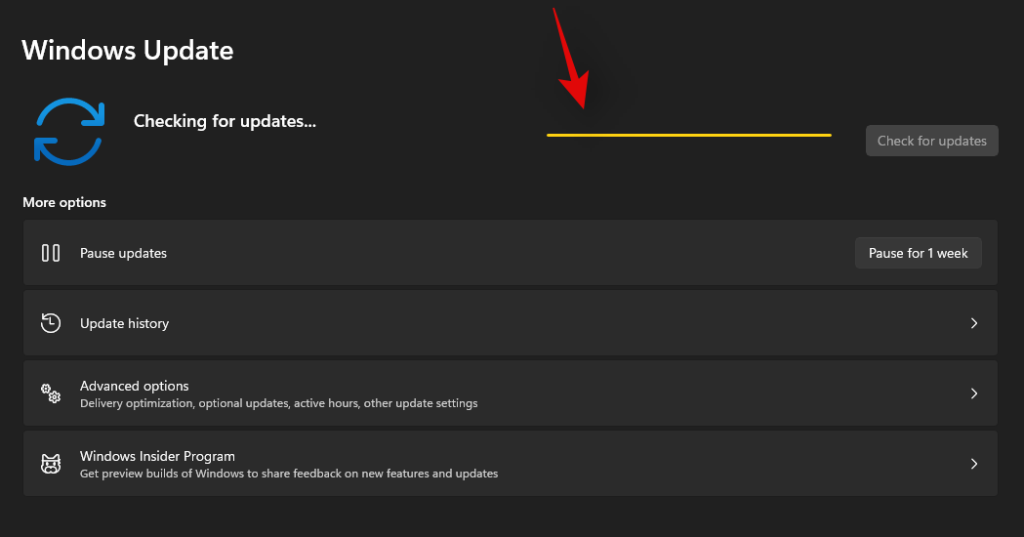
Once the necessary Windows updates are installed on your system, Focus assist should be restored in your action center and the Settings app.
Last Resort: Reset your PC
If Focus assist is still missing from your PC then this indicates a corrupted Windows installation on your system. The best way to fix this without wasting much time on troubleshooting would be to simply reset your PC while keeping all your files intact. This will refresh the entire Windows 11 installation and reinstall all the apps which should help restore functionality for all Windows features including Focus assist. Follow the guide below to reset your PC while keeping your files.
Note: The reset process will remove all installed applications and only retain files stored manually on your local storage. A list of all the removed apps will be available in .txt format on your desktop once your PC has been reset.
Press Windows + i on your keyboard and click on ‘Windows Update’ on your left.
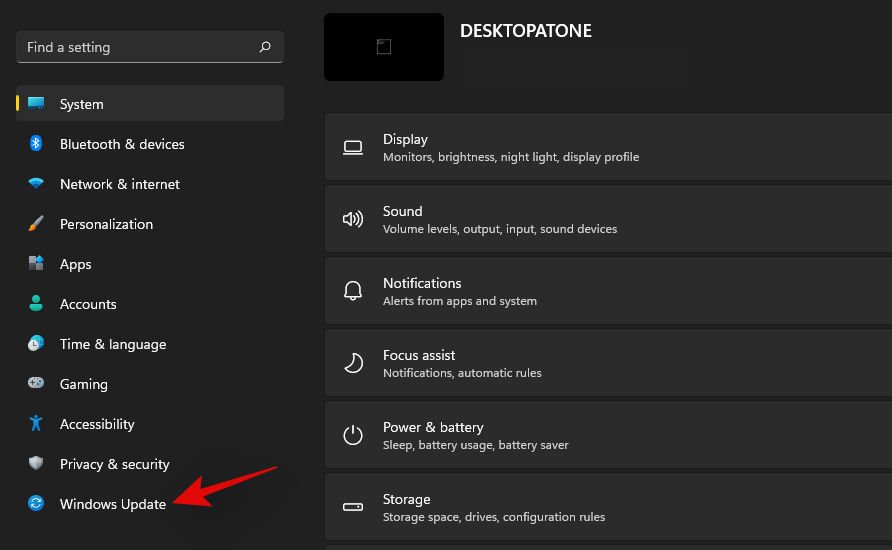
Click on ‘Advanced options’.
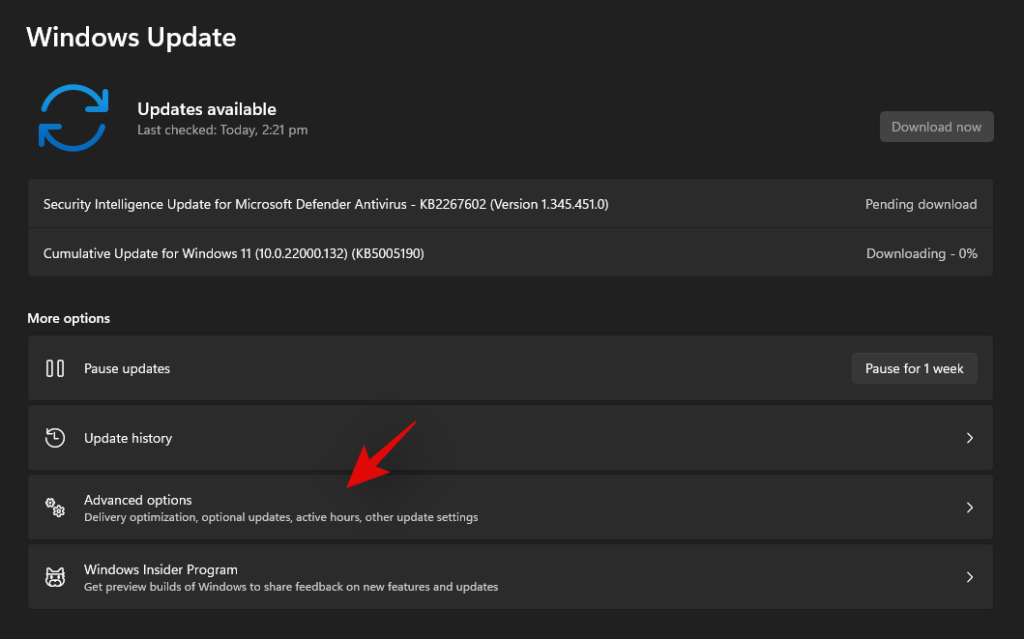
Click and select ‘Recovery’.
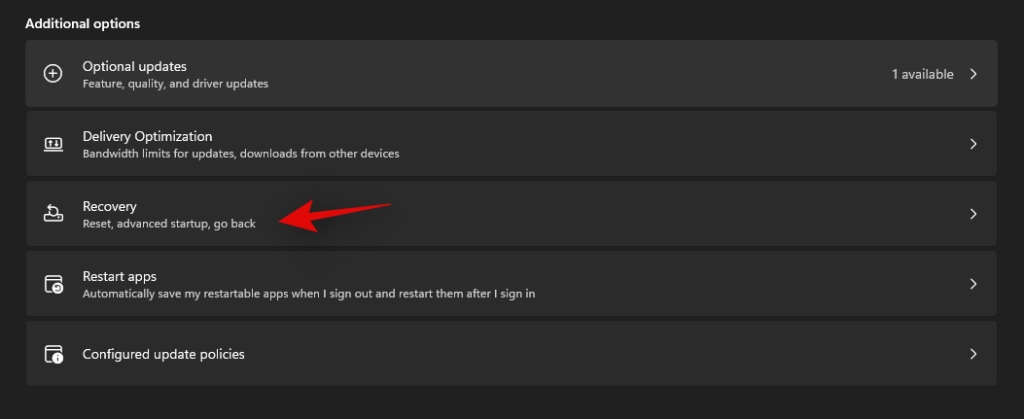
Click on ‘Reset PC’ beside Reset this PC.

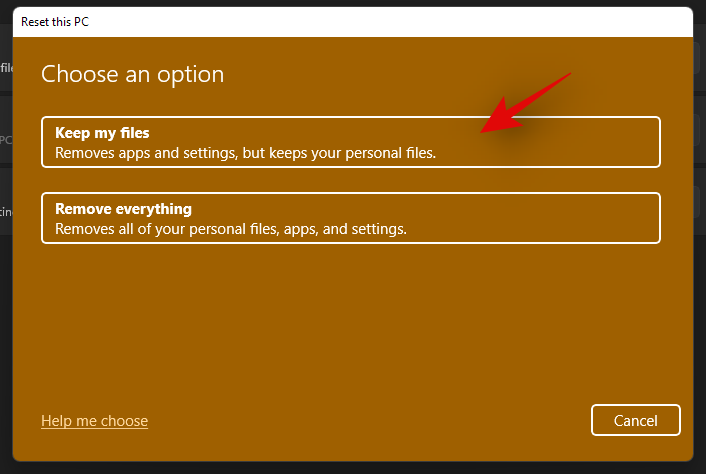
Click on ‘Keep my files’.
Windows will now process all the files on your local storage. Click on ‘Reset’.
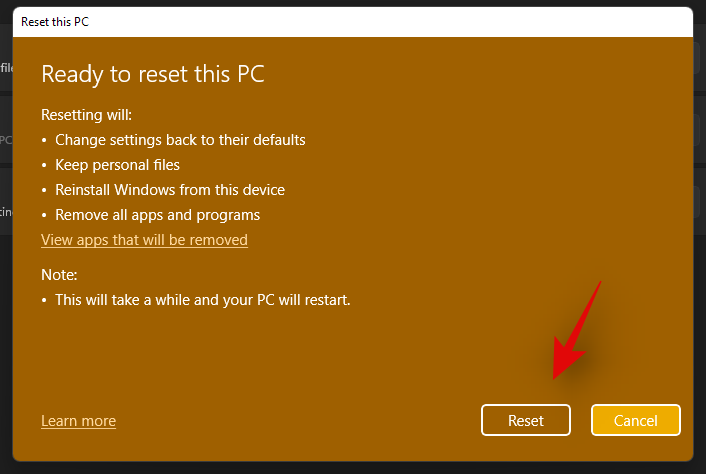
Note: If you are using Windows 11 Pro or higher then you will get the option to use a local installation/recovery media to reinstall Windows 11 as well. However, this option will be missing for Windows 11 Home users.
Windows will now reset your PC while retaining all your files. Your PC will restart several times during this process. This is completely normal and you should let Windows do its thing. If you are using a laptop or a portable NUC, then ensure that your unit is plugged into the power at all times during this process.
How to turn off Focus assist permanently
Do you wish to turn off Focus assist permanently in all scenarios? Then you can use the guide below to do so. The best way to disable Focus assist is by using the group policy editor. But in case you are using Windows 11 Home Edition, then you can use the first method in this guide to disable Focus assist permanently.
Method #1: Disable all settings and rules
Once you disable all the settings and rules for Focus assist, the feature should be turned off automatically on your system. Use the guide below to get you started.
Press Windows + i on your keyboard to open the Settings app and click on ‘Focus assist’ on your right.

Click and select ‘Off’ at the top.
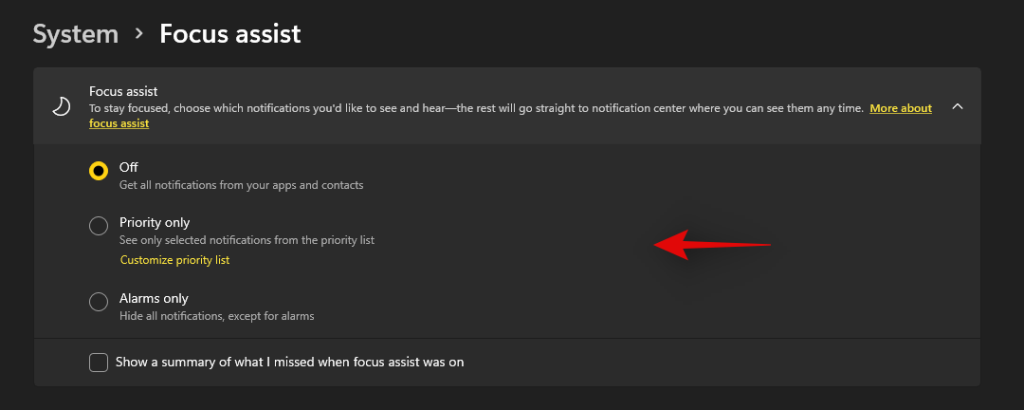
Uncheck the box for ‘Show a summary of what I missed when focus assist was on’.

Subsequently, disable all the toggles under ‘Automatic rules’ as shown below.

We also recommend turning off notifications for unnecessary apps using the guide after this section to avoid unnecessary notifications from interrupting you when focus assist is disabled.
Method #2: Using Group Policy Editor
The group policy editor will permanently disable focus assist on your system and even prevent you from accessing it in your settings. However, this method will only work on Windows 11 Pro or higher versions. In case you have the Windows 11 home edition, you can use the guide above to disable Focus assist instead.
Press Windows + R and type in the following to open Froup Policy EDitor. Click on ‘Ok’ once done.
gpedit.msc
Navigate to the following node.
User configuration > Administrative Templates > Start Menu and Taskbar > Notifications
Find and double-click on ‘Turn on Quiet Hours’ on your right.
Select ‘Enabled’ in the top left and click on ‘Ok’.
Focus assist will now be permanently disabled on the selected system. We recommend you restart your system or explorer.exe in case the changes do not take place immediately.
Is there any other way to disable notifications?
Yes, you can disable notifications individually on a per-app basis in Windows 11 to customize the notifications you receive. This is another way to ensure that you are only notified about the apps and notifications that you intended. Customizing your notifications this way will also allow you to retain the full functionality of the focus assist mode without having to disable certain rules to avoid mismatched scenarios in your workflow.
However, the only downside to managing your notifications this way is that you have to keep enabling and disabling notifications for apps every few months depending on your new installs and uninstalls. You can use the guide below to disable notifications on a per-app basis in Windows 11.
Disable notifications permanently on a per-app basis
Here’s how you can disable notifications on a per-app basis in Windows 11.
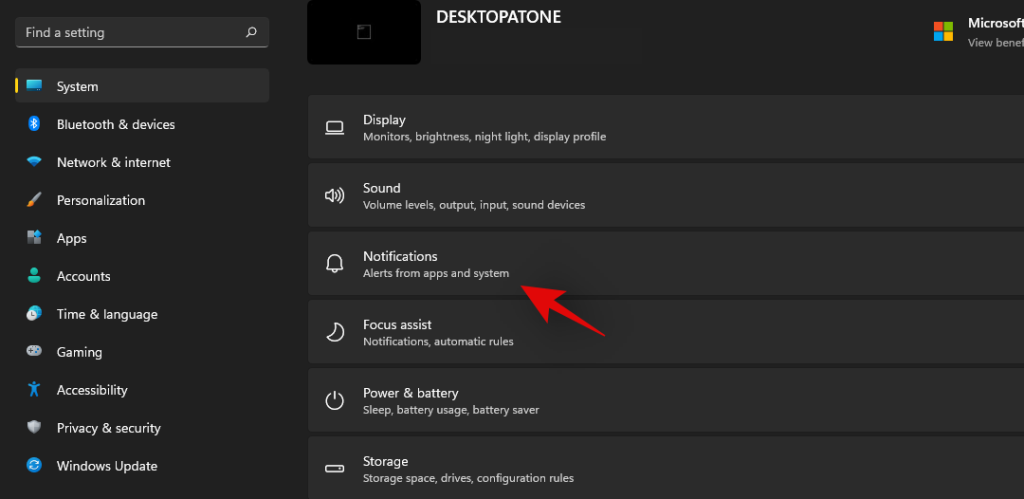
Press Windows + i on your keyboard to open the Settings app and then click on ‘Notifications’ on your right.
You will now get a list of all the apps that have the permission to deliver notifications on your system. Scroll the list to find the necessary apps and turn off the toggle beside them to disable notifications.

Repeat the steps above for all the intended apps to disable notifications.
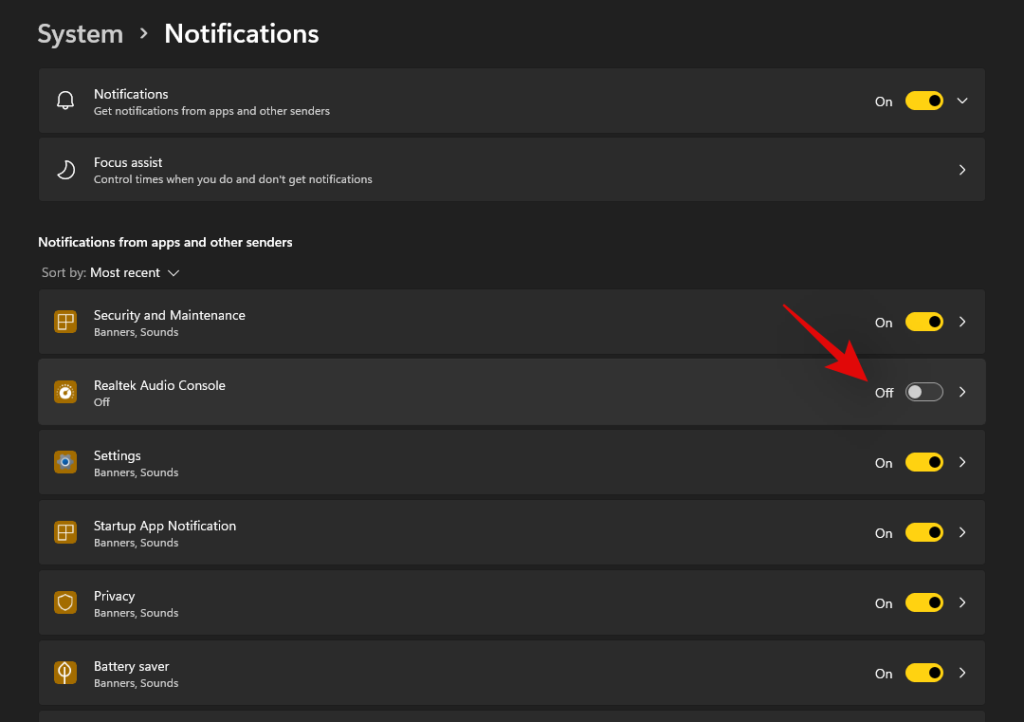
Close the Settings app and notifications for the selected apps should now be permanently disabled on your system.
Can you customize notifications in Windows 11?
Well, not exactly. Windows 11 currently has very limited options when it comes to customizing your notifications. You can not change the look, behavior, or color palette of your notifications without changing the accent color of your overall UI. However, you can customize the way your notifications sound. You can set a nice quiet notification sound that does not interrupt your workflow or opt for a quirky take that makes for a few good laughs each time you get a notification. The choice is completely up to you. Use the guide below to customize your Windows 11 notification sounds.
Required
Guide
Let’s start by first placing the .wav file in a compatible media folder so that you can set it as your default notification sound in Windows 11. Navigate to the concerned .wav file and copy it to your clipboard.
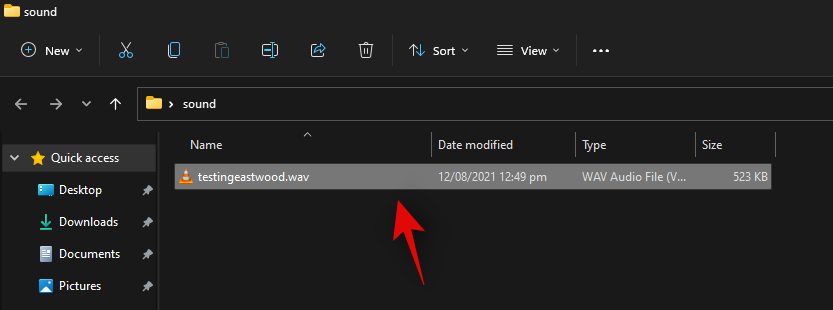
Now navigate to the following path given below. Paste your .wav file in this location. Click on ‘Continue’ when you will be prompted for administrator permission.
C:\Windows\media
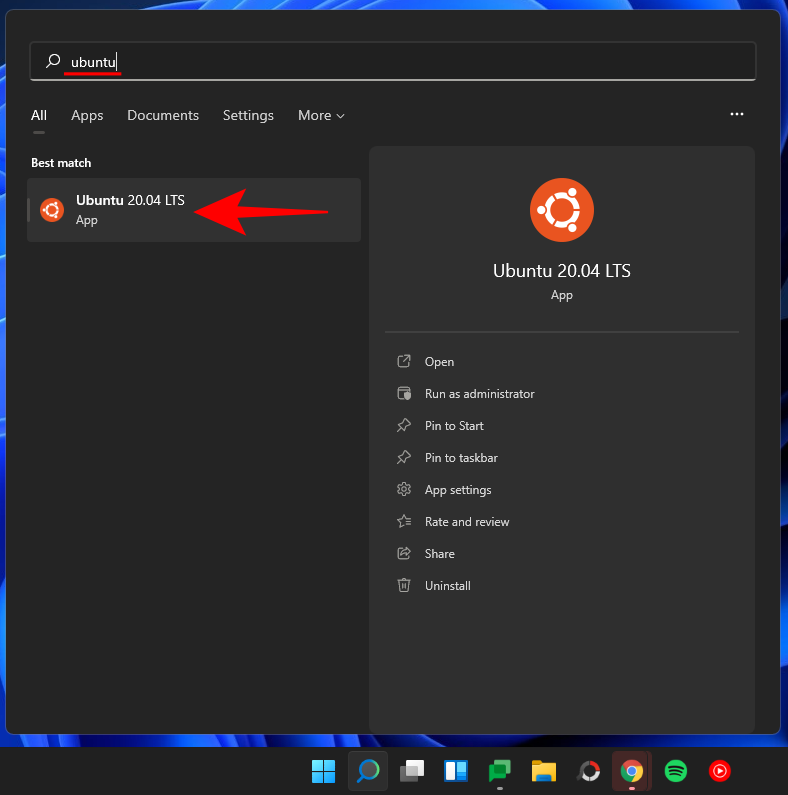
We can now use the .wav file as our default notification sound. Press Windows + i on your keyboard to open the Settings app and then click on ‘Sound’ on your right.
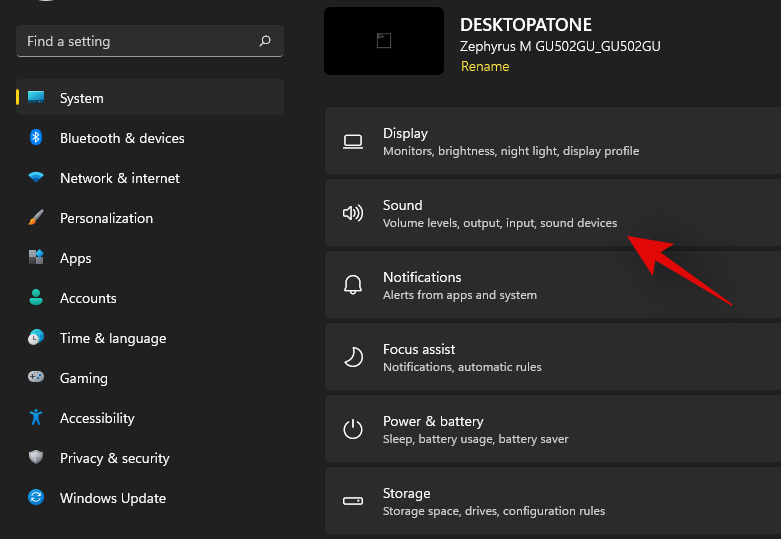
Scroll to the bottom and click on ‘More sound settings’.

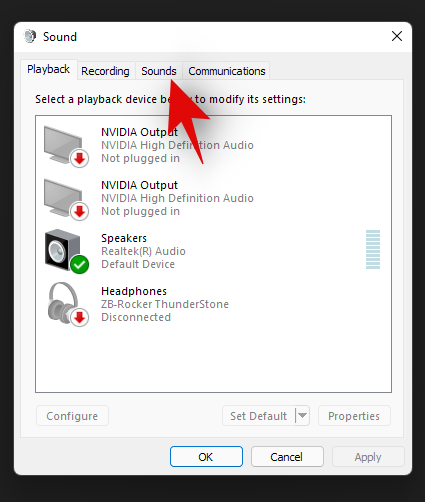
Click and switch to the ‘Sounds’ tab at the top.
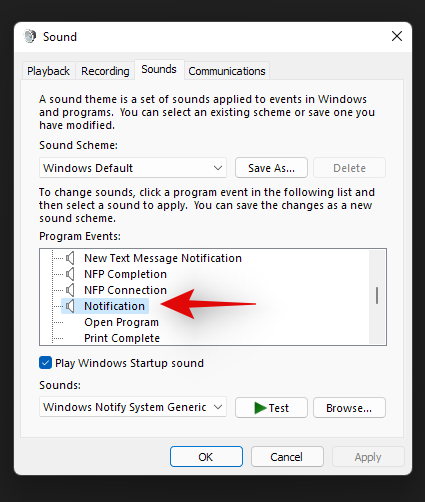
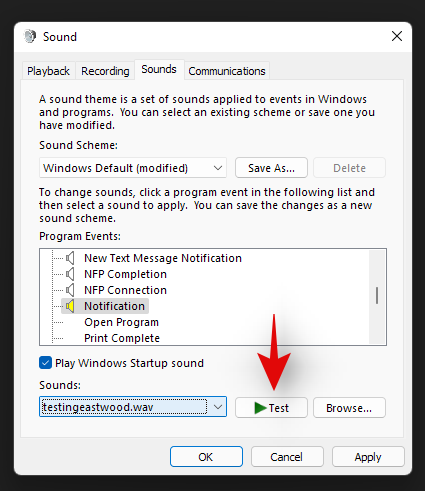
Under ‘Program Events’ scroll the list and find ‘Notifications’. Click on ‘Notifications’ to select it.
Now click on the drop-down arrow under Sounds and select the .wav file we pasted in the Media folder.
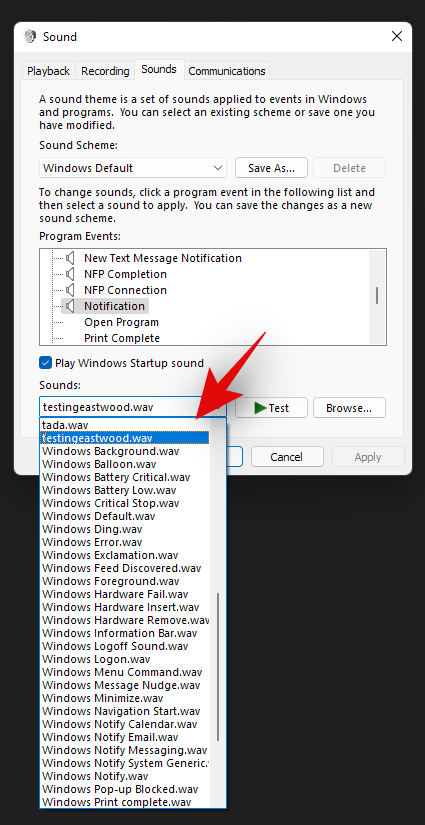
You can click on ‘Test’ to test your custom notification sound.
Click on ‘Ok’ to save your changes.
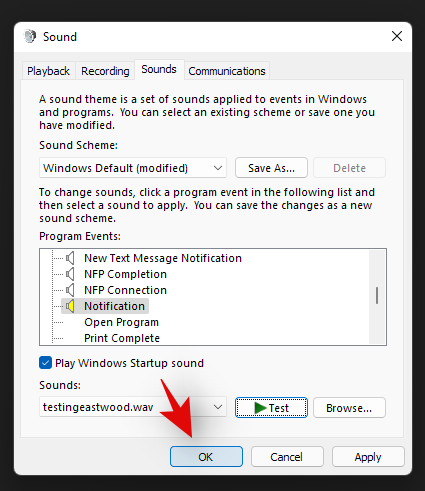
And that’s it! You will now have set a custom sound as your default notification sound in Windows 11.
Distractions from notifications are a huge problem especially when you are into some important work. Using the steps mentioned above, now, you can easily get rid of unnecessary notifications and work peacefully with full concentration.
Related:
تعرف على طرق فعالة لحل مشكلة شاشة التحميل اللانهائية المحبطة في Skyrims، مما يضمن تجربة لعب أكثر سلاسة ودون انقطاع.
أنا غير قادر على العمل مع شاشة اللمس الخاصة بشكوى HID فجأة. أنا جاهل فيما يتعلق بما أصاب جهاز الكمبيوتر الخاص بي. إذا كان هذا هو الحال، فإليك بعض الإصلاحات.
هل تريد معرفة كيف يمكنك بث Aquaman حتى لو لم يكن متاحًا للبث في بلدك؟ واصل القراءة وبحلول نهاية المنشور، ستتمكن من الاستمتاع بـ Aquaman.
تعرف على كيفية حفظ صفحة ويب بسهولة كملف PDF واكتشف طرقًا وأدوات متنوعة لتحويل محتوى الويب إلى ملفات PDF محمولة للوصول إليها ومشاركتها دون اتصال بالإنترنت.
ستساعد هذه المدونة المستخدمين على تنزيل برنامج التشغيل Logitech G510 وتثبيته وتحديثه لضمان قدرتهم على الاستفادة الكاملة من ميزات لوحة المفاتيح Logitech هذه.
اكتشف خطوات استكشاف الأخطاء وإصلاحها والأساليب التي أثبتت جدواها لمعالجة المشكلات المتأخرة في Rainbow Six Siege، مما يضمن تجربة لعب أكثر سلاسة ومتعة
ما الذي يمكنك تحويل ملف PDF الخاص بك إلى ملف نصي؟ لا تقلق، فستجد في هذا الدليل طريقتين من أبسط الطرق لتحويل ملف PDF إلى ملف نصي.
قد لا يعمل محرر نهج المجموعة على جهاز الكمبيوتر الخاص بك بسبب خطأ gpedit.msc لم يتم العثور عليه. هنا هو كيفية إصلاحه!
جوجل العثور على جهازي لا يعمل؟ لا تقلق، ستزودك المدونة بدليل شامل لاستكشاف مشكلات Google Find My Device وإصلاحها وحلها.
استكشف الحلول خطوة بخطوة المصممة خصيصًا لأنظمة Mac، مما يضمن تجربة Discord سلسة دون انقطاع.
استكشف خطوات استكشاف الأخطاء وإصلاحها لمعالجة المشكلات الشائعة واستعادة بث Netflix مرة أخرى على Roku بسلاسة.
تعرف على كيفية زيادة سعة تخزين أجهزة iPhone بكفاءة من خلال دليلنا الشامل. اكتشف الخطوات والخيارات العملية لضمان عدم نفاد المساحة المخصصة لذكرياتك العزيزة وبياناتك الأساسية مرة أخرى.
هل تعرف كيف ترى جميع التطبيقات التي تتعقبك على الفيسبوك؟ وهل لديك أي فكرة عن كيفية منعهم؟ تابع القراءة لمعرفة كيفية حماية بياناتك من التطبيقات التي يتتبعها فيسبوك.
ستساعد هذه المدونة القراء على تنزيل وتحديث برنامج تشغيل Canon MF237W لنظام التشغيل Windows 11/10 من خلال الخطوات الموصى بها من قبل الخبراء.
ستساعد هذه المدونة القراء على تعطيل ميزة Copilot على نظام التشغيل Windows إذا كانوا لا يريدون استخدام نموذج الذكاء الاصطناعي.
شراء محرك أقراص خارجي جديد؟ وفر لنفسك بعض المال وقم بتحويل القرص الصلب القديم إلى قرص ثابت خارجي. اقرأ لمعرفة المزيد حول التحويل وأنواع العبوات الخاصة بمحرك الأقراص الثابتة الجديد لديك.
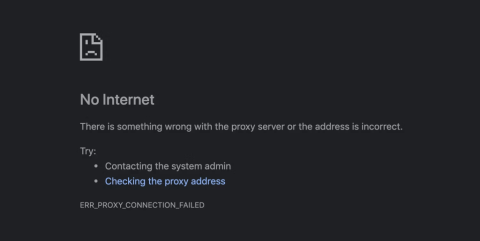
ستساعد هذه المدونة القراء الذين يواجهون الخطأ "هناك خطأ ما في الخادم الوكيل" في Chrome على نظام التشغيل Windows.
لا يعمل Kaspersky Password Manager بشكل صحيح على جهاز الكمبيوتر الذي يعمل بنظام Windows 11/10. بغض النظر عن السبب، إليك بعض أفضل الطرق لإصلاح المشكلة.
ستساعد هذه المدونة القراء على حل مشكلة ASUS Touchpad Not Working On Windows من خلال الخطوات التي يوصي بها الخبراء والتي تكون سريعة وسهلة المتابعة.
إذا بدا أن وظيفة النسخ واللصق لا تعمل على WhatsApp web، على الرغم من المحاولات الكثيرة، فجرّب هذه الإصلاحات وستتمكن من حل المشكلة في أسرع وقت.
هل تواجه مشكلة في نظام التشغيل ويندوز 11 بسبب خطأ "برنامج تشغيل Precision مفقود"؟ اكتشف حلولاً مجربة لاستعادة دقة لوحة اللمس والماوس. دليل خطوة بخطوة لحل المشكلة بسهولة.
هل تعاني من تأخر في الألعاب على نظام ويندوز 11 بسبب تقنيتي VBS وHVCI؟ اكتشف خطوات فعّالة لحل المشكلة وتحسين الأداء، وتقليل التقطيع، وزيادة معدل الإطارات دون المساس بالأمان. حلول سهلة للاعبين.
هل تواجه مشكلة في إعادة تعيين رمز PIN الخاص بـ Windows Hello في نظام Windows 11؟ اكتشف خطوات استكشاف الأخطاء وإصلاحها المجربة لحل هذه المشكلة بسرعة واستعادة الوصول الآمن إلى جهازك. تم التحديث بأحدث الإصلاحات.
هل تواجه مشكلة في ميزة "بيئة الاختبار المعزولة" في نظام التشغيل ويندوز 11؟ اكتشف حلولاً مجربة وفعّالة خطوة بخطوة لتشغيل بيئة الاختبار المعزولة بسلاسة. لا حاجة لأي خبرة تقنية!
هل تعاني من صوت مكتوم من الميكروفون الداخلي في نظام ويندوز 11؟ اكتشف حلولاً مجربة وفعّالة خطوة بخطوة لاستعادة جودة صوت نقية وواضحة دون عناء. اجعل ميكروفونك يعمل بكفاءة تامة اليوم!
هل تواجه مشكلة في بطاقة التقاط الفيديو في ويندوز 11 حيث لا تظهر إشارة عند 60 إطارًا في الثانية؟ اكتشف حلولًا مجربة لاستعادة سلاسة البث والتسجيل. دليل خطوة بخطوة لإعداد سهل وسريع.
هل تواجه مشكلة في تثبيت برنامج تشغيل مجموعة الشرائح في ويندوز 11؟ اكتشف حلولاً مجربة وفعّالة خطوة بخطوة لحل هذه المشكلة المزعجة بسرعة وتشغيل نظامك بسلاسة. مُحدّث بأحدث الحلول.
هل تواجه مشكلة في كتالوج تحديثات ويندوز 11؟ اكتشف حلولاً مجربة وفعّالة خطوة بخطوة لاستعادة التحديثات بسلاسة. أعد نظامك إلى وضعه الطبيعي بسرعة - لا حاجة لأي خبرة تقنية!
هل تواجه مشاكل في تحديد موضع واجهة Rainmeter على نظام التشغيل Windows 11؟ اكتشف حلولاً مجربة وفعّالة خطوة بخطوة لاستعادة مظهر سطح المكتب المثالي. تم تحديثه بأحدث التحسينات لتخصيص سلس.
هل تواجه مشاكل في زمن استجابة برنامج التسجيل الصوتي الرقمي (DAW) ونقص البيانات المخزنة مؤقتًا على نظام ويندوز 11؟ اكتشف حلولًا مجربة لتحسين إعدادات الصوت، وتقليل التأخير، وتعزيز الأداء لإنتاج موسيقي سلس. مُحدَّث بأحدث النصائح.
