Durante años, Windows ha estado promocionando su gran cantidad de nuevas características y mejoras alegando que están a solo un clic del menú Inicio. Pero, ¿qué pasa si el menú Inicio deja de abrirse? Bueno, puede suceder que el menú Inicio en Windows 11 deje de funcionar repentinamente para usted, lo que hace que realizar tareas habituales sea un poco agotador.
Si el menú Inicio no se abre para usted en Windows 11, hay tantas correcciones como podríamos pensar para ayudarlo a resolver el problema .
Relacionado Cómo desinstalar aplicaciones en Windows 11
NOTA: Si las 17 (!) Correcciones regulares que se proporcionan a continuación fallan, intente la corrección n. ° 18 que se proporciona a continuación en la sección 'Últimos recursos', que habla sobre la creación de un nuevo usuario a través de la línea de comando . Esto le ayuda a crear un nuevo usuario usando CMD, por lo tanto, sin necesidad de acceder a la aplicación Configuración o al menú Inicio, que puede no funcionar para usted. Dicho esto, la solución n. ° 1 sobre el problema causado por la 'Actualización de Windows KB5004300' es una nueva adición, así que tal vez verifique esto primero.
Contenido
Hemos incluido un total de 20 (!) Correcciones para resolver el problema con el menú Inicio en Windows 11 a continuación. 3 de ellos son arreglos generales que deben probarse solo después de estar seguro de que los 17 arreglos principales no son de ayuda.
17 arreglos primarios
Pruebe estas correcciones primero antes de probar las 3 correcciones generales (que también se detallan a continuación).
Solución n. ° 1: desinstale y vuelva a instalar Windows Update KB5004300
Una solución reciente descubierta por usuarios con ojos de águila parece arreglar fácilmente el menú de inicio en las nuevas actualizaciones de Windows 11. La actualización de Windows publicada con el nombre KB5004300 parece estar causando este problema. Desinstalar y reinstalar el mismo en su PC arreglará el menú Inicio y la barra de tareas por usted. Siga la guía a continuación para comenzar.
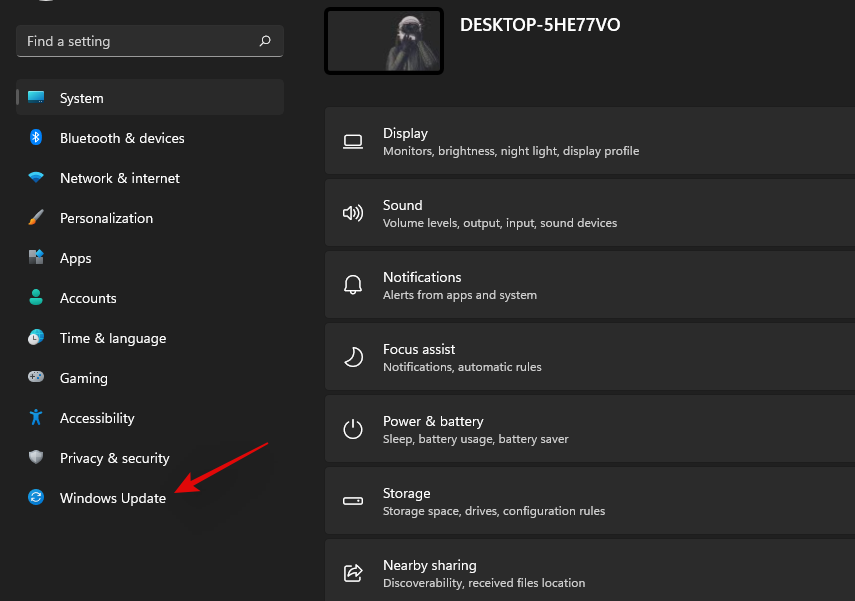
Presione Windows + ien su teclado para abrir la aplicación Configuración. Haga clic en 'Actualización de Windows' a su izquierda.
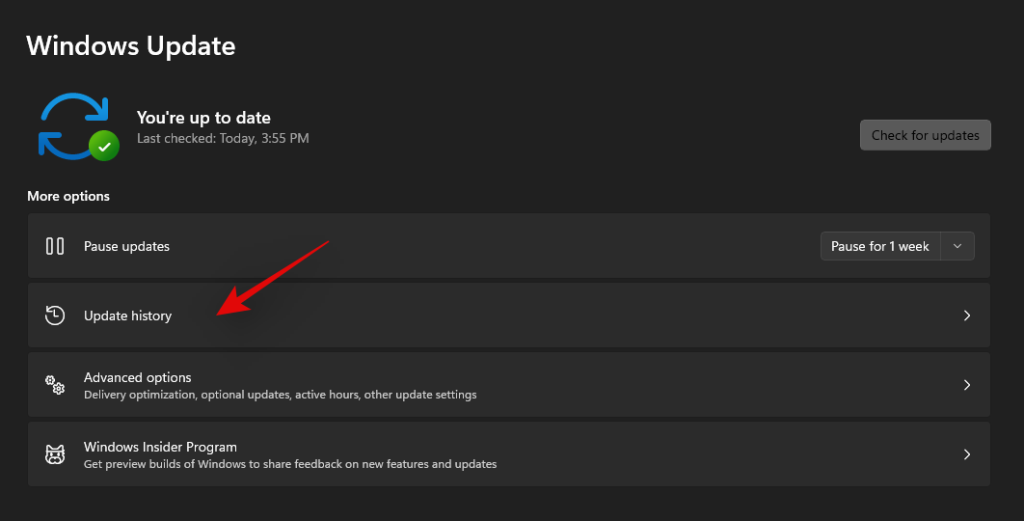
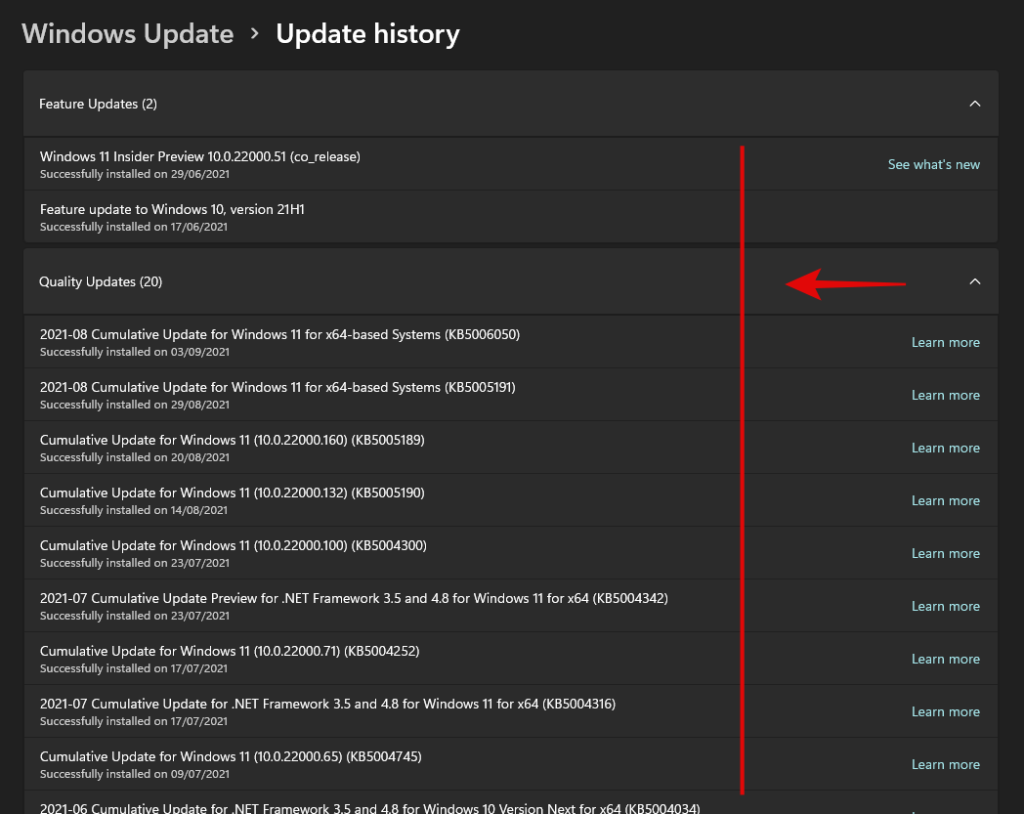
Ahora haga clic en 'Historial de actualizaciones'.
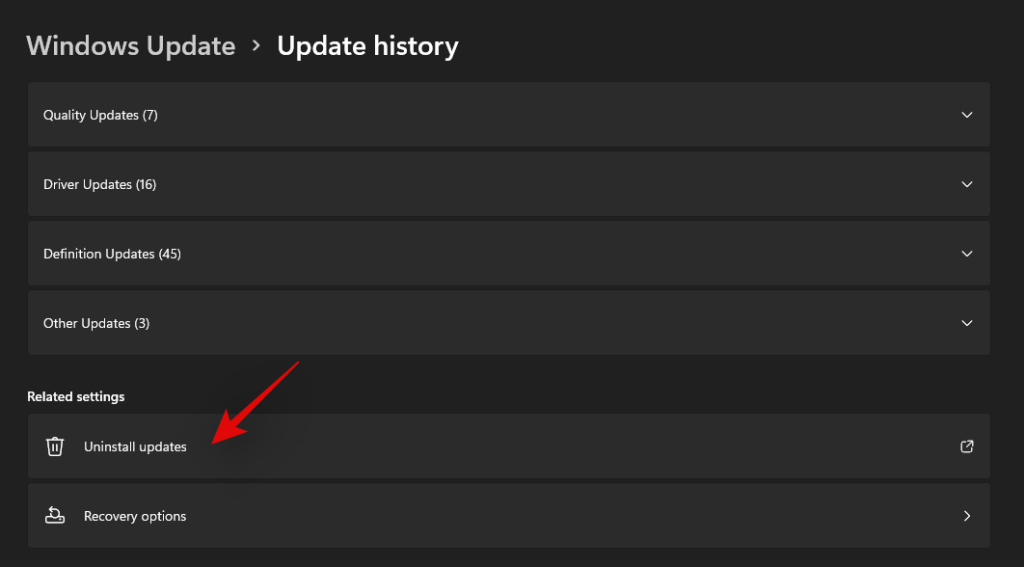
Haga clic en 'Desinstalar actualizaciones'.
Ahora será redirigido al Centro de control. Busque la actualización KB5004300 en cuestión en la lista, haga clic y selecciónela.
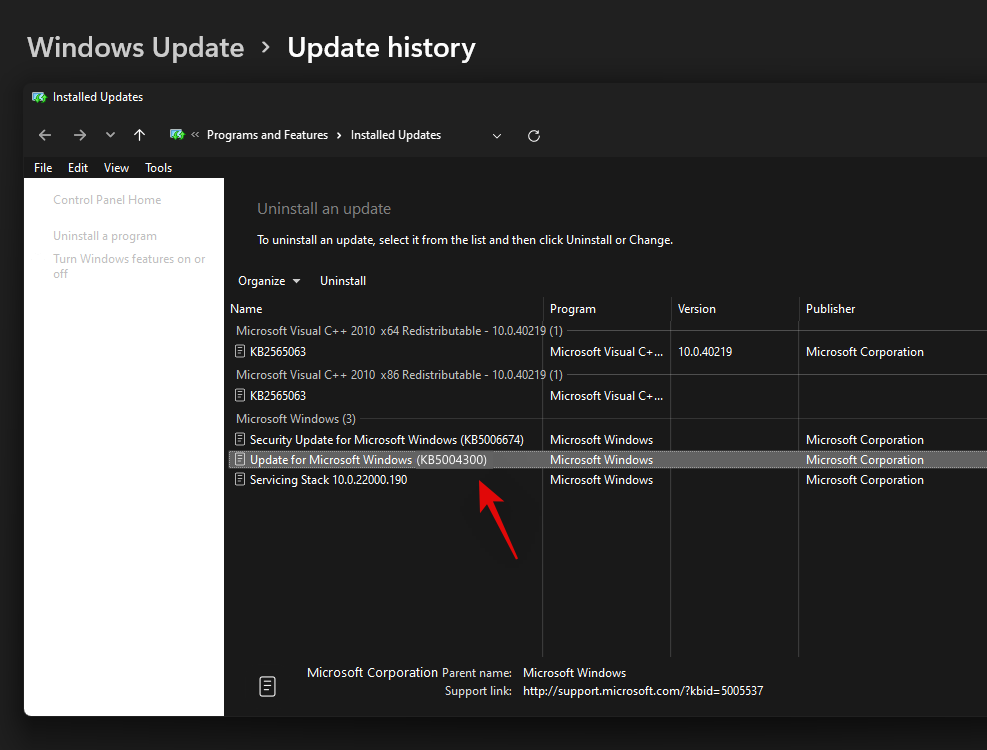
Ahora haga clic en 'Desinstalar' en la parte superior.
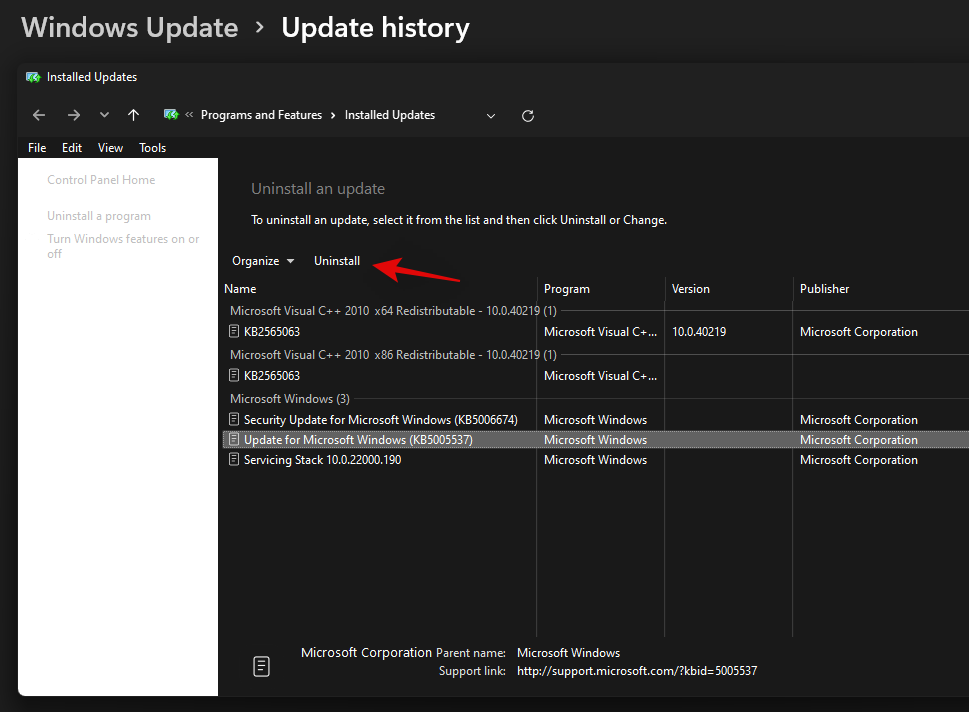
Siga las instrucciones en pantalla para eliminar la actualización de su PC. Una vez actualizado, reinicie su PC por si acaso.
Ahora presione Windows + inuevamente una vez que su PC se reinicie y seleccione Windows Update nuevamente.

Busque actualizaciones y ahora debería tener la opción de instalar Windows Update KB 5004300 en su PC nuevamente.
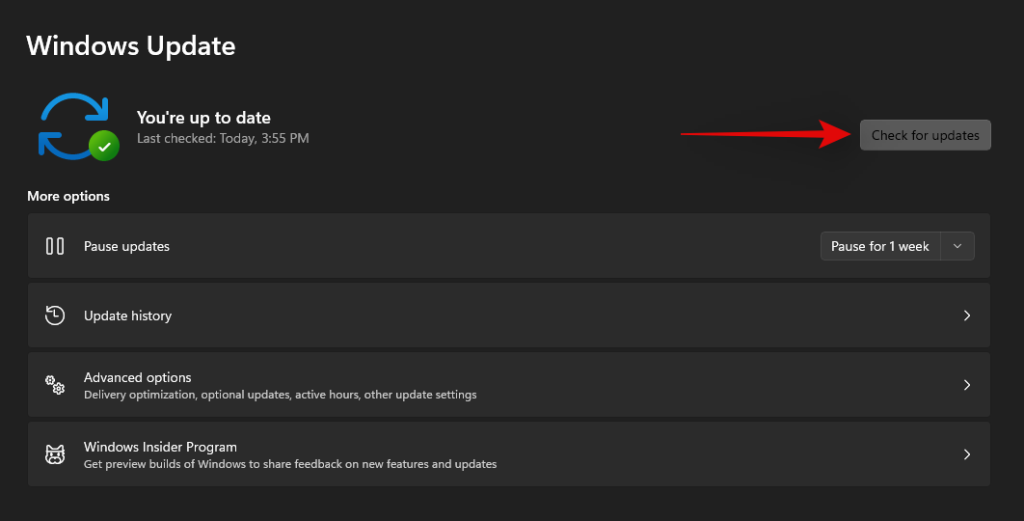
Descargue e instale la actualización y la funcionalidad del menú Inicio y barra de tareas ahora debería restaurarse dentro de Windows 11.
Solución n. ° 2: Forzar reinicio del servicio Iris
Una actualización reciente de las compilaciones internas de Microsoft ha causado problemas importantes con la barra de tareas y el menú Inicio para muchos usuarios. Si usted también está suscrito al canal Insider y ha tenido problemas al actualizar al número de compilación 22449 o superior, puede usar la solución que se menciona a continuación.
Este método eliminará el valor de registro para el servicio Iris, lo que obligará a reinstalarlo al reiniciar. Una reinstalación parece ayudar a solucionar este problema para la mayoría de los usuarios. Incluso si no estás en las mismas versiones, vale la pena intentar esta solución. Siga la guía a continuación para comenzar.
Nota: Este comando reiniciará inmediatamente su PC. Si tiene algún trabajo en curso en segundo plano, asegúrese de guardarlo antes de continuar con esta guía.
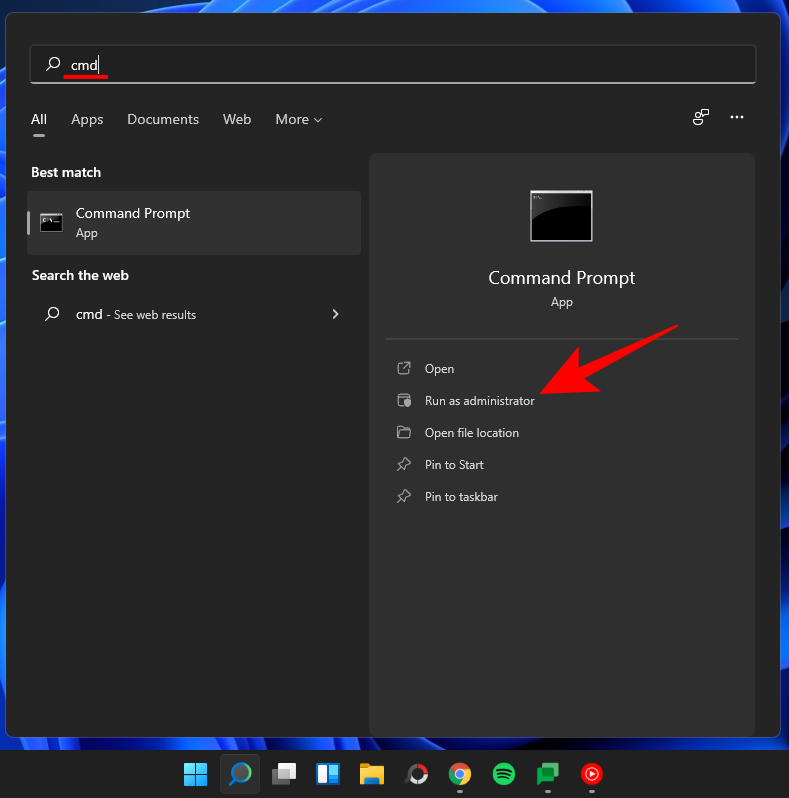
Presione Windows + S en su teclado y busque CMD. Haga clic en 'Ejecutar como administrador' o presione Ctrl + Shift + Enter en su teclado.
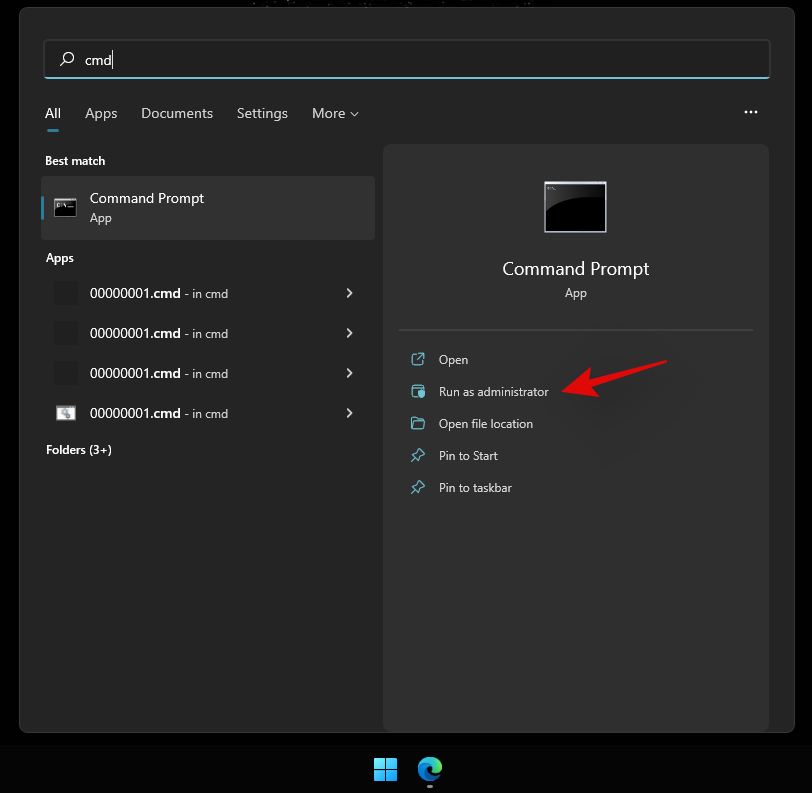
Ingresa el siguiente comando y presiona Enter en tu teclado.
reg delete HKCU\SOFTWARE\Microsoft\Windows\CurrentVersion\IrisService /f && shutdown -r -t 0

Su PC ahora se reiniciará. Inicie sesión en su PC como de costumbre y la funcionalidad del menú Inicio ahora debería restaurarse en su sistema.
Solución n. ° 3: reinicie su PC
Este es, con mucho, el método más sencillo que me viene a la mente al intentar solucionar la mayoría de los problemas en una PC con Windows 11. Normalmente, cuando reinicia el sistema, esencialmente obliga a todos los procesos, incluido Windows, a reiniciar todos sus servicios y procesos. Esto también reinicia el proceso del menú Inicio que ayudará a solucionar el problema.
Si no es obvio, estos son los pasos para reiniciar su PC.
Asegúrese de que todas sus aplicaciones y archivos estén cerrados. O simplemente vaya a la pantalla Escritorio presionando Windows key + D juntos. Ahora, presione las Alt + F4 teclas juntas en su teclado para obtener la pantalla "Apagar Windows".
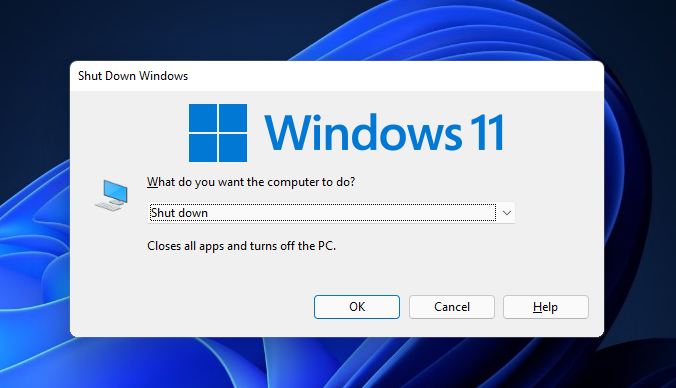
Haga clic en el menú desplegable, seleccione 'Reiniciar' y presione el botón 'Aceptar'.
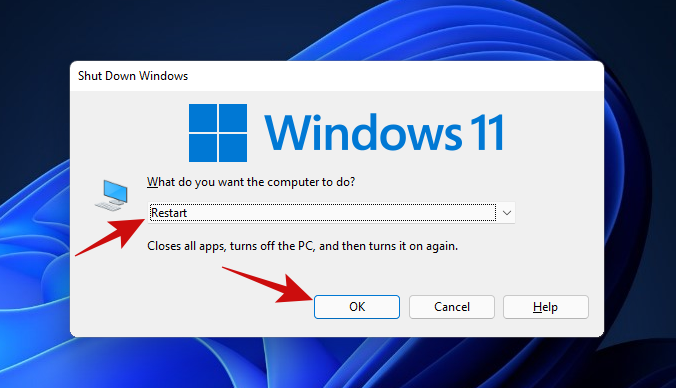
Una vez que su PC se reinicie, debería poder volver a usar el menú Inicio. Si aún no puede, pruebe con el siguiente método.
Solución n. ° 4: reinicie el Explorador de Windows usando el Administrador de tareas
La siguiente solución fácil para un menú Inicio congelado usa el Administrador de tareas. El Administrador de tareas puede ser la herramienta perfecta para administrar cualquier proceso en ejecución en una PC con Windows.
Si tiene un menú Inicio que no quiere responder a sus clics, siga los pasos que se mencionan a continuación para ver si soluciona su problema.
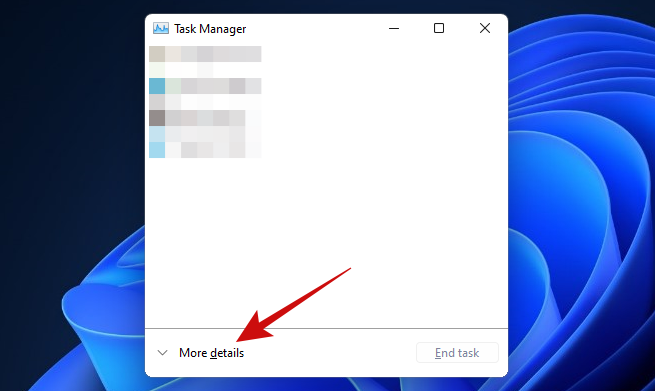
Presione las Ctrl + Shift + Esc teclas para activar el Administrador de tareas. Si su Administrador de tareas se ve así, haga clic en el botón 'Más detalles' para obtener acceso a la vista detallada.
Una vez dentro del Administrador de tareas, desplácese por la lista de Procesos para encontrar el proceso 'Explorador de Windows'. Haga clic derecho en el proceso y haga clic en la opción 'Reiniciar'.
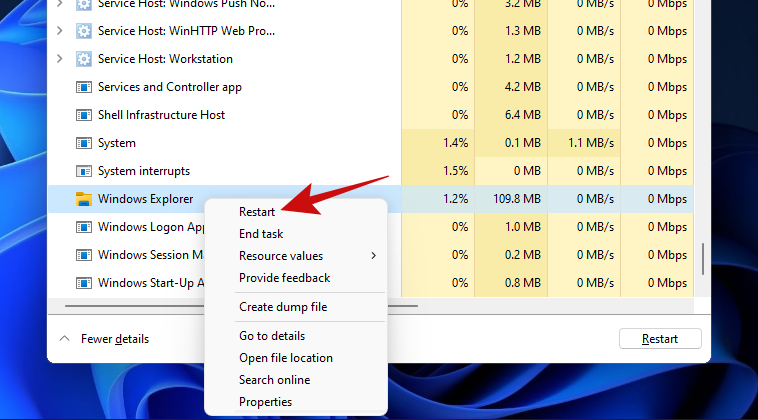
Una vez hecho clic, Windows debería reiniciar el proceso del Explorador de Windows en un instante, y eso debería arreglar su menú de inicio.
Reiniciar el proceso del Explorador de Windows es bastante similar a reiniciar su PC. La única diferencia es que aquí, solo está reiniciando un único proceso, mientras que, con un reinicio, reinicia todos los procesos. Además, muchas personas en el pasado han tenido éxito al arreglar su menú Inicio con este método, lo que hace que valga la pena intentarlo.
Solución n. ° 5: busque actualizaciones de Windows
Si aún no puede abrir el menú Inicio, debe probar Windows Update. El problema puede estar más extendido de lo que cree y es posible que Microsoft haya lanzado una revisión para parchear el menú Inicio que no responde.
He aquí cómo puede hacer eso.
Abra la aplicación Configuración con las Win key + i teclas juntas. Una vez abierta, haga clic en la opción 'Actualización de Windows'.
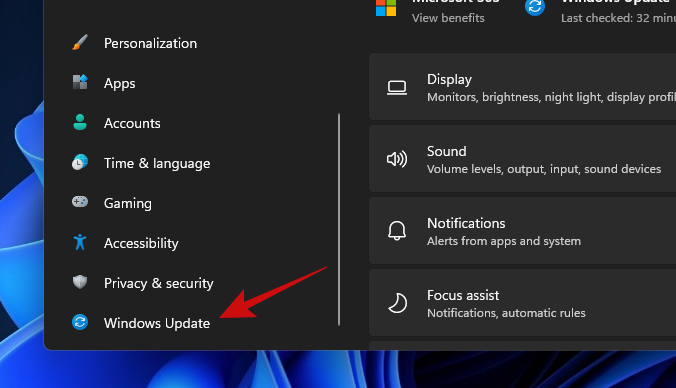
Haga clic en el botón grande 'Buscar actualizaciones' para comenzar a buscar actualizaciones disponibles para Windows para su PC. Si está disponible, deje que Windows instale todas las actualizaciones.
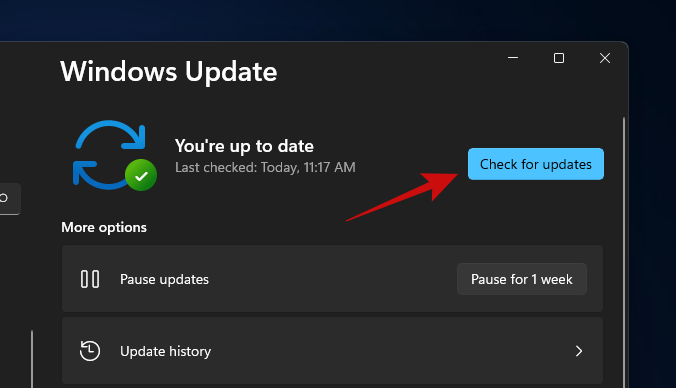
Cuando Windows termine de actualizar su PC, simplemente reinícielo e intente abrir el menú Inicio. Si aún no puede abrir el menú Inicio, creemos que es hora de buscar soluciones más avanzadas.
Solución # 6: Ejecute DISM y SFC
DISM (Administración y mantenimiento de imágenes de implementación) y SFC (Comprobador de archivos de sistema) son dos de las herramientas más potentes para identificar y reparar instalaciones de Windows dañadas. Estas herramientas se pueden utilizar con el símbolo del sistema o con Windows PowerShell. Para esta guía, los usaremos con el símbolo del sistema.
Comencemos con DISM. DISM se puede utilizar para obtener copias nuevas de archivos de Windows dañados.
Presione Win key + r para abrir el cuadro Ejecutar, escriba cmd y luego presione Ctrl + Shift + Enter juntos (en lugar de presionar enter) para abrir un símbolo del sistema elevado.
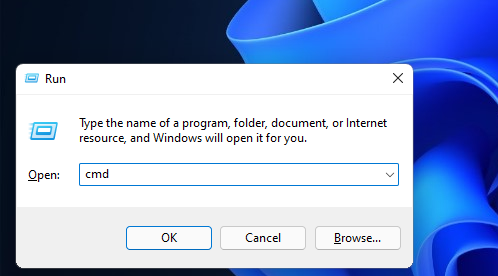
Una vez que esté dentro del símbolo del sistema, pegue el siguiente código y presione enter.
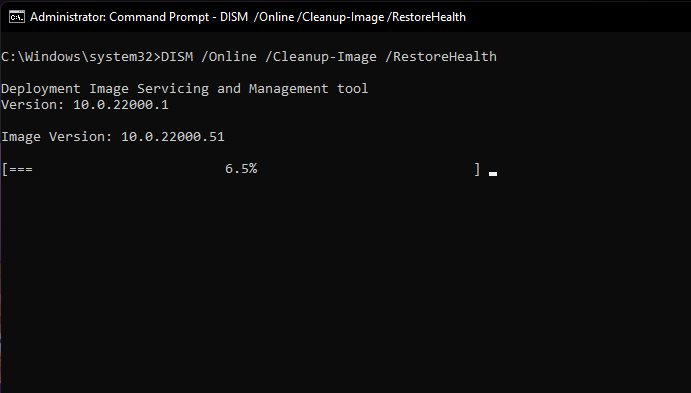
DISM /Online /Cleanup-Image /RestoreHealth
DISM ahora intentará restaurar los archivos dañados (si los hay) de su instalación actual solicitando una copia nueva de ese archivo desde la actualización de Windows. Todo el proceso tardará entre 15 y 20 minutos. Así es como se ve el comando en acción.
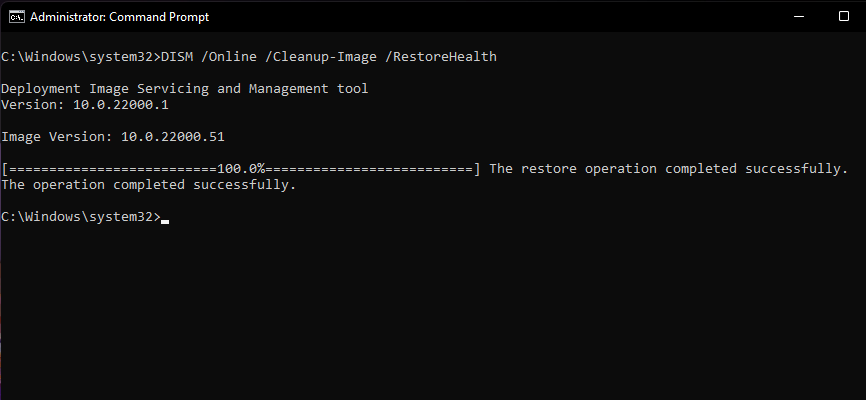
Una vez que el comando haya restaurado todos los archivos dañados, debería ver algo como esto.
Una vez que haya terminado con este paso, mantenga abierta la ventana del símbolo del sistema para ejecutar el siguiente comando.
El siguiente paso es verificar la integridad de todos sus archivos de Windows 11 para asegurarse de que estén en buen estado. Para ello, usaremos la herramienta SFC.
Así es cómo.
Pegue el siguiente código en la ventana del símbolo del sistema y presione enter.
sfc /scannow
Así es como se ve el comando.
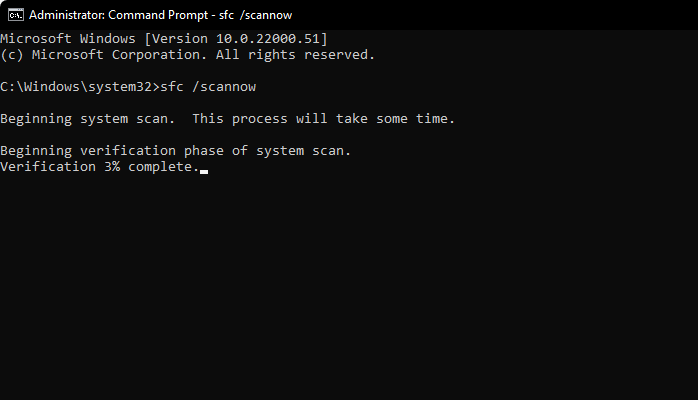
El comando anterior solo tomará un par de minutos para terminar de escanear la integridad de sus archivos de Windows. Una vez hecho esto, el resultado debería verse así.
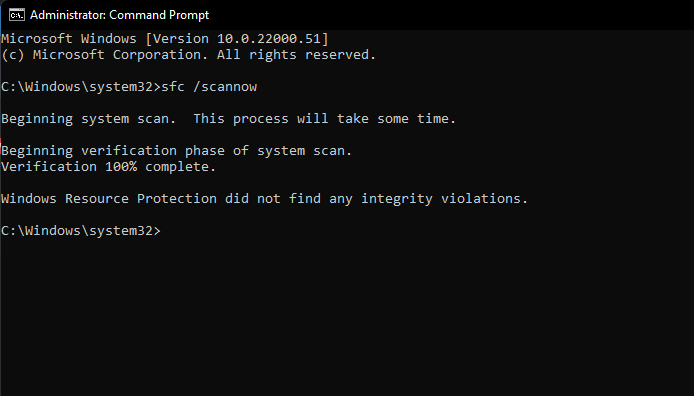
Consejo: asegúrese de que su PC tenga una conexión a Internet estable para que este método funcione.
Ahora es el momento de reiniciar.
Aún atascado con un menú de inicio roto, es hora de probar el siguiente método.
Relacionado: 6 formas de actualizar controladores en Windows 11
Solución # 7: Reconstruir el índice de búsqueda
El menú Inicio y la búsqueda de Windows están estrechamente integrados. Es posible que los problemas con la búsqueda y la indexación se hayan infiltrado en el menú Inicio y lo hayan afectado. Entonces, descartemos esta posibilidad también.
Echemos un vistazo a los pasos para hacerlo.
Abra el cuadro Ejecutar presionando Win key + r. Luego pegue el texto a continuación en el cuadro Ejecutar y presione enter.
control /name Microsoft.IndexingOptions
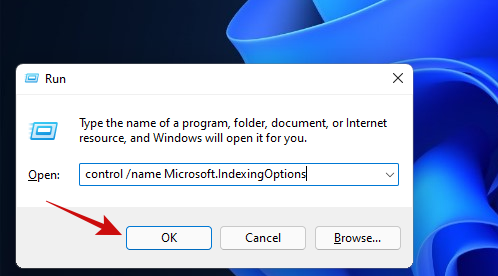
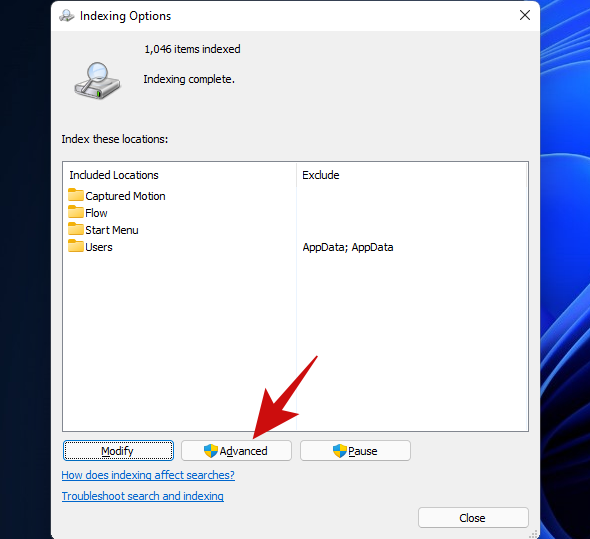
Debería ver una ventana emergente titulada 'Opciones de indexación' abierta. Haga clic en el botón 'Modificar'.
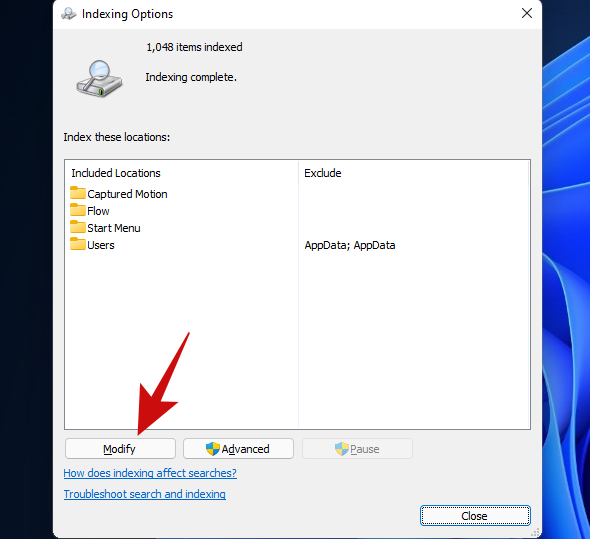
Haga clic en el botón 'Mostrar todas las ubicaciones'.
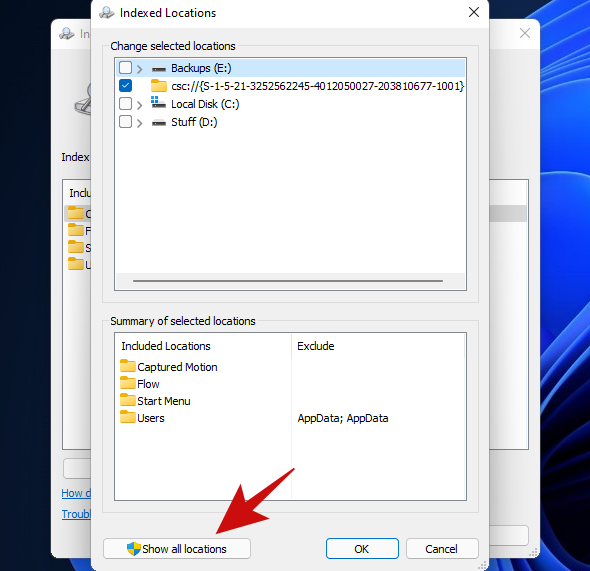
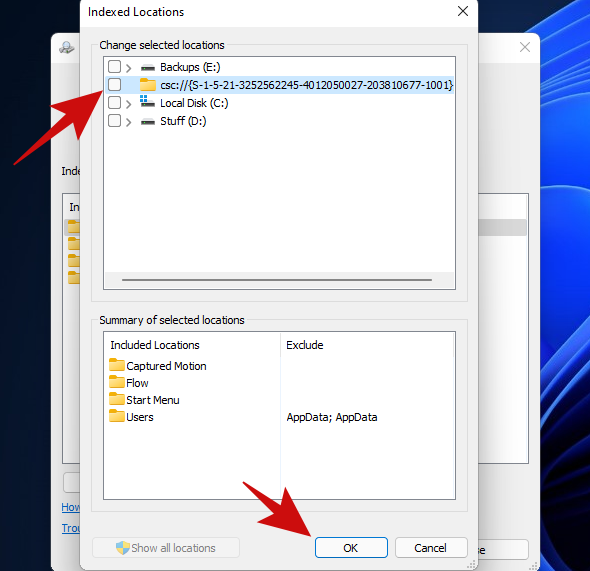
En esta pantalla, desmarque todas las ubicaciones y haga clic en el botón 'Aceptar'. La nuestra tenía solo una ubicación marcada, por lo que desmarcamos solo una ubicación en esta lista.
Haga clic en el botón 'Avanzado'.
Haga clic en el botón 'Reconstruir'.
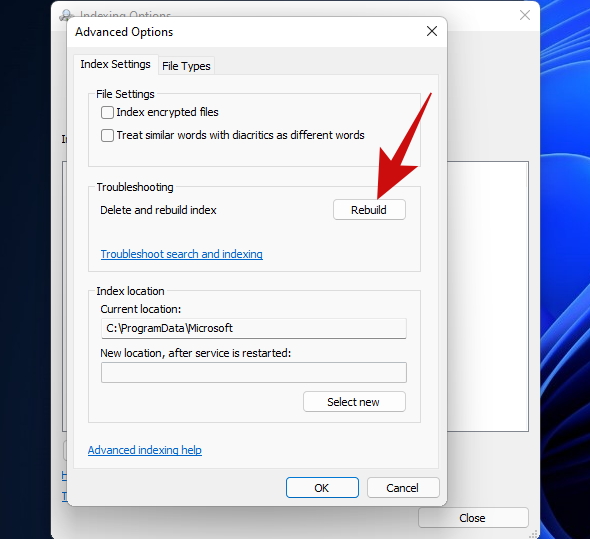
Windows ahora comenzará a reconstruir el índice de búsqueda. Tenga la seguridad de que todo el proceso ahora será manejado por Windows y realmente no requiere ninguna entrada del usuario, aunque lleva bastante tiempo completarlo.
Cuando Windows haya reconstruido su índice de búsqueda, reinicie su PC. Una vez que esté dentro de Windows nuevamente, intente abrir el menú Inicio. Si aún no funciona, creemos que es hora de optar por un método más resistente.
Si ha instalado programas de terceros para modificar el aspecto o las funciones de su menú de inicio, le recomendamos que elimine todos esos programas. Probablemente, uno de estos programas no es compatible con el nuevo menú de inicio de Windows 11, por lo que tiene problemas con su sistema. Si tiene una de las siguientes aplicaciones que se mencionan a continuación, le recomendamos que revierta su configuración y la desinstale lo antes posible. La mayoría de estas aplicaciones fueron diseñadas para Windows 10 y, hasta cierto punto, son incompatibles con el código del menú Inicio de Windows 11. Una actualización reciente de Windows 11 probablemente rompió su compatibilidad y provocó que el menú de inicio fallara en su sistema.
- Shell abierto
- Inicio clásico
- WinAero Tasbar
- Barra de tareasX
Y más. Si eliminar una aplicación de terceros que modifica su menú de inicio ayuda a restaurar su funcionalidad, entonces puede esperar una actualización compatible para usar la aplicación nuevamente.
¿Usó un truco de registro para obtener el menú de inicio de Windows 10 anterior en Windows 11? Si es así, es probable que la funcionalidad de este truco de registro se haya roto con una actualización reciente de Windows 11. En tales casos, puede utilizar la guía a continuación para revertir los cambios en su sistema.
Presione Windows + R en su teclado y escriba lo siguiente en el cuadro de diálogo Ejecutar.
regedit

Presione Entrar en su teclado una vez que haya terminado para iniciar el editor de registro. En su lugar, también puede hacer clic en "Aceptar".
Ahora copie y pegue la dirección que se proporciona a continuación en la barra de direcciones en la parte superior del editor de registro y presione 'Enter' en su teclado.
Computer\HKEY_CURRENT_USER\Software\Microsoft\Windows\CurrentVersion\Explorer\Advanced
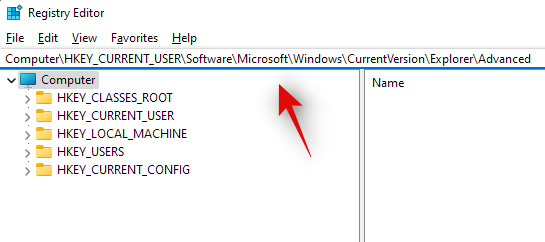
Look for ‘Show_StartClassicMode’ on your right and right-click on it.

Select ‘Modify’.

Change its value data to ‘0’ and click on ‘Ok’. Do not close the registry editor just yet.

Press Ctrl + Shift + Esc on your keyboard to launch the Task Manager. Now click and switch to the ‘Details’ tab at the top.
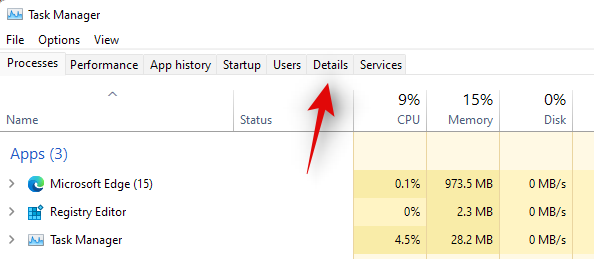
Click and select Explorrer.exe from the list and press Delete on your keyboard.

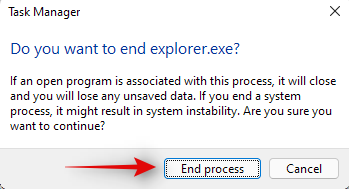
Confirm your choice by clicking on ‘End Process’.
Now click on ‘File’ in the top left corner and select ‘Run new task’.
Type in ‘Explorer.exe’ and press Enter on your keyboard. You can also click on ‘Ok’ instead.
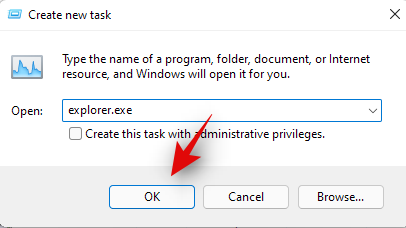
Explorer will now be restarted on your system. Switch back to the registry editor and click and select ‘Start_ShowClassicMode’.
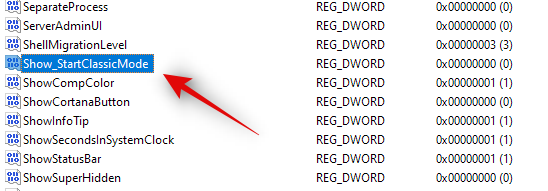
Press Delete on your keyboard and confirm your choice to delete the registry value.

Restart your system for good measure now.
If your Start menu wasn’t working due to a registry hack to get the older start menu then it should be fixed by now. You can check for the same by clicking on the Start menu icon in your taskbar.
Windows 11 has come a long way when compared to its predecessors. Background processes, tasks, and apps are more streamlined now and various features and elements seem to have their own dedicated packages. These dedicated packages make it easier for you to troubleshoot problems with certain features of Windows and even reinstall them in worst-case scenarios. If the start menu is still not working for you then you can reinstall basic elements of Windows 11 which will also reinstall the Start menu module on your system. This should help fix any background conflicts and get the Start menu back up and running on your system. Follow the guide below to get you started.
Press Windows + S on your keyboard and search for PowerShell. Click on ‘Run as administrator’ once the app shows up in your search results.
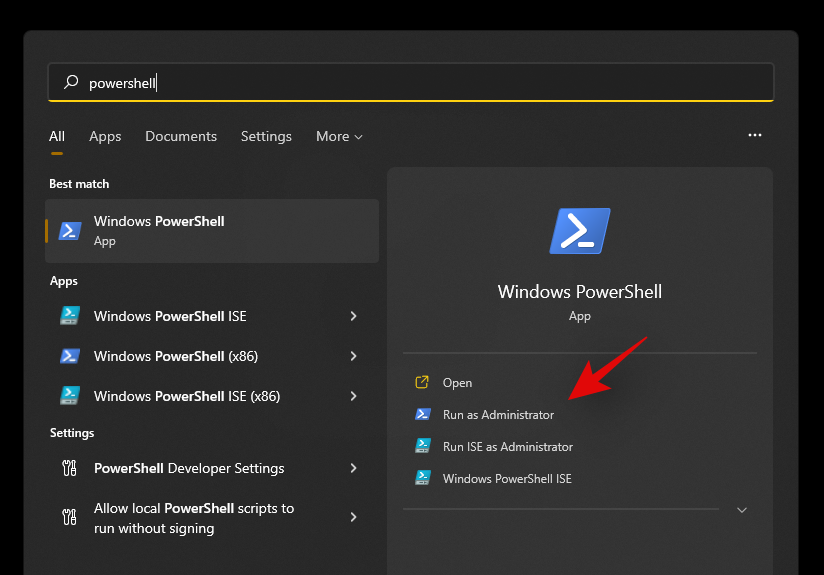
Now type in the following command and press ‘Enter’ on your keyboard.
Get-appxpackage -all *shellexperience* -packagetype bundle |% {add-appxpackage -register -disabledevelopmentmode ($_.installlocation + “\appxmetadata\appxbundlemanifest.xml”)}

Ignore any warnings that you get and continue with the process. Once complete, restart your system for good measure.
Now that the Start menu and other basic features have been reinstalled on your system, let’s rebuild your system’s index to get everything back up and running again. Press Windows + R on your keyboard to open the Run dialog box.
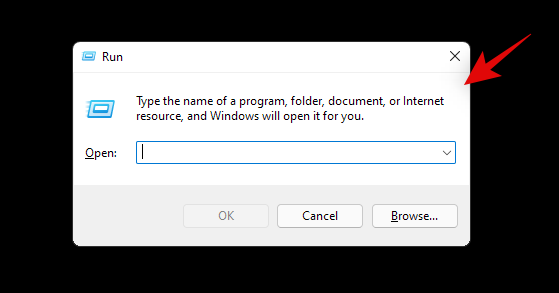
Type in the following command and press Enter on your keyboard.
control /name Microsoft.IndexingOptions
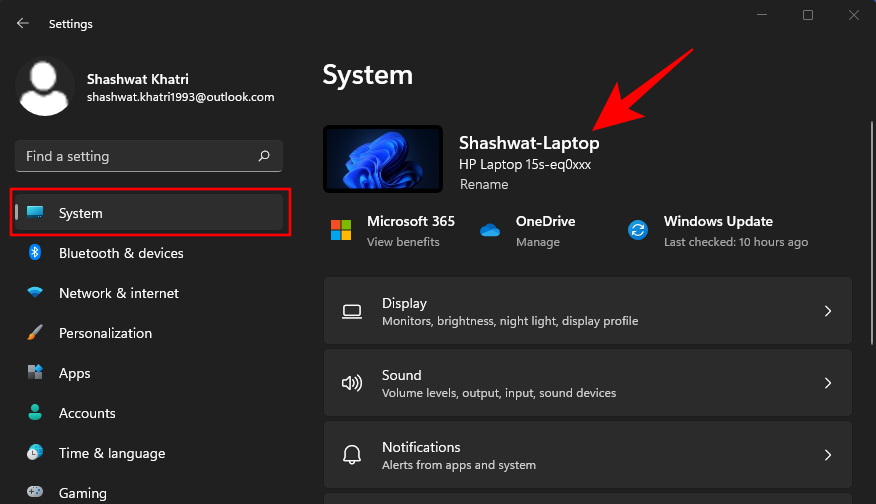
Click on ‘Modify’ and select ‘Show all locations’.
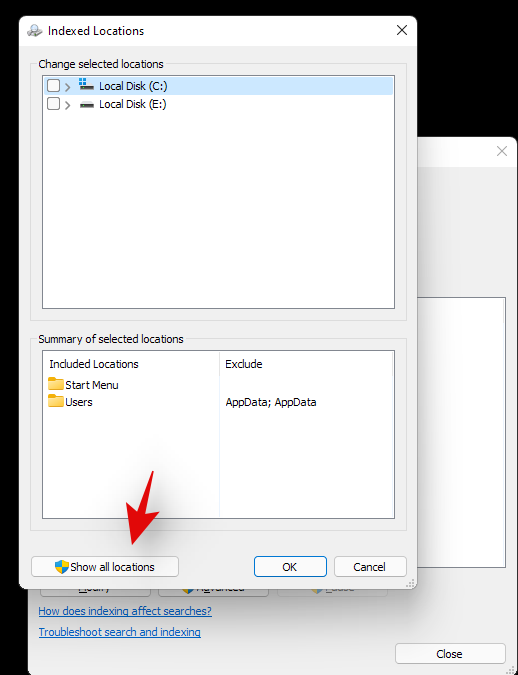
Uncheck all the boxes in the current list.
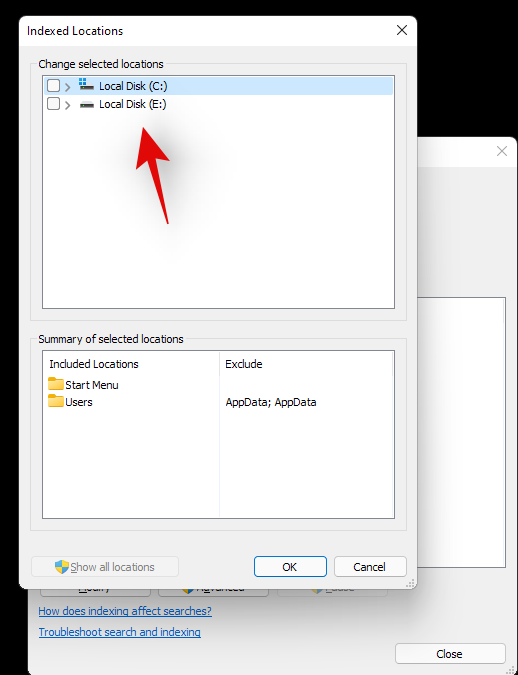
Click on ‘Ok’.
Click on ‘Advanced’ now.
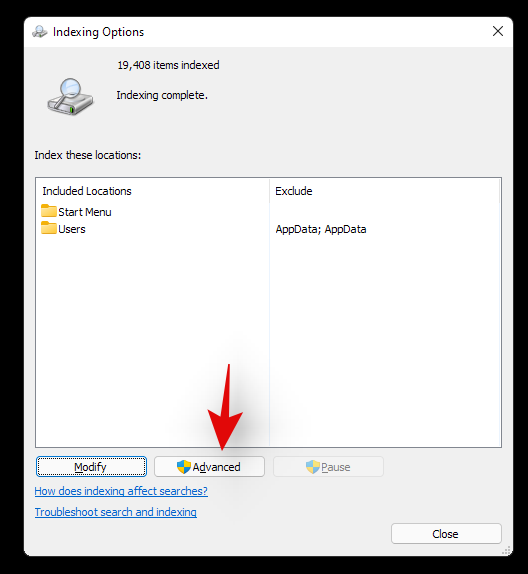
Select ‘Rebuild’ under troubleshooting.
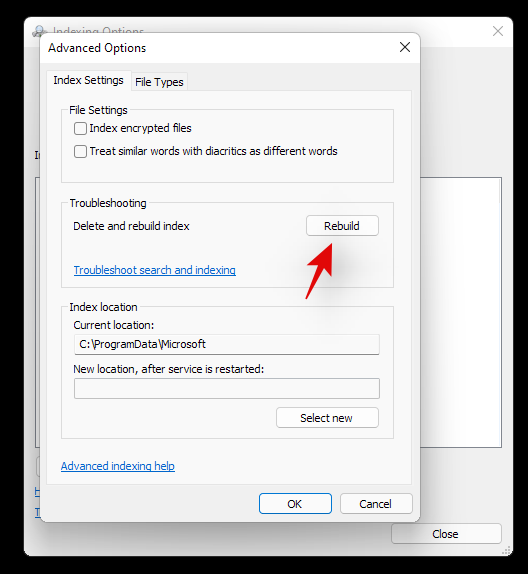
Click on ‘Ok’ once the warning pops up on your screen.
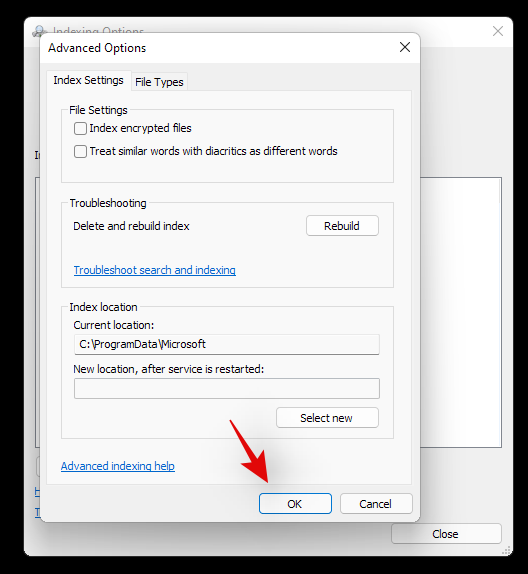
Once the process finishes, we highly recommend you restart your system.
You can now try clicking on the Start icon once your system restarts. Reinstalling the Start menu should help fix any issues with the Start menu on most systems.
Fix #11: Install any pending driver and Windows updates
This might be a bit obvious but you should definitely install any pending driver updates or Windows update on your system. This will help get you up and running on the latest drivers and help your system be compatible with all the hardware installed on your system. While drivers rarely cause issues with Windows features, you can never be too sure. Hence we recommend you install the latest available drivers on your system. You can use the link below to go to our detailed guide for updating drivers on Windows 11. If you are using a pre-built system or a laptop, then we recommend checking your OEM support page for dedicated driver updates as well.
There is a registry value that if modified, can disable your Start menu altogether. If you have been using registry modifiers, cleaners, and more, then it is likely that this registry value was modified which ended up disabling the Start menu on your system. Additionally, the Start menu’s functionality was moved to a Xaml process once Windows 10 was released. This process is known to glitch out
Use the guide below to check if the start menu is disabled on your system and re-enable it if needed.
Press Windows + R on your keyboard and type in the following command given below.
regedit
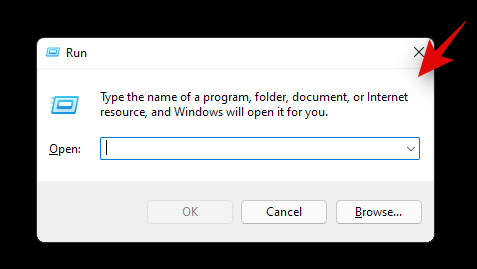
Now press Enter on your keyboard or click on ‘Ok’.
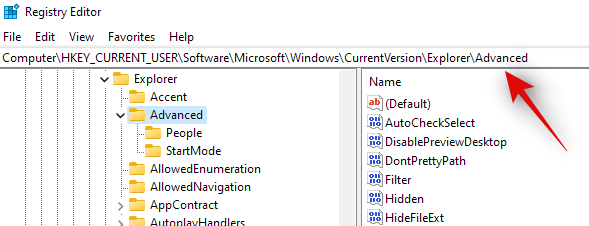
Copy and paste the following address in the address bar at the top of your registry editor.
HKEY_CURRENT_USER\Software\Microsoft\Windows\CurrentVersion\Explorer\Advanced
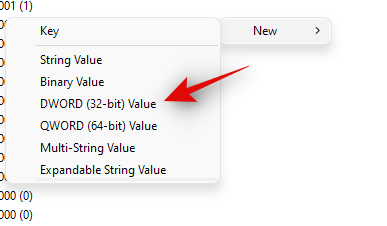
Now right-click on your right tab and select ‘New’.
Select ‘DWORD (32-bit value)’.
Enter the name as ‘EnableXamlStartMenu’.
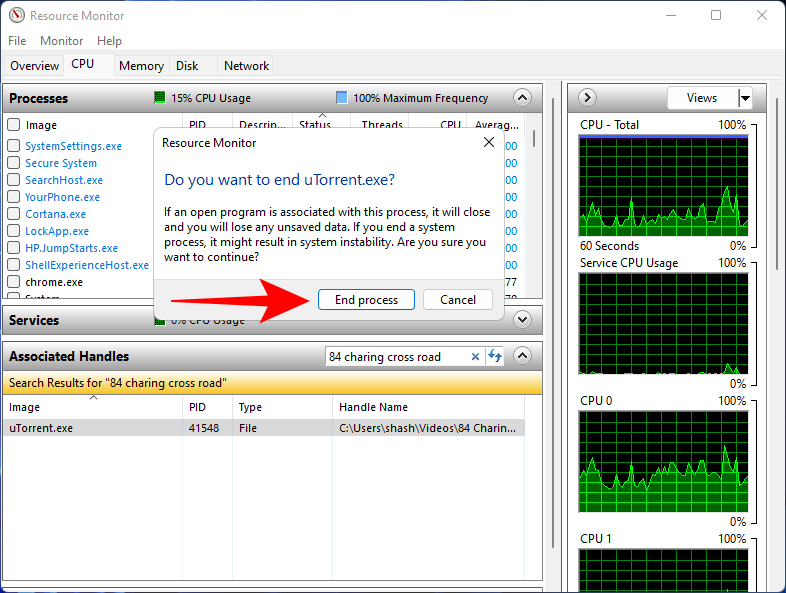
Enter the value as ‘0’.
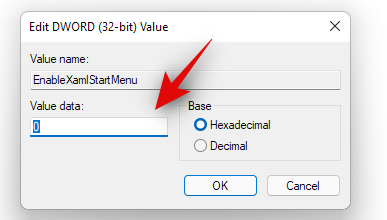
Restart your PC now.
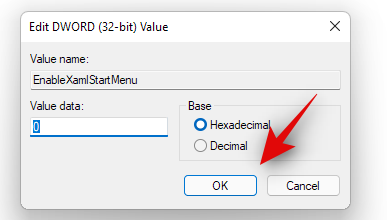
Once restarted try activating the Start menu now. If the Xaml process was facing conflicts, then they should be fixed now and the Start menu should be back up and running on your system again.
Fix #13: Restart Windows background services
If the Start menu still fails to launch then it’s time to restart all background Windows services. Usually restarting the ‘ShellExperienceHost.exe’ is enough but if that does not work for you, you can try restarting all the services listed below. This usually gets the Start menu back up and running on most systems.
Press Ctrl + Shift + Esc on your keyboard to open the ‘Task Manager’. Now click on ‘Details’ at the top to switch to the Details tab.
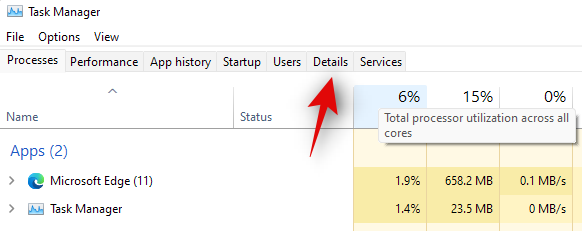
Find ‘StartMenuExperienceHost.exe’ in the list and click and select it.

Press Delete on your keyboard or click on ‘End Task’ in the bottom right corner. Click on ‘End Process’ again to confirm your choice.
ShellExperienceHost.exe will now be killed. The process should automatically restart within a few seconds. Once restarted, try activating the Start menu on your system. If the menu starts working then you are good to go. However, if it is still not working then use the guide above to restart the following services on your system as well.
- SearchIndexer.exe
- SearchHost.exe
- RuntimeBroker.exe
And that’s it! If a background process was stopping you from accessing the Start menu then the issue should be fixed for you by now.
Fix #14: Run a Windows Troubleshooter
During a Windows 1909 feature update back in 2019, the Start menu was essentially broken due to a background conflict. To fix this issue for the masses, a troubleshooter was released by Microsoft to help fix this issue. If the Start menu is still not working for you then you can try running this troubleshooter on your system. Use the guide below to download and run the troubleshooter on your system.
Download the archive linked above to a convenient location on your local storage and extract its contents.
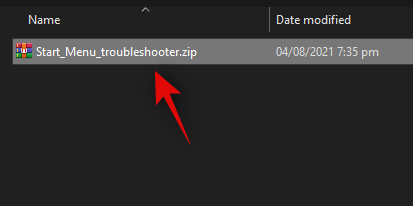
Now copy and paste the ‘startmenu.diagcab’ file on your desktop.

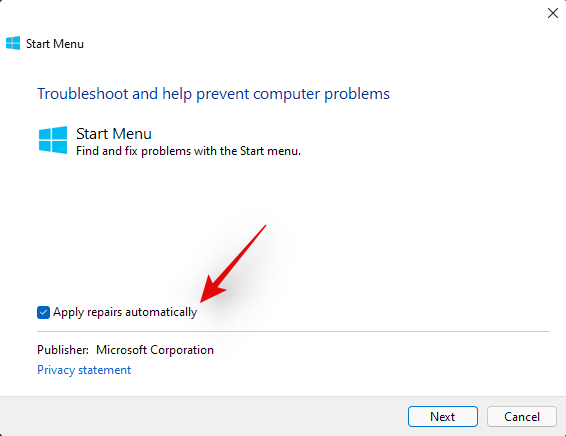
Double click and run the file from your desktop. Click on ‘Advanced’.
Check the box for ‘Apply repairs automatically’. Click on ‘Next’ once you are done.
The troubleshooter will now do its thing and try to fix the Start menu on your system. Any errors or issues found will be automatically fixed and the Start menu’s functionality should now be restored on your system.
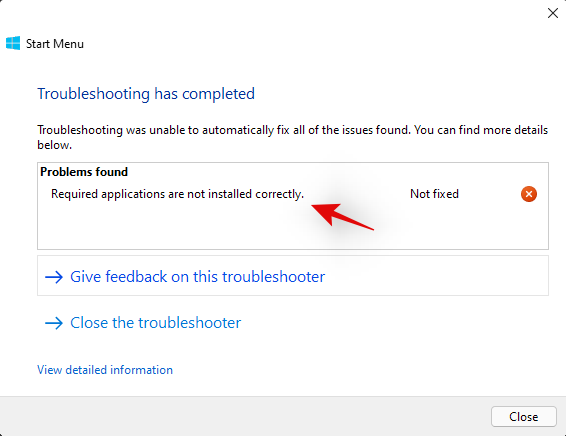
However, if the troubleshooter fails to fix the Start menu then this might indicate a more serious issue on your system. In such cases, let’s verify if Windows is actually able to access and initiate the process for the Start menu on your system. Use the checks below to help you along with the process.
We now need to check if the Start menu is actually available within your install of Windows 11. Let’s create a new local account that will help you verify its functionality. If the Start menu is working in the new account then it is likely an issue with your current user account.
Press Windows + i on your keyboard and click on ‘Accounts’ on your left.
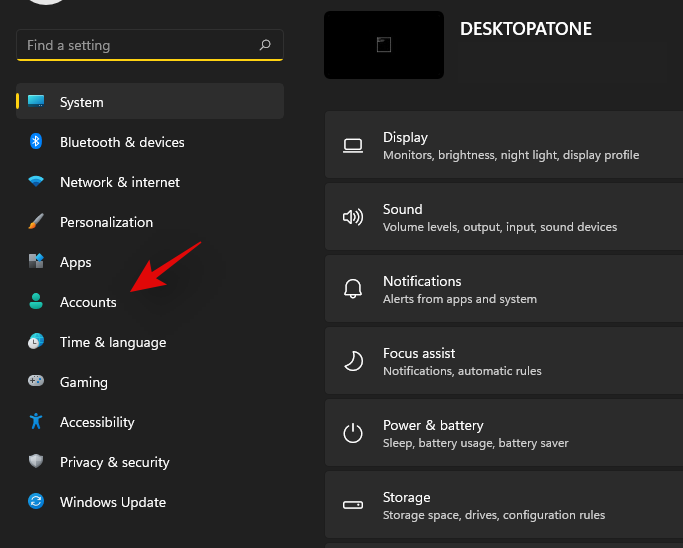
Click on ‘Family & other users’.
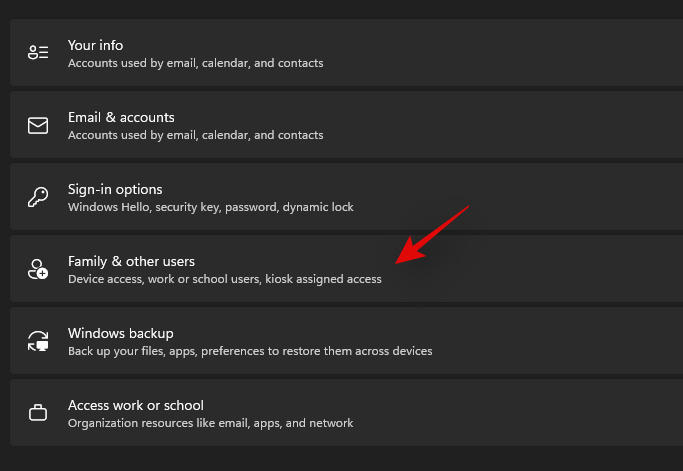
Now click on ‘Add account’ under other users.

Click on ‘I don’t have this person’s sign-in information’.
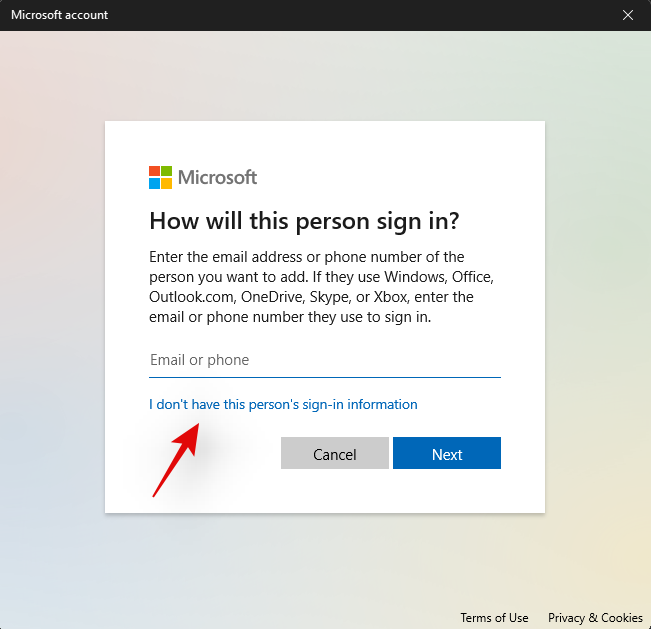
Click on ‘Add a user without a Microsoft Account’.
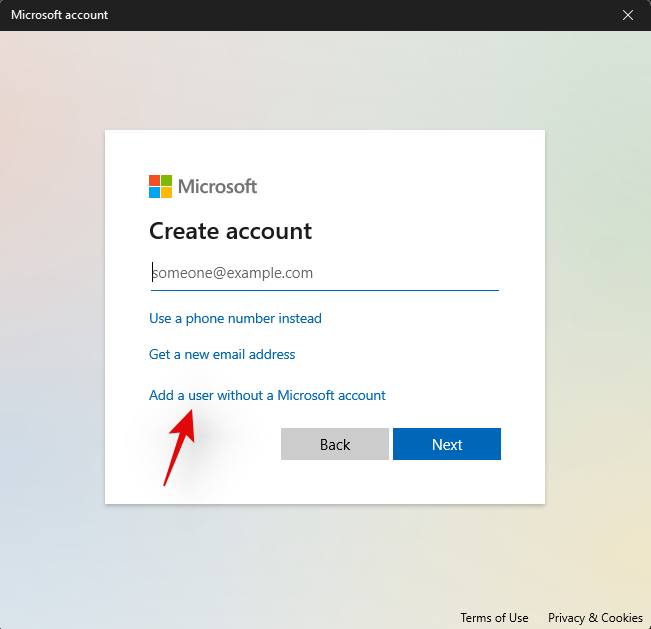
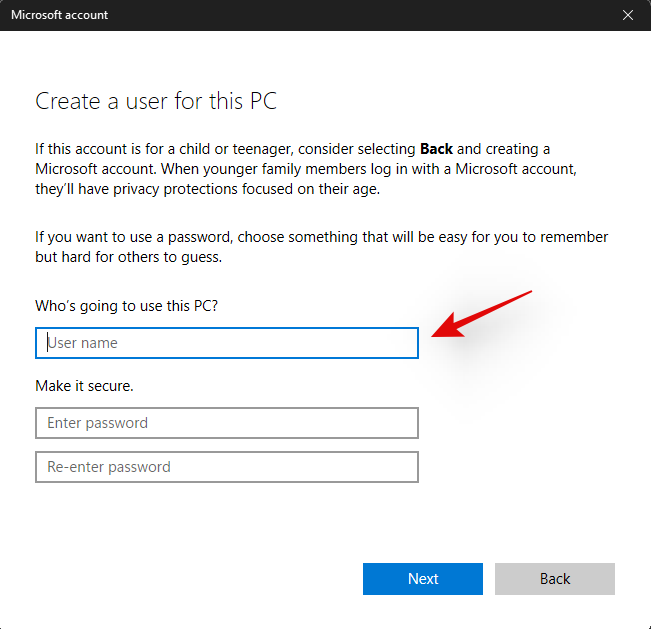
Now enter a username for the new account, and a password if needed.
Click on ‘Next’ once you are done.
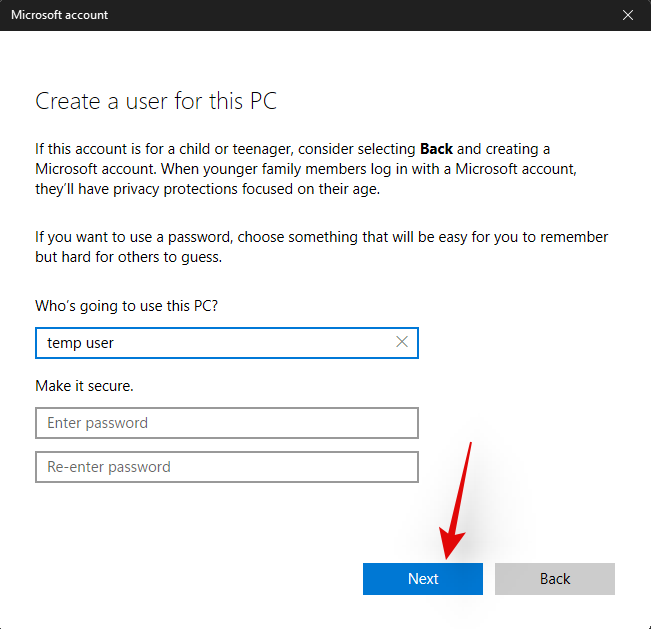
The new user account will now be created. Sign out of your current account and sign in to the new account.
Try to activate the Start menu now in the new temporary local account. If it is working then this is an issue specific to your user account. However, in case the Start menu fails to open, then this might indicate a more serious issue with your Windows 11 installation.
It’s now time to check if the Start menu is working in Safe mode. In case it is, then a third-party app is likely interfering with the Start menu’s functionality. You can remove any third-party apps used to modify the Start menu to try and fix this issue. Follow the guide below to activate Safe mode on Windows 11.
Press Windows + i on your keyboard and select ‘Windows Update’.
Now click on ‘Advanced options’.
Click and select ‘Recovery’.
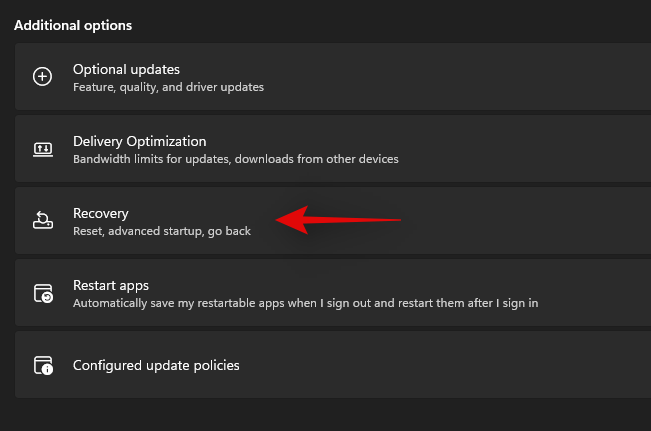
Now click on ‘Restart now’ beside ‘Advanced startup’.

Click on ‘Restart now’ again.
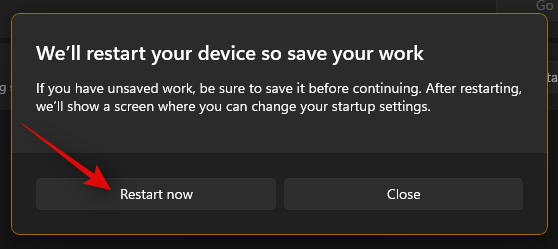
Your PC will now restart to the recovery screen. Click and select ‘Troubleshoot’.
Now click on ‘Advanced options’.
Click on ‘Startup Settings’.
Press ‘F4’ to start your PC in safe mode now.
Once your PC restarts, the safe mode should be active on your system. Now try to activate the start menu. If the menu activates, then it is likely that a third-party app is causing issues on your Windows 11 system. You can try removing apps used to customize the Start menu one by one to find the culprit on your system.
Fix #17: Run a malware and antivirus scan
We recommend you try and run a malware scan before opting for the last resort. If any malware or malicious service is causing issues with the Start menu, then a scan will help solve these issues. Use the guide below to run a malware scan through Windows Defender.
Press Windows + S on your keyboard and search for ‘Windows Security’. Click and launch the app once it shows up in your search results.

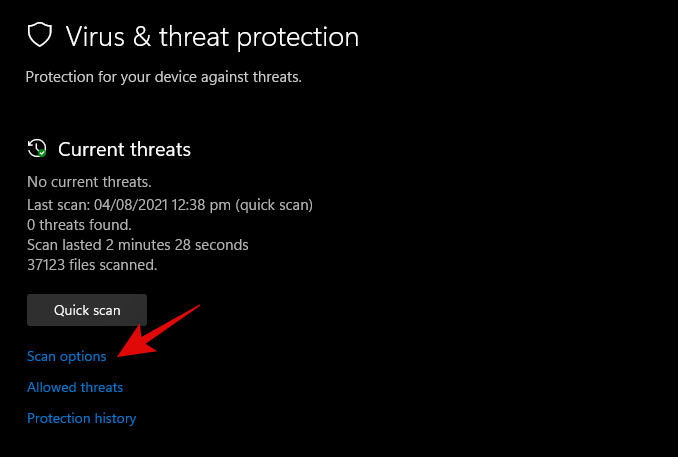
Click on ‘Virus & threat protection’.
Click on ‘Scan options’.
Select ‘Full Scan’.
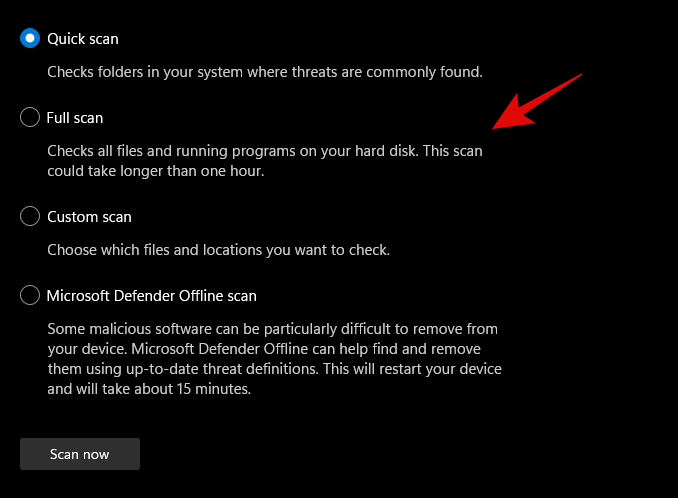
Finally, click on ‘Scan now’.
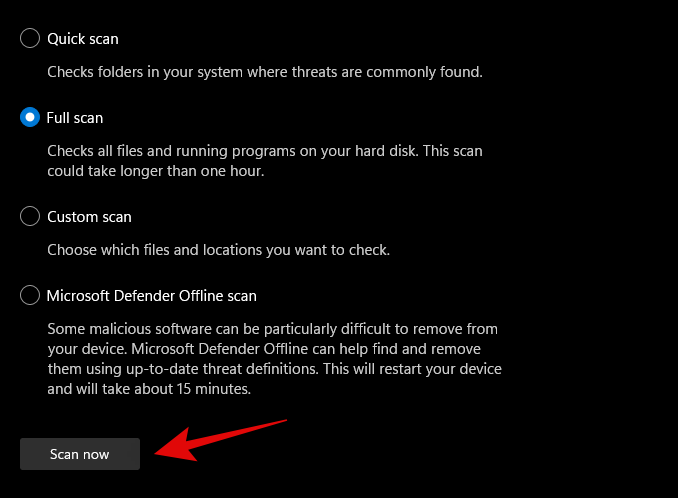
Windows Defender will now scan your entire PC for malware and malicious software. In case any are found, they will be automatically quarantined, and you will be prompted to take the necessary action as soon as possible.
3 General Fixes: Last Resort options
Fix #18: Create a new user via command prompt
If you’re facing an issue where you’re unable to add a local account via Settings to your PC then you can use the command prompt (CMD) for the same. Once added you can try and check if the Start menu is working for you. If it is, you can try the fixes below to restore it in your original account. However, if none of the fixes work for you then you can use the newly created account instead. The new account will be created with administrator privileges so you shouldn’t have problems moving your files and Settings. More on this below.
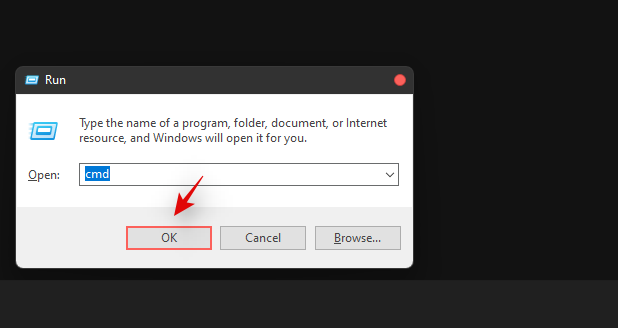
Press Windows + R to bring up the Run dialog box and type in the following. Press Ctrl + Shift + Enter on your keyboard once you are done.
cmd
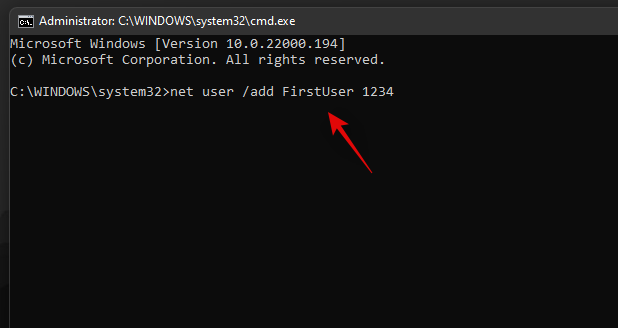
Type in the following command and press Enter on your keyboard. Replace ‘USER’ with your desired username for the new account. Similarly, replace ‘PASSWORD’ with your desired password.
net user /add USER PASSWORD
Now execute the following command as well and use the same username as above.
net localgroup administrators USER /add
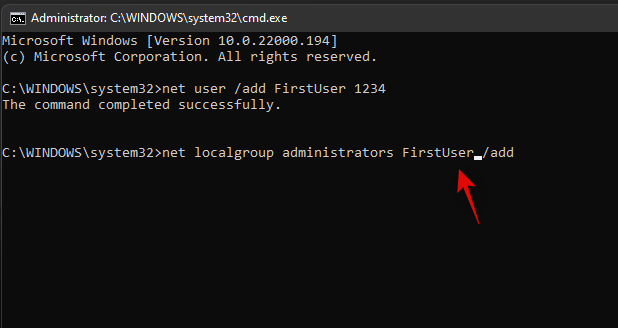
The user will now be added to your PC. Simply restart and log into the new account when the PC restarts.
The start menu should work alright now in the new user account. You can copy your files from the old user account to the new account.
To find your data in the old user account, open Windows Explorer and go to the User folder under the C Drive (or whichever drive you have installed Windows in).
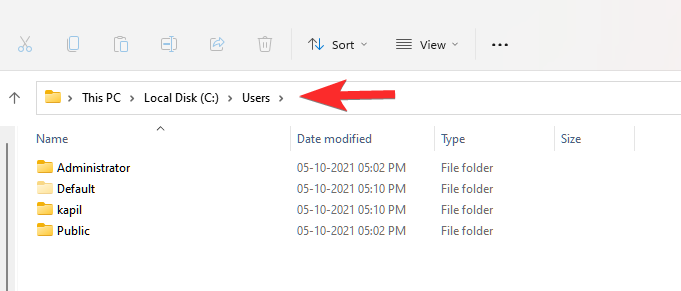
Click on the old user account. Now, copy all the files from here to your new user account that you can also find in the Users folder.
An easy method to transfer files from one user account (old one) to another user account (new one) is to copy the profile. Read more about it here.
Fix #19: Perform a Windows Reset
If you had zero luck with all of the previous methods, we think you should try a Windows Reset. It has been known to solve a host of problems in Windows 11 while keeping your personal files intact. Moreover, resetting Windows to its factory settings can give your PC a fresh start.
Here are the steps.
For this method, you’ll need an elevated PowerShell instance.
Press Win key + r to open the Run box, then type in ‘PowerShell and press Ctrl + Shift + Enter to open PowerShell as administrator.
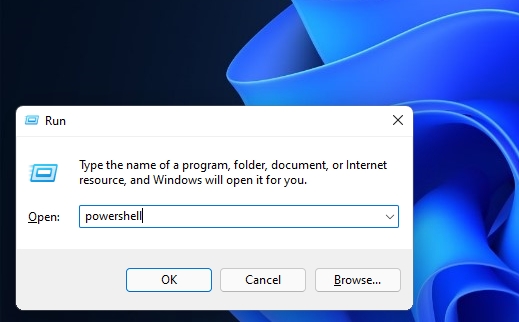
When opened correctly, you should already be inside the C:\Windows\system32 folder.
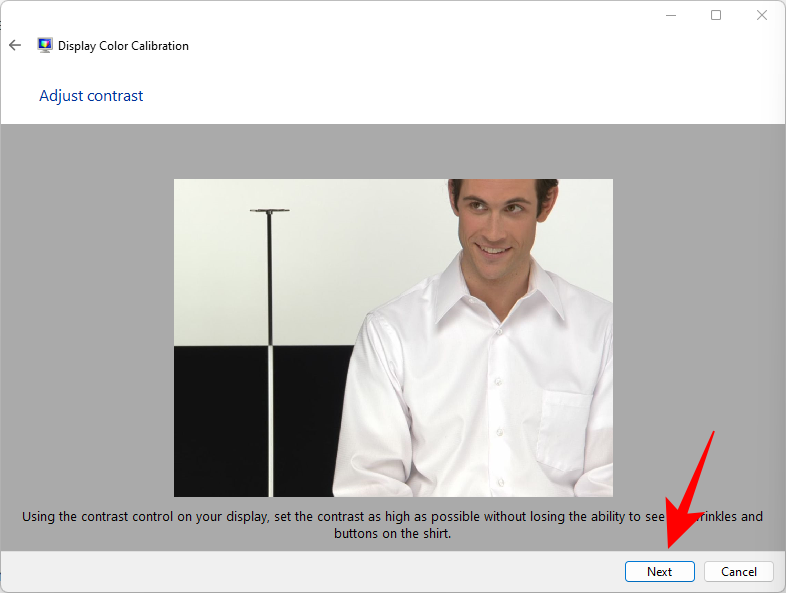
Now type in ‘system reset and press enter. You should be presented with two options, to either keep all your files or to remove everything. Click on ‘Keep my files’.
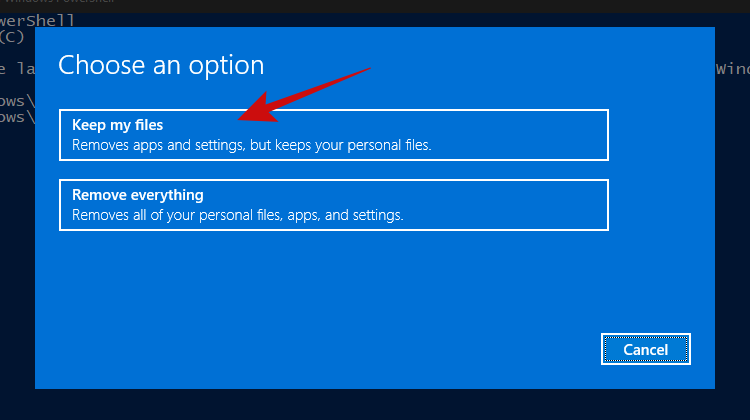
Within a few minutes, Windows should give you a list of apps that’ll be removed from your PC after the reset. Here’s how our list looks.
Once you’ve scrolled through the list of apps, simply click on the ‘Next’ button.
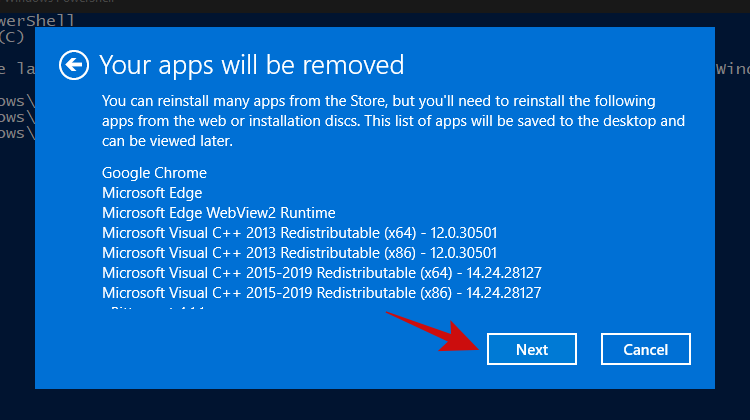
Windows should now start the reset process. Simply follow the instructions and your PC should be reset within a couple of minutes. The Start menu should be working now.
Fix #20: Re-install Windows from scratch
Well, if you’re really considering this method, it’s safe to assume that none of the other methods worked for you. At this point, we think it’s now time to go for a clean installation of Windows 11, which will probably wipe your current Windows partition (if you choose to).
Note: Before proceeding with this method, we recommend making a complete backup of all your files stored inside folders on the Windows drive, such as in Downloads, Documents, and the likes.
Once you have backed up all your files from the Windows drive, let’s take a look at the things you’ll need.
- A USB stick of 8GB or more (no external hard drives, unless you want to lose all your precious data)
- Rufus
Next, follow our guide on downloading and installing the Windows 11 ISO.
Read: How to Download and Install Official Windows 11 ISO
We hope that after following this guide, you were able to fix the annoying and unresponsive Start menu in Windows 11 and bring it back to life.
If you find yourself stuck at any point in this guide, let us know in the comments below.
Related:


![Cómo reparar el error de pantalla verde de Windows 11 [8 formas] Cómo reparar el error de pantalla verde de Windows 11 [8 formas]](https://cloudo3.com/resources8/images31/image-5564-0105182715287.png)


