7 correctifs pour le logiciel AMD Adrenalin qui ne fonctionne pas ou ne souvre pas

Vous êtes confronté au problème du logiciel AMD Adrenalin qui ne fonctionne pas ou ne s

Pendant des années, Windows a vanté ses nombreuses nouvelles fonctionnalités et améliorations, affirmant qu'elles ne sont qu'à un clic du menu Démarrer. Mais que se passe-t-il si le menu Démarrer cesse de s'ouvrir pour vous ? Eh bien, il peut arriver que le menu Démarrer de Windows 11 cesse soudainement de fonctionner pour vous, ce qui rend les tâches régulières un peu pénibles.
Si le menu Démarrer ne s'ouvre pas pour vous sur Windows 11, alors il existe autant de correctifs que nous pourrions penser pour vous aider à résoudre le problème .
Connexe : Comment désinstaller des applications sur Windows 11
REMARQUE : si les 17 (!) correctifs ci-dessous échouent pour vous, essayez le correctif n° 18 ci-dessous dans la section « Derniers recours » qui parle de la création d'un nouvel utilisateur via la ligne de commande . Cela vous aide à créer un nouvel utilisateur à l'aide de CMD, donc sans avoir besoin d'accéder à l'application Paramètres ou au menu Démarrer, qui peuvent ne pas fonctionner pour vous. Cela dit, le correctif n°1 concernant le problème causé par « Windows Update KB5004300 » est un nouvel ajout, alors vérifiez-le en premier.
Contenu
Nous avons inclus un total de 20 (!) correctifs pour résoudre le problème avec le menu Démarrer de Windows 11 ci-dessous. 3 d'entre eux sont des correctifs généraux qui ne doivent être essayés qu'une fois que vous êtes sûr que les 17 correctifs principaux ne sont pas utiles.
17 correctifs principaux
Essayez d'abord ces correctifs avant d'essayer les 3 correctifs généraux (également donnés ci-dessous).
Correctif n°1 : désinstallez et réinstallez Windows Update KB5004300
Un correctif récent découvert par des utilisateurs aux yeux d'aigle semble corriger facilement le menu Démarrer sur les nouvelles mises à niveau de Windows 11. La mise à jour Windows publiée sous le nom KB5004300 semble être à l'origine de ce problème. Désinstaller et réinstaller le même sur votre PC corrigera le menu Démarrer et la barre des tâches pour vous. Suivez le guide ci-dessous pour commencer.
Appuyez Windows + isur votre clavier pour ouvrir l'application Paramètres. Cliquez sur 'Windows Update' sur votre gauche.
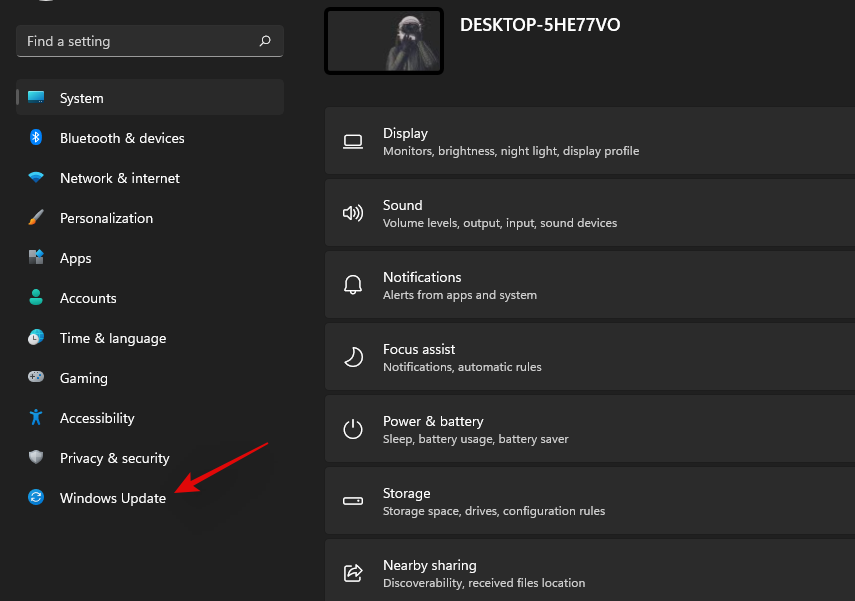
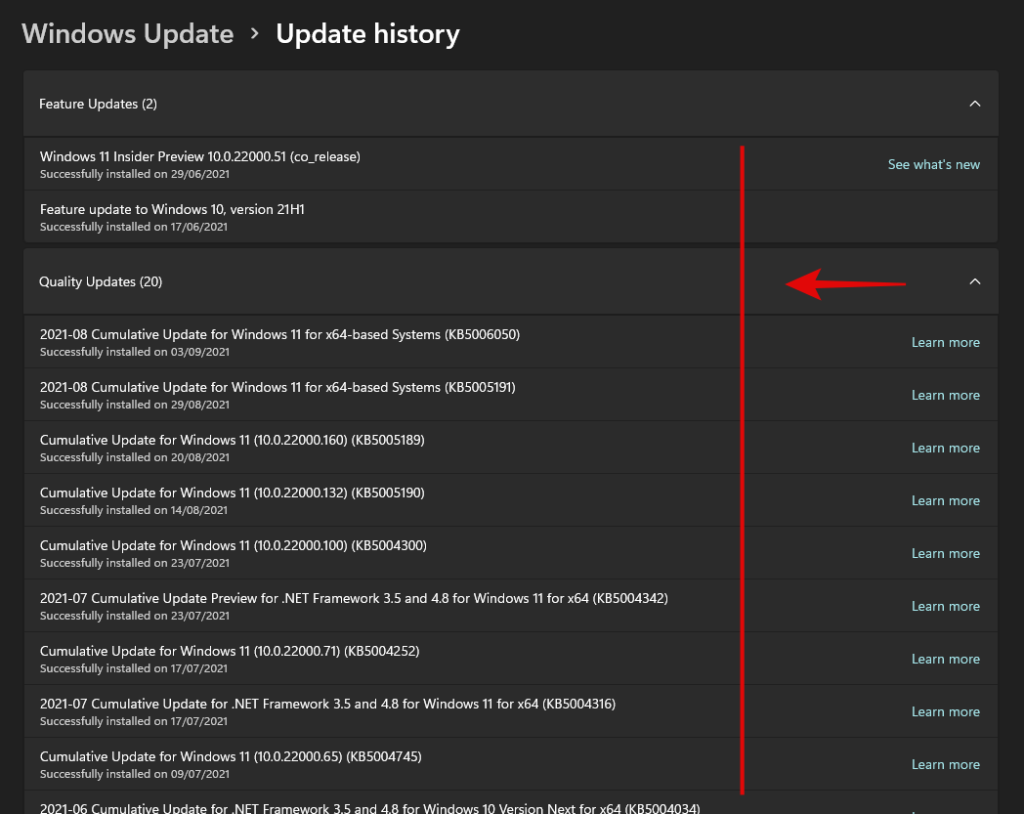
Cliquez maintenant sur « Mettre à jour l'historique ».
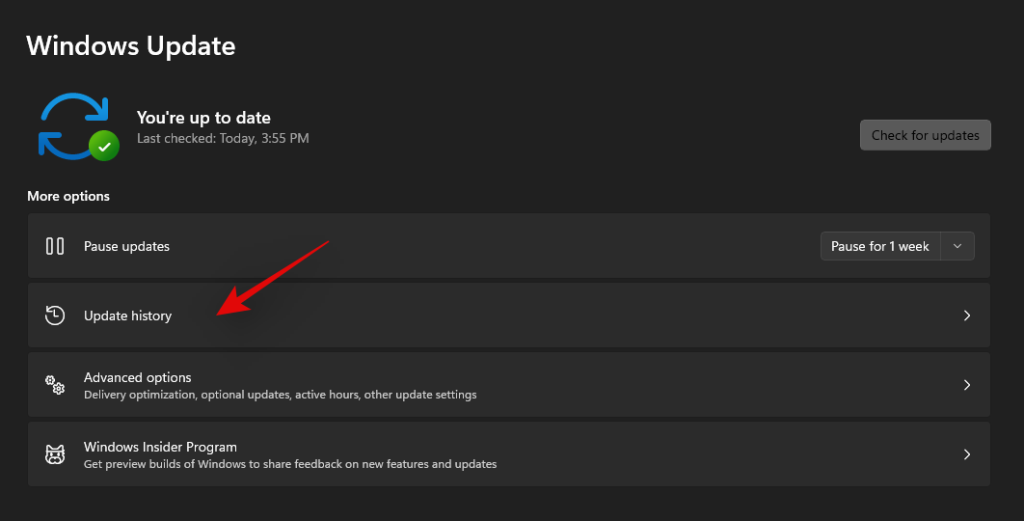
Cliquez sur 'Désinstaller les mises à jour'.
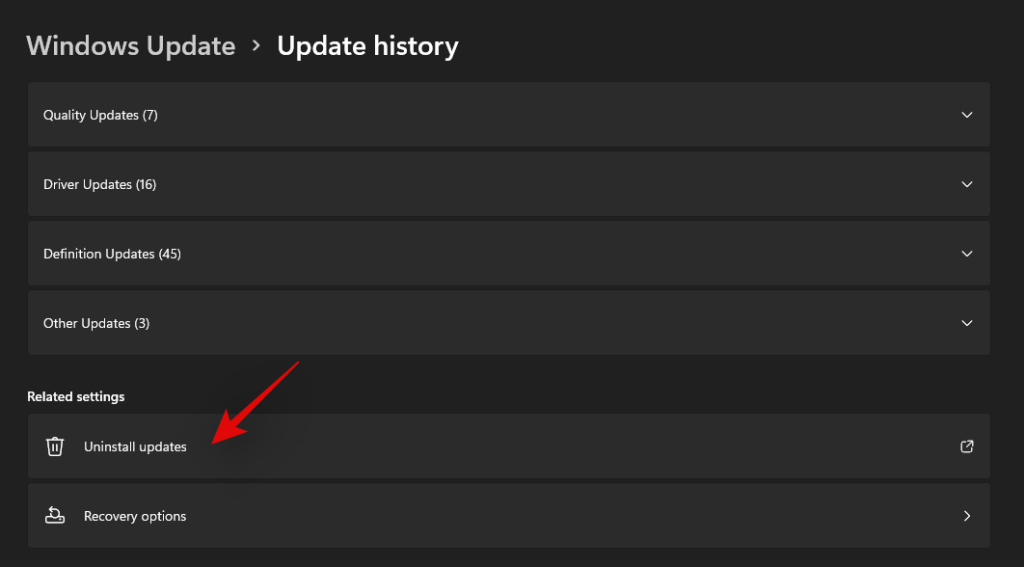
Vous allez maintenant être redirigé vers le Centre de contrôle. Recherchez la mise à jour KB5004300 concernée dans la liste et cliquez dessus et sélectionnez-la.
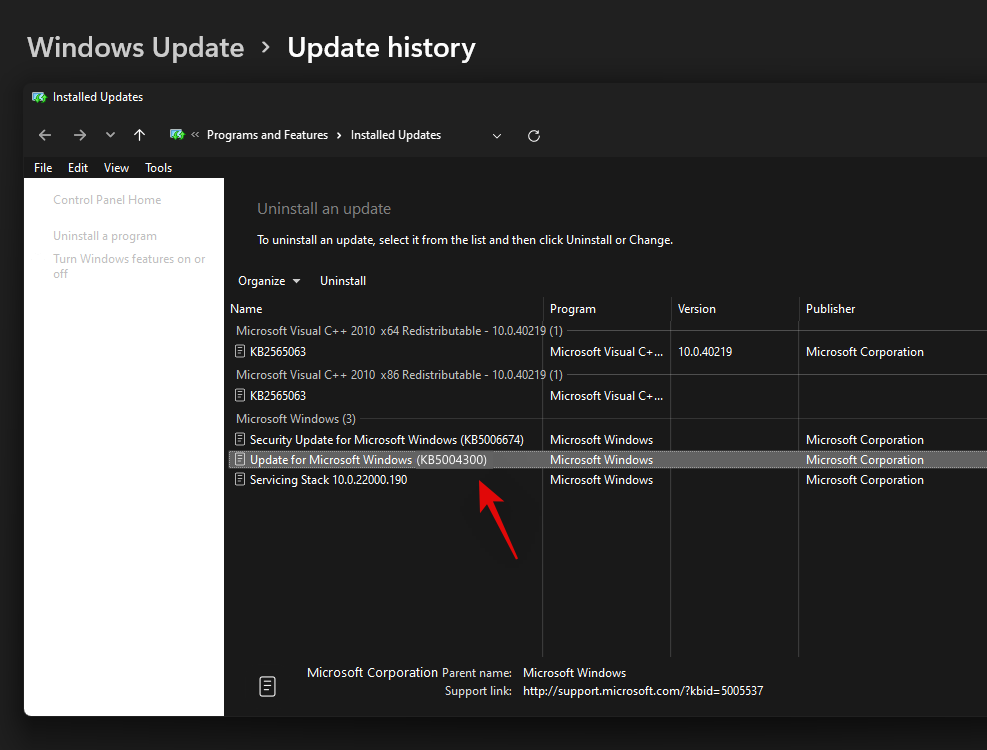
Maintenant, cliquez sur « Désinstaller » en haut.
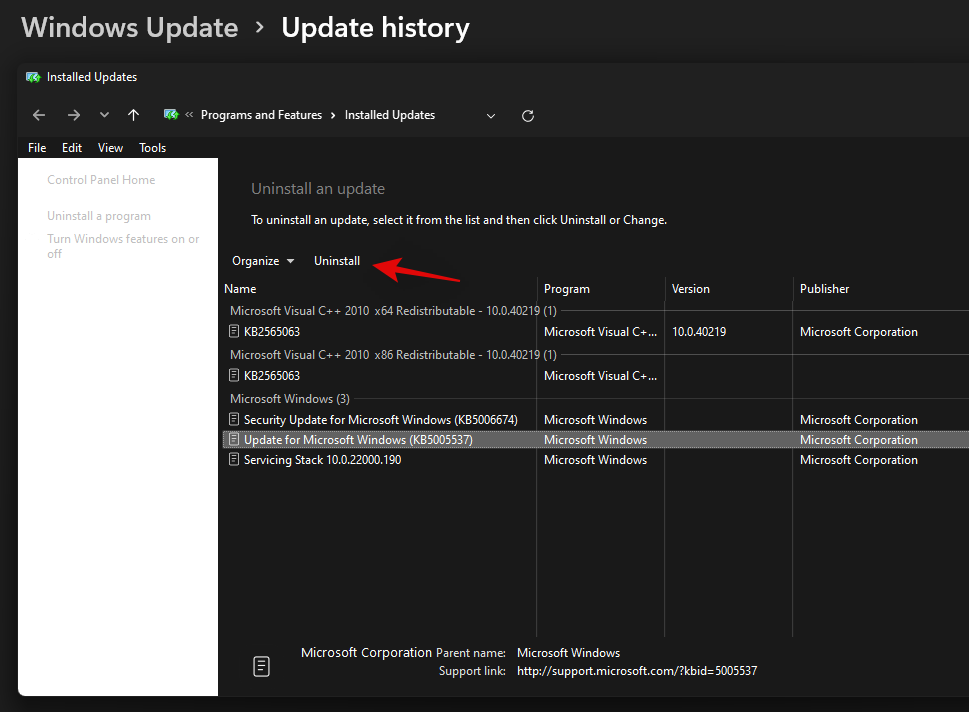
Suivez les instructions à l'écran pour supprimer la mise à jour de votre PC. Une fois la mise à jour effectuée, redémarrez votre PC pour faire bonne mesure.
Maintenant, appuyez à Windows + inouveau une fois votre PC redémarré et sélectionnez à nouveau Windows Update.

Vérifiez les mises à jour et vous devriez maintenant avoir la possibilité d'installer à nouveau Windows Update KB 5004300 sur votre PC.
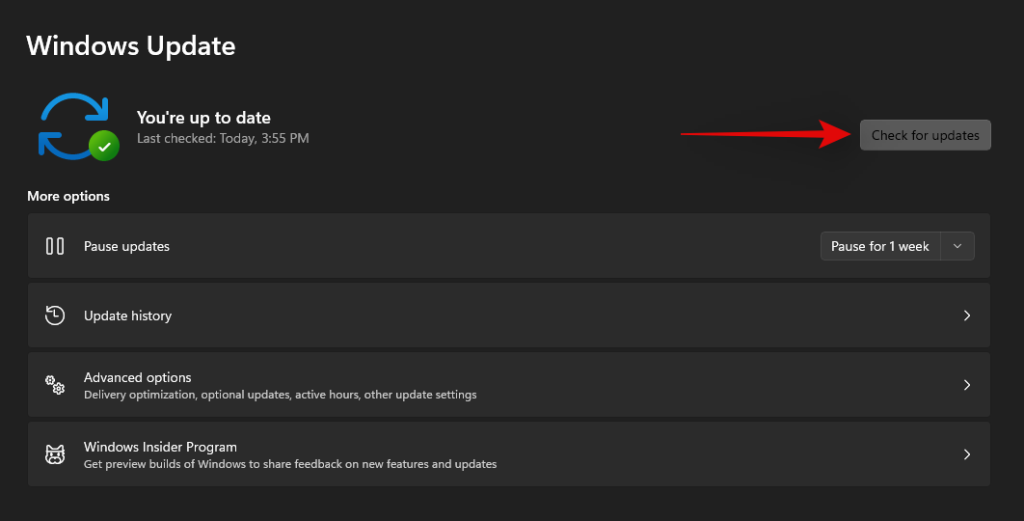
Téléchargez et installez la mise à jour et les fonctionnalités de la barre des tâches et du menu Démarrer devraient maintenant être restaurées dans Windows 11.
Correctif #2 : Forcer le redémarrage du service Iris
Une mise à jour récente des versions d'initiés de Microsoft a causé des problèmes majeurs avec la barre des tâches et le menu Démarrer pour de nombreux utilisateurs. Si vous êtes également abonné au canal Insider et que vous rencontrez des problèmes lors de la mise à jour vers le numéro de build 22449 ou supérieur, vous pouvez utiliser le correctif mentionné ci-dessous.
Cette méthode supprimera la valeur de registre pour le service Iris, ce qui devrait forcer sa réinstallation lors d'un redémarrage. Une réinstallation semble aider à résoudre ce problème pour la plupart des utilisateurs. Même si vous n'êtes pas sur les mêmes versions, ce correctif vaut le coup. Suivez le guide ci-dessous pour commencer.
Remarque : cette commande redémarrera immédiatement votre PC. Si vous avez un travail en cours en arrière-plan, assurez-vous de l'enregistrer avant de continuer avec ce guide.
Appuyez Windows + S sur votre clavier et recherchez CMD. Cliquez sur « Exécuter en tant qu'administrateur » ou appuyez Ctrl + Shift + Enter sur votre clavier.
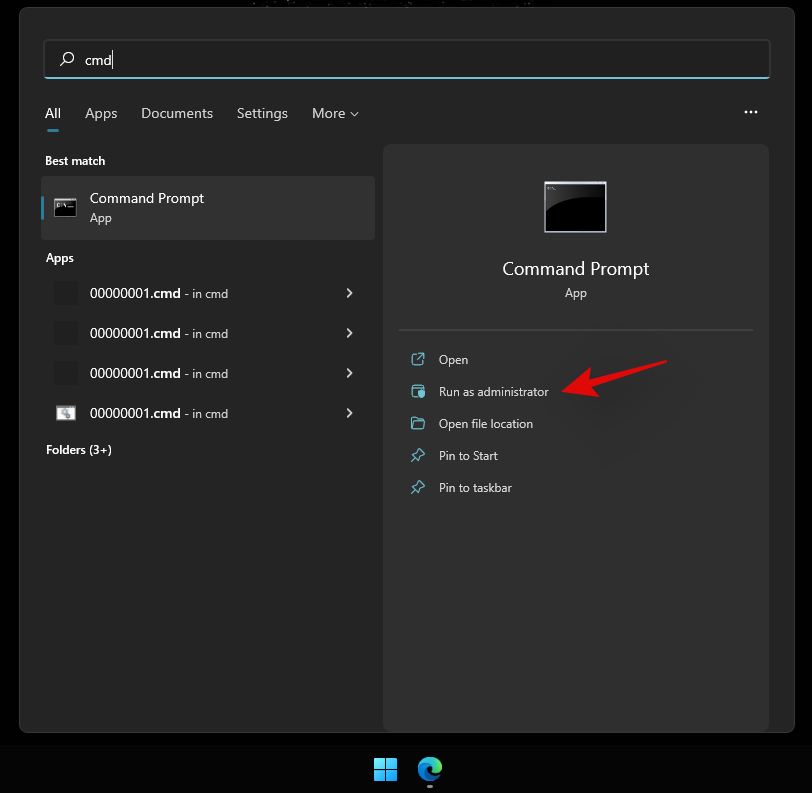
Entrez la commande suivante et appuyez sur Entrée sur votre clavier.
reg delete HKCU\SOFTWARE\Microsoft\Windows\CurrentVersion\IrisService /f && shutdown -r -t 0

Votre PC va maintenant redémarrer. Connectez-vous à votre PC comme d'habitude et la fonctionnalité du menu Démarrer devrait maintenant être restaurée sur votre système.
Correctif n°3 : redémarrez votre PC
C'est de loin la méthode la plus simple qui vient à l'esprit en essayant de résoudre la plupart des problèmes sur un PC Windows 11. Normalement, lorsque vous redémarrez le système, vous forcez essentiellement tous les processus, Windows y compris, à redémarrer tous leurs services et processus. Cela redémarre également le processus du menu Démarrer qui aidera à résoudre le problème avec celui-ci.
Si ce n'est pas évident, voici les étapes pour redémarrer votre PC.
Assurez-vous que toutes vos applications et fichiers sont fermés. Ou, accédez simplement à l'écran du bureau en appuyant Windows key + D simultanément. Maintenant, appuyez Alt + F4 simultanément sur les touches de votre clavier pour obtenir l'écran « Fermer Windows ».
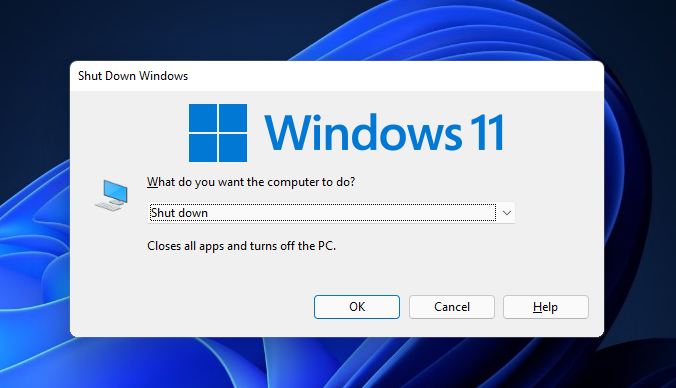
Cliquez sur la liste déroulante, sélectionnez « Redémarrer » et appuyez sur le bouton « OK ».
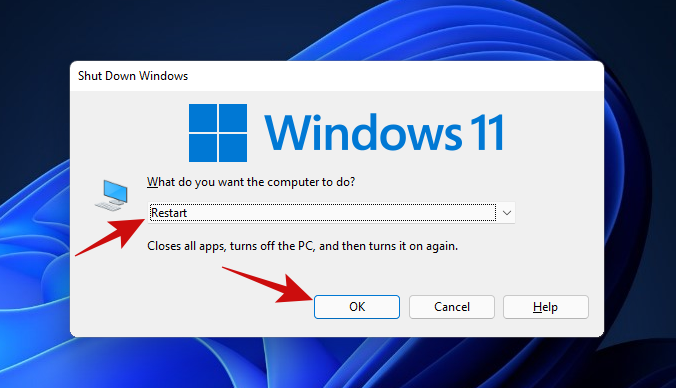
Une fois votre PC redémarré, vous devriez pouvoir réutiliser le menu Démarrer. Si vous ne pouvez toujours pas, essayez la méthode suivante.
Correctif n°4 : Redémarrez l'Explorateur Windows à l'aide du Gestionnaire des tâches
La prochaine solution facile pour un menu Démarrer gelé utilise le Gestionnaire des tâches. Le Gestionnaire des tâches peut être l'outil parfait pour gérer tout processus en cours d'exécution sur un PC Windows.
Si vous avez un menu Démarrer qui ne veut pas répondre à vos clics, suivez les étapes mentionnées ci-dessous pour voir s'il résout votre problème.
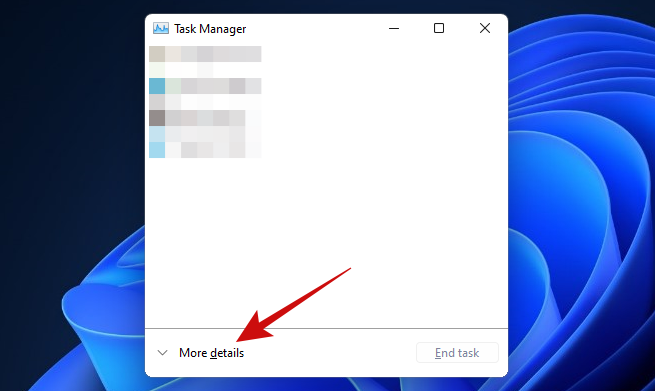
Appuyez sur les Ctrl + Shift + Esc touches pour déclencher le Gestionnaire des tâches. Si votre gestionnaire de tâches ressemble à ceci, cliquez sur le bouton "Plus de détails" pour accéder à la vue détaillée.
Une fois dans le Gestionnaire des tâches, faites défiler la liste des processus pour trouver le processus « Windows Explorer ». Cliquez avec le bouton droit sur le processus et cliquez sur l'option « Redémarrer ».
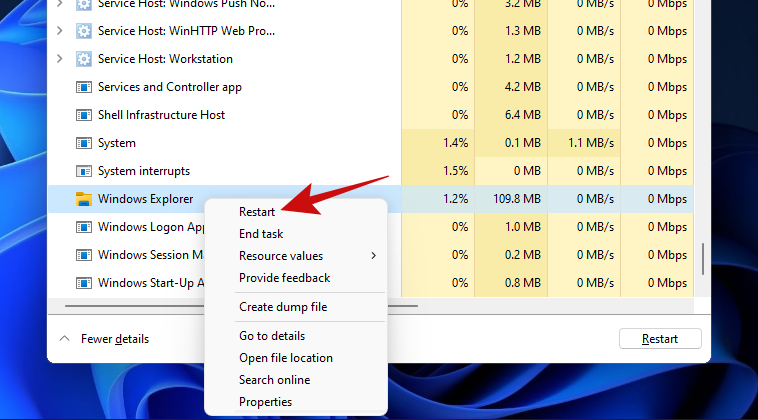
Une fois cliqué, Windows devrait redémarrer le processus de l'Explorateur Windows en un instant, et cela devrait corriger votre menu Démarrer.
Le redémarrage du processus de l'Explorateur Windows est assez similaire au redémarrage de votre PC. La seule différence est qu'ici, vous ne redémarrez qu'un seul processus, alors qu'avec un redémarrage, vous redémarrez tous les processus. De plus, beaucoup de gens dans le passé ont réussi à réparer leur menu Démarrer avec cette méthode, ce qui vaut la peine d'essayer.
Correctif n°5 : recherchez les mises à jour de Windows
Si vous ne parvenez toujours pas à ouvrir le menu Démarrer, vous devriez essayer Windows Update. Le problème est peut-être plus répandu que vous ne le pensez et Microsoft a peut-être publié un correctif pour corriger le menu Démarrer qui ne répond pas.
Voici comment vous pouvez le faire.
Ouvrez l'application Paramètres avec les Win key + i clés ensemble. Une fois ouvert, cliquez sur l'option 'Windows Update'.
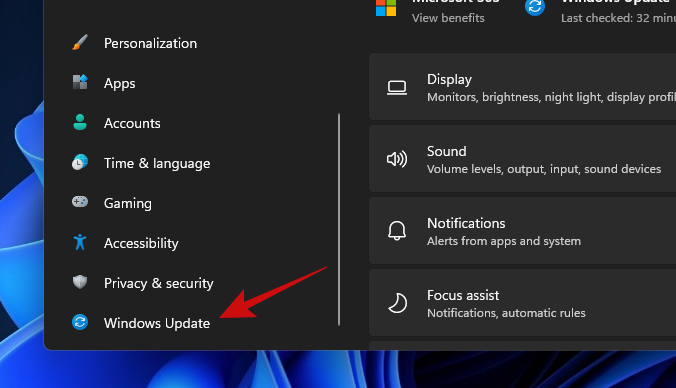
Cliquez sur le gros bouton « Rechercher les mises à jour » pour commencer à rechercher les mises à jour disponibles pour Windows pour votre PC. Si disponible, laissez Windows installer toutes les mises à jour.
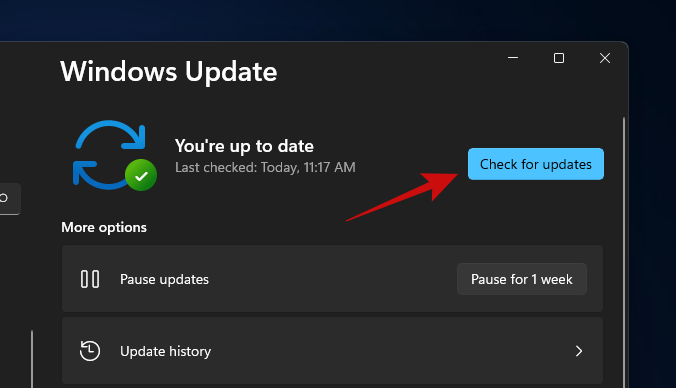
Lorsque Windows a terminé la mise à jour de votre PC, redémarrez-le simplement et essayez d'ouvrir le menu Démarrer. Si vous ne parvenez toujours pas à ouvrir le menu Démarrer, nous pensons qu'il est temps d'opter pour les correctifs les plus avancés.
Correctif n°6 : exécutez DISM et SFC
DISM (Deployment Image Servicing and Management) et SFC (System File Checker) sont deux des outils les plus puissants pour identifier et réparer les installations Windows corrompues. Ces outils peuvent être utilisés avec l'invite de commande ou Windows PowerShell. Pour ce guide, nous les utiliserons avec l'invite de commande.
Commençons par DISM. DISM peut être utilisé pour récupérer de nouvelles copies de fichiers Windows corrompus.
Appuyez sur Win key + r pour ouvrir la zone Exécuter, tapez cmd , puis appuyez Ctrl + Shift + Enter simultanément (au lieu d'appuyer sur Entrée) pour ouvrir une invite de commande élevée.
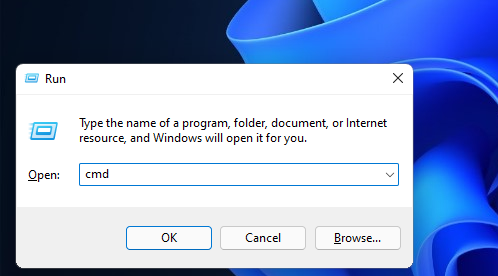
Une fois que vous êtes dans l'invite de commande, collez le code ci-dessous et appuyez sur Entrée.
DISM /Online /Cleanup-Image /RestoreHealth
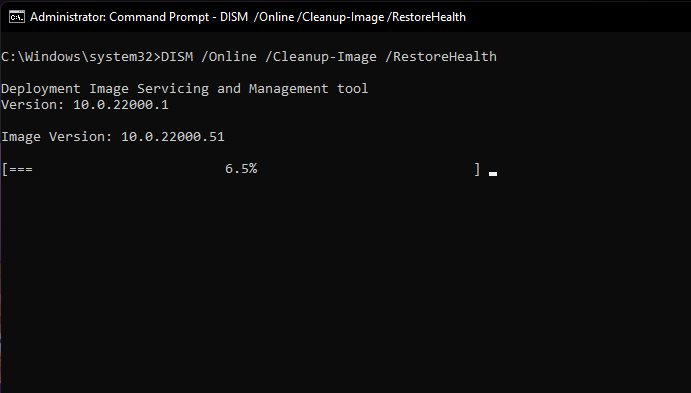
DISM va maintenant essayer de restaurer les fichiers corrompus (le cas échéant) de votre installation actuelle en demandant une nouvelle copie de ce fichier à partir de la mise à jour Windows. L'ensemble du processus prendra environ 15 à 20 minutes. Voici à quoi ressemble la commande en action.
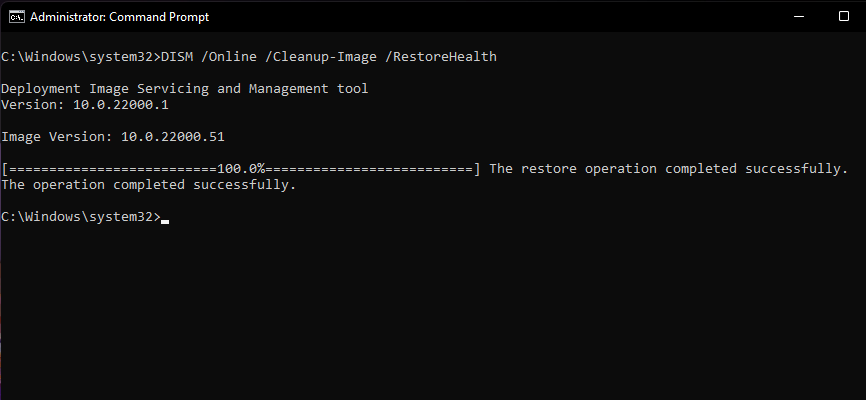
Une fois que la commande a restauré tous les fichiers endommagés, vous devriez voir quelque chose comme ceci.
Une fois que vous avez terminé cette étape, gardez la fenêtre d'invite de commande ouverte pour exécuter la commande suivante.
L'étape suivante consiste à vérifier l'intégrité de tous vos fichiers Windows 11 pour vous assurer qu'ils sont en bon état. Pour cela, nous utiliserons l'outil SFC.
Voici comment.
Collez le code ci-dessous dans la fenêtre d'invite de commandes et appuyez sur Entrée.
sfc /scannow
Voici à quoi ressemble la commande.
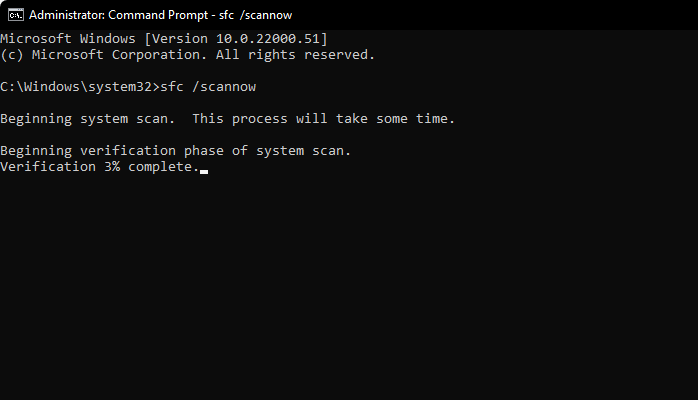
La commande ci-dessus ne prendra que quelques minutes pour terminer l'analyse de l'intégrité de vos fichiers Windows. Une fois terminé, le résultat devrait ressembler à ceci.
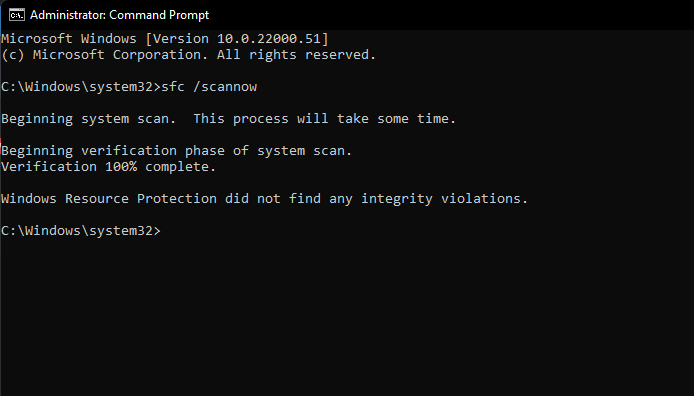
Astuce : assurez-vous que votre PC dispose d'une connexion Internet stable pour que cette méthode fonctionne.
Il est maintenant temps de redémarrer.
Toujours bloqué avec un menu Démarrer cassé, il est temps d'essayer la méthode suivante.
Connexe : 6 manières de mettre à jour les pilotes sous Windows 11
Correctif n°7 : reconstruire l'index de recherche
Le menu Démarrer et Windows Search sont étroitement intégrés. Des problèmes de recherche et d'indexation peuvent s'être glissés dans le menu Démarrer et l'affecter. Donc, écartons également cette possibilité.
Jetons un coup d'œil aux étapes pour le faire.
Ouvrez la boîte Exécuter en appuyant sur Win key + r. Collez ensuite le texte ci-dessous dans la zone Exécuter et appuyez sur Entrée.
control /name Microsoft.IndexingOptions
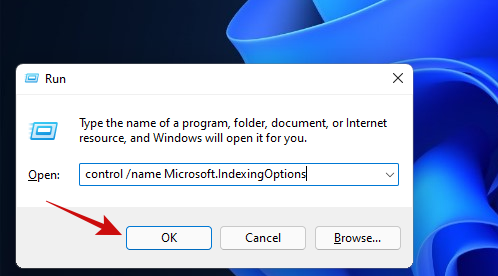
Vous devriez voir une fenêtre contextuelle intitulée « Options d'indexation » s'ouvrir. Cliquez sur le bouton 'Modifier'.
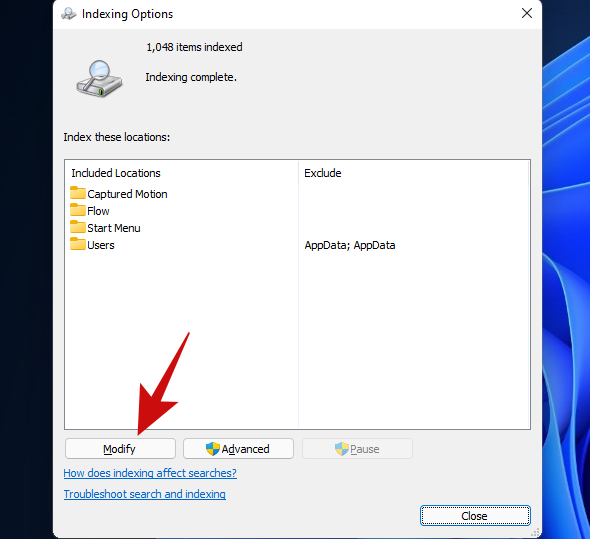
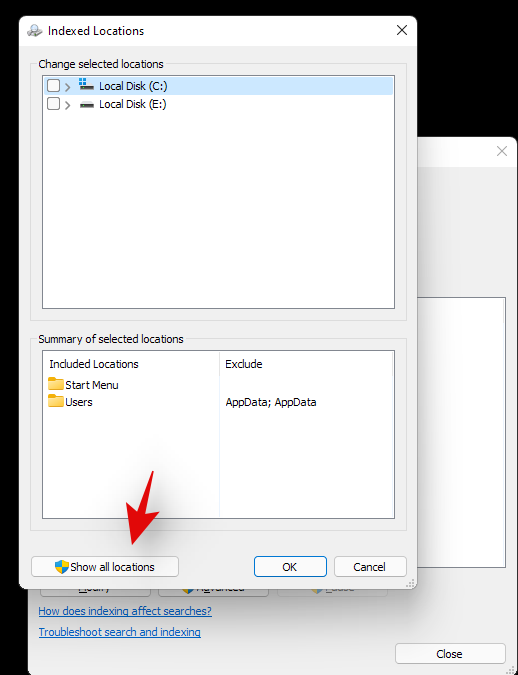
Cliquez sur le bouton « Afficher tous les emplacements ».
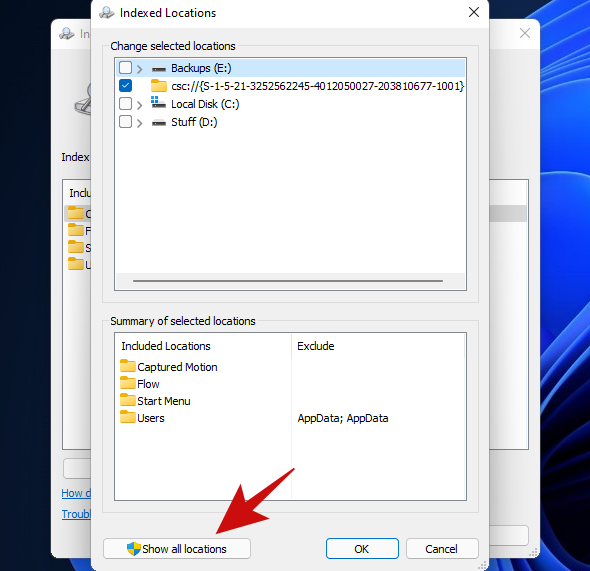
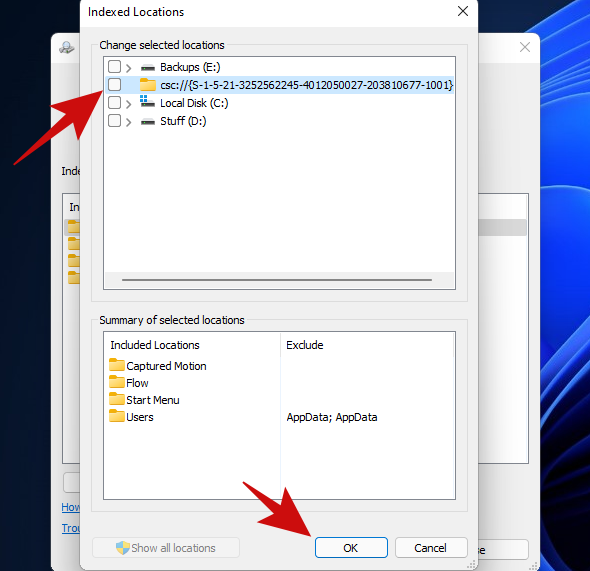
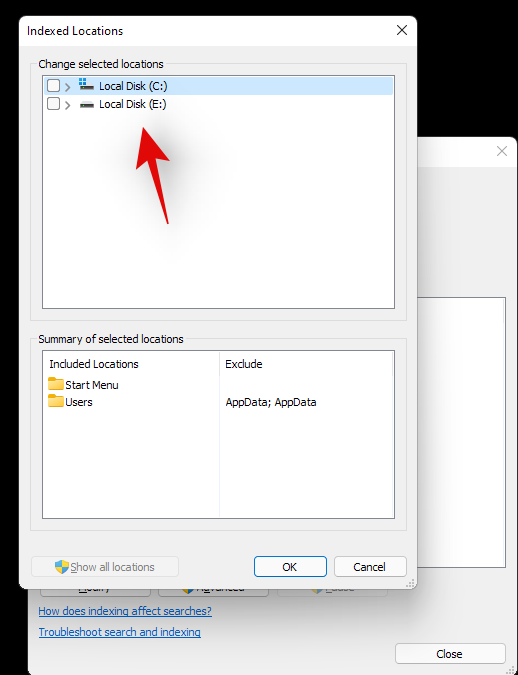
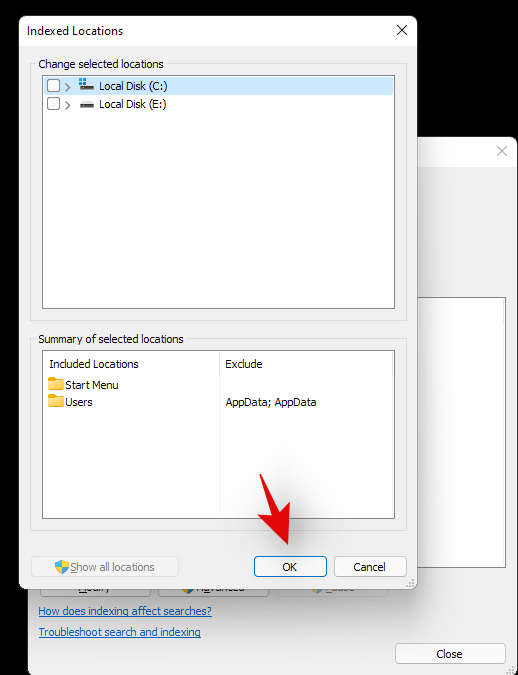
On this screen, uncheck all the locations and click on the ‘OK’ button. Ours had only one location ticked, so we unticked just one location on this list.
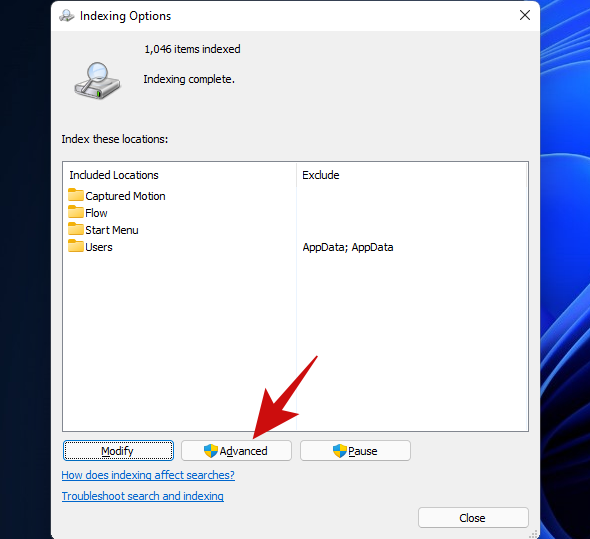
Click on the ‘Advanced’ button.
Click on the ‘Rebuild’ button.
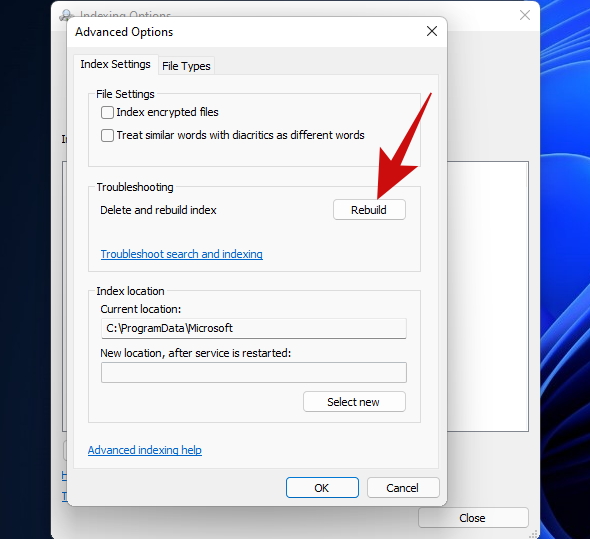
Windows will now start rebuilding the Search Index. Rest assured, the entire process will now be handled by Windows and doesn’t really require any user input, although it does take quite a bit of time to complete.
When Windows has rebuilt your Search Index, restart your PC. Once you’re inside Windows again, try opening the Start menu. If it still doesn’t work, we think it’s time to opt for a more resilient method.
If you have installed any third-party programs to modify the look or functions of your start menu then we recommend removing all such programs. Likely, one of these programs is not compatible with the new Windows 11 start menu which is why you are facing issues with your system. If you have one of the following apps mentioned below, then we recommend you revert their settings and uninstall them as soon as possible. Most of these apps were designed for Windows 10 and are incompatible with the Windows 11 Start menu code to a certain extent. A recent Windows 11 update likely broke their compatibility causing the start menu to glitch out on your system.
And more. If removing a third-party app that modifies your start menu helps restore its functionality then you can wait for a compatible update to use the app again.
Did you use a registry hack to get the older Windows 10 start menu on Windows 11? If so then it is likely that this registry hack’s functionality broke with a recent Windows 11 update. In such cases, you can use the guide below to revert the changes on your system.
Press Windows + R on your keyboard and type in the following in the Run dialog box.
regedit

Press Enter on your keyboard once you are done to launch the registry editor. You can also click on ‘Ok’ instead.
Now copy and paste the address given below in the address bar at the top of the registry editor and press ‘Enter’ on your keyboard.
Computer\HKEY_CURRENT_USER\Software\Microsoft\Windows\CurrentVersion\Explorer\Advanced
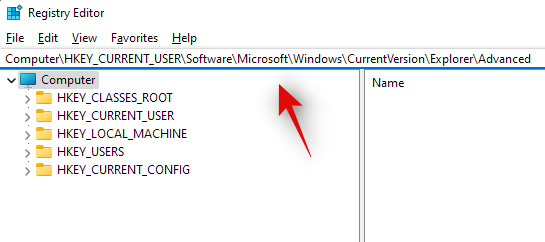
Look for ‘Show_StartClassicMode’ on your right and right-click on it.

Select ‘Modify’.

Change its value data to ‘0’ and click on ‘Ok’. Do not close the registry editor just yet.

Press Ctrl + Shift + Esc on your keyboard to launch the Task Manager. Now click and switch to the ‘Details’ tab at the top.
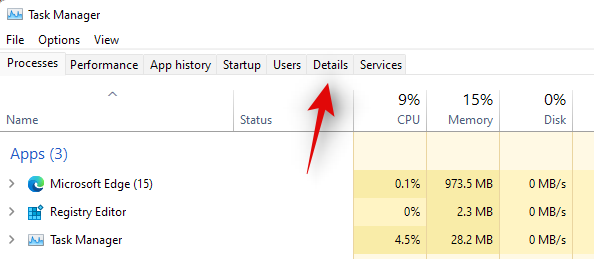
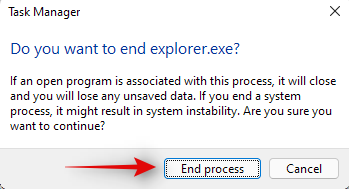
Click and select Explorrer.exe from the list and press Delete on your keyboard.

Confirm your choice by clicking on ‘End Process’.
Now click on ‘File’ in the top left corner and select ‘Run new task’.
Type in ‘Explorer.exe’ and press Enter on your keyboard. You can also click on ‘Ok’ instead.
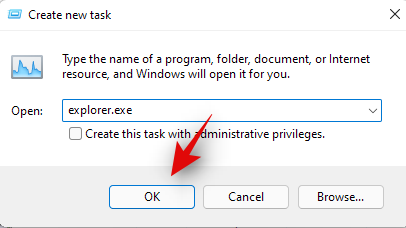
Explorer will now be restarted on your system. Switch back to the registry editor and click and select ‘Start_ShowClassicMode’.
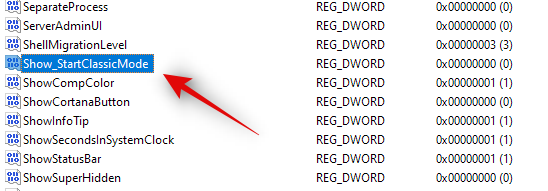
Press Delete on your keyboard and confirm your choice to delete the registry value.

Restart your system for good measure now.
If your Start menu wasn’t working due to a registry hack to get the older start menu then it should be fixed by now. You can check for the same by clicking on the Start menu icon in your taskbar.
Windows 11 has come a long way when compared to its predecessors. Background processes, tasks, and apps are more streamlined now and various features and elements seem to have their own dedicated packages. These dedicated packages make it easier for you to troubleshoot problems with certain features of Windows and even reinstall them in worst-case scenarios. If the start menu is still not working for you then you can reinstall basic elements of Windows 11 which will also reinstall the Start menu module on your system. This should help fix any background conflicts and get the Start menu back up and running on your system. Follow the guide below to get you started.
Press Windows + S on your keyboard and search for PowerShell. Click on ‘Run as administrator’ once the app shows up in your search results.
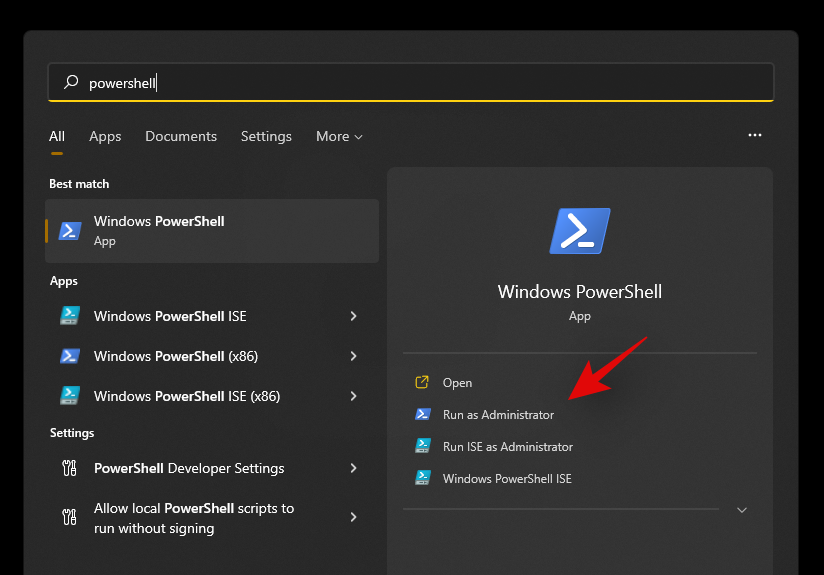
Now type in the following command and press ‘Enter’ on your keyboard.
Get-appxpackage -all *shellexperience* -packagetype bundle |% {add-appxpackage -register -disabledevelopmentmode ($_.installlocation + “\appxmetadata\appxbundlemanifest.xml”)}

Ignore any warnings that you get and continue with the process. Once complete, restart your system for good measure.
Now that the Start menu and other basic features have been reinstalled on your system, let’s rebuild your system’s index to get everything back up and running again. Press Windows + R on your keyboard to open the Run dialog box.
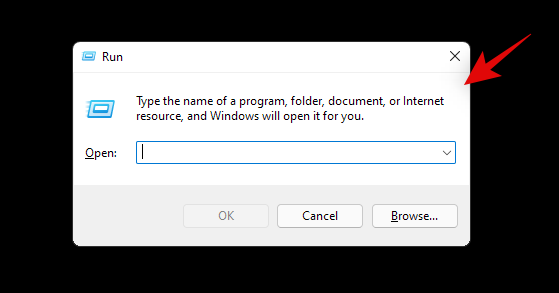
Type in the following command and press Enter on your keyboard.
control /name Microsoft.IndexingOptions
Click on ‘Modify’ and select ‘Show all locations’.
Uncheck all the boxes in the current list.
Click on ‘Ok’.
Click on ‘Advanced’ now.
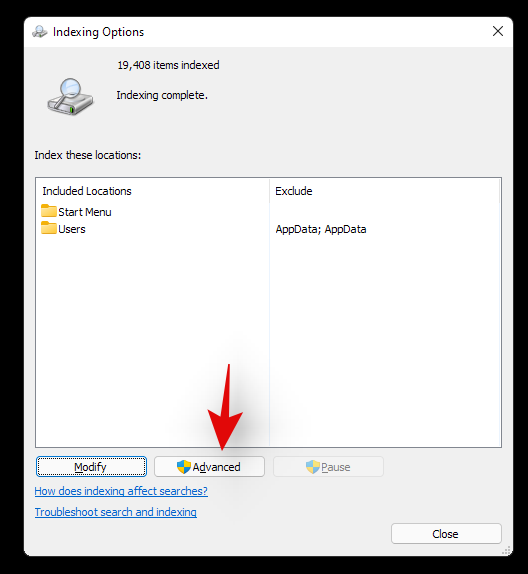
Select ‘Rebuild’ under troubleshooting.
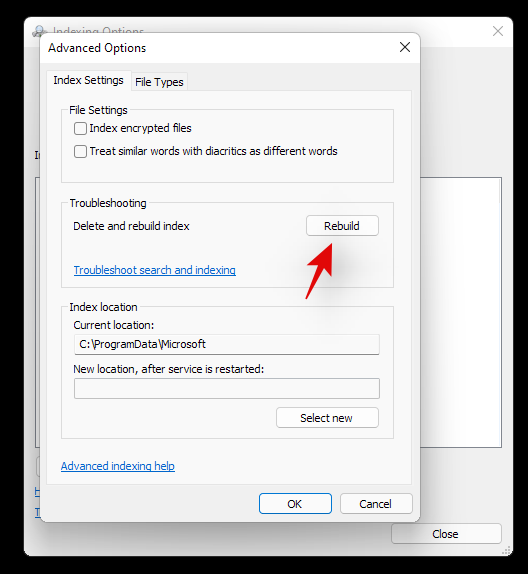
Click on ‘Ok’ once the warning pops up on your screen.
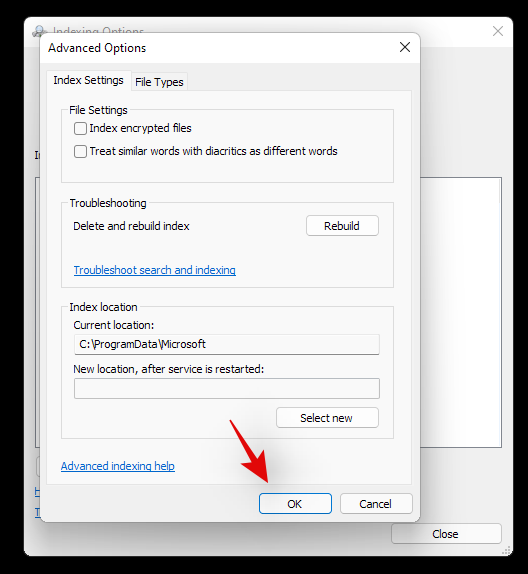
Once the process finishes, we highly recommend you restart your system.
You can now try clicking on the Start icon once your system restarts. Reinstalling the Start menu should help fix any issues with the Start menu on most systems.
Fix #11: Install any pending driver and Windows updates
This might be a bit obvious but you should definitely install any pending driver updates or Windows update on your system. This will help get you up and running on the latest drivers and help your system be compatible with all the hardware installed on your system. While drivers rarely cause issues with Windows features, you can never be too sure. Hence we recommend you install the latest available drivers on your system. You can use the link below to go to our detailed guide for updating drivers on Windows 11. If you are using a pre-built system or a laptop, then we recommend checking your OEM support page for dedicated driver updates as well.
There is a registry value that if modified, can disable your Start menu altogether. If you have been using registry modifiers, cleaners, and more, then it is likely that this registry value was modified which ended up disabling the Start menu on your system. Additionally, the Start menu’s functionality was moved to a Xaml process once Windows 10 was released. This process is known to glitch out
Use the guide below to check if the start menu is disabled on your system and re-enable it if needed.
Press Windows + R on your keyboard and type in the following command given below.
regedit
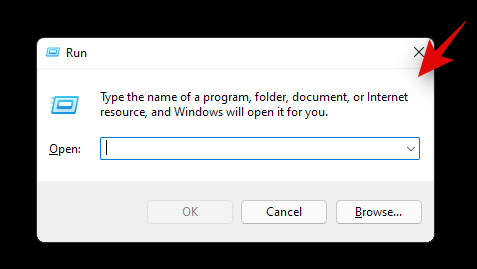
Now press Enter on your keyboard or click on ‘Ok’.
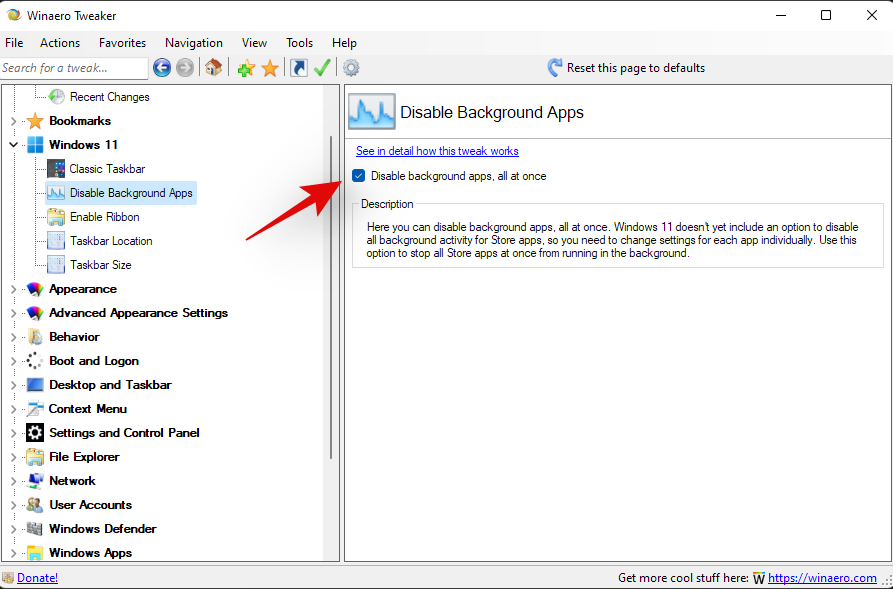
Copy and paste the following address in the address bar at the top of your registry editor.
HKEY_CURRENT_USER\Software\Microsoft\Windows\CurrentVersion\Explorer\Advanced
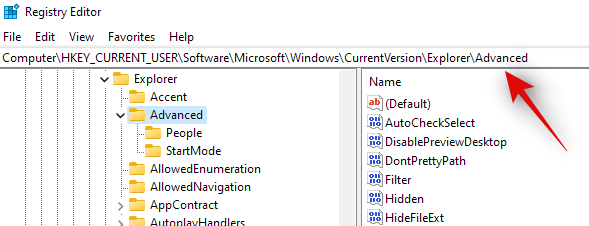
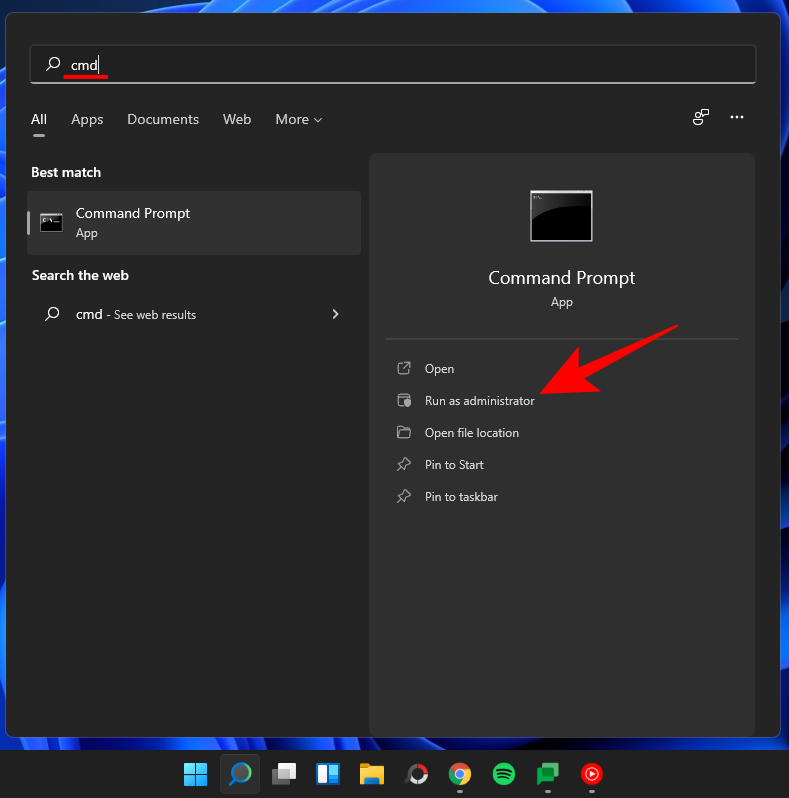
Now right-click on your right tab and select ‘New’.
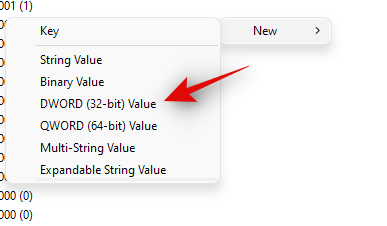
Select ‘DWORD (32-bit value)’.
Enter the name as ‘EnableXamlStartMenu’.
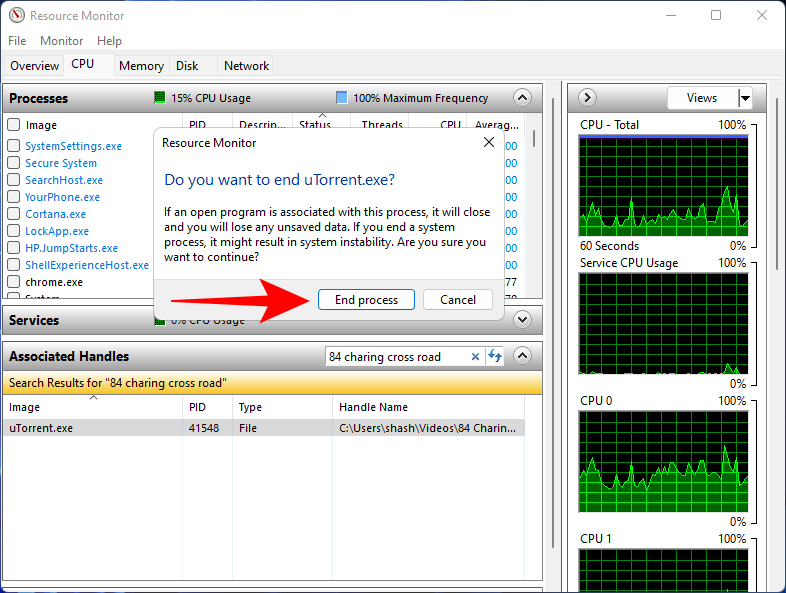
Enter the value as ‘0’.
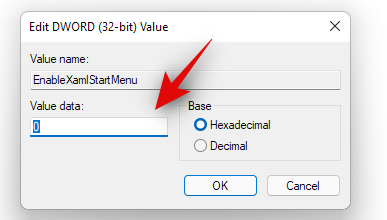
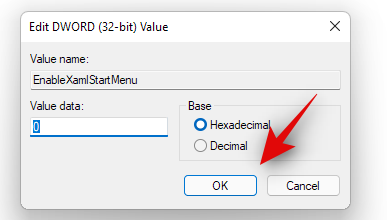
Restart your PC now.
Once restarted try activating the Start menu now. If the Xaml process was facing conflicts, then they should be fixed now and the Start menu should be back up and running on your system again.
Fix #13: Restart Windows background services
If the Start menu still fails to launch then it’s time to restart all background Windows services. Usually restarting the ‘ShellExperienceHost.exe’ is enough but if that does not work for you, you can try restarting all the services listed below. This usually gets the Start menu back up and running on most systems.
Press Ctrl + Shift + Esc on your keyboard to open the ‘Task Manager’. Now click on ‘Details’ at the top to switch to the Details tab.
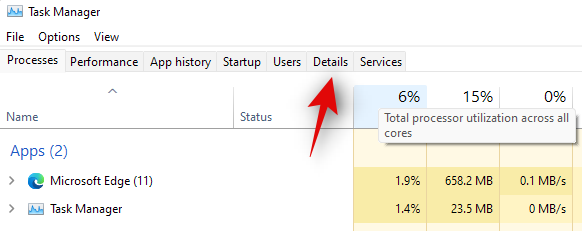
Find ‘StartMenuExperienceHost.exe’ in the list and click and select it.

Press Delete on your keyboard or click on ‘End Task’ in the bottom right corner. Click on ‘End Process’ again to confirm your choice.
ShellExperienceHost.exe will now be killed. The process should automatically restart within a few seconds. Once restarted, try activating the Start menu on your system. If the menu starts working then you are good to go. However, if it is still not working then use the guide above to restart the following services on your system as well.
And that’s it! If a background process was stopping you from accessing the Start menu then the issue should be fixed for you by now.
Fix #14: Run a Windows Troubleshooter
During a Windows 1909 feature update back in 2019, the Start menu was essentially broken due to a background conflict. To fix this issue for the masses, a troubleshooter was released by Microsoft to help fix this issue. If the Start menu is still not working for you then you can try running this troubleshooter on your system. Use the guide below to download and run the troubleshooter on your system.
Download the archive linked above to a convenient location on your local storage and extract its contents.
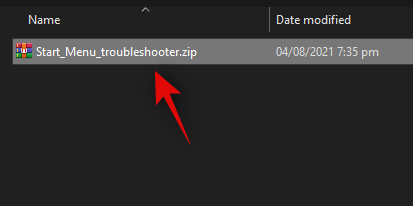
Now copy and paste the ‘startmenu.diagcab’ file on your desktop.

Double click and run the file from your desktop. Click on ‘Advanced’.
Check the box for ‘Apply repairs automatically’. Click on ‘Next’ once you are done.
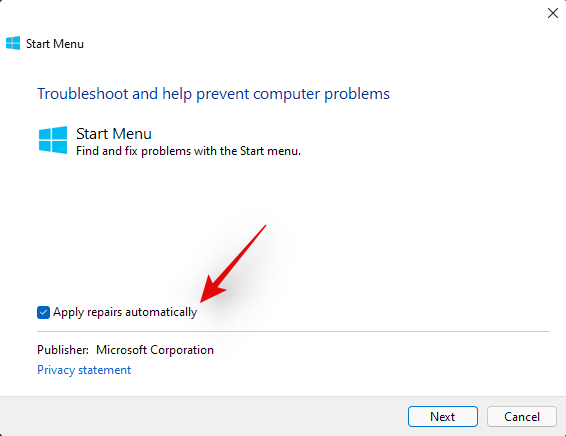
The troubleshooter will now do its thing and try to fix the Start menu on your system. Any errors or issues found will be automatically fixed and the Start menu’s functionality should now be restored on your system.
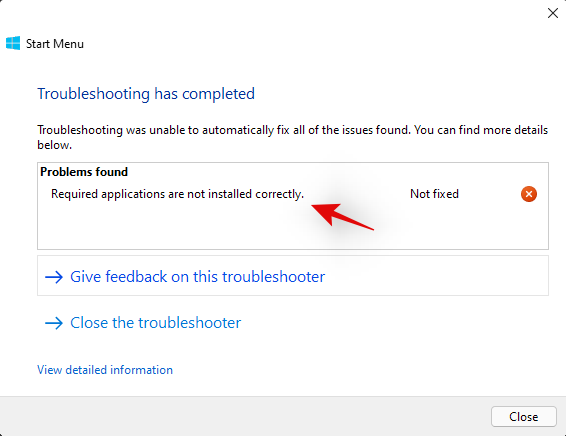
However, if the troubleshooter fails to fix the Start menu then this might indicate a more serious issue on your system. In such cases, let’s verify if Windows is actually able to access and initiate the process for the Start menu on your system. Use the checks below to help you along with the process.
We now need to check if the Start menu is actually available within your install of Windows 11. Let’s create a new local account that will help you verify its functionality. If the Start menu is working in the new account then it is likely an issue with your current user account.
Press Windows + i on your keyboard and click on ‘Accounts’ on your left.
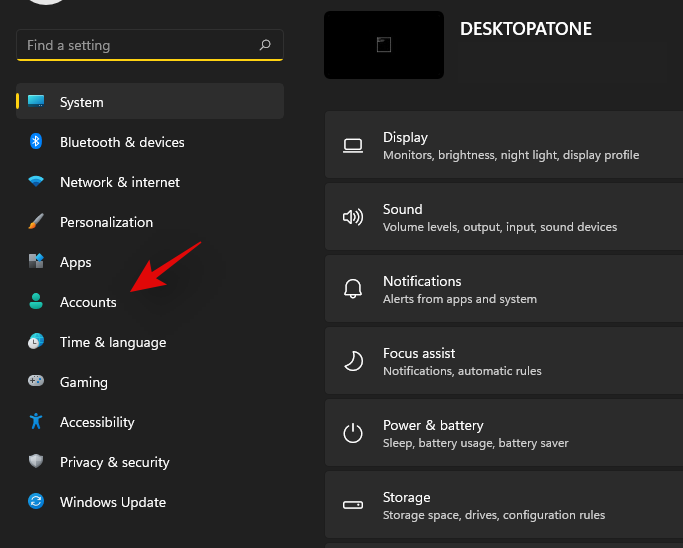
Click on ‘Family & other users’.
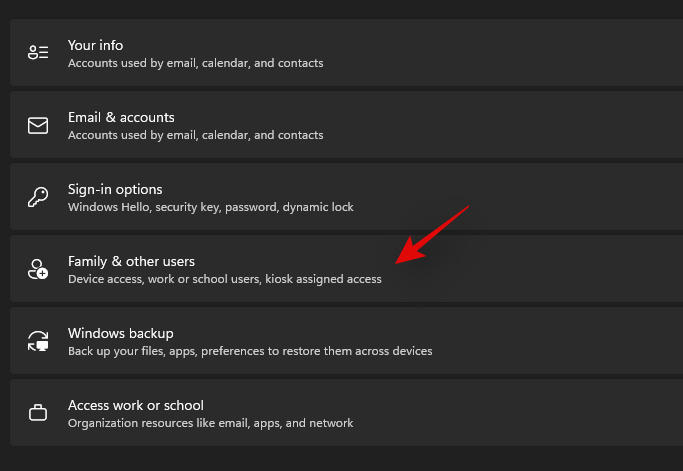
Now click on ‘Add account’ under other users.

Click on ‘I don’t have this person’s sign-in information’.
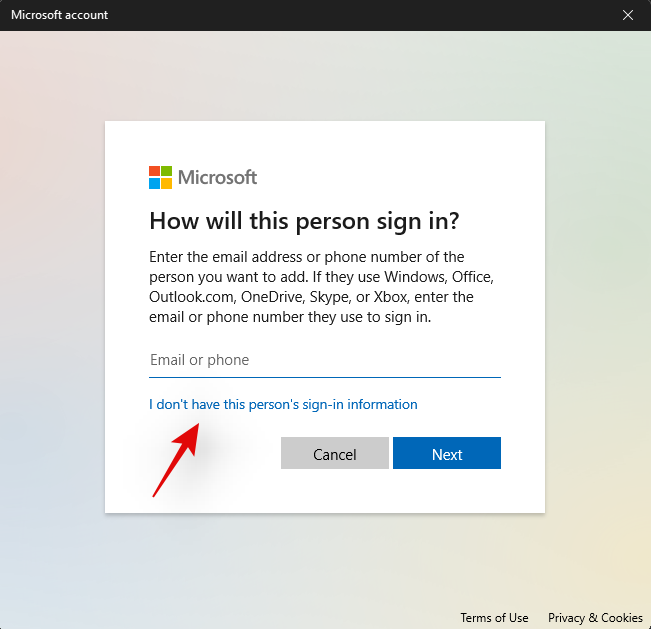
Click on ‘Add a user without a Microsoft Account’.
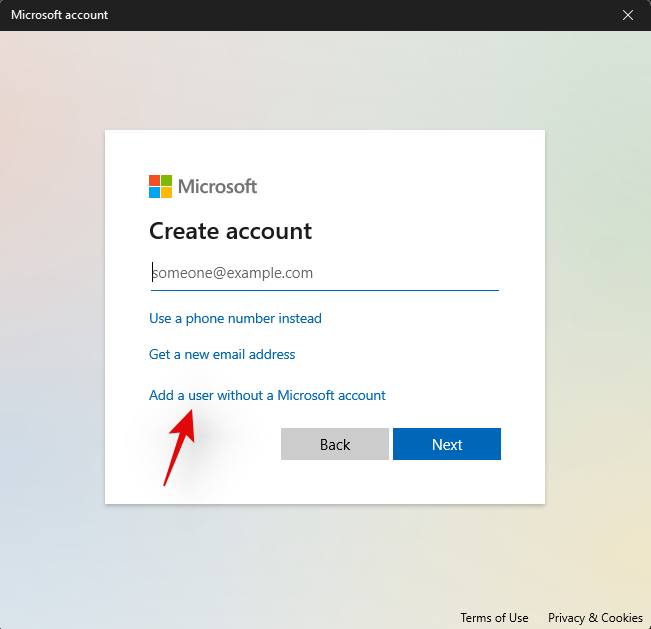
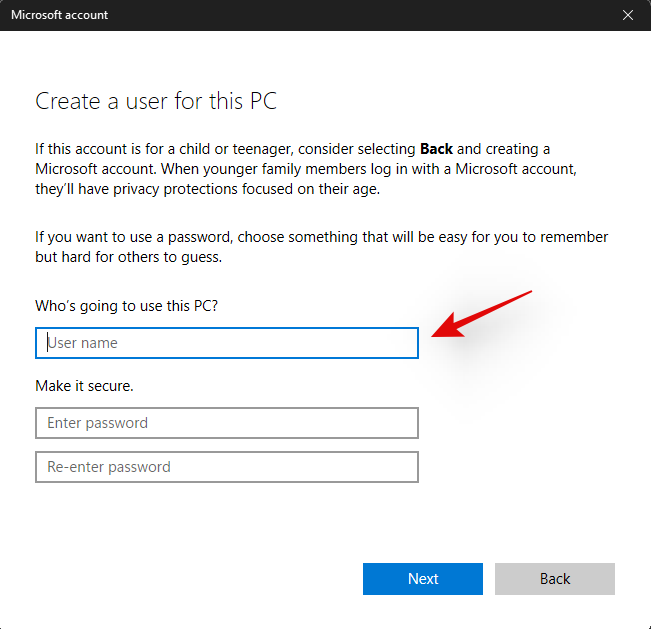
Now enter a username for the new account, and a password if needed.
Click on ‘Next’ once you are done.
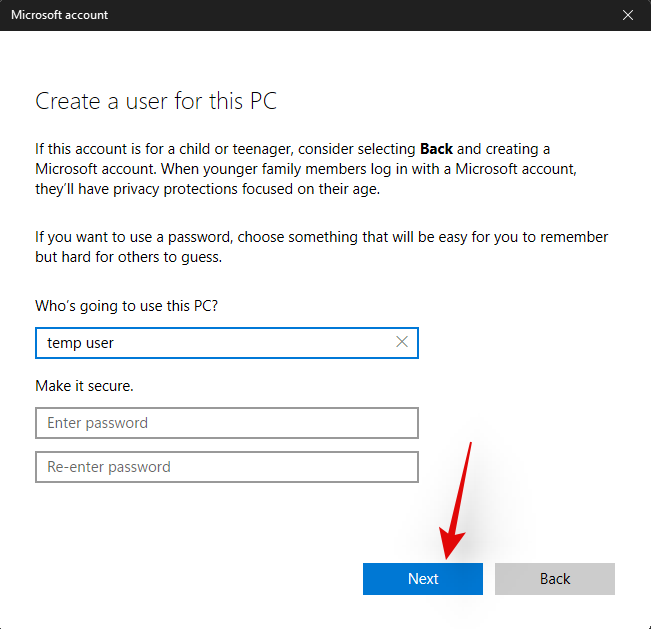
The new user account will now be created. Sign out of your current account and sign in to the new account.
Try to activate the Start menu now in the new temporary local account. If it is working then this is an issue specific to your user account. However, in case the Start menu fails to open, then this might indicate a more serious issue with your Windows 11 installation.
It’s now time to check if the Start menu is working in Safe mode. In case it is, then a third-party app is likely interfering with the Start menu’s functionality. You can remove any third-party apps used to modify the Start menu to try and fix this issue. Follow the guide below to activate Safe mode on Windows 11.
Press Windows + i on your keyboard and select ‘Windows Update’.
Now click on ‘Advanced options’.
Click and select ‘Recovery’.
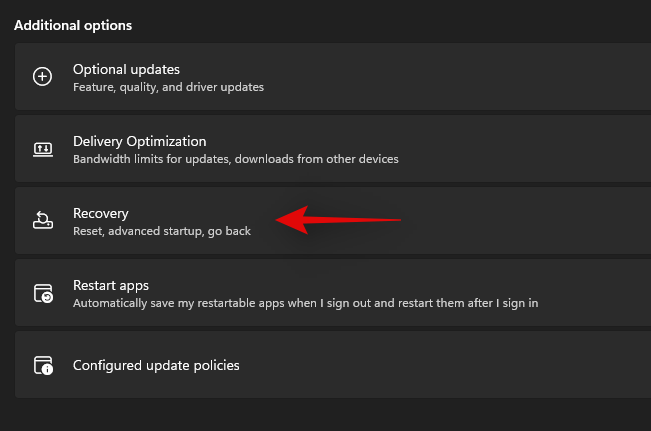
Now click on ‘Restart now’ beside ‘Advanced startup’.

Click on ‘Restart now’ again.
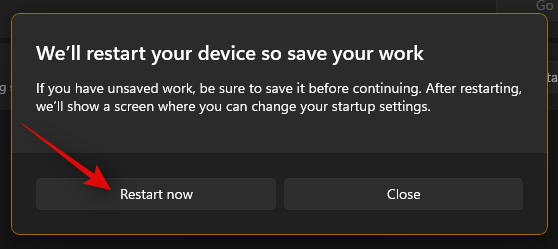
Your PC will now restart to the recovery screen. Click and select ‘Troubleshoot’.
Now click on ‘Advanced options’.
Click on ‘Startup Settings’.
Press ‘F4’ to start your PC in safe mode now.
Once your PC restarts, the safe mode should be active on your system. Now try to activate the start menu. If the menu activates, then it is likely that a third-party app is causing issues on your Windows 11 system. You can try removing apps used to customize the Start menu one by one to find the culprit on your system.
Fix #17: Run a malware and antivirus scan
We recommend you try and run a malware scan before opting for the last resort. If any malware or malicious service is causing issues with the Start menu, then a scan will help solve these issues. Use the guide below to run a malware scan through Windows Defender.
Press Windows + S on your keyboard and search for ‘Windows Security’. Click and launch the app once it shows up in your search results.

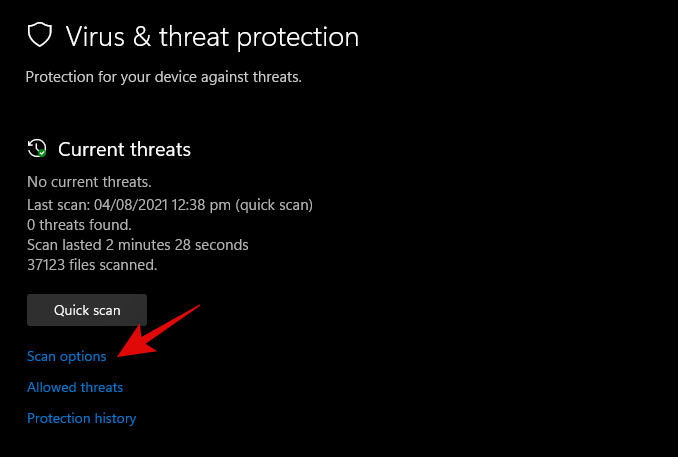
Click on ‘Virus & threat protection’.
Click on ‘Scan options’.
Select ‘Full Scan’.
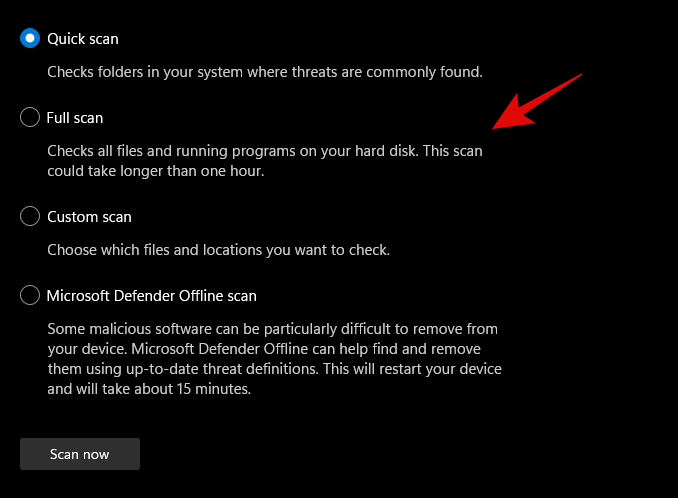
Finally, click on ‘Scan now’.
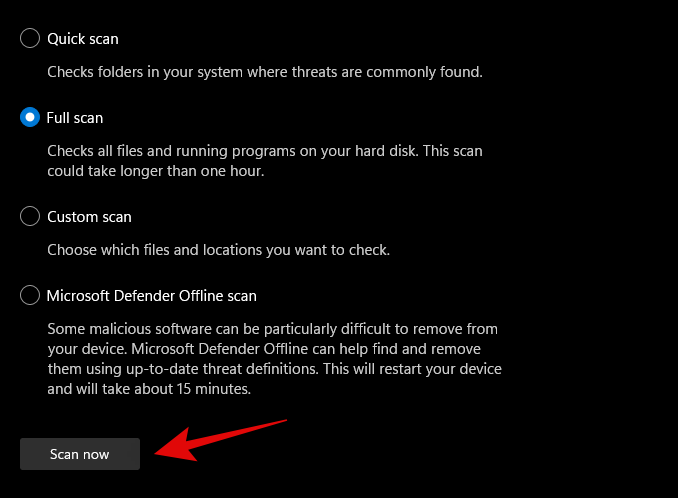
Windows Defender will now scan your entire PC for malware and malicious software. In case any are found, they will be automatically quarantined, and you will be prompted to take the necessary action as soon as possible.
3 General Fixes: Last Resort options
Fix #18: Create a new user via command prompt
If you’re facing an issue where you’re unable to add a local account via Settings to your PC then you can use the command prompt (CMD) for the same. Once added you can try and check if the Start menu is working for you. If it is, you can try the fixes below to restore it in your original account. However, if none of the fixes work for you then you can use the newly created account instead. The new account will be created with administrator privileges so you shouldn’t have problems moving your files and Settings. More on this below.
Press Windows + R to bring up the Run dialog box and type in the following. Press Ctrl + Shift + Enter on your keyboard once you are done.
cmd
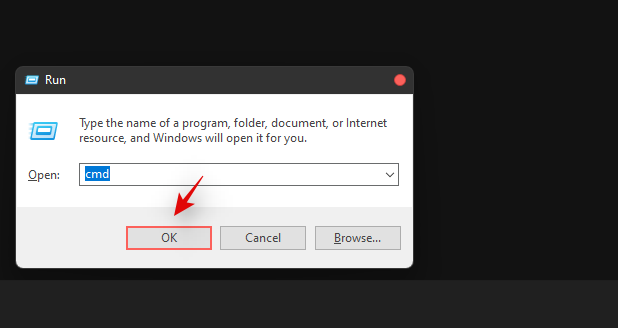
Type in the following command and press Enter on your keyboard. Replace ‘USER’ with your desired username for the new account. Similarly, replace ‘PASSWORD’ with your desired password.
net user /add USER PASSWORD
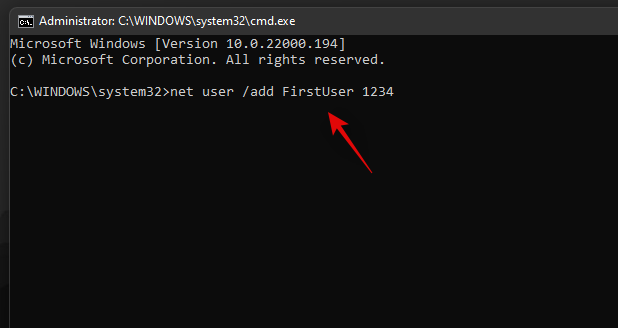
Now execute the following command as well and use the same username as above.
net localgroup administrators USER /add
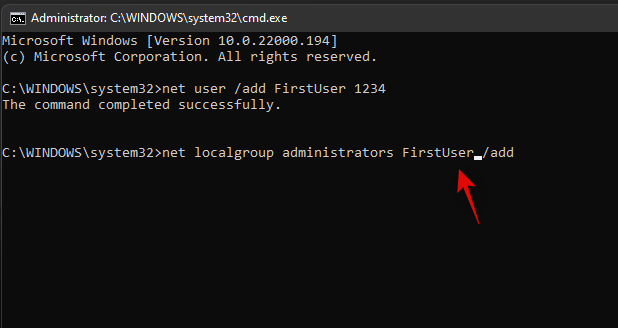
The user will now be added to your PC. Simply restart and log into the new account when the PC restarts.
The start menu should work alright now in the new user account. You can copy your files from the old user account to the new account.
To find your data in the old user account, open Windows Explorer and go to the User folder under the C Drive (or whichever drive you have installed Windows in).
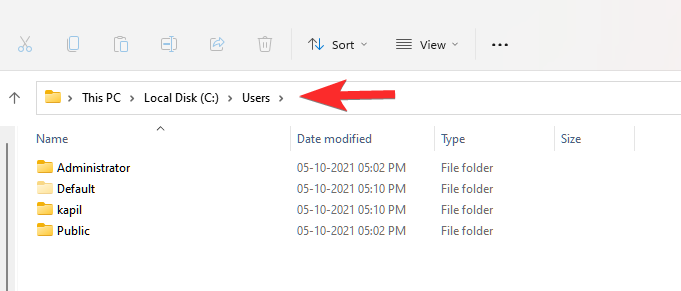
Click on the old user account. Now, copy all the files from here to your new user account that you can also find in the Users folder.
An easy method to transfer files from one user account (old one) to another user account (new one) is to copy the profile. Read more about it here.
Fix #19: Perform a Windows Reset
If you had zero luck with all of the previous methods, we think you should try a Windows Reset. It has been known to solve a host of problems in Windows 11 while keeping your personal files intact. Moreover, resetting Windows to its factory settings can give your PC a fresh start.
Here are the steps.
For this method, you’ll need an elevated PowerShell instance.
Press Win key + r to open the Run box, then type in ‘PowerShell and press Ctrl + Shift + Enter to open PowerShell as administrator.
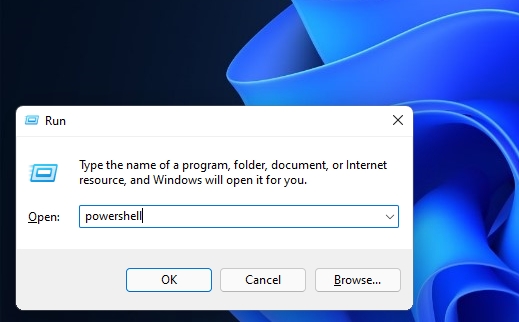
When opened correctly, you should already be inside the C:\Windows\system32 folder.
Now type in ‘system reset and press enter. You should be presented with two options, to either keep all your files or to remove everything. Click on ‘Keep my files’.
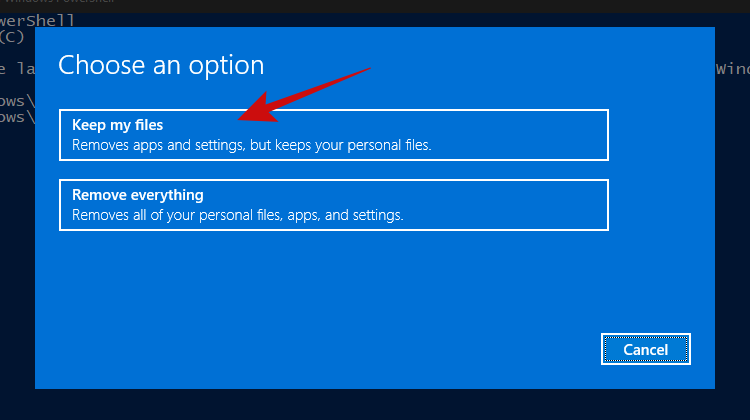
Within a few minutes, Windows should give you a list of apps that’ll be removed from your PC after the reset. Here’s how our list looks.
Once you’ve scrolled through the list of apps, simply click on the ‘Next’ button.
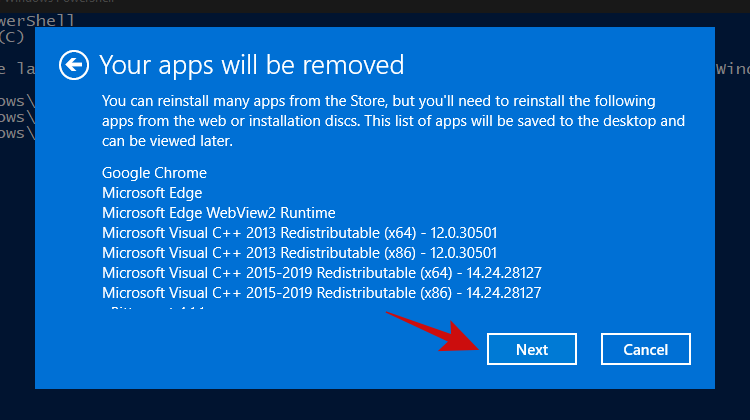
Windows should now start the reset process. Simply follow the instructions and your PC should be reset within a couple of minutes. The Start menu should be working now.
Fix #20: Re-install Windows from scratch
Well, if you’re really considering this method, it’s safe to assume that none of the other methods worked for you. At this point, we think it’s now time to go for a clean installation of Windows 11, which will probably wipe your current Windows partition (if you choose to).
Note: Before proceeding with this method, we recommend making a complete backup of all your files stored inside folders on the Windows drive, such as in Downloads, Documents, and the likes.
Once you have backed up all your files from the Windows drive, let’s take a look at the things you’ll need.
Next, follow our guide on downloading and installing the Windows 11 ISO.
Read: How to Download and Install Official Windows 11 ISO
We hope that after following this guide, you were able to fix the annoying and unresponsive Start menu in Windows 11 and bring it back to life.
If you find yourself stuck at any point in this guide, let us know in the comments below.
Related:
Vous êtes confronté au problème du logiciel AMD Adrenalin qui ne fonctionne pas ou ne s
Avez-vous rencontré une erreur importante de correctifs de sécurité et de qualité sur votre appareil ? Voici huit solutions pour résoudre ce problème.
Au cours de la première semaine d'octobre 2021, Microsoft a officiellement déployé la version stable de Windows 11. Tous les nouveaux produits publiés après le dévoilement exécuteront Windows 11 dès la sortie de la boîte, et Windows…
Google Meet s'efforce d'être à la hauteur des grandes applications de visioconférence du moment, mais semble simplement échouer. Alors que leurs options de personnalisation sont encore loin de ce à quoi nous nous attendons, un gros…
Le seul écran dont les utilisateurs de Windows ont une peur collective est l'écran bleu de la mort. Le BSOD existe depuis des décennies maintenant, changeant très peu au fil des ans, mais toujours assez puissant pour ca…
Vous êtes donc inscrit au canal de développement de Windows Insider Preview, vous avez enfin reçu la version d'aperçu de Windows 11 et les mises à jour sont en cours. Mais combien de temps faut-il attendre le…
Microsoft Teams est un outil complet qui a été très populaire récemment en raison de ses fonctionnalités de collaboration en équipe. Le service vous permet de créer des équipes spécifiques pour votre organisation, d'inviter des di…
Les utilisateurs de Windows 11 ont récemment été confrontés à une énigme avec les pratiques douteuses de Microsoft en ce qui concerne Edge et les résultats Web dans le nouveau système d'exploitation. Il semble maintenant que la société a bund…
Windows 11 acquiert lentement une mauvaise réputation auprès des gens pour sa sous-performance par rapport à son prédécesseur. Tout d'abord, il y avait les nouvelles exigences pour Secure Boot et TPM 2.0, ensuite la diminution…
Microsoft a beaucoup travaillé sur Windows 11, en utilisant un tas d'éléments de conception, anciens et nouveaux, pour lui donner vie. L'explorateur de fichiers Windows par défaut a également été doté d'un nouveau look,…
Lorsque Windows 11 a été révélé au monde, Snap Layouts a été la première chose qui a attiré l'attention de tout le monde. Ils étaient innovants, nouveaux et réellement utiles lorsque vous travailliez sur un système Windows…
La version développeur de Windows 11 a été publiée et les passionnés du monde entier se lancent dans la version pré-bêta. Cependant, comme prévu, il y a plein de petits bugs présents à ce sujet…
Windows 11, qui se trouve être le dernier ajout à la célèbre gamme de systèmes d'exploitation Windows, a réussi à attirer beaucoup de regards même dans l'aperçu des développeurs. De nombreux passionnés se précipitent…
12 octobre 2021 : Une grosse mise à jour ! Veuillez noter que vous n'avez plus besoin de remplacer le fichier appraiserres.dll afin de contourner le contrôle TPM et de corriger l'erreur d'installation lors de l'installation de Windows 11. …
Windows 11 a fait l'objet de nombreuses controverses concernant la prise en charge de certains processeurs depuis la fuite du système d'exploitation en juillet. La version officielle du système d'exploitation a maintenant été rendue publique avec de nombreux changements…
Microsoft a beaucoup travaillé sur ses applications mobiles, mais de temps en temps, vous pouvez rencontrer des problèmes occasionnels. En parcourant ou en ouvrant l'application des équipes Microsoft pour la première fois, vous pourriez…
Google Meet est le nouvel outil de collaboration à distance en ville qui offre des capacités de vidéoconférence et audio ainsi que des fonctionnalités intéressantes telles que le cryptage de bout en bout, l'audio HD, la vidéo HD et le muc…
Google Meet est devenu l'une des plateformes de collaboration à distance les plus discutées actuellement disponibles sur le marché. Il offre des tonnes de fonctionnalités étonnantes et est livré avec la fiabilité…
Si Windows Search utilise des ressources CPU ou disque exceptionnellement élevées, vous pouvez utiliser les méthodes de dépannage suivantes sur Windows 11. Les méthodes pour résoudre le problème incluent des méthodes plus simples…
Windows 11 a maintenant été rendu public après une fuite controversée en juin de cette année. L'OS a depuis connu de nombreux changements parmi lesquels le très bienvenu givré…
Vous rencontrez des difficultés avec le pare-feu Windows 11 qui bloque les jeux en local ? Découvrez des solutions éprouvées pour débloquer le multijoueur et retrouver une expérience de jeu fluide. Guide pas à pas pour jouer sans souci.
Vous rencontrez l'erreur 0x80073712 lors de la mise à jour de Windows 11 ? Découvrez des solutions éprouvées et détaillées pour 2026, ainsi que des conseils de dépannage pour une mise à jour système fluide et sécurisée. Fini les soucis de mise à jour !
Vous rencontrez des difficultés avec l'erreur « Pilote de précision manquant » sous Windows 11 ? Découvrez des solutions éprouvées pour restaurer la précision de votre pavé tactile et de votre souris. Guide pas à pas pour un dépannage simplifié.
Vous rencontrez des problèmes de lenteur avec Windows 11 ? Découvrez des solutions étape par étape pour optimiser votre PC grâce au Plan de performances ultimes.
Vous rencontrez des problèmes de positionnement avec le thème Rainmeter sous Windows 11 ? Découvrez des solutions éprouvées et détaillées pour retrouver un bureau impeccable. Mise à jour avec les dernières améliorations pour une personnalisation optimale.
Vous rencontrez des problèmes de latence en jeu sous Windows 11 à cause de VBS et HVCI ? Découvrez des solutions éprouvées pour optimiser les performances, réduire les saccades et augmenter le nombre d'images par seconde sans compromettre la sécurité. Des solutions simples pour les joueurs.
Vous êtes bloqué dans une boucle de récupération BitLocker sous Windows 11 ? Découvrez des solutions pas à pas pour contourner les invites interminables, récupérer votre disque et retrouver un fonctionnement normal. Aucune compétence technique n'est requise : des solutions simples et efficaces vous attendent.
Votre Windows 11 est lent ? Découvrez des solutions éprouvées pour réduire la taille du registre, optimiser la vitesse et reprendre le contrôle de votre PC.
Vous rencontrez une erreur du catalogue Windows Update sous Windows 11 ? Découvrez des solutions éprouvées et détaillées pour rétablir les mises à jour sans interruption. Remettez votre système en état de marche rapidement : aucune compétence technique n’est requise !
Vous rencontrez des problèmes de son étouffé avec votre micro interne sous Windows 11 ? Découvrez des solutions éprouvées et faciles à mettre en œuvre pour retrouver une qualité audio optimale. Réparez votre micro dès aujourd’hui !


![Comment réparer lerreur décran vert de Windows 11 [8 manières] Comment réparer lerreur décran vert de Windows 11 [8 manières]](https://cloudo3.com/resources8/images31/image-5564-0105182715287.png)


