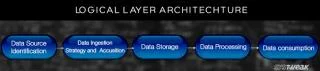
نظرة ثاقبة على 26 أسلوبًا لتحليل البيانات الضخمة: الجزء الأول
نظرة ثاقبة على 26 أسلوبًا لتحليل البيانات الضخمة: الجزء الأول
هناك العديد من الحلول التي تحل محل Microsoft Exchange بحل Linux ، ولكن جميعها لديها مشكلة واحدة لم أحبها حقًا. عندما تلقيت دعوات الاجتماع ، ستصل كمرفقات على أجهزتي التي تعمل بنظام التشغيل iOS ولا تفتح مباشرة في تطبيق التقويم. كان Zarafa هو الحل الوحيد الذي اختبرته والذي سيفتح أحداث التقويم في تطبيق التقويم. سيعلمك هذا الدليل كيفية إعداد Zarafa و Yaffas على CentOS 6.
نجري الافتراضات التالية لتسهيل فهم التهيئة. ومع ذلك ، يجب عليك استخدام قيمك الحقيقية الخاصة بهذه العناصر:
ابدأ بنشر مثيل خادم vultr.com. لقد اخترت 1 غيغابايت في الثانية لتشغيل CentOS 6 ، 32 بت. عند الانتهاء من التثبيت ، نقوم بإعداد الخادم ليصبح خادم بريد.
في شاشة "My Servers" الخاصة بلوحة تحكم الخادم ، انقر فوق الرابط "إدارة" بجوار الخادم الذي تم إنشاؤه حديثًا. في الصفحة التي تفتح ، يمكنك رؤية تفاصيل الخادم الخاص بك. انقر فوق علامة التبويب IPv4 ، ثم انقر فوق الزر الأزرق "تحديث". يظهر حقل إدخال النص ويتم تعيينه مسبقًا بشيء مثل ".vultr.com". استبدل هذا الإدخال باسم النطاق الكامل لخادمك (على سبيل المثال: pegasus.example.com) واضغط على الزر الأزرق "تحديث".
حان الوقت الآن لتسجيل الدخول إلى الخادم الجديد. افتح محطة ssh الخاصة بك واتصل بخادمك. بدلاً من ذلك ، يمكنك النقر فوق الزر الأزرق "عرض وحدة التحكم" للحصول على نافذة المستعرض مع شاشة تسجيل الدخول إلى الخادم الخاص بك.
ssh root@your_ip_address
الجزء " your_ip_address" هو عنوان IP الرئيسي كما هو مدرج في لوحة تحكم الخادم. إذا كنت تستخدم المتصفح للاتصال بخادمك ، فما عليك سوى تسجيل الدخول كجذر باستخدام كلمة مرور الجذر.
أولاً ، نقوم بإعداد اسم المجال الصحيح. افتح ملف تكوين الشبكة.
nano /etc/sysconfig/network
استبدل "vultr.guest" باسم المجال الكامل لخادمك (مثال: pegasus.example.com). حفظ الملف مع السيطرة + X ، ثم Y .
النقطة الثانية التي نغيرها هي /etc/hostsالملف.
nano /etc/hosts
أضف السطر التالي. يمكن أن يكون في أعلى الملف أو السطر الثاني.
127.0.1.1 pegasus.example.com pegasus
حفظ الملف مع السيطرة + X ، ثم Y . أحب التأكد من أن كل شيء يعمل بعد إعادة التشغيل ، لذلك أقوم بإعادة تشغيل VPS بعد تلك التغييرات.
reboot
امنح الجهاز لحظة لإعادة التشغيل ، ثم اتصل مرة أخرى.
ssh root@your_ip_address
يافاس وزرافه بحاجة إلى مستودع EPEL المثبت بالفعل في المصادر على خوادم vultr.com. هم بحاجة إلى مستودع RPMforge أيضًا. قم بإصدار الأمر التالي لتثبيت هذا المستودع.
أنظمة 32 بت:
rpm -Uvh http://packages.sw.be/rpmforge-release/rpmforge-release-0.5.2-2.el6.rf.i686.rpm
أنظمة 64 بت:
rpm -Uvh http://packages.sw.be/rpmforge-release/rpmforge-release-0.5.2-2.el6.rf.x86_64.rpm
بعد ذلك ، نضيف مستودع يافاس.
nano /etc/yum.repos.d/yaffas.repo
قم بلصق النص التالي في الملف الذي تم إنشاؤه حديثًا:
[yaffas]
name = yaffas $releasever
baseurl = http://repo.yaffas.org/releases/latest/rhel/$releasever
enabled = 1
protect = 0
gpgcheck = 1
priority = 1
حفظ الملف مع السيطرة + X ، ثم Y .
لتجنب مشاكل التوافق ، نحتاج إلى استبعاد بعض العناصر من مستودع EPEL. افتح ملف المستودع.
nano /etc/yum.repos.d/epel.repo
ثم في [epel]القسم ، أسفل خط "gpgkey" مباشرةً ، أدخل ما يلي.
exclude=clamav* clamd* amavisd* libvmime libical libvmime-devel libical-devel php-mapi zarafa*
سيبدو القسم الكامل كما يلي:
[epel]
name=Extra Packages for Enterprise Linux 6 - $basearch
#baseurl=http://download.fedoraproject.org/pub/epel/6/$basearch
mirrorlist=https://mirrors.fedoraproject.org/metalink?repo=epel-6&arch=$basearch
failovermethod=priority
enabled=1
gpgcheck=1
gpgkey=file:///etc/pki/rpm-gpg/RPM-GPG-KEY-EPEL-6
exclude=clamav* clamd* amavisd* libvmime libical libvmime-devel libical-devel php-mapi zarafa*
حفظ الملف مع السيطرة + X ، ثم Y .
استيراد مفتاح GPG لمستودع يافا:
rpm --import http://repo.yaffas.org/repo.rpm.key
الآن ، دعنا ننظف يم.
yum clean all
At this point, we should be all set for the Yaffas installation. Install it by simply entering this command.
yum install yaffas
Yum will check the dependencies and give you a summary.
Install 359 Package(s)

Total download size: 260 M
Installed size: 639 M
Is this ok [y/N]:
Press Y, then Enter/Return to start the installation.
Installation will take a while, so treat yourself to a coffee and cookie while waiting for the installation to finish.
Before we can start the final setup, we have to configure MySQL. Start MySQL and begin the secure setup.
service mysqld restart
mysql_secure_installation
In order to log into MySQL to secure it, we'll need the current password for the root user. If you've just installed MySQL, and you haven't set the root password yet, the password will be blank, so you should just press Enter/Return here.
Enter current password for root (enter for none): **{press Enter/Return}**

[...]

Setting the root password ensures that nobody can log into the MySQL
root user without the proper authorisation.

Set root password? [Y/n] **Y**

New password: **{enter super secret password}**
Re-enter new password: **{enter super secret password again}**

Remove anonymous user? [Y/n] **Y**

Disallow root login remotely? [Y/n] **Y**

Remove test database and access to it? [Y/n] **Y**

Reload privilege tables now? [Y/n] **Y**
Open a web browser and go to the following URL.
http://your_ip_address:10000

#If you have a DNS entry already, use this instead.
http://server.example.com:10000
The initial username is admin with password yaffas.
After logging in, you will see the setup wizard. It has 5 steps. Press "Next" to start.
The first step is to enter a new admin password. Enter the new password twice. Make sure it is complicated enough to be safe, but don't forget it. Then click "Next".
The next screen configures the MySQL backend. The only thing that you need to enter is the password you created for the MySQL root user.
On the 4th screen, setup your mail domain. Enter "example.com" in the primary mail domain field. This must be your own domain. Press "Next".
I believe the 5th screen is optional, but just to be on the safe side, create a user account who will be the LDAP admin, then click "Finish".
It will take a while until the setup finishes. Once it completes, a popup appears that tells you everything was successful. Click the "OK" button. After a moment, you will see the login screen again. You can login as admin with the new password that you created during the setup.
During the installation, some general self-signed certificates for the app are generated and installed. Personally, I prefer to have my own self-signed certificates to show the values that I entered and I also want to make sure that all requests are sent over HTTPS.
Zarafa comes with a few scripts to generate your own certificates. These are of course self-signed certificates.
Let's make a home for the certificate authority.
mkdir -p /etc/zarafa/ssl
chmod 700 /etc/zarafa/ssl
cd /etc/zarafa/ssl
... then run the script:
sh /usr/share/doc/zarafa/ssl-certificates.sh server
The parameter "server" means the certificate we create will be called server.pem.
You will be greeted with the following message.
No Certificate Authority Root found in current directory.
Press enter to create, or ctrl-c to exit.
Press Enter or Return.
The next message that appears is:
CA certificate filename (or enter to create)
Press Enter or Return to continue and create the CA Certificate.
After a little activity on the screen, you will get a prompt to enter the PEM passphrase. Enter any passphrase for the CA certificate, but make sure that you don't forget it, as you will need it later. For simplicity's sake, let's assume we chose the passphrase "ca-root-pem".
Answer the questions to generate the certificate. The answers here are my examples, so replace them with the correct values for yourself.
Country Name (2 letter code) [XX]: **MY**
State or Province Name (full name) []:**Selangor**
Locality Name (eg, city) [Default City]: **Shah Alam**
Organization Name (eg, company) [Default Company Ltd]: **ELMIMA-Systems**
Organizational Unit Name (eg, section) []: **Certificate Authority**
Common Name (eg, your name or your server's hostname) []:**server.example.com** **Must be the full domain name of your server**
Email Address []: **admin@example.com**

Please enter the following 'extra' attributes
to be sent with your certificate request
A challenge password []: **Enter/Return**
An optional company name []: **Enter/Return**
Next, it will ask you for the passphrase of the cakey.pem file. This is the passphrase that you created earlier.
Enter pass phrase for /etc/pki/CA/private/./cakey.pem:ca-root-pem
سترى نشاطًا صغيرًا على الشاشة ، ثم سيطالبك بعبارة مرور PEM. هذه هي عبارة مرور server.pemالملف الذي أنشأناه. أدخل أي شيء تريده ، ولكن تأكد من أنك لا تنساه. من أجل البساطة ، سوف نستخدم عبارة "server-pem-العبارة".
Enter PEM pass phrase:**server-pem-phrase**
Verifying - Enter PEM pass phrase:**server-pem-phrase**
حان الوقت لإدخال قيم server.pemالملف.
Country Name (2 letter code) [XX]: **MY**
State or Province Name (full name) []:**Selangor **
Locality Name (eg, city) [Default City]: **Shah Alam**
Organization Name (eg, company) [Default Company Ltd]: **ELMIMA-Systems**
Organizational Unit Name (eg, section) []: **Server SSL Certificate**
Common Name (eg, your name or your server's hostname) []: **server.example.com** **Must be the full domain name of your server**
Email Address []: admin@example.com


Please enter the following 'extra' attributes
to be sent with your certificate request
A challenge password []: **Enter/Return**
An optional company name []: **Enter/Return**

Enter pass phrase for /etc/pki/CA/private/cakey.pem:ca-root-pem **Replace with your own passphrase**
تظهر بعض الأنشطة على الشاشة أنه تم إنشاء الشهادة.
Sign the certificate? [y/n]:
أدخل Y واضغط على Enter / Return .
1 out of 1 certificate requests certified, commit? [y/n]
أدخل Y واضغط على Enter / Return .
Create public key from this certificate? [y]
نحن لا نحتاجها حقًا ولكن أعتقد أنه لا يضر بإنشائها. ببساطة اضغط على Enter / Return .
Enter pass phrase for server.pem: **server-pem-phrase**
حان الوقت الآن لتهيئة server.cfgملف Zarafa.
nano /etc/zarafa/server/cfg
ابحث عن الإدخال server_ssl_enabledوقم بتغيير قيمته إلى "نعم" (بدون علامات الاقتباس).
ابحث عن الإدخال server_ssl_portوتأكد من أنه 237.
ابحث عن الإدخال server_ssl_key_fileواضبط قيمته على " /etc/zarafa/ssl/server.pem" (بدون علامات الاقتباس).
أنشئ الإدخال server_ssl_key_passباستخدام عبارة المرور التي أنشأتها server.pemللملف (مثال: server-pem-العبارة) كقيمتها.
ابحث عن الإدخال server_ssl_ca_file. التوثيق الأصلي للزرفا يفترض أن المسار /etc/zarafa/ssl/demoCA/cacert.pem، ولكن على CentOS ، المسار /etc/pki/CA/cacert.pem. قم بتحديث هذه القيمة وفقًا لذلك.
server_ssl_ca_file = /etc/pki/CA/cacert.pem
أعِد تشغيل خادم زارفة.
service zarafa restart
دعنا نولد شهادة أباتشي.
cd /etc/zarafa/ssl
openssl req -nodes -newkey rsa:2048 -keyout zarafa-ssl.key -out zarafa-ssl.csr
نحصل على نموذج آخر لإنشاء شهادة.
Country Name (2 letter code) [XX]: **MY **
State or Province Name (full name) []: **Selangor**
Locality Name (eg, city) [Default City]: **Shah Alam**
Organization Name (eg, company) [Default Company Ltd]: **ELMIMA-Systems**
Organizational Unit Name (eg, section) []: **Zarafa Web Services**
Common Name (eg, your name or your server's hostname) []: **server.example.com** **Must be the full domain name of your server**
Email Address []: **admin@example.com**
ثم وقع الشهادة.
openssl x509 -req -in ./zarafa-ssl.csr -signkey zarafa-ssl.key -out zarafa-ssl.crt -days 9999
... وإضافته إلى أباتشي.
cd /etc/httpd/conf.d
nano ssl.conf
ابحث عن السطر "SSLCertificateFile /opt/yaffas/etc/ssl/certs/zarafa-webaccess.crt" وقم بتغييره إلى "SSLCertificateFile /etc/zarafa/ssl/zarafa-ssl.crt".
ابحث عن السطر "SSLCertificateKeyFile /opt/yaffas/etc/ssl/certs/zarafa-webaccess.key" وقم بتغييره إلى "SSLCertificateKeyFile /etc/zarafa/ssl/zarafa-ssl.key"
احفظ الملف ثم قم بإنهاء.
الآن ، افتح zarafa-webapp.confالملف.
nano /etc/httpd/zarafa-webapp.conf
ابحث عن السطرين التاليين وألغ تعليقهما.
#php_flag session.cookie_secure on
#php_flag session.cookie_httponly on
أضف الأسطر التالية.
RewriteEngine On
RewriteCond % !=on
RewriteRule (.*) https://pegasus.example.com/webapp/ [R] (Of course use your own real domain here)
احفظ الملف ثم قم بإنهاء. ثم أعد تشغيل Apache.
service httpd restart
الآن سيستخدم تطبيق الويب HTTPS دائمًا. يمكنك أن تفعل نفس الشيء من أجل zarafa-webapp.conf.
عند اختبار التثبيت على CentOS ، لاحظت بعض رسائل الخطأ بسبب فقدان المجلدات. يمكنك إصلاحه بالأوامر التالية.
mkdir -p /var/run/policyd-weight/cores/master
mkdir -p /var/run/policyd-weight/cores/cache
chown -R polw /var/run/policyd-weight
لاستخدام خادم Zarafa الجديد كخادم البريد لنطاقك ، ستحتاج إلى إعداد سجل A وسجل MX لنطاقك. إذا رغبت في ذلك ، يمكنك استخدام محرك البحث المفضل لديك للعثور على معالج نظام التعرف على هوية المرسل (SPF) ، مما يسهل إنشاء سجل نظام التعرف على هوية المرسل (SPF) لنطاقك.
نظرة ثاقبة على 26 أسلوبًا لتحليل البيانات الضخمة: الجزء الأول
اقرأ المدونة لمعرفة الطبقات المختلفة في بنية البيانات الضخمة ووظائفها بأبسط طريقة.
يعرف الكثير منكم أن Switch سيصدر في مارس 2017 وميزاته الجديدة. بالنسبة لأولئك الذين لا يعرفون ، قمنا بإعداد قائمة بالميزات التي تجعل "التبديل" "أداة لا غنى عنها".
هل تنتظر عمالقة التكنولوجيا للوفاء بوعودهم؟ تحقق من ما تبقى دون تسليم.
اقرأ هذا لمعرفة مدى انتشار الذكاء الاصطناعي بين الشركات الصغيرة وكيف أنه يزيد من احتمالات نموها ومنح منافسيها القدرة على التفوق.
مع تطور العلم بمعدل سريع ، واستلام الكثير من جهودنا ، تزداد أيضًا مخاطر تعريض أنفسنا إلى تفرد غير قابل للتفسير. اقرأ ، ماذا يمكن أن يعني التفرد بالنسبة لنا.
لقد أصبح حل CAPTCHA صعبًا جدًا على المستخدمين في السنوات القليلة الماضية. هل ستكون قادرة على أن تظل فعالة في اكتشاف البريد العشوائي والروبوتات في المستقبل القريب؟
ما هو التطبيب عن بعد والرعاية الصحية عن بعد وأثره على الأجيال القادمة؟ هل هو مكان جيد أم لا في حالة الوباء؟ اقرأ المدونة لتجد طريقة عرض!
ربما سمعت أن المتسللين يكسبون الكثير من المال ، لكن هل تساءلت يومًا كيف يجنون هذا النوع من المال؟ دعنا نناقش.
أصدرت Apple مؤخرًا macOS Catalina 10.15.4 تحديثًا تكميليًا لإصلاح المشكلات ولكن يبدو أن التحديث يتسبب في المزيد من المشكلات التي تؤدي إلى إنشاء أجهزة macOS. قراءة هذه المادة لمعرفة المزيد